Spanish designer Antonio García (also known as Duke Doks) shows off how to create incredibly detailed 3D printed Rick and Morty bobbleheads. Seriously, these models will have you screaming wubba lubba dub dub!
If you haven’t seen (or at least heard of) the critically acclaimed and unconscionably hilarious animated television series Rick and Morty, you must be living in another dimension. By now, the intergalactic adventures of the easily agitated Morty and his lawless scientist of a grandfather Rick have touched our funny bone at some time or another
Now, you can have this dynamic duo bobbing away and flipping you the bird on your desk thanks to the Madrid-based motion graphics and 3D artist Antonio García, also known as Duke Doks. He recently shared two highly detailed 3D printable models–one of Rick and one of Morty– that look like they just sprung right out of the television screen and into this reality.
With a desktop 3D printer, some primer and paint, a couple of springs and some intensive post-processing, you can follow along with Duke Doks and create your own Rick and Morty bobbleheads–no Mr. Meseeks required.
Let’s take a quick look at this awesome project and what you need to bring your favorite dimension-traveling characters to life.
3D Printed Rick & Morty Bobbleheads: How to Create Your Own
The STL files for the Rick and Morty bobbleheads are available to download from Cults. The Morty model is completely free, while Rick Sanchez will cost you a mere $1.80 to obtain. Considering these are incredibly high quality models, we definitely don’t mind shelling out a few bucks for them.
Both models are divided into a few different parts, which are later attached with an adhesive glue later on. García appears to have used 20 percent infill for each 3D printed section, and utilizes support structures when necessary. As you can probably tell from the smooth and glossy surface finish on these bobbleheads, there’s a lot of post-processing involved. Thankfully, the designer shares his methodology in a YouTube video (posted below).
After gluing the parts together (keeping the body and head separate, for now), the next step is to smoothen out the 3D model with 240 grit sandpaper. Once the 3D printed parts are properly sanded, the designer uses double-sided tape to secure the models down for painting. The painting process starts by applying a coating of Grey Filler/Primer, which eliminates the appearance of any layering or scratches. Once the primer has settled, García sands down the model once more to give it a glossy aesthetic.
Finally, using an assortment of spray paint from Montana Colors and meticulously applied tape to prevent the various colors from getting in the wrong area, he carefully applies the paint to evoke the look of the cartoon characters. He also uses a paint brush to detail the small and hard-to-reach sections, like the eyes and Rick’s drool-laden mouth. We assume that acrylic paint can be used here as well, but the automotive-grade spray paint seems to have a magnificent aesthetic effect that might not be replicated otherwise.
After the paint job is complete, simply insert a small spring into the head and attach it to the body. You now have your very own Tiny Rick and ticked off Morty! You can learn more about this project by checking out the video below.
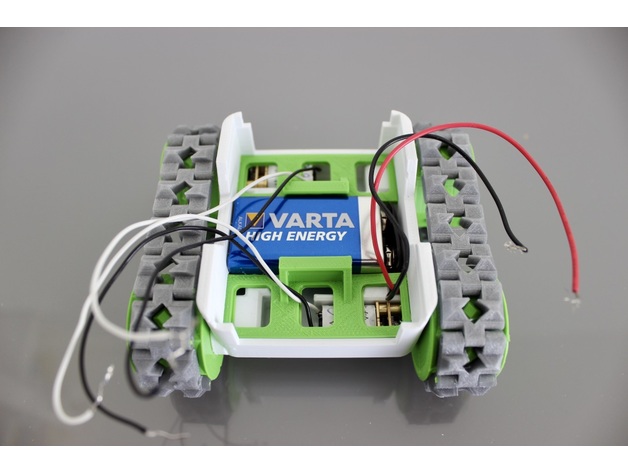
You can have the time, weather, news and more at your side at all times with this easy-to-build 3D printed LED marquee scroller created by Instructables user Qrome.
In a world where infinite information is accessible at our fingertips, we’ve grown accustom to obtaining the latest news or data as soon as we wake up and unlock our smartphones. You can take things a step further by 3D printing your own LED marquee scroller, which was created by Instructables member and RC plane enthusiast Qrome.
The designer has made it possible to add a plethora of information to this LED marquee scroller, including a digital clock, local weather, news headlines, 3D printing progress via OctoPrint, the value of Bitcoin and even random and humorous advice. This project shows what you can accomplish with just a couple of electronic components and a 3D printer. Equipped with a 3D printed enclosure, you can get creative and mix different colors to go along with your personal preference.
Let’s take a look at what you need to build your own LED marquee scroller.
3D Printed LED Marquee Scroller: What you Need
There isn’t much you need to create this LED marquee scroller as far as components are concerned. Of course, you’ll need the STL files for the 3D printed case, which can be freely downloaded from Thingiverse. This project does require a bit of soldering, but Qrome lays out the step-by-step process very clearly. Aside from the 3D printed enclosure, here’s what else you need:
In order to program the scroller with relevant information, you can follow along with the coding process included on the project’s Github.
3D Printed LED Marquee Scroller: Putting it Together
Starting off with the 3D printing process, Qrome suggests printing the two STL files (Base and Plate) with 20 percent infill, no supports required. The case is designed to snap-fit the Dot Matrix, and also includes a slot in the back panel for the Wemos D1 Mini. But before we start putting everything together, you’ll need to do some soldering first.
The Dot Matrix Module comes with the wires you can utilize during the soldering process. All you need to do is cut off the plugs and solder them directly to the pin locations on the LED Dot Matrix Display and to the Wemos D1 Mini. Here are the connections that need to be made:
CLK -> D5 (SCK)
CS -> D6
DIN -> D7 (MOSI)
VCC -> 5V+
GND -> GND-
Next, using Arduino IDE software, you’ll need to configure it to work with the Wemos board and USB port. There are a range of USB drivers, as well as packages and libraries, to download in order to program the marquee scroller. Qrome goes into detail on which to install on his Instructables post.
Once you’ve completed this, the final step is to configure the web interface.
The marquee scroller utilizes the Wemos board’s WiFiManager to become an AP Hotspot when the last network it was connected to can’t be found. You can connect to the WiFi manager with your phone and enter your WiFi connection information. After the device is connected to your WiFi network, the assigned IP address can be used to open a browser to the Web Interface, which is where everything can be configured there.
And that’s about all it takes to create your own marquee scroller. To learn more about this project, check out the Instructables post.
That’s quite the mouthful to breakdown in one sentence, so here’s the deal in three easy to digest bullet points.
If you ask us, the Pulse XE bundle is a steal — including Olsson Ruby nozzle, Bondtech extruder, re-badged BLTouch auto bed-leveling probe, filament runout detection, Print Dry filament storage tech and two spools of NylonX filament.
All3DP is an editorially independent publication. Occasionally we need to pay our bills, so we affiliate some product links through which we may receive a small commission. For the full spiel, check out our Terms of Use.
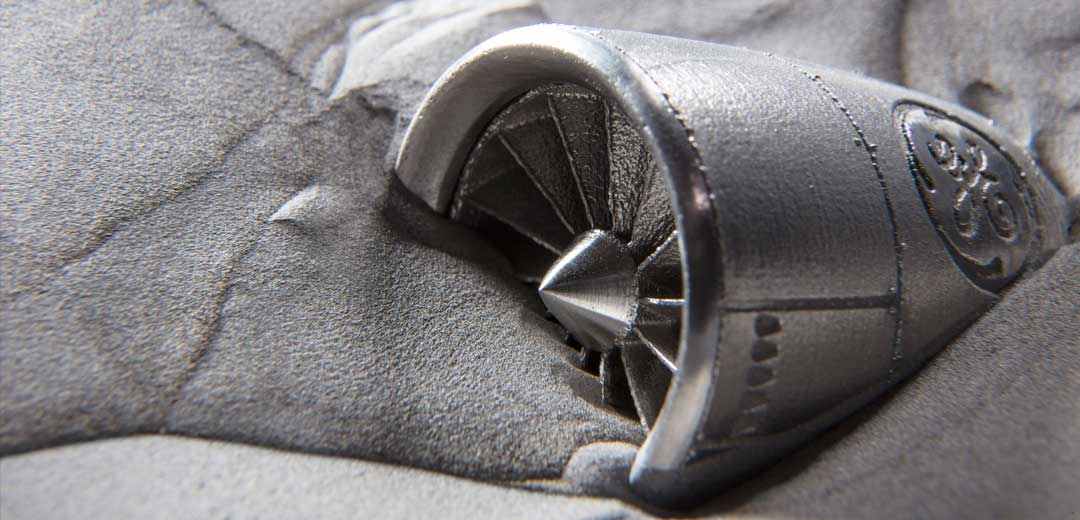
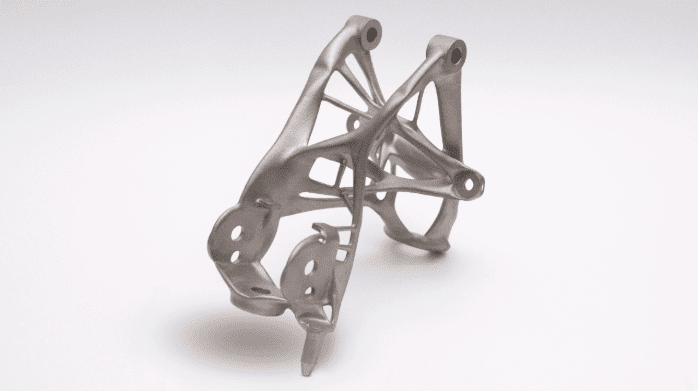
General Electric (GE) has recently filed a patent application that would allow them to use blockchain technology to validate and verify 3D printed objects on its supply chain.
As both 3D printing and blockchain technology are adopted into our daily lives, there have been a number of instances where the two have converged to create groundbreaking applications. We’ve recently seen the development of the 3dP-Token by the manufacturing service provider Makerslab24.com, a cryptocurrency that provides customers with greater accessibility to 3D printed products at a lower cost.
Now, in yet another intriguing example of these two technologies intersecting, the industrial powerhouse General Electric (GE) has recently filed a patent application that would enable use of the blockchain to verify 3D printed parts in its supply chain. In this case, blockchain technology would be utilized to create a database that validates and verifies 3D files and the 3D printing process.
According to the filing, GE is planning to create a blockchain-based manufacturing history that would track and authenticate 3D printed objects. This would address one of the most glaring issues found with industrial additive manufacturing: the lack of verification and validation systems that are able to ensure the certification of 3D printed parts.
“It would therefore be desirable to provide systems and methods for implementing a historical data record of an additive manufacturing process with verification and validation capabilities that may be integrated into additive manufacturing devices,” GE states in the filing.
GE Sees Blockchain Technology as an Answer to 3D Printing Security Problems
While GE is certainly the biggest name in industrial manufacturing to try and link blockchain technology with 3D printing security, they’re far from the first. Back in 2016, Cubichain Technologies released an application that uses secure blockchain networks to store encrypted data of 3D printable parts.
The increasing adoption of additive manufacturing technology has conjured up security concerns for industrial manufacturers, particularly with 3D printed models being compromised or changed. For instance, in GE’s patent filing, they explain that if a 3D printable replacement part is shared with users, the user on the receiving end of the model is unable to verify whether the part was produced using the correct build file and manufacturing process.
Therefore, the ability of blockchain to verify and authenticate data makes it the perfect safeguard to prevent a 3D file or printing process from being modified without authorization. And so, GE is planning to use this technology to verify their own parts on the supply chain, allowing them to track and certify every part that goes into production.
GE seems to be entering the blockchain space from a few different angles, having also joined the Blockchain in Transport Alliance (BiTA), which is a blockchain consortium that aims to use the technology to improve the cargo transport industry.
Designer and Royal College of Art graduate Lingxiao Luo is combining traditional knitting techniques and 3D printing to create garments that echo the playful style of children’s toys.
As 3D printing becomes an increasingly popular tool in the world of fashion and art, the technology has been adapted to be compatible with other classic techniques. One shining example of this is 3D knitting, an automated knitting technique that is already being used by the furniture design giant IKEA. Sometimes fusing traditional techniques with 3D printing can lead to new innovative processes of their own kind.
One fashion designer, named Lingxiao Luo, is mixing traditional knitting methods with 3D printing to produce playful and vibrant garments. A graduate student from the prestigious London-based Royal College of Art, the designer’s latest work aims to replicate the vibe of children’s toys. The collection, which is called is called AddiToy, is produced via a method that involves 3D printing threads of plastic directly onto knitwear.
Luo had previously worked as a childrenswear designer, and that experience seems to have carried over in her ongoing experimentation with knitting and 3D printing. She believes that the AddiToy collection provides a new aesthetic to the fashion world, and also promotes the idea of zero-waste fabrication.
Lingxiao Luo 3D Prints Plastic Threads Directly Onto Knitwear
To create the colorful garments, Luo starts by selecting the type of yarn and deciding whether to weave it into a delicate or thick finish. The material she utilizes offers more texture and structure compared to traditional knitwear fabrics. Different 3D printed textures are added directly to the garment, where it is then either joined, felted or twisted directly onto the design.
The joining process is incredibly straightforward, using 3D printed patterns that are added to the fabric to attach two different knitted fabrics into a single piece. Felting, on the other hand, entails directly weaving 3D printed patterns into the knitted fabric. This method leads the fabric to become wet and felted, where it then shrinks to form the desired 3D design.
Lastly, the twisting technique involves printing flexible filament onto tightly-knitted elastic fabric, which enables the 3D printed threads to be twisted into the garments.
“In the future, AddiToy can provide technical service to design studios for using this technique and products into their collections,” Luo recently told Dezeen.
The designer has utilized her newly developed technique to create several pieces for her MA final collection for the Royal College of Art. These objects include a book of samples, garments, accessories and several perfume prototypes. Her garments were also featured in the recently held Royal College of Art MA Fashion show.
Die Welt des antiken Griechenlands in Assassin’s Creed Odyssey ist die größte und dynamischste aller Zeiten. Wir erkundeten, kletterten und erdolchten uns den Weg durch einen kleinen Teil davon. Das Spiel wurde von Ubisoft Quebec entwickelt, dem Studio, das hinter Assassin’s Creed Syndicate steckt. Assassin’s Creed Odyssey führt die Spielreihe in eine neue, spannende Richtung. In der Demo, die auf der E3 spielbar war, bekamen wir einen kleinen Vorgeschmack: Wir unterstützten eine Rebellion, bekämpften unzählige Feinde in einer gigantischen Schlacht und beobachteten Haie, die sich über die leblosen Körper unserer besiegten Gegner hermachten.
Während des peloponnesischen Krieges, einem uralten Konflikt zwischen Athen und Sparta, der ein entscheidender Wendepunkt in der griechischen Geschichte darstellte, befindet sich das Griechenland in Odyssey zwischen Demokratie und Tyrannei, Mythos und Wissenschaft und Ordnung und Chaos – du wirst eine große Rolle dabei spielen, um über sein Schicksal zu entscheiden. Hier kannst du einen Blick darauf erhaschen, was dich am 5. Oktober erwartet, wenn Assassin’s Creed Odyssey für Xbox One, PS4 und PC erscheint.
Wähle deine eigene Odyssee
Zum ersten Mal in dieser Reihe, wird Assassin’s Creed Odyssey die Spieler laufend mit Entscheidungen konfrontieren, die die Story verändern. Du kannst dir aussuchen, was du sagen möchtest, wem du vertraust und wie du handelst. „Entscheidungen treffen war eins der ersten Dinge, die wir in dem Spiel haben wollten,“ sagt Game Director Scott Phillips. „Nicht nur in dem Dialog-System, sondern auch innerhalb der Spielstruktur. Wir wollten auch daraus resultierende Konsequenzen. Die Dinge, über die du in Quests Entscheidungen triffst, werden später Auswirkungen mit sich bringen. Es Missionen für dich auftauchen, weil du in der Vergangenheit bestimmte Entscheidungen getroffen hast.“
Die erste Entscheidung die du treffen wirst ist, wer du sein möchtest. Beinahe vier Jahrhunderte vor Assassin’s Creed Origins und der Gründung der Assasinen Bruderschaft, wirst du nicht die Rolle eines Assassinen übernehmen – du wirst ein Söldner sein, ungebunden und frei, um über dein eigenes Schicksal zu entscheiden. Genauer gesagt, kannst du zwischen zwei Söldnern wählen – den Spartanern Alexios und Kassandra – der Charakter, den du wählst, bleibt das ganze Spiel über dein Protagonist. Doch egal für wen du dich entscheidest, beide verfolgen die selbe Storyline und führen die gleiche unerschütterliche Crew von Abenteurern auf eine Seefahrts-Quest nach Geld, Ruhm, Gerechtigkeit und Rache.
Du bist mehr als nur ein abenteuerlustiger Spartaner. Du bist ein Nachkomme von König Leonidas und du wirst die Spitze seines Speers tragen, um es zu beweisen. Du hast auch die Kontrolle über einen Adler, Ikaros, der von oben spähen kann und dich Ziele markieren lässt. Der gebrochene Speer von Leonidas – wie ein Dolch im Kampf als zweite Waffe oder während Attentaten anstelle der Verborgenen Klinge – ist eigentlich ein Artefakt der Ersten Zivilisation, das deinem auserwählten Söldner scheinbar übermenschliche Fähigkeiten verleiht, die du im Laufe des Spiels entwickeln wirst.
Wie passt dieses neue Element der Entscheidungen zu der Tatsache, dass Sie genetische Erinnerungen aus der fernen Vergangenheit wiedererleben? „Die DNA ist alt und ungenau, so dass du die Wahl hast, zwei Charaktere zu verfolgen“, sagt Creative Director Jonathan Dumont. Es gibt auch eine gewisse Verschwommenheit in den historischen Aufzeichnungen, denn „[Alexios und Kassandra] stammen aus einem verlorenen Buch von Herodotus – dem ersten Historiker – der über einen Helden schrieb, der einer dieser beiden Charaktere sein könnte“, fügt Dumont hinzu.
Der größte Unterschied zwischen einem Abenteuer mit Alexios oder Kassandra ist die Folge der Handlungen. Im Laufe des Spiels wirst du mit großen und kleinen Entscheidungen konfrontiert, wo du die Kontrolle über Dialogoptionen hast. Zum Beispiel auf welcher Seite du bei Konflikten stehst oder welche romantischen Bindungen du eingehst. Einige Quests kannst du auch einfach ablehnen, wenn du sie nicht machen möchtest, was später zu neuen führen kann.
„Die Hauptgeschichte wird sich verzweigen,“ sagt Phillips. Sie wird allerdings wieder zusammenfinden, sodass sich ähnliche Engpässe ergeben, wo bestimmte Ereignisse auftreten – historische Ereignisse, die wir nicht verändern werden. Aber es gibt sehr viele andere Möglichkeiten, wo das Spiel dramatisch auseinandergeht. Und wenn du dann außerhalb des Hauptpfads schaust, wenn du dir ansiehst, was du in der Welt bewirkt hast, welche Entscheidungen du getroffen hast, um andere Quests zu machen, wirst du einen dramatischen Wandel darin erleben, wie die Welt dich wahrnimmt und was dir zur Verfügung steht, aufgrund deiner Handlungen.“
„Das Ziel, das das Team gemeinsam verfolgt hat ist, dass du dein Odyssey hast und ich werde ein anderes Odyssey haben,“ sagt Dumont. „Also ja, es wird eine Hauptgeschichte geben, die erzählt wird und es werden Gleichheiten auftreten. Aber was geschah mit dir auf der Insel, als du das Mädchen trafst, was dich küssen wollte? Hast du das kleine Mädchen von der anderen Insel gerettet? Hast du dem spartanischen General geholfen oder ihn getötet? Es ist deine Geschichte.“
Also während du die persönliche Reise deines Söldners beeinflussen kannst und wie er mit historischen Ereignissen interagiert, kannst du aber nicht den überlieferten Pfad der Geschichte verändern. Oder wie Dumont sagt: „Sokrates wird nicht mitten im peloponnesischen Krieg explodieren, wenn er eigentlich 30 Jahre länger gelebt haben soll.“
Als Söldner liegt auch deine Einstellung zur Moral ganz bei dir. Das bedeutet, dass du ein (relativ) geradliniges Verhalten an den Tag legen und hilfreiche Dinge tun wie Piraten jagen kannst oder du hast eher ein gereiztes Gemüt und stiehlst und tötest, um alles zu bekommen was du willst. Denke nur daran, dass durch deine Handlungen ein Kopfgeld auf dich ausgesetzt werden kann und umso größer das ist, desto mehr Söldner werden dich jagen. Sie verhalten sich in etwa wie die Phylakes in Assassin’s Creed Origins – ihre Bewegungen sind auf deiner Karte und deinem Kompass sichtbar und ein Warnhorn ertönt, wenn sie in der Nähe sind – diese robusten Gauner können gleichwertige Fähigkeiten besitzen wie du oder diese sogar übertreffen – manchmal sogar mit Raubtieren im Schlepptau. Ohne aktives Kopfgeld, werden sie dich in Ruhe lassen – aber wenn sie dich aufspüren, werden sie deinen Standort ausfindig machen und können oft in ungünstigen Momenten auftauchen, wie zum Beispiel mittendrin in einer Schlacht. Manchmal sogar zwei oder drei gleichzeitig.
„Die Söldner dieser Welt – egal was für einer du bist – reisen durch die Gegend, auf der ständigen Suche nach Jobs,“ sagt Phillips. „Wenn du schlimme Dinge in dieser Welt tust, Leute töten oder ausrauben, werden sie dich ausfindig machen, ein Kopfgeld wird auf dich ausgesetzt und diese Söldner werden kommen und dich gnadenlos jagen. Die gute Sache daran ist, dass sie nahezu die beste Ausrüstung des Spiels besitzen und diese wird dir gehören, wenn du sie besiegen kannst.“
Sie zu besiegen ist alles andere als leicht. „Wenn du auf mehrere Söldner gleichzeitig triffst, ist es als würden drei Spielcharaktere gleichzeitig auf dich eindreschen,“ sagt Phillips. Du musst entweder sehr gut oder clever sein, denn du kannst sie aus dem Hinterhalt überfallen, wenn sie zu dir kommen. Du wirst wissen ob sie kommen, welche Fähigkeiten sie besitzen und du wirst wissen ob sie ein Haustier mit sich führen. Es gibt viele Wege wie man sich mit diesen Söldnern messen kann und eine Vielzahl von Möglichkeiten für den Spieler, sich selbst herauszufordern oder listige Hinterhalte zu kreieren.“
Söldner zu töten hat den zusätzlichen Vorteil, dass dadurch dein Wert in der griechischen Söldner-Rangliste wächst, es gibt aber auch andere Wege, sie von dir abzubringen. Dein Kopfgeld begleichen wären eine Möglichkeit. Möchtest du allerdings dein Geld sparen, kannst du die Person ausfindig machen, die ein Kopfgeld auf dich ausgesetzt hat und sie töten. Meistens ist das ein gegnerischer Offizier, der auf der Karte markiert und von Wachen flankiert ist. Wenn du es schaffst einen Söldner zu überraschen, kannst du ihn auch nur ausschalten, anstatt ihn zu töten. Schaffst du es das durchzuziehen, kannst du ihnen ein besseres Angebot machen und sie als Leutnant auf deinem Schiff rekrutieren. Und das sind nicht einmal die Einzigen.
„Die Zeit vor 2.500 Jahren ist die älteste, die wir bei Assassin’s Creed je gesehen haben. Das ist die Zeit, wo die Verbindung zur ersten Zivilisation stärker ist als je zuvor in der Spielreihe.“ – Scott Phillips, Game Director
Du kannst auch versuchen Leute als Leutnant zu rekrutieren, die du während Quests antriffst, auch wenn sie das Angebot nicht immer annehmen werden. Zum Beispiel entpuppte sich eines unserer Attentatsziele während der Demo als ein Dersteur aus Athen, der sich versteckte und eine zweite Chance als Bogenschütze auf unserem Schiff dankend annahm. Diese Charaktere helfen auch, wenn deine Crew andere Schiffe entert. Sie können sogar gerufen werden, um an deiner Seite zu kämpfen, während du an Land bist.
„Es ist ein interessanter Kreislauf, den wir in das System einbauen wollten, damit es nicht nur heißt ‚Hier ist ein Haufen Gegner, ich muss sie alle ausradieren‘, sondern ‚Hier ist ein Haufen Leute – ohh, der Typ sieht interessant aus! Den könnte ich echt auf meinem Schiff gebrauchen. Ich werde ihn mir an Bord holen.‘ Also muss ich einen Weg finden, mich dieser Situation zu nähern, ohne ihn versehentlich zu töten,“, sagt Phillips.
DIE LANDSCHAFT UND DAS MEER DES ANTIKEN GRIECHENLANDS ENTDECKEN
Die E3-Demo entfaltet sich auf Delos und Mykonos, zwei kleinen Splittern einer viel größeren Spielwelt. Die Landschaft von Mykonos hat viele felsige Klippen und unberührte Strände, wo sich rauchige Tempel und gemalte Statuen über belebten Städten erheben und die Grenzen zwischen Mythos und Alltag verwischen. Es ist auch dicht besiedelt, üppig und voller Aktivitäten. Wölfe wandern durch die Außenbezirke der Stadt, athenische Soldaten haben an strategischen Punkten Lager aufgebaut, und eine kolossale Statue von Artemis Agrotera ragt über den höchsten Hügel von Mykonos. (Du kannst die Statue der Jagdgöttin auch hochklettern; die Pfeilspitze, die auf den Himmel zeigt, dient gleichzeitig als Synchronisationspunkt.) Das strategisch wichtigere Delos ist unterdessen kleiner und vergleichsweise ruhig, mit nur wenigen Ruinen und Dörfern in der felsigen Landschaft. Da Delos ein heiliger Ort des Gottes Apollon ist, ist es verboten, dort Blut zu vergießen – aber lass dich dadurch nicht davon abhalten, feindliche Soldaten, denen du begegnest, niederzustrecken. In Delos treibt auch ein riesiger, legendärer Bär an einem der Strände sein Unwesen. Also sei vorsichtig – außer du bist zuversichtlich, dass du ihn töten kannst.
Eine Entdeckungstour in Assassin’s Creed Osyssey erweitert das, was wir in Assassin’s Creed Origins bereits gesehen haben, mit dem Überall-Raufklettern-Ansatz, den KI-gesteuerten NPCs, die sich nach individuellen Mustern bewegen und der Liste von Objekten, die auftauchen, wenn du ein feindliches Camp oder einen anderen interessanten Ort besuchst. Zwei Dinge jedoch sind in der neuen griechischen Open World im Vergleich zum sandigen Ägypten sofort auffällig anders: Erstens ist es lebhaft bunt (zumindest auf Mykonos und Delos), mit hellen Wildblumen und lebhaftem Laub, das sich von den sonnengebleichten Klippen und unberührten Stränden abhebt.
„Es ist so eine wunderschöne Welt und die Umsetzung, die unser World- und Art-Team vollbracht hat, ist fantastisch,“ sagt Dumont. „Weißt du, warum die Menschen damals dort lebten? Weil es großartig aussah!“
Eine andere bemerkenswerte Sache über das antike Griechenland ist, dass sein Gelände von „hügelig“ bis zu „nur ein großer Berg“ reicht. Die Städte sind auf Erhebungen gebaut und die meisten Klettermöglichkeiten gibt es nicht an riesigen, verzierten Gebäuden (von denen es immer noch genug gibt), sondern von Klippen und Berghängen, die einen Großteil der griechischen Landschaft ausmachen. Das spiegelt eine reale Geografie wider, die laut Phillips einer der Hauptgründe dafür ist, dass die alten Griechen so fähige Seefahrer waren.
„Im alten Griechenland waren die meisten Menschen nicht zu Fuß unterwegs – sie würden mit dem Boot reisen, wenn sie irgendwohin wollten“, sagt Phillips. „Weil Griechenland super-super-gebirgig ist, war es viel einfacher mit dem Boot zu fahren.“
Auch wenn du besser klettern kannst als die meisten anderen Griechen, wirst du wahrscheinlich feststellen, dass es schneller ist sich ein Ruderboot zu schnappen und die Küstenlinie zu umfahren als das raue Gelände zwischen dir und deinem Ziel zu durchqueren. Für eine größere Reise solltest du besser das Steuer deines Schiffs übernehmen – eine Trireme, die nach Adrestia, der Göttin der Vergeltung benannt ist.
Das alte Griechenland von Assassin’s Creed Odyssey ist die bisher größte Open World der Spielreihe und hat ungefähr das 1,6-fache der Fläche von Assassin’s Creed Origins in Ägypten. Etwa die Hälfte davon ist Wasser und du kannst es zwischendurch erkunden, durch malerische Wellen schneiden und Angriffe von Piraten abwehren (oder andere Schiffe plündern, wenn du nichts dagegen hast dein Kopfgeld zu vergrößern.) Wenn du die See-Segmente von Assassin’s Creed Origins gespielt hast, wird dir die Schiffsführung bekannt vorkommen, ebenso wie das Zielen und Abfeuern von Salven mit Pfeilen auf gegnerische Schiffe. Diese sind natürlich nicht deine einzige Waffe: Du kannst auch Speere aus nächster Nähe werfen, um größeren Schaden zu verursachen. In der Demo gab es auch Feuerpfeile, die nicht nur massiven Schaden anrichten, sondern auch den Gegner davon abhalten, sich zu bewegen oder anzugreifen, sobald sich das Feuer über ihr Schiff ausbreitet. Du kannst dir auch Ruderer anheuern, die der Adrestia eine höhere Geschwindigkeit verpassen. Das ist nicht nur nützlich, um Ziele zu verfolgen, sondern auch wichtig, um andere Schiffe rammen zu können. Wenn du ein Schiff rammst, wird sein Rumpf beim letzten Hieb in mehrere Stücke zerteilt und in den Wellen versinken.
Wenn du andererseits deinen Gegner nicht einfach zerschmettern willst, kannst du ein feindliches Schiff außer Gefecht setzen, um gegen den Schatz der Crew zu kämpfen. Wenn du alles noch etwas grausamer gestalten möchtest, kannst du die Gegner über Bord werfen, was hungrige Haie anlocken wird – wenn du mehrere Haie gleichzeitig anlockst, wird das Versenken des gegnerischen Schiffes einen riesigen Fressrausch auslösen.
Haie sind nicht so wählerisch, was ihre Beute angeht, was sie zu einem großen Problem macht, wenn du vorhast unterhalb der Wasseroberfläche eine Entdeckungsreise zu machen. Solange du nicht mitten in einer Seeschlacht steckst, kannst du jederzeit unter Wasser tauchen. In der Nähe der Küste, wo das Wasser klarer ist, fanden wir Schiffswracks, versunkene Ruinen, Höhlen und andere Unterwasserschätze. Im offenen Ozean ist die Sicht jedoch begrenzt und das Wasser geht viel tiefer. Auch wenn dein Söldner die Lungenkapazität besitzt den Boden zu erreichen und die Stärke, alles zu bekämpfen was da durch die Dunkelheit schlängelt, ist man der ständigen Bedrohung ausgesetzt zu ertrinken und/oder von einem großen Fisch verfolgt zu werden. Man sollte sich also nicht unbedacht hineinstürzen – außer man sucht nach etwas Spezifischem.
Odysseys Version des antiken Griechenlands besteht nicht nur aus Inseln und Ozean und der Rest der Welt wird nicht nur wie Mykonos und Delos aussehen. Wie gesagt, die Inseln sind nur zwei kleine Teile einer viel größeren Karte und da ist sehr viel, was wir noch nicht gesehen haben. Einschließlich griechischer Mythen und Relikten der ersten Zivilisation.
„Es ist eine super-diversifizierte Welt“, sagt Dumont und fügt hinzu, dass es saisonale Veränderungen sowie einen Tag- / Nacht-Zyklus geben wird. „Wir haben verschiedene Biome für unsere Regionen – und da wir den peloponnesischen Krieg als Hintergrund verwenden, stehen sie in Konflikt – also gibt es da einen großen Gameplay-Aspekt. Wir wollten, dass jede Region anders aussieht. Sagen wir mal, wenn man in den Süden geht, wie auf Kreta oder ähnliche Orte, ist es sehr schroff, sehr felsig. Wenn man nach Delphi geht, mehr im Norden, gibt es große Wälder. Wenn man sich unsere E3-Demo anschaut, sieht man wunderschöne weiße Felsen und einen blauen Ozean. Wenn man umhergeht, bekommt man ein einzigartiges Gefühl.“
DEINE AUFGABE IST ES, DEN GRIFF DES ANFÜHRERS ZU SCHWÄCHEN
In der Demo findet der Haupteil des Geschehens in Mykonos statt, da unser Misthios (Kassandra in unserem Playthrough) auf die Insel gerufen wurde, um eine Rebellion gegen den lokalen Diktator namens Podarkes zu unterstützen – dieser ist praktischerweise auch noch Mitglied des Kults des Kosmos, einer geheimnisvollen Verschwörung, die Kassandras Familie verfolgt. Zu Beginn heißt es, entweder Kyra die Anführerin der Rebellion oder Thaletas, einen spartanischen Kommandeur, der ebenfalls kommt, um sie zu unterstützen, aufzuspüren. Die Reihenfolge, in der du sie findest, führt zu leicht unterschiedlichen Zwischensequenzen, aber die Events sind dieselben: Kyra wird dir von Podarkes Unterdrückung erzählen und Thaletas und seinen Spartanern wirst du dabei helfen, einen Angriff von athenischen Truppen abzuwehren.
Ab diesem Zeitpunkt, schlagen Kyra und Thaletas jeweils eine Strategie vor: Kyra möchte, dass du herumschleichst und die Vorräte der Athener auf Delos zerstörst, während Thaletas will, dass du ihre Schiffe im Meer versenkst. Es liegt an dir, zu entscheiden, welchen Plan du verfolgen möchtest. Deine Entscheidung beeinflusst, welche Einstellung die beiden Anführer dir gegenüber für kurze Zeit haben – auch, wenn du dich für eine Seite entschieden hast, kannst du immer noch beide Pläne verfolgen. Das ist ebenfalls hilfreich, wenn du eine Romanze mit Kyra und/oder Thaletas eingehen möchtest. (Liebe ist, wie viele andere Dinge auch in Assassin’s Creed Odyssey, geschlechterunabhängig.) Eine erfolgreich abgeschlossene Quest mit einem der Charaktere führt zu weiteren Quests mit ihnen. Wenn du sie abschließt und gleichzeitig nach Geschenken Ausschau hältst und herzerwärmende Dialogoptionen wählst, eröffnest du eine Reihe von privaten Quests mit den Charakteren, in denen sich ein Verhältnis entwickeln kann – genauso wie eventuelle Konsequenzen, wenn ein Job erledigt ist und es an der Zeit ist, weiterzuziehen.
Interessanterweise sind Quests auf der Karte markiert, sobald du allerdings eine angefangen hast, führt Assassin’s Creed Odyssey dich nicht gleich zum nächsten Ziel. Stattdessen erhältst du Anweisungen wie „südlich des Marktes und westlich des Tempels“ oder „im westlichen Lager in den Hügeln von Artemis“. Du bekommst immer noch einen Hinweis, dass du mit Ikaros spähen und Objekte in der Nähe bestimmen kannst, aber es fühlt sich echter an, als wenn du einfach nur auf einen markierten Bereich zuläufst. Es bringt dich dazu, dich mit deinem Umfeld vertrauter zu machen.
Du musst auch nicht jede Mission wahrnehmen, um dein zu Ziel zu erreichen, egal ob sie Bezug darauf nimmt oder nicht. Sobald du dich mit deinen Verbündeten arrangiert und das Land erobert hast, hast du ein zentrales Ziel – Podarkes zu töten – den du jederzeit angreifen kannst. Podarkes ist jedoch von einer Menge starker Wachen umgeben. Sobald du also auf die Jagd gehst, ist es einfacher, wenn du zuerst Missionen abschließt, Militärlager infiltrierst, alle Schätze und Reichtümer stiehlst oder zerstörst, die für Podarkes und seine athenischen Anhänger nützlich sein könnten. Das schwächt die nationale Macht, die sie über Mykonos haben. Richtest du sogar genug Schaden an, wird Podarkes eventuell mit ein paar Wachen aus dem Palast geworfen, was bedeutet, dass du ihn dann auf der Straße vernichten kannst.
Der Ansatz, dass du ein zentrales Ziel hast, welches du jederzeit erfüllen kannst, bedeutet, dass die zielführenden Missionen größtenteils optional sind. Was nicht heißt, dass sie für die Story irrelevant oder unnötig sind. Du kannst beispielsweise einiges über Mykonos und die Menschen lernen, mit denen du zu tun hast, einschließlich einiger überraschender Enthüllungen über Kyra (die du entweder ihren Anhängern verkünden oder geheim halten kannst, was jeweils Konsequenzen mit sich bringt.) Du kannst dich auch deinen spartanischen Verbündeten in einem Eroberungsgefecht gegen die Athener am Strand anschließen – eine neue Art von Herausforderung, die das Gleichgewicht der Macht in einer Region verschieben und bis zu 300 Krieger gleichzeitig zusammenbringen kann (Sowie Söldner, die auftauchen, um dich herauszufordern). Während der Nahkampf um dich herum ausbricht, kämpfst du dich durch die Soldaten, bis ihre Anführer auf dem Feld erscheinen. Besiege sie und du kannst den stahlharten Helden der Gegner herausfordern, dessen Niederlage die andere Seite vernichten und deinen Verbündeten den Sieg bringen wird.
„Im alten Griechenland waren die meisten Menschen nicht zu Fuß unterwegs… weil Griechenland super-super-gebirgig ist, war es viel einfacher mit dem Boot zu fahren.“ – Scott Phillips, Game Director
Zwischendurch kannst du eine Pause einlegen und eine Mission von einem der vielen Job-Boards annehmen. Das sind kleine Aufgaben wie das Versenken eines bestimmten Piratenschiffs oder das Wiederbeschaffen eines gestohlenen Gegenstands.
KAMPF, RÜSTUNG UND WAFFEN, DIE ACHILLES WÜRDIG SIND
Das Kämpfen mit Kassandra oder Alexios baut auf das Kampfsystem von Assassin’s Creed Origins auf. Dein auserwählter Söldner benutzt eine große Auswahl von Waffen und Kampfstilen, um sich gegen feindliche Gruppen mit leichten und starken Angriffen durchzusetzen. Das heißt, Kampf-, Ausrüstungs- und Charakterfähigkeiten wurden alle enorm überarbeitet, was zu einer ganz neuen Erfahrung führt. Origins-Fans, die zum Beispiel einen Speer benutzen, könnten überrascht sein, dass ihr Söldner anstelle von Bayeks weitreichenden Schlägen graziöse Sparta-Stöße ausführt. Noch überraschter werden sie sein, wenn sie ihr Schwert ziehen und sehen, wie ihr Söldner mit einem abgebrochenen Speer von Leonidas kämpft, anstatt mit einem Schild.
Einer der größten Unterschiede ist, dass du keine Schultertaste mehr halten kannst, um ankommende Angriffe zu blockieren. Stattdessen, drückt man im richtigen Moment auf den Knopf, pariert die Angriffe und man verlässt sich auf schnelles Ausweichen oder längere Ausweich-Rollen, um den meisten Schaden zu vermeiden. In der Zwischenzeit wird durch Drücken des vorherigen Buttons ein benutzerdefiniertes Schnellmenü aufgerufen, wo du eine von vier Spezialfähigkeiten entfachen kannst, die du im Vorfeld festlegst.
„Die speziellen Fähigkeiten sind eine Möglichkeit, die Fähigkeiten, die schon immer da waren, zu erweitern, um deinen Spielstil zu individualisieren“, sagt Phillips. „Wir treiben es noch weiter, weil wir den gebrochenen Speer von Leonidas benutzen, um noch größere und bessere Fähigkeiten zu erlangen. Du musst Adrenalin innerhalb von Kämpfen oder Attentaten aufbauen, um eine dieser Fähigkeiten anwenden zu können. Es ist wirklich interessant zu sehen, wie die Spieler sie mischen und anpassen und ihren eigenen Stil entwickeln.“
Die Fähigkeiten sind in Jäger-, Assassinen- und Krieger-Stämmen gruppiert, die Fernkampf-, Hinterhalt- und Nahkampfkünste verkörpern. Die meisten Fähigkeiten können durch Zusatzinhalte aufgewertet werden. Einige davon sind bekannt; Die verschiedenen Bogen-Funktionen von Assassin’s Creed Origins zum Beispiel sind nun Fähigkeiten, die auf jeden getragenen Bogen angewendet werden können. So kannst du ferngesteuerte Schüsse und mehrere Pfeile gleichzeitig ohne entsprechende Ausrüstung abfeuern.
Es gibt auch viele neue Fähigkeiten, wie den spartanischen Tritt, der genau so funktioniert, wie du es dir vorstellst und Feinde fliegen lassen kann. Rush-Attentate, wo du den Speer von Leonidas lautlos auf einen entfernten Feind werfen kannst und direkt heimlich zu ihm hinsprintest, um ihn auszunehmen; und der Schildbrecher, wo du einen gegnerischen Schild packen und ihn mit seinem Träger wegschleudern kannst. Du kannst sogar während eines Kampfes heilen oder deine Waffen mit Feuer- oder Gift-Effekten ausrüsten, solange du genügend Adrenalin und die Fähigkeit freigeschaltet hast. Und das ist nur der Anfang; Arbeite dich durch den Fähigkeitsbaum und du schaltest Dinge frei wie Pfeile, die durch Schilde und Wände fliegen können, oder die Fähigkeit, unsichtbar zu werden.
Du hast auch eine Reihe von passiven Fähigkeiten zur Auswahl wie zum Beispiel die bereits bekannten hinterhältigen Attentate, sowie neue Fähigkeiten wie Feinde auszuknocken und zu rekrutieren. Und dann gibt es den Sprung des Glaubens, mit dem du nicht nur einen klassischen Schwanentauchgang von hohen Plätzen aus durchführen kannst, sondern der dich auch davor bewahrt, bei einem schweren Sturz zu sterben. Werte diese Fähigkeit auf und die Macht des Speers von Leonidas wird dich davon abhalten, jemals wieder Fall-Schaden zu erleiden.
Odysseys Ausrüstungs-Methode ist eine weitere große Veränderung; Während du immer noch in der Lage bist, immer neue Waffen in der Welt zu finden und schnell zwischen zweien zu wechseln, wirst du jetzt auch einen durchgehend neue Rüstungen sammeln. Dein Kopf, deine Arme, dein Oberkörper, deine Taille und deine Füße brauchen individuelle Rüstungen und du solltest auf die Buffs achten, die sie und deine Waffen gewähren können. Zum Beispiel könnte eine Brustplatte, die deinen Assassinenangriffen einen Bonus von 5% gewährt, für dich nützlicher sein als ein scheinbar identisches Stück, das den Schaden von Kriegern erhöht.
Es ist aber der Speer von Leonidas, der Assassin’s Creed Odyssey wirklich ausmacht. „Wir haben Artefakte der ersten Zivilisation in der ganzen Assassin’s Creed-Reihe gesehen,“ sagt Phillips. „Der Apfel von Eden ist ein ikonisches Stück dieser uralten Zivilisation und der Speer von Leonidas ist unsere Methode, um ihn in die Story und in das Gameplay einzubringen und dem Spieler Zugang zu jenen Elementen der ersten Zivilisation zu ermöglichen. In der Vergangenheit hattest du vielleicht den Apfel von Eden für eine begrenzte Zeit. Nun hast du in das ganze Spiel über und du wertest ihn auf, du machst ihn besser, du bekommst mehr Fähigkeiten, aufgrund seiner Verbindung zu dir, die wir im Laufe der Geschichte entwickeln werden.
„Es ist eine spannende Art, die Hintergründe der ersten Zivilisation mit der griechischen Umgebung und Mythologie zu entdecken,“ fügt Phillips hinzu. „Die Zeit vor 2.500 Jahren ist die älteste, die wir bei Assassin’s Creed je gesehen haben. Das ist die Zeit, wo die Verbindung zur ersten Zivilisation stärker ist als je zuvor in der Spielreihe.“
„Das Spiel handelt von Ordnung und Chaos und erklärt den Ursprung des Krieges, der später zwischen den Assassinen und den Templern ausbricht“, sagt Senior Producer Marc-Alexis Côté. „In dem Spiel gibt es also keine versteckte Klinge. Zum ersten Mal spielst du einen Charakter, der kein Assassine ist … aber das gibt uns die Freiheit, eine Geschichte zu erzählen, die anders ist. Die Spieler können die Story steuern wie sie möchten und machen sie zu ihrer eigenen Odyssey. “ Assassin’s Creed Odyssey erscheint am 5. Oktober für PS4, Xbox One und PC und kann während der E3 2018 am Ubisoft-Stand gespielt werden.
(Anmerk. d. Red.: Vielen Dank an dieser Stelle an Nicole Scheidemann für die Unterstützung bei dieser enorm umfangreichen Übersetzung.)
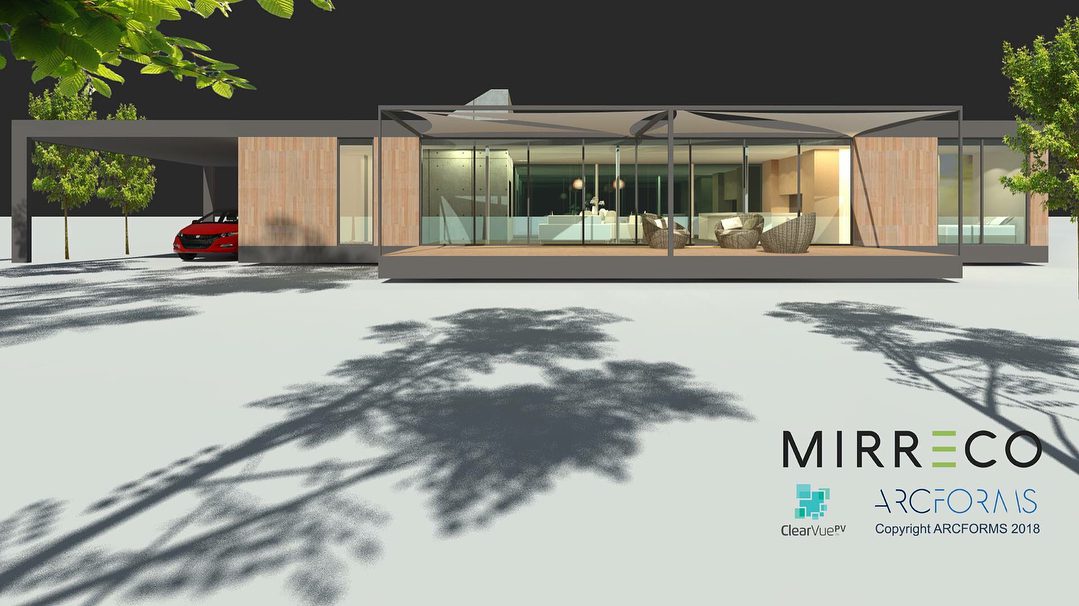
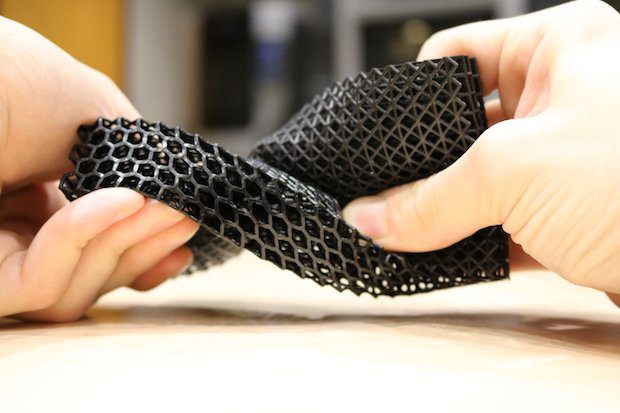
Australian hemp company Mirreco is developing a 3D printing process that utilizes hemp biomass as a material to manufacture building panels for houses.
With the cannabis legalization movement spreading rapidly throughout many parts of the world, even the 3D printing industry has found ways to make use of this controversial plant. For instance, we’ve seen a handful of specialty hemp-based filaments that are both sustainable and fun to print with.
While hemp can be used for a wide range of applications–from clothing to food–the Australian company Mirreco is taking hemp to new heights. The Perth-based company is working on a process that would use hemp biomass to construct habitable residential homes. Having already developed a machine to process this multi-faceted plant material, removing the most useful components like fibers and seeds, the next step is to integrate additive manufacturing into the mix
By combining this hemp processing technique with 3D printing technology, this plant-based material will soon be used to manufacture building panels for homes. Mirreco is collaborating with the Australian architecture firm Arcforms to showcase the potential of hemp biomass in the construction sector.
Hemp-Based 3D Printed Houses are Coming to the Land Down Under
Aside from the cultural novelty of using hemp, this plant material also offers unique properties. In a recently released statement, Compared to traditional building materials, Mirreco claims that the 3D printed hemp-based panels are “structurally sound, easy to produce, and provide superior thermal performance.”
“The floors, walls and roof will all be made using hemp biomass, and the windows will incorporate cutting-edge technology that allows light to pass through glass where it is converted into electricity,” the company states.
The hemp biomass material can be used to produce panels for residential and commercial buildings, and can be 3D printed into floors, walls and roofs. Arcforms will be designing the sustainable hemp homes, and have already sketched up the concept.
Mirreco has an overarching mission to curb the imminent consequences of global warming, and these carbon-neutral hemp panels fit into that vision. Hemp plants are capable of absorbing large amounts of carbon dioxide, which makes it an environmentally-friendly building material.
These hemp-based homes are certainly not the first example of 3D printing technology being used to build habitable structures. In fact, there are a number of 3D printed homes and other construction projects that have sprouted up across the world. However, Mirreco’s use of hemp plant biomass presents an evergreen path towards buildings that are incredibly sustainable and highly efficient.
There are some shows that have hype thrust upon them because no one knows exactly what to expect, but people get excited nonetheless.
Then there are shows that are hyped because they already exist in other formats, and fans just can’t wait to see characters they already know transformed for the screen.
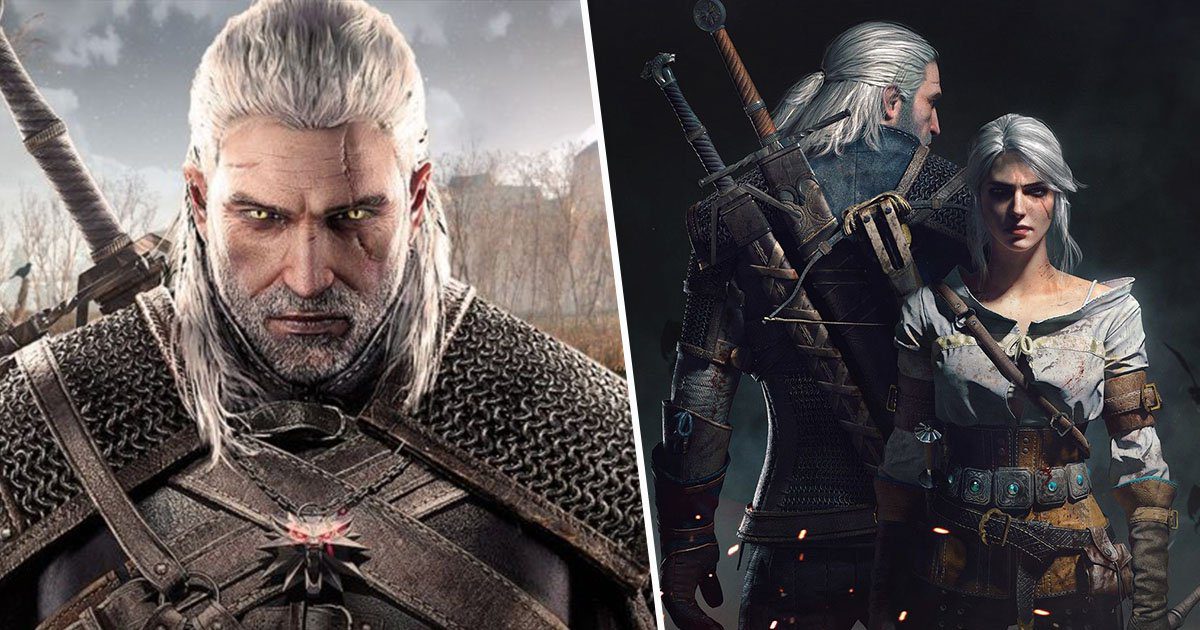
One such show which falls into the latter category, is The Witcher. Already a series of short stories, novels and (perhaps most well-known) video games, the saga is now getting the Netflix treatment, and though details are scarce so far, fans are getting excited.
Written by Andrzej Sapkowski, the first Witcher story came out in 1993 and new instalments have been been released steadily ever since, so there’s a lot of material to go off for the Netflix series.
Lead writer, showrunner and executive producer of the series, Lauren Schmidt Hissrich, has been keeping fans on their toes by tweeting snippets of details of the new series.
For example:
Everything will be organically derived from the books.
She has also shared details of the upcoming casting process that is already underway, Forbes reports.
When auditioning for new shows, actors usually read a script from the show’s pilot episode. However, things are being done a bit differently for The Witcher.
In a series of tweets, Hissrich said:
Let’s talk casting. Yes, I said the magic word! Casting is starting soon, and no, I can’t tell you who our top picks are so don’t ask. But. There is something very important you need to know.
Normally, when casting a show, the casting director pulls character-specific scenes from the pilot script for actors’ auditions. However, because we’re casting internationally (which means lots of emails and self-tapes) and because we know by now the internet keeps no secrets…
The writing staff has instead created entirely new scenes for our main characters. These are written to illustrate the precise tone, vibe, depth, and emotional resonance we need from Geralt and friends… but voila! They are spoiler-free, for us and for you. Which means…
If you start seeing Witcher scenes floating around the internet in the coming weeks — yes, they’re probably real! But no, they won’t give anything away as to the stories we’re telling, or the ways we’re telling them. You’re safe. For now.
And hells yes, his name is Jaskier.
It’s Friday night in LA, and it’s been a seriously great week here at #Witcher.
So.
Let’s talk casting. Yes, I said the magic word! Casting is starting soon, and no, I can’t tell you who our top picks are so don’t ask. But. There is something very important you need to know. pic.twitter.com/9dfkhBIyo0
While no actors have officially been linked to the project, it’s clear that things are well under way with the series. And Hissrich’s tweets are doing a good job of keeping eager fans interested.
Netflix itself hasn’t said much about the upcoming adaptation. On their website, however, there is a brief description of the show.
It reads:
The witcher Geralt, a mutated monster hunter, struggles to find his place in a world where people often prove more wicked than beasts.
And while the page also lists a 2018 release date, an official release date is yet to be confirmed. In fact, it’s more likely to be a little while longer, as Hissrich suggested the show will appear in 2020, but followed it up with ‘Who knows?!’
Whether the series comes sooner or later, the hype is certainly building.
If you have a story you want to tell, send it to UNILAD via [email protected]
Have some loose change lying around? Why not save it for a rainy day by 3D printing this gear motor-driven Apple Coin Bank designed by maker Greg Zumwalt.
Saving money is a healthy financial habit that will keep your bank account growing, and even a few coins can go a long way. Many of us know that feeling of relief that comes about when we have some cash set aside, and developing these frugal habits will help us plan for the future.
Now, you can create a 3D printed Apple Bank to be your now coin-stashing companion. This model was designed by maker Greg Zumwalt, who was looking for a way to teach his grandchildren good money saving habits. The 3D printed coin bank is comprised of 20 different 3D printed parts, a single gear motor and two micro level switches. It operates back on the Hoeken mechanism,
The coin bank mechanics are based on the Hoeken mechanism. The design consists of 20 unique 3D printed parts and uses a single gear motor and two micro lever switches for operation. With large eyes and an appetite for currency, this Apple Coin Bank looks quite adorable and unintimidating. However, this project is difficult to print, and requires a lot of precision and careful planning (just like saving money does).
Let’s take a peek at what you need to build this 3D printed coin bank…
3D Printed Apple Coin Bank: What You Need & Putting it Together
As we mentioned, the Apple Coin Bank consists of 20 different 3D printed parts, all of which can be freely downloaded from Zumwalt’s Instructables post. Zumwalt warns that this project is no walk in the park, as the design include the threaded assembly, as well as small parts and confined spaces. But if you have your 3D printed well-tuned and some basic soldering skills, you should be able to create your own coin eating apple.
The designer suggests 3D printing all parts at .15mm layer height and 20% infill. Some parts require supports to print cleanly, so be sure to add those when necessary. Before you start assembling to Apple Coin Bank, Zumwalt also recommends that you test fit and trim, as well as file and sand all of the parts to ensure smooth movement for moving parts and a tight fit for the stationary surfaces.
Aside from the 3D printed parts, here’s what else you’ll need to assemble the Apple Coin Bank:
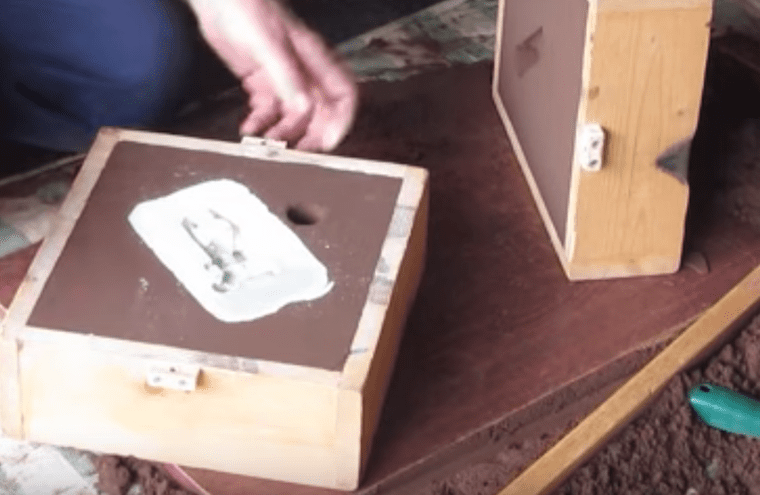
The build process begins with installing the motor into the 3D printed base and motor mount. After assembling the coin arm mechanism and completing the base, you’ll have to start soldering the wires together, which Zumwalt details on his Instructables post. After inserting the base into the 3D printed apple, the final step is to add the face to your print.
The step-by-step build process is lengthy and could be a bit arduous, so keep that in mind as you start constructing your own Apple Coin Bank. You can find the full assembly instructions and more on Instructables.
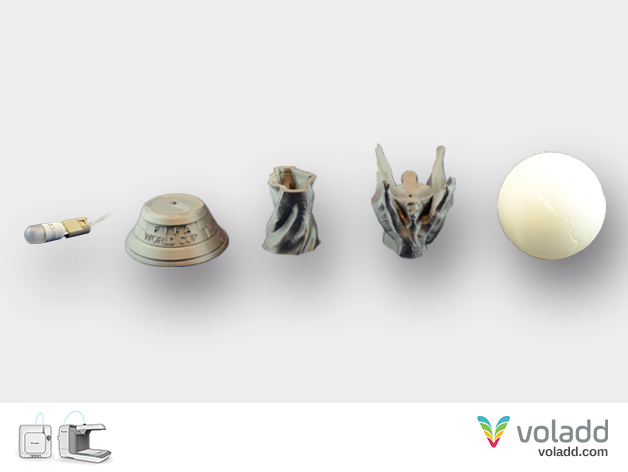
The FIFA World Cup is in full swing, and now you can 3D print your own lithophane lamp to light your favorite team’s path to victory! Check out this amazing 3D printed World Cup-themed lamp designed by the 3D printing company Voladd.
With the 2018 FIFA World Cup currently taking place in Russia, people from every corner the world are getting faces painted and flags waving in support of their home country or favorite qualifying team. Depending on what time zone you live in, some World Cup games might start a bit too early or late for you, but most of us will turn on a lamp and watch through the night nonetheless.
Now you can light your path to victory with a World Cup-themed 3D printed lithophane lamp created by the 3D printing company Voladd. The model is based off of the event’s iconic trophy, which features a robed human holding the world up above their head. This model is a remix based on “World Cup” by Bekarion and “Spherical Lithophane – World Map 12cm remix” by Domi1988.
With a bit of post-processing, you can make this lamp look like the real World Cup trophy. If you want to keep the spirit of this international tournament alive with a 3D printed lithophane lamp, keep reading to find out what you need and how to build it!
World Cup Lithophane Lamp: What You Need & How to Build it
There are four different STL files that you’ll need to print to build this lamp: three parts for the base and the globe-shaped light source. These 3D printable models are freely available to download from Thingiverse. Voladd suggest printing these parts with 15 percent infill and supports when necessary.
Other than a 3D printer and the STL files, there are obviously a few other things you’ll need to make this lithophane lamp shine. Here’s what you need to build this project:
Now that you’ve got all of your supplies ready, it’s time to kick off the build process. The first step is to 3D print all of the parts for the base and world map. Next, take the electrical installation and insert it from the upper part of the base until it reaches the bottom of the 3D printed base. Once that’s situated, you can glue the three base parts together.
Once the glue is dried, cover the lamp cap with paper and apply filler to the model, sanding it down to provide a better surgace finish. After that, you’ll apply the bonding primer, followed by the gold metallic paint spray. In the example from Voladd, they also add a few green lines to make it resemble the original FIFA World Cup. For the globe, which is where the light source will emit from, the designers recommend only using a light coating of paint to ensure the light shines through properly.
And that about does it for the assembly process. Pretty easy, huh? Well, definitely easier than watching your favorite team playing in a close World Cup match… If you want to learn more about this project, you can find more information on Thingiverse!
Shapeways has launched an in-house collection of fully customizable 3D printed jewelry. Called Spring & Wonder, the products and brand were designed in two months to demonstrate what Shapeways can do for other companies wanting to incorporate mass personalization.
Shapeways, the 3D printing marketplace and service company, has just launched Spring & Wonder. The company’s first in-house jewelry brand, the collection was teased back in April.
Greg Kress, CEO of Shapeways, explains the idea behind the collection, saying: “It’s a brand, storefront, and jewelry collection that we built in 2 months. We are proud of the collection and hope you love the jewelry. But Shapeways didn’t do this to become a jewelry store, we did it for you.”
He goes on to explain that the brand shows “what’s possible” and just what the Shapeways platform can do as well as what the company hopes it will do in the future.
That is to say Shapeways hopes that brands will add its customizer technology into their Shopify sites. This way, customers can personalize pieces from online stores before the product is manufactured by Shapeways. The resulting product would be 3D printed and may also have custom packaging, although this idea is still undergoing beta testing.
Would YOU Wear the Shapeways Spring & Wonder Jewelry Brand?
Kress explains: “Shapeways has developed a sophisticated back-end of production, distribution, and supply chain fulfillment network, so we’re eager to expand our software services to brands looking to take advantage of mass personalization via 3D modelling and printing technology… With this simple software extension, we’re offering brands the opportunity to empower their customers to create truly one-of-a-kind products at affordable prices.”
However, Shapeways found that many see incorporating the software into online sites as seemingly futuristic. So, the company decided to “show not just tell” the wonders of mass personalization by creating Spring & Wonder.
The jewelry line is simple, personal and for everyday wear. Thanks to the Shapeways 3D modeling and printing technology, pieces are fully customizable as both design and material can be changed by the customer.
Current design options include three different collections, ‘Signature,’ ‘Celestial,’ and ‘Geometric’. Materials include silver, 14K gold, 14K rose gold, brass and bronze. The jewelry can also be inscribed.
Shapeways describes the brand as everyday jewelry and the three collections are aptly titled. Signature collections include 3D printed words which: “Make a statement” and “Tell the world who you are and what you’re about.”
The Celestial collection includes a range of moons, stars and Zodiac signs which can also be inscribed. Finally, the Geometric collection offers, you guessed it, a range of geometric shapes. You can find prices ranging from just $45 to $350.
If you’d like to buy some simple yet personal jewelry, visit the Spring & Wonder website. However, if you’re interested in Shapeways’ larger idea, check out their “blueprint”.
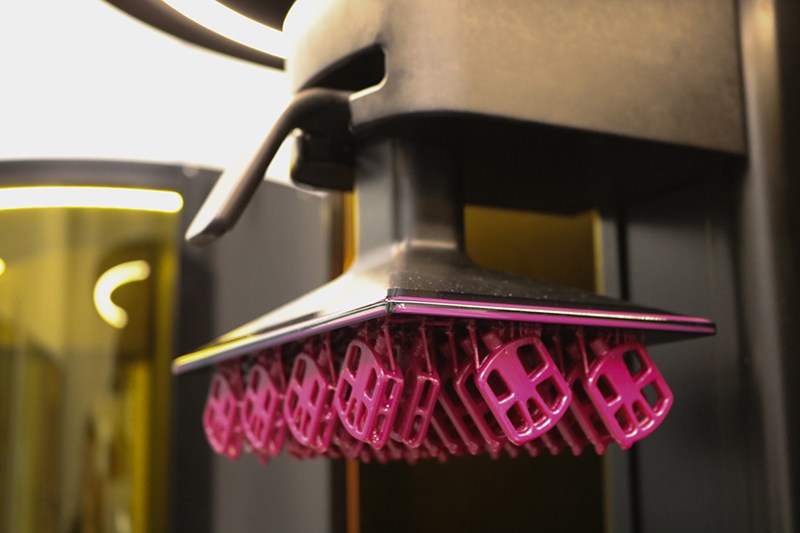
Phoenix Analysis and Design Technologies (PADT) has announced it’s opening a 3D printing factory, using Carbon’s Digital Light Synthesis technology and production system to create 2,000-5,000 parts on-demand weekly.
Phoenix Analysis and Design Technologies (PADT), the Arizona-based provider of Product Development and Rapid Prototyping services, has announced it’s opening an On-Demand Manufacturing facility with Carbon — believed to be a first in the Southwest of America.
PADT is a certified Production Partner of the Silicon Valley-based 3D printing company and manufacturer, Carbon. This new tie-up means that, using Carbon’s printers, PADT can create between 2,000 to 5,000 cost-effective, quality production plastic parts on-demand in one week.
Rey Chu, co-founder and principal of PADT, is excited by this prospect, saying: “Since we started in 3-D Printing almost 25 years ago, we have dreamed of the day that we could use additive manufacturing to move beyond prototyping and deliver production parts to our customers when they need them, the way they need them… Carbon’s (Digital Light Synthesis) technology has made this possible by giving us a faster process that creates parts with the same properties as injection molding.”
PADT Can Now Deliver 3D Printed Parts in Just One Week
PADT is using Carbon’s Digital Light Synthesis technology and production system. During the testing period, Eric Miller, principal and co-owner of PADT, said that the company could produce 20 parts every three hours with the three Carbon printers on site.
The production parts which will be printed by PADT include low volume, specialized components predominantly for the medical and automotive industries. The company explains that no molds are required thanks to 3D printing and fully-assembled complex shapes can be created in one go.
Miller adds that it’s now possible to 3D print parts as they’re needed, rather than in bulk. This means companies can order only as much as they need at any time. Better yet, they can expect to receive the parts in one week, rather than three months as with injection molding processes.
“Our goal is to deliver true, scalable digital fabrication across the globe, enabling creators to design and produce previously unmakeable products, both economically and at scale… PADT has a long history in the industry and a strong reputation for engineering excellence. We’re thrilled to have them as a certified Carbon production partner,” said Dana McCallum, head of Production Partnerships at Carbon.
PADT’s Digital Manufacturing Facility is now open, visit the website to find out more.
Während der Beyond Good and Evil 2 Demo auf der E3 2017 drehte sich alles um den Umfang und darum stufenlos zwischen dem detailierten Charakter, der Erkundung detailierter Tiefen eines kolonisierten Mondes, hin zum Orbit um selbigen wechseln zu können. Dieses Jahr durften wir einen Blick darauf werfen, was man so alles machen kann auf terrestrischer Ebene, Luftraum-Ebene und orbitaler Ebene. Den Anfang machte die Erkundung eines unterirdischen Tempels mit zwei Weltraumpiraten im Koop.
Als waschechtes Prequel zum ersten Spiel, ereignet sich alles in Beyond Good and Evil 2 gegen Ende des 24. Jahrhunderts im System 3, einem Sonnensystem das von diversen Siedlern der Erde kolonisiert wurde. Mit der Ankunft der ersten Menschen im System 3, mussten diese feststellen, dass sie sterilisiert wurden. Diese Tatsache zwang sie quasi dazu sich selbst und deren Mensch-Tier Hybridsklaven zu klonen. Sobald ihr also Beyond Good and Evil 2 startet werdet ihr erstmal festlegen müssen, wie euer geklonter Weltraum-Piratenkapitän eigentlich aussehen soll. Jeder Bewohner innerhalb des Systems stammt von einigen ganz bestimmten DNA-Strängen, welche die ersten Kolonisten auf die Erde brachten und genau diese werden jetzt von euch verwendet werden, um euren eigenen Charakter zu entwickeln. Beispielsweise sahen die beiden Piraten wesentlich anders aus als Shani und Knox die man aus den Trailern kennt. Trotz ihrer massiven Individualisierung entstammen sie alle den gleichen genetischen Klon-Linien.
Schauplatz ist Ganesha City – eine Metropole mit Hinduistischen Einflüssen innerhalb des neuen Kontinents Neu-Indien und dem Mond Soma, welcher in den Ausbezirken von System 3 den Gasplaneten Dyaus umkreist. Die Demo war ein kleiner Vorgeschmack auf eine Gesellschaft die eine Kombination aus mächtigen Korporationen, religiösen Einflüssen und der Umgebung selbst entstanden ist. Soma, beispielsweise befindet sich in einem synchronen Orbit um Dyaus, was bedeutet das eine Seite des Mondes stets dem Gasplaneten zugewandt ist. Dieser Umstand schützt die entsprechende Seite vor Verwüstungen durch Objekte aus dem All, erlaubt es dem Ökosystem zu erblühen und erweckt so innerhalb der Bevölkerung den Eindruck, dass die Götter ihnen wohlgesonnen sind. Die Seite die dem Weltraum zugewandt ist, besteht jedoch aus einer öden Höllenlandschaft die kontinuierlich mit Meteor-Einschlägen zu kämpfen hat.
Die Firmen, die System 3 kontrollieren, züchteten Hybrid-Sklaven, die für ganz bestimmte Aufgaben gedacht waren. Primaten beispielsweise wurden wortwörtlich für Minenarbeiten kreiert. Zusätzlich dazu konnte man sie unter Vortäuschung einer heiligen Mission in lebensfeindliche Bereiche schicken, um die Rohstoffe der Meteore zu bergen, während gleichzeitig das Gerücht gestreut wurde, dass jene die einen ganz bestimmten Edelstein finden, in die Freiheit entlassen werden. All das dient dazu die Sklaven in einem arbeitswilligen Zustand zu halten und damit auch unter Kontrolle – jener Kontrolle der die Weltraumpiraten ein Ende setzen wollen, indem sie mehrere Schiffe beanspruchen und Crews aus Gleichgesinnten Unruhestiftern zusammenstellen.
Um das jedoch bewerkstelligen zu können, benötigt man auch die entsprechende Feuerkraft, weshalb die Demo gleich mit einigen Scheinkämpfen unter zwei Piraten begann. Jeder vom Spieler kreierte Weltraumkapitän führt jederzeit vier Basis-Gegenstände mit sich: Eine Pistole, ein Schwert, ein Schild und ein Jetpack. Und alle können mit Augmentierungen ausgestattet werden – Spezialkernen die in der gesamten Welt verteilt sind und über die unterschiedlichsten Fähigkeiten verfügen, Einige der Spieler-gesteuerten Piraten führte beispielsweise eine Verlangsamung, Paralyse und Rückstoß-Effekte vor, während die beiden sich gegenseitig mit Schüssen durch den Raum jagten.
Nachdem sie sich aufteilten, um zwei unterschiedliche Richtungen abdecken zu können – schließlich muss man nicht ständig zusammen herumhängen, nur um gemeinsam spielen zu können – stießen die beiden Piraten auf einige Wissenschaftler und Soldaten die scheinbar gerade ein Experiment an einem festgebundenen Affen-Hybriden durchführten. Als sich die beiden Piraten auf einem Steg darüber befanden, zog einer der beiden schnell sein Fernrohr – das ähnlich wie Jades Kamera im ersten Beyond Good and Evil – einen Scan durchführen und allerhand Informationen über das anvisierte Objekt darstellen kann. Durch einen Blick auf die Leute unter uns, konnten wir beispielsweise deren Firmenzugehörigkeit sehen, erfuhren welcher Spezies sie anghören und natürlich auch für welche Firma sie arbeiten.
Als die Piraten dann aus verschiedenen Richtungen angriffen, begannen auch die Gegner sich in alle Richtungen aufzuteilen. Durch die Platzierung einer zylindrischen Verlangsamungsfalle, gelang es einem der menschlichen Piraten einen der Wissenschaftler zu fangen und jede Menge Schaden zu verursachen – der kurzerhand von dem zweiten Wissenschaftler geheilt wurde, wodurch wir erfuhren, dass wir zuerst diesen ausschalten müssen. Nachdem die beiden neutralisiert wurden, näherten sich die die Piraten nun den Soldaten um den übrigen Widerstand mit einer Kombination aus Schwert- und Schildangriffen zu brechen.
Nachdem der Raum gesäubert war, scannten die Piraten den gefangenen Hybriden – der zugegebenermaßen zwar noch lebendig, aber dennoch in keiner guten Verfassung war und erfuhren, dass dieser ursprünglich ein Mechaniker war. Solche Befreiungsaktionen sind aber nur eine der Möglichkeiten, um neue Rekruten anzuwerben und dadurch deren Fähigkeiten zur eigenen Crew hinzuzufügen.
Während ihrer Flucht durch den zum Labor umfunktionierten Tempel, entdeckten die beiden zwei Fahrzeuge, die auf sie zu warten schienen: Ein Hoverbike und ein kleiner Starfighter. Der Chimpansen-Pirat nahm im Starfighter Platz und machte sich aus dem Staub. Währenddessen hüpfte der menschliche Pirat auf das Hoverbike und ging in Ganesha City auf Erkundungstour. Aufgrund der religiösen Wurzeln finden sich innerhalb der Stadt jede Menge hinduistische Symbole und Wandbilder. Unglaublich vielschichtig gebaut, sieht man in der für Flugverkehr optimierten Stadt zwar gigantische Wolkenkratzer, aber auch Barackensiedlungen am Erdboden wo die Ärmsten der Armen ihr Dasein fristen, während die Reichen sowie die religiöse Klasse an der Spitze der Gebäude leben.
Alles in Ganesha City und auch dem Rest von System 3 lebt nach seinen eigenen Regeln, selbst dann wenn man nicht dort ist, was es zu einem dynamischen Ort voller Gelegenheiten für einen unternehmungsfreudigen Piraten macht. Oben bieten sich beispielsweise gleich mehrere Gelegenheiten, um Unruhe zu stiften. So wartet dort beispielsweise ein Polizeipräsidium, wo man inhaftierte Piraten befreien und anschließend zur eigenen Crew hinzufügen könnte. Oder gar eine Bank, deren Tresorinhalt sich wunderbar in Augmentierungen oder kosmetischen Objekten im nahegelegenen Store umsetzen lassen würde. Während eurer Fahrten könnt ihr auch den Klängen von Radio Cheetah lauschen, dem Piratensender dessen DJ niemand anderer ist als Knox, der Chimpansen-Hybrid der innerhalb beider Trailer zu sehen war.
Zurück beim Starfighter (und damit zu den vielen Arten wie auf die dieser sich individualisieren lässt z.B. durch Austausch der Flügelkonfigurationen oder kosmetischen Mustern), schloss sich der menschliche Pirat nun seinem Partner an, der sich wiederrum gerade in einem Dogfight mit einigen Cops oberhalb einer gigantischen Ganesha Statue befand. Nachdem sie gemeinsam Dank der augmentierten Raketen und Maschinengewehren ihre Kontrahenten vom Himmel geholt haben, flüchteten sie nach Ganesha City, durchbrachen die Atmosphäre, beschleunigten auf Hypergeschwindigkeit und liessen die Metropole auf dem Planeten wie ein Staubkorn hinter sich. All das, von den Kämpfen, über die Erkundung bis hin zum Aufbruch zu den Sternen auf orbitaler Ebene, geschah ohne einen Ladebildschirm oder sonstigen Übergang.
Nachdem er sich erfolgreich mit dem im niedrigen Orbit schwebenden Mutterschiff getroffen hat, parkte er sein Schiff und kletterte hinaus – geschützt durch eine Art Kraftfeld-gestützten Raumanzug. Als sie durch ihr Fernrohr sieht und den Zoom verwendet, kann man die Wolkenkratzer der Stadt und die entsprechenden Informationen darüber klar sehen. Anschließend richtet sich ihre Aufmerksamkeit auf eine Nazca-ähnliche Formation eines Affen auf der Oberfläche des Planeten, doch dessen Bedeutung, wollen uns die Entwickler derzeit noch nicht verraten.
Zum Abschluss wechselt die Ansicht auf den Galaxy-Monitor – eine Art digitale Karte über welche die Spieler die Oberfläche von Soma aber auch andere nahegelegene Planeten auf wichtige Punkte von Interesse untersuchen können, sowie nach einem Zoom einen Blick auf das gesamte System 3 und dessen Stern Surya in dessen Mittelpunkt werfen können. All das wird ab dem Verkaufsstart von Beyond Good and Evil 2 frei erkundbar sein. Weitere Informationen findet ihr auch in unseren bisher veröffentlichten E3 2018 bezogenen Artikeln.
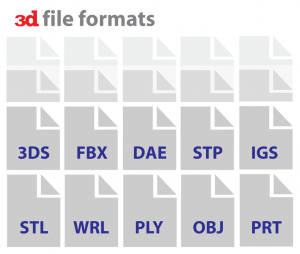
Which 3D file formats are there? How do they compare? What should you use? We simply explain the 8 most common 3D file formats used today: STL, OBJ, FBX, COLLADA, 3DS, IGES; STEP, and VRML/X3D.
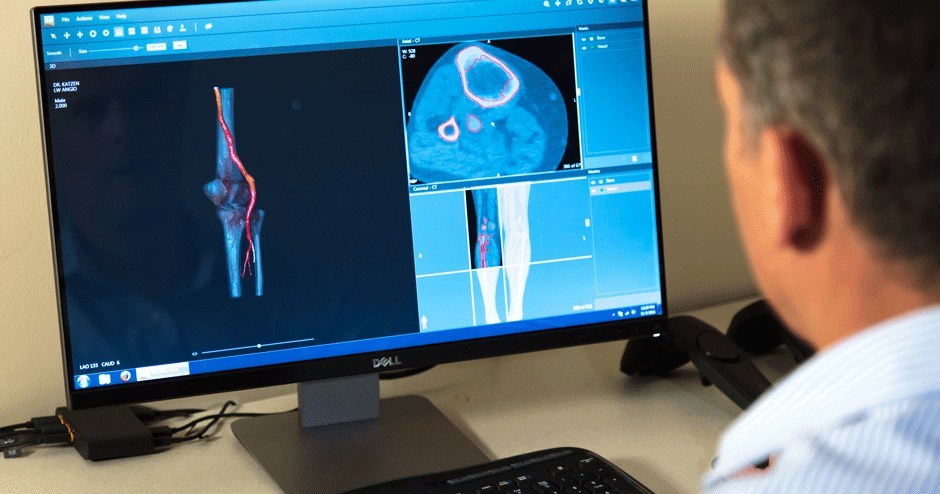
A 3D file format is used for storing information about 3D models. You may have heard of the most popular formats STL, OBJ, FBX, COLLADA etc. They are widely used in 3D printing, video games, movies, architecture, academia, medicine, engineering, and earth sciences. Each industry has its own popular 3D file formats for historical and practical reasons. We will learn about 3D file formats and take a deep dive into the 8 most common 3D file formats in this article.
A 3D model of a pigeon which contains color information, light sources (notice the shadow) and animations
The basic purpose of a 3D file format is to store information about 3D models as plain text or binary data. In particular, they encode the 3D model’s geometry, appearance, scene, and animations.
The geometry of a model describes its shape. By appearance, we mean colors, textures, material type etc. The scene of a 3D model includes the position of light sources, cameras, and peripheral objects. Finally, animation defines how a 3D model moves.
However, not all 3D file formats store all of this data. 3D file formats such as STL store only the 3D model’s geometry and ignores all other attributes. On the other hand, the format COLLADA stores everything.
STL and COLLADA are just two of the many 3D file formats that people use. We estimate that there are hundreds of 3D file formats currently being used in the wild!
How Many 3D File Formats are there?
There are hundreds of 3D file formats
The problem with 3D file formats is that there are literally hundreds of them. Every CAD software manufacturer such as AutoDesk and Blender has their own proprietary format which is optimized for their software. So if you use AutoCAD, you get a DWG file. If you use Blender, you get a BLEND file.
Proprietary 3D File Formats Hinder Interoperability
However, the presence of so many proprietary file formats is a big problem. Suppose you use AutoCAD (which is an AutoDesk product) and your friend uses Blender. Suppose that you also want to share your 3D model with your friend.
This is not so easy. Your AutoCAD software gives you a DWG file because it is the native AutoCAD format. But your friend’s software, Blender, can only work with a BLEND file. This means that the two of you cannot work on the same 3D model.
Neutral 3D File Formats Solve this Problem
You often need to share your 3D models with your clients, collaborators and machines. Neutral formats are perfect for this task.
To solve the problem of interoperability, neutral or open source formats were invented as intermediate formats for converting between two proprietary formats. Naturally, these formats have become hugely popular now.
Two famous examples of neutral formats are STL (with a .STL extension) and COLLADA (with a .DAE extension). They are widely used to share models across CAD software. If you want to share your 3D model, you convert the DWG file to a COLLADA file in a process called exporting and give your friend the COLLADA file. Your friend takes the COLLADA file and imports it into Blender, where the COLLADA file is converted to the native BLEND format. This way, you can continue to use different software and collaborate with others.
Proprietary vs. neutral is one of the most important dichotomies in the world of 3D file formats. Nowadays, most 3D modeling software supports reading and writing popular neutral formats. In addition, most software also support reading and writing to a subset of proprietary formats that are so popular that they cannot be ignored. We will discuss 8 such 3D file formats in this article. Here is the list, where the 3D file formats are marked with their type.
But before we discuss each these formats in detail, we will first take a look at the general features of a 3D file format and discuss the important things you should keep in mind when selecting a format for your project.
General Features of 3D File Formats
As we discussed earlier, the general features of a 3D file format are:
1. 3D File Formats: Encoding Geometry of the 3D Model
Every 3D model has a unique geometry and the capability of encoding this geometry can be considered to be the most basic feature of a 3D file format. Every 3D file format supports this — otherwise, they wouldn’t be considered 3D file formats.
There are three distinct ways of encoding surface geometry, each with their corresponding strengths and weaknesses. They are called approximate mesh, precise mesh and constructive solid geometry (CSG).
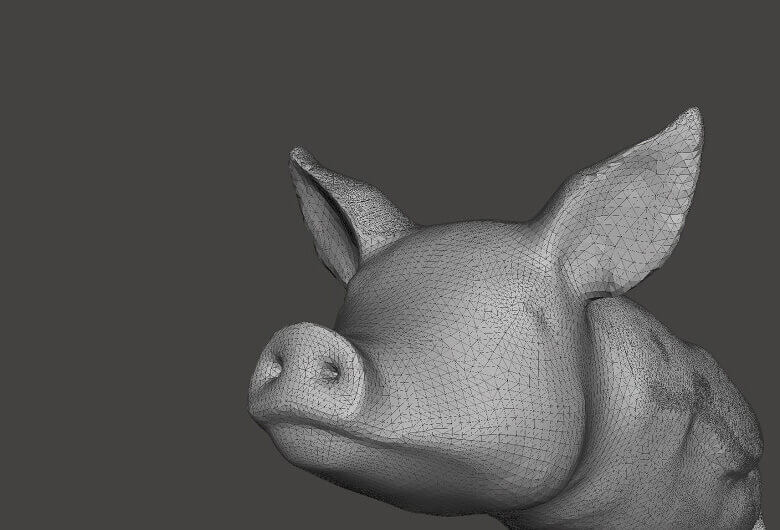
1.1 3D File Format Geometry: The Approximate Mesh
The fine triangular mesh is approximately encoding the surface geometry of this 3D model (source: i.materialize)
In this encoding, the surface of a 3D model is first covered with a mesh of tiny imaginary polygons. Triangles are most commonly used shape. The vertices of the covering triangles and the outward normal vector to the triangles are stored in the file. This represents the surface geometry of the target model.
The vertices and the normal to each triangular facet making up the mesh is stored in the file.
The process of covering a surface with non-overlapping geometric shapes is also known as “tessellation”. Hence these file formats are also called tessellated formats.
The triangles approximate the smooth geometry of the surface. Hence this is an approximate format. The approximation gets better as the triangles get smaller. However, the smaller the triangles, the larger the number of triangles you need to tile the surface. This implies that the file needs to store a larger number of vertices and normal vectors. Thus better approximations come at the cost of increasing file size.
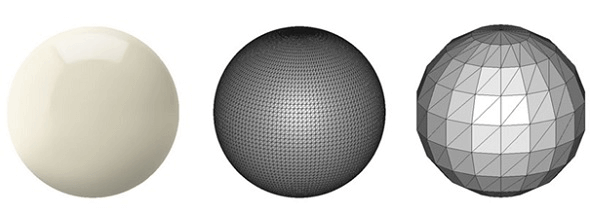
The perfect spherical surface on the left is approximated by tessellations. The figure on the right uses big triangles, resulting in a coarse model. The figure on the center uses smaller triangles and achieves a smoother approximation (source: i.materialize)
Approximate or tessellated formats are best used in situations where you don’t need ultrafine resolutions of the 3D model. A good example is 3D printing. 3D printers cannot print beyond a certain resolution and therefore, this type of 3D printing file formats are perfect for the job. In fact, the most popular 3D printing file format STL indeed belongs to this class of file formats.
1.2 3D File Format Geometry 2: The Precise Mesh
An example of NURBS patches encoding a curved surface geometry precisely. The red dots are the control points of the NURBS.
There are, of course, situations where an approximate encoding of the 3D model is not enough and one needs precise encoding of the surface geometry. For example, when constructing the body of an airplane, in particular the round hull, a discrete polygonal mesh won’t work. Although the model might look good at small resolutions, the flat faces and sharp corners will become apparent up close.
Precise file formats get around this problem by using Non-Uniform Rational B-Spline patches (or NURBS) instead of polygons. These parametric surfaces are made up of a small number of weighted control points and a set of parameters called knots. From knots, a surface can be computed mathematically by smoothly interpolating over the control points.
These surfaces look smooth in any scale and can replicate the surface geometry of a small part of a 3D model in exact detail. However, there’s always a trade off. While the precise mesh is exact at any resolution, they render slower and should be avoided in applications where speedy rendering is important.
1.3 3D File Format Geometry 3: Constructive Solid Geometry aka CSG
Finally, there’s yet another type of file format that does not involve meshes at all. In this format, 3D shapes are built by performing boolean operations (addition or subtraction) of primitive shapes like cubes, spheres etc. For example, to make a dumbbell, one can simply take two spheres and add a connecting cylindrical rod between. If you have ever used a CAD software, then you have seen this in action, because most of them use this principle.
Constructive solid geometry in action during the construction of a dumbbell in Tinkercad
Constructive solid geometry is great for designing 3D models and is very user-friendly. Another big advantage is that each individual editing step (addition, subtraction, transformations of primitive shapes) is stored in this 3D file format. Therefore, one can undo and redo any step at any time.
Clearly, if you convert this format to a mesh-based format, you will lose the information about the individual editing steps.
2. 3D File Formats: Appearance
The second important feature of 3D file formats is the ability to store appearance related information. In many applications, the appearance of the 3D model is of prime importance. For example, no one wants to play Need For Speed with dull, colorless cars. The cars better be colorful and shiny! The color and shine of a car are examples of appearance related properties. In simple terms, appearance describes surface properties such as material type, texture, color etc. This decides how the model looks like when it is rendered.
Information about appearance can be encoded in two different ways.
2.1 3D File Format Appearance: Texture mapping
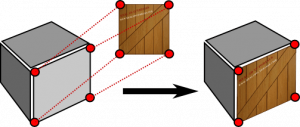
Illustration of how texture mapping is used to encode color and texture information of one side of a cube
In texture mapping, every point in the 3D model’s surface (or the polygonal mesh) is mapped to a 2-dimensional image. The coordinates of the 2D image have attributes like color and texture. When rendering the 3D model, every surface point is assigned a coordinate in this 2-dimensional image. The vertices of the mesh are mapped first. The other points are then assigned coordinates by interpolating between the coordinates of the vertices.
Most 3D file formats support texture mapping. In this case, the 2D image containing texture information needs to be stored within the same file or separately in a different file.
2.2 3D File Format Appearance: Face attributes
Another common way of storing texture information is to assign each face of the mesh a set of attributes. Common attributes include color, texture and material type.
In addition, a surface can have a specular component indicating the color and intensity of true mirror reflections of light sources and other nearby surfaces. Surfaces can be transparent or semi transparent. This is encoded by a transmissive component describing the color and intensity of light that passes through the surface. Transparent surfaces usually distort light passing through them. This distortion is represented by an index of refraction property, associated with the model’s material type.
A transparent 3D model of a chair. The transparency is encoded as a property of each individual facet.
3.3D File Formats: Scene information
The capability of encoding information about the scene is another important feature of some 3D file formats. The scene describes the layout of the 3D model in terms of cameras, light sources, and other nearby 3D models.
The camera is defined by four parameters: magnification and principal point, location, the direction the camera is facing and an arrow indicating which direction is “up”.
The encoding of the light source depends on the nature of the light source. In the simplest case of a point source, we simply need to store the source’s location, its color, and its intensity.
Some 3D file formats have the capability to encode information about lights, as shown in this image.
The spatial relationship between the 3D model and other nearby models is also sometimes stored. This is particularly important if the model is made of several parts, which needs to be laid out in a certain way to make up the scene.
It is worth noting that most 3D file formats often do not support scene information. This stems from practical reasons. When it comes to layout, one can always ensure that the parts of the model are placed in the correct location before saving the model. In this case, the file format does not need to explicitly define the relationships between the parts. The camera and light attributes can also be ignored since it is expected that the end users will change the camera position anyway as they navigate around a scene.
4. 3D File Formats: Animation
Some 3D file formats have the capability to store animations of a 3D model. This is very useful in game designing or movie making where animations are used heavily.
4.1 3D File Format Animation: Skeletal animation
The most popular way of animating a 3D model is called “skeletal animation”. In skeletal animation, each model is associated with an underlying skeleton. The skeleton is made out of a hierarchy of virtual “bones”. The movement of bones higher in the hierarchy (parent bones) affect the bones lower in the hierarchy (child bones). This is similar to the human body, where a movement of the shin bone affects the position of the toes.
It is important to understand that these bones are not real bones, but merely mathematical constructs that help an animator define movements in a model. The bones are typically represented by a 4×3 matrix where the first three columns represent rotation, scale, and shear of the bone. The last column is the translation relative to the parent’s world space.
In addition to the transformation, each bone is given a unique ID and is associated with a subset of the mesh encoding the surface geometry. This subset moves along with the virtual bone.
Bones are connected by “joints”. Joints introduce constraints in the possible transformations associated with a bone, thereby restricting how a bone can move in relation to its parent. This is again similar to the human body – the elbow may only rotate around a specified axis while the ball joint between the thigh and pelvis allow rotation around all axis.
Here is a cool and short video explaining how bones and joints can be used to create basic animations in Cinema4D.
4.2 3D File Format Animation: Techniques of animation
There are many different techniques of storing animations of skeletal structures. The most important techniques are forward kinematics, inverse kinematics, and keyframes. You can read much more about animation techniques and encodings in this Bachelor thesis by Marcus Lundgren.
Which 3D File Format Should you use for Exporting and Sharing your Model?
We are now in good position to answer this question.
Every 3D modeling software allows exporting into many different 3D file formats. However, which one you choose for your application depends a lot on which features you need for your work and the software you are going to use. Since we are now familiar with the different features of 3D file formats, we are ready to take an abstract look at the different considerations that goes behind the choice of a particular file format. There are three major considerations.
1. 3D File Formats: Which Features do you Need?
3D file formats are used in many different sectors and industries and each has their own specific needs and requirements. Depending on which industry you are in, you might want different sets of features in your ideal 3D file format. To explain what we mean, let’s discuss three major industries using 3D file formats.
1.1 3D File Formats for 3D Printing
The 3D printing industry uses approximate file formats. Capability for storing appearance is required in some cases.
In 3D printing, high precision is not a requirement because the current printers cannot print beyond a certain resolution. Therefore, file formats using the approximate encoding of the surface geometry are ideal for the job. STL is such a file format and is the most popular 3D printing format to date.
STL, however, cannot store information related to appearance. So if you want to print a multicolor model, then you can’t use STL anymore because it cannot store color or material related information. There are other file formats such as OBJ or AMF which can store appearance related information. Thus these formats (OBJ being the most popular) are the best choice for multi-color models.
1.2 3D File Formats for Graphics Based Applications (Games and Movies)
Games require fast rendering, support for rich color and textures, and animation.
In graphics based applications, the requirements are different from 3D printing. Since we are way past the black and white era, 3D models used in games and movies require rich colors and texturing. Games and movies also need to support animation. In addition, all graphics based applications usually demand high rendering speeds. Therefore, the best formats for this kind of job would be something that uses approximate geometry to achieve fast rendering, can encode appearance and support animation. The FBX and COLLADA formats check all these boxes and hence are ideal for graphics applications.
1.3 3D File Formats for High-Precision Engineering
3D modeling in the area of aeronautics engineering requires precise encoding of surface geometry
The name says it all. In the discipline of high precision engineering such as aerospace engineering, the 3D models need to be smooth and precise at any scale. Therefore, formats using precise geometry such as IGES or STEP are going to be the best fit for this task.
Since the features of a 3D file format is a crucial consideration in identifying the ideal format, we have provided a table of features supported by the top 8 3D file formats in the appendix to this article. You can take a look at it when you need to make a decision.
2. Which Software Pipeline are you Going to Use?
The next important consideration is the software pipeline that you will use for your task. Not all software support importing and exporting of all 3D file formats. You should choose a file format that is supported by your software of choice.
For your reference, we have included a table of file formats supported by the commonly used 3D modeling software and engines in the second appendix to the article. This is another resource you can consult when deciding on a file format.
Market share of the most popular 3D modeling software
3. Which Software does your collaborator use?
The file format that you choose not only needs to fit into your pipeline, but also into your collaborator’s pipeline. If you know your collaborators, ask them what they use and discuss which file formats fits well into both your and your collaborator’s workflow.
If you don’t know your collaborators, then it’s best to play it safe. Just choose the most popular format that satisfies the previous requirements. It’s best if the format is neutral and not proprietary.
Top 8 3D File Formats in Detail
So far, we have discussed 3D file formats at an abstract and high level. We have discussed the different features that 3D file formats implement and how you can pick the ideal 3D file format based on this knowledge. Now, let’s take a look at the 8 most important 3D file formats and find out which of these features they support, how popular they are and which industries use them the most.
If you are looking for information about a certain 3D file format, you can skip the others and jump right to that 3D file format.
STL (STereoLithography) is one of the most important neutral 3D file formats in the domain of 3D printing, rapid prototyping, and computer aided manufacturing. It is native to the stereolithography CAD software made by 3D Systems. The corresponding file extension is .STL.
STL is one of the oldest 3D file formats and was created in 1987 by Chuck Hull, who is currently the CTO at 3D Systems. He also invented the world’s first stereolithographic 3D printer. The STL file format was created subsequently as a simple way of transferring information about 3D CAD models to this 3D printer.
Main characteristics
STL encodes the surface geometry of a 3D model approximately using a triangular mesh. Since it was one of the first 3D file formats to exploit tessellations as a way of encoding surface geometry, it has several backronyms such as “Standard Tessellation Language” and “Standard Triangle Language”.
STL ignores appearance, scene, and animations. It is one of the simplest and leanest 3D file formats available today. The STL format specifies both ASCII and binary representations. Binary files are more common since they are more compact.
Popularity and future prospects
Ever since its invention, the STL file format has been rapidly adopted by the rapid prototyping, 3D printing, and computer-aided manufacturing industries. It is still the most widely used file format in 3D printing.
The reign of STL over 3D printing might end soon, however. In recent years, 3D printing technology has advanced rapidly. The fidelity of printing processes are now reaching micron level accuracy. Since STL is an approximate format, it needs very small triangular facets to reach this resolution, producing huge and unwieldy files in the process. Secondly, many 3D printers now allow printing in full color, a technology that’s expected to become more widespread in the near future. STL can’t encode color information and is useless for this purpose. For these reasons, the reign of STL over the 3D printing world may not last long and formats like OBJ, 3MF, or AMF might replace it.
The OBJ file format is another neutral heavyweight in the field of 3D printing. It is also widely used in 3D graphics. It was first developed by Wavefront Technologies for its Advanced Visualization animation package. The 3D file format has the extension .OBJ.
Main characteristics
The OBJ file format supports both approximate and precise encoding of surface geometry. When using the approximate encoding, it doesn’t restrict the surface mesh to triangular facets. If the user wants, he can use polygons like quadrilaterals. When using precise encoding, it uses smooth curves and surfaces such as NURBS.
The OBJ format can encode color and texture information. This information is stored in a separate file with the extension .MTL (Material Template Library). It does not support any kind of animation. The format specifies both ASCII and binary encodings, but only the ASCII encoding is open source.
Popularity and future prospects
The OBJ file format, by virtue of being neutral or open, is one of the most popular interchange formats for 3D graphics. It is also gaining traction in the 3D printing industry as the industry moves towards full color printing.
FBX is a proprietary file format which is widely used in the film industry and video games. It was originally developed by Kaydara but was bought by Autodesk in 2006. Ever since the acquisition, AutoDesk has used FBX as an interchange format for its own portfolio which includes AutoCAD, Fusion 360, Maya, 3DS Max and other software packages.
Main characteristics
The FBX file format supports geometry and appearance related properties like color and textures. It also supports skeletal animations and morphs. Both binary and ASCII files are supported.
Popularity and future prospects
FBX is one of the most popular choices for animation. In addition, it is also used as an exchange format which facilitates high fidelity exchange between 3DS Max, Maya, MotionBuilder, Mudbox and other proprietary software.
Collada is a neutral file format used heavily in the video game and film industry. It is managed by the non-profit technology consortium, the Khronos Group. The file extension for the COLLADA format is .DAE.
Main characteristics
The COLLADA format supports geometry, appearance related properties like color, material, textures, and animation. In addition, it is one of the rare formats supporting kinematics and physics. The COLLADA format stores data using the XML markup language.
Popularity and future prospects
The original intention behind the COLLADA format was to become a standard among 3D file formats. Indeed, in 2013, it was adopted by ISO as a publicly available specification, ISO/PAS 17506. As a result of this history, lots of 3D modeling software support the COLLADA format.
However, the consensus is that the COLLADA format hasn’t kept up with the times. The COLLADA format was once used heavily as an interchange format for Autodesk Max/Maya in the film industry, but the industry has now shifted more towards OBJ, FBX, and Alembic.
Which industries use it?
Film industry, video game industry. For more information about the COLLADA file format, see the official docs from the Khronos Group.
3D Files Format #5: 3DS
3DS is a proprietary file format used in architecture, engineering, education, and manufacturing. It is native to the old Autodesk 3D Studio DOS, a popular modeling software which was later replaced by its successor 3D Studio MAX in 1996. Developed in the 90s, it is one of the oldest 3D file formats. It has become one of the de facto industry standards for storing 3D models or for interchanging between two other proprietary formats.
Main characteristics
The 3DS file format retains only the most basic information about geometry, appearance, scene, and animation. It uses a triangular mesh to encode the surface geometry approximately, the total number of triangles being limited to 65536. It stores appearance related properties like color, texture, material, transmissivity etc. Scene information such camera position, lights can also be stored, but the format does not support directional light sources.
The 3DS format specifies a binary encoding and stores information in chunks. This allows parsers to skip chunks they don’t recognize and allows for extensions to the format.
Popularity and future prospects
Being one of the oldest file formats, 3DS has become a standard for storing 3D models and interchanging between other 3D file formats. Virtually all 3D software packages support it. However, since this format retains only the most basic information about the 3D model, it cannot be used in situations where one does not want to lose information. In this case, this format needs to supplemented by the MAX format (now superseded by the PRJ format), which contains extra information specific to Autodesk 3DS Max, to allow a scene to be completely saved/loaded.
IGES (pronounced eye-jess) is a neutral old timer used primarily in the defense industry and in the field of engineering. It was developed in the mid-seventies by the US Air Force.
Back in those days, the Air Force used to waste a lot of time in the tedious process of sharing and converting data between proprietary systems used by its suppliers. The situation was especially bad with larger projects like aircraft carriers or missile delivery systems involving hundreds of suppliers. The IGES format was developed by the Air Force in partnership with Boeing and others in order to serve as an interchange format that can be shared across all CAD systems. Since the 80s, the US Department of Defense has required that all defense and weapons contracts use IGES as the standard file format. The file extension corresponding to the IGES format is .IGS or .IGES.
Main characteristics
The IGES format is an ASCII encoding that is extremely flexible when it comes to representing surface geometry. It has the ability to use circuit diagrams, wireframes, precise free-form surfaces or CSG for storing geometry related information. The format can also store colors but does not support material properties like textures, material type etc. Animation is also not supported.
Popularity and future prospects
IGES has enjoyed widespread popularity ever since it was invented in the 70s. It has been adopted as a national standard in many countries such as UK and Australia. Virtually all CAD software supports it.
The IGES file format is no longer developed, and yet it is still widely used to transfer data between CAD, CAM, and CAE software programs. It is a popular choice for 3D modeling, creation of technical drawings, and product design. It has the reputation of being a good choice for amateurs in 3D; professional 3D artists now prefer its successor STEP.
Which industries use it?
Defense, engineering
3D Files Format #7: STEP
STEP (The Standard for the Exchange for Product Data) or ISO 10303 was developed as a successor of the IGES file format. It is widely used in engineering related fields like automotive and aeronautic engineering, building construction etc. The corresponding file format is .STP.
The officially stated objective of developing STEP was to create a mechanism that is capable of describing product data throughout the life cycle of a product, independent from any particular system. However, due to the complexity and size of the original standard, it has been later broken down into smaller, modular specifications in four major releases.
Main characteristics
The STEP format supports all the features supported by the IGES format. In addition, it can also encode topology, geometrical tolerances, material properties like textures, material types, and other complex product data.
Popularity and future prospects
STEP, like IGES, is a popular format for interchange of data between CAD, CAM and CAE software programs. For compatibility, it is still advisable to use IGES as it is the more common format and more likely to work with the receiving party’s software. However, for use cases where one needs to transfer information related to the model’s appearance, tolerances of the parts etc., STEP is the right format.
Which industries use it?
Engineering e.g. automotive, aerospace, building construction etc.
The last 3D file format we will discuss is VRML and X3D. VRML (pronounced vermal and having the file extension .WRL) stands for Virtual Reality Modeling Language. It is a 3D file format that was developed for the World Wide Web. It has been succeeded by X3D.
The term VRML was first coined in a paper by Dave Raggett titled “Extending WWW to support Platform Independent Virtual Reality” submitted to the first First World Wide Web conference in 1994. It took three more years till a mature version of the format VRML97 was created and became an ISO standard.
VRML97 was used in some personal homepages and 3D chatting sites such as “CyberTown”. However, the format failed to gain any significant adoption. In addition, VRML’s capabilities remained stagnant while realtime 3D graphics improved fast. Eventually, the VRML consortium changed its name to the Web3D Consortium and started developing the successor of the VRML format X3D, which was released in 2001.
Main characteristics
X3D is an XML based 3D file format. It supports all features of the VRML format along with some additions.
The VRML format uses a polygonal mesh to encode surface geometry and can store appearance related information such as color, texture, transparency etc. The X3D format adds NURBS encoding of the surface geometry, the capability of storing scene related information and support for animation.
Popularity and future prospects
The goal of X3D is to become the standard 3D file format for the web. In particular, X3D applets can run within a browser and display content in 3D using the OpenGL 3D graphics technology. X3D was also designed to integrate seamlessly with HTML5 pages much like the SVG format for images. However, till date, the format has not received wide acceptance.
We have learned quite a bit about 3D file formats in this article. We discussed how and why there are hundreds of formats and how they can be classified into two broad categories: proprietary and neutral. Next, we explored the most important features of a 3D file format and provided tips on how you can choose the ideal format for your application. We wrapped up with a discussion of the 8 most important 3D file formats, focusing on their features, popularity and use cases. The appendix has a wealth of information about the compatibility of these 3D file formats with the most popular 3D modeling software and engines. It also has a table for comparative analysis of the feature sets of these 3D file formats.
We hope you enjoyed this article. Share it with your friends who are interested in the world of 3D modeling, game development, special effects, engineering, architecture and 3D printing. If you have any question, opinion or feedback, please share it with us in the comment section.
Appendix
1. Feature matrix of the 8 most popular 3D file formats
Green indicates supported, red indicated not supported
File format
Geometry
Appearance
Scene
Animation
Approximate mesh
Precise mesh
CSG
Color
Material
Texture
Camera
Lights
Relative positioning
STL
OBJ
FBX
COLLADA
3DS
IGES
STEP
X3D
2. Import/Export support in popular 3D modeling software and engines
Since the General Motors Lansing Delta Township assembly plant bought a $35,000 3D printer, they’ve seen savings of €300,000 in two years. However, the company expects to see savings of millions of dollars in the future as it standardizes the technology throughout its plants across the globe.
All over the world, companies are relying on 3D printing to help speed up production and save money. General Motors (GM), the American multinational automaker, is no different.
Since the company employed 3D printing, it has been able to streamline operations as well as save money. Most of GM’s factories already have 3D printers but the company is now expanding on this since noticing just how much money the technology can save.
In fact, a 3D printer which cost $35,000 two years ago at GM’s Lansing Delta Township plant (which produces the Buick Enclave and the Chevrolet Traverse) has saved the company over $300,000. The printer was used to create tools and other accessories, explains Zane Meike, the additive manufacturing lead at the facility.
Dan Grieshaber, GM’s director of global manufacturing integration adds: “We’re quickly evolving, creating real value for the plant… This will become, as we progress, our footprint. We’ll have this in every one of our sites.”
Savings from tools and prototyping can make a huge difference to a global manufacturing footprint. By purchasing a 3D printer for every site, the company believes it’ll see even bigger savings in the coming years.
Spending $35,000 to Save $300,000
Of course, for a company such as GE, $35,000 isn’t a huge investment. But, the savings that the technology offers aren’t to be sniffed at. For example, the company was paying a third party $3,000 for a tool to align engine and transmission vehicle ID numbers. However, they’ve since found this part can be 3D printed for less than $3.
The Lansing Delta Township plant initially bought the 3D printer to create kitting boxes for parts. But, it wasn’t long before the machine was printing a whole range of different items due to employee requests.
Items being printed aren’t only helping the company save money, they’re also improving safety. For example, a few safety prints include socket covers and hangers for parts.
Grieshaber adds that the company is working on standardizing the 3D printing throughout all of its plants. The implementation of this technology is an important part of a bigger project which GM calls “smart manufacturing” or “Manufacturing 4.0”.
For this, a range of new tools and manufacturing processes are also being implemented. Think collaborative robots which work safely around humans, drones, and big data.
Want to find out more about 3D printing at GM? Check out how they’re working with Autodesk to create lighter vehicles in the video below or on All3DP.
On Monday, we welcomed TheWaveVR to Oculus Rift. Since then, we’ve seen rave reviews (pun intended), with members of the Rift community calling it “my favorite VR experience” and “some next level sh1t.” And now, this immersive music platform takes another innovative step forward with the release of See Without Eyes—a brand-new album and live show from cutting-edge electronic artists The Glitch Mob you can experience on Rift for free, starting today at 7:00 pm PT!
“We are excited to present the See Without Eyes VR Experience in partnership with TheWaveVR and Strangeloop Studios,” The Glitch Mob says. “This is a completely new way to experience music. We cannot wait for you all to take this journey with us.”
During a 20-minute custom mix of the band’s third studio album, you’ll explore a number of shifting environments while interacting with other people on both Rift and HTC Vive. Those without VR headsets can also join in the fun with Facebook Live. Once the live show is complete, fans will be able to revisit a looped version of the experience in TheWaveVR at any time.
“Imagine being able to fly through fantastical dreamscapes made from The Glitch Mob’s music alongside your friends- or meet people from around the world,” explains TheWaveVR CEO and Co-Founder Adam Arrigo. “In The Glitch Mob VR experience, players literally embody the cosmos while they create parts of the light show as the audience. Part concert, part film, part rave, part art installation, the only way to understand it is to put on the headset and take the trip.”
Clear your living room and get the dance party started when The Glitch Mob drops the bass in TheWaveVR, tonight at 7:00 pm PT on Rift!
In Trials Rising macht es fast so viel Spaß zu gewinnen, wie zu verlieren. Wie bereits in den bisherigen Trials Spielen, geht es auch diesmal wieder darum knackige Herausforderungen zu meistern, während ihr durch total durchgeknallte Motorradstrecken brettert, die Physik eures fahrbaren Untersatzes vorsichtig ausbalanciert um gefährliche Sprünge schaffen zu können, euch ganz knapp an nahen Hindernissen vorbei mogelt und von einer kleinen Plattform zur anderen hechtet. Der größte Spaß sind aber nach wie vor die vielen beschämenden Arten auf die man bei dem Versuch die Herausforderungen zu überwinden, das Zeitliche segnen kann. In Trials Rising macht es dank besonders großzügig gesetzter Checkpoints und asynchronen Wettkämpfen mit diversen Mitspielern, besonders viel Spaß deren Ghosts dabei zu beobachten, wie sie gnadenlos versagen. Einen lokalen Koop-Modus gibt’s zudem noch oben drauf und der lässt euch mit einem weiteren Mitspieler ein Tandem-Motorrad steuern.
Die neuen Strecken führen euch durch die gesamte Welt und reichen von maroden Motocross-Strecken bis hin zu den wesentlich anspruchsvolleren, unfassbar hohen Todesfallen, die man in einem Trials Spiel mit Schauplätzen wie dem Yellowstone Nationalpark (inkl. explosiver Geysiere), dem Eiffelturm, Pripyat – dem ägyptischen Tal der Könige und sogar dem Mount Everest erwarten würde. Während ihr euch erfolgreich von einer Strecke zur Nächsten kämpft, wird euer Fahrer über das Karriere-Fortschritt-System immer weiter aufsteigen und so auch die Aufmerksamkeit von Sponsoren auf sich ziehen. Sobald euch das gelungen ist, werden euch auch Strecken mit einem Ausrufezeichen-Symbol auf der Karte angezeigt, die bedeuten, dass dort ein Vertrag auf euch wartet. Verträge sind Bonus-Herausforderungen bei denen ihr beispielsweise die Punktzahl eines Spielers schlagen oder bestimmte Medallien verdienen müsst. Schafft ihr es diese Herausforderungen zu meistern indem ihr die Ziele erreicht, warten neben EP-Boni auch Ingame Währung und kosmetische Objekte auf euren Fahrer und euer Fahrzeug.
Sollten euch die Solo-Fahrten noch nicht herausfordernd genug sein, so könnt ihr die Grenzen eurer Freundschaft austesten, indem ihr euch auf eine Runde Tandem im Koop-Modus einlasst. Und das ist genau wonach es sich anhört: Ihr und euer Freund werdet zusammen auf einem Tandem-Motorrad Platz nehmen und zusammen die Balance halten müssen. Nur so wird es euch gelingen, nicht abzustürzen während ihr euch durch Ringe arbeitet, spitze Anhöhen erklimmt oder Flips während eines langen Sturzes vollführt. Wer hier kein gutes Timing und die bereits erwähnte Balance vorweisen kann, der wird öfter als ihm lieb ist auf die Nase fliegen – aber auch das gehört zum Spaß dazu.
Trials Rising wird im Februar 2019 für die Nintendo Switch, PS4, Xbox One und den PC erhältlich sein. Weitere Details zu diesem Spiel und vielen weiteren E3 Ankündigungen, findet ihr auf unserer Seite.
Want to build your own custom robot with no screws attached? The 3D printed SMARS modular robot is the perfect project for beginners and seasoned makers who want a quick and easy introduction to the world of robotics.
As we’ve constantly seen while exploring the expansive maker universe, robotics and 3D printing are two fields that often intersect with one another. Still, soldering electronics and complex assemblies can make it tough for inexperienced makers to create their own robots. If you’ve always wanted to use your 3D printer to make a delightful droid, but don’t have the knowledge to take on advanced projects, take a look at the Screwless/Screwed Modular Assemblable Robotic System (SMARS) robot.
Designed by Thingiverse user Kevin Thomas, the 3D printed and fully modular SMARS robot is a terrific project for hobbyists or educational purposes. What makes it special is the low number of components and the ability to put it all together without needing any screws or soldering skills.
On top of that, it’s relatively inexpensive to assemble and the components are easily available. Those who have a bit more expertise can use the modular design to their advantage, adding camera or sensors to enhance the robot.
What’s not to love about this terrain traveling robot? Let’s take a look at what you need in order to build your SMARS robot.
3D Printed Modular SMARS Robot: What You Need & How to Build It
The STL files for the SMARS robot are freely available to download on Thingiverse. Along with the variety of 3D printable parts, there’s also instructions, documentation, demos and source files included on the project page.
Outside of the STL files, here’s what else you’ll need to build your own SMARS robot:
Since the SMARS robot is modular, there are a few approaches you can take to building it up. For the basic model, the designers lays out the step-by-step process and different demos in the “doc_lite.zip” file on Thingiverse. For those who want to use this project for educational purposes, there’s also a lesson plan includes in the batch of files.
We generally go into the build process a bit more on these projects, but the modular style of this robot leaves some room for you to get creative. If you want to learn more about this project and how to create your own SMARS robot, check out the Thingiverse page!
In a recent video YouTuber MyfordBoy duplicates a metal part using a novel process involving 3D printing, a sand mold and casting aluminum. Don’t try this at home, but definitely enjoy the craftsmanship at work.
MyfordBoy is a YouTuber with 141,ooo subscribers. And despite the possible misleading moniker — it is inspired by British lathe maker Myford, not American automobile company Ford –MyfodBoy’s focus is on metal casting and machining.
The latest upload to the channel is very much on theme. In the silent video, MyfordBoy goes through a process of duplicating a metal part for a 3D printer. He explains that this will be the extruder body to replace a printed part.
To begin, MyfordBoy prints a plastic design with a 0.2mm layer height on a Creality CR-10 printer using PLA. This part is used to create plaster cast mold. The plaster was left to dry for over 24 hours before being put in the oven to burn out the PLA. To do this, the temperature had to be slowly raised to 650 °C (or 1202 °F).
From Plaster Casting to Melting Aluminum
After the PLA was successfully burned out, MyfordBoy put the plaster cast into a flask and filled this with greensand. The two-part sand box was then ready for the melted aluminum to be added.
Finally, MyfordBoy plunged the resulting metal filled plaster cast into water and the mold, being soluble, broke down leaving the aluminum part behind.
Definitely don’t try this at home unless you know what you’re doing. MyfordBoy ends up with an impressive aluminum part which looks great. He adds in the comments: “The part came out pretty much the size planned. I printed the pattern at 102%. If it were really critical and the part came out under or oversize it’s just a matter of printing another pattern adjusting the size as required.”
In the spirit of the channel and encouraging novices to get their hands dirty making stuff, MyfordBoy also runs a blog, detailing casting tips and the plans for Stirling cycle engines, among other things.
3D Systems has announced a new service called the On Demand Anatomical Modeling Service, which will enable medical professionals to upload and 3D print digital files through the company. The idea is to make 3D printing models more accessible for the entire healthcare community.
This new service from industry veteran 3D Systems aims to help the entire medical community from students to surgeons. They’re calling it the On Demand Anatomical Modeling Service.
Medical professionals in need of a physical model to aid them in pre-surgery planning and diagnoses can now send 3D models derived from scan data to 3D Systems, which will 3D print accurate anatomical models.
“For more than 25 years, 3D Systems has assisted medical professionals through the combination of our anatomical modeling experience and our 3D printing expertise… The healthcare industry is seeing the benefits provided through 3D printed anatomical models, and we are dedicated to continuing to expand our healthcare offerings to meet market needs. With the launch of our new On Demand Anatomical Modeling Service, we are making 3D printed models easier and more accessible to a broader range of the healthcare community,” said Katie Weimer, vice president, medical devices, 3D Systems.
3D Print an Anatomical Model in a Few Simple Steps
Creating such models from scan data is possible using commercially available software or 3D Systems’ D2P™ software. D2P (short for Dicom to Print) is an “end-to-end solution for 3D digital model creation“.
The company ensures that there is a “seamless connection” between the Anatomical Models site and the D2P software. So, when preparing your model, it’s possible to choose from a range of materials and areas to highlight within the model too. The company adds that the model should be on your doorstep within the next five business days.
The Italian 3D printing manufacturer tested its new range of ceramic 3D printers on a remake of Michelangelo’s famous David sculpture.
WASP, the 3D printer manufacturer, has just presented a new product line that allows for the 3D printing of clay and other dense semi-fluid materials. The company officially launched the DeltaWASP 2040 Clay and the DeltaWASP 40100 Clay. This marks the start of what the company hopes will be a revolution in ceramic 3D printing.
The printers have been tested by artist Andrea Salvatori for his reproduction of Michelangelo’s David – the “Grande testone” (The Big Head) sculpture. Salvatori worked closely with Wasp to help scan, model, and eventually 3D print the final sculpture using a technique called liquid deposition modeling.
The making of Grande testone
To faithfully recreate Michelangelo’s famous artwork, Salvatori used the Wasp 3D scanner to detect and acquire the sculpture structure. This allowed for a faster acquisition of the intricate details of the original sculpture. Furthermore, the 3D modeling software helped refine the graphics of the structure and prepare it for additive manufacturing.
The team then molded sixteen separate elements and later fixed them in place through a special fixture system (3d printed, of course).
The team used the DeltaWASP 3MT Industrial with pellet extruder to create the 16 pieces. To make the process cheaper and faster, the final design is based on a 3D printable plastic material in granules.
Finally, Salvatori gave the sculpture the final touch by plastering the molds by hand. It was then displayed at the contemporary and pop art exhibition Cèramica 2018 at Montelupo Fiorentino.
The final piece not only highlights the innovative new Wasp ceramic 3D printing technology, but also the opportunity for large-scale reproductions of this type.
Before proposing to his girlfriend, Dan Ko decided that everything had to be perfect, including the engagement ring. So, he truly personalized his proposal by 3D modeling and printing a ring which he knew his future wife would love.
For his wedding back in March 2016, Dan Ko, a self-proclaimed “tech enthusiast and 3D printing expert” came up with a few romantic and highly personalized touches.
Around the time of the wedding, Ko wrote a how to guide for 3D printing porcelain vases which adorned the tables. However, he is now divulging how he created the perfect engagement ring for his partner, Jen.
Ko explains that designing a ring is actually more time-intensive than it is difficult. He explains that the process took four months to create a design he was happy with. He also had the help of an experienced Shapeways designer. Of course, ring shopping could take less time than this but would the result be as personal?
He explains: “I wanted my wedding to have custom touches, to be meaningful for my family and friends and not just a commercialized, cookie cutter event. I could have gone the DIY route, but why pull out the hammer and saw when I could simply design something, upload the file and have it made professionally instead?”
Reducing Costs but Increasing Sentimental Value
Ko adds that his personalized ring actually cost 50% less than if he’d bought a major brand ring from a retailer. Even with the costs of multiple prototypes and jeweler fees, he still managed to save.
To design the ring, Ko first found an experienced 3D designer who could help him out. He reached out to Scott Denton, a New-York based designer who “made the process easy”.
He explains that a Pinterest board created by Jen made the designing process a lot easier too. Her preferred aesthetic was clean simple lines with antique engraved elements. As Jen is a dentist, Ko knew he needed to design a ring which would be comfortable during her working day as she’s constantly taking gloves on and off.
One of the more expensive processes of designing the ring was hiring an experienced jeweler who would ensure the stone was set properly. Ko then headed to New York City’s diamond district to find the perfect stone. He found the right diamond at a wholesale.
Ko and Denton then went back and forth to come up with a sketch and finally a 3D file which would be right for Jen. When the file was ready, they prototyped the ring in Fine Detail Plastic (FDP). By prototyping the ring, they found a few design aspects which needed to be changed but it wasn’t long before they were printing in platinum and having the jeweler set the stone.
The final touches for the proposal were renting and decorating a lounge, inviting friends and family and getting down on one knee. Ko explains that he was nervous about the size of the ring but, luckily, it was a perfect fit and Jen loved it. She also said yes!
Um dir ein optimales Erlebnis zu bieten, verwenden wir Technologien wie Cookies, um Geräteinformationen zu speichern und/oder darauf zuzugreifen. Wenn du diesen Technologien zustimmst, können wir Daten wie das Surfverhalten oder eindeutige IDs auf dieser Website verarbeiten. Wenn du deine Einwillligung nicht erteilst oder zurückziehst, können bestimmte Merkmale und Funktionen beeinträchtigt werden.
Funktional
Immer aktiv
Die technische Speicherung oder der Zugang ist unbedingt erforderlich für den rechtmäßigen Zweck, die Nutzung eines bestimmten Dienstes zu ermöglichen, der vom Teilnehmer oder Nutzer ausdrücklich gewünscht wird, oder für den alleinigen Zweck, die Übertragung einer Nachricht über ein elektronisches Kommunikationsnetz durchzuführen.
Vorlieben
Die technische Speicherung oder der Zugriff ist für den rechtmäßigen Zweck der Speicherung von Präferenzen erforderlich, die nicht vom Abonnenten oder Benutzer angefordert wurden.
Statistiken
Die technische Speicherung oder der Zugriff, der ausschließlich zu statistischen Zwecken erfolgt.Die technische Speicherung oder der Zugriff, der ausschließlich zu anonymen statistischen Zwecken verwendet wird. Ohne eine Vorladung, die freiwillige Zustimmung deines Internetdienstanbieters oder zusätzliche Aufzeichnungen von Dritten können die zu diesem Zweck gespeicherten oder abgerufenen Informationen allein in der Regel nicht dazu verwendet werden, dich zu identifizieren.
Marketing
Die technische Speicherung oder der Zugriff ist erforderlich, um Nutzerprofile zu erstellen, um Werbung zu versenden oder um den Nutzer auf einer Website oder über mehrere Websites hinweg zu ähnlichen Marketingzwecken zu verfolgen.
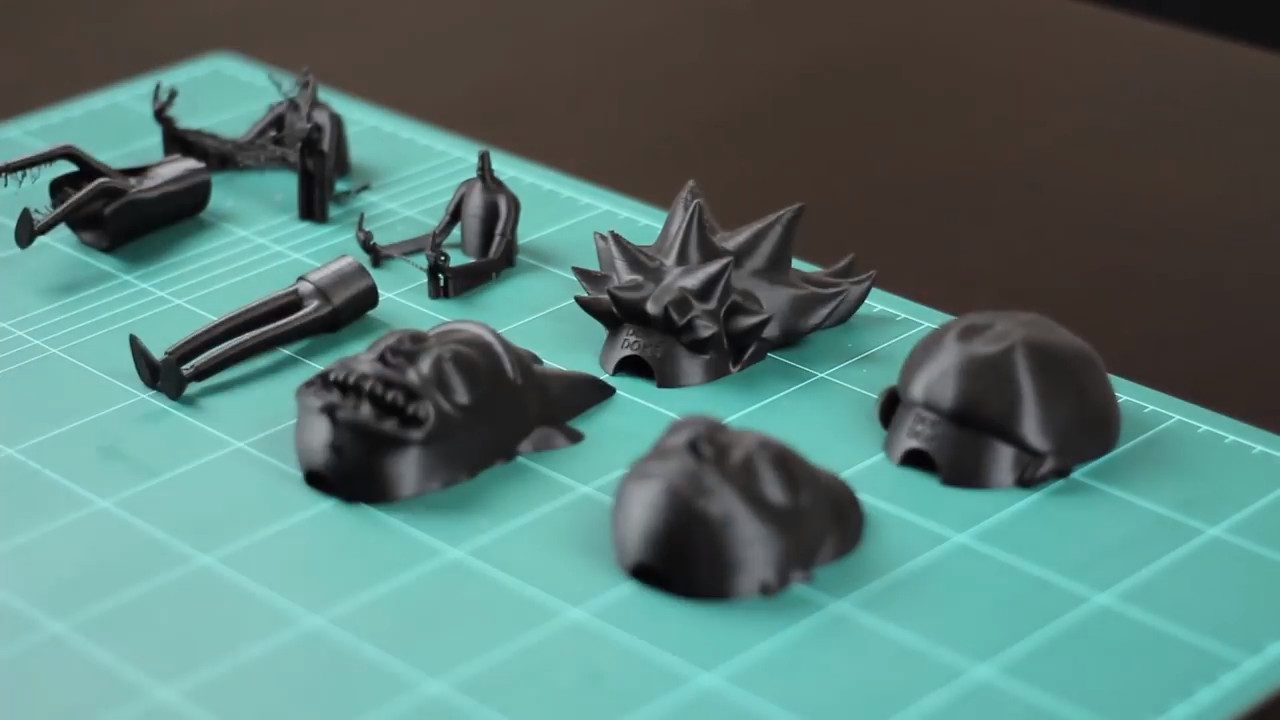


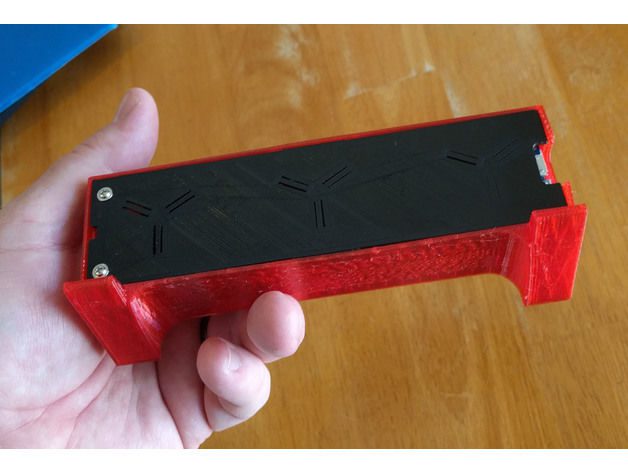
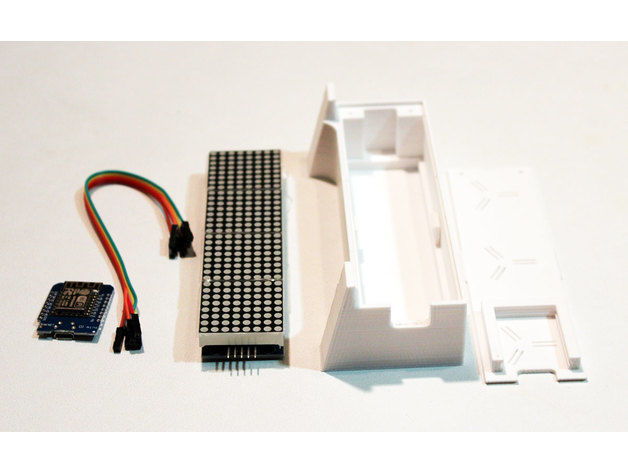

![[DEAL] Up to $250 Off Peopoly Moai, Craftbot Plus & PulseXE 3D Printers](https://www.blogdot.tv/wp-content/uploads/2018/06/deal-up-to-250-off-peopoly-moai-craftbot-plus-pulsexe-3d-printers.jpg)