Kategorie: Science
-

3D Printing Living Tissue Could Heal Damaged Joints and Eliminate Arthritis
Reading Time: 3 minutesA team of researchers from the University Medical Centre Utrecht in the Netherlands have created a biofabrication method to create living tissues that replicate cartilage and could potentially be implanted to repair damaged joints. Experienced by millions and millions across the world, arthritis is a physical disability that nearly one in ten…
-

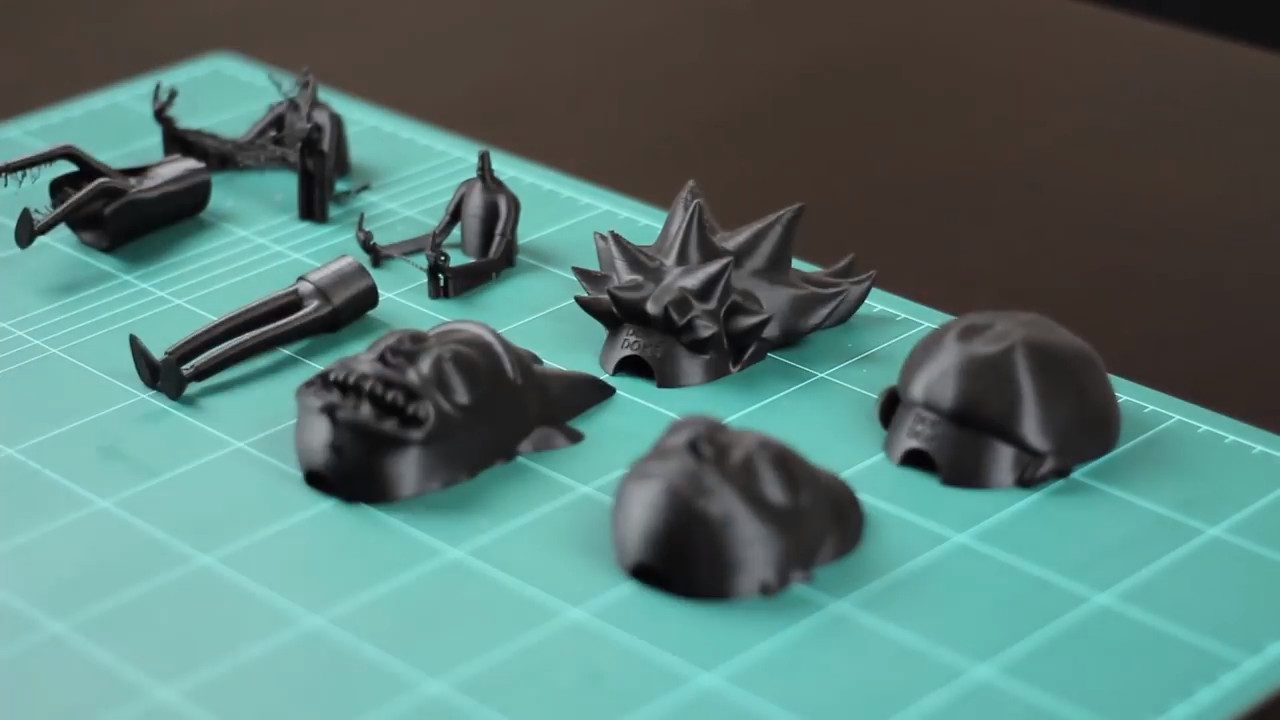
Weekend Project: Get Schwifty with These 3D Printed “Rick and Morty” Bobbleheads
Reading Time: 4 minutesSpanish designer Antonio García (also known as Duke Doks) shows off how to create incredibly detailed 3D printed Rick and Morty bobbleheads. Seriously, these models will have you screaming wubba lubba dub dub! If you haven’t seen (or at least heard of) the critically acclaimed and unconscionably hilarious animated television series Rick and Morty,…
-

Weekend Project: Get Your Message Across with this 3D Printed LED Marquee Scroller
Reading Time: 4 minutesYou can have the time, weather, news and more at your side at all times with this easy-to-build 3D printed LED marquee scroller created by Instructables user Qrome. In a world where infinite information is accessible at our fingertips, we’ve grown accustom to obtaining the latest news or data as soon as…
-
[DEAL] Up to $250 Off Peopoly Moai, Craftbot Plus & PulseXE 3D Printers
Reading Time: < 1 minuteMatterHackers is celebrating the 4th of July early, with some tasty discounts applied to three rather good 3D printers. Indeed, from now until Independence Day itself (July 4th, the day Randy Quaid liberated us all from extraterrestrial destruction) you can save between $100 and $250 on the Craftbot Plus, MatterHackers PulseXE…
-

GE Files Patent to Improve 3D Printing Security with Blockchain Tech
Reading Time: 3 minutesGeneral Electric (GE) has recently filed a patent application that would allow them to use blockchain technology to validate and verify 3D printed objects on its supply chain. As both 3D printing and blockchain technology are adopted into our daily lives, there have been a number of instances where the two have…
-

Traditional Knitwear and 3D Printing Combined to Create Clothing Inspired by Children’s Toys
Reading Time: 3 minutesDesigner and Royal College of Art graduate Lingxiao Luo is combining traditional knitting techniques and 3D printing to create garments that echo the playful style of children’s toys. As 3D printing becomes an increasingly popular tool in the world of fashion and art, the technology has been adapted to be compatible with other…
-

Australian Company is Constructing 3D Printed Homes From Hemp
Reading Time: 3 minutesAustralian hemp company Mirreco is developing a 3D printing process that utilizes hemp biomass as a material to manufacture building panels for houses. With the cannabis legalization movement spreading rapidly throughout many parts of the world, even the 3D printing industry has found ways to make use of this controversial plant. For instance,…
-

Weekend Project: Start Saving with a 3D Printed Apple Coin Bank
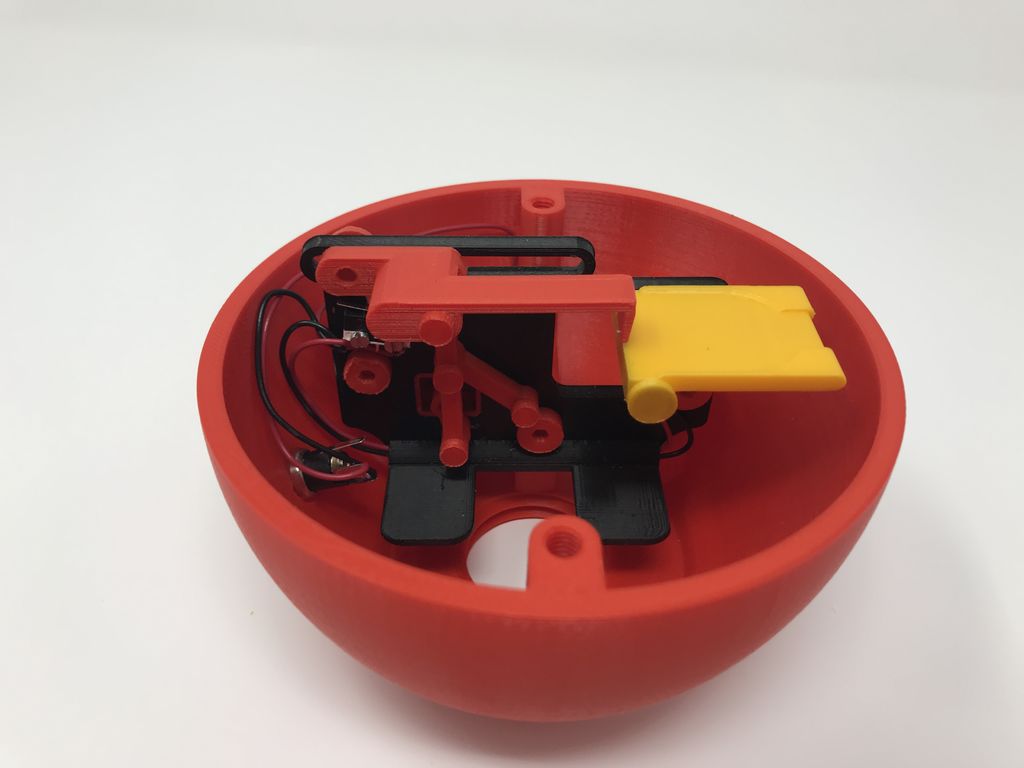
Reading Time: 3 minutesHave some loose change lying around? Why not save it for a rainy day by 3D printing this gear motor-driven Apple Coin Bank designed by maker Greg Zumwalt. Saving money is a healthy financial habit that will keep your bank account growing, and even a few coins can go a long way. Many…
-
Weekend Project: Satisfy Your World Cup Fever with This 3D Printed Lithophane Lamp
Reading Time: 4 minutesThe FIFA World Cup is in full swing, and now you can 3D print your own lithophane lamp to light your favorite team’s path to victory! Check out this amazing 3D printed World Cup-themed lamp designed by the 3D printing company Voladd. With the 2018 FIFA World Cup currently taking place in…
-

Shapeways Launches Customizable 3D Printed Jewelry Collection
Reading Time: 3 minutesShapeways has launched an in-house collection of fully customizable 3D printed jewelry. Called Spring & Wonder, the products and brand were designed in two months to demonstrate what Shapeways can do for other companies wanting to incorporate mass personalization. Shapeways, the 3D printing marketplace and service company, has just launched Spring &…
-

PADT Opens On-Demand Factory Using Carbon 3D Printers
Reading Time: 3 minutesPhoenix Analysis and Design Technologies (PADT) has announced it’s opening a 3D printing factory, using Carbon’s Digital Light Synthesis technology and production system to create 2,000-5,000 parts on-demand weekly. Phoenix Analysis and Design Technologies (PADT), the Arizona-based provider of Product Development and Rapid Prototyping services, has announced it’s opening an On-Demand Manufacturing facility…
-

8 Most Common 3D File Formats – Simply Explained
Reading Time: 24 minutesWhich 3D file formats are there? How do they compare? What should you use? We simply explain the 8 most common 3D file formats used today: STL, OBJ, FBX, COLLADA, 3DS, IGES; STEP, and VRML/X3D. A 3D file format is used for storing information about 3D models. You may have heard of the most…
-

General Motors Makes Saves $300,000 Thanks to Standardizing 3D Printing
Reading Time: 3 minutesSince the General Motors Lansing Delta Township assembly plant bought a $35,000 3D printer, they’ve seen savings of €300,000 in two years. However, the company expects to see savings of millions of dollars in the future as it standardizes the technology throughout its plants across the globe. All over the world, companies…
-

HackSpace magazine 8: Raspberry Pi <3 Arduino
Reading Time: 3 minutesArduino is officially brilliant. It’s the perfect companion for your Raspberry Pi, opening up new possibilities for robotics, drones and all sorts of physical computing projects. In HackSpace magazine issue 8 we’re taking a look at what’s going on on planet Arduino, and how it can make our world better. This little…
-
Project of the Week: Travel Terrain With This 3D Printed Modular SMARS Robot
Reading Time: 3 minutesWant to build your own custom robot with no screws attached? The 3D printed SMARS modular robot is the perfect project for beginners and seasoned makers who want a quick and easy introduction to the world of robotics. As we’ve constantly seen while exploring the expansive maker universe, robotics and 3D printing…
-

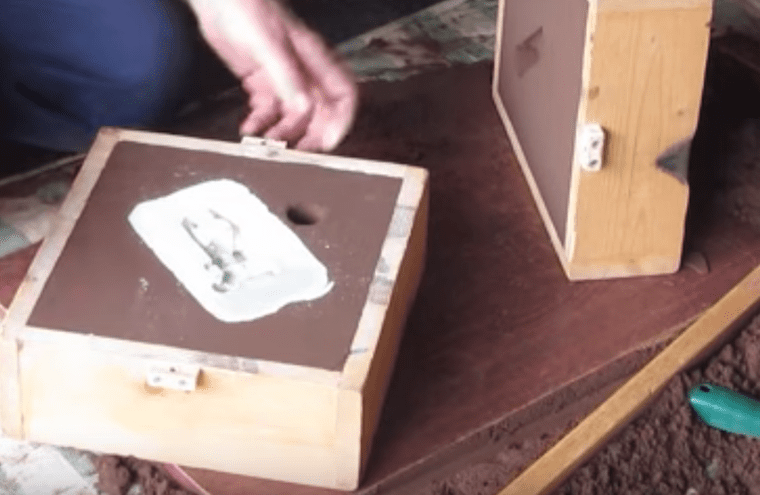
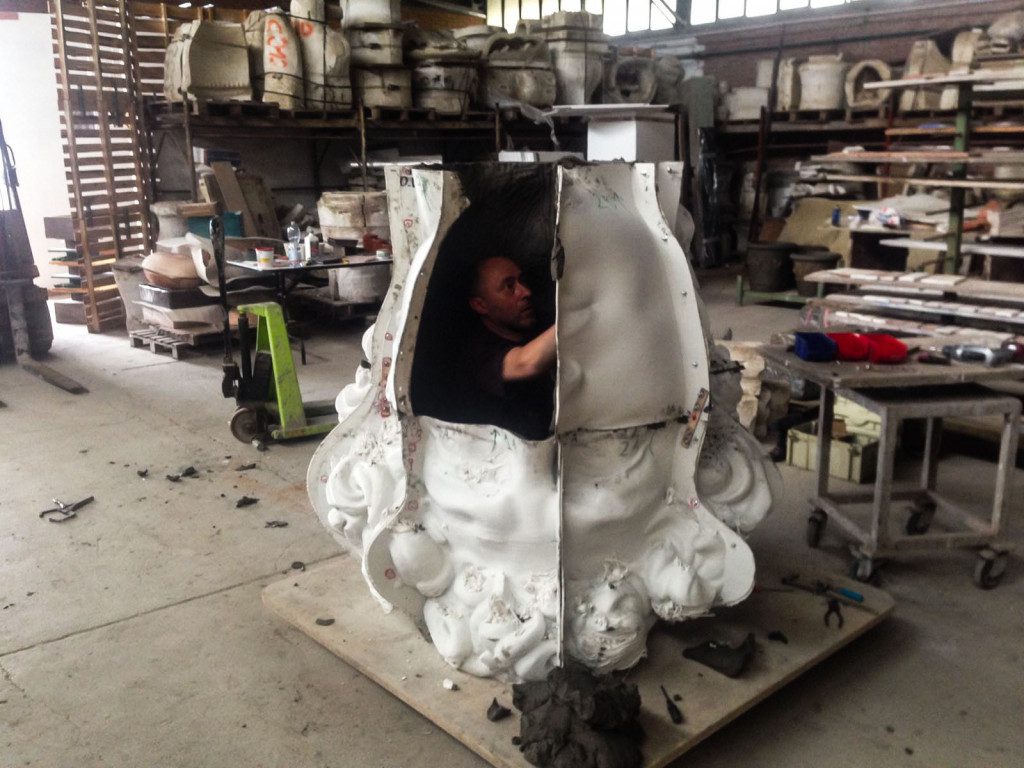
Watch this YouTuber Cast an Extruder Body in Aluminum
Reading Time: 2 minutesIn a recent video YouTuber MyfordBoy duplicates a metal part using a novel process involving 3D printing, a sand mold and casting aluminum. Don’t try this at home, but definitely enjoy the craftsmanship at work. MyfordBoy is a YouTuber with 141,ooo subscribers. And despite the possible misleading moniker — it is inspired by…
-

3D Systems Launches On Demand Anatomical Modeling Service
Reading Time: 3 minutes3D Systems has announced a new service called the On Demand Anatomical Modeling Service, which will enable medical professionals to upload and 3D print digital files through the company. The idea is to make 3D printing models more accessible for the entire healthcare community. This new service from industry veteran 3D Systems…
-
Wasp Launches 2 New Ceramic 3D Printers
Reading Time: 2 minutesThe Italian 3D printing manufacturer tested its new range of ceramic 3D printers on a remake of Michelangelo’s famous David sculpture. WASP, the 3D printer manufacturer, has just presented a new product line that allows for the 3D printing of clay and other dense semi-fluid materials. The company officially launched the DeltaWASP…
-

3D Printing an Personalized Engagement Ring for a Proposal
Reading Time: 3 minutesBefore proposing to his girlfriend, Dan Ko decided that everything had to be perfect, including the engagement ring. So, he truly personalized his proposal by 3D modeling and printing a ring which he knew his future wife would love. For his wedding back in March 2016, Dan Ko, a self-proclaimed “tech enthusiast and…
-

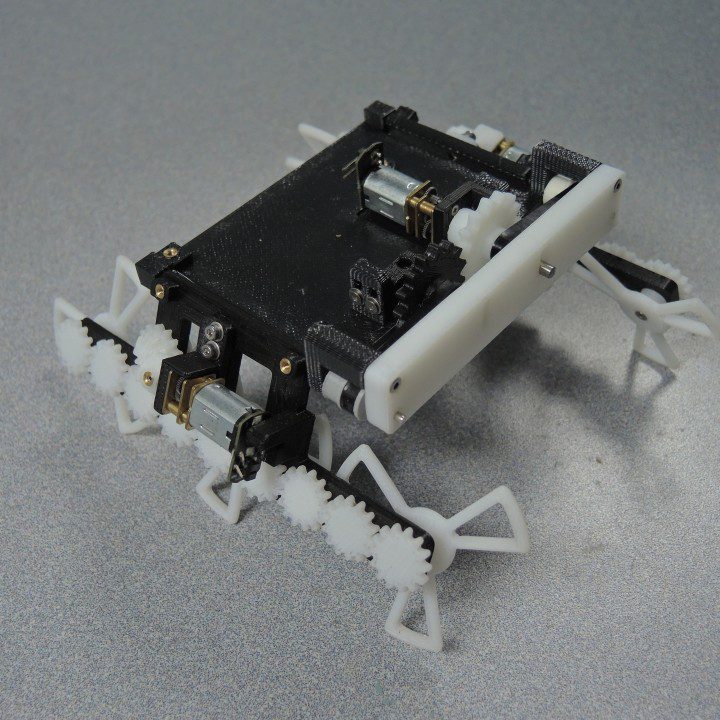
This 3D Printed Robot Can Crawl Underneath Doors
Reading Time: 2 minutesA designer has developed a 3D printed robot that can auto-adjust its height to maneuver a wide range of spaces. A Reddit member called potentprintables has just presented a 3D printed robot that adjusts its size in order to fit into tight spaces. That means the robot can also squeeze underneath doors.…
-

Makerslab24.com Combines Cryptocurrency and 3D Printing with 3dP-Token
Reading Time: 3 minutesMakerslab24.com is launching a platform that will fuse cryptocurrency with 3D printing technology. The company is creating the 3dP-Token to offer customers greater accessibility to 3D printed products at a lower cost. Over the last five years or so, the world has become captivated by two emerging technologies: 3D printing and blockchain…
-

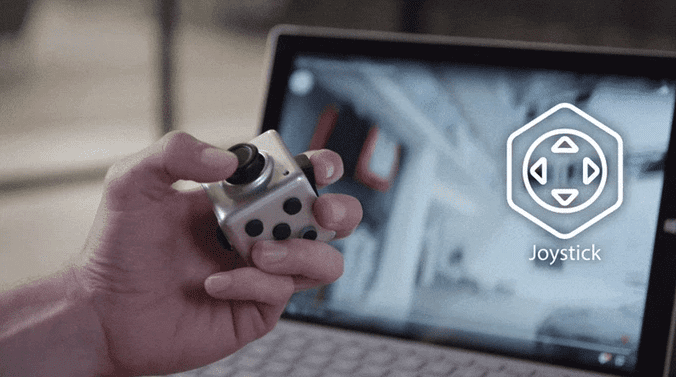
Control Your PC and Presentations with a Fidget Cube
Reading Time: 3 minutesInspired by the original Fidget Cube, Masta Box is a Bluetooth 4.0 controller gadget which serves a range of purposes, such as a Micro SD card reader, an Air Mouse, a Joystick and a Laser Pointer. Fidget toys have been helping people satisfy their need to fidget since last year. However, a…

![[DEAL] Up to $250 Off Peopoly Moai, Craftbot Plus & PulseXE 3D Printers](https://www.blogdot.tv/wp-content/uploads/2018/06/deal-up-to-250-off-peopoly-moai-craftbot-plus-pulsexe-3d-printers.jpg)