Schlagwort: 3D Printable Files & 3D Models

  • Weekend Project: Turn Back Time with a 3D Printed Delorean Clock From ‘Back to the Future’

    Weekend Project: Turn Back Time with a 3D Printed Delorean Clock From ‘Back to the Future’

    Reading Time: 3 minutes

    Have you always wanted to travel through time like Marty McFly and Doc Brown in ‘Back to the Future’? Well, Great Scott! Now you can with this amazing 3D printed Delorean clock. 

    Originally released in 1985, the critically acclaimed film Back to the Future has proven itself to be timeless, which is a bit ironic considering the plot is about a teenager and mad scientist traveling through time. The instant classic quickly transformed into a gigantic franchise, spawning two sequels, several video games, a theme park ride, and even acting as the inspiration behind the main characters featured in the animated hit-series Rick & Morty

    Of all the many memorable scenes in Back to the Future, few are as iconic as those featuring the time-traveling Delorean, which is a sleek and futuristic car that is still famously recognized as “the car from that movie!” In the movie, Marty McFly and Doc Brown use the car as their personal time machine, dialing in the settings on the zany clock-like contraption that is mounted on the center console.

    Now, fans of Back to the Future can 3D print their own time circuit device by following along with a project by Thingiverse user Premium95. The maker and engineer has created a 3D printable Delorean clock, taking the device from the film and turning it into a functional clock that shows you the time and date of the past, present and future.

    This project requires a fair bit of soldering and post-processing, but hey, nobody said being a time traveller was easy work. If you’re up for the challenge, keep on reading to learn more about this awesome Weekend Project.


    3D Printed Delorean Clock: What You Need & How to Build it

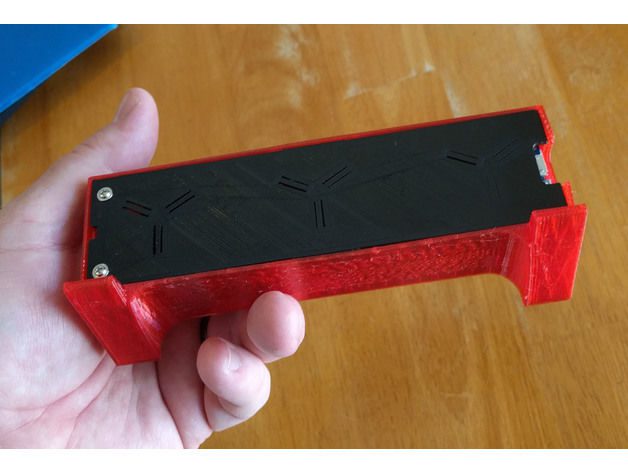
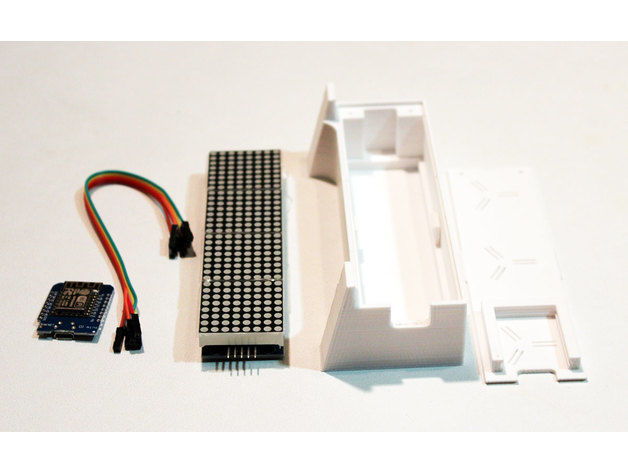
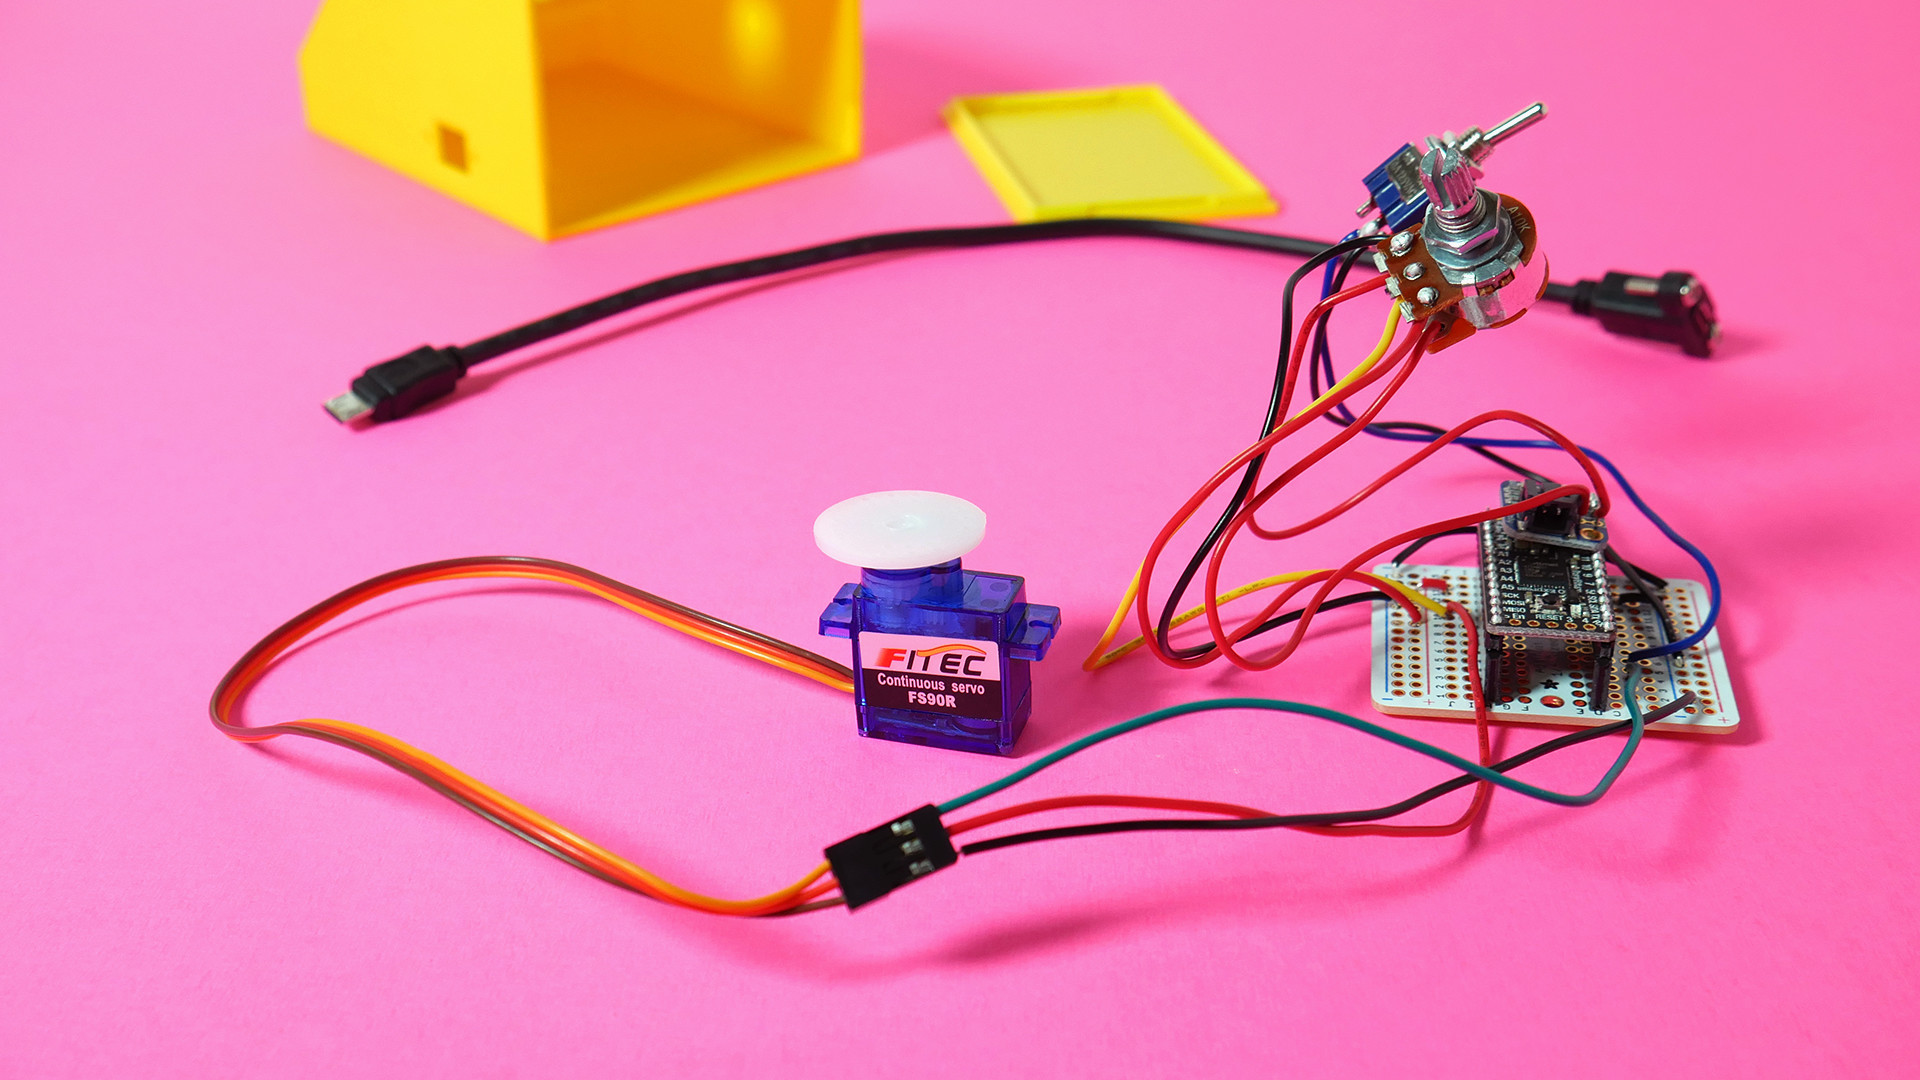
    While the case of the Delorean Clock is 3D printed, you’ll still need a handful of electronic components and parts to complete the job. Here’s the checklist of what you need, all of which is available through Banggood:


    The Thingiverse user also shares a download link to the code that allows the Delorean to function. The labels that are attached to the clock are included in the collection of Thingiverse files. According to Premium95, the six 3D printable files should have 20 percent infill, no supports needed.

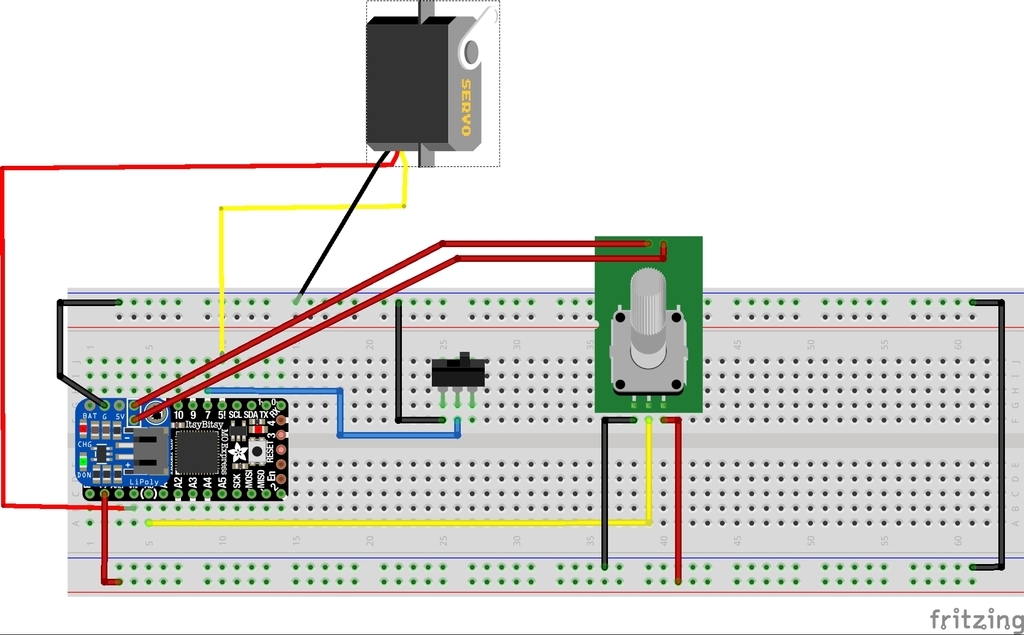
    The engineer also shares the circuit digram for the entire clock, showing where soldering connections needs to be made.


    However, other than that, assembly instructions are sparse. Judging from the photos, the 3D printed parts seem to be post-processed with sandpaper and black paint.

    The soldering process seems a bit complex for unexperienced makers, but this project can be approached as a challenging way to learn. Of course, if you have any questions about the project, you can head over to the Thingiverse page and drop a comment for the designer.


    Website: LINK

  • Weekend Project: Get Schwifty with These 3D Printed “Rick and Morty” Bobbleheads

    Weekend Project: Get Schwifty with These 3D Printed “Rick and Morty” Bobbleheads

    Reading Time: 4 minutes

    Spanish designer Antonio García (also known as Duke Doks) shows off how to create incredibly detailed 3D printed Rick and Morty bobbleheads. Seriously, these models will have you screaming wubba lubba dub dub!

    If you haven’t seen (or at least heard of) the critically acclaimed and unconscionably hilarious animated television series Rick and Morty, you must be living in another dimension. By now, the intergalactic adventures of the easily agitated Morty and his lawless scientist of a grandfather Rick have touched our funny bone at some time or another

    Now, you can have this dynamic duo bobbing away and flipping you the bird on your desk thanks to the Madrid-based motion graphics and 3D artist Antonio García, also known as Duke Doks. He recently shared two highly detailed 3D printable models–one of Rick and one of Morty– that look like they just sprung right out of the television screen and into this reality.

    With a desktop 3D printer, some primer and paint, a couple of springs and some intensive post-processing, you can follow along with Duke Doks and create your own Rick and Morty bobbleheads–no Mr. Meseeks required.

    Let’s take a quick look at this awesome project and what you need to bring your favorite dimension-traveling characters to life.

    3D Printed Rick & Morty Bobbleheads: How to Create Your Own

    The STL files for the Rick and Morty bobbleheads are available to download from Cults. The Morty model is completely free, while Rick Sanchez will cost you a mere $1.80 to obtain. Considering these are incredibly high quality models, we definitely don’t mind shelling out a few bucks for them.

    Both models are divided into a few different parts, which are later attached with an adhesive glue later on. García appears to have used 20 percent infill for each 3D printed section, and utilizes support structures when necessary. As you can probably tell from the smooth and glossy surface finish on these bobbleheads, there’s a lot of post-processing involved. Thankfully, the designer shares his methodology in a YouTube video (posted below).


    After gluing the parts together (keeping the body and head separate, for now), the next step is to smoothen out the 3D model with 240 grit sandpaper. Once the 3D printed parts are properly sanded, the designer uses double-sided tape to secure the models down for painting. The painting process starts by applying a coating of Grey Filler/Primer, which eliminates the appearance of any layering or scratches. Once the primer has settled, García sands down the model once more to give it a glossy aesthetic.


    Finally, using an assortment of spray paint from Montana Colors and meticulously applied tape to prevent the various colors from getting in the wrong area, he carefully applies the paint to evoke the look of the cartoon characters. He also uses a paint brush to detail the small and hard-to-reach sections, like the eyes and Rick’s drool-laden mouth. We assume that acrylic paint can be used here as well, but the automotive-grade spray paint seems to have a magnificent aesthetic effect that might not be replicated otherwise.


    After the paint job is complete, simply insert a small spring into the head and attach it to the body. You now have your very own Tiny Rick and ticked off Morty! You can learn more about this project by checking out the video below.

    License: The text of „Weekend Project: Get Schwifty with These 3D Printed “Rick and Morty” Bobbleheads“ by All3DP is licensed under a Creative Commons Attribution 4.0 International License.

    Subscribe to updates from All3DP

    You are subscribed to updates from All3DP

    Website: LINK

  • Weekend Project: Get Your Message Across with this 3D Printed LED Marquee Scroller

    Weekend Project: Get Your Message Across with this 3D Printed LED Marquee Scroller

    Reading Time: 4 minutes

    You can have the time, weather, news and more at your side at all times with this easy-to-build 3D printed LED marquee scroller created by Instructables user Qrome. 

    In a world where infinite information is accessible at our fingertips, we’ve grown accustom to obtaining the latest news or data as soon as we wake up and unlock our smartphones. You can take things a step further by 3D printing your own LED marquee scroller, which was created by Instructables member and RC plane enthusiast Qrome.

    The designer has made it possible to add a plethora of information to this LED marquee scroller, including a digital clock, local weather, news headlines, 3D printing progress via OctoPrint, the value of Bitcoin and even random and humorous advice. This project shows what you can accomplish with just a couple of electronic components and a 3D printer. Equipped with a 3D printed enclosure, you can get creative and mix different colors to go along with your personal preference.

    Let’s take a look at what you need to build your own LED marquee scroller.


    3D Printed LED Marquee Scroller: What you Need

    There isn’t much you need to create this LED marquee scroller as far as components are concerned. Of course, you’ll need the STL files for the 3D printed case, which can be freely downloaded from Thingiverse. This project does require a bit of soldering, but Qrome lays out the step-by-step process very clearly. Aside from the 3D printed enclosure, here’s what else you need:

    In order to program the scroller with relevant information, you can follow along with the coding process included on the project’s Github.


    3D Printed LED Marquee Scroller: Putting it Together

    Starting off with the 3D printing process, Qrome suggests printing the two STL files (Base and Plate) with 20 percent infill, no supports required. The case is designed to snap-fit the Dot Matrix, and also includes a slot in the back panel for the Wemos D1 Mini. But before we start putting everything together, you’ll need to do some soldering first.

    The Dot Matrix Module comes with the wires you can utilize during the soldering process. All you need to do is cut off the plugs and solder them directly to the pin locations on the LED Dot Matrix Display and to the Wemos D1 Mini. Here are the connections that need to be made:

    • CLK -> D5 (SCK)
    • CS -> D6
    • DIN -> D7 (MOSI)
    • VCC -> 5V+
    • GND -> GND-

    Next, using Arduino IDE software, you’ll need to configure it to work with the Wemos board and USB port. There are a range of USB drivers, as well as packages and libraries, to download in order to program the marquee scroller. Qrome goes into detail on which to install on his Instructables post.

    Once you’ve completed this, the final step is to configure the web interface.

    The marquee scroller utilizes the Wemos board’s WiFiManager to become an AP Hotspot when the last network it was connected to can’t be found. You can connect to the WiFi manager with your phone and enter your WiFi connection information. After the device is connected to your WiFi network, the assigned IP address can be used to open a browser to the Web Interface, which is where everything can be configured there.

    And that’s about all it takes to create your own marquee scroller. To learn more about this project, check out the Instructables post.


    License: The text of „Weekend Project: Get Your Message Across with this 3D Printed LED Marquee Scroller“ by All3DP is licensed under a Creative Commons Attribution 4.0 International License.

    Subscribe to updates from All3DP

    You are subscribed to updates from All3DP

    Website: LINK

  • Weekend Project: Start Saving with a 3D Printed Apple Coin Bank

    Weekend Project: Start Saving with a 3D Printed Apple Coin Bank

    Reading Time: 3 minutes

    Have some loose change lying around? Why not save it for a rainy day by 3D printing this gear motor-driven Apple Coin Bank designed by maker Greg Zumwalt. 

    Saving money is a healthy financial habit that will keep your bank account growing, and even a few coins can go a long way. Many of us know that feeling of relief that comes about when we have some cash set aside, and developing these frugal habits will help us plan for the future.

    Now, you can create a 3D printed Apple Bank to be your now coin-stashing companion. This model was designed by maker Greg Zumwalt, who was looking for a way to teach his grandchildren good money saving habits. The 3D printed coin bank is comprised of 20 different 3D printed parts, a single gear motor and two micro level switches. It operates back on the Hoeken mechanism,

    The coin bank mechanics are based on the Hoeken mechanism. The design consists of 20 unique 3D printed parts and uses a single gear motor and two micro lever switches for operation. With large eyes and an appetite for currency, this Apple Coin Bank looks quite adorable and unintimidating. However, this project is difficult to print, and requires a lot of precision and careful planning (just like saving money does).

    Let’s take a peek at what you need to build this 3D printed coin bank…

    3D Printed Apple Coin Bank: What You Need & Putting it Together

    As we mentioned, the Apple Coin Bank consists of 20 different 3D printed parts, all of which can be freely downloaded from Zumwalt’s Instructables post. Zumwalt warns that this project is no walk in the park, as the design include the threaded assembly, as well as small parts and confined spaces. But if you have your 3D printed well-tuned and some basic soldering skills, you should be able to create your own coin eating apple.

    The designer suggests 3D printing all parts at .15mm layer height and 20% infill. Some parts require supports to print cleanly, so be sure to add those when necessary. Before you start assembling to Apple Coin Bank, Zumwalt also recommends that you test fit and trim, as well as file and sand all of the parts to ensure smooth movement for moving parts and a tight fit for the stationary surfaces.


    Aside from the 3D printed parts, here’s what else you’ll need to assemble the Apple Coin Bank:

    The build process begins with installing the motor into the 3D printed base and motor mount. After assembling the coin arm mechanism and completing the base, you’ll have to start soldering the wires together, which Zumwalt details on his Instructables post. After inserting the base into the 3D printed apple, the final step is to add the face to your print.

    The step-by-step build process is lengthy and could be a bit arduous, so keep that in mind as you start constructing your own Apple Coin Bank. You can find the full assembly instructions and more on Instructables.

    License: The text of „Weekend Project: Start Saving with a 3D Printed Apple Coin Bank“ by All3DP is licensed under a Creative Commons Attribution 4.0 International License.

    Subscribe to updates from All3DP

    You are subscribed to updates from All3DP

    Website: LINK

  • Weekend Project: Satisfy Your World Cup Fever with This 3D Printed Lithophane Lamp

    Weekend Project: Satisfy Your World Cup Fever with This 3D Printed Lithophane Lamp

    Reading Time: 4 minutes

    The FIFA World Cup is in full swing, and now you can 3D print your own lithophane lamp to light your favorite team’s path to victory! Check out this amazing 3D printed World Cup-themed lamp designed by the 3D printing company Voladd.  

    With the 2018 FIFA World Cup currently taking place in Russia, people from every corner the world are getting faces painted and flags waving in support of their home country or favorite qualifying team. Depending on what time zone you live in, some World Cup games might start a bit too early or late for you, but most of us will turn on a lamp and watch through the night nonetheless.

    Now you can light your path to victory with a World Cup-themed 3D printed lithophane lamp created by the 3D printing company Voladd. The model is based off of the event’s iconic trophy, which features a robed human holding the world up above their head. This model is a remix based on “World Cup” by Bekarion and “Spherical Lithophane – World Map 12cm remix” by Domi1988.

    With a bit of post-processing, you can make this lamp look like the real World Cup trophy. If you want to keep the spirit of this international tournament alive with a 3D printed lithophane lamp, keep reading to find out what you need and how to build it!


    World Cup Lithophane Lamp: What You Need & How to Build it

    There are four different STL files that you’ll need to print to build this lamp: three parts for the base and the globe-shaped light source. These 3D printable models are freely available to download from Thingiverse. Voladd suggest printing these parts with 15 percent infill and supports when necessary.


    Other than a 3D printer and the STL files, there are obviously a few other things you’ll need to make this lithophane lamp shine. Here’s what you need to build this project:


    Now that you’ve got all of your supplies ready, it’s time to kick off the build process. The first step is to 3D print all of the parts for the base and world map. Next, take the electrical installation and insert it from the upper part of the base until it reaches the bottom of the 3D printed base. Once that’s situated, you can glue the three base parts together.

    Once the glue is dried, cover the lamp cap with paper and apply filler to the model, sanding it down to provide a better surgace finish. After that, you’ll apply the bonding primer, followed by the gold metallic paint spray. In the example from Voladd, they also add a few green lines to make it resemble the original FIFA World Cup. For the globe, which is where the light source will emit from, the designers recommend only using a light coating of paint to ensure the light shines through properly.


    And that about does it for the assembly process. Pretty easy, huh? Well, definitely easier than watching your favorite team playing in a close World Cup match… If you want to learn more about this project, you can find more information on Thingiverse!


    License: The text of „Weekend Project: Satisfy Your World Cup Fever with This 3D Printed Lithophane Lamp“ by All3DP is licensed under a Creative Commons Attribution 4.0 International License.

    Subscribe to updates from All3DP

    You are subscribed to updates from All3DP

    Website: LINK

  • Project of the Week: Travel Terrain With This 3D Printed Modular SMARS Robot

    Project of the Week: Travel Terrain With This 3D Printed Modular SMARS Robot

    Reading Time: 3 minutes

    Want to build your own custom robot with no screws attached? The 3D printed SMARS modular robot is the perfect project for beginners and seasoned makers who want a quick and easy introduction to the world of robotics.  

    As we’ve constantly seen while exploring the expansive maker universe, robotics and 3D printing are two fields that often intersect with one another. Still, soldering electronics and complex assemblies can make it tough for inexperienced makers to create their own robots. If you’ve always wanted to use your 3D printer to make a delightful droid, but don’t have the knowledge to take on advanced projects, take a look at the Screwless/Screwed Modular Assemblable Robotic System (SMARS) robot.

    Designed by Thingiverse user Kevin Thomas, the 3D printed and fully modular SMARS robot is a terrific project for hobbyists or educational purposes. What makes it special is the low number of components and the ability to put it all together without needing any screws or soldering skills.

    On top of that, it’s relatively inexpensive to assemble and the components are easily available. Those who have a bit more expertise can use the modular design to their advantage, adding camera or sensors to enhance the robot.

    What’s not to love about this terrain traveling robot? Let’s take a look at what you need in order to build your SMARS robot.


    3D Printed Modular SMARS Robot: What You Need & How to Build It

    The STL files for the SMARS robot are freely available to download on Thingiverse. Along with the variety of 3D printable parts, there’s also instructions, documentation, demos and source files included on the project page.

    Outside of the STL files, here’s what else you’ll need to build your own SMARS robot:


    Since the SMARS robot is modular, there are a few approaches you can take to building it up. For the basic model, the designers lays out the step-by-step process and different demos in the “doc_lite.zip” file on Thingiverse. For those who want to use this project for educational purposes, there’s also a lesson plan includes in the batch of files.

    We generally go into the build process a bit more on these projects, but the modular style of this robot leaves some room for you to get creative. If you want to learn more about this project and how to create your own SMARS robot, check out the Thingiverse page!

    License: The text of „Project of the Week: Travel Terrain With This 3D Printed Modular SMARS Robot“ by All3DP is licensed under a Creative Commons Attribution 4.0 International License.

    Subscribe to updates from All3DP

    You are subscribed to updates from All3DP

    Website: LINK

  • Weekend Project: 3D Print a Sleek 7-Segment LED Clock

    Weekend Project: 3D Print a Sleek 7-Segment LED Clock

    Reading Time: 4 minutes

    Combine function and form with this 7-segment LED clock, designed by Kansas-based maker Leonard Lee. It reliably delivers accurate time — down to the second — while at the same time adding a little light to your life.

    How many times have you squinted across a room trying to read the time off a cheap dollar store clock? Squash that humiliating feeling forever with this stylish 7-segment LED clock from Thingiverse user leonardlee. Apart from the electronics, it’s completely made from easy-to-assemble 3D printed parts. All you need is a little time. (And a little money…)

    In addition to looking great, this timeless (timeful?) piece has a number of fascinating features. Its automatic abilities include NTP time syncing, time zone detection, and daylight savings adjustment. It can also be assembled with or without the 7-segment displays for seconds.

    You can mount the 7-segment LED clock on the wall using the two holes in the back. Otherwise, if you prefer that it rest on a desk or table, attach the provided 3D printable stands.

    leonardlee's 7-segment LED clock from behind
    leonardlee's 7-segment LED clock from behind

    7-Segment LED Clock: What You Need

    In order to build leonardlee’s clock, you’ll need to 3D print eight parts, plus the stand. All nine STL files are available for download for free on Thingiverse. As whole segments light up by diffusing single-point LED light through thin translucent plastic, it’s probably best to print with the recommended white PLA.

    Below are the non-printed components needed for the 7-segment LED clock, which should together cost around $30:

    The Arduino Integrated Development Environment (IDE) is needed to upload some code to the D1 Mini. You’ll also need to use some soldering equipment.

    Step-by-step animation of the 7-segment LED clock
    Step-by-step animation of the 7-segment LED clock

    7-Segment LED Clock: Putting it Together

    The 3D printed pieces fit together intuitively, with only the electronics adding a bit of complexity. Never fear, though: leonardlee provides a thorough set of assembly instructions (in the “Post-Printing” section, below “Supplies”) as well as a handy step-by-step GIF.

    The first step is to prepare the software. This involves uploading code to the D1 Mini using the Arduino IDE, which will likely require you to integrate the ESP8266 boards and install the CH340G driver. (Click here for instruction from Wemos Electronics.)

    Up next we have some soldering to do. That is, after fastening together the 3D printed back pieces using the aforementioned nuts and screws. Begin by soldering the level shifting chip to the clock shield PCB. Then, solder the included 8-pin female headers of the D1 Mini as well as the power and LED wires to the clock shield PCB.


    You can now slide the clock shield PCB onto the pegs of 3D printed back_hour_minute piece. And then we’re soldering again! Start with connecting the power barrel connector to the power wires, keeping in mind the polarity of your power supply. Then move on to the LED wires, which need to be soldered to the single LEDs that will be positioned in the colon of the back_hour_minute piece. Make sure the LEDs are properly aligned using the arrows on the strip.

    The next step is to attach the D1 Mini to the PCB, sliding its male pins into the PCB’s female header. Periodic testing of the circuit should now be possible.

    The remaining soldering involves connecting the LEDs through the wires guides around the digits. This will result in two strips of LEDs, one going to the left of the controller (for the hours), and one going to the right (for the minutes and seconds).

    Finally, cover all segments and gaps with the corresponding 3D printed pieces and, unless you’re planning to mount the clock on the wall, attach the stands. Let there be light!

    leonardlee's 7-segment LED clock
    leonardlee's 7-segment LED clock

    License: The text of „Weekend Project: 3D Print a Sleek 7-Segment LED Clock“ by All3DP is licensed under a Creative Commons Attribution 4.0 International License.

    Subscribe to updates from All3DP

    You are subscribed to updates from All3DP

    Website: LINK

  • Project of the Week: 3D Printed High-Speed Marblevator Mini Machine

    Project of the Week: 3D Printed High-Speed Marblevator Mini Machine

    Reading Time: 3 minutes

    Maker and Instructables regular Greg Zumwalt has created the 3D printed Marblevator Mini, a marble machine with a high speed loop mechanism that can handle over 324,000 marble runs per day. Check out how you can build this jaw-dropping project yourself! 

    Most of us can remember the childhood joy that arose when playing with marbles, a simplistic and sometimes colorful spherical toy that you could just watch roll around for hours. Outside of being a popular knickknack for kids, marbles can also be used to demonstrate the laws of physics.

    You’ve probably seen or at least heard of a marble machine, which is a ball-run contraption that sends the marble through loops and tunnels until it reaches the end, where it is elevated back up to start the rollercoaster ride over again. And get this… you can easily 3D print your own apparatus to send marbles into this cosmic loop.

    Greg Zumwalt, a retired software company owner and current full-time maker, recently shared the 3D printed Marblevator Mini, a marble machine capable of reaching seriously high speeds. In fact, it’s the fastest version that Zumwalt has ever created (and he’s made a few), capable of 324,000 marble runs in a single day. He conducted a stress test for over 29 hours without losing a single marble, all while looping 10 marbles at a time.

    We previously covered one of the maker’s recent project, an incredible 3D printed mechanical hummingbird. Now, we’ll dig into his latest concoction: the Marblevator Mini.

    3D Printed Marblevator Mini Machine: What You Need

    If you want to build your own 3D printed Marblevator Mini, you’ll need to get the STL files from Greg Zumwalt’s Instructables post. There are only three individual models to 3D print. Aside from your 3D printer and some different shades of filament, there’s a few other supplies you need to pick up (though some of them are optional).


    3D Printed Marblevator Mini Machine: Putting it Together

    Before getting into the assembly process, you’ll need to 3D print the “Base.stl” and “Auger.stl” (at .15mm layer height, 20 percent infill, no supports) and the “Track.stl” (.15mm layer height, 20 percent infill, with support material). Once the three parts are printed, test fit and sand down the parts to ensure smooth movement and a snug fit.

    Next, solder the wires from the power supply to the motor and make sure it turns clockwise when looked at from the motor shaft end. If you’re using some of the optional components, such as the coaxial power jack, you’ll have a bit more soldering to do, but Zumwalt lays out those steps in his Instructables post.

    To assemble the Marblevator Mini Machine, insert the servo motor into the “Base.stl” model, followed by the mounting the “Track.stl” and finally the “Auger.stl” onto the motor shaft. Again, make sure that everything fits tightly, especially the track, as this will have an impact on the performance of your marble machine.

    Finally, it’s time to test out this high-speed looping mechanism. Place the 8mm ball bearing on the top of the track and let it roll. At this point, it should traverse smoothly down the track without jumping or falling short of the auger. If not, you’ll probably need to do a bit more sanding and filing, but that’s a small price to pay to obtain the power of physics!

    If you want to build your own Marblevator Mini, check out the full scoop on Instructables.


    License: The text of „Project of the Week: 3D Printed High-Speed Marblevator Mini Machine“ by All3DP is licensed under a Creative Commons Attribution 4.0 International License.

    Subscribe to updates from All3DP

    You are subscribed to updates from All3DP

    Website: LINK

  • Weekend Project: 3D Printed Motorized Turntable for Photo & Video

    Weekend Project: 3D Printed Motorized Turntable for Photo & Video

    Reading Time: 4 minutes

    Want to capture all 360 degrees of an object with your camera? Adafruit has recently shared a 3D printing project that shows you how to create an inexpensive turntable made for photographers and videographers. 

    As anyone in the photography or film world knows, the many different types of production equipment that are available can be incredulously expensive. Even something as simple as a turntable (no, not the kind you spin your father’s old records on) can be quite costly for aspiring photographers or even a professional on a budget.

    A photography turntable is a flat platform that has one job: spinning. In doing so, it provides a 360 degree view of whatever object happens to be stationed upon it at the time. This piece of equipment is oftentimes used for product photography, adding motion to video clips, as well as for capturing intricate details and propping up an object to improve lighting.

    There’s no doubt that this tool is helpful, but it can be difficult for a frugal photographer to justify spending $100+ on a platform that simply spins around. Thankfully, the open source hardware pioneers at Adafruit have recently shared a DIY turntable that you can create with 3D printing and various electronic components.

    This turntable platform has an adjustable rotation speed, clockwise and counterclockwise rotation, and interchangeable platforms that you can 3D print. Let’s take a look at what you need to build your own 3D printed motorized turntable for photography and videography purposes.

    3D Printed Motorized Turntable: What do you Need?

    As this project was featured on Adafruit, most of the non-3D printed supplies you’ll need can be obtained directly from them. The STL files for the turntable and base are available on Thingiverse. Aside from your 3D printer and filament, here’s what else you’ll need to build your own 3D printed motorized turntable:

    Without including the 3D printing filament that you’ll end up using for this project, all of the required electronics and components will only cost you around $35. Now that’s a bargain!


    3D Printed Motorized Turntable: Putting it Together

    If you’re relatively inexperienced with electronics, this project is actually the perfect place to start learn some soldering skills. The circuitry for the turntable is quite easy to follow, using just five components. The main source here is the Itsy Bitsy board, which runs CircuitPython code to control the mechanics of the turntables and supply power via USB or battery.

    You’ll have to solder a LiPo battery to the board, and also mount the potentiometer, which controls the rotation speed; the SPDT switch controls, which determines whether the turntable spins clockwise or counterclockwise; and the servo motor, which keeps things spinning along. Check out the circuit schematic below.


    Once the electronics are assembled, the next step is to run the CircuitPython code on the Itsy Bitsy M0 board. You can find the script and further programming instructions on the Adafruit website.

    There’s only two primary parts that you’ll need to 3D print: the electronics enclosure and the turntable platform. The 3D models are designed to make the assembly process easy, equipped with a snap-fit back to allow access to the electronics, as well as cutouts for both the USB and servo motor.


    According to Liz Clark, the author behind this project, she 3D printed the parts at a 0.2 layer height with 20 percent infill. The maker also suggests using supports to ensure that the cutouts have accurate dimensions. She also points out that the 3D models can be easily modified or resized on Fusion360 to fit your needs. 

    The final step is putting it all together, starting off with soldering the electronics. Once the soldering process is completed, Clark explains how to properly wire the components into the 3D printed enclosure, beginning with mounting the USB micro B extension into the cutouts and finishing up with the servo. We won’t go into every detailed step here, so if you’re planning on taking this project for a “spin”, be sure to check out the Adafruit project page for the entire play-by-play.

    Once you complete the assembly process and place the 3D printed turntable platform on top of the servo, you’ll have your very own 3D printed motorized turntable. Now you can take 360 degree photos or videos of your 3D prints, products, or anything else that manages to fit on this affordable, yet highly capable, DIY turntable!


    License: The text of „Weekend Project: 3D Printed Motorized Turntable for Photo & Video“ by All3DP is licensed under a Creative Commons Attribution 4.0 International License.

    Subscribe to updates from All3DP

    You are subscribed to updates from All3DP

    Website: LINK

  • Weekend Project: 3D Print Your Own Workshop-Ready Steampunk Goggles

    Weekend Project: 3D Print Your Own Workshop-Ready Steampunk Goggles

    Reading Time: 3 minutes

    Many steampunk cosplay items provide mechanical style and an aesthetic look. But these elaborate 3D printed steampunk goggles are equipped with prescription lenses and welding filters that will keep your eyes safe while you’re in the workshop.

    Inspired by historical science fiction and steam-powered machinery, the steampunk genre has blossomed into one of the most popular styles of cosplay. Movies like Mad Max and Wild Wild West exemplify this mechanical fashion to a T, think clothing and accessories made with grinding gears and an anachronistic look.

    Read more: Sci-Fi Fashion: 20 Best Steampunk Props to DIY

    For today’s Weekend Project, we’re sharing some 3D printable steampunk goggles that not only look awesome, but are also extremely useful. Created by Thingiverse user TickTock, this wearable will have you looking the part, and will also protect your eyes when you’re building in the workshop. How? Well, these steampunk goggles are equipped with prescription lenses, welding filters, and even a magnifying lens as well.

    If you’re a maker who loves the steampunk look, these 3D printed goggles are perfect for you. Let’s take a look at what you need and how to build these sweet workshop shades.


    3D Printed Steampunk Goggles: What do you Need?

    The STL files for the 3D printed steampunk goggles are freely available via Thingiverse. Each model, aside from the headrest and eyecups, need to be printed twice. Produce one part as is, and then mirror it and print it again for the left side of the goggles. While the default version contains three lens slots, TickTock has also provided versions for two or five lens slots as well.

    Aside from the various tools listed below, the maker also utilized Rust-Oleum spray paints to give a metallic look to the 3D printed parts. Conversely, you can also try printing in materials like Copper fill, Steel fill, and Bronze fill, all of which are available through colorFabb.

    Here’s the rest of the material checklist for the steampunk goggles:


    3D Printed Steampunk Goggles: Putting it Together

    After printing the components for the goggles, the first step is to remove the supports that TickTock has embedded into his files. Since these support structures are already put in place, you don’t need to worry about adding any during the slicing process. The next step is to throughly paint the 3D printed parts, letting them dry before moving onto the assembly process.

    Once that step is complete, it’s finally time to start putting it together. There are quite a few steps before the assembly is complete, but TickTock lays everything out in detail on his Thingiverse post. The process is quite meticulous, as there are a number of small gears and pieces that need to be connected.

    Lastly, after the build is complete, you’ll add eyecups and lenses of your choice. If you wear prescription glasses, you’ll have to find the right lens for your eyes.


    If you want to find out more about how these steampunk goggles work, check out TickTock’s YouTube video below. And, if you’re ready to start constructing your own workshop-ready glasses, check out the full assembly instructions on Thingiverse.

    License: The text of „Weekend Project: 3D Print Your Own Workshop-Ready Steampunk Goggles“ by All3DP is licensed under a Creative Commons Attribution 4.0 International License.

    Subscribe to updates from All3DP

    You are subscribed to updates from All3DP

    Website: LINK

  • Project of the Week: 3D Print a Solar-Powered Open RC Boat

    Project of the Week: 3D Print a Solar-Powered Open RC Boat

    Reading Time: 3 minutes

    Want to spend the summer days sailing the seven seas and soaking up the sun? Thingiverse user UniversalMaker shows us how to build a 3D printed Open RC Boat equipped with solar panels.  

    With summertime approaching and warm weather abound, it’s the perfect time to head over to your local body of water to lounge out, swim, and maybe even sail a remote controlled boat?

    A German maker and Thingiverse user who goes by the name of UniversalMaker has revealed the Open RC Boat. The latest version is equipped with solar panels, made with 3D printed hull and electronics from Wavebreaker RC boat.

    Started in 2012, the OpenRC Project has already taken the 3D printing world by storm, and was recently used to create a RC Formula 1 car by renowned maker Daniel Norée. Now, you can take this open source project to the high seas, soaking up energy from the sun while you cruise around with your RC boat.


    Solar-Powered Open RC Boat: What do you Need?

    The STL files for this 3D printable parts are freely available on Thingiverse, all of which should be printed at 20 percent infill. UniversalMaker also shares the .scad file to enable customization of the model on OpenSCAD.

    If you want to build your own Open RC Boat with solar panels, here’s what else you’ll need:


    Solar-Powered Open RC Boat: Putting it Together

    The assembly process for the Open RC boat is surprisingly easy. First, use the customizer to select the parts you need. Print all of the parts, and then glue the main hull together and drill holes through the mounting plates so you can insert m3 screws.

    Once you have the 3D printed hull glued together, it’s time to take the electronics out of a toy boat. Check out the photo below to see which components are used and where they are placed.


    After the boat and electronics are assembled, use clear spray paint to make everything watertight, eliminating the porosity that FDM printing tends to create.

    If you want to add the solar upgrade to the Open RC Boat, which is optional, there are some other parts you’ll need to 3D print. These 3D printed holders will be used to mount the solar panel to the boat.

    Check out UniversalMaker’s YouTube video below for more detailed assembly instructions. He also shares some important information tips on the project’s Thingiverse page, so be sure to check that out while you’re downloading the STL files.

    Happy sailing!

    License: The text of „Project of the Week: 3D Print a Solar-Powered Open RC Boat“ by All3DP is licensed under a Creative Commons Attribution 4.0 International License.

    Subscribe to updates from All3DP

    You are subscribed to updates from All3DP

    Website: LINK

  • Weekend Project: Create a 3D Printed Pocket Microscope from E-Waste

    Weekend Project: Create a 3D Printed Pocket Microscope from E-Waste

    Reading Time: 4 minutes

    Have an ancient DVD or CD drive collecting dust in your garage? You can use your 3D printer and a recycled lens to create an e-waste pocket microscope. 

    For those of us living in the modern world, it’s hard to imagine surviving without the electronics that have become such an integral part of our lives. However, as new and innovative devices replace the electronics of yesteryear, e-waste is quickly piling up across the world.

    This is why so many environmentally-conscious makers prefer to salvage useful components from old computers, CD/DVD players, and so on.

    One maker, who is aptly named “The-PC-Bloke”, recently shared an incredibly project on Instructables that shows how to make a pocket-sized microscope with your 3D printer and e-waste. The maker had a few goals he wanted to satisfy with this project, including sourcing parts from e-waste, creating something useful, portable, and child-friendly, while also keeping things simple.

    His solution was to take the lens from an old CD drive and use 3D printing to transform it into a microscope.


    3D Printed Pocket Microscope: What do you Need?

    Believe it or not, you don’t need much to construct a functional pocket-sized microscope. Alongside your 3D printer and some PLA filament, you’ll also require an old CD drive that you can disassemble and source the primary lens from.

    The maker uses a relatively ancient IDE interface CD drive, but you should be able to find the proper lens in any spare CD, DVD, or BLU-RAY player. In addition, make sure you have a pair of wire cutters and a cross-head screwdriver handy to help take your e-waste apart.


    3D Printed Pocket Microscope: Putting it Together

    First and foremost, you’ll have to source the lens from an old CD/DVD/BLU-RAY player, which are quite abundant and easy to obtain nowadays. Using the screwdriver, the maker behind this project carefully took apart his old CD drive, saving other parts along the way that could possibly be used for other creations in the future.

    For this project, you’ll need to safely retrieve the main focus lens, which is generally held inside the centre of a carriage by fine wires and magnets. You should be able to remove the lens with a pair of wire cutters. Unsure of how well this lens would work for magnification, The-PC-Bloke was pleasantly surprised by the outcome, able to clearly see the pixels on the display of his older smartphone devices.

    Once the main lens was unearthed, the maker moved onto the CAD design process, keeping in mind that he wanted something simple with pocket-sized portability. The-PC-Bloke goes into longwinded detail about his design process on his Instructables post, but we’ll go ahead and skip ahead to the fun part: 3D printing.

    The model itself is split into four different pieces, each of which was 3D printed with 100 percent infill at 0.1mm layer height. Once the printing process is complete, it’s time to assemble the microscope. You’ll probably want to do a bit of post-processing with high-grit sandpaper, which will help remove stringiness and blobs, as well as sharp corners, from the microscope enclosure.

    Lastly, insert the primary lens into the carriage and use some oil to ease the sliding motion and acquire a snug fit. In the project’s instructional guide, The-PC-Bloke concludes with a few test shows using the microscope (one of which you can see below), and the results are quite impressive to say the least!

    Check out the Instructables post to learn more about this easy and environmentally sound project!


    License: The text of „Weekend Project: Create a 3D Printed Pocket Microscope from E-Waste“ by All3DP is licensed under a Creative Commons Attribution 4.0 International License.

    Subscribe to updates from All3DP

    You are subscribed to updates from All3DP

    Website: LINK

  • Weekend Project: Make Your Garden Glow with 3D Printed LED Flowers

    Weekend Project: Make Your Garden Glow with 3D Printed LED Flowers

    Reading Time: 4 minutes

    Want to give your 3D printer the green thumb? Autodesk and Instructables content creator Becky Stern shares a project on how to make 3D printed light-up flowers with LED lights. 

    FDM desktop 3D printing has opened up a new world of possibilities when it comes to making customizable and decorative objects. By integrating LED lights, electronics, and other non-printed components, the potential to create practical or aesthetic projects with your 3D printer expands tenfold.

    Becky Stern is a Brooklyn-based content creator for Autodesk and Instructables, and her last couple of projects have strived to teach CAD design while supplying ornaments to spruce up your home. We recently covered her tutorial on how to create 3D printed LED mason jar lanterns, and now she’s back with another project to adorn your surroundings with.

    This project is simple, educational, and like any blossoming garden, will brighten up your day. Let’s take a look at how to create your own 3D printed LED flower.


    3D Printed Glowing Flowers: What Do You Need?

    To create your own 3D printed LED flower, you’ll need access to a 3D printer, as well as green PLA filament and white PLA filament (if you want to replicate Stern’s version). The STL files are freely available for download via Stern’s Instructables post, where she also explains how to design your own plastic bloom using Tinkercad.

    Outside of the typical desktop 3D printing equipment and filament, here’s what else you need to sprout the seed of this project:


    3D Printed Glowing Flowers: Putting it Together

    Stern kicks her Instructables project off with the CAD design process, explaining how to design your own flower model. She also provides the STL files for her own version, making this first step completely optional. However, if you want to become more familiar with 3D modeling, you can follow her step-by-step process on how to grow a digital flower on this freely available CAD software.

    The model is split into two different STL files, allowing you to pick and choose what color combination you want to evoke with your flower. The flower base should be 3D printed at 100 percent infill, while the pedals are printed at 20 percent infill with a concentric fill pattern.

    Once your flower pedal and stem are 3D printed, it’s time to prep the LED light by clipping both legs and fitting them into the 3D printed base. Be sure to keep track of which leg is the longer one, as this will be important in the following step.


    In the flower stem, there’s a slot for you to insert the battery. There’s a “+” indicator on the 3D printed model to show you which way the battery should be facing. Take the longer leg and line it up with the positive (+) side of the flower base. This should make the LED light illuminate with a white glow.

    Next, you’ll insert the LED into the top of 3D printed base, resting in the small channels that are placed at the opening of the stem. Then, slide the 3D printed flower pedal over the LED and voilà, you now have a 3D printed LED flower.

    The final step is optional, but definitely adds a bit of natural flair to your 3D printed flower. Stern uses a needle felting technique to create the bulb of the flower. By poking tiny holes in the fiber, you can tangle it up and create a dome-like shape to fit over the LED. This will help diffuse the light and produce a more relaxing glow.

    If you want to learn more about Stern’s educational and enjoyable project, check out the full instructions on her Instructables post, as well as the step-by-step video posted below.

    License: The text of „Weekend Project: Make Your Garden Glow with 3D Printed LED Flowers“ by All3DP is licensed under a Creative Commons Attribution 4.0 International License.

    Subscribe to updates from All3DP

    You are subscribed to updates from All3DP

    Website: LINK

  • Weekend Project: Five Things to 3D Print for Your Cinco De Mayo Celebrations

    Weekend Project: Five Things to 3D Print for Your Cinco De Mayo Celebrations

    Reading Time: 4 minutes

    Are you getting ready to celebrate the Mexican holiday of Cinco de Mayo this weekend? Prep for the festivities, which usually entail endless margaritas, music, and food, with some of these Cinco de Mayo-themed 3D prints!

    Today is May 5th, and while that might seem like an ordinary day to a majority of the world, it’s a cause for celebration all across Mexico, as well as in the United States and other countries. The annual holiday commemorates the Mexican Army’s victory over the French Empire in on May 5, 1862, but for many people, it has evolved into a cultural appreciation for the amazing food, drinks, and music that have come out of Mexico.

    Regardless of where you and your ancestors come from, there’s no denying that Cinco de Mayo is one of the most fun holidays around, especially if you love Mexican culture and cuisine. Why not use your 3D printer to help prepare you for the long day of margaritas, tacos, nachos, and salsa music? Here are five quick and easy things you can 3D print to make your Cinco de Mayo a special.

    As some of these models will come in contact with food, we highly recommend using food-safe filaments when taking on these projects.

    Margarita Glass Rim Salter


    What is it? Nothing says Cinco de Mayo quite like a chilled margarita with lime in a salt-rimmed glass. This 3D printable glass rim salter can do the job for you. Not only does it have the word “MARGARITAS” embedded on it, but it can also be printed in the colors of the Mexican flag!

    Who designed it? heytiger

    Download here: Thingiverse

    Sombero Hat for Your Cerveza


    What is it? Hailing from Mexico, the sombrero is a wide-brimmed hat that helps shield your face from the sun. Why not 3D print a miniaturized version to keep the sun away from your beer? This 3D printable Sombrero is designed to fit over your bottle and give your beverage a bit of style.

    Who designed it? Steffen_lae

    Download here: Thingiverse

    3D Printed Taco Truck


    What is it? Everybody loves a good taco, and oftentimes, you’ll find the best ones come from your local taco truck. You can now 3D print your own truck capable of delivering tacos into your very hands. This 3D printable food truck doubles as a taco holder, making it easy to prepare and place your taco down onto the truck’s bed.

    Who designed it? Mizunoslove

    Download here: Thingiverse

    Coronarita Holder


    What is it? If you’ve never heard of Coronarita, then chances are you’ve never experienced Cinco de Mayo to its fullest. This cocktail mixes Corona beer and the classic margarita, making for a refreshingly twisted beverage for all (adults) to enjoy. With this Coronarita Holder, you can attach it to your margarita glass and hold the Corona in place, making for the ultimate drinking experience.

    Who designed it? AddisonGrist

    Download here: Thingiverse

    PotatoChip-E


    What is it? The best way to kick off Cinco de Mayo (besides with a Coronarita) is with a nice plate of chips and salsa. Bonus points if those chips are served on the sombrero of a 3D printed Marachi band member. He’s not big enough to hold too many tortilla chips, but what he lacks in size he makes up for with a seriously sweet mustache and guitar.

    Who designed it? Wexion

    Download here: Thingiverse

    License: The text of „Weekend Project: Five Things to 3D Print for Your Cinco De Mayo Celebrations“ by All3DP is licensed under a Creative Commons Attribution 4.0 International License.

    Subscribe to updates from All3DP

    You are subscribed to updates from All3DP

    Website: LINK

  • Project of the Week: Make Your Own Coin-Spitting Mario Question Block

    Project of the Week: Make Your Own Coin-Spitting Mario Question Block

    Reading Time: 3 minutes

    For this week’s Project of the Week, 3D print and Arduino your way to this coin-spitting Question Block from universe of Nintendo favorite, Mario.

    Loose change, shrapnel… whatever you call it, the blight of small denomination coins deserves better than sitting in a jar on the shelf at home. Which is perhaps the thought that crossed maker Jonathan Whalen’s mind when he created a fully functioning Question Block from the Mario universe.

    Putting his spare change to use in some video game themed frivolity, he fashioned a Question Block from the Nintendo’s Mario video game series using a 3D printer, Arduino and a bunch of other small electronics parts.

    The result is pretty spectacular. We’re just holding out for the mushroom-ejecting remix.

    Find out how to build your own after the jump.

    Super Mario Question Block: What do You Need?

    In order to create your own Super Mario Question Block, you’ll first need to download and print the required STL files. Handily Whalen has published them on the usual file repositories — you can get them from Thingiverse here.

    Naturally you’ll need to print the main sections of the box in that signature yellow color too, which means an appropriately hued filament. That, and white for the question mark symbols themselves.

    It’s also worth keeping in mind that the box will only shoot $1 coins. Whalen provides an STL to print your own correctly sized coins, which would naturally look best printed in gold filament.

    Here’s the full bill of other materials you’ll need:

    Super Mario Question Block: Putting it all Together

    To create this coin-shooting Question Block, Whalen (a.k.a. Jonnywayway) 3D prints the outer shell, glue-on question marks and structure of the internal coin-firing mechanism. Printed at 20% infill with no supports, Whalen describes it as a long print, so leave yourself adequate time if you’re planning to whip this up to a deadline.

    The mechanism to spit the coins out of the box is ingenious for its simplicity. A sliding carriage slots into a guiding rail printed in place on the “roof” part of the box. Held in place with a rubber band, this carriage is free to slide deeper into the box, bringing a coin with it, before firing back into place under the elastic tension from the band.

    With the band and carriage in place, Whalen fixes the Arduino Nano, vibration sensor and slide switch in place (also on the roof of the box) with screws, before turning his attention to the stepper motor.

    Inserted into one of the printed pieces for the mechanism, the motor mounts to the guiding rail. With a printed cog attached to its driveshaft, the stepper draws the carriage down, releasing it to spring back into place and launching a coin in the process.

    Wiring these electrical components up, then its just a case of closing the box and gluing the decorative elements on the outside.

    It’s worth noting this’ll be a tough project for absolute beginners. Whaley linking to the Arduino code but does not going as far as to explain how to set it all up. The same goes for hooking up power inside the Question Block. Though we imagine carefully watching his build video should give some clues.

    You can find all the elements of Whaley’s build on his Thingiverse page for the project. Happy making!

    License: The text of „Project of the Week: Make Your Own Coin-Spitting Mario Question Block“ by All3DP is licensed under a Creative Commons Attribution 4.0 International License.

    Subscribe to updates from All3DP

    You are subscribed to updates from All3DP

    Website: LINK

  • Weekend Project: 3D Print Your Own Honeycomb-Designed Card Wallet

    Weekend Project: 3D Print Your Own Honeycomb-Designed Card Wallet

    Reading Time: 3 minutes

    Need a safe and sleek place to store your credit cards, gift cards, and your other wallet inhabitants? This fully 3D printed Card Wallet is extremely easy to make, and has a card pusher to give you instant access to your plastic money!  

    Most of the projects we share at All3DP are primarily focused on 3D printing, but some of them require other components and technologies to bring the idea to life. Unfortunately, that could end up being quite a drain on your wallet, so we decided to bring you a fully 3D printed that will not only save you money, it will also store your credit cards too!

    The 3D printable Card Wallet by Instructables user mdavisgtm is a simple, yet sleek design, a unique fusion of minimalistic style and functionality. The wallet uses card inserts to individually hold each card in place so they don’t slip out. It’s also equipped with a card pusher that is activated by sliding a knob on the side of the print.

    Not only is this impressive design fully 3D printed, it doesn’t require any support structures, and can also be assembled in under one minute without any glue or screws.

    Let’s take a closer look at how to assemble the fully 3D printed Card Wallet.


    3D Printed Card Wallet: Putting it Together

    The Card Wallet comes in seven individual parts, all of which can be 3D printed without support structures. The STL files are all freely available on the Instructables post that details the project.

    There are four different models, but the card insets must be printed four times at a .08mm layer height. All of the other parts are printed at a .16mm layer height. You can even print a multi-colored version by switching filaments after the first couple of layers of the Top-print 1.STL.

    Once you’ve finished printing the parts, the rest of the assembly process is a cinch. Take the bottom part of the wallet and stack the four Card Insert parts on top of one another. Then, snap the Card Pusher onto the designated post at the bottom of the model. Finally, slide the honeycomb-designed top into place and there you have it. Pretty easy, right?

    Now that you have your 3D printed Card Wallet ready, pick your four most important cards and slide them into the slots. You now have a secure place to keep your cards without taking up too much space in your pockets. If you want, you can even tape the card wallet to the back of your phone case!

    If you’re more of a visual learner, be sure to check out the short assembly video below. You can find the STL files and learn more about this project by heading over to Instructables.

    License: The text of „Weekend Project: 3D Print Your Own Honeycomb-Designed Card Wallet“ by All3DP is licensed under a Creative Commons Attribution 4.0 International License.

    Subscribe to updates from All3DP

    You are subscribed to updates from All3DP

    Website: LINK

  • Weekend Project: Prepare for ‘Avengers: Infinity Wars’ with this 3D Printed Ironman Helmet

    Weekend Project: Prepare for ‘Avengers: Infinity Wars’ with this 3D Printed Ironman Helmet

    Reading Time: 5 minutes

    Looking forward to the release of Avengers: Infinity Wars? Why not 3D print a fully functional Ironman helmet. This wearable looks like it came straight out of the big screen, equipped with light up eyes and a retractable face plate.  

    Unless you’ve been living under a rock, or, if you reside in the Marvel universe, on the moon of Titan, you’ve probably heard the hype about the new Avengers: Infinity Wars film. As superhero movie buffs flock to theatre this weekend, show them how much of a fanboy-or-girl you are with some 3D printed cosplay.

    Originally created by Instructables user “samohtep” back in 2012, this 3D printed Ironman helmet is one of the most realistic prints we’ve seen come out of Stark Industries. This advanced project will show you how to produce a wearable Ironman helmet that is equipped with a retractable faceplate and light-up eyes.

    This project is probably not exactly suitable for beginners, but should be doable for more experienced makers. But hey, each superhero needs to start somewhere. Of course, if you think this project is too tough for you, you can always opt for an easier print, such as this Captain America helmet or Thor’s hammer. There are also easier options for 3D printing an Ironman helmet, but this version was definitely the best we could find.


    3D Printed Ironman helmet: What Do You Need?

    This is not your average 3D printed helmet, as it requires a handful of assembly steps and some heavy post-processing. Firstly, you’ll need the STL files, which are available in the Instructables post detailing the project.

    Aside from a sizable 3D printer, some red and gold PLA filament, and the suave of Tony Stark, here’s what else you need to create your own 3D printed Ironman helmet:

    Components for the helmet:

    Post-processing checklist:

    Be advised that you’ll need to wear rubber gloves, long sleeved clothing, and a breathing helmet with eye protection throughout the assembly process. In order to make a realistic helmet, there are some potentially hazardous chemicals that will be used, such as the fiberglass cloth, primer spray, automotive paints, and so on. Find a ventilated and open area to assemble the Ironman helmet, it’s always better to be safe than sorry.


    3D Printed Ironman helmet: Putting it Together

    For the 3D printing process, samohtep stresses making the parts thick, so that they don’t warp. After some trial and error, the original STL files were thickened to provide a better structure. After the various parts are printed, it’s time to assemble them together.

    To do this, the creator of the project first connected the two main halves of the helmet and clamped them together. After this, he laid down three layers of fiberglass cloth and epoxy resin. Once hardened, he added a few layers of bondo to the outside and sanded it down to fill the gap on the exterior surface. At this point, it would be wise to wear your protective gear, as the fiberglass cloth can irritate both your skin and eyes.

    Once the 3D printed parts are assembled, samohtep installed the cabinet hinges, which are used to open and close the face plate. Using hot glue, the top piece of the hinge was attached to the top edge of the interior face of the faceplate. This took some tweaking to ensure that both the faceplate could open and close, and also that it didn’t cause discomfort to the wearer. He also added a pair of center release buckles to each side of the neck opening.

    After the hinges and jaw connectors are properly placed, the maker added a layer of padding inside of the helmet. To do so, he cut several 1″ wide strips of foam and attached them to the back with a dab of hot glue.


    Next, he used a .375″ wide circuit board and five bright white LEDs for the eyes, placing them inside a container made from an index card and electrical tape. According to samohtep, it took more trial and error to situate the lights properly, which you can follow along in more detail via his Instructables post.

    After priming the entire helmet, the maker used red and gold spray paint from Duplicolor Perfect Match to add the signature Ironman look. Keep in mind that, if you use the same automotive paint used by samohtep, you should continue wearing your breathing mask during the priming and painting process. In between the four to five coats of paint, he did some light sanding to keep the surface of the helmet as pristine as possible.

    Lastly, to keep the faceplate up, the ambitious maker decided to add .1875″ round rare earth magnets to the upper rim of the face to help keep the faceplate open. Final touches include some more sanding and adding more padding or felt to areas that could use more comfort.

    All in all, this 3D printed Ironman mask is a difficult yet rewarding way to celebrate the release of Avengers: Infinity Wars. You might not have the riches or charm of Tony Stark, but with this project, you can at least match his powers.

    If you want to learn more or get the full instructions, check out the Instructables post here!

    Website: LINK

  • Project of the Week: Wield the Power of the Infinity Gauntlet from New ‘Avengers’ Film

    Project of the Week: Wield the Power of the Infinity Gauntlet from New ‘Avengers’ Film

    Reading Time: 3 minutes

    Looking forward to the release of Avengers: Infinity Wars? Why not become the most powerful villain in the Marvel universe with your own 3D printed Infinity Gauntlet. 

    This weekend, Marvel fans will be flocking to the theatre to see the highly anticipated superhero film Avengers: Infinity Wars. The movie puts the Avengers up against the all-powerful villain Thanos, a mad titan that has his heart set on stealing the Infinity Gems held by the Elder of the Universe, using them to destroy the team of heroes and life as we know it.

    Once the six ‘Soul Gems’ are inserted into the Infinity Gauntlet, the wearer gains both omnipotence and omniscience, not exactly something you’d want an infamous supervillian to have in their possession. However, you can use your 3D printer to acquire this unprecedented power by creating your own Infinity Gauntlet.

    In anticipation of Avengers: Infinity Wars, which is officially released on April 27th, a team of professional 3D designers called Do3D have unveiled a 3D printable Infinity Gauntlet. One YouTuber known as The Broken Nerd recently obtained the STL files and produced an insanely accurate version of this powerful movie prop.

    Want to be the most intimidating member in the cinema this weekend? Celebrate the release of Avengers: Infinity Wars by 3D printing the Infinity Gauntlet.


    3D Printed Infinity Gauntlet: Putting it Together

    In order to 3D print the Infinity Gauntlet, you’ll need to purchase the STL files from Do3D. You can find the price and receive the model by contacting the design firm at [email protected] Although you’ll have to pay for the model, you can’t really put a price on such unlimited power.

    Once you have 3D printed the Infinity Gauntlet at your selected scale (the bigger the better), it’s time to make this prop look like the real deal. If you want to follow The Broken Nerd’s assembly and post-processing method, you’ll need a few items:


    After 3D printing the Infinity Gauntlet, The Broken Nerd coats the prop with XTC 3D, which is a high performance 3D print coating solution. Then, he goes onto spray an even coat of primer across the 3D printed prop, preparing it for painting. In order to achieve a rustic, bronzed effect, the maker uses a few layers of different colored paints. He starts with black gloss spray paint, followed with a gold/bronze spray paint. Finally, he weathers the model down by adding some black acrylic paint in certain areas.

    Unfortunately, the YouTuber doesn’t go into detail on how he fused the glowing Infinity Stones into his model. However, other tutorials suggest using different colored plastic gems and LEDs to make the prop shine with galactic power as it does in the film.

    If you want to learn more about the project, check out The Broken Nerd’s video below, and get ready to save (or destroy) the universe with your 3D printed Infinity Gauntlet.

    Website: LINK

  • Weekend Project: Celebrate Earth Day with This 3D Printed Greenhouse Dome

    Weekend Project: Celebrate Earth Day with This 3D Printed Greenhouse Dome

    Reading Time: 3 minutes

    With Earth Day coming up this weekend, why not celebrate by 3D printing a DIY greenhouse dome for your garden? Polish up that green thumb, it’s time to use those maker skills for a Mother Nature-approved project.  

    Nature is filled with majestic plants, vibrant flowers, and ripe fruits, all of which tend to tickle the sentimental side of human beings. While it’s always nice to hike through areas that are rich with green, you can also bring the beauty of the earth into your own backyard.

    No matter what type of climate you reside in, a greenhouse can create the ideal environment for your favorite plants. You don’t need to create a gigantic greenhouse, you can also 3D print your miniaturized version on your own!

    Designed by Thingiverse user “graph”, this 3D printable Greenhouse Dome is a great way to show your appreciation for the environment and celebrate Earth Day 2018. On top of that, you’ll be able to start sprouting seeds in a warm and nurturing greenhouse.

    It’s not too often we see a 3D printing project that will end with some beautiful plants or flowers, so let’s take a quick look at this special Earth Day-edition Weekend Project!


    3D Printed Greenhouse Dome: What Do You Need?

    To build your own 3D printed Greenhouse Dome, you’ll need to do a lot of 3D printing. Depending on the size you want to make, the models consist of numerous tiny pieces that need to be assembled together. For just one mini Greenhouse Dome, you’ll need to print over 130 parts. Luckily, most of the individual pieces are small and can be grouped together.


    You can find the STL files for the Mini Greenhouse Dome here, along with the quantity for each model. If you want to print the larger model, you can also find the STL files on Thingiverse. The unique part about the miniaturized version is that it comes with its own 3D printed plant pot. For the larger dome, you’ll need to buy one separately.

    Other than your 3D printer, PLA filament, and a whole lotta patience, you’ll also need to purchase some greenhouse plastic film to wrap around the dome. Add some soil and your plant of choice and you should be good to grow!

    For more information on this environmentally sound project, check out the Thingiverse post.


    License: The text of „Weekend Project: Celebrate Earth Day with This 3D Printed Greenhouse Dome“ by All3DP is licensed under a Creative Commons Attribution 4.0 International License.

    Subscribe to updates from All3DP

    You are subscribed to updates from All3DP

    Website: LINK

  • Weekend Project: How to 3D Print Watertight and Airtight Containers

    Weekend Project: How to 3D Print Watertight and Airtight Containers

    Reading Time: 3 minutes

    A new Instructables post from user mikey77 shows how you can adjust your 3D printing slicer settings to make watertight and airtight containers, cups, tanks, and more.  

    There are tons of useful and unique objects that you can create with your desktop 3D printer, but there are certain factors that prevent makers from properly producing food-safe and watertight items. Generally speaking, the layering of FDM prints lead to micro spaces that allow bacteria to build up, water to leak, and air to seep out.

    But a new Instructables post from user mikey77 claims that with just a few tweaks to your 3D printing slicer settings, you can 3D print containers, cups, and tanks that are watertight and airtight. The concept is simple. All you need to do adjust your slicer to prompt over-extrusion of your filament.

    That’s it? Well, pretty much. You’ll have to manually change a number of slicer settings, and, if you’re planning to print something for the kitchen, make sure you’re using a food-safe filament, a clean extruder, and the right nozzle.

    Let’s take a closer look at the maker’s methodology, slicer settings, and impressive results.


    3D Printed Watertight and Airtight Containers: How to Make it

    Aside from your 3D printer, all you’ll need here is a reliable slicing software and PLA filament, preferably one that is considered to be food-safe.

    To achieve over-extrusion, you’ll need to slow down your print speed and increase the extrusion multiplier. By doing so, the extrusion will be wider and overlap side by side layers. There are a number of slicer settings you’ll need to adjust, and thankfully, mikey77 shares all of the specifics on his Instructables post. He uses the MatterControl slicer in his example, but the settings should be able to transcend into any slicing software.

    These setting adjustments will lead to 3D prints that are more solid, making it easier to clean and keep bacteria out. The maker claims that storing and measuring dry food should be fine with most types of PLA. But when it comes to holding liquid, you’ll want to use a filament that doesn’t have additives and is rated food-safe.


    You’ll also want to utilize a clean extruder for all food-safe 3D prints. This is because previously used filaments can leave residue in the extruder, and could end up being infused into your food-safe filament.

    Lastly, to be on the safe side, you should also use stainless steel or another lead-free nozzle to print food-safe items, rather than the commonly used brass nozzle. Some brass nozzles are alloys that include lead, which could seep out and come in contact with food.

    Mikey77 also claims that his slicer settings could also be used to produce airtight objects like air pressure tanks and artificial muscles. In his Instructables post, he also includes STL files for a glass and beaker, allowing you to experiment with this innovative concept.


    License: The text of „Weekend Project: How to 3D Print Watertight and Airtight Containers“ by All3DP is licensed under a Creative Commons Attribution 4.0 International License.

    Subscribe to updates from All3DP

    You are subscribed to updates from All3DP

    Website: LINK

  • Project of the Week: 3D Print Your Own Articulating LED Lamp

    Project of the Week: 3D Print Your Own Articulating LED Lamp

    Reading Time: 3 minutes

    Engineer and maker Igor Albuquerque has created a 3D printed articulating LED lamp that you can mount on your desk and configure to fit your work or study environment. 

    Studying or working late tonight? Well, you’ll need good lighting at your desk to keep your eyes comfortable and healthy. Why not use your 3D printer to create a flexible LED lamp?

    Today’s project is an Articulating LED Lamp designed by Brazilian engineer and maker Igor Albuquerque. This 3D printed desk accessory is extremely versatile and doesn’t get in the way while you’re busy at work. The designer provides three different sized arms, allowing you to extend the reach of the lamp however you see fit.

    Albuquerque modeled his lamp after the 3D printable articulating phone mount designed by Kenneth Haynie. Thanks to the adaptable design, you’ll be able to configure the desk lamp to your needs.

    Previously featured on our list of 3D printable back to school supplies, this DIY lamp is the perfect addition to your desk. Want to build your own? Let’s shine a light on the 3D printed Articulating LED Lamp!


    3D Printed Articulating LED Lamp: What Do You Need?

    In order to create your own 3D printed Articulating LED Lamp, here’s what you’ll need:

    You can download the STL files for the model from Thingiverse.

    Although this project isn’t too difficult to 3D print and assemble, Albuquerque does caution us to be careful when working with electricity.

    “Make sure there is no short circuit and just try to connect to the electrical power plug after making sure that all components are properly connected and double insulated. If you don’t have enough experience working with electricity, ask for others help,” he states on his Instructables post.

    You should also be careful not to touch any exposed wires or the metal part of the LED lamp once it’s turned on. If the wiring is exposed, keep it out of reach from children and pets.


    3D Printed Articulating LED Lamp: Putting it all Together

    The lamp is comprised of eight individual parts, all of which need to be 3D printed once, aside from the nut.stl (you’ll need to print this part four times). Albuquerque suggests using 0.2mm resolution and 20 percent infill. Additionally, only the lamp holder.stl requires support structures.

    Once you’ve 3D printed the various parts that make up the Articulating LED Lamp, it’s time to put everything together. First, you’ll start with the wall mount, threading the bolt through the wall mount and the wall joint parts. Next, attach the female arm to the wall joint using a knob, followed by connecting the male arm to the female arm. Then, attach the lamp holder to the other end of the male arm and pass the LED spotlight through the lamp holder.

    Here’s a great picture showcasing the full assembly process:


    Finally, mount the Articulating LED Lamp to your desk area and plug it in. You should have a working light to guide you through your studies or work.

    If you want to view the full assembly instructions, check out Albuquerque’s Instructables post. Happy making!

    License: The text of „Project of the Week: 3D Print Your Own Articulating LED Lamp“ by All3DP is licensed under a Creative Commons Attribution 4.0 International License.

    Subscribe to updates from All3DP

    You are subscribed to updates from All3DP

    Website: LINK

  • Weekend Project: Take Aim With This Awesome 3D Printed Mini Crossbow

    Weekend Project: Take Aim With This Awesome 3D Printed Mini Crossbow

    Reading Time: 3 minutes

    South Korean maker “DIYPark” shows us how to create a fully 3D printed and functional Mini Crossbow. Set up some targets and take aim, because it’s time to get your archery on.  

    When taking on a DIY project, we often see how combining 3D printing with electronics and other technologies can produce some unbelievable objects. But sometimes a 3D printer is all you need to bring a spectacularly fun concept to life.

    That’s what South Korean maker Park Gwan Su (known on Thingiverse on DIYPark) did with his 3D printed Mini Crossbow. This tiny bow will have you feeling like Robin Hood of the maker world. Not only is it fully functional, but it also packs quite a punch, so you’ll need to be responsible and cautious with where you’re taking aim.

    Nonetheless, this Weekend Project is a great way to showoff the capabilities of your desktop 3D printer, and will provide endless enjoyment to you, your family, and your friends. Let’s take a closer look at this incredible 3D printed Mini Crossbow.


    3D Printed Mini Crossbow: What Do You Need?

    In order to build your own 3D printed Mini Crossbow, all you need is your 3D printer, a few different colors of filament, some fishing line for the crossbow string, and toothpicks for ammunition.

    This project will require a fair amount of 3D printing time, as the model is made up of 10 individual parts. There’s also some targets that you can print out as well, giving you something to shoot at once your bow is complete.

    You can download the STL files for free from Thingiverse or Cults3D. The maker uses 20 percent infill for the parts, none of which require support structures. Feel free to get creative with colors and personalize the Mini Crossbow to your style!

    According to the project’s creator, the crossbow is capable of firing off four consecutive shots. DIYPark also recommends wearing safety goggles to protect yourself from any stray arrows, because, well, it’s better to be safe than sorry.


    3D Printed Mini Crossbow: Putting it all Together

    In his Youtube video on the project (posted below), DIYPark shares insight into every step of the project, from 3D modeling to assembly. Right around the 3:30 mark, the maker moves on from the CAD modeling process to the assembly. The instructions are clearly depicted and easy to follow, but may require a tiny amount of post-processing to make sure everything fits together.

    Once all of the 3D printed parts are put together, it’s time to thread the fishing line onto the bow. Simply tie some knots on each end and snip the leftover sting off. And there you have it. Load in some toothpicks and take aim at the mini targets that DIYPark provides with the other STL files.

    And don’t forget, while it might look like a toy, the Mini Crossbow can be dangerous and shouldn’t be taken lightly. Please be careful where you aim this tiny bow, and don’t let children play around with it without adult supervision.

    License: The text of „Weekend Project: Take Aim With This Awesome 3D Printed Mini Crossbow“ by All3DP is licensed under a Creative Commons Attribution 4.0 International License.

    Subscribe to updates from All3DP

    You are subscribed to updates from All3DP

    Website: LINK