Kategorie: Science

  • Iranian Artist Counters Digital Colonialism with “She Who Sees the Unknown” Display

    Iranian Artist Counters Digital Colonialism with “She Who Sees the Unknown” Display

    Reading Time: 3 minutes

    Morehshin Allahyari is an Iranian artist and activist. For her latest exhibition, she is using ancient illustrations of Middle Eastern dark goddesses to create sculptures using 3D modeling, scanning, and printing. Her aim is to fight against “digital colonialism” with the display called She Who Sees the Unknown.

    Digital colonialism, artist and activist Morehshin Allahyari explains, is when a company goes to a Middle Eastern cultural site and begins a reconstruction project which then isn’t made public. She adds that corporations are even using traditional mythologies and cultural artefacts to make a profit.

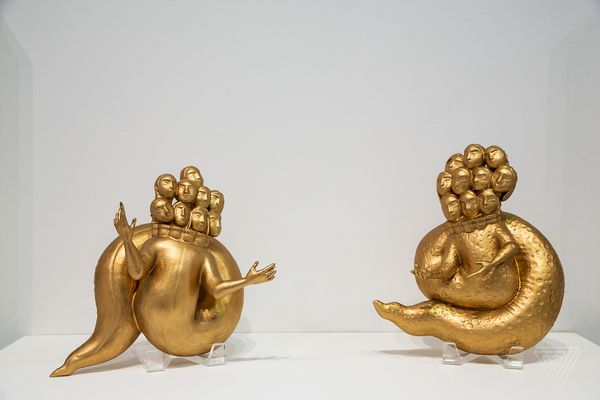
    However, Allahyari is countering this by using 3D modeling, scanning, and printing to redistribute forgotten cultural artefacts. By using modern technologies to create 12 sculptures, she is archiving dark female figures worth remembering.

    She Who Sees the Unknown
    She Who Sees the Unknown

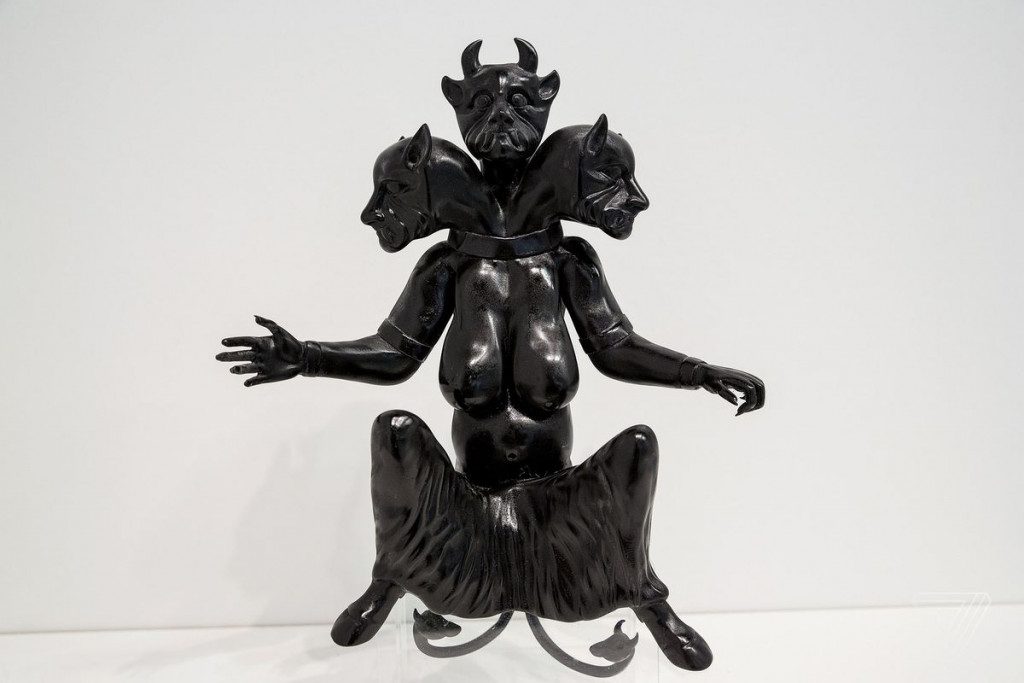
    Her source material is ancient illustrations of Middle Eastern dark goddesses. The interesting results are her way of reclaiming ownership of traditional mythologies.

    The work, called She Who Sees The Unknown, is now on display at The Armory in New York City. The display explores the “forgotten histories and narratives” of female figures in North Africa and the Middle East.

    “It’s a meaningful archive that’s focused on these kinds of dark female figures in the Middle East. We don’t have that archive at all,” Allahyari explains.


    a

    She Who Sees the Unknown Made Using Ancient Sources and Modern Technology

    Allahyari explains that she is not a sculptor and that she wouldn’t know where to begin. But 3D modeling and printing is something which she knows how to do well.

    “The first time that I saw an object getting 3D printed, I was really fascinated by this idea of seeing a digital file, a digital model from a platform becoming a physical object. It blew my mind actually watching that process,” Allahyari said.

    To create She Who Sees the Unknown, Allahyari began by researching Middle Eastern ancient texts. She wanted to make sure her prints were as accurate as possible.

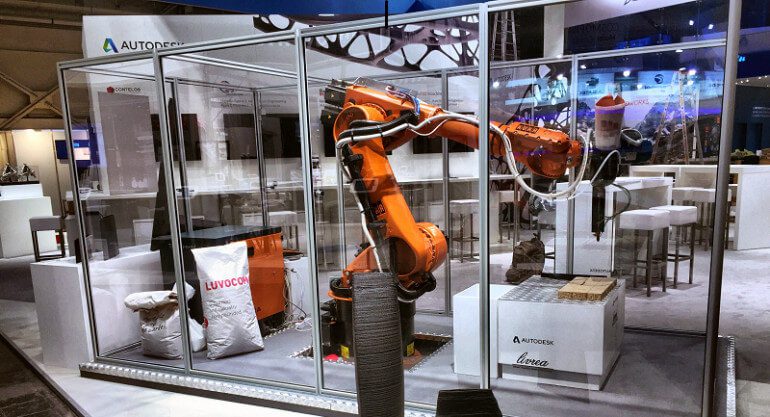
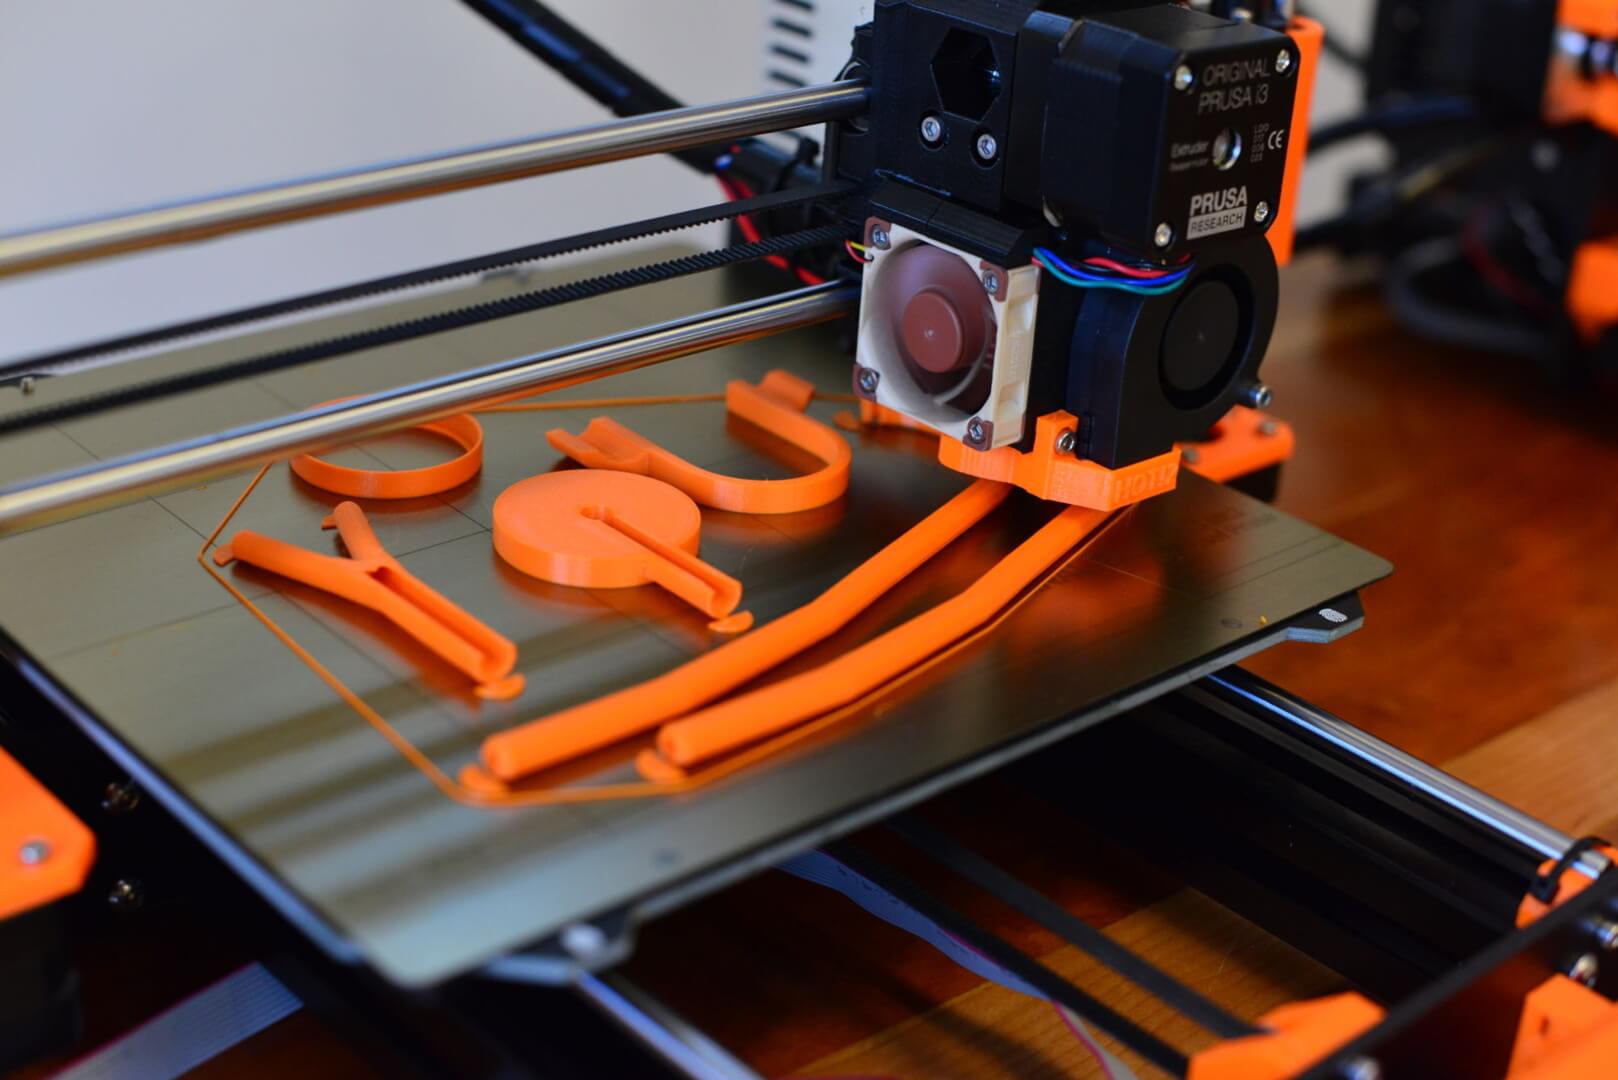
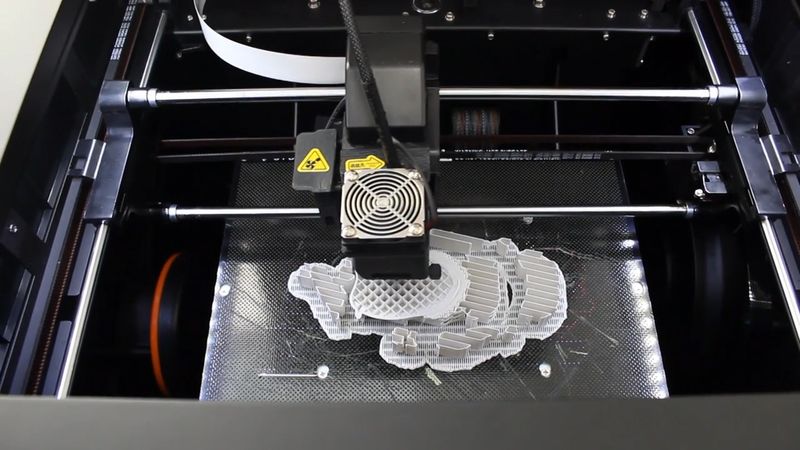
    Next, she created a scan of each sculpture and 3D printed it. To print, Allahyari used resin and the Stratasys J750 printer at New York University’s LaGuardia Studio. Each sculpture takes between fifteen and twenty-five hours to print. Allahyari then sands down and paints the resulting prints.

    She Who Sees the Unknown
    She Who Sees the Unknown

    Finally, to ensure the information is clear and available to the public, Allahyari has included a video essay or storytelling component with each of the sculptures. The stories link each goddess to a modern source of oppression.

    As well as the sculpture, She Who Sees the Unknown will include Ha’m-Neshini or “intimate public performances”. These involve Allahyari sitting together with other activists, artists and even scientists from the Middle East.

    “In this whole body of work, these figures and retelling their stories is the idea about what it means to embrace monstrosities and to take this power that these jinns have and use it against the powers that oppress,” Allahyari says.

    Find out more about each of Allahyari’s figures and their meanings along with her own story on her website.

    Source: The Verge

    Website: LINK

  • Lehvoss Group Provides Carbon-Reinforced Thermoplastics for World’s First 3D Printed Yacht

    Lehvoss Group Provides Carbon-Reinforced Thermoplastics for World’s First 3D Printed Yacht

    Reading Time: 3 minutes

    Livrea Yacht, an ambitious project from two Italian boat builders, will be the first-ever 3D printed yacht. The Hamburg-based Lehvoss Group is providing the team with carbon fiber-reinforced thermoplastics to produce parts with dedicated direct extrusion 3D printing technology.

    Francesco Belvisi and Daniele Cevola are two Italian boat builders with big and buoyant dreams. The duo is currently working on a project called Livrea Yacht, which involves designing and building a sailboat with 3D printing. The boat, dubbed the Mini 650, will enter into the upcoming 2019 Mini-Transat yacht race. This lengthy race starts in France and spans across the Atlantic ocean, ending in Brazil.

    Since 2014, the two boat builders have been working on a 3D printed yacht for this prestigious race. Their plan is to use 3D printing to “overcome the problems of traditional boat building.” In fact, the entrepreneurs recently won Italy’s National Innovation Award 2017 for their groundbreaking work.

    Together, the Italian entrepreneurs have also founded the company OCORE, which provides the dedicated direct extrusion 3D printing technology that is used in the project.

    As any seafarer knows, you can’t properly embark upon the ocean without a reliable crew. And so, the Italian designers teamed up with Autodesk and KUKA to help man the ship. The OCORE 3D printer works using a KUKA robotic arm, which is a customizable and automated manufacturing solution that improves production efficiency.

    However, these aren’t the only companies that are planning to get in on the action. The latest partner to climb aboard this project is the Lehvoss Group.

    Lehvoss Group, a subsidiary of Lehmann&Voss&Co.., is supplying the Livrea Yacht team with its LUVOCOM 3F materials. These carbon-fiber reinforced high-performance materials are based thermoplastic polymers, such as high quality polyamides and PEEK.

    “We are excited to have the LEHVOSS Group on board for this innovative project. They are an acknowledged global manufacturer of customized polymer materials. Their sponsorship, additional support and experience with dedicated materials for our technology has helped a lot in driving our project. In parallel, we now can also translate this technology to other industrial sectors for serial applications”, said Cevola, Managing Director of OCORE.


    OCORE’s 3D printing technology with KUKA robotic arm

    Livrea Yacht Project: Carbon-Reinforced Thermoplastics Make for Smooth Sailing

    The LUVOCOM 3F materials developed by Lehvoss are based on thermoplastic polymers and reinforced with carbon fibers, greatly improving layer strength and reducing warping.

    “The boat will be highly competitive thanks to the light and strong 3D printed parts. 3D printing reduces the build time for the boat dramatically and makes it also cheaper. We are looking forward not only to the first 3D printed boat but also to winning the competition in 2019”, added Belvisi, CTO of OCORE.

    To 3D print the boat, the Italians are using the patented OCORE material deposition method. This technique uses an algorithm inspired by fractals to make parts stronger, and works similarly to fused filament fabrication (FFF).

    The team is hoping that many parts of the sailboat will be made using this 3D printing process. However, there is no official word on how many of the yacht’s parts will actually be 3D printed.

    Nonetheless, Lehvoss and the two Italian boat builders are looking forward to showcasing how 3D printing technology is disrupting the way that yachts and ships are being manufactured.

    “We are happy to be a partner in this challenging and very exciting project and strongly believe in 3D printing as a way of enabling the production of higher performing and competitive parts. The Livrea Yacht will show what dedicated processing and 3D printing polymers today can already achieve“, said Thiago Medeiros Araujo, Market Development LUVOCOM 3F of LEHVOSS.


    Source: Lehvoss Press Release

    Website: LINK

  • Stunning 3D Printed Cathedral of St James in Transparent Resin

    Stunning 3D Printed Cathedral of St James in Transparent Resin

    Reading Time: 3 minutes

    Croatian company Vectrino used 3D printing to create a replica of the Šibenik Cathedral of St James, a UNESCO World Heritage Site, for a new exhibition.

    A new multimedia centre is opening in Šibenik, Croatia which will provide information for visitors about the city’s cathedral. And 3D printing plays a big part in providing visitors with a detailed insight into its construction.

    The technology has long proven useful for creating prototypes and architectural models. And in this case, the result is stunning to behold; a transparent replica of Šibenik Cathedral of St. James created by 3D printing company Vectrino.

    The company used transparent resin to 3D print the cathedral so that visitors can peer inside the model. The new permanent exhibition will provide visitors with details on how the cathedral came to be.

    The resulting print renders this architectural achievement from the 15th and 16th century in perfect detail. It’s no wonder the cathedral is a UNESCO World Heritage Site.

    “The building was built over a period of 105 years, and is a testimony to the determination, sacrifice and belief of the generations of inhabitants of Šibenik,” explains Josip Rukavina, director of the design and measurement process of the Cathedral.


    Creating an Interactive, Modern Museum at the Cathedral of St James

    The coordinators of the project wanted to create a modern museum which was interactive. The transparent resin print of the cathedral allows visitors to see all of the changes which took place during the 105 years.

    In fact, the first construction of the cathedral was Venetian Gothic style. But this has changed over the years, and it’s now classed as Tuscan Renaissance.

    Francesco di Giacomo, Georgius Mathei Dalmaticus and Niccolò di Giovanni Fiorentino were three masters behind the cathedral. The museum will show each of the three stages.

    To measure the cathedral, Vectrino used laser scanning and 3D photogrammetry technologies. These methods made it possible to get enough accurate data to print in a 1:100 scale replica. They built a virtual model using AutoCAD software before printing the cathedrals.

    The three prints show off each of the separate styles. However, when it came to printing the Gothic style cathedral, Vectrino had a lot more work on their hands. They made this model manually in 3D from sketches of the cathedral.

    Although the 3D prints are not life-size, they manage to capture and show off the cathedral extremely well. Check out the Vectrino website to find out about the company.

    Source: i.Materialise


    License: The text of „Stunning 3D Printed Cathedral of St James in Transparent Resin“ by All3DP is licensed under a Creative Commons Attribution 4.0 International License.

    Subscribe to updates from All3DP

    You are subscribed to updates from All3DP

    Website: LINK

  • Cal Poly Supermileage Club Uses 3D Printing in Shell EcoMarathon

    Cal Poly Supermileage Club Uses 3D Printing in Shell EcoMarathon

    Reading Time: 3 minutes

    Student engineers use 3D printing to improve vehicle design — with an emphasis on efficient fuel consumption — for the Shell EcoMarathon.

    The Shell EcoMarathon is a yearly competition that sees teams of engineers and designers compete to build a fuel-efficient vehicle capable of reaching a certain distance. The event is sponsored by Shell, the oil company, and usually sees 30 select teams competing against each other.

    As part of the competition, engineering and tech students come together to develop a single-person vehicle built for optimal fuel consumption.

    All teams start out with a one-cylinder lawnmower engine. They then optimise the design and make modifications according to their engineering aims.

    However, the competition distinguishes between college and high school divisions in order to give teams a fair chance to compete.

    One of the groups recently scoring 4th place at the 2017 event was the California Polytechnic State University in San Luis Obispo, California. The Cal Poly Supermileage team built a vehicle that reached 1,500 miles per gallon.

    For the 2018 competition, the team is currently bolstering the design and performance of its latest model.


    shell ecomarathon

    Shell EcoMarathon Combines 3D Printing and a Lawnmower Engine

    Weston Andrew Cramer, a third-year member of the Cal Pol team explained that the team was effectively remodelling the insides of its previous model.

    “Essentially what we do, is kind of like what Apple does with the iPhone 6 vs. the iPhone 6S, where it’s basically the same chassis of the model, but the interior of it is remodeled to make it faster and more efficient,” he says.

    “That’s kind of how Supermileage operates, because making a chassis is extremely expensive, there’s a lot of analysis, and material, like carbon fiber that go into it; and of course a lot of man hours.”

    In 2017, the team rebuilt the chassis to become more shock-absorbent. At the same time, the team updated the look and safety of the model as well.

    Among the core challenges in designing the inside of the vehicle were the breaking mechanics and the steering wheel.

    In order to overcome these issues, the Cal Poly team recently employed 3D printing technologies. Specifically, the use of FDM materials allowed the team to design more durable parts.

    Eli Rogers, a Cal Poly Supermileage Alumni, added that the experience had been highly rewarding – going from theory to practice.

    In the real world, engineers will often face challenges that students do not encounter in the classroom. That is what has made the competition so valuable for many students.

    Source: Stratasys


    License: The text of „Cal Poly Supermileage Club Uses 3D Printing in Shell EcoMarathon“ by All3DP is licensed under a Creative Commons Attribution 4.0 International License.

    Subscribe to updates from All3DP

    You are subscribed to updates from All3DP

    Website: LINK

  • Siemens to Launch $37 Million 3D Printing Factory in the UK

    Siemens to Launch $37 Million 3D Printing Factory in the UK

    Reading Time: 3 minutes

    Siemens is planning to build a new $37 million 3D printing factory in the United Kingdom. Located in the town of Worcester, the facility will have a total of 50 industrial 3D printers installed over the next 5 years.   

    The German electronics titan Siemens is spending around £27 million ($37 million USD) in an effort to build the largest 3D printing factory in the United Kingdom. Through this new facility, which will open in the town of Worcester, Siemens hopes to shift its attention towards additive manufacturing innovation.

    The actual investment is being made through Materials Solutions, which was acquired by Siemens back in 2016. Material Solutions focuses on selective laser melting technologies for metal parts and super alloys. The specializes in 3D printing for the automative, aviation, and motor sports industries.

    Furthermore, the factory launch will create around 55 new jobs. Among the roles will be opportunities for engineers, metallurgists, and manufacturing specialists. The facility itself is set to open in September.

    According to Jurgen Maier, CEO of Siemens UK, 3D printing technology needs to be embraced in order to drive the UK’s manufacturing sector. The opening of this multi-million dollar facility will help the country take a major step towards that end goal.

    “This significant investment underlines our belief that there is huge potential for innovation and growth within the Additive Manufacturing sector. It is also the next step towards achieving our ambition of pioneering the industrialisation of 3D printing. [It] demonstrates how we are leading the way for the fourth industrial revolution,” Maier explained.


    The location of the new Siemens 3D printing facility.

    Siemens 3D Printing Facility Gives UK Hope for Industrial Growth Despite Brexit Looming

    In addition to the grand opening of this new facility, the company also plans to boost the number of metal additive manufacturing machines on-site. Over the next five years, Siemens wants to add at least 35 industrial 3D printers to its fleet, taking them from 15 to 50.

    Phil Hatherley, General Manager of Materials Solutions, believes that the new additive manufacturing center will give the company the “space and scope to continue to innovate for these specialist and demanding industries.” The factory will replace an older factory located at the Worcester Six Business Park Development.

    The UK government applauded the move given current economic insecurities over Brexit. Greg Clark, the UK’s business secretary, said that the investment underlined that businesses still had confidence in the UK market.

    “Britain has a proud manufacturing heritage. [We want to] create an environment that enables manufacturers to continue to thrive,” Clark added.

    Last year, Siemens revealed extensive work it was doing with 3D printed gas turbine blades and parts for nuclear power plants. In fact, in December 2017, the American Society of Mechanical Engineers (ASME) awarded Siemens for developing and fully testing the 3D printed gas turbine blades.

    Now, with a $37 million facility opening in the UK, Siemens seems keen on continuing its innovative work in the field of additive manufacturing.


    Source: Siemens


    License: The text of „Siemens to Launch $37 Million 3D Printing Factory in the UK“ by All3DP is licensed under a Creative Commons Attribution 4.0 International License.

    Subscribe to updates from All3DP

    You are subscribed to updates from All3DP

    Website: LINK

  • Weekend Project: Shred the Streets with Your Own 3D Printed Longboard

    Weekend Project: Shred the Streets with Your Own 3D Printed Longboard

    Reading Time: 3 minutes

    Lulzbot shows us how to build a fully functional longboard using 3D printing technology. You can follow along with their surprisingly simple instructions or use them as a basis to build your own board. 

    Ever want to use your 3D printer to create a functional mode of transportation? On today’s edition of Weekend Project, we’re featuring a gnarly idea for all the street shredders who love to roll around town on four wheels.

    Aleph Objects, the company behind the 3D printer brand Lulzbot, is sharing instructions on how to build a 3D Printed Longboard. In the past, we’ve seen a number of insanely cool 3D printed skateboards created by makers like James Bruton of XRobots, who is actually fully sponsored by Lulzbot.

    Now, the Colorado-based manufacturer is sharing a simple design for all to undertake. The 3D Printed Longboard is a relatively simple and well-structured project, but does require a 3D printer with a large build volume, as well as some tooling around with threaded rods.

    If you’ve been looking for a 3D printing project that you can take with you all around town, hit the brakes and get ready to make. Here’s more information of Lulzbot’s 3D Printed Longboard.


    3D Printed Longboard: What Do You Need?

    This project is tailor-made to be used with the Lulzbot TAZ 6 3D printer. However, if you have a desktop 3D printer with a large enough build volume, you should have no trouble building your own 3D printed longboard.

    Your 3D printer will need to be able to produce pieces that measure around 230 x 25 x 240 mm. Aside from the Lulzbot TAZ 6, which we recently awarded as the best large format 3D printer in 2017, this project can likely be undertaken with the Creality CR-10, among other large volume FDM 3D printers.

    Here’s everything you’ll need to create the 3D Printed Longboard:

    3D Printed Longboard: Putting it All Together

    Believe it or not, building your own 3D printed longboard is actually not as difficult as it sounds. The Lulzbot team lays out a simple set of instructions to help get your wheels rolling.

    Before you start assembling your longboard, you’ll need to 3D print the four sections of the deck. The STL files are freely available on the Lulzbot website.

    Next, take the three 3/8″ threaded rods and prepare to cut them down with the proper tools, such as a vise and hacksaw. Two of the rods will be trimmed to 700 mm for the side of the deck, while the middle rod will be cut to 820 mm. Then, insert the threaded rods into the holes of 3D printed deck parts one section at a time.


    Once the threaded rods are inserted into the 3D printed deck, loosely attach the four 3/8″ nylon lock nuts and washers to the threaded rods. By slowly tightening the nuts with a wrench, you’ll notice the sections begin to constrict together. According to the Lulzbot team, this step will be easier to complete if you have an assistant to hold the other end of the longboard.

    Lastly, it’s time to mount the wheels and trucks with skateboard truck mounting hardware. After this final step, you should be left with functional 3D printed longboard. Have fun shredding your neighborhood streets and remember, always wear a helmet!

    You can learn more about the 3D Printed Longboard project on the Lulzbot website.


    License: The text of „Weekend Project: Shred the Streets with Your Own 3D Printed Longboard“ by All3DP is licensed under a Creative Commons Attribution 4.0 International License.

    Subscribe to updates from All3DP

    You are subscribed to updates from All3DP

    Website: LINK

  • This 3D Printed Stethoscope is Medical-Grade and Costs $3

    This 3D Printed Stethoscope is Medical-Grade and Costs $3

    Reading Time: 3 minutes

    Dr. Tarek Loubani has designed a 3D printed stethoscope which can be made using recycled plastic in 3 hours for just $3. The device is especially useful in low-income countries which have little access to diagnostic tools.

    The stethoscope still has its place in medicine. Although many Western countries rely on CT scans and ultrasound, Dr. Tarek Loubani points out that the stethoscope is a vital diagnostic tool in low-income and war-torn countries.

    Loubani is an associate professor at the Schulich School of Medicine & Dentistry. He’s also an associate scientist at Lawson Health Research Institute and an emergency room physician at London Health Sciences Centre in Ontario, Canada.

    Back in 2012 he was working in a hospital in Gaza where he shared a stethoscope with ten other doctors. These doctors were responsible for treating more than 100 patients. This was an impossible task and Loubani wanted to come up with a solution.

    “We weren’t just low on medical supplies, but even the basics, like stethoscopes, were totally missing,” says Loubani. He wanted to find a way in which doctors could create their own supplies.

    He explains that it was a toy stethoscope which gave him a light bulb moment. Although the toy was made from plastic, it worked well enough. As a result of playing with a toy, Loubani came up with the solution of an open-access template of a 3D printed stethoscope. Better yet, the medical-grade stethoscope can be made from recycled plastic.

    3D Printed Stethoscope Made from Recycled Plastic in 3 Hours

    The stethoscope is called the Glia model and it has now been clinically validated. Loubani used free open-source software to create the model, keeping costs to a minimum.

    It’s possible to print the stethoscope using a desktop 3D printer and ABS plastic. Impressively, it takes just three hours to 3D print the stethoscope and costs under $3.

    “Our product from this research is not the stethoscope, it is how to make the stethoscope and how to ensure that it is the best quality,” Loubani says.

    “As far as we know this is the first open-source medical device that has been clinically validated… We wanted physicians and allied health care professionals to be able to have something that was high quality. We found that the acoustic quality was the same in our stethoscope as in a premium brand stethoscope.”

    Physicians in both Gaza and London, Ontario are currently testing out the stethoscope. Next, Loubani plans to create more 3D printable medical device templates.

    Want to find out more about the Glia model? The results were published in the journal PLOS ONE. Alternatively, you can download and 3D print your own stethoscope using the original files hosted on GitHub, Thingiverse and MyMiniFactory.

    Source: Western News


    stethoscope


    License: The text of „This 3D Printed Stethoscope is Medical-Grade and Costs $3“ by All3DP is licensed under a Creative Commons Attribution 4.0 International License.

    Subscribe to updates from All3DP

    You are subscribed to updates from All3DP

    Website: LINK

  • Weekend Project: Recycle Your Leftover Filament with a “Plastic Smoothie”

    Weekend Project: Recycle Your Leftover Filament with a “Plastic Smoothie”

    Reading Time: 4 minutes

    Have a trash bin full of leftover filament scraps and failed prints? Designer Agustin Flowalistik shows us how to recycle 3D printing waste by creating a Plastic Smoothie, which can be used in a laser cutter to create vibrant objects. 

    You know how the old saying goes… One manufacturing technology’s trash is another manufacturing technology’s treasure.

    Well, at least that’s the case in the latest DIY project by Agustin Flowalistik. Looking for an easy and affordable way to recycle filament scraps and failed prints, the renowned designer came up with the idea to concoct a Plastic Smoothie.

    While there are a variety of devices that allow you to recycle your 3D printing filament, Flowalistik’s latest method truly evokes the maker spirit. Using everyday kitchen appliances and laser cutting technology, you can create new objects with an endless array of colors.

    After blending up all of your leftover filament into finely shredded plastic scraps, you’ll melt the colorful mess of plastic together in a mini oven. With this freshly baked sheet of recycled PLA, you can get creative using a laser cutter and a bit of vibrant imagination.

    Here’s a brief overview on Flowalistik’s Plastic Smoothie project, which he recently shared on Instructables.


    Plastic Smoothie: What Do You Need?

    First and foremost, if you want to undertake the Plastic Smoothie project, you’re going to need an abundance of PLA filament scraps and failed prints to sacrifice. You’ll also need access to a laser cutter, which you can likely find at your local makerspace or FabLab. If you’re unfamiliar with laser cutting and want to learn more, be sure to check out our comprehensive overview on laser cutting technology.

    Otherwise, there are still a few supplies needed before you start blending your Plastic Smoothie. Here’s the checklist for this DIY project:

    There are a few tips and tricks that Flowalistik shares to make this project as affordable as possible. For starters, he recommends using an old blender if you have one handy. Obviously, once you start shredding plastic in it, you’re not going to want to use it for an actual smoothie afterwards.

    When it comes to using failed 3D prints, you should break them down into small pieces before throwing them into the blender, reducing the damaged that the blades will incur. Additionally, due to the toxins in ABS and other material types, Flowalistik only used PLA filament for this project.


    Plastic Smoothie: Putting it All Together

    The first step to the Plastic Smoothie project is gathering and blending your leftover PLA. You can take this opportunity to decide which colors and textures you want to create. Once the recycled plastic is shredded up, you’ll lay it out on an oven tray and prepare to start baking. Flowalistik uses oven paper on the base of the tray, bending the corners to avoid any molten plastic from spilling over.

    After experimenting a bit, the maker found that the most consistent results came about when melting medium and small plastic bits at 190-200 C for 20 – 25 minutes. Once the plastic scraps are melted together into a colorful sheet, you’ll need to remove it quickly and flatten it out in between the wood panels.


    This pressing procedure has to be performed quickly, as the melted plastic will cool down quickly once it’s removed from the oven. Keep the oven paper on the plastic and add as much weight as you can onto the wood panels, and you’ll have a perfect sheet of recycled PLA.

    Finally, Flowalistik uses an Epilog Laser Mini 18 40W laser cutter to cut the 3mm plastic panels. You can use the same settings as you would for a 3mm sheet of acrylic. The designer adds that he had to increase the power of the laser in order to make the engraving more apparent.


    If you don’t have much experience with laser cutting, you might be wondering what you can make with this recycled plastic. Luckily, Flowalistik has shared a number of his own experimental models, including coasters, animal rings, spirographs, and a really impressive rocket ship.

    You can learn more about the Plastic Smoothie project and the laser cutting process on Flowalistik’s Instructables post. If you want to continue supporting the designer and his intriguing projects, head on over to his Patreon page.


    License: The text of „Weekend Project: Recycle Your Leftover Filament with a “Plastic Smoothie”“ by All3DP is licensed under a Creative Commons Attribution 4.0 International License.

    Subscribe to updates from All3DP

    You are subscribed to updates from All3DP

    Website: LINK

  • GT-Moto 3D Prints Prototypes for Custom-Built Motorcycles

    GT-Moto 3D Prints Prototypes for Custom-Built Motorcycles

    Reading Time: 3 minutes

    GT-Moto is a motorcycle shop in Texas using a Robo R2 3D printer and Robo’s carbon fiber PLA to save time and money while prototyping custom parts.

    Every year GT-Moto, a custom motorcycle shop in Plano, Texas, builds a motorcycle for charity.

    Owner Sofi Tsingos explains that she’s loved motorcycles since she was a little girl and was inspired by her father. After her father was diagnosed with cancer one year, she came up with the idea of building a motorcycle together as a form of therapy. This work physically and mentally occupied both father and daughter during a difficult time.

    After the motorcycle was complete, Tsingos sold it for $16,000 and donated the proceeds to St. Jude’s Hospital. This has since become a yearly tradition, and the profits always go to cancer research organizations.

    However, building a motorcycle is no easy process. Tsingos had to come up with some way of lowering costs of parts and speeding up iterations. After hearing about 3D printing, she decided it would be the best way to prototype and test parts.

    “When we first saw a 3D printer and realized that we could put one on our desk and just design and immediately produce a part, we knew that was it,” explains Tsingos.

    GT-Moto Zooms Through Iterations with 3D Printing

    During Tsingos’ first build, she and her father faced multiple challenges. This was largely due to the fact that they were creating their own designs and outsourcing parts. These parts would often not only be costly, but they also wouldn’t fit.

    A solution arrived one Christmas, when Tsingos bought her design and modeling expert, Ross Freehling, a 3D printer. She chose a Robo R1+, and since then they haven’t looked back.

    With 3D printing, Tsingos explains that she can quickly print creative ideas and test them out with the right dimensions. It’s also possible to go through multiple iterations until a part is perfect. Instead of waiting weeks, parts take just hours to print.

    “3D printing really makes it easy to take ideas and turn them into a physical item to place onto the motorcycle, in a matter of hours and at basically no cost,” explains Tsingos.

    “Since we were able to do this at our shop, we no longer need to deal with the high costs and slow lead time associated with outsourcing jobs. Plus, lots of time has also been saved by not having to communicate back and forth during the prototyping phase.”

    GT-Moto has now upgraded to the Robo R2 and they regularly print with Robo’s carbon fiber PLA. Tsingos adds that the technology saves multiple pieces of metal from going in the trash. Want to find out more? Visit the GT-Moto website.


    License: The text of „GT-Moto 3D Prints Prototypes for Custom-Built Motorcycles“ by All3DP is licensed under a Creative Commons Attribution 4.0 International License.

    Subscribe to updates from All3DP

    You are subscribed to updates from All3DP

    Website: LINK

  • Gramazon: Turn Your Amazon Echo Dot Into a Gramophone with 3D Printing

    Gramazon: Turn Your Amazon Echo Dot Into a Gramophone with 3D Printing

    Reading Time: 3 minutes

    Recently purchased an Amazon Echo Dot but not in love with its eerie futuristic attitude? Maker Baard Fleistad has created the Gramazon, a 3D printable gramophone attachment to give your AI device a 1920s makeover.

    Small, black, and round, the Amazon Echo Dot is an inconspicuous addition to the household, that is until it hears anything akin to its name being called. If you’re someone who wishes they could go back to the days where people were swing dancing around a blaring gramophone, then you may be interested in giving your Amazon Echo Dot a 1920s makeover.

    Baard Fleistad, self-proclaimed as “some Norwegian nerd who lives in Florida”, has come up with a 3D printable design to spruce up your Echo Dot with class. His idea is a 3D printed acoustic amplifier in the form of the old-fashioned gramophone.

    This amplifier then turns the Echo Dot into a 1920s style horn speaker. Fleistad explains that he’s wanted a horn speaker for some time but hasn’t found an economical option.

    “I have always loved the look of the old radio horns of the 20’s and 30’s, but sadly, acquiring them is becoming harder and harder these days, and when you do come across one, the price is usually very high. There are reproductions on the market in the form of standalone bluetooth speakers, but these are usually sold at an even higher price point than the originals,” Fleistad explains.

    So, instead of continuing in his unsuccessful search, Fleistad came up with his own solution. He used the Echo Dot as the center of his 1920s horn and created a 3D printed shell. The final design, which the designer wittingly calls the Gramazon, is a gorgeous and classical attachment for your AI housemate.

    Give Your Home a Cheap 1920s Makeover with the Gramazon

    Fleistad wanted to create a straightforward and slick 3D printable model, and started designing with Autodesk Fusion 360 to see what he could “slap together”. His primary goal was to create a design which didn’t require anything other than the 3D printed parts and some paint.

    “Initially I was just going to make the horn part, and make a wooden base for it to house some electronics for a Bluetooth receiver and speaker, however, looking at my Echo Dot sitting at the corner of my desk, a light-bulb went off and the idea for the Gramazon was born!” Fleistad exclaims.

    After succeeding with the design process, the maker finally started 3D printing the Gramazon. The STL files, which are available on Thingiverse, are printed with 20 percent infill, no supports necessary.

    After assembly, Fleistad used 80 and 100 grit sandpaper, as well as copious amounts of Bondo, primer coats, and XTC-3D (for the inside of the model) to get the perfect finish.

    “Just expect a lot of sanding if you plan to achieve a smooth surface finish on this project,” he warns.

    If you’d like to create your own Gramazon, it’s as simple as downloading Fleistad’s files, 3D printing them, assembling, sanding the print down, priming it, and painting it with style. Visit his Thingiverse page to download the files and bring your Amazon Echo on a trip to the roaring twenties.


    Gramazon

    Source: Hackaday


    License: The text of „Gramazon: Turn Your Amazon Echo Dot Into a Gramophone with 3D Printing“ by All3DP is licensed under a Creative Commons Attribution 4.0 International License.

    Subscribe to updates from All3DP

    You are subscribed to updates from All3DP

    Website: LINK

  • Stanley Black & Decker Cuts Production Cost with Markforged Metal X 3D Printer

    Stanley Black & Decker Cuts Production Cost with Markforged Metal X 3D Printer

    Reading Time: 3 minutes

    Stanley Black & Decker is using the Markforged Metal X 3D printer to produce functional parts. Since adopting the metal 3D printing system into its production workflow, the industrial tool manufacturer is saving between 34 percent to 48 percent on manufacturing costs. 

    Engineers at Stanley Black & Decker, an American Fortune 500 company that makes household and industrial hardware, have recently welcomed the Markforged Metal X 3D printer onto its production floor.

    Last year, the company unveiled the Stanley Model 1, a desktop FDM 3D printer that mimics the enclosed style of the Sindoh 3DWOX DP200. However, Stanley Black & Decker has been looking to 3D print metal parts, aiming to reduce manufacturing costs and lead times.

    The industrial tools manufacturer seems to have found a perfect match in the Markforged Metal X 3D printer…

    Stanley Black & Decker’s Infrastructure Innovation Center anticipates significant savings through using the Metal X 3D printer. The metal 3D printing system is being employed to 3D print two different functional parts; the actuator housing for a PD45 Hydraulic Post Driver and the wheel shaft for the PG10 Profile Grinder.

    Engineers at the facility have rigorously tested the performance, durability, and life cycle of these two components.


    The actuator housing for a PD45 Hydraulic Post Driver

    Stanley Black & Decker Adopts Metal X 3D Printer to Slash Production Costs

    Now that Stanley Black & Decker has replaced its traditional manufacturing workflow with the Markforged Metal X, the company is saving between 34 percent to 48 percent on manufacturing costs. In addition, manufacturing lead time has just been decreased by a whopping 69 percent.

    Using this metal 3D printing, parts are up to 12.5 times cheaper and produced 20 times faster than with traditional casting and machining. For the actuator housing of PD45 Hydraulic Post Driver, the Metal X 3D printer was able to manufacture the four part assembly in a single piece.

    The Metal X is the world’s first Atomic Diffusion Additive Manufacturing (ADAM) machine. This additive manufacturing technology works by 3D printing metal powder bound in a plastic matrix one layer at a time until the parts are finished.

    Once 3D printed, the parts are washed to remove residues. Subsequently, they are sintered in a furnace and the metal powder solidifies into pure metal part. Since metal 3D printed parts tend to shrink during the sintering process, Markforged’s Eiger software compensates for this by scaling up the parts. With the Markforged Metal X, these 3D printed components can reach a density of up to 99.7 percent.

    The Markforged 3D printer also offers significant safety benefits, eliminating exposure to potentially harmful metal powder dust. On top of that, compared to other metal 3D printers, the Markforged Metal X is around 10 times cheaper.

    By integrating this metal 3D printing system into its production workflow, Stanley Black & Decker has been able to save money and time while creating functional metal parts.


    The wheel shaft for the PG10 Profile Grinder


    License: The text of „Stanley Black & Decker Cuts Production Cost with Markforged Metal X 3D Printer“ by All3DP is licensed under a Creative Commons Attribution 4.0 International License.

    Subscribe to updates from All3DP

    You are subscribed to updates from All3DP

    Website: LINK

  • This is a Prosthetic Nerf Gun Made with 3D Printing

    This is a Prosthetic Nerf Gun Made with 3D Printing

    Reading Time: 3 minutes

    Parisian collective Hackerloop have made a custom non-lethal weapon with 3D printing; DIY prosthetic Nerf gun is triggered using electrodes that detect muscle activity.

    In the litany of crazy projects involving 3D printing, this ranks somewhere near the top; a prosthetic Nerf Gun that fires foam bullets.

    Credit belongs to the Hackerloop collective of tinkerers in Paris, France, who devised a way to trigger the gun using electrodes attached to the muscles of the forearm.

    The base for the project is a Swarmfire Nerf blaster with the handle removed. Using 3D printed modifications, the device is mounted to the arm of volunteer Nicolas Huchet, who lost his right hand several years ago. With the custom made sheath and casing, he can wear the Nerf gun as a prosthetic extension of his right arm.

    But the ingenious hack doesn’t stop there. In the next stage, an Arduino-like microcontroller is connected to the Nerf Gun so it can be activated at will.

    A trio of electrodes are located on the elbow; each time Huchet contracts his muscle, the electrodes send the electrical activity to the microcontroller. Once the voltage reaches a certain level, the microcontroller fires the Nerf gun.

    Prosthetic Nerf Gun Causes a Stir on the Streets of Paris

    Huchet gamely tested the prosthetic Nerf gun on the streets of Paris. Together with a POV helmet cam, he hops around like a modern day Mega Man. Clearly he’s having lots of fun.

    Until, that is, the local police appear and ask him to stop fooling around (and also to turn off his camera).

    The motivation behind the project is nowhere near as sinister as the gendarmes would like to believe. Hackerloop members regularly have Nerf battles, and they wanted their friend without a hand to join in the fun. Hence, the custom non-lethal weapon they’ve been diligently developing.

    And if the name Hackerloop is ringing bells, you might have heard of their other creative hacks. The collective built a replica of the house from pixar movie Up using paper and foam, then sent it floating above Paris to post photos on Instagram using a Raspberry Pi.

    They also devised the Nosulus Rift, a VR fart simulator to promote South Park video game The Fractured But Whole. Each time you break wind in the game world, the Nosulus Rift emits a honking great stink capable of raising the dead. Classy!

    Source: Medium


    nerf gun


    License: The text of „This is a Prosthetic Nerf Gun Made with 3D Printing“ by All3DP is licensed under a Creative Commons Attribution 4.0 International License.

    Subscribe to updates from All3DP

    You are subscribed to updates from All3DP

    Website: LINK

  • Live at SXSW: $4,000 3D Printed Homes for Those Who Lack Shelter

    Live at SXSW: $4,000 3D Printed Homes for Those Who Lack Shelter

    Reading Time: 3 minutes

    The construction company ICON is working together with the charity New Story to combat inadequate housing across the globe. Using ICON’s Vulcan 3D printer, the collaborative effort aims to 3D print 650-square-foot homes that are affordable and sustainable.  

    With 3D printing emerging throughout the construction industry, the technology is becoming a  groundbreaking production tool for affordable and sustainable housing. The latest organization to adopt 3D printing into its humanitarian efforts is New Story. The charity’s mission is to place people without adequate housing into a proper shelter, taking them away from the throes of “survival mode”.

    The non-profit organization is now working with ICON, an Austin, Texas-based construction tech company. ICON has unveiled the Vulcan 3D printer at SXSW Festival, a manufacturing solution that could eventually provide homeless or struggling families with a roof over their heads.

    Together, ICON and New Story are 3D printing homes using a cement mixture. Each structure takes around 12 to 24 hours to produce. The 650-square-foot single story homes have a modern design.

    The current plan is to build 100 homes in El Salvador next year. According to Alexandria Lafci, co-founder of New Story, the charity has also been 3D printing homes for communities in Haiti, El Salvador, and Bolivia.

    However, before these homes are built, ICON is planning to trial the model by 3D printing an office in Austin. Within the office, the construction tech company plans to install air quality monitors and keep an eye on how the 3D printed structure looks and smells.


    New Story and ICON Attempt to 3D Print Sustainable Homes for $4,000

    New Story explains on its website that last year, the technology they needed to create homes quickly and cheaply wasn’t available yet. However, by working alongside ICON, they now have access to the impressive Vulcan 3D printer.

    Currently, it costs $10,000 to 3D print a home with the Vulcan 3D printer. Eventually, ICON hopes to reduce this construction cost to just $4,000.

    “There are a few other companies that have printed homes and structures. But they are printed in a warehouse, or they look like Yoda huts. For this venture to succeed, they have to be the best houses… I think if we were printing in plastic we would encounter some issues,” explains co-founder of ICON, Jason Ballard.


    Since these structures need to be sturdy and hospitable, the companies aren’t taking any risks and will be refining the process right up until they take it over to El Salvador. If all goes according to plan, we may soon see the Vulcan 3D printing homes in the United States as well.

    As we’ve seen in cases both inside and outside of the construction sector, 3D printing offers many benefits other than just being very quick. The technology also tends to reduce waste and manual labor costs.

    After solving the vast housing and homelessness problems that plague the Earth, Ballard hopes to use 3D printing to help humans build homes in outer space. He explains:  “One of the big challenges is how are we going to create habitats in space… You’re not going to open a two by four and open screws. It’s one of the more promising potential habitat technologies.”

    In the meantime, if you’d like to join the effort to eliminate homelessness on Planet Earth, you can donate to the cause on the New Story website.

    Source: The Verge


    License: The text of „Live at SXSW: $4,000 3D Printed Homes for Those Who Lack Shelter“ by All3DP is licensed under a Creative Commons Attribution 4.0 International License.

    Subscribe to updates from All3DP

    You are subscribed to updates from All3DP

    Website: LINK

  • Gigabot X can 3D Print with Recycled Plastic Pellets

    Gigabot X can 3D Print with Recycled Plastic Pellets

    Reading Time: 3 minutes

    Now live on Kickstarter is the Gigabot X, a large-scale, direct pellet extrusion 3D printer for fabricating with recycled plastic.

    Houston, Texas might seem likely an unlikely location for a revolution in 3D printing, but this is where re:3d have announced the Gigabot X, an open source 3D printer that fabricates with pelletized plastic. The unit is specifically designed to accept recycled pellets, a cleaner and greener approach for fused deposition modeling.

    The official launch of the Kickstarter campaign for the Gigabot X took place at the SXSW Festival, with a campaign seeking $50,000 in funding. Pledges of $9,500 or more will secure backers an exclusive Gigabot X Beta 3D printer, plus 5 lbs of pellets to get started.

    The first-generation Gigabot is an affordable large format 3D printer which was also a crowdfunding success story in 2013. But in launching the Gigabot X, the gang at re:3D reckon they’re fast approaching the realization of a goal 5 years in the making; a 3D printer that can print using plastic trash.

    How so? The answer appears to lie in direct pellet extrusion. Melting small chunks of plastic instead of extruded filament for the input material makes 3D printing directly from recyclables an easier process.

    Gigabot X creates a Virtuous Cycle for 3D Printing

    There are other benefits that come from printing with pellets. It eliminates the need for extruded plastic filament, for example, which tends to be about 10x more expensive than pelletized plastic.

    re:3D also say that direct pellet extrusion dramatically cuts back on printing times; in current tests, they’ve increased print times up to 17x than a filament-fed Gigabot.

    There are other pellet printers already on the market, but they’re typically used in larger, more expensive manufacturing systems. According to the Kickstarter page:

    “Our goal, much like with the first-generation Gigabot, is to increase 3D printer accessibility and bridge the gap between cost and scale by creating an affordable, large-scale pellet printer.”

    In addition to raising funds, the campaign has another important objective; to recruit a number of beta testers who will fine-tune the Gigabot X. With their feedback, they’ll be collaborating with re:3D in an ongoing process of iteration and improvement.

    And there will be some work ahead, to be sure. In addition to the direct pellet extruder, a small ecosystem of accessories are required for the Gigabot X. This includes a low-cost dryer, grinder, and feeder system.

    It’s an ambitions plan, but if successful it could blaze the trail for 3D printing directly from ground-up plastic. Interested? Visit the official Gigabot X Kickstarter campaign page to learn more.


    gigabot X


    License: The text of „Gigabot X can 3D Print with Recycled Plastic Pellets“ by All3DP is licensed under a Creative Commons Attribution 4.0 International License.

    Subscribe to updates from All3DP

    You are subscribed to updates from All3DP

    Website: LINK

  • Zortrax Inventure: Smart, Simple, and Super Convenient

    Zortrax Inventure: Smart, Simple, and Super Convenient

    Reading Time: < 1 minute

    The Zortrax Inventure is a new dual extrusion 3D printer that is both intelligent and accessible. This Polish 3D printer includes a Dissolvable Support System Station and a completely enclosed and stable heated print chamber.

    The emergence of desktop 3D printing has opened up a whole new world of creative possibilities to the average person. However, there are still a number of limitations that have stunted the technology’s growth for the time being. The Polish 3D printer manufacturer Zortrax is aiming to break some of these barriers with the new Zortrax Inventure 3D printer.


    License: The text of „Zortrax Inventure: Smart, Simple, and Super Convenient“ by All3DP is licensed under a Creative Commons Attribution 4.0 International License.

    Subscribe to updates from All3DP

    You are subscribed to updates from All3DP

    Website: LINK

  • Bose Develops AR Sunglasses which use Sound

    Bose Develops AR Sunglasses which use Sound

    Reading Time: 3 minutes

    Bose, the American audio systems company, used 3D printing to create a prototype of AR sunglasses which use sound rather than a camera and screen. 

    At 2018 South by Southwest (SXSW), which took place over the weekend, speaker and headphone company, Bose, announced an interesting pair of sunglasses.

    The company is using 3D printing to create a prototype of the sunnies which use sound, rather than a screen, to augment reality. The idea is that while wearing the sunglasses and walking around, you’ll hear sounds and audio comment which provide context.

    This is very different to the Google Glass. They don’t give you a visual, but audio feedback on the surrounding. Another difference is that these sunglasses blend in and look like a regular pair of sunnies with fashionable shapes and a regular size. However, tucked behind your ear in the stems of the glasses sit the electronics.

    “Unlike other augmented reality products and platforms, Bose AR doesn’t change what you see but knows what you’re looking at — without an integrated lens or phone camera. And rather than superimposing visual objects on the real world, Bose AR adds an audible layer of information and experiences, making every day better, easier, more meaningful, and more productive,” the company explains in a press release.


    Bose

    Learn While on the Move with the Bose AR Sunglasses

    Instead of having to wear sunglasses and headphones, you could soon simply wear just the Bose glasses and listen to music without anyone realizing. This is thanks to directional speakers which play music into your ears without the need for headphones.

    To choose a song, use the head-based gestures feature. This can also be used when receiving a phone call – simply nod your head to answer or shake to decline.

    With a double tap of the stems, you can also get audio information about whatever you’re looking at. For example, in future, it should be possible to translate signs or learn about a painting you’re looking at.

    Bose also hope that users will be able to look at an establishment and get useful information. For example, ratings and reviews. The company explains that this works with your smartphone, GPS coordinates, and onboard motion sensors. This picks up which direction you’re facing.

    However, Bose requires companies to work with them to provide such content. But, the solution for this is a $50 million venture fund. Already companies such as TripAdvisor, Yelp, TuneIn, and Strava are signed up to work with the company.

    “Bose AR represents a new kind of augmented reality, one that’s made for anyone and every day. It places audio in your surroundings, not digital images, so you can focus on the amazing world around you — rather than a tiny display,” John Gordon, vice president of the Consumer Electronics Division at Bose, explains.

    This summer the company is releasing a limited number of the tweaked glasses. If you’re a developer and are interested in building Bose AR into your wearable, you can learn more on the company’s website.

    Source: Mashable


    Bose


    License: The text of „Bose Develops AR Sunglasses which use Sound“ by All3DP is licensed under a Creative Commons Attribution 4.0 International License.

    Subscribe to updates from All3DP

    You are subscribed to updates from All3DP

    Website: LINK

  • Autodesk Wants To Let You Build Circuit Boards Faster and Easier

    Autodesk Wants To Let You Build Circuit Boards Faster and Easier

    Reading Time: 2 minutes

    Autodesk’s Library.io lets users 3D model their own PCB parts libraries.

    Creating your own part libraries for printed circuit board (PCB) designs may no longer be such a hassle. Thanks to Autodesk, the addition of PCB components is now a little easier.

    The company recently launched library.io, which allows 3D print and PCB developers to create component outlines for Autodesk Eagle and 3D models. These can then be used with Fusion360, which is Autodesk’s 3D CAD and CAM design software.

    Previously, PCB developers had to use random part libraries or cumbersomely create their own. Until now, it was quite common to inspect datasheets and arrange pads in the right size onto a grid.

    3D modeling has made it much easier to help develop component libraries.

    Indeed, most parts already follow PCB standard including QFP, TO-, DFN, or SOT23. Based on these, developers can 3D model their own parts in Eagle.

    Two versions of the tool exist. The first one is in the form of a web-based app, which lets users develop packages and outlines parametrically in a browser. The designs can then be exported as libraries.

    The second version of the feature comes integrated with Eagle. Users can develop the components parametrically within Eagle.


    Parametric Parts Creation Simplified

    Thanks to the new technology, creating parametric footprints couldn’t be easier.

    Autodesk also added a new tool to Eagle that abolishes pins for symbols. Instead, users simply get to cut and paste their pin lists from a dataset.

    To make usage even smoother, footprints created in library.io can be downloaded for offline use.

    Additionally, the Eagle dashboard is now implemented as part of KiCad, the free software suite for electronic design automation. This should make it even easier for cross-platform users to enjoy all their favorite tools under one hood.

    Source: hackaday.com


    License: The text of „Autodesk Wants To Let You Build Circuit Boards Faster and Easier“ by All3DP is licensed under a Creative Commons Attribution 4.0 International License.

    Subscribe to updates from All3DP

    You are subscribed to updates from All3DP

    Website: LINK

  • Expectant Parents Can Now Get a 3D Printed Model of their Unborn Child

    Expectant Parents Can Now Get a 3D Printed Model of their Unborn Child

    Reading Time: 3 minutes

    Embryo 3D offers standard and metal-plated 3D printed models of fetuses crafted from ultrasound scans.

    Parents-to-be are now able to get their hands on a 3D printed model of their unborn child. Created by Embryo 3D, the process uses ultrasound scans to craft the plastic models of the fetus.

    Incredibly, the printing process manages to capture even the smallest details on the hands and feet.

    Ivan Gridin, head of Embryo 3D, said that the company also offers gold-plated and metal-plated versions.

    Although traditionally the models were only available in plastic, they are now made using plaster models to enable metal coverings.


    However, the 3D printed embryos do not just serve as memorabilia. Yuliana Recu, an expectant mum taking part in the trials described a “weird feeling” as she touched a model of her unborn child.

    The idea for Embryo 3D came to Gridin when he was worried about a friend and the health of her unborn child. Already a user of 3D printing, Gridin decided to print a model from the ultrasound scan.

    Therefore, the technology may also offer opportunities for medical decision-making to help parents uncover birth defects.

    3D imaging technologies allow doctors and researchers to inspect fetal anatomy

    Researchers in Brazil launched a 3D imaging technology in 2016 that allowed parents to view realistic images of their unborn children.

    They used the Oculus Rift virtual reality headset to bring magnetic resonance imaging (MRI) and ultrasound scans to life. Parents could then view sharp and realistic images of the fetus instead of the traditionally blurred polaroids.

    The technology layers MRI scans to create an accurate model.


    Indeed, 3D models of fetuses enable researchers to gain an enhanced understanding of the anatomy of the unborn child. These can serve educational purposes, but in the future may also be utilized as part of personalized medicine packages.

    The advantage of the virtual reality models is that they are more life-like. Even the internal anatomy of a fetus can be recreated to observe abnormalities.

    Using the Oculus Rift 2, doctors have been able to create a more realistic environment to observe the fetal anatomy. This has also allowed them to make a better decision when it comes to the delivery and post-delivery treatments if necessary.

    Source: 9news.com.au (images: Rutly)


    License: The text of „Expectant Parents Can Now Get a 3D Printed Model of their Unborn Child“ by All3DP is licensed under a Creative Commons Attribution 4.0 International License.

    Subscribe to updates from All3DP

    You are subscribed to updates from All3DP

    Website: LINK

  • Weekend Project: 3D Print a Mechanical Hummingbird

    Weekend Project: 3D Print a Mechanical Hummingbird

    Reading Time: 4 minutes

    It’s time to leave the nest and make yourself a stunning and challenging DIY desk ornament. Maker Greg Zumwalt has created a complex 3D printed mechanical hummingbird-themed automata toy–and you can too.   

    One of the many advantages of 3D printing is its ability to manufacture complex geometries in a single print. But you can also use the technology to create a barrage of small parts, each one given a role within a magnificent mechanical structure. 

    Greg Zumwalt, an Oklahoma-based maker and former software and video game company owner, has recently shared the Mechanical Hummingbird. The project will push your 3D printer to the limit, but the results will have you enjoying the sweet nectar of automata magic.

    This Mechanical Hummingbird is an intricate 3D puzzle, requiring a substantial number of 3D printed parts. Zumwalt designed the entire structure to be 3D printed, save for the small motor used to bring movement to the bird.

    3D printed parts include the bird’s wings and body, the blossoming flower, the elaborate array of gears, and even the base. By the time you’re finished with this project, both you and your 3D printer will go from a novice in the nest to soaring DIY eagles.

    Interested yet? We thought so… Here’s some insight into Zumwalt’s marvelous –and almost fully 3D printed — Mechanical Hummingbird project.

    3D Printed Hummingbird: What Do You Need?

    Your 3D printer is going to do most of the work here. In fact, this complex automata is comprised of 97 individual 3D printed parts. All of these STL files are available for download on Zumwalt’s Instructables post. He also shares CAD images for each component, which he modeled using Autodesk Fusion 360.

    However, while you get that extruder warmed up, you’ll need to obtain a few other things as well.

    3D Printed Hummingbird: Putting It All Together

    This project consists of 97 3D printed parts, so you can max out your efficiency by grouping together sections of the mechanic device on the print bed. Zumwalt provides steps to assembling the innumerable amount of puzzle pieces. Be aware of the filament color you use for each component, particularly with the bird and flower.

    Each step in the Instructables post goes into detail about the assembly of the STL files. You’ll start with the base of the bird, which is also where the electric motor will be mounted. This is followed by the transmission, the body and wings of the bird, and an explanation on how to conjoin these 3D printed pieces. Finally, it’s time to 3D print the flower stem and bulb, which along with the hummingbird, offers a good opportunity to get creative with filament colors.


    Zumwalt suggests that before starting assembly, you should test fit, trim, and sand the 3D printed parts to ensure smooth movement and a proper fit. You can also file any excess “ooze” (also known as an elephant foot) from the surface of the 3D print that is contacting the build plate.

    Since the Mechanical Hummingbird uses threaded assembly, the maker also recommends using a 6mm x 1 tap to clean out the threads. He also uses petroleum jelly to lubricate the gear train, as well as areas between the rotating contact surfaces.

    There’s no denying that this project will require a lot patience and 3D printing time, but this automata ornament is an enormous example of the little things your 3D printer can do.

    If you’re interested in building Zumwalt’s Mechanical Hummingbird, check out the full description, STL files, and assembly instructions on his Instructables post.


    License: The text of „Weekend Project: 3D Print a Mechanical Hummingbird“ by All3DP is licensed under a Creative Commons Attribution 4.0 International License.

    Subscribe to updates from All3DP

    You are subscribed to updates from All3DP

    Website: LINK

  • [DEAL] Sindoh 3DWOX DP201 3D Printer, $400 Off

    [DEAL] Sindoh 3DWOX DP201 3D Printer, $400 Off

    Reading Time: 2 minutes

    The Sindoh 3DWOX DP201 is accessible, safe, and easy to use, making it the perfect 3D printer for the classroom. This 3D printer is currently available at a 31% discount, reducing the retail price by $400. 

    As 3D printing technology becomes an integral part of STEM education in classrooms across the globe, teachers are increasingly tasked with finding a 3D printer that is affordable, capable, and most importantly, safe for student use. The South Korean 3D printer manufacturer Sindoh is cornering this growing sector of the market with its self-proclaimed “Smart & Safe” desktop 3D printers.

    The Sindoh 3DWOX DP201 3D printer offers a wide range of features that satisfy educational demands, particularly when it comes to accessibility and security. It includes a flexible print surface, auto-leveling, remote camera monitoring, and a 210 x 200 x 189 mm build size.

    In order to make the 3D printing process more convenient,  the Sindoh 3DWOX DP201 3D printer utilizes a proprietary filament system. While most makers would probably be turned off by material limitations like this, the cartridge system makes it easy for beginners to swap filaments. Sindoh has also made this 3D printer fully compatible with SOLIDWORKS, enabling users to print designs directly from the CAD software platform.

    The Sindoh 3DWOX DP201 3D printer is currently available on Amazon for $400 off the retail price, over a 30% discount. At just $899, beginners and educators can get their hands on this reliable and easy to use 3D printer.

    DEAL: Sindoh 3DWOX DP201 3D printer, $400 off

    Other deals:

    Additionally, feel free to check out our full-on review for the Sindoh 3DWOX DP200 3D Printer.

    All3DP is an editorially independent publication. Occasionally we need to pay our bills, so we affiliate some product links through which we may receive a small commission. For the full spiel, check out our Terms of Use. All prices accurate at the time of publication.


    License: The text of „[DEAL] Sindoh 3DWOX DP201 3D Printer, $400 Off“ by All3DP is licensed under a Creative Commons Attribution 4.0 International License.

    Subscribe to updates from All3DP

    You are subscribed to updates from All3DP

    Website: LINK

  • [DEAL] Creality CR-10 3D Printer, Over 28% Off

    [DEAL] Creality CR-10 3D Printer, Over 28% Off

    Reading Time: 2 minutes

    Already celebrated for its affordability and build size, the Creality CR-10 is currently available on GearBest and Banggood for 28% off or more. Check out these two deals and get your hands on one of the most popular budget 3D printers on the market. 

    Last year, the Creality CR-10 3D printer quickly climbed to the top of the desktop 3D printer food chain. As the consumer market continues to shift its focus towards affordability, the CR-10 manages to offer quality 3D prints at an exceptionally low price. In fact, we ended up awarding this budget 3D printer as the best 3D printer under $500 in 2017.

    Read our review: Creality CR-10 Review – The Best 3D Printer Under $500

    The Creality CR-10 offers a generous 300 x 300 x 400 mm build size, and can be upgraded in a multitude of ways. The open-faced frame has been copied by a number of 3D printer manufacturers, and for good reason. The simplicity of the CR-10’s design enables an unbeatable price-to-volume ratio, making it one of the most popular 3D printers to emerge in recent years.

    Over the next four days, the online retailer GearBest is taking 28 percent off the price of the Creality Cr-10, placing it right around the $400 mark. Additionally, Banggood is currently selling the same 3D printer for just $379.99, and there is no specified end date on this proposed bargain.

    Usually, the 3D printer is listed in between $450 and $480, making these two deals compelling for consumers on a budget. Striking a nearly perfect balance between price and performance, the CR-10 is a fantastic option for any frugally-minded maker.

    It’s important to note that the GearBest deal is only valid when you select the CR-10 with the EU Plug. However, both the EU and US machines are identical, using a basic 3 prong standard computer power connector on the back of the control box.

    On the other hand, the Banggood deal is only available for the US and Canadian version.  So, no matter where you’re located geographically, these deals should definitely pique your interest.

    The 28 percent discount offered by GearBest will carry on until March 13.

    DEAL #1 (Europe/North America): Creality CR-10 3D Printer, 28% Off (via GearBest)

    or

    DEAL #2 (North America): Creality CR-10 3D Printer, $379.99 (via Banggood)

    Other deals:

    All3DP is an editorially independent publication. Occasionally we need to pay our bills, so we affiliate some product links through which we may receive a small commission. For the full spiel, check out our Terms of Use. All prices accurate at the time of publication.


    License: The text of „[DEAL] Creality CR-10 3D Printer, Over 28% Off“ by All3DP is licensed under a Creative Commons Attribution 4.0 International License.

    Subscribe to updates from All3DP

    You are subscribed to updates from All3DP

    Website: LINK

  • Weekend Project: 3D Print Your Own Animated Physics Toy

    Weekend Project: 3D Print Your Own Animated Physics Toy

    Reading Time: 3 minutes

    Looking for an awesomely interactive project to 3D print this weekend? The Ruiz Brothers and Phillip Burgess have shared Animated LED Sand, a DIY physics toy featured on Adafruit. 

    Although the laws of physics are an integral part to our understanding of the nature and universe that surrounds us, learning about Newton’s laws from a textbook can be a daunting and exasperating task. Instead, why not enjoy the science of matter and energy with an interactive toy you can 3D print yourself!

    The Animated LED Sand device is an incredibly simple, yet awe-inspiring DIY toy that will entertain kids and adults alike. Using an LED matrix that displays little grains of sand, this 3D printable toy interacts with motion and acts as if it’s under the influence of gravity.

    This Weekend Project, created by the Ruiz Brothers and Phillip Burgess, is currently featured on Adafruit. We’ll give you a quick recap of the project, and show you how to make the complexities of physics more fun.

    Animated LED Sand Toy: What Do You Need?

    If you’re interested in assembling your own 3D printed physics toy, most of the supplies can be purchased from Adafruit. Here’s what you’ll need:


    Animated LED Sand: Putting it all Together

    Once you have your supplies, it’s time to dig into the circuitry and coding for the Animated LED Sand. You’ll need to connect the slide switch to the Feather Board, and will need to be 70mm for the GND and 50mm for the EN pin.

    The CharliePlex Featherwing also connects directly to the board, and requires the connections for the SDA and SCL wires to be 70 mm long. Meanwhile, the 3V and GND connections can be 80mm long.

    Lastly, the LIS3DH connects to the top of the Feather (via the 3d printed mount), and will need to be 40mm long for all connections. If you’re more of a visual learner, Adafruit shares a circuit digram to help you connect the various electronic components together (pictured below).


    In order to use the LED Sand sketch, you’ll need to download the latest version of Arduino IDE. If you’re unfamiliar with Arduino, the Ruiz Brothers suggests going over introductory tutorials. There are also a few libraries that will need to be installed onto Arduino IDE.

    The code for this DIY physics toy, written by Burgess, can be found on the Adafruit project page.

    The 3D printed enclosure comes in a handful of relatively easy to print files. You can download the STL files from Thingiverse. There is a dome version, which teeters back and forth on a surface, or a gimbal version, which keeps the toy in constant spin.

    Lastly, you’ll need to solder the electronic components together and assemble the Animated LED Sand toy. This project showcases an interesting relationship between electronics and 3D printing, using 3D printed spacers and mounts to keep everything in check.

    If you’re interested in building this DIY Physics Toy over the weekend, you can view the full assembly instructions here. Be sure to check out the video below for more information and maker inspiration.


    License: The text of „Weekend Project: 3D Print Your Own Animated Physics Toy“ by All3DP is licensed under a Creative Commons Attribution 4.0 International License.

    Subscribe to updates from All3DP

    You are subscribed to updates from All3DP

    Website: LINK