It’s time to leave the nest and make yourself a stunning and challenging DIY desk ornament. Maker Greg Zumwalt has created a complex 3D printed mechanical hummingbird-themed automata toy–and you can too.
One of the many advantages of 3D printing is its ability to manufacture complex geometries in a single print. But you can also use the technology to create a barrage of small parts, each one given a role within a magnificent mechanical structure.
Greg Zumwalt, an Oklahoma-based maker and former software and video game company owner, has recently shared the Mechanical Hummingbird. The project will push your 3D printer to the limit, but the results will have you enjoying the sweet nectar of automata magic.
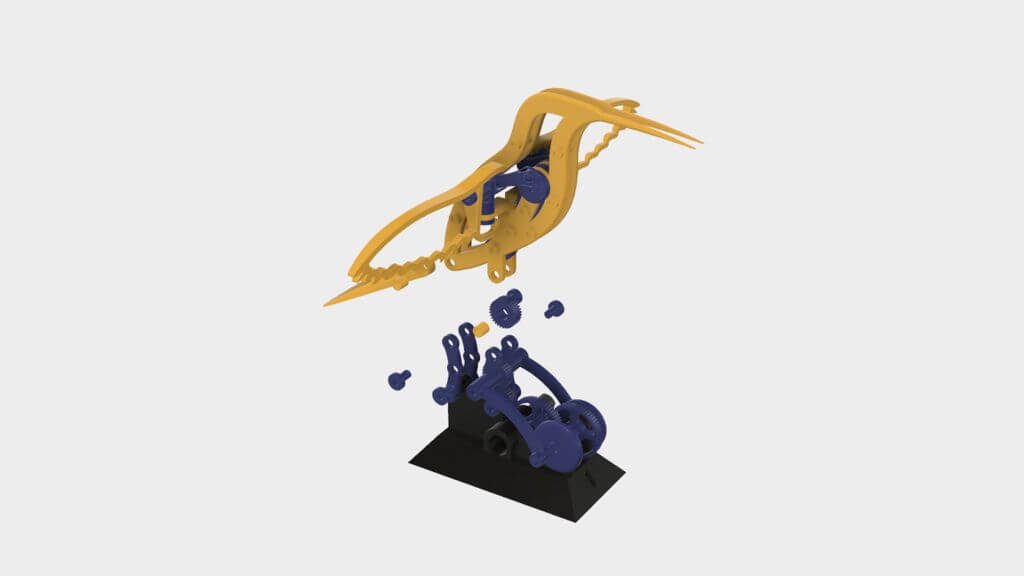
This Mechanical Hummingbird is an intricate 3D puzzle, requiring a substantial number of 3D printed parts. Zumwalt designed the entire structure to be 3D printed, save for the small motor used to bring movement to the bird.
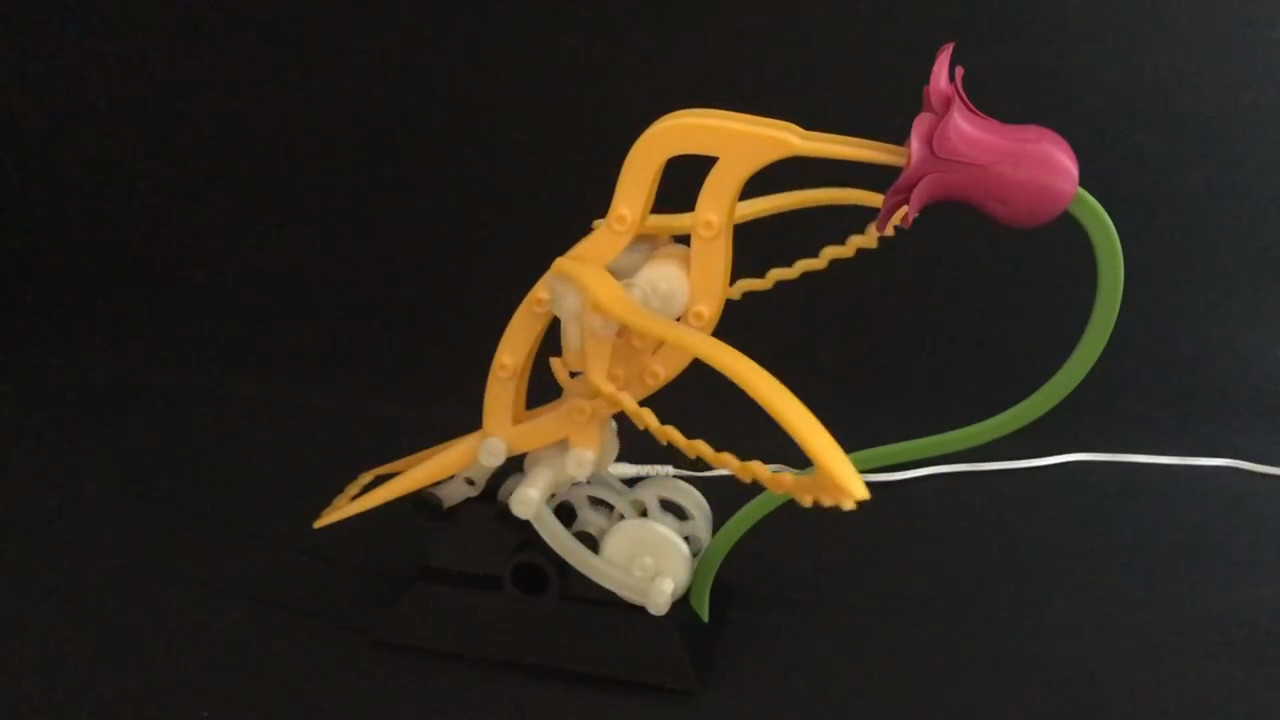
3D printed parts include the bird’s wings and body, the blossoming flower, the elaborate array of gears, and even the base. By the time you’re finished with this project, both you and your 3D printer will go from a novice in the nest to soaring DIY eagles.
Interested yet? We thought so… Here’s some insight into Zumwalt’s marvelous –and almost fully 3D printed — Mechanical Hummingbird project.
3D Printed Hummingbird: What Do You Need?
Your 3D printer is going to do most of the work here. In fact, this complex automata is comprised of 97 individual 3D printed parts. All of these STL files are available for download on Zumwalt’s Instructables post. He also shares CAD images for each component, which he modeled using Autodesk Fusion 360.
However, while you get that extruder warmed up, you’ll need to obtain a few other things as well.
3D Printed Hummingbird: Putting It All Together
This project consists of 97 3D printed parts, so you can max out your efficiency by grouping together sections of the mechanic device on the print bed. Zumwalt provides steps to assembling the innumerable amount of puzzle pieces. Be aware of the filament color you use for each component, particularly with the bird and flower.
Each step in the Instructables post goes into detail about the assembly of the STL files. You’ll start with the base of the bird, which is also where the electric motor will be mounted. This is followed by the transmission, the body and wings of the bird, and an explanation on how to conjoin these 3D printed pieces. Finally, it’s time to 3D print the flower stem and bulb, which along with the hummingbird, offers a good opportunity to get creative with filament colors.

Zumwalt suggests that before starting assembly, you should test fit, trim, and sand the 3D printed parts to ensure smooth movement and a proper fit. You can also file any excess “ooze” (also known as an elephant foot) from the surface of the 3D print that is contacting the build plate.
Since the Mechanical Hummingbird uses threaded assembly, the maker also recommends using a 6mm x 1 tap to clean out the threads. He also uses petroleum jelly to lubricate the gear train, as well as areas between the rotating contact surfaces.
There’s no denying that this project will require a lot patience and 3D printing time, but this automata ornament is an enormous example of the little things your 3D printer can do.
If you’re interested in building Zumwalt’s Mechanical Hummingbird, check out the full description, STL files, and assembly instructions on his Instructables post.

Website: LINK
Schreibe einen Kommentar
Du musst angemeldet sein, um einen Kommentar abzugeben.