Looking for an awesomely interactive project to 3D print this weekend? The Ruiz Brothers and Phillip Burgess have shared Animated LED Sand, a DIY physics toy featured on Adafruit.
Although the laws of physics are an integral part to our understanding of the nature and universe that surrounds us, learning about Newton’s laws from a textbook can be a daunting and exasperating task. Instead, why not enjoy the science of matter and energy with an interactive toy you can 3D print yourself!
The Animated LED Sand device is an incredibly simple, yet awe-inspiring DIY toy that will entertain kids and adults alike. Using an LED matrix that displays little grains of sand, this 3D printable toy interacts with motion and acts as if it’s under the influence of gravity.
This Weekend Project, created by the Ruiz Brothers and Phillip Burgess, is currently featured on Adafruit. We’ll give you a quick recap of the project, and show you how to make the complexities of physics more fun.
Animated LED Sand Toy: What Do You Need?
If you’re interested in assembling your own 3D printed physics toy, most of the supplies can be purchased from Adafruit. Here’s what you’ll need:


Animated LED Sand: Putting it all Together
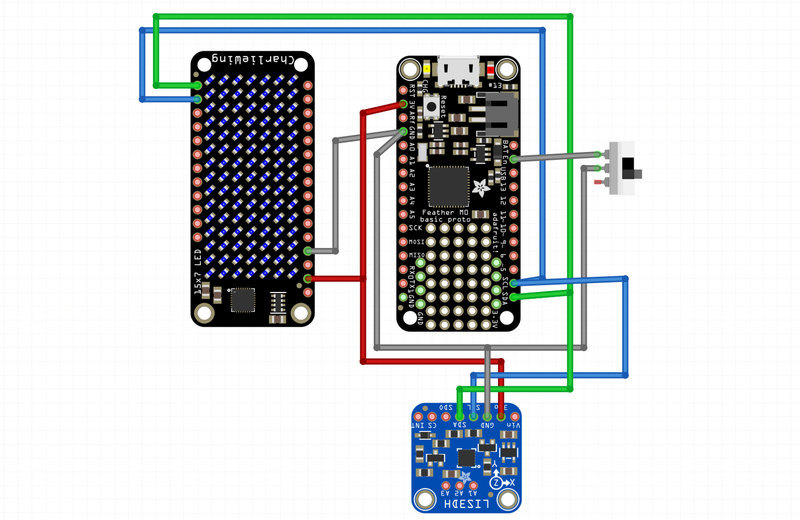
Once you have your supplies, it’s time to dig into the circuitry and coding for the Animated LED Sand. You’ll need to connect the slide switch to the Feather Board, and will need to be 70mm for the GND and 50mm for the EN pin.
The CharliePlex Featherwing also connects directly to the board, and requires the connections for the SDA and SCL wires to be 70 mm long. Meanwhile, the 3V and GND connections can be 80mm long.
Lastly, the LIS3DH connects to the top of the Feather (via the 3d printed mount), and will need to be 40mm long for all connections. If you’re more of a visual learner, Adafruit shares a circuit digram to help you connect the various electronic components together (pictured below).

In order to use the LED Sand sketch, you’ll need to download the latest version of Arduino IDE. If you’re unfamiliar with Arduino, the Ruiz Brothers suggests going over introductory tutorials. There are also a few libraries that will need to be installed onto Arduino IDE.
The code for this DIY physics toy, written by Burgess, can be found on the Adafruit project page.
The 3D printed enclosure comes in a handful of relatively easy to print files. You can download the STL files from Thingiverse. There is a dome version, which teeters back and forth on a surface, or a gimbal version, which keeps the toy in constant spin.
Lastly, you’ll need to solder the electronic components together and assemble the Animated LED Sand toy. This project showcases an interesting relationship between electronics and 3D printing, using 3D printed spacers and mounts to keep everything in check.
If you’re interested in building this DIY Physics Toy over the weekend, you can view the full assembly instructions here. Be sure to check out the video below for more information and maker inspiration.
Website: LINK
Schreibe einen Kommentar
Du musst angemeldet sein, um einen Kommentar abzugeben.