With these excellent Altoids tin projects, you can upcycle the metal case after you’ve finished chewing over the curiously strong mints.
The Altoids tin is more than just an iconic receptacle for strong mints, it’s also an astonishingly versatile little beast.
Makers have hacked its metallic frame into a million and one different uses, ranging from an RFID wallet to a headphone amplifier, from an urban survival kit to a Raspberry Pi computer case.
And 3D printers haven’t missed out on the action, either. Collected below are 12 awesome Altoids tin projects to 3D print. These hacks are remarkable in their simplicity, just print them off and away you go.
Did we miss any of your favorites? Let us know in the comments, and we’ll pencil them in for a future update.
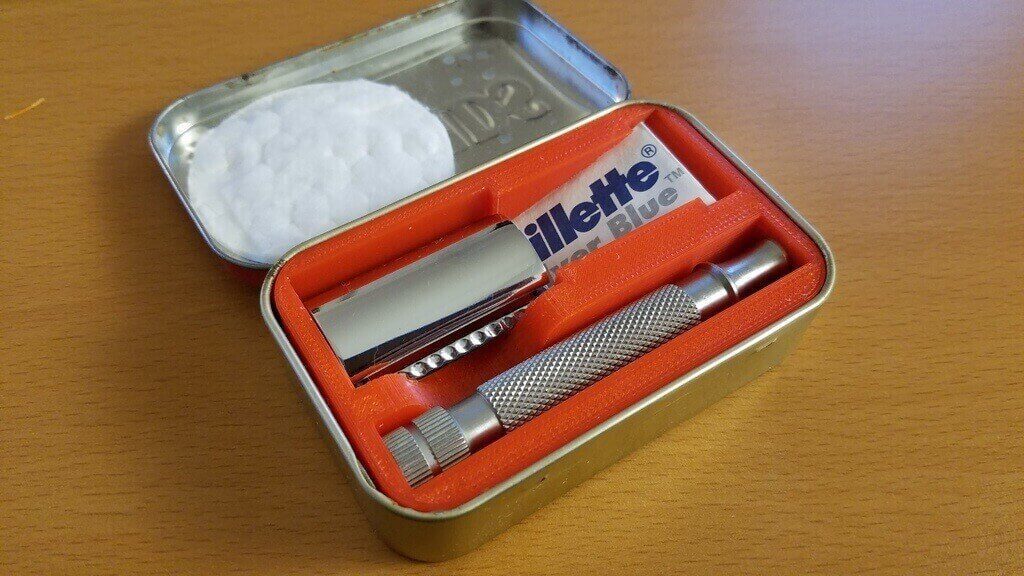
MEN! And, er, LADIES! Do you like to have a proper shave when on the road? Don’t want to use disposable razors? Of course you don’t! Only a double-edged razor will do. Print out this DE insert for an Altoids tin, and there will be no compromises in your personal grooming.
Inspiration can strike at the most unexpected moments. You’re walking through a field and then — BANG — you see a beautiful tree and you’ve got to paint it before you die of heartbreak. Be prepared with this nifty tin insert that functions as a watercolor palette.
Paging Google Cardboard, we think you’ve got some serious competition. On second thoughts, maybe not. A phablet smartphone is never going to fit inside an Altoids tin. But you can still create lo-fi 3D images of your own to enjoy in this portable VR machine.
The perfect Altoids Survival Tin. So long as your idea of survival is a kit containing some plasters, antibacterial ointment, and some aspirin. With the inclusion of some toothpaste and wet-wipes, this could easily be modified into a morning-after-the-night-before kit.
In the sports and outdoors category, this is a project to create a dedicated mini-tackle box for fishing. The beauty here is that you can sort and compartmentalize all those different lures and wotsits into separate boxes, and take along only the ones you need.
Of course, the Altoid tin projects on this list are so incredibly awesome, there’s simply no way you could possibly confine yourself to just one. This 3D printable caddy allows you to stack and store up to five tins at a time.
Celebrate the spirit of Christmas with this nativity ornament that fits inside an Altoids tin. Because nothing says “Jesus Christ Our Savior” like minty fresh breath.
If you’re in a situation where you have to take medication daily, this pill box insert is useful for sorting your drugs into separate compartments. This model is good for six days a week, but there’s a seven-day variation available too.
A rather clever evolution on the pill insert idea is a divider which incorporates a pair of plastic tweezers. Because if you have fingers that are thicker than a bunch of butcher’s sausages, digging out those little pills is going to be a royal pain.
This charming design is one of several “Altoy” designs by maker Chad Ruble, where he collaborated with his 9-year-old daughter on making pocket games and toys to fit inside an Altoids tin. Check out Minty Tic-Tac-Toe and Lily Pad Leap, too.
This project’s point of difference is that it’s a solid insert for the tin, making it more substantial and providing greater structural integrity, whilst also not having any specific purpose. Use it how you think best!
Convert that Altoids tin into a miniature briefcase that’s fit for a doll’s house. Or someone with really tiny hands. It also doubles as a security band, so there’s no danger of the lid popping open and spilling its contents if you drop it on the floor.
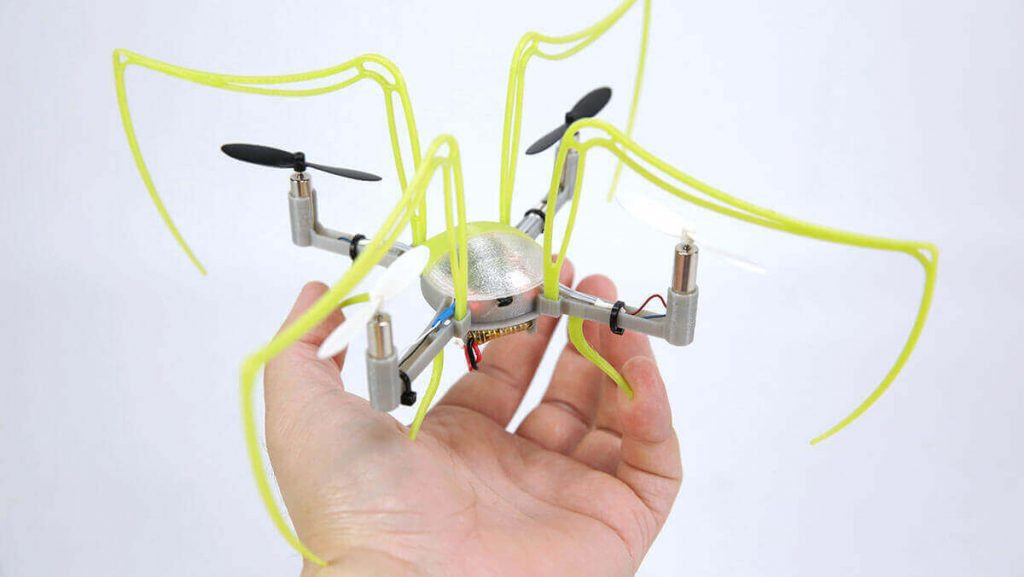
Check out 2019 guide to 3D printed drones with resources, materials, and ideas. In fact, all you need to start 3D printing your own drone parts.
While it’s not yet common to fabricate electrical components like motors, sensors or even electronics – but watch this space – it’s entirely possible to 3D print drone parts like the frame, landing gear, and propellers. And these are usually the parts that break easily.
Have we piqued your interest? Read about the pros and cons of 3D printed drones, plus a guide to the best resources to be found online. Right here, you can jump to the topics directly:
Sections
3D Printed Drone Parts: Why You Should 3D Print Them
What‘s the benefit of 3D printed drone parts? If you’re not an experienced RC pilot, crashing and breaking parts of your aerial vehicle can be expensive. Instead of buying new parts at a hobby shop, you can 3D print your own spare parts as needed.
With your own 3D printer to hand, part designs can be easily upgraded and further developed to improve the performance of your quadcopter. On top of that, 3D printed drone parts are quickly interchangeable and you can do it yourself. You can even have the parts manufactured by a professional 3D printing service – if you want to get the best price for a special item, please consult Craftcloud – All3DP’s 3D Printing &Price Comparison Service.
Building your own RC vehicle out of 3D printed parts serves as a great opportunity to learn about how it works and how it reacts to modifications you make.
3D Printed Drone Parts: Things to Consider First
First, 3D printing takes time. It can take up to several hours to print a small sized part of sufficient quality.
Moreover, becoming an expert in 3D modeling and 3D printing requires skills you have to develop and practice. In the early stages, a beginner may experience frustration when designing the parts they need.
But don’t worry, there are plenty of tutorials online, plus websites where you can find. STL files of 3d printable drone parts which you can download and print without having to create them yourself.
Other than the above, there aren’t many reasons why you shouldn’t just go ahead and 3D print your own parts!
3D Printed Drone Parts: The Parts You Can 3D Print
The good thing is: You can 3D print almost every part of a drone except the electronic components. Here are some components:
Propellers
FrameLanding gear
Landing gear
Camera mounts
Antenna holder
Protective equipment (i.e. prop guards)
Remote casing
Battery pack casing
Even some commercial drone manufacturers are using 3D printing. For example, Southern Californian company Blue Robotics uses 3D printing for their submarine drones. Their creations are open source, the digital blueprints are available for everyone who wants a 3D printed drone.
3D Printed Drone Parts: The Best Resources
There are many resources online that not only offer 3D printed drone parts for existing makes and models but also instructions how to build your own 3D printed drone parts.
You’ll need to buy the electronic components in most cases, but a significant chunk of the parts can be fabricated on any 3D printer.
Resources for 3D Printed Drones:
Watch the amazing mechanism that moves the landing struts up when in mid-air (to lower the center of gravity) and down while landing… It’s a really sophisticated piece of design.
3D Printed Drone Parts: 3D Printing Accessories
Aside from vital components, there is a huge variety of extra things you can add to your quadcopter. There are functional accessories… and then less functional accessories.
One might make a flying Helicarrier from The Avengers movie out of their drone (which would be awesome). Others will stick to more practical applications like 3D printed propeller guards, cases for transportation and mounts for various cameras used on FPV drones (which is also awesome).
The possibilities are limited only by your imagination.
3D Printed Drone Accessories #1: Protect your Vehicle
Parts you can 3D print range from optional accessories to add-on protective equipment like prop guards. The latter are useful for small indoor quadcopters like the Hubsan X4 and gear protectors for the very popular Parrot AR versions.
Every part that will commonly bump into obstacles (including the ground) may need replacement at some point. If you 3D print drone spares, you won’t suffer from much downtime when this occurs.
3D Printed Drone Accessories #2: 3D Printed Drone Mounts
Of course, we’re not referring to mounting the drone onto something, that would be pointless. Rather, the idea is to mount accessories onto the drone.
And if you’re planning on getting started with FPV drone racing, 3D printed parts like a camera mount as well as mounts for the live video transmitter or maybe an additional antenna holder are highly useful.
If you want to know more, please consult this article.
3D Printed Drone Accessories #3: Boost the drone’s range with 3D Printed Parts
There are many ways you can come up with iterations of existing parts that may or may not improve your drone – and it’s fun to experiment for sure!
For different use cases, different designs will prove worthwhile. For the hobbyist that buys a fully assembled quadcopter (like the DJI Phantom or Inspire models), they’ll still appreciate a simple 3D printed range booster that, acting as a parabolic reflector with some metallic tape, will increase the range of the remote control threefold.
Elsewhere, the tech enthusiast that builds his own drone from scratch can improve the accuracy of his onboard electronics by eliminating general shakiness with a 3D Printed Anti Vibration Mount, which still conducts major movements that come from actual changes in flight.
3D Printed Drone Parts: The Best Materials
Choosing the right material is vital because every gram of weight will cost you flight time. Why? Because the heavier the drone, the faster the drain on the drone’s battery. At the same time, it would be foolish to try to navigate properly with a wobbly construction made from shoddy parts.
There are many “high-grade” 3D printing filaments available. They are sold as extra-strong and durable alternatives to the widely used PLA and ABS. You can also spend extra cash on some enhanced filament spools with carbon fiber. So, should you print in nylon, PET or rather use some exotic stuff you haven’t even heard of yet?
3D Printed Drone Parts – Material #1:PET/PETG
PET / PETG is stable and shockproof, but it requires a heated print bed, is relatively expensive, and quite heavy.
In conclusion, you can almost always print in PLA when you’re an absolute beginner and should transition to ABS when you’re ready for the big leagues. Advanced 3D printing and drone pros will also enjoy printing with Nylon.
3D Printed Drone Parts – Material #2:TPU/TPE
Because it is flexibel and absorbs vibrations.
3D Printed Drone Parts – Material #3: PLA
PLA is easy to work with, has no odor, and is cheap and widely available. However, it’s not UV or heat-resistant.
3D Printed Drone Parts – Material #4: ABS
ABS is tough and stable, lightweight, and has better temperature resistance. It’s also cheap and widely available. However, you need a heated print bed for optimal results, and there are the dreaded toxic fumes to consider.
3D Printed Drone Parts – Material #5:Nylon
Nylon has amazing strength and temperature resistance and is lightweight, but it’s tricky to print with.
If you want more information on filaments, please continue here.
TheBest 3D Printed Drones
Here’s a short collection of the best drones and quadcopters you can 3D print:
3D Printed Quadcopter #1: PIXXY (Pocket drone / FPV quad)
The Pixxy is of the smallest FPV miniature quadcopters you can build yourself. It only weighs 4 gram, can be easily stored and relatively easy to manufacture. You need some simple soldering skills, the parts widely available in common online hobby and toy shops. The cost for this 3D printed drone shouldn‘t exceed USD $100.
3D Printed Quadcopter #2: Hovership MHQ2 (Quadcopter)
Being one of the most popular designs of 3D printed drones, this redesigned MHQ2 folding mini quadcopter is built like a tank! Building on the success of the original MHQ frame, it offers improved functionality, durability, and stability of this frame.
This beauty of a 3D printed drone can go really fast: The Firefly is a fully featured racing quad with amazing flight characteristics. If you’re into DIY racing drones, this is one to consider.
3D Printed Quadcopter #4: Rey’s Speeder Bike (Quadcopter)
This is custom quadcopter inspired by Rey’s Speeder Bike from new Episode 7 Star Wars The Force Awakens trailer. This is one of the 3D printed drones that just look beautiful – but beware, there’s a lot of work to do until Rey takes off.
3D Printed Quadcopter #5: Foldable Brushed Microquad
It looks like a flying circuit board, right? Well, that’s pretty much what it is. This 3D printed drone is foldable to 83 x 58mm, consists of affordable components and is relatively easy to build, if you have some DIY experience.
If you’ve neglected to remember the fact that it is soon to be Valentine’s day; don’t fret as there is still time to whip up something on your 3D printer which should suffice as a gift.
Below are some of the most romantic prints for you to choose from which are free to download and print, but perhaps don’t tell your loved one that part.
3D Print for Valentine’s Day #1: Infinity Heart Pendant
What is it? This design was made for a wedding but works perfectly well for a Valentine’s Day gift too.
Where can I get it? You can find the pendant files here, or if you’d like to print it in metal check out our All3DP price comparison service.
3D Print for Valentine’s Day #2: Valentine with Bare Conductive Electric Paint
What is it? The designers said: “Light up your Valentine’s geeky heart, with our 3dprinted AdaBot card, using LEDs and Bare Conductive Paint. Turning the gears applies pressure to the batteries hidden inside a heart, lighting up the LEDs.”
Where can I get it? You can find this design on Thingiverse.
3D Print for Valentine’s Day #3: MailBot – The Robot Note Mailbox
What is it? Mailbot is a 3D printed mini robot mailbox for little notes. The designer said: “There’s mail, and then there’s the mail you actually love to get.” Mailbot can be kept anywhere such as; your desk, office, car, and everywhere in between!
Where can I get it? You can find this cute little guy here.
3D Print for Valentine’s Day #4: Heart Charms or Hearticles
What is it? Heart Charms! They can easily be linked together in different ways. If you’d prefer a bracelet, a necklace or even a ring from just one closed charm, there are many choices. The hearticles come in different sizes, some are closed, some have an opening on the side and some on the bottom. This sweet little idea makes nice jewelry.
Where can I get it? You can find the downloadable files here on Pinshape.
3D Print for Valentine’s Day #5: Heart Wings Cookie Cutter
What is it? With this OogiMe Valentine’s Day Collection cookie cutter, you can easily surprise your loved one. The estimated print time is just 44 minutes, and depending on how good you are in the kitchen, estimated baking time can vary.
Where can I get it? You can find this fabulous design here.
3D Print for Valentine’s Day #6: Heart Light
What is it? For anyone who likes pink heart lighting, this gift is the perfect choice. The heart light is one which casts beautiful mood lighting, perfect for Valentine’s Day.
Where can I get it? Find this gorgeous print here.
3D Print for Valentine’s Day #7: Male Valentines Duck
What is it? This little guy has been described as: “the ancient forefather of the almighty Duck Dynasty”. Sharing a bubble bath with him may make Valentine’s Day feel a lot less lonely. Hopefully.
Where can I get it? This super cute heart pendant can be found here, with a free download too.
3D Print for Valentine’s Day #9: “Hole in My Heart” Cookie Cutter
What is it? Of this slightly different print, the designer said: “I wanted to create something fun for Valentine’s day and ended up with a heart shaped cookie cutter with a difference.”
Where can I get it? If you’re looking for an alternative present option, then you can find this idea on Thingiverse.
3D Print for Valentine’s Day #10: Cupic
What is it? The Cupic’s are a great idea for anyone wanted to share any romantic food on Valentine’s Day. The designers said: “Lovers desert for two? Valentines party? Meet CUPIC, our most romantic food-pick. Dispose after one use.”
Where can I get it? You can find this sweet little idea on 3DShook, and download the print for free, here.
3D Print for Valentine’s Day #11: Valentine Vase & Dish Set
What is it? The Valentine Set comprises of heart inspired vases in short and tall varieties with an optional heart-shaped base, and a matching three section heart shaped candy dish too.
Where can I get it? These classic looking dishes can be found on Pinshape.
3D Print for Valentine’s Day #12: “I Love You”-Box
What is it? A circular trinket/present box with the words “I LOVE YOU” embossed in the style of Morris/Goudy around the outside. There is a plain lid, or if you prefer, a lid with space for an insert of your loved one’s initial printed separately and pressed in.
3D Print for Valentine’s Day #14: Simple Heart Bracelet
What is it? To go with your loved one’s heart ring is a simple heart bracelet too. Perhaps you could make a whole jewelry collection from your 3D printer?
Where can I get it? Check out this beautifully simple design on MyMinifactory.
3D Print for Valentine’s Day #15: Support Bouche
What is it? Moving away from the heart theme is this sweet yet functional idea. The Support Bouche is used to hold up your smartphone or tablet – something romantic yet useful.
Where can I get it? You can check out this cheeky idea on Cults3d.
3D Print for Valentine’s Day #16: Couple Egg Cups
What is it? This interesting idea could be a great way to serve breakfast in bed on Valentine’s Day. The designer said: “Need a special gift for the upcoming Valentine’s day? How about this 3d printed couple? One for him, one for her.”
Where can I get it? Check out this sweet idea here.
3D Print for Valentine’s Day #17: Heart Gear Keychain
What is it? If you want an understated present, then check out this 3D printed design which works as a key ring. The whole print only takes about 40-60 minutes and can be done in a single print with no raft or supports.
Where can I get it? The geared heart works with a hand crank and is available to download on Thingiverse, but a motorised version is also available here too.
3D Print for Valentine’s Day #19: “You’re the one” Sound Wave
What is it? If you’re not really into hearts, but still want to find an equally cheesy present, then perhaps the “you’re the one” sound wave will fit the bill. The designer said, of this little token: “I recorded the words “you’re the one”, took that into Reaper to visualize the waves it made and designed a printable Sound Wave using Sketchup. The original idea was to put this in a box frame with the words as a gift but I’ve not gotten that far! Valentine’s gift perhaps?”
Where can I get it? You find a 3D printed necklace at Shapeways.
Disclaimer:
All3DP GmbH makes 3D printing available to everyone.
If you choose to buy an item through one of All3DP’s articles, we do not charge any fee or additional price on top of our partners fulfillment price. We are paid on a commission, which means that we receive a small percentage from our partners.
Also, we are not selling the models. By comparing the prices of our 3D printing services, we simply are pointing you to the lowest 3D printing price available. If you would like to know more, please visit our Terms of Service.
Also, the editorial team of All3DP only conveys models that are under Creative Commons 4.0 Licence. All3DP will never convey STL files which are marked with the non-commercial use licence (CC NC). Also, according to CC BY, we give attribution where needed. If you are the designer of a model and want to be removed from All3DP’s price comparison service, please send a mail to [email protected].
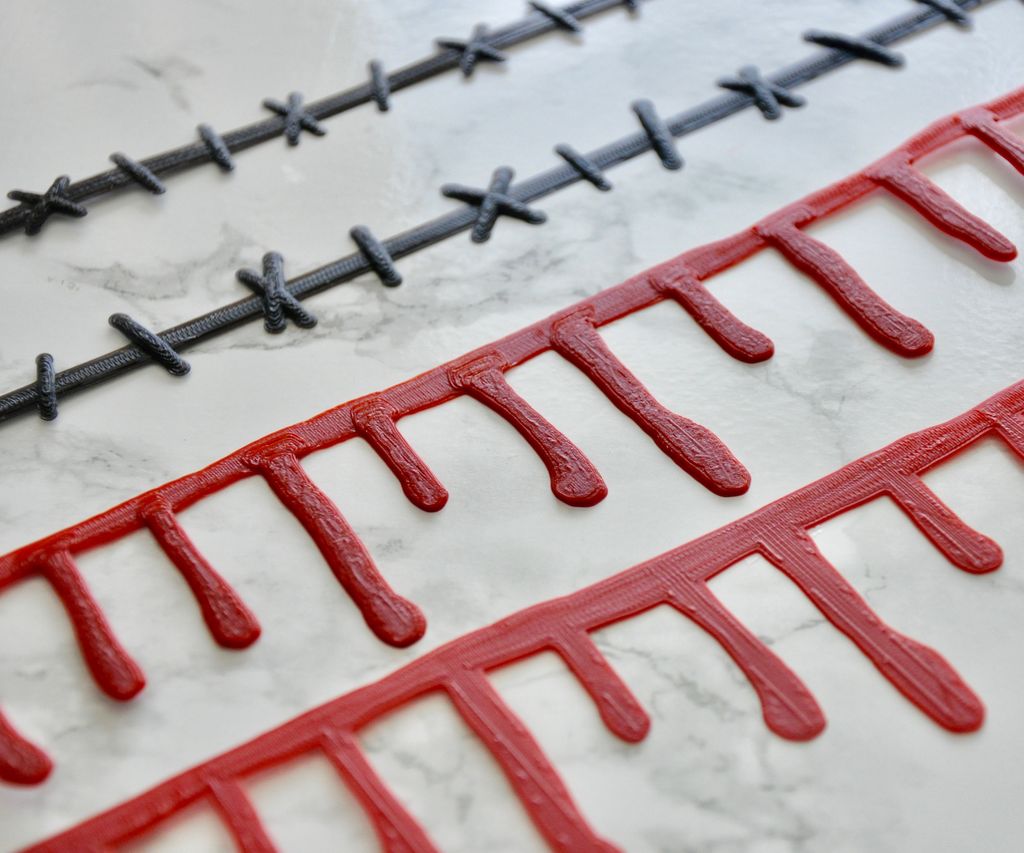
Add some fright to your spine-chilling costume with this collection of Halloween-themed 3D printed jewelry, which includes a stitched neck and dripping bloody neck.
Do you need to add some extra dread to your undead aesthetic? One Instructables user who goes by the name of Penolopy Bulnick has recently shared a collection of 3D printed Halloween jewelry that will complement the most terrifying of costumes. Her latest designs include a dripping bloody neck, as well as a stitched neck and wrists.
This collection of Halloween-themed accessories are easy to make and actually look pretty realistic, making them ideal for anyone planning to go to dress up as a zombie, vampire, or Frankenstein for an upcoming costume party. The designer has shared a handful of 3D printable models that vary in size and thickness, as well as the Tinkercad files so you can customize them yourself.
With just a few affordable jewelry pieces and these 3D printed effects, you can attach dripping blood or stitches directly to your throat. Let your friends stare in horror as you parade your gory trinkets around the neighborhood. Let’s take a look at how you can 3D print your own creepy jewelry for the haunted holiday ahead.
Also, be sure to check out our other Halloween-themed Weekend Projects for more ideas:
3D Printed Halloween Jewelry: What You Need & How to Build it
You can find the STL files for the stitched neck and dripping bloody neck on the designer’s Instructables post. There, she also goes over the design process for both pieces, explaining how she created them on Tinkercad.
The supply list needed to create this jewelry collection is quite short. You can either use red and black filament (Penolopy Bulnick recommends Iron Red and Black from Hatchbox3D) or spray paint once the print is complete. Aside from your 3D printer and filament, here’s what else you need to make your own bloody or stitched neck:
Since these designs are so thin, you don’t really need flexible filament to wear them. However, if you want to print a thicker version or improve the comfort a bit, a flexible material like TPU might be worth investing in. Otherwise, when loading these models into your 3D printing slicer software, double check them to make sure they aren’t too thick. If you decide to print the thicker version of the bloody neck with regular filament, the band of the design should only be two layers high.
The next step is dependent on what color filament you’re using. If you’ve already got the right color extruding out of your nozzle, there’s no need to worry about spray painting. For those who don’t have any red or black filament, or want to use paint to enhance the gruesomeness of the jewelry, you can just color the side of the print that will be on display. The designer uses a sealer after painting to give her slit neck a more glossy effect.
Next, add the jump rings to the corners of the print, followed by the clasp and necklace chain. Both the bloody neck and stitches are designed to be worn as a choker, so make sure the chain is long enough, but not too long. And that’s about all it takes to add some terrifying jewelry to your Halloween costume!
Need to prepare decorations for Halloween? We’ve got you covered with this spooky 3D printed Pumpkin Spider Transformer designed by William Bruning.
The spookiest day of the year is just weeks away… Why buy your decorations when you can make them on your 3D printer? To get you prepared for the ghouls, ghosts, and trick-or-treaters that are coming to your door this Halloween, All3DP will share a handful of fun and frightening weekend projects to keep you and your 3D printer busy.
And what better creature to mark the upcoming holiday than a Pumpkin Spider Transformer (yes, you read that correctly). Designed by New Zealand-based maker William Bruning, this 3D print can appear as a plain old pumpkin at one instance, but can suddenly transform itself into a creepy spider in the blink of an eye.
We stumbled across this eight-legged print on Thingiverse, where it’s currently being featured on the front page. The creator even made a short animation video with his creation, which you can watch below.
This isn’t one of those difficult projects that require soldering, various electronics, or anything that might scare away a 3D printing novice. In fact, the Halloween Pumpkin Spider Transformer is fully 3D printed, making it an easy way to spruce up this year’s decorations. Let’s take a peek at how to print and put together this creepy-crawling project.
Halloween Pumpkin Spider Transformer: What You Need & How to Build
The STL files for the Halloween Pumpkin Spider Transformer are freely available on Thingiverse. The model is comprised of seven different parts (six if you attempt to print the chest in one piece). Bruning recommends using support structures, a 10 percent infill, and a .15mm resolution.
As for colors, you’ll probably want the outside of the pumpkin to be orange, which you can either achieve via colored filament or (preferably) spray paint. Once the parts are finished and the supports are removed, it’s time for the assembly process.
First, put a bit of superglue on the base of the ball joint in the middle of the chest to strengthen the connection. Next, push the leg ball joints into the chest socket. According to the designer, the assembly may be a bit tight, but there shouldn’t be any issues that end up breaking the part. After that, click the other end into the slices of pumpkin to finish the leg section. Lastly, connect the head to the body via the two neck joints.
In order to make it look like a spider, move the head to the front. To disguise it as a pumpkin, movie the head down until its fit snugly into the middle of the model. And that’s about all it takes to make your own Halloween Pumpkin Spider Transformer!
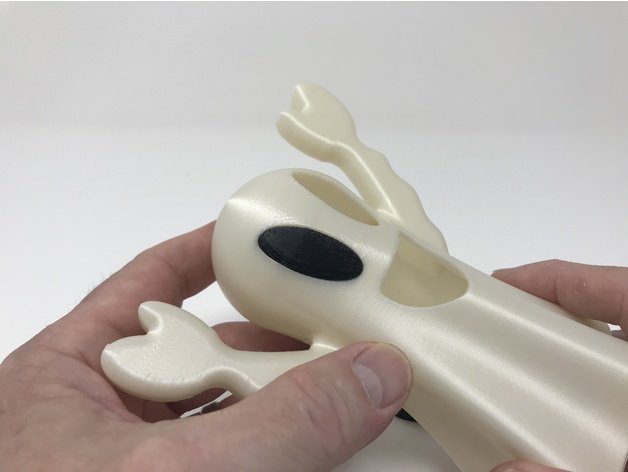
Want to make your Halloween decorations more cheerful this year? This 3D printed Tea Light Ghost will make a happy addition to your seasonal adornments, greeting all of the trick-or-treaters with a smile.
Halloween is a time for haunted houses, elaborate costumes and frightening amounts of candy, but not every decoration has to scare you out of your socks. Why not lighten up the mood with a friendly-looking 3D printed Tea Light Ghost lamp, designed by maker Greg Zumwalt.
This grinning ghost is equipped with a base for a LED tealight candle, which emits light throughout the model and creates a subtle lamp effect. It’s the perfect addition to a house that is haunted with smiles rather than spookiness. It’s easy to print and doesn’t require much time to make, making it an ideal project for beginners or makers looking for a quick way to add some Halloween ornaments to their seasonal display.
If you want to consider a different approach to this project, you can also check out Zumwalt’s Illuminated Happy Ghost Lamp on Instructables. Otherwise, let’s take a quick look at how to conjure up the spirit of your own 3D printed Tea Light Ghost.
Illuminated Happy Ghost: What You Need & How to Build it
The files for this 3D printed ghost lamp are available to download via Thingiverse. There are two versions of the ghost – one for single extrusion and another for dual extruder 3D printers. The ghost itself can either be printed as one piece or with the eyes and mouth separately.
Aside from your 3D printer and some filament, you’ll also need LED tealight candles (37.5mm in diameter), which act as the base of the lamp. You can find them at a local hardware store or order them on Amazon. Zumwalt suggests printing the parts with a 20 percent infill, no support structures necessary.
There’s no assembly process with the dual extrusion version; simply print it out and insert the tealight candle at the base. If you opt for the single extruder model, you’ll need to apply some thick cyanoacrylate glue to attach the right eye, left eye, and mouth. While mounting the eyes, you can insert your pinky finger through the mouth hole for support. When attaching the mouth, go through the bottom base to secure the ghost’s wide smile.
The final step is simple. Just press the tealight candle into the base of the ghost and turn it on. Now you have giddy decoration to lighten the spooky Halloween mood.
This project is easy to create and doesn’t take too much time or effort, so feel free to make a collection and have yourself a friendly ghost party!
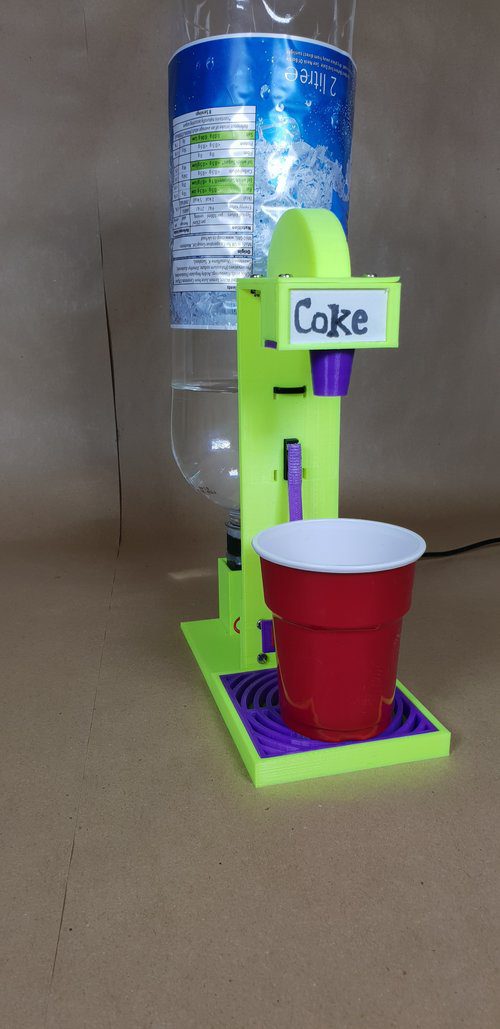
Want to bring the convenience of a soda fountain machine into your own home? Take a refreshing sip from the 3D printed Drinks Tap created by That Robot Guy.
There are few things in the restaurant world that are as enticing as a free refill, just one more glass of your beloved soft drink. What if you could take the refill machine from the local fast food joint and into your home?
One maker named That Robot Guy has created a 3D printed Drinks Tap that you can build for around $15-$20. This simple robotic machine is essentially made up of a handful of 3D printed parts, along with a pump, switch, and power socket. All you have to do is flip over your favorite soft drink (or a water bottle for the more health-conscious maker) and connect it to the tap, hitting the 3D printed level to get the refreshments flowing.
This 3D printing project has the look and style of a drink refill machine that you’d find in a restaurant. It’s easy to build and the components are pretty easy to acquire. Let’s take a look at what you need and how to build this 3D printed Drinks Tap.
3D Printed Drinks Tap: What You Need & How to Build it
That Robot Guy’s 3D printed Drinks Tap is comprised of six 3D printed parts: the base, support for the switch and nozzle, the nozzle itself, drip tray, the PUSH lever, and tube cover. The STL files are free to download via Thingiverse. The refreshment will flow through PVC tubing, so no need to worry about your drink coming in contact with the 3D printed plastic.
Aside from the 3D printed parts, here’s what else you need to build your own refill machine:
Once you have all of your 3D printed parts and non-printed components prepared, you can move on to the assembly process. Taking your bottled drink, the first step is to cut a 6mm wide on the lid and ensure that it fits over the top of the pump. Once this is verified, attach the bottom of the lid to the pump using your glue gun.
Next, you will need to cut the PVC tubing to measure out to 50cm, connecting one end to the outlet of the pump. After that, it’s time to attach the 3D printed parts to the base, starting with the support piece and nozzle rack with a push fit. Feed the tubing through each part and cut away any excess tubing. Use the M3 bolts to attach the support piece and, once the tubing is fed through the parts, the hose cover as well.
The final few steps consist of soldering the wires on the power supply port, connecting the switch, and connecting the power supply to the power socket. More details on the schematics are available on That Robot Guy’s website. Lastly, mount and screw the bottle onto the pump and flip it over, putting it back onto the mount.
From here, you should be able to start pouring your own refreshments from your very own Drinks Tap. Stay hydrated!
For more information on this project and the assembly process, click here.
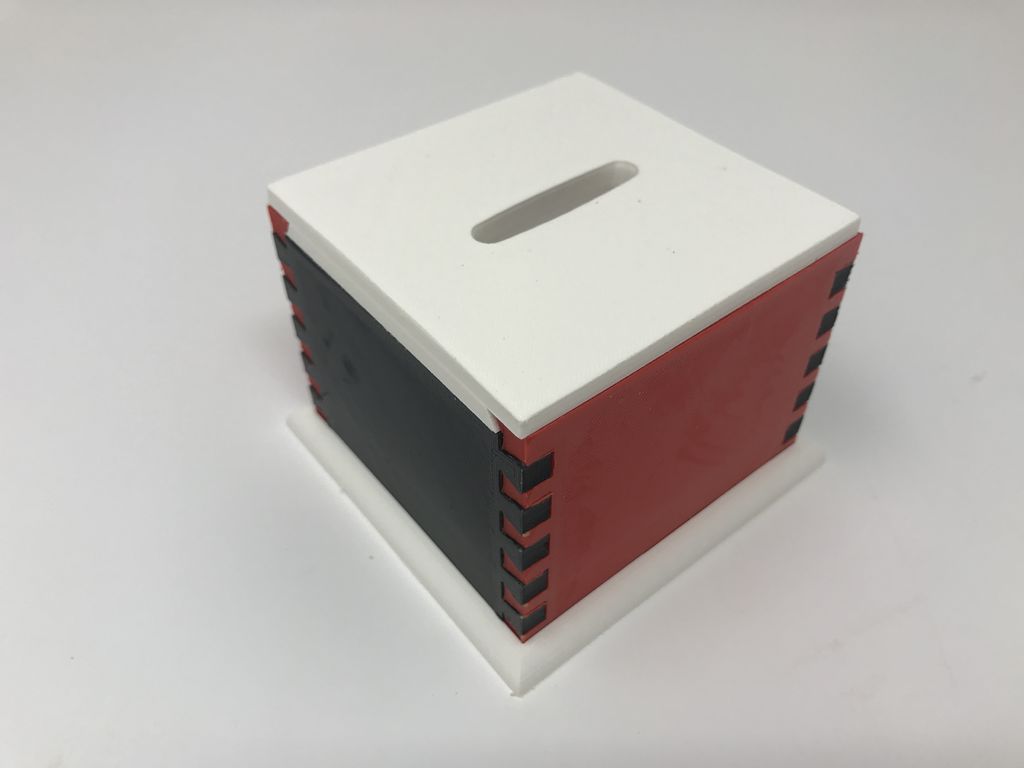
Maker Greg Zumwalt is back on Instructables with another 3D printed coin bank. His latest creation is the Simple Secret Box II, a fully 3D printed coin bank with a secret locking mechanism.
Searching for a fun way to teach his grandchildren the valuable lesson of saving money, maker Greg Zumwalt decided to design a coin bank with a secret lock mechanism. This resulted in the Simple Secret Box II: Coin Bank, a 3D printing project that will provide you with a secure place to stash your leftover change.
We’ve covered some of Zumwalt’s projects in the past, including a 3D printed Apple Coin Bank that utilized a similar mechanism. His latest coin bank doubles as a kind of puzzle, as the dovetail fixed joinery and a sliding dovetail top makes it tricky to open. The designer based the locking mechanism off of the German designed “Radbox”, which uses two mirror image slotted wheels to keep the box closed.
Furthermore, the Simple Secret Box II functions with no batteries, electronics, motors, or any hardware really. Zumwalt even adds some excitement by refraining to tell us how to open the box, leaving the mystery for you to figure out. All you need to make your own coin bank is a 3D printer and some filament. Let’s take a look at how to make this frugally-minded 3D printing project on your own!
3D Printed Coin Bank: What You Need & How to Build it
As we previously stated, all you need to make the Simple Secret Box II is a 3D printer, so no need to break out your wallet for electronics and other non-printed components. The STL files for this 3D printed coin bank are freely available through Zumwalt’s Instructables page.
There are nine different parts to 3D print, each of which should be 3D printed at .15mm layer height and 20 percent infill. After the parts are all 3D printed, you may need to do some sanding and post-processing in order to ensure smooth movement once everything is put together. The designer also recommends filing all of the edges that came in contact with the print bed, especially in and around the dovetail joinery.
Once you’ve finished 3D printing and cleaning up the parts, it’s time to build your coin bank. The assembly process is quite simple and is laid out in just a few photos. Start by connection the “Side, Left”, “Side, Right”, and “Divider” parts.
Next, using the “End, Lock”, “Cam 1” and “Cam 2” components, slide Cam 2 and Cam 1 onto the axle on end lock. Make sure that these cams can easily pivot on the axle. Align the end lock axle with the hole in the divider and press this assembly onto the end of the sides and divider assembly. You have to rotate the two Cam parts until the flat sides are parallel with the divider.
Use a business card to hold them in place and slide “Top With Slot” into the assembly until it aligns with end lock. Finally, remove the business card and secure the top with the “End” part and press the “Base” onto the bottom. Now you have your very own 3D printed coin bank!
To learn more about how the assembly process and how the secret locking mechanism works, check out the full project description on Instructables.
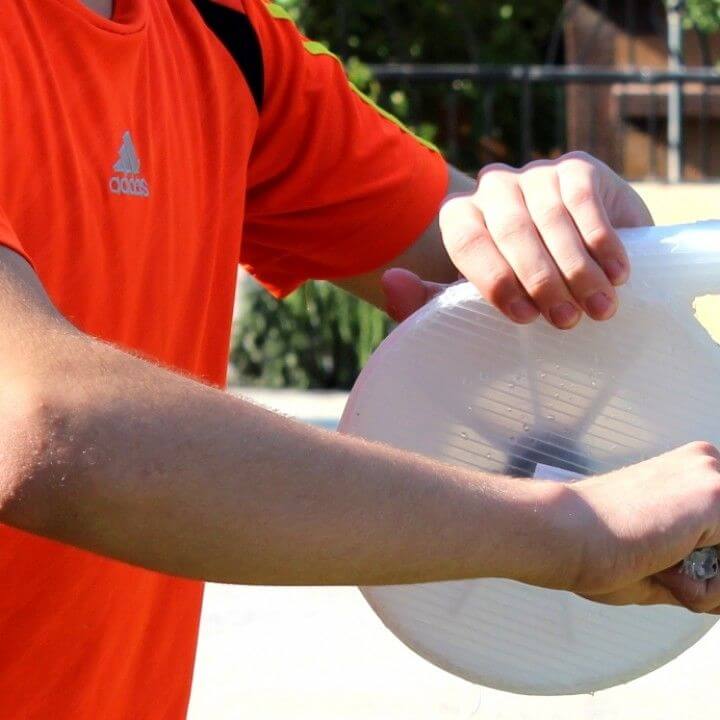
The summer might be coming to a close, but that doesn’t mean you can’t soak your friends and family in a water fight. Spray the day away with this 3D printed Manivelle Water Gun designed by maker Hassan Nasser.
Many of us can recall our fond summer memories of neighborhood water fights, from the strong spray of a Super Soaker to the surprise splash of water balloons. While this summer season may be coming to a close, one maker named Hassan Nasser has shared an awesome 3D printing project that will keep you in the pool until the Autumn leaves have taken over.
His DIY Manivelle Water Gun is a crank-based water gun that is entirely made from 3D printed parts. It uses a crank mechanism to spin a fan and shoot out water from the head of the device. It doesn’t look like your average water gun, instead resembling some kind of leaf blower or handheld vacuum cleaner.
It’s unique, easy to make, and most importantly, will provide immense enjoyment for the waning summer days. Let’s take a closer look at this project and how you can make one yourself.
3D Printed Manivelle Water Gun: What You Need & How to Build it
In order to build this crank-based water gun yourself, all you need is a 3D printer, some filament, and a hot glue gun. The designer has shared the STL files and assembly instructions on Instructables, where he details the role of each 3D printed part. Since this project will come in contact with a fair amount of water, it’s probably wise to use a material like PETG.
The Manivelle Water Gun consists of various 3D printed parts, including the fan, base, cover, head of the gun, handle, and even a 3D printed screw. The maker mentions that a metallic screw can be used to maintain the strength and durability of the crank gun.
Nasser showcases the assembly process for the Manivelle Water Gun through a screenshot of his Tinkercad design. All you have to do is connect all of the parts using a hot glue gun.
It’s a simple and easy project that will result in a lot of fun for the whole family. It might not have the pizazz or spray radius of an original Super Soaker, it’s still a great example of how 3D printing can lead to some fun in the sun. You can learn more about this project on Instructables, or download the STL files directly from MyMiniFactory.
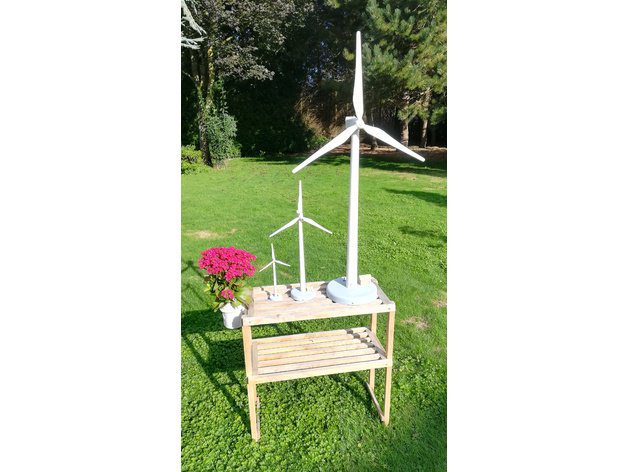
Want to teach your kids about the power of renewable energy? Or just want to build your own wind turbine replica? Then check out this 3D printed wind turbine model created by maker Luc Tellier.
If you’ve ever driven past a batch of towering wind turbines on a rural road, you know just how mesmerizing these larger-than-life structures really are. Wind power has become an integral part of the world’s renewable energy movement, and will only grow in prominence as society shifts towards more environmentally-friendly resources.
Obviously, a full-sized wind turbine is much too large to be created on your desktop 3D printer. But if you want to create a small-scale model that actually spins, maker and Thingiverse user Luc Tellier has created the perfect project for you.
The Eolienne Wind Turbine is a 3D printed educational model that has been produced at three different scales (1/100, 1/200, 1/400). Tellier created the model for his wife, who is teaching students about renewable energy and wind turbines. No, these models won’t provide any power to your home, but they are great for educational purposes or even decoration.
The maker recently shared his project to Thingiverse, so we thought we’d share an overview for all of you who are searching for a gust of creativity over the weekend. Here’s what you need to know in order to build your own 3D printed wind turbine model.
3D Printed Wind Turbine: What You Need & How to Build it
The STL files for the wind turbine model are available via Thingiverse. Some of the parts will require support structures and should be printed with 30 percent infill.
Other non-printed components that you need will depend on which scale you decide to print the model. For instance, the 1/100 model utilizes a 3V battery, while the middle sized one uses four AA batteries. The smallest model doesn’t have any power source, as the maker was unable to find a motor that fit inside of it.
You can use a variety of gear motors, which will also depend on the scale of the model. For the assembly process, the maker suggests using wood screws (3 x 16 mm) for the holes and head location that are implemented into the 3D printed parts. There are also LEDs added to the top of the wind turbine, providing an even more realistic feel to the scale model.
While these models can’t be used to power anything, the motors will simulate the impact that wind has on the turbine blades. Since Tellier’s project has already garnered so much interest, he’s now planning to create a version that is able to generate power in the near future.
If you want to learn more about the assembly process, how to optimize the printing process and what else you need to create your own 3D printed wind turbine, check out the project details on Thingiverse!
Want to make your video gaming experience even more realistic? New York-based designer Brent Scott has created a 3D printable mini steering wheel that you can mount onto your Xbox One or PlayStation 4 controller.
As the video game graphics slowly become on par with our own reality, they create an immersive experience that is being enjoyed by people both young and old. However, as realistic as your favorite racing title may be, it’s hard to feel like you’re actually behind the wheel when all you’re doing is tilting your sticks and mashing some buttons.
New York designer Brent Scott– known on Thingiverse as pixel2 – has recently created an incredible 3D printed attachment for Xbox One and PlayStation 4 controllers. This mini rack and pinion steering wheel was made to enhance your experience with racing games, allowing you to steer your virtual vehicle of choice using your controller.
No need to start a console war either… The designer has released a model for both Xbox and PS4 controllers. It’s useful, relatively easy to print, and all you need aside from your 3D printer is a bearing and some glue! So, if you’re planning on doing some gaming this weekend, why not add a 3D printed steering wheel to your controller.
Let’s take a closer look at this project.
3D Printed Mini Steering Wheel: What You Need & How to Build it
Ready to start racing? Here’s what you need to build your own steering wheel.
The STL files for both the Xbox One and PS4 controllers are freely available via Thingiverse. There are multiple parts that make up this steering wheel contraption, so feel free to get creative and mix different filament colors. Aside from your 3D printer, all you need to put this project into overdrive is a bearing from an old fidget spinner or skateboard, along with some superglue.
Once you have the parts printed and your bearing ready, it’s time to move into the assembly process. Taking the 3D printed parts, snap the rack into the pivot, moving it back and forth until the ridges of the print are smoothed out.
Next, mount the bearing onto the frame by gluing the top and bottom edge of the bearing. Make sure that the glue is fully dried before snapping it onto the controller, as the glue can leave some residue on the controller. After snapping the 3D printed rack onto the frame, mount the entire wheel onto the controller.
Slide the pivot down onto the controller’s stick until the ball joint is in the center and the bottom edge of the pivot is parallel with the rack. Finally, center the wheel on the rack and press it into the bearing.
Now you’re finally ready to get behind the wheel and start racing.
Turn your home into a magical forest of fungi with the 3D printed Magic Mushroom lighting decoration –created by German designer UniversalMaker.
One spectacular aspect of 3D printing is that it provides the ability to expand your imagination beyond the everyday world, no matter how fantastical your idea might be. On today’s Weekend Project, we’re taking you to a magical forest that contains a vibrant collection of colorful mushrooms.
Dubbed as “Magic Mushrooms”, this DIY light structure features a patch of fungi that has a voronoi-styled design. The 3D printed mushroom tucked into the stem of The decorative lights were designed by a German maker named Tobias–also known as UniversalMaker.
This project includes a tree trunk-like base and a slew of different sized mushrooms, each of which consists of a mushroom cap and stem. UniversalMaker came up with a clever concept for the LED lights, tucking them into the top of the mushroom stem.
We’ve shared a few of his 3D printing projects in the past, including the DIY Voronoi Blowball Flower Lamp and a Solar-Powered Open RC Boat. So let’s take another trip into the UniversalMaker’s world. Here’s everything you need to know about creating your own 3D printed Magic Mushrooms.
3D Printed Magic Mushrooms: What You Need & How to Build it
The STL files for this project are freely available to download via Thingiverse. UniversalMaker suggests using support structures and 20 percent infill when printing the models. Aside from your 3D printer and some natural and woodsy filament, you’ll also need some electronics and other various components.
Here’s the full checklist of parts:
Once you have everything 3D printed, the rest of the assembly process seems pretty simple. First, take the LED lights and insert them into the top of the mushroom stem/trunks, connecting them via the switch with a 9V battery.
The Voltage converter is used to control the multicolor LEDs. The mushroom caps should be clipped to the top part of the stems. The stems will to be glued directly to the main tree trunk base. You might need to do a bit of sanding to make everything fit together snugly.
Otherwise, that’s about all you need to know about 3D printing your own Magic Mushroom lights. To learn more, visit UniversalMaker’s website and watch his instructional video above.
Looking for an affordable and fun project to round out the summer with? Why not practice your archery skills with a fully 3D printed miniature compound bow.
While the world has been expressing an immense amount of concern over the potential rise of 3D printed guns, it’s easy to lose sight of all the fun projects that this technology enables us to create. To us, the most impressive projects consist of functional objects that are primarily made up of 3D printed parts.
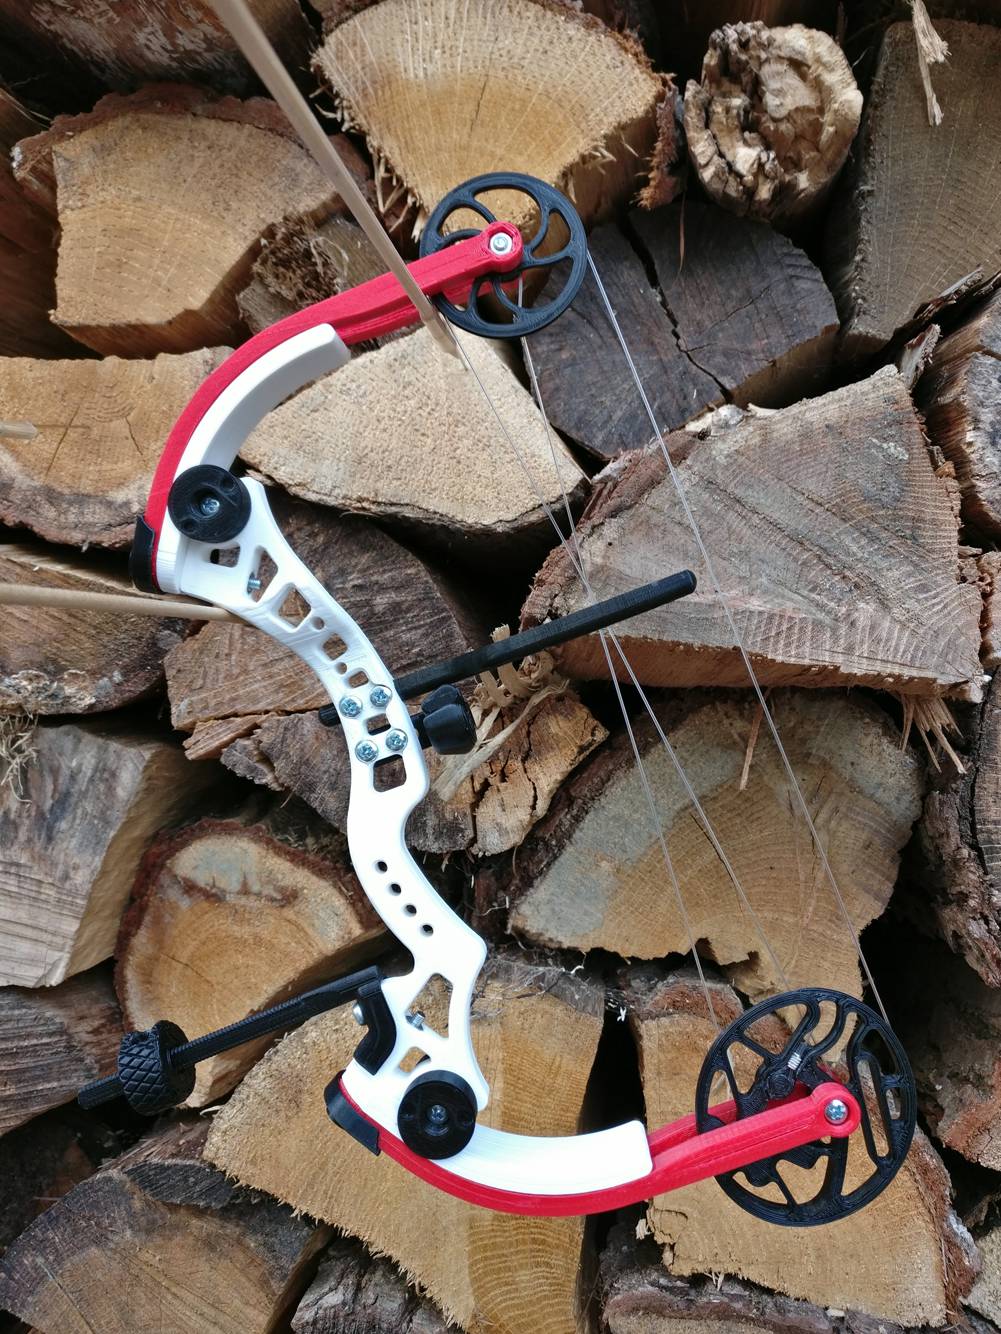
One type of design we’ve commonly seen shared by makers is the crossbow, available on the internet in both miniature and regular size. For instance, German engineer and maker Sebastian Stickel–who goes by DonStick3l on Thingiverse–created a 3D printed miniature compound bow to fire off wood skewers.
It’s fully functional and has an incredible design, made up of 18 3D printed parts, some string and a few screws.
For just a few bucks, you can create your own compound bow too. Of course, if you plan on 3D printing your own, be sure to use it responsibly! With it, you can become maker version of Robin Hood, becoming a master archer and having an enjoyable outdoor activity to impress your friends and family with.
Let’s take a look at what you need and the basics on how to build your own.
3D Printed Miniature Compound Bow: What You Need & How to Build it
There are 18 different 3D printed parts that make up the miniature compound bow, all of which are freely available to download via Thingiverse. Aside from your 3D printer, you need a collection of M3 screws and some bow string (some Thingiverse comments suggest using nylon fishing line with a 0.7mm diameter). Finally, for the arrows, the designer recommends wood skewers that are 300mm in length and have a diameter of 2.5 to 3.5mm.
Compared to some of the other Weekend Projects we’ve shared, this miniature compound bow seems quite challenging to build. Thankfully, Stickel shares a comprehensive assembly guide alongside the STL files, equipped with every step, part ID, and pictures to assist in the build process.
After a quick disclaimer urging makers to use the compound bow responsibly, the creator shares all of his slicer settings. Next, there’s a lengthy section that explains what each 3D printed part does and how it was designed, along with how to optimize the printing process and perform post-processing for every component.
After going over some information on how to select the non-3D printed hardware, the engineer starts on the intensive build process, which consists of 36 different steps.
If you want to learn more about the assembly of the miniature compound bow, head over to the project’s Thingiverse page and look at the Compound_Bow_Instructions.pdf, which is included with the collection of STL files. Stickel also appears to be quite active in the comment section, so feel free to drop him a line if you’d like.
Recently shared on the r/3DPrinting subreddit, one maker created an endearing anniversary gift for his girlfriend. This 3D printed clock has a custom 3D map as the face, showcasing the exact area where they first met. You make your own too!
Every relationship is special in its own way, and 3D printing offers a great way to express your affection with a completely customized and unique present.
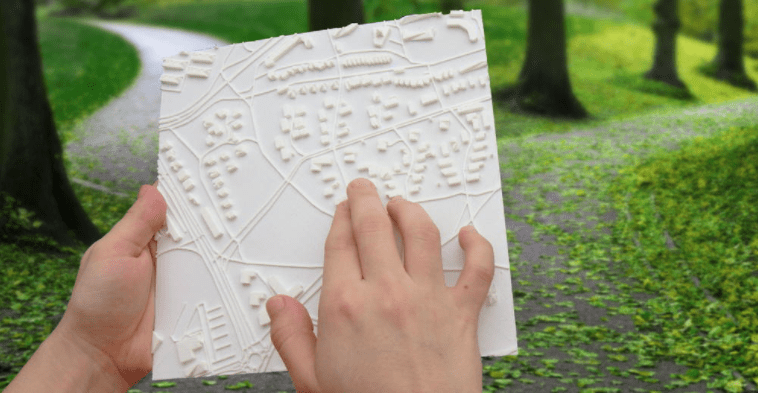
One Reddit user named “rhonest” recently shared an amazing anniversary gift on the r/3Dprinting subreddit: a 3D printed clock that showcases a map of the location where the couple met. To make the gift even more personal, he also accentuated the numbers of the date when they first became acquainted with one another.
It’s a lovely and charming idea, and also pretty easy to make on your own. Using your 3D printer, a custom map making website and a simple clock mechanism, you can also preserve your own cherished memories in time (pun intended).
Whether you’re celebrating a relationship or just want to pay homage to your childhood neighborhood, this Weekend Project is an easy way to make something extremely special to you or your loved ones.
Let’s take a quick look at how to make a 3D printed clock with a customized map embedded into the face!
3D Printed Customized Map Clock: What You Need & How to Build it
According to “rhonest”, he used Touch Mapper to create his 3D tactile map. The platform is simple to use; all you have to do is enter an address to create your map. You can either order a professional 3D print directly from the website or download the STL yourself.
Aside from your 3D printer and 3D map file, all you need is a Quartz Movement mechanism to operate the wall clock.
Since the map comes in a square shape, you’ll need to use some CAD software to transform it into a circle. And, in order to tell the time, you’ll also need to integrate the proper marks where each number should be situated. For the clock mechanism, a small circle must be placed in the very center of the design. The exact measurement will depend on the Quartz Movement mechanism you decide to buy.
If you don’t have too much experience with 3D modeling, there are easy options like TinkerCAD. Check out our TinkerCAD Tutorial to learn more about this web-based program.
A floating faucet? Sounds interesting, doesn’t it? This 3D printed Magic Faucet is a wonderful project for those who love optical illusions. It’s relatively easy to make and simply amazing to look at.
In our never-ending endeavor to provide users with fun and useful projects to take on during the weekend, we’ve stumbled across a handful of 3D printed fountains to help wash away the boredom. However, we’ve yet to find anything quite like the Magic Faucet created by designer Manuel Arrigoni (who goes by “hazon” on Thingiverse).
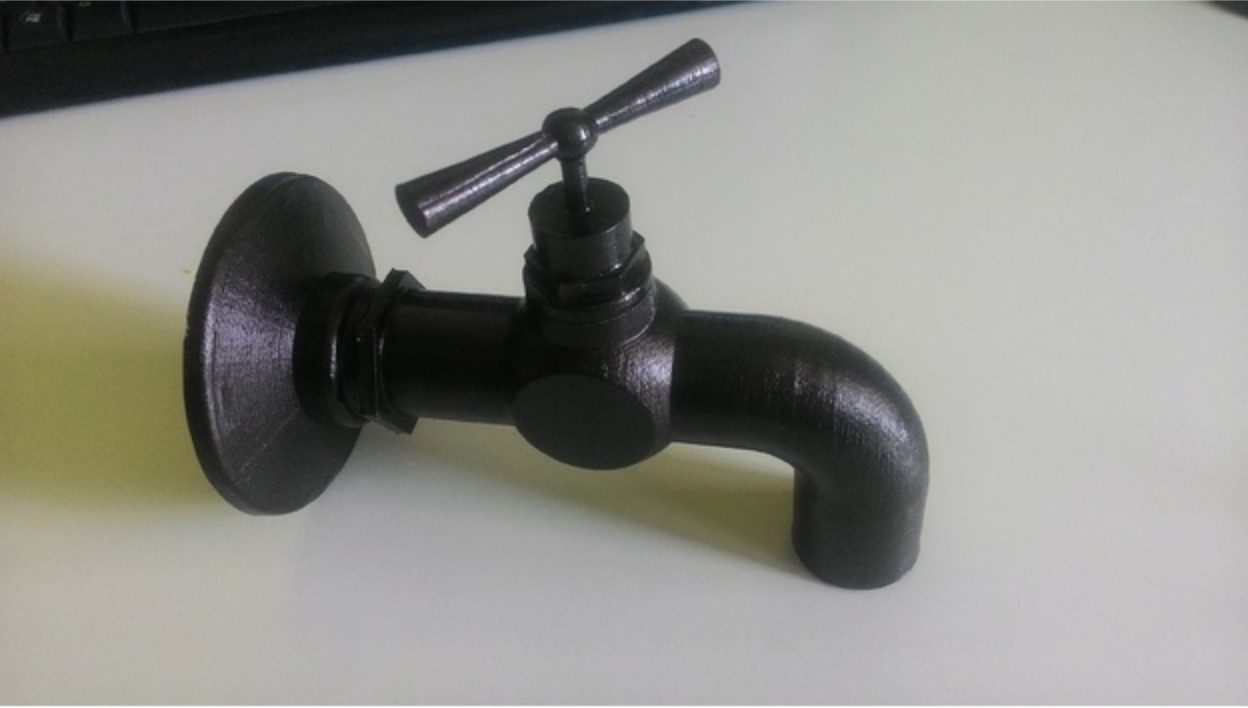
This remarkable fountain uses 3D printed parts and components that are commonly found online or at your local aquarium shop to create the illusion of a floating faucet. You can decorate it with different colors and knickknacks, so you can also customize your fountain the way you see fit.
Having some mental blockage and need a 3D printing project to help the creativity flow? Look no further than this Magic Faucet. Let’s take a quick look at what you need and how to build this one-of-a-kind Weekend Project.
3D Printed Magic Faucet: What You Need & How to Build it
You can build your own Magic Faucet with a 3D printer and a few components. There are 12 different parts of the fountain that need to be 3D printed, all of which are freely available on Thingiverse.
Here’s what else you need to create your own Magic Faucet:
Now for the assembly process… The designer has separated the .STL files into two categories: the “faucet” and the “vase” (or base). Once the parts are 3D printed, you can perform some post-processing and spray paint them in the color of your choice.
For the pump cable, you can either run it through the pot or pull it out of the top of the base. Arrigoni has provided different models depending on how you want to situate the pump cable. If you decide to run the pump cable through the pot you should cut it to avoid potential harm from the electric current.
He also notes that the “faucet water diffuse.stl” model must be printed in its pre-determined position with the supports, as this is critical to the functionality of the internal part.
Once everything is 3D printed, use the silicone sealing to connect all of the parts together. The designer also suggests using the silicone to isolate the cable that passes through the faucet’s base.
If you want more information or have questions on this unique Magic Faucet, head over to Thingiverse and drop a comment to the designer. He also provides a hefty amount of photos to help make the assembly process easier.
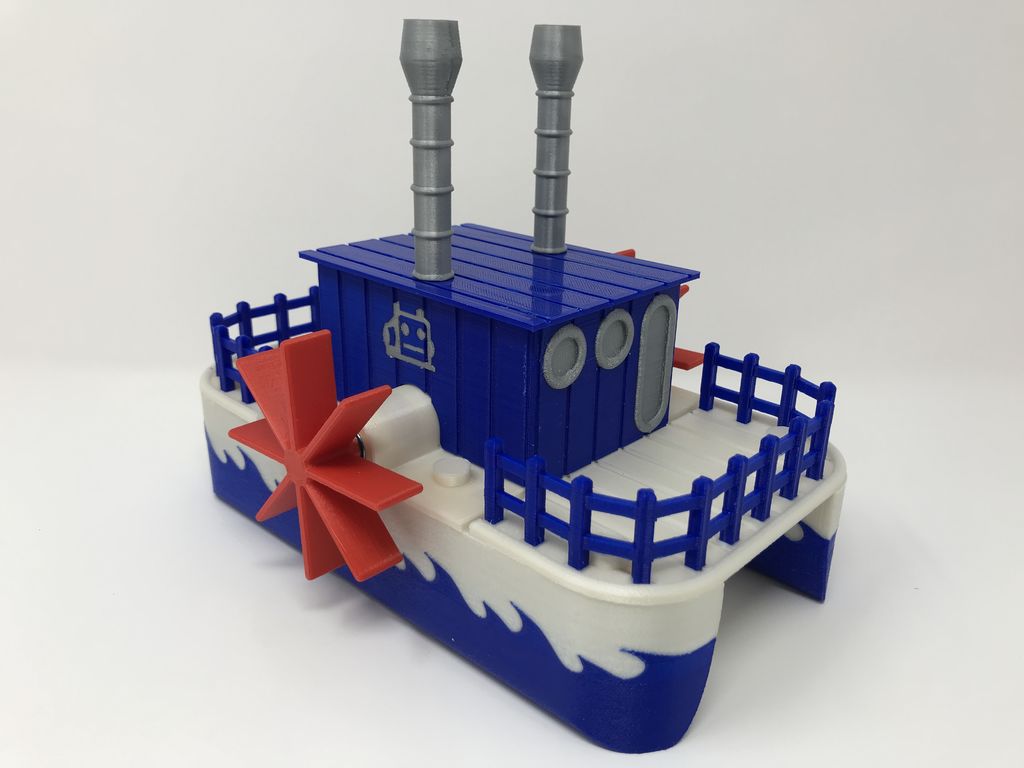
The Ruiz Brothers of Adafruit are at it again with another fascinating 3D printing project: the 3D printed Crickit Paddle Wheel Boat. This water rover even has an underwater camera mount, so you can capture footage at your end of the summer pool party!
As we enter into the final stretch of the summer, it’s time to soak up the sun and enjoy a refreshing swim to cool down from the heat. Pool parties are a great way to make memories with the friends and family, and now you can also capture your underwater moments with a 3D printed Crickit Paddle Wheel Boat.
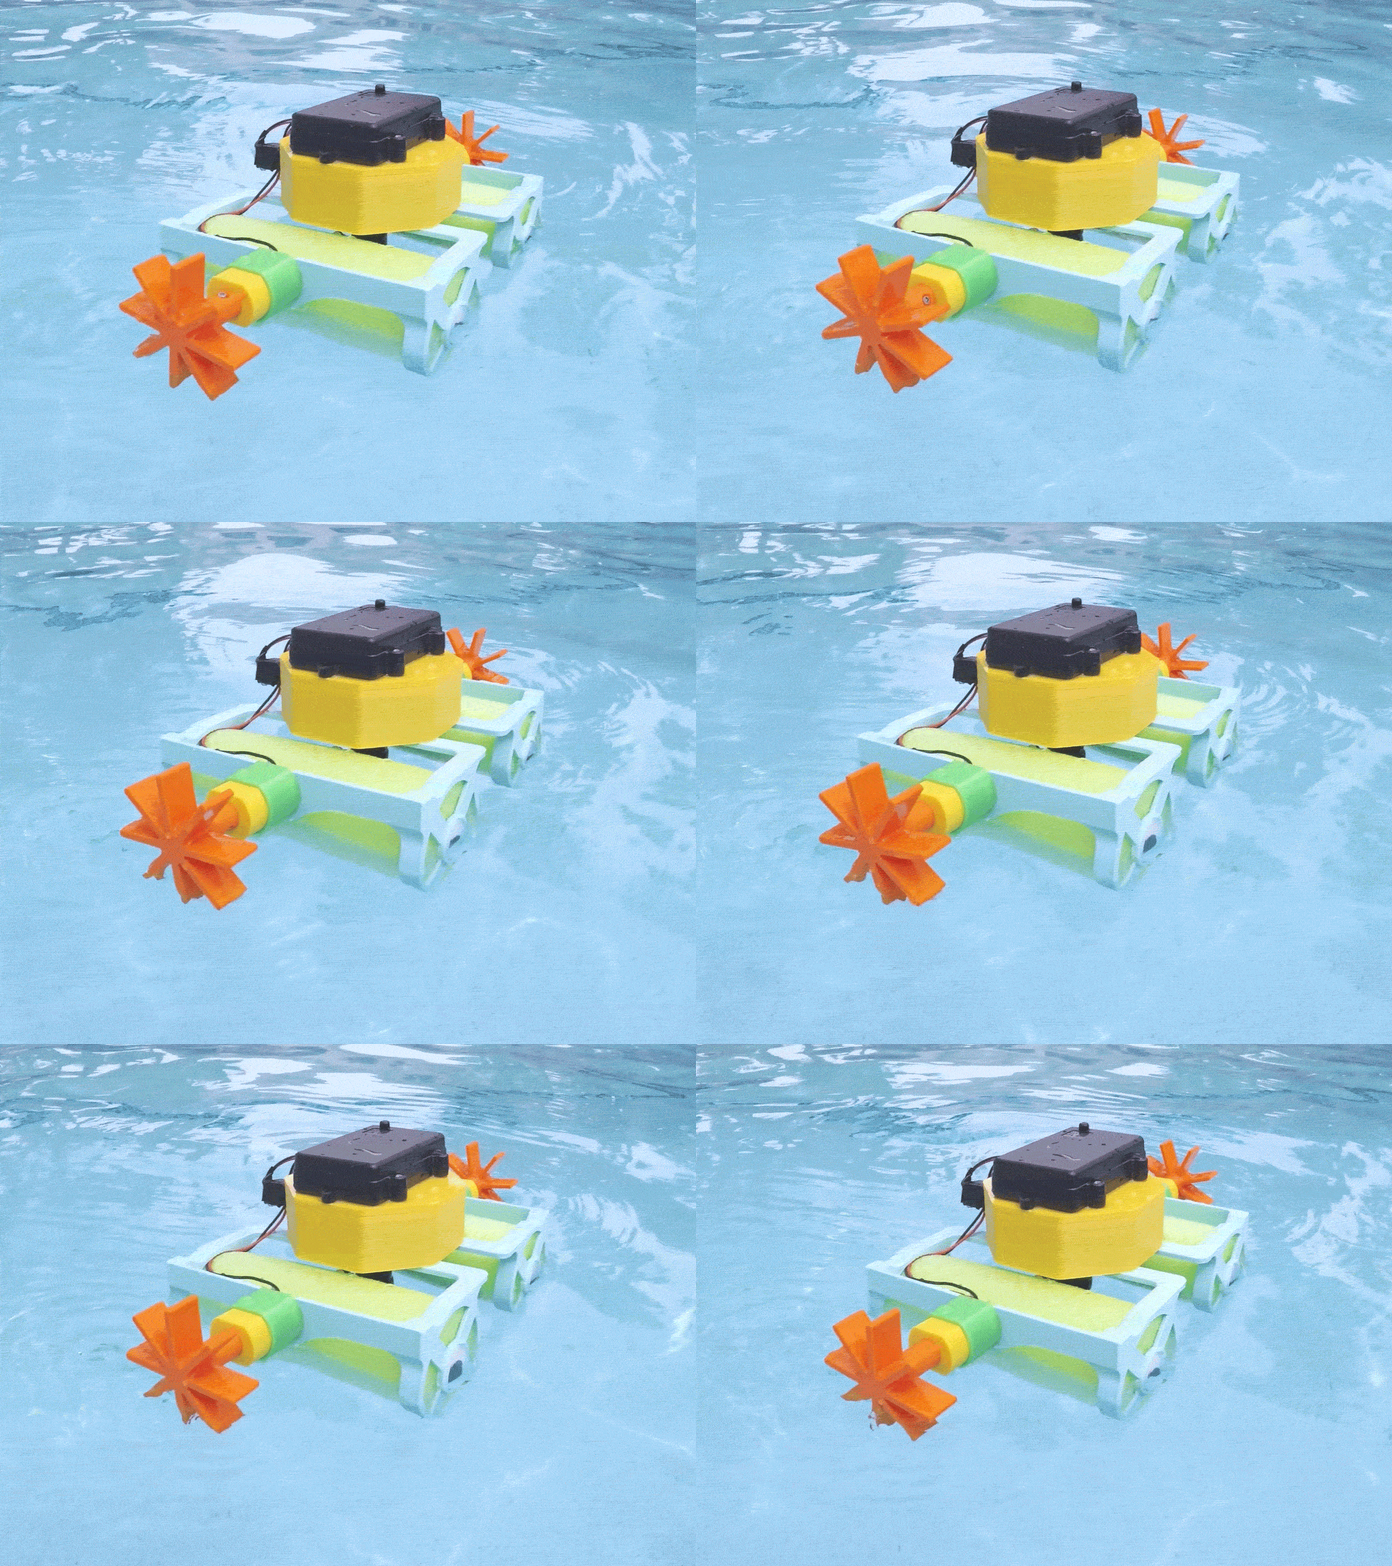
Designed by the Ruiz Brothers from Adafruit, this unique water bot makes use of 3D printing, some electronic components and a pool noodle (which keeps the paddle wheel boat afloat). It also has a tripod mount so you can utilize underwater photography with a GoPro camera.
Powered by an Adafruit CRICKIT and Circuit Playground Express, this 3D printed boat also resembles an actual cricket with its googly eyes, especially if you decide to utilize a green pool noodle. Needless to say, this buoyant little critter will keep everyone entertained while you lounge poolside.
Want to take a dive into this project? Let’s take a look at what you need in order to put the Crickit Paddle Wheel Boat together.
3D Printed Crickit Paddle Wheel Boat: What You Need
The STL files for the Crickit Paddle Wheel Boat are available to download via Thingiverse. 3D printed parts include the pool noodle enclosure, wheel props, and enclosures for both the electronics and motors. When printing the watertight mounts for the motors and components, the Ruiz Brothers suggest using NinjaFlex filament.
There are also a handful of electronic components that go into the assembly of the Paddle Wheel Boat. Here’s a checklist of what you need:
If you’re unfamiliar with the Adafruit CRICKIT and Circuit Playground Express, there are a number of resources and tutorials available on the project’s page. Once the parts are 3D printed or acquired and your up to speed with using MakeCode, it’s time to start building the Crickit Paddle Wheel Boat.
There’s a modest amount of soldering to connect the circuitry, but the Ruiz Brothers spell everything out in a simple diagram and instructions. After the connections are made, the next step is to setup the Circuit Playground Express with MakeCode, a programming editor that is both block based and text editor and runs in the Google Chrome web browser.
The assembly process seems to require an ample amount of time, but again, the Ruiz Brothers do a terrific job with their instructions, including photos and GIFs for every step of the way. All in all, this project is ideal for ambitious beginners and seasoned makers that want a fun way to make a splash at the next poolside gathering!
If you want to build the Crickit Paddle Wheel Boat, you can find the full step by step process for the circuitry, coding and assembly on the Adafruit website.
Need some affordable scientific equipment to experiment and make a breakthrough discovery? This 3D printed open source laboratory rocker is a terrific tool for biological and molecular mixing applications.
In the scientific setting, a laboratory rocker is used as a mixing device for various biological and molecular applications. It consists of a tray mounted on top of a base, which contains the electronics and motor that control the speed and tilt angles of the platform.
This 3D printed lab rocker was designed by biomedical engineer and designer Akshay Dhamankar. It’s a variable speed, two-dimensional device that moves back and forth to create waves in liquid samples at mild to moderately aggressively rate. The design uses a changeable apparatus rack that can either hold a test tube or beaker.
While this 3D printed lab device sounds a bit difficult to put together, Dhamankar lays everything out in a few simple steps. If you’re a researcher on a budget who wants to spruce up your wet lab, bring some science home, or just take on a fun and educational project, this open source laboratory rocker is worth a look.
The creator of this project lists a number of applications that this lab rocker can be utilized for, including biological and molecular mixing, aggressive agitation of a biological mixture, PCB etching via Ferric Chloride bath, and even for mixing paint and thinner.
“It is my sincere hope that my design and contribution will help out many of the research personnel, small labs, wet labs etc. who plan to incorporate laboratory equipment like this with a tight budget,” the designer writes on Thingiverse.
3D Printed Open Source Laboratory Rocker: What you Need & How to Built it
The purpose of this open source project is to provide access to researchers and scientists on a tight budget, so the components needed to build your own lab rocker aren’t too costly. Aside from your 3D printer and material, here’s what else you need:
There are 10 different STL files you’ll have to 3D print for this project, which the designer recommends using 25 percent infill for. Once you’ve printed the parts out, the rest of the assembly process is relatively straightforward.
Following along schematics and provided photos, you need to connect all of the electronic components and situate them inside of the 3D printed base.
Dhamankar uses super glue to mount the skateboard bearings in the various slots that are embedded in the 3D printed parts. He also suggests using a thick silicone rubber sheet (3mm) on the surface of the ‘Single Piece Beaker Tray’ to act as an anti-slip mat.
Summertime is here, and what better way to spend it then by lounging outside by a refreshing body of water. Take your enjoyment of the outdoors a step further by becoming the captain of your own 3D printed WiFi Paddle Boat, designed by Greg Zumwalt.
When the heat of the summer hits, we all want to flock to the nearest pool or lake to cool off. Just because you’ve decided to get off of the computer and outdoors doesn’t mean you can’t utilize WiFi for some recreational fun. At least that’s what we’ve learned from maker and designer Greg Zumwalt, who recently shared his 3D printed WiFi Paddle Boat on Instructables.
The WiFi Paddle Boat is controlled use WiFi via a smart phone, tablet, or any other touch enabled device. The designer explains that his boat creates a WiFi access point that you can connect directly to. From there, you can navigate the ship from his WiFi Paddle Boat webpage.
This project offers a great way to entertain the kids or even yourself this summer, and is a bit complex but also undeniably awesome. Think you’re up for the challenge? Let’s take a closer look at this project to see whether you’re seaworthy or not!
3D Printed WiFi Paddle Boat: What You Need & How to Build
This is a pretty complex project that requires a wide range of 3D printed parts, components and also some soldering. However, don’t get discouraged, as Zumwalt lays out the entire project in detail on his Instructables page. We’ll give a quick overview of what you need and how to build the WiFi Paddle Boat.
For printing, the designer shares the STL files for three versions: the base model, detailed model and another for those that have a dual extrusion 3D printer. Depending on which model you choose, you’ll need to print anywhere from seven to ten parts. You should also test fit and trim, file, and sand the 3D printed parts prior to assembly. The STL files can be downloaded directly from Instructables.
Here’s the rest of the checklist for this project:
Main Components
Additional Tools
Once you’ve gathered your supplies and printed the parts, it’s time to start the assembly process. The instructions are bit lengthy, so we’ll just spell out the basics for you. After preparing the 3D printed parts for assembly, you’ll have to program the Heltec WiFi Kit 32 board. The WiFi Paddle Boat was written in the Arduino environment for the ESP32 chip, and Zumwalt shares the libraries and everything else you need on the project page.
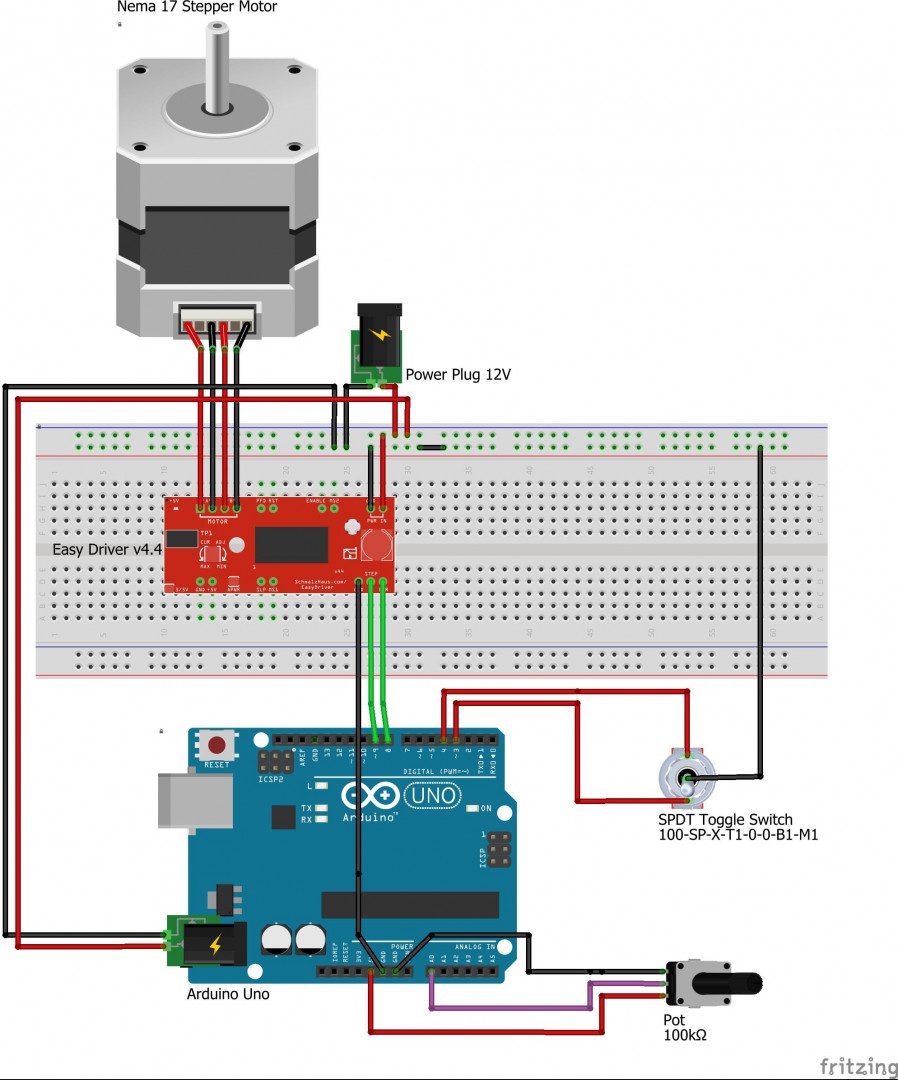
Next, there’s some wiring required, so you’ll need to have a soldering iron and solder on-hand. The maker shares each step on Instructables, but to give you an idea of the complexity level, here’s a photo of the wiring:
Finally, once the wiring is complete, it’s time to assemble the WiFi Paddle Boat. There are a number of steps to take in order to put everything together, making this project more ideal for seasoned makers. However, if you’re feeling ambitious enough, a determined beginner can also follow along with Zumwalt’s step-by-step instructions. You can find the lengthy assembly process on Instructables, along with detailed photos and videos showcasing how to build and test your 3D printed ship.
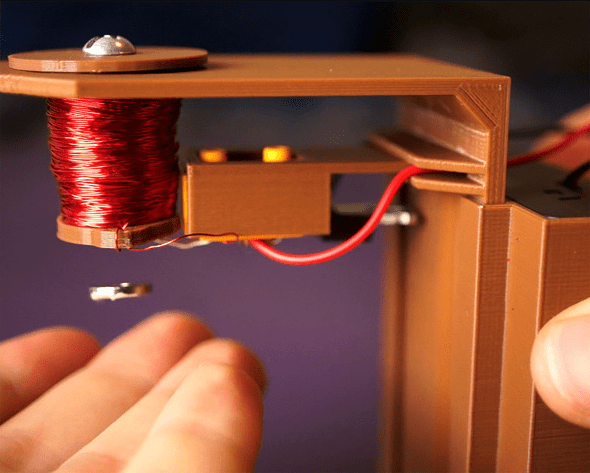
Instructables user and designer 3DSage has unveiled an amazing 3D printed Levitation Device that you can make at home. It’s a crazy contraption that uses a magnet to make objects float before your very eyes!
For many of us, childhood was marked by amazement when we witnessed our favorite superhero defy the laws of gravity and levitate to the rescue. The concept of levitation is one that seems highly technical or even impossible to some. But that couldn’t be further from the truth, and we’re here to show you how.
One maker named 3DSage has proven that you can bring this phenomenon to reality with your 3D printer and a few components. That’s right…You can make your own Magnetic Levitation Device at home! It might sound like a daunting task, but this project is actually quite easy for beginners and advanced makers alike.
This project is designed for those who lack experience with electronic circuitry and soldering, so don’t be intimidated by the end result. You will need to 3D print a few parts and obtain and handful of components to assemble this Magnetic Levitation Device, so let’s take a closer look at this incredible Weekend Project!
3D Printed Magnetic Levitation Device: What You Need & How to Build
There are eight different parts that need to be 3D printed, all of which are available to download on Thingiverse. The designer suggest printing the parts with 20 percent infill, no support structures necessary. When printing the spool holder parts, 3DSage recommends using a slow print speed.
Other than the STL files, here’s what else you need to create your own 3D printed Magnetic Levitation Device:
Once you have all of your materials, it’s time to get started on the assembly process. 3DSage begins with the 3D printed spool holder and magnet wire. First, place the small 3D printed spool holder inside of the larger one, adding the 4x15mm screw on top. Insert a couple of inches of the wire through the small hole closest to the center of the spool holder and wind the wire tightly.
The next step is the breadboard circuit, which the designer has made as simple as possible. Here’s a diagram to help you follow along:
You have to place the hall sensor in the exact right position to make this levitation device work properly. This is why 3DSage made a breadboard holder so that you can move it around and tune it accordingly. The designer goes into the assembly process in more depth on YouTube, so if you want to learn more about how to created a levitation device, check out the video below!
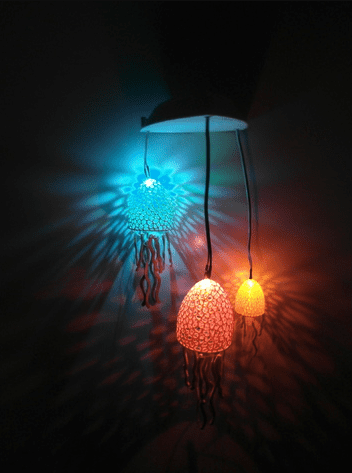
Give your home an aquatic feel with these incredible 3D printed DIY Voronoi Jellyfish lights created by German maker and Thingiverse user UniversalMaker3D.
Who needs IKEA when you have your very own 3D printer? Okay, well sometimes it’s nice to buy some new furnishings and chow down on those Swedish meatballs, but you can also go the DIY route and produce your own stylish and decorative objects to spruce up the home. One common use for 3D printing is to create custom lighting fixtures, and we’ve seen a myriad of great ideas across the maker-sphere.
German student and Thingiverse user UniversalMaker3D has recently designed free-floating Jellyfish lights. The design is inspired by the mathematically-driven design concept of Voronoi, which provides a complex structure to the 3D printed sea creature.
The Voronoi design gives a coral reef-like impression, adding to the oceanic vibe that these jellyfish lights conjure up. The 3D printed shell is embedded with a number of tiny holes, creating a jaw-dropping lighting effect on your walls. Add some tentacles to the mix and you’ve got yourself a lighting fixture that will have you feeling as if you’re living under the sea.
3D Printed Voronoi Jellyfish: What You Need & How to Build it
Since the jellyfish-like lighting enclosure is designed in the complex Voronoi style, you’ll need to use supports when 3D printing the base of the model. UniversalMaker also shares the STL files for the tentacles and other parts, all of which are freely available on Thingiverse.
Aside from your 3D printer, filament and the 3D model, there’s still some other components you’ll need to make your sea creature lamp light up. Here’s the checklist:
Once you have your 3D printed jellyfish body and tentacles, along with all of the necessary electronic components, it’s time to put everything together. Take the LEDs and run them through the bottom of the 3D printed top and connect it via the switch to the battery.
The 3D printed top and bottom sections are designed to slide perfectly over each other, but might require a bit of sanding. Finally, mount the jellyfish with the cables, which are used to activate the LEDs. That’s about it as far as assembly goes! If you want to catch a visual of how awesome these 3D printed jellyfish lights look, check out the designer’s instructional video below.
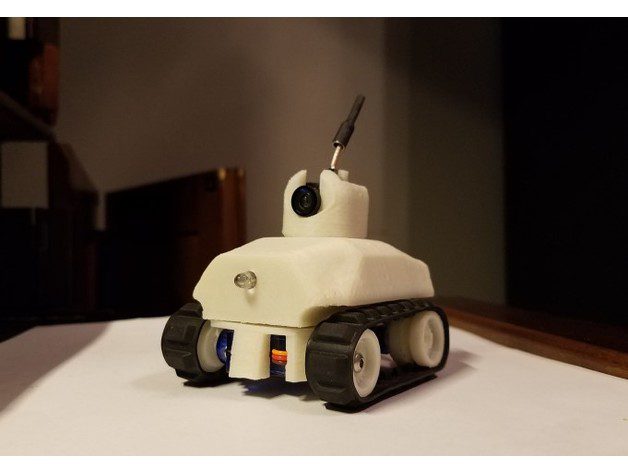
Roll through the upcoming workweek in a servo-driven 3D printed Tiny FPV Tank. This RC model comes equipped with a camera, LEDs, and uses Lego threads to roll around.
Spearheaded by projects like OpenRC, the team here at All3DP definitely noticed an increase of interest in using 3D printing to create remote-controlled cars, planes, drones and boats. While we’ve featured a handful of these fun hobbyist-type projects in our Weekend Project series, few of them pack a compact punch like this Tiny FPV Tank designed by Thingiverse user RotorGator.
Not only is this servo-powered tank small, it also implements Lego threads, a tiny FPV camera and LEDs. It might not be battle-ready, but this miniaturized tank will provide you with a fun way to inconspicuously cruise around and film all of life’s top-secret missions.
Let’s take a look at what you need to put together your own 3D printed Tiny FPV Tank.
3D Printed Tiny FPV Tank: What You Need & Putting it Together
This Tiny FPV Tank is comprised of a handful of 3D printed parts, but RotorGator has split the body into six sections: the chassis, frame, two drive wheels, two non-drive wheels, two non-drive spacers and the FPV camera mount. Use of support structures is only necessary for a few parts if you decide to print them whole, otherwise you can go support-less by printing the wheels and frame in halves.
Although the body of this tank is heavily based around 3D printing, you’ll still need a handful of components to put this armored vehicle into action. Here’s what else you need besides your 3D printer:
The details on the assembly process are sparse, but the build seems relatively easy. Here’s how the designer lays things out on the Thingiverse page.
Once you have the parts 3D printed, remove any supports before you start putting it together. Cut off the servo arm in order to fit it snugly into the driven wheel and attach it using the supplied screw. Using M3 bolts and spacers, mount the non-driven wheels. If you decided to print the parts in halves, use super glue to put them together. The 3D printed frame and chassis should snap together quite easily. Finally, use a bit of super glue to attach the FPV pod to the top of the tank’s frame.
Um dir ein optimales Erlebnis zu bieten, verwenden wir Technologien wie Cookies, um Geräteinformationen zu speichern und/oder darauf zuzugreifen. Wenn du diesen Technologien zustimmst, können wir Daten wie das Surfverhalten oder eindeutige IDs auf dieser Website verarbeiten. Wenn du deine Einwillligung nicht erteilst oder zurückziehst, können bestimmte Merkmale und Funktionen beeinträchtigt werden.
Funktional
Immer aktiv
Die technische Speicherung oder der Zugang ist unbedingt erforderlich für den rechtmäßigen Zweck, die Nutzung eines bestimmten Dienstes zu ermöglichen, der vom Teilnehmer oder Nutzer ausdrücklich gewünscht wird, oder für den alleinigen Zweck, die Übertragung einer Nachricht über ein elektronisches Kommunikationsnetz durchzuführen.
Vorlieben
Die technische Speicherung oder der Zugriff ist für den rechtmäßigen Zweck der Speicherung von Präferenzen erforderlich, die nicht vom Abonnenten oder Benutzer angefordert wurden.
Statistiken
Die technische Speicherung oder der Zugriff, der ausschließlich zu statistischen Zwecken erfolgt.Die technische Speicherung oder der Zugriff, der ausschließlich zu anonymen statistischen Zwecken verwendet wird. Ohne eine Vorladung, die freiwillige Zustimmung deines Internetdienstanbieters oder zusätzliche Aufzeichnungen von Dritten können die zu diesem Zweck gespeicherten oder abgerufenen Informationen allein in der Regel nicht dazu verwendet werden, dich zu identifizieren.
Marketing
Die technische Speicherung oder der Zugriff ist erforderlich, um Nutzerprofile zu erstellen, um Werbung zu versenden oder um den Nutzer auf einer Website oder über mehrere Websites hinweg zu ähnlichen Marketingzwecken zu verfolgen.