Kategorie: Reviews

  • LCD Chalkboard

    LCD Chalkboard

    Reading Time: 3 minutes

    Making costumes for herself and others under the guise of the Maladjusted Milliner takes up much of her evenings and weekends, while Dede’s day job is as an intra-office administrator and logistics expert at Operation Restoration (or-nola.org), a non-profit organisation where “an awesome group of women provide assistance to women and girls affected by incarceration”.

    Food for thought

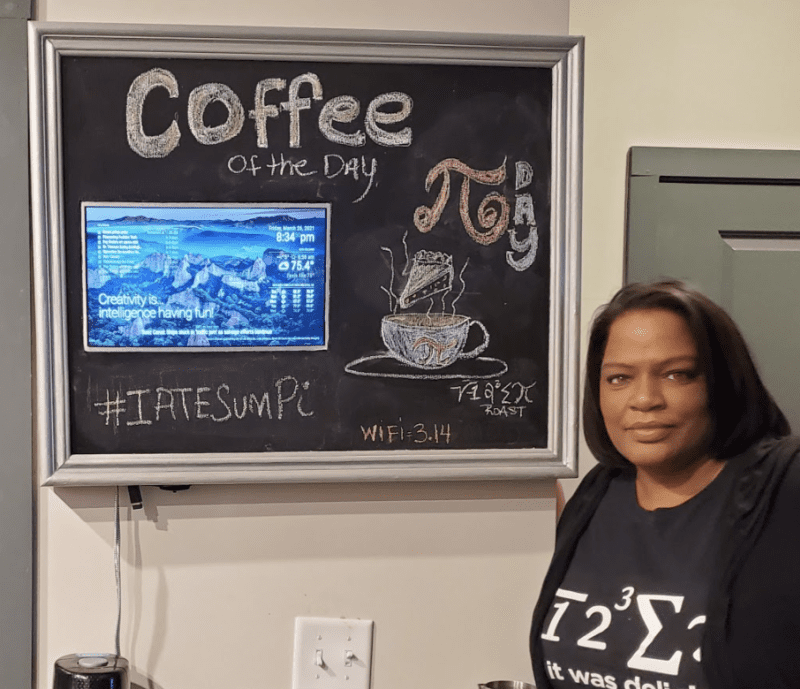
    Faced with more downtime than she knew what to do with during lockdown, Dede was keen to keep her mind active and decided to learn about Raspberry Pi. After “binge-watching” the cartoon TV show Bob’s Burgers, an idea for her first Raspberry Pi project began to emerge: the LCD Chalkboard was inspired by the burger of the day displays on the show, as well as “the many smart mirror projects online”.

    Dede made the chalkboard frame, so this is her first woodworking project, as well as her first Raspberry Pi project

    Dede is a confident and experienced wearable tech maker who builds “anything that comes to my mind. Usually I build wearables [for New Orleans’ parades including Mardi Gras], so I like smaller microcontrollers such as Trinket and Feather.” Her love of LEDs and blinking lights started when Dede was helping organise a STEM event for kids and was introduced to microcontrollers, Adafruit, and Arduino. However, coding didn’t click until she picked up a Raspberry Pi Zero W and started learning bits of Python and MicroPython. “For me it is intuitive and just makes sense,” she reports.

    “I love Raspberry Pi Zero W because, unlike a regular microcontroller, Raspberry Pi Zero W is a minicomputer. It allows me to build some of the projects that only live in my head right now. Interactive costume pieces are buzzing around in my head.”

    Adaptable attitude

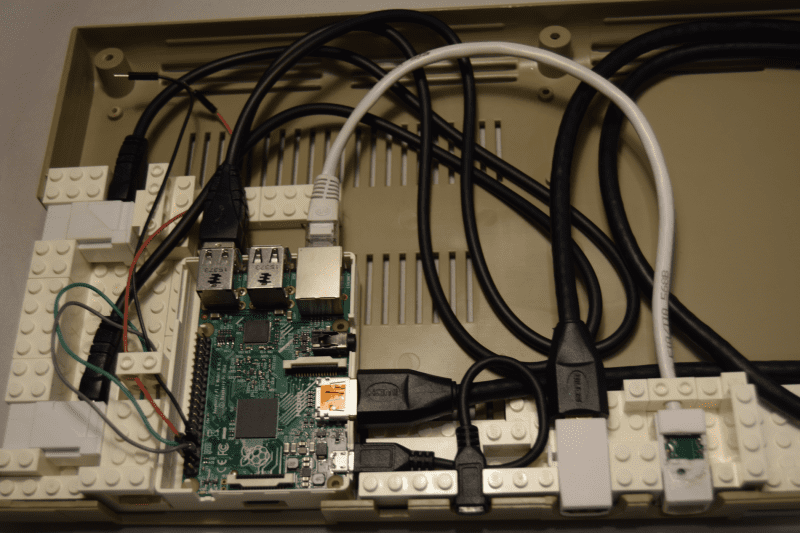
    By the time she began designing her chalkboard, there were three Raspberry Pi Zero W boards on hand. She needed to adapt the smart mirror example builds she found online as most were not for Raspberry Pi Zero. “But I did find a couple of guys that got it to work, so I cobbled together information from their sites and I was off to the races!” she says.

     Dede can bring the smart chalkboard to life with a tap on her phone; coming up with witty missives takes a bit longer

    However, using Raspberry Pi Zero meant she had to use it headless. At first she was intimidated by the command prompt, but having followed a useful guide she found online, it’s “so ordinary for me now, I occasionally reboot or shut down my sign with my phone, from my bed.”

    The chalkboard design is all Dede’s. She decided to use whatever tools were available, and learnt to use a jig-saw and scroll-saw for this project. Once she was happy with her sketches and the design, the build process took around two weeks’ worth of evenings and weekends. To keep things simple, she stuck with the existing Raspberry Pi OS wallpaper, but intends to customise this with her holiday photos once her coding skills allow.

    She’s largely happy with how the project turned out and with Raspberry Pi Zero W, but will eventually upgrade it to Raspberry Pi B+. “More processing power allows for better interaction,” she reasons, and Dede is keen to add face- and voice-recognition by adding speakers and a camera. Along with learning “some basic Java script, and basic Linux commands,” she’s going to invest in a framing square. “I couldn’t find mine during the build and decided to wing it!”

  • Resident Evil 8: Village – Boss Fight Lady Alcina Dimitrescu (PC/PS5/PS4PRO)

    Resident Evil 8: Village – Boss Fight Lady Alcina Dimitrescu (PC/PS5/PS4PRO)

    Reading Time: < 1 minute

    Resident Evil 8: Village – Boss Fight Lady Alcina Dimitrescu (PC/PS5/PS4PRO)

  • Commodore 64 Revamp

    Commodore 64 Revamp

    Reading Time: 3 minutes

    In this instance, Stephen Williams has brought a broken Commodore 64 (C64) computer back to life. He’s stripped out the original motherboard, replaced it with a Raspberry Pi computer, and used Lego bricks to build the internal housing. It reminds us of Christian Simpson’s fantastic Brixty Four project (magpi.cc/brixtyfour). But while that sought to create a new C64 case out of Lego, Stephen’s project retains the original, iconic ‘breadbin’ plastic.

    “I’ve played with Raspberry Pi since the computer first came out, making and discovering new things along the way,” he tells us. “I had a truly broken Commodore 64 that I felt would benefit from a new lease of life. My project blends retro with a modern twist, and brings together some of the things I’ve liked to play with over the years – notably Lego, the C64, Raspberry Pi, and Arduino.”

    Building the project

    Stephen turned to Lego for a practical reason. “I didn’t have access to a 3D printer, and Lego has so many different pieces that it’s really versatile to experiment with,” he says. “I already had a Lego Raspberry Pi case, so it seemed to make sense to build around it. I wasn’t sure what the fit would be like inside the C64, so I bought a mix of pieces from a market stall to see what would work.”

    Raspberry Pi sits within the Multicomp Pi-BLOX case which Stephen bought from The Pi Hut

    He says it was important to build a solid base inside the C64 and position the USB, HDMI, and other ports in the right places. “I didn’t want to modify the computer’s case in any way and Lego helped me to do all of this.” The rest of the build was rather straightforward and involved inserting a Raspberry Pi computer into the case so that the ports were accessible, inserting a microSD card with RetroPie installed on it, and connecting to the C64 keyboard.

    To do this, Stephen used an Arduino Micro. “It provides the mechanism to get a fully working C64 keyboard for Raspberry Pi,” he explains. “The basic idea is to scan the pin readings on the Arduino which are connected to the row and column pins on the C64’s matrix keyboard. Using the Arduino software libraries, the row and column pins are scanned, and the mapped keystrokes are sent to the computer connected to the Arduino via USB.”

    Pulling it apart

    Since creating this project, Stephen has acquired a 3D printer. As such, he’s been replacing the Lego using printed parts, again for practical reasons. “When Raspberry Pi 4 came out, I wanted to use it but because I needed to install a fan, I couldn’t use the Lego Pi case any more,” he says. “The 3D build means I’ve been able to get closer to the original Commodore 64 regarding the location of the power socket and switch.”

    	Externally, the Commodore 64 Revamp appears identical to the original. Keyboard mapping software is used to communicate with Raspberry Pi

    Even so, he’s not always entirely faithful to the C64. “Since RetroPie brings many emulators into one place, it’s been a bit surreal playing a Spectrum game with the C64 sitting in front of me, but I’ve become used to it. RetroPie is also easy to extend to include things such as homebrew programs, media players, and bespoke themes. It’s been fun to dabble with these too.”

  • Pi Day donors

    Pi Day donors

    Reading Time: 4 minutes

    “When people think about Raspberry Pi, they usually think about the tiny, affordable, and powerful computers we all know and love,” says Anna Coe, Senior Development Manager at the Raspberry Pi Foundation North America. “What many don’t know is that the Raspberry Pi Foundation is a non-profit organisation with an educational mission. That mission is to put the power of computing and digital making into the hands of people all over the world.”

    There was a special little bonus for people who donated – their name mentioned here in The MagPi.

    “In the weeks leading up to Pi Day, over 400 generous individuals and companies contributed more than £18,000 to support young learners who rely on the Raspberry Pi Foundation’s free learning resources,” Anna reveals. “Through gifts of $3.14, £31.42, €314.16, and more, Pi Day campaign donors have made an impact on 60,000 young digital makers who are learning new skills and getting creative with computing.”

    We’re honoured to display all your names. Thank you for funding the Raspberry Pi Foundation.

    Special thanks from Raspberry Pi

    The Raspberry Pi Foundation extends deep gratitude to the Pi Day campaign donors listed here, and to the additional 220 supporters who have chosen to remain anonymous. Special thanks goes to EPAM Systems. who matched the first $5000 raised dollar-for-dollar; to CanaKit for their generous gift of $3141; and to OKdo for donating 50% of their Pi Day weekend proceeds to this campaign.

    If you would like to learn how you or your company can support the Raspberry Pi Foundation’s mission, please visit raspberrypi.org/support-us.

    Donors


    COMPANIES

    AAxios Technologies

    CanaKit

    Crosstalk Solutions

    eduGOOGdroid.com

    EPAM Systems

    Hallsten Innovations Ltd

    Logwood Computing Ltd

    MINT Genie

    OKdo

    RaspberryTips

    RICELEE

    Tadintune Limited

    Wild Computing Ltd

    Woolsey Workshop


    INDIVIDUALS

    Alessandro Rani

    Alex Penfold

    Alexander Kirsch

    Alister Ware

    Alya Amarsy

    Andrew Bennett

    Andrew Book

    Andrew Potter

    Andrew Thomson

    Andrew White

    Andy Elder

    Andy Felong

    Antoine Vincent

    Ariel Perez V.R.

    Armand Christophe

    Benjamin Howe

    Bob Bailey

    Brando Sabatini

    Brian Coupe

    Brian Fargo

    Bruce Clawson

    Carl Reasoner

    Carl Smith

    Carol Gonzales

    Charles Godwin

    Chloë Allen-Ede

    Chris DeHut

    Chris Kirk

    Christian Bechheim

    Christian Hiob

    Christopher Bowring

    Christopher Leadholm

    Ciaran Byrne

    Clayton Dymond

    Clint Dimick

    Damien Duddy

    Daniel Dimmick

    Daniel Harper

    Daniel Pullan

    David Ashworth

    David Johnson

    David Jones

    David Rush

    Dejun Yuan

    Dirk Heinkelmann

    Divyendu Singh

    Dominic Varley

    Dru Nelson

    Ed Parsons

    Efren Rodriguez

    Eitan Sharon

    Ella Sharon

    Emma Staves

    Ethan Banks

    Everett Faircloth

    Francisco de Assis Barros de Menezes

    Frank Dube

    Garreth Tinsley

    Garry Heather

    Gary Thompson

    Geoffrey Cross

    Gerry Quinn

    Gery Brosens

    Gnanasekaran Thoppae

    gojimmypi

    Graham Fisher

    Grahame Hambleton

    Greg Parke

    Grigori Fursin

    Guy Leech

    Harry Myhre

    Hector Serrano

    Hugh Cowan

    Iván Oliva

    Ivan Soldo

    James Banks

    James Copeland

    James Duggan

    James Pearson

    James Turck

    Jason Miller

    Jason Townsend

    Jay Roberts

    Jeff Liu

    Jeffrey Rollin

    Jesper E. Siig

    Joffrey Birster

    Johann Blauensteiner

    John Dallman

    John Elliott

    John Fitzpatrick 

    John Peart

    Jonah Neeb

    Jonathan

    Jonathan Nourse

    Jonathan Vannieuwkerke

    Jorge Bailon

    Jürgen Falch

    Justin Driscoll

    Justin Pinner

    Justin Sauber

    Kamilla Marosi

    Kasper Holst

    Keith Carscadden

    Kevin McAleer

    Kevin Taylor

    Larry Howell

    Laura Simms

    Leah Yes

    Lee Jordan

    Len Layton

    Leonard Wong

    Linda Goetze

    LK Ward

    Luca Campisi

    Lucas Dreher

    Luis Alberto R. Antunez

    Margot Thomas

    Mark Routledge

    Mark Seymour

    Martin Woodward

    Masafumi Ohta

    Masami Mitsuhashi

    Matt Heavner

    Matt Sendorek

    Matthew Sylvester

    Michael Haß

    Michal Krzywonos

    Mohammad Asad

    Murlidhhar Naidu

    Neil Hoare

    Nelson Hinman Jr

    Nick Gushlow

    Nick Kaufmann

    Nick Sharp

    Nick Stringer

    Nick Twigg

    Niklas Gertoft

    Nithinut Ekapand

    Patrick D.

    Paul Clark

    Paul Fretwell

    Paul Gittere

    Pavel Maly

    Peter Becker

    Peter Francis

    Peter Taeleman

    Peter Vincent

    Phil Randal

    Philip Ichinaga

    Philip Mather

    Poul Christiansen

    R.C. Whiteley

    Ralf Geschke

    René Beckerschmidt

    Ricardo de Azambuja

    Rich Pearson

    Richard Ash

    Rob Sutton

    Robert Sternberger

    Robert Bradley 

    Rupert Wilson

    Salvatore Del Pizzo

    Samuel Pickard

    Samyar Sadat Akhavi

    Sarah Fawcett

    Scott Bickley

    Sean McManus

    Shawn Bird

    Shea Silverman

    Simon Bartlett

    Simon Reap

    Simon Withers

    Sinead Harold

    Steffen Taube

    Stephen Kellat

    Stephen McGuinness

    Steve Beck

    Stewart Watkiss

    Tero Hemiö

    Thomas Proctor

    Thomas Veach

    Tihamer Benjamin Kovacs

    Timothy Sailer

    Tom Borg

    Tom van den Enden

    Trust your Imagination

    Tyler Bramble

    Venugopal Chidambaram

    Walter Mollineaux

    Yannick Bentz 

    Zachary Zebrowski

  • Review: Grove Starter Kit for Raspberry Pi Pico

    Review: Grove Starter Kit for Raspberry Pi Pico

    Reading Time: 3 minutes

    At the heart of the Grove Starter Kit for Raspberry Pi Pico is a Grove Shield ($4). This board has ten different Grove Connectors: three analogue ports, two digital ports, three UART ports, and four I2C ports. It also has a 3 V/5 V power switch to adjust the voltage output, and a six-pin SPI interface.

    Raspberry Pi Pico slots into the header on the Grove Shield and Grove parts are snapped straight into the white Grove connectors. This enables you to prototype projects quickly and easily.

    The Grove Starter Kit contains a range of Grove components and the Grove Shield

    You will need to have soldered pins on to your Pico (or you can pick up a pre-soldered Pico). But from that point on, you don’t need to solder parts or figure out circuits and jumper wires. You just connect the Grove part to the Grove Shield using one of the included Grove Universal 4-Pin cables. Grove itself says this “simplifies the learning system, but not to the point where it becomes dumbed down”.

    Each Grove cable has four wires: typically one for power, another for ground, and two for input and output (the exact nature of each wire depends on the part it’s connected to; you can read more here.

    This does, indeed, make it extremely easy to hook up components to Raspberry Pi Pico. And to that end, the kit comes with a wide range of parts to play with. There is an LED pack, RGB LED display, light sensor, sound sensor, rotary angle sensor, temperature and humidity sensor, passive buzzer, button, servo, mini fan (with DC motor), relay, and a 16×2 character LCD.

    Learning curve

    The Grove Shield for Pi Pico wiki page has a range of tutorials that use the parts found in the kit.

    	The Grove Shield for Raspberry Pi Pico has a range of ports that make it easy to click and connect components

    The tutorials use all the parts found in the Starter Pack and give a good overview of what you can do. You typically need to download a Python module for each part. And analysing the code will give you a good overview of what each component can do. We programmed the LCD to respond to light and sound; a fan and servo movement detector; and played around with lights, buttons, and the relay.

    Thanks to the Python support files, introductory wiki tutorials, and the click-and-play nature of the kit, it is ridiculously easy to move from having an idea to getting it working.

    There is an argument that replacing the pure jumper wires and breadboard with a custom connector removes part of the learning curve. And it’s hard to take a prototyped circuit and wire components directly to Pico so you remain attached to the Grove Shield and its ecosystem of parts. But, for the sheer joy of attaching a component and getting it to work, this is hard to beat.

  • Automatic Seedling Nurturer

    Automatic Seedling Nurturer

    Reading Time: 3 minutes

    “This specific robot allows Raspberry Pi to communicate with the VEX IQ system to create a plant watering and lighting system,” Chloe tells us. “I was trying to raise seedlings and found that sometimes I would forget to water the plants or turn on the grow light. I thought it would be useful to automate the project. VEX – with its motors, sensors, and Lego-like parts – lends itself to making structures. However, there is no internal mechanism for monitoring the time of day. I wondered if I could use a Raspberry Pi with a real-time clock to trigger the mechanism. Raspberry Pi would open up many other possibilities, like accessing the mechanism via the web or recording data points (temperature, humidity, growth) for later comparison.”

    Ideas on ideas

    Just using a Raspberry Pi as a timer, though, is a bit overpowered, but the possibilities of what could be done with it sparked new ideas.

    As the arm is over a seedling, the VEX IQ microcontroller pushes a button that is sensed by Raspberry Pi and triggers a watering pump to stream water over the plant

    “Initially, the goal was to water seedlings automatically,” Chloe reveals. “However, as the idea formed, other benefits of using a Raspberry Pi arose. From an educational standpoint, I learned how to wire a breadboard, an LED light, and a button. Learning to do these tasks with a Raspberry Pi was rewarding in itself, but applying the wiring of the breadboard and peripherals as part of my project was an added bonus.”

    She says there were many reasons for using Raspberry Pi. “For one, with its multitude of sensors, accessibility to networks, and bountiful options for programming languages, [it] provided a flexible solution that could not only be used in this project, but whose lessons could be expanded to other projects. This project could have been done more simply with a UART connection using an older model VEX EDR microcontroller. This way, the transmission of information would have then been direct. But by doing the project with the Raspberry Pi VEX IQ communicator, I learned about 3D printing, circuits, LEDs, and GPIO pins.”

    Let them grow

    We’ve seen that Raspberry Pi can help grow plants and such, but can a Raspberry Pi/construction block robot hybrid do the same?

    The communicator uses a series of buttons and lights that allow Raspberry Pi and VEX to communicate

    “It works quite well,” Chloe says. “There is a YouTube video that shows not only how it works, but a couple examples of seedling growth. I had to connect the VEX IQ microcontroller to a constant DC power supply. Sometimes, one in 40 waterings, one of the motors would seize up and my apparatus would commit egregious overwatering. This was uncommon, however.”

    Chloe isn’t resting on her laurels either: “I want to learn more about networking. My goal is to create an easy-to-use interface to be able to manipulate the apparatus from distant sites. I also used the Raspberry Pi VEX IQ Communicator to create an automatic pet feeder and water bowl filler. There is a short video on the same YouTube channel of this device. The pet carer is in a more nascent stage of development.”

  • Discover 50 hacks & hints in The MagPi #105

    Discover 50 hacks & hints in The MagPi #105

    Reading Time: 2 minutes

    Get more from your Raspberry Pi with this excellent collection of tips

    50 Hacks & Hints

    The whole team worked together on this one. We sat down and threw all our favourite secrets into the ring, and in doing so we all learned something new from each other. Result! Now it’s your turn to learn the hidden secrets that make using Raspberry Pi a joy.

    Dede Mitchell's fantastic chalkboard mixes traditional chalk drawings with smart software

    Build an LCD Chalkboard

    Dede Mitchell’s day job is as an intra-office administrator and logistics expert at Operation Restoration. Under her guise of the Maladjusted Milliner, she runs Operation Restoration –  a non-profit organisation that provides assistance to women and girls affected by incarceration. Check out her amazing story and this great LCD Chalkboard build.

    Recreating this complex Star Wars arcade machine was no small challenge

    3/4 Star Wars Arcade Cabinet

    James Milroy built the arcade cabinet that he played back in the 1980s. And we think he did an amazing job. The Star Wars Arcade cabinet has a lot of detail, a replica analogue controller yoke, and superb styling.

    KG explains how to assemble your parts and start building an arcade machine

    Build an arcade machine: Assemble your cabinet

    If you want to build your own arcade machine then KG has you covered. Last month our arcade expert ran a list of components that you’ll need to make an arcade machine. This month KG starts to put the bits together and switches on the cabinet. 

    Check out these incredible builds for #MonthOfMaking 2021

    #MonthOfMaking 2021 Showcase

    We saw an amazing variety of stuff made by our community this year, so we thought it would be a great idea to show off what you all made. Remember, you can keep making and showing us what you’ve done any day of the year. We look forward to seeing what else the community makes over the rest of the year. 

    Pick up your copy of The MagPi magazine #105

    The MagPi magazine is available as a free digital download, or you can purchase a print edition from our Raspberry Pi Press store.

  • Win one of two 4.01″ ACeP 7-colour e-Paper display HATS!

    Win one of two 4.01″ ACeP 7-colour e-Paper display HATS!

    Reading Time: < 1 minute

    Subscribe

  • Diablo 2: Resurrected (PC) 4K 60FPS Max Settings Gameplay RayTracing Shaders (Technical Alpha)

    Diablo 2: Resurrected (PC) 4K 60FPS Max Settings Gameplay RayTracing Shaders (Technical Alpha)

    Reading Time: < 1 minute


    Diablo 2: Resurrected (PC) 4K 60FPS Max Settings Gameplay RayTracing Shaders (Technical Alpha)

    RayTracing Shaders installed with ReShade Reshader, and made my own resahde preset based on my screen settings, playing it on 3 screen setup just for recording in 4k 🙂 🙂

    How to access the Alpha and Beta Test Phase: https://eu.battle.net/support/de/article/284796

    Direct Link, Scroll Down to middle of Page: https://diablo2.blizzard.com/de-de/#masthead

    Old Diablo 2 (2000) Versions Downloads:

    Windows:

    Mac:

    Website Mirror Link: https://eu.battle.net/support/de/article/000013867

    To Import your old Save Files just drop them in your Windows User Folder, SavedGames: „C:\Users\YOURUSER\Saved Games\Diablo II Resurrected Tech Alpha“

    LVL99 SaveGame Files (All Characters): https://www.reddit.com/r/Diablo_2_Resurrected/comments/motr8r/character_files_for_99_sorc_with_access_to_nmhell/


    Diablo II Resurrected

    Diablo II: Resurrected will be released at a later date. Diablo II: Resurrected will not be available on Mac, but will be available for PlayStation, Xbox, and Switch.

    Official Source: https://diablo2.blizzard.com/

  • 10 Amazing: Maker Tools

    10 Amazing: Maker Tools

    Reading Time: 4 minutes

    Helping hands

    Handy holders

    Handy holders

    Due to various reasons, humans have two hands. Sometimes less. Balancing wires and solder and a (very hot) soldering iron, or holding a small piece steady painting, can be tricky even for the most dextrous. With movable clamps and a magnifying glass, helping hands make it easier for everyone.

    3D printer

    Print your dreams

    3D printer

    A quite expensive item for sure, but one that has endless possibilities. Thanks to online modelling communities and easy access to basic CAD software, you can quickly prototype and test designs for projects, or create that part you can’t get elsewhere.

    Wire stripper

    No knife required

    Wire stripper

    Snipping wires to length is easy; removing the plastic insulation to reveal the actual conductive wire underneath can be a little tricky. We recommend a good wire stripper, especially when you get past the breadboard prototyping phase.

    Glue gun

    Hot fusion

    Glue gun

    Easy to apply, quick to set, strong, and insulating? Glue guns are a maker’s best friend. Always make sure to get one with at least two settings, though. And don’t rely on just one for all your gluing needs. You can even get sealing wax sticks for them, as well.

    Cutting mat

    Precision slicing

    Cutting mat

    While you can cut on the surface of a wooden workbench in a pinch (and with permission), a cutting mat is definitely the preferred method. It won’t dull the blade as much, they self-heal, and they usually come with angles and measuring tools built onto the surface so you can have a better visual guide.

    Rotary multi-tool

    Spinning trimmer

    Rotary multi-tool

    Otherwise known as a Dremel, which is a brand of tool maker that makes popular rotary tools, they’re great for small projects. You can sand, buff, cut, drill, shave, and more by switching out the different tool heads. It’s great for makers as they’re small and cover a lot of bases.

    Directional light

    See your project

    Directional light

    It’s easy to find little USB LED lights on a goose neck these days. They’re bright, low energy, can be clamped to a table, and moved around however you wish. For finer work, good illumination is key, and they’re a bit more flexible than a head torch.

    Needle-nose pliers

    Grab small things

    Needle-nose pliers

    You never realise just how much you need a slim pair of pliers until you really need them and all you have are tweezers or heavy-duty pliers bigger than a Raspberry Pi. Of course, a good set of tweezers and regular-sized pliers are great to have as well.

    Soldering iron

    Create circuits

    Soldering iron

    An essential tool for electronics, a soldering iron is basically a very hot metal pen that allows you to melt specially treated, soft metal that allows for wires and circuits to be connected and have electricity run through them. Make sure to tin the tip before using, though: magpi.cc/tin.

    Clamps/vice

    Steady on

    Vital for a lot of wood- and metalwork – even some painting! A clamp can keep your projects sturdy so that drilling or cutting won’t go awry, or make sure glue will dry firmly, or even make sure metal is aligned for welding. Got a miniature with a base? You can lightly clamp it in one to keep it steady too.

    Clamps/vice

  • Design a high-tech home office

    Design a high-tech home office

    Reading Time: 2 minutes

    In The MagPi issue 103 we addressed one of the burning issues of the day: how do I let my family know I’m on a Zoom call? We invented a ‘digital do-not-disturb sign’ that can be remotely controlled by some buttons or an event detected by Home Assistant. Display any message you want right outside your door and avoid those moments that could send you viral on social media.

    If you’re working at home and have your own working space, particles and gases (now, now) can build up without proper ventilation. Consider adding a Pimoroni Enviro+ to your arsenal. This HAT with optional add-on particle sensor monitors dust, temperature, and other concerns, sending the data straight into Home Assistant.

     This miniature railway sign can make sure you are on time

    Home automation isn’t just about switching lights on and off. There’s a wealth of information provided free-of-charge from the internet that you can use to affect your environment. A great example is the data that powers all the railway station displays in the UK. This is freely available and this great project by Chris Crocker-White allows you to make your own home display.

    Our newest member of the Raspberry Pi family, Pico, can act as a keyboard over USB. Pairing one with Pimoroni’s RGB Keypad Base creates an inexpensive macro keyboard. Create shortcuts for your common operations and program them into your Pico to speed up your day. No more fighting with the mouse to reach ‘Leave Meeting’.

  • Automate your kitchen

    Automate your kitchen

    Reading Time: 2 minutes

    Wire up a coffee machine

    If you really want that fresh coffee in the morning to be just right, how about automating your coffee machine? If your machine can start when power is applied, then a simple WiFi power switch will suffice. There are some ‘smart’ coffee machines available such as Smarter Coffee, but another option is to add a button-presser such as MicroBot Push which can be controlled with HA.

    Drink smarter

    Discover sous-vide

    This amazing technique cooks plastic-wrapped food in a water bath using precise temperatures. The result is tender and flavoursome meals that cook over hours not minutes. Sous-vides are typically expensive, but you can build your own and monitor it using HA, such as this project. As ever, always be careful mixing electricity and water.

    Create tender and flavoursome meals with sous-vide

    Install smart meters

    The kitchen is the heart of the home, so it pays to keep an eye on how much blood it’s pumping. As smart meters roll out, it’s good to know that many models such as Honeywell’s AS302P advertise their usage to supplied displays. With a bit of help, these transmissions can be captured by HA so you can create your own dashboards or set alarms when the cooker gets too greedy. Take a look at this tutorial by Erik Schrama.

    Keep an eye on power consumption

    Get smart about safety

    After lighting, a logical first step for the home automation fan is monitoring of the environment. Smart smoke alarms and carbon monoxide detectors are available, but you may be interested in making open-source versions so you can trigger alerts when things don’t seem right. The Pi Hut sells an MQ-135 Gas Sensor which is great for experimenting with home-built smoke detectors. Please note that no DIY smart device is ever any replacement for a proper certified smoke alarm, such as those made by FireAngel.

    Smart smoke alarms and carbon monoxide detectors

  • Ride 4 (PC) 4K 60FPS Max Settings RTX 2060 Gameplay RayTracing Shaders

    Ride 4 (PC) 4K 60FPS Max Settings RTX 2060 Gameplay RayTracing Shaders

    Reading Time: < 1 minute

    Ride 4 (PC) 4K 60FPS Max Settings RTX 2060 Gameplay RayTracing Shaders

  • Resident Evil 8 Village (PS5/PS4PRO) 4K 60FPS 30Minutes Gameplay Demo – PART1 The Village

    Resident Evil 8 Village (PS5/PS4PRO) 4K 60FPS 30Minutes Gameplay Demo – PART1 The Village

    Reading Time: < 1 minute

    Resident Evil 8 Village (PS5/PS4PRO) 4K 60FPS 30Minutes Gameplay Demo – PART1 The Village

    PART2 is coming next Week!

  • Cam Chess

    Cam Chess

    Reading Time: 3 minutes

    Playing against an on-screen computer opponent just isn’t the same, says Geoff. “It loses the social aspect.” Furthermore, it takes time to adapt from on-screen diagrams to playing with a physical board and pieces – something he imagines more people doing now that the TV show has given chess a moment in the spotlight. “The ideal practice is to train with the same board and pieces as you would use at the local club,” he says, but it’s prohibitively expensive for schools and many clubs, which is where his CamChess project fits in. “I wanted to build a system that would work with standard plastic pieces on a standard vinyl board,” and also record the moves.

    A canny move

    CamChess combines the best elements of an electronic board with the ability to record moves, but costs only around £50 ($70) excluding Raspberry Pi 4.

     A Raspberry Pi Zero with ZeroCam is fixed to the ceiling above

    After retiring 20 years ago from his job as a consultant for large-scale computing systems, Geoff has racked up experience of building small-scale projects. Despite a 30-year break from it, he can still write code. “Python was a bit of a culture shock,” he reveals, “but I soon adapted.” Geoff made full use of standard Python modules, along with OpenCV and NumPy for image processing, and Stockfish as the chess engine.

    A Raspberry Pi Zero with an attached ZeroCam worked well for capturing images of the chess board. Mounting the ZeroCam on a door frame using some sticky tape high above the centre of the chess board helped minimise lens distortion. Raspberry Pi Zero takes pictures on command and sends them back to another computer for analysis. Geoff used a Raspberry Pi 4 to do this, but says any ‘non-antique’ Linux, Windows, or Mac computer would work.

    Match ready

    Due to congested WiFi channels where he lives, he opted for Ethernet to connect Raspberry Pi 4 and Raspberry Pi Zero and send images using the USB cable that also powers the latter. These images tell the computer the latest chess move that has been made, which Python-chess then replicates on-screen. Having experimented with the image comparison method used by Realtime OpenCV Chess, Geoff thrashed out a method that determines whether each chess square is empty or occupied and whether it’s a white piece or a black piece.

     The ZeroCam picks up moves on the board and displays them on screen

    It was a challenge to get the board to configure itself automatically but Geoff eventually worked out how to do so using standard threshold optimisation techniques. CamChess now only needs to be shown the start position, and works out its internal settings from there. CamChess’s difficulty level can be set to engage the hobbyist player and they can make moves for both sides until they reach a position that is of interest to them.

    While he’s largely happy with the existing build, Geoff hopes others will make their own versions of CamChess and let him know how they get on. We did ask him about his own next move, but he’s keeping mum. 

  • Giant Hornet Detector

    Giant Hornet Detector

    Reading Time: 3 minutes

    Sean has been keeping bees for around seven years and began developing a small photo booth – the HoneyBee Booth – that would use artificial intelligence to detect and count Varroa mites, and notify him of the findings. He adapted it to detect other species on hearing about the murder hornets’ arrival.

    Geolocation data of any affected hives is sent to a Microsoft Azure IoT Central dashboard. Washington’s Department of Agriculture can use this in their efforts to eradicate the invasive species. “Using Raspberry Pi 3, Arducam [camera], small motion sensor, and 3D-printable case, I’m able to classify an image in about two seconds,” claims Sean. However, keen to make this an easily and cheaply replicable project, he suggests a $5 Raspberry Pi Zero will work almost as well, with the caveat that identification takes closer to a minute.

    The booth can be fitted with a weather protection cover

    Sharing the resulting images poses a problem, since many beehives are remotely located, but Sean is hoping LoRaWAN (Long Range Wide Area Network) will help. LoRaWAN is designed to work with low-power devices over vast areas and will work well in locations not covered by 3G or wireless LAN. “All the image classification takes place on Raspberry Pi, leaving only the need to transmit telemetry data, which should fit nicely within packet size limitations that exist with LoRaWAN.”

    Track and trace

    Sean is keen to ensure others can replicate his project, envisaging “a non-tech savvy beekeeper” putting one together and watching for Asian giant hornets. Cost, open-source code, and a simple build were therefore priorities. “I love the idea of a community contributing to a large pool of images that can be used to further train and improve the learning models,” he says. It also means Raspberry Pi Zero can be used, keeping all-important costs low.

    An as-yet-unresolved issue is how to photograph booth visitors, such as this earwig, from the bottom as well as the top to aid identification

    He sketched and 3D-printed his own basic, but weatherproof, case as the camera booth and to house Raspberry Pi. There’s a hole on the top for the LED, while the camera and wires for the motion sensor were inserted via the booth door and attached at the end. Sean enabled SSH and I2C using the command prompt (see the setup instructions) so Raspberry Pi can be accessed remotely. A funnel added at the end helps ensure insects are hustled into the booth to be photographed. Getting the camera focus right and clear images of booth visitors was time-consuming but, as Sean’s enthusiasm shows, the results have proved rewarding.

    Exciting sightings

    Sean is excited about the possibilities of the project based around a camera, motion sensor, and a learning model. “Maybe you want to spot an incoming locust migration, get up-close pictures of a very rare insect species, [or] spot elephants on a train track and alert the conductor or train station to stop?” he enthuses. “I can’t wait to see what people come up with!”

  • Create a cool kids room

    Create a cool kids room

    Reading Time: 2 minutes

    Set up a sibling alarm

    Brothers! Sisters! Boo! If your sibling is driving you up the wall by messing with your stuff, then catch them in the act. Using a Raspberry Pi HQ Camera and a cheap magnetic door sensor, you can take a photo or record video whenever the door opens, then send it straight to your phone. Busted! Take a look at this Room Guard project: magpi.cc/roomguardproject.

    Brothers! Sisters! Boo!

    Fit a dinner klaxon

    A really popular project from The MagPi issue 73 (magpi.cc/73), the teenage klaxon is the ultimate solution to yelling up the stairs in frustration at a headphone-clamped offspring. Simply use the web interface on your phone to set the candle light to green, amber, or ‘right, now you’re really in trouble’.

    DINNER TIME!

    Listen to internet radio

    No kid’s sanctuary is complete without some sounds. Why not add to your home audio system (see ‘Living room’) with another device or build an internet radio, capable of reaching thousands of stations across the globe. We really like Pimoroni’s Pirate Radio (magpi.cc/pirateradio) as a great starter kit.

    Sanctuary sounds

    Fit some fun lighting

    If you really want to make an impression on your friends, get some LED strips and power them with a Raspberry Pi. You can start with single-colour 5050-type LED strips or move up to individually controllable NeoPixel sets (magpi.cc/neopixels). A project like this can just build and build; how about adding a microphone to create dancing lights? The Pi Hut has a great NeoPixels tutorial (magpi.cc/usingneopixels).

    Rainbow steps

  • Liven up your living room

    Liven up your living room

    Reading Time: 2 minutes

    Install smart lighting

    Most HA projects start with lighting. Being able to switch lights on throughout the house, wherever you are, or have them react to different sensors or events is a great way to get started in this field. There are a lot of options and the prices have plummeted. Check out ikea’s Trådfri range or the popular Philips Hue system.

    Smart lighting options

    Build a home cinema

    How about the ability to convert your living room into a cinema at the click of a button? Logitech’s Harmony Hub allows you to control your TV, amp, and game consoles from your phone or Home Assistant. You can create complex scripts and also set lighting or lower blinds. Popcorn optional.

     Build a home cinema

    Set up a smart sound system

    If you’re after some sounds, check out our recent tutorials on building the ultimate music server using Raspberry Pi and Mopidy. Create your own Sonos-rivalling system and have synced music throughout the home. A Raspberry Pi Zero with an inexpensive DAC (digital-to-analogue converter) HAT will give you excellent audio reproduction for a fraction of the commercial price. See issues 96, 97 & 98.

     DAC (digital-to-analogue converter) HAT

    Control your central heating

    Need to be cosy? Need to control exactly how cosy you are? Many solutions exist for remote control of central heating. We particularly like the motorised thermostats that can be quickly added to radiators as these give you precise control over every room and HA can use individual temperature sensors to get every room just right.

    Motorised thermostats

    Build a magic mirror

    A magic mirror places a screen behind a semi-transparent sheet. Once framed, it gives the impression of text floating in the air that can display your calendar, the weather, or anything else. To find out how to make one, pick up a copy of The MagPi issue 90.

    MagPi 90

  • Haptic navigation

    Haptic navigation

    Reading Time: 2 minutes

    There are other ways to relay the information, though, such as how Sukriti has made use of touch: “This open-source solution uses a Raspberry Pi Zero W and a mobile phone to relay turn-by-turn instructions with haptic feedback, more commonly known as vibrations, over an SSH connection with the mobile device.”

    A running thread

    Sukriti tells us that around 466 million people worldwide have disabling hearing loss, 34 million of which are children. The WHO believes that this number will double in the next 30 years.

    You can rest it on your person while driving to get directions

    “Having worked in the distracted navigation space at a Tel Aviv startup in 2014, I was acutely aware of the limitations of voice navigation for those with hearing impairments,” she says. “My interest in the space was reignited during a conversation with Pete Cossaboon, who runs obstacle races as a blind athlete. I learned that he wanted to be more independent in navigating the space he is in. Both of these problems could potentially be solved with a haptics-based solution, and this is the first version of it.”

    Using Raspberry Pi made sense in this context due to price and small size, and Sukriti found it easier to work with as well. “For me as a developer, programming on Raspberry Pi is intuitive, especially since I was looking for an interface between a mobile phone and a physical device.”

    Touch and go

    The system currently works using MapBox, a third-party mapping and navigation service, which provides the directions that are then translated to vibrations on the device. It can be extended to other frameworks with an API that allows for HTTP requests to be sent to Raspberry Pi, such as iOS and mobile web.

    The basic electronics are quite simple

    “It works really well in terms of navigation … for people with hearing impairments,” Sukriti reveals. “I can see its applications in VR navigation as well. The solution would be even more useful for visually impaired users with proximity sensors to help avoid obstacles, in addition to navigation outdoors.”

    Work is ongoing with the project, with Sukriti wanting to add more haptic sensors for different navigation commands, proximity sensors, PWM output for varying intensity, and more.

    “I have tested the prototype with a couple of people, and the feedback has been really positive,” she says. “I have personally been using it on runs, so my music is not interrupted if I go on unfamiliar paths.”

  • GTA 5 – How to install RTX Shader? RTGI and Normal Free Shader Tutorial

    GTA 5 – How to install RTX Shader? RTGI and Normal Free Shader Tutorial

    Reading Time: 3 minutes

    How to install Ray Tracing Nvidia in GTA 5? RTGI and Normal Free Shader Tutorial

    Details:

    First of all This is not a Hacker or Crack Tutorial and NO This will not WORK for GTA ONLINE, Pls play normal Online. No one likes cheaters!

    After these Steps you got the Main key to start moding!

    Open OVI and choose your GTA V Folder and let it start.

    • After that you go to: Tools->Asi Manager and Install everything (AsiLoader, Free Cam..) If you got asked to create a Mod folder say YES!

    • After that close OpenIV and navigate to your GTA Directory.
    • Copy the folder x64 and update to your mods folder.

    Now we can start Copying our Mods, Shaders and Everything!

    MOST IMPORTANT PART , PLS FOLLOW ALL LINKS AND READ ALL README.TXT IN THE ZIP FILES CAREFULLY, SOME ARE UPDATED SOME ARE NOT, SO PLS Follow every Step from installing in this order, and you should be fine.

    [mycred_give amount=10 log="Bonus points for reading our special article" ref="bonus_points"]
    [mycred_show_if balance=500 ctype="mycred_lvl_key"]

    Graphical Mods Used in the Video:

    About RTGI McFly
    I’ve been modding game graphics for the better part of the last decade, starting off as an ENBSeries preset author for GTA: San Andreas, moving on to ReShade which has been my main hobby/passion/vocation for the last few years! 2 years ago, I started working with NVIDIA on the Ansel and FreeStyle modules of GeForce Experience. If you have a NVIDIA video card, my code is on your computer.

    NVR – Natural Vision Remastered is not Part of this Tutorial, we will make another one just for this and LA REVO 2.0: https://www.youtube.com/watch?v=5trifCruTQI

    Make sure to edit global preprocessor definitions and set RESHADE_DEPTH_INPUT_IS_REVERSED 0 to 1
    For ENB to work properly, frame scaling should be turned off in advanced settings
    post-processing must be veryhigh and shader quality should also be very high in in-game settings

    Mods used in this Video:

    1. MenyooSP Trainer: https://de.gta5-mods.com/scripts/menyoo-pc-sp
    2. LA REVO 1.0 aka LA ROADS and Update: https://de.gta5-mods.com/misc/l-a-revo
    3. RCA Real California Architecture: https://de.gta5-mods.com/maps/real-freeway-signs
    4. 100 Percent Save (if you have played the game already, but always nice to have one): https://de.gta5-mods.com/misc/100-save-game
    5. Heap Adjuster: https://de.gta5-mods.com/tools/heap-limit-adjuster-600-mb-of-heap
    6. VisualV: https://de.gta5-mods.com/misc/visualv Optional Files: Advanced Motion Blur
    7. RTGI Presets + ENB: https://www.nexusmods.com/gta5/mods/293 MOST IMPORTANT!! THX for this to LT_Ripjaws
    8. Extended Camera Settings: https://de.gta5-mods.com/scripts/extended-camera-settings
    9. Extended Video Export: https://de.gta5-mods.com/scripts/extended-video-export
    10. Real California License Plate: https://www.gta5-mods.com/paintjobs/real-california-license-plates
    11. LA Vegetation: https://de.gta5-mods.com/misc/l-a-vegetation-oiv-installer-cryhd-frazzlee
    12. Franklin Shoes Pack: https://de.gta5-mods.com/player/ultimate-shoes-pack-for-franklin-add-on
    13. Bugatti Veyron Car Pack: https://de.gta5-mods.com/vehicles/bugatti-veyron-grand-sport

    After you Install Everything you should have a fully Converted Grand Theft Auto V that looks more like 2021 🙂 🙂


    Hope you liked our Tutorial, pls Hit the Subscribe Button on Youtube. https://www.youtube.com/channel/UC9CRiIgxWGYDISAapDcMZyQ

    Check out our other GTAV Posts: https://www.blogdot.tv/?s=gta+v

    And old but Golden 🙂 🙂


    Content hidden by this shortcode
  • The smart crust-cutting robot

    The smart crust-cutting robot

    Reading Time: 3 minutes

    For Andrew DeGonge, the latter question has a clear cut answer: crusts are to be chopped. Indeed, he’s so determined that the sides of bread are banished, he’s used his loaf and created an automatic guillotine-like device to do the hard work for him.

    “Crust in general isn’t my main problem. Cheap bagged bread is,” he tells The MagPi. “It’s all so mushy and the crust is even more of a burnt soggy mush. So, like any reasonable adult I prefer bagged bread without it to make it a bit more tolerable, although I do love the crust on a good sourdough or Italian loaf.”

    No crumby thought

    The idea for a crust cutter rolled into his head when he was considering building a robot with computer vision. “I wanted it to be original so I thought to myself, ’what’s a problem many people have that doesn’t have an automated solution?,” he says. “I realised there was no way to automatically cut the crust off sandwiches so decided to create one, just because I can.”

    Although a Raspberry Pi 4 is used for the project, Andrew says a Raspberry Pi Zero would have been more than enough to handle the task

    Andrew spent ten hours creating a CAD drawing of the project, ensuring enough room for the necessary motors and knife. “I went with stepper motors for the motion control and used V-slot extrusions and wheeled gantries for linear motion,” he explains.

    He also built a custom four-axis control board (“the OSR, which controls all of the stepper motors”) and he used a Raspberry Pi 4 paired with a Camera Module V2. “Raspberry Pi is the easiest and cheapest way I know to integrate computer vision into my projects,” Andrew says.

    As such, with the components sitting within a 3D-printed frame, Andrew envisaged placing a sandwich on a rotating cutting board before having the camera take images for analysis using OpenCV. “I spent 30 to 40 hours on the code, which included all the OSR, computer vision, and Python segments,” he reveals. It was time to get chopping.

    Sticking the knife in

    By comparing the current image frame to previous ones, the device determines the shape and size of the bread. “I then feed the rotation of the rectangle to the stepper controlling the turntable cutting area to align the sandwich with my knife,” Andrew says. “Next, the knife moves horizontally in the X-axis to a position that is a small offset in from the edge of the bread, and finally the Z-stage comes down and makes a cut. Then it’s a matter of doing three more rotations and three more cuts to remove the rest of the crust.”

    Andrew’s own four-axis control board (dubbed the OSR control board) communicates with Raspberry Pi via USB and controls all the stepper motors

    The main problem was figuring how to convert the camera’s pixel measurements into real-world measurements. “I ended up uniformly converting the measurements because cutting food doesn’t need to have sub-millimetre accuracy,” he says. “I ran into some motor control issues which ended up being bugs in my stepper control loops, but it all works pretty well.”

    Now Andrew doesn’t worry about crusts, especially now he’s using a sharper knife. “People criticised the bot for not cutting well enough, so I redesigned the gantry to support a sharper knife while using a pivoting knife mechanism and adding a food-holding spring-loaded platform. It’s now a seriously capable bot that cuts bread very cleanly and accurately. It’s cool, if not a little scary.”

  • Review: Pico Explorer Base

    Review: Pico Explorer Base

    Reading Time: 3 minutes

    To use the Explorer Base, your Pico will need to have male pin headers soldered, facing downwards – if you don’t fancy doing this yourself, it’s possible to buy Pico boards with pre-soldered pins. It’s then just a case of mounting your Pico in the dual female headers; a helpful ‘landing area’ graphic on the Explorer Base indicates which way round to place it.

    Making connections

    On the left side of the Explorer Base is a mini green breadboard with 170 points. While this may prove a little cramped for some projects, you could always just use a separate breadboard to house extra components. Note that no electronic components are supplied with the board, so it’s up to you to source your own LEDs, buttons, sensors, etc., along with the male-to-male jumper wires to connect them.

    Packed with features, the Pico Explorer Base is billed as an ‘electronic adventure playground’

    Rather than wiring components to Pico’s pins directly, a selection of its pins are broken out via two 12-pin female headers. These are clearly labelled and include I2C, SPI, ADC, and seven standard GP pins. While there are two GND connections, the only power option is 3V3, so this rules out any components requiring 5V power, such as NeoPixels. An Audio pin is connected to the on-board piezo speaker.

    The remaining four breakout pins are allocated to motor connections. Making use of a DRV8833 dual H-bridge motor driver chip, these can deliver 1.5A RMS current output to control two DC motors (or other power-hungry devices such as bright LEDs) – there’s even a handy overcurrent warning LED next to them. 

    Mini display

    One of the highlights of the Explorer Base is the mini LCD screen found on its right-hand side. This 1.54-inch, 240×240 IPS display is vibrant and useful for showing data such as sensor readings, as well graphs, text, and colourful graphics. Like most of Pimoroni’s mini displays, it also features four tiny tactile buttons around the outside for user input. You could even use them to play simple games.

    Connect a jumper wire from a GP female pin to the Audio pin to send sound to the on-board piezo speaker

    Above the screen are a couple of five-pin I2C-based breakout slots that are compatible with Pimoroni’s large range of Breakout Garden boards. Making use of them isn’t so simple, however, since the Explorer Base’s supporting software libraries – for C and MicroPython – are still very much a work in progress at the time of writing, and only include drivers for four breakouts. With a great deal of jiggery-pokery, and the help of a CircuitPython bus conversion library created by Ben Everard from our sister magazine HackSpace – we managed to get a BME680 breakout sensor working in MicroPython. Note that you’ll also need to flash Pimoroni’s custom UF2 firmware to Pico to use the Explorer Base with MicroPython.

    Driving the LCD display and reading its buttons is made fairly simple by a MicroPython module. This enables you to set pixels, create filled rectangles and circles, change pen colours, and display text strings and characters (using a preset upper-case font). With a bit of effort, it’s possible to create some more advanced effects, such as lines, hollow shapes, and even scrolling text on a path – as demonstrated by Tony Goodhew in his excellent Instructable, which shows the power of the display and Pico itself.