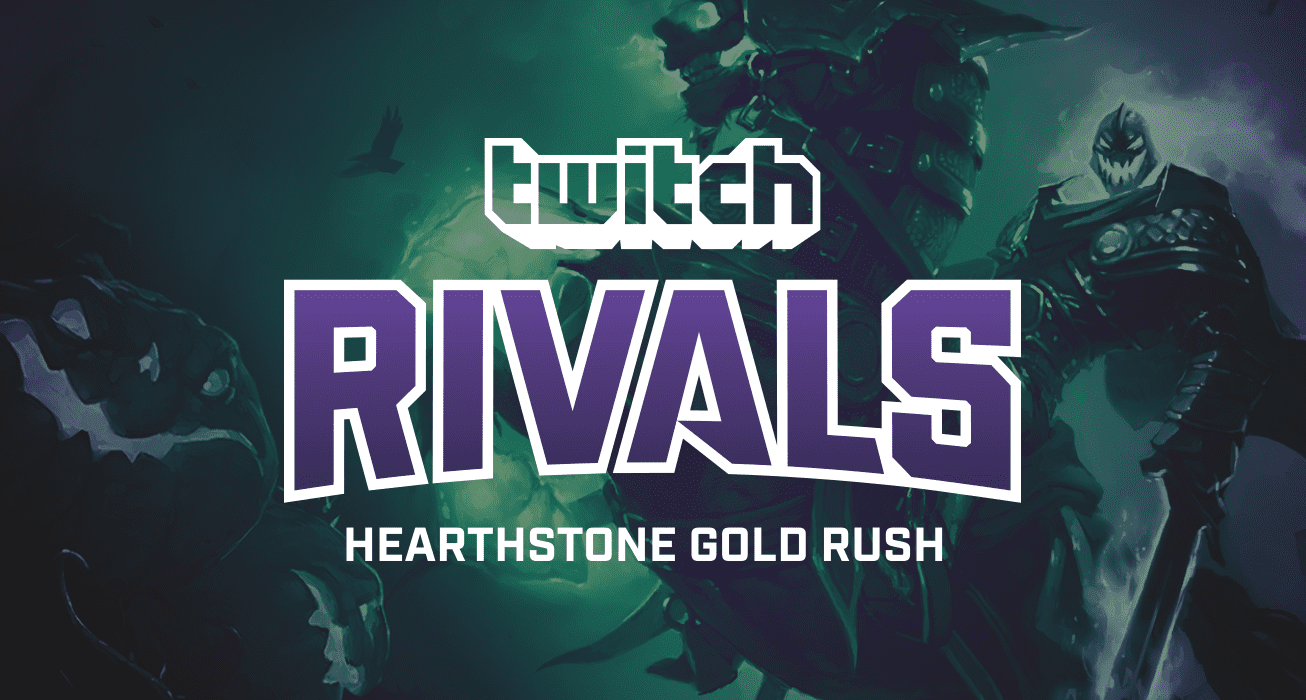
In one week, Hearthstone’s Dual Class Arena mode, The Hallow’s End, will return for a two week limited time special event!
Hallow’s End, in case you missed it before, is a spin on the classic Hearthstone Arena formula where you can pick two classes and fuse them for ultimate drafting synergy. To celebrate, we’re inviting all broadcasters around the tavern to a good ol’ fashion Gold Rush speed challenge on Twitch.
Starting on October 17 worldwide, the event will be unlocked and playable to every Hearthstone account, for free. The only two requirements to sign up are:
Make a brand new Battle.Net / Hearthstone account
Register that new Battle.net account over at the Smash.GG portal (https://www.smash.gg/hsgoldrush)
The Gold Rush challenge is a race to obtain 5000 Hearthstone in-game gold.. You can participate and play co-op together with friends, but no “Challenge A Friend” quests for 80 gold! Tavern Brawl is also off limit, but Constructed or Arena are fair game. Can you figure out the fastest way to reach 5000 gold?
And of course, using real money to buy anything is forbidden! For those focusing on the Hallow’s End Dual Class Arena, you can only use gold to pay for your Arena entry tickets. If you run out of gold — you bust. However, you have up to three attempts on your registered account due to the three server access regions (Americas, Europe, and Asia). If you bust on all 3 servers, you’re out for good.
The Gold Rush challenge features over $25,000 in prizes at stake and is open to anyone.. Pre-registration at smash.gg/hsgoldrush is mandatory, so if you forget to sign up, your submission won’t count!
Hallow’s End run from October 17–31. Submissions sent before or after those dates will be invalid. No cheating.
Note: You are allowed to complete the game’s tutorial and play all the classes to level 10 in Solo Adventure before the Challenge begins. However, you are not allowed to play any other game mode outside of Solo Adventure or start accumulating gold until Hallow’s End has officially started. Failure to abide by these prerequisites may invalidate your submission. You’ve been warned.
Prizes ($25,000 in total) 1st — $15,000
2nd — $7,000
3rd — $3,000
If nobody is able to cross the 5000 gold mark, the highest *current* gold holders will be selected as the winners.
Once you’ve completed your Arena run, grab the VOD and go to the smash.gg portal for submission. Winners will have their accounts verified and later announced at the conclusion of the event.
Finally, to all participants who are joining us for this epic challenge, while the event has no broadcast length limitations, please take extra care to ensure your own health and safety. Stay hydrated, eat well, take breaks, get lots of sleep, and most importantly, have lots of fun.
If you do not have a Twitch account, signing up is free and easy. For all the details, read the official ruleset here and ask any questions in the Discord to the admins.
FAQ
When does the Challenge begin and end?
October 17 is when Hallow’s End starts. October 31 is the last day of the event. If your submission contains non-Hallow’s End content, it will not be eligible.
I finished! How do I submit to verify if I have won anything?
Log onto smash.gg portal page (https://www.smash.gg/hsgoldrush) and click “Submit my run”.
What if I disconnect halfway or my stream goes down?
You are responsible for your own internet connection. Triple check your settings and test stability before you start. Any partial runs will be reviewed for authenticity, so submit chopped up VODs at your own risk.
I accidentally didn’t stream some games on the account halfway through. Will this invalidate my run?
You must stream the event in its entirety. Gaining gold off-stream can be grounds for disqualification based on on the admin’s discretion. Accidents do happen, but do your due diligence to ensure your hard work isn’t jeopardized!
I lost pretty quickly. Can I still participate if I bust out of gold early?
You may create a new submission by starting fresh on a different server of the Battle.net account that you registered on Smash.gg. However, if you bust out and are unable to purchase an arena ticket with in-game gold on any server (Americas, Europe, Asia), you are effectively eliminated from competition.
Can I play on multiple accounts on the same time?
Each valid submission must show only 1 account being played at a time. Playing multiple servers or multiple accounts simultaneously will invalidate your run.
I finished the 5000 gold, but I did not stream some of it. Can I claim the prize?
Unfortunately, if you did not stream the completion of the challenge in its entirety, you are not eligible to win. However, if you recorded locally on your computer, you may broadcast the missing part as a VOD on Twitch. However, you must the run must be streamed in its entirety (at normal 1x speed) before officially claiming the prize. Don’t forget to turn on your stream before you start/continue your runs!
Can I have a friend on call or next to me?
Absolutely. The challenge can be a team effort, but we will credit it to the official owner (by email account) of the stream. However, you may not compete in the challenge on multiple channels, so if you compete on a friend’s stream, you may not submit your own individual run on your personal channel or help another broadcaster with their runs.
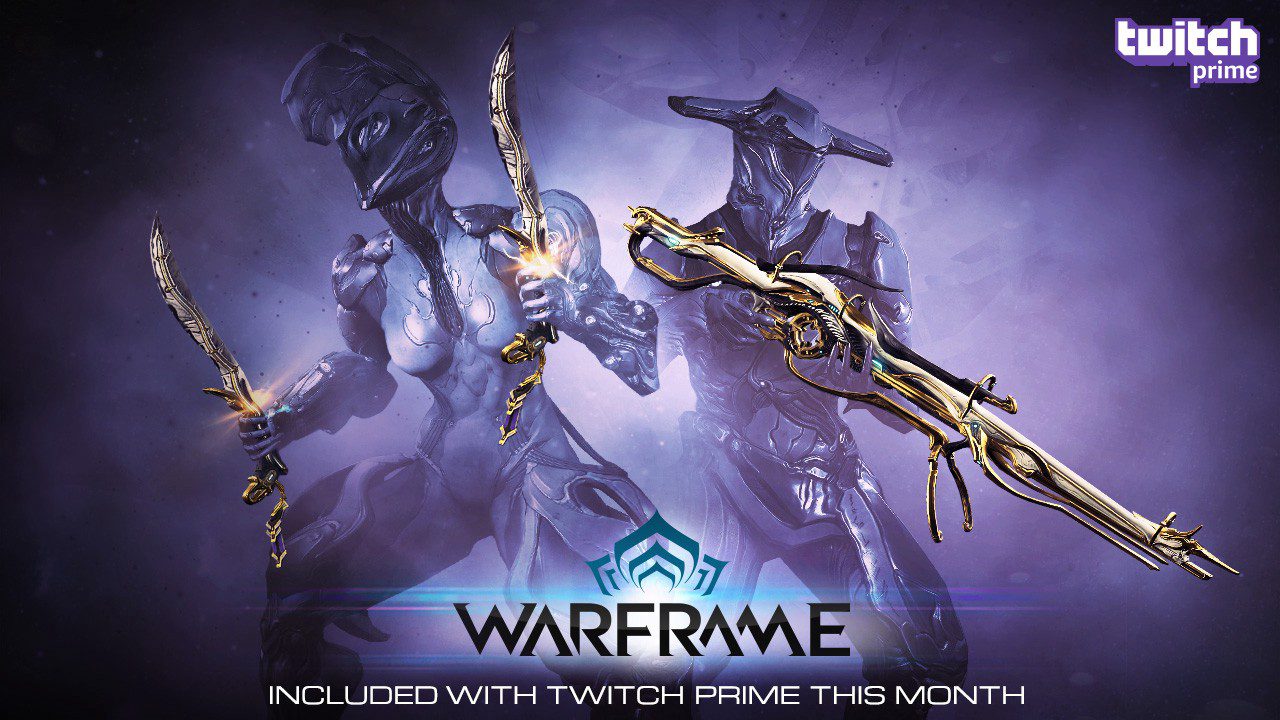
Starting Oct. 16, Twitch Prime members can instantly unlock Prime Weapons to help you dominate in Warframe. Get Vectis Prime, Fang Prime, and an exclusive Prime Sugatra with your Twitch Prime membership! Claim the offer here to get the following items:
Vectis Prime + Weapon Slot: A semi-automatic sniper rifle designed with high damage and fire rate making it powerful for destroying enemies at a distance.
Fang Prime + Weapon Slot: Dual daggers with fast attack speed that can unleash a flurry of multi-hit attacks.
Exclusive Prime Sugatra: Adorn any Melee Weapon with a flash of exclusive style. Prime Sugatras are rare Weapon Cosmetics and this one will only be available with Twitch Prime.
For those of you who are new to Warframe; a Prime Warframe, Weapon, Sentinel, or Accessory represents technology as it was during the height of the Orokin Era. A Prime Warframe will often have enhanced stats and “modability” compared to the non-Prime version; also, Prime weapons will boast superior performance or other advantages over their counterparts. Due to its rarity, Prime technology is coveted throughout the Origin System.
To take advantage of this offer on PC, PS4, or Xbox One, you must be a Twitch Prime member and link your Warframe and Twitch accounts. If you’re not a Twitch Prime member, you can sign up for a free trial on the Twitch Prime page.
Also, we’ve extended the availability of the Trinity Prime Bundle, which is included with your Twitch Prime membership! Match your new Prime Weapons and Exclusive Sugatra with a vital Support Warframe and matching Syandana!
What is Twitch Prime?
Twitch Prime is a premium experience on Twitch that is included with Amazon Prime. Benefits include monthly in-game loot, a channel subscription every 30 days AND all the benefits of being a Prime member.
You can try it for free for 30 days right here, and when you do, you get all the Twitch Prime benefits instantly just by linking your Twitch account to your Amazon account.
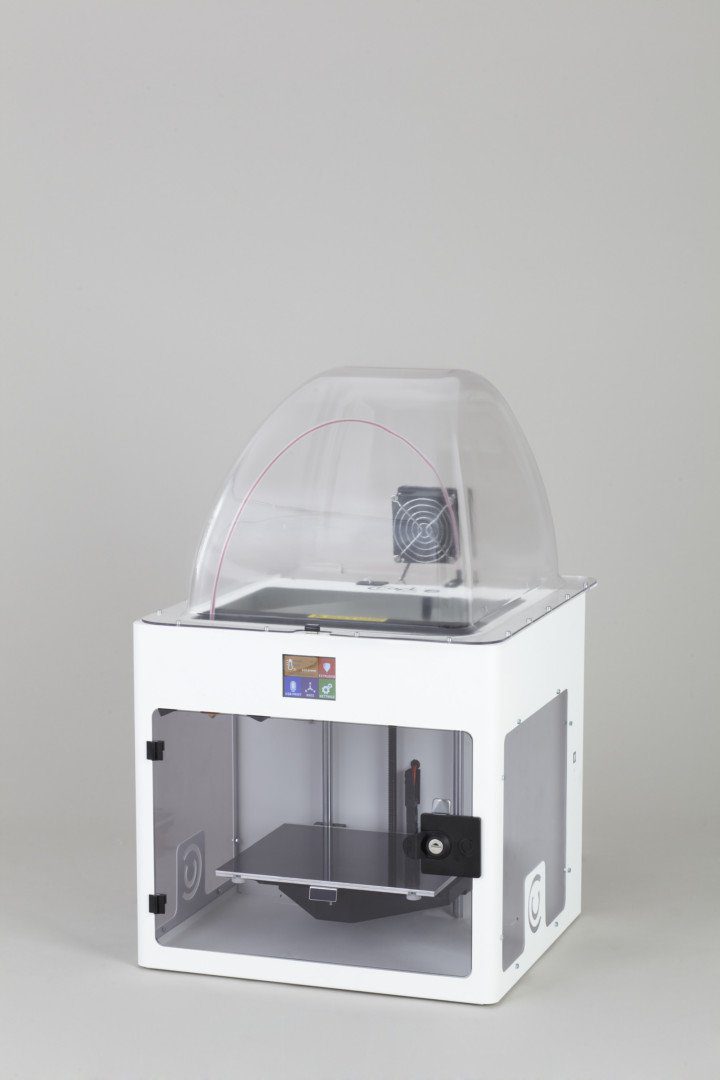
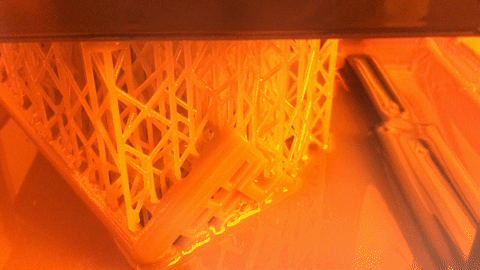
CraftBot has added the new CraftBot 3 Dual to its expansive range of 3D printers. This professional-grade desktop machine offers dual extrusion printing, an advance filament monitoring system, and a 374 x 250 x 250mm build volume.
The desktop 3D printer market has become increasingly crowded with endless options, making it difficult to decide which machine is the right match for you. For those who want a 3D printer that is highly capable, affordable and respected across the 3D printing community, look no further than the Hungarian-based company CraftBot.
After raising more than $245,000 in their 2014 Indiegogo campaign, CraftBot set upon its journey to develop plug and play machines that are easy to use and provide impeccable quality. Thus far, the 3D printer manufacturer appears to be succeeding at that goal. CraftBot has released a number of FDM 3D printers, including the flagship CraftBot Plus and CraftBot 2. In fact, the CraftBot Plus was awarded as the Best Plug N’ Play 3D Printer by 3D Hubs in 2016, 2017, and 2018.
The award-winning CraftBot Plus
A closer look at CarftBot as a company showcases exactly what makes their product line so unique and highly praised by the community. Each CraftBot 3D printer is manufactured in Europe, and both software and hardware development is entirely done in-house by a team of highly qualified technicians. The company takes all of their customers’ feedback into account, allowing them to constantly improve and refine their 3D printers.
Now, to add to its expansive product line, CraftBot has been working on a dual extrusion 3D printer that goes above and beyond what we usually find on the consumer market.
The CraftBot 3 Dual 3D Printer Strikes Balance Between Affordability and Professional Quality
Following their success with the popular CraftBot Plus and CraftBot 2, the Hungarian manufacturer has now released CraftBot 3 – The Supervisor. With a superhero-like name, it’s no surprise that this desktop dual extrusion 3D printer has some magical features. At $2,199, the CraftBot 3 is incredibly affordable compared to similar dual extrusion machines.
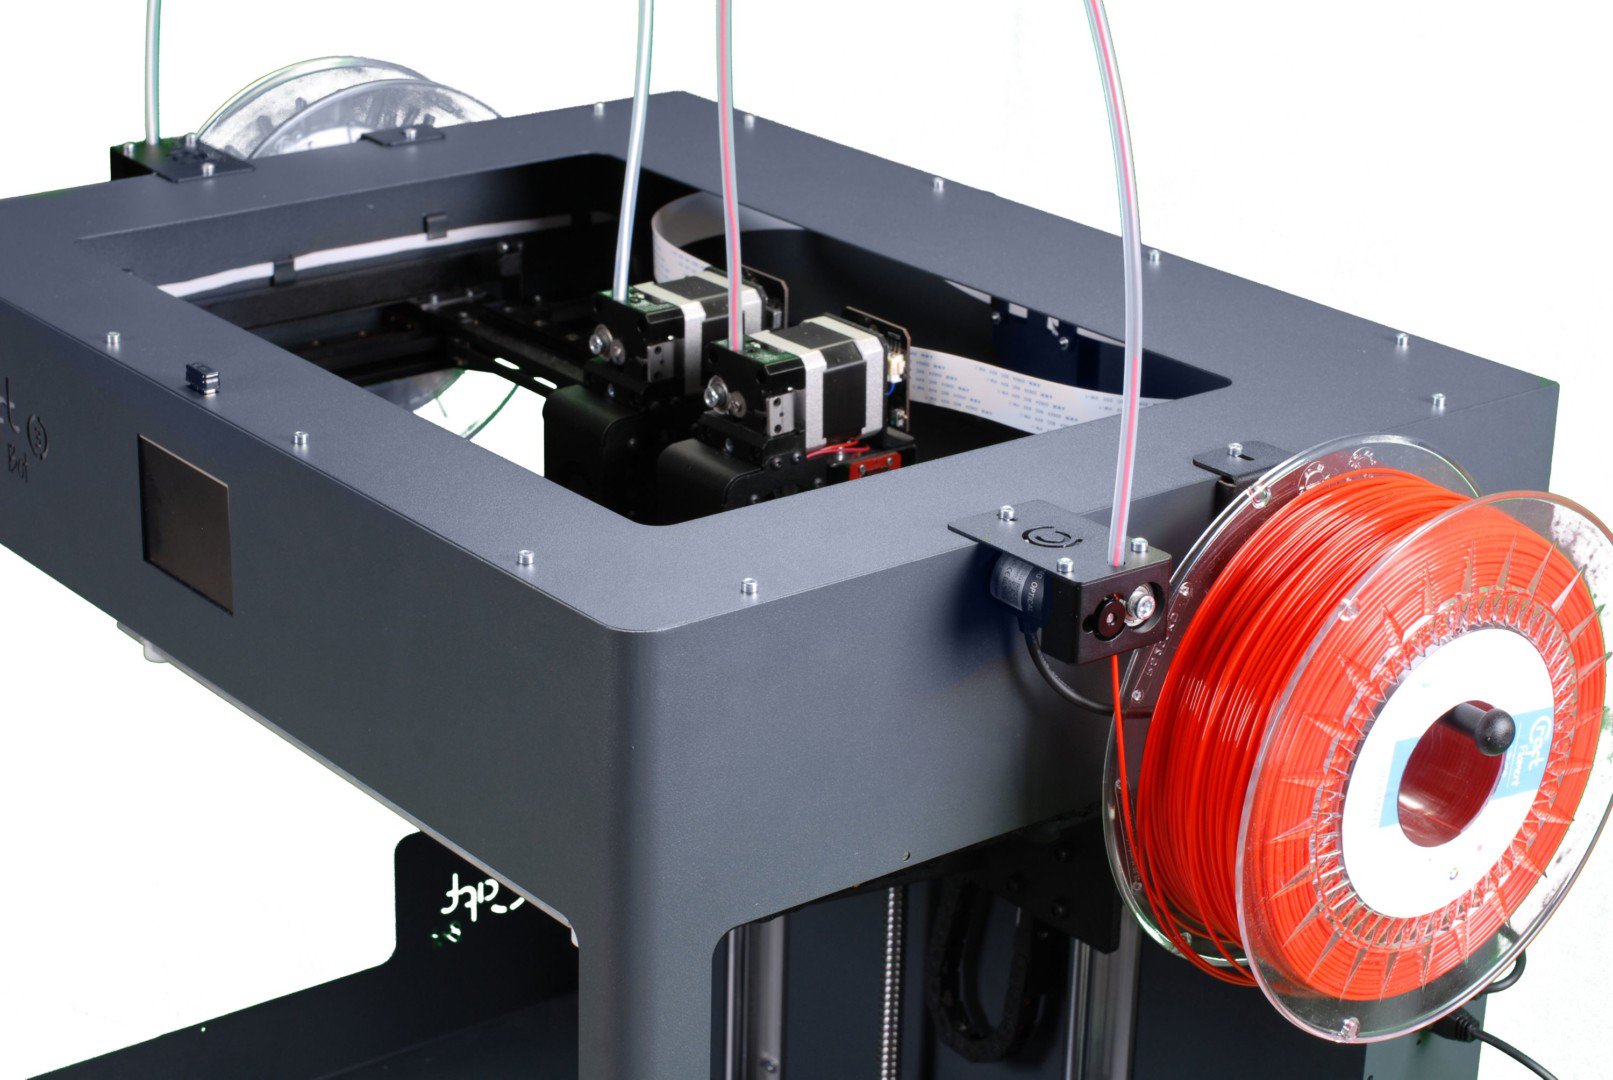
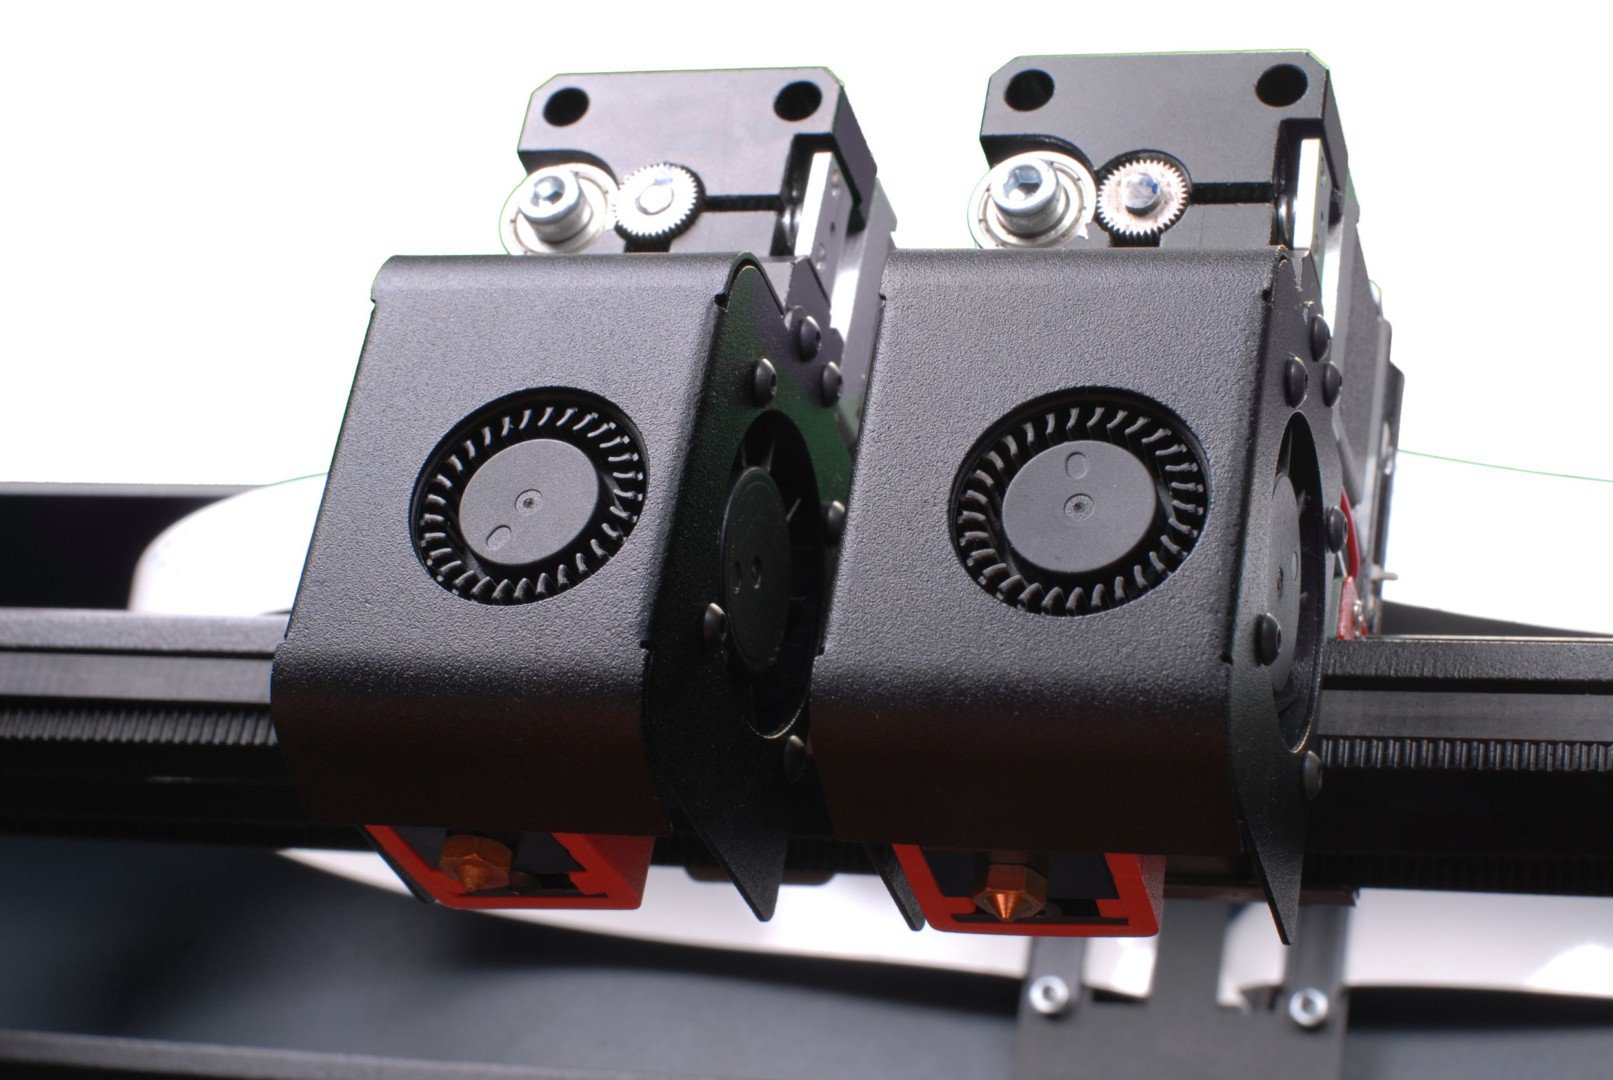
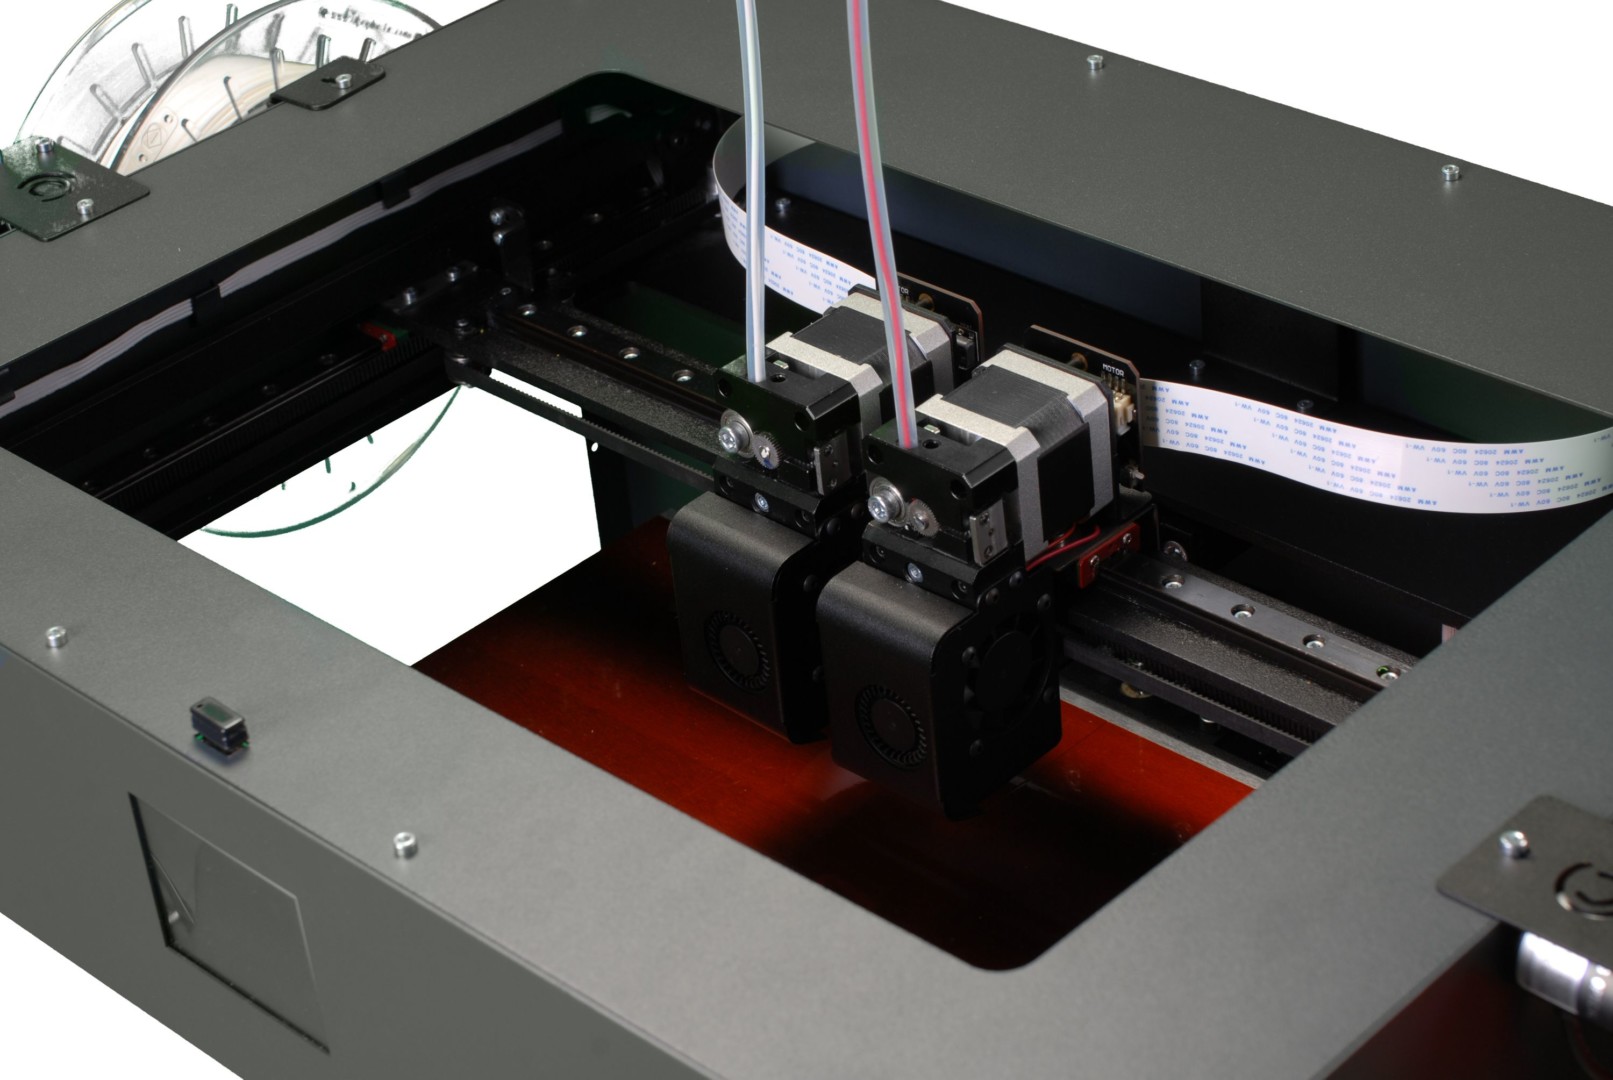
The CraftBot 3 utilizes an Independent Dual Extrusion (IDEX) system, meaning that the two print heads operate independently from one another. Therefore, users can print two objects at once, or use PVA support material to produce more complex parts. Equipped with silicone discs, the nozzles are wiped clean while the print heads are changing, ensuring that excess filament material doesn’t muddle up the surface of your print.
While dual extrusion might seem like the main attraction here, the CraftBot 3 is jam-packed with impressive features that promote quality and accessibility. For starters, there’s a state-of-the-art filament monitoring system (FMS) that keeps track of filament consumption, provides troubleshooting when a filament jam is detected and sends messages to the user when manual intervention is required.
With the CraftBot 3, you’ll get a sizable build volume of 374 x 250 x 250mm (270 x 250X 250mm for dual extrusion and 187 x 250 x 250mm for multi-part printing). This printer is capable of printing at a layer resolution of 50 microns when using the 0.25mm nozzle. And, if you’re concerned about keeping the family up while you print the night away, rest assured that the CraftBot 3 Dual’s motor control makes this 3D printer more quiet than ever before.
Despite the low price point, “The Supervisor” is engineered to deal with professional-grade materials. The full-metal hotend makes it possible to print at a temperature as high as 300°C, expanding the range of compatible materials beyond the usual suspects. It’s also equipped with high-accuracy ball screws to improve overall print quality.
The CraftBot team has implemented optimized object cooling technology into their latest dual extrusion machine, making it easy to print small objects at an exceptional resolution. The heated bed is designed to prevent warping and sticking, and can be easily removed once your print is complete.
The new 3D printer by CraftBot uses different colored LED status indicators to signal the current status of printing that can be customized for an even better experience. Using WiFi connectivity and CraftBot’s mobile app, users can upload 3D models to the printer, start and stop print jobs, and even control various printing settings from a remote location.
Need to prepare decorations for Halloween? We’ve got you covered with this spooky 3D printed Pumpkin Spider Transformer designed by William Bruning.
The spookiest day of the year is just weeks away… Why buy your decorations when you can make them on your 3D printer? To get you prepared for the ghouls, ghosts, and trick-or-treaters that are coming to your door this Halloween, All3DP will share a handful of fun and frightening weekend projects to keep you and your 3D printer busy.
And what better creature to mark the upcoming holiday than a Pumpkin Spider Transformer (yes, you read that correctly). Designed by New Zealand-based maker William Bruning, this 3D print can appear as a plain old pumpkin at one instance, but can suddenly transform itself into a creepy spider in the blink of an eye.
We stumbled across this eight-legged print on Thingiverse, where it’s currently being featured on the front page. The creator even made a short animation video with his creation, which you can watch below.
This isn’t one of those difficult projects that require soldering, various electronics, or anything that might scare away a 3D printing novice. In fact, the Halloween Pumpkin Spider Transformer is fully 3D printed, making it an easy way to spruce up this year’s decorations. Let’s take a peek at how to print and put together this creepy-crawling project.
Halloween Pumpkin Spider Transformer: What You Need & How to Build
The STL files for the Halloween Pumpkin Spider Transformer are freely available on Thingiverse. The model is comprised of seven different parts (six if you attempt to print the chest in one piece). Bruning recommends using support structures, a 10 percent infill, and a .15mm resolution.
As for colors, you’ll probably want the outside of the pumpkin to be orange, which you can either achieve via colored filament or (preferably) spray paint. Once the parts are finished and the supports are removed, it’s time for the assembly process.
First, put a bit of superglue on the base of the ball joint in the middle of the chest to strengthen the connection. Next, push the leg ball joints into the chest socket. According to the designer, the assembly may be a bit tight, but there shouldn’t be any issues that end up breaking the part. After that, click the other end into the slices of pumpkin to finish the leg section. Lastly, connect the head to the body via the two neck joints.
In order to make it look like a spider, move the head to the front. To disguise it as a pumpkin, movie the head down until its fit snugly into the middle of the model. And that’s about all it takes to make your own Halloween Pumpkin Spider Transformer!
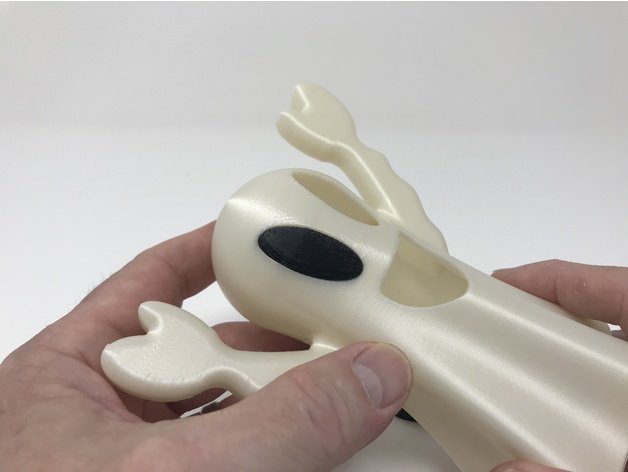
Want to make your Halloween decorations more cheerful this year? This 3D printed Tea Light Ghost will make a happy addition to your seasonal adornments, greeting all of the trick-or-treaters with a smile.
Halloween is a time for haunted houses, elaborate costumes and frightening amounts of candy, but not every decoration has to scare you out of your socks. Why not lighten up the mood with a friendly-looking 3D printed Tea Light Ghost lamp, designed by maker Greg Zumwalt.
This grinning ghost is equipped with a base for a LED tealight candle, which emits light throughout the model and creates a subtle lamp effect. It’s the perfect addition to a house that is haunted with smiles rather than spookiness. It’s easy to print and doesn’t require much time to make, making it an ideal project for beginners or makers looking for a quick way to add some Halloween ornaments to their seasonal display.
If you want to consider a different approach to this project, you can also check out Zumwalt’s Illuminated Happy Ghost Lamp on Instructables. Otherwise, let’s take a quick look at how to conjure up the spirit of your own 3D printed Tea Light Ghost.
Illuminated Happy Ghost: What You Need & How to Build it
The files for this 3D printed ghost lamp are available to download via Thingiverse. There are two versions of the ghost – one for single extrusion and another for dual extruder 3D printers. The ghost itself can either be printed as one piece or with the eyes and mouth separately.
Aside from your 3D printer and some filament, you’ll also need LED tealight candles (37.5mm in diameter), which act as the base of the lamp. You can find them at a local hardware store or order them on Amazon. Zumwalt suggests printing the parts with a 20 percent infill, no support structures necessary.
There’s no assembly process with the dual extrusion version; simply print it out and insert the tealight candle at the base. If you opt for the single extruder model, you’ll need to apply some thick cyanoacrylate glue to attach the right eye, left eye, and mouth. While mounting the eyes, you can insert your pinky finger through the mouth hole for support. When attaching the mouth, go through the bottom base to secure the ghost’s wide smile.
The final step is simple. Just press the tealight candle into the base of the ghost and turn it on. Now you have giddy decoration to lighten the spooky Halloween mood.
This project is easy to create and doesn’t take too much time or effort, so feel free to make a collection and have yourself a friendly ghost party!
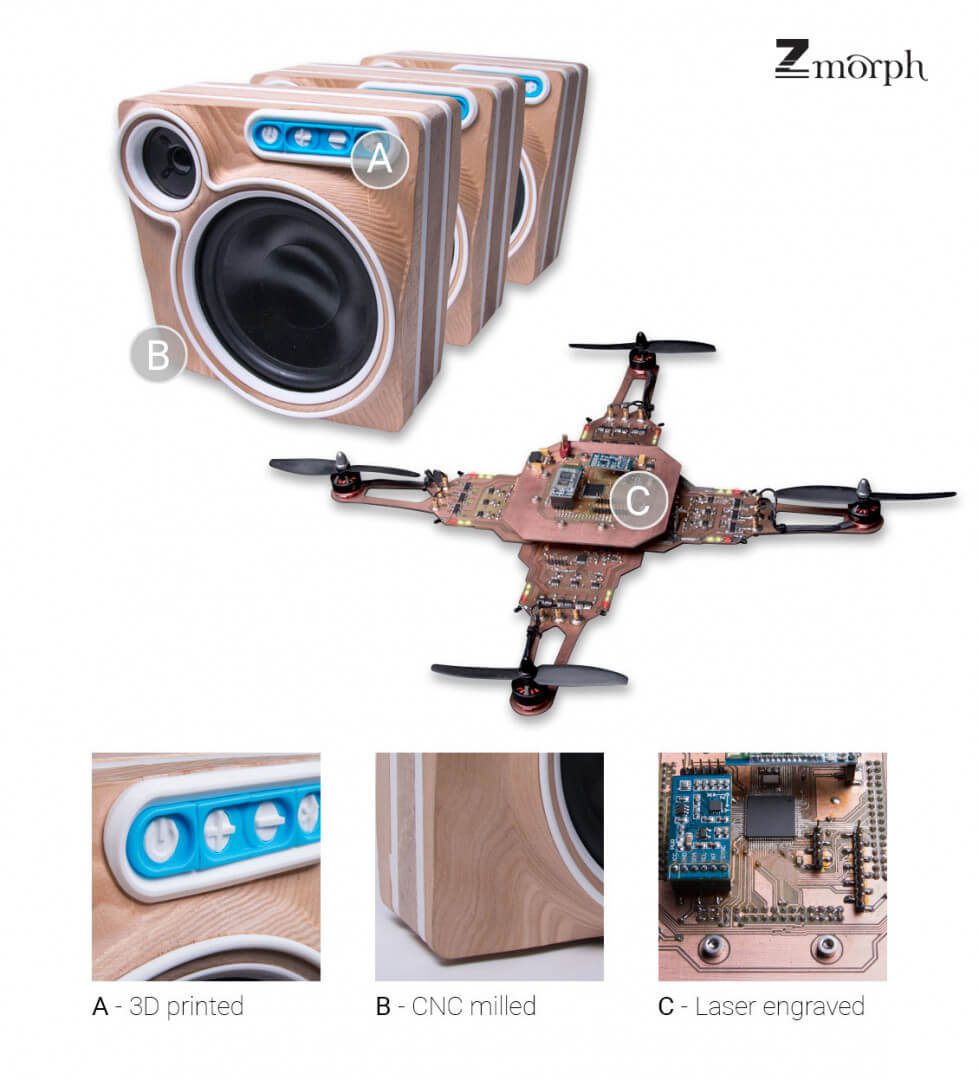
The magical multitool machine gets upgraded with the ZMorph VX. Review the facts on this 3-in-1 3D printer, CNC mill, and laser engraver.
Are you ready for the next generation of multitool 3D printer? Is the world even ready? Nobody knows for sure, but Polish company ZMorph says to hell with the consequences. They’ve gone ahead and announced their new multitool machine, the ZMorph VX.
ZMorph already has a solid reputation for their versatile 3D printers; we had a decent experience with the ZMorph SX not so long ago. Their point of distinction is being able to offer multiple fabrication methods within the one desktop machine. And thanks to their modular design of detachable heads, a ZMorph machine can work with dozens of available fabrication materials. More than enough to satisfy even the most demanding professional designers, engineers, and educators.
The next generation model, the ZMorph VX, boasts advanced solutions in print quality and machine reliability. The company promises that the machine is easier to set up and operate than ever before. In addition, there’s a flexible pricing system for those who want to pick and choose the feature-set for their custom requirements. In addition to 3D printing, you can upgrade to CNC milling, laser engraving, and even food printing.
“Whether you want to make a fully functioning drone, a bluetooth speaker or a plastic enclosure for your project, ZMorph VX is a solution that is always up for the task.”
“We’ve been making digital fabrication machines since 2013. Long enough to learn that quality, reliability, and ease of use are the keys for every creative business,” says Przemek Jaworski, ZMorph CEO, and Founder.
“That’s why we bring the new ZMorph VX to the public — a workhorse, versatile object making machine, ready to prototype or mass produce as 3D printer, CNC cutter or laser engraver. Whether you want to make a fully functioning drone, a bluetooth speaker or a plastic enclosure for your project, ZMorph VX is a solution that is always up for the task.”
ZMorph VX has New Hardware, New Software Improvements
While the preceding SX model already featured a solid aluminum body with fully enclosed electronics, double belt drive, and original closed loop system, the VX model introduces several hardware upgrades of note.
These include:
Super-flat borosilicate 3D printing worktable;
Stiffer construction of X and Y axis with top quality linear guides;
Improved cooling system; a reinforced X axis carriage;
Redesigned Dual Extruder toolhead with interchangeable hotends feature;
Injection-molded plastic parts.
The company has also sought to address the user experience. A significant hardware change is the fully automatic calibration system, which should make the 3D printing process just that little bit less frustrating.
There’s also a new CNC worktable for those who want to work with CNC and laser-engraving. This has a sturdy aluminum construction with pre-set holes to provide a stable, flat surface and easy clamping of materials like wood, acrylic glass, modeling boards, and PCB boards.
On the software side, there’s the completely revamped Voxelizer software. It has “faster and smarter algorithms” plus a cleaner interface for both absolute beginners and experienced pros. This last announcement is perhaps the most encouraging; in previous iterations, the Voxelizer software suite was the weakest link in the ZMorph ecosystem.
So how much is a ZMorph VX going to cost? And when can you buy one? They’re available worldwide now from ZMorph and authorized resellers.
Our tip for prospective buyers? You’re definitely going to want the Dual Extruder with Mixer Hotend in there somewhere, it’s an impressive piece of kit.
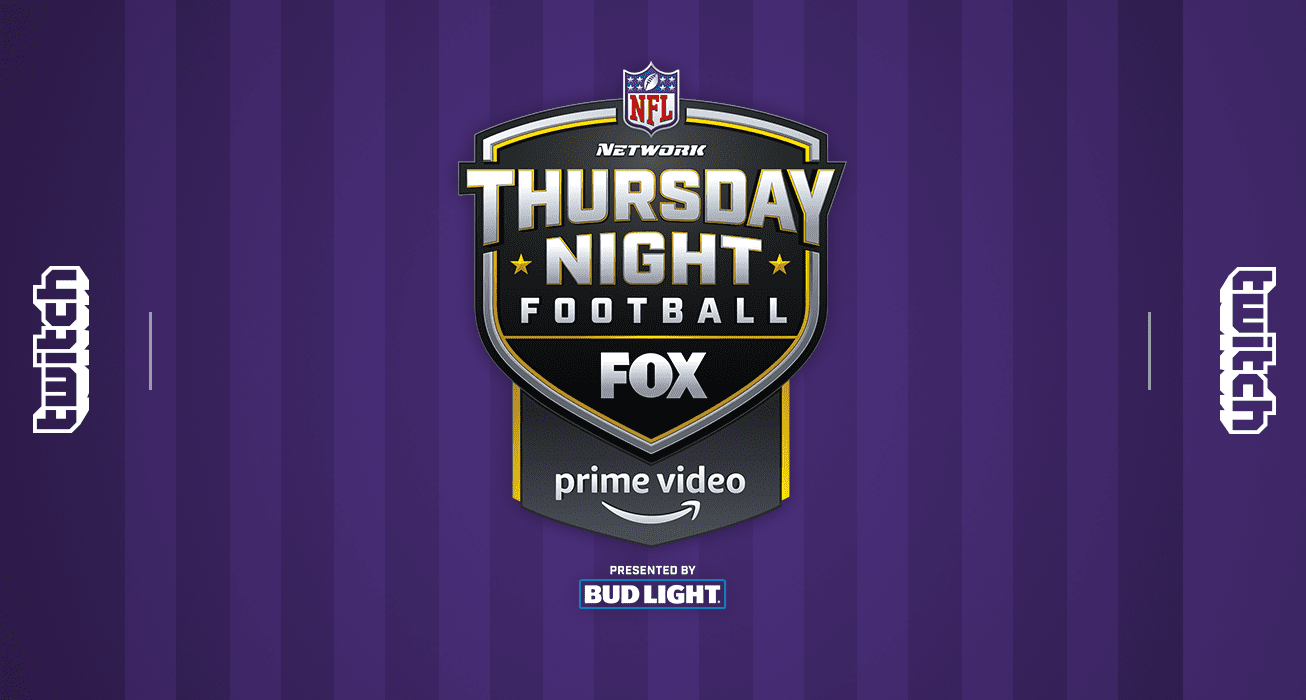
Last week thousands of you tuned in to watch the season debut of Thursday Night Football on Twitch*. Chat was fired up, the team emotes were flying, and we hear the game was pretty good too.
Now we’re excited to announce a new way to let your voice be heard with the TNF Live Extension, two legendary co-streaming Partners who are broadcasting this week’s matchup, and a way to give to charity while also supporting your favorite teams in chat. Let’s get into it.
The TNF Live Extension
This season Twitch’s NFL coverage includes a brand new Extension on twitch.tv/primevideo that lets you project how drives will end, who will win, and more. Make the right calls and you can rule the leaderboard and prove that you should be on the sidelines calling the shots. Or at least hold one of those clipboards.
The Extension also lets you access team stats that are updated live as the game progresses.
Legendary Co-Streamers
Last week GoldGlove co-streamed our inaugural broadcast and put his unique spin on the game. This week, we’ve got two more incredible co-streamers lined up.
First, Hall of Famer and three time Super Bowl champion Shannon Sharpe is bringing his takes to Twitch for his first live NFL co-stream!
And our very own Twitch legend, TimTheTatman, will also be adding commentary on his own co-stream.
Cheer for charity
Cheering for your favorite team, whether you’re in the stands, or yelling at your screen is one of the best parts about being a fan. Now it can also be a way to show support of a good cause. This October, during all our Thursday Night Football broadcasts, for every 100 bits cheered on twitch.tv/primevideo, Twitch will donate $1 to the American Cancer Society. So make your voice heard and cheer like crazy for whoever you’re supporting.
Check out the TNF Live Extension and legendary co-streamers this week when the Colts visit the Patriots tomorrow at 8:20pm ET.
* Also available on FOX, NFL Network, and Prime Video on Thursdays at 8:20pm ET.
Claim the Aegean Pirate Pack for Assassin’s Creed Odyssey with your Twitch Prime membership! Embody the ruthless qualities of the Aegean Sea Pirates and plunder at will, from October 2nd — December 5th 2018.
The packs contain a rare gear set, the Atoll Horse Mount, a unique pirate ship design, and a pirate crew theme.
– Aegean Pirate Gear Set: Like the waves themselves, pirates surge forth, strike fiercely and escape swiftly. Embody the ruthless qualities of the Aegean Pirate with this gear set.
– Aegean Atoll: This mount somehow enjoys being on rocking boats as much as running on dry land.
– Aegean Ship Design: The mythical creature motifs on this ship cause most merchants to quickly surrender.
– Aegean Crew Theme: For most people, the mention of pirates brings the image of savage men on the seas.
AEGEAN PIRATE PACK CLAIM INSTRUCTIONS
Step 1: LOG IN TO YOUR TWITCH PRIME ACCOUNT
Visit twitch.tv/prime and claim the Assassin’s Creed: Odyssey offer at the bottom of the page.
Step 2: LINK YOUR TWITCH PRIME ACCOUNT AND UPLAY ACCOUNT
Follow the link in the claim instructions to navigate to the Ubisoft website where you’ll be prompted to link your Twitch and Ubisoft accounts.
Step 3: CHOOSE YOUR PLATFORM AND CLAIM YOUR PACK
Select the platform on which you play Assassin’s Creed Odyssey. If you did not link that platform to your Ubisoft Account yet, you can do it from here by clicking on the corresponding button.
What is Twitch Prime?
Twitch Prime is a premium experience on Twitch that is included with Amazon Prime. Benefits include monthly in-game loot, a channel subscription every 30 days AND all the benefits of being a Prime member. See all active Twitch Prime offers here.
Whether you were finding the perfect response on Twitter or just goofing around on Slack, you’ve probably used GIPHY for your urgent GIF needs. The app has long been a staple of online interactions, and now it’s made the move to Twitch.
Nick Santaniello is a senior product engineer at GIPHY and retro gaming fan who loves to watch speedruns on Twitch. Seeing all the different ways streamers worked to integrate visuals onto their streams inspired him to bring thesimple, yet powerful GIPHY toolset to the Twitch platform.
“Our goal was to bring the fast-paced, witty, reference and meme-laden back-and-forth banter that GIPHY excels at to the world of Twitch streamers and their viewers, followers, and subscribers,” said Santaniello.
To that point, GIPHY is incredibly simple and intuitive to use. Once installed on your stream, simply select a section of screen to display GIFs on, and then the Extension pretty much does the rest. “If you’ve used GIPHY on Slack or elsewhere on the web, GIPHY for Twitch works in much the same way except with a slim, graphical interface,” explained Santaniello. “Viewers can insert a term and GIPHY will ‘automagically’ deliver the perfect GIF for that term and layer it atop a broadcaster’s stream for all of the audience to see.”
Unlike other Extensions which use donations or subscriptions, Santaniello hopes GIPHY’s simplicity and low barrier of entry will lead more streamers to install and more viewers to get involved. “We built this Extension for broadcasters who want to give their viewers the ability to participate in the stream and interact with other viewers via GIFs,” said Santaniello. “For fans of GIPHY, the Extension presents another huge arena in which to use GIFs to communicate with friends and strangers.”
It might sound chaotic, but Santaniello says GIPHY has worked out the kinks to create a smooth and enjoyable experience. “Have you ever requested a song in a popular jukebox only to end up waiting forever, not knowing when your song would play, or if it would even play at all? The same problem could occur with our Extension on Twitch if too many GIFs are queued on a given stream,” GIPHY explains on their blog. “We solved this problem in our frontend by shortening the duration of GIFs as the queue grows. This ensures that all GIFs are played in a timely manner, shortly after they were initially requested.”
Streamers can install the GIPHY Extension on their channels right now, but Santaniello says more features are already in the works.
“Some ideas we had for future features include allowing a broadcaster to choose who can request GIFs (whether it be followers, subscribers, or any viewer, etc.) as well as more configuration options,” he said. “One possible new feature would consist of allowing users to choose a GIF from search results when following or subscribing to a channel.”
When asked what advice he would give to other developers looking to get into building Twitch Extensions, Santaniello had one suggestion: don’t go it alone. “I encourage Extension developers to leverage Twitch’s awesome developer community by leaving questions and comments in their forum to help improve the Developer Rig and other tools even further,” he said. “We’re looking forward to hearing users’ feedback and responses to the Extension and ways we can make it even more useful and fun for Twitch streamers and viewers in the future.”
October is finally here! This means yet another batch of Free Games with Prime. In honor of Halloween, we decided to go a little scarier this time around. Starting today, you’ll be able to claim and play all of October’s free games; and once you claim a game, it’s yours to keep forever. October’s games are:
· Darksiders Warmastered Edition Embark on an epic quest in this moody hack and slash puzzle game. Tricked by the forces of evil into prematurely bringing about the Apocalypse, War — one of 4 horsemen of the Apocalypse — is accused of inciting a war between the high heavens and the burning hells.
· SOMA The creators of Amnesia: The Dark Descent bring you this sci-fi horror game. Journey below the waves of the Atlantic Ocean inside the underwater facility of PATHOS-II as you struggle to survive a hostile world that will make you question your entire existence.
· Sanitarium A timeless point and click horror game. You play as an amnesiac pushed into a creepy and morbid universe. After a terrible accident, you are awakened and find yourself inside an old asylum. Who are you? Why are you here? These are all questions you will need to solve as you struggle to regain your sanity.
· System Shock A creepy first person fight to the death in the depths of space. You play as a famous computer hacker who has awakened from a coma in the aftermath of a terrible disaster. Where is everyone? Why is the space station in such shambles? You will need to use every bit of your wits to battle the mindless cyborgs and robots that serve the station’s ruthless A.I.
What is Twitch Prime?
Twitch Prime is a new premium experience on Twitch that is included with Amazon Prime. Benefits include monthly in-game loot, a channel subscription every 30 days AND all the benefits of being a prime member. See all the Twitch Prime benefits here.
Check out the full list of Amazon Prime benefits in: US, UK, Canada, Germany, France, Austria, Belgium, Italy and Spain. You can try it for free for 30 days right here, and when you do, you get all the Twitch Prime benefits instantly just by linking your Twitch account to your Amazon account.
Prime Now One and two-hour delivery on tens of thousands of items from Amazon and local stores. Check out Prime Now.
The Developer Rig concept is a cornerstone of Twitch’s developer outreach. Our vision for building Extensions on Twitch requires that we provide the tools that developers need to build and test Extensions quickly and intuitively. Since we launched the Developer Rig, we have made consistent improvements to start times, online and local capabilities and product management features. Lowering the barrier to entry for developers who to build for Twitch is our number one priority.
As part of our product planning cycle, we conducted research to gauge how well we’re hitting our own goals. What we’ve heard from our community is that the Developer Rig needs some love. The major obstacles we’ve heard from you are that it’s challenging to get started, some of the user experience is unclear and the documentation is hard to grok.
Thanks to your feedback, today, we’re releasing a rebuilt and redesigned Developer Rig. The new Developer Rig is available now.
To improve the Developer Rig experience, we spent a lot of time thinking about how to get developers started as quickly, intuitively, and efficiently as possible in a stable and reliable environment.
Create Extensions Project from scratch or use provided samples to get started
Reduced start time
When you download the Rig, you just need to invoke a simple script to install dependencies and configure your dev machine. After that, type `yarn start` to launch the Rig and you’re in. We now drop a user directly in an Extensions building experience without having to manually enter commands. On the first-run experience, you can create your own project or use a Twitch-provided sample. If you already have Extension Projects in the Rig, it pre-populates them for you. Finally, in order to start up front and back-end services, you simply click two buttons.
Intuitive workflow
We are also introducing the concept of an Extension Project — this is a combination of the Extension manifest you create on our dev site, along with your code. You can use the Rig to create an Extension Project, including your own code or samples created by Twitch. We’re also releasing a brand new React-based boilerplate sample that you can easily add to your Extension Projects. With an Extension Project, it will make running your Extension in the Rig a lot simpler with pre-populated commands that you need to run the Rig and contextually relevant tutorials and documentation for when you need them.
Improved documentation
Due to popular demand, we’ve reworked the Rig documentation. We streamlined the README file (getting started info) and created a new document to focus on the Rig. In addition, a new Rig UI leverages the Rig itself to provide the contextual information you need. Developers can now rely on technical documentation for getting started or when they are stuck.
Let us know what you think by connecting with us @twitchdev on Twitter or in the developer forums. Have fun building with the new Rig. We can’t wait to see your Extension on Twitch!
One thing is for certain, the Twitch community loves games. Nothing speaks to that magnetic appeal more than our Games in Extensions category. It showcases dozens of Extensions that creators can choose to provide their viewers with a playable experience while they watch — or more importantly while creators are AFK.
This month, we’re highlighting some games that are sure to keep Twitch viewers engaged and entertained. Here are a few Extensions included in the Fresh New Games featured category.
This casual puzzler has players placing hexagonal shapes on a hexagon grid to earn points. With no time limits, this engaging game will keep people playing long after a stream ends! Create and destroy full lines on the screen in any of the primary three directions by dragging and dropping blocks to the screen and get combo bonuses by destroying multiple lines at the same time.
Stack adorable pigs on top of each other and watch your score climb along with them. If it all falls down, players can use Bits to pick up where they left off, or start a new game.
We hope you’re getting excited for our second-annual TwitchCon Developer Day; where developers can learn how to create the best interactive experiences on Twitch! Whether you’re looking to get started building with Twitch or grow the technology you have already, we’ll have two tracks and a workshop for you to explore.
Build Track
If you’re new to Twitch development and are excited to start building, you’ll definitely want to check out our first track. We have a full menu of sessions to help you with your first Extension and spark ideas for all the interactions you might want to build. Panels, overlays, components, and even chatbots; the sky’s the limit when it comes to creating innovative, new experiences for the Twitch community.
Grow Track
For those of you who are game devs or are deeper into Extensions development, our second track is perfect to tune your skills. With a focus on discovery, monetization, engagement, and analytics, this track will take your ideas to the next level.
Workshops
And if you haven’t dipped your toe into the waters of Extensions yet, our 90-minute workshop will get you up and running, even if all you know is a little JavaScript, HTML, and CSS. You won’t need experience with Extensions, but you’ll definitely need a creative spirit…and a laptop.
Party!
After everything is done, relax your brain and your coding muscles with our after-party, featuring drinks, food, music, and plenty of high fives from your fellow developers!
The 2018 NFL season is underway and starting tonight at 8:20pm ET, when the Vikings visit the Rams, you can catch every Thursday Night Football matchup live on Twitch. We’ve saved you a seat on the world’s largest couch (Twitch Chat), so tune in, cheer with thousands of other fans in chat, and experience the game of football in a whole new way.
As any fan knows, repping your favorite team is of the utmost importance. So to help you let chat know who you’re pulling for, each week the NFL teams’ playing in the Thursday Night game will have their logos available as global emotes. We’ve also added a few new emotes just for fun. So get out there and let the world know you truly believe the Browns will win it all this year.
The first game on Twitch is Vikings at the Rams this Thursday with kick-off at 8:20pm ET on twitch.tv/primevideo (available on web and mobile apps). And to celebrate sportsball returning to Twitch, one of the Twitchverse’s biggest sports fans, GoldGlove, will be co-streaming the game live. So tune in to twitch.tv/goldglove during the broadcast to check out his live commentary and takes on the game.
Follow twitch.tv/primevideo for alerts when games are starting and to take a look at the full Thursday Night Football schedule. We’ll see you tonight!
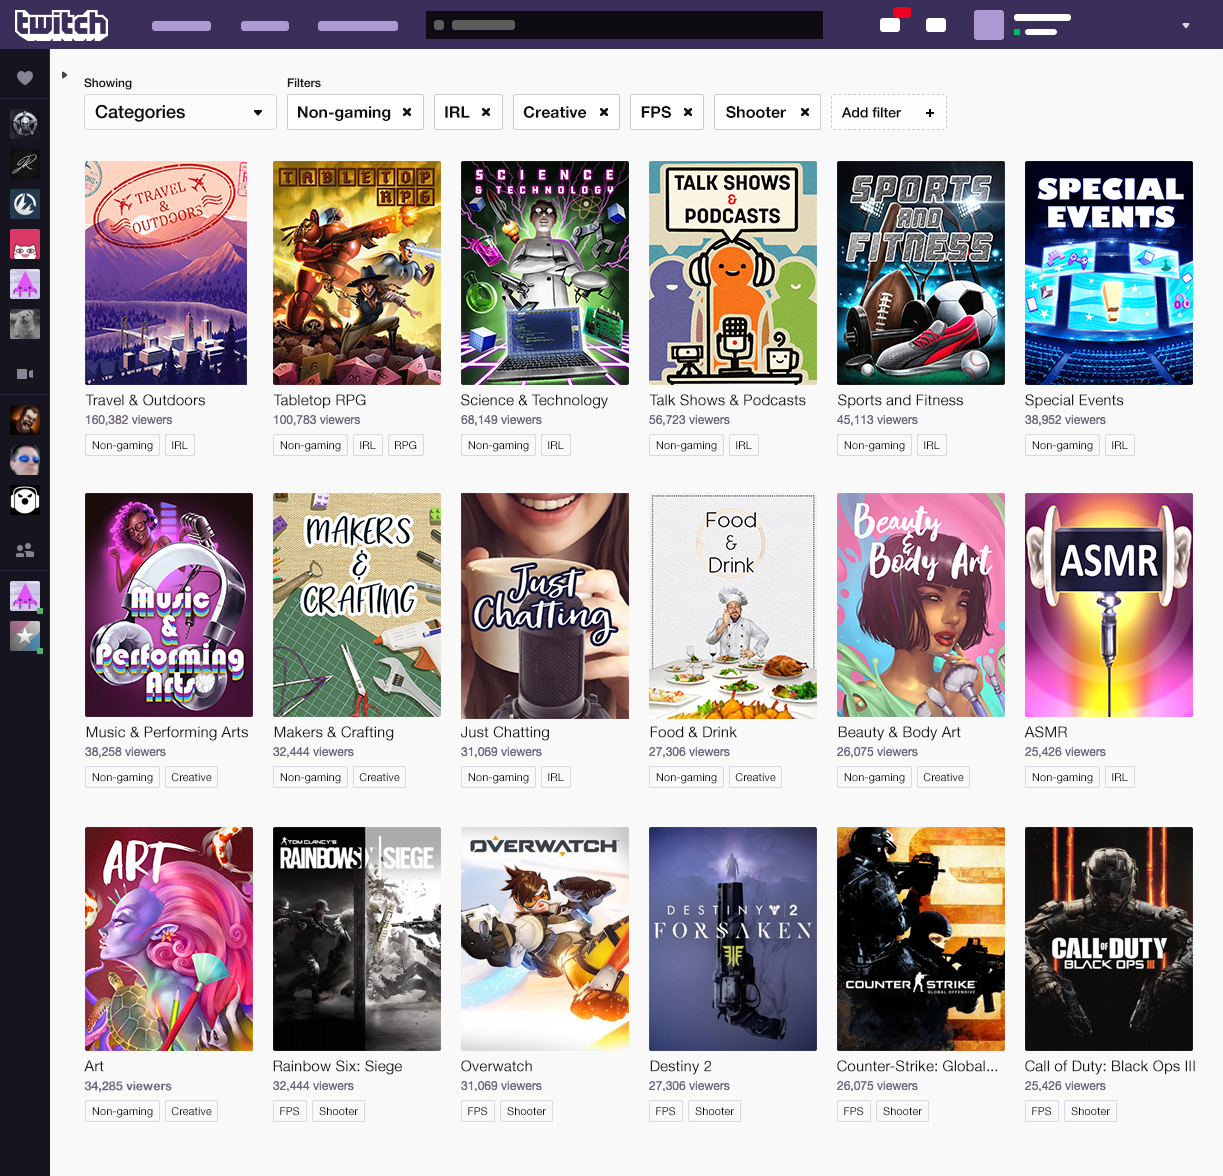
New Categories: The Creative and IRL categories have exploded in growth since they were introduced in 2015 and 2016, respectively. We’ve heard from many viewers that these categories have such a wide variety of content that it’s difficult for them to find streamers around the topics they’re interested in. Starting today, we’re replacing IRL and Creative with 10 new categories designed to help viewers find streamers around things they love from Art, to Science & Technology, to Talk Shows and Podcasts, and beyond. These new Categories will appear in the Browse directory, which shows gaming and non-gaming in a single view as well as in search results.
Streamers who previously streamed under IRL or Creative will need to select a new category when they broadcast in order to appear in the Browse directory and in search results. To learn more about the categories streamers can choose, please visit the Discovery Updates Site.
We know that introducing Tags, replacing IRL and Creative with new Categories, and discontinuing Communities impacts streamers and their workflow. We’ve received a lot of feedback since we announced these changes in early August. Based on those conversations, we’ve broadened the Tags available in this first release, included descriptions with Tags to make them clearer for streamers, and renamed the ”Hobbies & Crafts” category to “Makers & Crafting” to better reflect our professional makers. We also recognize that streamers were using our Communities feature to find others who shared their identity and interests, and we are working with those communities to build solutions for them.
Our plan is to continue to adapt these tools to ensure that Tags and Categories work for everyone on Twitch. If you have feedback for us, please let us know here. We’re continuing to invest in new ways to improve discovery, and if you want to follow along, visit the Discovery Updates Site.
The Formlabs Form 2 is our pick for the “Best Resin 3D Printer of Fall 2018”. Check out our Formlabs Form 2 review to find out why.
When it comes to 3D printing, FDM printers take all the glory; Ultimakers, Prusas, and Crealitys are talked about constantly. Their machines offer makers, hobbyists, and semi-pros great creative tools. But FDM printers aren’t the only choice when it comes to 3D printing.
If you are looking for professional printers that can deliver stunning details, stereolithography (SLA) machines are the right choice.They work with resin instead of thermoplastics. As of 2018, there are cheap SLA machines targetting hobbyist – and then there’s the category of SLA 3D printers that can be found in labs, professional fabs, universities, and engineering spaces.
Formlabs holds the number 1 position for several years now. At $3,500 / €3,925, their flagship 3D printer Form 2 doesn’t come cheap. But it’s a fraction of the price you would pay for a 3D Systems ProJet 6000 HD.
Don’t Miss:
Also for a desktop machine, the Formlabs Form 2 has a quite powerful optical engine. The 250mW violet laser is guided by custom-built galvanometers, delivering prints in impressive quality. For the purposes of this Formlabs Form 2 review, we didn’t encounter a single misprint.
Formlabs Form 2
Check Price
Free Sample
Formlabs Form 2 Review: Pros
Print quality is brilliant
Easy to setup and maintain
Great interplay of hard- and software
Reliable and predictable results
Good software slicer
Great user interface
Relatively silent operation
Formlabs Form 2 Review: Cons
No print without post-processing
Not faster than FFF 3D printers
Standard support structures are very dense
Changing resin is easier than with the Form 1+, but still no trivial task
Consumables (resin and tank) and the printer are expensive
Formlabs Form 2 Review: The Verdict
If you’re looking for a reliable, professional, high-quality SLA 3D printer, look no further. The Formlabs Form 2 is a workhorse that delivers stunning results.
This high-class SLA 3D printer isn’t aimed at the regular consumer who wants to dabble in 3D printing. It’s for people who have a clear use case and a budget — so we’re talking about semi-professional and professional users.
However, this SLA 3D printer is an excellent machine for prototyping. The Formlabs Form 2 can be a valuable addition to an engineer’s office, a dental lab or a jewelry designer — it really does turn your ideas into reality. It even can be used to manufacture (very) small batches.
What makes this SLA 3D printer interesting is the consistent quality. While FFF printers need a constant balancing of parameters, temperatures, filaments, and extruders, the Formlabs Form 2 just delivers without you having to worry about quality. If you remember the old “Get a Mac” Apple Ads pointing out the differences between Apple and Windows-PCs — that pretty much sums it up.
But there are drawbacks, and they have to do with SLA technology itself. First of all, working with resin means you will have to do some post-processing. Formlabs offers a special post-production kit for the Form 2, which we found expensive but invaluable.
Secondly, neither the printer nor the resins are a steal. For most people, the price of $150 for a liter of resin is too high, and over the longer term the cost of consumables will add up. Thirdly, the print dimensions are limited to 125 × 125 × 165 mm — if you are prototyping in bigger dimensions, you have to search for alternative solutions.
But if you are looking for a 3D printer that just delivers with (nearly) every single print, you have found your match.
Formlabs Form 2
Check Price
Free Sample
Formlabs Form 2 Review: The Long Read
Before we dig deeper in this Formlabs Form 2 review, here’s a short preamble on the differences between an SLA 3D printer and FFF 3D printer.
Fused Filament Fabrication (FFF) is the most common desktop 3D printer technology. A FFF printer feeds plastic filament into a heated extruder and prints layers with the molten material. FFF 3D printers are versatile machines and can use different materials. But most of them lack predictability when it comes to results.
Exactly this predictability is one of the strengths of SLA 3D printers like the Formlabs Form 2. It points a high precision laser on a tray of liquid resin, which causes a thin layer to solidify. This chemical reaction allows for the creation of water-tight printed parts. The 3D printing speed is comparable to FFF machines when comparing layer thickness and density. SLA printers are also known for printing high-detailed objects.
Formlabs Form 2 Review: Unboxing and Setup
Setting up the Form 2 was a breeze. Our Formlabs Form 2 review sample came securely packaged. We found every part nicely labeled. There’s a helpful setup guide on the Formlabs website. Even if you’ve never assembled a printer before, you can do this in no time.
Just put the printer on a flat and sturdy surface (a.k.a. “table”). The dimensions of the printer are 35 × 33 × 52 cm, which is big, but not huge compared to other 3D printers.
Next, you open the orange cover and attach the build platform. If you are new to SLA 3D printers, you might be surprised to find that the build platform of the Formlabs Form 2 hangs upside down… that‘s because the object is “drawn out” of the resin, so to speak.
After that, you put the resin tray in place and click in the tray wiper. The latter is an improvement over the previous generation Form 1-series. Every time a layer is finished, the print bed moves up a little. Then the wiper moves and makes sure the resin is spread equally on the tray. The result? You’ll get fewer misprints.
After this step, you slide the Form 2 resin tank into the printer, plug in the power cord, and start the printer. The tray is automatically filled with resin. We didn’t have to do any calibration (unlike with the Form 1 and Form 1+).
Last stop is adding the Formlabs Form 2 to your wireless network. As an alternative, you can use the USB- or Ethernet ports to transfer files.
All in all, setting up the Formlabs Form 2 didn’t take us more than 1 hour.
Formlabs Form 2 Review: Available Resin Types
There are several resin types to choose from. The resins consist of methacrylic acid esters, photoinitiators, proprietary pigment, and other secret ingredients. If you are planning to use your own resins, you will run into problems — the cartridge system of the Formlabs Form 2 is proprietary.
Formlabs offers two flavors of standard resins. The standard resins come in clear, white, gray, and black. A liter of these “bread and butter” resins costs €160 / $150 — that’s not exactly cheap.
The second type of resins for the Formlabs Form 2 are functional resins. They also come in different flavors.
Tough Resin is good if you want to have more durable or resilient prototypes. The standard resin isn’t strong enough for daily use. They break easily. So this is the one you should order if you’re building functional parts. A 1-liter tank costs €160 / $175.
Flexible resin is bendable and compressible. You pay $199 for a liter.
Castable resin is made with jewelers in mind. The resin burns out without ash or residue. The price is $300.
Dental resin is Class 1 biocompatible. It’s designed to directly print surgical or pilot drill guides. If you don’t have a clue what that is, you’ll probably never need to order it. Price is a whopping $399.
But wait, there are other consumables! First, there’s the resin tank, which — according to Formlabs — should be switched out every 2 liters of resin. A tank will cost you €66. It also comes with the wiper.
You can also buy a second build platform if you want to speed up the workflow in an intensive use case scenario.
Formlabs Form 2 Review: Software
In our Formlabs Form 2 review process, we found the interplay between the software and hardware to be the real beauty of the 3D Printer.
For 3D printing, you need a software slicer to tell the 3D printer what to do. Formlabs have developed their own tool called PreForm. As with other 3D slicers, it lets you import STL files, which are placed on the print bed and displayed in the software. PreForm also auto-repairs broken meshes.
In most cases, you don’t want to 3D print your object directly on the build plate, as you might accidentally scratch it when you try to remove it. To prevent this, Preform invites you to add supports, which are customizable in density and strength. The support structures on the build plate are bent slightly upwards, so you can slide a removal tool under them — that’s clever!
There‘s also a “One Click Print” button, which should be sufficient for most use cases. Unless your 3D object doesn’t fit the printer, you will probably not adjust the size. It’s also possible to place several objects onto the build plate and have it 3D printed in one go.
The software auto-rotates the object and adds support structures where needed. If you’re happy with your results, the software will calculate the layers and give you an estimate on how many layers will be printed and how much resin you’ll need for it. One thing that was somewhat annoying; Preform only shows you the estimated printing time if you click on the field… this should be an easy option to add.
The print is now transferred wirelessly to the 3D printer. If you‘re printing a highly complex and large model, calculating and transferring can take up a few minutes.
To start the print, you have to press a button on the printer itself.
The Formlabs Form 2 will retain most of the 3D prints you’ve already made, so you can start a new print without having to run to the computer again. It’s the little things like these that make this 3D printer a joy to use.
The software can also notify you by mail when the print is finished — that‘s a thing you’d love to see as standard in many FFF 3D printers.
If you’re designing 3D objects, you should know that the minimum supported wall thickness is 0.4 mm, and the unsupported wall thickness is 0.6 mm. A proper design guide can be found at the Formlabs site.
Formlabs Form 2 Review: Printing
It takes the Formlabs Form 2 considerable time to heat up the resin tray to 30 degrees Celsius / 95 degrees Fahrenheit. If you place the printer in a very hot or very cold environment, you might reconsider taking the printer to a more “moderate climate”. When the resin is at the right temperature, the build plate lowers itself into the resin-filled tray.
You can keep track of your print on the touchscreen, on your computer, or even on a smartphone. Formlabs uses a ring in lieu of a progress bar. The outer ring shows the layers, the inner one the progress of the current layer. Also, there’s a constant time estimate of remaining print time.
Over the course of our Formlabs Form 2 review, we found the graphical user interface of the printer to be extremely clear, helpful, and easy to understand. We also liked the LCD touch screen — it’s bright and responsive. The menu isn’t overloaded with information and displays the right choices at the right time. There’s only one button which is used for confirming actions and also serves as the power switch.
The build speed is comparable to FFF machines when comparing layer thickness and density. It’s roughly 1-3 cm/hour along the Z axis when printing at 100 microns. The Formlabs Form 2 can 3D print in 25, 50, and 100 microns.
Formlabs Form 2
Check Price
Free Sample
Formlabs Form 2 Review: Post-Production
Post-production is where SLA printing becomes ugly. If you‘re using an FFF printer, you just pluck the model from the build plate, and you’re usually ready to go. For SLA 3D printers like the Formlabs Form 2, that‘s not the case.
As you’re printing with liquid resin, you will have to remove the print from the plate, immerse it in chemicals, then remove the supports. This can take up a considerable amount of time.
Formlabs offers a finishing kit, which we found extremely helpful. It consists of a rinse station with two buckets, which you partially fill with isopropyl alcohol (IPA).
Before you begin post-processing, you should wear protective gloves and eye protection. Avoid breathing in gas, mists, vapors or spray of resin — or any other chemicals — and wash your skin thoroughly after handling. Working with resin is considered to be relatively safe, but in some rare cases, skin irritations and allergic reactions have been reported.
First, you should put on some rubber gloves. Be careful when removing the build plate. As it’s still covered with liquid resin, the “goo” has a tendency to drip. Next, you need the removal tool to slide it under the “quick release tabs” generated by the PreForm software. With larger prints, you’ll need to pry them firmly from the build platform.
Next you rinse the print; drop it in the tank and leave it there for roughly 20 minutes. For smaller parts, reduce the soak time accordingly. A rinse bottle will help you clean any internal channels of your print.
Allow the (still sticky) print to dry for several hours. As a final step, you remove the support structures with a pair of “flush” cutters. This can be demanding, as the Preform software has the tendency to make the supports a little stronger than needed in order to provide a good print.
In our Formlabs Form 2 review process, we found that too many supports can leave ugly dots on your final print — if you want perfect results, you’ll have to experiment with the support structure settings and also clean them after removing the support. Also, we found it quite hard to remove supports that lie in the inner structures of a delicate print.
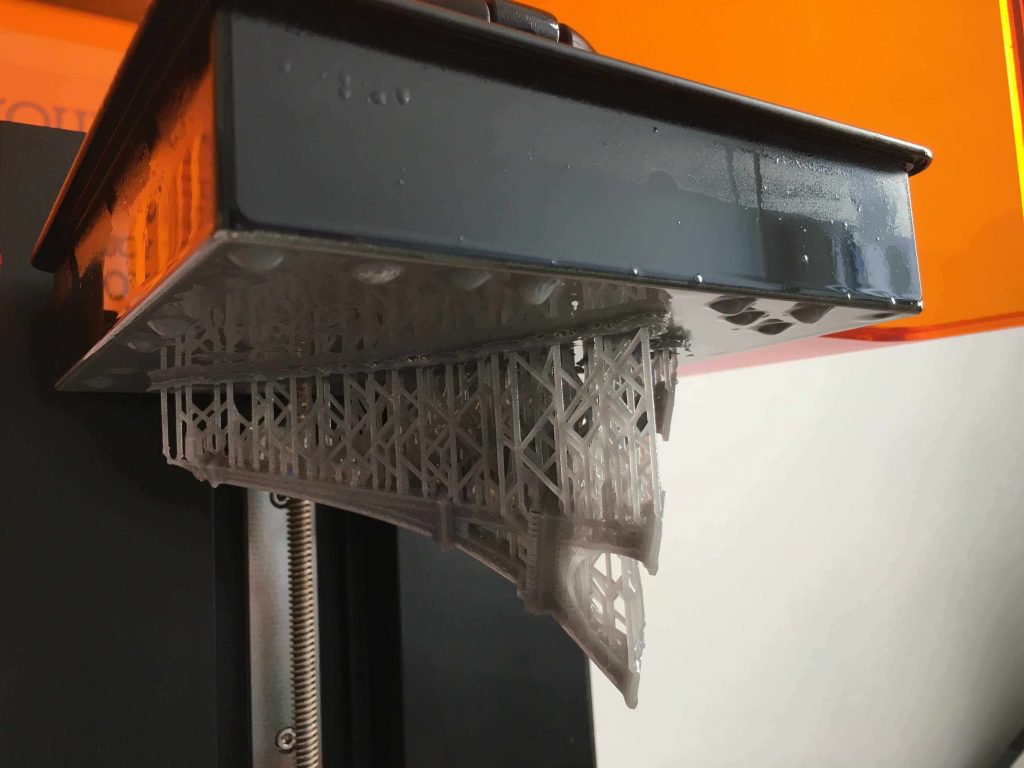
You could even break some delicate pieces from your print, as we did in this example.
You can then finish your prints by spraying them with acrylic paint, or post-cure them in UV lightboxes. Formlabs provide good support information on priming prints.
Formlabs Form 2 Review: Wrapping up
As we’ve stated several times in our Formlabs Form 2 review — this is a stunning machine! We were very impressed with the quality of results this SLA 3D printer delivered, and it did it constantly.
There are some challengers to their crown. If you consult this list of competitors, you’ll find that most rival machines start at $5000 — so for small budgets, the Formlabs Form 2 stays “best in class.” The cheapest alternative we can recommend is XYZ Printing’s Nobel 1, which only costs $1,900, but is said to deliver less quality (we haven’t reviewed this printer yet).
If you just want to print out high detail models only occasionally, you might be better off ordering from a 3D printing service. The costs of the consumables (trays, resin) for the Formlabs Form 2 add up and will dent a hole in a non-professional budget.
But if you are looking for a reliable, professional, high-quality SLA 3D printer you can use on a daily basis, then look no further. The Formlabs Form 2 is a premium printer that delivers stunning results.
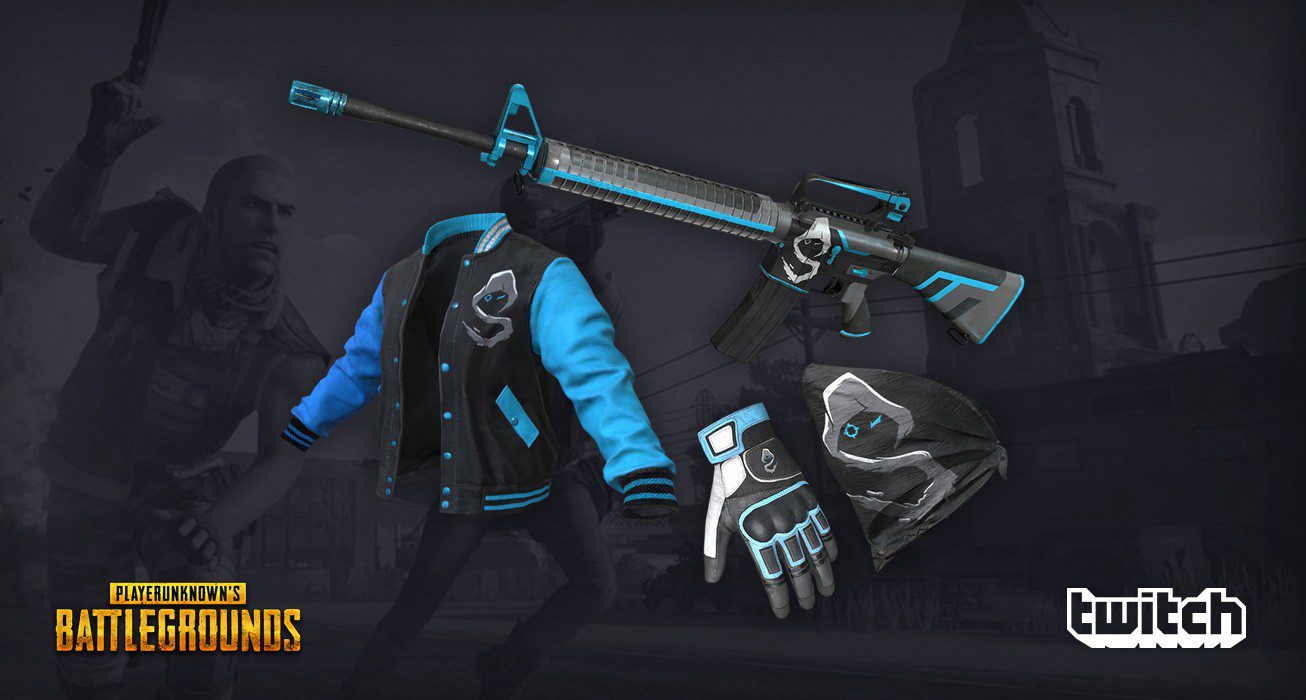
Starting September 18th through October 17th, Twitch Prime members can ride into the danger zone with the PUBG Pilot Crate, featuring 6 skin items and 1 parachute skin.
PUBG and Twitch Streamers go together like winners and chicken dinners. And now we’re excited to announce that we’re bringing them together in an awesome new way with PUBG in-game Twitch streamer skins.
Twitch is partnering with PUBG to create limited edition in-game items featuring your favorite streamers, putting tons of new skins in your hands and adding a new way for you to support your favorite streamers by purchasing them.
Skins will gradually become available over the next few months, and Twitch Prime members will also find free items available exclusively to them. There are skins featuring streamers from all over the world including:
Shroud
JennaJulien
Zerator
SPYGEA
Kate
SkipNho
xChocoBars
Zerator
WackyJacky101
How to Purchase
You can purchase everything currently available and see some of the items that are coming soon at www.twitch.tv/pubg. You can also buy skins via the Extension on participating streamer channels or Steam. Simply roll your mouse over the video player on the channel and click the PUBG logo overlaid on the player. If the streamer is offline, click on the PUBG Contraband panel below the video player. Then follow the In-Extension Purchase flow to complete the purchase. Please note: in-game items will only be claimable on PC.
How to Claim
To claim your exclusive skins, ON PC ONLY, link PLAYERUNKNOWN’S BATTLEGROUNDS to your Twitch account:
Enter the game lobby and click on the Twitch icon next to your account name to link accounts. Once confirmed, the items will be sent to your PLAYERUNKNOWN’S BATTLEGROUNDS account.
Then go to Store > Inventory to access your loot crate that contains your new skins.
FAQ
Q: Who can install the Extension?
A: Any revenue-earning Partner or Affiliate can install the extension and sell these streamer in-game items. Items sold on your channel will generate revenue for you.
Q: Can I claim the items on my XBOX account?
A: No, skins can only be claimed on the PC version of PLAYERUNKNOWN’S BATTLEGROUNDS.
Q: How long will the skins be available for sale?
A: Each skin is available for a limited time and the availability varies between skins. Make sure to check www.twitch.tv/pubg to find details on how long a specific skin will be available for.
Q: In which countries will these crates be available?
A: The crates containing weapon skins will be available for purchase for users in all countries.
Q: Can I purchase more than one of each skin or crate?
A: Nope. Each account is limited to one purchase of each item.
Q: Will there be more partnerships like this with more streamers in the future?
A: We’re working with PUBG to create more interesting ways for fans to get exclusive in-game items and support streamers. So stay tuned for more to come!
Trials ist bekannt für seine wilden Strecken und seltsamen Hindernisse, aber bisher blieb der Physik-Plattformer immer auf dem Boden. In Trials Rising werden alle Bikes und Strecken im Rahmen des Spielfortschritts freischaltbar sein, womit sichergestellt wäre, dass alle Spieler die gleichen Chancen haben, während sie nach Ruhm und Anerkennung in der Rangliste streben. Natürlich heißt das aber nicht, dass sie währenddessen auch alle gleich aussehen müssen, sobald sie die Ziellinie überqueren, denn die Individualisierungsmöglichkeiten, die Trials Rising zu bieten hat, versprechen noch mehr Motorsport-typischen-Flair. In reger Erwartung der Closed Beta von Trials Rising, hat das Entwicklerteam ein neues FAQ produziert, welches euch dabei helfen soll Ränge zu sichern, neue Objekte freizuschalten und euren Fahrer auszustatten, während ihr euch den zahlreichen Herausforderungen aus aller Welt stellt.
Kannst du uns mehr darüber verraten, wie man im Karrieremodus von Trials Rising vorankommen wird?
Spieler werden Ruhm erhalten indem sie beispielsweise Strecken und Verträge meistern, Herausforderungen annehmen oder sich anderen Spielern im Multiplayer stellen. Mit jedem Stufenaufstieg wird Ruhm generiert, die Spieler schalten neue Bikes frei, sowie Events und neue Strecken. Sie werden zudem Individualisierungsobjekte erhalten, mit denen sowohl der eigene Fahrer als auch die Bikes personalisiert werden können.
Du hast gerade die Personalisierung in Trials Rising erwähnt, auf was können wir uns freuen?
Wir lieben es zu sehen, wie sich unsere Spieler innerhalb von Trials ausdrücken und das nicht nur indem sie besonders stylisch fahren, sondern auch indem sie Fahrer und Bikes entsprechend gestalten. Daher wollen wir das Ganze diesmal noch mehr fördern, weshalb wir in Trials Risings mehr Personalisierungsmöglichkeiten haben werden, als in jedem anderen Trials-Spiel zuvor.
Bis zu welchem Grad werden Spieler ihre Bikes und Fahrer im Spiel anpassen können?
Zunächst mal werden wir eine Vielzahl unterschiedlichster Bike-Skins und Fahrer-Skins zu bieten haben, die unsere Spieler einfach nur durch ihren Fortschritt im Spiel freischalten können. Darüber hinaus werden wir auch neue Accessoires anbieten, mit denen man den eigenen Look noch cooler gestalten kann, sowie Animationen und Posen, mittels denen man all das schöne Zeug gut in Szene setzen können wird.
Um euch noch mehr Freiheiten geben zu können, wird es in Trials Rising tausende Sticker geben, die man entweder auf der eigenen Kleidung oder am Bike selber anbringen kann. Mittels der Sticker könnt ihr euch noch besser ausleben oder alternativ vorgefertigte Designs erwerben. Und wir haben sogar noch spannendere News für euch, was die Personalisierung angeht. Freut euch schon mal auf die kommenden Monate.
Wie werden Spieler in den Genuss dieser Personalisierungsobjekte kommen können?
Personalisierungsmöglichkeiten werden sich mit jedem Stufenaufstieg kontinuierlich erweitern. Manche Objekte werden dabei direkt dem Spieler zugänglich gemacht, sobald bestimmte Verträge bzw. In-Game – Aufgaben erfüllt wurden, während andere mit sogenannten Ausstattungskisten in Verbindung stehen. Ausstattungskisten beinhalten Personalisierungsobjekte, die ausschließlich kosmetischen Nutzen haben und Spielern dabei helfen sollen, ihr Inventar und ihre Personalisierungsoptionen weiter auszubauen. Gegenstände die Bestandteil der Ausstattungskisten sind, können zudem auch einzeln erworben werden. Sollte es also etwas geben, wonach ihr euch sehnt, könnt ihr es dadurch finden. Zusätzlich zu den Ausstattungskisten, die ihr für das Erreichen bestimmter Ruhm-Meilensteine erreicht, könnt ihr diese auch mit Hilfe der Trials-Münzen oder Eicheln kaufen.
Welche In-Game Währung wird es in Trials Rising geben, und wie wird man diese als Spieler erhalten bzw. für was wird man sie verwenden können?
Trials-Münzen sind eine Währung, die man sich durch Spielen von Trials Rising verdienen kann. Die erfolgreiche Absolvierung bestimmter Strecken, das Erfüllen von Verträgen, die Teilnahme an Community – Aktivitäten, der Verkauf nicht-gewollter Personalisierungsobjekte und die Öffnung von Ausstattungskisten, sind nur einige der vielen Wege, auf die man Trials-Münzen erhalten kann. Neben Ausstattungskisten, kann man mit Trials-Münzen auch in Personalisierungsobjekte investieren. Natürlich wird es auch Gelegenheiten geben, Post-Launch Inhalte mittels der Trials-Münzen zu erwerben, sowie sich den Zugang zu speziellen Events zu sichern.
Eicheln sind eine weitere Währung im Spiel, die ebenfalls in Trials Rising als Belohnung für erfolgreiche Spezialverträge oder Multiplayer-Runden winken. Eicheln können von den Spielern auch durch Echtgeld erworben werden. Was Trials-Münzen angeht, können diese zum Kauf von Personalisierungsobjekten und einigem Post-Launch Inhalten verwendet werden. Es wird allerdings auch Premium Objekte geben, die man über jene Eicheln kaufen können wird, Legendäre Ausstattung und Premium Ausstattungskisten.
Bald schon werden wir weitere Informationen zum Spielfortschritt und zur Personalisierung in Trials Rising für euch haben, während wir uns dem Release am 12. Februar 2019 nähern. Wenn ihr euch schon vorher ein Bild dieses Spiels Machen wollt, registriert euch am besten heute noch für die Closed Beta, die vom 13. September – 16. September stattfinden wird auf trialsgame.com/beta.
A popular Twitch streamer had his house shot at while he was live streaming his video game.
Guy Beahm, who goes by the name Dr DisRespect on Twitch, was live streaming his game of the new Blackout beta on the website, which is a video platform people can use to share their game play in real time.
Wearing a wig and sunglasses, the gamer was talking to his 50,000 viewers about not being able to finish the game when he suddenly went quiet and looked off screen.
Beahm disappeared from the view of the camera and returned a few moments later, without the wig or sunglasses, to announce to his viewers that his house had just been shot at.
Watch the clip of Dr DisRespect’s stream here:
[embedded content]
[embedded content]
Explaining the situation, he said:
Ladies and gentlemen, I gotta f**king end the … I’ve gotta end the broadcast right now.
Someone just shot at our house. Broke the f**king upstairs window.
This is the second shot, someone shot yesterday. Someone shot yesterday at our f**king house.
And someone shot again right now and connected with the house, upstairs.
A clip of the video was shared on Reddit, where viewers commented their shock at the situation.
One concerned viewer wrote:
What a coward. Who would seriously go to a streamers house, and shoot at it driving by. He has kids, and a wife. Super messed up, hoping he gets it all sorted it. Stay safe Doc.
Another suggested:
Doc needs to get some good security cameras and hopefully catch the f**ker. There is a child in that home. One time is maybe a coincidence, but two times is probably targeted.
A third shocked viewer commented:
That is crazy, he has a child in that house too. I hope the person gets caught. No CCTV or anything any his area?
The fact they’re aiming for windows could be an assassination attempt.
Dr DisRespect is one of the most popular streamers on the Amazon-owned platform, with over 2.5 million followers.
His internet personality has become quite widely known, and he worked as community manager of Sledgehammer Games until 2015, when he quit to pursue streaming.
Though the shootings have not been confirmed to be targeted attacks, the two consecutive days of someone shooting at Beahm’s house suggest they are not random, but rather a planned attempt to harm the gamer.
Beahm lives in the house with his wife and young daughter, meaning if the attacks are targeted, their lives could also be at risk.
Do you like developing awesome tools to make Twitch better for everyone? Wait, let us rephrase…
Do you like developing awesome tools to make Twitch better for everyone while a big clock ticks down to 0:00 like you’re in an action movie? If you’re up for a fun and rewarding challenge, you should join us Saturday, October 27 for our 24-hour TwitchCon Hackathon.
Here’s how it works: Partnered streamers will approach us with ideas for new and useful extensions. Our expert staff will vet their ideas, and then teams of up to four hackers (that’s you!) will race to create prototypes of those extensions by the end of the Hackathon.
The TwitchCon Hackathon will begin Saturday morning, with the list of hackable extension concepts being revealed. Each team will pick one streamer’s project to work on from the list. After the opening session, hacking begins! Food will be provided; sleep will be optional. 24 hours later we’ll demo the projects. Entries will be judged based on functionality, design, and other criteria, and prizes will be awarded for top extensions. Winners will receive trophies, blog recognition, and a featured extension slot.
Want to learn about Twitch Extensions before you join the TwitchCon Hackathon 2018? Request a ticket for Developer Day on Thursday, October 25 for a deep dive into the technologies that power Extensions.
All participants will have TwitchCon access on Saturday and Sunday (but not Friday) and will receive exclusive TwitchCon Hackathon 2018 swag. Check out the full event rules and the FAQ below. When you’re ready to hack, register here!
Event rules:
All participants must be at least 18 years of age.
Teams must be no more than four members and can be formed before or at the start of the event.
Each participant may only work on one project.
A project may not have any code dedicated to it until hacking begins on the Saturday of the event. Setting up your development environment with SDKs in advance is fine (and recommended).
Projects must be Twitch extensions and must be built as close to the chosen extension concept as possible.
Projects must be submitted by the time hacking ends on the Sunday of the event. After that, presentation materials may be worked on but no more design/development can be done on the submission.
Submissions will be judged on creativity, utility, presentation, and that special “Twitch” factor.
FAQ
What is a hackathon? Think “hack” in the sloppy-creation sense of “hacking” a project together. Think “marathon” in the sense of “you’ll be doing it nonstop for a while”. A hackathon is a software development contest that gives you 24 hours to create a project following certain restrictions. They are spaces for passion, innovation, and they are great opportunities to learn new technologies and meet other builders.
Who can participate? This hackathon is open to anyone who is at least 18 years of age.
What should I bring? All of your work gear, and maybe a few items to make your stay more comfortable. We recommend a laptop, charger, headphones, light sweater, and hygiene products to stay fresh.
Can I hack with a team? Yes! You will be hacking alongside a team of 4 other members. Team creation is informal, so feel free to build an alliance beforehand or at the event, however all team members must apply and be selected to participate individually. We will hold a team-building session at the beginning of the event for anyone who is still LFG.
Can I submit a project I’ve worked on in the past? Out of fairness to other participants, all submissions must have no work dedicated to them before hacking begins.
Where can I read the full rules? The complete rules are right here.
Um dir ein optimales Erlebnis zu bieten, verwenden wir Technologien wie Cookies, um Geräteinformationen zu speichern und/oder darauf zuzugreifen. Wenn du diesen Technologien zustimmst, können wir Daten wie das Surfverhalten oder eindeutige IDs auf dieser Website verarbeiten. Wenn du deine Einwillligung nicht erteilst oder zurückziehst, können bestimmte Merkmale und Funktionen beeinträchtigt werden.
Funktional
Immer aktiv
Die technische Speicherung oder der Zugang ist unbedingt erforderlich für den rechtmäßigen Zweck, die Nutzung eines bestimmten Dienstes zu ermöglichen, der vom Teilnehmer oder Nutzer ausdrücklich gewünscht wird, oder für den alleinigen Zweck, die Übertragung einer Nachricht über ein elektronisches Kommunikationsnetz durchzuführen.
Vorlieben
Die technische Speicherung oder der Zugriff ist für den rechtmäßigen Zweck der Speicherung von Präferenzen erforderlich, die nicht vom Abonnenten oder Benutzer angefordert wurden.
Statistiken
Die technische Speicherung oder der Zugriff, der ausschließlich zu statistischen Zwecken erfolgt.Die technische Speicherung oder der Zugriff, der ausschließlich zu anonymen statistischen Zwecken verwendet wird. Ohne eine Vorladung, die freiwillige Zustimmung deines Internetdienstanbieters oder zusätzliche Aufzeichnungen von Dritten können die zu diesem Zweck gespeicherten oder abgerufenen Informationen allein in der Regel nicht dazu verwendet werden, dich zu identifizieren.
Marketing
Die technische Speicherung oder der Zugriff ist erforderlich, um Nutzerprofile zu erstellen, um Werbung zu versenden oder um den Nutzer auf einer Website oder über mehrere Websites hinweg zu ähnlichen Marketingzwecken zu verfolgen.


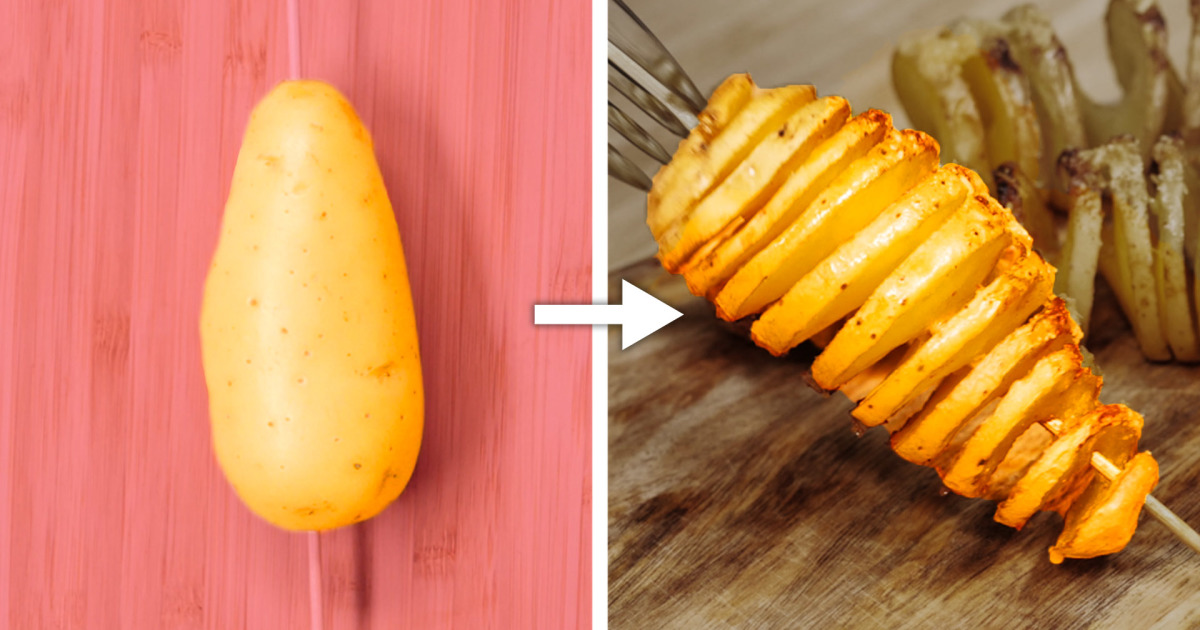
![9 Simple And Delicious Potato Recipes That Your Friends Will Love [video]](https://www.blogdot.tv/wp-content/uploads/2018/09/9-simple-and-delicious-potato-recipes-that-your-friends-will-love-video.jpg)

