Reading Time: 7 minutesThere will be times when you can’t – or don’t want to – switch to your Raspberry Pi. Perhaps you’re using another computer, your Raspberry Pi is out of reach, behind your TV or a nest of cables or you’re on the road and have left your Raspberry Pi at home.
Fortunately, with VNC (Virtual Network Computing) – free for non-commercial use and built into the Raspbian operating system – you can access Raspberry Pi remotely from any other computer, tablet, or smartphone. Either on your home network, or via the internet.
In this walkthrough, we’ll be using VNC Viewer and VNC Server to connect on the fly to a Raspberry Pi from a Windows PC and an Android smartphone.
What you’ll need
-
Raspberry Pi with Raspbian
-
Network and internet connection
-
VNC Server and VNC Viewer
Step 1: Enable VNC
First, make sure both your Raspberry Pi and the other computer you’re going to use are connected to the same network.
In Raspbian, click the applications menu icon (raspberry) at the top-left of the screen and select Preferences > Raspberry Pi Configuration.

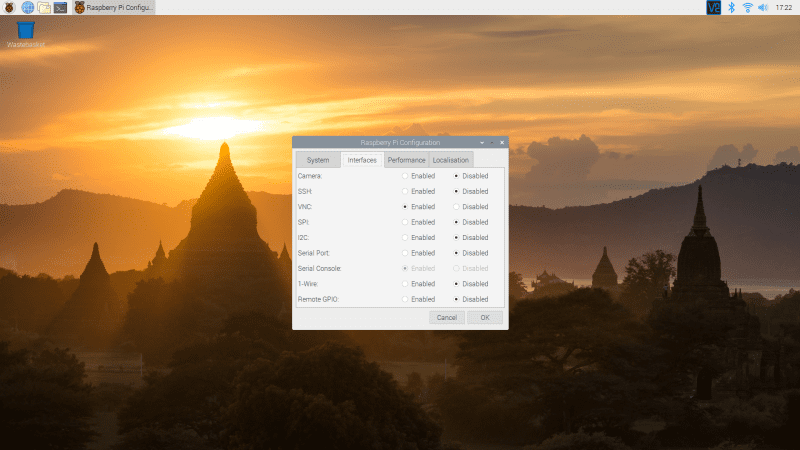
If you haven’t changed Raspbian’s password from the default ‘raspberry’, now is a good time to do so. Click the Change Password button and enter a new one. Now click the Interfaces tab, and set the radio button next to VNC to Enabled. Click OK. A VNC button appears in the top right of the screen, at the end of the menu bar. Click it to open VNC Server.
Your IP (internet protocol) address will appear in the VNC Server Window (below Connectivity). Note down the four numbers; they enable you to locate your Raspberry Pi over the network.
Step 2: Open VNC Viewer
You’re now ready to connect to your Raspberry Pi from another computer. We’re going to use a Windows PC, but you can connect from a Mac, Linux PC, or even another Raspberry Pi on the same network.
Because we’re using VNC Server on Raspberry Pi, it makes sense to use VNC Viewer on the Windows PC. VNC Viewer is available for macOS, Linux, Android, and iOS platforms, along with a web interface. Head to RealMac (magpi.cc/hTpNBm) and click Download VNC Viewer. Install and open the software.
Step 3: Connect to Raspberry Pi
Enter the IP address of your Raspberry Pi (the four numbers displayed in VNC Server) into the search bar of VNC Viewer (the part saying ‘Enter a VNC Server address or search’). Press RETURN to connect to Raspberry Pi.
The first time you do this, a window will appear with a warning: ‘VNC has no record of connecting to this VNC Server so its identity cannot be checked’. Click Continue.
You need to enter the username (typically ‘pi’) and password for your Raspberry Pi. Click on Remember Password and then OK to connect to Raspbian.
Step 4: Remote control
A window appears on your Windows PC displaying the Raspbian desktop interface from your Raspberry Pi. Move the mouse around the window and you’ll see the mouse moving around on your Raspberry Pi. You can now use this window to control your Raspberry Pi over the network (just as if you were sitting in front of it).
Hover the mouse at the top of the VNC Viewer window and a menu will drop down from the top of the screen. To the left of the Options is Enter Full Screen; click it and the preview window will take over the screen. Your Raspberry Pi display may not fit your PC display, so click the Scale button in the menu (so it’s set to Scale Automatically).
You will now be able to open apps and use your Raspberry Pi as if you were working directly on the small computer.
Step 5: Looking at properties
You can access Properties from the menu at the top of the VNC Viewer preview window, but we’re going to close down the preview window to access it from VNC Connect. Click End Session in the drop-down menu and Yes to disconnect.
VNC Viewer now displays a small preview of your Raspberry Pi desktop in the Address Book, along with the IP address. You can double-click this at any time to reopen the connection – but first, right-click and choose Properties.
Enter ‘Raspberry Pi’ in the Name window; this will make your screen friendlier. Now click Options. The Picture Quality setting is set to Automatic by default. If you have a slow connection, try setting it to Low; alternatively, if you have a fast connection, set it to High.
Finally, take a look at the Expert tab. Here you can find a variety of settings for all aspects of the system. Scroll down to find FullScreen and set the drop-down menu below from False to True. Now when you open Raspberry Pi in VNC Viewer, the preview window will automatically be in full-screen mode. Choose the options you prefer and click OK to set them.
Step 6: Get online
So far we’ve been working on our local network. With a RealVNC account, you can access your Raspberry Pi across the wider internet.
Open VNC Viewer on your PC and click the Sign In button on the top left. It’s most likely that you don’t have an account already, so click ‘Sign up online’. This will take you to the RealVNC website.
Enter your email address and click the ‘I’m not a robot’ checkbox. Now create a password. Please choose a long and complex password that is not easy to guess. We suggest using a Diceware password generator (rempe.us/diceware). Follow the rest of the setup process and click on the email authentication when it arrives.
Step 7: Sign in
Now you need to sign in with the same account on both VNC Viewer on your PC and VNC Server on Raspberry Pi.
The Sign In window should still be displayed in the Sign In window in VNC Viewer on your PC. Open VNC Server on your Raspberry Pi and click Sign In to enable the cloud connectivity link (displayed just below your IP address under Connectivity).
Return to VNC Viewer on your PC. You’ll still see a Raspberry Pi window in the Address Book section, but below it you’ll see an option called Team (it will appear with your name). Click this to see your Raspberry Pi again. However, this is the connection using your VNC Connect account. Double-click it to launch into your Raspbian desktop and remote control.
The difference? This account works remotely, and you can use this from other networks.
Step 8: Send files
You can send and receive files from your Raspberry Pi and PC. We’ve created a blank test document in our Documents folder called test.txt.
To send the file to your Raspberry Pi, access Raspberry Pi using VNC Viewer. From the VNC Viewer preview window, click the menu at the top of the screen and choose Transfer Files.
Now click Send Files in the VNC Viewer – File Transfer window. Use the file picker to choose a file on your PC and click Open. The file will be sent to the desktop of your Raspberry Pi. A File Transfer window will appear with ‘Download complete’; close it.
Step 9: Retrieve files
You can retrieve a file from your Raspberry Pi using VNC Viewer, although the process is slightly different. This time, right-click the VNC Server icon in Raspbian’s menu bar. Choose File Transfer from the drop-down menu to open the VNC Server – File Transfer window.
Click Send Files and choose a file on your Raspbian file system. Click OK to send the file to the desktop on your Windows PC.
Your Raspberry Pi is now set up for remote access. It’s now perfectly possible to remove the screen and keyboard from your Raspberry Pi and leave it on the network. It’ll be there waiting for you to connect from your PC whenever you’re ready.
Step 10: Android and iOS
It is also possible to connect to Raspberry Pi remotely from your smartphone. Use the VNC Viewer app for Android or iOS – download it from the Google Play Store or Apple App Store. Open and sign in using your VNC Connect account email and password.
You will see your Raspberry Pi under the Team menu. Click it and enter the username and password for your Raspberry Pi.
When it first launches, you’ll need to run through the ‘Control the computer’ process. Click on Next and it will open the ‘How to control’ window. This screen outlines how to perform gestures such as mouse clicks from the touchscreen. Close this window and start using Raspberry Pi from your phone.
Use the touchscreen to move the pointer around. A virtual keyboard is accessed by tapping the Keyboard icon at the top of the app window.
You can now access Raspberry Pi from anywhere, including your phone. A great solution for remote monitoring.
Top tip 1: Technical information
You can find a wealth of detailed information on the RealVNC website. Take a look at this Technician’s Guide PDF: magpi.cc/JiSeZX
Top tip 2: Got a Mac?
Mac users must change the Authentication protocol to VNC password to connect using macOS’s native tools.


 Makoto Koike