Schlagwort: 3D Printable Files & 3D Models

  • Weekend Project: 3D Printed OKAY 2 Synth Brings Music to the Maker’s Ears

    Weekend Project: 3D Printed OKAY 2 Synth Brings Music to the Maker’s Ears

    Reading Time: 3 minutes

    Oskitone’s new and improved OKAY 2 is a mind-blowing DIY synth that you can 3D print and put together on your own. Hone your 3D printing and soldering skills with this sweet musical instrument and let the sounds sweep you away!

    Looking for a new musical instrument to play? Why not use your 3D printer to create a synthesizer that is completely tailored to your style? Well, we’ve got a great project for all the musically-minded makers to take on over the weekend.

    Last year, the San Francisco-based one-man musical instrument studio Oskitone released its first version of the OKAY synth, and has since refined the concept in a variety of ways. The new and improved OKAY 2 is an analog, monophonic, square wave synthesizer that is largely made up of 3D printed parts. It was designed on OpenSCAD and EAGLE by a man named Tommy, who is in charge of Oskitone.
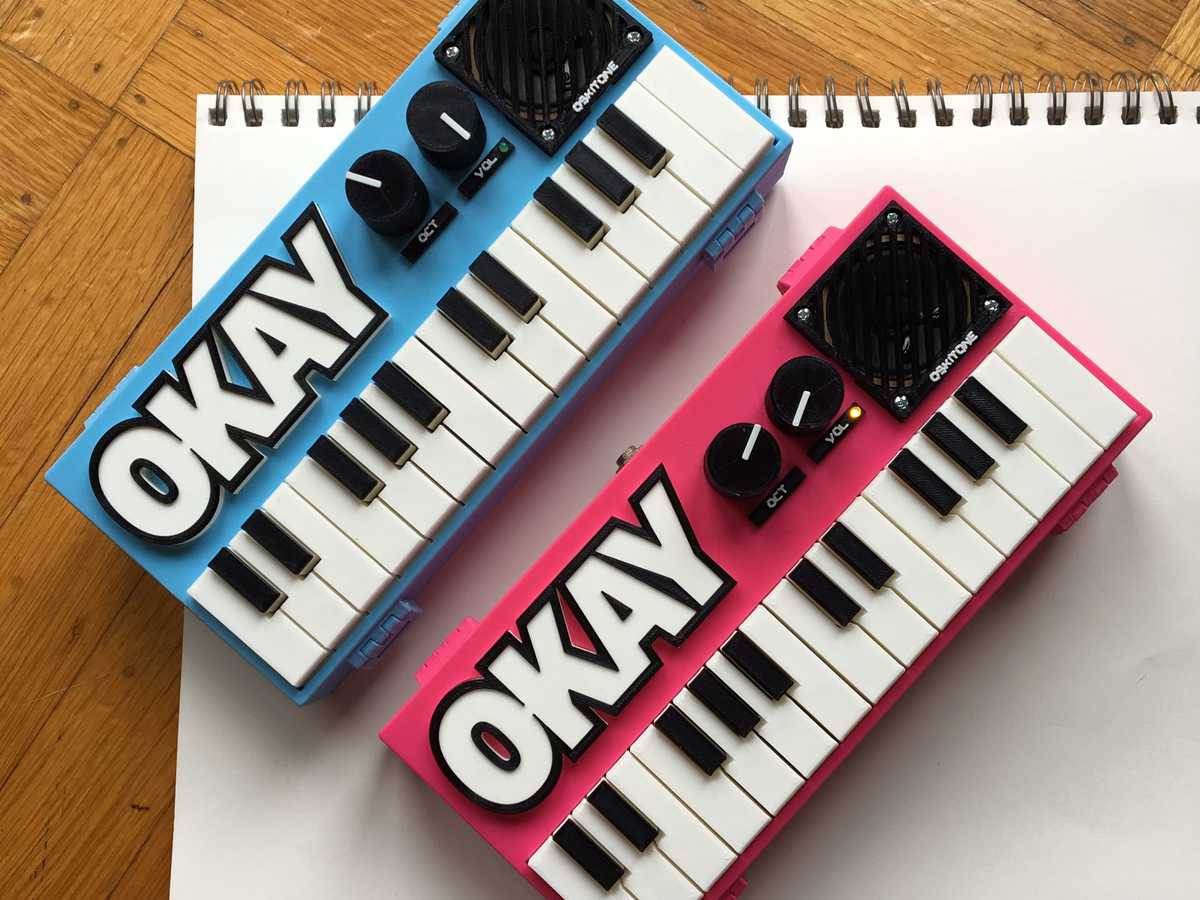

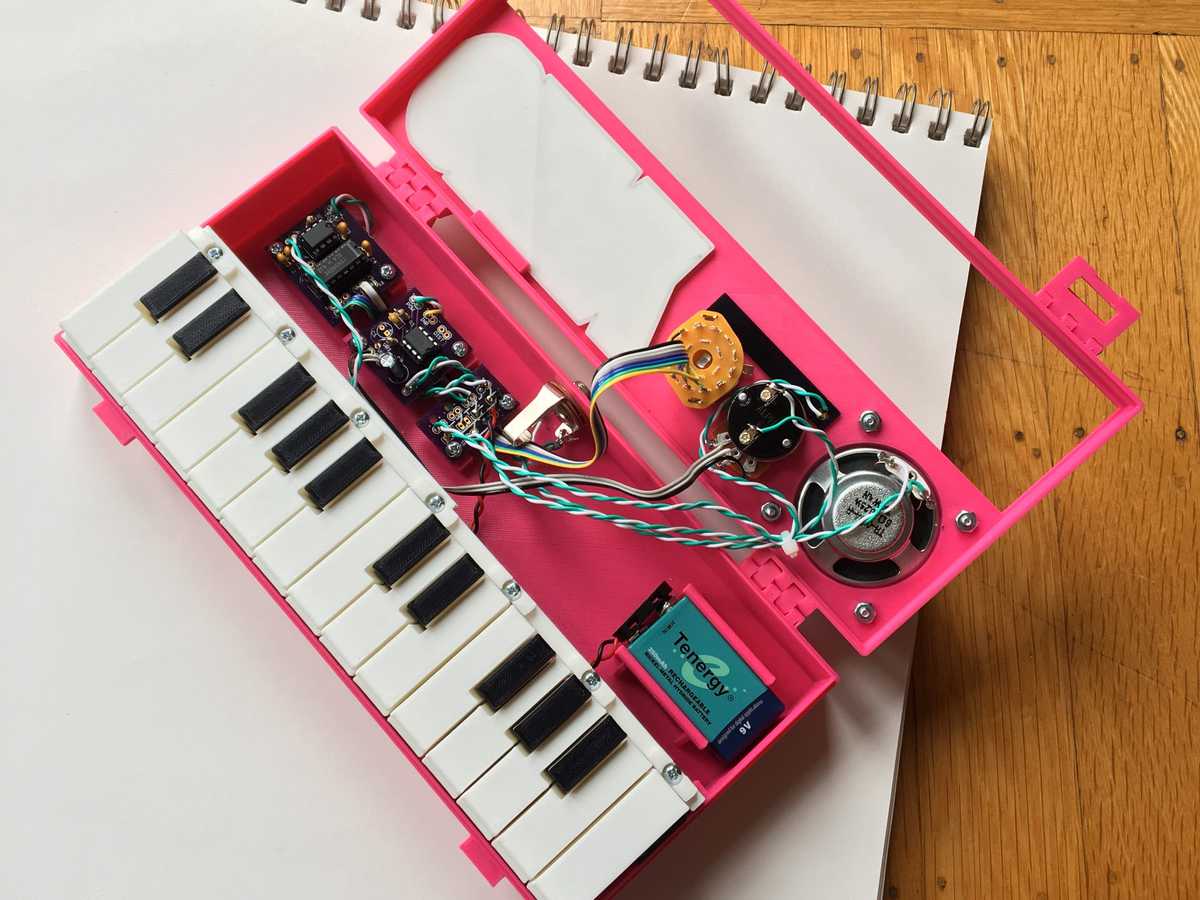
    The instrument utilizes modular PCBs, octave and volume controls, and a speaker to share your creative sounds with the world. Unlike the first iteration, the OKAY 2 has a completely redesigned key mounting, improvements in the key travel distance, an audio out jack, and a built-in display stand.

    More Musical Ideas: 15 Groovy Ideas for Homemade Musical Instruments to DIY

    This 3D printed synth looks and sounds tremendous, and you can build your own customized version for a relatively low price. Let’s take a look at what it takes to assemble and start jamming out on the 3D printed OKAY 2 synth.

    [embedded content]

    DIY OKAY 2 Synth: What Do You Need?

    In order to build your own OKAY 2 Synth, you’ll need to have a 3D printer and soldering iron kit. While there are a number of electronic components inside of this compact instrument, you can acquire everything by ordering the OKAY 2 Synth DIY kit from the Oskitone website for $55.

    The STL files for the body and keys of the synthesizer are freely available on Thingiverse.

    If you want to skip the 3D printing and assembly process, you can also just purchase the assembled version of the synth in green or hot pink for $110. But building the OKAY 2 your self is half of the fun! So let’s figure out how to put it all together.

    DIY OKAY 2 Synth: Putting it All Together

    Putting together this DIY synthesizer is no easy feat, but thankfully Oskitone provides detailed instructions on how to put this project together. The lengthy assembly manual goes into the 3D printing settings, the PCB assembly, testing and debugging, and circuit schematics.

    As you can see in the time-lapse video below, the OKAY 2 Synth requires quite a bit of assembly and soldering time, but your hard work will be rewarded with a customized musical instrument create with your very own hands. If you want to learn more about how this synthesizer is put together, be sure to view the full assembly manual from Oskitone.

    [embedded content]

    License: The text of „Weekend Project: 3D Printed OKAY 2 Synth Brings Music to the Maker’s Ears“ by All3DP is licensed under a Creative Commons Attribution 4.0 International License.

    Subscribe to updates from All3DP

    You are subscribed to updates from All3DP

    Website: LINK

  • Project of the Week: Fuse Your Filament and 3D Print Multicolor Objects

    Project of the Week: Fuse Your Filament and 3D Print Multicolor Objects

    Reading Time: 3 minutes

    No dual extrusion? No problem! This week’s Project of the Week shows us how to fuse different filaments together and create your own multicolor objects with a single extrusion 3D printer. 

    Thanks to recent advancements in dual extrusion FDM 3D printing, makers can now create vibrant objects in multiple colors. Unfortunately, only a select few desktop 3D printers offer multi-material capabilities, and these machines tend to be on the pricier side of the consumer market.

    But that doesn’t mean you can’t produce vivid objects with your single extruder 3D printer. In fact, there are a number of DIY method that will enable you to create multi-colored objects on any FDM 3D printer.

    We recently came across a project on Instructables that shows a new technique that fuses different filaments together. Posted by Matlek, the post makes mention to various DIY methods used to create multicolor filament, and then breaks down the maker’s simple, yet stunning filament fusion process.

    Let’s take a quick look at this multicolor fused filament project!


    Fused Multicolor Filament: What do you Need?

    Do you want to create your own multicolor filament? With this unique process, you only need a few select materials. Thankfully, all of the tools are easily obtainable, and there’s a good chance you already have them at home. Obviously, you’ll need a few different strands of filament to fuse together, as well as a 3D printer to extrude your Frankenstein filament.

    Here’s the rest of the required materials:


    Fused Multicolor Filament: Putting it all Together

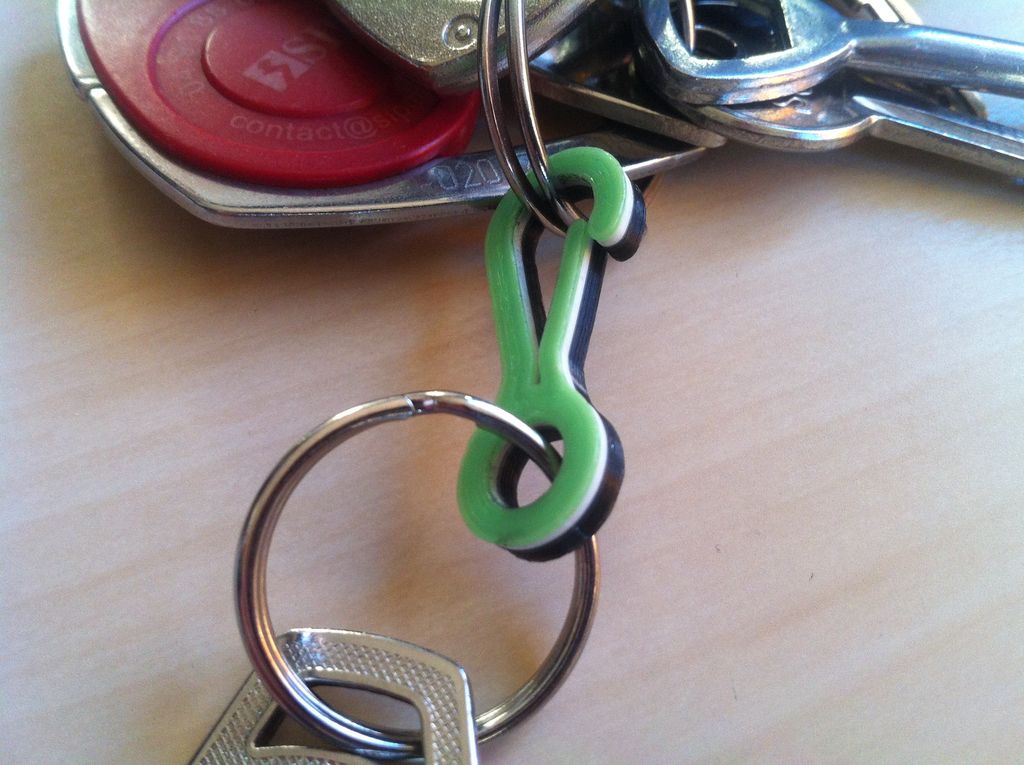
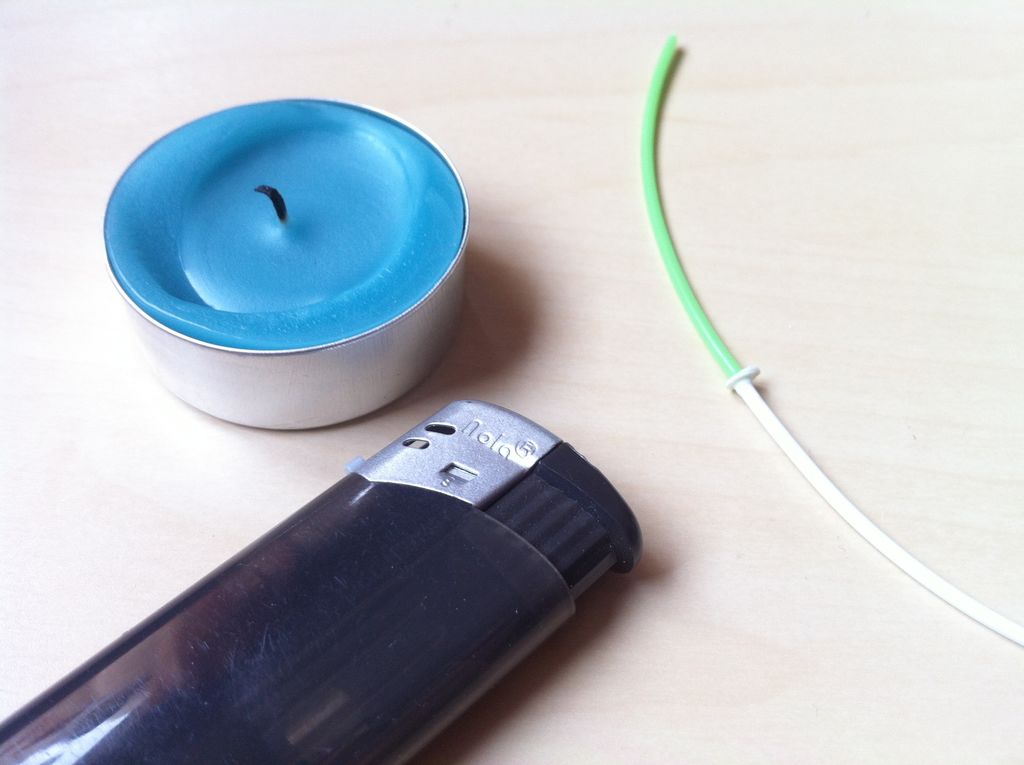
    First, you’ll want to take the two tips of your filament and place them over the candle flame. Using the heat source, firmly press the two tips together to fuse them for up to 30 seconds until you feel they are properly aligned.

    Once the two different filaments are fused together, there will be a small disc of plastic where the two tips met in a trial by fire. This is when you’ll take your plier cutters to remove this burnt ring, which will prepare you for the following step: smoothing out your newly fused filament.

    To perform advanced smoothing on the fused filament, you’ll take the file and sand the area where the two materials were merged, smoothing them as much as possible. This is the most important step, as a poorly smoothed filament strand could end up clogging your 3D printer’s hotend.

    This is why it’s handy to test the fused filament with the heat break, which will allow you to simulate whether or not the filament will extrude smoothly out of your 3D printer.

    As you might have guessed, you should be using two filaments that have a similar extrusion temperature. Although it will be tough to plan out which part of the model gets what color, a little experimentation can go a long way!

    At the very least, this is a fun and easy project that could turn your single-extrusion 3D printer into multicolor machine. Check out the full instructions on Instructables.

    License: The text of „Project of the Week: Fuse Your Filament and 3D Print Multicolor Objects“ by All3DP is licensed under a Creative Commons Attribution 4.0 International License.

    Subscribe to updates from All3DP

    You are subscribed to updates from All3DP

    Website: LINK

  • Weekend Project: 3D Print Your Own Customizable Soda Can Lamp

    Weekend Project: 3D Print Your Own Customizable Soda Can Lamp

    Reading Time: 3 minutes

    An engineer named Arnd (also known as AHNT) recently shared a fun 3D printing project, showing us how to create an customizable soda can lamp that can you light up with LEDs or a candle. 

    Here at All3DP, we go through a lot of 3D printing filament and thirst-quenching carbonated drinks, so we always try to encourage our readers to recycle as often as possible. But that doesn’t always have to equate to throwing your filament strands and soda cans into the recycling bin. It turns out you can also reuse your discarded aluminum trash to make a 3D printed soda can lamp.

    A young engineer named Arnd–who also goes by the name AHNT— recently shared his unique Individualized Soda Can Lamp project on MyMiniFactory. He designed a 3D printable sleeve that fits snugly around most 250mL soda cans. You can poke tiny pixel-like holes into the can through the sleeve, enabling you to add a customized design to your lamp.


    AHNT created two different types of bases to illuminate the lamp. There’s one designed to hold a votive candle, while the other is made for use with a LED strip circuit and 12 VDC barrel jack. Let’s take a look at this innovative 3D printing project and figure out how to make our own Soda Can Lamp.

    3D Printed Soda Can Lamp: What Do You Need?

    Aside from your 3D printer and 3D printing filament, here’s what else you need to complete this project:


    3D Printed Soda Can Lamp: Putting it Together

    There are five essential steps to creating a customized soda can lamp, and AHNT takes us through each part in his YouTube video detailing the project. The first thing you’ll do is open the can by getting ride of the top lid. You can either use sandpaper or a filer to grind away at the top of the can until the metal sheets divide, creating a gap in the can. This will make it easy to remove the cap.

    Next, you’ll stuff the can with some paper towels to stabilize it, which will prevent it from buckling when you begin piercing it with the needle. The 3D printed sleeve acts as a template for the design you will put into the can through the perforation process. The designer uses a size 18 medical needle, which you can find at your local pharmacy. After you put the can inside of the 3D printed sleeve, you’ll use the needle to poke holes through the tiny gaps in the sleeve.

    To create your own design, you can use Powerpoint or Adobe Illustrator (or a number of other programs). First, create a rectangle and place the design inside of the rectangle, which you will then print out. Cut out the design and glue it to the can, and push the 3D printed sleeve over it. The design will act as a stencil for you to poke out your custom design.

    To obtain a clean surface on the can, AHNT suggests spray painting the can to get rid of the branding design and any colors. Finally, you can use the 3D printed base for either the LED stripe or candle, which the engineer goes into more detail about in the YouTube video.

    If you want to create your own Soda Can Lamp, check out the comprehensive instructions in the video below!

    License: The text of „Weekend Project: 3D Print Your Own Customizable Soda Can Lamp“ by All3DP is licensed under a Creative Commons Attribution 4.0 International License.

    Subscribe to updates from All3DP

    You are subscribed to updates from All3DP

    Website: LINK
  • Project of the Week: 3D Printed Solid Eye from Metal Gear Solid 4

    Project of the Week: 3D Printed Solid Eye from Metal Gear Solid 4

    Reading Time: 4 minutes

    Are you a diehard fan of the Metal Gear video game franchise? Now you can use your 3D printer to cosplay as Solid Snake with a Solid Eye that is equipped with a working LED light.

    For over 30 years, generations of gamers have been captivated by Hideo Kojima’s massively popular action-adventure stealth video game franchise Metal Gear. The first iteration of the game was released way back in 1987, and earlier this year, the developer Konami is released the 23rd title from the series, entitled Metal Gear Survive.

    Each game stars a special forces operative, usually named Solid Snake or Big Boss, that is tasked with finding the super-weapon called “Metal Gear”.  Those who completed Metal Gear Solid 4 might recall a special eyepatch that helped Solid Snake defeat Liquid Ocelot.

    This device is called the Solid Eye, capable of combining “Enhanced Night Vision Goggles” light amplification and imaging technology, while also doubling as binoculars.

    Well, if you’ve been preparing to take on a top-secret mission of your own, you can gain some of the stealth that has made Solid Snake so successful over the years.

    Designer Cristian Esalini recently shared his 3D printed version of the Solid Eye, which is even equipped with a red LED light. This 3D printable prop is perfect for Solid Snake cosplay, or even just showing off your fandom and knowledge of this classic series.

    Here’s what you need to know in order to 3D print your own Solid Eye!


    3D Printed Solid Eye: What Do You Need?

    The casing of the Solid Eye accessory is 3D printed, but you’ll need a few other components to get the LED flashing. The STL files for the 3D model are freely available on Thingiverse.

    Here’s what else you need to build your own 3D printed Solid Eye:


    3D Printed Solid Eye: Putting it Together

    Now that you’ve got all the components needed to build the Solid Eye, it’s time to put it all together. The print itself takes about four hours to complete, and should only have support material from the base of the model.

    Esalini recommends sanding, priming and spray painting it black once it’s finished. Don’t be shy while sanding the 3D print, as the designers claims that this post-processing method requires some “insistence”. There’s also white lettering on the front that states “SOLID EYE SYSTEM”, which can be done with stickers or a stencil.

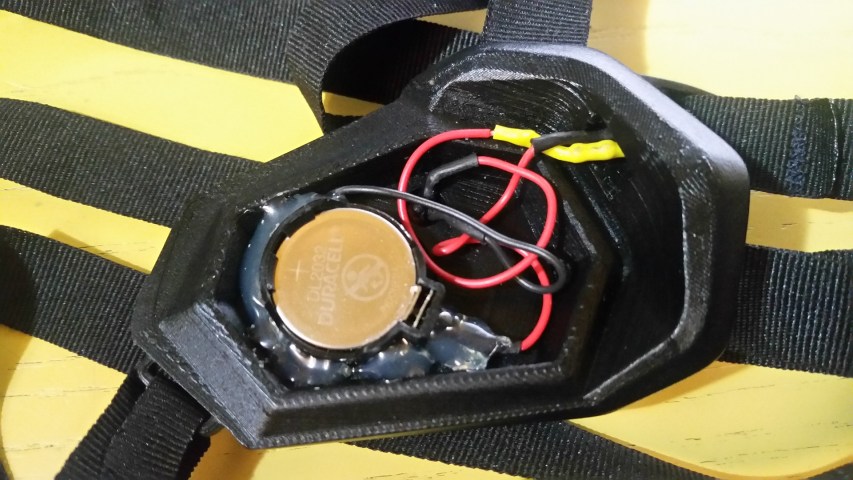
    For the strap, Esalini suggests finding one that measures between 10 and 15mm, depending on who will be wearing this contraption. The inner side of the 3D printed Solid Eye casing is where you’ll mount the electronic components. You can look at the photo of the circuit above. The assembly process looks quite simple, but comprehensive instructions are not available, so it’ll definitely be helpful to have some experience with soldering and electronic circuitry.

    Once you finish connecting everything, you should have a wearable Solid Eye with a leering red LED light. Show your friends that your the stealthiest Solid Snake in town, the Big Boss of gaming, and someone who knows how to make use of their 3D printer.


    License: The text of „Project of the Week: 3D Printed Solid Eye from Metal Gear Solid 4“ by All3DP is licensed under a Creative Commons Attribution 4.0 International License.

    Subscribe to updates from All3DP

    You are subscribed to updates from All3DP

    Website: LINK

  • 3D Print Your Own Tricorder from the TV Series “The Orville”

    3D Print Your Own Tricorder from the TV Series “The Orville”

    Reading Time: 3 minutes

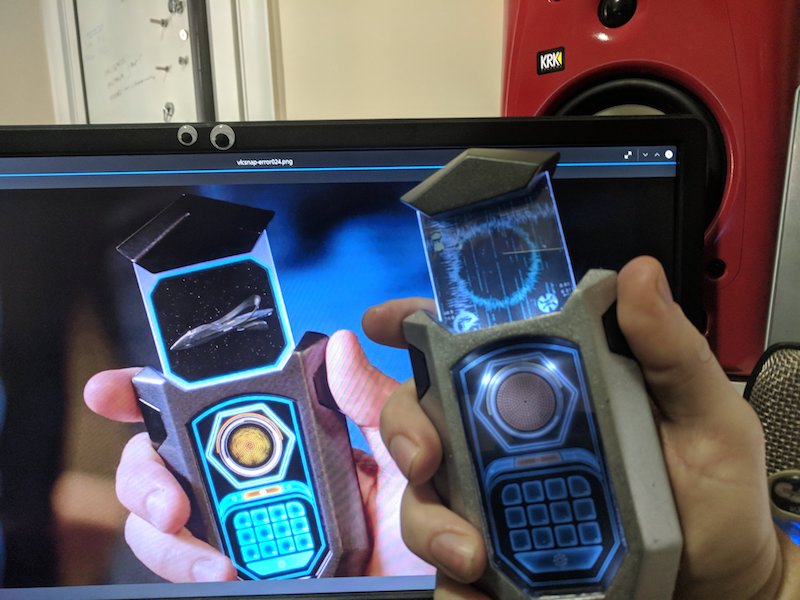
    A Reddit user 3D modeled and printed a replica comscanner from Star Trek inspired TV series The Orville without having anything to base his dimensions on other than screenshots from the show. 

    Any fans of The Orville, the American sci-fi comedy-drama inspired by Star Trek, will know the difficulty of procuring memorabilia. The show, which was created by and stars Seth MacFarlane (known for the “Family Guy”), was premiered in the fall last year. By some, it is considered to be truer to the lore and legacy of Star Trek.

    But, it’s not yet as popular as Star Trek… meaning there are no collectibles, replicas or souvenirs available other than those which have been made at home.

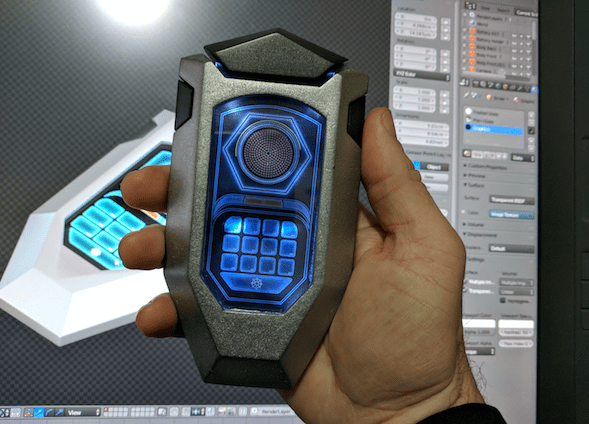
    One such impressive DIY replica is from Reddit user JohnSmallBerries who created the Orville communicator from scratch using Blender, a 3D printer, some paint and a few LEDs. This feat is particularly impressive considering the fact that John had no official measurements to go off.

    His work is based entirely on screenshots from the show. John jokes, “Had to guess at the scale, since they inconsiderately failed to write an episode that required a character to hold a ruler next to a comscanner, but it looked about the size of a large cellphone.”

    Comscanner
    Comscanner

    From 3D Printed Parts to Realistic Comscanner

    John used Blender to model the design, Cura for slicing and an Ultimaker 2+ for 3D printing his parts which he describes as “pricey, as FDM-style 3D printers go, but fantastic print quality and reliability”.

    He printed with 0.12mm layers to save time on printing. But, he adds it’s possible to go down to 0.02mm layers to minimize sanding time. However, he was on a time crunch as he wanted his Orville communicator ready for C2E2, the 2018 Chicago Comic & Entertainment Expo, which is taking place from the 6th to 8th of April.

    After printing, John smoothed and painted the parts. Just sanding the outer surfaces smooth took over 20 hours. He adds: “If I had a resin printer, I probably wouldn’t have had to do any sanding, but they’re a bit out of my price range.”

    Comscanner
    Comscanner

    The device uses two LEDs for the scanner screen and four for the main screen. To power the LEDs, he used a 12-volt A27 battery. The interior also has a spring-assisted retractable display and a screen-accurate user interface.

    However, John adds that the assembly of the interior is messier than he’d hoped but “at least it works”. He also designed a holster to make the comscanner practical to carry around. The holster is also based on the show and lined with felt to prevent it from scratching the scanner’s paintwork.

    John explains that, in total, he spent under $30 for parts and materials. However, it’s a time intensive project taking around a week to complete. He’s now in the process of tweaking the design and will then make it available for download on Thingiverse.

    Source: Hackaday

    License: The text of „3D Print Your Own Tricorder from the TV Series “The Orville”“ by All3DP is licensed under a Creative Commons Attribution 4.0 International License.

    Subscribe to updates from All3DP

    You are subscribed to updates from All3DP

    Website: LINK
  • Weekend Project: Create Your Own 3D Printed LED Mason Jar Lanterns

    Weekend Project: Create Your Own 3D Printed LED Mason Jar Lanterns

    Reading Time: 4 minutes

    Instructables content creator Becky Stern shares her latest 3D printing project: LED Mason Jar Lanterns. This beginner-level project will help you improve your design and DIY skills, and you’ll have some lovely new lanterns to light up your home! 

    If there’s one type of container that has become synonymous with the stereotypical hipster, most people would probably put their money into mason jars. But these popular receptacles aren’t only good for holding your neighborhood bar’s newest cocktail, you can actually do a lot with them.

    Becky Stern, a Brooklyn-based content creator for Instructables and Autodesk, recently shared a how-to guide for LED Mason Jar Lanterns. This unique 3D printing project is perfect for beginners, and will help you improve your design and DIY skills.

    These DIY LED Mason Jar Lanterns are a simple, yet stunning project that will fill your house with decorative light. The lanterns contain a simple LED, a battery circuit, and whatever ornamental touch you decide to put on them. Not only will you get more familiar with your 3D printer, Stern’s project also connects you with TinkerCAD, basic circuitry, and artistic creativity.

    Here’s what you need to know to get started on your own 3D printed LED Mason Jar Lanterns.


    LED Mason Jar Lanterns: What Do You Need?

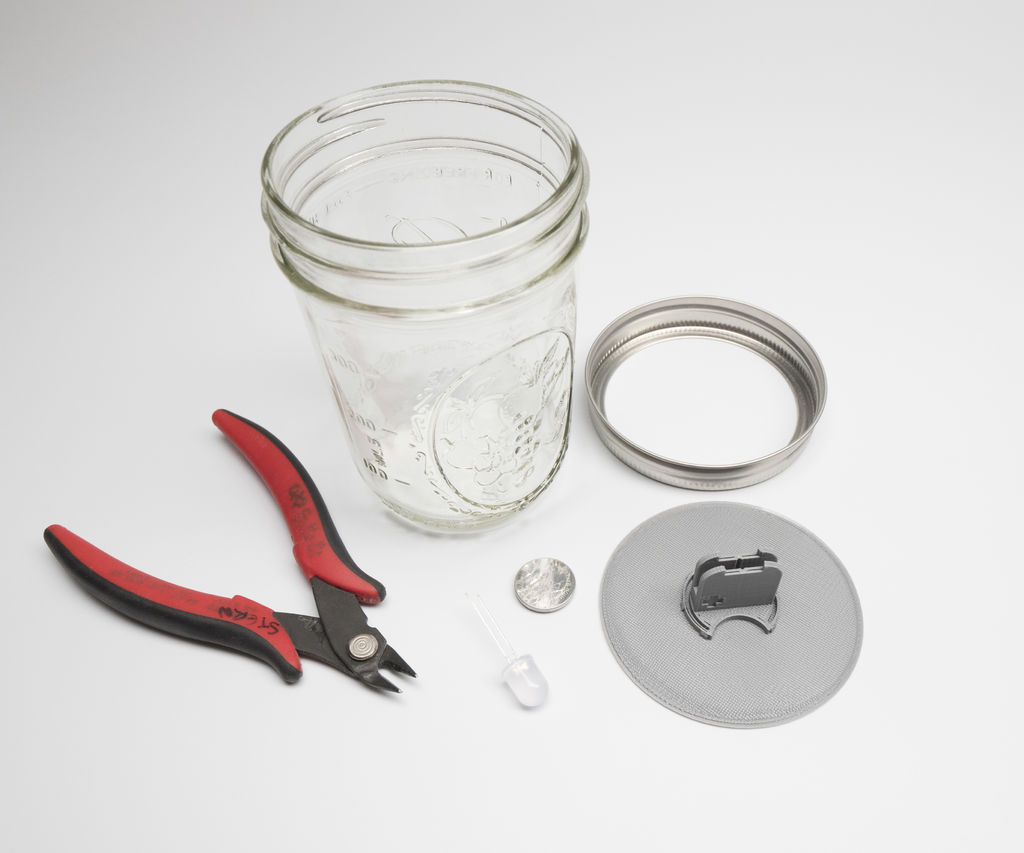
    Aside from your 3D printer, you’ll need a few other components and tools to create your own LED Mason Jar Lanterns. Luckily, the parts on required for this Weekend Project are easily obtainable. Here’s what you need:


    LED Mason Jar Lanterns: Putting it Together

    Once you have your materials ready, it’s time to start digitally crafting your LED Mason Jar Lanterns. For those who want to take an easier path, you can simply download Stern’s lid model. Conversely, you can also customize your own lid using the Glow Circuit Assembly in TinkerCAD. This 3D printable lid is designed to hold and connect the battery and LED together.

    On her Instructables post, Stern shares the TinkerCAD files for two different sized lids, both of which fit the common mason jar. After finding the 3D model that fits your jar, it’s time to 3D print the 3D printed lid and incorporated Glow Holder. The content creator states that she prepared her model on Autodesk Print Studio. In Stern’s example, the lid model is 3D printed with 20 percent infill, no supports or rafts required. If you want to design your own lid, Stern also supplies easy-to-follow TinkerCAD instructions on her post.


    Once the 3D printed lid and Glow Holder is ready to go, it’s time to insert the LED and battery into the mount. To do so, you must trim the leads of your LEDs, and then insert the battery and LED into the holder (place the positive side/leg facing the + on the 3D printed holder). Finally, fit the lid into the mason jar and secure it into place with the metal band.

    After the assembly process is complete, it’s time to get creative. Stern suggests decorating your lantern with paper cutouts, and even provides some instructions on how to make a Jack-O-Lantern design. All you have to do is cut the paper to match the inside of the mason jar, fold it, cut out a design, and voila! The Instructables content creator states that you can use the LED color and paper color to enhance the design of your lantern.

    You can also achieve a striking visual effect by painting the inside of the mason jar with glitter glue, or filling it with translucent beads, seaglass, or any other ornament that will help disperse the light throughout your DIY lantern. Feel free to experiment with other decorative ideas, and be sure to share your 3D printed LED Mason Jar Lanterns on Stern’s Instructables post!

    License: The text of „Weekend Project: Create Your Own 3D Printed LED Mason Jar Lanterns“ by All3DP is licensed under a Creative Commons Attribution 4.0 International License.

    Subscribe to updates from All3DP

    You are subscribed to updates from All3DP

    Website: LINK

  • Weekend Project: 3D Print a Chocolate Easter Egg Dispenser Bunny

    Weekend Project: 3D Print a Chocolate Easter Egg Dispenser Bunny

    Reading Time: 3 minutes

    Ready to scarf down lots of chocolate this holiday weekend? Exercise some portion control with a 3D printed Easter Egg Dispenser Bunny.

    This weekend, you may be indulging in a traditional Easter Egg hunt in your garden. Or perhaps you’ll be kicking back with a Martini. Whichever leisure activity you pursue, make it extra special with an Easter Egg Dispenser Bunny.

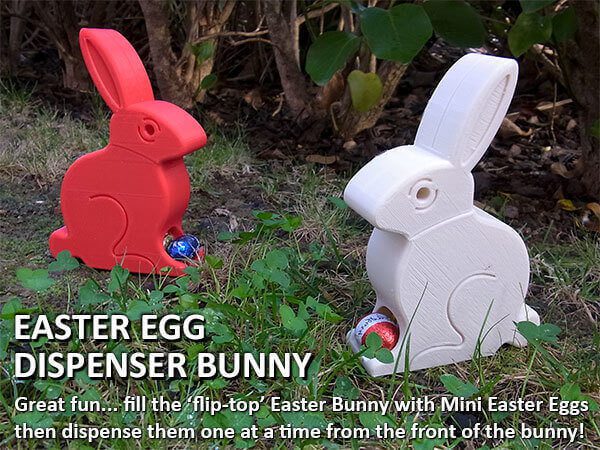
    What’s so special about this bunny? For starters, it’s made with 3D printing. And it poops out mini chocolate eggs from between its paws. And it has a flip-top head for the quick loading of more chocolate goodies. We like!

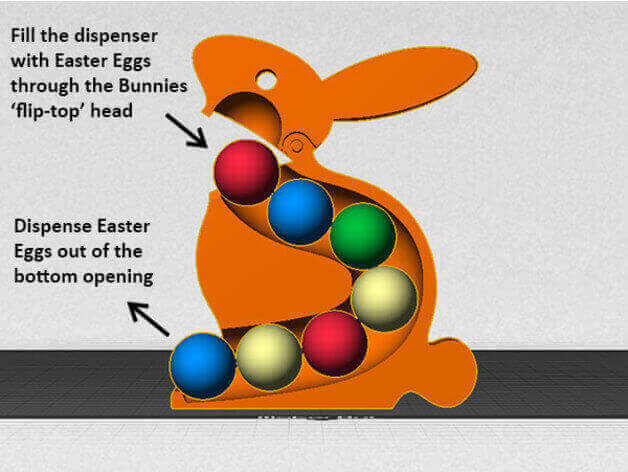
    From maker Murray Clark in New Zealand, this is a simple and functional print for the holiday season. The way the mechanism works is simplicity itself; load the eggs into an internal channel that runs from top to bottom, with some assistance from gravity.

    According to Clark, “it has been designed to be an easy one piece print with two components. The clearances applied are intentionally loose so it should print well regardless of the slicing app or machine used.”

    Easter Egg Dispenser Bunny
    Easter Egg Dispenser Bunny

    Easter Egg Dispenser Bunny is Ready to Serve

    Printed at standard scale, the Easter Egg Bunny Dispenser will measures 150 x 105 x 35 mm. It can handle mini chocolate Easter Eggs measuring up to 28 x 22 mm, with a rolling clearance between 1.5 to 2 mm.

    A little step at the bottom will prevent the Easter Eggs from rolling straight through, so they are dispensed one at a time. When the foremost Easter Egg is picked up (and devoured), the remaining eggs shuffle down the line until the next one comes to a rest against the step.

    If you have a bigger build plate on your 3D printer, the design can be scaled up to accept larger Easter Eggs. Or even just normal, hard-boiled eggs. The best way to do this, advises Clark, is to the measure the Easter Eggs to be dispensed before printing, to ensure they can roll freely in the internal channel.

    Another piece of advice is to ensure you roll your Easter Eggs in sideways so they roll through the internal channel. And you may need to hold the first egg in place at the bottom during loading, otherwise the momentum of the next egg to be be loaded may knock it out.

    Ready to print an Easter Egg Dispenser Bunny of your very own? Let us know how you get on. And if you love the result, don’t forget to tip the designer for their efforts.

    Easter Egg Dispenser Bunny
    Easter Egg Dispenser Bunny

    License: The text of „Weekend Project: 3D Print a Chocolate Easter Egg Dispenser Bunny“ by All3DP is licensed under a Creative Commons Attribution 4.0 International License.

    Subscribe to updates from All3DP

    You are subscribed to updates from All3DP

    Website: LINK

  • Weekend Project: Automate Easter Egg Decorating with the Sphere-O-Bot

    Weekend Project: Automate Easter Egg Decorating with the Sphere-O-Bot

    Reading Time: 3 minutes

    Why paint your own Easter eggs when you can have a robot do it for you? The Sphere-O-Bot is an open source project from Evil Mad Scientist, and has been modded to draw intricate designs on your Easter eggs. 

    The tradition of painting Easter eggs is one that many families hold dearly. There’s nothing quite like sifting through these dyed hardboiled eggs to find the chocolate imposters hidden in your Easter basket.

    Let’s face it, kids love painting their Easter eggs. But you know what else they love? Robots. The Sphere-O-Bot offers the best of both worlds. This popular open source robot has been modded into a device that will decorate your eggs with any design you choose.

    The Sphere-O-Bot is described as a simple 2 axis drawing machine that can draw on spherical surfaces. This means you can use it to decorate your Easter eggs, ping pong balls, Christmas decorations, and more.  Aside from the robotics kit, all you need is to 3D print the various parts and input the correct code.


    Sphere-O-Bot: What Do You Need?

    You can either try to source the Sphere-O-Bot parts independently or simplify things by ordering the entire build kit from jjRobots for $110. Here’s everything you need to build your own Sphere-O-Bot, all of which is included in the kit:


    Sphere-O-Bot: Putting it all Together

    There are quite a few steps involved in putting the Sphere-O-Bot together, which can be summed up in the following diagram:


    You’ll start with the drawing arm and the left egg support, which is where the servo motor will be installed. Next, fix the stepper motors and assemble the X axis rod to the main frame. Once everything is placed in the correct position, it’s time to connect the electronics and cables.

    Thankfully, the electronics provided in the Sphere-O-Bot kit require no soldering, making it easy to hook everything up. Lastly, program the Arduino Leonardo and start learning for to control your robot. Of course, you’ll need to view the expansive assembly guide to get things right, but we just wanted to give you a quick idea of how easy this project actually is.

    You can find the full assembly instructions, along with the necessary STL files and code, on the jjRobots website. Watch the video below to learn more! And Happy Easter!

    License: The text of „Weekend Project: Automate Easter Egg Decorating with the Sphere-O-Bot“ by All3DP is licensed under a Creative Commons Attribution 4.0 International License.

    Subscribe to updates from All3DP

    You are subscribed to updates from All3DP

    Website: LINK

  • Weekend Project: Shred the Streets with Your Own 3D Printed Longboard

    Weekend Project: Shred the Streets with Your Own 3D Printed Longboard

    Reading Time: 3 minutes

    Lulzbot shows us how to build a fully functional longboard using 3D printing technology. You can follow along with their surprisingly simple instructions or use them as a basis to build your own board. 

    Ever want to use your 3D printer to create a functional mode of transportation? On today’s edition of Weekend Project, we’re featuring a gnarly idea for all the street shredders who love to roll around town on four wheels.

    Aleph Objects, the company behind the 3D printer brand Lulzbot, is sharing instructions on how to build a 3D Printed Longboard. In the past, we’ve seen a number of insanely cool 3D printed skateboards created by makers like James Bruton of XRobots, who is actually fully sponsored by Lulzbot.

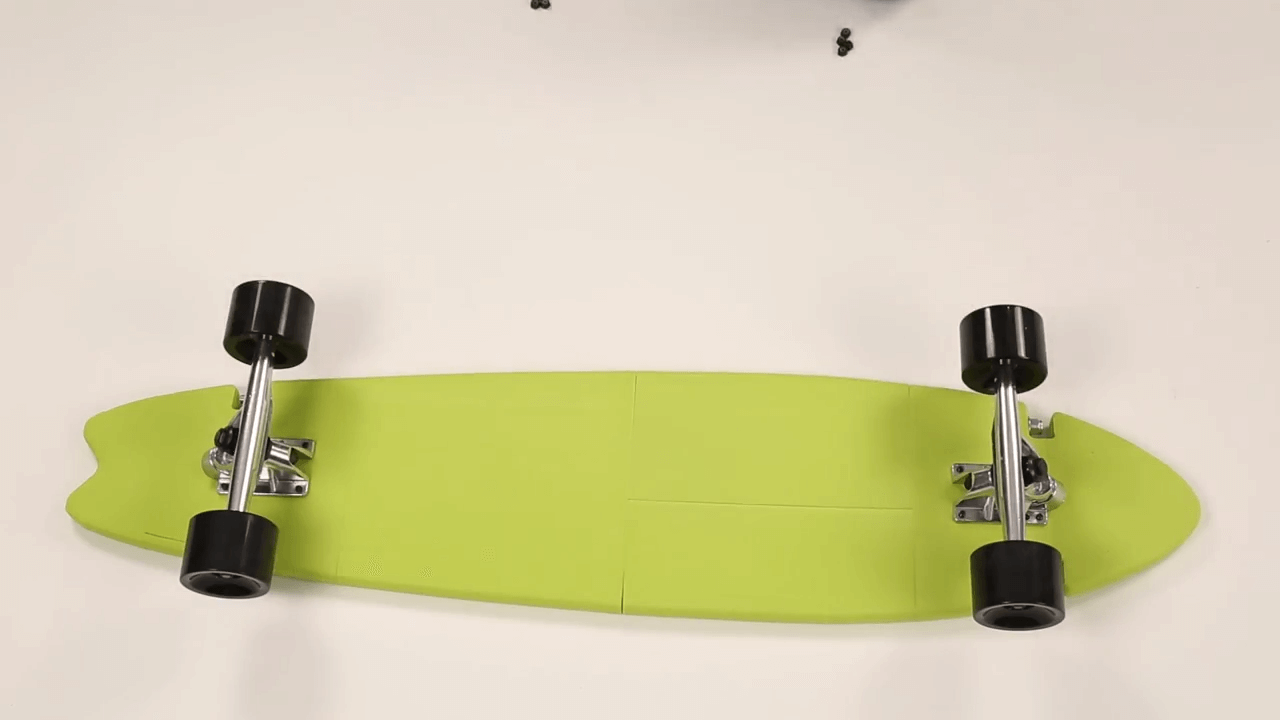
    Now, the Colorado-based manufacturer is sharing a simple design for all to undertake. The 3D Printed Longboard is a relatively simple and well-structured project, but does require a 3D printer with a large build volume, as well as some tooling around with threaded rods.

    If you’ve been looking for a 3D printing project that you can take with you all around town, hit the brakes and get ready to make. Here’s more information of Lulzbot’s 3D Printed Longboard.


    3D Printed Longboard: What Do You Need?

    This project is tailor-made to be used with the Lulzbot TAZ 6 3D printer. However, if you have a desktop 3D printer with a large enough build volume, you should have no trouble building your own 3D printed longboard.

    Your 3D printer will need to be able to produce pieces that measure around 230 x 25 x 240 mm. Aside from the Lulzbot TAZ 6, which we recently awarded as the best large format 3D printer in 2017, this project can likely be undertaken with the Creality CR-10, among other large volume FDM 3D printers.

    Here’s everything you’ll need to create the 3D Printed Longboard:

    3D Printed Longboard: Putting it All Together

    Believe it or not, building your own 3D printed longboard is actually not as difficult as it sounds. The Lulzbot team lays out a simple set of instructions to help get your wheels rolling.

    Before you start assembling your longboard, you’ll need to 3D print the four sections of the deck. The STL files are freely available on the Lulzbot website.

    Next, take the three 3/8″ threaded rods and prepare to cut them down with the proper tools, such as a vise and hacksaw. Two of the rods will be trimmed to 700 mm for the side of the deck, while the middle rod will be cut to 820 mm. Then, insert the threaded rods into the holes of 3D printed deck parts one section at a time.


    Once the threaded rods are inserted into the 3D printed deck, loosely attach the four 3/8″ nylon lock nuts and washers to the threaded rods. By slowly tightening the nuts with a wrench, you’ll notice the sections begin to constrict together. According to the Lulzbot team, this step will be easier to complete if you have an assistant to hold the other end of the longboard.

    Lastly, it’s time to mount the wheels and trucks with skateboard truck mounting hardware. After this final step, you should be left with functional 3D printed longboard. Have fun shredding your neighborhood streets and remember, always wear a helmet!

    You can learn more about the 3D Printed Longboard project on the Lulzbot website.


    License: The text of „Weekend Project: Shred the Streets with Your Own 3D Printed Longboard“ by All3DP is licensed under a Creative Commons Attribution 4.0 International License.

    Subscribe to updates from All3DP

    You are subscribed to updates from All3DP

    Website: LINK

  • Weekend Project: Recycle Your Leftover Filament with a “Plastic Smoothie”

    Weekend Project: Recycle Your Leftover Filament with a “Plastic Smoothie”

    Reading Time: 4 minutes

    Have a trash bin full of leftover filament scraps and failed prints? Designer Agustin Flowalistik shows us how to recycle 3D printing waste by creating a Plastic Smoothie, which can be used in a laser cutter to create vibrant objects. 

    You know how the old saying goes… One manufacturing technology’s trash is another manufacturing technology’s treasure.

    Well, at least that’s the case in the latest DIY project by Agustin Flowalistik. Looking for an easy and affordable way to recycle filament scraps and failed prints, the renowned designer came up with the idea to concoct a Plastic Smoothie.

    While there are a variety of devices that allow you to recycle your 3D printing filament, Flowalistik’s latest method truly evokes the maker spirit. Using everyday kitchen appliances and laser cutting technology, you can create new objects with an endless array of colors.

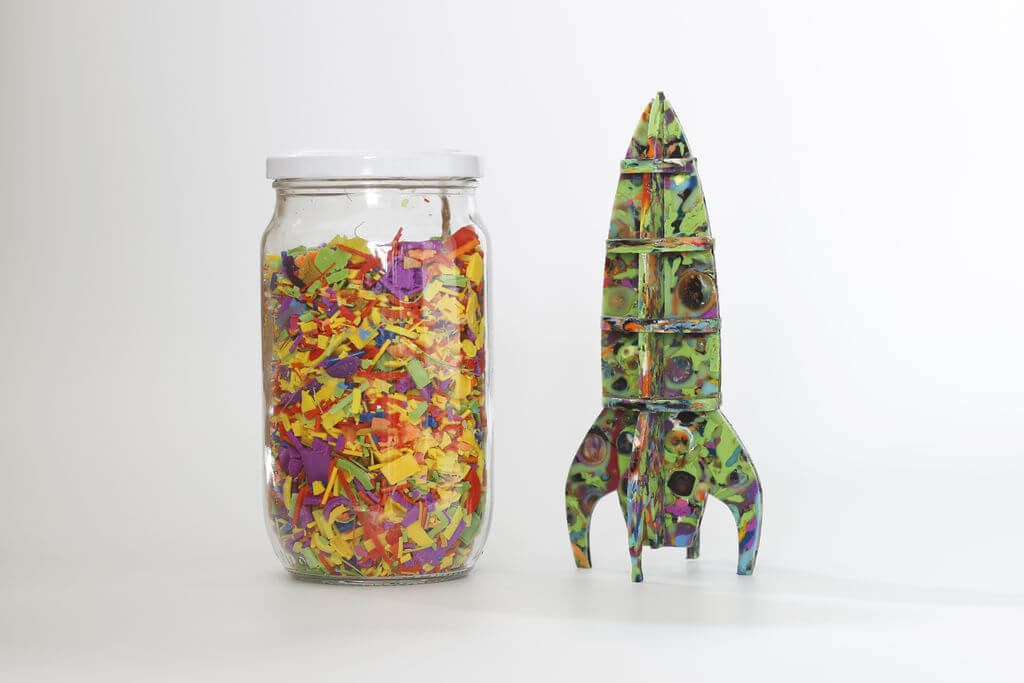
    After blending up all of your leftover filament into finely shredded plastic scraps, you’ll melt the colorful mess of plastic together in a mini oven. With this freshly baked sheet of recycled PLA, you can get creative using a laser cutter and a bit of vibrant imagination.

    Here’s a brief overview on Flowalistik’s Plastic Smoothie project, which he recently shared on Instructables.


    Plastic Smoothie: What Do You Need?

    First and foremost, if you want to undertake the Plastic Smoothie project, you’re going to need an abundance of PLA filament scraps and failed prints to sacrifice. You’ll also need access to a laser cutter, which you can likely find at your local makerspace or FabLab. If you’re unfamiliar with laser cutting and want to learn more, be sure to check out our comprehensive overview on laser cutting technology.

    Otherwise, there are still a few supplies needed before you start blending your Plastic Smoothie. Here’s the checklist for this DIY project:

    There are a few tips and tricks that Flowalistik shares to make this project as affordable as possible. For starters, he recommends using an old blender if you have one handy. Obviously, once you start shredding plastic in it, you’re not going to want to use it for an actual smoothie afterwards.

    When it comes to using failed 3D prints, you should break them down into small pieces before throwing them into the blender, reducing the damaged that the blades will incur. Additionally, due to the toxins in ABS and other material types, Flowalistik only used PLA filament for this project.


    Plastic Smoothie: Putting it All Together

    The first step to the Plastic Smoothie project is gathering and blending your leftover PLA. You can take this opportunity to decide which colors and textures you want to create. Once the recycled plastic is shredded up, you’ll lay it out on an oven tray and prepare to start baking. Flowalistik uses oven paper on the base of the tray, bending the corners to avoid any molten plastic from spilling over.

    After experimenting a bit, the maker found that the most consistent results came about when melting medium and small plastic bits at 190-200 C for 20 – 25 minutes. Once the plastic scraps are melted together into a colorful sheet, you’ll need to remove it quickly and flatten it out in between the wood panels.


    This pressing procedure has to be performed quickly, as the melted plastic will cool down quickly once it’s removed from the oven. Keep the oven paper on the plastic and add as much weight as you can onto the wood panels, and you’ll have a perfect sheet of recycled PLA.

    Finally, Flowalistik uses an Epilog Laser Mini 18 40W laser cutter to cut the 3mm plastic panels. You can use the same settings as you would for a 3mm sheet of acrylic. The designer adds that he had to increase the power of the laser in order to make the engraving more apparent.


    If you don’t have much experience with laser cutting, you might be wondering what you can make with this recycled plastic. Luckily, Flowalistik has shared a number of his own experimental models, including coasters, animal rings, spirographs, and a really impressive rocket ship.

    You can learn more about the Plastic Smoothie project and the laser cutting process on Flowalistik’s Instructables post. If you want to continue supporting the designer and his intriguing projects, head on over to his Patreon page.


    License: The text of „Weekend Project: Recycle Your Leftover Filament with a “Plastic Smoothie”“ by All3DP is licensed under a Creative Commons Attribution 4.0 International License.

    Subscribe to updates from All3DP

    You are subscribed to updates from All3DP

    Website: LINK

  • Gramazon: Turn Your Amazon Echo Dot Into a Gramophone with 3D Printing

    Gramazon: Turn Your Amazon Echo Dot Into a Gramophone with 3D Printing

    Reading Time: 3 minutes

    Recently purchased an Amazon Echo Dot but not in love with its eerie futuristic attitude? Maker Baard Fleistad has created the Gramazon, a 3D printable gramophone attachment to give your AI device a 1920s makeover.

    Small, black, and round, the Amazon Echo Dot is an inconspicuous addition to the household, that is until it hears anything akin to its name being called. If you’re someone who wishes they could go back to the days where people were swing dancing around a blaring gramophone, then you may be interested in giving your Amazon Echo Dot a 1920s makeover.

    Baard Fleistad, self-proclaimed as “some Norwegian nerd who lives in Florida”, has come up with a 3D printable design to spruce up your Echo Dot with class. His idea is a 3D printed acoustic amplifier in the form of the old-fashioned gramophone.

    This amplifier then turns the Echo Dot into a 1920s style horn speaker. Fleistad explains that he’s wanted a horn speaker for some time but hasn’t found an economical option.

    “I have always loved the look of the old radio horns of the 20’s and 30’s, but sadly, acquiring them is becoming harder and harder these days, and when you do come across one, the price is usually very high. There are reproductions on the market in the form of standalone bluetooth speakers, but these are usually sold at an even higher price point than the originals,” Fleistad explains.

    So, instead of continuing in his unsuccessful search, Fleistad came up with his own solution. He used the Echo Dot as the center of his 1920s horn and created a 3D printed shell. The final design, which the designer wittingly calls the Gramazon, is a gorgeous and classical attachment for your AI housemate.

    Give Your Home a Cheap 1920s Makeover with the Gramazon

    Fleistad wanted to create a straightforward and slick 3D printable model, and started designing with Autodesk Fusion 360 to see what he could “slap together”. His primary goal was to create a design which didn’t require anything other than the 3D printed parts and some paint.

    “Initially I was just going to make the horn part, and make a wooden base for it to house some electronics for a Bluetooth receiver and speaker, however, looking at my Echo Dot sitting at the corner of my desk, a light-bulb went off and the idea for the Gramazon was born!” Fleistad exclaims.

    After succeeding with the design process, the maker finally started 3D printing the Gramazon. The STL files, which are available on Thingiverse, are printed with 20 percent infill, no supports necessary.

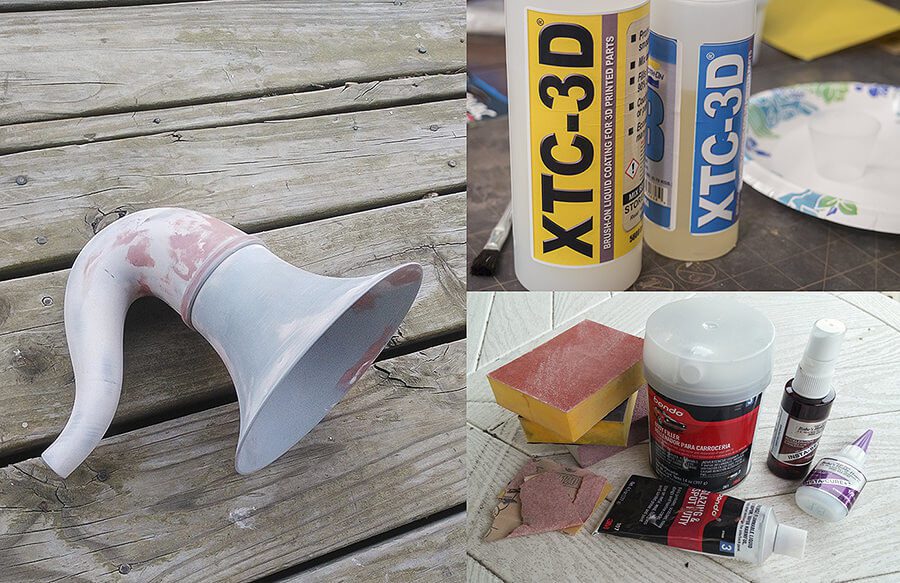
    After assembly, Fleistad used 80 and 100 grit sandpaper, as well as copious amounts of Bondo, primer coats, and XTC-3D (for the inside of the model) to get the perfect finish.

    “Just expect a lot of sanding if you plan to achieve a smooth surface finish on this project,” he warns.

    If you’d like to create your own Gramazon, it’s as simple as downloading Fleistad’s files, 3D printing them, assembling, sanding the print down, priming it, and painting it with style. Visit his Thingiverse page to download the files and bring your Amazon Echo on a trip to the roaring twenties.


    Gramazon

    Source: Hackaday


    License: The text of „Gramazon: Turn Your Amazon Echo Dot Into a Gramophone with 3D Printing“ by All3DP is licensed under a Creative Commons Attribution 4.0 International License.

    Subscribe to updates from All3DP

    You are subscribed to updates from All3DP

    Website: LINK

  • Weekend Project: 3D Print a Mechanical Hummingbird

    Weekend Project: 3D Print a Mechanical Hummingbird

    Reading Time: 4 minutes

    It’s time to leave the nest and make yourself a stunning and challenging DIY desk ornament. Maker Greg Zumwalt has created a complex 3D printed mechanical hummingbird-themed automata toy–and you can too.   

    One of the many advantages of 3D printing is its ability to manufacture complex geometries in a single print. But you can also use the technology to create a barrage of small parts, each one given a role within a magnificent mechanical structure. 

    Greg Zumwalt, an Oklahoma-based maker and former software and video game company owner, has recently shared the Mechanical Hummingbird. The project will push your 3D printer to the limit, but the results will have you enjoying the sweet nectar of automata magic.

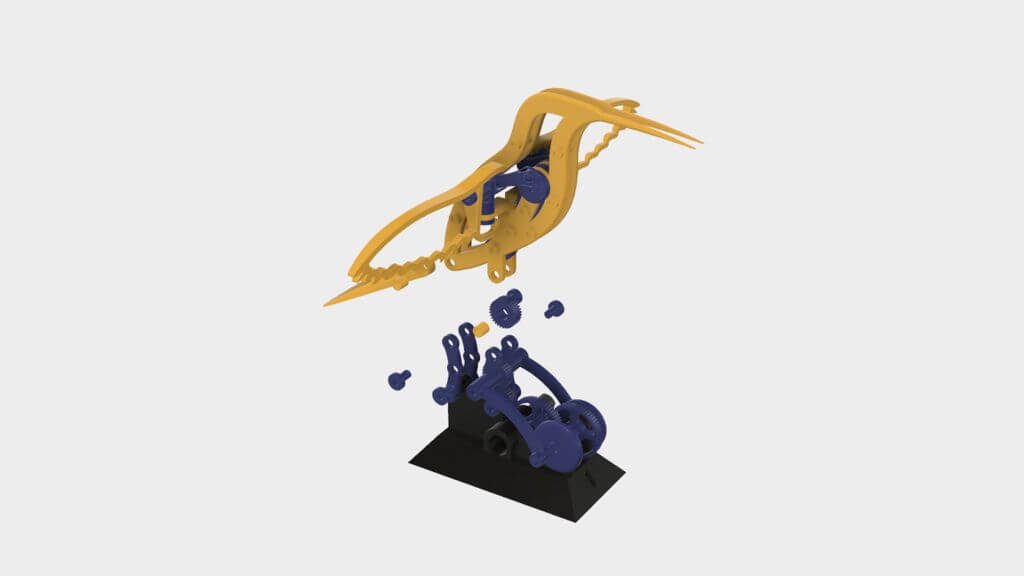
    This Mechanical Hummingbird is an intricate 3D puzzle, requiring a substantial number of 3D printed parts. Zumwalt designed the entire structure to be 3D printed, save for the small motor used to bring movement to the bird.

    3D printed parts include the bird’s wings and body, the blossoming flower, the elaborate array of gears, and even the base. By the time you’re finished with this project, both you and your 3D printer will go from a novice in the nest to soaring DIY eagles.

    Interested yet? We thought so… Here’s some insight into Zumwalt’s marvelous –and almost fully 3D printed — Mechanical Hummingbird project.

    3D Printed Hummingbird: What Do You Need?

    Your 3D printer is going to do most of the work here. In fact, this complex automata is comprised of 97 individual 3D printed parts. All of these STL files are available for download on Zumwalt’s Instructables post. He also shares CAD images for each component, which he modeled using Autodesk Fusion 360.

    However, while you get that extruder warmed up, you’ll need to obtain a few other things as well.

    3D Printed Hummingbird: Putting It All Together

    This project consists of 97 3D printed parts, so you can max out your efficiency by grouping together sections of the mechanic device on the print bed. Zumwalt provides steps to assembling the innumerable amount of puzzle pieces. Be aware of the filament color you use for each component, particularly with the bird and flower.

    Each step in the Instructables post goes into detail about the assembly of the STL files. You’ll start with the base of the bird, which is also where the electric motor will be mounted. This is followed by the transmission, the body and wings of the bird, and an explanation on how to conjoin these 3D printed pieces. Finally, it’s time to 3D print the flower stem and bulb, which along with the hummingbird, offers a good opportunity to get creative with filament colors.


    Zumwalt suggests that before starting assembly, you should test fit, trim, and sand the 3D printed parts to ensure smooth movement and a proper fit. You can also file any excess “ooze” (also known as an elephant foot) from the surface of the 3D print that is contacting the build plate.

    Since the Mechanical Hummingbird uses threaded assembly, the maker also recommends using a 6mm x 1 tap to clean out the threads. He also uses petroleum jelly to lubricate the gear train, as well as areas between the rotating contact surfaces.

    There’s no denying that this project will require a lot patience and 3D printing time, but this automata ornament is an enormous example of the little things your 3D printer can do.

    If you’re interested in building Zumwalt’s Mechanical Hummingbird, check out the full description, STL files, and assembly instructions on his Instructables post.


    License: The text of „Weekend Project: 3D Print a Mechanical Hummingbird“ by All3DP is licensed under a Creative Commons Attribution 4.0 International License.

    Subscribe to updates from All3DP

    You are subscribed to updates from All3DP

    Website: LINK