Kategorie: Science

  • Carbon Raises $200 Million in Series D Funding, Prepares to Scale for Mass Production

    Carbon Raises $200 Million in Series D Funding, Prepares to Scale for Mass Production

    Reading Time: 3 minutes

    Carbon announces $200 million in Series D funding, and will use the investment to scale its 3D printing technology for manufacturing.

    While the additive manufacturing industry has grown immensely over the last year, no 3D printing company has had as much success in 2017 as the Silicon Valley startup Carbon.

    Earlier this year, the digital 3D manufacturing company struck gold through a partnership with Adidas, using its Continuous Liquid Interface Production (CLIP) technology to create the Futurecraft 4D performance footwear, now known as the world’s first mass-produced 3D printed product.

    Learn more: Carbon Talks Adidas Collaboration and Bringing 3D Printing to the Serial Production Stage

    Today, Carbon announced the first closing in a total raise of $200 million in Series D funding, a hefty investment that will help the company scale its 3D printing technology for manufacturing.

    The startup plans to use the money to speed up its global expansion plans and product roadmap. Moreover, the  investment will allow Carbon to double down on its commitment to achieving real-world, mass digital production at scale.

    The funding comes from an eclectic mix of investors, including Baillie Gifford, Fidelity, ARCHINA Capital, Hydra Ventures (the venture arm of Adidas), GE Ventures, JSR Corporation, Emerson Elemental, among others. The diversity in investors proves just how expansive the interest in Carbon’s technology truly is. 


    Carbon Raises $200 Million, Plans to Bring Digital 3D Manufacturing to the Main Stage

    Carbon is currently in the midst of an ambitious collaboration with Adidas, aiming to produce hundreds of thousands of pairs of the Futurecraft 4D sneaker over the next year. However, despite being its biggest, this is far from the company’s only potential market.

    With the $200 million funding series, Carbon plans to dig deeper into other industries, such as consumer electronics, medical and dental, and so on. Dr. Joseph DeSimone, Carbon’s CEO and co-founder, elaborated more on how his company will utilize the additional capital.

    “This funding will help us realize new classes of workers and business models, where product design and engineering is facilitated by cloud-based computing and a wide range of scanning, sensor, and simulation technologies that enable the creation of perfectly tuned – even personalized –products that have been previously impossible to produce,” he explained.

    Counting the $200 million in Series D funding, Carbon has now raked in $420 million in total investment money. Clearly, the company is capturing the interest of big players across numerous industries, and for good reason too.

    As the manufacturing world has eagerly waited for 3D printing technology to improve upon speed and scalability, Carbon has been one of the only to offer solutions to these issues. Now, the company plans to utilize the recent funding series to help accelerate and scale up its technology, bringing additive manufacturing one step closer to the mass production stage. 


    Dr. Joseph DeSimone, Carbon CEO and Co-Founder

    Website: LINK

  • 11 Festive Christmas Decorations You Can Print at Home

    11 Festive Christmas Decorations You Can Print at Home

    Reading Time: < 1 minute

    The best part about the holidays is jazzing up our normally drab surrounds with the technicolor delights of tinsel, baubles and all manner of festive frippery. But before you go digging around the closet for that dusty old box of hall deckers, check out these 3D printable Christmas decorations and consider making some new ones!

    For your festive pleasure, here’s 11 Christmas decorations you can 3D print at home.

    Or, if you find yourself currently sans 3D printer, there’s always our 3D printing price comparison engine. Upload printable files and get near-instant prices from many of the world’s biggest print services.

    Also, don’t forget to check out the All3DP 3D Printing Gift Guide.  It’s full of ideas and inspiration for 3D printing themed gifting.

    Website: LINK

  • Students Use 3D Printing to Create Suspended Bamboo Pavilion in Jerusalem

    Students Use 3D Printing to Create Suspended Bamboo Pavilion in Jerusalem

    Reading Time: 2 minutes

    Students in Jerusalem used 3D printed joints to create a unique, suspended bamboo pavilion at the Bezalel Academy of Arts and Design.

    Thanks to their students’ innovative design, Bezalel’s Architecture Department has a new hanging pavilion at the entrance. It’s made of ropes, natural bamboo reed, and various 3D printed joint shapes.

    They created this 430 square feet (40 sq. meters) structure as part of a Design-Build summer studio project.

    “The Bamboo Pavilion welcomes visitors, students, and faculty with an inspiring play of shadows and lights, and invites them to engage with the hanging bamboos while challenges their perception of being ‘inside’ and ‘outside,’” the architecture students explain.

    So, how did they make it? Students used 3D computer modeling to generate different suspension patterns. Next, they attached them to a hanging bamboo grid.

    They attached the bamboo using the 3D printed joints, which are shaped kind of like ‘shuriken,’ or Japanese throwing stars. Or, if you’re not into ninja movies, just imagine the now famous ‘fidget spinners.’

    Due to the flexibility of 3D printing, the students can change the prototypes at any time. This is also in part due to the non-permanent nature of the structure. So, their suspended bamboo pavilion can be constantly adapted.

    Their unique concept invites visitors to stand within the suspended bamboo reeds and feel neither inside nor outside the pavilion.


    Bamboo Pavilion Jerusalem

    About the Design-Build summer projects

    Design-Build projects are known throughout the world for their ‘green design ideas, innovations and inspiration to build a cleaner, brighter, and better future.’

    Every year, they also vote on the Best Design-Build Projects, which enjoy widespread international support and recognition.

    Of course, these international efforts certainly yield very interesting and useful creations.

    For example, one American student built a modern cabin for his father made entirely from recycled materials. Another group from France discovered a way to use banana peels to detect skin cancer.

    While this project certainly isn’t detecting cancer or providing eco-friendly homes, it’s unique use of 3D printing has created a beautifully artistic entrance to this popular design school in Jerusalem.


    3d printed parts for Bamboo Pavilion

    Source: Inhabitat

    Website: LINK

  • Purdue Researchers Print Explosives and Propellants

    Purdue Researchers Print Explosives and Propellants

    Reading Time: 3 minutes

    Researchers at Purdue University have developed a technique to safely and precisely deposit tiny traces of highly reactive materials.

    Ever wonder how airbags deploy so quickly? The answer is a small amount of solid propellant, which is ignited to achieve a tiny burst. And that’s just one example of micromechanical systems benefiting from energetic material.

    Taking the technology one step further is a diverse team of researchers from Purdue University in Indiana. They’ve developed a means to deposit tiny amounts of energetic material with unprecedented levels of precision and safety.

    Essentially, energetic materials are solids that rapidly produce large amounts of thermodynamic energy when ignited. Examples include explosives, propellants, and pyrotechnics.

    The team’s printing method combines expertise in this area with knowledge of additive manufacturing. Apart from the “extruder”, which uses inkjet technology, their custom machine uses normal principles of deposition printing to weave two materials with a high degree of complexity.

    In order to produce the desired explosive effect, a metal and metal-oxide must overlap in such a way as to permit in situ mixing. Thanks to the team’s efforts, these materials — called nanothermites — can now be deposited at a precision of 0.1 microns. That’s 1000 times thinner than a human hair!


    Printing with energetic material

    A Complex Technology with a Complex Team

    Instead of an extruder with a hot-end, the researchers’ printer uses inkjet technology. Specifically, a glass tube is surrounded by material that flexes when voltage is passed through it, squeezing the glass tube in order to force droplets out of the nozzle.

    By adjusting the voltage, the size of the drops and their rate of propulsion can be finely tuned.

    This type of inkjet printing is called piezolectric. It has the advantage over other methods of allowing for a wider range of printing materials. Of course, explosives probably weren’t on anyone’s minds when inkjet printing was first being developed, back in the 70s.

    Even the team at Purdue is able to experiment with different types and amounts of energetic material. Some burn hotter than 3000 degrees Celcius, and droplet volumes are in the range of picoliters (10−12).

    Managing all the various factors requires a diverse group of experts. The printer’s creator is Allison Murray, a Ph.D. candidate in mechanical engineering. She’s supervised by four professors. Dr. Rhoads is a professor in the same field, but Dr. Chiu is an expert in inkjet printing and Drs. Gunduz and Son in energetic material.

    It’s thanks to this unique collaborative environment at Purdue that this research, which has huge potential, has come to exist. Murray reflects on her own experience:

    “When you think engineering, you’re thinking maybe the automotive industry… maybe I’ll make a plane… And then this project comes across your radar, of energetic material and additive manufacturing, which are two things that I personally never saw together. But now that I have, I’ve been able to gain a lot of knowledge in both areas.”

    Source: Purdue University


    Murray next to her custom-built printer
    Murray next to her custom-built printer

    Website: LINK

  • Say Pfft to The Last Jedi: 3D Print Your Own Boba Fett Instead

    Say Pfft to The Last Jedi: 3D Print Your Own Boba Fett Instead

    Reading Time: 2 minutes

    Whether you loved Star Wars: The Last Jedi, fell asleep halfway through or found it the pits, cheer yourself up with this excellent Boba Fett printable.

    There’s certainly no dearth (or should we say Darth, hardy har har) of Star Wars printables. It’s not unreasonable to expect them rise to prominence around the release of any major installment in the far-flung franchise.

    Star Wars: The Last Jedi however, is something of an exception. But, for all the mixed reviews, hollering of reinvention of series-staple conventions and butt-aching run time, we haven’t seen much in the way of iconic new characters, vehicles or creatures to nerd out over and 3D print.

    So the classics will have to do. And few things are more iconic for Star Wars than Boba Fett.


    Star Wars Boba Fett printable

    3D Printed Boba Fett

    Morgan Morey, a UK-based jewelry maker, 3D modeler and pop culture aficionado (judging from his MyMiniFactory uploads) recently uploaded a highly detailed Boba Fett 3D model to MyMiniFactory.

    The model was sculpted in ZBrush (and streamed live on Twitch, though sadly the session is no longer available to view) over the course of some four hours, according to htxt.africa.

    Split into 7 individual parts, you’ll need some 3D printing and post-processing savvy to get the full effect of this bounty hunter. And for the ambitious (or those with an SLA 3D printer), there’s also a full single print model, too.

    Source: htxt.co.za

    In case you need something to put the new Star Wars films into perspective, here’s the Star Wars Holiday Special in all its hideousness.

    Website: LINK

  • A Lifetime In 60 Seconds

    A Lifetime In 60 Seconds

    Reading Time: 2 minutes

    If there’s one thing skin care ads aren’t famous for, it’s honesty. A Norwegian pharmacy is doing away with all the airbrushing and editing for their latest campaign, however, and they’ve produced a poignant video that shows ‘getting older’ in a new light.

    ‘A Lifetime in 60 Seconds,’ a collaborative project between Vitus Apotek and ad agency T/A Pol, is a frank and unfiltered look at how our skin ages over time, and the importance of both caring for it and loving it. Women and girls from ages 0 to 100, of all colors, shapes, and sizes were filmed and arranged in chronological order, illustrating the many ways beauty evolves just like wisdom and character.

    “We’re not doing any retouching. We’re going to let people be what they are… it’s a really refreshing take on showing the human body just the way it is,” ad photographer Pål Laukli said of the project in a behind-the-scenes video.

    Scroll down to see life flash before your eyes in a brief minute, then let us know what you think of this advertising approach in the comments.

    See all 100 years of beauty here:

    Website: LINK

  • Need for Speed – Payback im Test: Es ist Zahltag!

    Need for Speed – Payback im Test: Es ist Zahltag!

    Reading Time: < 1 minute

    [unable to retrieve full-text content]Website: LINK

  • Take a journey inside the universe, with COSM

    Take a journey inside the universe, with COSM

    Reading Time: 7 minutes

    The unseen universe is all around us – things we cannot see because they are too small for the naked eye to ever register. There is an opportunity to explore the universe in a unique way in VR, and Dynamoid are taking advantage of it with COSM (Available on Viveport – currently US customers only).

    We asked Laura Lynn Gonzalez, co-founder at Dynamoid (on Twitter) and all-around developer on COSM, to chat to us about the platform.

    What’s COSM about in a (ahem) microcosm?

    COSM is a powerful tool for creating VR experiences using all kinds of real data – from scientific data to analytics to financial datasets, and on. The current release on Viveport is a collection of demo experiences we created to show off what the technology is capable of. In the future, we’ll update COSM as a fully-fledged platform where you can create custom experiences.

    What can you do in COSM? What’s available to explore?

    In our original demos, you can zoom into a water plant or a human hand, down to the molecular level, exploring a system of branching, interrelated environments. Recently, we’ve added two additional experiences: one shows off some really cool neuron structures and MRI-type datasets. It includes a mouse environment with a mouse brain, and the inside of a mouse kidney. (Eww right? It’s pretty amazing actually.)

    The other new environment gives you a peek into the non-structural data we’ve been implementing: we imported some energy statistics from quandl.com and made an animated visualization of CO2 emissions vs. solar energy consumption/capacity, visualized per-country on top of a model of the Earth (Strangely enough, a similar-looking animation was being passed around the internet this last week or two.) We augmented this solar power visualization with a model of our local star cluster, an “inside the sun” view, and imported a super-detailed model of the ISS that we got from NASA’s website, just for fun. If you look closely, you can see how it appeared in 1998!

    COSM

    What were the origins of COSM? What prompted you to create it?

    Back in 2010, I got an NSF grant and made a marginally successful app called Powers of Minus Ten – this was the precursor to COSM in a lot of ways. It had the same zooming navigation, and similar content to some of the current COSM demo environments. The problem with Powers of Minus Ten was that we couldn’t create content fast enough to really satisfy users, so we shifted focus to creating a platform where anyone could use our existing tools to upload data and create their own content. There are a ton of open data repositories – many pieces are there, they just need to be assembled.

    Farther back, the inspiration for Powers of Minus Ten came from two places. First, there was a push in the planetarium industry to add in microscopic content to real-time astronomy visualization software, so a lot of the core concepts came from my discussions and collaborations with those guys. The other piece was, of course, the Eames film, Powers of Ten.

    What I didn’t envision in the beginning is how suited what we were working on was to the VR medium. I’ve been working in 3D space since forever ago, even making 360-ish immersive films for planetariums, but VR is the first time that the average person can explore amazing 3D content like a pro, without having to learn the complex UIs and control schemes of Maya/Max/Unity/etc or even console games.

    What I also didn’t anticipate is how our COSM toolset could be used for any kind of multidimensional data – even data that doesn’t describe something structural in nature. Any time you have more than two dimensions on a graph, it’s very difficult to visualize in traditional, 2D space. Most times you end up with something that looks a lot like a ball of string. Data scientists and content experts can parse these complex graphs, but the average person needs something a little more easy to consume, visually.

    COSM

    If a human is 1:1 scale in VR, just how small do you become in COSM?

    That depends, since COSM can support experiences that either expand or contract, a human at 1:1 scale could be a very small part in a large system, or a large part consisting of smaller systems. It’s really up to the creator of that environment. In our water plant and human hand experiences, you can zoom down to the level of macromolecules (where atoms are just starting to be visible), or ~100,000,000x. In our Solar Energy demo, you become about 0.0000001% of your actual size.

    What sort of facts are explained while using COSM? What data was used to create it?

    The written content of our demo environments is pretty basic, but in general we designed the current experiences to show off the relationship between things at different scales or levels of organization. Over the last six months or so, we’ve been working on supporting a wider variety of data types to demonstrate the huge range of potential uses. So far, we’ve got:

    • Protein and molecular structures from the Protein Data Bank
    • Neuron 3D structural data from Neuromorpho.org
    • Solar energy and other datasets from quandl.com (source of lots of financial and economic data)
    • Our local star cluster from the AMNH’s Digital Universe Atlas
    • 3D models from NASA
    • 3D models from Turbosquid.com

    We create a few of the 3D models and animations from scratch, but a lot of the content is imported directly from the sources above.

    How do you deal with a potential sense of motion sickness as you ‘zoom’ into objects and change scale dramatically?

    We haven’t had any reports of users actually getting motion sickness due to the zoom transition, but we understand that people are concerned that this might be an issue. In the latest release, we added a marquee effect, similar to Google Earth’s, that essentially puts “blinders” on you during the zoom transition. Generally, I think that the radial blur effect combined with the short duration of the zoom is good enough for most people, but we welcome the feedback of the motion-sensitive!

    COSM is primarily an education tool. What other possibilities do you think it could open up, when dealing with scale like this?

    Although education is an obvious use for the technology, we designed the COSM platform as a general data visualization tool – something that anyone who works with complex data can use to gain insight from their datasets or communicate concepts to others.

    At its core, COSM as a micro and macro exploration tool to help people understand complex systems and the relationships of their components at different levels of organization. Our hope is that you’ll be able to use it to explore huge amounts of data in new ways; seamlessly transitioning from one level of complexity to another, pulling up metadata and datasets as you think of them, sharing complex insights with others, etc.

    COSM

    If you could ‘shrink’ in real life – where would you want to see, up close?

    That’s a tough question! If you were to actually shrink in real life, aside from immediately dying because the oxygen molecules would be too big for your lungs to use, you would only be able to see things that are larger than about 100 nanometers, or 10,000,000x, because below that level light waves are too big to bounce off stuff that small, let alone come back to your (also now too small) eyeballs. Also, the space between things is either very crowded or very empty, depending on the scale, so you’d likely not see anything perceptible. Part of the reason we’ve been working on COSM is so we can begin to conceive of things that have a physical structure but aren’t able to “see” in a traditional sense.

    All of those caveats aside, I’d like to “see” what goes on in the levels below subatomic particles. Scientific models get pretty abstracted away from physical structures at that level, so it’s always interesting to think about visualizing that extreme scale.

    Finally – what’s next? Any other VR projects in the pipeline you’d like to tell us about?

    COSM development is ongoing – this is just the beginning! In the future, you will be able to import any kind of data, create your own experiences, and remix existing experiences. We’re working on supporting a bunch of different data types and usage scenarios, and are running pilots and gathering user data on how and why people would want to create their own data-based visualizations.

    My personal long-term vision is that, together, we’ll be able to build a customizable, modular, visual model of the universe, both in the traditional “structural” sense but that also encompasses the more abstract “universe of data” that is produced through all human activity.

    Thanks for talking with us, Laura!


    COSM: Worlds Within Worlds is available on Viveport (currently US only).

    Website: LINK

  • 360 Video // Microsoft Learning Hub 2017

    360 Video // Microsoft Learning Hub 2017

    Reading Time: < 1 minute

    Microsoft Learning Hub 2017 , hier kann man ein bisschen ins Klassenzimmer der Zukunft reinschnuppern.

  • Microsoft Learning Hub – Der Lernraum der Zukunft

    Microsoft Learning Hub – Der Lernraum der Zukunft

    Reading Time: 3 minutes

    Wie wir unsere Kinder auf die digitale Transformation vorbereiten können

    „Wir wissen zwar noch nicht welche Jobs unsere Schülerinnen und Schüler im Jahr 2025 haben werden, aber wir wissen, dass wir sie bereits heute bestmöglich auf die Arbeitswelt der Zukunft vorbereiten müssen. Microsoft ist sich seiner gesellschaftlichen Verantwortung bewusst, deshalb haben wir altersentsprechend verschiedene Programme entwickelt, um die digitale Bildung zu fördern und unseren Nachwuchs fit für die Zukunft zu machen“, so Yuri Goldfuß vom Microsoft Education Team.

    Bildungstechnologien von morgen bereits heute erleben „Dafür war es notwendig die Bildung der Zukunft erlebbar zu machen und modernsten Bildungstechnologien einen eigenen Raum zu geben – den Microsoft Learning Hub. Unsere Mission ist es, Lehrerinnen und Lehrer zu ermutigen vermehrt digitale Werkzeuge in ihren Unterricht einzubinden“, ergänzt Alexandra Thonabauer vom Microsoft Education Team.

    „Um bestmöglich auf die Arbeitswelt von morgen vorbereitet zu sein ist das selbstbestimmte Navigieren durch die digitale Welt ebenso wichtig wie Lesen, Schreiben und Rechnen. Darüber hinaus können Lehrkräfte mittels dem Einsatz digitaler Bildungstechnologien bereits heute wesentlich effektiver arbeiten und so noch stärker auf die individuellen Bedürfnisse der Schülerinnen und Schüler eingehen.“

    Das Thema „Laptop-Klassen“ wird in unserer Gesellschaft momentan heiß diskutiert – Kurt Söser, Lehrer an der HAK Steyr, erzählt von seinen ganz persönlichen Erfahrungen seines Berufsalltags: „Im Allgemeinen kann man sagen, dass meine Schüler aus den digitalen Klassen um einiges motivierter in die Schule kommen, als Schüler aus Klassen mit traditionellen Lehr- und Lernmodellen. Außerdem fehlen sie seltener und sind durchschnittlich um einen Notengrad besser.“

    Gleichzeitig wirft die Digitalisierung jedoch auch eine bedeutende Frage auf: Ob die Digitalisierung des Klassenzimmers dazu führt, dass Schülerinnen und Schüler künftig immer weniger zwischenmenschliche Beziehungen untereinander aufbauen werden. Kurt Söser verneint diese Frage vehement: „Neue Technologien im Bildungsbereich haben das Potenzial, soziales Lernen beispielsweise im Rahmen von Gruppenarbeiten oder internationalen Schul-Kollaborationsprojekten künftig enorm zu fördern. Die weltweite Zusammenarbeit zwischen einzelnen Schülerinnen und Schülern war noch nie so einfach. Man arbeitet in Echtzeit zusammen und auch die Lehrkörper können wesentlich effektiver und effizienter arbeiten.“

    Ein weiteres Beispiel, das zeigt, wie man mittels der richtigen Technologien den Unterricht besonders kreativ gestalten kann, beschreibt Susanna Jilka von der PH Wien: „Alle meine Schülerinnen und Schüler spielen in ihrer Freizeit Minecraft. Warum sollte ich die Minecraft: Education Edition also nicht auch im Rahmen meines Unterrichts einsetzen? So können meine Schülerinnen und Schüler das theoretisch Erlernte ohne Umwege, eigenverantwortlich und völlig selbstständig umsetzen.

    So wird das Wissen spielerisch vertieft und maßgeblich gefestigt. Und das hilft nicht nur in der Mathematik: Meine Schülerinnen und Schüler erklären mir ihre Minecraft-Projekte mit einer erzählerischen Freude, wie ich sie in Deutsch Aufsätzen niemals lesen würde.“

    Bild Galerie:

    Links: https://www.microsoft.com/de-at/unternehmen/das-neue-arbeiten/learning-hub/default.aspx

    https://news.microsoft.com/de-at/minecraft-education-edition-wie-game-based-learning-das-bildungswesen-revolutioniert/#sm.001b3sjsj17udeibpxb1roinhvrap

    https://www.microsoft.com/de-at/unternehmen/das-neue-arbeiten/learning-hub/erleben-sie-die-bildung-der-zukunft.aspx?CollectionId=6117cc36-a093-4550-b448-d2fc1d584157

  • A Quick and Easy 3D Printable Valentine’s Gift

    A Quick and Easy 3D Printable Valentine’s Gift

    Reading Time: 13 minutes

    Valentine’s day is approaching fast. If you are still looking for a last-minute, yet creative gift, don’t despair! We might just have the solution for you: a 3D printable Valentine’s gift in the form of a heart-shaped bookmark. 

    More…

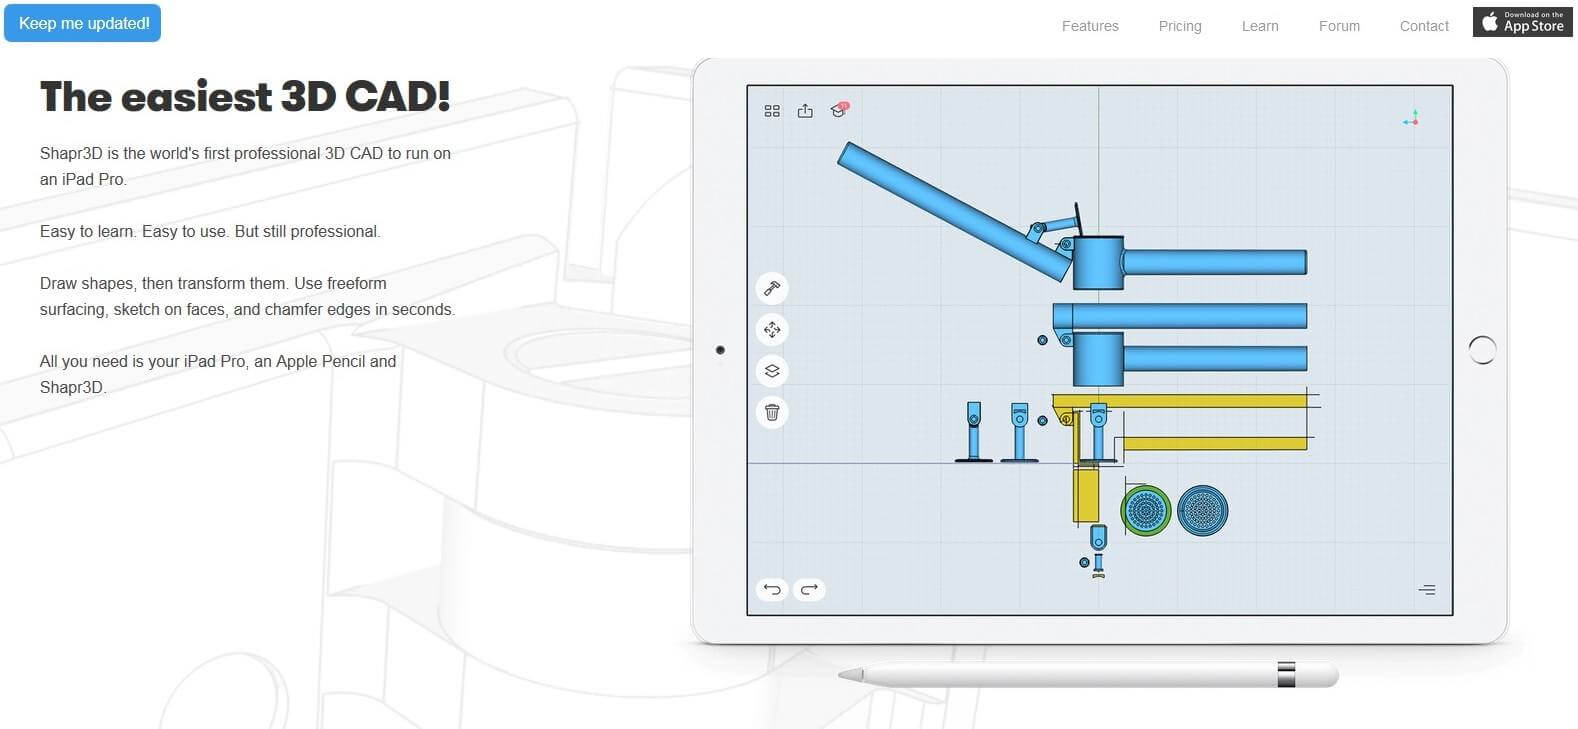
    As we know only too well, CAD modeling can be daunting, especially if you are a complete novice in the field. That’s why for this tutorial we have decided to team up with the guys at Shapr3D, a CAD software which is easy to learn, easy to use, but that still meets professional standards. And it is perfect for 3D printing projects.

    In order to show you how easy it can be to get started with your first project, Daniel Rosner from Shapr3D wrote this step-by-step guide to create a heart-shaped bookmark, which you can print for your special someone. Like this, you will learn how to model a file and, at the end, you will have a personalized gift for Valentine’s day – how awesome is that?


    Shapr3D main page

    Main page of Shapr3D © Shapr3D

    As we know that step-by-step guides can sometimes be a bit boring, we also made you a step-by-step movie, which explains in less than 5 minutes how to design your heart-shaped bookmark. Have a look for yourself:

    If you wish to skip the tutorial and just download the heart-shaped bookmark in order to print it, have a look at the end of this article.

    So, without further ado, here is the tutorial on the basics of 3D modeling with Shapr3D. Fire away Daniel:

    Basics of 3D modeling: Creating a bookmark with Shapr 3D

    This blog post will walk you through the very basics of creating print-ready 3D designs in Shapr3D, a professional 3D modeling tool, and will show you how to print those designs the easiest way. Since Valentine’s day 2017 is on the horizon, we wanted to show you how to design a simple object that fits the occasion. We found the inspiration for the bookmark on Thingiverse, as we were looking for a basic but interesting object, i.e. a perfect fit for a beginners tutorial. Have fun learning.

    More…

    We used the following tools to create the bookmark:

    • iPad Pro
    • Apple pencil
    • Shapr3D (CAD software – runs on the iPad Pro)
    • Craftbot (3D printer)
    • Craftware (the slicer software that comes with the Craftbot 3D printer)

    iPad Pro, Apple Pencil © Apple Inc. – Craftbot 3D printer © 3dprintingforbeginners.com

    A. The basic concepts

    Before we jump into the design work, there are two important lessons we would like you to understand. These lessons will actually shape the way you think, when you approach a design work. Although it might make everything a tad more difficult in the beginning, but it will definitely pay its dividends in the long run.

    1. Always go from 2D to 3D

    3D modeling always starts with a 2D sketch. Your sketch should be as simple as possible. This basic rule of thumb will help you get started even when you’re faced with a formidable object, like a turbine. (A turbine is, after all, just a combination of curved lines on top of a circle). This will also give you a bigger freedom when you start adjusting your object.

    2. Make sure you understand your goals and the specifics

    Before drawing anything, you should have a detailed look at the object you want to create. Do you know the size of your object, the width, the height and the length? Make sure you have these basics under control before you jump into anything.

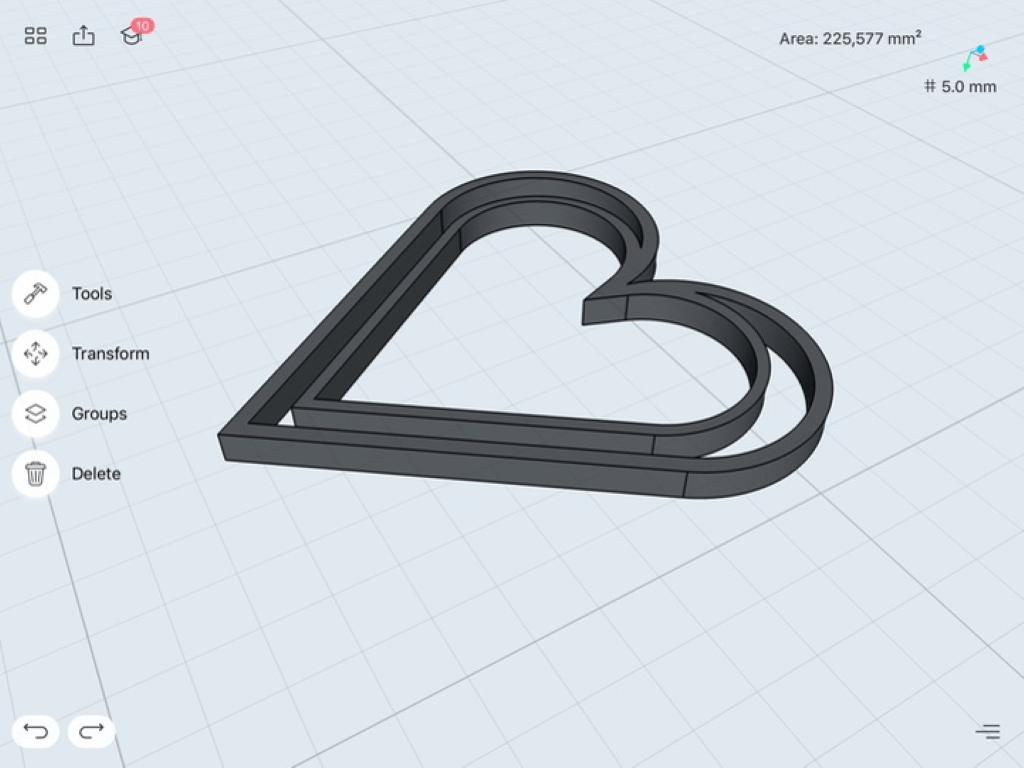
    We made your life easier and have the calculations for the bookmark ready. Our heart will be made up of 2 arcs and 2 lines connected to them. Here are the parameters:

    • Total length: 50mm
    • Total width: 50mm
    • Height: 3mm
    • ​Total width: 50mm
    • ​Arc radius: 12,5 mm
    • Big circle width: 1,5mm
    • Scale of the smaller circle in comparison of the bigger one: 0,8mm

    Heartshape bookmark measurements

    Heart-shaped bookmar parameters © Shapr3D

    B. Modeling the bookmark

    There are multiple tools you can use for 3D modeling, ranging from beginner-level software (e.g. TinkerCAD) to professional ones (Shapr3D, Fusion360, Rhino3D). There’s usually quite a price range difference between these as well. We chose Shapr3D, because it runs on a freemium model, allowing for a medium quality STL file export for 3D printing, free of charge. And it also has one of the best sketching tools on the market right now. The flip side that currently it only works on iPad Pro with Apple Pencil.

    Create your workspace

    Creating a workspace will help you keep your sketches clean and transparent, while it gives you guidelines on how to work precisely. This is not an essential step in the design process, but creating the workspace makes modeling much easier.
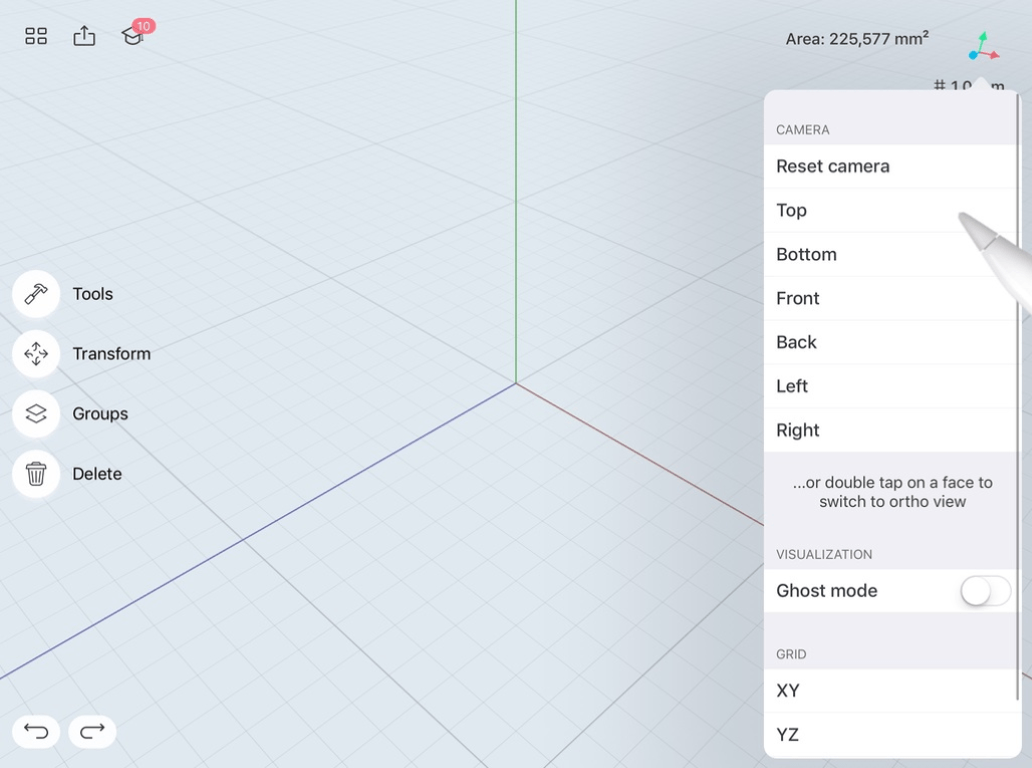
    1. Select the view

    Selecting the proper view is extremely important. You can go to a plain by either double tapping or by opening the View menu in the top right corner and selecting the Top Camera. The later solution is the better one, as it will put the origo (the point of origin, i.e. the coordinates 0,0,0 of the X,Y and Z axes in the Cartesian coordinate system) in the middle, giving you a pleasant and transparent workspace.


    Shapr3D - selecting your view

    View selection © Shapr3D

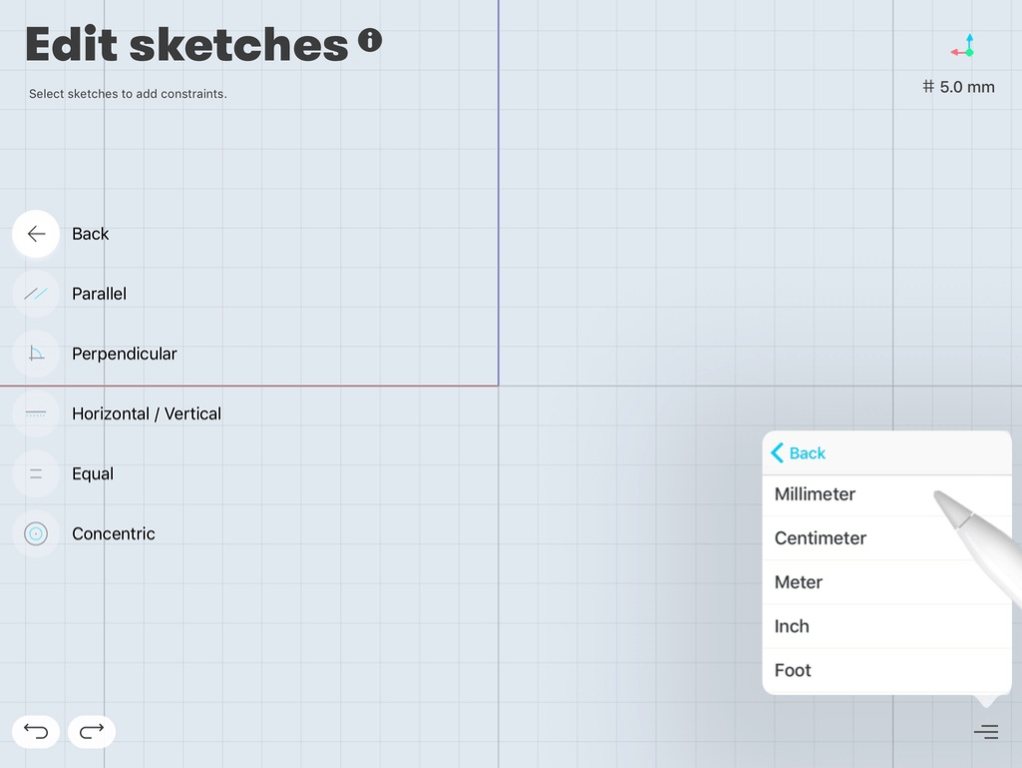
    2. Select millimeters as units

    The bookmark is measured in millimeters, so we should go ahead and make sure our sketch has this unit setting as well. You can reach the Units Settings by clicking on the „hamburger icon“ at the bottom right corner. Select Millimeters.


    Shapr3D unit selection

    Selecting units © Shapr3d

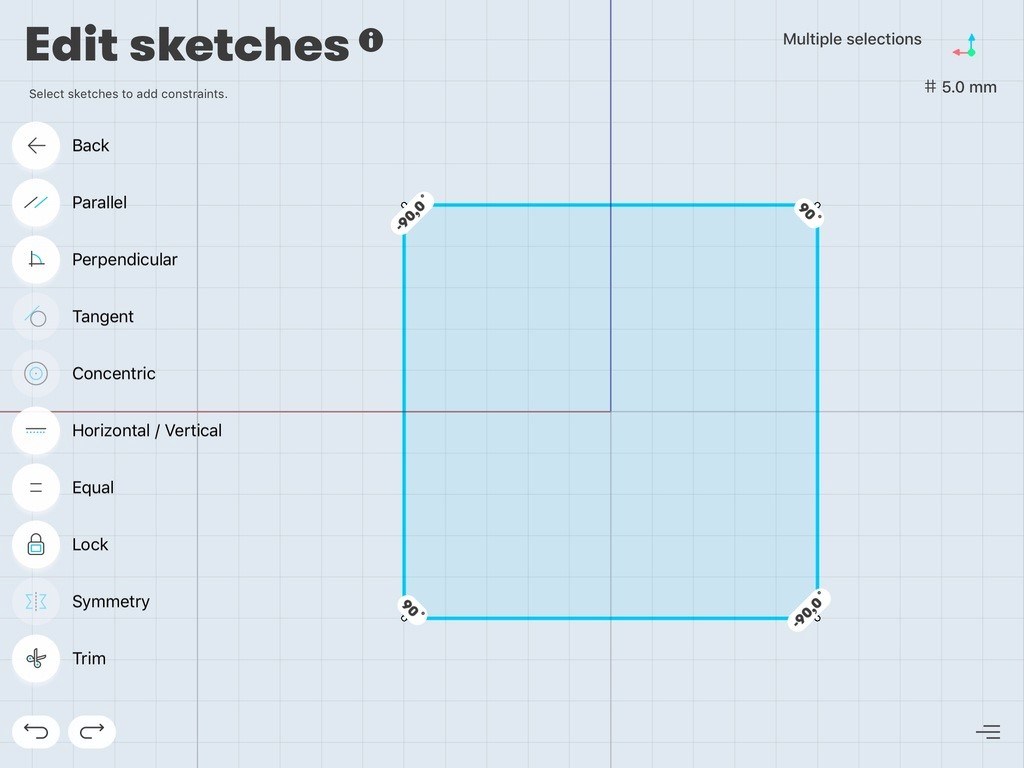
    3. Create a 50×50 mm square

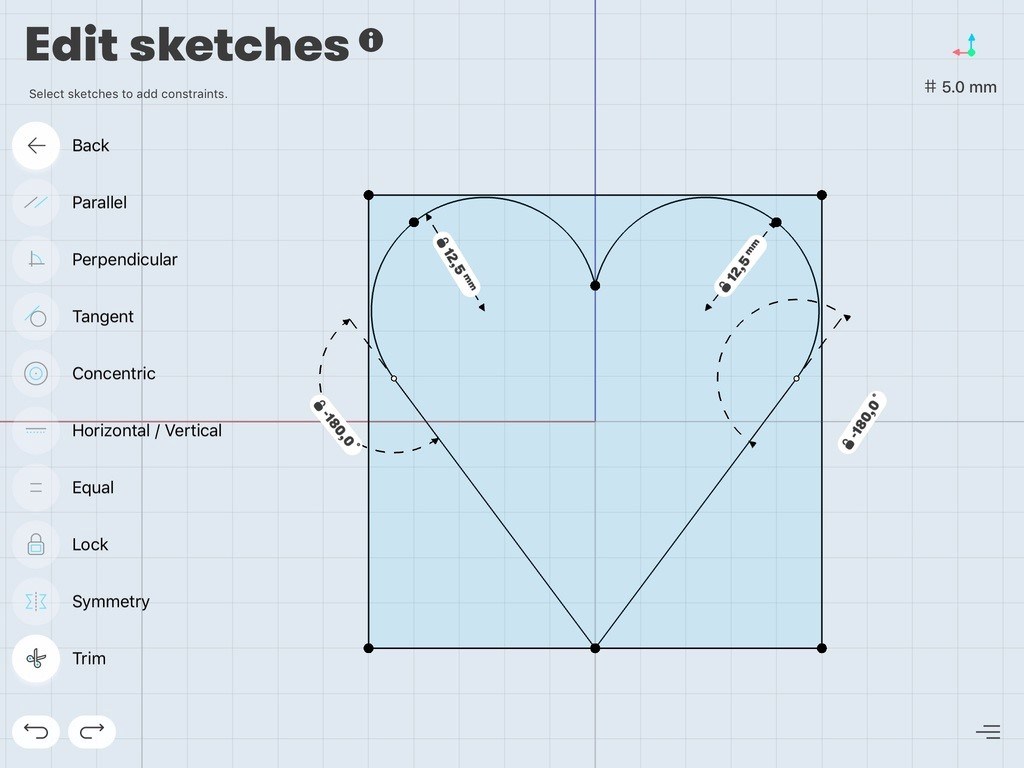
    Creating the 50×50 workspace is an easy practice before we get into the more serious modeling. Draw a 25mm line on the blue axis (X), then draw a 25 mm line perpendicular to it. This will give you your first corner and help you center the square at the origo. Now you only have to draw four 50 mm long perpendicular lines to create the square. Once you are done, you can delete the two, 25 mm guidelines and lock the square with the Lock icon in the Constraint menu.


    Square creation in Shapr3D

    Creating a workspace © Shapr3D

    Creating the hearts

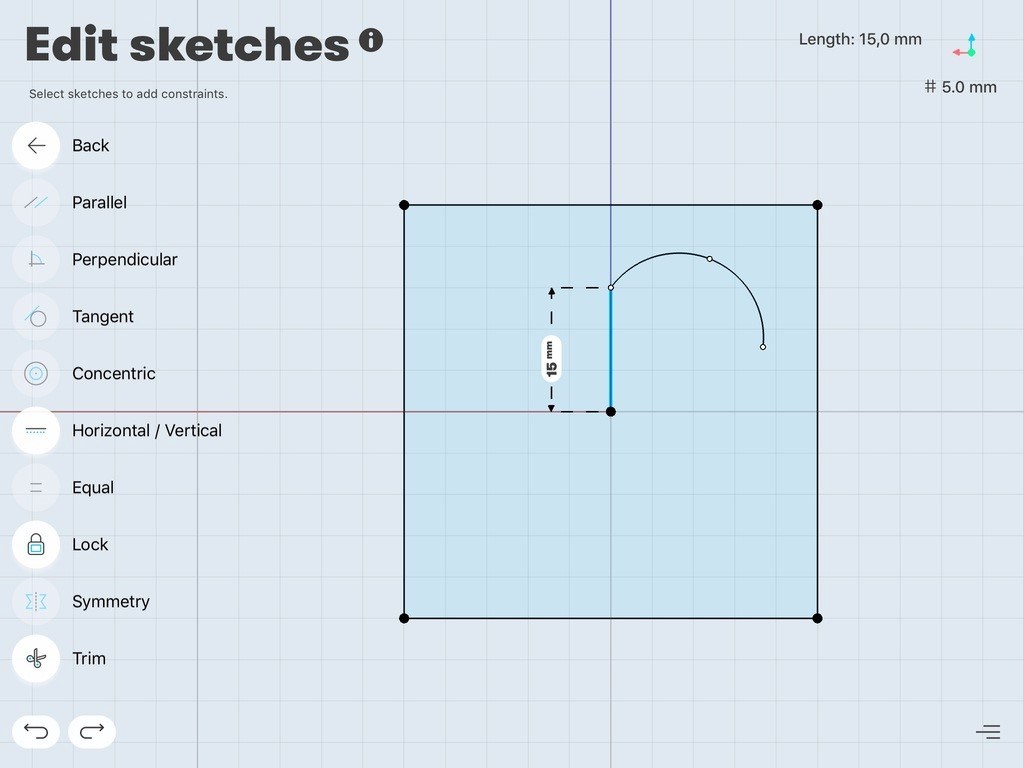
    1. Create the arc, starting 15mm from the origo

    Create a 15 mm long guideline starting from the origo. Lock this point and start creating the arc from the fixed point. You can create an arc easily by making an arc-like movement with your pencil. You can switch between drawing a straight line and an arc/circle by wiggling (shaking) your pencil while keeping contact with the pencil and the iPad Pro (see pic below).


    Setting an Arc in Shapr3D

    Creating the arc © Shapr3D

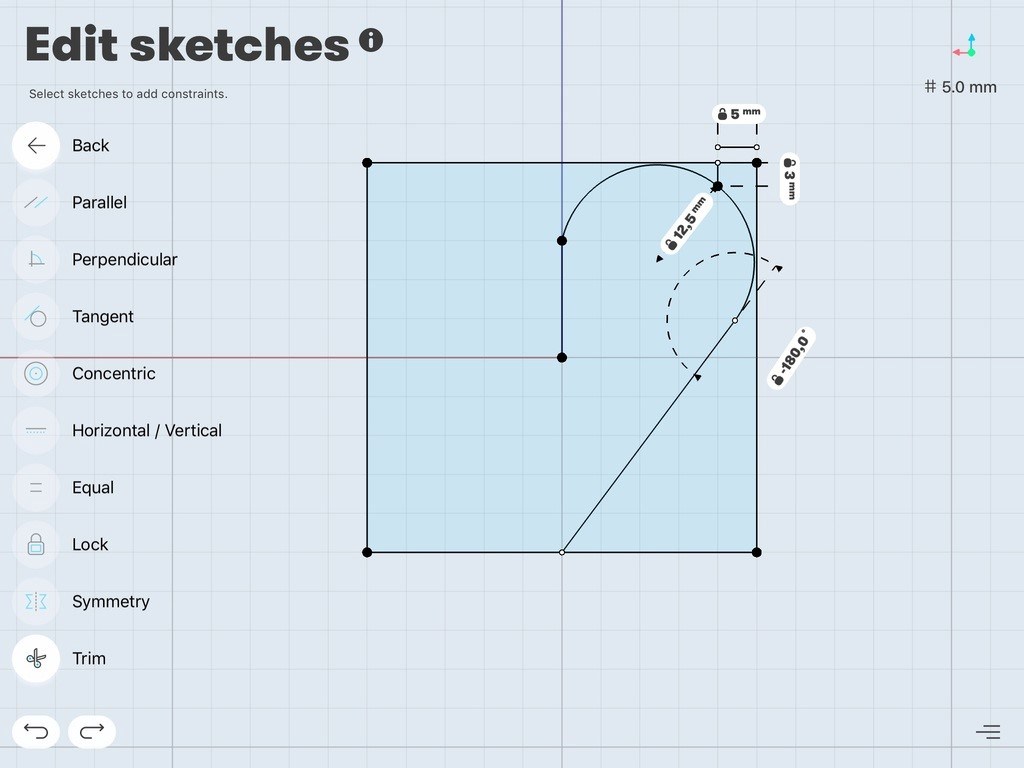
    2. Specify the arc: control points and radius

    Since we have the precise parameters, we should start using them. Click on the arc, and then click on the number showing how long it is. Set this number to 12,5 mm – this will automatically give it a Length Constraint.

    Constraints are geometric rules that tell sketch geometry how to behave (parallel, perpendicular, horizontal, vertical, equal, concentric, etc). These constraints can be added and modified later. You can also set a constraint to length, angle or diameter.) In this case, the length constraint will give a specific value to the length of the arc (12.5 mm). So even if we modify other parts of the sketch, it will keep this value. If we don’t need a constraint anymore, we can easily delete it, by clicking on the number and unlocking them.

    You will see 3 points on the arc, two endpoints and a control point. We now know where the first endpoint is, and we will deal with the second one later. But we have to find a proper place for the control point. It is located 5 mm to the left and 3mm down from the upper right corner. You can measure the exact location (as you can see on the picture I chose this way) or you can use the grid, the results will be the same. When you’ve found the location just drag the control point there and lock it.


    Setting constraints in Shapr3D

    Setting control points and radius © Shapr3D

    3. Creating the endpoint of the arc, the line and making them tangent

    Now we have to find the second endpoint’s place. It will be defined by the line that is tangent to it, so let’s create a that line first. Draw a line from the end arc point, and snap it to the bottom edge of our square. This will create a Coincidence Constraint, the line will stick to the chosen edge.

    When selecting both the arc and the created line, you will see a degree number popping up. Modify it to 180 degrees, and drag the free end of the line to the middle point of the bottom edge (either by using the grid or measuring it: 25 mm from either of the bottom corners).


    Shapr3D endpoints

    Setting endpoints and line © Shapr3D

    4. Repeat this on the other side

    You just have to repeat the 3 steps mentioned above on the other side of the square. Make sure the two parts are sharing the two points in the middle.


    Full Heart

    Creating the heart shape © Shapr3D

    Alternative techniques

    If you feel comfortable with 3D modeling you can try the following, a bit more advanced technics, which will be much easier to use in the long run. If you click on Transform you’ll see 4 different options that helps you move, rotate, scale your objects. We are going to use two of these to create the full heart.
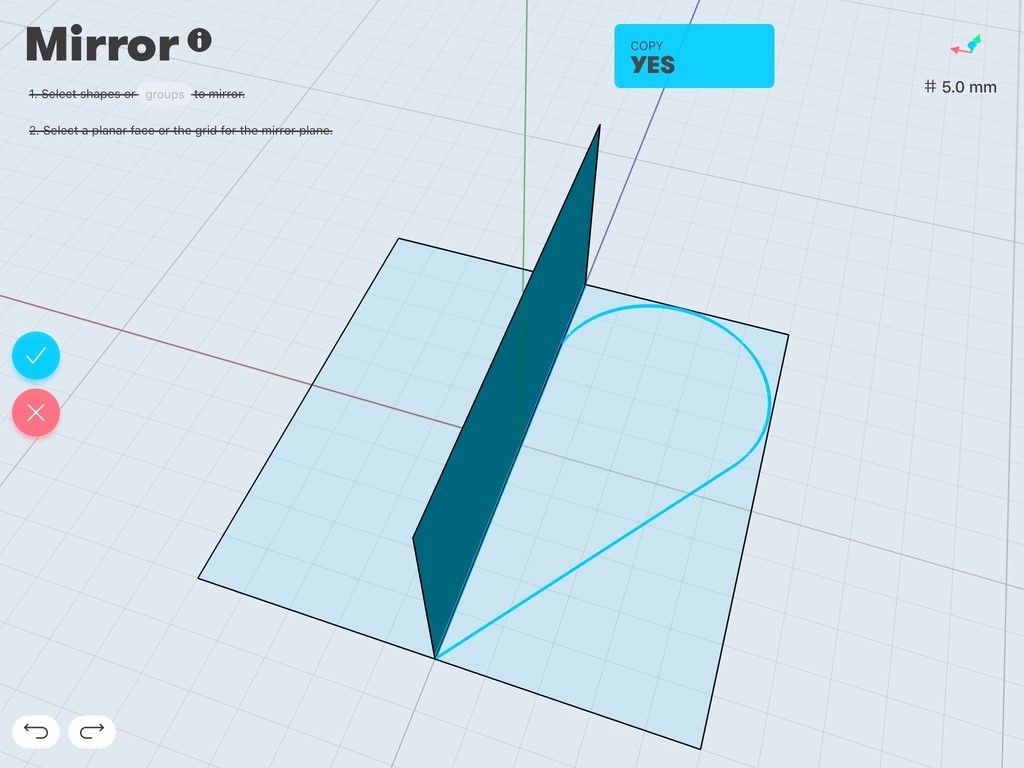
    Mirror&Copy

    You can mirror 2D and 3D objects as well, but you’ll always need a 3D plain to do this. First create the plain in the middle section by connecting the middle points of the two horizontal edges. Then click on the line and extrude it, by dragging it upwards. Click on the Mirror tool, select your object, select your plain, click Copy Yes and then the OK button.


    Mirror and copy in Shapr3D

    Rotate&Copy

    Rotating is even less time consuming. You only need an axis, rather than a plain. Click on the Rotate tool. Select your object, select the axis of rotation, Copy YES and lastly the angle of rotation (180 degrees)


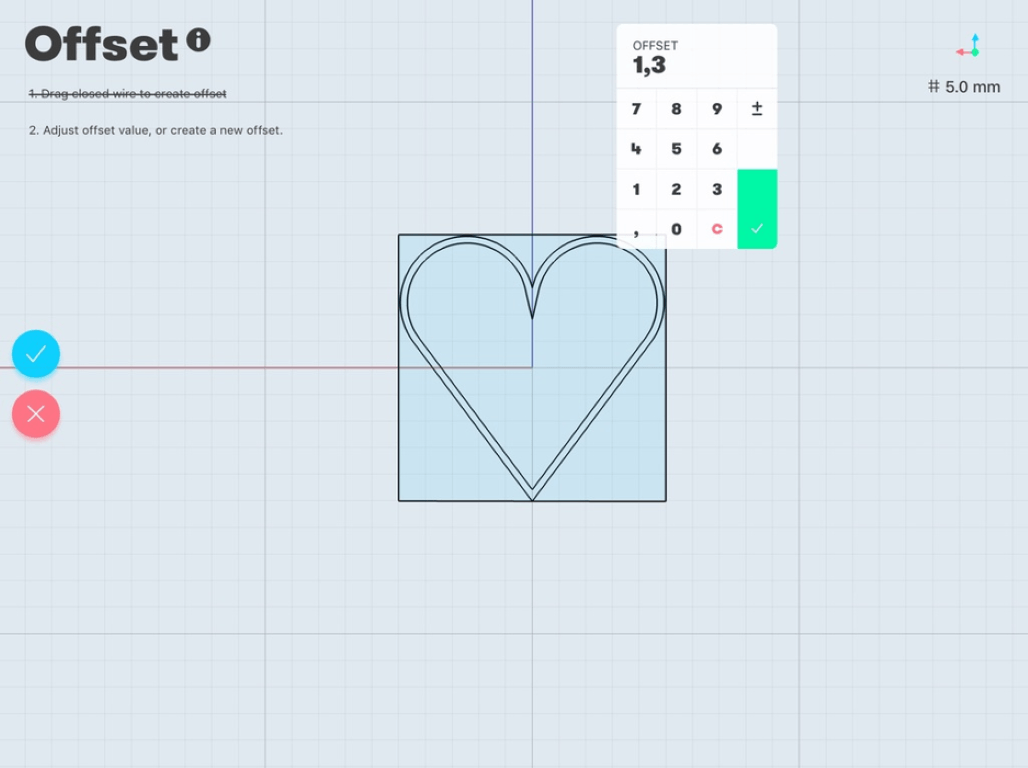
    5. Making the heart curve into a heart surface, with the offset tool

    You can easily turn these curves into the desired surface by offsetting them. Find the Offset tool in the Tool Menu, select it, and then follow the instructions on the screen. First select the curve to offset, and then select the rate of the offset. It should be 1,5. It will create a slightly smaller heart (1,5 points smaller) than the original one. This will be the thickness of the outside heart eventually.


    Shapr3D - offset

    Offset function © Shapr3D

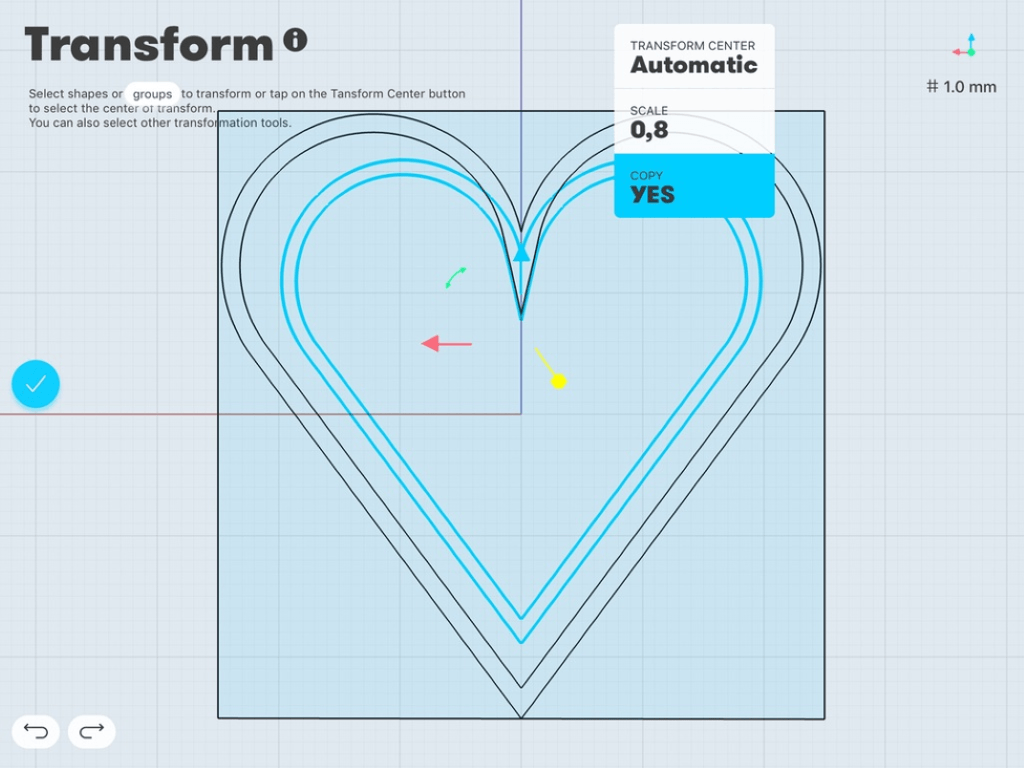
    6. Copying and scaling the heart

    We have to create the smaller heart in the middle as well. Since the two hearts look the same, we can easily copy and scale down our originally created heart. For this, go to Transform/Freeform, then select all the curves. Tap on Copy/Yes and by moving your Pencil scale it to a 0,8 rate version of the heart. This will make a smaller copy of our heart.


    Freeform and transform in Shapr3D

    Transform function © Shapr3D

    7. Adjusting the two hearts to each other

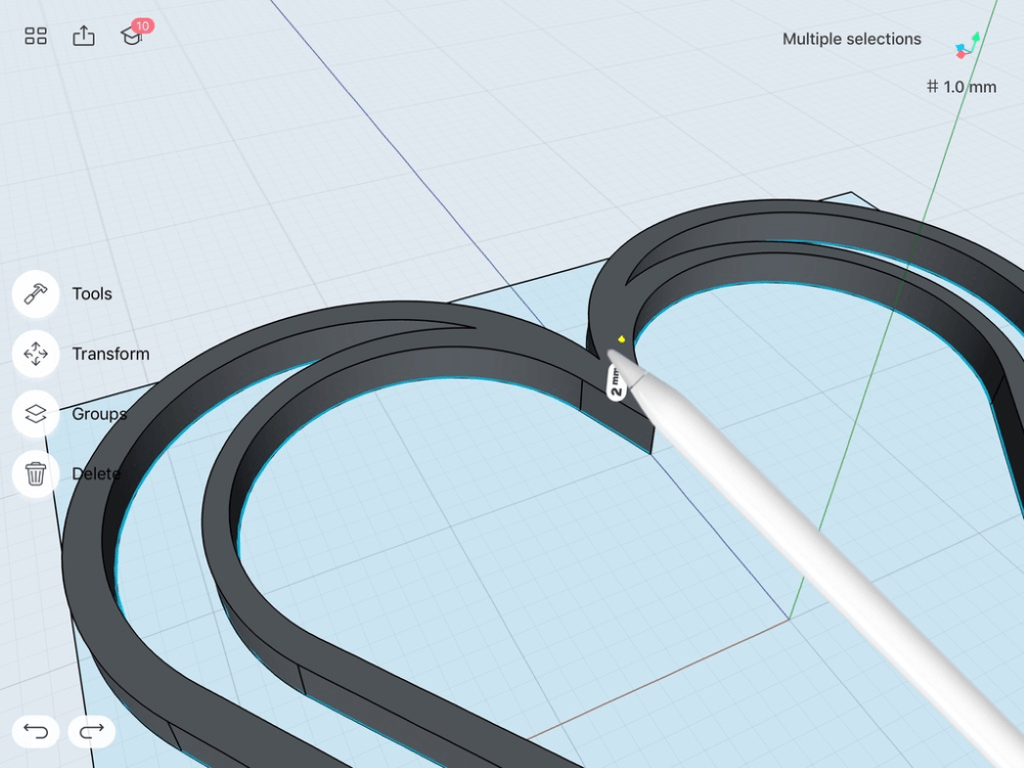
    You will notice that our hearts are not perfectly adjusted to each other. You can fine tune the intersections by moving the control points and snapping them together, as you can see it in the picture.


    Joining lines in Shapr3D

    Fine-tuning intersections © Shapr3D

    8. Transforming the sketch into a 3D model with the extrude tool

    Our last step is to extrude our surfaces. Select all 3 surfaces (outside and inside heart and the intersection), and extrude them by dragging them upwards. The height of the shape I chose was 3 mm, as this suited my needs. The final height is actually up to you, but choose it high enough, so that it does not break too easily.


    Extruding in Shapr3D

    Extrude tool © Shapr3D

    Conclusion

    We created the 2D sketch first and made a 3D version out of it with the extrude command. If we want to modify how the heart looks or how well the arc is bent, then we usually modify the initial sketch first, and then recreate the 3D version out of that. Modifying something in 2D first and turning it into 3D is usually much easier to do, so that’s why the quality of your sketch matters a lot.

    C. Slicing the bookmark

    Now that our 3D design is ready, we can finally start the printing process. We are using an additive printing method (layer-by-layer printing), so there is still a small step left before the actual printing. It is called slicing. Slicing is the process of transforming your 3D model (most likely from a .stl format) into a machine code (g-code), that your 3D printer can understand. A slicing program slices up your object into layers, so the machine knows exactly, where to start printing, and where to end it.

    We used the Craftbot’s own, free slicing software called Craftware. It does the job for beginners and advanced users as well. There are many other slicer options. If you’re not satisfied with Craftware, you can have a look at the slicer list on 3dprintingforbeginners.com. We downloaded the .stl file from Shapr3D, and opened it in Craftware.

    Craftware immediately showed us our object, and with one click the different options for slicing appears. First it will give you the Easy mode, but you have to switch to the Expert mode.


    Slicing options in Craftware

    text © text

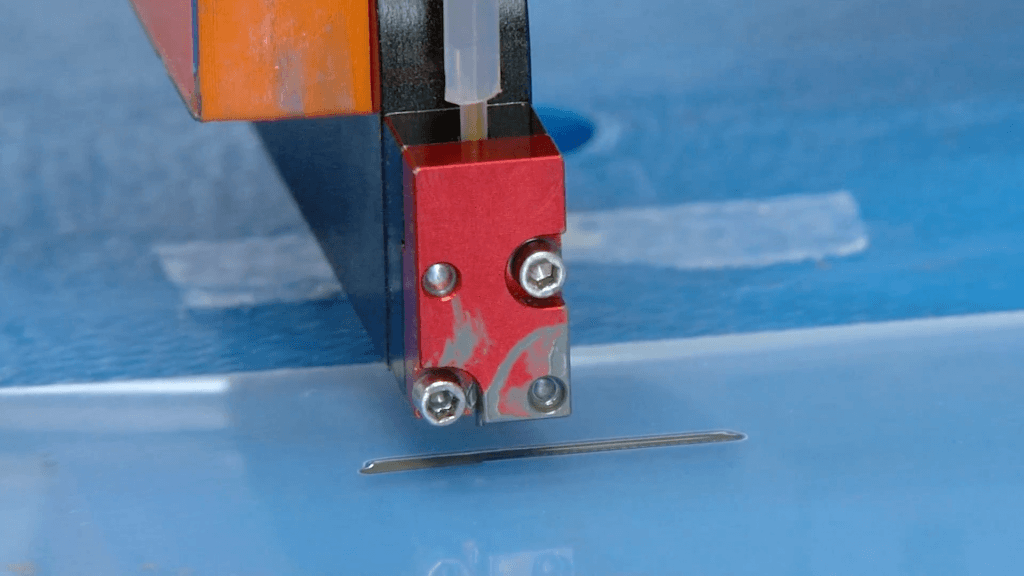
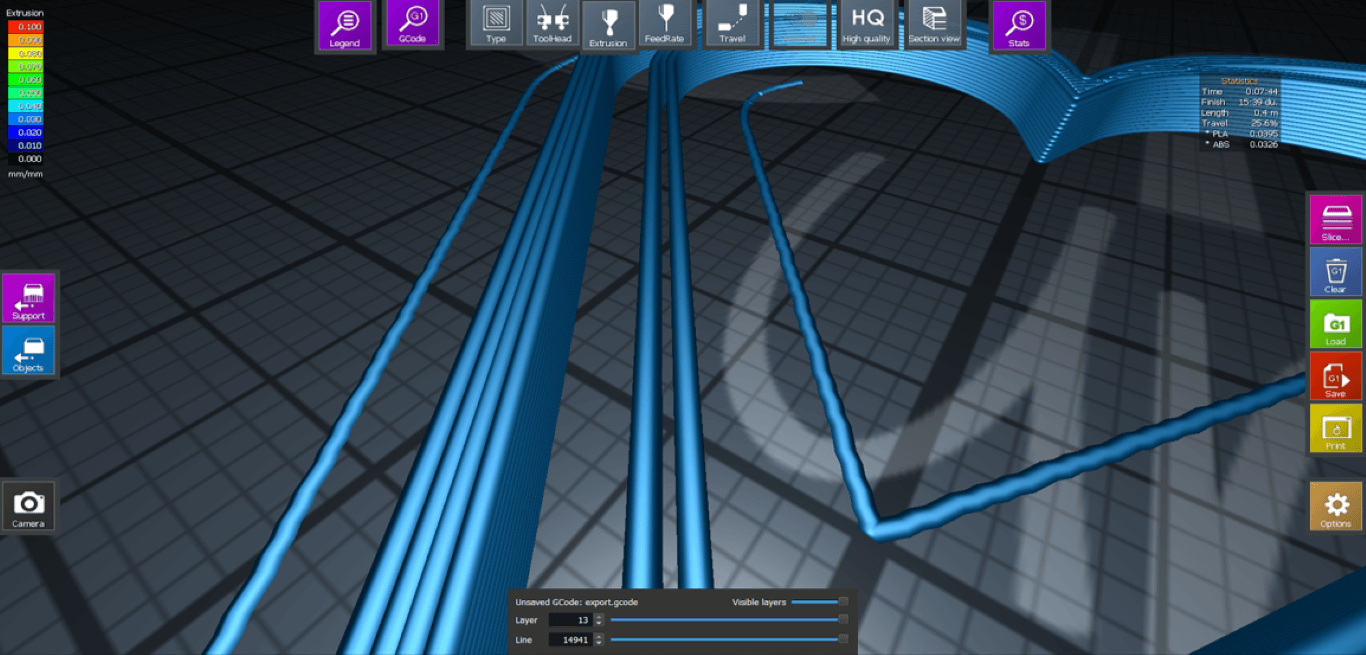
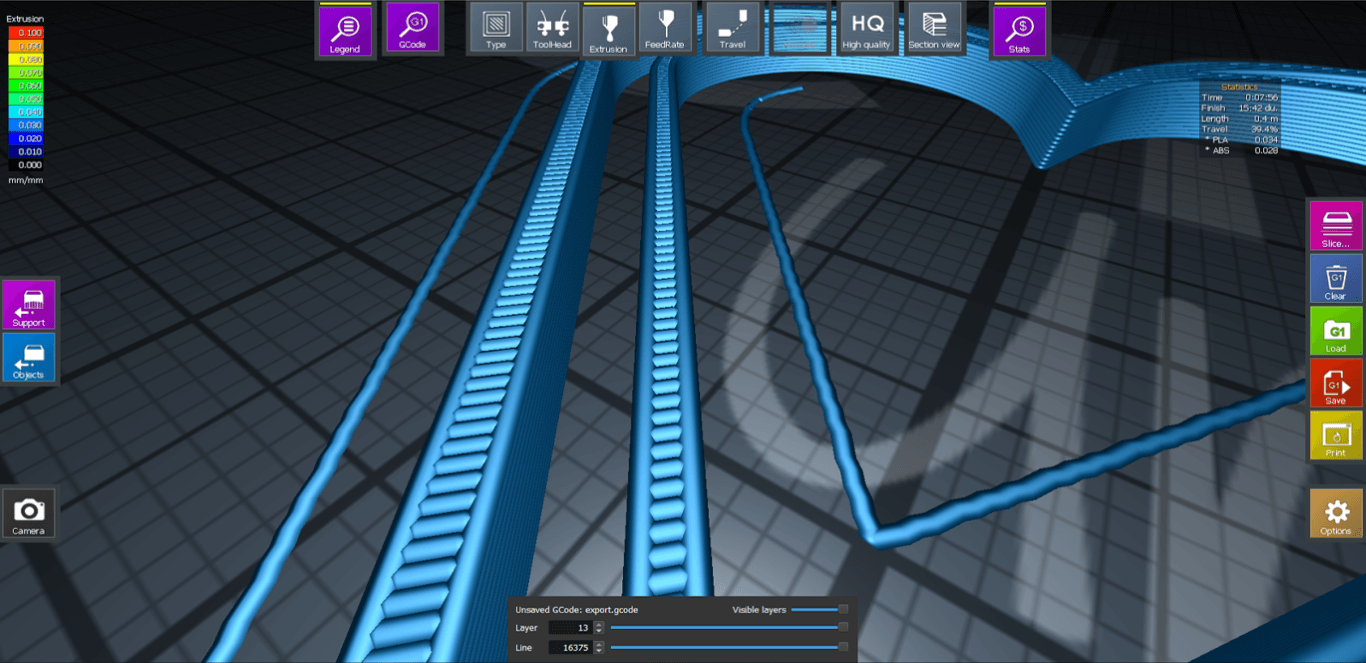
    We want to set the loop count to 1 (the system originally makes this 2 loops). We do this, because the inner circle is so narrow, that if there were two loops there would be a gap between the loops it creates. See for yourself:


    2 loop print in Craftware

    With two loops © Shapr3D


    1loop print in Craftware

    Single loop © Shapr3D

    When we finalize the slicing, we should have an object that looks like this. Notice the layers, this is how the printer will print our model, layer-by-layer.


    Craftware layers

    Layers of the model © Shapr3D

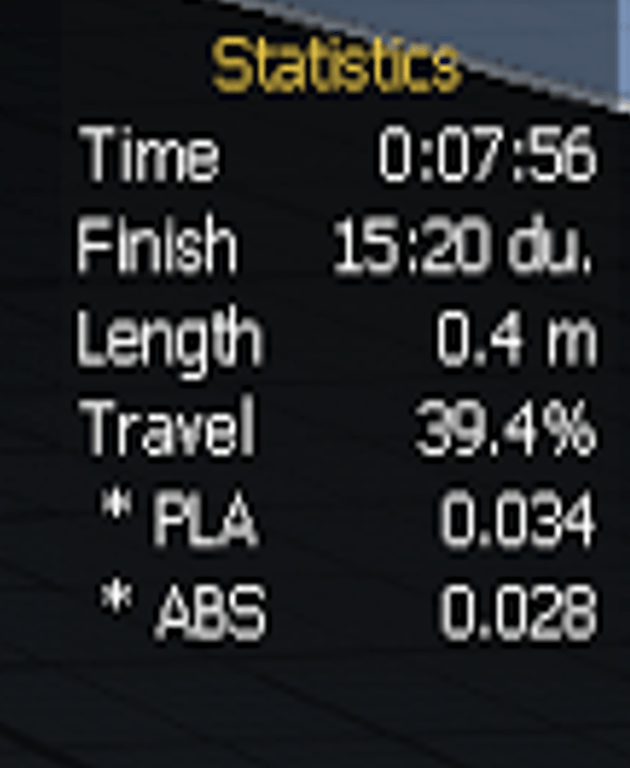
    The software will also give some small statistical analysis, so you know what to expect timing and money-wise (filament usage – length). It will also estimate the percentage of travel during the printing process, which tells you how much your extrude nozzle will go without actually printing something. During these periods filament can spill out of the nozzle and create an unwanted web. Adjust the nozzle’s speed during non-printing movements to avoid this problem.


    Craftware statistics

    D. Printing the bookmark

    Before explaining the printing process we would like to give you more information on why we chose a Craftbot 3D printer, i.e. an FDM-type (Fused Deposition Modeling) 3D printer. The machine melts the filament (usually plastic), and through the extrusion nozzle builds the object layer-by-layer, while the build platform constantly moves downwards. It is the simplest method of 3D printing, as it doesnt really require a lot of post-processing. A big disadvantage of FDM is that sometimes the still modifiable, melted material easily collapses under the weight of subsequent layers. It is also not able to print with very fine details.

    The technology people usually compare FDM with is the SLA technology. This technology works differently as the object is elevated from a the melted resin bath,while it is being cured (hardened) by a focused UV light. This method results in a far better quality in terms of the fine details, but there are three big disadvantages of this technology:  (a) it requires a lot of post-processing after printing (after removing it from the printer, you have to treat it in a isopropyl bath to remove the sticky outside of your object, caused by the printing process) , (b) the process is usually slower and (c) the resins are usually a lot more expensive than FDM printer filaments.

    We chose FDM printing in the end, because our object was small (only 13 layers) and not much detailing was needed. If we were to print a complex shape, we would have used an SLA printer.

    Our friends from the FabLabBudapest were helping us with the printing by lending us one of their Craftbots. We were done with it pretty fast and easy.

    Some numbers from the print

    • Filament heat up time: 15-20 minutes
    • Printing time: 8 minutes
    • Used filament: 0.4 meters
    • Cost: 2$

    Heartshaped bookmark - endresults

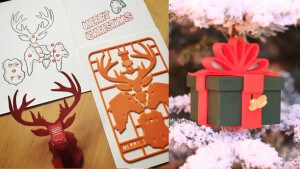
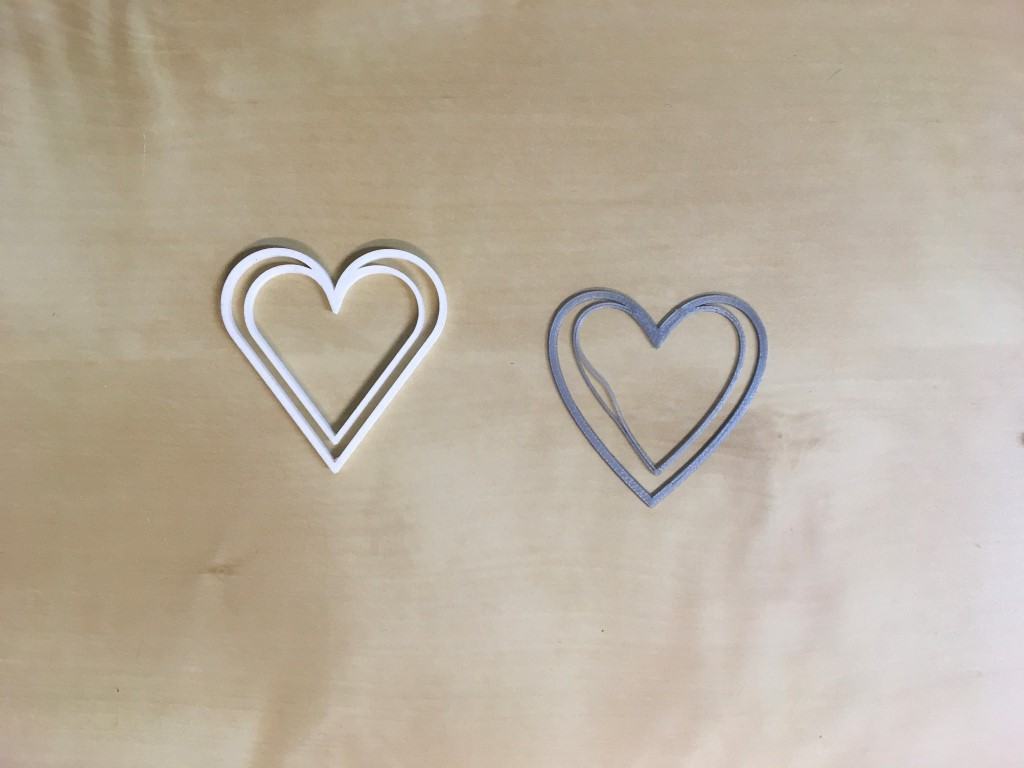
    Heart-shaped bookmarks iterations © Shapr3D

    Here is our end result. As you can see from the photo above (the gray heart), our first try was far from perfect. Actually, there were a lot of mistakes in it and the first print only took a couple of days of usage before the inner heart broke. So we made a few adjustments and the model came out fine. Have a look at the photos below to see how your heart-shaped bookmark can look in the book of your special someone.

    So, there you have it: an easy way to learn how to create your first model in a CAD software. If you wish to see in detail the functions that Daniel used, please have a look at our 5 minute video of this step-by-step guide.

    E. Free download of the .STL file

    And if you don’t feel like doing this whole tutorial or lack the necessary tools, don’t worry. The guys at Shapr3D graciously put the STL file of the heart-shaped bookmark at our disposal, so that you can download it for free! You can print it or even modify it to suit your needs.

    [EDIT: we are currently having some troube with the download feature and are looking to get this fixed as soon as possible]

    What do you think of this tutorial? Did you design the heart-shaped bookmark? And did you offer it as a Valentine’s gift? Please take a moment and share your experiences and feedback by commenting below.

    Website: LINK

  • Raspberry Pi Server , with LED Display videoplayback test

    Raspberry Pi Server , with LED Display videoplayback test

    Reading Time: < 1 minute


    Raspberry Pi Server , with LED Display videoplayback test

  • The only person to survive on our roads- Meet Graham

    The only person to survive on our roads- Meet Graham

    Reading Time: < 1 minute

    Meet Graham. To survive on our roads, you’d need to look something like him. You can visit him at the State Library of Victoria July 21 – August 08 or at http://www.meetgraham.com.au


    Graham is the TAC’s latest road safety project, highlighting how vulnerable the human body is to the forces involved in transport accidents.

    The TAC collaborated with leading trauma surgeon Christian Kenfield, crash investigator expert David Logan and world-renowned artist Patricia Piccinini, to produce Graham – an interactive, lifelike interactive sculpture demonstrating human vulnerability.

    Studies show the human body can only cope with impact speeds people can reach on their own, unassisted by vehicles. Graham has been designed with bodily features that might be present in humans if they had evolved to withstand the forces involved in crashes.

    When visiting Graham, visitors will have access to the latest immersive augmented reality technology, to look beneath Graham’s skin and better understand how his unique features would work to cushion him from serious injury in a crash.

    Want to learn more? http://www.meetgraham.com.au

  • Hacking an 8mm with a Raspberry Pi

    Hacking an 8mm with a Raspberry Pi

    Reading Time: < 1 minute

    [mbYTPlayer url=“https://www.youtube.com/watch?v=CQK3RmwoY7U“ opacity=“.5″ quality=“medium“ ratio=“auto“ isinline=“false“ showcontrols=“false“ realfullscreen=“true“ printurl=“true“ autoplay=“true“ mute=“true“ loop=“true“ addraster=“true“ stopmovieonblur=“false“ gaTrack=“false“]

    See[W]right films hacks an old 8mm camera using a Raspberry Pi computer. Is it analog? Digital? Something else?

    Follow me on Instagram @leftnwright https://www.instagram.com/leftnwright/

    Inspired/Influenced by:
    Laura Kampf
    https://www.youtube.com/channel/UCRix…

    LadyAda
    https://www.youtube.com/user/adafruit

    Casey Neistat

    Waelder
    https://www.youtube.com/user/DavidWae…

  • Going Interstellar – Laser Propulsion Could Take Humans to Mars in Just 3-Days

    Going Interstellar – Laser Propulsion Could Take Humans to Mars in Just 3-Days

    Reading Time: < 1 minute

    [mbYTPlayer url=“https://www.youtube.com/watch?v=WCDuAiA6kX0″ opacity=“.5″ quality=“medium“ ratio=“auto“ isinline=“false“ showcontrols=“false“ realfullscreen=“true“ printurl=“true“ autoplay=“true“ mute=“true“ loop=“true“ addraster=“true“ stopmovieonblur=“false“ gaTrack=“false“]

    Philip Lubin, a researcher at the University of California at Santa Barbara’s Experimental Cosmology Group, has proposed an innovative propulsion method that could eventually transport humans to Mars in 3-days or less. It involves an unmanned spacecraft with a one-meter DE-STAR laser sail that is propelled by aiming a powerful laser at it while still in Earth orbit, thus accelerating the craft to a significant fraction of the speed of light.

    laser-propulsion

    „As an example, on the eventual upper end, a full scale DE-STAR 4 (50-70 GW) will propel a wafer scale spacecraft with a one meter laser sail to about 26 percent the speed of light in about 10 minutes, reach Mars (1 AU [astronomical unit, the Earth-Sun distance]) in 30 minutes, pass Voyager 1 in less than 3 days, pass 1,000 AU in 12 days and reach Alpha Centauri in about 15 years,“ said Lubin.

  • Swallow an AudioPill and You’ll Have a Rave Inside Your Body!

    Swallow an AudioPill and You’ll Have a Rave Inside Your Body!

    Reading Time: < 1 minute

    Why go to a rave or dance club, when you could just swallow an AudioPill?

    Audiopill from Jan Poope on Vimeo.

    Created by Czech artist Jan Poope, this bizarre device is ingested orally and creates ‚a feeling like you are standing in the middle of a concert hall with a powerful audio-system‘ inside your body. It comes in three preset beats – 95 BPM / 130 BPM / 143 BPM, and once ingested, the pill takes an hour to travel through the upper section of your gastrointestinal tract. Then the party starts with a ‚very intensive‘ pain in your pelvic area, and once that calms down, a ‚beating pulse‘ starts in your abdomen, creating mixed feelings of ‚restlessness, amazement, and elation.‘

    audiopill

  • ThingMaker is a 3D Printer for Kids

    ThingMaker is a 3D Printer for Kids

    Reading Time: < 1 minute

    [mbYTPlayer url=“https://www.youtube.com/watch?v=mw8w7cTKEHI“ opacity=“.5″ quality=“medium“ ratio=“auto“ isinline=“false“ showcontrols=“false“ realfullscreen=“true“ printurl=“true“ autoplay=“true“ mute=“true“ loop=“true“ addraster=“true“ stopmovieonblur=“false“ gaTrack=“false“]

    We try out ThingMaker from Mattel, their new Autodesk partnered 3D printing toy/product for children.

    thingmaker

  • 2015 new #Yamaha #MotoBot Concept Ver#1 ‚To The Doctor‘

    2015 new #Yamaha #MotoBot Concept Ver#1 ‚To The Doctor‘

    Reading Time: < 1 minute

    [mbYTPlayer url=“https://www.youtube.com/watch?v=4asCK8yamb0″ opacity=“.5″ quality=“medium“ ratio=“auto“ isinline=“false“ showcontrols=“false“ realfullscreen=“true“ printurl=“true“ autoplay=“true“ mute=“true“ loop=“true“ addraster=“true“ stopmovieonblur=“false“ gaTrack=“false“]

    2015 new Yamaha MotoBot Concept Ver#1 ‚To The Doctor’ 親愛なるロッシへ promo video


  • Tesla Autopilot saves Driver, proof of Working Technology

    Tesla Autopilot saves Driver, proof of Working Technology

    Reading Time: < 1 minute

    [mbYTPlayer url=“https://www.youtube.com/watch?v=9X-5fKzmy38″ opacity=“.5″ quality=“medium“ ratio=“auto“ isinline=“false“ showcontrols=“false“ realfullscreen=“true“ printurl=“true“ autoplay=“true“ mute=“true“ loop=“true“ addraster=“true“ stopmovieonblur=“false“ gaTrack=“false“]

  • Microsoft demos wearable holograms on HoloLens!

    Microsoft demos wearable holograms on HoloLens!

    Reading Time: 2 minutes

    [mbYTPlayer url=“https://www.youtube.com/watch?v=A_NeDEPKvcA“ opacity=“.5″ quality=“medium“ ratio=“auto“ isinline=“false“ showcontrols=“false“ realfullscreen=“true“ printurl=“true“ autoplay=“true“ mute=“true“ loop=“true“ addraster=“true“ stopmovieonblur=“false“ gaTrack=“false“]

    Watch Microsoft Hololens demo at Windows 10 devices event. A game named Project X-Ray was revealed, and it was INSANE.

    Microsoft just announced that HoloLens development kit is launching early next year for $3000. The development kit will be available for developers who want to take advantage of the new wearable, which combines real life situations with virtual reality. The kit will allow them to create applications that should be available at launch.

    Microsoft shows off holograms you can wear and hold with a mixed-reality game called Project X Ray. The new game runs on the company’s HoloLens platform.

    Microsoft-HoloLens-Demo microsoft-hololens-ar

    Microsoft also announced that a Development Edition of the headset will launch in Q1 2016, for the somewhat princely sum of US$3,000. The first version of HoloLens to exist outside Microsoft’s own testing environments, the Development Edition is intended to help developers create apps and feed back on design,“ reports Game Planet.

  • Firefly Micro Camper Looks like from new STAR WARS Movie!

    Firefly Micro Camper Looks like from new STAR WARS Movie!

    Reading Time: < 1 minute

    Designed by NASA engineer Garrett Finney, the other worldly Firefly Micro Camper is crafted from aluminum, and can easily be towed into the middle of nowhere with a normal pickup truck.

    firefly-micro-camper-nasa

    You can also throw it onto your travel trailer, or even have it flown in to a remote location via helicopter. Simply plant its 4 sturdy legs into the ground to keep yourself elevated, and there’s plenty of storage space inside for your gear, complete with a folding couch.

    [mbYTPlayer url=“https://www.youtube.com/watch?v=btr5YLCG9gU“ opacity=“.5″ quality=“medium“ ratio=“auto“ isinline=“false“ showcontrols=“false“ realfullscreen=“true“ printurl=“true“ autoplay=“true“ mute=“true“ loop=“true“ addraster=“true“ stopmovieonblur=“false“ gaTrack=“false“]

    Source: YT

  • Ferrolic – The Story of a Watch!

    Ferrolic – The Story of a Watch!

    Reading Time: < 1 minute

    Your eyes aren’t playing tricks, nor is this computer-generated imagery, just Zelf Koelman’s latest project: Ferrolic. This alarm clock, which looks like a Rorschach test, relies on magnetic ferrofluids – a liquid that becomes strongly magnetized in the presence of a magnetic field – to display the time. „A few years ago I fell in love with the magical characteristics of a little black ‚blob‘ in a bottle. One could manipulate the position and shape of a floating drop of Ferro Fluid with a magnet. The dynamics and shape of this liquid body was much like a living entity. I decided to allow this entity to live its own life and have a function.

    ferrofluid-clock

    A year of research and engineering eventually resulted in Ferrolic,“ said Koelman. Tired of just seeing the time? You can use a web app to display texts, images and more.

    Source: https://vimeo.com/116510462