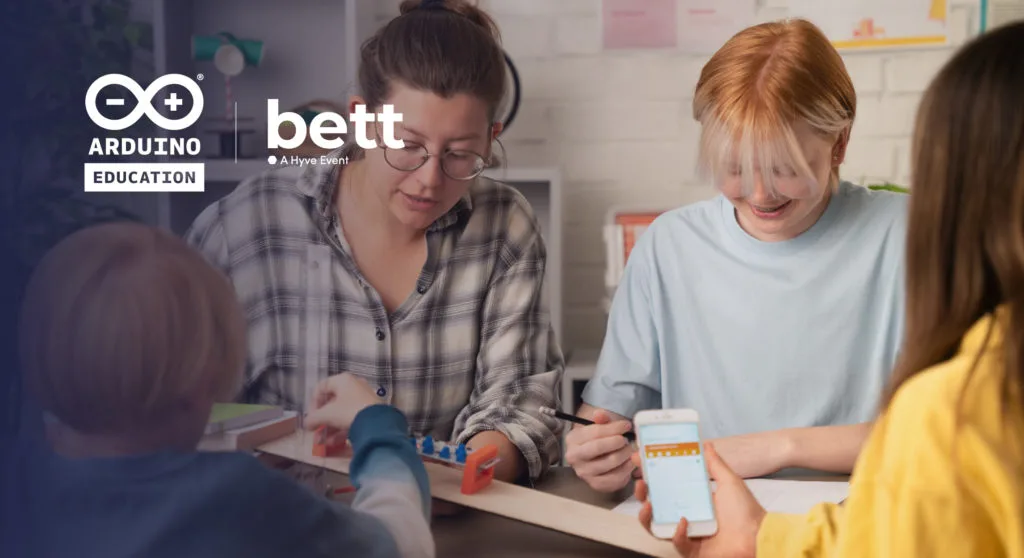
Discover the future of K-12 & HE at Bett 2024 with Arduino Education
Arduino Education will be back at Bett 2024, the global stage for education innovation, from January 24th-26th at ExCel London.
Our booth (which you’ll find in Bett Hall, Stand NJ12) will be a hub of creativity and excitement, where you can immerse yourself in the world of STEAM education and discover how Arduino empowers students to become inventors, innovators, and problem-solvers.
Meet our new educational solutions
At Bett, you’ll be the first to meet the new Arduino robot and have an interactive demo of our new Programmable Logic Controller, the Arduino PLC Starter Kit. Get hands-on with both of these new kits to explore their unique features and see how they can enhance your classroom for both K-12 and higher education.
You’ll also have the opportunity to try out the Arduino Cloud for Schools and all its new features, as well as seeing our collaboration with IED Rome and Sapienza Schools, which offers secondary age teaching tools designed to improve physics learning with the Arduino Science Kit R3.
Connect with our thriving teacher community
Create connections with fellow Arduino teachers and exchange ideas, strategies, and resources that will fuel your STEAM teaching journey.
Come and meet our team
Join our team of passionate educators and STEAM enthusiasts who are eager to share their expertise and guide you through our solutions. You’ll get practical tips and strategies for incorporating Arduino into your classroom, ensuring that every student has the opportunity to experience the transformative power of STEAM education.
Will we be award winners?
Arduino Education has been recognized as a finalist in not one, but THREE categories for the Bett Awards 2024!
COMPANY OF THE YEAR: We’re incredibly proud of the work our team has done to bring us this far.
COLLABORATION WITH A SCHOOL: Our partnership with Colegio San Jose de Las Vegas in Colombia for the Medellin Challenge.
BETT INNOVATION AWARD: Our work in IoT education, specifically with the Arduino Cloud for Schools, the Explore IoT Kit, and the Greenhouse Kit, is being acknowledged as a leading force in educational innovation.
Will we win? We’ll find out at Bett!
We look forward to seeing you at stand NJ12 in the Bett Hall.
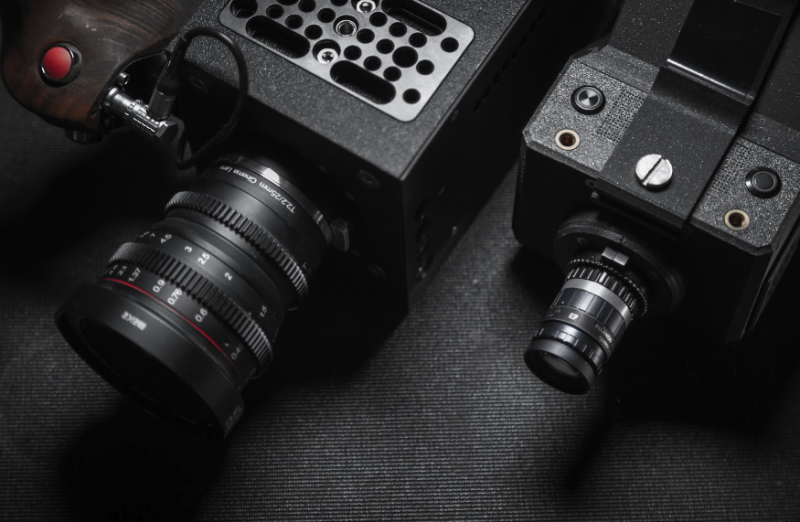
Csaba says that CinePI was always intended to push the possibilities of Raspberry Pi as a video camera with features found in cinema cameras, but in an open-source device so developers could integrate it into their own designs. CinePI V2 can record 2K RAW Cinema DNG video at frame rates up to 50 fps with 12-bit colour depth that far surpasses the 8-bit or 10-bit usual video fare. Csaba showcased its abilities, using CinePI V2 to film more than half of his Timekeeper short film this summer.
Having completed CinePI V2 in early 2023, it wasn’t long before Csaba began work on developing this latest version, with a Compute Module. He has been inspired all along by the cameras made by Blackmagic Design. “They were one of the very first manufacturers to offer RAW video capabilities at affordable prices; democratising tools used for filmmaking.” This means cameras cost a couple of thousand dollars rather than many thousands. If, as Csaba intends, you were to build your own CinePI camera, it would cost far less again, and can largely be built with off-the-shelf components and sensors from the likes of Adafruit. He estimates CinePI V2 costs $250–$300 while CinePI XL in the same or similar configuration would be closer to $400–$600. “A steeper cost, but still very affordable in comparison to the types of camera it would aim to compete with on the market.”
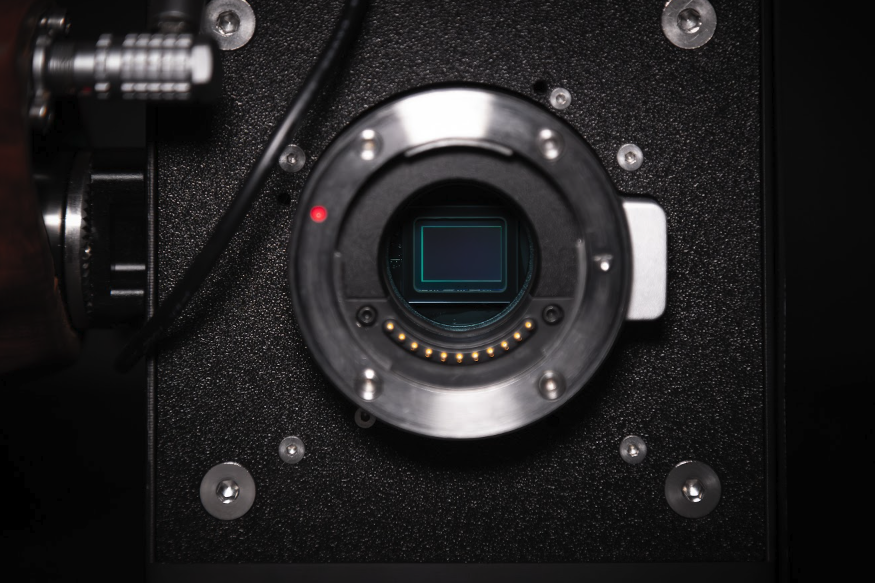
Whereas CinePI V2 was a compact form factor handheld camera, the XL model is noticeably larger. That’s because it features a specially developed sensor, OneInchEye, designed by Will Whang. This larger sensor enables greater image quality and higher frame rates than the Raspberry Pi HQ Camera and also necessitated a switch to Compute Module because it required a MIPI CSI-2 link with four data lanes. Csaba decided to embrace the possibilities this offered in terms of additional sensors and design a camera that mimicked the feature set and capabilities of real professional cinema cameras. Advantages included a larger battery, bigger display, more mounting points for accessories, and a larger physical lens mount.
Community spirit
This summer Csaba saw membership of his Discord server grow from 300 to 1000 members, “It’s been amazing to see the ways people have been using CinePI, modifying and customising it for their unique needs. Exactly what I was hoping for when I started the project.” With the launch of Raspberry Pi 5, Csaba expects to see even more interest. “Perhaps in the future, with the efforts of talented individuals from the community or established companies already in this space, we can see the production of larger sensor modules that will work on the Raspberry Pi platform,” he suggested to CineD.
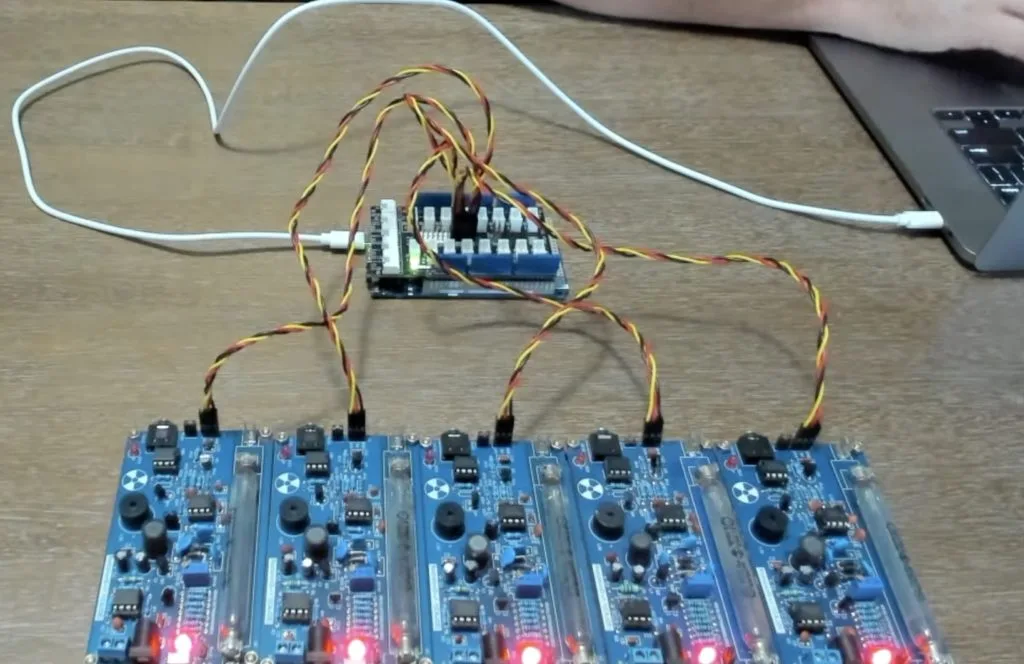
You’ve seen movies and TV shows with Geigers counters: handheld devices that click when they detect radiation — the faster the clicks, the stronger the radiation. Those clicks are actually the result of inert gas briefly made conductive by bursts of energy released by ionizing radiation particles entering the sealed Geiger–Müller tube. YouTuber The Edison Union had the clever idea to use those clicks as triggers for generative music and turned to Arduino to make it happen.
This is part of a larger project called The Cherenkov Effect, which seeks to explore Cold War-era anxieties related to nuclear power and nuclear weapons. The Cherenkov Effect does that through a combination of performance art and generative music. And what better way to generate that music than with radiation?
In this case, that radiation comes from Strontium-90 and Polonium-210. While those are less dangerous to handle than many other radioactive materials, they still aren’t safe and you shouldn’t replicate this project if you don’t know the proper procedures.
The Edison Union uses Ableton Live to produce the music for The Cherenkov Effect, but needed “seeds” for the generative processes that turn into audible notes. Those seeds come from five Geiger counter modules that connect to an Arduino GIGA R1 WiFi board through a Seeed Studio Grove Shield. The Arduino sketch counts radioactive pulses, then passes that data on to a Processing sketch that performs the generative music functions. The latter is where The Edison Union is able to get creative regarding the sound produced. Finally, Processing sends notes to Ableton Live to synthesize.
Now when The Edison Union moves Strontium-90 or Polonium-210 around the array of Geiger counters, the device will generate and play music based on the radiation it receives.
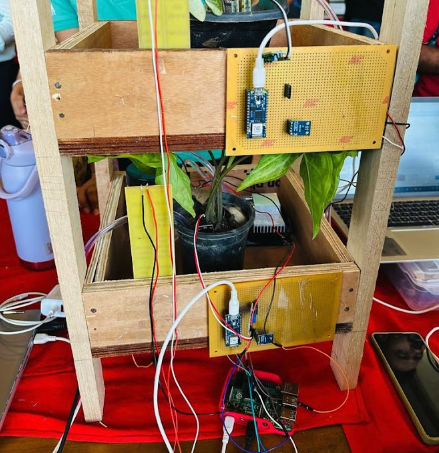
“The inspiration came from the need to address the challenges in traditional farming and leverage technology for efficient crop management,” Tanay explains. “It’s a forward-thinking approach to agriculture and my project was born out of a passion for sustainable agriculture. The aim was to explore innovative solutions, driven by a desire to contribute to a greener future.”
Making sense
Although Tanay has not had first-hand experience of vertical farming, he says he has read lots about it. “It’s a fascinating concept,” he adds. His research meant he had a good idea of what was needed to create his own system. “Raspberry Pi was chosen for its versatility, affordability, and the vast community support it offers,” Tanay says. “It’s a robust choice for managing and controlling various components in a system like this.”
These components include ambient light, soil moisture, and water level depth detection sensors. “The project was planned by first identifying the key requirements, such as real-time monitoring, efficient water supply, secure communication, and a user-friendly interface,” Tanay continues. “Components were selected based on their compatibility and functionality within the system.”
The sensors gather data about the plants. This data is then processed by a peripheral control unit (in this case an Arduino Nano 33 IoT) and sent to the central unit (Raspberry Pi 4) via Bluetooth Low Energy (BLE) communication. “The central unit makes decisions on actions such as activating actuators to adjust environmental parameters,” Tanay says. “This continuous loop ensures optimal conditions for crop growth.”
Friendly farming
A thermoelectric Peltier refrigeration cooling system kit has also been used. “A humidity-to-water conversion, with the help of the Peltier module device working on the principle of condensation, ensures a continuous supply of water,” Tanay explains. It ensures plants are kept alive and are able to thrive but there’s also a user-friendly GUI for remote manual control.
“The software was crafted with modularity and user-friendliness in mind,” says Tanay, who used the IoT platform ThingSpeak. “ThingSpeak is useful for visualising data from sensors in real-time which provides valuable insights to farmers,” he continues. “A user-friendly interface makes it accessible to those without extensive technical knowledge and providing a fault tolerance to the system.”
Tanay hopes the project will show that vertical farming doesn’t have to be expensive. “The project’s cost-effectiveness is a standout feature,” he says. It’s also scalable. “The project is aimed at small and large-scale farmers,” Tanay adds. “The modularity and scalability design principles suggest it’s adaptable to various farm sizes, making it accessible to a broad audience.”
New year, new Open Source Report! Lots has happened in 2023 in terms of open-source development, and we’re excited to share our yearly recap of the various contributions from the Arduino team and the community. Together, we have released new, important open-source projects – both hardware and software – as well as published and maintained a staggering number of libraries, growing our shared resources at a record-breaking pace.
Apparently, we have a history of surpassing our own expectations – and 2023 was no exception. We joined the Zephyr® Project, released five new open-source hardware products, five new versions of the Arduino IDE 2.x, 13 new versions of our command line tools, 12 new official libraries, and 13 versions of the official board packages. We also worked to significantly support MicroPython – releasing a new installer tool and creating a package index.
The Arduino community has clearly shown its love for open source too. During 2023, 1,068 new libraries were added (+20% in one year!) and 101 new versions of community board packages were released. On the content side, 205 new open-source tutorials were published on our new Project Hub.
The 2023 Report also includes a ranking of the most active library authors and maintainers, who provide an incredible service to the whole community with their hard work in the name of open source.
Finally, the achievements we are proud to recap in the Arduino Open Source Report would not be possible without you. To all the people who buy original Arduino products, subscribe to Arduino Cloud, or make donations: THANK YOU for supporting us and our efforts in open-source development.
In the rapidly evolving digital landscape, students are increasingly interacting with AI-powered applications when listening to music, writing assignments, and shopping online. As educators, it’s our responsibility to equip them with the skills to critically evaluate these technologies.
A key aspect of this is understanding ‘explainability’ in AI and machine learning (ML) systems. The explainability of a model is how easy it is to ‘explain’ how a particular output was generated. Imagine having a job application rejected by an AI model, or facial recognition technology failing to recognise you — you would want to know why.
Establishing standards for explainability is crucial. Otherwise we risk creating a world where decisions impacting our lives are made by opaque systems we don’t understand. Learning about explainability is key for students to develop digital literacy, enabling them to navigate the digital world with informed awareness and critical thinking.
Why AI explainability is important
AI models can have a significant impact on people’s lives in various ways. For instance, if a model determines a child’s exam results, parents and teachers would want to understand the reasoning behind it.
Artists might want to know if their creative works have been used to train a model and could be at risk of plagiarism. Likewise, coders will want to know if their code is being generated and used by others without their knowledge or consent. If you came across an AI-generated artwork that features a face resembling yours, it’s natural to want to understand how a photo of you was incorporated into the training data.
Explainability is about accountability, transparency, and fairness, which are vital lessons for children as they grow up in an increasingly digital world.
There will also be instances where a model seems to be working for some people but is inaccurate for a certain demographic of users. This happened with Twitter’s (now X’s) face detection model in photos; the model didn’t work as well for people with darker skin tones, who found that it could not detect their faces as effectively as their lighter-skinned friends and family. Explainability allows us not only to understand but also to challenge the outputs of a model if they are found to be unfair.
In essence, explainability is about accountability, transparency, and fairness, which are vital lessons for children as they grow up in an increasingly digital world.
Routes to AI explainability
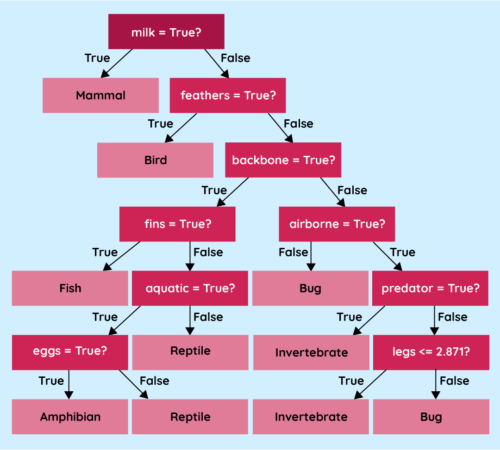
Some models, like decision trees, regression curves, and clustering, have an in-built level of explainability. There is a visual way to represent these models, so we can pretty accurately follow the logic implemented by the model to arrive at a particular output.
By teaching students about AI explainability, we are not only educating them about the workings of these technologies, but also teaching them to expect transparency as they grow to be future consumers or even developers of AI technology.
A decision tree works like a flowchart, and you can follow the conditions used to arrive at a prediction. Regression curves can be shown on a graph to understand why a particular piece of data was treated the way it was, although this wouldn’t give us insight into exactly why the curve was placed at that point. Clustering is a way of collecting similar pieces of data together to create groups (or clusters) with which we can interrogate the model to determine which characteristics were used to create the groupings.
A decision tree that classifies animals based on their characteristics; you can follow these models like a flowchart
However, the more powerful the model, the less explainable it tends to be. Neural networks, for instance, are notoriously hard to understand — even for their developers. The networks used to generate images or text can contain millions of nodes spread across thousands of layers. Trying to work out what any individual node or layer is doing to the data is extremely difficult.
Regardless of the complexity, it is still vital that developers find a way of providing essential information to anyone looking to use their models in an application or to a consumer who might be negatively impacted by the use of their model.
Model cards for AI models
One suggested strategy to add transparency to these models is using model cards. When you buy an item of food in a supermarket, you can look at the packaging and find all sorts of nutritional information, such as the ingredients, macronutrients, allergens they may contain, and recommended serving sizes. This information is there to help inform consumers about the choices they are making.
Model cards attempt to do the same thing for ML models, providing essential information to developers and users of a model so they can make informed choices about whether or not they want to use it.
Model cards include details such as the developer of the model, the training data used, the accuracy across diverse groups of people, and any limitations the developers uncovered in testing.
Model cards should be accessible to as many people as possible.
A real-world example of a model card is Google’s Face Detection model card. This details the model’s purpose, architecture, performance across various demographics, and any known limitations of their model. This information helps developers who might want to use the model to assess whether it is fit for their purpose.
Transparency and accountability in AI
As the world settles into the new reality of having the amazing power of AI models at our disposal for almost any task, we must teach young people about the importance of transparency and responsibility.
As a society, we need to have hard discussions about where and when we are comfortable implementing models and the consequences they might have for different groups of people. By teaching students about explainability, we are not only educating them about the workings of these technologies, but also teaching them to expect transparency as they grow to be future consumers or even developers of AI technology.
Most importantly, model cards should be accessible to as many people as possible — taking this information and presenting it in a clear and understandable way. Model cards are a great way for you to show your students what information is important for people to know about an AI model and why they might want to know it. Model cards can help students understand the importance of transparency and accountability in AI.
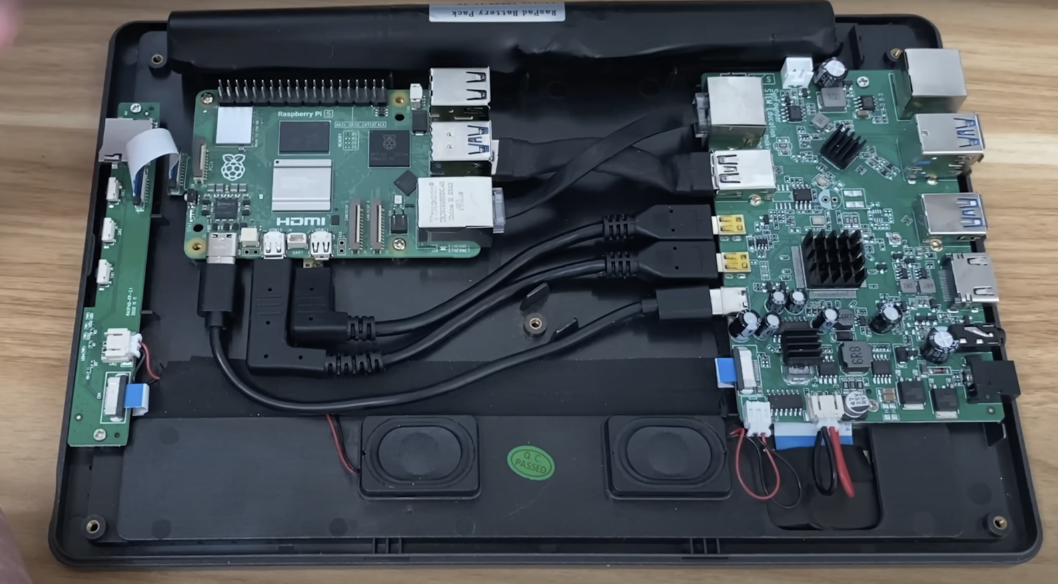
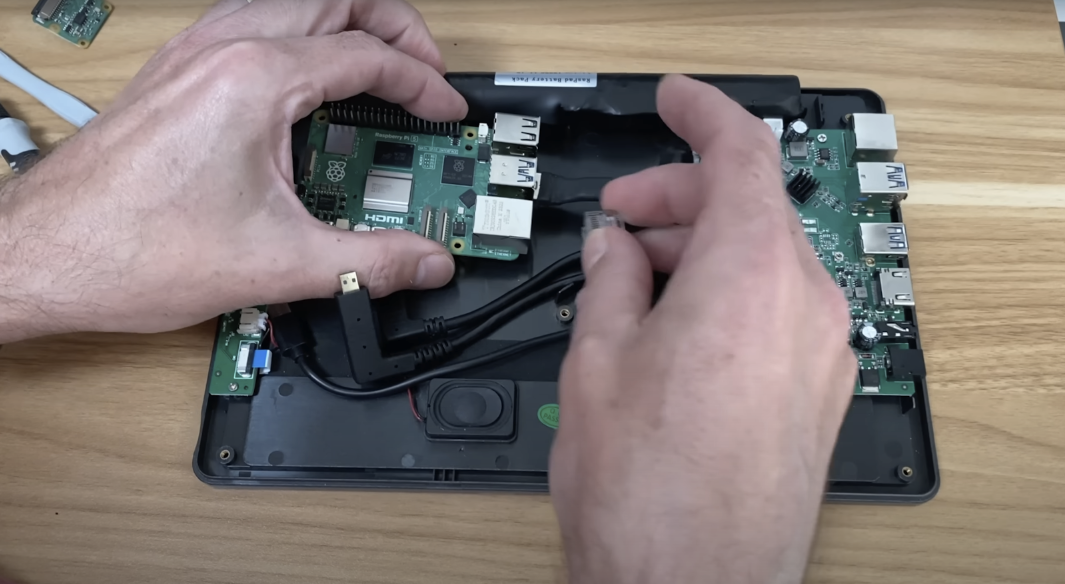
The project began with disconnecting the fan wires from the GPIO on Raspberry Pi 5 and unscrewing the standoffs. The Ethernet and USB 3.0 cables inside the RasPad are quite short, so they were a little more stretched than is ideal in order to reach the ports on Raspberry Pi 5. The slightly different layout of Raspberry Pi 5 also meant they had to cross over each other.
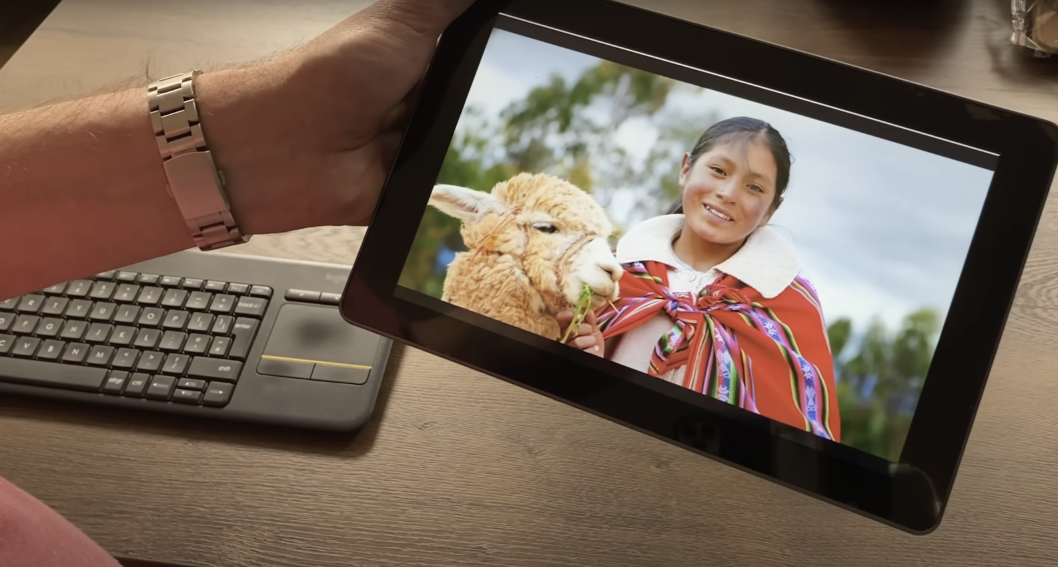
Once it was all connected, everything worked as normal in the Chromium browser. And the touchscreen was “nice and responsive” under the control of the super-speedy Raspberry Pi 5. RasPad 3 is a touchscreen device, but there are plenty of ports for you to plug in wireless keyboard and mouse dongles, which Lee did to test out accessing his YouTube channel. We were pleased to see that everything loaded nice and quickly, and of course, our Raspberry Pi 5 handled full-screen, high-resolution video with ease.
We’re officially crowning Lee as the creator of the first-ever Raspberry Pi 5-powered tablet. A special prize goes to the creators of RasPad 3, SunFounder, of course.
Retrofit dreams with Raspberry Pi 5
We cannot wait to see what weird and wonderful objects our newest board ends up inside. Eben is particularly keen to see someone using a 1950s TV as a display for Raspberry Pi 5, since, as he and James keep telling everyone, it can output an ancient TV standard [Editor’s note: please be careful working with old CRT TVs as they can be extremely dangerous]. Of course, an old Pye would be the dream for this, both for our nearly-shared name and for our shared Cambridge heritage. We spent a happy interlude on eBay, and someone dug up this informative and also daunting page about restoring old 405-line TV receivers, before sighing wistfully, closing about a dozen tabs, and going back to what we were all supposed to be doing. So, if you are pals with a retro TV enthusiast who’d relish the challenge, make sure you tip them the wink.
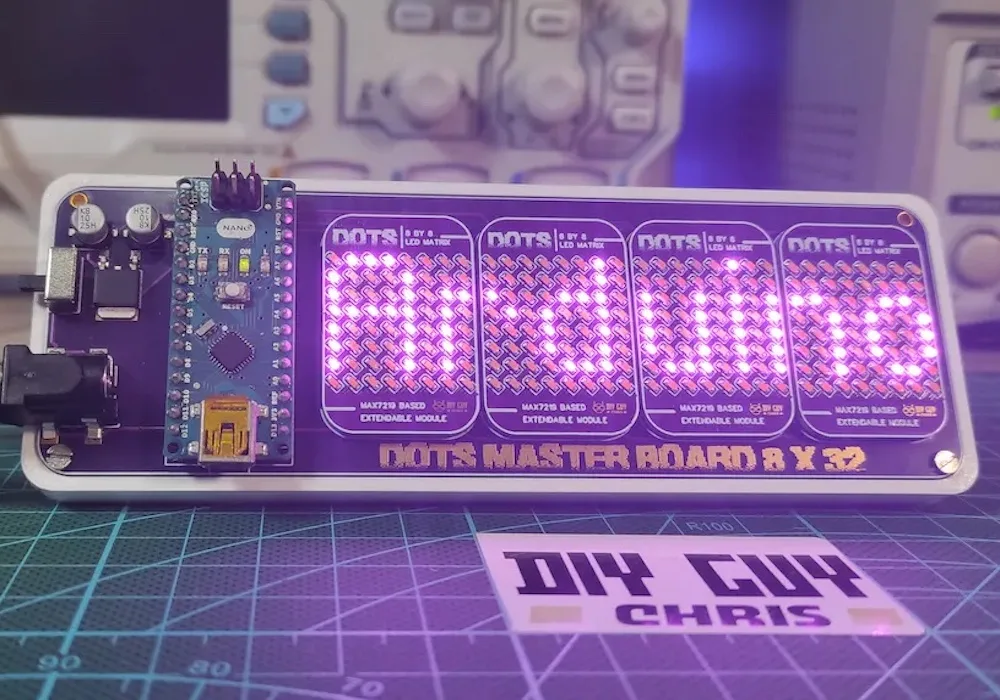
If you only care about showing content as clearly as possible at the lowest cost, then you’ll want to turn to LCD or OLED technology. But a project’s display gives you an opportunity to get creative with the aesthetic, which opens up a whole world of different display types. If you want a retro feel, then you can inspiration in DIY GUY Chris’ gorgeous LED matrix.
This is a dot-matrix LED display with an overall resolution of 32×8. But that description alone doesn’t do the project justice. Chris used tiny 0603 SMD LEDs, which allowed for very high “pixel” density and that results in better clarity than a typical LED matrix display. To enable future expansion, Chris set this up as a host board that accepts four LED boards — each of which contains an 8×8 matrix. A MAX7219 IC drives the LEDs on each of those boards.
The LED boards connect to the host board through nifty mezzanine connectors. The host board contains an Arduino Nano that sends control signals to the MAX7219 chips. The Arduino can supply USB power to the LEDs, but there is also a DC jack for power when USB isn’t connected. Chris’ Arduino sketch lets the user “print” alphanumeric characters to scroll across the four LED matrices.
The best part about this design (other than the great style) is that Chris can scale it up in the future with larger host boards that accept more than four LED boards.
The world of IoT just got more exciting: Arduino and SiLabs unveil plans for Matter protocol integration.
In a groundbreaking development for IoT enthusiasts and professionals alike, Arduino and Silicon Labs (SiLabs) have announced a collaboration that promises to revolutionize access to the Matter protocol. This initiative is set to unfold in two major phases, ushering in a new era of connectivity and innovation.
Phase one: The dawn of a new era in IoT development begins at CES 2024
At CES 2024, Arduino and SiLabs have revealed the first phase of their ambitious project. This phase marks the release of an extremely user-friendly Arduino library tailored for the Matter protocol, alongside the Arduino core for SiLabs microcontrollers. This integration into the Arduino IDE is a significant leap forward, making advanced IoT development more accessible than ever.
“Our partnership with Arduino brings simplicity and ease of use to wireless development for Silicon Labs developers as well as Arduino’s 40M users to take their project from concept to production,” said Rob Shane, VP of Global Mass Markets for Silicon Labs. “By integrating Matter with Arduino’s ecosystem, we’re opening a universe of possibilities for developers.”
This announcement is not just about new tools; it’s a statement of intent to make IoT technology more accessible to a wider range of users, from hobbyists to professionals.
Get started now: Use existing Matter boards
In anticipation of the second phase, the Arduino community can begin experimenting with Matter protocol through existing boards. Our friends at SparkFun have provided an excellent platform for this purpose, allowing users to get a head start in exploring the potential of Matter with Arduino.
“We are thrilled with the continued adoption of Matter to support IoT applications. The Matter implementation in Arduino has been a massive undertaking and it will make Matter even more accessible for engineers, creators, and innovators across the globe. This is another major step forward in interoperability and improving our daily interactions with the devices we have come to reply upon.” – Glenn Samala, CEO at SparkFun
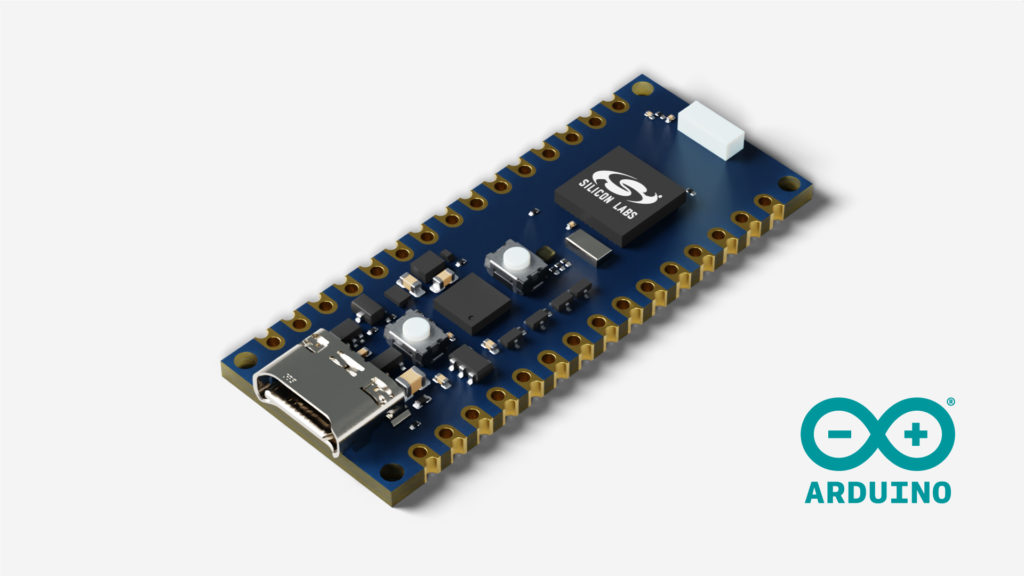
Phase two: The launch of a revolutionary board ads to Arduino Day celebrations
The second phase is set to culminate on Arduino Day, in March 2024, with the release of an innovative addition to the über-popular Nano family, with a board based on the SiLabs MGM240SD22VNA. This board is expected to be a game-changer in the field of IoT, offering unparalleled ease of use and capabilities.
The collaboration between Arduino and SiLabs, leading up to these releases, represents a major stride in making advanced IoT technologies more accessible. The combination of Arduino’s user-friendly interface with the robust capabilities of SiLabs’ technology and the universality of the Matter protocol is a recipe for innovation.
For educators, students, hobbyists, and professionals, this means an unprecedented opportunity to dive into IoT projects with greater ease and more powerful tools. The implications for smart home applications, industrial IoT, and educational projects are immense.
Looking ahead
Here is a sneak peek of the new board being developed – stay tuned for the launch in March 2024!
As we eagerly await these releases, the excitement within the Arduino community is palpable. This collaboration is not just about new products; it’s about empowering a whole generation of creators and innovators, breaking down barriers, and opening up new horizons in the world of IoT.
Stay tuned for more updates as we approach these landmark dates, and get ready to embark on a journey of discovery and innovation with Arduino and SiLabs.
Are you in Las Vegas? Come meet the Arduino team at CES 2024 – Venetian Tower — Suite 29-228.
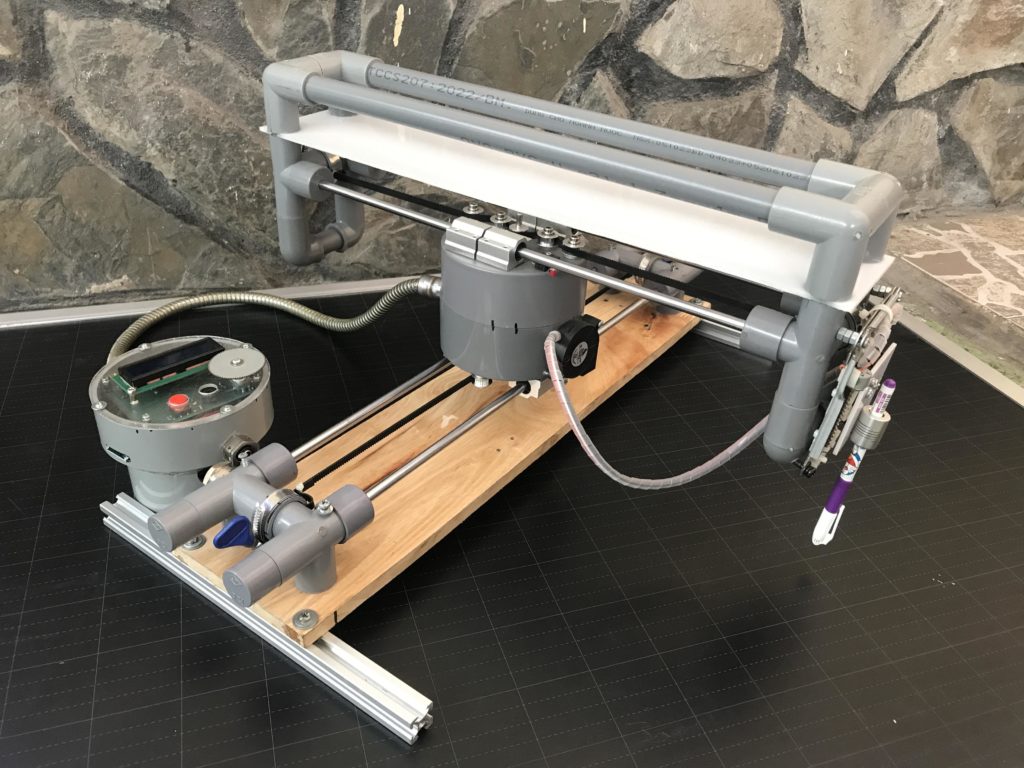
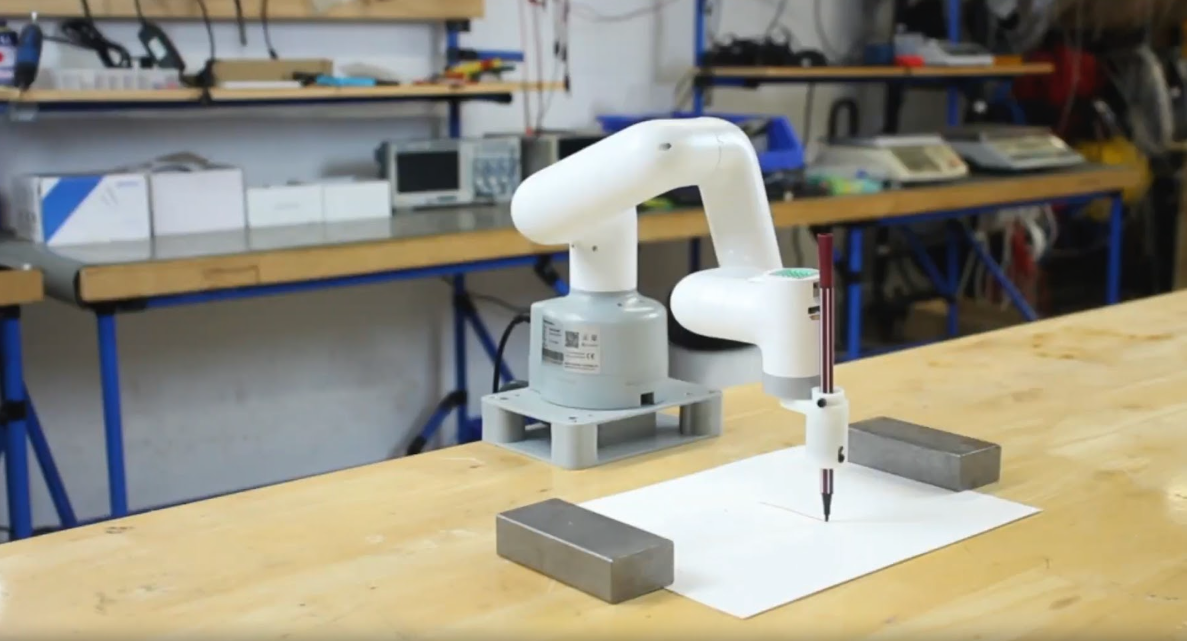
Design paradigms are the norm in every industry and automated machine tools aren’t any different. Most 3D printers, for example, function in a similar way: each axis rides on rails, with belts pulled by fixed motors. Pen plotters tend to utilize similar kinematics. But sometimes we see builds that ignore established paradigms, like this DIY fixed-belt CNC pen plotter.
Unlike most pen plotters, this machine moves along fixed belts. This layout treats the belts almost like rigid bodies, similar to a rack-and-pinion gear set. Because the belts remain fixed in place, the motors must move. The result is a unique form factor. In this case, creator tuenhidiy made heavy use of PVC pipe for the machine’s structure and enclosures. The materials are very inexpensive, but this machine’s axes ride on hardened steel rods and so it is still capable of drawing very well.
To keep costs down without sacrificing capability, tuenhidiy chose to use an Arduino UNO Rev3 board for control. That reads GRBL G-code files through a microSD card module and controls the stepper motors through a CNC shield with A4988 stepper drivers. There is also a simple Arduino Nano-based controller interface made with a 16×2 character LCD, button, and rotary encoder.
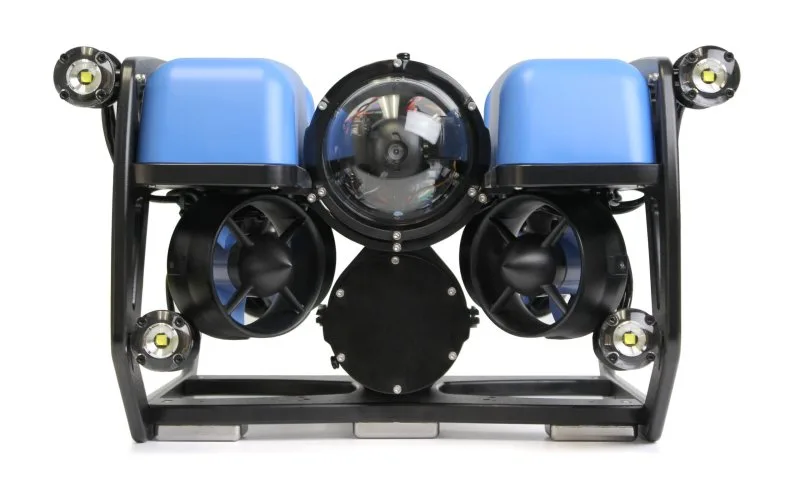
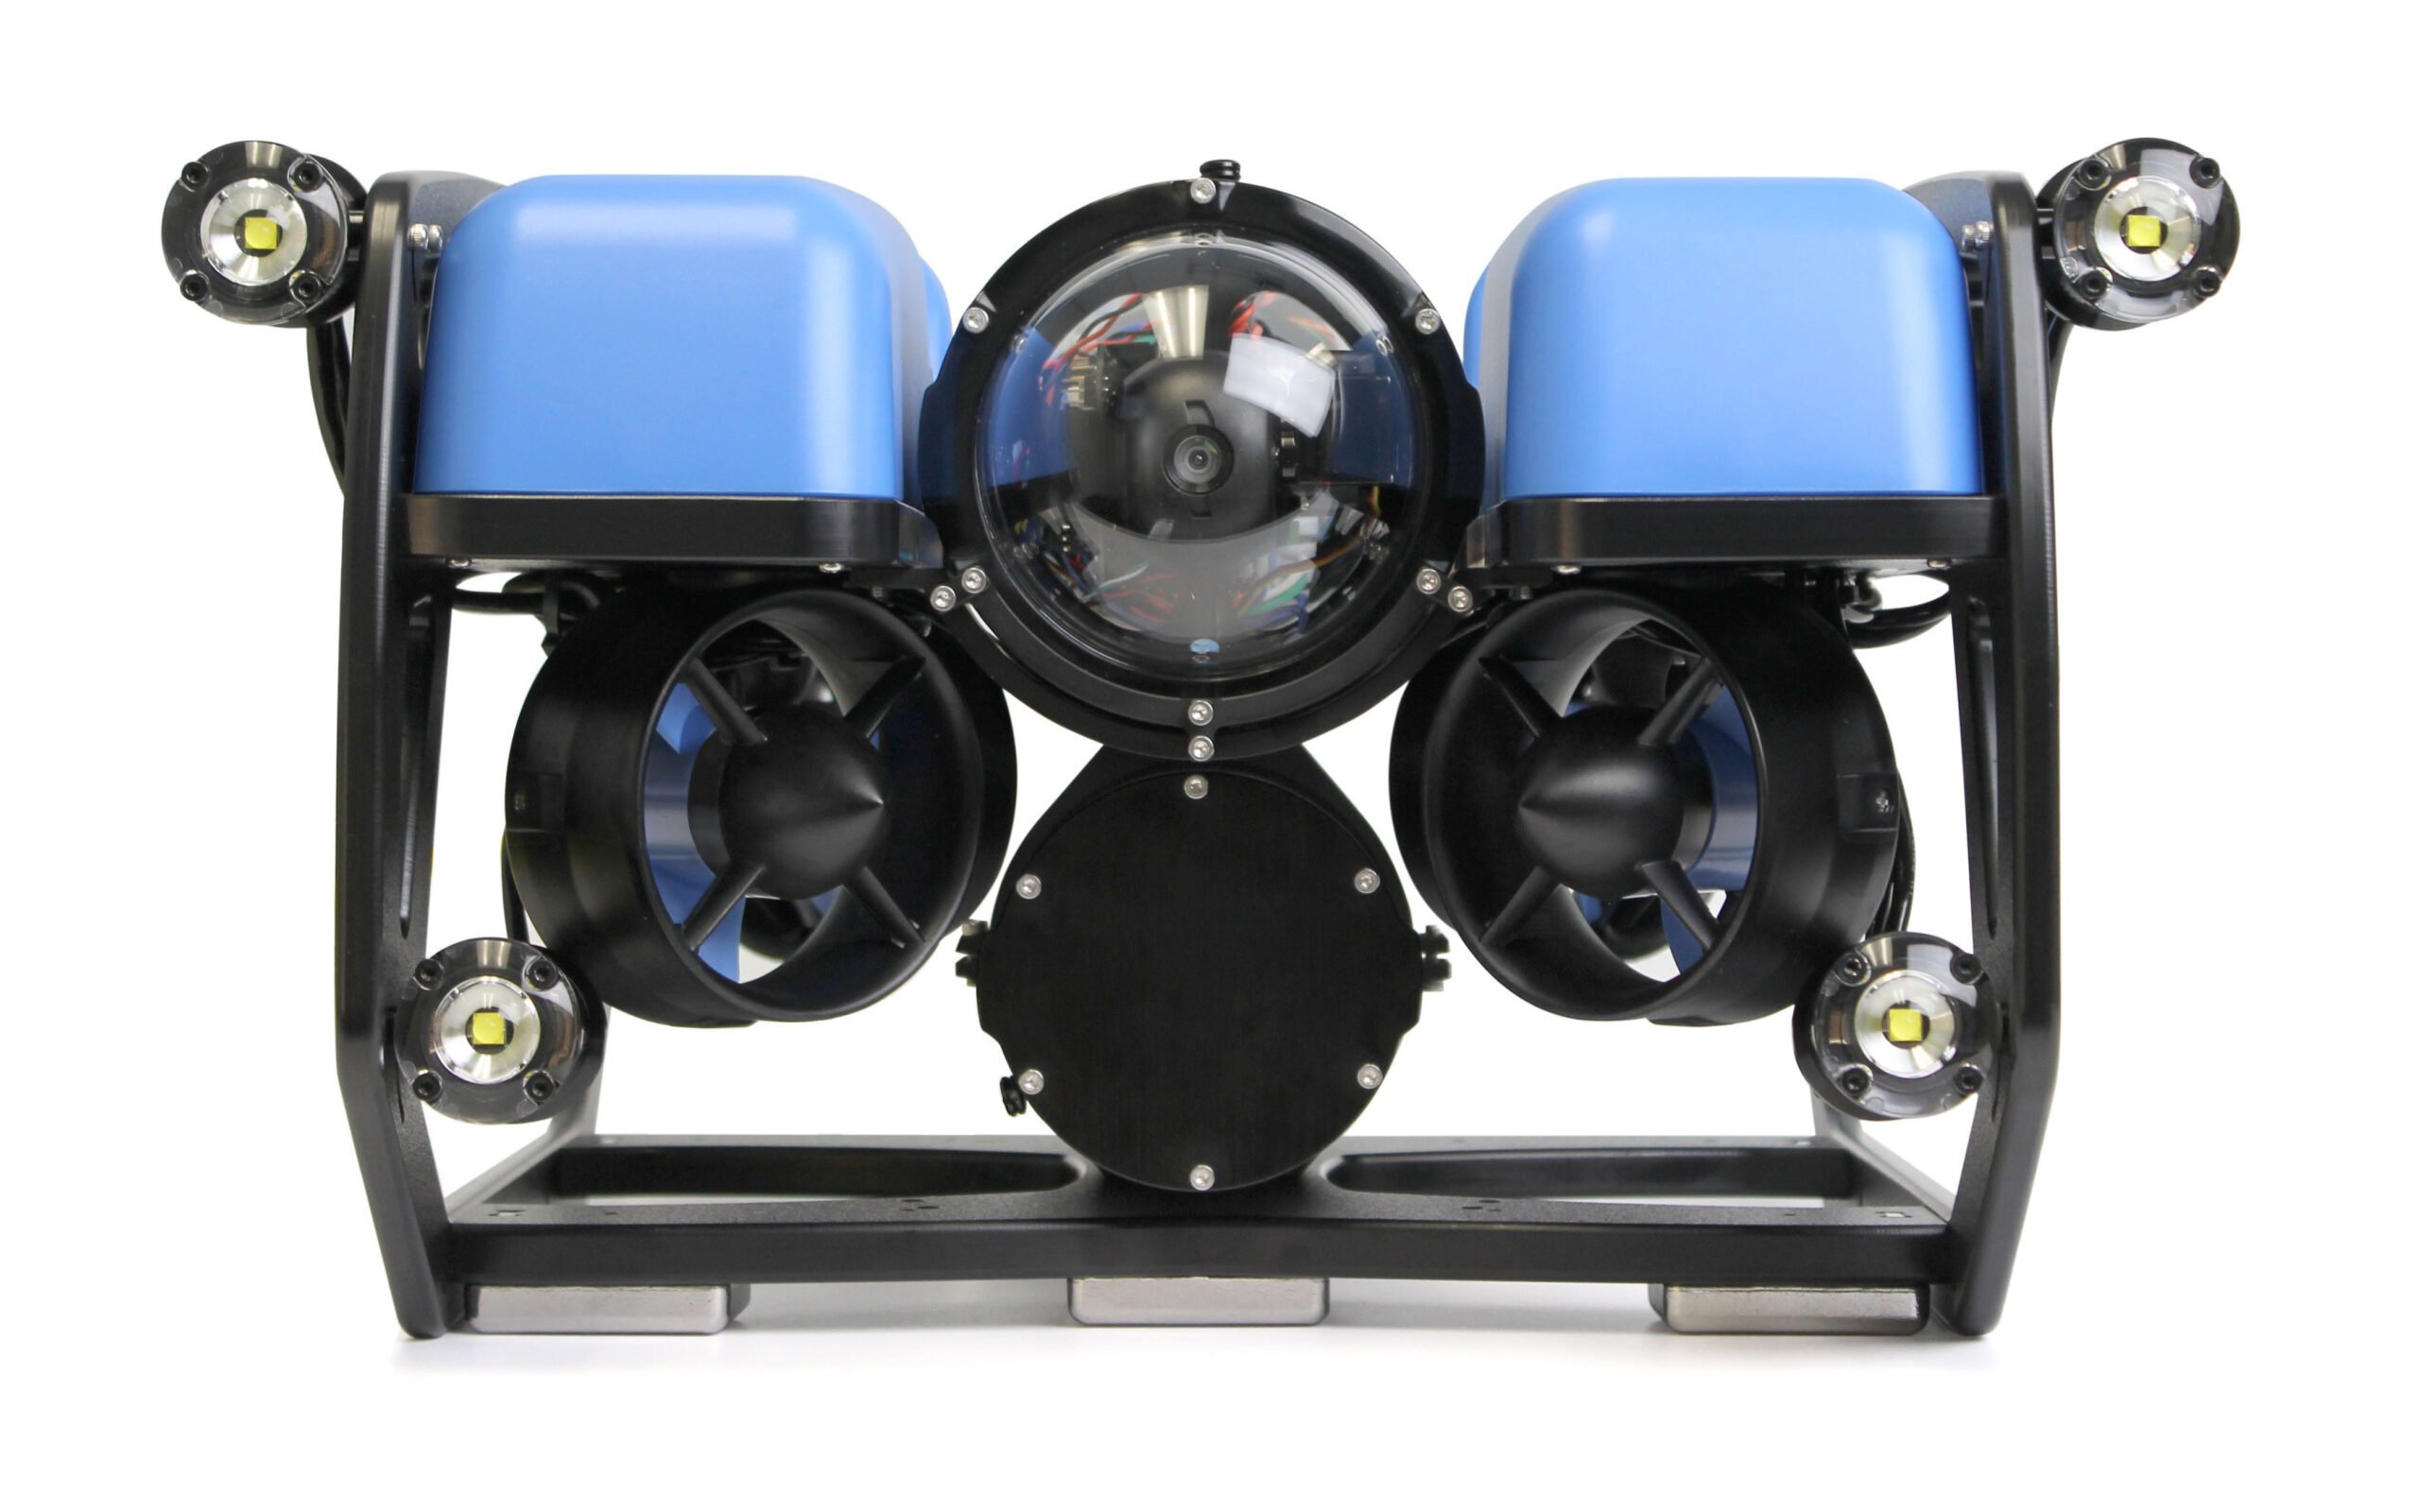
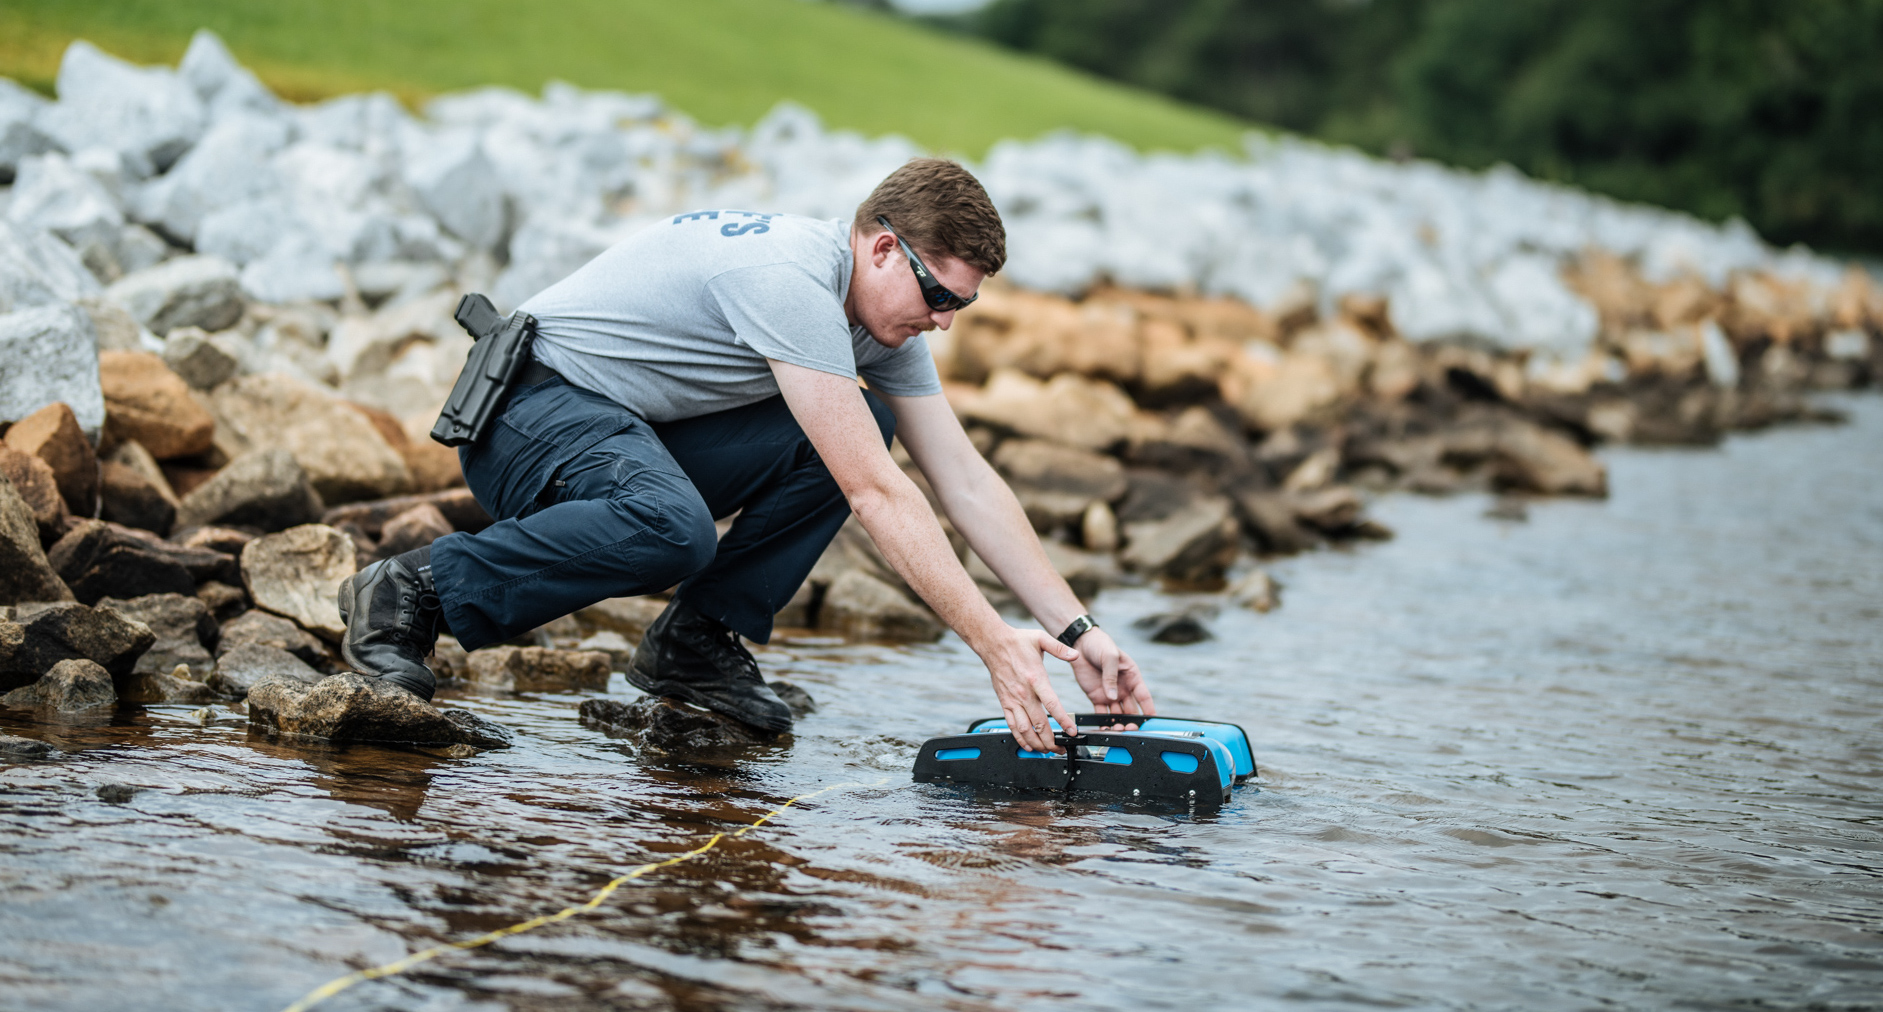
If you’re not sure what an underwater ROV is, the short answer is: a Remotely Operated Vehicle you chuck in the sea. But if you’re our favourite kind of geek and wish to feast on a much longer answer, Blue Robotics has shared a short history and explanation of how they work, including the excellent tidbit that the first ever ROV was called the Poodle.
BlueROV2 is billed as “the world’s most affordable high-performance underwater ROV.” While $3,950 seems like a lot, this ROV buying guide quotes prices up to $40,000. We like to think our affordable Raspberry Pi brain had a lot to do with bringing that cost down
What’s it made of?
The device measures 18 × 13.3 × 10 inches and can capture live 1080p HD video, thanks to a wide-angle low-light camera mounted to a tilt mechanism on the front. An on-board gyroscope, accelerometer, and magnetometer, along with pressure, depth, temperature, voltage, and leak detection sensors, make sure everything is functioning and navigating as it should.
If you choose a ROV with an acrylic enclosure, you can get to a depth of 100 metres, but splash out on the aluminium option and you’re safe to dive up to 300 metres. As far as we can tell, that’s deep enough to explore right down to the sea bed over much of the North Sea and almost all of the Irish Sea. Feel free to Google other bodies of water yourself.
What does its Raspberry Pi do?
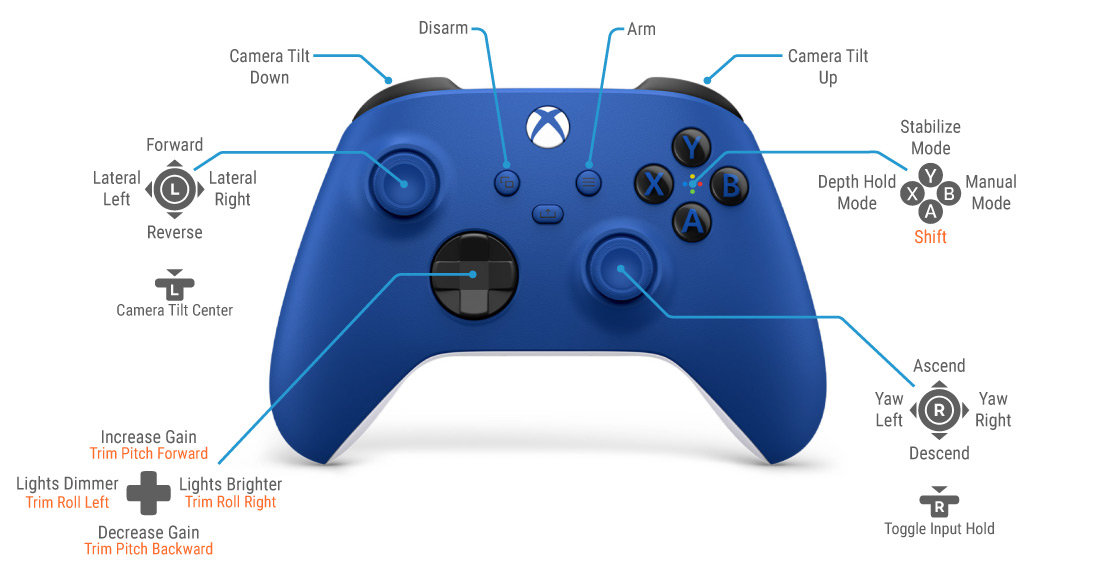
The BlueROV2 is controlled by the Navigator Flight Controller, which is a HAT designed for Raspberry Pi 4. Raspberry Pi runs Blue Robotics’ bespoke BlueOS software and handles all of the processing and computing requirements inside the ROV.
All of those sensors are provided by the Navigator, and Raspberry Pi 4 communicates what’s happening back to base on dry land via BlueOS.
While we do think BlueROV2 is cool and all, we’re still too traumatised by the shark chase at the beginning of The Little Mermaid to watch any of the video it captures.
A sixth joint rotates the end of the head, to which you can attach various accessories using tiny LEGO connectors inserted into its grid of holes and those on the accessory, making them easy to fit and remove.
A similar LEGO connection system is used on the bottom of the robot to attach a base. Several options are available; we were supplied with the G-Base 2.0 (£58), which attaches the arm securely to the edge of a desk (so long as it’s not too thick).
Robot connections
With the robot arm secured to a desk, it’s time to power it up. A DC supply connects to a barrel jack on the base with a red power switch next to it. Raspberry Pi 4’s USB and Ethernet ports are exposed, along with its GPIO pins via a breakout header just above. On the opposite side of the base are a micro-HDMI port, headphone jack, USB-C port, and microSD card slot.
The inserted microSD card is pre-installed with a special version of Ubuntu MATE featuring a built-in development environment for MyCobot and several apps and tools. An extensive Python library enables you to quickly start positioning the arm by setting one or more joint angles or co‑ordinates – you can also read the current values. So you can manually move the arm into different positions and read the values to help you program it to shift between positions.
Another coding option is the myBlockly app in which you drag and drop Scratch-style blocks, including dedicated ones for MyCobot to set joint angles/co-ordinates and light up the RGB LED matrix on the head. Make sure you set the Baud value in the init block to 1000000, however, otherwise it won’t move. The arm also works with the commonly used ROS (Robot Operating System) 1 and 2.
The MyCobot written documentation could be clearer and better organised, but several videos help you to get to grips with it.
Attaching accessories
Our MyCobot arm was supplied with a couple of optional accessories: an adaptive gripper (£106) and a pen holder (£58). The gripper has a connector that plugs into a servo port on the head. It worked well and we soon had it picking up and dropping items on the desk with good repeated positioning precision.
The head also features a Grove connector, USB-C, and mini GPIO breakout, so there are plenty of connection options. You could even add a camera to give the arm computer vision.
While considerably more expensive than other Raspberry Pi robot arms we’ve tested, even without the addition of accessories, the MyCobot 280 is more robust and stylish. It has more powerful servos, while the joints have bearings for smoother movement and improved precision.
Verdict
9/10
It’s not cheap, but it does include a Raspberry Pi 4 and is a robust and stylish robotic arm with smooth and accurate movement.
Specs
Features: 6DOF, 330° rotation range, 280 mm radius, up to 250 g payload, LEGO interfaces on base and head, Raspberry Pi 4
Connections: 2 × USB 3.0, 2 × USB 2.0, Ethernet, micro-HDMI, GPIO breakout headers, USB-C, headphone jack, Grove and servo connectors
The two Toms continue to work together and are both members of Sheffield-based VolcanoTech. They aim to get more instruments onto volcanoes and acquire unprecedented long-term datasets that contribute to volcano research and monitoring. Designing and constructing low-cost scientific instrumentation is crucial for developing countries, where funding for equipment can be quite limited but where many of the world’s active volcanoes are located.
Tell-tale signs
A volcano’s degassing behaviour changes before an eruption, often increasing or decreasing. Since sulphur dioxide is the gas most prevalent at active volcano sites, Tom focused on monitoring this using a UV camera. There were already scientific-grade UV cameras in the field in some locations, but they cost tens of thousands of pounds, whereas Tom aimed to develop a UV camera “an order of magnitude cheaper” and much smaller, making it suitable for permanent installation and remote reporting. Monitoring volcanoes often involves tracking how sulphur dioxide diverges from a baseline and then investigating those changes. Tom’s system uses the Beer-Lambert law of absorption, comparing the optical depth of plume pixels in an image to the background sky radiance.
Tom and his colleagues didn’t know much about Raspberry Pi at the outset, “which made the detailed knowledge and wealth of experimentation by others invaluable when it came to asking specific questions or pulling ideas from pre-existing threads.” A particularly fruitful discovery was a YouTube video by Les Wright which simplified the process of removing the Bayer filter from the camera lens to enhance its sensitivity to ultraviolet light. This worked well for a Raspberry Pi Camera 1.3, but Tom reports that he was unable to remove the Bayer filter in the same way for the newer Raspberry Pi Camera Module. The process in any case requires a fume cupboard and dangerous chemicals (see ‘Warning’ box). Tom originally made use of the UV camera in a spectrometer he used for sulphur dioxide monitoring. Although this worked well, he subsequently decided to focus on the camera-based system.
How predictable
Having created an affordable alternative to the £10,000 scientific cameras, Tom has been working on modifying the camera design so they can be deployed permanently on volcanoes, without the need for human interaction. To date, only Stromboli in the Aeolian Islands, and Etna just to the south, have fixed monitoring. “We are now beginning to build high time-resolution sulphur dioxide emission rate datasets from several volcanoes, the likes of which are quite rare in volcanology,” he says.
Getting the cameras installed on hazardous volcanoes is no mean feat! Using a Starlink satellite connection has helped them overcome the major issue of handling and processing the terabytes of data each camera acquires each year, as well as partially solving issues relating to debugging camera installations remotely. With cameras in the Amazon rainforest as well as the Atacama desert, temperature extremes and huge amounts of rainfall add to the challenges. However, once in place, they’ll give volcanologists significantly improved monitoring capabilities that contribute to longer-term volcanological research – an increasingly critical aspect of their work “since a volcano can exhibit significant changes in activity over a wide range of time scales.
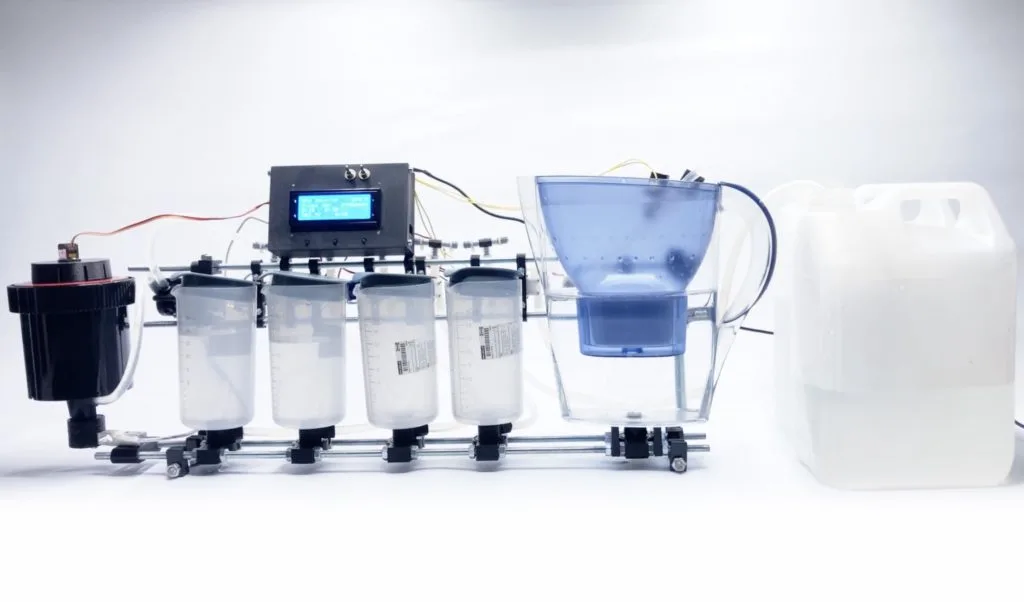
20 years ago, you could walk into any pharmacy or big box store with your rolls of film, then get developed photos back within 24 hours at a reasonable price. But that industry is dead and life is much more difficult for film photographers today. While big chain pharmacies still have developing services, they have to send the film out to a lab and it is quite an expensive. One alternative is to build the OpenAutoLab, which can automatically develop black-and-white and color film photos without user interruption.
The OpenAutoLab machine only develops film and so you’ll still need to turn elsewhere to get your prints, but it makes the process much easier to perform at home. It handles most of the steps you would need to do in a dark room, so you aren’t fumbling around with baths and washes. It pumps the chemicals back and forth as needed and, most importantly, maintains the ideal temperature and performs periodic agitation.
An Arduino Nano board is responsible for most of the process control. It opens and closes the valves and operates the pump. It monitors each reservoir with a load cell and HX711 amplifier or float switch, moving the liquids back and forth at specific times according to the user-set parameters. Interestingly, the designers chose to use a sous vide stick to maintain temperature and circulate the bath. That’s a clever idea, because those sous vide sticks are very affordable and quite precise.
OpenAutoLab is intended to be a more affordable alternative to the Jobo Autolab and it appears to have promise. Documentation is sparse at the moment and we aren’t sure how well it works, but brave photographers can use the build instructions to try out OpenAutoLab right now.
Shuffling and dealing is very serious business when you’re playing any card game that puts money on the line, like poker. Even when the stakes aren’t that high, poor shuffling or dealing can drive a family apart. If you’re tired of being criticized for your card-handling skills, maybe you should build this automatic card dealer and shuffler designed by VUBGROUP1.
VUBGROUP1 consists of electromechanical engineering students at Bruface (The Brussels Faculty of Engineering) and this machine was a project for a mechatronics course. It is capable of both shuffling and dealing cards. Both of those subsystems work in a similar manner: DC motors spin wheels that grip the top card and push it out.
To shuffle, the user splits the deck and loads the two halves. The machine then pushes the cards together in semi-random order into the pre-deal area. That probably isn’t enough for a true shuffle, so it might be worth running the deck through a few times. From the pre-deal area, the machine spits out a selected number of cards, pivots on a stepper motor, and the repeats until all hands have been dealt.
An Arduino UNO Rev3 board controls that entire process according to user parameters set through a simple interface consisting of a 16×2 character LCD and push buttons. The enclosure is laser-cut MDF held together by M3 screws and there are a handful of 3D-printed parts, such as the gears attached to the motors.
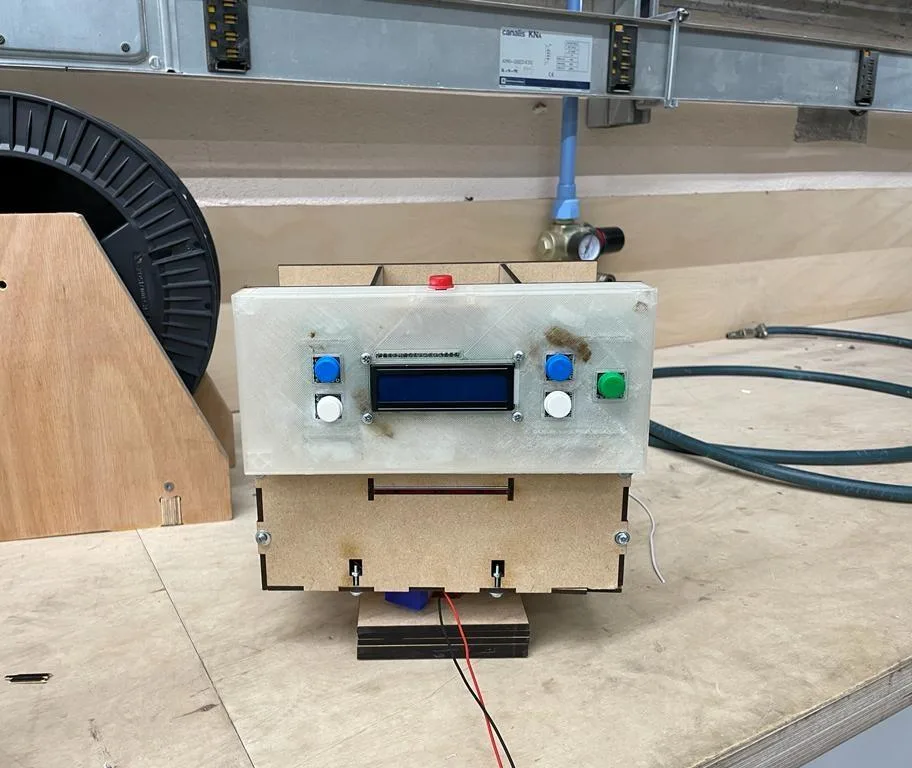
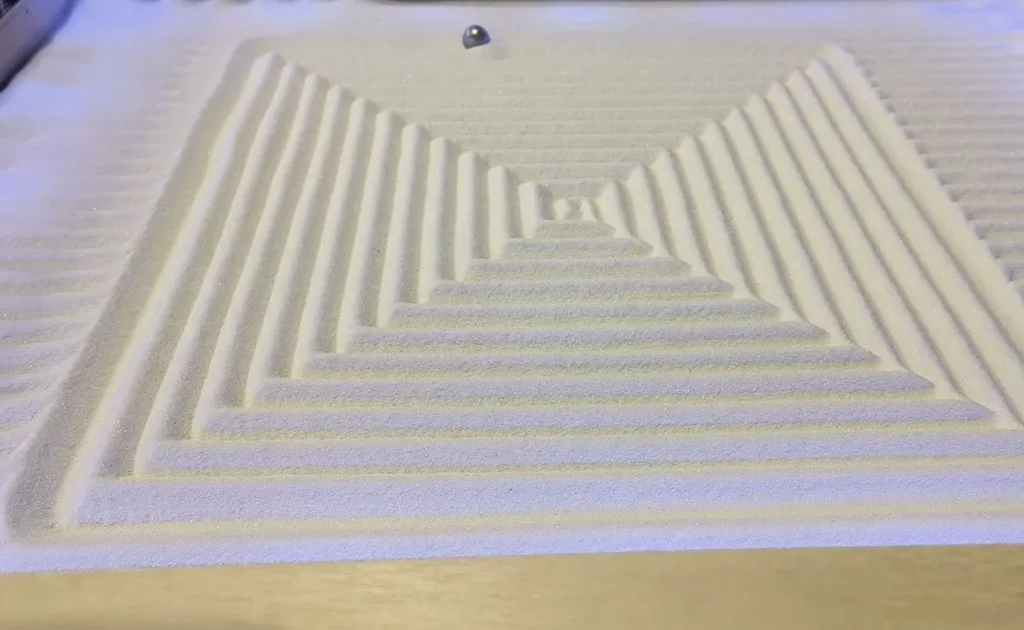
Like most furniture, a coffee table should both look good and function well. To function well, a coffee table just needs a flat surface. But looking good is a lot more complicated and depends entirely on owner taste. If kinetic art is your thing, then you might consider building this automatic sand art coffee table.
This is a coffee table with a large pocket in the center filled with sand. A ball bearing rolls around in the sand, leaving intricate patterns behind. LED lighting highlights those patterns and users can program their own sequences of movements to create whatever art they like.
The secret to a kinetic sand coffee table like this one is magnetism. There is a two-axis CNC system underneath the table with a strong magnet that pulls the ball bearing through the sand. In this case, the kinematics are straightforward with a linear rail gantry riding on a pair of linear rails. Stepper motors pull the gantry and carriage with GT2 belts.
An Arduino UNO Rev3 board controls those stepper motors through a CNC Shield V3 with two TMC2209 drivers. The sketch is very simple and doesn’t run G-code directly. Instead, the user must extract a series of coordinates from a G-code file and copy them into the sketch. But because this is a coffee table, most users will only need to do that one time to program a series of patterns to cycle through.
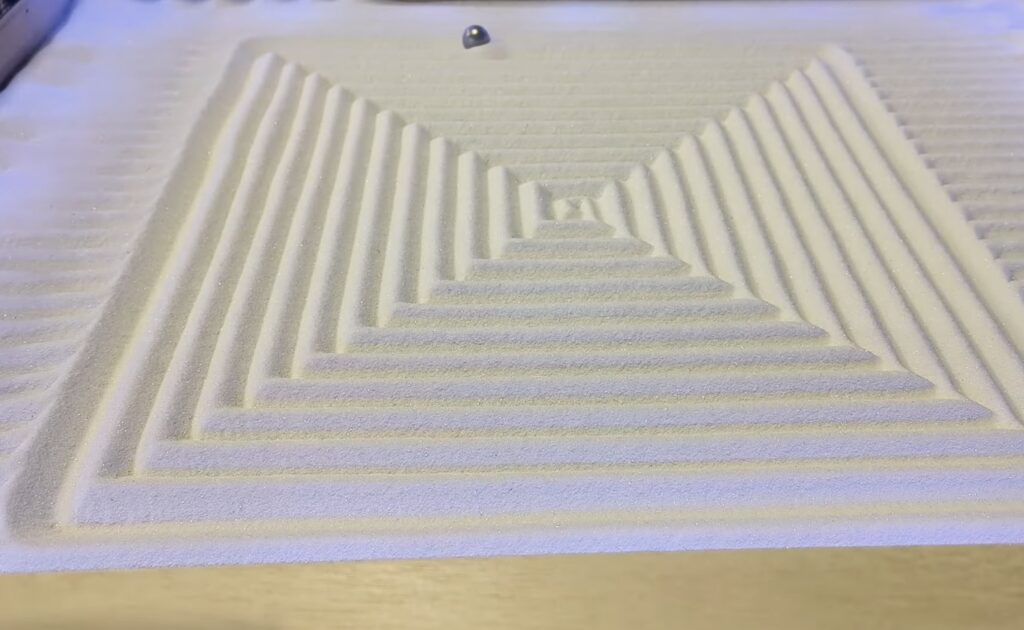
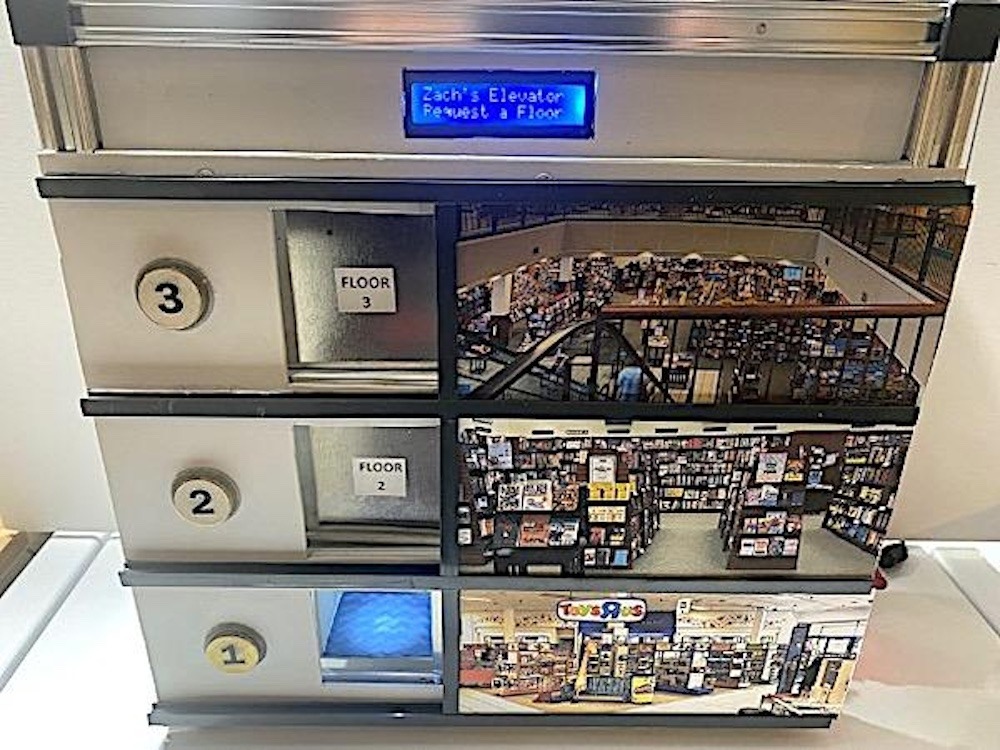
Autism often comes with a unique sensory experience that differs from that of most neurotypical people. That tends to be publicized as a negative thing, as some sensations can cause some autistic people a lot of discomfort. But the opposite can also be true, with positive sensory experiences providing great joy. The latter scenario inspired CapeGeek to build this desktop elevator for a friend’s autistic son.
Elevators are popular with many people living with autism because they provide a multi-sensory experience that can be quite enjoyable. As such, there is a whole community of people with a shared love of elevators. This desktop model may have been designed for one child in particular, but it should appeal to many others. It has three floors and a car that moves between them in an elevator shaft. The user can send the car to a specific floor by pushing the corresponding button. The car will then move to that floor and the elevator doors will open.
CapeGeek constructed this using a frame made of aluminum extrusion. The elevator car rides on a lead screw driven by a stepper motor and servo motors open the doors. An Arduino UNO R3 board controls those motors in response to the call buttons, which are standard momentary push buttons. Three micro switches tell the Arduino when the car reaches a floor. Optional upgrades include a small LCD screen reads “Zach’s Elevator” and a prompt to select a floor, sound effects, and LED lighting to illuminate the elevator car.
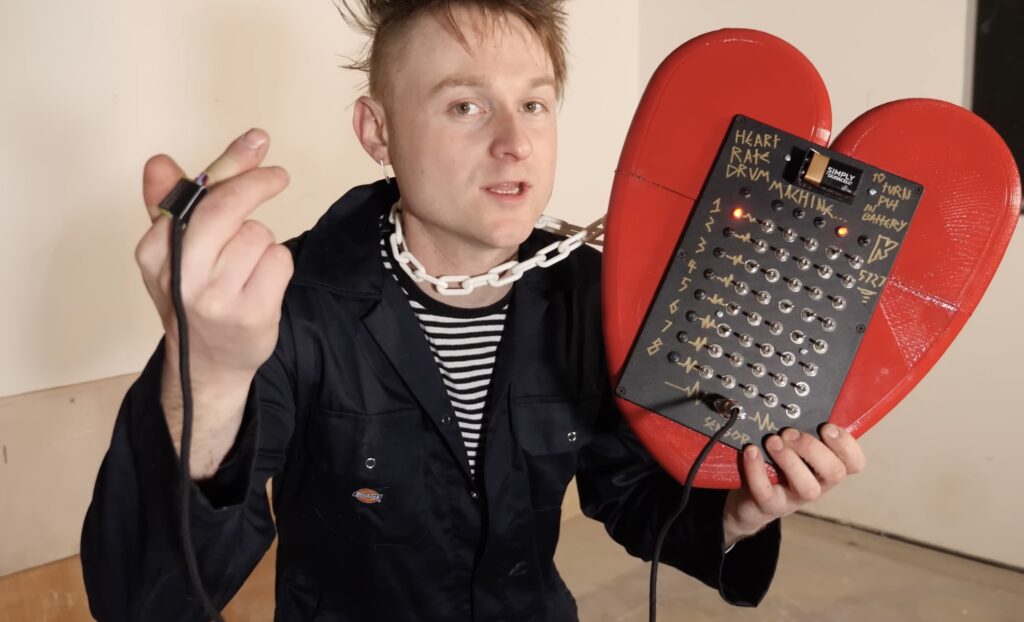
Some of YouTube’s most famous makers get together every year for a Secret Santa gift exchange. We already showed you the heartbeat-controlled drum machine that Sam Battle created for Ali Spagnola, but what did Battle receive? Roboticist extraordinaire James Bruton drew Battle and decided to build him this oversized robotic Furby.
Bruton started by skinning a normal Furby to take a look inside and find out how it ticks. The current models are a bit different than the originals from a couple of decades ago, but they’re still pretty simple. There are basic mechanical linkages for the animatronic movement, sensors to detect touch and movement, a speaker for the sound, and cheap LCD eyes. Bruton didn’t reuse any of those components, but this dissection gave him some direction.
With a Furby anatomy lesson under his belt, Bruton designed the scaled-up version with a 3D-printed skeleton. That houses several servo motors to actuate the eyes, eyelids, ears, and mouth, along with two small linear actuators that let it rock back and forth. An Arduino Mega 2560 board controls those motors, as well as a DFRobot DFPlayer Mini MP3 player for the sound effects. An infrared proximity sensor lets the Arduino detect nearby movement, so it can react. Under normal conditions, it just cycles through pre-programmed movement and audio. But if the infrared proximity sensor triggers, the Arduino will switch to something new immediately.
The final step was to cover the giant Furby in its signature fur. Bruton left an opening in the chest where there is a cavity big enough for a normal Furby to reside, complete with LED illumination. That has some concerning implications, but the entire Furby aesthetic skirts the creepy line and so it seems fitting.
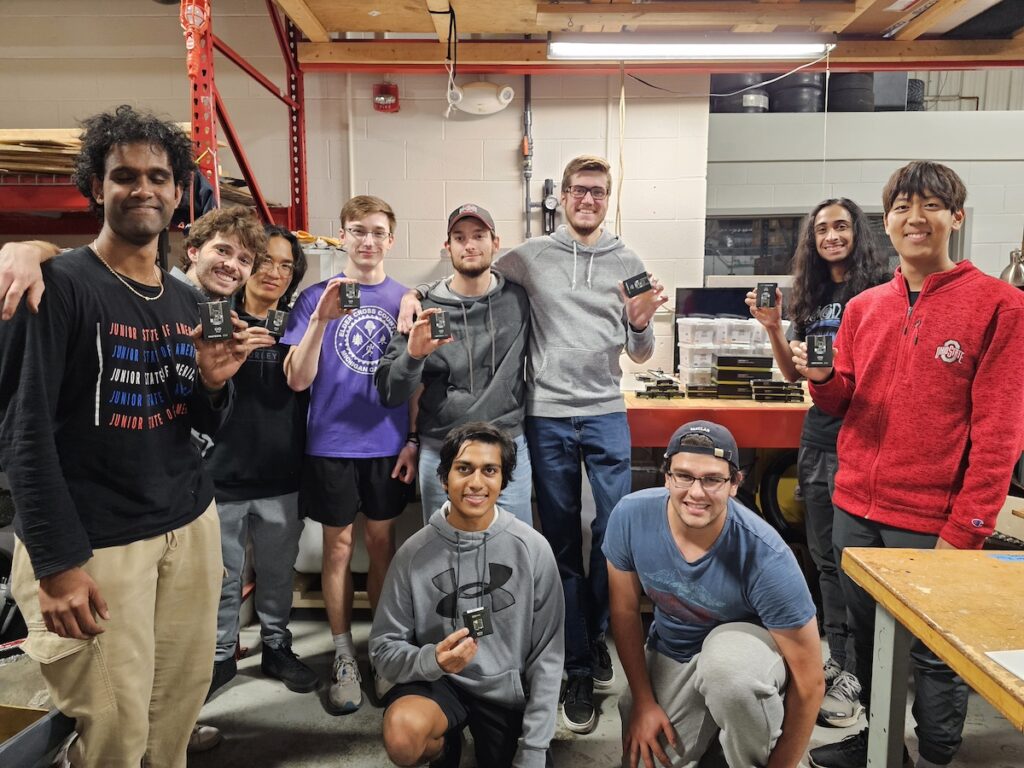
Arduino is ready to graduate its educational efforts in support of university-level STEM and R&D programs across the United States: this is where students come together to explore the solutions that will soon define their future, in terms of their personal careers and more importantly of their impact on the world.
Case in point: the groundbreaking partnership with the Ohio State University Buckeye Solar Racing Team, a student organization at the forefront of solar vehicle technology, committed to promoting sustainable transportation by designing, building, and racing solar-powered vehicles in national and international competitions. This collaboration will see the integration of advanced Arduino hardware into the team’s cutting-edge solar vehicles, enhancing driver displays, data transmission, and cockpit metric monitoring.
In particular, the team identified the Arduino Pro Portenta C33 as the best option for their car: “extremely low-powered, high-quality and reliable, it also has a CAN interface – which is how we will be getting data from our sensors,” team lead Vasilios Konstantacos shared.
We have also provided Arduino Student Kits for prototyping and, most importantly, accelerating the learning curve for new members. “Our goal is to rapidly equip our newcomers with vital skills, enabling them to contribute meaningfully to our team’s progress. Arduino’s hardware is a game-changer in this regard,” Vasilios stated. In addition, the team received Nicla Vision, Nicla Sense ME, and Nicla Voice modules to integrate essential sensors in the car, and more Portenta components to make their R&D process run faster (pun intended!): Portenta Breakout to speed up development on the Portenta C33, Portenta H7 to experiment with AI models for vehicle driving and testing, and Portenta Cat. M1/NB IoT GNSS Shield to connect the H7 to the car wirelessly, replacing walkie-talkie communication, and track the vehicle’s location.
Combining our beginner-friendly approach with the advanced features of the Arduino Pro range is the key to empower students like the members of the Buckeye Solar Racing Team to learn and develop truly innovative solutions with the support of a qualified industrial partner and high-performance technological products. In particular, the Arduino ecosystem offers a dual advantage in this case: components’ extreme ruggedness, essential for race vehicle operations, paired with the familiarity and ease of use of the Arduino IDE.
The partnership will empower Ohio State University students to experiment with microcontrollers and sensors in a high-performance setting, fostering a seamless, hands-on learning experience and supporting the institution’s dedication to providing unparalleled opportunities for real-world application of engineering and technology studies. Arduino’s renowned reliability and intuitive interface make it an ideal platform for students to develop solutions that are not only effective in the demanding environment of solar racing but also transferable to their future professional pursuits.
“We are thrilled to collaborate with the Ohio State University Buckeye Solar Racing Team,” commented Jason Strickland, Arduino’s Higher Education Sales Manager. “Our mission has always been to make technology accessible and foster innovation. Seeing our hardware contribute to advancing solar racing technology and education is a proud moment for Arduino.”
Every holiday season, several of YouTube’s most prominent makers get together for a Secret Santa gift exchange. It is always fun to see what kind of tailored gifts they create and this year is no different. Sam Battle of the LOOK MUM NO COMPUTER YouTube channel drew Ali Spagnola in the most recent exchange. Ali likes both music and exercise, so Battle built her this quirky drum machine controlled by the user’s heart beat.
At first glance, this looks like a fairly conventional drum sequencer. It cycles through eight beats and can play from five different samples. Each beat has a set of five switches to select the sample to play on that beat. But the twist is that the machine only moves to the next beat when the user’s heart beats, as opposed to moving through the sequence at a consistent rate.
That sounds a little bit jarring, because hearts are not metronomes. But the benefit is that the tempo increases with the user’s heart rate, so the pace matches their activity level.
An Arduino Nano board detects the user’s pulse through a Pimoroni Pulse Sensor. It plays drum samples (or any audio clips) loaded onto a SparkFun WAV Trigger module. Battle wired the sequencer switches in a keyboard-style matrix, which reduces the number of IO pins required to just the number of rows plus columns instead of one pin for every switch. On each beat, the Arduino checks the switches and then plays the corresponding drum samples. Finally, Battle crammed all of that hardware into an enclosure with 3D-printed decoration that makes the device look like an oversized heart.
We are pleased to announce a new partnership with Chilean engineering services firm C3D, joining our System Integrators Program at the Gold level. The collaboration will focus on enhancing the company’s IoT and automation capabilities by leveraging the entire Arduino Pro product line to accelerate the product development of connected applications in key verticals.
“Through exploration, design, prototyping and manufacturing, we strive to solve every challenge that may prevent our clients from turning their product into a reality,” states Juan Pablo Oyarzún Alcayaga, CEO of C3D. “By combining Arduino Pro industrial-grade modular products and our expertise, we can now offer accelerated development and lower non-recurring engineering fees at the same time.”
According to a Gartner report published in June, “Spend on the Internet of Things (IoT) across key industries reached over $268 billion in 2022, and IoT devices are forecast to grow at a compound annual growth rate (CAGR) of 15% from 2021 through 2025.” The significant global growth experienced by the IoT market has been driven by increased connectivity and the integration of smart devices across various industries – including healthcare, manufacturing, transportation and logistics, smart homes and smart cities. On top of this, 2023 has been the year of artificial intelligence, leading to unprecedented advancements in automation: the integration of AI into IoT systems currently allows for intelligent decision-making and process automation at an entirely new level. Businesses that incorporate AI-driven automation into their workflows can enhance efficiency, reduce costs, and improve overall performance – and C3D offers a variety of services to achieve all of this and more.
The firm is particularly interested in the potential impact that the emergence of Narrowband Internet of Things (NB-IoT) technology will have on the market, as it gains traction as a specialized communication standard designed for the IoT. Offering low power consumption, extended coverage, and support for a massive number of devices, it stands out as the ideal solution for applications in agriculture, utilities, asset tracking, and mining.
“We are excited C3D is our first system integrator partner in Chile,” comments Paul Kaeley, Strategic Sales Advisor to Arduino. “Their strategic insights and expertise, in the context of machine design and manufacturing increasingly moving to South America, create amazing opportunities to potentially set a new standard, and drive customer value in this market.”
The System Integrators Partnership Program by Arduino Pro is an exclusive initiative designed for professionals seeking to implement Arduino technologies in their projects. This program opens up a world of opportunities based on the robust Arduino ecosystem, allowing partners to unlock their full potential in collaboration with us.
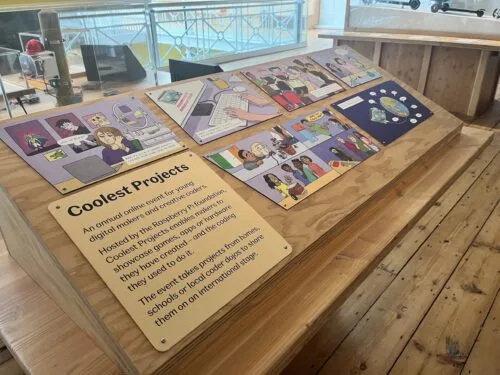
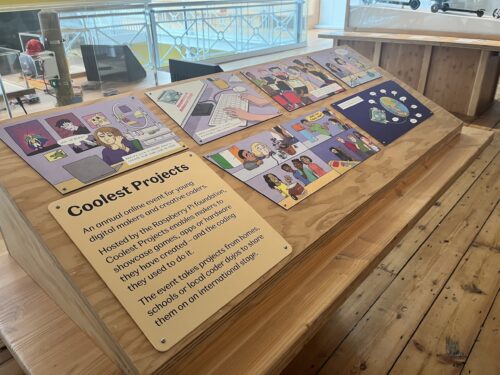
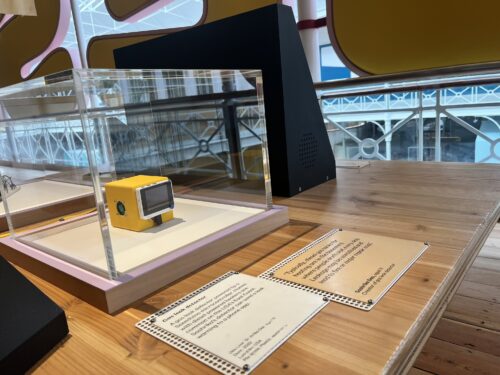
Each year, young people all over the world share and celebrate their amazing tech creations by taking part in Coolest Projects, our digital technology showcase. Our global online showcase and local in-person events give kids a wonderful opportunity to celebrate their creativity with their communities, explore other young creators’ tech projects, and gain inspiration and encouragement for their future projects.
The Coolest Projects exhibit at the Young V&A in London.
Now, visitors to the Young V&A museum in London can also be inspired by some of the incredible creations showcased at Coolest Projects. The museum has recently reopened after a large reimagining, and some of the inspiring projects by Coolest Projects 2022 participants are now on display in the Design Gallery, ready to spark digital creativity among more young people.
Projects to solve problems
Many Coolest Projects participants showcase projects that they created to make an impact and solve a real-world problem that’s important to them, for example to help members of their local community, or to protect the environment.
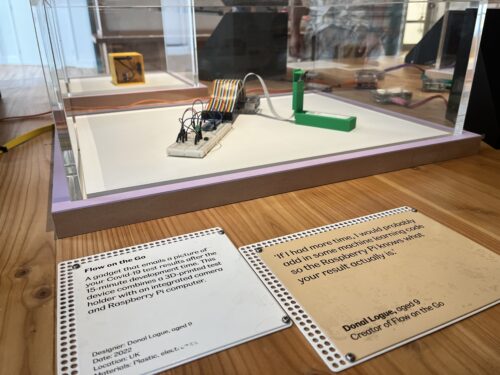
At Coolest Projects, Donal (age 9) showcased his creation to send notifications about coronavirus test results via email.
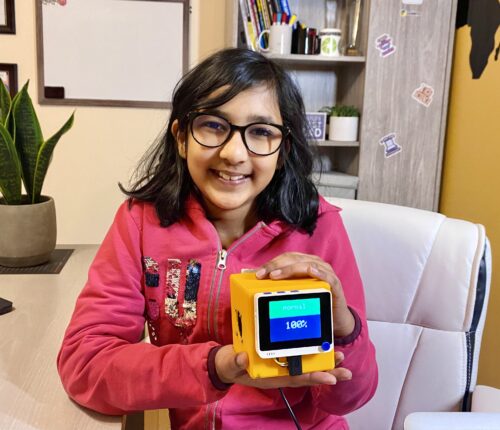
One example on display in the Young V&A gallery is EleVoc, by 15-year-old Chinmayi from India. Chinmayi was inspired to create her project after she and her family faced a frightening encounter:
“My family and I are involved in wildlife conservation. One time we were charged by elephants even though we were only passing by in a Jeep. This was my first introduction to human–animal conflict, and I wanted to find a way to solve it!” – Chinmayi
The experience prompted Chinmayi to create EleVoc, an early-warning device designed to reduce human–elephant conflict by detecting and classifying different elephant sounds and alerting nearby villages to the elephants’ proximity and behaviour.
Also exhibited at the Young V&A is the hardware project Gas Leak Detector by Sashrika, aged 11, from the USA. Gas Leak Detector is a device that detects if a fuel tank for a diesel-powered heating system is leaking and notifies householders through an app in a matter of second.
Sashrika knew this invention could really make a difference to people’s lives. She explained, “Typically, diesel gas tanks for heating are in the basement where people don’t visit every day. Leakage may be unnoticed and lead to fire or major repair cost.”
Projects to have fun
As well as projects designed to solve problems, Coolest Projects also welcomes young people who create things to entertain or have fun.
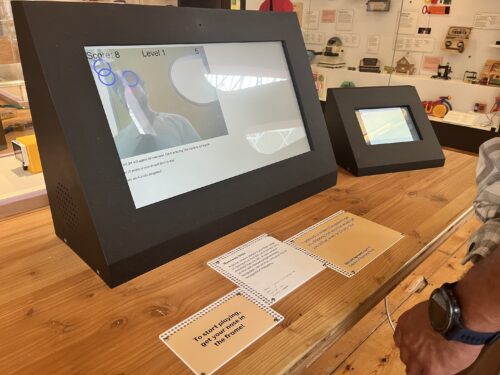
Harshit’s game for Coolest Projects, now exhibited in the Young V&A
At the Young V&A, visitors can enjoy the fun, fast-paced game project Runaway Nose, by 10-year-old Harshit from Ireland. Runaway Nose uses facial recognition, and players have to use their nose to interact with the prompts on the screen.
Harshit shared the motivation behind his project:
“I wanted to make a fun game to get you thinking fast and that would get you active, even on a rainy day.” – Harshit
We can confirm Runaway Nose is a lot of fun, and a must-do activity for people of all ages on a visit to the museum.
Join in the celebration!
If you are in London, make sure to head to the Young V&A to see Chinmayi’s, Sashrika’s, and Harshit’s projects, and many more. We love seeing the ingenuity of the global community of young tech creators celebrated, and hope it inspires you and your young people.
With that in mind, we are excited that Coolest Projects will be back in 2024. Registrations for the global Coolest Projects online showcase will be open from 14 February to 22 May 2024, and any young creator up to age 18 anywhere in the world can get involved. We’ll also be holding in-person Coolest Projects events for young people in Ireland and the UK. Head to the Coolest Projects website to find out more.
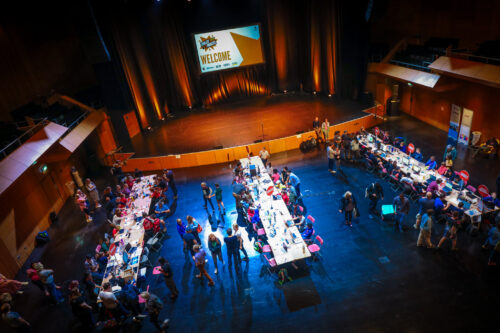
Coolest Projects Ireland 2023.
Coolest Projects is for all young people, no matter their level of coding experience. Kids who are just getting started and would like to take part can check out the free project guides on our projects site. These offer step-by-step guidance to help everyone make a tech project they feel proud of.
To always get the latest news about all things Coolest Projects, from event updates to the fun swag coming for 2024, sign up for the Coolest Projects newsletter.
Um dir ein optimales Erlebnis zu bieten, verwenden wir Technologien wie Cookies, um Geräteinformationen zu speichern und/oder darauf zuzugreifen. Wenn du diesen Technologien zustimmst, können wir Daten wie das Surfverhalten oder eindeutige IDs auf dieser Website verarbeiten. Wenn du deine Einwillligung nicht erteilst oder zurückziehst, können bestimmte Merkmale und Funktionen beeinträchtigt werden.
Funktional
Immer aktiv
Die technische Speicherung oder der Zugang ist unbedingt erforderlich für den rechtmäßigen Zweck, die Nutzung eines bestimmten Dienstes zu ermöglichen, der vom Teilnehmer oder Nutzer ausdrücklich gewünscht wird, oder für den alleinigen Zweck, die Übertragung einer Nachricht über ein elektronisches Kommunikationsnetz durchzuführen.
Vorlieben
Die technische Speicherung oder der Zugriff ist für den rechtmäßigen Zweck der Speicherung von Präferenzen erforderlich, die nicht vom Abonnenten oder Benutzer angefordert wurden.
Statistiken
Die technische Speicherung oder der Zugriff, der ausschließlich zu statistischen Zwecken erfolgt.Die technische Speicherung oder der Zugriff, der ausschließlich zu anonymen statistischen Zwecken verwendet wird. Ohne eine Vorladung, die freiwillige Zustimmung deines Internetdienstanbieters oder zusätzliche Aufzeichnungen von Dritten können die zu diesem Zweck gespeicherten oder abgerufenen Informationen allein in der Regel nicht dazu verwendet werden, dich zu identifizieren.
Marketing
Die technische Speicherung oder der Zugriff ist erforderlich, um Nutzerprofile zu erstellen, um Werbung zu versenden oder um den Nutzer auf einer Website oder über mehrere Websites hinweg zu ähnlichen Marketingzwecken zu verfolgen.