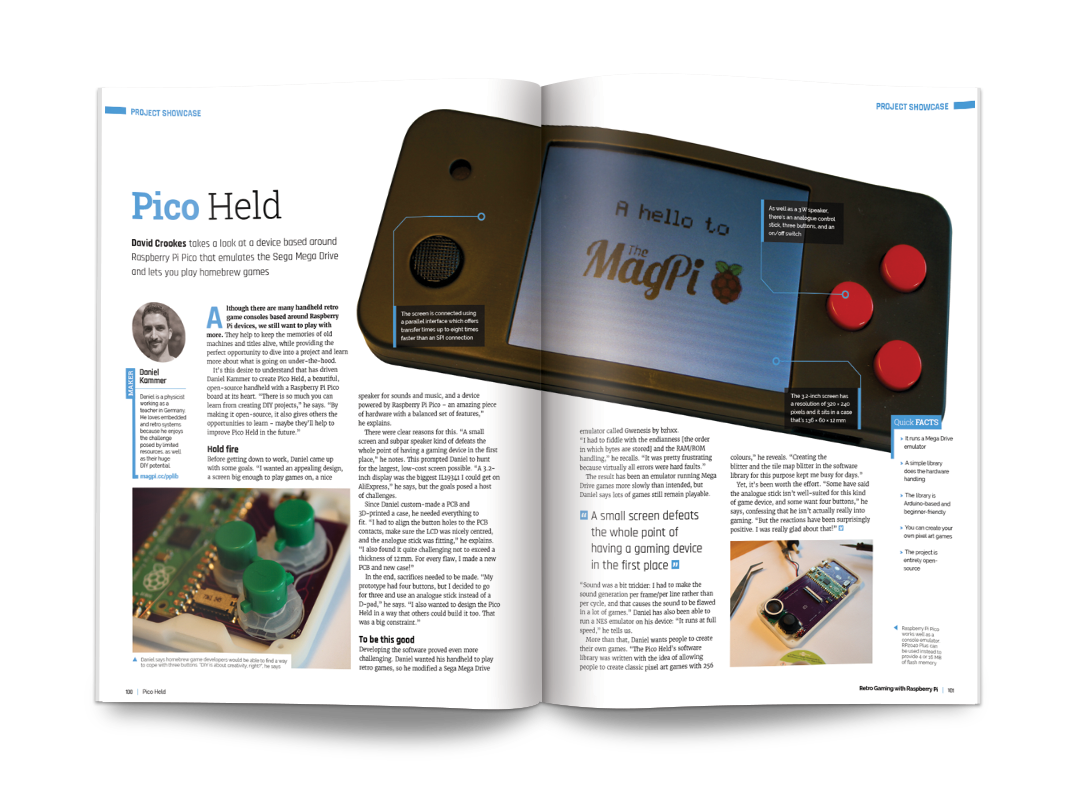
His solution was to make use of persistence of vision (POV) – the brief retention of a visual impression on the eye’s retina that creates the illusion of a moving image in film and television.
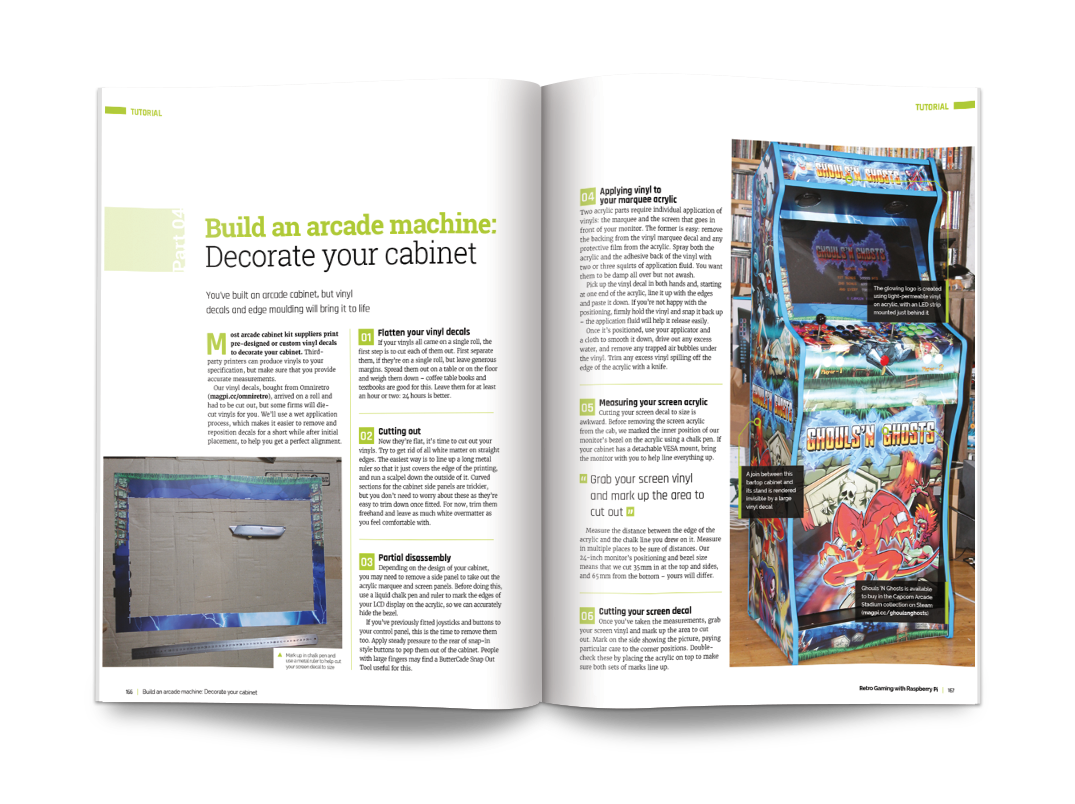
Shine a light
While the general consensus was that POV displays require too much in the way of supporting machinery to make them work, such as bearings and slip rings, Tim had the bright idea of getting a whole tiny device, including battery and motor, to spin.
He quickly threw together an LED matrix board design. “It took about a week for the matrix PCB to arrive,” he says, “which gave me a little time to think about how it was going to go together, but once I had all the parts building the whole thing only took a couple of hours.
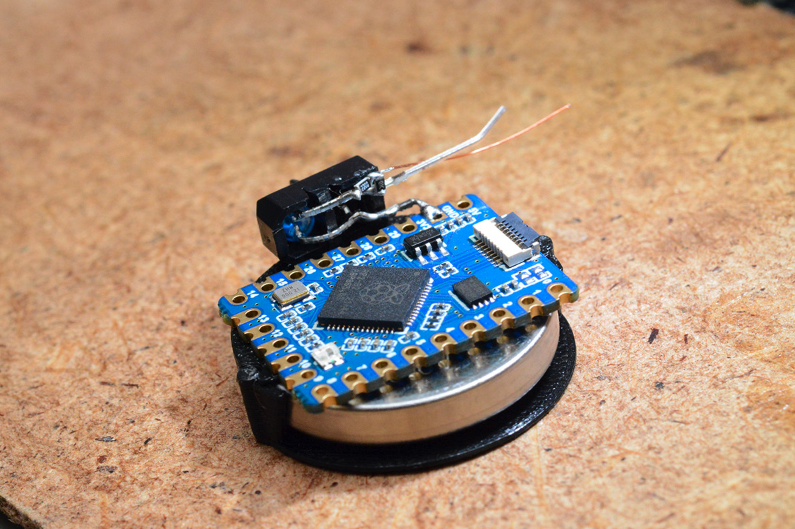
For the brains of the device, he looked at using Raspberry Pi Pico, but eventually opted for a Waveshare RP2040-tiny partly due to its smaller size (about half that of Pico).
“Aside from the low cost and easy availability, one of the nice things about the RP2040 is that you can set, or get, all of the GPIO pins in a single clock cycle,” he notes. “This makes implementing a custom matrix very easy. The software [for the project] does very little at all: it just steps through an array of numbers to send to the GPIO port.”
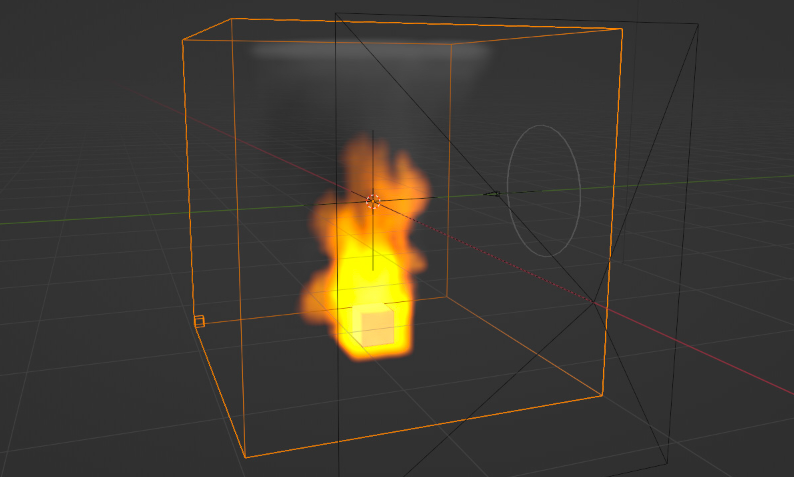
The flame effect is an animation based on volumetric data and rendered in the open-source Blender 3D modelling application. Tim first experimented with a rotating cube and fluid simulation. “Getting the software to work and generating those animations took maybe a couple of days of experimenting.”
Spinning around
The candle is spun around by a Mabuchi RF-410CA motor Tim had to hand. This can rotate at up to 5900rpm, but for a 30fps animation he used PWM to reduce it to around 1800rpm.
Power for the project is supplied by a LIR2450 coin cell housed in a custom 3D-printed battery holder. “The amount of current a battery can deliver is related to its capacity,” says Tim, “so it’s not just about making the battery last as long as possible, it’s also that a smaller battery might not be able to drive the motor at all.”
From this initial prototype, “the next step is to make a circuit board out of the hand-wired mess it is currently, and then increase the resolution of the display. We can roughly double the number of LEDs without changing the design, but beyond that we’ll need to rethink how the display is driven.”
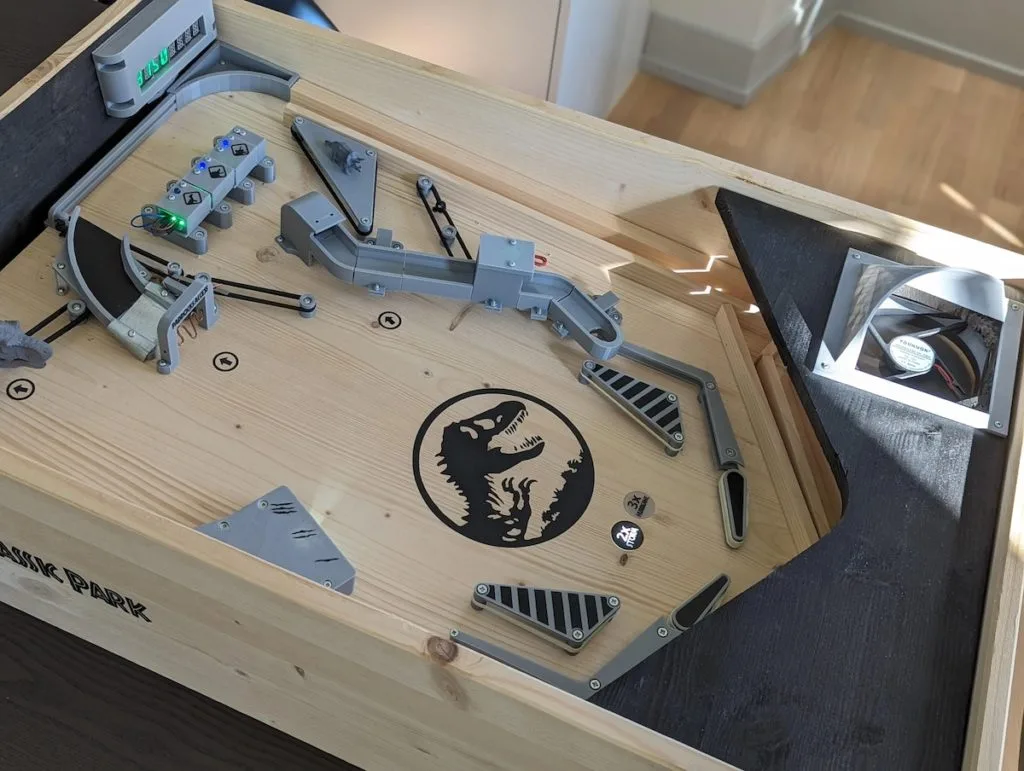
Pinball machines are prime examples of the dizzying heights achieved by engineers in the electromechanical era before digital electronics came along. But while those classic pinball machines are extremely impressive from an engineering standpoint, they required an immense amount of expertise and were therefore unapproachable to most. By utilizing modern digital components like Arduino development boards, Barjo was able to construct this amazing Jurassic Park-themed pinball machine.
From a user perspective, this looks and operates a lot like a classic pinball machine. But instead of relying on complex mechanical linkages and vast arrays of electric switches, it takes advantage of today’s microcontrollers and sensors. The table is mostly wood and Barjo 3D-printed a bunch of custom parts, such as the paddles, pathways for the ball, and enclosures for the electronic components.
Some of the parts, like the spring-loaded ball launcher, are standard off-the-shelf pinball components that are available through retailers that sell refurbishment parts. But most are custom and work using electronic circuitry. The electronic components operate under the control of an Arduino Nano and an Arduino Mega 2560. The Nano is tasked with the flippers, while the Mega handles the displays, sensors, and solenoids.
There are a variety of sensors on the table, such as infrared break beam sensors to detect the passing ball. Those can trigger solenoids to open up gates to specific pathways, like the T-Rex paddock that lets the player rack up additional points. Those points, and some status information, show up on an eight-digit seven-segment display. And, of course, there are plenty of flashing lights to create the ideal pinball experience.
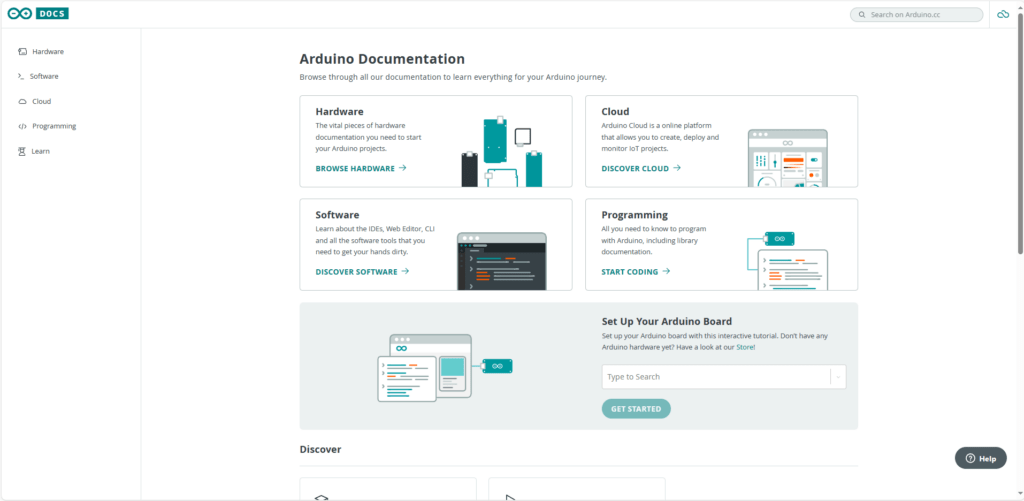
Have you checked out Arduino Docs lately? If it looks different, that’s because we can finally reveal the makeover we’ve been working on for months – in line with our constant efforts to learn, improve, and share all of it along the way!
You can always count on Arduino Docs
Arduino Docs is our public and collaborative repository of info, tech specs, and tutorials. It is a huge mass of online resources that we create, organize and maintain also thanks to our amazing community’s contributions (managed via GitHub: here’s how you can help if you are interested).
With 75+ current hardware products documented, hundreds of tutorials, and dozens of datasheets, it’s definitely the go-to resource center any time you have a new Arduino product, want to learn a new skill, or need help to figure something out! Want to host a web server on your brand new MKR WiFi 1010? Can’t wait to dive into the ultimate manual for your Opta micro PLC? Wondering how to set up a security system using ML? Need a solid starter guide for Arduino Cloud, the IDE 2, or Arduino in general? Arduino Docs has you covered, with specific and updated information to support all of this and so much more.
What’s new and improved!
Open-source through and through, Arduino Docs is a shared space that’s wonderfully alive with updates and new ideas. But it can also get messy and confusing – and that’s why we decided to revamp its design and architecture completely, to improve your experience and navigation.
Our goal was to make all the resources more accessible: easier to find, easier to consult. That’s why you can now explore a new and improved Arduino Docs:
It welcomes you with a new homepage. Don’t know where to start? Pick one of the main sections featured here: choose between hardware, software or Cloud, and see what each one has to offer.
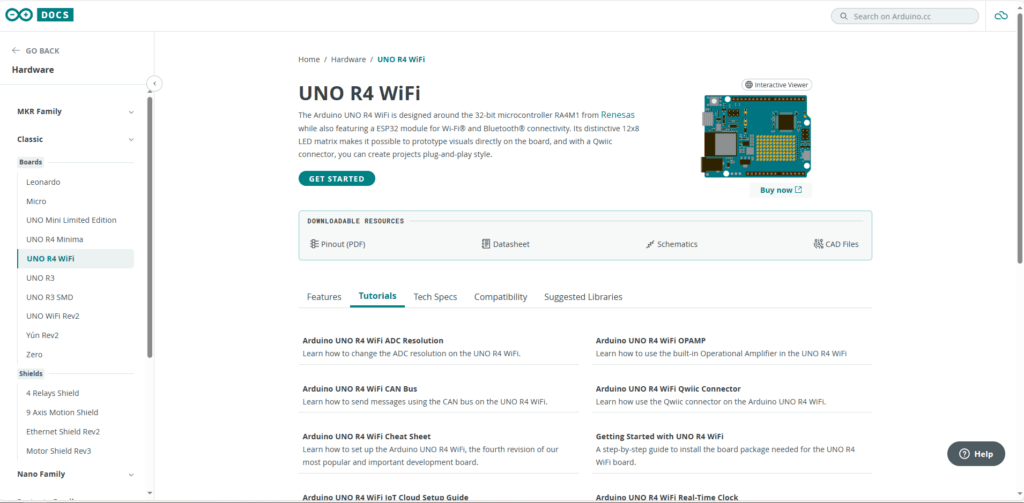
It has a sidebar so you never get lost. The side menu mirrors the main sections and drills down so you always know where you are as you browse documentation.
It streamlines finding hardware info. Datasheets and tutorials specific to each component are now presented within its dedicated page.
It helps you get started. As much as we’ve worked on making specific items more intuitive to find, we know sometimes you’re just curious about discovering more about a broader subject. That’s why we’ve included new suggestions to get started with the Arduino Cloud or MicroPython, and you’ll see a whole Learn section prominently displayed.
It looks (and works) better on mobile. A big improvement for smaller devices!
The myriad resources and open-source nature of the project remain the same. But they now live in a neater home, where it’s easier and faster for you to find everything you need to discover, learn, make, and share your knowledge about Arduino.
In our series of community stories, we celebrate some of the wonderful things young people and educators around the world are achieving through the power of technology.
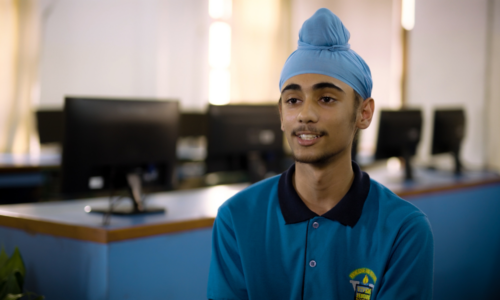
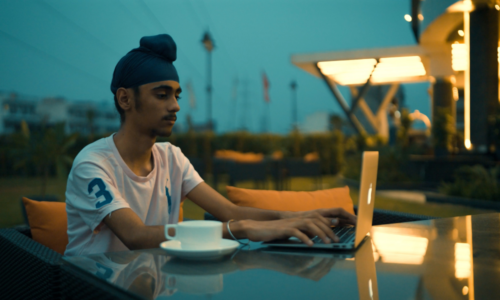
In our latest story, we’re heading to Vivek High School in Mohali, India, to meet Sahibjot, a 14-year-old coding enthusiast who has taken his hobby to the next level thanks to mentorship, Code Club, and the exciting opportunity to take part in the Coolest Projects 2023 global online showcase.
When he was younger, Sahibjot loved playing video games. His interest in gaming led him to discover the world of game development, and he was inspired to find out more and try it out himself. He began to learn to code in his spare time, using tutorials to help him develop his skills.
Keen to share the joy he had experienced from gaming, Sahibjot set himself the challenge of creating a game for his cousin. This project cemented his enthusiasm for coding and developing games of his own.
“I always felt that I have played so many games in my life, why not make one and others will enjoy the same experience that I had as a child.
For my cousin, I made a personal game for him, and he played it and he liked it very much, so once he played it, I felt that, yes, this is what I want to do with my life.” – Sahibjot
Mentorship and collaboration
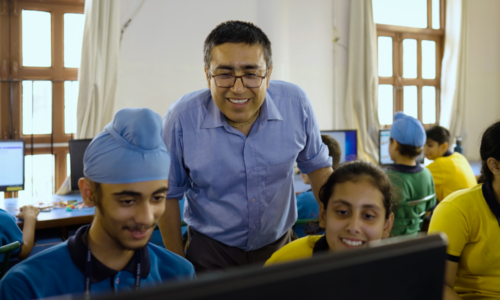
While continuing to hone his computing skills at home, Sahibjot heard that his school had started a Code Club. After initially feeling nervous about joining, his enthusiasm was bolstered by the club mentor, Rajan, talking about artificial intelligence and other interesting topics during the session, and he soon settled in.
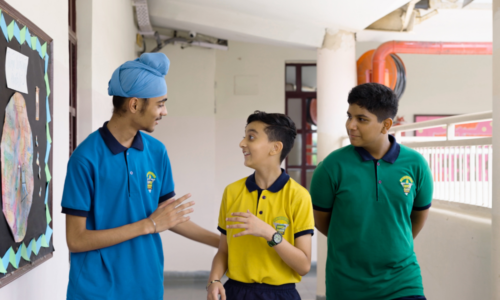
At Code Club, with support and encouragement from Rajan, Sahibjot continued to develop and grow his coding skills. Alongside his technical skills, he also learned about teamwork and working collaboratively. He embraced the opportunity to help his peers, sharing his knowledge with others and becoming a mentor for younger club members.
“Last year, we joined this coding club together and we became friends. He’s a very friendly person. Whenever we need him, he just quickly helps us. He helps us to troubleshoot, find any bugs, or even fix our codes.” – Akshat, fellow Code Club member
A global opportunity
The next step for Sahibjot came when Rajan introduced him and his fellow Code Club members to Coolest Projects. Coolest Projects is a celebration of young digital creators and the amazing things they make with technology. It offers participants the opportunity to share their tech creations in a global, online showcase, and local in-person events celebrating young creators are also held in several countries.
Sahibjot was eager to take part and showcase what he had made. He submitted a Python project, a ping-pong game, to the online showcase, and was very excited to then see his creation receive a special shout-out during the Coolest Projects global livestream event. He was delighted to share this achievement with his friends and family, and he felt proud to be representing his school and his country on a global stage.
“I told everyone around me that there was going to be a livestream and I possibly might be featured in that, so that was really exciting. I learned a lot about just not representing my school and myself as an individual, I learned about representing my whole nation.” — Sahibjot
Sahibjot’s passion for computing has helped shape his aspirations and ambitions. Looking to the future, he hopes to use his technology skills to benefit others and make an impact.
“Using code and technology and all of the things like that, I aspire to make effort to do something with the world, like help out people with technology.” — Sahibjot
Inspire young creators like Sahibjot
To find out how you and young creators you know can get involved in Coolest Projects, visit coolestprojects.org. If the young people in your community are just starting out on their computing journey, visit our projects site for free, fun beginner coding projects.
For more information to help you set up a Code Club in your school, visit codeclub.org.
Join us in celebrating Sahibjot’s inspiring journey by sharing his story on X (formerly Twitter), LinkedIn, and Facebook.
This has taken a few weeks longer this time, simply due to the sheer amount that changed under the hood in Bookworm, but the bug-fix release is now ready and can be installed from today via Raspberry Pi Imager, or downloaded from the usual place on our website. Or, to upgrade an existing image, simply use the updater icon on the taskbar, or (if you’re more old-school) open a terminal and type
$ sudo apt update
followed by
$ sudo apt full-upgrade
This update includes improved support for encrypted connections in WayVNC; the latest version of Thonny; Mathematica and Scratch 3 working on Raspberry Pi 5; and a bunch of other small bug fixes and tweaks. But we thought we’d give you a little bonus in this release too…
A few weeks ago, Eben wandered past my desk, and remarked, “wouldn’t it be nice if we had a dark theme?” (He’s not the first person to suggest this, but he is the boss, so I tend to pay more attention when he suggests things!) And as it happened, I wasn’t particularly busy that day.
Our PiXflat theme has been around for a few years now – we launched it along with Raspberry Pi OS Buster back in 2019. It started out as a mildly tweaked version of the default GTK theme called Adwaita, but it changed quite a bit over the years, so now doesn’t have all that much in common with Adwaita any more.
A theme is basically a big CSS (cascading style sheet) file as used for styling web pages, e-books and the like, which defines the appearance of every widget used to draw applications. (A widget is a user interface element such as a button or a text label.) You can set the colour, the font, the background and numerous other aspects for each widget, and you can set different values depending on whether the widget is active (e.g. a button which is being pressed), whether it is disabled, whether the mouse pointer is over it, and so on. And when I say it is a “big” file – it’s really big: PiXflat is around 4500 lines.
Dark mode
Creating a dark theme can be relatively easy, or really hard, depending on how the colours have been defined in your original theme. If all your colours are defined as variables, it is relatively easy – but if all your colours are hard-coded values then it is rather more time-consuming. In PiXflat, as in Adwaita before it, the colours were all hard-coded! So the first job was to go through 4500 lines of CSS and find all the hard-coded colours, replacing them with variables, and then setting those variables to the original hard-coded values so I didn’t break the original light theme.
Then, having done that, it was time to consider how each one of those colours should change to produce a suitable dark appearance. The obvious first step was simply to invert each colour, so that black became white and so on. The trouble with this is that while what you end up with is indeed dark, it doesn’t usually look that good.
So then the hard work began – choosing exactly which contrasting colour was going to be used in the dark theme to replace the light version. This involved setting the values of around 70 colour variables to create a set that worked together; you have to take into consideration having sufficient contrast between elements so that you can still see everything clearly, so that text is still readable against darker backgrounds, so that the colour change when you move the mouse over an element is still obvious, and so on. And it all interacts, so you find that if you tweak one colour, you then need to tweak four or five others to keep all the contrast correct.
Endless themes
From past experience with PiXflat, creating a theme is very much like the proverbial painting of the Forth Bridge; it’s never really finished, because you keep making little tweaks. But the theme which I have called PiXnoir – the dark version of PiXflat – is now ready to use; like PiXflat it will doubtless continue to evolve over time, but the first version is included in this release.
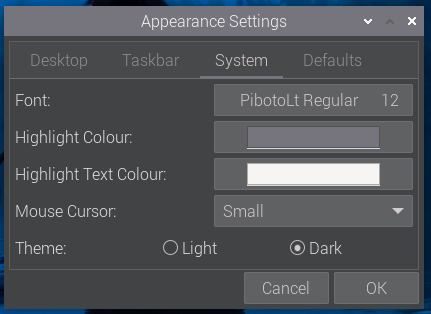
We’ve made it easy to switch between the themes. Just open ‘Appearance Settings’ from the ‘Preferences’ section of the main menu, go to the ‘System’ tab, and switch the ‘Theme’ option from ‘Light’ to ‘Dark’. Most applications will load the new theme on the fly, but some applications – particularly Geany and Calculator – use their own internal themes as well, so you’ll need to close those first if they are running in order to get the theme to change
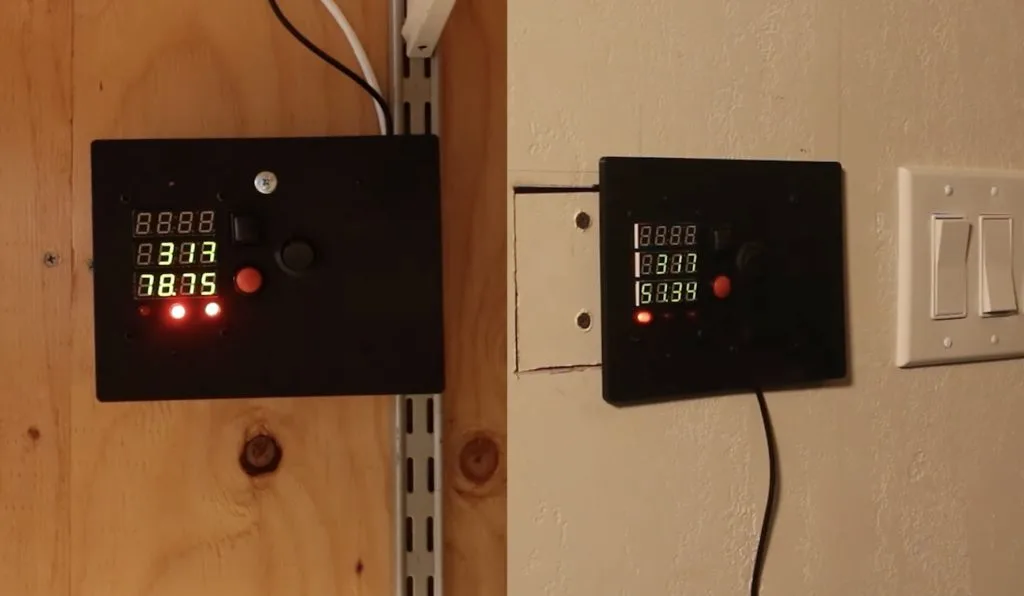
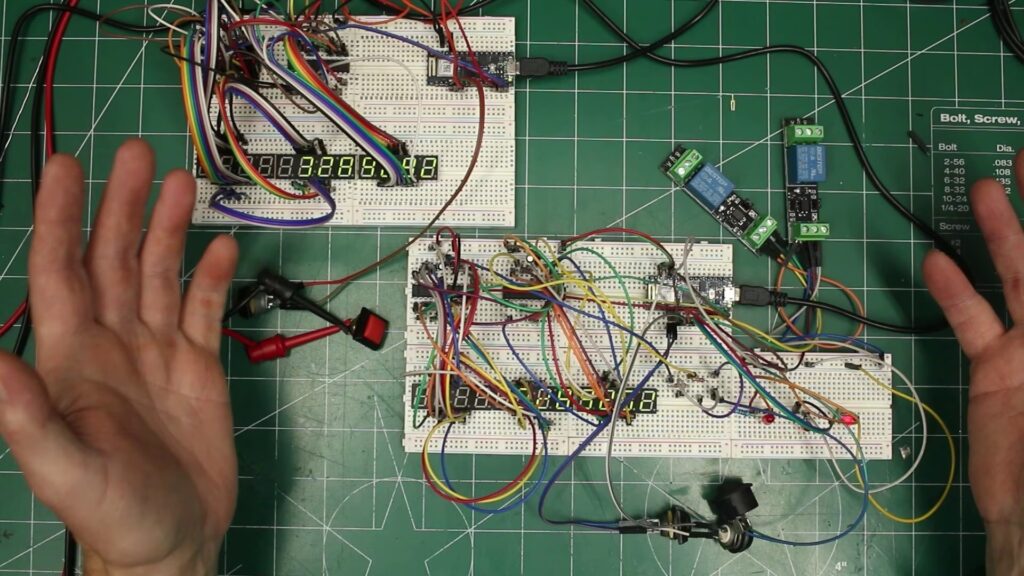
Living off the grid is a dream for many people, but it also presents unique challenges that are otherwise absent in our urban-centric lifestyles. One of the largest adjustments one has to make is the lack of readily available power, as it typically comes from renewable wind/solar or generator setups. In element14 Presents host Kaleb Clark’s case, his Honda EU-7000iS generator works in combination with some solar panels around his property, although the generator is located nearly 200 feet away and downhill, making it a very tough journey to operate in bad weather.
After finding a bypass cable with one pair of leads for enabling the generator and another pair for powering on the starter motor, Clark got a couple relays that could bridge their contacts together programmatically. In order to communicate the current output of the generator, solar panels, battery, and if the motor should run, a pair of Arduino Nano 33 IoT boards were chosen for both the house and generator sides of the project. They send data through Wi-Fi and MQTT to stay in consistent synchronization while either one is also connected to a few seven-segment display modules and MAX7221 LED drivers for showing the most recent data.
While inside the house, Clark is able to simply hold down a button and watch how the generator across his property roars to life and begins producing measurable power output to the display. More information about this project can be seen in Clark’s video below!
With the rapid advances in digital technologies like artificial intelligence, it’s more important than ever that every young person has the opportunity to learn how computers are being used to change the world and to develop the skills and confidence to get creative with technology.
Crown copyright. Licensed under the Open Government Licence.
There’s no better way to develop those abilities (super powers even) than getting hands-on experience of programming, whether that’s coding an animation, designing a game, creating a website, building a robot buggy, or training an AI classification model. That’s what tens of thousands of young people do every day in Code Clubs all over the world.
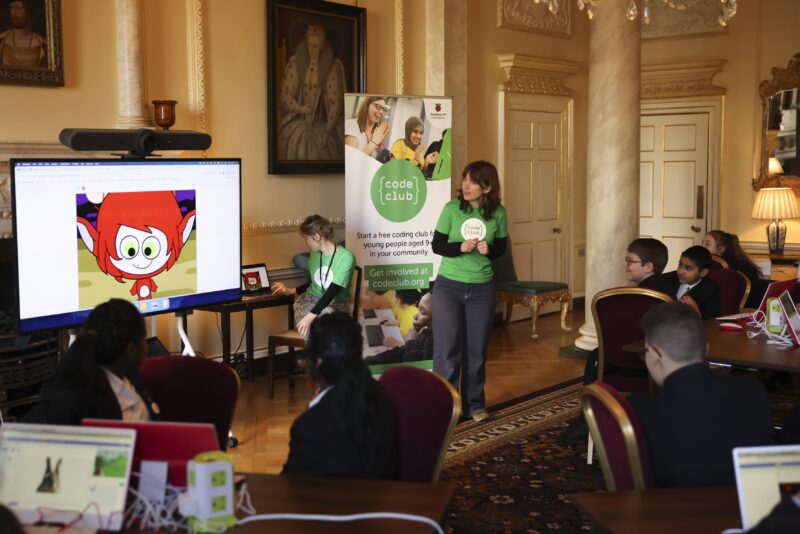
Lessons at 10
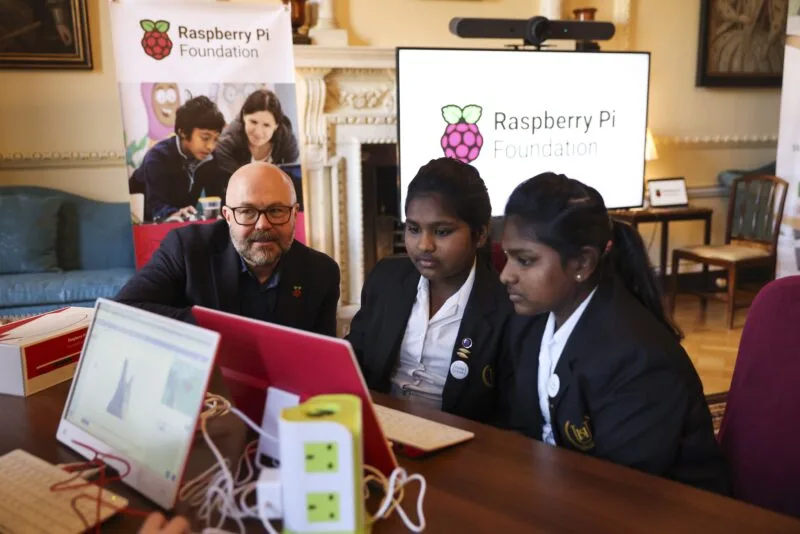
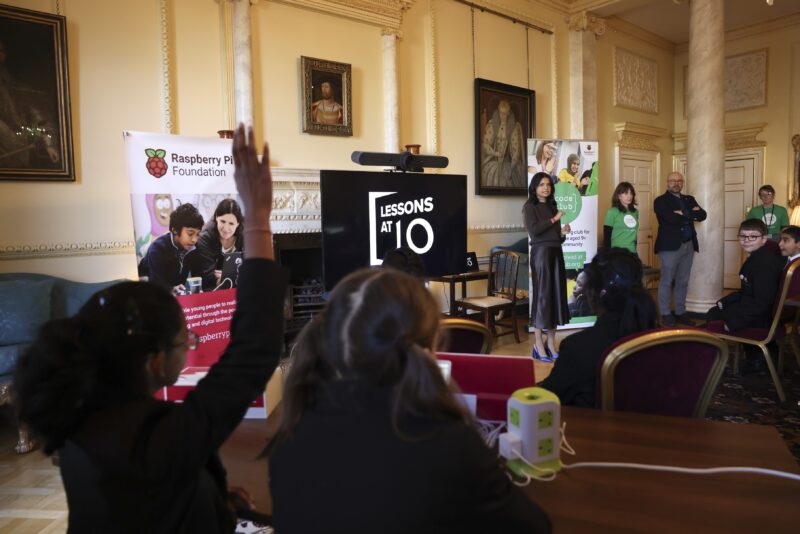
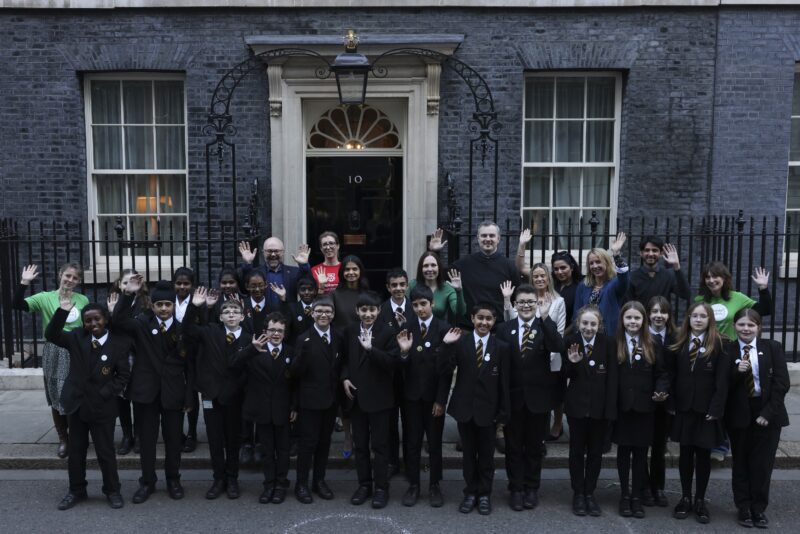
We were absolutely thrilled to organise a Code Club at Number Ten Downing Street last week, hosted by the UK Prime Minister’s wife Akshata Murty as part of Lessons at 10.
Crown copyright. Licensed under the Open Government Licence.
Lessons at 10 is an initiative to bring school children from all over the UK into Number Ten Downing Street, the official residence of the Prime Minister. Every week different schools visit to attend lessons led by education partners covering all kinds of subjects.
Crown copyright. Licensed under the Open Government Licence.
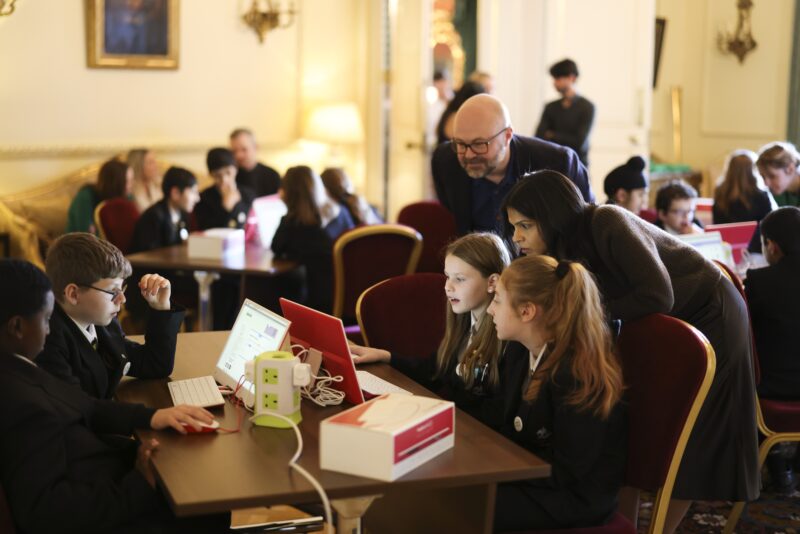
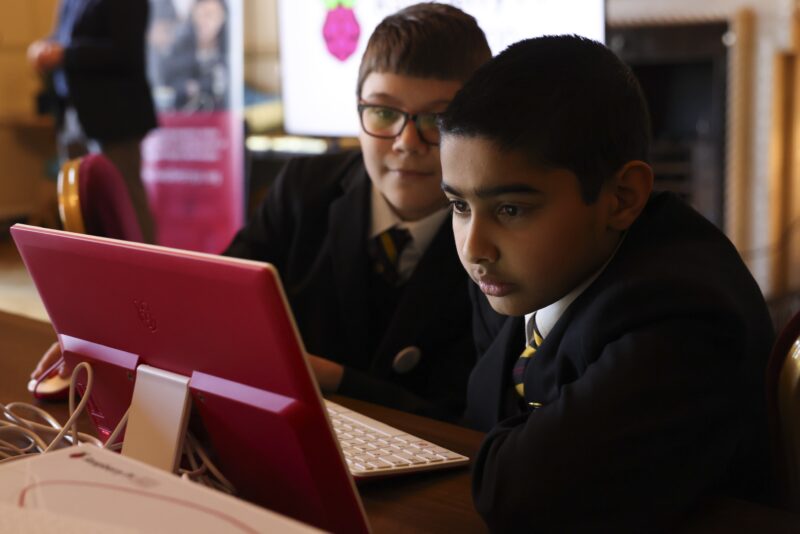
We ran a Code Club for 20 Year 7 students (ages 11 to 12) from schools in Coventry and Middlesex. The young people had a great time with the Silly eyes and Ghostbusters projects from our collections of Scratch projects. Both stone-cold classics in my opinion, and a great place to start if you’re new to programming.
Crown copyright. Licensed under the Open Government Licence.
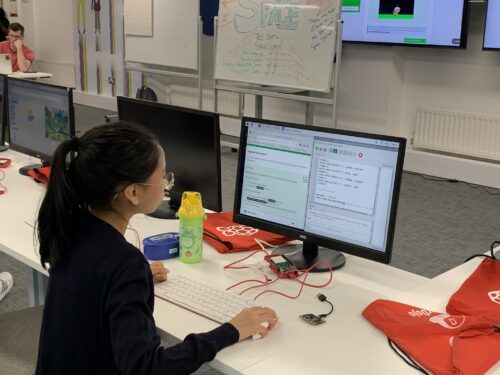
You may have spotted in the photos that the young people were programming on Raspberry Pi computers (the incredible Raspberry Pi 400 made in Wales). We also managed to get our hands on some cool new monitors.
Mrs Murty’s father was one of the founders of Infosys, which ranks among the world’s most successful technology companies, founded in India and now operating all over the world. So it is perhaps no surprise that she spoke eloquently to the students about the importance of every young person learning about technology and seeing themselves as digital creators not consumers.
Crown copyright. Licensed under the Open Government Licence.
We were lucky enough to be in one of the rather fancy rooms in Number Ten, featuring a portrait by John Constable of his niece Ada Lovelace, the world’s first computer programmer. Mrs Murty reminded us that one of the lessons we learn from Ada Lovelace is that computer programming combines both the logical and artistic aspects of human intelligence. So true.
A global movement
Since Code Club’s launch in April 2012, it has grown to be the world’s largest movement of free computing clubs and has supported over 2 million young people to get creative with technology.
Crown copyright. Licensed under the Open Government Licence.
Code Clubs provide a free, fun, and safe environment for young people from all backgrounds to develop their digital skills. Run by teachers and volunteers, most Code Clubs take place in schools, and there are also lots in libraries and other community venues.
The Raspberry Pi Foundation provides a broad range of projects that young people use to build their confidence and skills with lots of different hardware and software. The ultimate goal is that they are empowered to combine their logical and artistic skills to create something original. Just like Ada Lovelace did all those years ago.
Crown copyright. Licensed under the Open Government Licence.
All of our projects are designed to be self-directed, so young people can learn independently or in groups. That means that you don’t need to be a tech expert to set up or run a Code Club. We provide you with all the support that you need to get started.
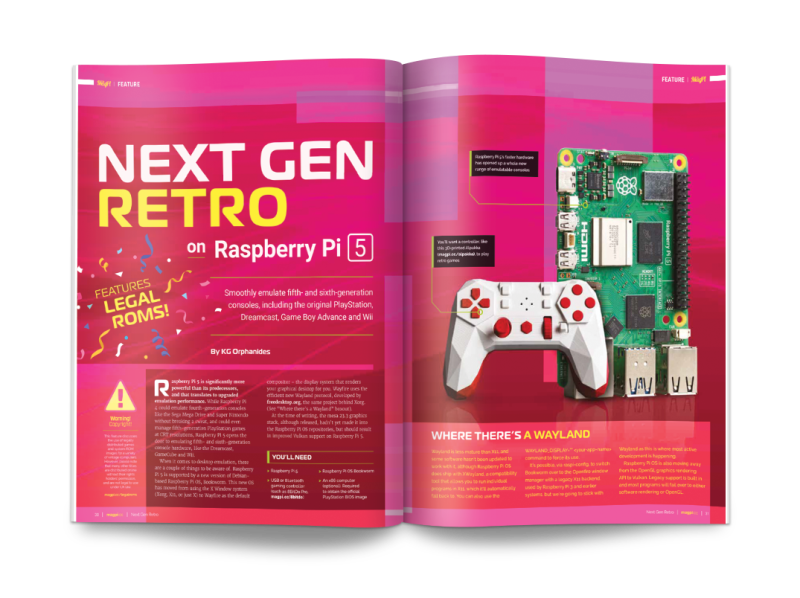
Smoothly emulate fifth- and sixth-generation consoles including Playstation, Nintendo Game Boy Advance and GameCube, Sega Dreamcast and more. What’s more, there’s a whole new homebrew scene to discover, with brand-new games being made for these classic consoles.
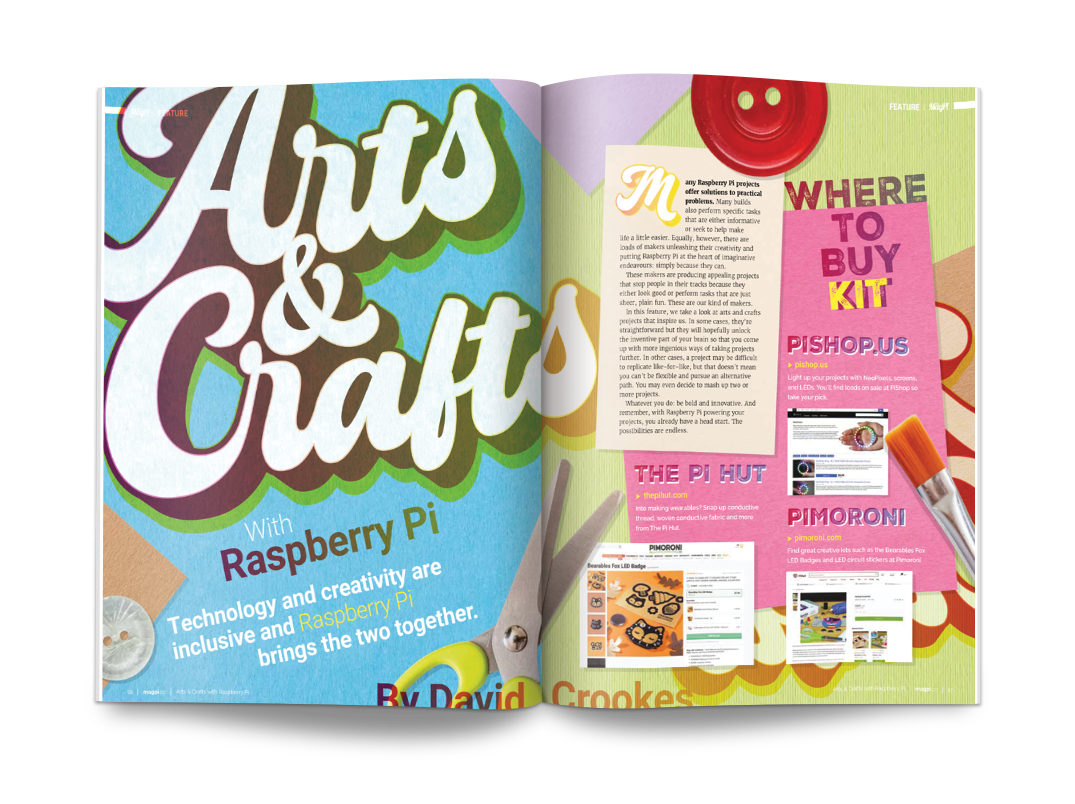
Arts & Crafts with Raspberry Pi
Technology and creativity are inclusive and Raspberry Pi brings the two together. These projects stop people in their tracks because they either look good or perform tasks that are just sheer, plain fun.
The best Raspberry Pi projects
We’ve got a fantastic selection of project showcases this month. Such as this OneInchEye for solar photography. It can capture 4K images at 30fps (frames per second) or 20MP at 12fps for RAW recording.
Learn to use Raspberry Pi’s RTC funcitonality
Our step-by-step tutorials walk you through the process of learning to use Raspberry Pi. Amongst other tutorials, this month is this fantastic step-through of the new RTC (real time clock). Attach a lithium battery to Raspberry Pi to automatically turn the device on and off while keeping perfect time.
Play games on Beepy
We’re still smitten with the Beepy device that turns Raspberry Pi into a PDA (personal digital assistant) with a BlackBerry-style keyboard. In keeping with the theme this month we’re looking at a range of text adventures and other games you can play on this diminutive device.
Learn to use a synthesizer
We adore this Bullfrog Synth developed in association with Richie Hawtin (aka Plastikman). Inside a RP2040 is used to generate audio and integrate MIDI control while a series of wires are used to link the various synth elements together. It’s the ideal way to learn about sound generation.
Raspberry Pi at Maker Faire Shenzen
Raspberry Pi CEO Eben Upton attended one last big event before Christmas: Maker Faire Shenzen. Joining them was Seeed Studios, a Raspberry Pi Approved Reseller, showing off their wares and hunting down cool Raspberry Pi projects in the process. It was a busy event full of talks and cool stalls!
Save 35% off the cover price with a subscription to The MagPi magazine. UK subscribers get three issues for just £10 and a FREE Raspberry Pi Pico W, then pay £30 every six issues. You’ll save money and get a regular supply of in-depth reviews, features, guides and other Raspberry Pi enthusiast goodness delivered directly to your door every month.
This book is packed with information on retro gaming. In particular, it covers how to retro game with Raspberry Pi 5 in a lot of detail. Learn to use all the major emulation systems, and recreate retro consoles up to the Dreamcast and Sony Playstation generations. It’s packed with homebrew software and new games being developed for original systems. This year’s retro gaming guide is bigger than ever: 180 pages. Each page is packed with classic gaming goodness. We’re incredibly proud of this one and we hope you enjoy reading it as much as we did writing it.
Use ready-made emulation software to quickly and easily turn Raspberry Pi into a huge range of retro consoles and computers. It’s easy to set up a retro gaming console and we’ll show you how. You’ll even learn how to build your own portable gaming consoles and finally achieve that dream of owning your own arcade machine.
Rediscover those systems from your childhood
We’ve got the latest information hot from The MagPi team on how to emulate a whole new generation of consoles. From the Nintendo GameCube, to Sony PlayStation, and the Sega Dreamcast. Discover how to play new games on these classic systems with Raspberry Pi.
Meet incredible makers and hear all about their builds
We’ll show you how to download retro games and emulate them with Raspberry Pi computers. You’ll discover how to build your consoles, both handheld and television-based and hear from some of the best makers around. They share their secrets to successful emulation.
Discover a thriving homebrew scene
There are hundreds of developers making games every bit as good as back in the 1980s and 1990s. And they’ve only got better at making classic games. We’ll show you how to find new games for classic consoles, and how to get involved with this incredible gaming scene.
Since November, registration is open for Mission Space Lab, part of the European Astro Pi Challenge 2023/24. The Astro Pi Challenge is an ESA Education project run in collaboration with us here at the Raspberry Pi Foundation that gives young people up to age 19 the amazing opportunity to write computer programs that run on board the International Space Station (ISS). It is free to take part and young people can participate in two missions: Mission Zero, designed for beginners, and Mission Space Lab, designed for more experienced coders.
This year, Mission Space Lab has a brand-new format. As well as introducing a new activity for teams to work on, we have created new resources to support teams and mentors, and developed a special tool to help teams test their programs.
A big motivator for these changes was to make the activity more accessible and enable more young people to have their code run in space. Listening to feedback from participants and mentors, we are creating the opportunity for even more teams to submit programs that run on the ISS this year, by offering a specific activity and providing more extensive support materials.
A scientific task
For this year’s mission, ESA astronauts have given teams a specific scientific task to solve: to calculate the speed that the ISS is travelling as it orbits the Earth. People working in science often investigate a specific phenomenon or try to solve a particular problem. They have to use their knowledge and skills and the available tools to find ways to answer their research question. For Mission Space Lab, teams will work just like this. They will look at what sensors are available on the Astro Pi computers on board the ISS, develop a solution, and then write a Python program to execute it. To test their program, they will use the new Astro Pi Replay software tool we’ve created, which simulates running their program on board the ISS.
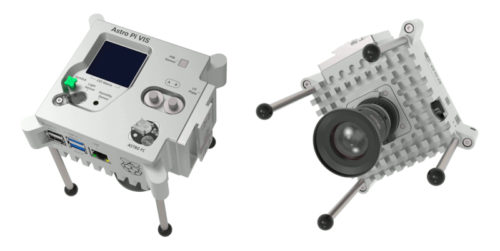
The Astro Pi computers
To help teams and mentors take part in Mission Space Lab, we are providing a variety of supporting materials:
Our mentor guide has everything mentors need to support their teams through Mission Space Lab, including guidance for structuring the mission and tips to help teams solve problems.
Our creator guide helps young people design and create their programs. It provides information and technical instructions to help young people develop their coding skills and create a program that can be run on the Astro Pis on board the ISS.
We have created an ISS speed project guide that shows an example of how the scientific task can be solved using photos captured by the Astro Pi’s camera.
We have also run virtual sessions to help mentors and teams familiarise themselves with the new Mission Space Lab activity, and to ask any technical questions they might have. You can watch the recordings of these sessions on YouTube:
The Astro Pi Replay tool
Astro Pi Replay is a new simulation tool that we have developed to support Mission Space Lab teams to test their programs. The tool simulates running programs on the Astro Pi computers on board the ISS. It is a Python library available as a plug-in to install in the Thonny IDE where teams write their programs. Thanks to this tool, teams can develop and test their programs on any computer that supports Python, without the need for hardware like the Astro Pi units on board the ISS.
The Astro Pi Replay tool works by replaying a data set captured by a Mission Space Lab team in May 2023. The data set includes readings from the Astro Pi ‘s sensors, and images taken by its visible-light camera like the ones below. Whenever teams run their programs in Thonny with Astro Pi Replay, the tool replays some of this historical data. That means teams can use the historical data to test their programs and calculations.
The Mediterranean sea with the coastlines of Sicily and Tunisia
The Irish Sea with the coastlines of Great Britain and Ireland
The coastline of southern Egypt and the Red Sea
One of the benefits of using this simulation tool is that it gives teams a taste of what they can expect if their program is run on the ISS. By replaying a sequence of data captured by the Astro Pis in space, teams using sensors will be able to see what kind of data can be collected, and teams using the camera will be able to see some incredible Earth observation images.
If you’re curious about how Astro Pi Replay works, you’ll be pleased to hear we are making it open source soon. That means you’ll be able to look at the source code and find out exactly what the library does and how.
Get involved
Community members have consistently reported how amazing it is for teams to receive unique Earth observation photos and sensor data from the Astro Pis, and how great the images and data are to inspire young people to participate in their computing classes, clubs, or events. Through the changes we’ve made to Mission Space Lab this year, we want to support as many young people as possible to have the opportunity to engage in space science and capture their own data from the ISS.
If you want a taste of how fantastic Astro Pi is for learners, watch the story of St Joseph’s, a rural Irish school where participating in Astro Pi has inspired the whole community.
Submissions for Mission Space Lab 2023/24 are open until 19 February 2024, so there’s still time to take part! You can find full details and eligibility criteria at astro-pi.org/mission-space-lab.
If you have any questions about the European Astro Pi Challenge, please get in touch at contact@astro-pi.org.
Keep Talking and Nobody Explodes is a fun party game for iOS and Android that presents players with the challenge of cooperatively defusing a virtual bomb. It is a bit like those “no, cut the blue wire!” scenes in movies, because only one player can see the bomb. The other player(s) has access to information about the bomb and good communication is necessary to guide the first player through the disarming process. Inspired by that game, Heath Paddock built this physical escape room-in-a-box for his friends that looks like a blast to play.
This self-contained escape room works almost exactly like Keep Talking and Nobody Explodes, but lets the player in charge of defusing interact with a physical “bomb.” If they wait too long or mess up the disarming process three times, the bomb explodes and the players lose.
As with Keep Talking and Nobody Explodes, this device has several modules that each act as distinct puzzles. For example, one module has an LED matrix “maze” that the defuser must guide a dot through. But they can’t see the walls of the maze, so they have to rely on instructions from the “expert” player that has access to the documentation.
One Arduino oversees the whole game, tallying failed attempts and counting down until detonation. And each module also has its own dedicated Arduino to read the inputs and set the outputs (such as LEDs and displays) for that specific puzzle.
To keep everything in sync, Paddock developed his own communication protocol. It allows any Arduino to send a message to the central Arduino by passing it along a serial chain that goes through every Arduino in the box. That chain forms a big loop, so every message will eventually reach its destination.
This project is a delight to see in action and looks like a lot of fun. It takes the proven gameplay of Keep Talking and Nobody Explodes and adds tactility to enhance the experience.
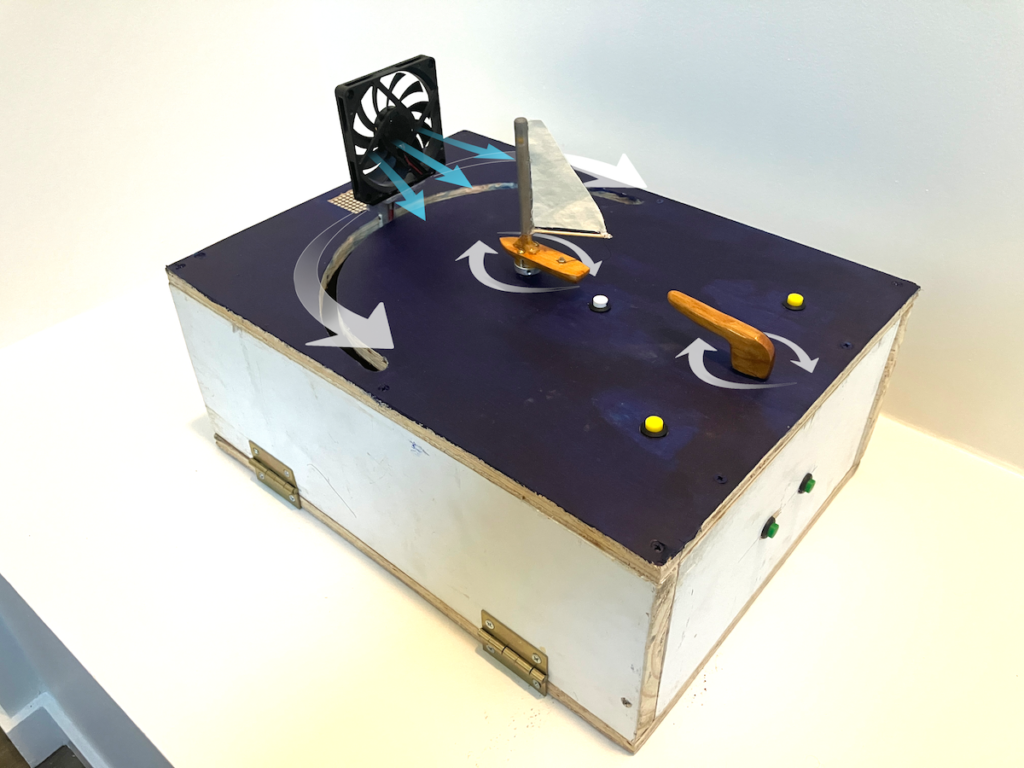
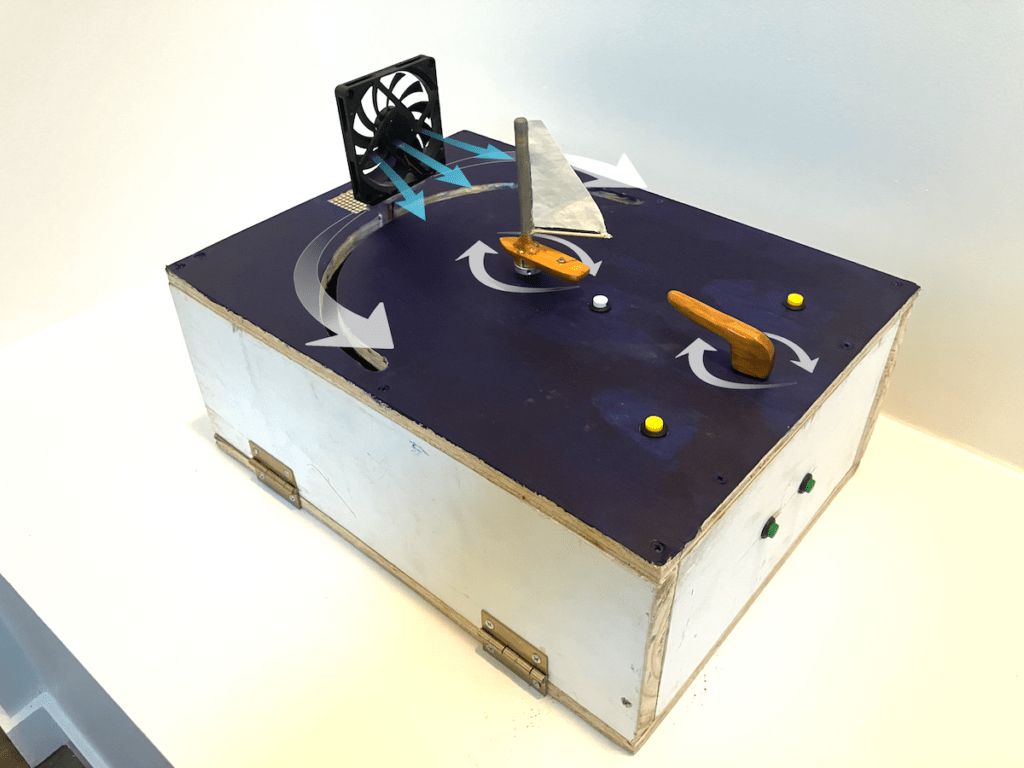
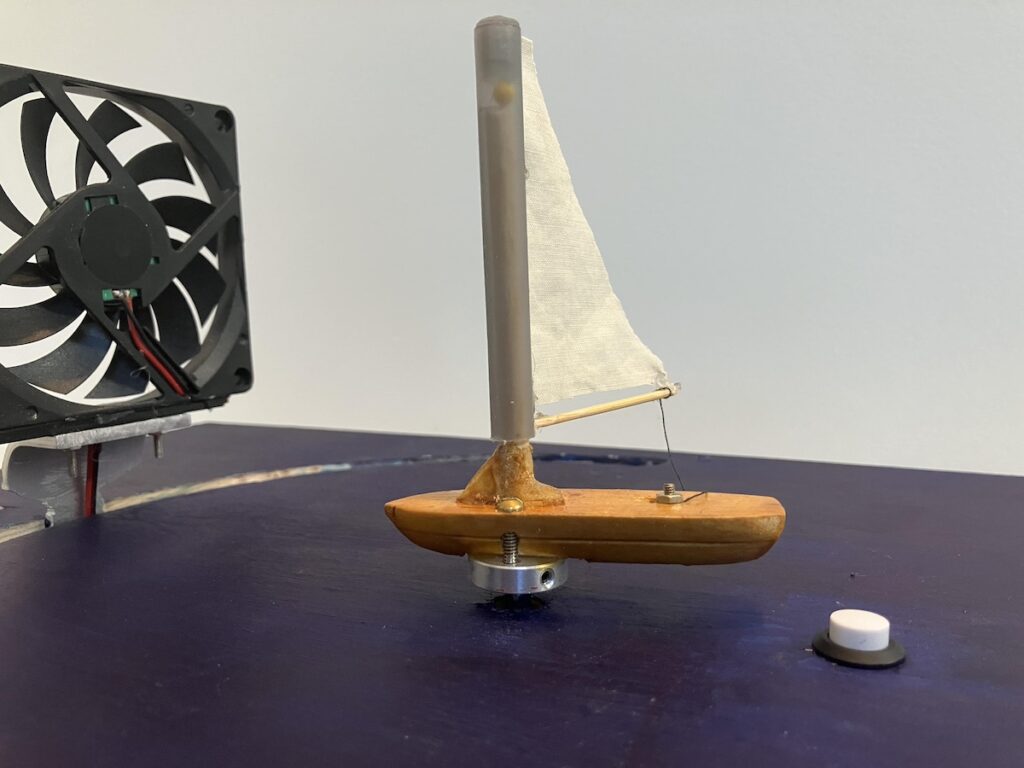
Sailing is a great way to get outdoors and explore the open waters, yet it can also pose some risks to the pilot and passengers if they are unfamiliar with how the boat handles under different wind conditions. As Kif Scheuer notes in his project write-up, traditional instruction relies on simple 2D illustrations, so he decided to take it a step further and build a highly interactive demonstrator that can affect a model sailboat in a more realistic/physical manner.
Because this device is meant to simulate sailing, Scheuer needed some sort of wind generator in the form of a 5V PC fan that was powerful enough to move the boat’s sail. It’s mounted onto an aluminum arm that is positioned on the output shaft of a NEMA17 stepper motor, thus allowing the Arduino UNO Rev3 to pivot its direction. Similarly, the boat was also hooked up to another stepper motor so that it could turn according to the fan’s updated position along its arc. The other electronics include a display for showing the current mode, a potentiometer for user interaction, and several buttons that control the mode/fan angle.
Once assembled, the user is able to switch between the various modes: manual, selective, random, and wind, with this last mode enabling the user to pivot the fan rather than the boat to observe how the sail reacts. You can read more about the sailing demonstrator on Instructables.
Three is the magic number, and extending the annual event that celebrates our community from one to three days will make for a very special edition this year. Today, we are finally announcing the dates for Arduino Days, taking place on March 21st, 22nd and 23rd, 2024. Mark your calendars, and bookmark the dedicated website for up-to-date information as we get closer to launch.
Now in its 11th year, this is the event that brings together all Arduino users and shines the spotlight on the most outstanding projects and ideas – across the world! We’ve had some great contributions in the past: remember Jeanne Harignordoquy’s World Wind Radio in 2023, or the Blue Box Project by Judit Giró Benet and Billy Chen in 2021? All sessions will be broadcast in live streaming (and later remain available on our YouTube channel) for maximum accessibility and visibility.
This year, we look forward to showcasing a huge range of applications, from industrial-grade solutions to wow-worthy prototypes, and from educational tutorials to completely original ideas that put a twist on our ecosystem. We’ll also treat our community to some exciting new product announcements, behind-the-scenes from our collaborations with industrial partners, and deep dives on current trends like Edge AI, TinyML, real-time monitoring, and so much more. Stay tuned!
The Call for Speakers
We will share the complete three-day agenda in the run-up to the event, but first… we want to give you the chance to be part of Arduino Days with your most impressive and interesting projects! Submit yours following the easy process on the dedicated website.
Should you be selected as a speaker for the 2024 edition, our team will be in touch to support you in producing the most effective video or presentation for the Arduino Days lineup – so you can be sure to make the best of your 10 minutes at the center of our stage.
We are also currently accepting submissions for organized events around the world, to take place during Arduino Days (either online or in person). If you want to be part of this incredible network of initiatives, tell us more by answering the call! All submissions will be featured on our website for a boost of visibility, and selected organizers will receive an exclusive package of communication material.
Whether you want to speak at Arduino Days or add to the celebrations with your own original event, we can’t wait to see your suggestions – and for the whole Arduino community to see YOU!
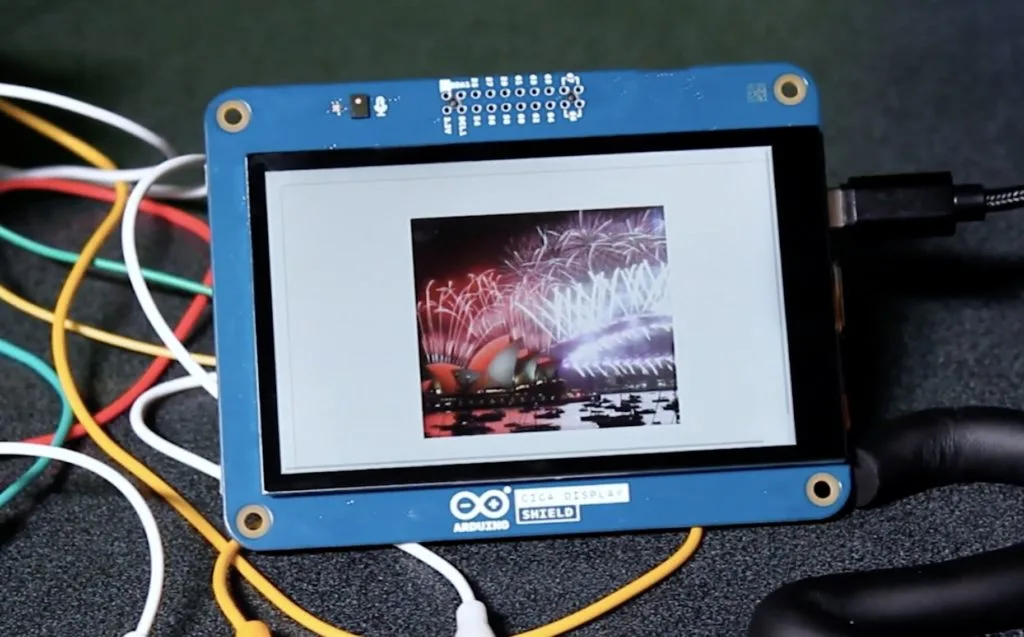
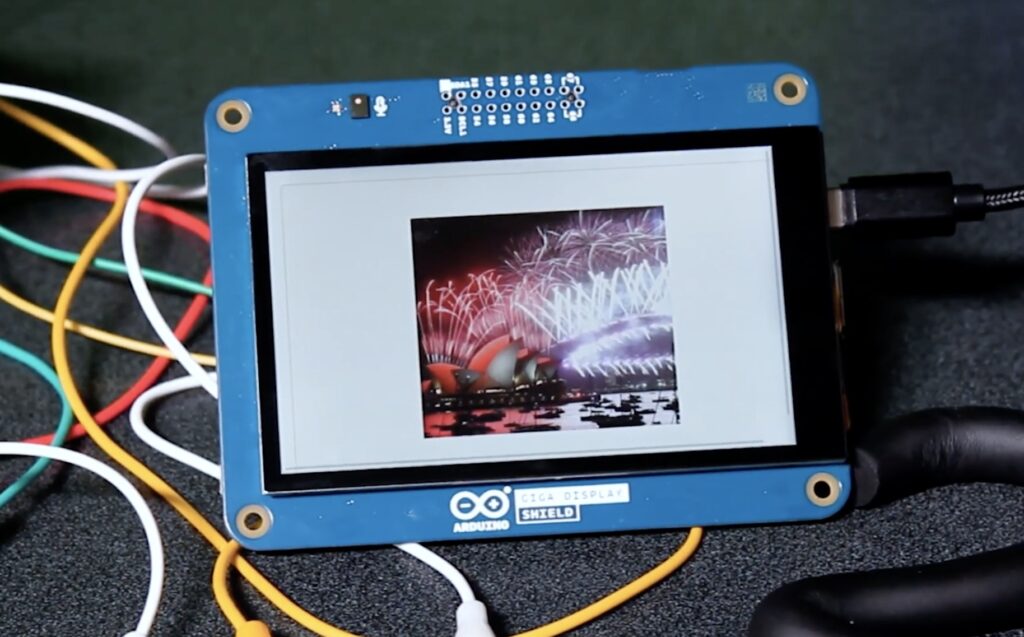
Watching back a slideshow of some of your favorite times of the past years is a great way to reflect on what’s happened and get excited for the future. The Electronic Cats crew wanted to incorporate this concept into a more simplified, interactive form which resulted in the Garrita project.
Garrita is a homemade platform that lets an Arduino GIGA R1 WiFi with GIGA Display Shield transform into a highly mobile slideshow thanks to its larger onboard memory capacity and convenient layout. This year, the Electronic Cats were able to take their image shifter concept even further with Michi: an existing project that turns any conductive object into a capacitive touch-sensing controller. Whenever one of Michi’s inputs are toggled, the board sends a signal to the GIGA R1 WiFi that causes the current slide to advance to the next one.
In order to go from a locally stored image to something on the Display Shield, users first transform their images into a more suitable format via the LVGL conversion tool. Once downloaded, the resulting files can be easily bundled into a Sketch before they become accessible in the application code. To see more about how the Electronic Cats built Garrita, you can read their write-up here on Hackster.io.
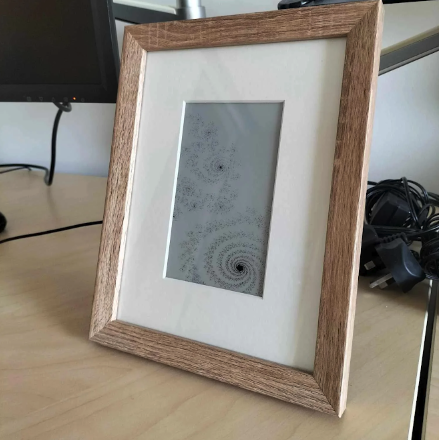
Fractals are shapes that contain complex detail however closely you look at them, or however far you zoom in. Often, they are self-similar: if you zoom in on the small-scale detail, you find it resembles the overall shape. Some of the most familiar forms that have fractal features are ones found in nature, like fern leaves and frost patterns, and we bet we’re not the only ones who call Romanesco “fractal cauliflowers”.
They are also beautiful. Fractal art can be created algorithmically by software, with the results usually represented as still digital images or animations. It all kicked off in the mid-1980s, so it’s the kind of thing that’s likely to be right up our street.
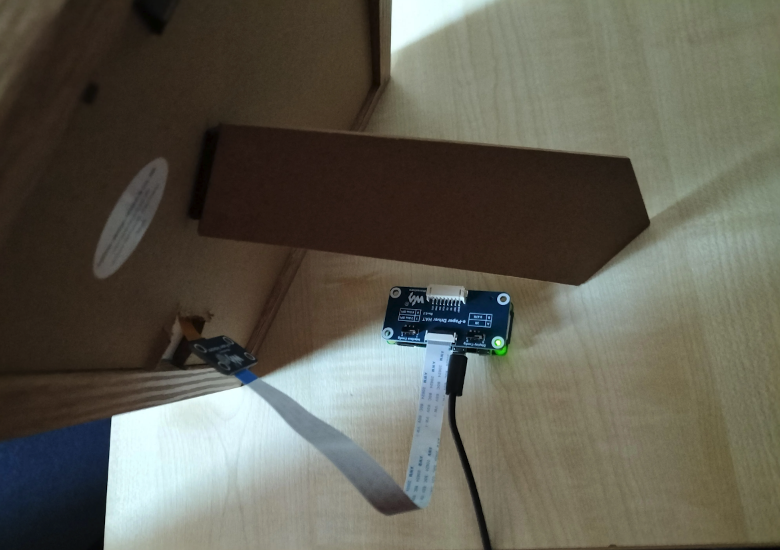
The maker kept the assembly pretty simple, cutting a small hole in the picture frame’s back mount panel to slip the display HAT’s ribbon cable through, with the project’s Raspberry Pi left free-floating behind it. The e-ink display itself fits snugly inside the frame, with a card mount providing a little breathing space between the display and the glass.
Software setup
Getting the software going looks to be as elegantly easy as the hardware. All the code you need is on GitHub, including a step-by-step guide in the README. It generates part of a Mandelbrot set with dimensions to suit the e-paper screen, then renders it for display.
Fellow maker Rob Weber has added extra code to the GitHub repository from the Omni-EPD project. The additional code allows for more electronic display types to be used.
We’re not going to get into what the Mandelbrot set is, but Jimi Sol in this here video seems to do a great job of explaining.
“I bought the panel from the Waveshare Amazon store,” says Karl. “For the 7.5 in Waveshare panel, I’d recommend getting an 18×24 cm frame [like this one].” Karl also ordered a custom frame from Best4Frames: “I ordered mine around 15×9.7 cm, which is one of the smallest cutouts they can make.”
“The picture mount is good for aesthetics,” explains Karl alongside offering “extra protection.” A small slit on the side of the back panel of the frame allows access to the ribbon cable. “I attached it to the header which comes with the Waveshare panel, and which goes directly on [Raspberry] Pi Zero.
“Those of you who are more gifted in building might be able to come up with an enclosure, but in my build Raspberry Pi is free‑floating,” says Karl.
Italian artist, designer, and inventor Bruno Munari is often quoted as saying “If I listen, I forget; if I see, I remember; if I do, I understand.” We couldn’t agree more, and that is one of the reasons why we believe in the power of our Project Hub to help everyone truly learn, grow, and innovate. The tutorials our community shares are not only “recipes” you can replicate, but opportunities to go deeper and test different skills in real life. Don’t believe us? Check out this month’s top three picks!
Perplexed about the best way to safely multiplex a seven-digit LED display? Adrian Smith’s write-up offers a wonderful deep dive into electronics design best practices, suggesting shift registers as an alternative to directly connecting display segments and digit commons to microcontroller pins. The example, based on an Arduino UNO Rev3, will spur you to reflect on the interrelations between cost, complexity, and the crucial need to avoid overloads.
Your favorite Arduino module – Portenta H7 or H8, GIGA R1 WiFi, or Nano ESP32 will work great! – can inject a precious dose of flexibility into a field-programmable gate array (FPGA) to complete extreme tasks. Find out more about the general architecture and software drivers that can help you appropriately balance components’ performance, speed and costs: Dave Nardella’s Project Hub upload is not so much a step-by-step tutorial, but a springboard for infinite ideas!
Biking is an eco-friendly and healthy way of moving around the city! But traffic can be chaotic and safety should always be the priority: that’s why we love Luis Castillo’s idea to add direction indicators to the back of a bicycle. Activated via buttons installed directly on the handlebars, two LED arrows not only communicate clearly when you are ready to turn left or right, but also increase visibility and, of course, are a great excuse to try 3D printing, laser cutting, wiring, programming, and more!
These three Project Hub entries were selected for a $100, $300, and $500 gift card to spend on the Arduino Store, according to the terms and conditions of the Project Hub Competition we ran in 2023. Thank you all, for your contributions to open-source resources!
“Computational thinking is really about thinking, and sometimes about computing.” – Aman Yadav, Michigan State University
Computational thinking is a vital skill if you want to use a computer to solve problems that matter to you. That’s why we consider computational thinking (CT) carefully when creating learning resources here at the Raspberry Pi Foundation. However, educators are increasingly realising that CT skills don’t just apply to writing computer programs, and that CT is a fundamental approach to problem-solving that can be extended into other subject areas. To discuss how CT can be integrated beyond the computing classroom and help introduce the fundamentals of computing to primary school learners, we invited Dr Aman Yadav from Michigan State University to deliver the penultimate presentation in our seminar series on computing education for primary-aged children.
In his presentation, Aman gave a concise tour of CT practices for teachers, and shared his findings from recent projects around how teachers perceive and integrate CT into their lessons.
Research in context
Aman began his talk by placing his team’s work within the wider context of computing education in the US. The computing education landscape Aman described is dominated by the National Science Foundation’s ambitious goal, set in 2008, to train 10,000 computer science teachers. This objective has led to various initiatives designed to support computer science education at the K–12 level. However, despite some progress, only 57% of US high schools offer foundational computer science courses, only 5.8% of students enrol in these courses, and just 31% of the enrolled students are female. As a result, Aman and his team have worked in close partnership with teachers to address questions that explore ways to more meaningfully integrate CT ideas and practices into formal education, such as:
What kinds of experiences do students need to learn computing concepts, to be confident to pursue computing?
What kinds of knowledge do teachers need to have to facilitate these learning experiences?
What kinds of experiences do teachers need to develop these kinds of knowledge?
The CT4EDU project
At the primary education level, the CT4EDU project posed the question “What does computational thinking actually look like in elementary classrooms, especially in the context of maths and science classes?” This project involved collaboration with teachers, curriculum designers, and coaches to help them conceptualise and implement CT in their core instruction.
During professional development workshops using both plugged and unplugged tasks, the researchers supported educators to connect their day-to-day teaching practice to four foundational CT constructs:
Debugging
Abstraction
Decomposition
Patterns
An emerging aspect of the research team’s work has been the important relationship between vocabulary, belonging, and identity-building, with implications for equity. Actively incorporating CT vocabulary in lesson planning and classroom implementation helps students familiarise themselves with CT ideas: “If young people are using the language, they see themselves belonging in computing spaces”.
A main finding from the study is that teachers used CT ideas to explicitly engage students in metacognitive thinking processes, and to help them be aware of their thinking as they solve problems. Rather than teachers using CT solely to introduce their students to computing, they used CT as a way to support their students in whatever they were learning. This constituted a fundamental shift in the research team’s thinking and future work, which is detailed further in a conceptual article.
The Smithsonian Science for Computational Thinking project
The work conducted for the CT4EDU project guided the approach taken in the Smithsonian Science for Computational Thinking project. This project entailed the development of a curriculum for grades 3 and 5 that integrates CT into science lessons.
Part of the project included surveying teachers about the value they place on CT, both before and after participating in professional development workshops focused on CT. The researchers found that even before the workshops, teachers make connections between CT and the rest of the curriculum. After the workshops, an overwhelming majority agreed that CT has value (see image below). From this survey, it seems that CT ties things together for teachers in ways not possible or not achieved with other methods they’ve tried previously.
Despite teachers valuing the CT approach, asking them to integrate coding into their practices from the start remains a big ask (see image below). Many teachers lack knowledge or experience of coding, and they may not be curriculum designers, which means that we need to develop resources that allow teachers to integrate CT and coding in natural ways. Aman proposes that this requires a longitudinal approach, working with teachers over several years, using plugged and unplugged activities, and working closely with schools’ STEAM or specialist technology teachers where applicable to facilitate more computationally rich learning experiences in classrooms.
Integrated computational thinking
Aman’s team is also engaged in a research project to integrate CT at middle school level for students aged 11 to 14. This project focuses on the question “What does CT look like in the context of social studies, English language, and art classrooms?”
For this project, the team conducted three Delphi studies, and consequently created learning pathways for each subject, which teachers can use to bring CT into their classrooms. The pathways specify practices and sub-practices to engage students with CT, and are available on the project website. The image below exemplifies the CT integration pathways developed for the arts subject, where the relationship between art and data is explored from both directions: by using CT and data to understand and create art, and using art and artistic principles to represent and communicate data.
Computational thinking in the primary classroom
Aman’s work highlights the broad value of CT in education. However, to meaningfully integrate CT into the classroom, Aman suggests that we have to take a longitudinal view of the time and methods required to build teachers’ understanding and confidence with the fundamentals of CT, in a way that is aligned with their values and objectives. Aman argues that CT is really about thinking, and sometimes about computing, to support disciplinary learning in primary classrooms. Therefore, rather than focusing on integrating coding into the classroom, he proposes that we should instead talk about using CT practices as the building blocks that provide the foundation for incorporating computationally rich experiences in the classroom.
Our 2024 seminar series is on the theme of teaching programming, with or without AI. In this series, we explore the latest research on how teachers can best support school-age learners to develop their programming skills.
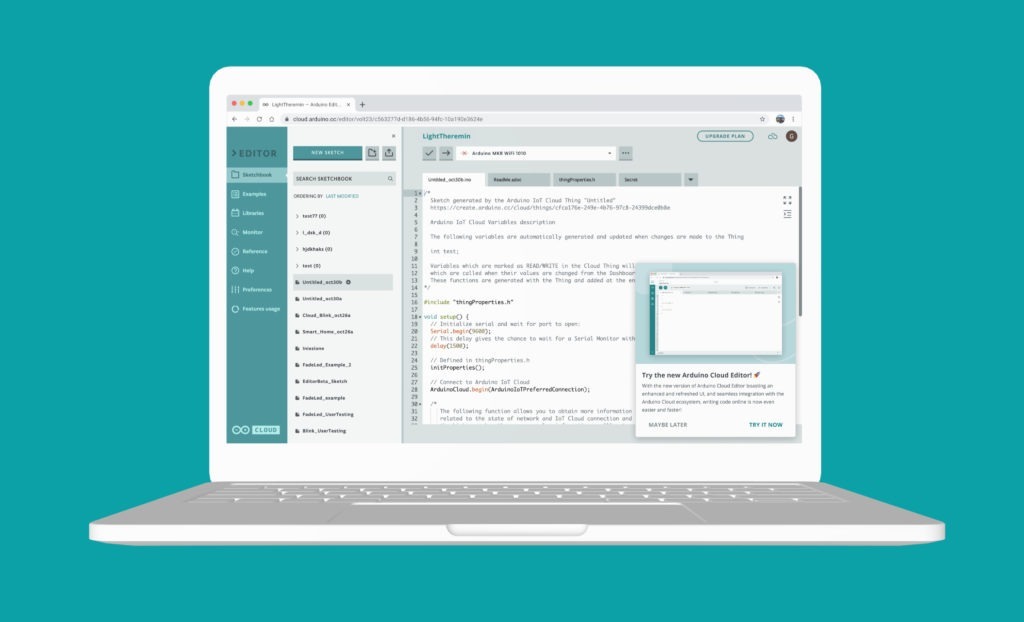
Welcome to the next chapter in our ‘Better, with You’ journey! In recent blog posts, we’ve explored the refreshed look of Arduino Cloud and introduced the latest features of the renewed Arduino IoT Remote app. Today, we’re thrilled to unveil another game-changer, the new Arduino Cloud Editor, which brings the classic Arduino IDE experience to your browser.
The new Cloud Editor
Imagine that you can start your project without having to deal with any annoying setups or maintenance headaches. Imagine that you’re free to work from wherever you want. Well, that’s the vibe of our new Cloud Editor. We’ve made the whole development experience way smoother, so you can forget about the boring techy stuff and just focus on bringing your ideas to life. Let’s dive in!
A unified and more powerful editor
Traditionally, Arduino Cloud had two separate editors: an embedded simple one and the full editor. Users have long awaited a unified editor that gets the best of each one. The new Cloud Editor achieves just that, completely revamping its implementation and setting the stage for exciting new upcoming features.
Tip: To facilitate a smooth transition, the new Cloud Editor will coexist with the current one over the next two months. During this period, you can choose to opt in for the new editor or keep the existing version. It’s your call! Scroll down to the “Try it now” section to find out how to activate the new Cloud Editor on your account.
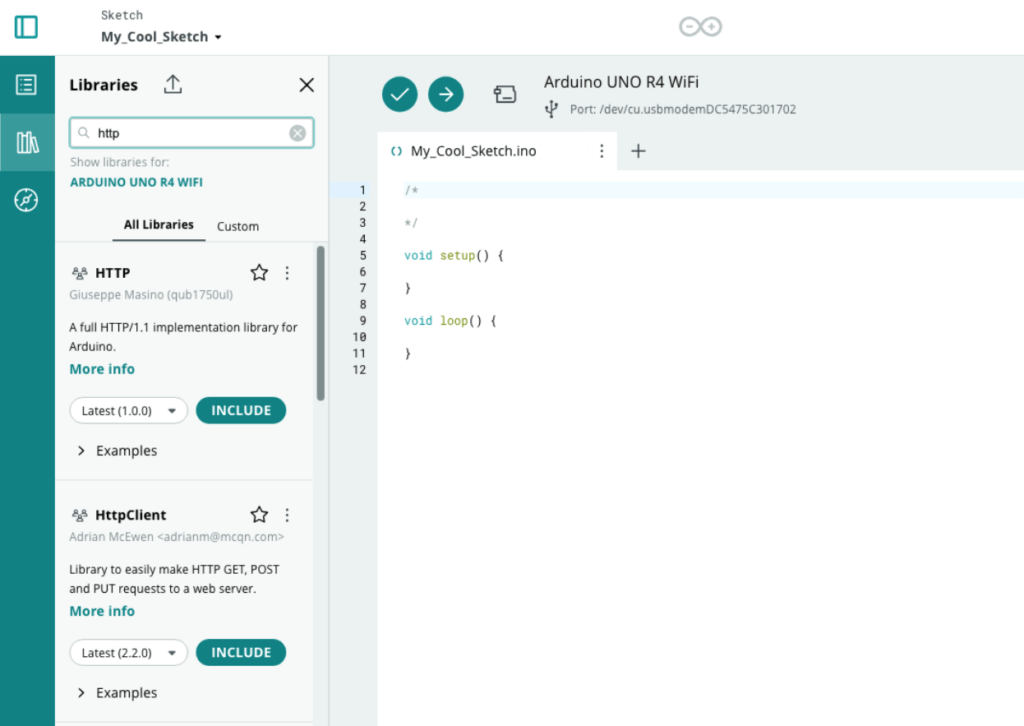
Better library and example management
The new Cloud Editor provides a library manager that helps you explore and organize libraries as well as easily use their examples.
Screenshot of the revamped library manager in the new Arduino Cloud Editor
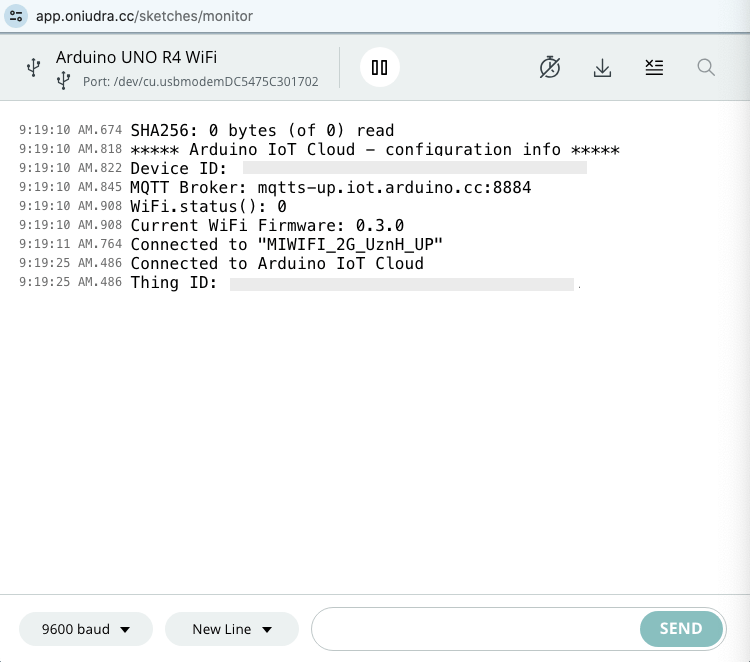
Improved serial monitor
The serial monitor has been improved with the ability to download logs and the inclusion of timestamps per line. This is a long-time requested feature by users to improve debugging.
Screenshot of the improved serial monitor with timestamps in the new Arduino Cloud Editor
Support for any Arduino IDE-compatible device
The Arduino Cloud Editor supports any device compatible with the Arduino IDE, thus extending your Arduino development experience to your browser.
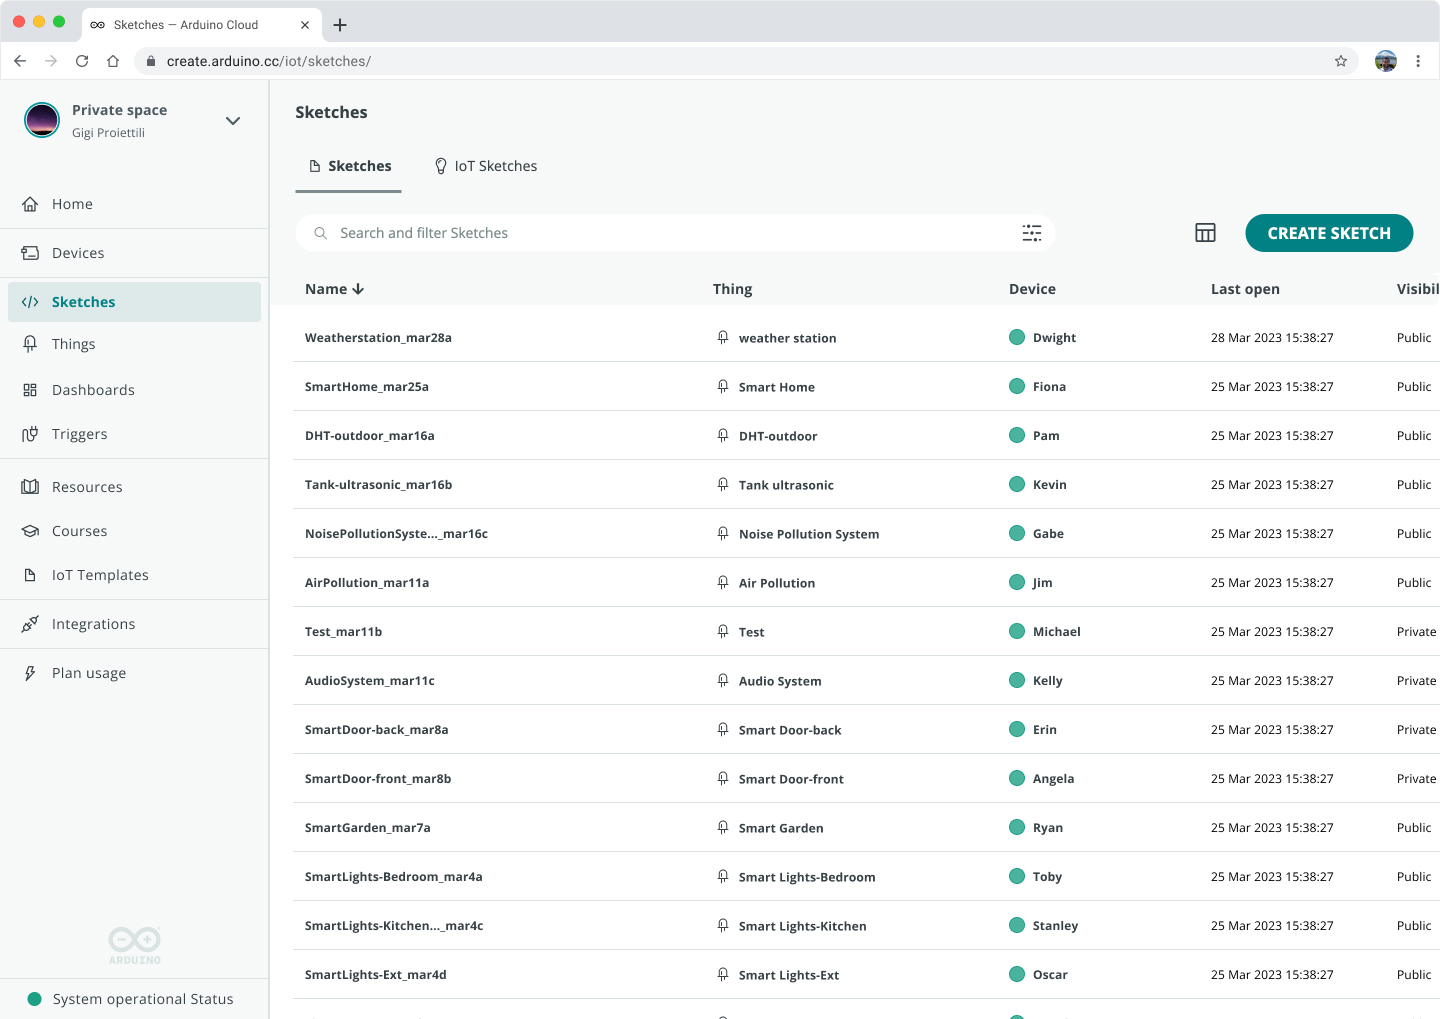
A single sketch repository
Whether you’re programming IoT sketches or traditional ones, the new Arduino Cloud provides a unified place to store and organize your sketches with a single editor for all of them.
Screenshot of the new Arduino Cloud sketchbook with the Sketches and IoT Sketches tabs
Keep your sketches organized
The sketchbook allows you to create folders so that you can keep your sketches organized in a more efficient way.
How to use the Cloud Editor
In the new Arduino Cloud, sketches are organized as “Sketches” and “IoT Sketches”, where “IoT Sketches” are the ones that have been created to connect the application with Arduino Cloud so that it can be monitored and controlled using the dashboards.
Your standalone sketch development starts from the “Sketch” section of your sketchbook. Just click on “CREATE SKETCH” or select the sketch you want to edit.
IoT Sketches are automatically created when you create an Arduino Cloud Thing. Once they are created, you can access the sketch either from the Thing or the “IoT Sketch” section of your sketchbook.
Try it now
Click on “TRY NOW” as shown in the screenshot below to start using the new Cloud Editor. If you need a bit more time before moving to the new version, you can still use the existing version until March 31st by clicking on “MAYBE LATER.”
You can now have the option to try the new Cloud Editor from the notification at the bottom right hand corner of your screen.
Please note that Chromebook support will not be available initially. Stay tuned for updates as we will announce Chromebook support as soon as it is ready.
The new editor is part of the new Arduino Cloud
If you’re just getting into the Arduino Cloud, don’t worry, we’ve got the lowdown for you right here. Arduino Cloud is the next exciting step in the Arduino journey for IoT enthusiasts. Here is a quick intro video that will give you a summary in 2 minutes.
Basically, if you’ve got an IoT project idea, you can easily turn it into a real project using this all-in-one, easy Cloud platform. It helps you create applications that can be monitored and controlled from custom dashboards accessible from your browser or your mobile phone. It not only supports Arduino and ESP-based devices, but also any device programmed using Python, MicroPython, Javascript or Node-RED. Which is why the Arduino community is talking a lot about it at the moment! Forget about dealing with complicated stuff – the Arduino Cloud lets anyone, no matter their skill level, create stuff from wherever.
Want a sneak peek? Here’s Karl giving you a tour of Arduino Cloud with the latest new UI.
Get started with the Arduino Cloud
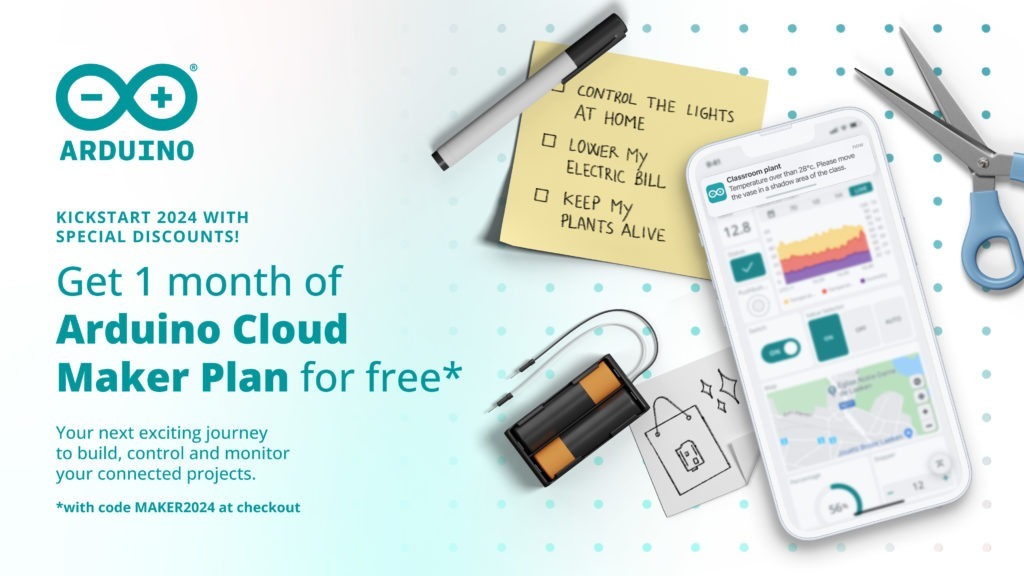
Are you ready to dive in? Learn more about the new Cloud Editor through our detailed documentation. And to sweeten the deal, don’t forget to grab your first month free on the Maker plan with the code ‘MAKER2024 at checkout. But hurry, this offer is only valid until January 31st (You can cancel anytime). Join us in unlocking the full potential of your creative projects!
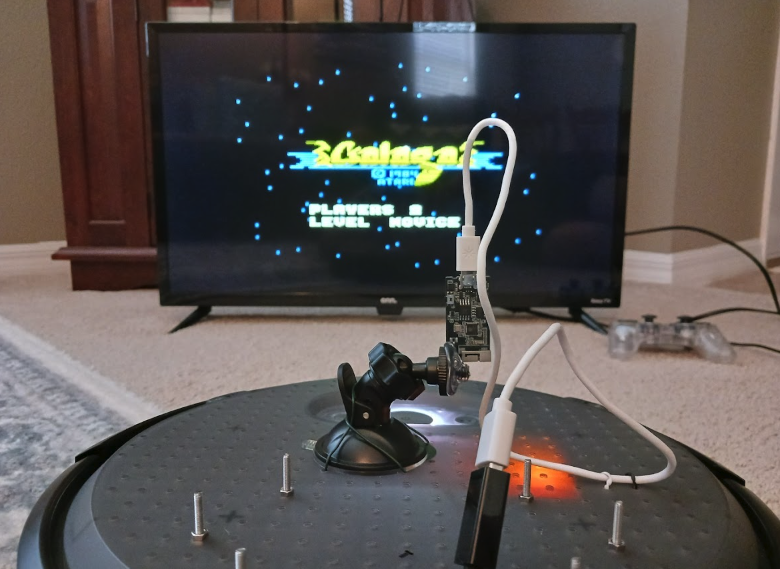
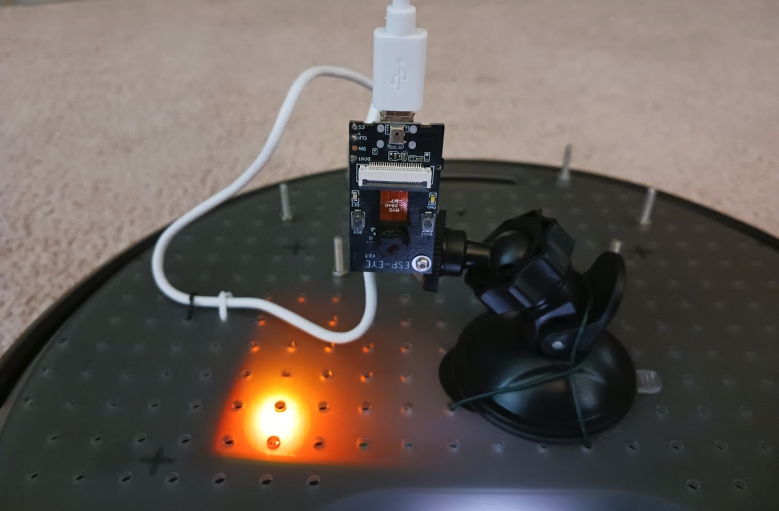
It’s like a Rube Goldberg machine from Looney Tunes or Wallace and Gromit, and we think it also crosses the boundary into modern art too. Nick says he hates to throw away electronics, and likes to repurpose them if he can’t fix them, which has resulted in this interesting fix.
What a fix
“After gutting the arcade cabinet, I installed a new 320×240 LCD display of the same size as the original,” Nick reveals. “The display, along with the joystick and buttons, are wired to a Raspberry Pi 4 computer that fits inside the casing. Raspberry Pi runs fbcp-ili9341 to use the LCD as its main display. It also runs a custom Python script which handles input from the joystick and buttons.
“The arcade operates in two modes – ‘drive’ and ‘game’, which are toggled by the ‘Start’ button. In drive mode, the script sends HTTP requests to a laptop that issues ROS 2 commands over Wi-Fi that control the movements of the robot. In game mode, HTTP requests are sent to an Arduino Nano 33 IoT attached to a Raspberry Pi 3, running RetroPie and emulating Galaga, that acts as a keyboard emulator. This allows remote key-strokes to be sent to control the action in the game.”
The robot has an Espressif ESP-EYE camera board connected to ESP32 MJPEG streaming server which allows for sub-second video streaming delays – very impressive and also fairly necessary for the experience to feel as organic as possible.
Remote control
With all this tech, was Nick able to fix his Galaga machine? Yes, as he explains.
“It works surprisingly well in some respects. The game is clearly visible on the display screen, and the lag is only about 200 milliseconds, which is acceptable for most retro games — nothing happens much faster than that in games of that era,” Nick says. “As for the robot, the controls are smooth and it is easy to get around without bumping into obstacles.”
We look forward to the explosion of arcade cabinet repair kits with streaming robot cameras at their core.
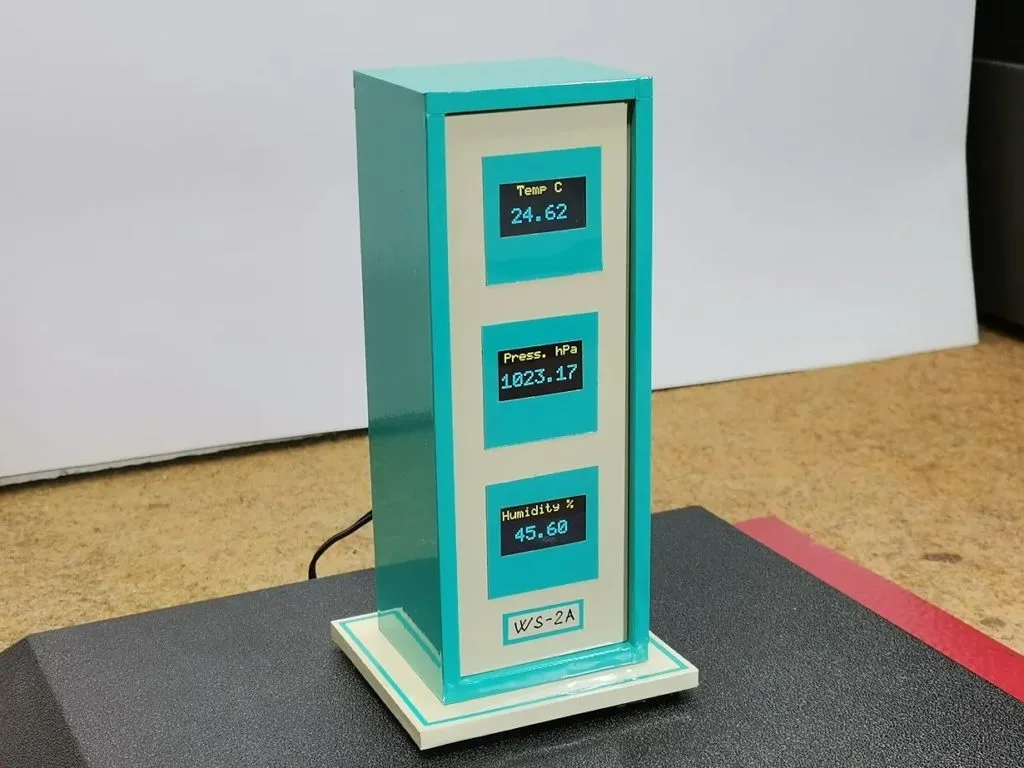
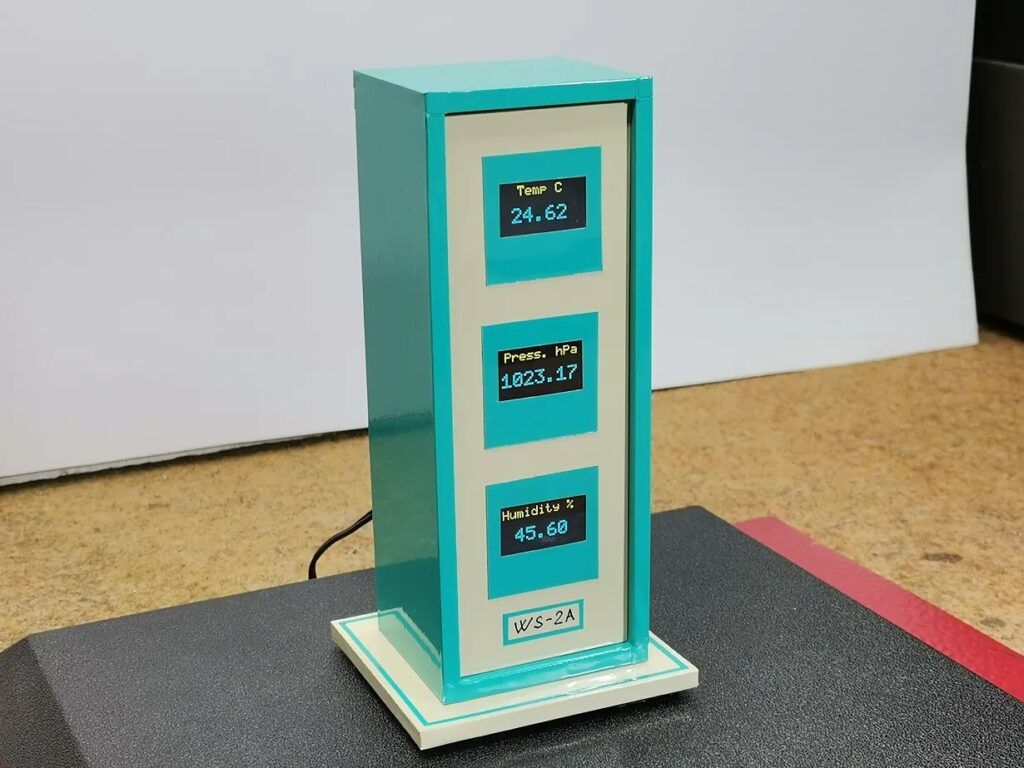
Weather stations are very popular projects for people new to Arduino. They’re complex enough to help a person learn new skills, but they’re simple enough to be approachable. However, that popularity has led to something of an arms race, with many makers attempting to design the most impressive weather stations on the internet. If you want to go back to the basics to dip your toes into the water, Mirko Pavleski explains how to build a classic weather station that prioritizes the essentials.
Inspired by older devices that displayed information like temperature, barometric pressure, and humidity on analog gauges, Pavleski chose a design with three screens in a vertical stack. Each screen can display whatever data the user can access through a sensor. In this case, his station utilizes the popular BME280 module that monitors the same three parameters as the vintage inspiration: temperature, pressure, and humidity.
This weather station shows each reading on a small two-tone OLED screen. Those screens have yellow pixels on the top and blue pixels on the bottom, which is handy for distinguishing the title from the data without the expense or complexity of a full-color screen.
An Arduino Nano board reads the data from the BME280 sensor and writes to the displays. But those displays and the BME280 all connect through I2C. To interface with all of them through the single pair of SCL/SDA pins, Pavleski included a TCA9548a multiplexer module.
Those components all mount in a minimalist enclosure made from foam board. And while we certainly enjoy complex weather stations, we appreciate the simplicity and approachability of this design.
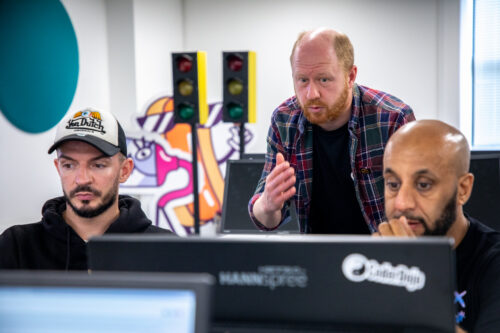
At the heart of our work as a charity is the aim to democratise access to digital skills and technologies. Since 2020, we have partnered with over 100 youth and community organisations in the UK to develop programmes that increase opportunities for young people experiencing educational disadvantage to engage and create with digital technology in underserved communities.
Youth organisations attempting to start a coding club can face a range of practical and logistical challenges, from a lack of space, to funding restrictions, and staff shortages. However, the three issues that we hear about most often are a lack of access to hardware, lack of technical expertise among staff, and low confidence to deliver activities on an ongoing basis.
In 2023, we worked to help youth organisations overcome these barriers by designing and delivering a new hybrid training programme, supported by Amazon Future Engineer. With the programme, we aimed to help youth leaders and educators successfully incorporate coding and digital making activities as part of their provision to young people.
“Really useful, I have never used Scratch so going [through] the project made it clear to understand and how I would facilitate this for the children[.]” – Heather Coulthard, Doncaster Children’s University
Participating organisations
We invited 14 organisations from across the UK to participate in the training, based on:
The range of frontline services they already provide to young people in underresourced areas (everything from employability skills workshops to literacy classes, food banks, and knife crime awareness schemes)
Previous participation in Raspberry Pi Foundation programmes
Their commitment to upskill their staff and volunteers and to run sessions with young people on a regular basis following the training
Attendees included a number of previous Learn at Home partners, including Breadline London, Manchester Youth Zone, and Youth Action. They all told us that the additional support they had received from the Foundation and organisations such as The Bloomfield Trust during the coronavirus pandemic had directly inspired them to participate in the training and begin their own coding clubs.
Online sessions to increase skills and confidence
We started with four online training sessions where we introduced the youth leaders to digital making concepts, programming languages, and recommended activities to run with their young people. This included everything from making their own block-based Scratch games, to running Python programs on our Code Editor and trying out physical computing via our new micro:bit project path.
Alongside digital skills and interactive codealongs, the training also focused on how to be an effective CoderDojo mentor, including classroom management best practice, an explanation of the thinking behind our 3…2…1…Make! project paths, and an overview of culturally relevant pedagogy.
This last part explored how youth leaders can adapt and tailor digital making resources designed for a wide, general audience for their specific groups of young people to aid their understanding, boost their learning outcomes, and increase their sense of belonging within a coding club environment — a common blocker for organisations trying to appeal to marginalised youth.
In-person training to excite and inspire
The training culminated in a day-long, in-person session at our head office in Cambridge, so that youth leaders and educators from each organisation could get hands-on experience. They experimented with physical computing components such as the Raspberry Pi Pico, trained their own artificial intelligence (AI) models using our Experience AI resources, and learned more about how their young people can get involved with Coolest Projects and Astro Pi Mission Zero.
The in-person session also gave everyone the chance to get excited about running digital making activities at their centres: the youth leaders got to ask our team questions, and had the invaluable opportunity to meet each other, share their stories, swap advice, and discuss the challenges they face with their peers.
“Having the in-person immensely improved my skills and knowledge. The instructors were all brilliant and very passionate.” – Awale Elmi, RISE Projects
Continuing support
Finally, thanks to the generous support from Amazon Future Engineer, we were able to equip each participating organisation with Raspberry Pi 400 kits so that the youth leaders can practise and share the skills and knowledge they gained on the course at their centres and the organisations can offer computing activities in-house.
Over the next 12 months, we will continue to work with each of these youth and community organisations, supporting them to establish their coding clubs, and helping to ensure that young people in their communities get a fair and equal opportunity to engage and create with technology, no matter their background or challenges they are facing.
“It was really great. The online courses are excellent and being in-person to get answers to questions really helped. The tinkering was really useful and having people on hand to answer questions [was] massively useful.” – Liam Garnett, Leeds Libraries
For more information about how we can support youth and community organisations in the UK to start their own coding clubs, please send us a message with the subject ‘Partnerships’.
Um dir ein optimales Erlebnis zu bieten, verwenden wir Technologien wie Cookies, um Geräteinformationen zu speichern und/oder darauf zuzugreifen. Wenn du diesen Technologien zustimmst, können wir Daten wie das Surfverhalten oder eindeutige IDs auf dieser Website verarbeiten. Wenn du deine Einwillligung nicht erteilst oder zurückziehst, können bestimmte Merkmale und Funktionen beeinträchtigt werden.
Funktional
Immer aktiv
Die technische Speicherung oder der Zugang ist unbedingt erforderlich für den rechtmäßigen Zweck, die Nutzung eines bestimmten Dienstes zu ermöglichen, der vom Teilnehmer oder Nutzer ausdrücklich gewünscht wird, oder für den alleinigen Zweck, die Übertragung einer Nachricht über ein elektronisches Kommunikationsnetz durchzuführen.
Vorlieben
Die technische Speicherung oder der Zugriff ist für den rechtmäßigen Zweck der Speicherung von Präferenzen erforderlich, die nicht vom Abonnenten oder Benutzer angefordert wurden.
Statistiken
Die technische Speicherung oder der Zugriff, der ausschließlich zu statistischen Zwecken erfolgt.Die technische Speicherung oder der Zugriff, der ausschließlich zu anonymen statistischen Zwecken verwendet wird. Ohne eine Vorladung, die freiwillige Zustimmung deines Internetdienstanbieters oder zusätzliche Aufzeichnungen von Dritten können die zu diesem Zweck gespeicherten oder abgerufenen Informationen allein in der Regel nicht dazu verwendet werden, dich zu identifizieren.
Marketing
Die technische Speicherung oder der Zugriff ist erforderlich, um Nutzerprofile zu erstellen, um Werbung zu versenden oder um den Nutzer auf einer Website oder über mehrere Websites hinweg zu ähnlichen Marketingzwecken zu verfolgen.