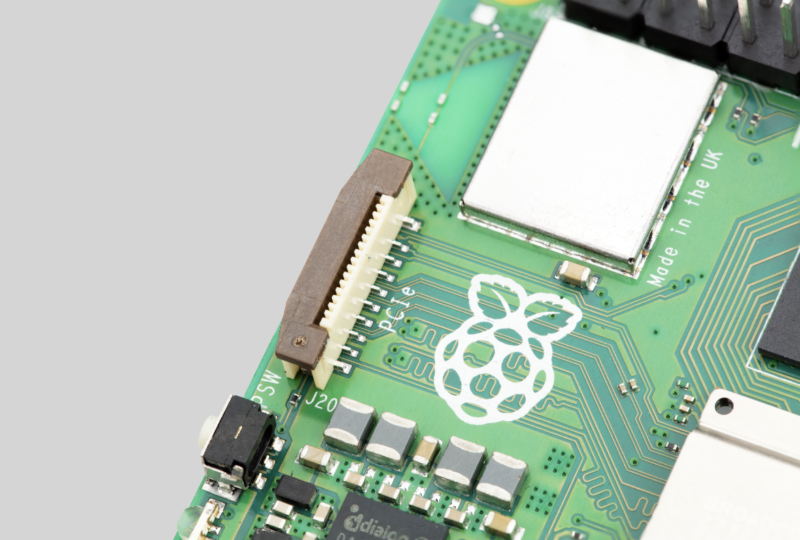
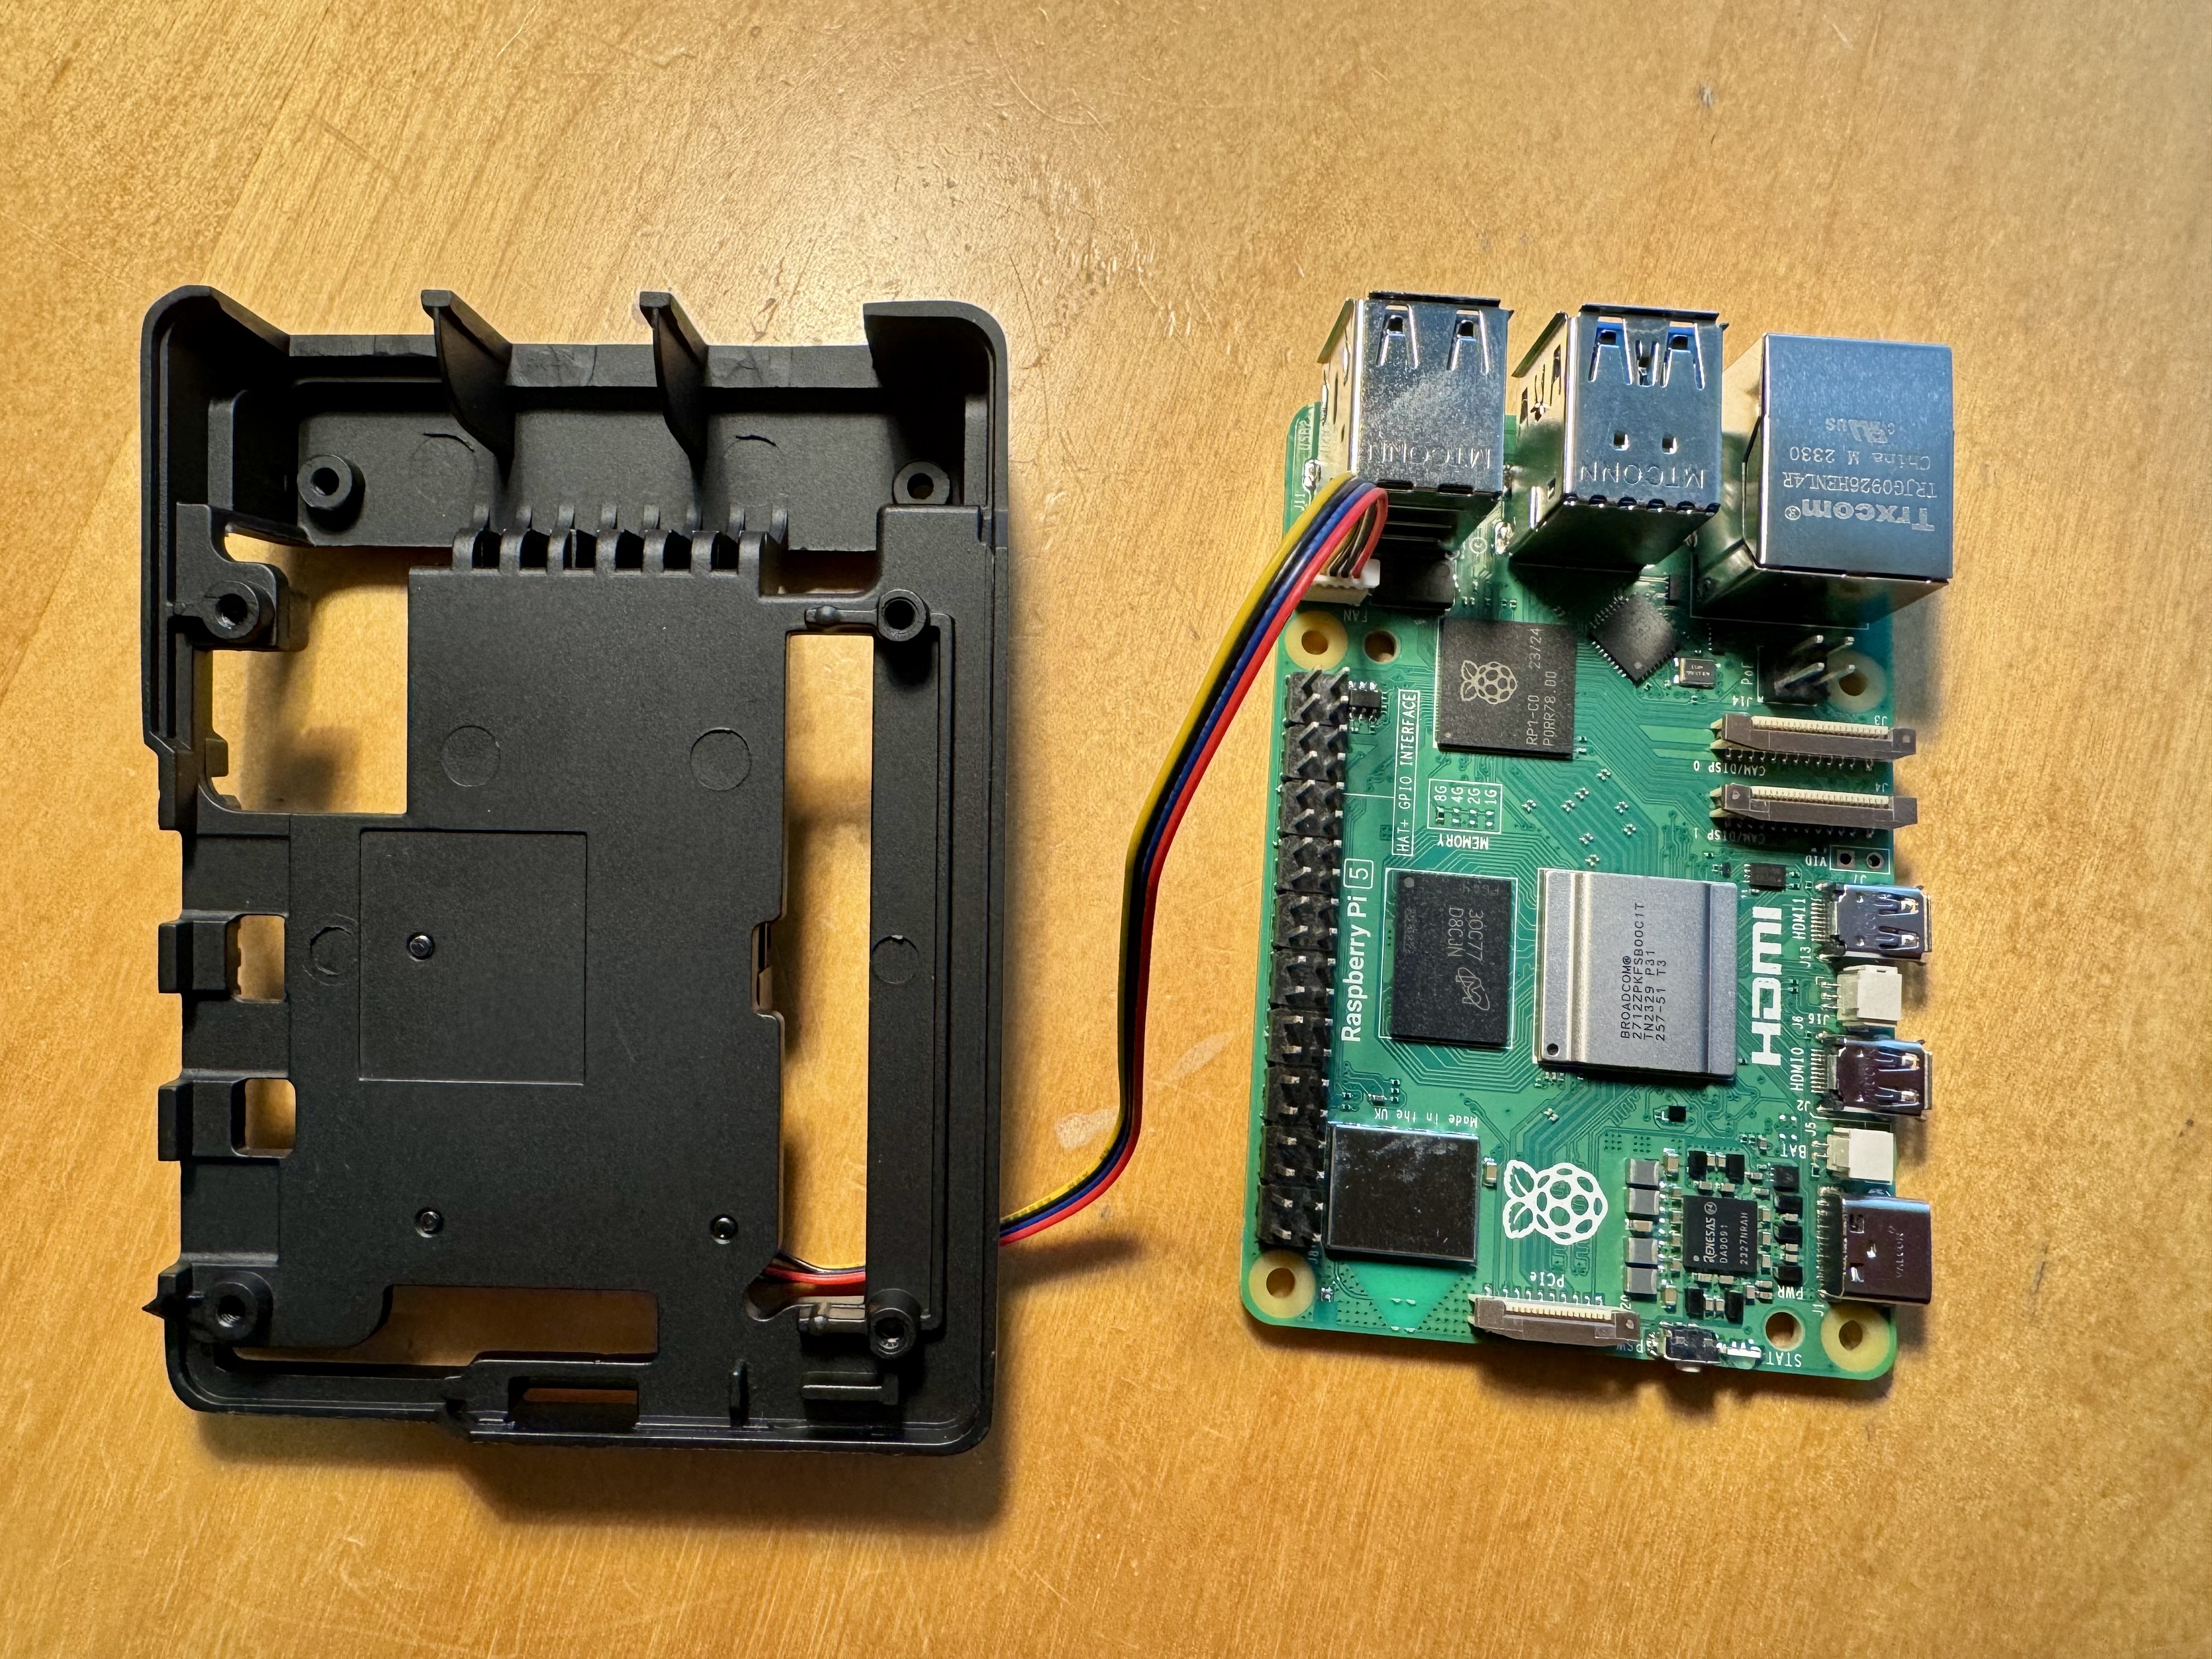
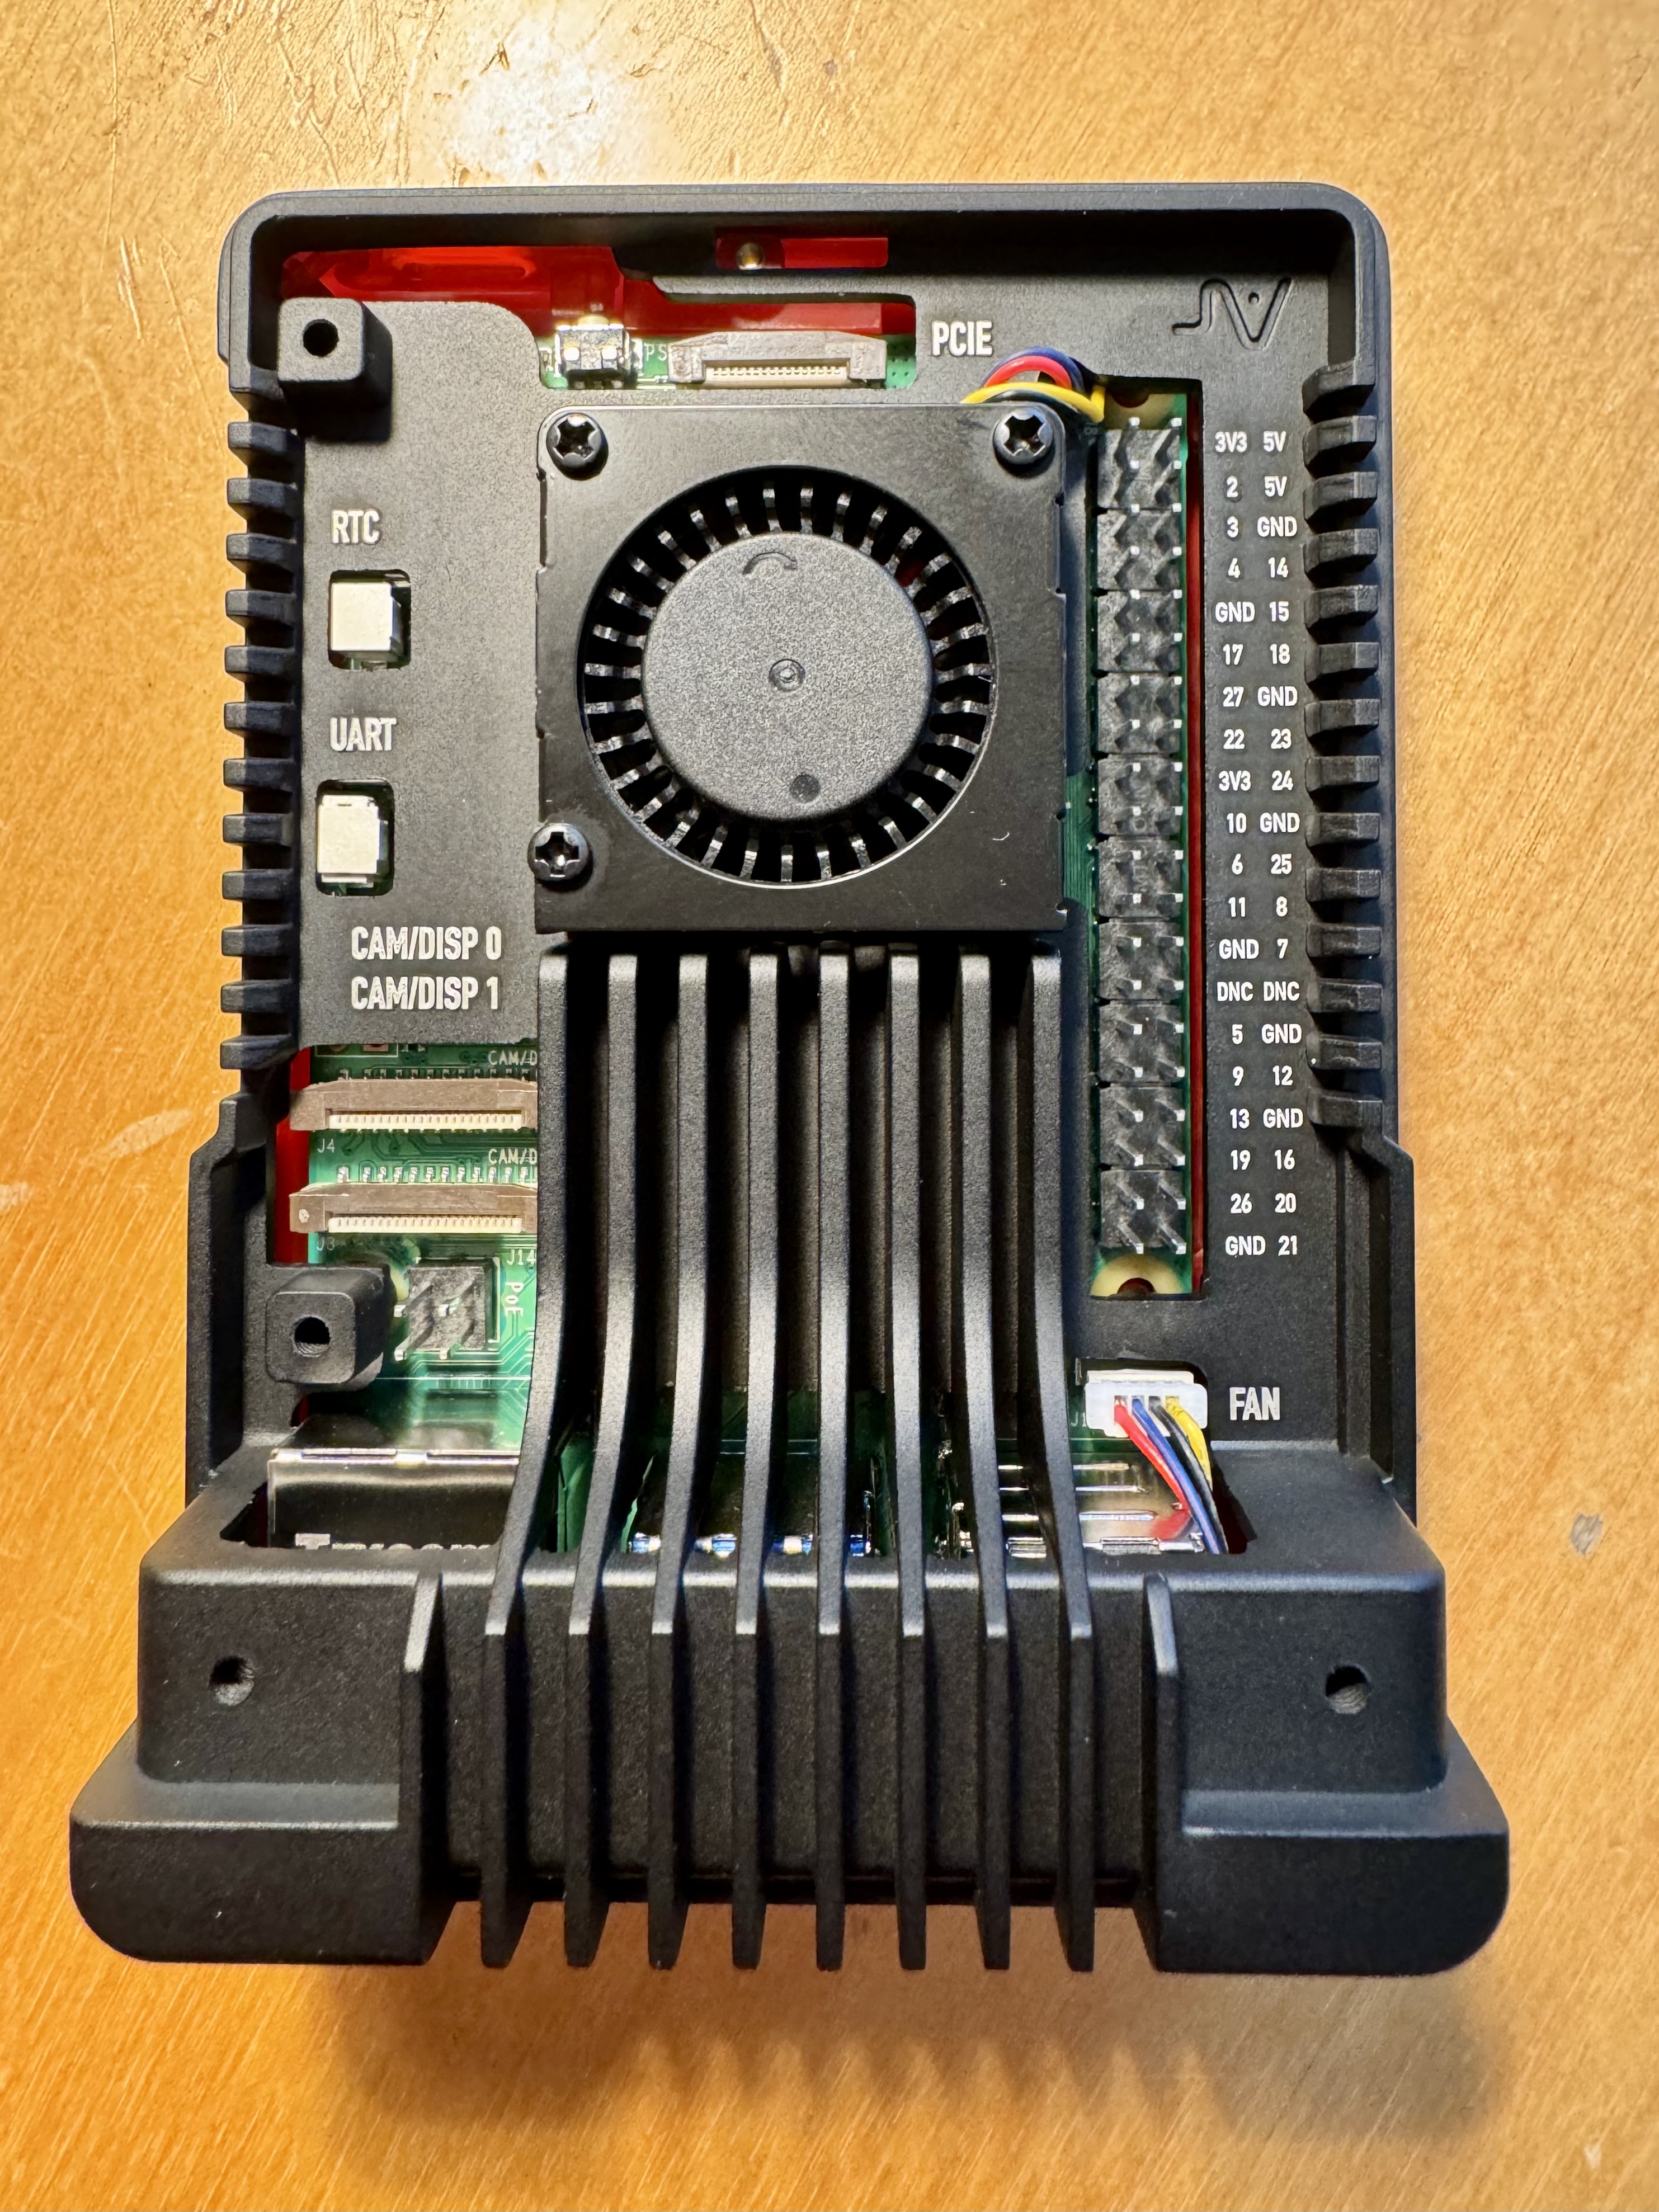
Kategorie: Linux

  • These custom Chucks are smokin’ hot kicks

    These custom Chucks are smokin’ hot kicks

    Reading Time: 2 minutes

    Once you get bored with the shoes on the shelves at Payless, you can dive into the fascinating world of custom sneakers. Converse Chuck Taylors are probably the most popular canvas for shoe customizers, as they offer plenty of room for paint and jewel bedazzling. But creative technologist Tigris Li took it to a whole other level with her Chuck 70s Smoke Shoes that blow clouds as the wearer walks.

    Each shoe has an apparatus that looks like it was cobbled together by a mad scientist trying invent their way into dunking. When the wearer puts pressure down on the sole, that apparatus will puff out a cloud of smoke. Those soles are actually custom, too. Li 3D-printed them in TPU to give the shoes a cool, angular look. They also contain the force sensors that trigger the smoke production.

    An Arduino Nano ESP32 board in each shoe monitors the force sensor in the sole. When the signal surpasses a set threshold, the Arduino activates a relay that allows power to flow through a heating coil. That coil sits in smoke machine fluid that comes from a tiny flask attached to the shoe. With power flowing, the coil burns the fluid and that expands to create the smoke.

    https://platform.twitter.com/widgets.js

    We can only assume that we’ll see Jay-Z wearing these at his next appearance at the Grammy Awards.

    The post These custom Chucks are smokin’ hot kicks appeared first on Arduino Blog.

    Website: LINK

  • Hello World #23 out now: Global exchange of computing education ideas

    Hello World #23 out now: Global exchange of computing education ideas

    Reading Time: 3 minutes

    How is computing taught around the globe? Our brand-new, free issue of Hello World, out today, paints a picture for you. It features stories from over 20 countries, where educators, researchers, and volunteers share their work and their personal challenges and joys in bringing computing education to their part of the world.

    The Hello World Global Exchange magazine cover on a plain background.

    Global exchange in a worldwide community

    In Hello World issue 23, you’ll hear about countries where computing is an official school subject and how it was set up that way, and you’ll hear about countries that are newer to computing education and working to fast-track their students’ learning.

    • Ethel Tshukudu’s article on her research using the CAPE framework is a fascinating comparison of computer science education in four African countries
    • Iliana Ramirez describes how volunteers are at the heart of Ciberistas, a technology training programme for young people in Mexico
    • Matthew Griffin’s article highlights how computing education works in Canada, a large country with two official languages
    • Dana Rensi’s article about a solar-powered Raspberry Pi computing lab in the middle of the Peruvian rainforest will surprise and delight you
    • Randal Rousseau, a librarian in Cape Town, South Africa, shares how he teaches children to code through unplugged activities

    And there is lots more for you to discover in issue 23.

    Sue Sentance, director of the Raspberry Pi Computing Education Research Centre at the University of Cambridge, says in her article:

    “Our own experience of implementing computing education in England since 2014 has shown the importance of teachers supporting each other, and how various networks … are instrumental in bringing computing teachers together to share knowledge and experiences. With so many countries introducing computing education, and teachers around the globe facing similar challenges, maybe we need to extend this to a global teacher network, where teachers and policymakers can share good practice and learn from each other. “

    We aim for Hello World magazine to be one of the places where this sharing, exchange, and learning can take place. Subscribe for free to never miss an issue, and find out how you can write for the magazine.

    Download Hello World issue 23 for free

    Research highlights the importance of computing education to young people’s futures, whether or not they pursue a degree or career in the area. From teaching computing in schools where the electricity cuts out, to incorporating artificial intelligence into curricula in different countries, and to teaming up with local governments when there isn’t a national computing curriculum, educators are doing wonderful things around the globe to make sure the young people they support have the opportunity to learn. Read their stories today.

    Also in issue 23:

    • Research on culturally adapted resources 
    • How community building enhances computing education
    • Tips for hosting a STEM event in school

    And much, much more.

    Send us a message or tag us on social media to let us know which articles have made you think, and most importantly, which will help you with your teaching. And to hear monthly news about Hello World and the whole Raspberry Pi Foundation, sign up to the Hello World newsletter.

    Website: LINK

  • The ultimate lighting system for model railroaders

    The ultimate lighting system for model railroaders

    Reading Time: 2 minutes

    Go to any model railroading convention and you’ll see that most layouts have far more work put into the terrain and buildings than into the trains themselves. The emphasis is usually on realism, so enthusiasts spend uncountable hours constructing and weathering their buildings. But lighting those buildings can be difficult, leading many people choose simple static lighting. This project by Olivier Wagener makes it relatively easy to upgrade that lighting to something much more sophisticated.

    Wagener started this project to help his father improve the lighting of a train station building for his model railroad. The result is really impressive, because every room in the building has two of its own LEDs: one a warm temperature and one a cool temperature. This also supports RGB LEDs. Using a smartphone, the user can set the brightness, color, and temperature of each room individually. They can also group those into zones for quick control. Once setup, the user has complete control over the realistic lighting and that adds a whole new dimension to model railroading.

    This is possible thanks to an Arduino MKR 1010 WiFi board that communicates with Wagener’s custom app over the local network. This can handle up to 976 single-color LEDs (warm or cool), 305 RGB LEDs, or some combination of the two. To give the Arduino full PWM (pulse-width modulation) control over that many LEDs, Wagener chose PCA9685 PWM module boards. Each one has 16 channels, so a full set of 976 single-color LEDs will require 61 boards. 305 RGB LEDs will also require 61 boards, because each of those LEDs takes up three channels.

    [youtube https://www.youtube.com/watch?v=cVVxhGMEgmw?feature=oembed&w=500&h=281]

    If you want to use Wagener’s project in your own buildings, all of the code and information is available on his Gitlab page

    The post The ultimate lighting system for model railroaders appeared first on Arduino Blog.

    Website: LINK

  • Adam Cohen-Rose interview

    Adam Cohen-Rose interview

    Reading Time: 3 minutes

    What is your history with making?

    I’ve always enjoyed building things – I had a big chest of LEGO as a kid, and so did my wife, and now we’ve only expanded it as our children got into model building too!

    I’ve been going to BarCamps and hackathons since 2007 and have loved the opportunity to work with other people to put something together in a short space of time. I was even featured on BBC Click as an ‘Inventor’ back in 2009 for building a LEGO Dalek controlled from my phone.

    The maze game on the Astro Pi – it’s a bit small, but so is the screen it’s displayed on.

    When did you learn about Raspberry Pi?

    Pretty early on. My then 12-year-old (now 20!) was one of the judges at the Code Club Pi-hack back in December 2012.

    I’ve three active Raspberry Pi [boards] in the house, plus about seven or eight others, connected or embedded in various projects.

    This displays temperature and humidity, so during the demo people can figure out how the Sense HAT works.

    How did you start with Code Club?

    I started running a programming club in my child’s primary school back in February 2012 – just before Code Club was founded. I approached the head teacher to offer a free lunchtime club for year 4s and he jumped at the idea!

    Once the Code Club Scratch projects came out, I switched to using them pretty quickly as they were great fun and the children really enjoyed making their own games.

    We’ve now had Code Clubs at Fleetville Junior School for nearly 12 years. I’m still running the year 6 club, even though neither of my kids go there any more! And we also run lunchtime clubs for years 4 and 5 – using Code Club material as well as Minecraft Education, micro:bits and Machine Learning for Kids.

    I’ve also started up Code Clubs at work: Tesco Technology supports two clubs – one lunchtime club by our Welwyn office, and one after-school club by our London office.

    What are some of your favourite Astro Pi moments?

    Getting the kids to guess what the sensors are on my 3D-printed Astro Pi mockup – I run a small program that displays a maze for the gyroscope and accelerometer, and a bar graph for the humidity and temperature sensors. The kids then have to try different inputs to figure out what they are responding to. See the code and some pictures here.

    Seeing the actual Astro Pi hardware at Raspberry Pi Big Birthday Bash events and at Richard Hayler’s talk at EMF Camp – and then seeing videos of their twins in the space station.

  • Supporting learners with programming tasks through AI-generated Parson’s Problems

    Supporting learners with programming tasks through AI-generated Parson’s Problems

    Reading Time: 6 minutes

    The use of generative AI tools (e.g. ChatGPT) in education is now common among young people (see data from the UK’s Ofcom regulator). As a computing educator or researcher, you might wonder what impact generative AI tools will have on how young people learn programming. In our latest research seminar, Barbara Ericson and Xinying Hou (University of Michigan) shared insights into this topic. They presented recent studies with university student participants on using generative AI tools based on large language models (LLMs) during programming tasks. 

    A girl in a university computing classroom.

    Using Parson’s Problems to scaffold student code-writing tasks

    Barbara and Xinying started their seminar with an overview of their earlier research into using Parson’s Problems to scaffold university students as they learn to program. Parson’s Problems (PPs) are a type of code completion problem where learners are given all the correct code to solve the coding task, but the individual lines are broken up into blocks and shown in the wrong order (Parsons and Haden, 2006). Distractor blocks, which are incorrect versions of some or all of the lines of code (i.e. versions with syntax or semantic errors), can also be included. This means to solve a PP, learners need to select the correct blocks as well as place them in the correct order.

    A presentation slide defining Parson's Problems.

    In one study, the research team asked whether PPs could support university students who are struggling to complete write-code tasks. In the tasks, the 11 study participants had the option to generate a PP when they encountered a challenge trying to write code from scratch, in order to help them arrive at the complete code solution. The PPs acted as scaffolding for participants who got stuck trying to write code. Solutions used in the generated PPs were derived from past student solutions collected during previous university courses. The study had promising results: participants said the PPs were helpful in completing the write-code problems, and 6 participants stated that the PPs lowered the difficulty of the problem and speeded up the problem-solving process, reducing their debugging time. Additionally, participants said that the PPs prompted them to think more deeply.

    A young person codes at a Raspberry Pi computer.

    This study provided further evidence that PPs can be useful in supporting students and keeping them engaged when writing code. However, some participants still had difficulty arriving at the correct code solution, even when prompted with a PP as support. The research team thinks that a possible reason for this could be that only one solution was given to the PP, the same one for all participants. Therefore, participants with a different approach in mind would likely have experienced a higher cognitive demand and would not have found that particular PP useful.

    An example of a coding interface presenting adaptive Parson's Problems.

    Supporting students with varying self-efficacy using PPs

    To understand the impact of using PPs with different learners, the team then undertook a follow-up study asking whether PPs could specifically support students with lower computer science self-efficacy. The results show that study participants with low self-efficacy who were scaffolded with PPs support showed significantly higher practice performance and higher problem-solving efficiency compared to participants who had no scaffolding. These findings provide evidence that PPs can create a more supportive environment, particularly for students who have lower self-efficacy or difficulty solving code writing problems. Another finding was that participants with low self-efficacy were more likely to completely solve the PPs, whereas participants with higher self-efficacy only scanned or partly solved the PPs, indicating that scaffolding in the form of PPs may be redundant for some students.

    Secondary school age learners in a computing classroom.

    These two studies highlighted instances where PPs are more or less relevant depending on a student’s level of expertise or self-efficacy. In addition, the best PP to solve may differ from one student to another, and so having the same PP for all students to solve may be a limitation. This prompted the team to conduct their most recent study to ask how large language models (LLMs) can be leveraged to support students in code-writing practice without hindering their learning.

    Generating personalised PPs using AI tools

    This recent third study focused on the development of CodeTailor, a tool that uses LLMs to generate and evaluate code solutions before generating personalised PPs to scaffold students writing code. Students are encouraged to engage actively with solving problems as, unlike other AI-assisted coding tools that merely output a correct code correct solution, students must actively construct solutions using personalised PPs. The researchers were interested in whether CodeTailor could better support students to actively engage in code-writing.

    An example of the CodeTailor interface presenting adaptive Parson's Problems.

    In a study with 18 undergraduate students, they found that CodeTailor could generate correct solutions based on students’ incorrect code. The CodeTailor-generated solutions were more closely aligned with students’ incorrect code than common previous student solutions were. The researchers also found that most participants (88%) preferred CodeTailor to other AI-assisted coding tools when engaging with code-writing tasks. As the correct solution in CodeTailor is generated based on individual students’ existing strategy, this boosted students’ confidence in their current ideas and progress during their practice. However, some students still reported challenges around solution comprehension, potentially due to CodeTailor not providing sufficient explanation for the details in the individual code blocks of the solution to the PP. The researchers argue that text explanations could help students fully understand a program’s components, objectives, and structure. 

    In future studies, the team is keen to evaluate a design of CodeTailor that generates multiple levels of natural language explanations, i.e. provides personalised explanations accompanying the PPs. They also aim to investigate the use of LLM-based AI tools to generate a self-reflection question structure that students can fill in to extend their reasoning about the solution to the PP.

    Barbara and Xinying’s seminar is available to watch here: 

    [youtube https://www.youtube.com/watch?v=ieFB_C2bq2Y?feature=oembed&w=500&h=281]

    Find examples of PPs embedded in free interactive ebooks that Barbara and her team have developed over the years, including CSAwesome and Python for Everybody. You can also read more about the CodeTailor platform in Barbara and Xinying’s paper.

    Join our next seminar

    The focus of our ongoing seminar series is on teaching programming with or without AI. 

    For our next seminar on Tuesday 12 March at 17:00–18:30 GMT, we’re joined by Yash Tadimalla and Prof. Mary Lou Maher (University of North Carolina at Charlotte). The two of them will share further insights into the impact of AI tools on the student experience in programming courses. To take part in the seminar, click the button below to sign up, and we will send you information about joining. We hope to see you there.

    The schedule of our upcoming seminars is online. You can catch up on past seminars on our previous seminars and recordings page.

    Website: LINK

  • Registration is open for Coolest Projects 2024

    Registration is open for Coolest Projects 2024

    Reading Time: 4 minutes

    Big news for young coders and everyone who supports them: project registration is now open for Coolest Projects 2024! Coolest Projects is our global technology showcase for young people aged up to 18. It gives young creators the incredible opportunity to share the cool stuff they’ve made with digital technology with a global audience, and receive certificates and rewards to celebrate their achievements.

    A young coder shows off her tech project Five young coders show off their robotic garden tech project for Coolest Projects to two other young tech creators.

    What you need to know about Coolest Projects

    The Coolest Projects online showcase is open to young people worldwide. Young creators can register their projects to share them with the world in our online project gallery, and join our exciting livestream event to celebrate what they have made with the global Coolest Projects community.

    Four young coders show off their tech project for Coolest Projects.

    By taking part in Coolest Projects, young people can join an international community of young makers, represent their country, receive personalised feedback on their projects, and get certificates and more to recognise their achievements.

    Here’s how it works:

    • Coolest Projects is completely free to take part in!
    • All digital technology projects are welcome, from very first projects to advanced builds, and the projects don’t have to be complete
    • Projects can be registered in one of six categories: Scratch, games, web, mobile apps, hardware, and advanced programming
    • Young creators up to age 18 can take part individually or in teams of up to five friends
    • Any young person anywhere in the world can take part in the online showcase, and there are in-person events in some countries for local creators too (find out more below)
    • Registration for the online showcase is now open and closes on 22 May 2024
    • All creators, mentors, volunteers, teachers, parents, and supporters are invited to the special celebration livestream on 26 June 2024

    Taking part in Coolest Projects is simple:

    • Young people think of an idea for their project, or choose something they’ve already made and are proud of
    • Young people work with friends to create their project, or make it on their own 
    • Creators (with the help of mentors if needed) register projects via the Coolest Projects website by 22 May
    • Creators’ projects are shared with the world in the online showcase gallery
    • Creators, mentors, and supporters explore the amazing projects in the online gallery, and join the livestream on 26 June to celebrate young creators’ achievements with the Coolest Projects community worldwide
    Two young coders work on their tech project on a laptop to control a sewing machine for Coolest Projects.

    Coolest Projects in-person events in 2024

    As well as the global online showcase, Coolest Projects in-person events are held for young people locally in certain countries too, and we encourage creators to take part in both the online showcase and their local in-person event.

    The exhibition hall at Coolest Projects Ireland 2023.

    In 2024, creators can look forward to the following in-person events, run by us and partner organisations around the world:

    More events are coming soon, so sign up to the Coolest Projects newsletter to be sure to hear about any in-person events in your country. And if there isn’t an event near you, don’t worry. The online showcase is open to any young person anywhere in the world.

    A Coolest Projects sign with two people doing handstands in front of it.

    Help for you is at hand

    Coolest Projects welcomes all digital tech projects, from beginner to advanced, and there are loads of great resources available to help you support the young people in your community to take part.

    Young people and an adult mentor at a computer at Coolest Projects Ireland 2023.

    We are running a series of online calls and webinars for mentors and young people to share practical tips and help participants develop their ideas and build their creations. Sign up for the sessions here. All sessions will be recorded, so you can watch them back if you can’t join live.

    You can also check out the Coolest Projects guidance page for resources to help you support young people throughout their Coolest Projects journey, including a mentor guide and session plans.

    Five young coders show off their robotic garden tech project for Coolest Projects.

    To inspire your coders, encourage them to take a look at the 2023 showcase gallery, where they can explore the incredible projects submitted by participants last year.

    Our projects site is also a great place for participants to begin — there are hundreds of free step-by-step project guides to help young people create their own projects, whether they’re experienced tech creators or they’re just getting started.

    Sign up for Coolest Projects updates

    There’s lots more exciting news to come, from the announcement of our VIP judges to details about this year’s swag, so sign up for email updates to be the first to know. And whether your coders have already made something fun, innovative, or amazing that they want to share, or they’re inspired to make something new, Coolest Projects is the place for them. We can’t wait to see what they create!

    Website: LINK

  • SPIN is a beautiful and imaginative AI synthesizer

    SPIN is a beautiful and imaginative AI synthesizer

    Reading Time: 2 minutes

    If you’re heard the pop music emanating from any recent reality TV show, you won’t be surprised to learn that AI is perfectly capable of generating tunes on demand. It won’t replace true artistry any time soon, but AI music fits all of the technical criteria. But typing a prompt is boring, which is why Arvind Sanjeev constructed this gorgeous and imaginative AI synthesizer called SPIN.

    SPIN is beautiful and looks like a cross between a turntable and a drum machine. Those visual cues hint at its function. The user can press buttons on the right-side pad to define musical characteristics, which then form a prompt for a language model called MusicGen. That synthesizes music according to the selected characteristics, like “happy” and “lo-fi.” The music then starts playing and the user can control its speed and direction using the record on the turntable — even scratching like a DJ if they want.

    A Raspberry Pi 4 Model B runs MusicGen, but it receives inputs through an Arduino Mega 2560 connected to the buttons. There are also dials to set song duration and BPM (beats per minute), as well as control knobs.

    The turntable is a Numark PT-01, but the vinyl is a special dummy record that only contains a time code track. The sound from that then feeds through the audio driver back to the Raspberry Pi, where it is decoded to control the playback of the synthesized music. 

    SPIN is truly stunning to look at and its functionality is quite interesting, but Sanjeev’s real motivation was to raise awareness about the ethics of AI-generated art and the original human-made art it is trained on. 

    The post SPIN is a beautiful and imaginative AI synthesizer appeared first on Arduino Blog.

    Website: LINK

  • Upgrade your shop with voice-controlled smart LED lighting

    Upgrade your shop with voice-controlled smart LED lighting

    Reading Time: 2 minutes

    Congratulations! You finally have a garage to call your own and you’re ready to turn it into the workshop of your dreams. But before you go on a shopping spree in Home Depot’s tools section, you may want to consider upgrading from that single dim lightbulb to more substantial lighting — otherwise, you’ll never find the screws you drop on the ground. LeMaster Tech can help with his great video on installing DIY voice-controlled smart LED lighting.

    LeMaster Tech’s primary goal was simply to increase the brightness in the garage. He took the route that gives the best bang for the buck: LED tubes. Those are similar in form factor to fluorescent light tubes, but they can put out more lumens with fewer watts and they tend to last a lot longer. They also don’t need expensive and bulky ballasts. LeMaster Tech installed several of those on the ceiling of his garage, then took things to the next level.

    These LED light tubes work with standard household mains AC power, so they can be wired like regular light bulbs. But instead, LeMaster Tech made them smart by wiring them through a relay board controlled by an Arduino UNO Rev3 board. That lets the Arduino safely switch each light tube on and off. LeMaster Tech gave it the ability to do that in response to voice commands by adding a DFRobot Gravity voice recognition module. That handy module works entirely offline and uses a simple AI to recognize spoken words. It has 121 built-in words and supports 17 custom words, so LeMaster Tech was able to tailor it to his needs.

    Now he can switch the lights with a simple voice command and even activate pre-programmed effects, like flashing the lights. 

    [youtube https://www.youtube.com/watch?v=L6Vg9dT7hsU?feature=oembed&w=500&h=281]

    The post Upgrade your shop with voice-controlled smart LED lighting appeared first on Arduino Blog.

    Website: LINK

  • Build a better spindle controller for your CNC mill

    Build a better spindle controller for your CNC mill

    Reading Time: 2 minutes

    Proper spindle speed control is necessary to get good CNC milling results. If your spindle speed is inconsistent, your speed and feed calculations will be wrong. That will lead to poor finishes and even broken end mills (and ruined parts) in extreme cases. But cheap CNC mills and routers often have insufficient spindle speed controllers. That’s why Joekutz’s Workbench built an improved spindle speed controller for his generic CNC 3040.

    This DIY spindle speed controller has two major improvements: more precise adjustment and closed-loop feedback.

    The original controller just had an imprecise potentiometer knob and dot markings, making it impossible to set to a specific speed. The new version lets the user set the spindle to a desired speed with a digital readout.

    It also has closed-loop feedback, so it can adjust power to the motor as necessary to maintain the set speed under load. Without that, even a light load could slow down the spindle and throw off the speed/feed balance. 

    Joekutz’s Workbench achieved this using an Arduino UNO Rev3 board. It reads input from a rotary encoder to set the motor speed, then shows that speed on a seven-segment display. It controls the motor speed via PWM through a DIY optical isolator, a transistor, and a MOSFET. At the same time, it receives feedback on the real-world motor speed using an LED and photoresistor. That measures the reflectivity of the spinning spindle, which has a piece of aluminum foil tape in one area to increase reflectivity. That lets the Arduino detect a revolution of the motor and calculate the RPM. 

    [youtube https://www.youtube.com/watch?v=_ExjwMC0-Nw?feature=oembed&w=500&h=281]

    The CNC mill uses an Arduino Mega 2560 with GRBL for controlling the axes’ stepper motors. The Arduino Uno spindle controller can receive g-code speed commands from that, or the user can set the speed using the rotary encoder dial. 

    The post Build a better spindle controller for your CNC mill appeared first on Arduino Blog.

    Website: LINK

  • Argon NEO 5 Raspberry Pi case review

    Argon NEO 5 Raspberry Pi case review

    Reading Time: 2 minutes

    The enclosure is provided with instructions. These are straightforward, although we will confess to some confusion with wiring in the fan cable. It took four attempts before the ‘ah ha!’ moment when we realised what was intended. The instructions could cover this better. The rest of the installation was painless and thermal pads are included for good contact with the heatsink. Once you have Raspberry Pi inserted, you can add the aluminium cover which gives the overall package a solid, strong feel making it more suitable for environments such as factories or classrooms. The case is held together by screws, adding to the strength of the overall package. You can choose between rubber feet (supplied) or wall-mounting using the built-in screw points.

    The case in use

    The aluminium cover looks great, but it does mean that the GPIO, PCIE, camera ports and other headers become inaccessible. You are not required to have the cover on to use your Raspberry Pi but it would be great to see alternative covers just as with the official cases. The SD card slot is exposed (which is not the case with many third-party cases) and a nice touch is a cover which can be screwed into place to protect the card from accidental removal. A welcome feature is the combo power light and switch, which links to the new on-board power switch.

    Being actively controlled by Raspberry Pi OS means that the fan is silent for the majority of the time and you’ve got to get the CPU nice and busy to get any noise out of the case, which is minimal. As the body is nearly all aluminium, there is plenty of area for soaking up heat, so this would be a great choice for Raspberry Pis under heavy load.

    With the cover removed, the NEO exposes all important headers and the GPIO

    Argon’s build quality is some of the best in Raspberry Pi’s space and this case is no exception. You get the impression that a fall off a desk (normally due to a curious cat) would do it no harm whatsoever. The plastic base has a cheaper feel, but the red accents it provides look the part.

    The NEO 5 is another excellent product from Argon that combines value and features into a hard-to-beat package.

    Verdict

    8/10

    A low-cost, good-looking case with excellent resilience and cooling options. A solid choice for any Raspberry Pi project, although some may wish to wait for the next generation of the Argon ONE.

    Specs

    Cooling: Passive and active, air intake vents

    Fan: 30mm PWM

    Materials: Aluminium, plastic

  • UNO R4 Stars: Meet Anouk Wipprecht

    UNO R4 Stars: Meet Anouk Wipprecht

    Reading Time: 3 minutes

    The launch of the Arduino UNO R4 marks a huge leap forward for our community. For us, it’s also the chance to celebrate the people who bring our ecosystem to life with their bright ideas, radiant enthusiasm, and shining insight.

    That is how the UNO R4 Stars blog post series began: to highlight makers who have not only created amazing projects with Arduino, but who are giving back to the community by sharing as they go and helping others make anything they wish.

    We invite you to discover each profile, hoping you might find a North Star to navigate around an expanding galaxy or venture into completely new universes.

    Many of us think electronics are a beautiful thing, but Anouk Wipprecht takes it to the next level. The Dutch designer creates interactive dresses that turn garments into sensorial experiences, pushing wearables into the field of robotic couture she is pioneering. Check out her YouTube or Vimeo channel to see the Spider Dress, which attacks anyone getting too close to the wearer, or the Smoke Dress, inspired by octopi’s defense mechanisms. 

    Wipprecht began exploring #FashionTech over 20 years ago, when computers were still big and bulky – and very difficult to hide in a dress. For her, everything changed when she discovered Arduino by attending an interaction design course held by our very own David Cuartielles and the Arduino team in Malmo, Sweden. That’s when she learned to leverage the technological platform Arduino provides to create increasingly smaller wearable systems, and most importantly, with that she became part of a diverse and eclectic community of makers. Using the same simple boards her teammates were working on projects ranging from RC cars to early drones. Meanwhile, following her passion for fashion, she was especially interested in the potential of smaller and more flexible hardware components to bring her creations to life.

    Over the years she has furthered her research with every new technological advancement, up to her latest creation: the Chroma dress for Chromatic 3D, which senses other people’s proximity and lights up accordingly, mimicking the bioluminescence of fireflies with LEDs embedded in an innovative elastomer mesh fabric.

    For this particular garment, Wipprecht chose the new Arduino Nano ESP32 because of its outstanding combination of small form factor – easy to integrate in the design and comfortable to wear on the body – and great power. Not to mention, the module made interconnections easier than ever and helped speed up the entire project: “The process went super rapidly from ideation to final experiment, and we were able to switch back and forth in order to optimize it.”

    “The coolest thing about Arduino is it makes working with electronics really fun,” she says. The experience is so enjoyable thanks to great ease of use and flexibility – which also allows Wipprecht to use Arduino when she teaches, encouraging a whole new generation of makers to turn their ideas into reality. 

    “The great advantage we have today is we have a lot of accessibility to really cool tools, from powerful machines, to all the latest electronics and technology, and it doesn’t cost as much as it used to. It makes it really easy to make cool stuff.”

    [youtube https://www.youtube.com/watch?v=UrxWnsEQpB0?feature=oembed&w=500&h=281]

    We asked Wipprecht, “What’s your favorite part of the UNO R4?”

    • The higher processing power: “Everyone wants better processing power, all the time!”
    • How easy it is to use: “It’s basically plug-and-play,” making it perfect for prototyping as well as teaching.

    To keep up with the latest fashion in microcontrollers, follow Wipprecht on Vimeo and LinkedIn, or bookmark her website!

    The post UNO R4 Stars: Meet Anouk Wipprecht appeared first on Arduino Blog.

    Website: LINK

  • DOS ain’t dead

    DOS ain’t dead

    Reading Time: 2 minutes

    No one really uses MS-DOS any more, but the modern, open-source FreeDOS ships with every copy of DOSBox, and you’ve quite probably used that. Most modern DOS developers use DOSBox and its forks for testing, so they can rapidly spot bugs and iterate solutions.

    The year 2023 in DOS also saw the release of Damien “Cyningstan” Walker’s stylish Barren Planet, a turn-based, space exploitation-themed strategy game in which rival mining corporations battle for control of resources, with some of the best four-colour CGA graphics we’ve ever seen. Cyningstan has also released a range of tools and libraries to support DOS games development in C, as well as open-sourcing his older games.

    Juan J. “Reidrac” Martinez, developed Gold Mine Run! in C and cross-compiled from Linux to DOS, using DJGPP to target 32-bit (i386) DOS. He also open-sourced the game’s code to help other developers.

    But you don’t have to use C. Tiny DOS city-builder Demografx was developed in Microsoft QuickBasic 4.5, an IDE released in 1990, which you can run on Raspberry Pi in DOSBox if you can find a copy. Microsoft’s more common QBASIC and GW-BASIC languages are no longer available, but PC-BASIC is a fully-compatible GW-BASIC interpreter you can install on Raspberry Pi, and there’s even a GW-BASIC extension for Visual Studio Code if you want an IDE.

    There’s an entire community of developers making wildly distinct games based on ZZT, a 1991 game creation system by Tim Sweeny, now CEO of Epic Games. ZZT spawned a vast living ecosystem of DOS games like WiL’s Galactic Foodtruck Simulator, development tools like KevEdit, and modding tools such as Weave.

    There are multiple DOS game jams to encourage would-be developers. In 2023, we saw the DOS COM jam, the DOS Games June Jam, and the DOS Games End of Year Jam.

    The DOS renaissance still has a way to go before it catches up to the C64, ZX Spectrum, and Game Boy development scenes, but the sheer range of tools available makes it a very approachable space to experiment in. If you want some inspiration, check out this DOS games we’ve created.

  • Our T Level resources to support vocational education in England

    Our T Level resources to support vocational education in England

    Reading Time: 3 minutes

    You can now access classroom resources created by us for the T Level in Digital Production, Design and Development. T Levels are a type of vocational qualification young people in England can gain after leaving school, and we are pleased to be able to support T Level teachers and students.

    A teenager learning computer science.

    With our new resources, we aim to empower more young people to develop their digital skills and confidence while studying, meaning they can access more jobs and opportunities for further study once they finish their T Levels.

    We worked collaboratively with the Gatsby Charitable Foundation on this pilot project as part of their Technical Education Networks Programme, the first time that we have created classroom resources for post-16 vocational education.

    Post-16 vocational training and T Levels

    T Levels are Technical Levels, 2-year courses for 16- to 18-year-old school leavers. Launched in England in September 2020, T Levels cover a range of subjects and have been developed in collaboration with employers, education providers, and other organisations. The aim is for T Levels to specifically prepare young people for entry into skilled employment, an apprenticeship, or related technical study in further or higher education.

    A group of young people in a lecture hall.

    For us, this T Level pilot project follows on from work we did in 2022 to learn more about post-16 vocational training and identify gaps where we could make a difference. 

    Something interesting we found was the relatively low number of school-age young people who started apprenticeships in the UK in 2019/20. For example, a 2021 Worldskills UK report stated that only 18% of apprentices were young people aged 19 and under. 39% were aged 19-24, and the remaining 43% were people aged 25 and over.

    To hear from young people about their thoughts directly, we spoke to a group of year 10 students (ages 14 to 15) at Gladesmore School in Tottenham. Two thirds of these students said that digital skills were ‘very important’ to them, and that they would consider applying for a digital apprenticeship or T Level. When we asked them why, one of the key reasons they gave was the opportunity to work and earn money, rather than moving into further study in higher education and paying tuition fees. One student’s answer was for example, “It’s a good way to learn new skills while getting paid, and also gives effective work experience.”

    T Level curriculum materials and project brief

    To support teachers in delivering the Digital Production, Design and Development T Level qualification, we created a new set of resources: curriculum materials as well a project brief with examples to support the Occupational Specialism component of the qualification. 

    A girl in a university computing classroom.

    The curriculum materials on the topic ‘Digital environments’ cover content related to computer systems including hardware, software, networks, and cloud environments. They are designed for teachers to use in the classroom and consist of a complete unit of work: lesson plans, slide decks, activities, a progression chart, and assessment materials. The materials are designed in line with our computing content framework and pedagogy principles, on which the whole of our Computing Curriculum is based.

    The project brief is a real-world scenario related to our work and gives students the opportunity to problem-solve as though they are working in an industry job.

    Access the T Level resources

    The T Level project brief materials are available for download now, with the T Level classroom materials coming in the next few weeks.

    We hope T Level teachers and students find the resources useful and interesting — if you’re using them, please let us know your thoughts and feedback.

    Our thanks to the Gatsby Foundation for collaborating with us on this work to empower more young people to fulfil their potential through the power of computing and digital technologies.

    Website: LINK

  • A terrifying FNAF-style Mickey Mouse animatronic

    A terrifying FNAF-style Mickey Mouse animatronic

    Reading Time: 2 minutes

    The copyright for Steamboat Willie famously expired at the beginning of this year. Steamboat Willie was the first appearance Mickey Mouse, so this copyright expiration is a big deal for Disney. Anyone will be able to use the character for the first time in history, as Mickey Mouse is now in the public domain. To celebrate this momentous occasion, Jaimie and Jay of the Wicked Makers YouTube channel built this terrifying FNAF-style Mickey Mouse animatronic.

    A few months ago, Wicked Makers built a Five Nights at Freddy’s Springtrap animatronic and the results were amazing. For this project, they took many of those same lessons, techniques, and stylistic decisions and applied them to Mickey.

    This is a full, life-saved head that can move, open and close its jaw, and direct its scary glowing gaze. The vast majority of the head’s structure is a 3D-printed shell (modeled by BeardlessProps) with a ridiculous amount of superb texturing, painting, and weathering. The ears, for example, have a coating of dark fiber that gives a felt-like appearance. The aesthetic does a fantastic job of making this look like an old and beaten animatronic from a theme park.

    The movement is all actuated by hobby servo motors controlled by an Arduino UNO R4 board. Wicked Makers added a USB host shield, which let them connect a PlayStation 4 controller. The Arduino reads the stick positions and button presses from the PS4 controller and adjusts the servo motors accordingly. That allows for nice organic control when puppeteering.

    This video ends with the animatronic dying. But from what we saw before that, it was very much a success. The Wicked Makers plan to repair the head and will post a video with updates, so be sure to subscribe to their channel.

    [youtube https://www.youtube.com/watch?v=1ZaJVcytjyQ?feature=oembed&w=500&h=281]

    The post A terrifying FNAF-style Mickey Mouse animatronic appeared first on Arduino Blog.

    Website: LINK

  • IDE 2.3 is out, and you’ll love the new debugging features in it

    IDE 2.3 is out, and you’ll love the new debugging features in it

    Reading Time: 2 minutes

    We’ve just released Arduino IDE 2.3, and along with the usual list of bug-fixes and improvements, this new version marks the end of the experimental phase for the debug feature – which is now stable and fully incorporated into the IDE!

    True to our belief in open standards and interoperability, the debug feature is now based on a standard framework documented in the new specifications and guidelines. As a result, maintainers of Arduino cores can now add debugging for any board and leverage the UI and debugging engine provided by the Arduino IDE. 

    What’s more, thanks to this new open framework, we already enabled the debug feature for all the Arduino boards based on the Mbed™ core, which include GIGA R1 WiFi, Portenta H7, Opta, Nano BLE and Nano RP2040 Connect, while the Renesas-based boards (UNO R4, Portenta C33) will follow in the next hours.

    We’ve worked on implementing debug in IDE 2 for a long time, in collaboration with the open-source community and, more recently, in close contact with Espressif to make sure that ESP32 devices would be fully supported. So keep an eye on the upcoming release of the Arduino-ESP32 core, which will support the new debug framework! 

    Want to be able to debug your favorite board using IDE 2.3?

    Get in touch with the platform developer or, even better, help them by submitting a pull request to implement the new specifications.

    We look forward to receiving your feedback on the new debugging features in the Arduino forum or, if you’re a developer and want to report a bug, directly in the GitHub repository.

    Still curious about those bug-fixes? Arduino IDE 2.3 fixes security issue CVE-2023-4863 (see details in this commit).

    Enjoy the new Arduino IDE, and help us make our development environment better than ever! 

    The post IDE 2.3 is out, and you’ll love the new debugging features in it appeared first on Arduino Blog.

    Website: LINK

  • Double Standards

    Double Standards

    Reading Time: 3 minutes

    Once people had recovered from the shock of seeing both a power button and a real-time clock on a Raspberry Pi, one of the most commented-on features of the new platform was the small, vertical, 16-way FFC (Flat Flexible Cable) connector on the left-hand side of the board, which exposes a single-lane PCI Express interface.

    PCIe of cake

    Peripheral Component Interconnect Express (PCI Express or PCIe) is, as the name suggests, a board-level interconnect that allows high-speed data transfer between a processor chip (in our case BCM2712) and external peripherals such as NVMe SSDs, Ethernet cards, or more exotic things such as AI/ML accelerators.

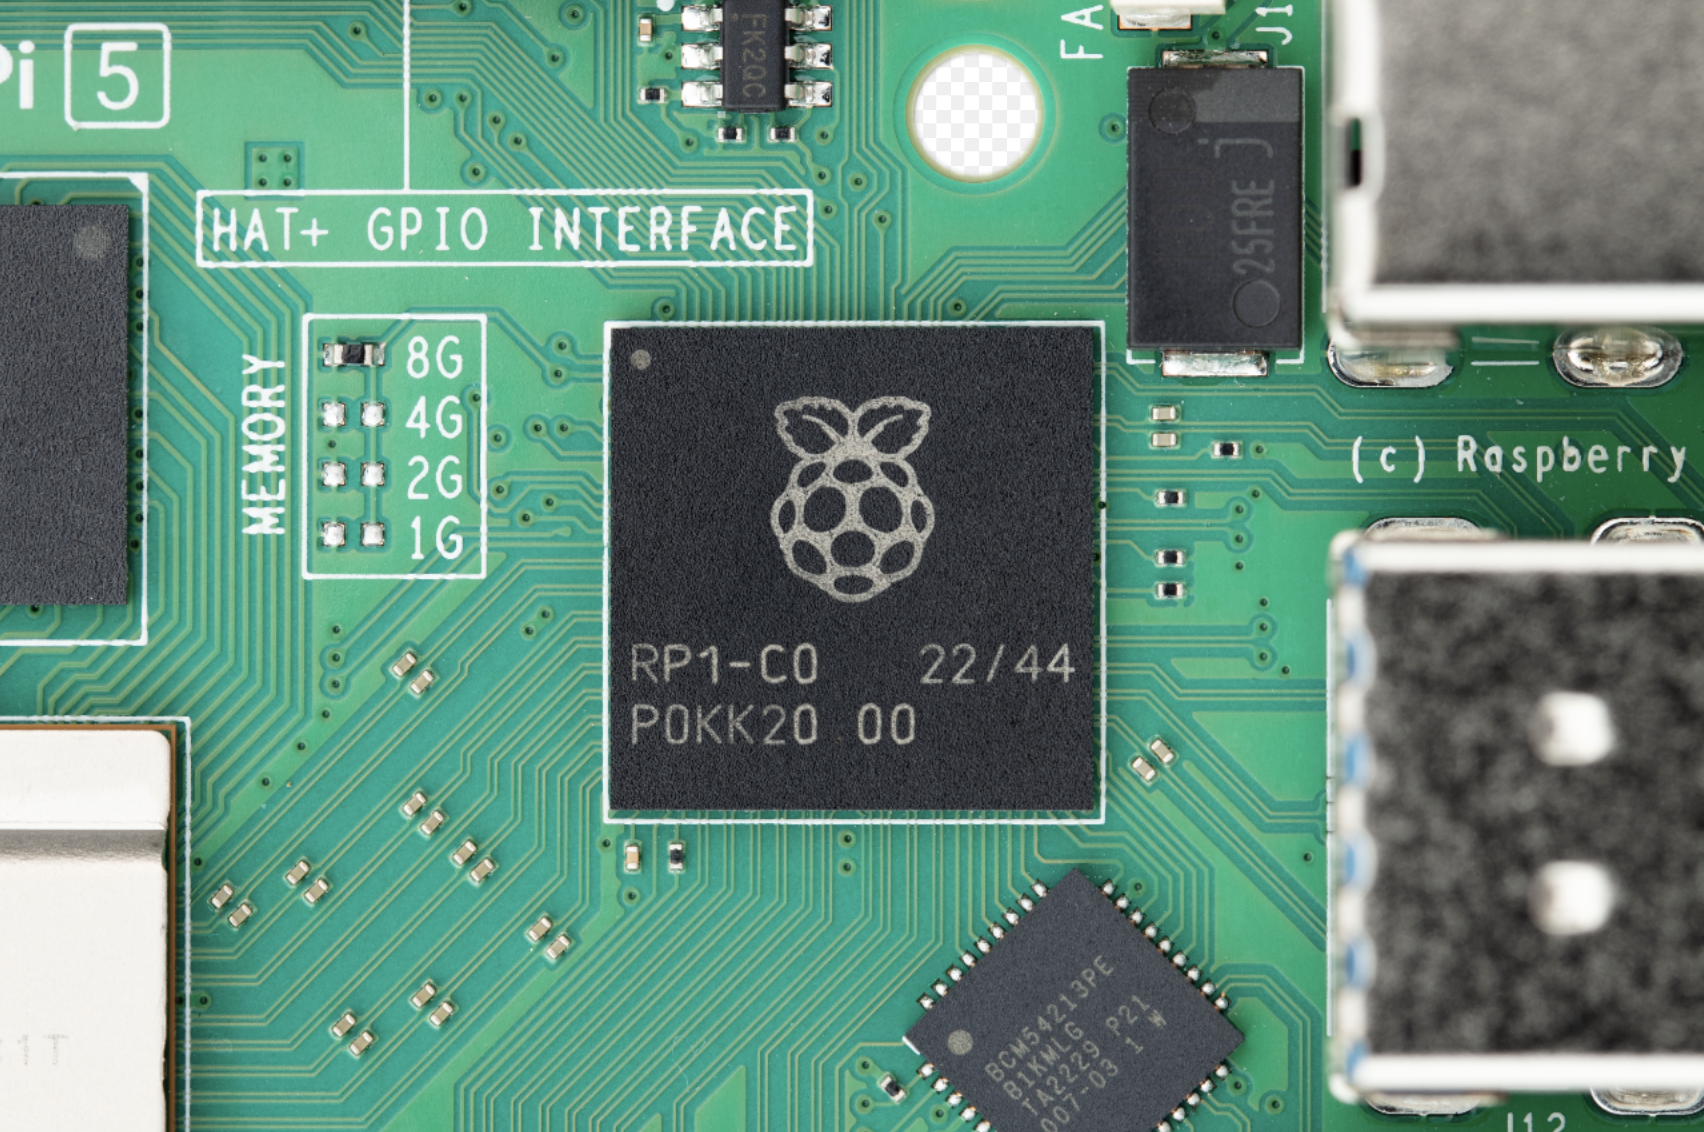
    PCIe works by serialising data transfers and sending one bit at a time down a single channel. Higher-capacity PCIe interfaces have more lanes (×2, ×4, ×8, ×16); on Raspberry Pi 5, BCM2712 is connected to our RP1 I/O controller via a ×4 interface. Each lane runs at 5Gbits/s for PCIe 2.0 (the fastest mode that we officially support on Raspberry Pi 5); after coding overhead, this translates into a capacity of 4Gbits/s. Even taking into account other protocol overheads, you’re likely to see ~450MBytes/sec to and from a good NVMe SSD. Pretty fast!

    Alongside the data and clock channels, the PCIe specification requires some sideband signals like reset, clock request (which does double duty as a power state signal), and wakeup. Our 16-way connector provides all these signals. We also have two pins that allow us to control board power, and to ensure that an appropriately designed PCIe peripheral is automatically detected by the Raspberry Pi firmware.

    Not an M.2

    Why didn’t we add an M.2 connector to the Raspberry Pi 5? The M.2 connector is large, relatively expensive, and would require us to provide a 3.3V, 3A power supply. Together, these preclude us offering it in the standard Raspberry Pi form factor.

    Using a small, low-cost FFC connector allowed us to provide a PCIe interface without growing the board, or imposing the cost of an M.2 connector and its supporting power-supply circuitry on every Raspberry Pi user.

    Specification the first

    One thing we did not have ready at the time of the Raspberry Pi 5 launch was a specification for how to build peripherals that attach to the 16-way PCIe connector. The interaction of PCIe peripherals with Raspberry Pi power states and firmware required detailed consideration, and we wanted to make sure we had done extensive testing of our own prototype product to make sure everything was working exactly as expected.

    Today, we’re releasing the first revision of that specification: Raspberry Pi Connector for PCIe A 16-way PCIe FFC Connector Specification. Our own M.2 M Key HAT+ is in the final stage of prototyping, and will be launched early next year.

    The 16-way FFC PCIe connector

    Specification the second

    For those of you reading closely, you’ll have noticed that we’re calling our M.2 HAT a “HAT+”. If one new specification wasn’t enough for you, today we’re also releasing a preliminary version of the new Raspberry Pi HAT+ Specification.

    The original HAT specification was written back in 2014, so it is now very overdue for an update. A lot has changed since then. The new specification simplifies certain things, including the required EEPROM contents, and pulls everything into one document in the new Raspberry Pi documentation style, along with adding a few new features.

    HAT+ on the Raspberry Pi 5 silkscreen, sort of gave the game away?

    There’s still work to be done on this standard, and our EEPROM utilities haven’t yet been updated to support the generation of the new style of EEPROMs. So this release is very much for people that want to get a feel for how the HAT standard is changing.

    We really wanted to get the HAT+ standard right, as it’s likely to be around for as long as the old HAT standard. One of the reasons for the delay in getting the PCIe connector standard published was our sense that PCIe boards that go on top, rather than boards that go beneath, should probably be HAT+ boards. Ours is going to be!

    Standards for all!

    If you want to discuss them with the community, head over to the Raspberry Pi forums, where you’ll find a dedicated area to talk about HATs, HAT+ and other peripherals.

    Watch this space for the new M.2 HAT+, and a final version of the HAT+ standard, which we’ll release alongside it in 2024.

  • Arduino Cloud Café: Let’s chat about environmental monitoring!

    Arduino Cloud Café: Let’s chat about environmental monitoring!

    Reading Time: < 1 minute

    Exciting news! We’re gearing up for the second edition of Arduino Cloud Café, and we’re thrilled to have you join us. Tune in on Tuesday, February 13th at 5pm CET for an engaging session on environmental monitoring.

    This time, we have two fantastic guests — Bill from Dronebot Workshop and Muhammad Afzal, author of “Arduino IoT Cloud: A Guide for Developers — who will be sharing their insights and connected projects. It’s an opportunity you won’t want to miss!

    Save the date and be ready to dive into the world of Arduino Cloud with us:

    The post Arduino Cloud Café: Let’s chat about environmental monitoring! appeared first on Arduino Blog.

    Website: LINK

  • Grounded cognition: physical activities and learning computing

    Grounded cognition: physical activities and learning computing

    Reading Time: 4 minutes

    Everyone who has taught children before will know the excited gleam in their eyes when the lessons include something to interact with physically. Whether it’s printed and painstakingly laminated flashcards, laser-cut models, or robots, learners’ motivation to engage with the topic will increase along with the noise levels in the classroom.

    Two learners do physical computing in the primary school classroom.

    However, these hands-on activities are often seen as merely a technique to raise interest, or a nice extra project for children to do before the ‘actual learning’ can begin. But what if this is the wrong way to think about this type of activity? 

    In our 2023 online research seminar series, focused on computing education for primary-aged (K–5) learners, we delved into the most recent research aimed at enhancing learning experiences for students in the earliest stages of education. From a deep dive into teaching variables to exploring the integration of computational thinking, our series has looked at the most effective ways to engage young minds in the subject of computing.

    An adult on a plain background.

    It’s only fitting that in our final seminar in the series, Anaclara Gerosa from the University of Glasgow tackled one of the most fundamental questions in education: how do children actually learn? Beyond the conventional methods, emerging research has been shedding light on a fascinating approach — the concept of grounded cognition. This theory suggests that children don’t merely passively absorb knowledge; they physically interact with it, quite literally ‘grasping’ concepts in the process.

    Grounded cognition, also known in variations as embodied and situated cognition, offers a new perspective on how we absorb and process information. At its core, this theory suggests that all cognitive processes, including language and thought, are rooted in the body’s dynamic interactions with the environment. This notion challenges the conventional view of learning as a purely cognitive activity and highlights the impact of action and simulation.

    A group of learners do physical computing in the primary school classroom.

    There is evidence from many studies in psychology and pedagogy that using hands-on activities can enhance comprehension and abstraction. For instance, finger counting has been found to be essential in understanding numerical systems and mathematical concepts. A recent study in this field has shown that children who are taught basic computing concepts with unplugged methods can grasp abstract ideas from as young as 3. There is therefore an urgent need to understand exactly how we could use grounded cognition methods to teach children computing — which is arguably one of the most abstract subjects in formal education.

    A recent study in this field has shown that children who are taught basic computing concepts with unplugged methods can grasp abstract ideas from as young as 3.

    Anaclara is part of a group of researchers at the University of Glasgow who are currently developing a new approach to structuring computing education. Their EIFFEL (Enacted Instrumented Formal Framework for Early Learning in Computing) model suggests a progression from enacted to formal activities.

    Following this model, in the early years of computing education, learners would primarily engage with activities that allow them to work with tangible 3D objects or manipulate intangible objects, for instance in Scratch. Increasingly, students will be able to perform actions in an instrumented or virtual environment which will require the knowledge of abstract symbols but will not yet require the knowledge of programming languages. Eventually, students will have developed the knowledge and skills to engage in fully formal environments, such as writing advanced code.

    A graph illustrating the EIFFEL model for early computing.

    In a recent literature review, Anaclara and her colleagues looked at existing research into using grounded cognition theory in computing education. Although several studies report the use of grounded approaches, for instance by using block-based programming, robots, toys, or construction kits, the focus is generally on looking at how concrete objects can be used in unplugged activities due to specific contexts, such as a limited availability of computing devices.

    The next steps in this area are looking at how activities that specifically follow the EIFFEL framework can enhance children’s learning. 

    You can watch Anaclara’s seminar here: 

    [youtube https://www.youtube.com/watch?v=BgjSKhqRHDU?feature=oembed&w=500&h=281]

    You can also access the presentation slides here.

    Research into grounded cognition activities in computer science is ongoing, but we encourage you to try incorporating more hands-on activities when teaching younger learners and observing the effects yourself. Here are a few ideas on how to get started:

    In 2024, we are exploring different ways to teach and learn programming, with and without AI tools. In our next seminar, on 13 February at 17:00 GMT, Majeed Kazemi from the University of Toronto will be joining us to discuss whether AI-powered code generators can help K–12 students learn to program in Python. All of our online seminars are free and open to everyone. Sign up and we’ll send you the link to join on the day.

    Website: LINK

  • UNO R4 Stars: Meet Brenda Mboya

    UNO R4 Stars: Meet Brenda Mboya

    Reading Time: 3 minutes

    The launch of the Arduino UNO R4 marks a huge leap forward for our community. For us, it’s also the chance to celebrate the people who bring our ecosystem to life with their bright ideas, radiant enthusiasm, and shining insight.

    That is how the UNO R4 Stars blog post series began: to highlight makers who have not only created amazing projects with Arduino, but who are giving back to the community by sharing as they go and helping others make anything they wish.

    We invite you to discover each profile, hoping you might find a North Star to navigate around an expanding galaxy or venture into completely new universes.

    Brenda Akoth Mboya, a trailblazing STEM educator and the co-founder of Jenga Labs Africa, embodies the spirit of Arduino-driven innovation in the realm of education and community empowerment. “My passion lies in inspiring African youth by using technology and leadership as tools,” she affirms – and we take pride in being the platform of choice for her vision. 

    Mboya’s journey with Arduino began with a revelatory moment, when she realized that technology could be both easy and fun, empowering even children under 13 to create meaningful and innovative projects of their own.

    Initiating Jenga Labs Africa in 2019, Mboya embarked on a groundbreaking venture to introduce 4th Industrial Revolution technologies to the next generation of African innovators and makers. Through collaborations with West African schools, the startup has seamlessly infused STEM activities into curricula and set up makerspaces available to all students.

    In addition, Mboya actively engages young minds in the technology space as part of the Arm Engage program and the Arduino user group in Kenya, organizing events that bring together electronics enthusiasts eager to dive into the vast potential of microcontrollers. A recent major achievement was the successful orchestration of a 12-hour hackathon in Kisumu, leveraging the capabilities of IoT to address critical agricultural challenges in western Kenya. The event showcased the exceptional talents of the local youth – something that Mboya holds dear: “Being a maker in 2023, especially in the African continent, means having the tools to create solutions tailored to African needs – thus moving away from being mere consumers of Western technologies, and towards becoming creators of solutions that address specific African use cases.”

    Indeed, the project that most deeply resonates with her vision at the moment is the one-year Leadership and Technology Program Jenga Labs is about to launch in Kibera, one of Nairobi’s largest slums. This initiative aims to empower the community by training them on Arduino technology, enabling them to create innovative solutions for the myriad problems and challenges they face every day. Mboya sees this as a transformative way to give back, fostering a sense of leadership and innovation that can spark positive change. In Mboya’s world, Arduino is not just a tool: it’s a catalyst for African youths to shape their destinies and contribute to the advancement of their communities.

    [youtube https://www.youtube.com/watch?v=10_TUOeLEEw?feature=oembed&w=500&h=281]

    We asked Mboya, “What’s your favorite part of the UNO R4?”

    • The LED matrix for quick visualization, allowing for instant satisfaction as well as clear help in debugging.
    • The USB-C connector: having this extremely popular option means “I can even use my phone’s cable to quickly do something on the Arduino.”
    • The top-notch speed and connectivity features compared to the UNO Rev3.

    Keep up with the updates on Mboya’s impact on the world by following her LinkedIn profile or visit Jenga Labs’ website!

    The post UNO R4 Stars: Meet Brenda Mboya appeared first on Arduino Blog.

    Website: LINK

  • Bullfrog synthesizer review

    Bullfrog synthesizer review

    Reading Time: 3 minutes

    The front of Bullfrog is a smorgasbord of dials with instant appeal to anybody who loves tweaking and the feel of hands-on analogue technology. There are three main sections: VCO, VCF, and VCA/Delay (corresponding to the three elements of sound: pitch, timbre, and amplitude). To the right of this are envelope generators and a Sample&Hold section, while at the top sits a blue cartridge socket. This is where the (included) voicecards slot in. Voicecards patch the internals of Bullfrog and quickly expand the sounds to create a variety of noises. The kit comes with three voicecards: an acid bassline, sampler-loopers (that can record and playback any sound), and a sequencer. There are also three blank voicecards that you can patch yourself by soldering the points together with wires.

    Around the back of Bullfrog we see input and output including CV and MIDI control inputs

    To the rear are CV (control voltage) and MIDI (Musical Instrument Digital Interface) ports, phone and audio out, plus power sockets and config buttons. There’s a speaker set into the device itself, or you can use headphones.

    Wired for sound

    The 77-page manual is where things come to life. It walks you through sound generation, pitch, waveforms, overtones and harmonics, plus virtually every aspect of sound synthesis. Far more than just how to use the equipment, it covers the science behind sound. If there’s any criticism, it’s that it gets a little stuck in the weeds before getting you to patch together the components and start making noises. But this is nitpicking on what is a wonderful educational resource. Girts Ozolins from Erica Synths has made a YouTube video that explains the Bullfrog project that also includes a patching guide.

    Taking things further

    Bullfrog is more fun with a CV (controlled voltage) keyboard, and the manual mentions an Arturia Keystep or a MIDI keyboard. These enable you to turn the synthesized sounds into notes. It’s also possible to use Raspberry Pi to expand on the music abilities and learning. Either by using Pico to create a CV generator or by attaching a MIDI HAT to Raspberry Pi (see this OSA tutorial). Both of which could add programming aspects to this sound generator.

    Girts Ozolins running a workshop in Hamburg

    Erica Synths is using Bullfrog as an educational tool, and to that end has been running workshops using an XL version of the kit that also features an oscilloscope. They are hoping to get it into educational environments around the world.

    Verdict

    10/10

    An innovative educational resource that takes you through sound creation and is a fully working subtractive synthesizer to boot. We loved testing this one out.

    Specs

    Features: Analogue design, 8-octave voltage controlled oscillator (VCO), voltage controlled amplifier (VCA), voltage controlled waveshapes with pulse width modulation (PWM, voltage controlled amplifier (VCA)

    I/O: DIN5 MIDI input, USB connector, CV (controlled voltage), phones out, audio out

    Voicecards: cid bassline, sampler-looper, sequencer, 3 × black voicecards are included

  • An integrated learning experience for young people

    An integrated learning experience for young people

    Reading Time: 3 minutes

    We’re currently trialling the full integration of our Code Editor in some of the projects on our Projects site, with the aim of providing a seamless experience for young learners. Our Projects site provides hundreds of free coding projects with step-by-step instructions for young people to use at school, in Code Clubs and CoderDojo clubs, and at home. When learners make text-based programming projects in our Python and web design project paths, they use our Code Editor to write and run code in a web browser.

    A young person at a computer in a classroom.

    Our new integrated learning experience allows young people to follow the project instructions and work in the Code Editor in a single window. By providing a simpler workspace, where learners do not need to switch between windows to read instructions and input code, we aim to reduce cognitive load and make it easier for young people to learn.

    How the new integrated experience works

    In the integrated project workspace, learners can access the project instructions, coding area, and output (where they can see what they have made) all in the same view. We have reorganised the project guides into short, easy-to-follow steps made up of simple instructions, including code snippets and modelled examples, for learners to work through to create their projects. The project guides feature fresh designs for different types of learning content, such as instruction steps, concept steps, code snippets, tips, and debugging help.

    A screenshot of the new Code Editor.

    We have also optimised this learning experience for young people using mobiles and tablets. On mobile devices, a new ‘Steps’ tab appears alongside the ‘Code’ and ‘Output’ tabs, enabling learners to easily navigate to the project guide and follow the steps to make their projects.

    Try out our new learning experience

    We are testing our new integrated learning experience as a beta version in three projects: 

    • Hello world (part of our ‘Introduction to Python’ project path) 
    • Target practice (part of our ‘Introduction to Python’ project path) 
    • Anime expressions (part of our ‘Introduction to web development’ project path) 

    In each of these projects, young people can choose to complete the original version of the project, with the project instructions and Code Editor in separate windows, or click the button on the project page to try out the new integrated learning experience.

    A screenshot of the new Code Editor.

    We’d love to hear how your young learners get on with this new integrated experience. Try it out in the three projects above and share your feedback with us here.

    Code Editor developments have been made possible with generous support from the Cisco Foundation.

    Website: LINK

  • A gaming platform tailored to those with special needs

    A gaming platform tailored to those with special needs

    Reading Time: 2 minutes

    As a society, we have decided to enact some measures to make our world more accessible to those with disabilities. Wheelchair ramps, for example, are often legal requirements for businesses in many countries. But we tend to drop the ball when it comes to things aren’t necessities. For instance, entertainment options are an afterthought much of the time. That’s why Alain Mauer developed this LED gaming platform for people with special needs.

    This device offers a lot of flexibility so that builders can tailor it to a specific individual’s own needs and tastes. Mauer designed it for his son, who is 17 years old and lives with non-verbal autism. Entertainment options intended for neurotypical people don’t engage the teen, but toys designed for children fail to hold his interest for long. This game, dubbed “Scott’s Arcade,” is simple to understand and interact with, while still offering a lot of replayability. It is also durable and able to withstand rough handling.

    Scott’s Arcade consists of a “screen” made up of individually addressable RGB LEDs and a faceplate with shape cutouts that act as masks for the LEDs. An Arduino Nano controls the lights and responds to presses of the large buttons beneath the screen. It can trigger sound effects through a DFRobot DFPlayer Mini MP3 player as well.

    [youtube https://www.youtube.com/watch?v=p7KceTKOyhQ?feature=oembed&w=500&h=281]

    Mauer programmed a few simple games for the device, such as a matching game that challenges the player to find the circle of the same color as the triangle. When they succeed, they’re rewarded with fanfare sound effects and flashing lights. Makers can also program their own games to suit the players’ abilities and interests. 

    The post A gaming platform tailored to those with special needs appeared first on Arduino Blog.

    Website: LINK