Make a Donkey Kong–style walk cycle | Wireframe issue 14
Effective animation gave Donkey Kong barrels of personality. Raspberry Pi’s own Rik Cross explains how to create a similar walk cycle.
Donkey Kong wasn’t the first game to feature an animated character who could walk and jump, but on its release in 1981, it certainly had more personality than the games that came before it. You only have to compare Donkey Kong to another Nintendo arcade game that came out just two years earlier — the half-forgotten top-down shooter Sheriff — to see how quickly both technology and pixel art moved on in that brief period. Although simple by modern standards, Donkey Kong’s hero Jumpman (later known as Mario) packed movement and personality into just a few frames of animation.
In this article, I’ll show you how to use Python and Pygame to create a character with a simple walk cycle animation like Jumpman’s in Donkey Kong. The code can, however, be adapted for any game object that requires animation, and even for multiple game object animations, as I’ll explain later.

Jumpman’s (aka Mario’s) walk cycle comprised just three frames of animation.
Firstly, we’ll need some images to animate. As this article is focused on the animation code and not the theory behind creating walk cycle images, I grabbed some suitable images created by Kenney Vleugels and available at opengameart.org.
Let’s start by animating the player with a simple walk cycle. The two images to be used in the animation are stored in an images list, and an animationindex variable keeps track of the index of the current image in the list to display. So, for a very simple animation with just two different frames, the images list will contain two different images:
images = [‘walkleft1’,‘walkleft2’
To achieve a looping animation, the animationindex is repeatedly incremented, and is reset to 0 once the end of the images list is reached. Displaying the current image can then be achieved by using the animationindex to reference and draw the appropriate image in the animation cycle:
self.image = self.images[self.state][self.animationindex]

A list of images along with an index is used to loop through an animation cycle.
The problem with the code described so far is that the animationindex is incremented once per frame, and so the walk cycle will happen way too quickly, and won’t look natural. To solve this problem, we need to tell the player to update its animation every few frames, rather than every frame. To achieve this, we need another couple of variables; I’ll use animationdelay to store the number of frames to skip between displayed images, and animationtimer to store the number of frames since the last image change.
Therefore, the code needed to animate the player becomes:
self.animationtimer += 1
if self.animationtimer >= self.animationdelay:
self.animationtimer = 0
self.animationindex += 1
if self.animationindex > len(self.images) - 1:
self.animationindex = 0
self.image = self.images[self.animationindex]
So we have a player that appears to be walking, but now the problem is that the player walks constantly, and always in the same direction! The rest of this article will show you how to solve these two related problems.
There are a few different ways to approach this problem, but the method I’ll use is to make use of game object states, and then have different animations for each state. This method is a little more complicated, but it’s very adaptable.
The first thing to do is to decide on what the player’s ‘states’ might be — stand, walkleft, and walkright will do as a start. Just as we did with our previous single animation, we can now define a list of images for each of the possible player’s states. Again, there are lots of ways of structuring this data, but I’ve opted for a Python dictionary linking states and image lists:
self.images = { ‘stand’ : [‘stand1’],
‘walkleft’ : [‘walkleft1’,‘walkleft2’],
‘walkright’ : [‘walkright1’,‘walkright2’]
}
The player’s state can then be stored, and the correct image obtained by using the value of state along with the animationindex:
self.image = self.images[self.state][self.animationindex]
The correct player state can then be set by getting the keyboard input, setting the player to walkleft if the left arrow key is pressed or walkright if the right arrow key is pressed. If neither key is pressed, the player can be set to a stand state; the image list for which contains a single image of the player facing the camera.
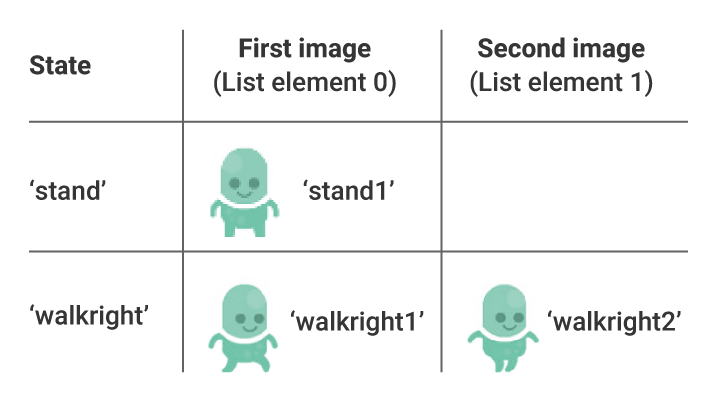
Animation cycles can be linked to player ‘states’.
For simplicity, a maximum of two images are used for each animation cycle; adding more images would create a smoother or more realistic animation.
Using the code above, it would also be possible to easily add additional states for, say, jumping or fighting enemies. You could even take things further by defining an Animation() object for each player state. This way, you could specify the speed and other properties (such as whether or not to loop) for each animation separately, giving you greater flexibility.

Here’s Rik’s animated walk cycle, coded in Python. To get it running on your system, you’ll first need to install Pygame Zero. And to download the full code, go here.
Get your copy of Wireframe issue 14
You can read more features like this one in Wireframe issue 14, available now at Tesco, WHSmith, and all good independent UK newsagents.
Or you can buy Wireframe directly from Raspberry Pi Press — delivery is available worldwide. And if you’d like a handy digital version of the magazine, you can also download issue 14 for free in PDF format.

Make sure to follow Wireframe on Twitter and Facebook for updates and exclusive offers and giveaways. Subscribe on the Wireframe website to save up to 49% compared to newsstand pricing!
Website: LINK