Kategorie: Technology

  • RAYMAN LEGENDS – DAS PREISGEKRÖ​NTE JUMP & RUN ZUM VERGÜNSTIG​TEN PREIS

    RAYMAN LEGENDS – DAS PREISGEKRÖ​NTE JUMP & RUN ZUM VERGÜNSTIG​TEN PREIS

    Reading Time: 2 minutes

    Nach Rayman Origins nehmen unsere Helden ein 100 Jahre anhaltendes Nickerchen und geben Albträumen die Möglichkeit, die Lichtung der Träume zu befallen. Als Rayman aus seinem mysteriösen Schlaf aufwacht, muss er sich mit seinen Freunden auf ein neues Abenteuer machen, um die Ordnung im Universum wiederherzustellen. Spieler reisen durch fünf verschiedene Welten und müssen legendäre Gegner besiegen, um die Kleinlinge vor den üblen Schurken zu retten. Rayman Legends bietet eine Vielfalt an unterschiedlichen Spielelementen, darunter traditionelle Plattformer-Action und neue Rhythmus-basierende Musik-Level.

    111111 11111 1111 111

    Rayman Legends wird weltweit von Fans für seine atemberaubende Optik und das innovative Gameplay gelobt. Das Spiel bleibt dem Fantasy-Charme seines Vorgängers treu und bietet clevere und unterhaltsame Spielmodi, neue Charaktere und Umgebungen sowie einen neuen Soundtrack. Das preisgekrönte Team von Designern und Komponisten ist auch wieder dabei und erschuf eine weiterentwickelte UbiArt-Engine, die multidimensionale Gameplay-Elemente und  verbesserte Lichteffekte einführt. Das Spiel-Rendering wurde ebenfalls verbessert und hebt die Grafik auf ein neues Niveau.


    Für mehr Informationen zu Rayman Legends besuchen Sie bitte:

    www.raymanlegends.com

    Official Source: UBISOFT AT Press Release

    https://www.youtube.com/watch?v=iEpWFBA7OfU

  • Samsung YOUM Smartwatch Boasts Display Like You’ve Never Seen Before

    Samsung YOUM Smartwatch Boasts Display Like You’ve Never Seen Before

    Reading Time: < 1 minute

    Most smartwatches have your standard LED / OLED / LCD displays, but the Samsung YOUM boasts a flexible AMOLED display that literally wraps around your wrist. It’s powered by a custom version of Google Android and features Google Now, which is always listening for the ‚Ok Google‘ command, similar to Google Glass, for real-time notifications.

    thdY4Ei

    According to OLED-Info.com: „YOUM panels are bendable – but it’s likely that the first products to use those displays will actually be rigid. The display can be „curved“ thought. A plastic based AMOLED will also be shatterproof, and also lighter and thinner compared to glass based OLEDs.“

    Official Source: http://www.yankodesign.com/2013/12/03/sammys-got-a-smartwatch-now/

    http://www.oled-info.com/samsung-youm

    http://www.youtube.com/watch?v=sJehexDPEsE

  • Google is Currently Building Real Robots, Skynet May be Coming

    Google is Currently Building Real Robots, Skynet May be Coming

    Reading Time: < 1 minute

    Google already has self-driving cars, so self-aware robots with artificial intelligence are the next logical step, right?

    google-skynet

    To kick things off, „Google hopes to create robots for use in industrial settings, like factories [and they’re already] experimenting with delivering packages in urban areas, building upon that existing technology is a no-brainer.“

    Dvice says that „the company has also bought several robotics and AI companies in both the U.S. and Japan and are looking to purchase more. Although, the company calls the robotics division a ‚moonshot,‘ the idea is to get robots on the market as soon as possible. If that’s the case, sign me up for the first robot maid. Who cares if it might become self-aware and bring on the apocalypse?“

    Official Source: http://www.youtube.com/watch?v=fBVDp5eBMhU

    http://www.dvice.com/2013-12-5/skynet-born-google-making-robots

  • Project Spark Beta startet ab sofort für Windows 8.1

    Project Spark Beta startet ab sofort für Windows 8.1

    Reading Time: 2 minutes

    Project Spark Beta startet ab sofort für Windows 8.1


    image005

    Ab sofort können alle Fans und Entwickler, die sich auf http://projectspark.com registriert haben, die Beta-Version auf Windows 8.1 ausprobieren.


    Seit der Ankündigung von Project Spark auf der E3 im Juli dieses Jahres, haben sich hunderttausende Fans für die geschlossene Beta-Version angemeldet, die ab sofort exklusiv für Windows 8.1 startet. Anfang 2014 können sich dann auch Xbox One Besitzer in Project Spark kreativ austoben – dem einzigen Next-Gen-Spiel, in dem Spieler zu Entwickler und Entwickler zu Spieler werden. Die Beta-Version läuft bis zum Start des fertigen Produkts im nächsten Jahr auf beiden Plattformen.

    Projekt Spark sorgt durch unzählige Formen der Individualisierung für endlose Abenteuer: Wie in einem riesigen Sandkasten können Spieler ihre eigenen Spiele, Filme und Geschichten erschaffen und diese dann mit Familie, Freunden oder gleich der ganzen Welt teilen.

    ·          Jedes neu erschaffene Abenteuer in Project Spark kreiert spannende Geschichten für alle anderen Spieler.

    ·          Im neuartigen Crossroads Modus sind der Fantasie keine Grenzen gesetzt und nie dagewesene Welten entstehen.

    ·          Welten können individuell geformt und gestaltet werden: Form, Farbe und Material bieten dabei Möglichkeiten ohne Ende.

    ·          Mit dem einfach zu bedienenden Brain System hauchen Spieler den eigenen Schöpfungen Leben ein.

    Project Spark ist die ideale Spielwiese für Spieler jedes Alters. Der kostenlose Download fördert und unterstützt die Kreativität der Spieler und bietet nahezu grenzenlose Möglichkeiten. In jeder Spielwelt fügen sich Lebewesen, Umwelt und Spielmechaniken zu einem einzigartigen Erlebnis zusammen. Und das Beste ist: Jeder kann ein Teil die ser gemeinsamen Fantasiewelt aller Spieler werden. Einfach unter http://projectspark.com für die Beta-Version anmelden und loslegen.

    Auf der Facebook Fan Seite von Projekt Sparks und dem Twitter Account @proj_spark gibt es alle neuen Updates über die Beta-Version. Wer einen tieferen Einblick in das Universum von Projekt Spark bekommen möchte und wissen will, wie und was die Spielergemeinschaft alles miteinander teilt, sollte unbedingt auf Twitch.tv streams gehen, um auch nichts zu verpassen.

    Official Source: XBOX AT Press Release

    http://projectspark.com/#public

    http://www.youtube.com/watch?v=HyzF_p061xE

  • Xbox Video Store ab sofort im Web verfügbar

    Xbox Video Store ab sofort im Web verfügbar

    Reading Time: < 1 minute

    Xbox Video ab sofort auch im Internet Browser verfügbar

    Update für Windows Phone folgt bald


    Ab sofort steht der Xbox Video Store mit tausenden spannenden Filmen online unter XboxVideo.com zur Verfügung. Damit können die neusten Blockbuster entweder ausgeliehen oder gleich gekauft werden. Somit ist Xbox Video der zweitgrößte Videodienst der Welt und ab sofort in 21 Märkten vefügbar.*

    xboxvideo


    Ob zuhause oder unterwegs, die eigene Filmkollektion ist durch die Cloud immer mit dabei. Alle Filme, die über Xbox Video gekauft werden, können jederzeit auf XboxVideo.com, Xbox One, Xbox 360 und allen Windows 8.1 PC und Tablets abgerufen werden.


    Mehr Updates zu Xbox Video folgen bald, genauso wie ein spannendes Update für Windows Phone.


    *Xbox Video im Web ist verfügbar in Australien, Belgien, Brasilien, Dänemark, Deutschland, Finnland, Frankreich, Irland, Italien, Japan, Kanada, Mexico, Neuseeland, Niederlande, Norwegen, Österreich, Spanien, Schweden, Schweiz, Vereinigtes Königreich und USA.

    Official Source: XBOX AT Press Release

    https://video.xbox.com/

  • Kano: A computer anyone can make

    Kano: A computer anyone can make

    Reading Time: < 1 minute

    A computer and coding kit for all ages, all over the world. Simple as Lego, powered by Pi. Make games, learn code, create the future.

    Update, 5,000 BackersThank you. We’re humbled, amazed, and committed to getting you your kits on schedule. To new potential backers, Kano kits are still available –pledge $119 to get one (with free worldwide delivery!).

    What’s Kano?

    It’s a computer you make yourself. It’s simple, fun, and for everyone. And we need your help to make it happen.

    What can I do with it?

    Build…

    • A computer, powered by Raspberry Pi
    • Games like Pong, Snake
    • Music and sounds
    • HD video
    • speaker
    • Towers of dynamite (…in Minecraft)
    • wireless server
    • A custom case, with stickers, decals, or any printed design
    • Most Debian Linux packages
    • Pretty much anything else, because Kano is open source

    Who’s it for?

    Kano is for anyone who wants to start creating with technology – not just consuming it.

    It’s a simple, fun, useful toolkit that you can use to start taking control of the world around you.

  • Building your Custom LEGO Raspberry Pi LEGO Case

    Building your Custom LEGO Raspberry Pi LEGO Case

    Reading Time: 3 minutes

    From today’s HOW TO BUILD A CUSTOM RASPBERRY PI MINI PC to another challenge 😉

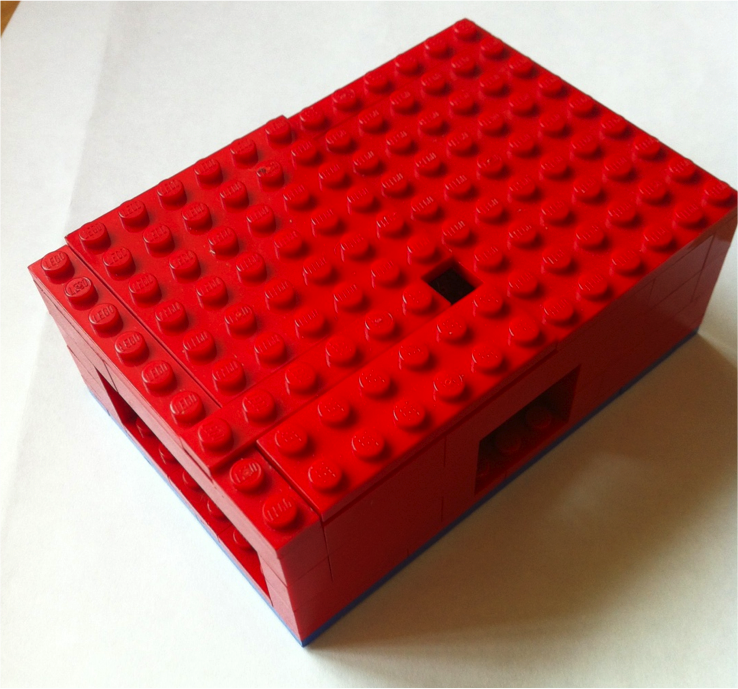
    Little girl named ‚Biz‘ (age 12) from UK managed to make this Case first and also did a Tutorial for everyone. Official Raspberry Pi Site posted it already earlier last year.

    cazzuniform


    Here come the instructions, from official Raspberry Pi Website:

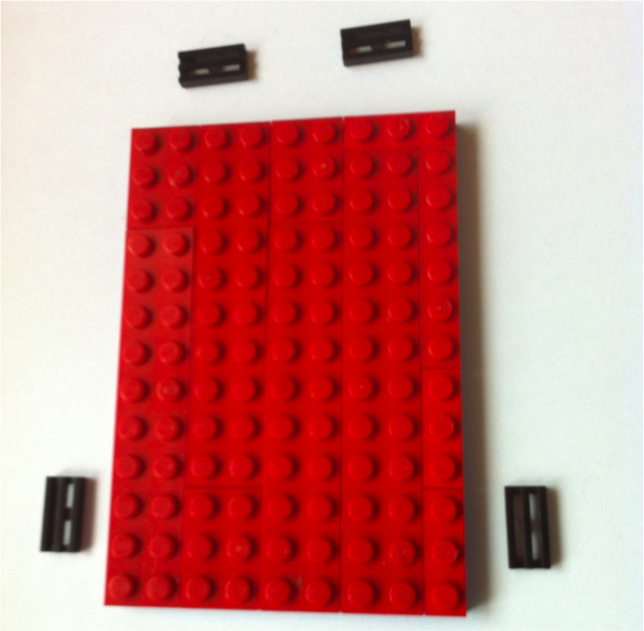
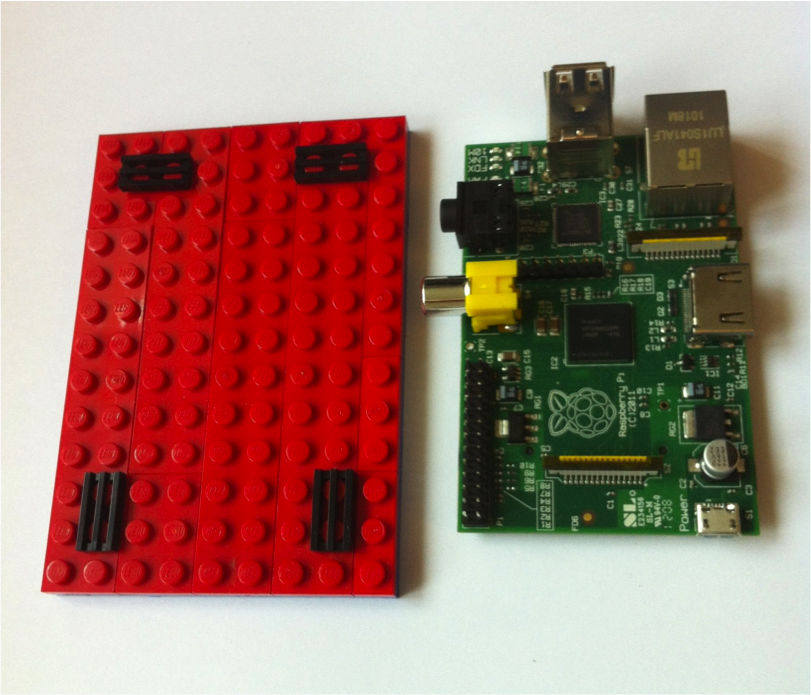
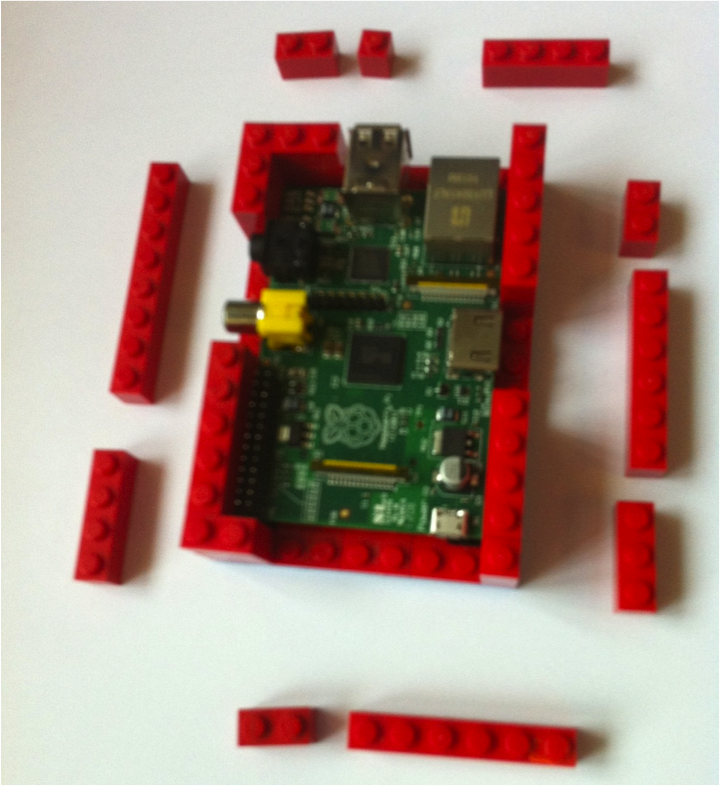
    First make a two layer base – we had to use blue and red because that’s what we had – it is 13 splots by 9 (awkward!)

    Now we add some flat bits to hold the Pi so the solder bits don’t get scraped when we plug things in and out.

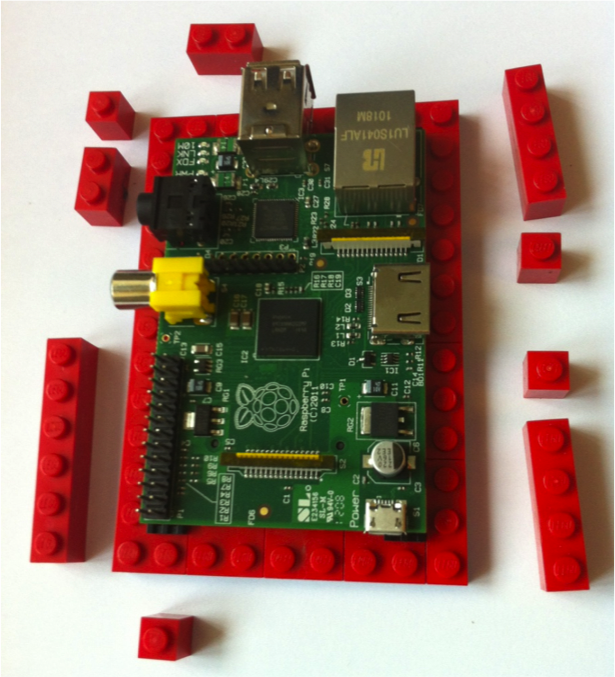
    You can load the RasPi in now or wait until the end!

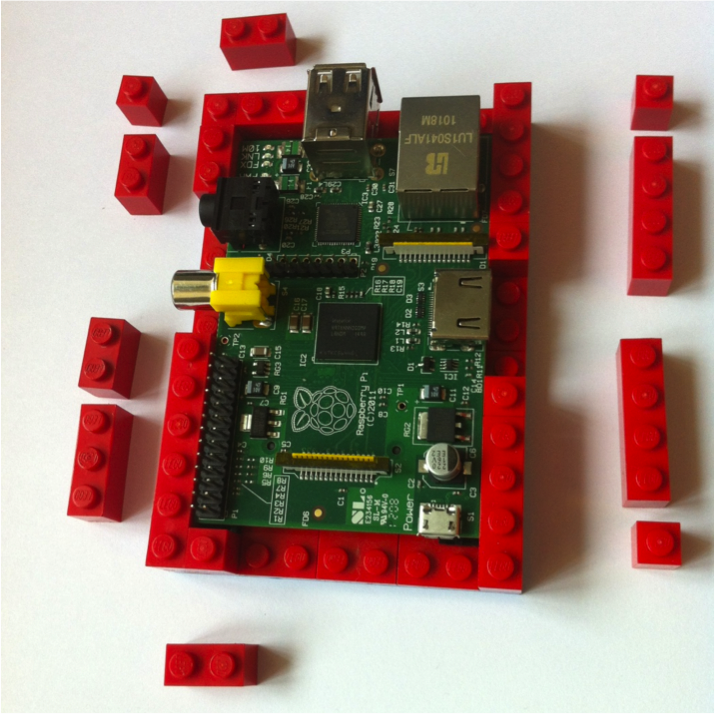
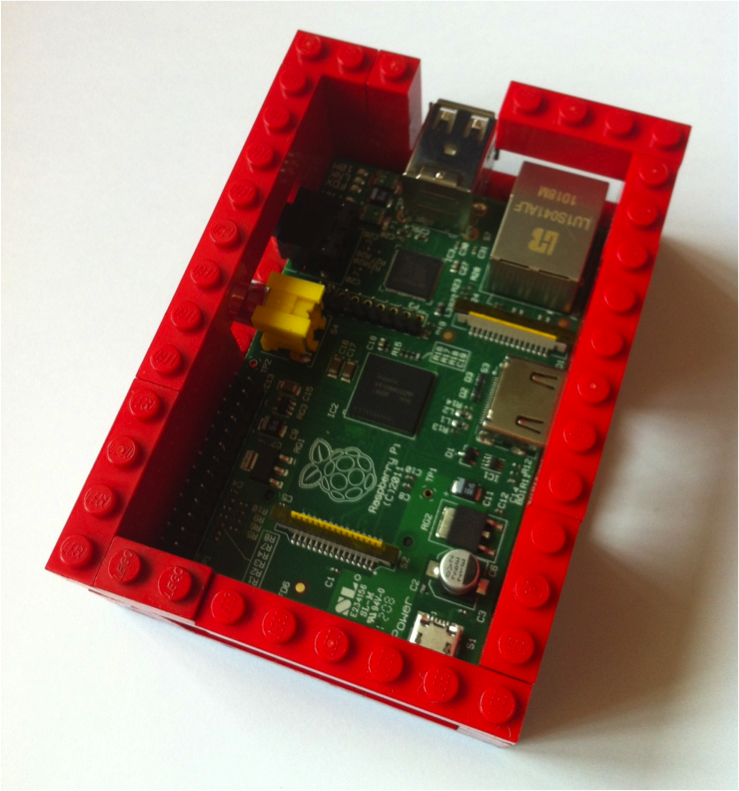
    Now build the walls – one layer at a time! Again we just used what bits we had.

    Going up!

    Oops! A bit fuzzy!

    Tah dah!

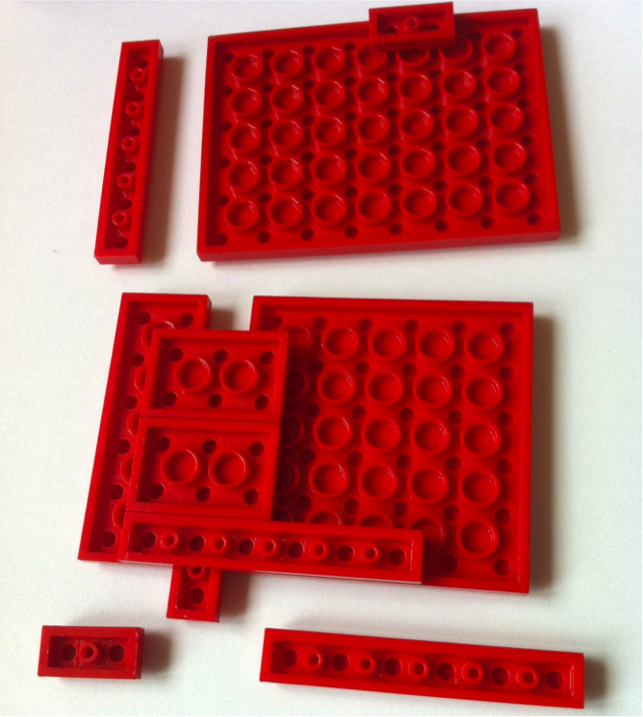
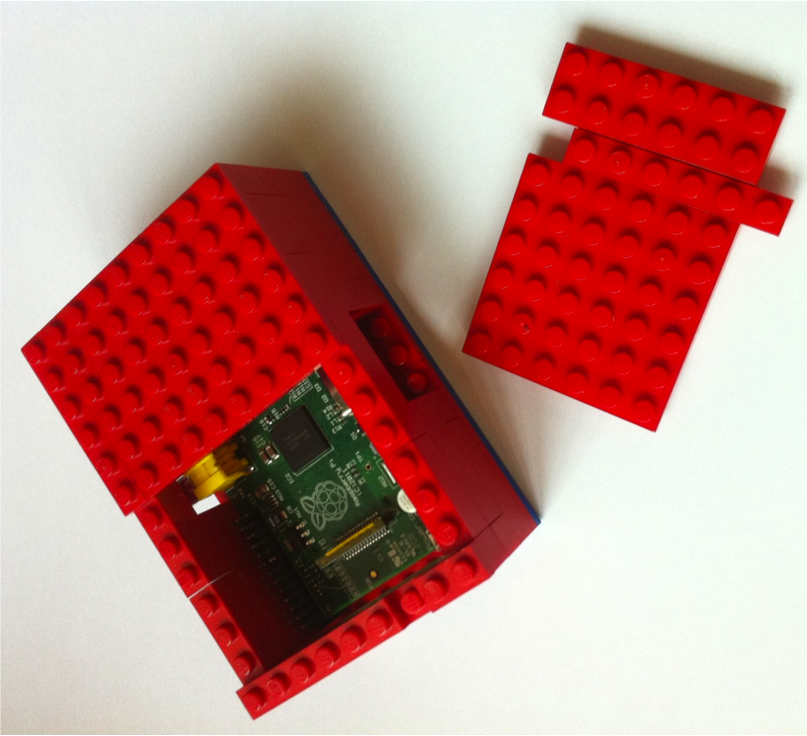
    Now we need a lid – again the lego sizes are a bit inconvenient and so we have a notch in the bottom edge and a corresponding hole that we were short of bits to fill.

    Actually that turned out to be quite handy as we have an easy detachable half lid that gives access to pinouts and test points.

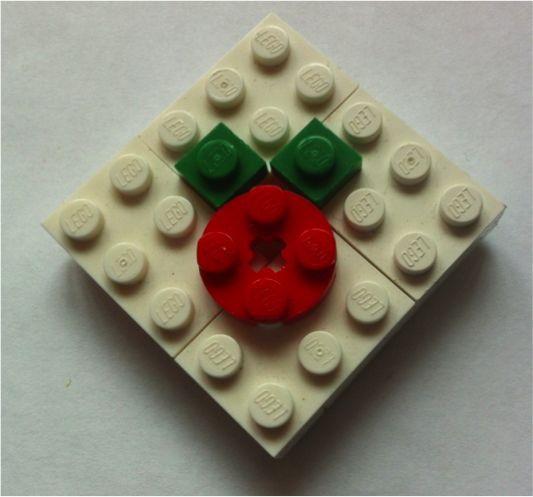
    Now for the cute bit…

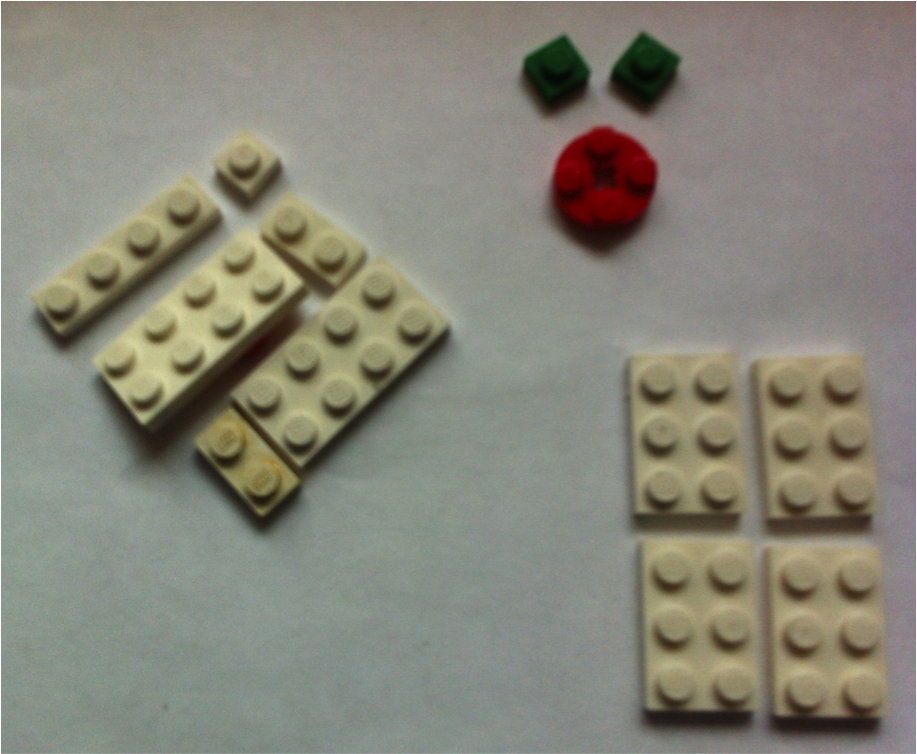
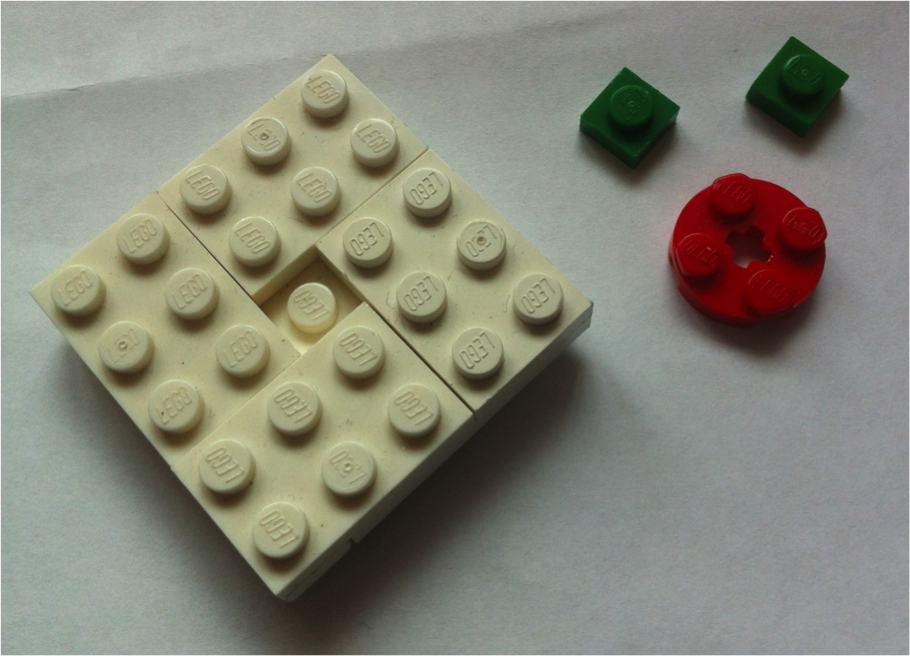
    Here are the bits…

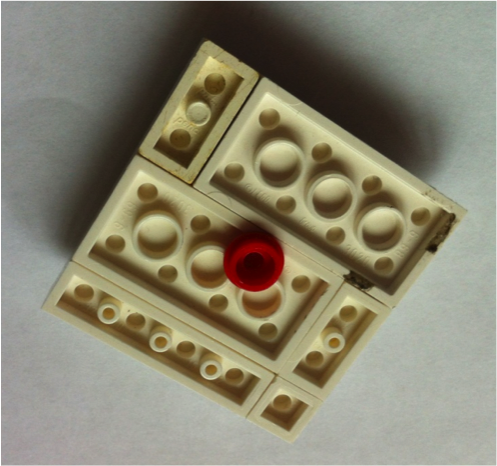
    Had to make it double thickness and again ran out of a splot – but that doesn’t show!

    And finally a round mini-splot to attach to the case (and hide the hole in the roof).

    Cute!

    And that’s Biz’s RasPi case!

    There are so many different way’s to Build the Case, there is not just 1 right way 😉

    Here are some other examples:

    FCI5AKVH6S49H5L.LARGE 7157136321_de71e2fe0b


    http://www.instructables.com/id/Lego-Raspberry-Pi-Case/

    http://org.orgraphone.org/2012/06/building-a-raspberry-pi-case-out-of-lego/

    Official Raspberry Pi Case from Biz to Buy: http://tdb.brickowl.com/store/the-daily-brick-case-for-raspberry-pi-set

    BONUS INSTRUCTIONS:

    And for all our Users we got some nice Bonus 😉 , we found on thedailybrick.co.uk:

    DIGITAL DESIGNER INTERACTIVE INSTRUCTIONS: 

    Step30

    http://www.thedailybrick.co.uk/instructions/Building%20Instructions%20%5BRaspberry%20Pi%202%5D.html#


    Official Source: http://www.raspberrypi.org/archives/1354

    http://www.thedailybrick.co.uk/instructions/Building%20Instructions%20%5BRaspberry%20Pi%202%5D.html#

  • AMAZON announces: Amazon ‚Prime Air‘

    AMAZON announces: Amazon ‚Prime Air‘

    Reading Time: 2 minutes

    We’re excited to share Prime Air — something the team has been working on in our next generation R&D lab.

    The goal of this new delivery system is to get packages into customers‘ hands in 30 minutes or less using unmanned aerial vehicles.

    Putting Prime Air into commercial use will take some number of years as we advance the technology and wait for the necessary FAA rules and regulations.

    prime_foil

    Frequently Asked Questions

    Q: Is this science fiction or is this real?

    A: It looks like science fiction, but it’s real. From a technology point of view, we’ll be ready to enter commercial operations as soon as the necessary regulations are in place. The Federal Aviation Administration (FAA) is actively working on rules for unmanned aerial vehicles.

    Q: One day we’ll see a fleet of Prime Air vehicles in the sky?

    A: Yes. One day, Prime Air vehicles will be as normal as seeing mail trucks on the road today.

    Q: When will I be able to choose Prime Air as a delivery option?

    A: We hope the FAA’s rules will be in place as early as sometime in 2015. We will be ready at that time.

    Q: How are you going to ensure public safety?

    A: The FAA is actively working on rules and an approach for unmanned aerial vehicles that will prioritize public safety. Safety will be our top priority, and our vehicles will be built with multiple redundancies and designed to commercial aviation standards.

    Images:


    Official Source: http://www.amazon.com/b?ref_=tsm_1_yt_s_amzn_mx3eqp&amp;node=8037720011&tag=kotakuamzn-20&ascsubtag=[referrer|www.facebook.com[type|link[postId|1474596274[authorId|5724032494550896668&node=8037720011

    https://www.youtube.com/watch?v=98BIu9dpwHU


  • Steam surpassed 7 million concurrent users

    Steam surpassed 7 million concurrent users

    Reading Time: < 1 minute

    Steam has established a new record of concurrent users using the service at the same time this last Sunday when 7.190.578 players were connected to Valve’s service. The previous record, established in January was 6.6 million users, so this is an increase of more than 500.000 players.

    icon_xl

    Valve’s service is doing pretty well and it is expected to do even better when the so-called ‚Steam Machines‘ will release the next year. These machines could directly rivalize with traditional consoles eating a portion of their market.

    Official Source: http://store.steampowered.com/stats/content/

    http://store.steampowered.com/stats

  • This is what you need to build a solid Raspberry PI Mini PC

    This is what you need to build a solid Raspberry PI Mini PC

    Reading Time: 3 minutes

    So let’s beginn, we choose our Austrian Resellers, but it’s more about the configuration:

    -Raspberry Pi Typ B 512MB: 27,40€

    http://raspberrypi.rsdelivers.com/product/raspberry-pi/raspberry-pi-type-b/raspberry-pi-type-b-single-board-computer-512mb/7568308.aspx

    -Samsung 8GB MicroSD,Adapter,Rasp Pi OS Pre-Installed: € 10,48

    R7796770-01

    http://raspberrypi.rsdelivers.com/product/rs/8gb-microsd-with-adapter-and-raspberry-pi-os-installed/7796770.aspx

    -Edimax Wireless Nano USB-Adapter:  € 11,00

    http://raspberrypi.rsdelivers.com/product/edimax/ew-7811un/edimax-wireless-nano-usb-adapter/7603621.aspx

    -Micro USB Power Supply Adapter,5V,2A: € 7,01

    http://raspberrypi.rsdelivers.com/product/rs/hnp10i-microusb/micro-usb-multi-head-power-supply-for-raspberry-pi/7653311.aspx

    -OPTIONAL FROM RS / Camera Module for Raspberry Pi: € 20,36

    http://raspberrypi.rsdelivers.com/product/raspberry-pi/camera-module/raspberry-pi-hd-video-camera-module/7757731.aspx

    -Cyntech Pink Raspberry Pi Case: € 7,17

    https://www.modmypi.com/raspberry-pi-cases/cyntech-pink-raspberry-pi-case

    -Cyntech Case SD Card Cover Pink: € 1,19

    https://www.modmypi.com/raspberry-pi-cases/cyntech-pink-raspberry-pi-sd-card-cover

    -Raspberry Pi Heat Sink Kit: € 6,01

    https://www.modmypi.com/raspberry-pi-accessories/raspberry-pi-heat-sink-kit

    -USB Sound Adapter for the Raspberry Pi: € 4,81

    https://www.modmypi.com/raspberry-pi-accessories/usb-sound-adapter

    -DELOCK Bluetooth USB 2.0 Micro Cl2 10m V3.0 EDR: € 11,64

    http://www.amazon.de/dp/B003Y3RZBM/ref=asc_df_B003Y3RZBM16150457?smid=A3JWKAKR8XB7XF&tag=geizhals1-21&linkCode=asn&creative=22494&creativeASIN=B003Y3RZBM

    -Logitech K400 Tastatur schnurlos schwarz mit Touchpad (deutsches Tastaturlayout, QWERTZ): 28,69

    http://www.amazon.de/dp/B005G16098/ref=asc_df_B005G1609816142541?smid=A3JWKAKR8XB7XF&tag=geizhals1-21&linkCode=asn&creative=22494&creativeASIN=B005G16098

    -Hub 7-Port mobil Belkin USB 2.0: € 19

    http://at.rs-online.com/web/p/usb-hubs/7533428/?origin=PSF_437613|acc


    Optional, external Cases for old Hard Drives:

    -LC-Power Festplattengehäuse für (6,3 cm (2,5 Zoll), SATA USB2: € 10,70

    http://www.amazon.de/dp/B001KN0ARY/ref=asc_df_B001KN0ARY16150550?smid=A3JWKAKR8XB7XF&tag=geizhals1-21&linkCode=asn&creative=22494&creativeASIN=B001KN0ARY

    -CONCEPTRONIC CHD3DUW 3.5Z SATA USB 2.0 6.4 cm externes HDD Gehaeuse extrem leicht robust screwless Design ohne Luefter weiss: € 18,59

    http://www.amazon.de/dp/B003H754RM/ref=asc_df_B003H754RM16138404?smid=A3JWKAKR8XB7XF&tag=geizhals1-21&linkCode=asn&creative=22494&creativeASIN=B003H754RM


    -SunshineTronic High Speed HDMI – Verlängerungskabel | FullHD | 3D | vollbeschaltet | Audio Rückkanal | Neueste Version | 20cm: € 5,96

    http://www.amazon.de/SunshineTronic-High-Speed-HDMI-Verl%C3%A4ngerungskabel/dp/B00CXXMFGE/ref=sr_1_14?s=ce-de&ie=UTF8&qid=1385953699&sr=1-14&keywords=hdmi+verl%C3%A4ngerung


    Main Computer without Optional Hardware:  134,40 All READY to hock up on your Monitor only and your Network Cable and you are good to go!

    5-7 Days later! Now you got all your Stuff ready, and hocked everything up:

    Screen-Shot-2012-12-24-at-10.59.55-1024x722


    http://www.raspberrypi.org/wp-content/uploads/2012/04/quick-start-guide-v2_1.pdf

    What can we do with our Raspberry Mini PC now?!

    Install other OS than the Main Raspbian OS.

    Install Fedora Remix Or Pidora

    Install XBMC Media Software

    raspbmc

    http://www.raspbmc.com/download/

    Many people say OPENELEC is way better, to me it looks a litl more neat, so maybe you wanna give it a try:

    OpenELEC-and-Raspberry-Pi-logo

    http://openelec.tv/get-openelec/download/viewcategory/10-raspberry-pi-builds

    All other OS Images: http://www.raspberrypi.org/downloads

    How to Remotely Accessing the Raspberry Pi via RDP – GUI Mode!

    Remotely Accessing the Raspberry Pi via RDP – GUI Mode
    SSH enables access of the Raspberry Pi command line. However, if you want to boot to the GUI (startx) you will need a different program – RD Connection Manager – a remote desktop manager!
    RD will allow you to connect remotely to your Raspberry Pi from another computer via LAN (local area network). The Raspberry Pi can then be run ‚headless‘, without a keyboard, mouse or monitor connected to it through your laptop or PC. The Raspberry Pi will of course need to be connected to your LAN via network cable or WiFi.
    Note that this is not merely a terminal login such as you get with an SSH or serial console connection. This will provide the full GUI user interface session. The GUI will start when connecting remotely, even if the Raspberry Pi is not configured with the auto startx. The remote session(s) will be independent and in addition to any session that may be already running on the Raspberry Pi.


    We hope you enjoyed our First small Tutorial about this new small ARM Chip based Mini Computer 🙂 Thank you for reading.

    Official Sources: http://www.raspberrypi.org/downloads

    http://www.youtube.com/watch?v=4WdiNQEkiFc

    http://www.youtube.com/watch?v=TTofiZ6SkHo

    http://www.youtube.com/watch?v=Z1eP42ELf3I

    http://comoyo.github.io/blog/2012/07/23/playing-with-the-raspberry-pi/

    http://raspberrypi.rsdelivers.com/

  • 10 Incredible Pictures of the All-New Curved Apple TV Display

    10 Incredible Pictures of the All-New Curved Apple TV Display

    Reading Time: < 1 minute

    Digital artist extraordinaire Martin Hajek is back at it again, and this time, he brings up some incredible renders of what he thinks the upcoming Apple TV display will look like. As you can tell, it’s pretty much a larger-sized iMac with a curved AMOLED display that should provide for some interesting viewing.

    Wa02USH


    Official Source: http://www.martinhajek.com/portfolio/itv-or-appletv/


  • Xbox One Debug Mode Unlock Method

    Xbox One Debug Mode Unlock Method

    Reading Time: < 1 minute

    This method may not fully convert a retail console into a dev kit but it could possibly help some small developers that can not afford to purchase a full dev unit to get started on making some ideas started.

    Here is the translated text from Logic-Sunrise:

    Xbox One does not stop talking to her. After an announcement of a first nand dump and a software to change the hard drive of the console, this is a person wishing to remain unknown sharing this information: the method of activation Debug mode is now known! For the average user, this feature does you no good. But for devs, this can open a lot of doors. For those wishing to see the debug mode by themselves simply go to System One Xbox and press the four gates of the controller parameter (LB – RB – LT – RT) and „parameter Developer“ menu will appear

    Official Source: http://www.logic-sunrise.com/news-678604-le-mode-debug-de-la-xbox-one-en-images.html

  • GTA IV in REAL – Oculus Rift Cyberith Official Long Version

    GTA IV in REAL – Oculus Rift Cyberith Official Long Version

    Reading Time: < 1 minute

    We got news from our Friends 😉

    Have fun watching everyone, and please share, the first Video got almost over a 500.000 Views in only 2 Days! This is crazy ^^

    Quote from Cyberith:

    Hello VR Fanatics!

    In this video, you see me in GTA 4 VR with the Virtualizer, the Oculus Rift and a Wii mote. I totally forgot reality and my mind was in Liberty City.

    I also show the sitting function of the Virtualizer in this video. You can adjust it to your body height and use it while driving a car or a tank, sitting in a helicopter or other vehicles. You can also use it to rest a while when you are exhausted of escaping from the cops hehe.

    There is a lot going on at Cyberith… subscribe and stay tuned.

    This is the long version video with some suprises inside!

    Special Thanks to Alexander Antic and his team from www.blogdot.tv
    also Thanks to INITS www.inits.at

    New Videos will follow, on list: Battlefield 3, Battlefield 4, Left 4 Dead 2, COD Ghost, Skyrim, Crysis 2, Crysis 3, Bad Company 2, Slenderman, Second Life,………………….. BE PREPARED!!!

    www.CYBERITH.com (New Homepage coming soon)
    Because Reality Is Not Enough….

    BONUS GALLERY:

    Pics by: Matthias Jurkovicts, Markus Haas, Andreas Winter, Adrian Covalschi and Claudia Pasteiner

    Official Source: https://www.youtube.com/watch?v=j44snZJDpUs

    Niko Bellic by pixeloo on deviantART

    http://fc09.deviantart.net/fs25/f/2008/169/1/0/Niko_Bellic_by_pixeloo.jpg

  • 10 Famous Logos That Have A Hidden Meaning

    10 Famous Logos That Have A Hidden Meaning

    Reading Time: 3 minutes

    Nowadays there are so many companies with instantly recognizable logos, but few people actually know the meaning behind these corporate symbols. Here are 10 modern day examples of company logos and the meanings behind them:

    1. Amazon

    amazon logo meaning Top 10 Famous Logos, Which Have A Hidden Meaning

    The arrow which looks like a smiling face in Amazon’s logo has another meaning behind it. It is a representation of the wide range of items available for retail by Amazon, from A to Z.

    2. Apple

    apple logo meaning Top 10 Famous Logos, Which Have A Hidden Meaning

    The Apple logo is derived from the story of Adam and Eve in the Bible. The bitten apple represents the fruit from the “Tree of Knowledge”.

    3. IBM

    ibm logo meaning Top 10 Famous Logos, Which Have A Hidden Meaning

    IBM’s logo has a hidden message for the whole world hidden in the Big Blue logo that represents it’s company. The white lines passing through give the appearance of the equal sign in the lower right corner, representing equality.

    4. Mobil

    mobil logo meaning1 Top 10 Famous Logos, Which Have A Hidden Meaning

    Mobil’s logo itself does not represent anything, but the colors do. The red represents strength while the blue in the logo represents faithfulness and security.

    5. FedEx

    fedex logo meaning Top 10 Famous Logos, Which Have A Hidden Meaning

    The FedEx logo looks simple and it’s hard to see what could be hidden within it. But looking closely at the space between the ‘E’ and ‘X’ in the orange Ex shows an arrow pointing forward. This arrow represents moving forward toward to the future.

    6. Audi

    audi logo meaning Top 10 Famous Logos, Which Have A Hidden Meaning

    Many have wondered what the four circles in this automaker’s logo mean. Well the four circles represent the 4 companies that were a part of the Auto-Union Consortium in 1932, namely, DKW, Horch, Wanderer and Audi.

    7. BMW

    bmw logo meaning Top 10 Famous Logos, Which Have A Hidden Meaning

    BMW’s logo is a tribute to the company’s history in aviation. The logo shows a propeller in motion with the blue part representing the sky. This is due to the company’s role of building aircraft engines for the German military during World War II.

    8. Mercedes-Benz

    mecerdes benz logo meaning Top 10 Famous Logos, Which Have A Hidden Meaning

    Mercedes’ tri-star represents the companies dominance over land, sea and air.

    9. Toyota

    toyota logo meaning Top 10 Famous Logos, Which Have A Hidden Meaning

    There are three ellipses visible in the company’s logo. Each ellipse represents the heart of the customer, the heart of the product and the heart of technological progress.

    10. Volkswagen

    volkswagen logo meaning Top 10 Famous Logos, Which Have A Hidden Meaning

    The Volkswagen logo simply shows the letter of the company’s initials. The word “Volks” is German for people, while “Wagen” is German for car.


    Official Source: http://wonderfulengineering.com/10-famous-logos-that-have-a-hidden-meaning/?utm_source=zergnet.com&utm_medium=referral&utm_campaign=zergnet_108172

    http://www.zergnet.com/news/108172/10-famous-logos-that-have-a-hidden-meaning

  • Sony: PS4 lifecycle may be shorter than PS3

    Sony: PS4 lifecycle may be shorter than PS3

    Reading Time: < 1 minute

    n an interview with TechRadarSony UK boss Fergal Gara hinted at a shorter PS4 lifecycle than the PS3.

    According to him, this is probably „a sign of the times“ and „how much has changed in seven years“:

    „I think there’s reasons to believe that the next cycle might be shorter in markets such as the UK,“ he said.

    „It’s probably a sign of the times and how much has changed in seven years, but I think the willingness and the appetite to pick up new technology fast has probably changed quite a bit.“

    However, he added that it was too early to tell what the future will hold for the console:

    „We’re going to have a much better feel for it once we’re a good few months in and we can see how the dynamics are emerging.“

    But although initial uptake of the PS4 has been fierce, new contenders such on the horizon such as Valve promise to make this a very different generation to the last.

    „What we do know is that the uptake [of the PS4] is going to be very sharp,“ said Gara. „Does that mean this is going to be a much bigger cycle? Maybe. Or it might mean that it’s just a bit more compressed into the first few years, that the latter years are a little softer.“

    The PS4 launches this weekend in Europe, Australia and Latin America.

    Official Source: http://www.techradar.com/news/gaming/consoles/sony-hints-that-the-ps4-lifecycle-may-be-shorter-than-ps3-1203461

    http://www.neogaf.com/forum/showthread.php?t=724489

  • Video Shows Why Neptune Pine Might be the Best Smart Watch Yet

    Video Shows Why Neptune Pine Might be the Best Smart Watch Yet

    Reading Time: < 1 minute

    After a year of development, the rugged Neptune Pine has finally been unveiled, and it works without a smartphone. Making and receiving calls, typing out text messages, or even just listening to music and taking pictures, is a breeze, functioning exactly like a smartphone. Simply pop in a micro SIM card and you’re ready for the road.

    neptune-pine

    Here are a few technical specifications: „At its core, the Pine is an Android 4.1.2 Jelly Bean device (Android 4.4 KitKat will be supported after launch). It has a 2.4-inch (320 x 240 resolution) touchscreen, 1.2GHz Qualcomm Cortex-A5 dual-core processor, 3G HSPA+ connectivity (no 4G LTE here), 16GB or 32GB of internal storage, GPS, Bluetooth 4.0, Wi-Fi, gyroscope and accelerometer, and two cameras (a 5-megapixel rear camera on the back and a VGA-resolution front camera; both with LED flash).“

    Official Source: http://www.youtube.com/watch?v=bZGTJw4EKfE

    http://www.dvice.com/2013-11-27/neptune-pine-now-smartwatch-done-right

  • 3D Printed Batteries Will Soon Be a Click Away, Might Change the Tech World

    3D Printed Batteries Will Soon Be a Click Away, Might Change the Tech World

    Reading Time: < 1 minute

    We have seen the future of batteries, and they’ll be 3D-printed from the comfort of your own home. That’s right, Harvard researcher Jennifer Lewis is working on inks that can solidify into electronic components. Technically speaking, lithium titanium oxide, deionized water, and ethylene glycol are mixed together with ceramic balls, then the whole thing is spun for 24 hours.“ Dvice says that „the balls break up particle clumps and allow the mixture to blend evenly; after that, the mixture is put into a custom-made syringe, which, guided by the 3D printer, can create incredibly intricate patterns of the mixture. Once outside of the syringe, it again solidifies. Slowly but surely, this solidified ‚ink‘ builds a battery’s cathode.“

    3d-printed-batteries

    Here’s a bit more information on these batteries: „Using one syringe, a 3D printer can make a battery in a number of minutes. Most printers could conceivably use hundreds of these nozzles. You do the math. It’s fairly amazing. At present, Lewis’s group has eight patents for the inks and hopes to commercialize the technology in the next few years.“

    Official Source: http://www.dvice.com/2013-11-26/3d-printed-batteries-could-change-3d-printing-completel2

    http://www.youtube.com/watch?v=olQn2iklQmw

  • Crazy Video Shows World’s First 18-Rotor Electric Helicopter Taking Flight

    Crazy Video Shows World’s First 18-Rotor Electric Helicopter Taking Flight

    Reading Time: < 1 minute

    Here’s a first look at the E-volo Volocopter VC200, the world’s first 18-rotor electric helicopter. The two-seater boasts 18 zero-emission motors powered by six battery packs, and a frame that’s made from carbon fiber to keep the aircraft lightweight. That’s not all, it maneuvers by using its multiple propellers and changing the thrust of its motors, similar to that of a quadcopter. (In case you’re looking around for the top quadcopters under 100 dollars – there’s more details here.)

    18-rotor-helicopter

    According to Dvice, a prototype of the VC200 recently „took to the skies for its first series of test flights. Not only was the team impressed with the smooth flight experience of the aircraft, but they were also surprised by how quiet the Volocopter ran. The VC200 took a total of nine flights, including one that lasted nearly 22 meters.“

    Official Source: http://www.dvice.com/2013-11-26/18-rotor-electric-helicopter-takes-skies

    http://www.youtube.com/watch?v=tNulEa8LTHI

  • Sony lists common PS4 error codes

    Sony lists common PS4 error codes

    Reading Time: < 1 minute

    Sony has published an official list of PlayStation 4 error codes, along with suggested ways of overcoming them.

    It’s short, as only covers some of the „common errors“ you could experience on the new console.

    icon_xl

    Here’s the full list:

    CE-33179-3: Application is not found. Retry after the installation is completed. Installation of Add-Ons fails until the installation of application installation is complete.

    • CE-33991-5: Get the status of the non HTTP_GET_200 in Internet connection. Retry Internet Connection test.

    • CE-34788-0: This update file cannot be used. Connect a USB storage device that contains an update file for reinstallation for version 1.50 or later. Delete the Update file from the USB storage device, and replace it with the update for reinstallation found from this page.

    • CE-34878-0: Application has crashed. Restart the application in the content area.

    • NW-31484-0: DNS server not specified. Restart the PS4 system.

    • NW-31367-0: Could not open wireless device. Restart the PS4 system.

    • NW-31453-6: Delayed server response. Try Internet connection test at [Settings] > [Network] > [Test Internet Connection]. Check that the internet status is valid.

    • NW-31194-8: Connection was reset. Restart the PS4 system.

    • E-8200002E: The credit card information is not valid. Remove credit card from account, and then re-enter the credit card information. Refer to Add / Remove Billing Information.


    Official Source: http://www.computerandvideogames.com/440239/ps4-error-codes-and-suggested-fixes-listed/

    https://support.us.playstation.com/app/answers/detail/a_id/5111

  • Xbox One costs $90 more than PS4 to make

    Xbox One costs $90 more than PS4 to make

    Reading Time: 2 minutes

    According to a teardown by research firm IHS (via AllThingsD), the combined cost of parts and manufacturing of everything that comes with the Xbox One (inc. the console, the Kinect and the controller) comes out to $471, or about $90 more than the cost of Sony’s PS4 ($381).

    At least $75 of that cost is derived from Kinect 2.0 alone. Here’s the info:

    At least $75 of the $471 comes from the Kinect camera included with every system, the IHS report concluded. It features chips from Samsung and STMicroelectronics as well as a mysterious chip used to emit infrared light.

    IHS was unable to determine the maker of this chip.

    The single most expensive item, however, is the Xbox One’s $110 AMD chip, which is around $10 more than the PS4’s AMD chip. „They’re both very powerful chips,“ IHS analyst Andrew Rassweiler said. „You might call them a gaming console on a chip.“

    The Xbox One’s DDR3 memory chips stem from SK Hynix and came out to about $60, around $28 less than the cost of the PS4’s higher-end GDDR5 memory chips. The system’s all-new controller, featuring Wi-Fi and Bluetooth components from Marvell Technology, costs about $15 and sells for $60.

    Unlike the PS4, the Xbox One features an external power supply, which costs around $25 to create, the report found, adding that the headset costs $10 to make and $14 to assemble.

    Notably, Texas Instruments is a major parts supplier for the Xbox One, with six parts total in the system (four in the console and two inside the Kinect).

    Because the Xbox One manufacturing cost is just $29 under its sale price (not to mention retailers taking their own cut of the retail price), Microsoft will look to software and services to post a profit. The reduction of manufacturing costs over time will also benefit Microsoft.

    xbone-kinect-exploded

    Official Source: http://allthingsd.com/20131126/microsofts-xbox-one-cost-90-more-to-build-than-sonys-ps4-teardown-shows/

    http://www.gamespot.com/articles/teardown-reveals-xbox-one-costs-90-more-than-ps4-to-make/1100-6416404/

  • GTA 4 in VR – Cyberith Virtualizer + Oculus Rift + Wii Mote = Mindblowing Experience

    GTA 4 in VR – Cyberith Virtualizer + Oculus Rift + Wii Mote = Mindblowing Experience

    Reading Time: < 1 minute

    Here some news from our crazy Friends in Vienna/Austria Cyberith, with their Virtualizer device for moving around in Los Santos!

    Yeah you heard right ‚Grand Theft Auto IV‘ in Oculus Rift VR Style, have fun Watching and reading everyone:

    Hello VR Fanatics!

    In this video, you see me in GTA 4 VR with the Virtualizer, the Oculus Rift and a Wii mote. I totally forgot reality and my mind was in Liberty City.

    I also show the sitting function of the Virtualizer in this video. You can adjust it to your body height and use it while driving a car or a tank, sitting in a helicopter or other vehicles. You can also use it to rest a while when you are exhausted of escaping from the cops hehe.

    There is a lot going on at Cyberith… subscribe and stay tuned.

    Subscribe to our Channel and write an E-mail to info@cyberith.com and we will send you a link to the long version of GTA 4 in VR.

    www.CYBERITH.com
    Because Reality Is Not Enough….

    Official Source: http://www.youtube.com/watch?v=TRyOzyTta24

  • Make yourself the Most Useless Machine EVER! Tutorial Instructions

    Make yourself the Most Useless Machine EVER! Tutorial Instructions

    Reading Time: 10 minutes

    Also Known As: The Ultimate Machine

    Parts list

    Battery Pack
    Gear Motor
    Toggle Switch
    Microswitch
    Printed Circuit Board
    Green & Red 3 mm LEDs
    Two 56 Ohm Resistors
    Hook-Up Wire
    Heat Shrink

    Soldering The Machine:

    Soldering is so easy there’s a comic book instruction guide called Soldering is Easy that we recommend.  It was created by DIY guru Mitch Altman, Andie Nordgren & Jeff Keyzer.

    If you have never soldered before we highly recommend that you read the above and/or get help from someone with experience before you assemble our kit.

    Observe All Safety Precautions:  wear eye protection.  Don’t breath the fumes: work in a well ventilated area.  Do not touch the hot end of the soldering iron…

    Tip:  Helping Hands  In the above photo you’ll see various ways of holding parts steady in order to solder them.  A PanaVise on the left is a great tool to own if you solder on a regular basis.

    Do not go out and buy a PanaVise just for this project. Less expensive alligator-clip contraptions are available or you can macgyver one as shown in the above photo using pliers and a rubber band.

    We don’t recommend using your real hand…

    PCB Top & Bottom

    Most of the components will be mounted on the Top-Side of the printed circuit board, with the exception of the LEDs.  Make sure you read the entire instructions before starting.

    Step 1:Seat Toggle

    Insert the toggle switch into the top-side of the circuit board as shown in the photo.  

    It’s location is marked on the circuit board as “Toggle”.


    Soldering Toggle

    On the bottom side of the board, solder all 6 pins of the toggle switch.


    Step 2:Insert Resistors

    Insert the two resistors in locations R1 & R2 as shown in the photo.

    Bend the wire leads of the resistors outward to help keep them in place while you solder them to the board.

    Solder the Resistors

    Solder the resistors to the board.

    Clip off the excess leads using a pair of snippers, nippers or even finger-nail clippers.


    Step 3:Insert the LEDs

    The green and red LEDs (LightEmitting Diodes) look identical so we’ve marked the wire leads of thered LED with ared felt marker in order to differentiate them.

    Insert the green LED in the location marked LED1.  The longer lead is the positive (+) one and should be inserted in the hole nearest the + symbol marked on the board.

    The red LED goes in the LED2 location and the longer positive lead goes in the hole nearest the + symbol.

    LED Detail

    The green LED needs to stand off the board 2 millimeters as shown in the photo.

    The red LED should be flush with the board.

    Bend the wire leads of the LEDs outwards so they stay in place while you solder them from the top side of the board.


    Bend Green LED

    After soldering, carefully bend the green led as shown in the photo and then clip the excess leads from the LEDs.


    Step 4:

    Cut the hook-up wire into two pairs about 17 cm (6.5 inch) and 10 cm (4 inch) long.


    Step 5:Microswitch

    Split one end of shorter, 10cm pair of wires and strip back 1/2cm of insulation.

    Cut the heat-shrink in two and slip them over the end of the wires as shown in the photo.  Make sure you keep the shrink away from the ends when are soldering; you don’t want to prematurely shrink them.

    Solder the wires to the outside pins on the micro-switch.  The middle pin on the micro-switch is not used.

    Now move the heat-shrink tubing over the end of the wires, and carefully apply heat using a heat gun or lighter.

    Step 6:Microswitch to PCB

    Split/strip the other end of the micro-switch wires and route them through the strain-relief holes. Solder the wires to the pads labeled Micro as shown in the photo.

    Polarity does not matter, either wire can go in either pad.

    Step 7:Battery Leads

    The battery holder comes with its wire leads stripped and tinned.

    Route the leads from the battery holder through the strain-relief holes of the board ensuring that the red wire goes to the Bat+ location & the black wire to theBat- location.

    Note: polarity matters, make sure the red and black wires are soldered to the correct pads.


    Step 8:  Split/strip the ends of the 17cm hook-up wire pair.

    You’ll note that the conductors are copper and silver colored which helps us install the motor wires with the correct polarity.Motor Wiring

    As shown in the photo to the right, solder one end of the silver wire to the indicated pin on the motor.

    The other end of the silver wire is soldered to pad on the board labeled Mot-.

    Solder the copper colored wire to the the other tab on the motor.  It’s other end is soldered to the Mot+ pad on the circuit board.

    Note that the wires are routed through the strain-relief holes in the board as well as through the clear plastic strap on the end of the motor.

    Test The Circuit:

    The above photos show how the circuit operates.

    ▪ When the toggle switch is flipped ON, the red LED is on and the motor turns counter-clockwise.

    ▪ When the toggle switch is flipped OFF, the green LED is on and the motor turns clockwise.

    ▪ Depressing the micro switch shuts power off to the whole circuit only when the toggle switch is in the OFF position.

    PART2:

    Step 1:
    Remove the protective film covering the acrylic pieces. The film protects the pieces from getting scratched during shipping.

    Step 2:Attach Motor
    Use a #1 Phillips screwdriver to attach the motor to the motor-mount bracket using the two longest screws.

    Tip: Be careful that the motor wires do not become pinched between the motor and the acrylic bracket, causing a finger alignment problem later.

    Step 3:Attach Micro-switch

    Attach the micro-switch using two of the smaller screws.

    Make sure you install the micro-switch so the bump on the micro-switch lever is at the top, as show in the photo to the right.

    Step 4:
    Attach the finger to the cam disc using two small screws.


    Make sure the protruding bump on the cam is assembled as shown in the photo.

    Step 5:Attach Finger
    Mount the finger and cam assembly to the motor shaft using the last small screw.

    You may need to depress the lever on the micro-switch in order to clear the bump on the cam.


    Step 6.
    Understand how the mechanism works:

    When the toggle is pointing to the left (the OFF position), then the green LED is lit and the motor turns clockwise until the micro-switch is activated by the cam, cutting off power to the machine.

    When you switch the toggle to the right (the ON position), then the micro-switch is bypassed, the red LED lights up, and the motor turns counterclockwise.


    The arrow in the picture indicates where the bump on the cam is depressing the micro-switch lever.

    When the toggle is in the OFF position and the micro-switch is depressed, then the machine should be powered off completely; there should be no power, no lights, and no motor movement.

    Step 7.
    Test your assembled mechanism:

    With the toggle switch in the OFF position, put two AA batteries in the holder. The finger should turn clock-wise until the cam touches the micro-switch. The micro-switch is wired so that when pressed, the switch is open (or off), opposite from way most push buttons work. The green LED should then turn off.

    Flip the toggle briefly to the ON position, and then back to the OFF position.

    Warning: Be careful as the machine is not fully assembled so, if the toggle is left in the ON position too long, the motor will keep turning counterclockwise until the finger hits the micro-switch in the other direction.

    You will want to flip the toggle back to the OFF position quickly.

    If the motor turns in the wrong direction, then you have either installed the motor backwards or the batteries are in backwards.

    Remove the batteries before proceeding to the next step.

    Step 8:
    Place a nut it the T-Slot on the motor bracket, as indicated by the arrow in the photo.

    Tip: You can use a small piece of tape to hold the nut temporarily in place.

    Carefully place the top cover plate on the tabs on the top of the motor mount bracket.

    Step 9:
    Carefully insert a bolt into the hole on the top plate. Thread the bolt into the nut and tighten it.

    Notice: Two rectangles were laser-etched into the top plate on the other side of the center hole. Do not try to remove or punch out these rectangles as they are cosmetic and meant to balance the appearance of the real tabs of the motor mount bracket.

    Drop a bolt into the hole between the rectangles and secure it from beneath with a nut.

    Note: The protective blue film on the finger in these two photos is only to make the finger easier to see in the photo. You should have removed the protective film from all your acrylic pieces in the first step for assembly.

    Step 10:
    The toggle switch has 2 hex nuts, a flanged washer, and a knurled lock washer.

    Remove all of them and replace the knurled lock washer.

    Insert the toggle switch into the center hole of the top plate with the LED’s facing the finger.

    Thread one of the hex nuts onto the toggle switch and carefully tighten with a 5-16″ socket or pliers.

    Warning: Be careful not to scratch the acrylic while tightening the nut.

    Now you can insert batteries and fully test the mechanism. The top plate should be a working Ultimate Useless Machine Assembly.

    Remove batteries before proceeding to the next step.

    Case Assembly

    Step 11:
    Start assembling the case:

    Attach the lid as shown in the photo. If you prefer having a blank ‘mystery’ box without “The Ultimate Useless Machine” text showing, then flip the top plate over and assemble the plate with the writing down.
    Note: Pay attention to the orientation of the hinge plate. If you install the hinge with the wrong side facing out, you will have trouble fitting the lid into the case and the lid will not move freely.

    Step 12:
    Attach the sides of the case.

    Note: Make sure the engraved lines on the front and side plates face out.


    Step 13:
    Leave out the final two nuts and bolts on the last side plate, and leave the other nuts loose in the plate, until you can slip the hinged end plate into the pivot holes on the side plates.

    Then press the side plate into position and install the last two nuts and bolts.

    Tighten the other nuts and bolts.

    Step 14:
    To keep the battery holder from moving around in the case, cut the velcro strip in two and apply the hooks side of the velcro to the bottom of battery holder.

    Stick the fuzzy sides of the velcro to the corresponding locations inside the case. Position the battery holder away from the acrylic finger, along the right side.


    Step 15:
    Lower the Toggle Plate Assembly into position on the top of the case and bolt it in place.


    Step 16:
    Stick the rubber feet onto the bottom of the machine. You are done!

    Official Source: http://frivolousengineering.com/

    http://www.youtube.com/watch?v=mD8BHWygt1c

    http://frivolousengineering.com/?page_id=4394#sthash.liRuwUo5.dpuf