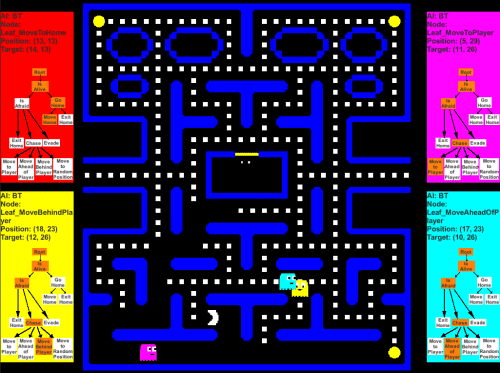
Schlagwort: Uncategorized

  • Official PlayStation Podcast 382: Five is Alive

    Official PlayStation Podcast 382: Five is Alive

    Reading Time: < 1 minute

    Email us at PSPodcast@sony.com!

    Subscribe via Apple Podcasts, Spotify, Google or RSS, or download here


    PlayStation 5 has arrived worldwide! Listen in as we talk Demon’s Souls, Astro’s Playroom, Sackboy: A Big Adventure, Marvel’s Spider-Man: Miles Morales, and more games we’ve been digging into on the new console.

    Stuff We Talked About

    • PlayStation 5
    • Demon’s Souls
    • Astro’s Playroom
    • Sackboy: A Big Adventure
    • Marvel’s Spider-Man: Miles Morales
    • Ghost of Tsushima
    • Mom Hid My Game
    • Switch ‘n’ Shoot
    • How Brett and Justin got started in the industry

    The Cast


    Thanks to Cory Schmitz for our beautiful logo and Dormilón for our rad theme song and show music.

    [Editor’s note: PSN game release dates are subject to change without notice. Game details are gathered from press releases from their individual publishers and/or ESRB rating descriptions.]

    Website: LINK

  • Classify your trash with Raspberry Pi

    Classify your trash with Raspberry Pi

    Reading Time: 3 minutes

    Maker Jen Fox took to hackster.io to share a Raspberry Pi–powered trash classifier that tells you whether the trash in your hand is recyclable, compostable, or just straight-up garbage.

    Jen reckons this project is beginner-friendly, as you don’t need any code to train the machine learning model, just a little to load it on Raspberry Pi. It’s also a pretty affordable build, costing less than $70 including a Raspberry Pi 4.

    “Haz waste”?!

    Hardware:

    • Raspberry Pi 4 Model B
    • Raspberry Pi Camera Module
    • Adafruit push button
    • Adafruit LEDs

    [youtube https://www.youtube.com/watch?v=jyz0ArPEsj4?feature=oembed&w=500&h=281]

    Watch Jen giving a demo of her creation

    Software

    The code-free machine learning model is created using Lobe, a desktop tool that automatically trains a custom image classifier based on what objects you’ve shown it.

    The image classifier correctly guessing it has been shown a bottle cap

    Training the image classifier

    Basically, you upload a tonne of photos and tell Lobe what object each of them shows. Jen told the empty classification model which photos were of compostable waste, which were of recyclable and items, and which were of garbage or bio-hazardous waste. Of course, as Jen says, “the more photos you have, the more accurate your model is.”

    Loading up Raspberry Pi

    Birds eye view of Raspberry Pi 4 with a camera module connected
    The Raspberry Pi Camera Module attached to Raspberry Pi 4

    As promised, you only need a little bit of code to load the image classifier onto your Raspberry Pi. The Raspberry Pi Camera Module acts as the image classifier’s “eyes” so Raspberry Pi can find out what kind of trash you hold up for it.

    The push button and LEDs are wired up to the Raspberry Pi GPIO pins, and they work together with the camera and light up according to what the image classifier “sees”.

    Here’s the fritzing diagram showing how to wire the push button and LEDS to the Raspberry Pi GPIO pins

    You’ll want to create a snazzy case so your trash classifier looks good mounted on the wall. Kate cut holes in a cardboard box to make sure that the camera could “see” out, the user can see the LEDs, and the push button is accessible. Remember to leave room for Raspberry Pi’s power supply to plug in.

    Jen’s hand-painted case mounted to the wall, having a look at a plastic bag

    Jen has tonnes of other projects on her Hackster profile — check out the micro:bit Magic Wand.

    Website: LINK

  • Willkommen zur PlayStation 5 Launch Night!

    Willkommen zur PlayStation 5 Launch Night!

    Reading Time: 2 minutes

    Endlich ist es soweit! So lange haben wir auf diesen Tag gewartet und nun wollen wir mit euch den Launch der PlayStation 5 so richtig feiern. Die digitale Road to PS5 wird mit einem großen Finale gekrönt. Ihr habt richtig gelesen: Wir planen eine großartige Show, bei der ihr dabei sein könnt! 

    Was: PlayStation 5 Launch Night

    Wann: 18.11.2020 ab 21:15 Uhr

    Auf diesen Kanälen könnt ihr die PS5 Launch Night anschauen:

    PS5 Launch Night – Gäste

    Keine Show ohne coole Gäste! Wir haben einige spannende Gäste eingeladen, um den Launch der neuesten Konsolengeneration zu feiern:

    PS5 Launch Night – Programm 

    Euch erwartet ein Abend voller Überraschungen! Ganz klar, dass wir uns an diesem Abend die PlayStation 5 Konsole ganz genau ansehen. Aber das ist noch lange nicht alles! Johanna Klum, die als Moderatorin durch die Show führen wird, schüttelt einige Highlights aus dem Ärmel, die ihr nicht verpassen solltet.

    Wir werden in Erinnerungen an die älteren Konsolen schwelgen, das PlayStation-Wissen unserer Gäste mit einem Quiz testen und den einen oder anderen FunFact mit euch teilen. Und ihr könnt mit dabei sein! 

    Wer während der Show gut aufpasst, hat sogar die Chance ein XXL Sony-Paket zu gewinnen..

    PS5 Launch Night – Gewinnspiel

    Was wäre eine großartige Show zum PlayStation 5 Launch, ohne dass ihr etwas Großartiges gewinnen könnt?

    Putzt euren Bildschirm, nehmt euch was zu Schreiben und passt während der Show gut auf: Es werden euch immer mal wieder PlayStation-Symbole eingeblendet, die ihr von eurem Controller bereits bestens kennen solltet. Schreibt euch auf, welche das sind und in welcher Reihenfolge wir sie zeigen. Auf unserer Gewinnspiel-Seite habt ihr die Möglichkeit, die richtige Kombination auszuwählen und eure Daten einzugeben, um einen mega Preis zu gewinnen!

    Wann: 18.11.2020, 21:15 Uhr – 25.11.2020, 23:59 Uhr

    Was: Richtige Code-Kombination in der Show herausfinden

    Wo: Im Teilnahmeformular hier eingeben, das ab Show-Beginn freigeschaltet wird

    Der Preis

    Unter allen korrekten Einsendungen wird zufällig ein Gewinner ausgelost, der/die einen fantastischen Sony-Preis gewinnen wird. Mit diesem XXL-Sorglospaket wird euer Gaming zu Hause nie wieder so sein wie vorher!

    Website: LINK

  • Official PlayStation Podcast Episode 381: Let’s Do Launch

    Official PlayStation Podcast Episode 381: Let’s Do Launch

    Reading Time: 2 minutes

    Email us at PSPodcast@sony.com!

    Subscribe via Apple Podcasts, Spotify, Google or RSS, or download here


    PS5 is here! The team celebrates launch week by sharing early impressions and which games have them most excited.

    Stuff We Talked About

    • PS5 Launch!!!
    • Astro’s Playroom
    • DualSense wireless controller impressions
    • Demon’s Souls
    • Assassin’s Creed Valhalla
    • Godfall
    • Call of Duty: Black Ops Cold War
    • Mortal Kombat 11 Ultimate

    The Cast

    Sid Shuman – Senior Director of Content Communications, SIE

    Tim Turi –  Senior Content Communications Specialist, SIE


    Thanks to Cory Schmitz for our beautiful logo and Dormilón for our rad theme song and show music.

    [Editor’s note: PSN game release dates are subject to change without notice. Game details are gathered from press releases from their individual publishers and/or ESRB rating descriptions.]

    Website: LINK

  • The dawn of a new generation: PS5 is almost here

    The dawn of a new generation: PS5 is almost here

    Reading Time: 2 minutes

    What a year. I want to thank all of you from the bottom of my heart for cheering us on and keeping us honest. I know I speak for all of Sony Interactive Entertainment when I say that you are at the very center of everything we make and do here. 

    We never wavered in our vision for delivering a truly next-generation console that was built to excite both gamers and developers. We also knew that it would be nearly impossible for gamers and press to experience next-generation features like the DualSense wireless controller’s haptic feedback, or our immersive 3D Audio, in a socially-distanced world.

    But starting tonight in some regions, players will begin turning on their PlayStation 5 consoles for the very first time and getting their first taste of these innovative features. It’s a heartening, and humbling, moment for all of us here at Sony Interactive Entertainment. 

    While the launch begins tonight in North America, Japan, Mexico, Australia, New Zealand, and South Korea – this is just the first step in our global rollout. PS5 will expand to the rest of the world on November 19, and I can’t wait until everyone can get their hands on it.

    PS5 represents a true generational leap, and the games you will experience over the coming years are sure to change gaming forever. The ultra-high speed SSD alone will revolutionize how games are developed and played, not to mention the increased fidelity and performance many PS5 games offer. And then there is, of course, the DualSense wireless controller. 

    It’s an exciting time, and we’re so grateful that you’re here with us. Thank you for trusting us and for being so patient this year. We created PS5 for you and you have been the center of our strategy since Ken Kutaragi envisioned the very first PlayStation. 

    Today, I just wanted to simply say: thank you. Thank you, and here’s to the dawn of a new generation of gaming. 

    Website: LINK

  • This useless box has lights, sounds, and a real attitude

    This useless box has lights, sounds, and a real attitude

    Reading Time: 2 minutes

    This useless box has lights, sounds, and a real attitude

    Arduino TeamNovember 11th, 2020

    You’ve probably seen an example of the “useless box,” or “useless machine,” which when switched on does nothing except open up to turn itself back off again. This one by creator Alex Pikkert adds a few new tricks, giving it a bit of a mood, and not one but two switches and fingers!

    When switched on, the device uses a micro servo to open the box. The correct finger then extends under the power of one of the other two servos to turn the particular switch you flipped off again.

    To help give it “attitude,” the Arduino Uno-controlled unit employs a pair of ID1820 sound boards that let it squawk out giggles and other noises as it seems to become increasingly annoyed over time. Tri-color LEDs can also flash angrily next to the switches, and there’s an as-yet unused passive infrared sensor, potentially usable for further automated hijinks.

    [youtube https://www.youtube.com/watch?v=RY2XYQ_1Hc0?feature=oembed&w=500&h=281]

    Website: LINK

  • Retro cassette player gets modern MP3 playback and RFID functionality

    Retro cassette player gets modern MP3 playback and RFID functionality

    Reading Time: 2 minutes

    Retro cassette player gets modern MP3 playback and RFID functionality

    Arduino TeamNovember 9th, 2020

    When creator mattb_138’s parents were cleaning out their house, he came across an old cassette player and decided to upgrade it with MP3 capabilities and an RFID interface.

    The newly-enhanced device uses an Arduino Nano for control, along with a DFPlayer Mini module to play songs stored on a microSD card. An RC522 reader enables him to select tracks based on RFID cards, printed with their appropriate album art.

    The cassette player’s internals are kept largely stock, using a potentiometer to adjust the volume of the original speakers. Two buttons are also implemented with long and short press functionality, allowing for pause/play, skip, shuffle, and selection between A/B “side” of each card.

    [youtube https://www.youtube.com/watch?v=Rkm5AI8038w?feature=oembed&w=500&h=281]

    You can find more details on the upcycled project — which was inspired by the Juuke RFID playerin mattb_138’s Instructables tutorial.

    Website: LINK

  • Official PlayStation Podcast 380: One Week

    Official PlayStation Podcast 380: One Week

    Reading Time: 2 minutes

    Email us at PSPodcast@sony.com!

    Subscribe via Apple Podcasts, Spotify, Google or RSS, or download here


    PlayStation 5 draws near! Join Kristen, Tim, and Justin for one last pre-PS5 podcast, wherein the gang talks the launch lineup, games that get our pulse pounding, and a whole bunch more. Listen in!

    Stuff We Talked About

    • PS5 out next week!
    • DualSense
    • Astro’s Playroom
    • Demon’s Souls
    • Bugsnax
    • PS5 merch now available
    • Games that get our blood pumping
    • Amnesia Rebirth
    • Ikenfell

    The Cast

    Tim Turi – Content Communications Manager, SIE


    Thanks to Cory Schmitz for our beautiful logo and Dormilón for our rad theme song and show music.

    [Editor’s note: PSN game release dates are subject to change without notice. Game details are gathered from press releases from their individual publishers and/or ESRB rating descriptions.]

    Website: LINK

  • Fabricate flexible electronics directly on your skin with the BodyPrinter

    Fabricate flexible electronics directly on your skin with the BodyPrinter

    Reading Time: 2 minutes

    Fabricate flexible electronics directly on your skin with the BodyPrinter

    Arduino TeamNovember 5th, 2020

    What if you could print circuit “tattoos” right on your body? While the idea of augmentation with a pre-assembled electronic sticker isn’t new, the technique proposed by a team of KAIST and MIT Media Lab researchers takes things to a new level.

    Their small BodyPrinter device — composed of a custom 3D-printed plotter with a movable head and a mounted extruder — can be strapped directly to multiple body parts, including fingers, arms, back, stomach, forehead, neck, laps and shoulders. After a little calibration, it deposits conductive ink on a “liquid bandage” substrate that’s already attached directly to a subject’s skin.

    The BodyPrinter is controlled by an Arduino Uno and CNC shield, and a number of experiments with the resulting circuits have already been explored. A quick overview of the system can be seen in the video below, and more details are available in the team’s paper.

    [youtube https://www.youtube.com/watch?v=fkMPmDZeFsk?feature=oembed&w=500&h=281]

    Website: LINK

  • Dragon Quest XI S: Echoes of an Elusive Age – Definitive Edition – demo out now!

    Dragon Quest XI S: Echoes of an Elusive Age – Definitive Edition – demo out now!

    Reading Time: 4 minutes

    This past July, we announced that Dragon Quest XI S: Echoes of an Elusive Age – Definitive Edition and its hundreds of hours-worth of content are arriving on PS4 on December 4. Today, we’re pleased to announce that a free demo is coming… right now! 

    Visit the demo page and download now!

    What’s included in the demo?

    The demo is a generous slice of the game that will take you multiple hours to complete – and all your progress carries over to the full game!  

    It takes you through the lengthy opening chapter of the game. You start as a young man about to take part in a ceremonial climb, marking his passage into adulthood. But when events take an unexpectedly dangerous turn, he discovers a power and destiny that will change his life forever.

    If you’ve ever played a Dragon Quest game, you know this simple setup will soon turn into something far more epic and emotional – and sure enough you’ll encounter all kinds of twists and turns in the demo that you won’t expect. We won’t spoil anything here, but let’s just say you’ll meet some characters you won’t forget any time soon…

    After the introduction, you’ll be unleashed into the lush and vibrant world of Erdrea. The areas you’ll get to explore are richly detailed, full of secrets to discover and monsters to defeat in exciting and fast-paced turn-based combat.

    You’ll also get to experience some of the new enhancements added to this version of the game.

    What’s new in the Dragon Quest XI S: Echoes of an Elusive Age – Definitive Edition?

    This version of Dragon Quest XI has more new features than you could shake a slime at. For example, it now features the orchestral in-game music as standard – these beautiful Dragon Quest tracks have never sounded so rich and full.

    Other new enhancements you’ll be able to experience in the demo include the ability to speed up battles, making those basic fights whiz by. Slicing through hordes of Cruelcumbers and Needlers in record time is weirdly satisfying and addictive. 

    You’ll also be able to try out the new photo mode so you can capture the beautiful vistas and meadows in artistic shots, or just pose the characters in funny ways.

    There’s loads more beyond the demo too – the full game has hours of additional story content, an improved crafting system, and even a feature that lets you play the whole game in 2D like a classic Dragon Quest game. Find out more about the new features here.

    How long is the demo?

    When we say this is a generous demo, we mean it. With so much story to see, so many characters to meet and so many monsters to battle, you could spend up to 10 hours playing this. And don’t worry – all that progress can be carried over to the full game. 

    When is Dragon Quest XI S: Echoes of an Elusive Age – Definitive Edition out?

    If you’re excited to play more, Dragon Quest XI S: Echoes of an Elusive Age – Definitive Edition releases December 4. You can pre-order now at PlayStation Store.

    We hope you enjoy your first steps on this epic journey, and we can’t wait for you to play the full game later this year.

    Website: LINK

  • #LightUpYourPlay – Gebt eurem Gaming-Zimmer den unverkennbaren PlayStation-Look

    #LightUpYourPlay – Gebt eurem Gaming-Zimmer den unverkennbaren PlayStation-Look

    Reading Time: 5 minutes

    Es werde Licht! Um genau zu sein: blaues Licht! In Vorbereitung auf den anstehenden PS5 Launch sehen wir blau und wollen die wohl schönste Farbe der Gaming-Welt auch bei euch sehen. 

    Light Up Your Play Foto-Challenge

    Jetzt sind wir neugierig! Zeigt uns euer Set-Up, ausgeleuchtet in der wohl schönsten Farbe die es gibt: PlayStation-Blau! Ob Retro-Ecke, PSVR-Zimmer oder Gaming-Setup neben dem Bett: Wir wollen wissen, wie es bei euch aussieht, wenn alles blau erleuchtet ist. Wie ihr das Ganze umsetzt, bleibt euch überlassen: Programmiert euer Nanoleaf Produkt auf die passende Farbe, platziert bunte Lichtröhren oder nutzt den Bastelkoffer aus eurer Kindheit, um alles blau zu färben. Tipps und Tricks dazu findet ihr im Laufe des Artikels.

    Zeigt uns euer blau leuchtendes Gaming-Setup, Wohnzimmer oder Spielzimmer mit den Hashtags #LightUpYourPlay auf Twitter, Facebook und/oder Instagram. Die Teilnahmebedingungen findet ihr hier.

    Jeder, der uns sein Zimmer in strahlendem Blau zeigt, hat die Chance auf 1 von 5 Spielepaketen, bestehend aus Marvel’s Spider Man: Miles Morales und Sackboy A Big Adventure.

    Instagrammerin galaxyshelf hat bereits fantastisch vorgelegt und ihr Wohnzimmer erstrahlen lassen. An der Wand seht ihr bereits die Nanoleaf Light Panels, die galaxyshelf individuell angebracht hat. Auch am Fernseher könnt ihr kleine Lichtpaneele entdecken, die den Look perfekt machen. Ihre Wohnwand bietet eine indirekte Beleuchtung – ebenfalls im typischen PlayStation-Blau. Vielleicht auch eine Anregung für euch?

    Nanoleaf Canvas für euch – Gewinnspiel

    Ihr wollt jetzt direkt loslegen und auch euer Gaming-Setup cool beleuchten? Kein Problem! Um euer Wohnzimmer in Blau erstrahlen zu lassen, habt ihr die Chance eines von 100 Nanoleaf Canvas zu bekommen. Meldet euch dazu einfach mit eurer E-Mail-Adresse an. Nach dem Zufallsprinzip vergeben wir an 100 Leser Nanoleaf Canvas.

    Hier anmelden

    Tipps, um euer Zimmer in blau zu erleuchten

    Wenn ihr (noch) keine Nanoleaf Produkte habt und trotzdem an der Challenge mitnehmen wollte, haben wir im Folgenden ein paar Tipps und Ideen, wie eure Welt PlayStation-Blau wird.

    • Am Einfachsten lässt sich eine blaue Hintergrundbeleuchtung mit einem passenden Hintergrundbild oder Bildschirmschoner auf dem Desktop erzeugen. Jetzt nur noch Licht aus und genießen.
    • Smarte Glühbirnen verschiedener Hersteller lassen sich oftmals problemlos über die passende Smartphone-App steuern und nach eigenen Wünschen konfigurieren. Hier müsst ihr nur den passenden Blauton finden und schon erstrahlt das gesamte Zimmer im Blau der PlayStation Konsole. Anstatt einer Glühbirne könnt ihr auch eine Smart Lightbar verwenden.
    • Wenn ihr vielleicht ein kleines Geschwisterkind Zuhause habt oder selbst schon Eltern seid, besitzt ihr vielleicht einen Sternenhimmel-Projektor. Einige Geräte lassen sich auch in verschiedenen Farben einstellen. Damit hüllt ihr euren Gaming-Platz in die passende Farbe.
    • Eine ähnliche Idee: Schnappt euch euer Handy, das Tablet und möglichst viele mobile Geräte eurer Familie und/oder von Freunden und stellt überall den gleichen blauen Hintergrund ein. Hinter dem Bildschirm, der Tastatur und den Design-Elementen eures Gaming-Zimmers platziert, könnt ihr so herrlich blaue Stimmung erzeugen.
    • Stellt die LED-Lights eures Zubehörs blau ein und dunkelt euer Zimmer so gut es geht ab.
    • Haltet ein Stück blaues Pergamentpapier kurz vor eine Lampe, um die Lichtfarbe im Zimmer zu verändern. Vorsicht – Brandgefahr!

    So erstrahlt euer Gaming-Zimmer mit Nanoleaf Panels

    In Zusammenarbeit mit Nanoleaf wollen wir euch diese ganz besonderen Smart Lights vorstellen. Mit diesem Upgrade für euer Gaming-Zimmer stehen zahlreiche Gestaltungsmöglichkeiten zur Verfügung. Das fängt mit der Form eurer Nanoleaf Canvas an und hört bei der einfachen Aktivierung von (blauem) Licht nicht auf. 

    Die einzelnen Paneele der Smart Lights können mit wenigen Handgriffen an den verschiedensten Untergründen angebracht werden. Daraus lassen sich zahlreiche geometrische Gebilde erschaffen. Hier könnt ihr euch kreativ ausleben und es nach euren Wünschen zusammenstellen. Mit der kostenlosen App verbindet ihr euch nun mit den Nanoleaf Canvas und stellt innerhalb weniger Sekunden das typische PlayStation Blau ein. Besonders am Abend kommt das Leuchten der Paneele so richtig gut zum Vorschein und lässt euer Zimmer erstrahlen.

    Übrigens: Ihr könnt unzählige verschiedene Farbkombinationen und Verläufe über die App einstellen. Für die Challenge jedoch wollen wir euer Setup in knalligem Blau sehen.

    Mit Nanoleaf zum PlayStation-blauen Zimmer – So geht’s!

    #LightUpYourPlay – Gebt eurem Gaming-Zimmer den unverkennbaren PlayStation-Look

    Schritt 1 – Welche Form darf es sein?

    Die Nanoleaf Canvas kommen nicht als fertiges Gebilde zu euch nach Hause, sondern in mehreren einzelnen Quadraten, die ihr euch nach Lust und Laune zusammenstellen könnt. Wir raten euch unbedingt, das Ganze zuvor auf dem Boden auszubreiten und verschiedene Zusammenstellungen auszuprobieren. Auf der Nanoleaf-Webseite gibt es einige Beispiele dazu. Außerdem könnt ihr die AR App der Firma verwenden, die eure Figur dank Augmented Reality an eure Wand bringt. So bekommt ihr einen guten Eindruck davon, ob es euch am Ende gefallen wird.

    Übrigens: Ihr könnt die Nanoleaf-Teile auch über die gesamte Zimmerwand und über Ecken hinweg mit den speziellen flexiblen Verbindungsstücken anordnen! Für immer größere Figuren und Konstrukte lassen sich einzelne Paneele problemlos nachkaufen.

    Schritt 2 – Miteinander verbinden und anbringen

    Damit eure Nanoleaf Design nicht nur weiß, sondern in blau und zahlreichen anderen Farben leuchten kann, müsst ihr sie mit sogenannten “Linker” verbinden. Jedes Modul hat verschiedene Slots, über die ihr sie miteinander verknüpfen könnt. Ist die Form fertig zusammengebaut, wird sie nun mit den Klebeflächen an der Wand angebracht. Das geht ganz einfach und schnell! 

    Denkt daran, dass das zweite Paneel das Steuerungsmodul sein sollte, das ihr gleich an den Strom anschließt. So stellt ihr sicher, dass alle weiteren Teile verstehen, dass sie miteinander verbunden sind.

    Schritt 3 – Nanoleaf Canvas verbinden

    Bevor ihr loslegen könnt, braucht ihr noch die kostenlose Nanoleaf App, die für Android und iOS verfügbar ist. Das Programm führt euch Schritt für Schritt zur perfekten Beleuchtung.

    Eure neuen Smart Lights an der Wand lassen sich problemlos via Touch steuern. Eines der Module verfügt über mehrere Sensoren, mit denen ihr die verschiedenen Aktionen starten könnt. Noch einfacher geht es über eine Sprachsteuerung: Egal, ob ihr ein Google Assistant, Apple HomeKit oder eine Alexa besitzt: Über eure App auf dem Smartphone könnt ihr die Lichter und Effekte ganz einfach einstellen und dann über das Handy oder mit eurer Stimme steuern. Zahlreiche Apps machen das ebenfalls möglich.

    Unser Tipp: Legt eine “Gruppe” mit allen sprachgesteuerten Lichtern in eurem Gaming-Zimmer an, um mit nur einem Sprachkommando alles zum Leuchten zu bringen.

    Nanoleaf SetUp an euer Spiel anpassen

    Für unsere Challenge wollen wir von euch ein strahlend blaues PlayStation-Setup sehen und sind schon ganz gespannt auf eure Kreationen. Wir freuen uns über jeden, der diese stimmungsvolle Beleuchtung beibehält – doch wollen wir euch nicht vorenthalten, dass die Lichtpaneele eine weitere, coole Funktion haben: 

    Screen Mirror

    Diese Funktion der Smart Lights lässt euer Gaming-Setup in neuen Dimensionen erstrahlen. Über die Nanoleaf Desktop-App aktiviert, spiegelt es eure Aktivitäten farblich wieder. Spielt ihr also Dark Souls, wird es ganz schön düster an eurer Wand. Bei Fall Guys hingegen wird alles bunt wie Bonbons.

    Website: LINK

  • Vom Grashalm bis zur Klinge – der künstlerische Prozess von Ghost of Tsushima

    Vom Grashalm bis zur Klinge – der künstlerische Prozess von Ghost of Tsushima

    Reading Time: 14 minutes

    Hallo! Ich bin Ian Jun Wei Chiew, leitender Konzeptkünstler bei Sucker Punch Productions. Ich hatte das große Glück, von Anfang an im Team von Ghost of Tsushima dabei sein zu können. Ghost of Tsushima spielt während der Kamakura-Periode im Jahr 1274 in Japan, was in Sachen visuelles Spieldesign individuelle Herausforderungen und interessante Möglichkeiten mit sich brachte.

    Die Hauptinspiration für unsere Geschichte war die Mongoleninvasion von 1274. Unser Hauptcharakter entkommt dieser nur knapp mit dem Leben und verteidigt allen Widrigkeiten zum Trotz seine Heimat. Das war im Kern das Spielerlebnis, das für uns alle im Studio als übergeordneter Leitfaden diente. Wir recherchierten so viel wie möglich über die Kamakura-Zeit sowie die japanische Kultur, alte Samurai-Filme und die Invasion von Tsushima. Danach entschieden wir uns für die finalen Designs unserer Charaktere, Kleidung, Landschaften, Architektur usw. Ein Großteil des Referenzmaterials stammte aus Museen und von Fotos, die Teams im Auftrag unseres Studios direkt auf Tsushima und der Hauptinsel von Japan aufgenommen hatten.

     CHARAKTERE

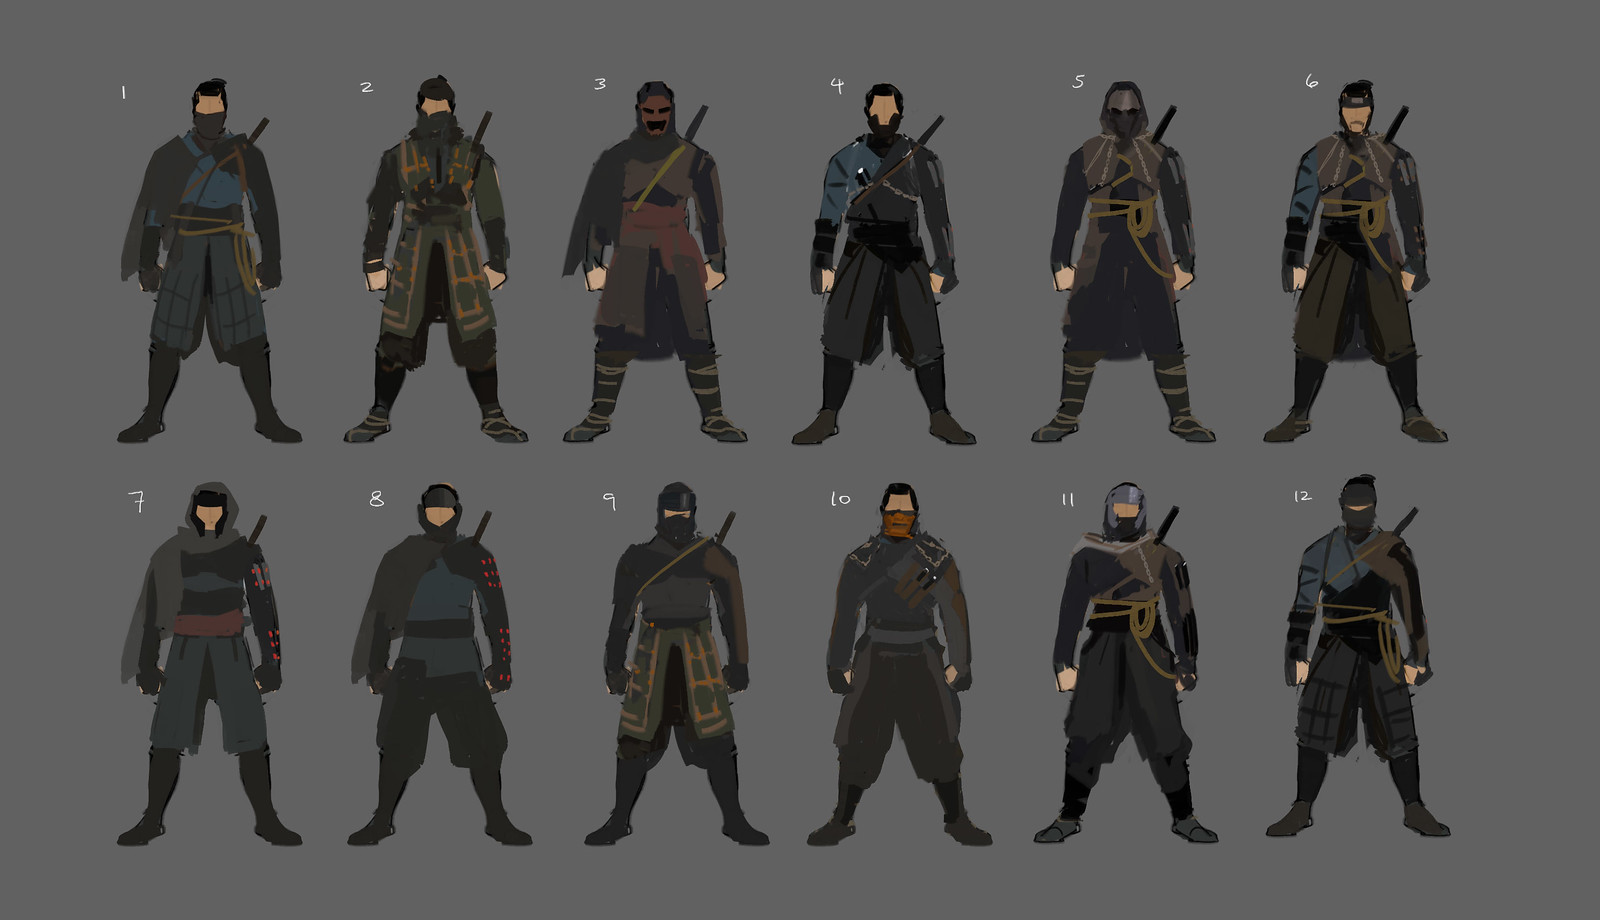
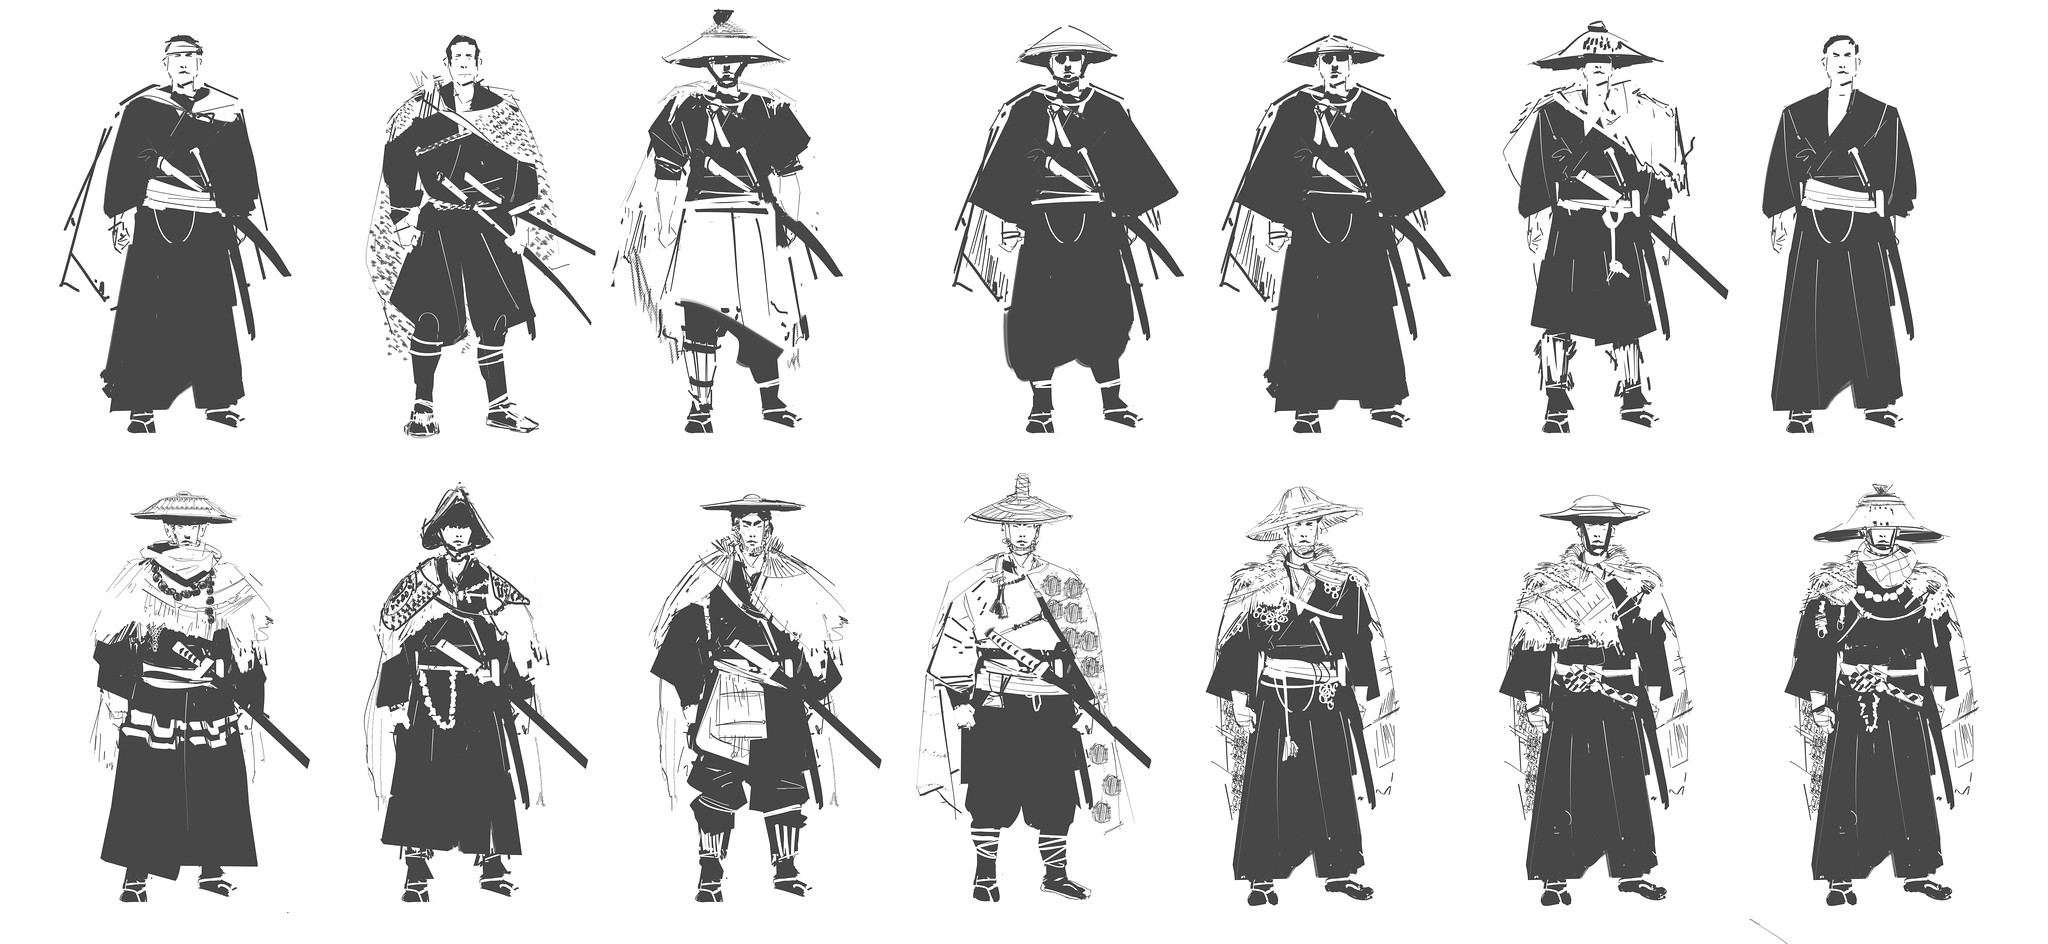
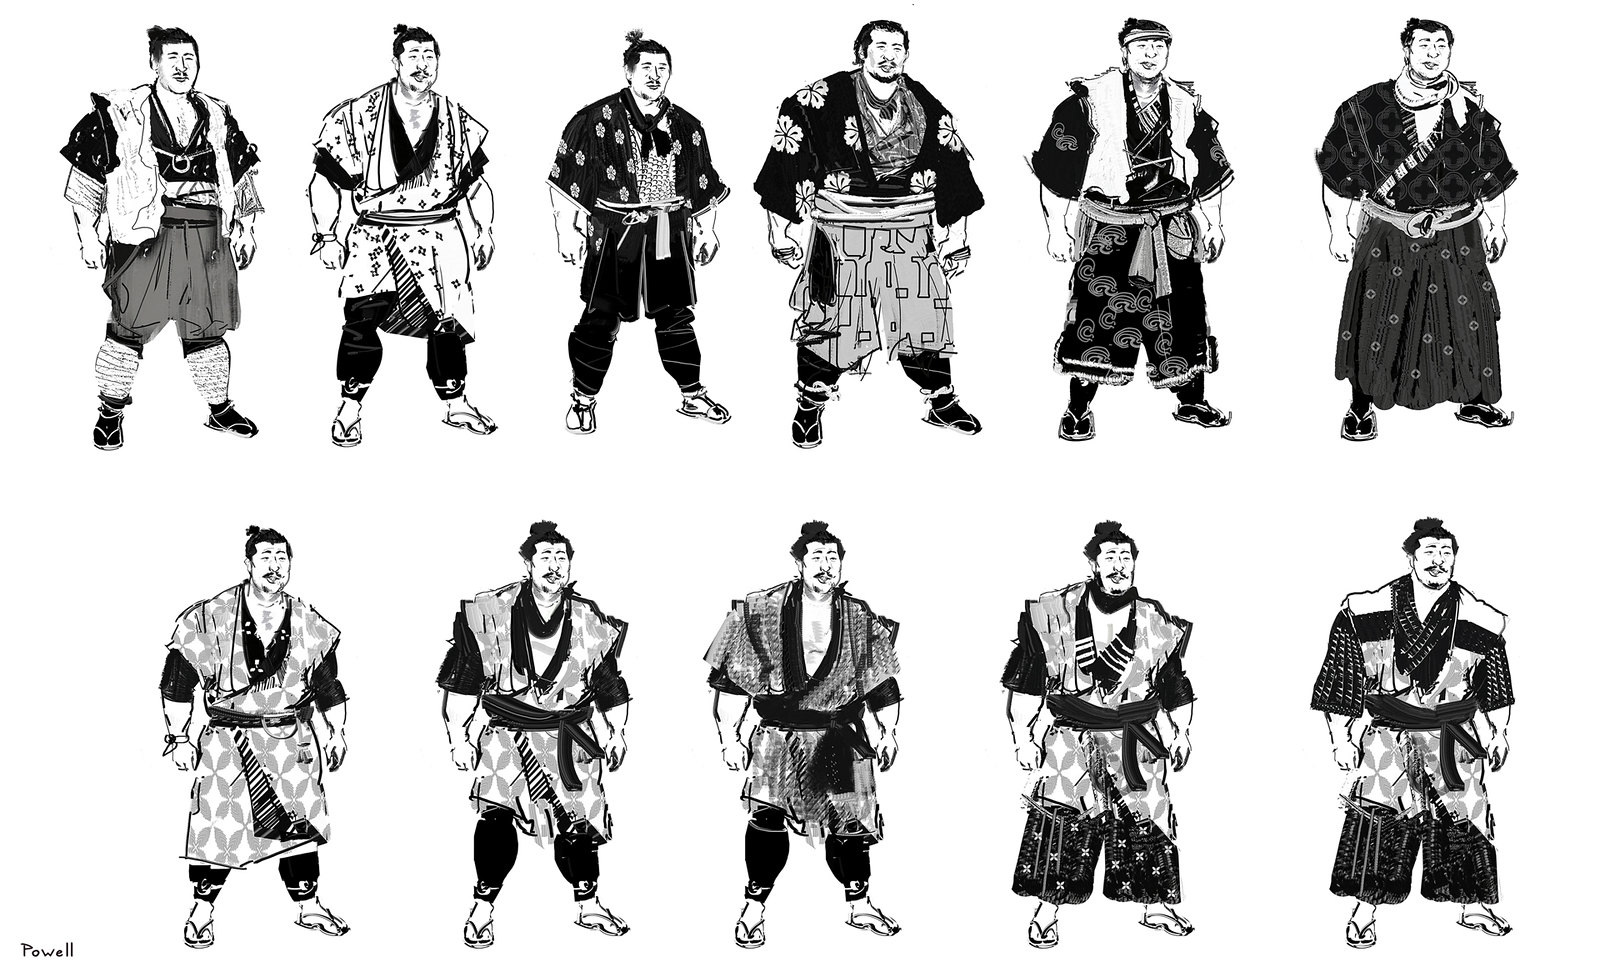
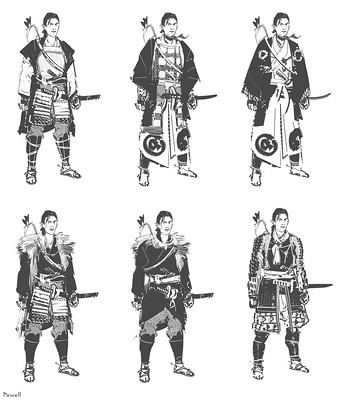
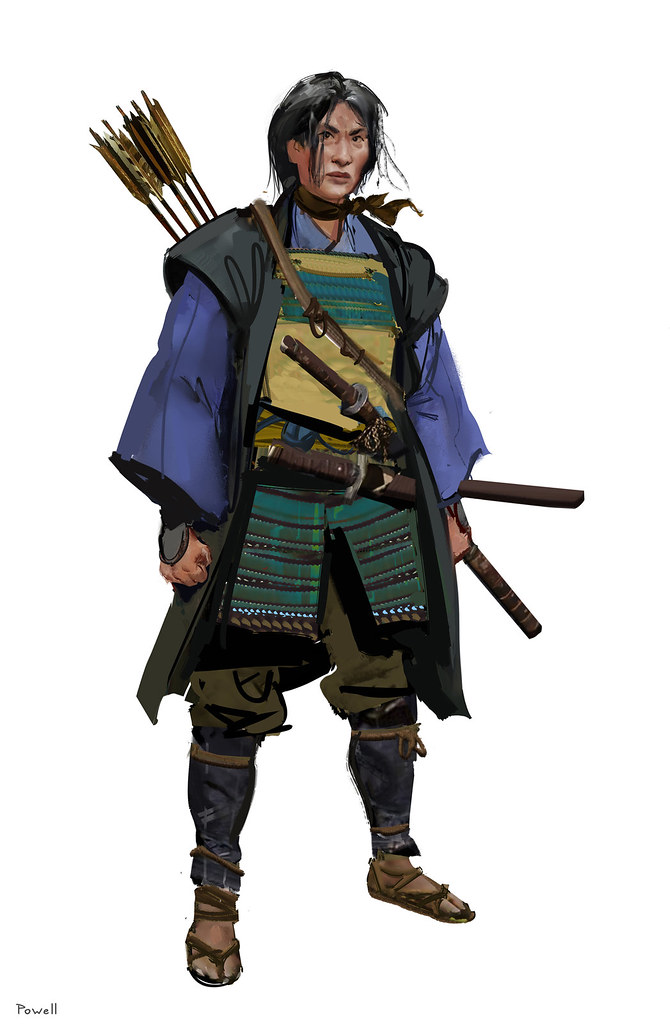
    Für unsere Charaktere haben wir recht lange Referenzmaterial gesammelt. Samurai-Filme, Bücher oder Ressourcen im Netz und Fotos von Ausstellungen in Museen dienten uns als Vorlage für aufwendig gekleidete Samurai, verzierte Rüstungen und arme, rabiate Banditen. Normalerweise entstehen die Charakterkonzepte, lange bevor die Rollen mit Schauspielern besetzt werden. Wir versuchen, dem Charakter über das Gesicht eine passende Persönlichkeit zu geben. Außerdem legen wir Anhaltspunkte für seine Grundstimmung fest. Das hilft dabei, später die richtigen Schauspieler zu finden. Sobald die Schauspieler feststehen, kombinieren wir ihre Gesichter mit den Kleidungsentwürfen, und dann erwacht der Charakter dank der individuellen Persönlichkeit und der Nuancen des Darstellers zum Leben. Unser Prozess lief allgemein folgendermaßen ab: Wir starteten unsere Recherche mit einer kurzen Zusammenfassung des Charakters und sammelten Referenzmaterial. Im Anschluss wurden Vorschauskizzen angefertigt, die wiederholt weiterentwickelt und überarbeitet wurden, um technische Probleme zu lösen.

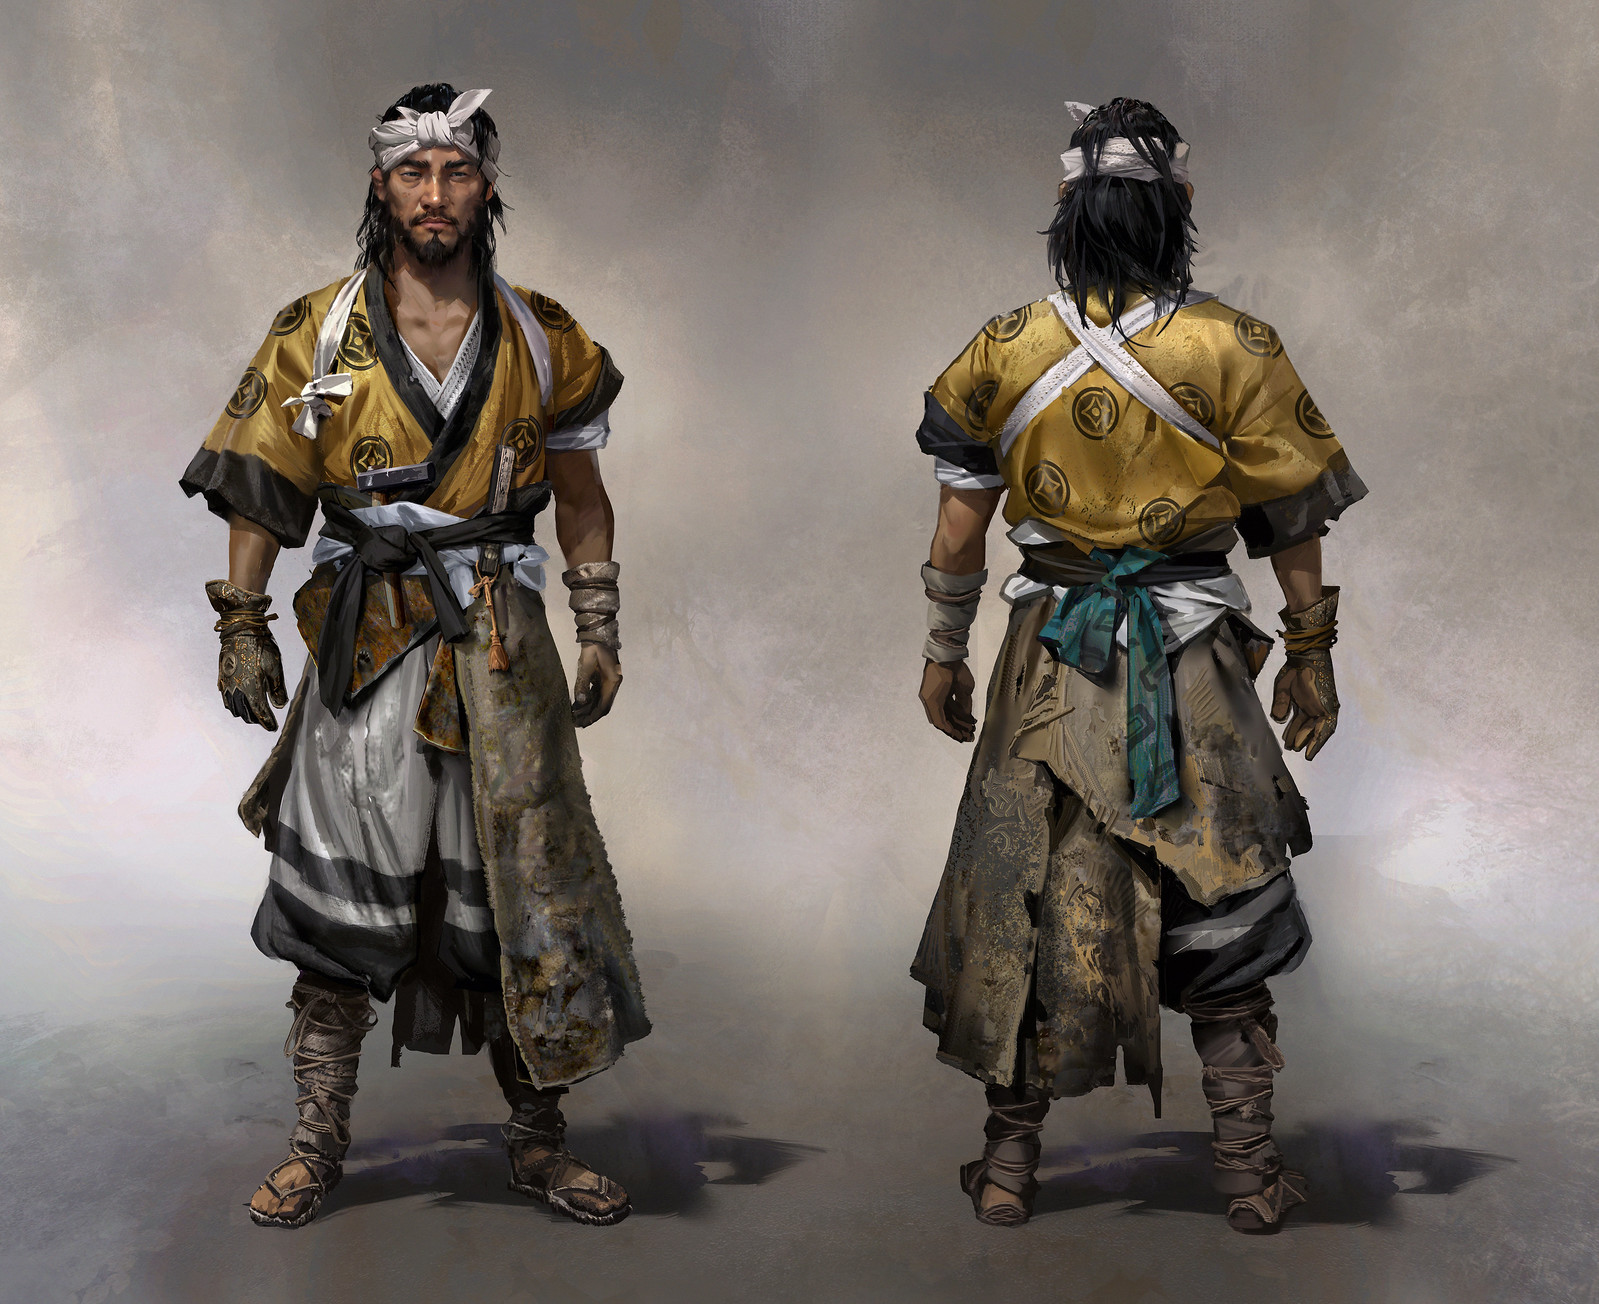
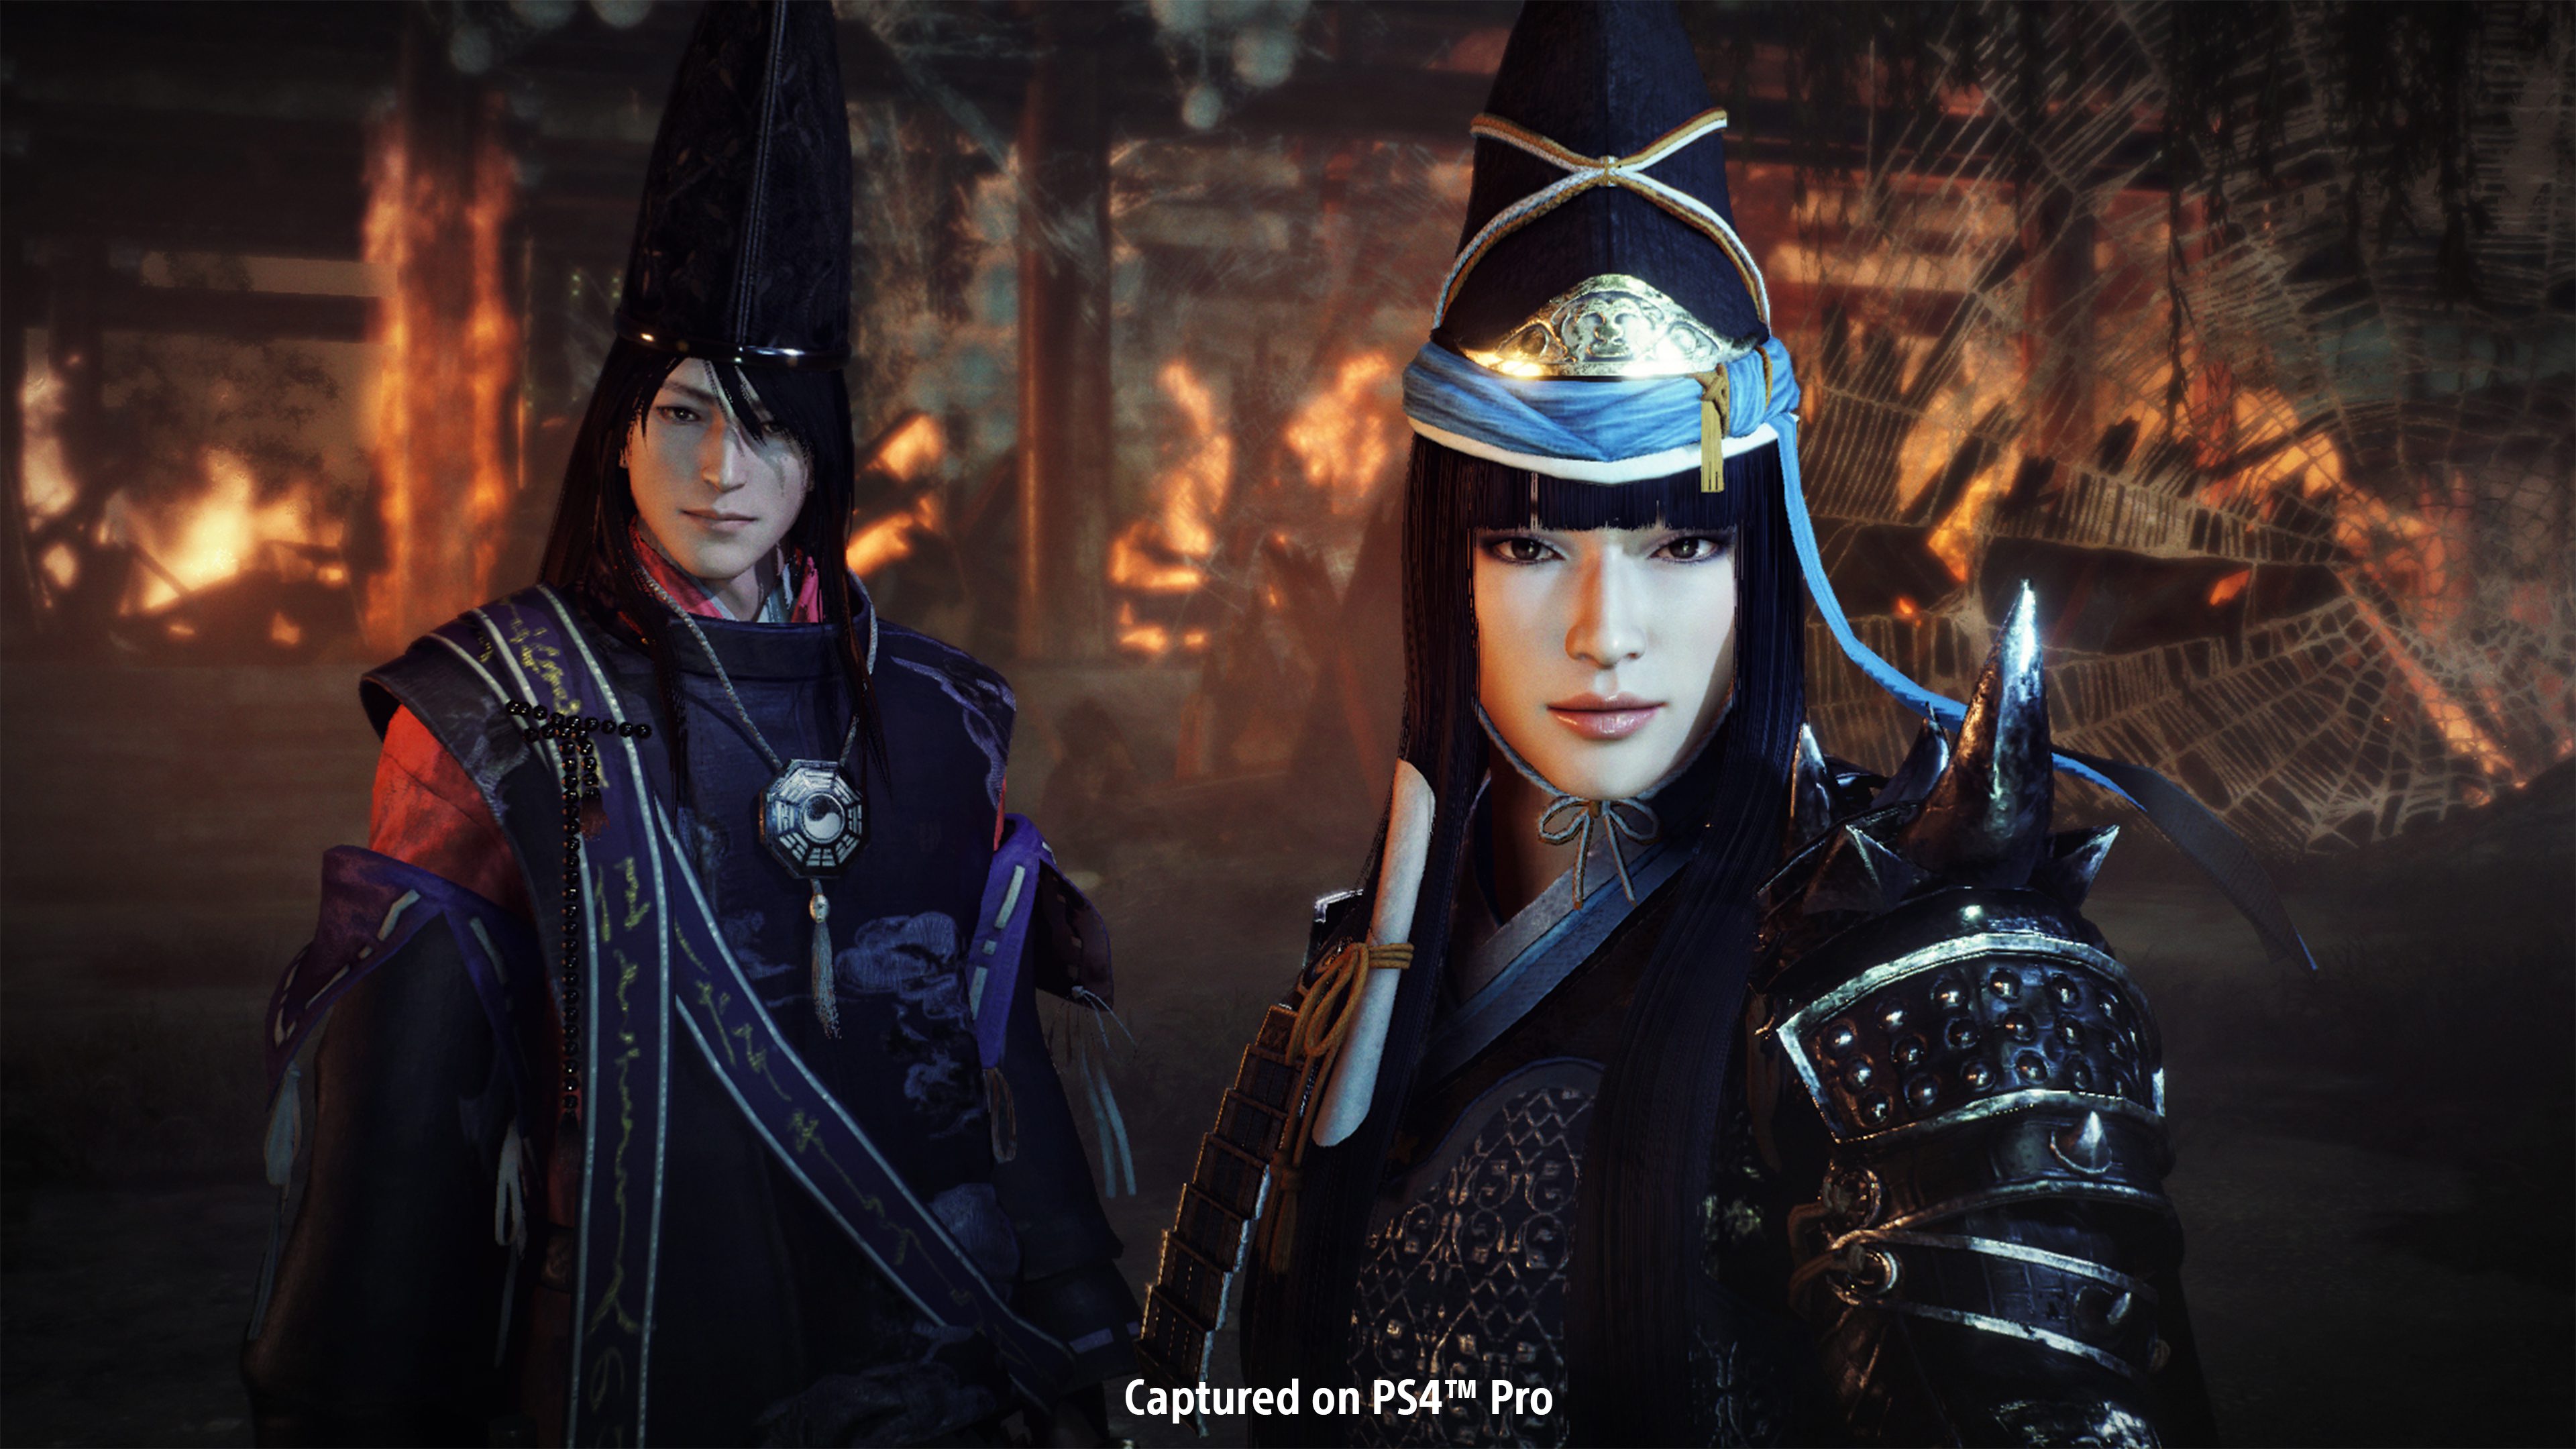
    JIN UND SEINE VERBÜNDETEN

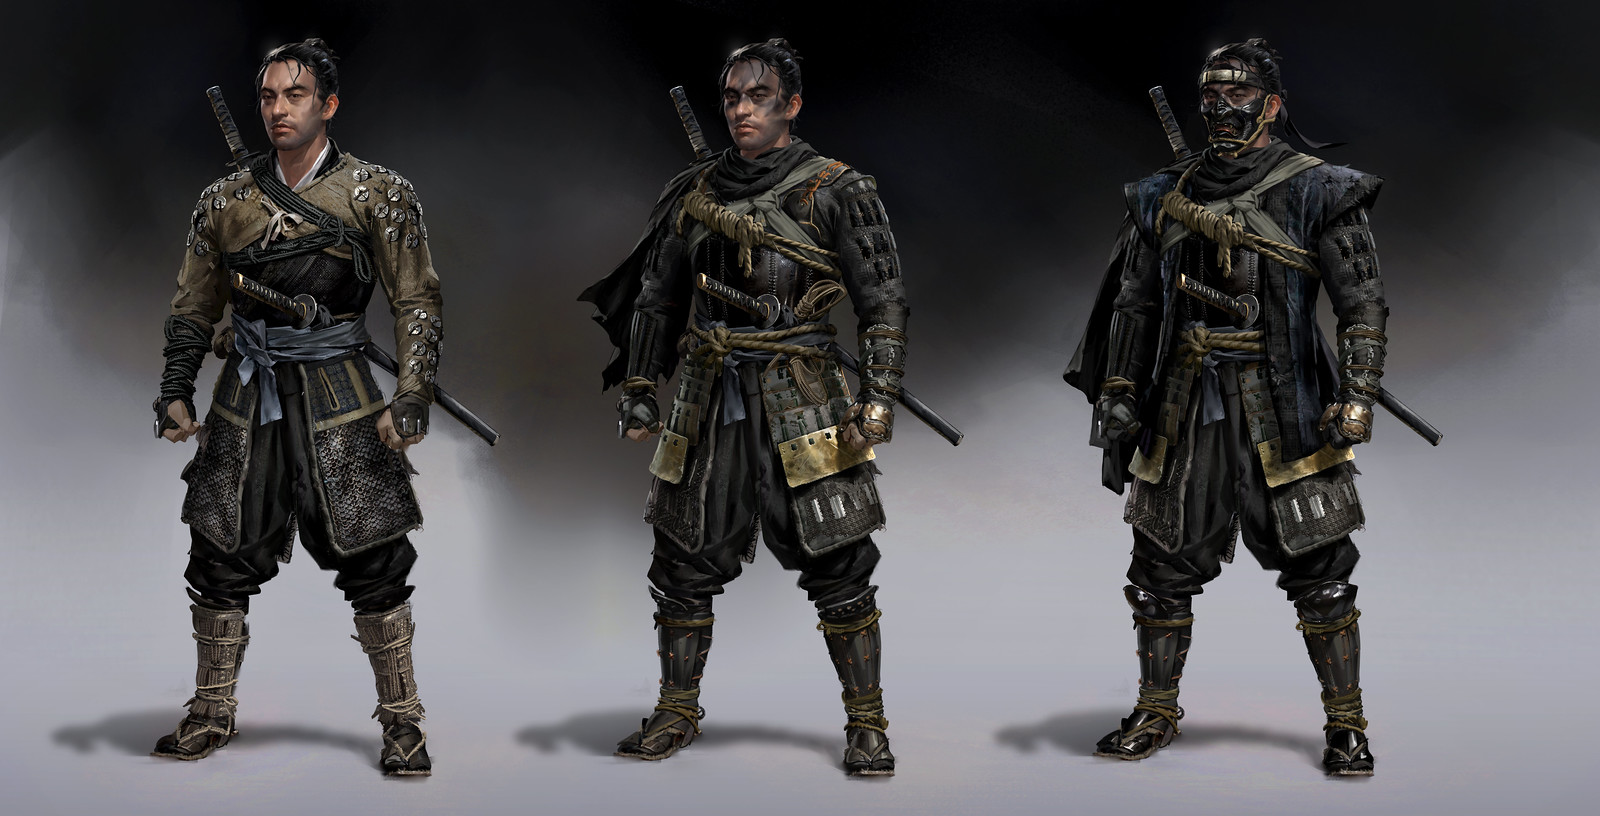
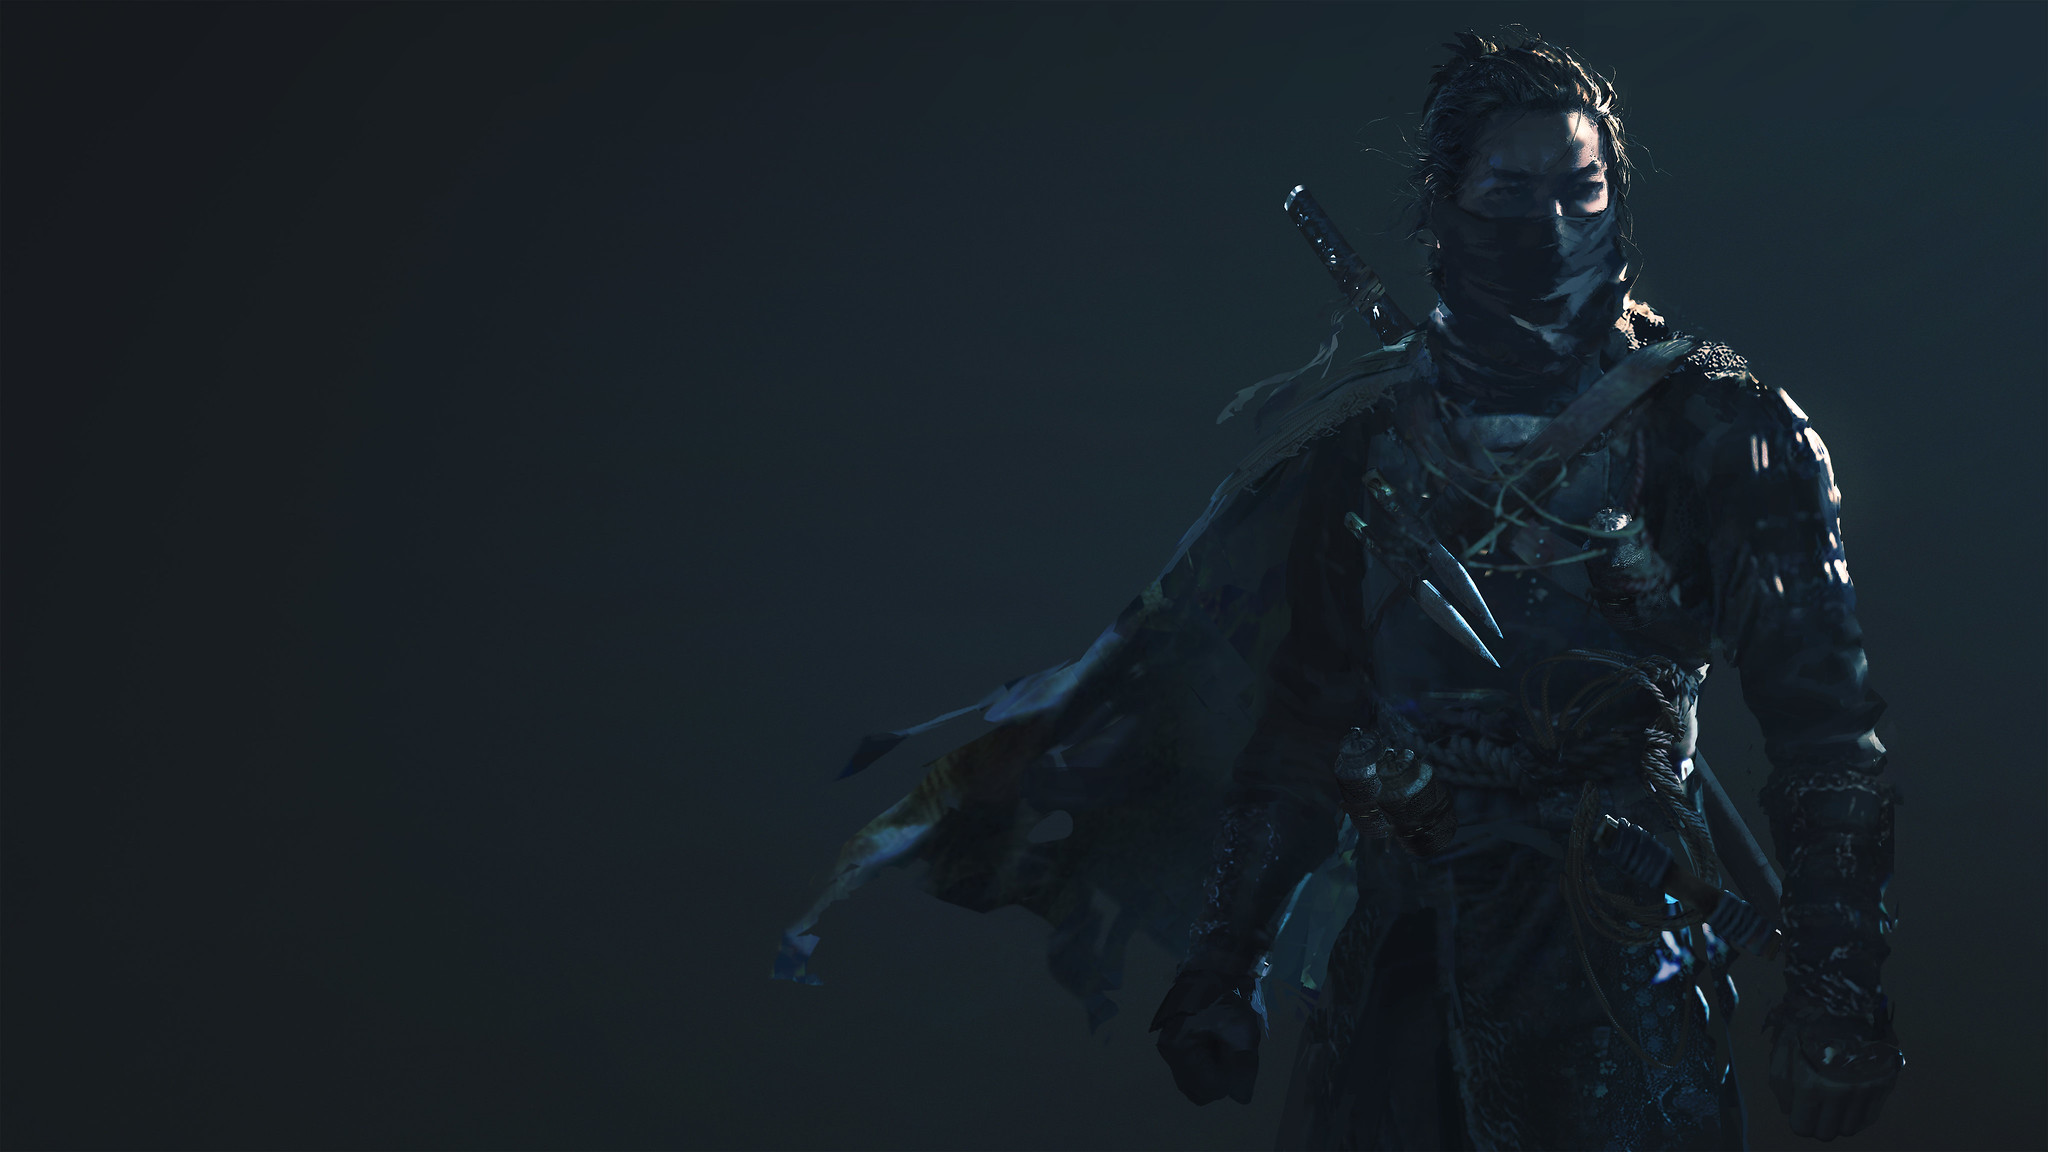
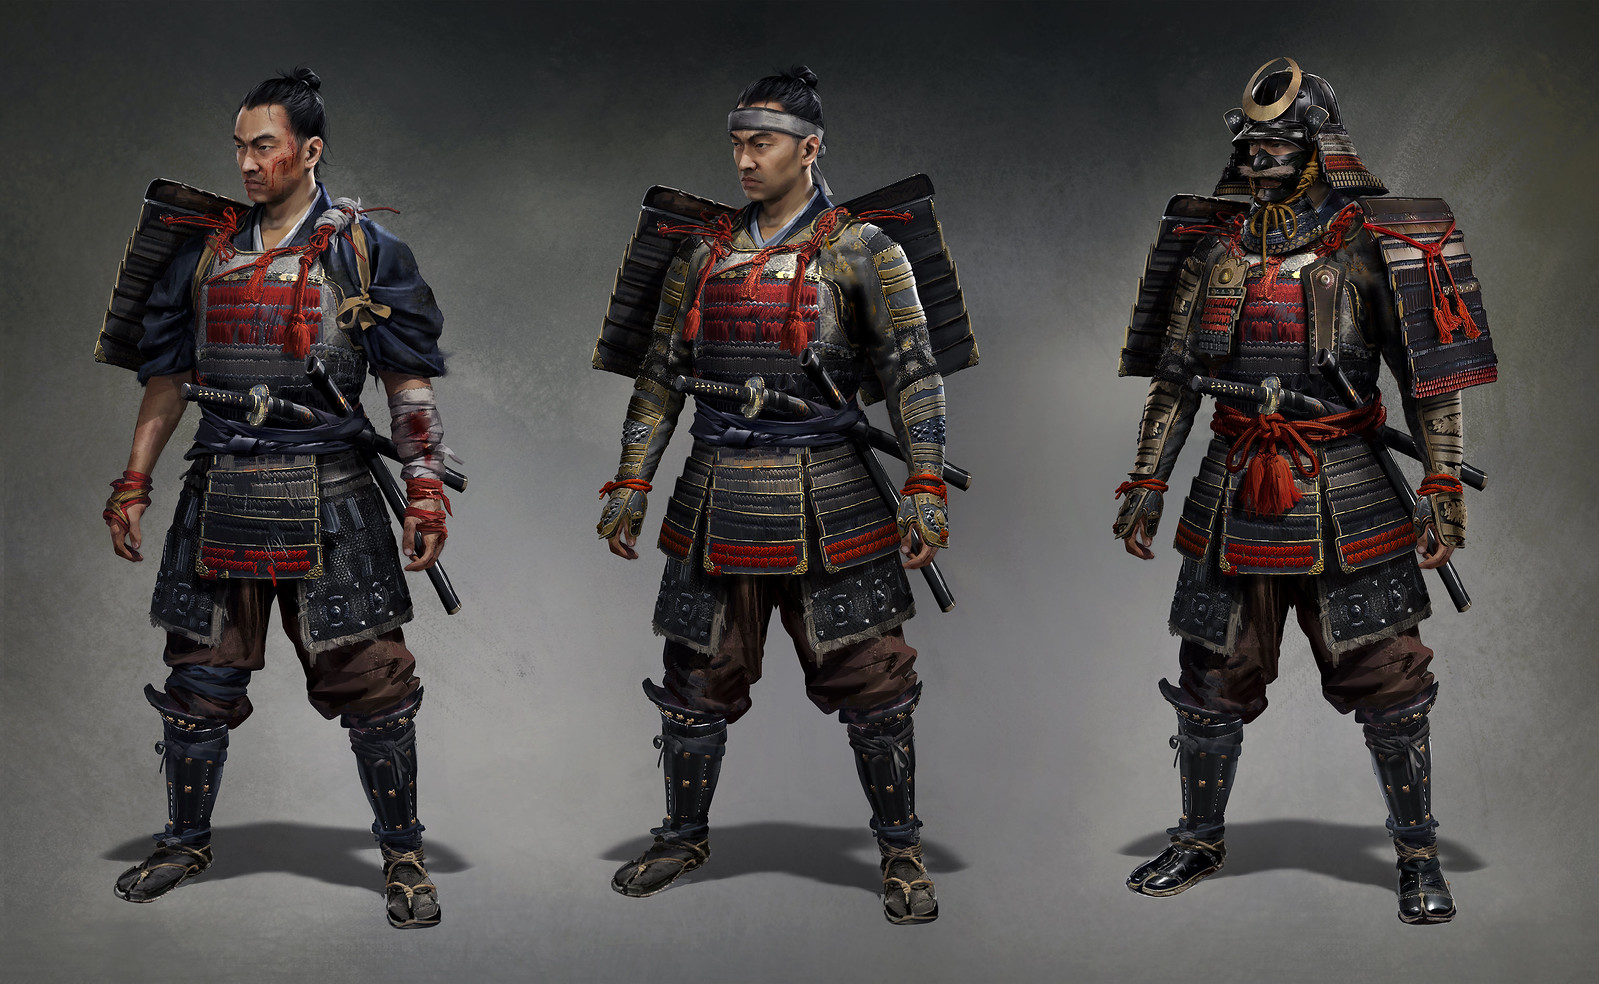
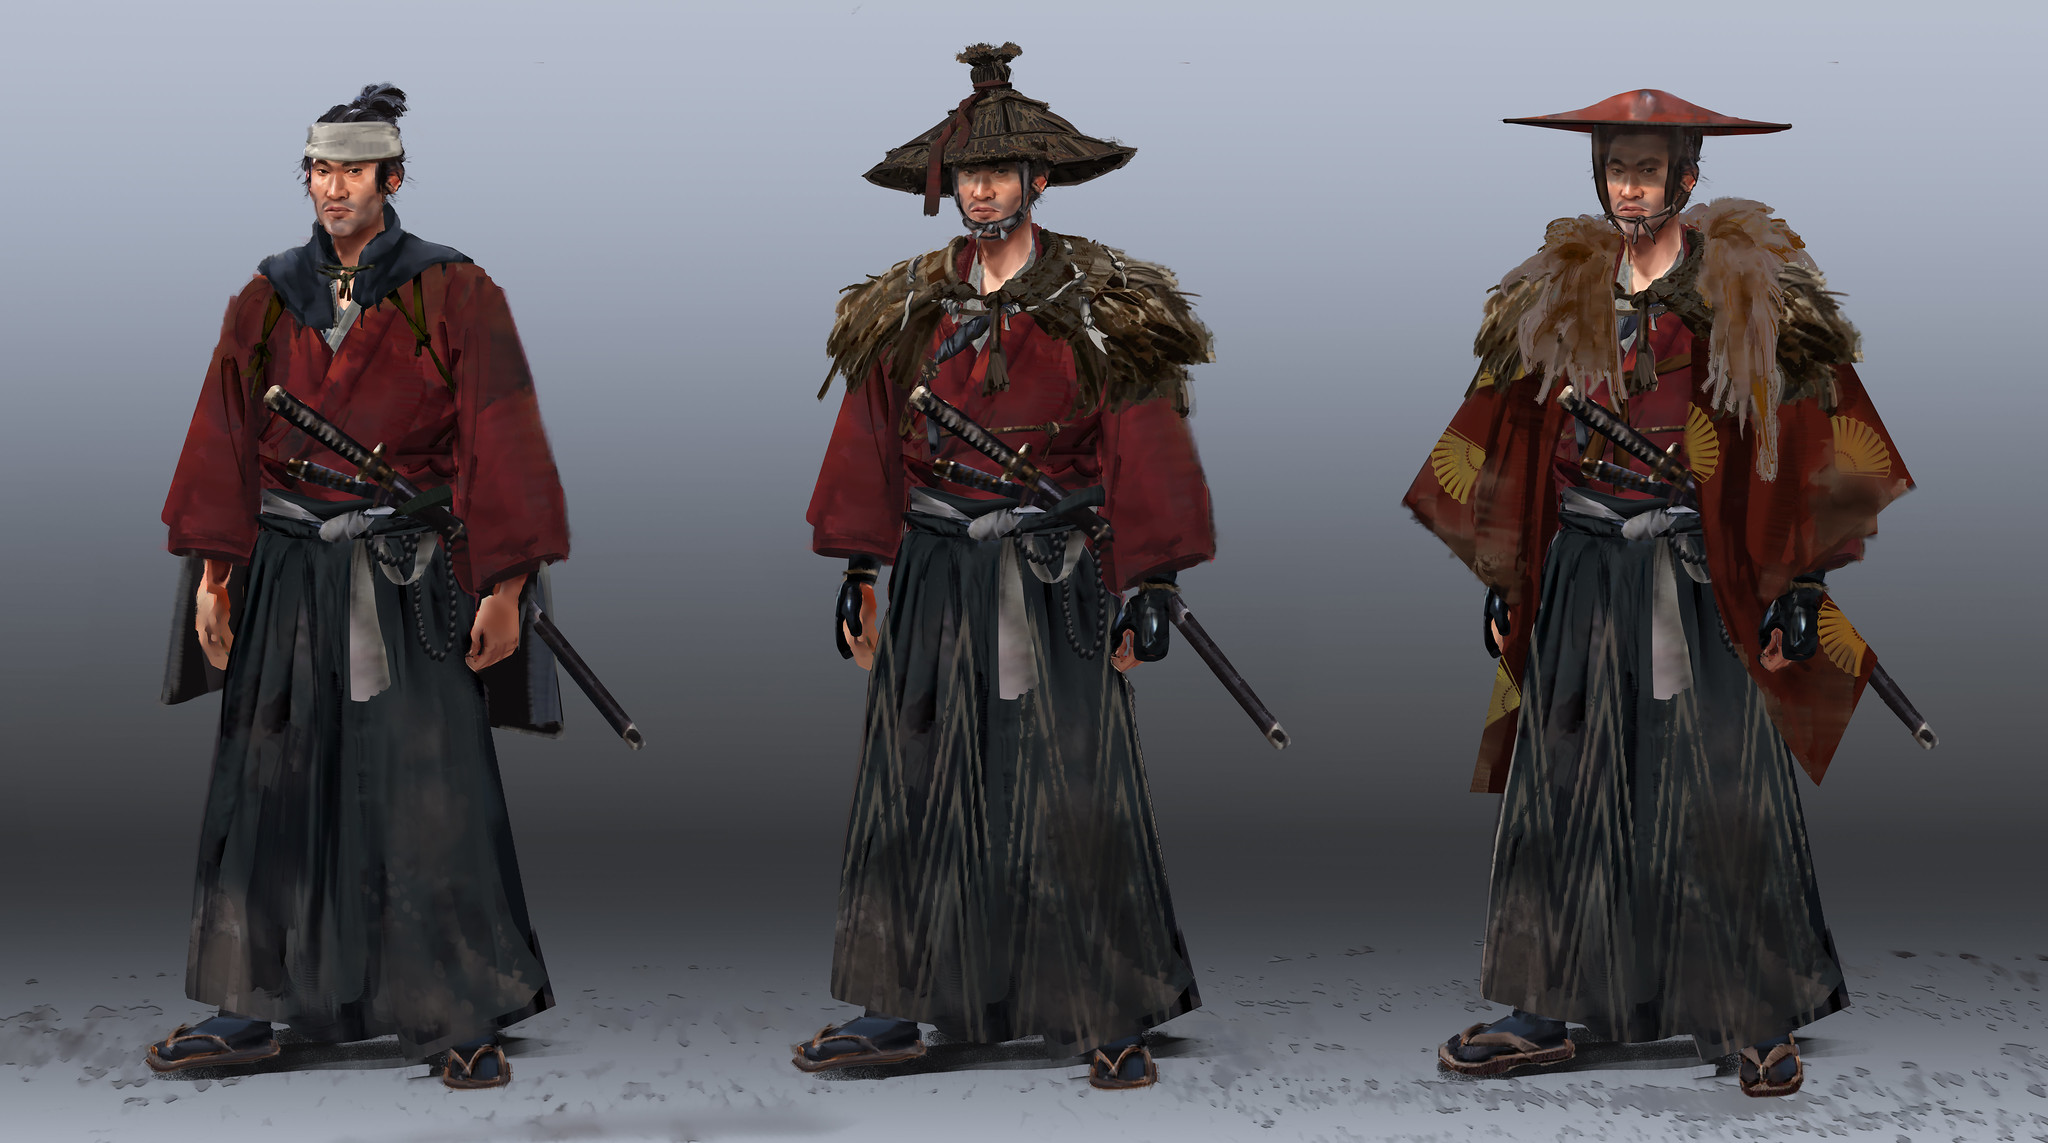
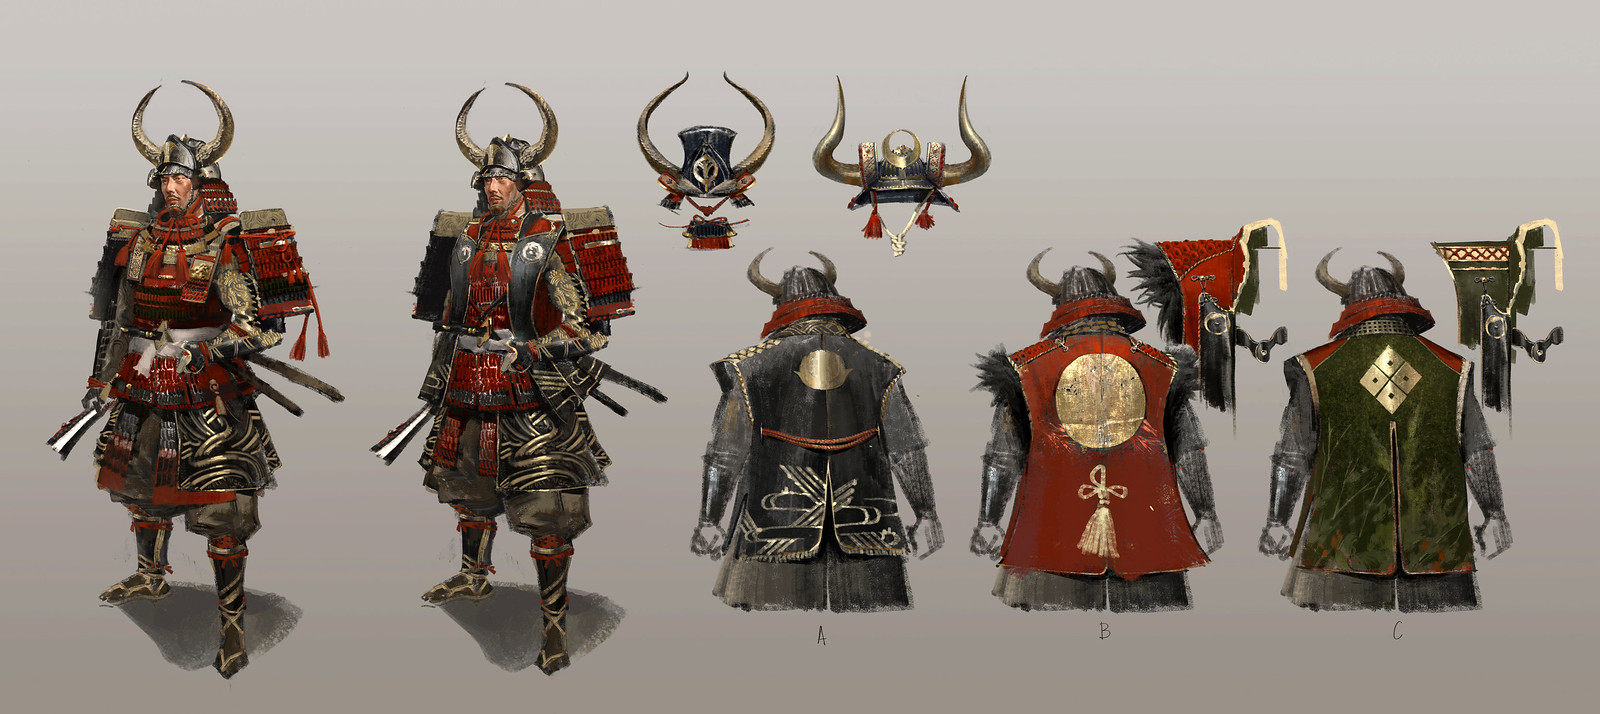
    Schon seit den frühen Entwürfen von Jin wussten wir, dass er sich in den Schatten verstecken, aber gleichzeitig einen Look haben sollte, der das Gefühl vermittelt, dass er von seiner Samurai-Rüstung und -Ästhetik inspiriert wurde. In der Geschichte tauchen zwar immer wieder Assassinen auf, die im Geheimen operieren, allerdings gibt es nur spärliche Informationen über den ersten Krieger dieser Art. Unser Charakter musste seine Traditionen zurücklassen und sich aus der Notwendigkeit heraus weiterentwickeln, sodass wir die fiktionale Geschichte eines neuartigen Kriegers erzählen konnten. Wir gaben uns nicht mit dem traditionellen, stereotypischen Assassinen in schwarzer Stoffkleidung zufrieden, sondern arbeiteten mit Elementen von Samurai-Rüstungen, um den Geist realistischer wirken zu lassen. Jins Charakterentwicklung vom ehrenhaften Samurai zum entehrten Krieger spiegelt sich in den subtilen Mustern sowie den traditionellen Rüstungsteilen wieder, die die Kleidung des Geistes glaubwürdiger in dieser Zeit verankern.

    Für Jins traditionellere Kleidung orientierten wir uns an Rüstungen aus der Kamakura- und der Heian-Periode. Sie strahlen eine Erhabenheit aus, die gut zu Jins Geschichte passt und im direkten Kontrast zum dunklen, gedeckten Entwurf der Geist-Rüstung steht. Jin war zuerst ein gestandener und dann ein gebrochener Samurai, der schlussendlich als Geist wiedergeboren wird. Die sperrige, eckige Form der traditionellen Samurai-Rüstung steht im direkten Gegensatz zu den leichten, agilen Elementen der Geist-Rüstung.

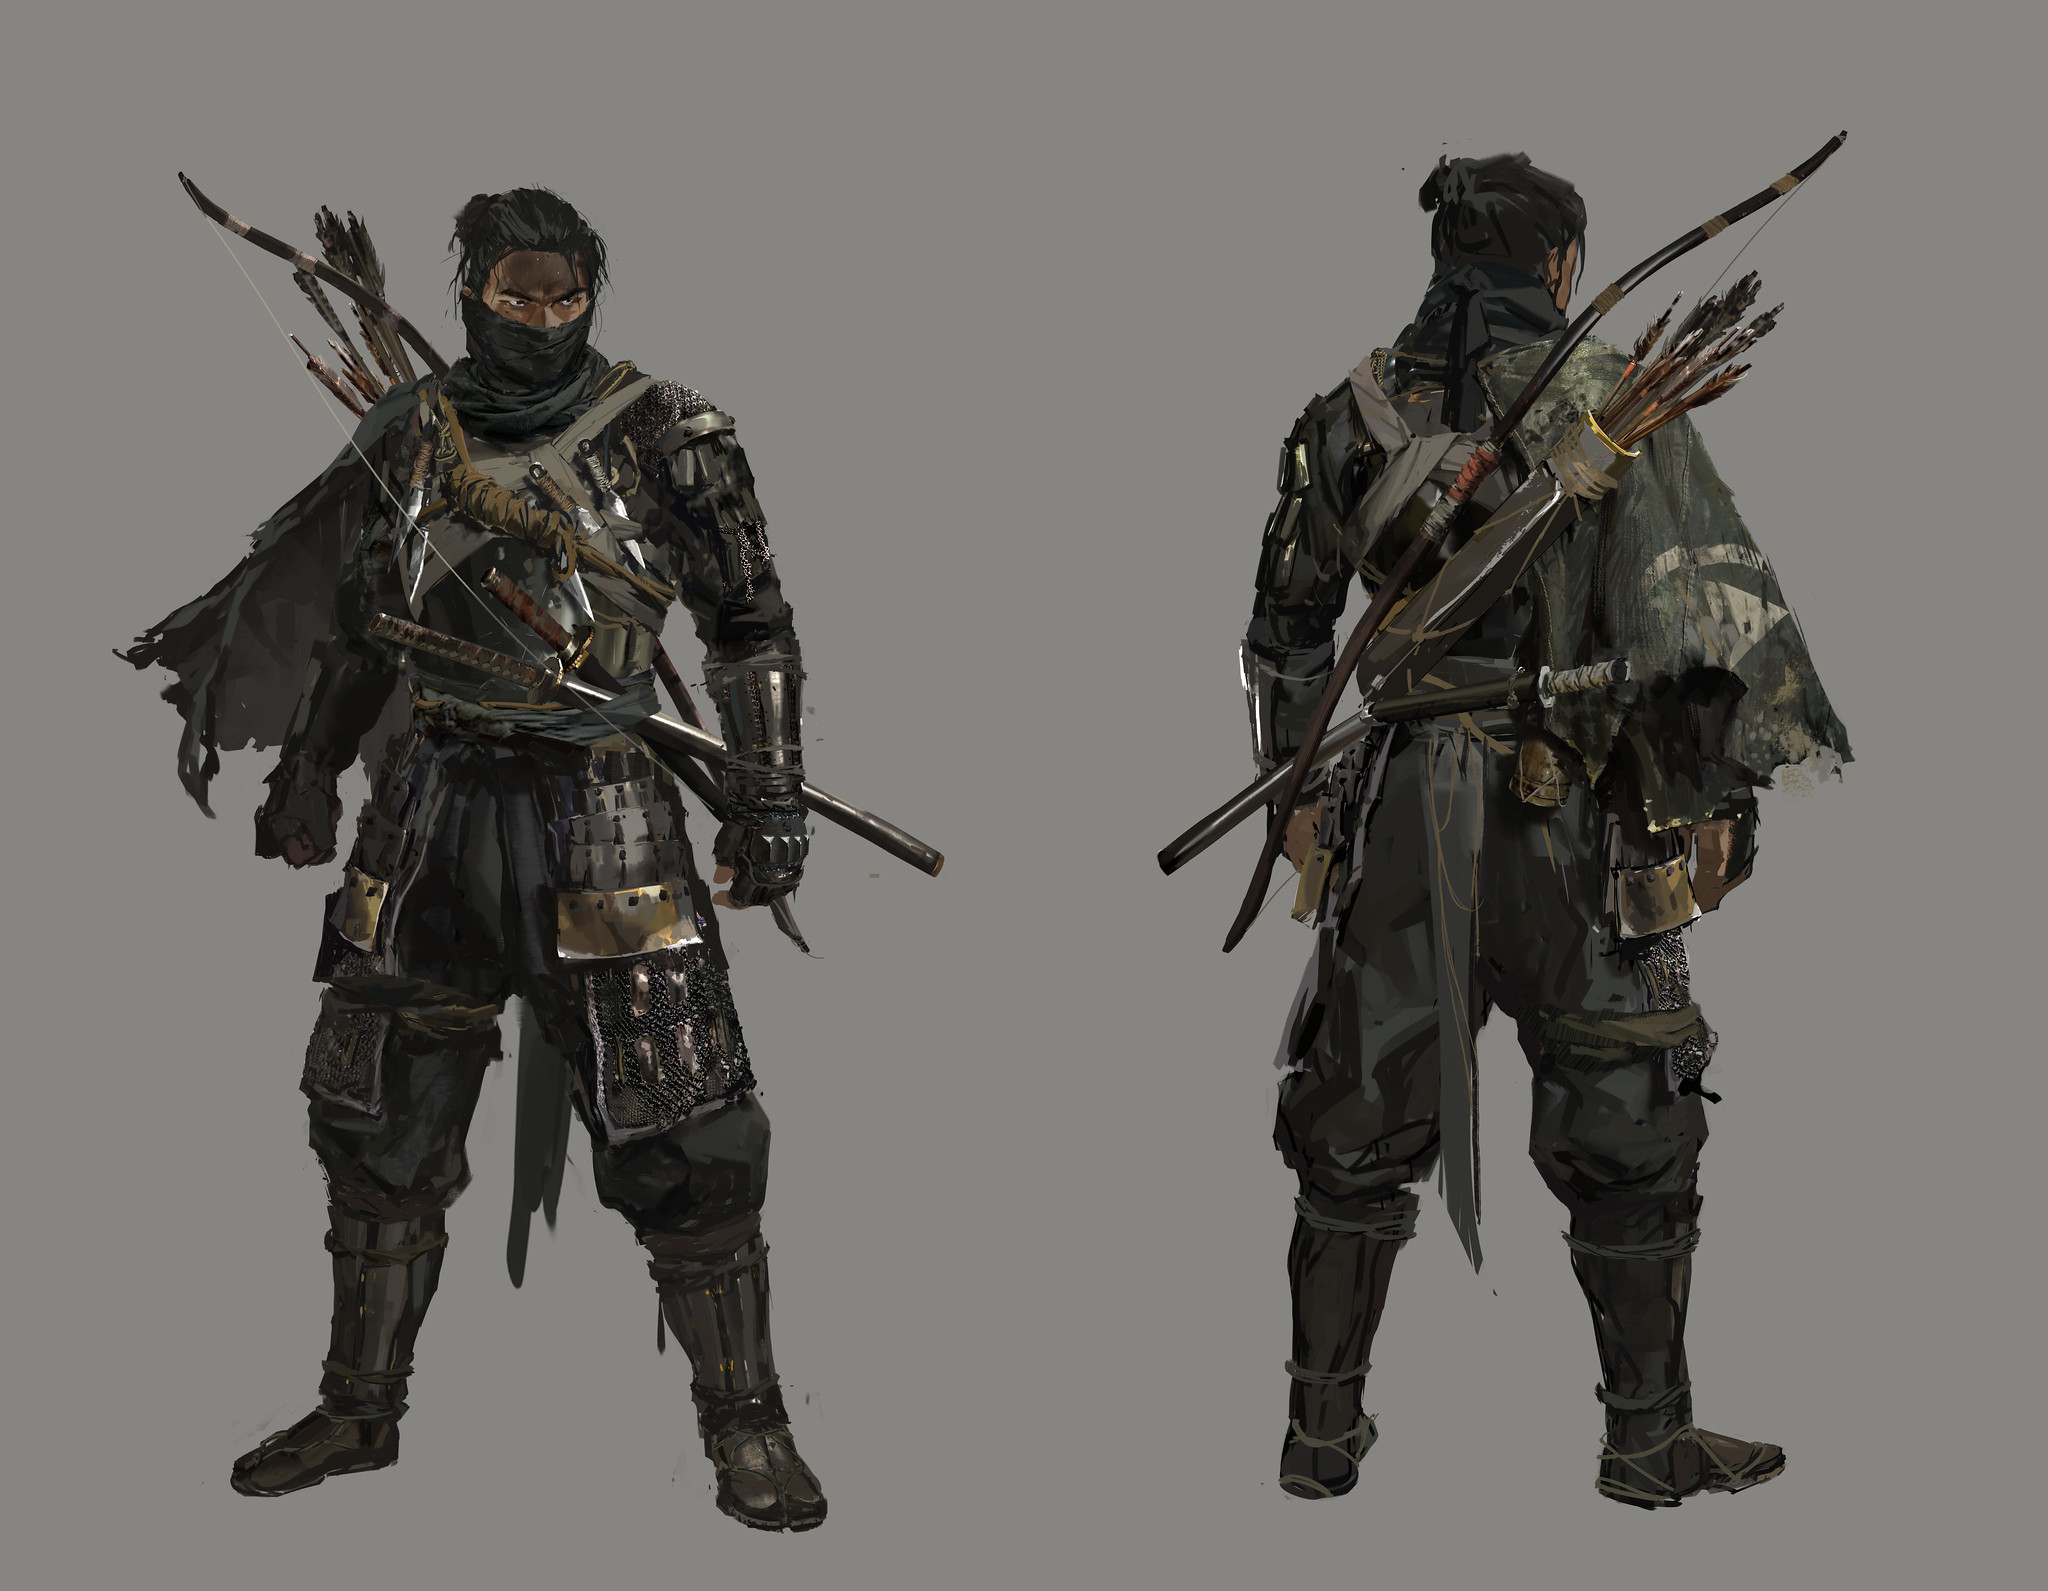
    Es gibt außerdem eine Reihe von Outfits, die Jin im Laufe seiner Reise finden kann. Hier hatten wir größere kreative Freiheiten und konnten uns eher auf die Samurai-Fantasie konzentrieren, wie z. B. bei Tadayoris Rüstung, die von Yabusame (traditionelle japanische Bogenschießkunst zu Pferd) inspiriert wurde. Vorwiegend aus Stoff erstelle Kleidung – z. B. das Kensei- und das Reisenden-Outfit – sollte den Spielern das Gefühl eines einsamen, wandernden Rōnins vermitteln, ganz genau wie in den alten Samurai-Filmen. Da der Wind in unserem Spiel eine wichtige Rolle einnimmt, stellten wir sicher, dass Teile des Outfits wie Umhänge oder Quasten auch immer auf den Wind reagieren. So ist der Charakter stärker mit der Spielwelt verbunden.

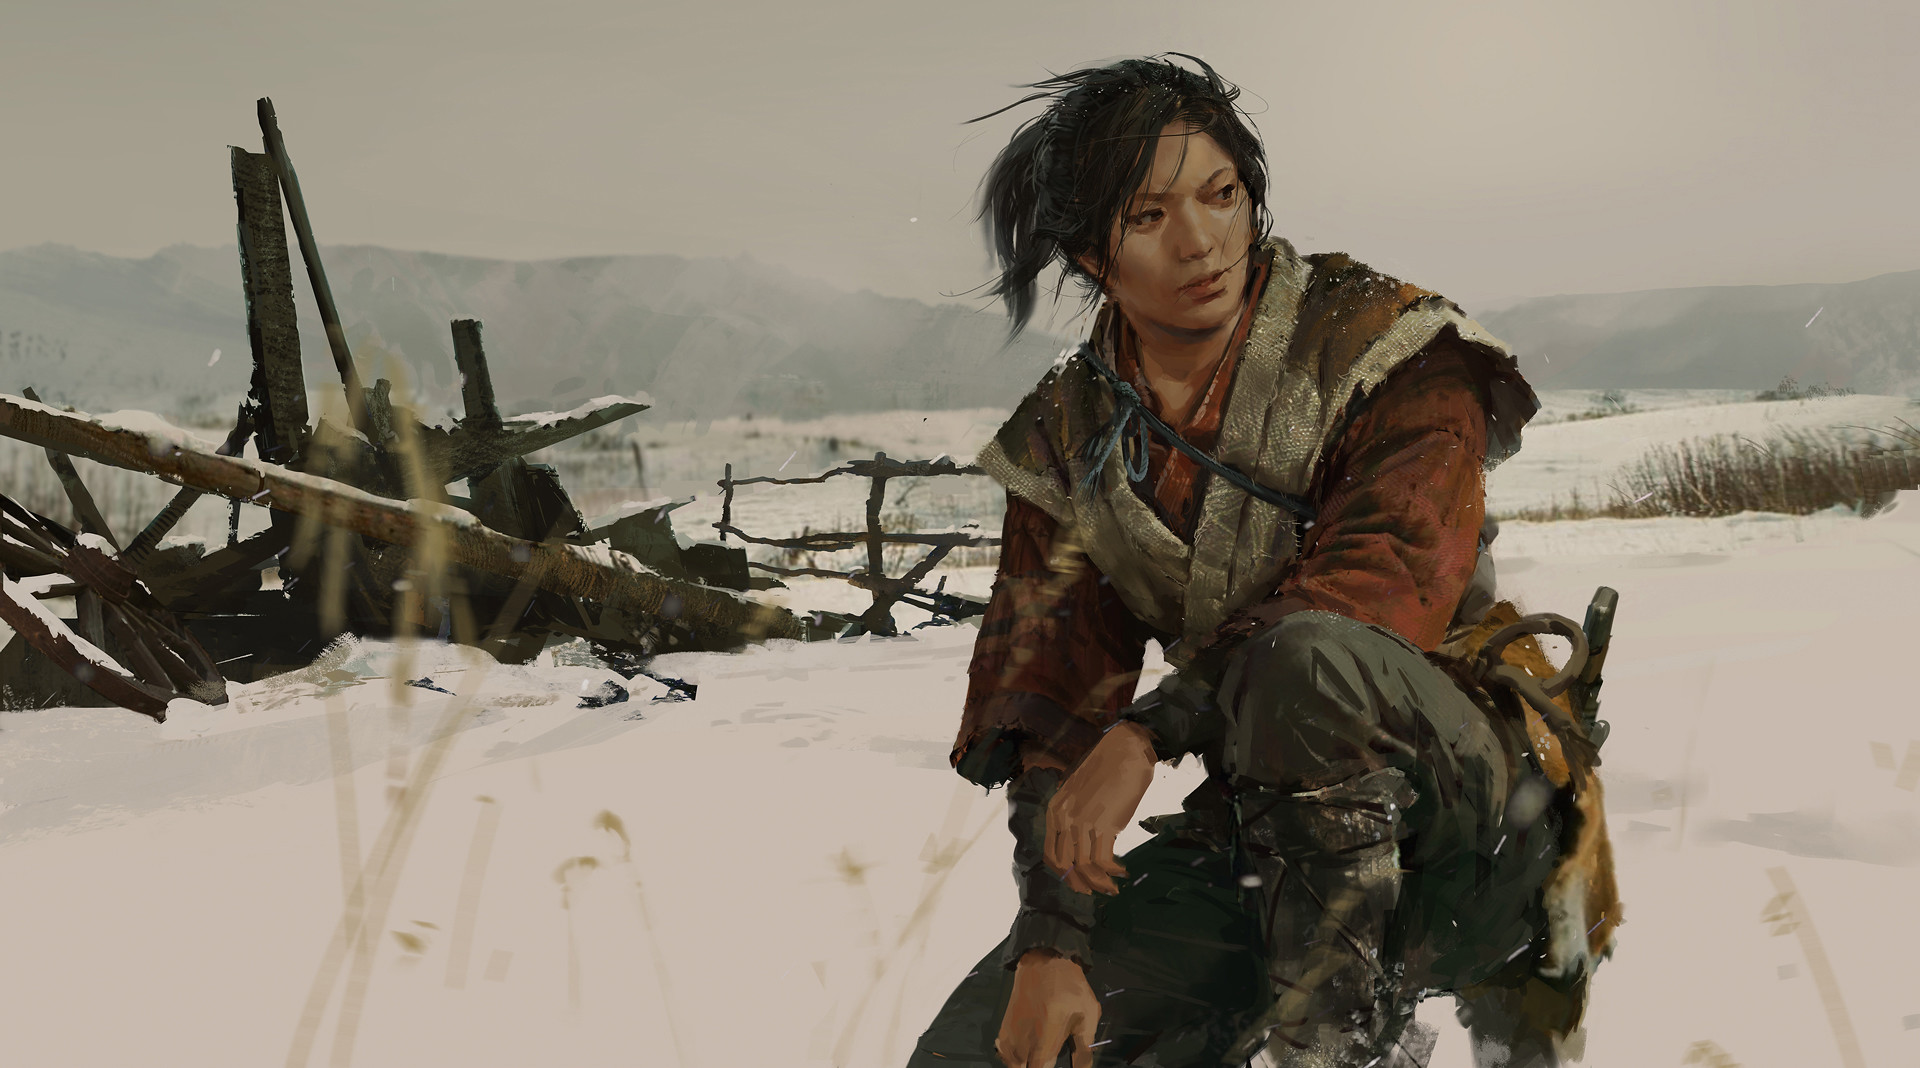
    Die anderen Haupt- und Nebencharaktere durchliefen die gleichen Prozesse. Auch sekundäre Charaktere wurden mit viel Liebe zum Detail entworfen – genau wie unsere Hauptrollen. Ich denke dabei vor allem an die schmuckvollen Muster von Shimuras Rüstung oder den Schal und die Wolkenmuster von Yuriko, die auf ihr verblassendes Gedächtnis schließen lassen.

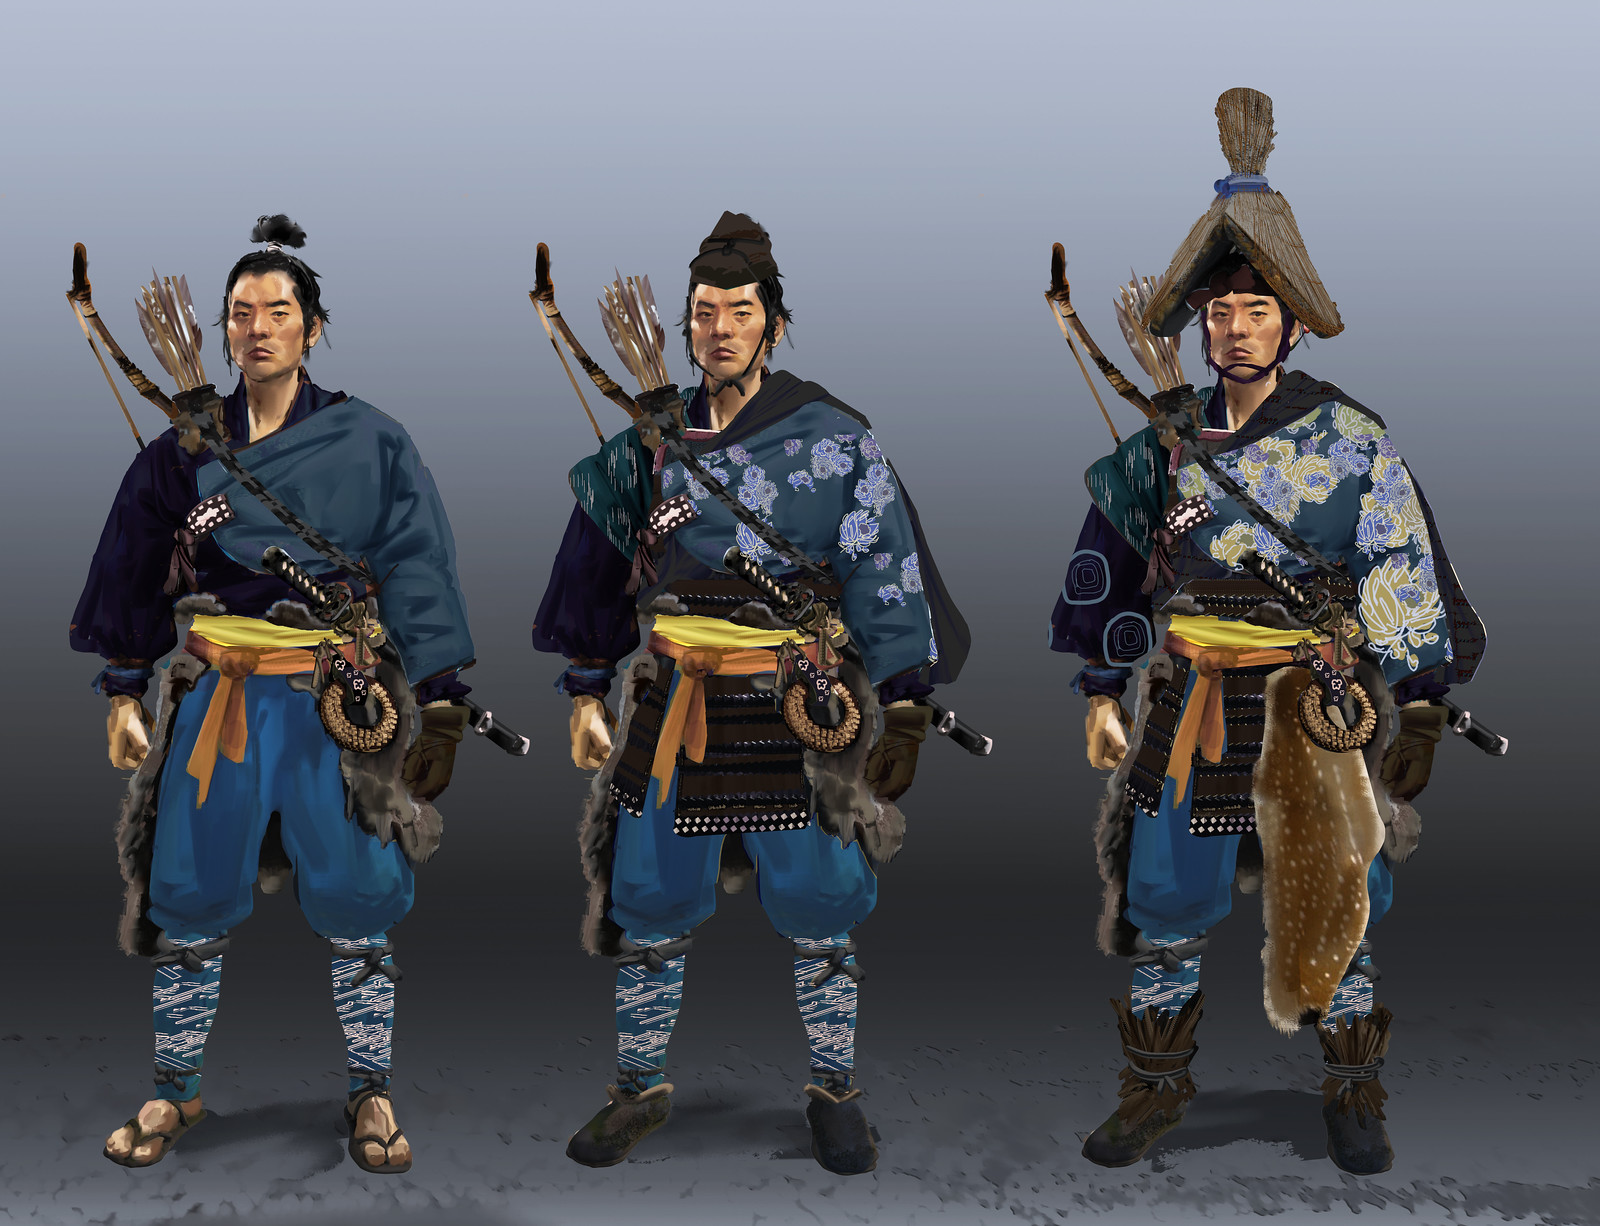
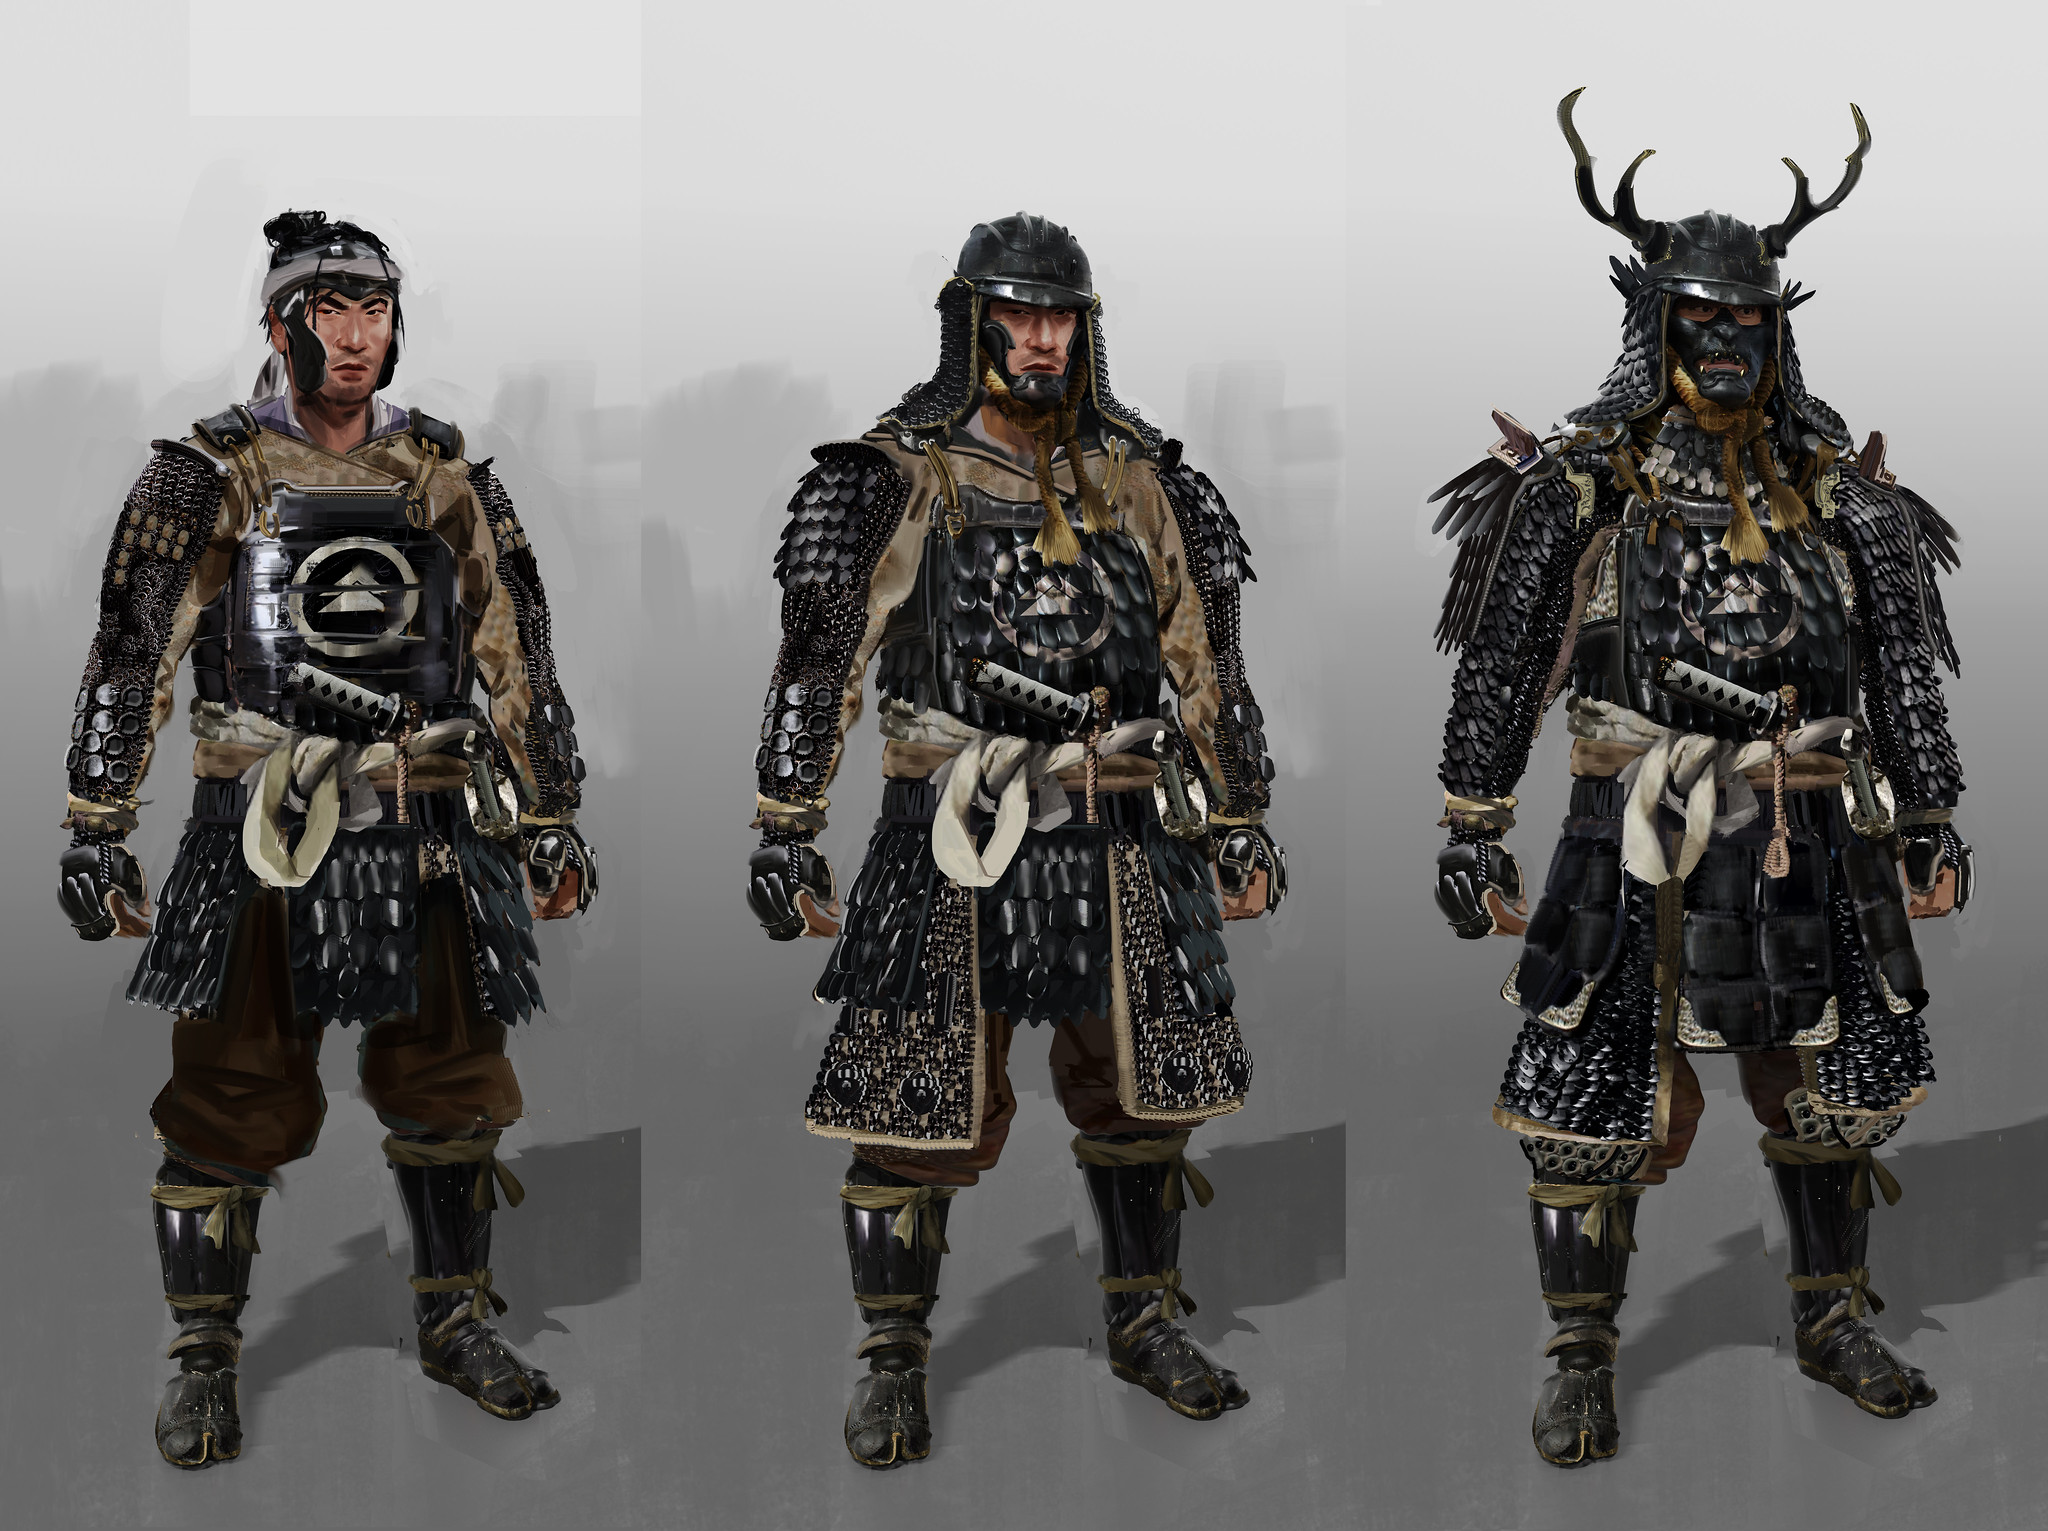
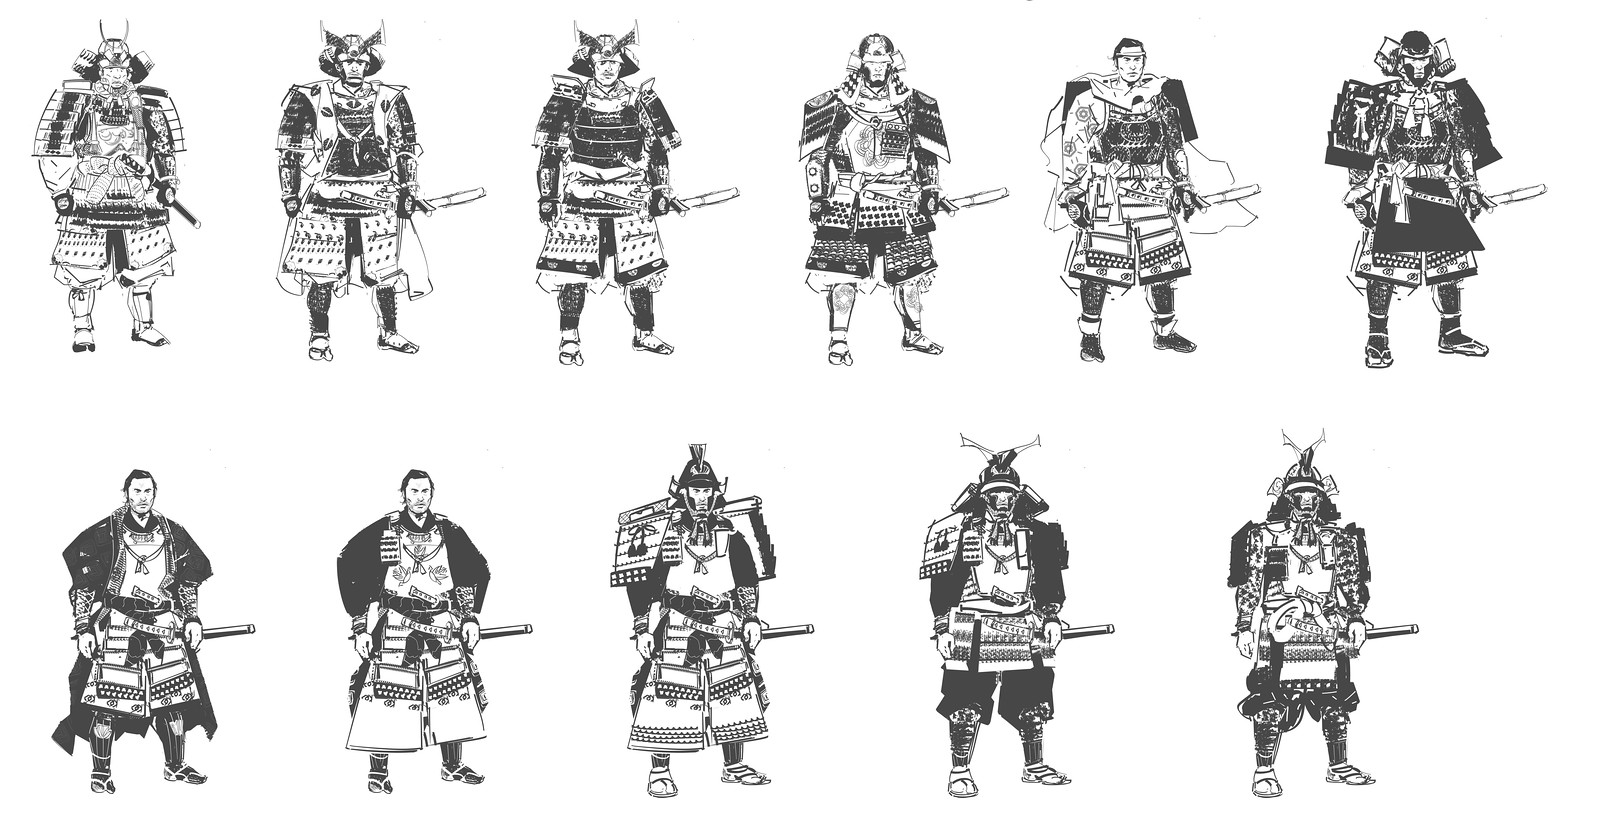
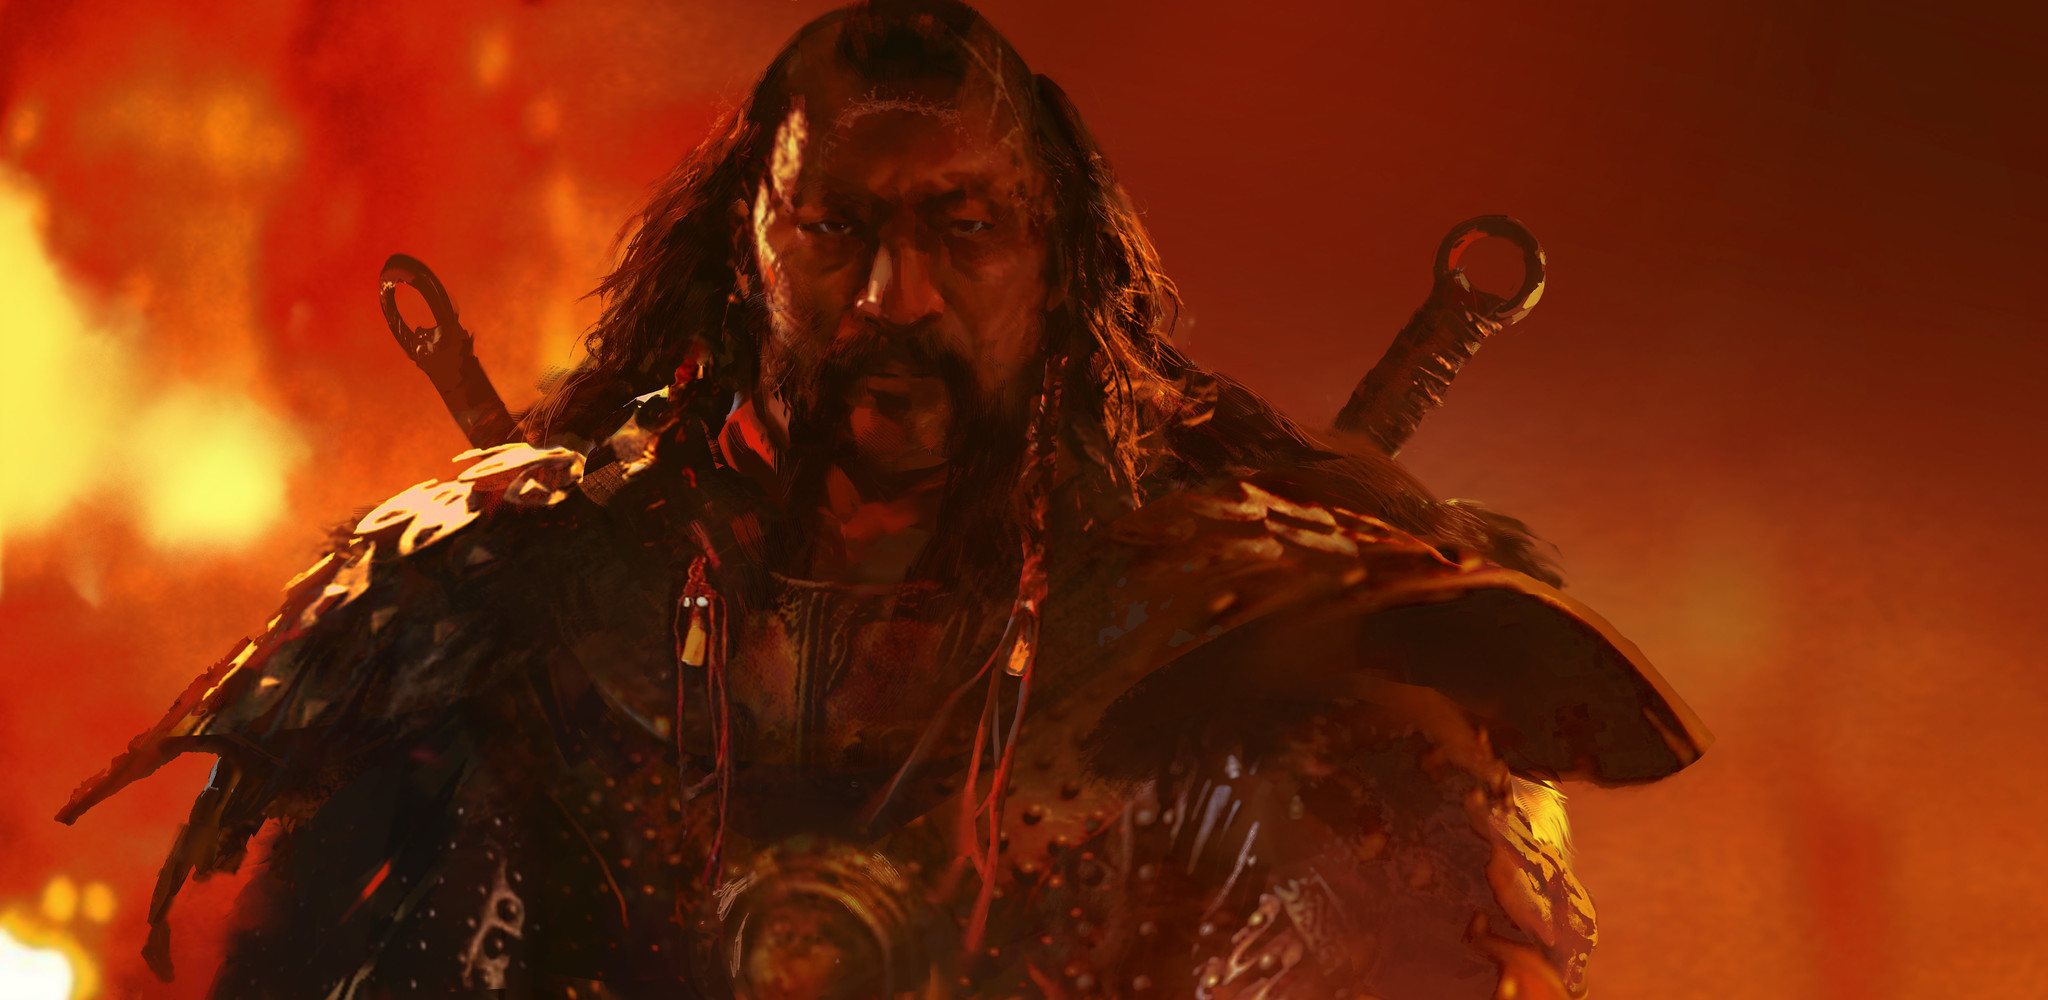
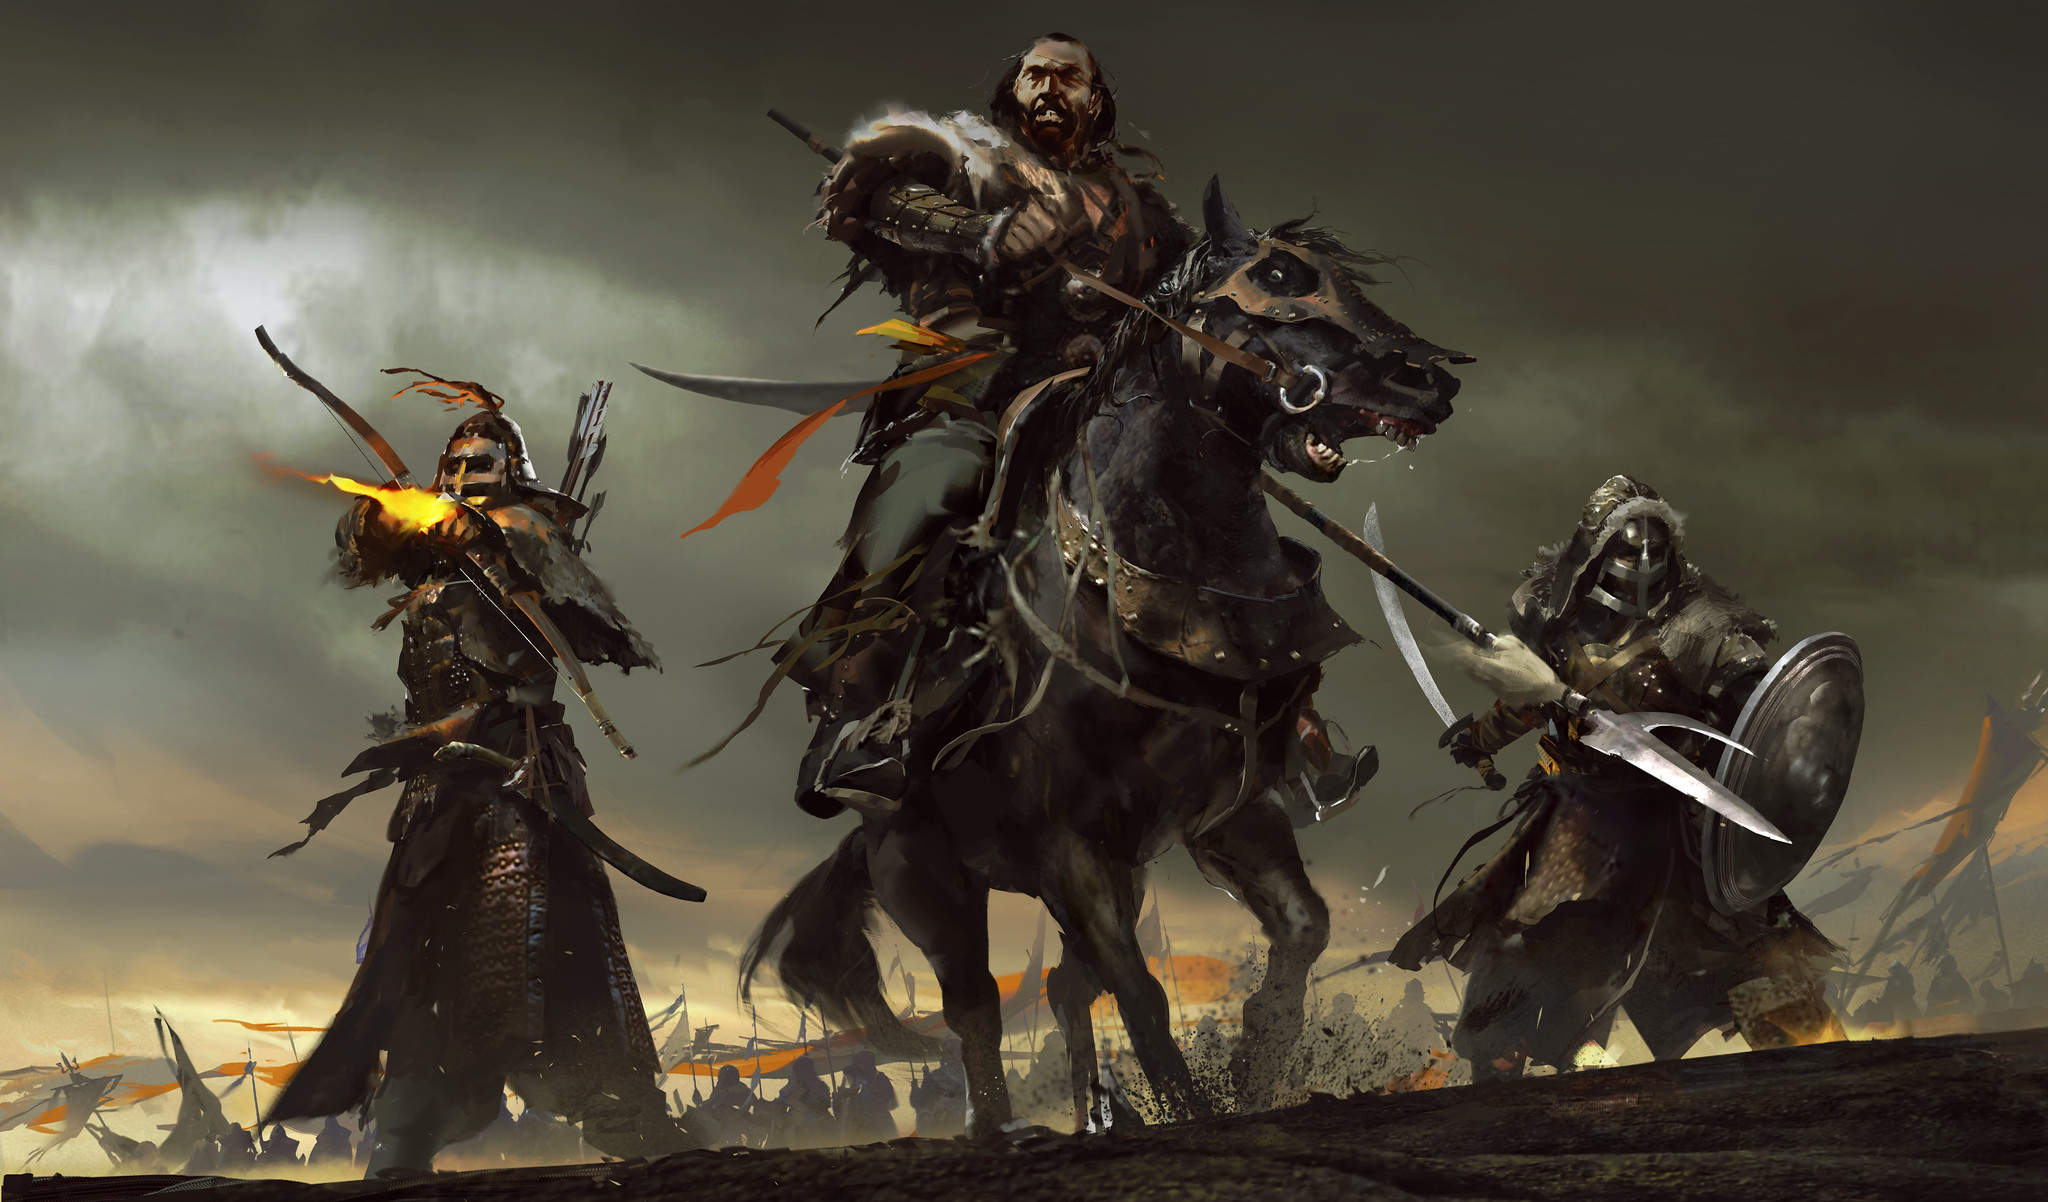
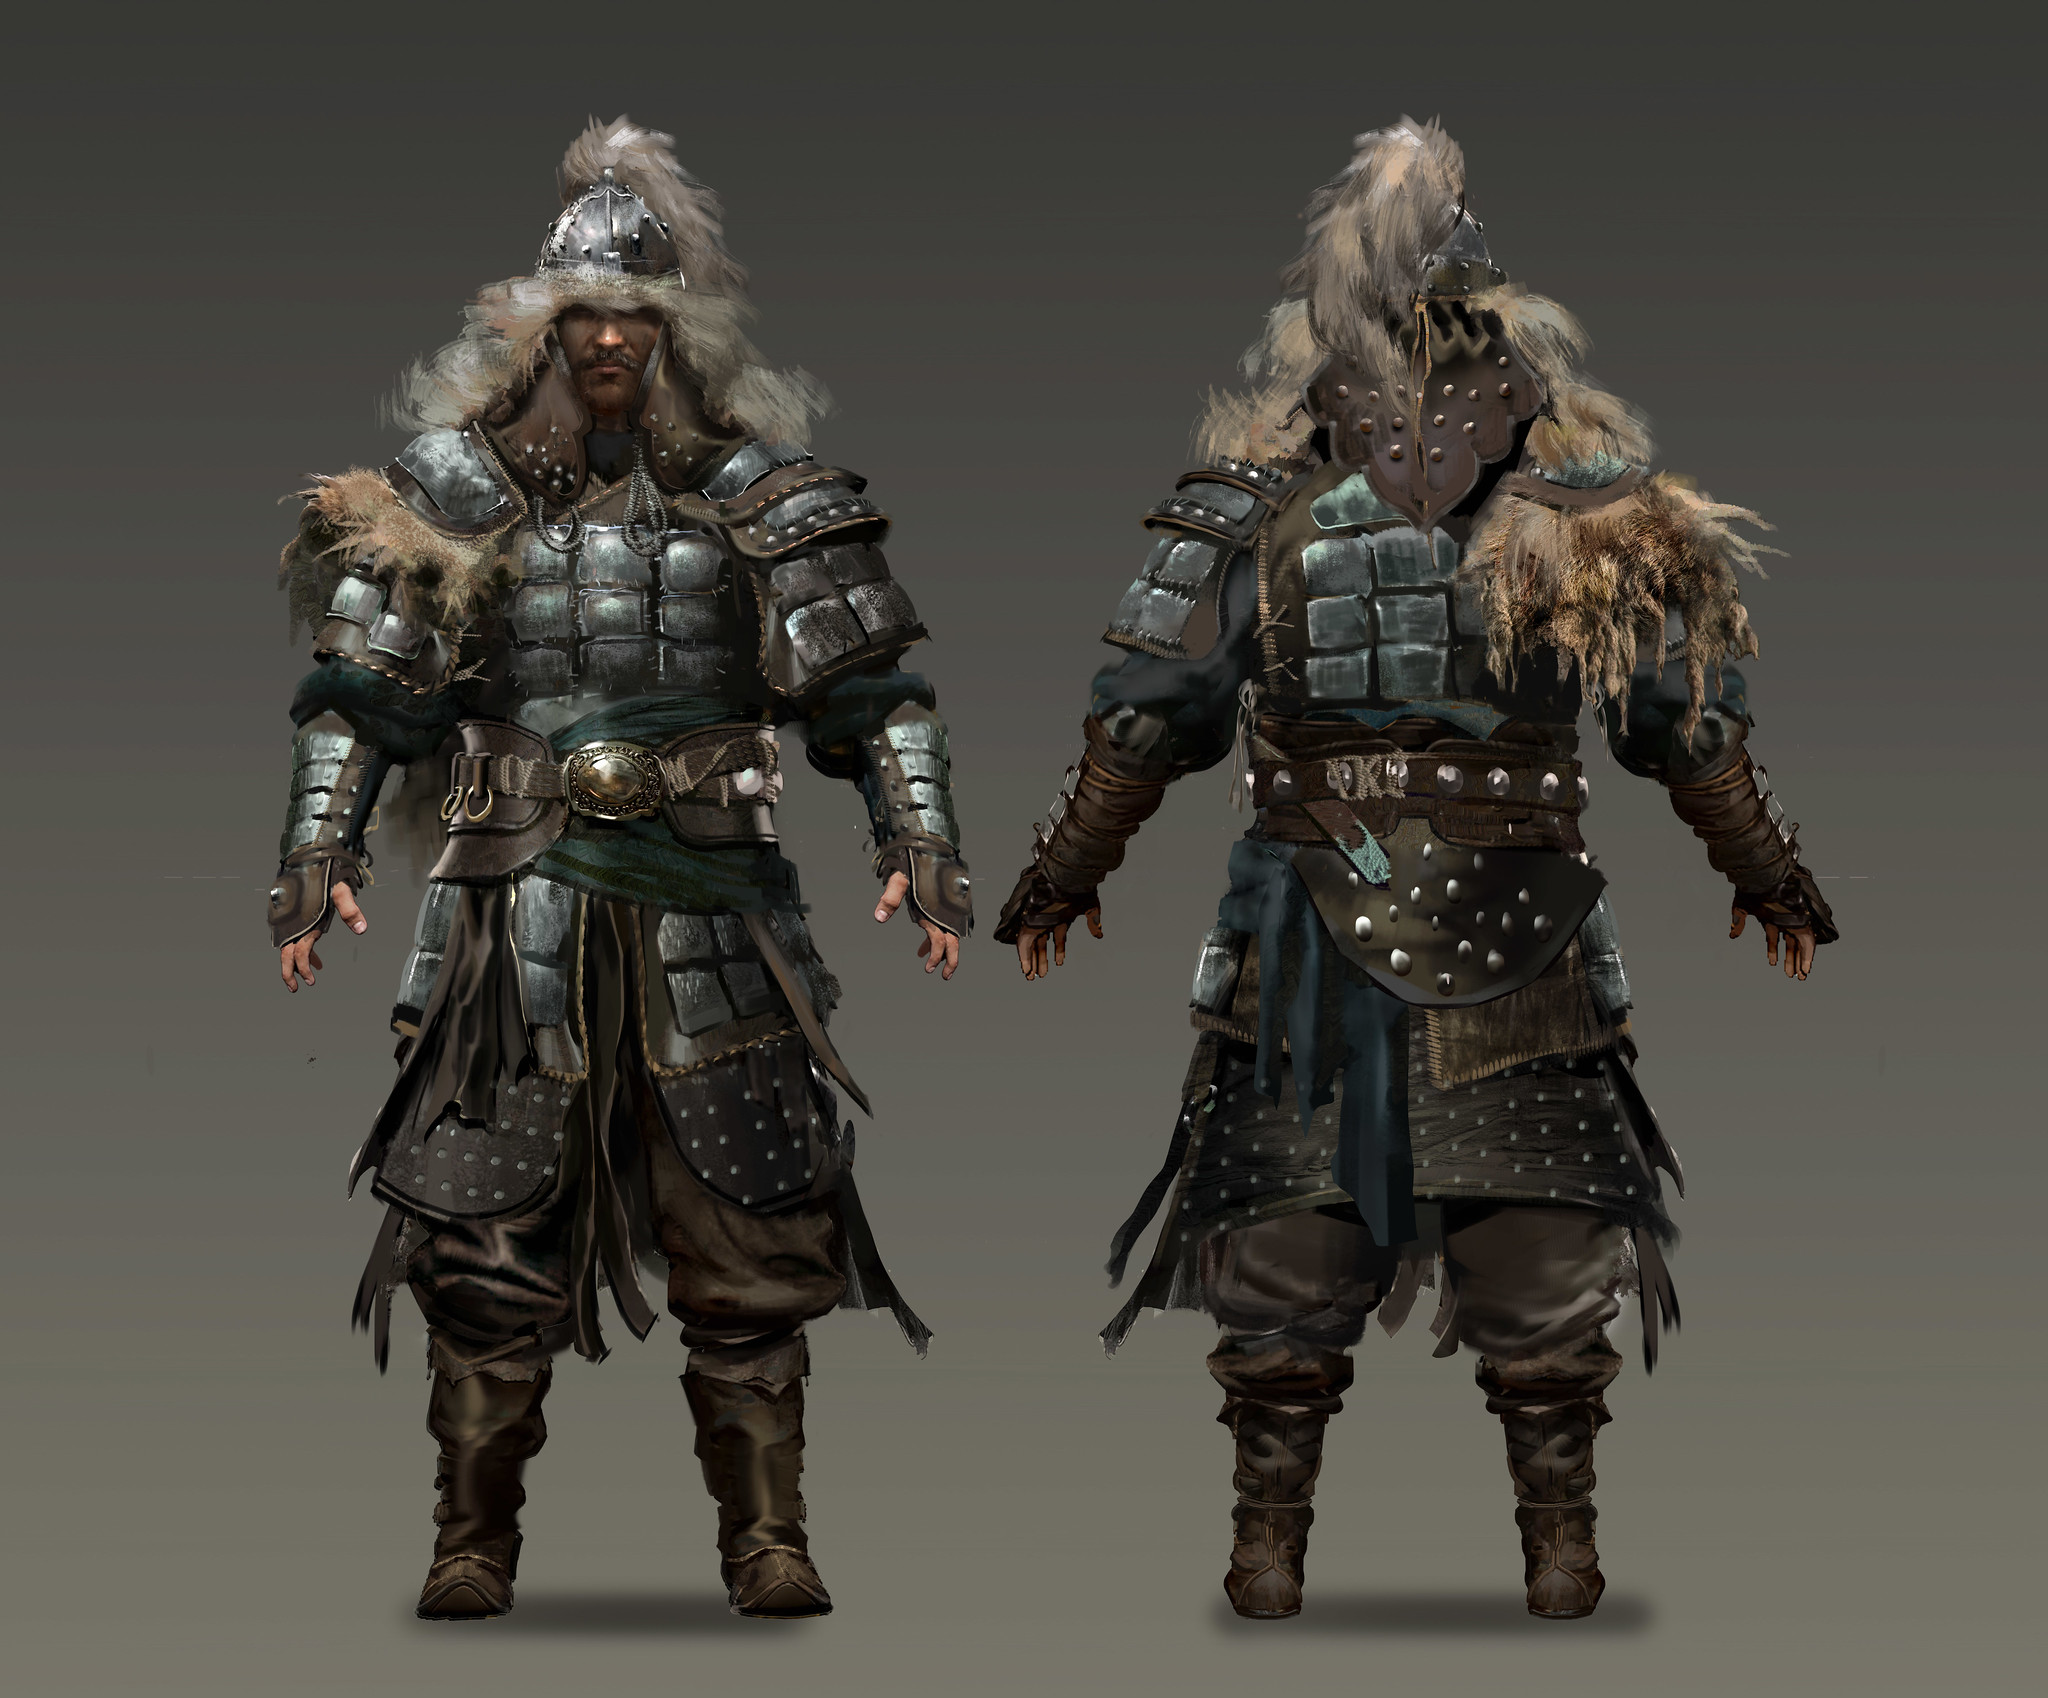
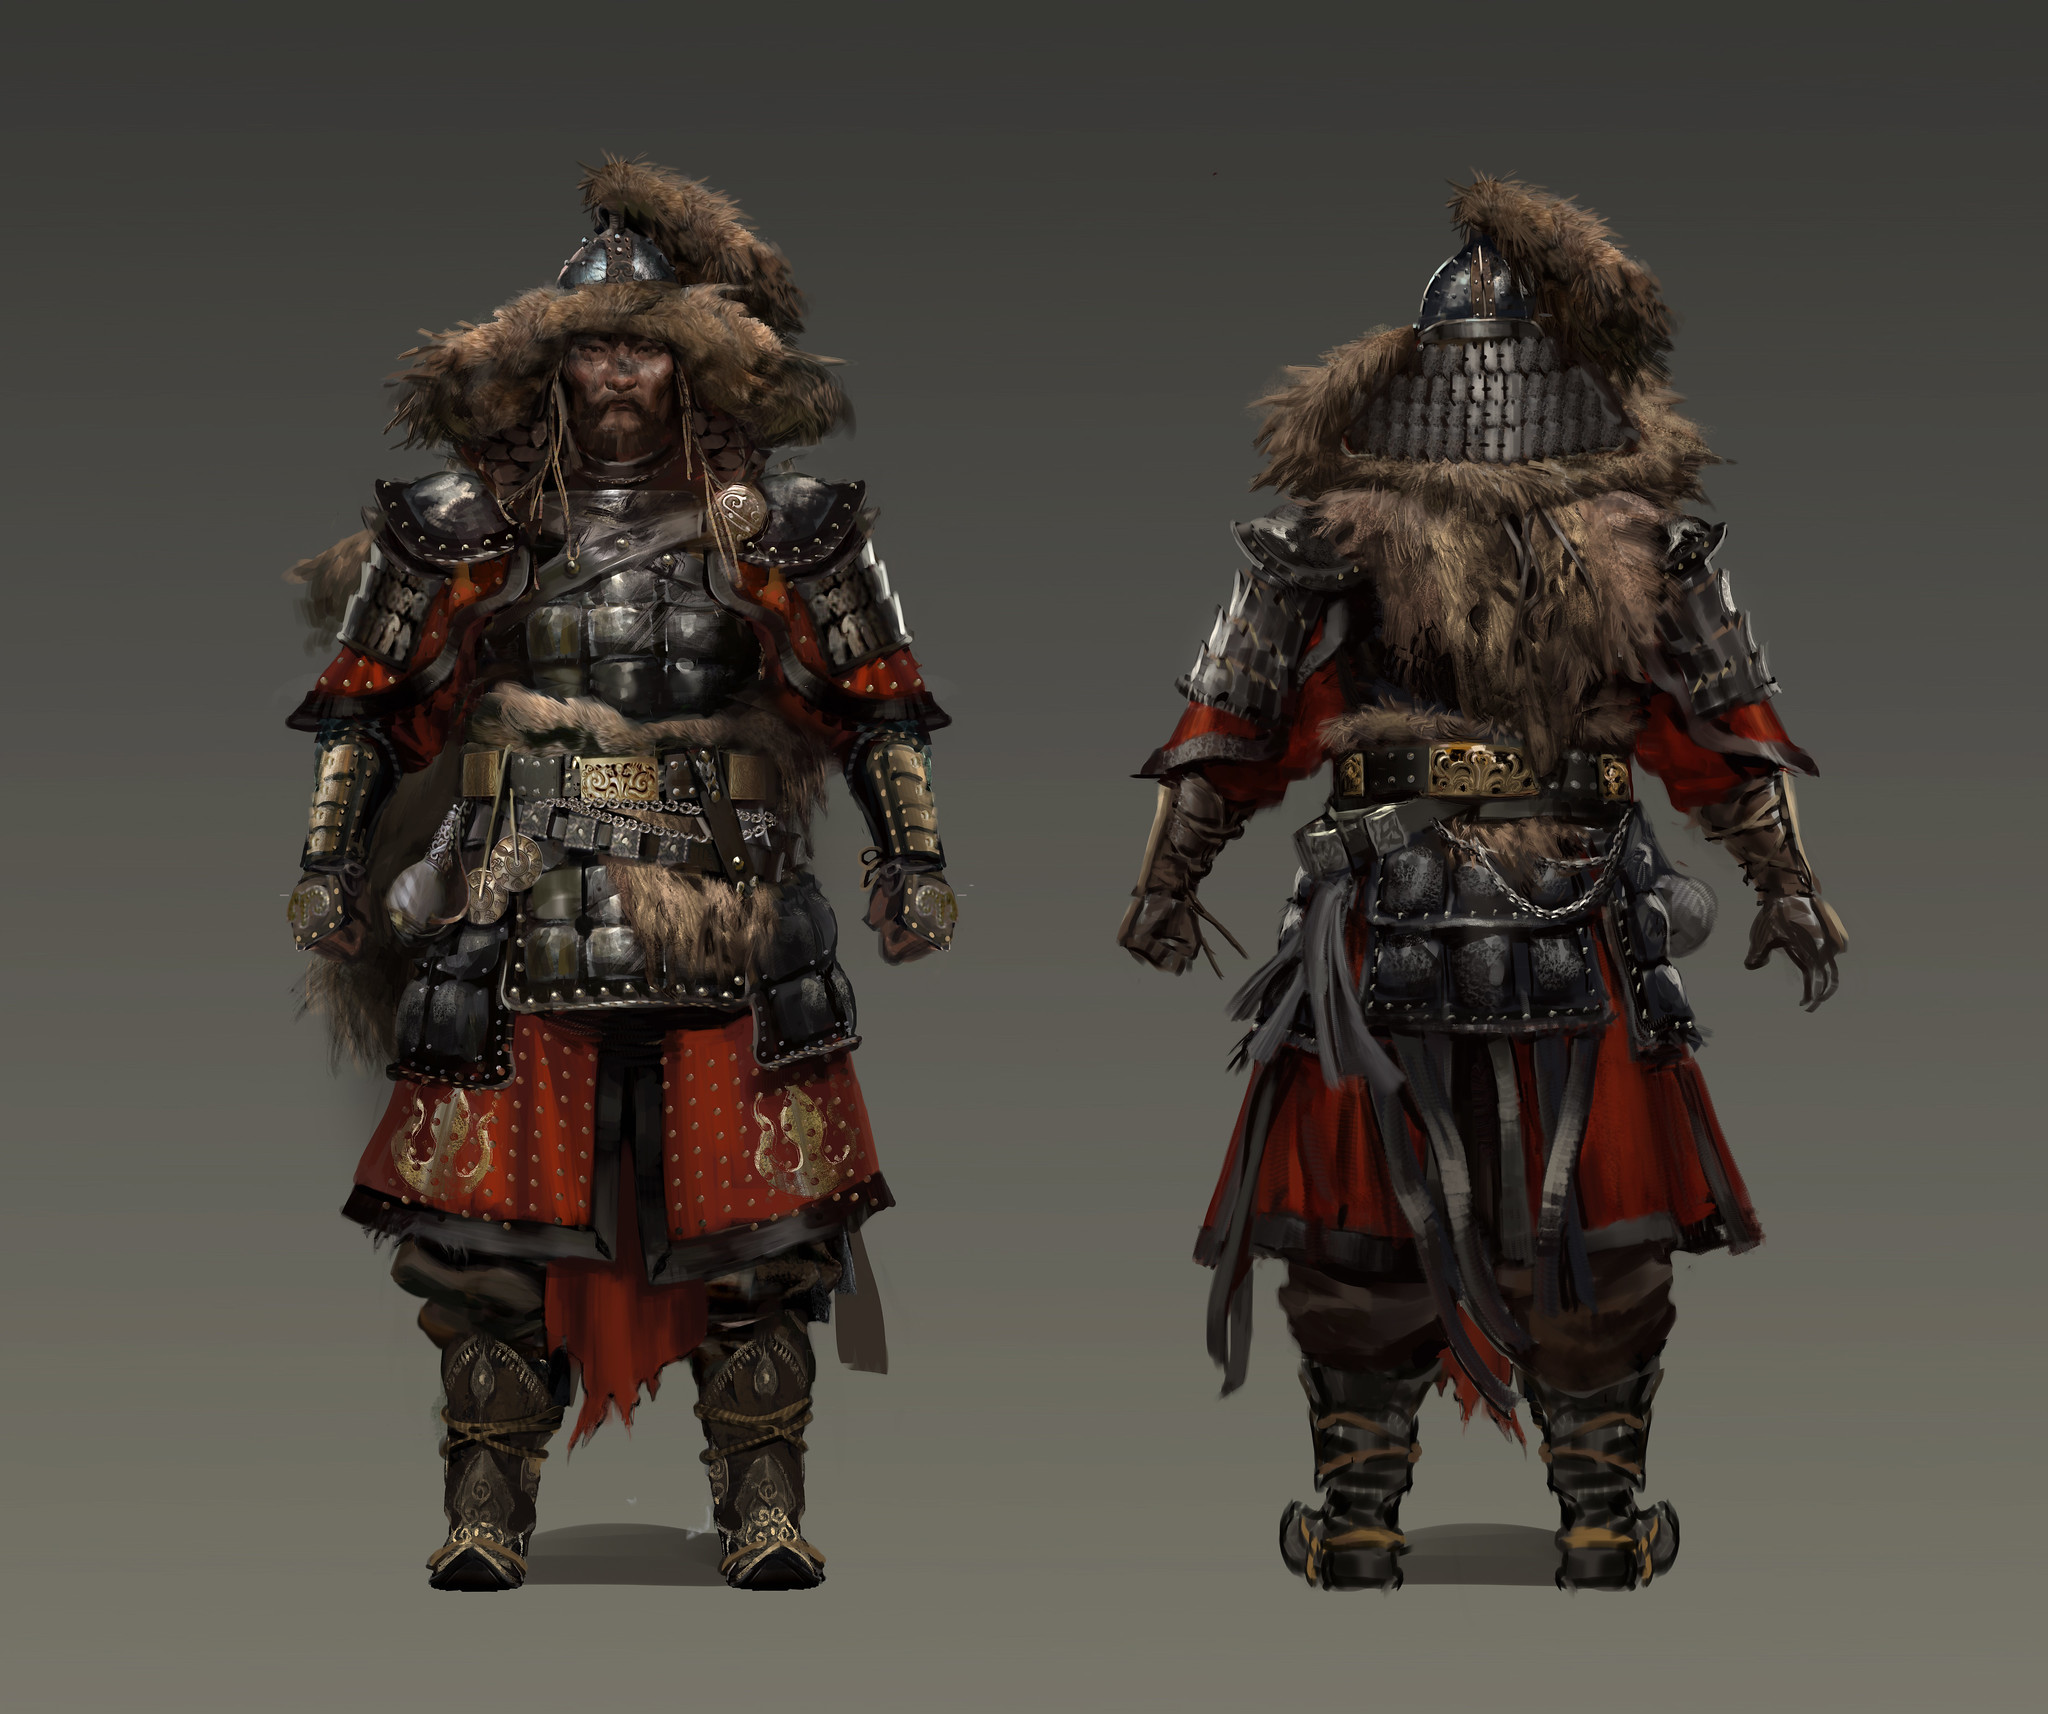
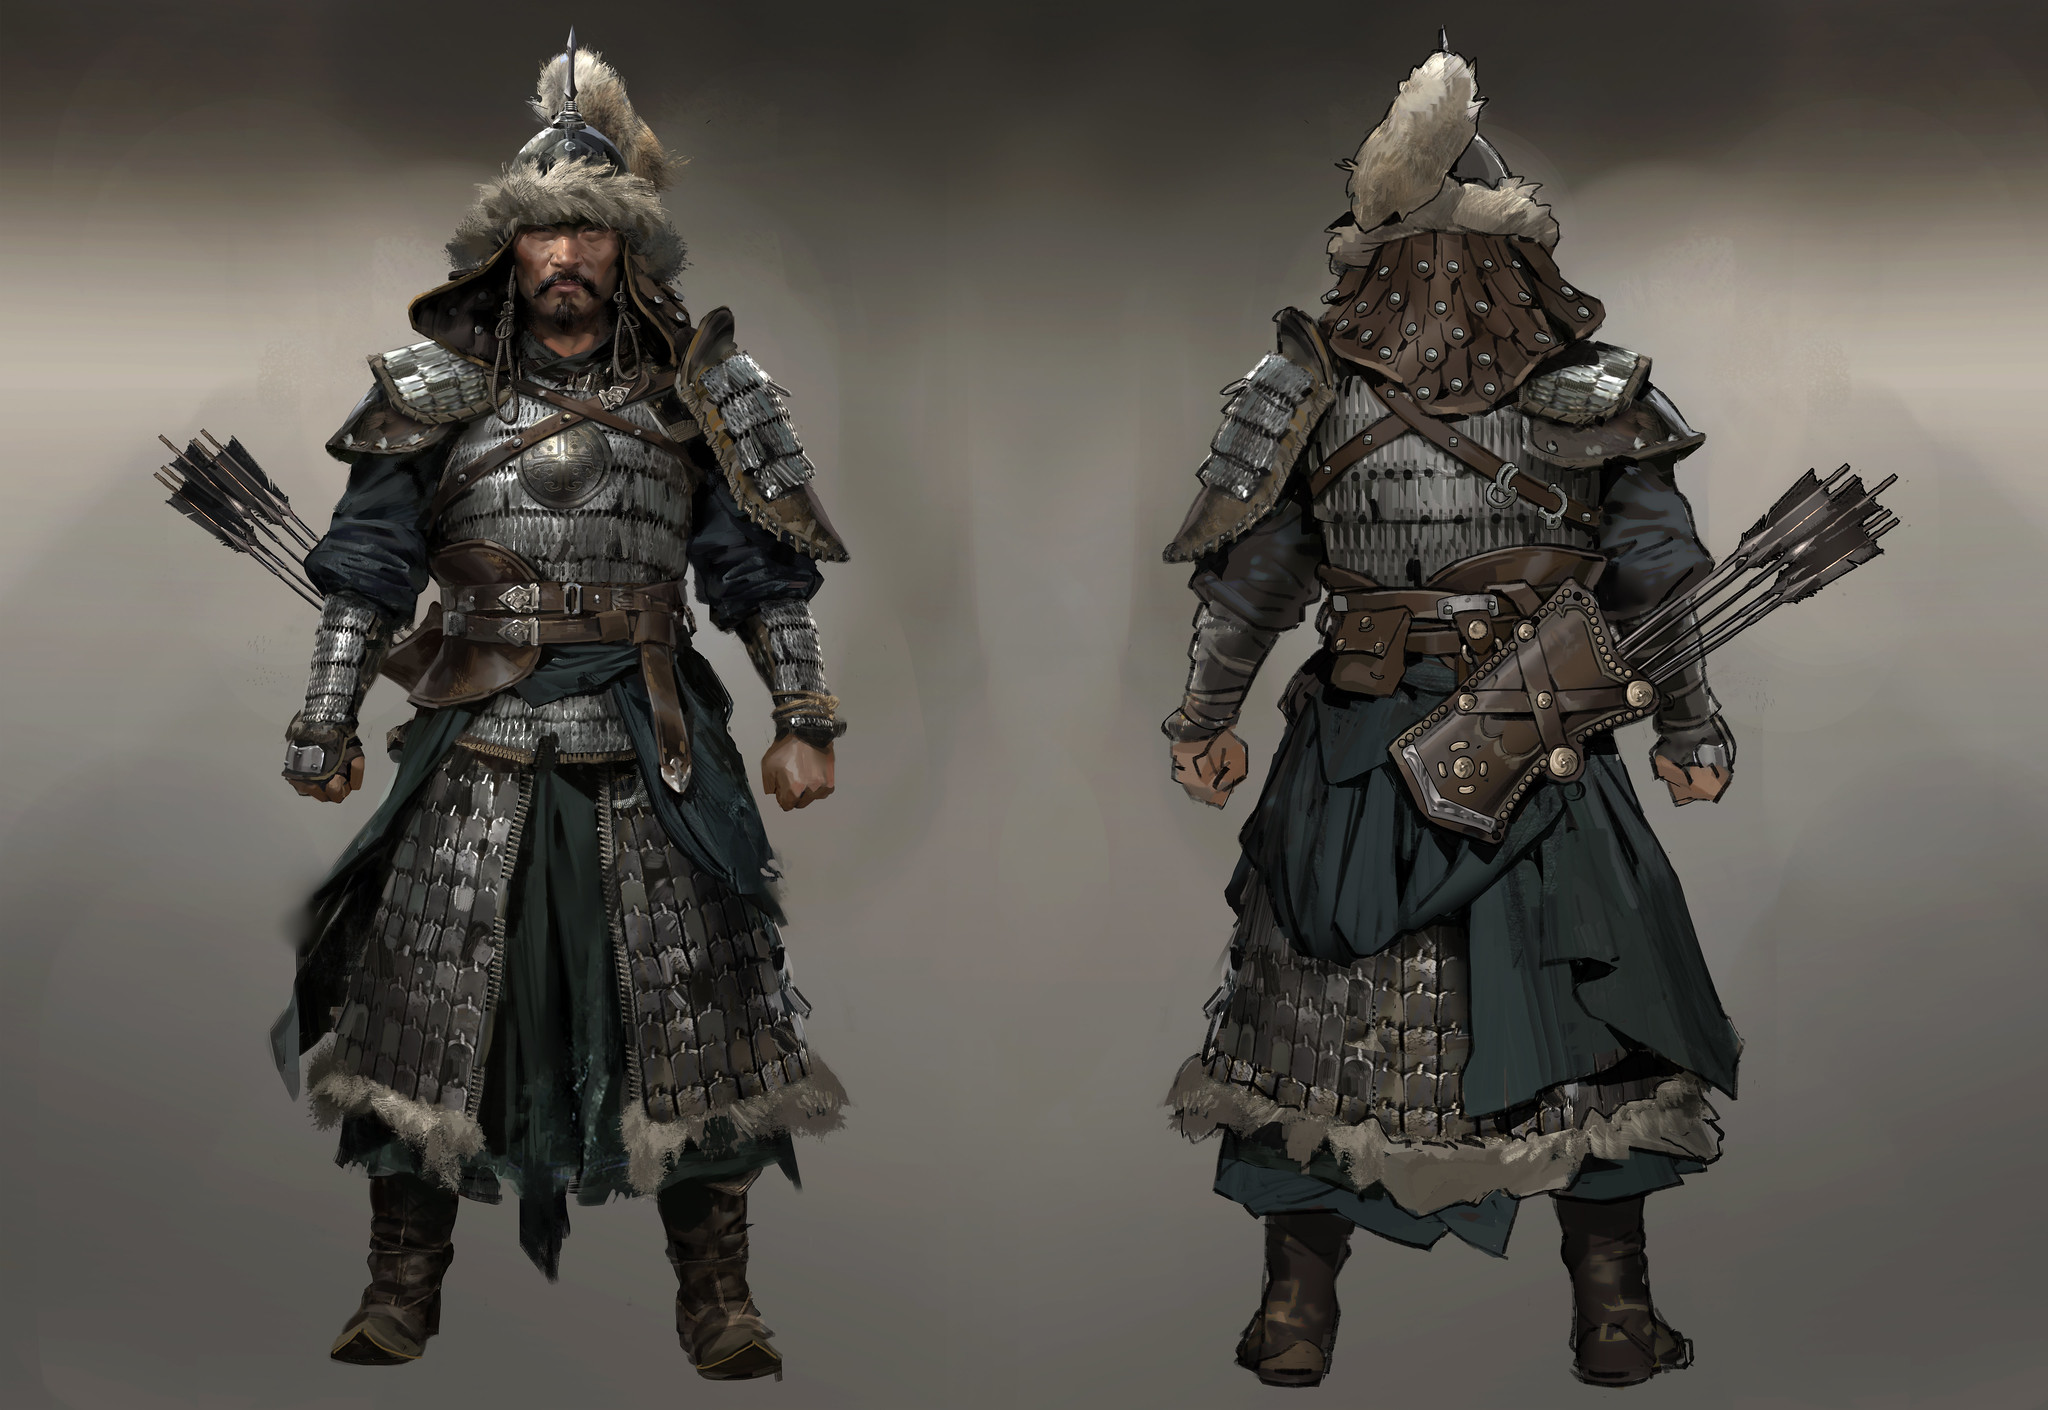
    KHOTUN KHAN UND SEINE ARMEE

    Khotun Khan ist ein intelligenter, skrupelloser, furchterregender, bedrohlicher und gewalttätiger Anführer. Es war uns wichtig, in seinem Design diese Aspekte, die im Gegensatz zu den strengen, ordnungsliebenden Samurai stehen, zum Ausdruck zu bringen. Der Khan hat zwei Outfits. Das eine bietet eine traditionellere Farbpalette mit organischen Mustern und Ästhetik, während das andere, das eher einer Rüstung gleicht, farblos ist und eckige, erdrückende Muster aufweist. Die Mongolenarmee besteht aus fünf Stämmen, die sich im Laufe der Geschichte und je nach Gebiet unterscheiden mussten. Je mächtiger ein Stamm ist, desto mehr Rüstungselemente und Pelze tragen seine Mitglieder. So zeigen wir, dass die Gegner im Spielverlauf immer stärker werden, und außerdem sinken im verschneiten Kamiagata gegen Ende des Spiels die Temperaturen. Innerhalb der mongolischen Reihen gibt es mehrere Klassen, die alle ihren individuellen Silhouetten haben. Hoffentlich können die Spieler so schon von Weitem unterscheiden, ob sie es mit einem Bogenschützen (dreieckige Silhouette) oder einem Kämpfer (massige, rechteckige Silhouette) zu tun haben.
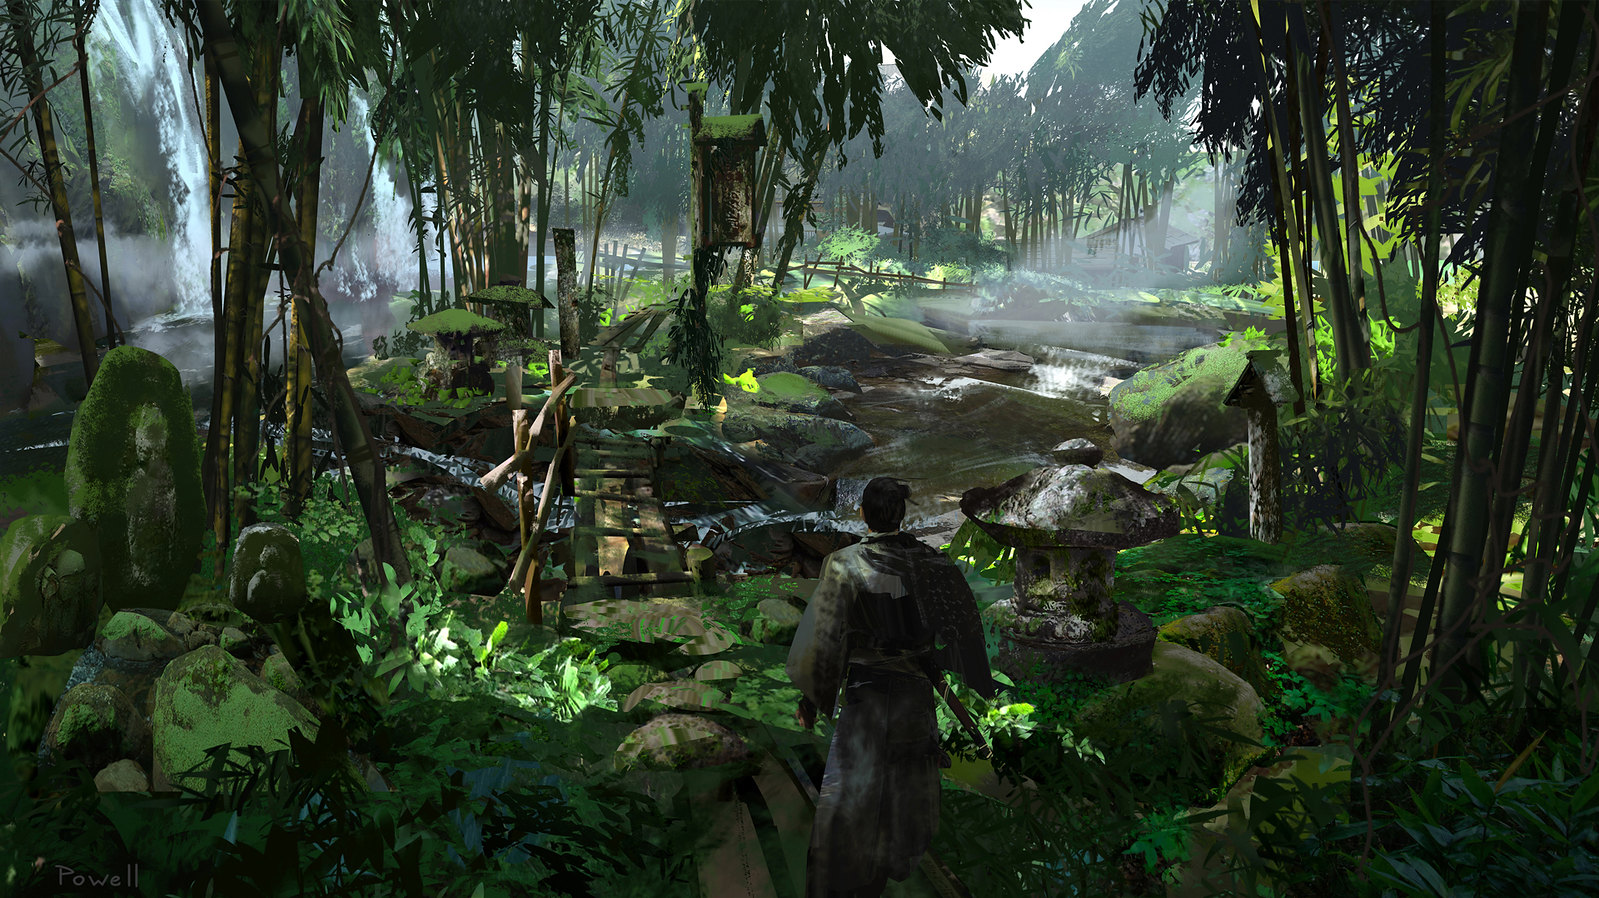
    DIE SPIELWELT

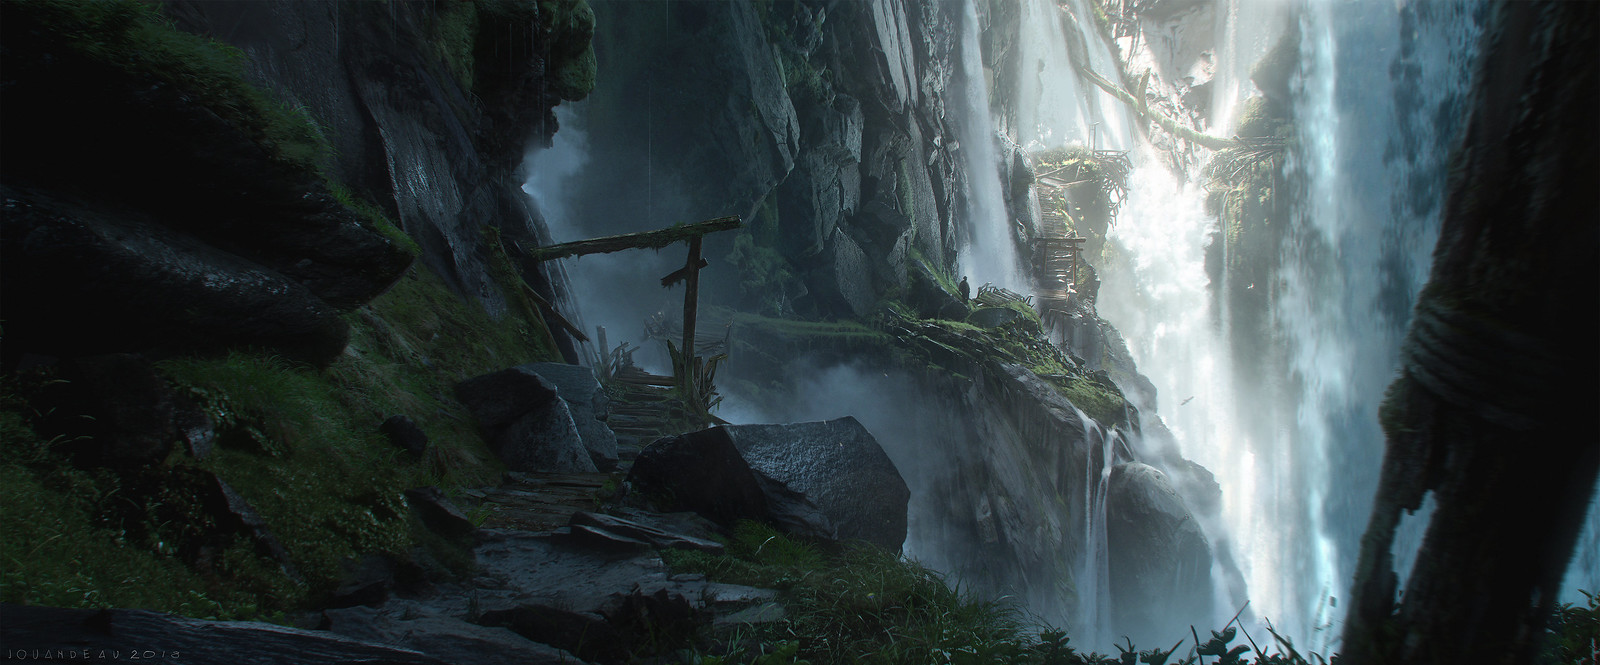
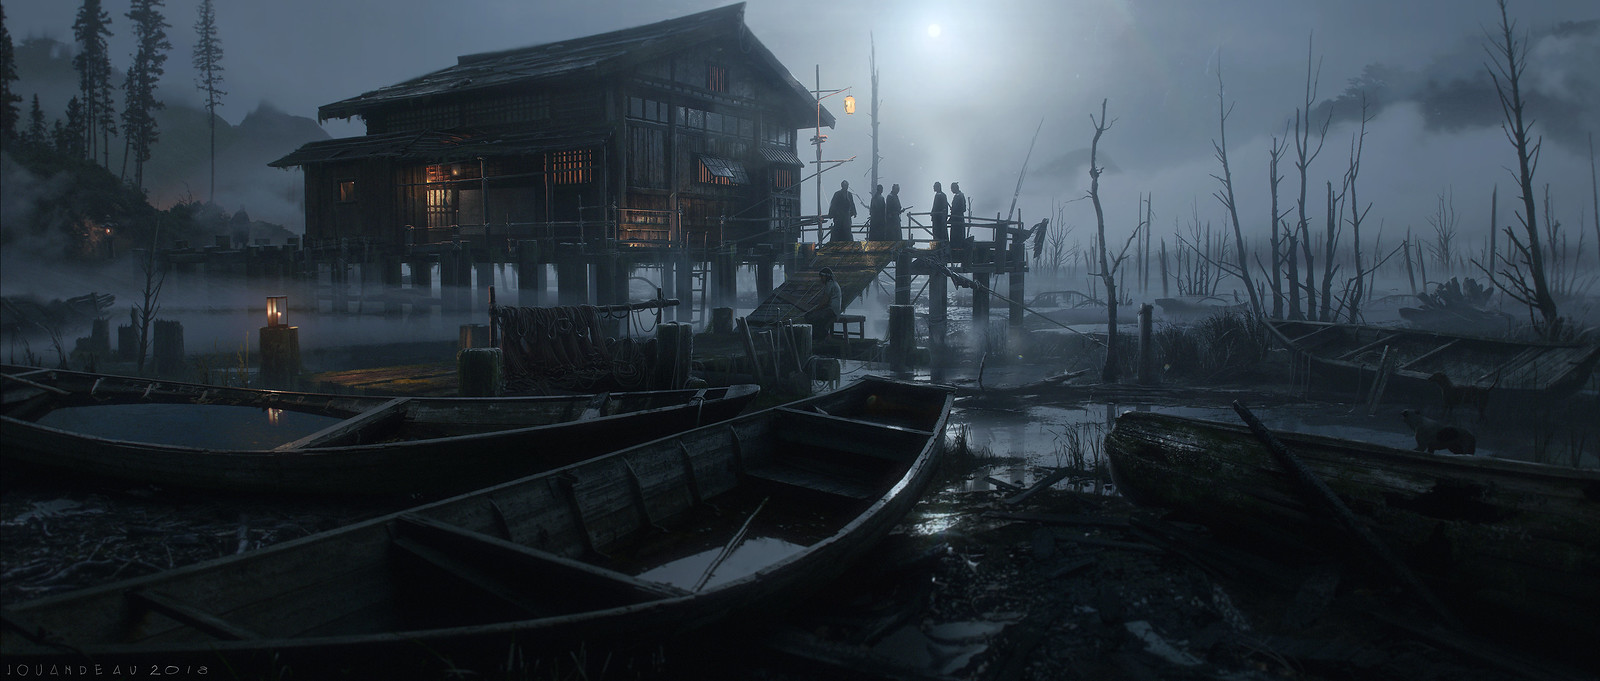
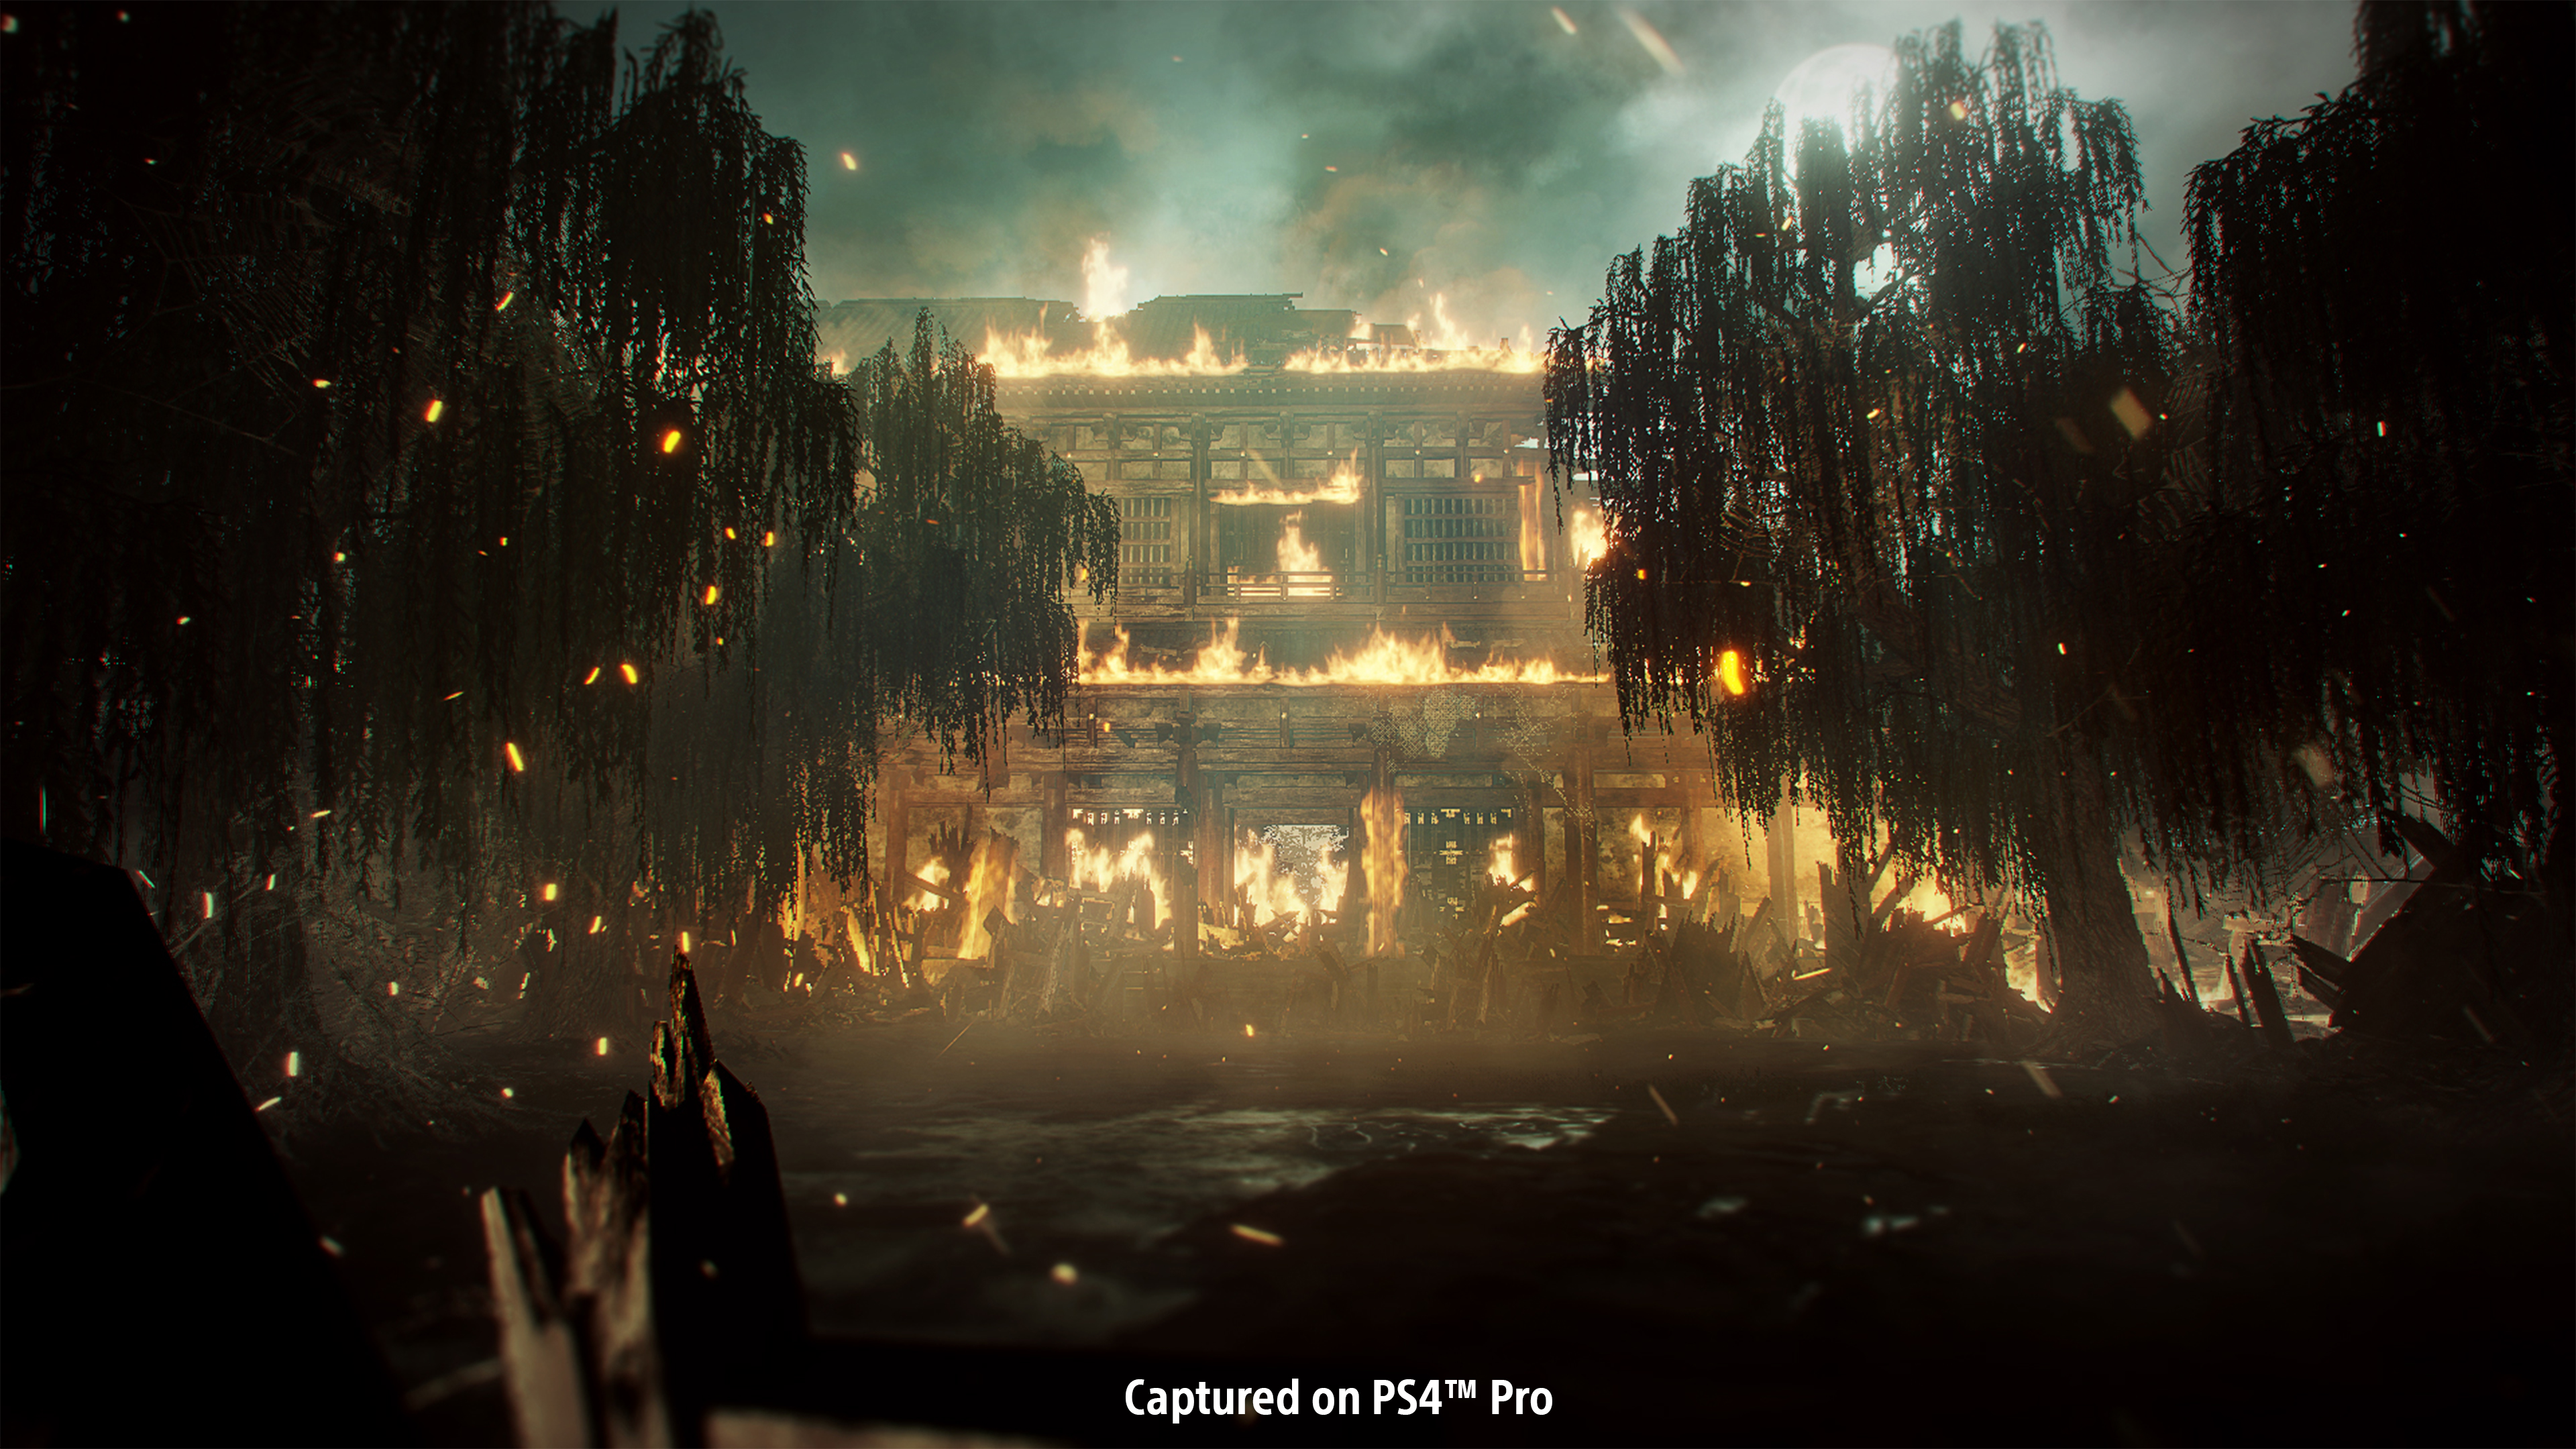
    Wir wollten vor allem ein visuell beeindruckendes Spiel erschaffen. Wenn man mit einem historischen Setting arbeitet, ist es oft schwer, die richtige Balance zwischen Ästhetik und Fakten zu finden. Wir mussten uns immer bewusst entscheiden, ob wir etwas historisch korrekt oder auf unsere eigene Art darstellen wollten. Das Wort „realistisch“ benutzen wir hier bewusst nicht. Wir wollten ein Spiel mit einem gewissen Stil entwickeln, auch wenn es sich gleichzeitig um ein historisches Epos handelte. Die Welt sollte wirken wie Japan im Jahre 1274, allerdings wollten wir auch kreativ mit dem Stoff umgehen. Das zeigt sich in vielerlei Hinsicht: gewagte Farbpaletten, einprägsame Umgebungen, beeindruckende Szenerien, die Spieler entdecken können, usw. Unsere Konzepte landen oft in einer reduzierten Form im Spiel. Wir mussten also die Designs und Farben schon in der Konzeptphase so intensiv wie möglich gestalten, um unserer Vision im fertigen Spiel Ausdruck zu verleihen.

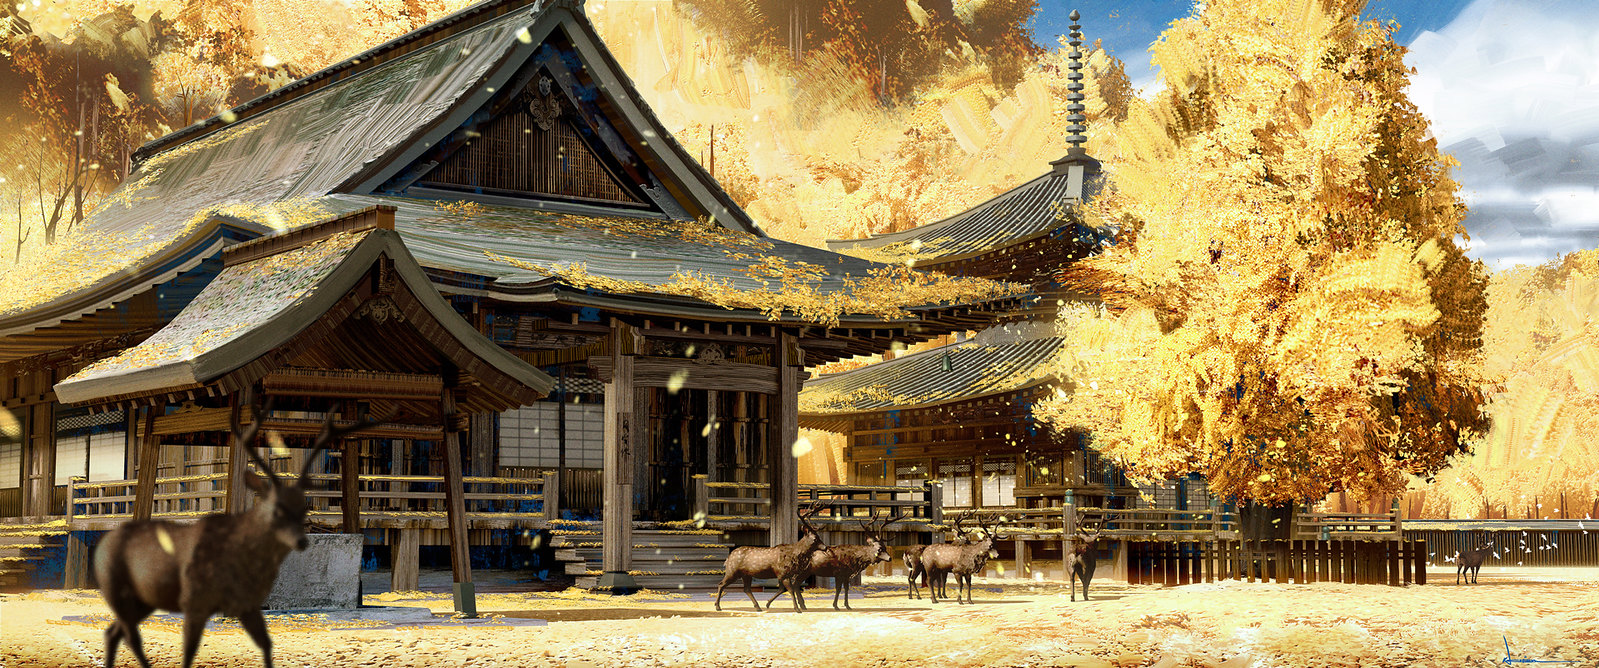
    Für die Architektur des Spiels wurde ebenfalls intensiv recherchiert: von Bauernhöfen, Siedlungen und Burgen bis hin zu Schreinen und Tempeln. Ein Großteil des Referenzmaterials im Netz stammt aus späteren Perioden. Für die Kamakura-Zeit gibt es nicht viele Details, was das Ganze etwas knifflig gestaltete. Wir hatten das große Glück, während der Entwicklung Unterstützung vom Japan Studio sowie von kulturellen Experten zu erhalten. Die Yayoi-Architektur in der Region von Toyotama ist einzigartig und in anderen Medien kaum zu finden. Sie wirkt sehr alt, fast antik und passt auch historisch in das Spiel, da sie aus der Zeit vor 1274 stammt. 

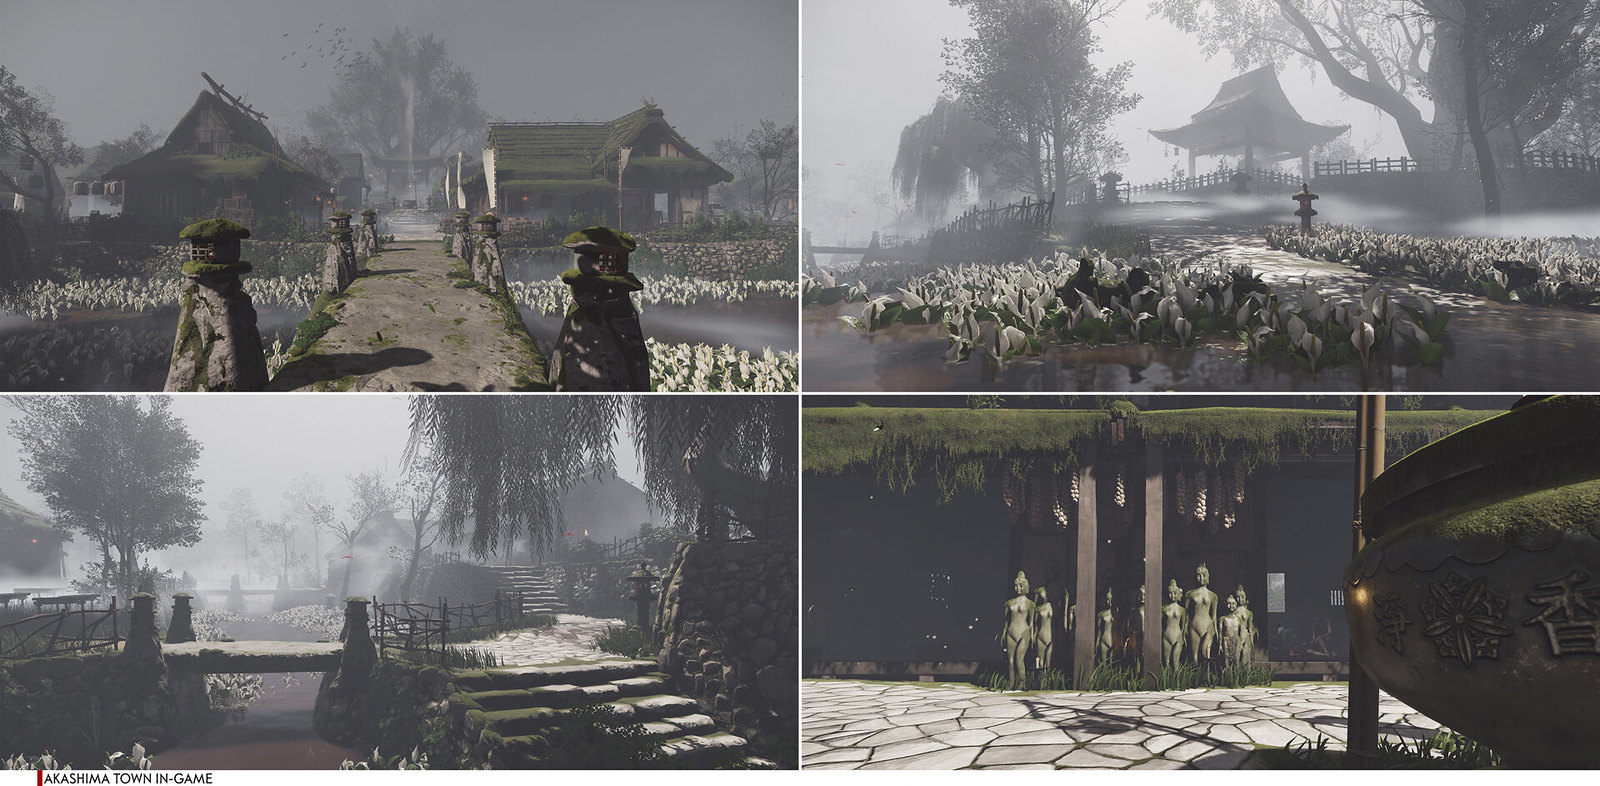
    Nachdem wir gewisse Regeln für unsere Architektur festgelegt hatten, entwarfen wir interessante Thematiken für die Siedlungen, darunter die Stadt der Heilung Akashima, das Versteck der Strohhüte Umugi und die heißen Quellen von Hiyoshi. Allgemein begannen wir die Konzeptphase für eine Stadt mit einer kurzen Story- und Design-Zusammenfassung. Dann stellten wir Referenzmaterial und Moodboards für die zusammengefassten thematischen Elemente zusammen und tasteten uns danach an die allgemeine Ästhetik sowie die Missionselemente heran.

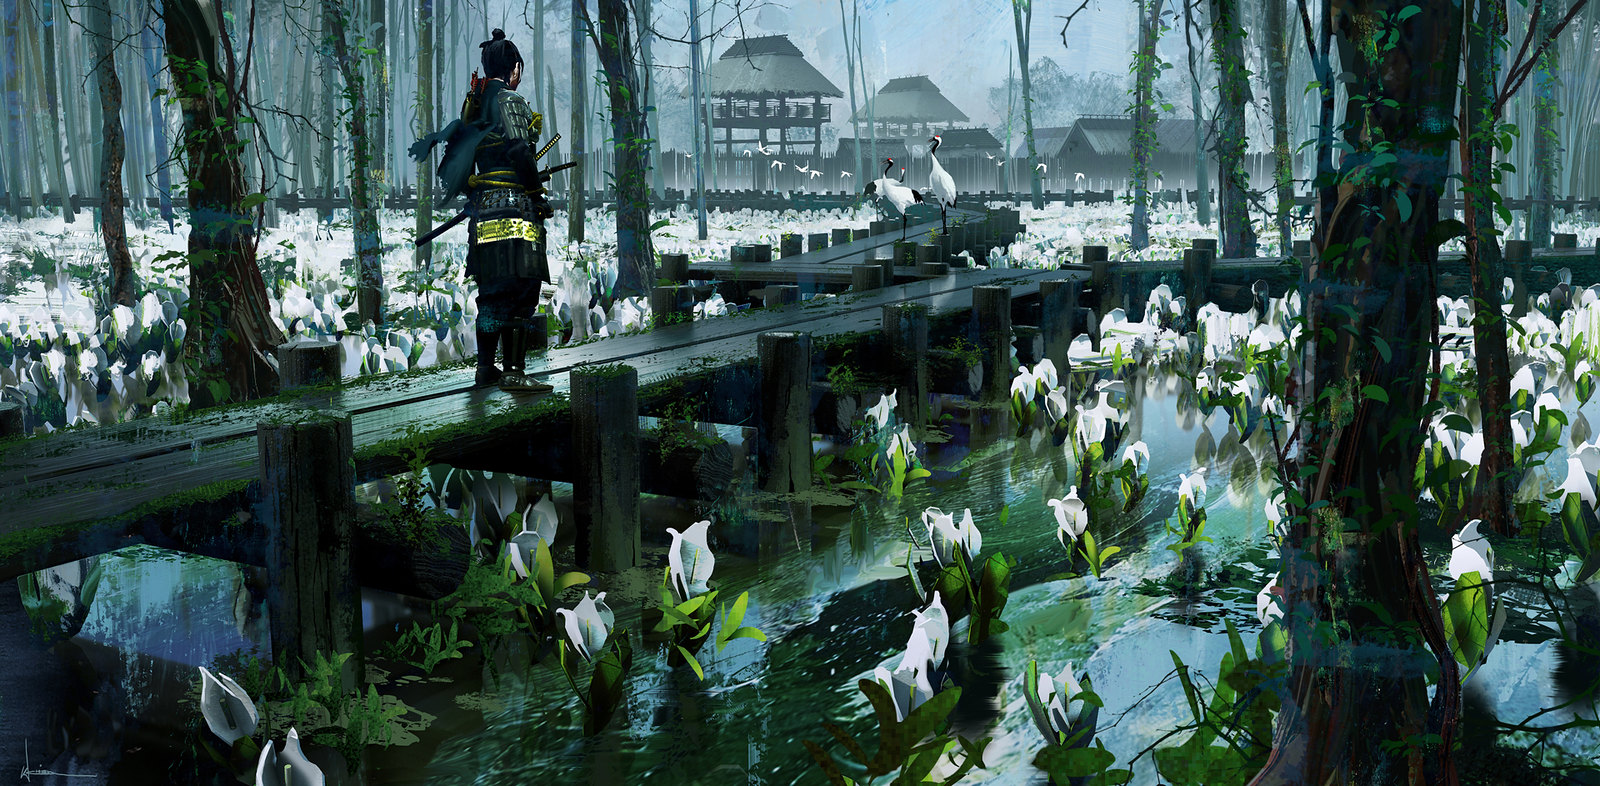
    Sehen wir uns als Beispiel die frühe Entwicklungsphase von Akashima an. Wir wollten eine Stadt kreieren, bei der die Heilung mit einer geheimnisvollen Komponente im Vordergrund steht. Also setzten wir uns zusammen und suchten nach Referenzmaterial für traditionelle alte japanische Medizin und Heilungstechniken sowie spannende ländliche Dörfer und Städte. Dann machten wir uns an die visuelle Anordnung und entwickelten das Konzept Schritt für Schritt weiter. Unsere Stadt sollte den Eindruck erwecken, dass die Lehren seit Generationen weitergegeben wurden. Gleichzeitig sollte sie friedlich und ruhig sowie gespenstisch und geheimnisvoll wirken. Das erreichten wir mit den Requisiten und der Kulisse. Die weißen Statuen, das Papier an den Wänden, der weiße Steinboden, die Vogelkäfige, der Nebel und das Biom der weißen Scheinkalla tragen sehr zur Atmosphäre der Siedlung bei. In Kombination mit der geheimnisvollen, bleichen Farbpalette kann sich Akashima so deutlich von anderen Umgebungen im Spiel abheben.

    Am kreativsten waren wir, wenn wir uns Ideen für Biome überlegten. Biome sind nämlich hauptsächlich für die Ästhetik verantwortlich. Die Teams für Konzepte und Spielwelt kamen zusammen und tauschten Ideen aus, um jede Präfektur der Insel einzigartig zu gestalten. Dazu betonten wir die Hauptaspekte eines Bioms über die Maßen und reduzierten andere weniger wichtige Elemente. So wurden die Biome visuell ansprechend und einprägsam und unterschieden sich deutlich von anderen Orten. Wir wollten hier Kunst machen und nicht unbedingt die wirkliche Welt abbilden.

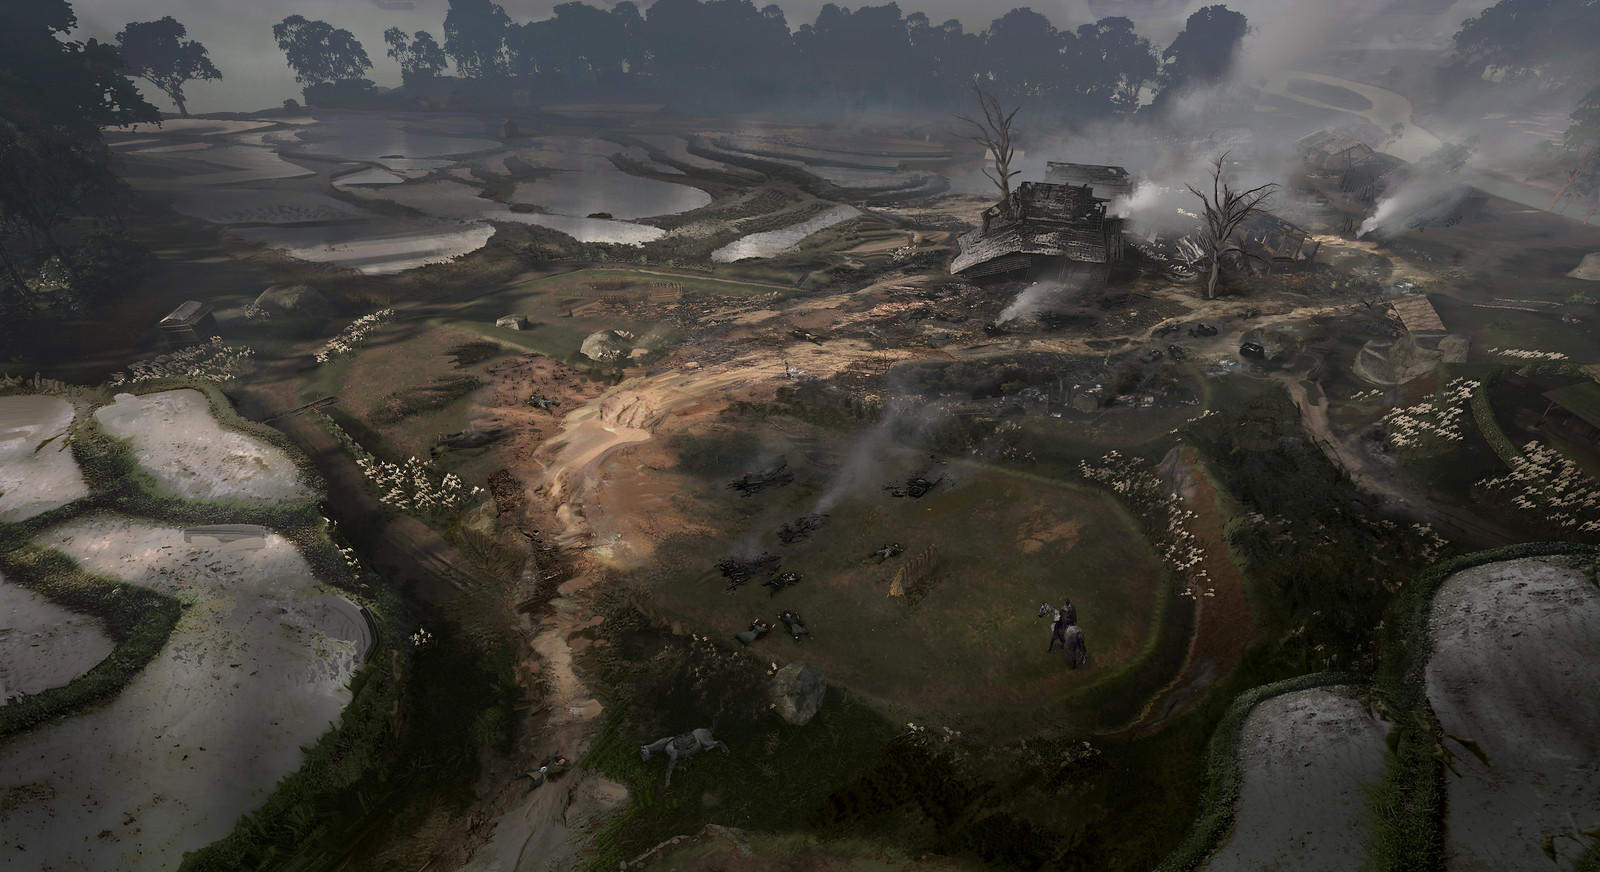
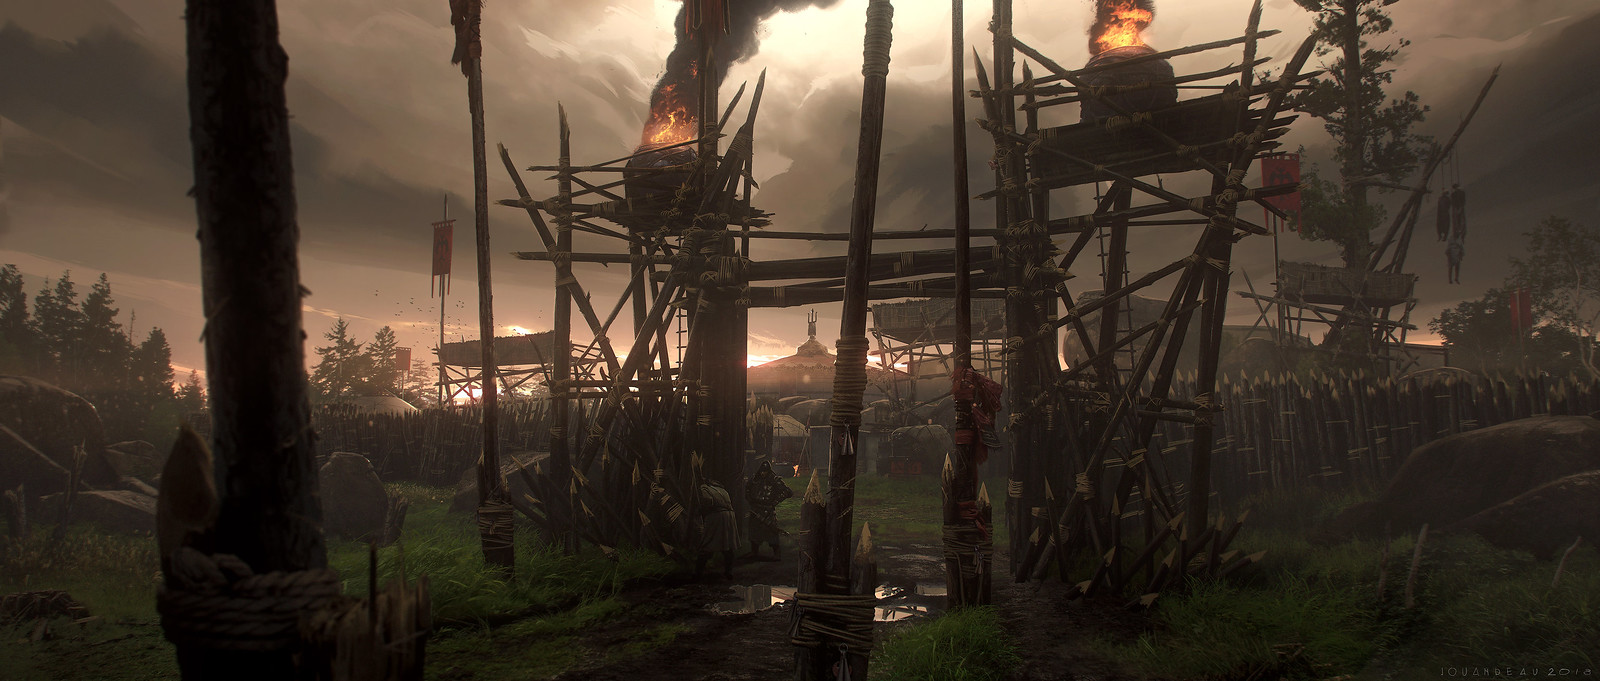
    Die mongolische Architektur und andere Aspekte im Spiel zeigen die Rolle der Mongolen als Besatzungsmacht. Wir sehen hier hauptsächlich traditionelle Jurten, mongolische Requisiten und Anzeichen für Zerstörung. Auf Bauernhöfen und in Kriegslagern zeigt sich die mongolische Thematik am deutlichsten. Hier sieht man die Unterdrückung der Bevölkerung von Tsushima sowie die Beschädigung der japanischen Architektur und Landschaft. Beispiele hierfür sind zertrampeltes Gras, zerstörte Reisfelder sowie kaputte und geplünderte japanische Gebäude. Die meisten mongolischen Elemente unterscheiden sich deutlich von den japanischen und bestehen hauptsächlich aus Behelfsunterkünften aus Holz, Fell- und Pelzrequisiten sowie ihren individuellen Bannern. So erreichen wir einen deutlichen Kontrast zwischen unberührten und besetzten Gebieten.

    DIE VISUELLE IDENTITÄT

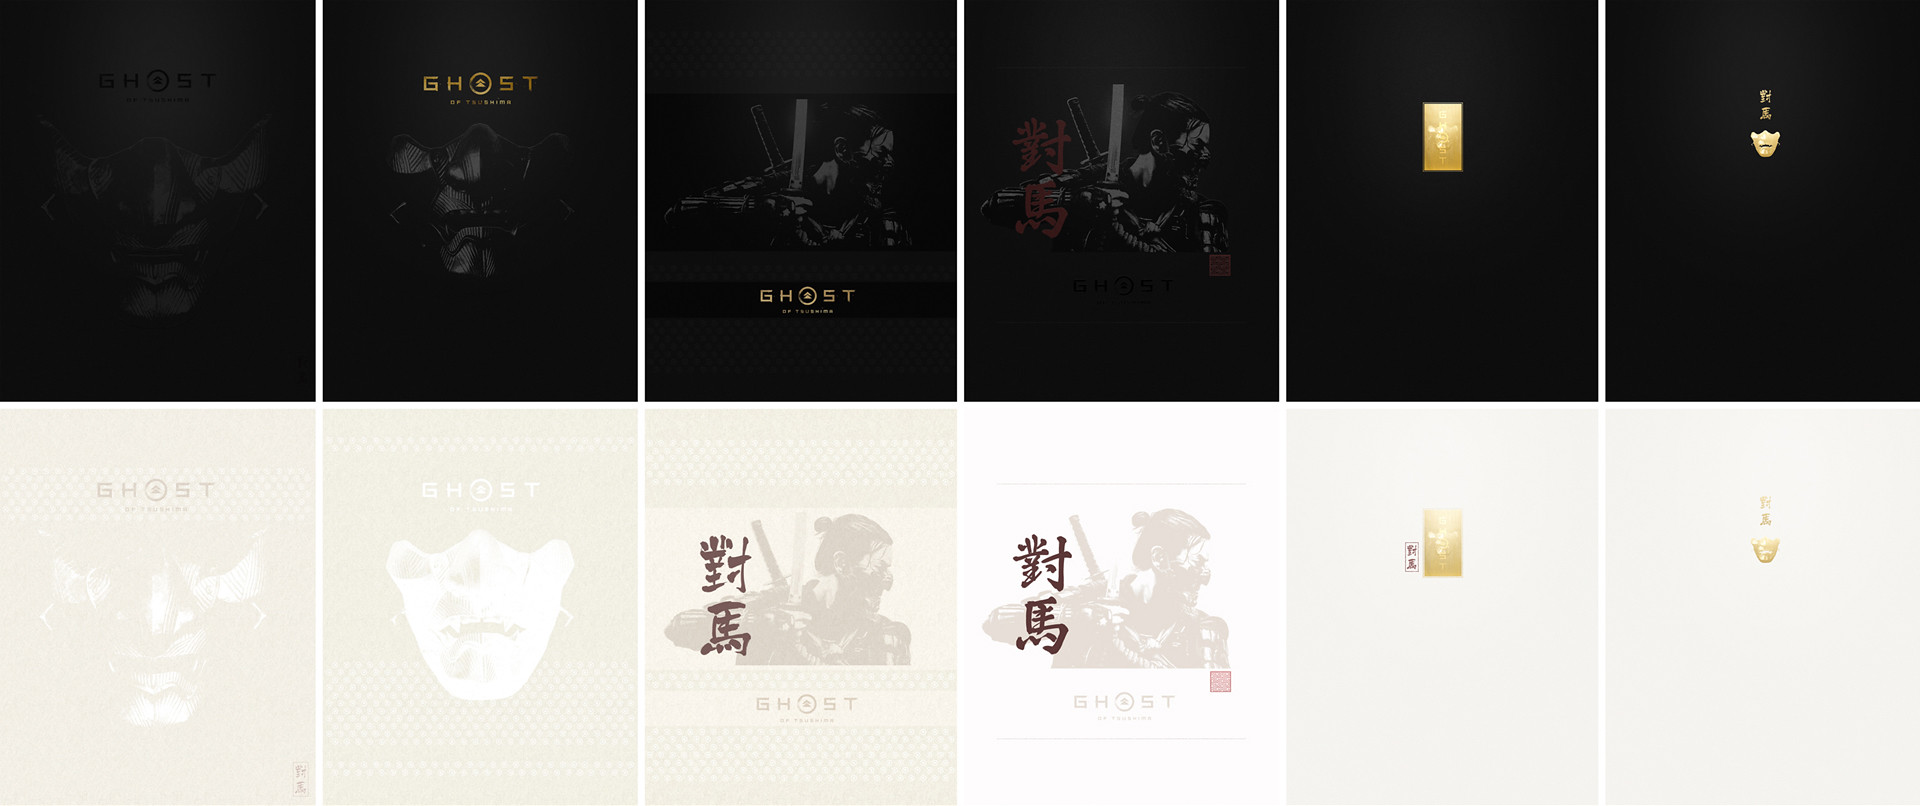
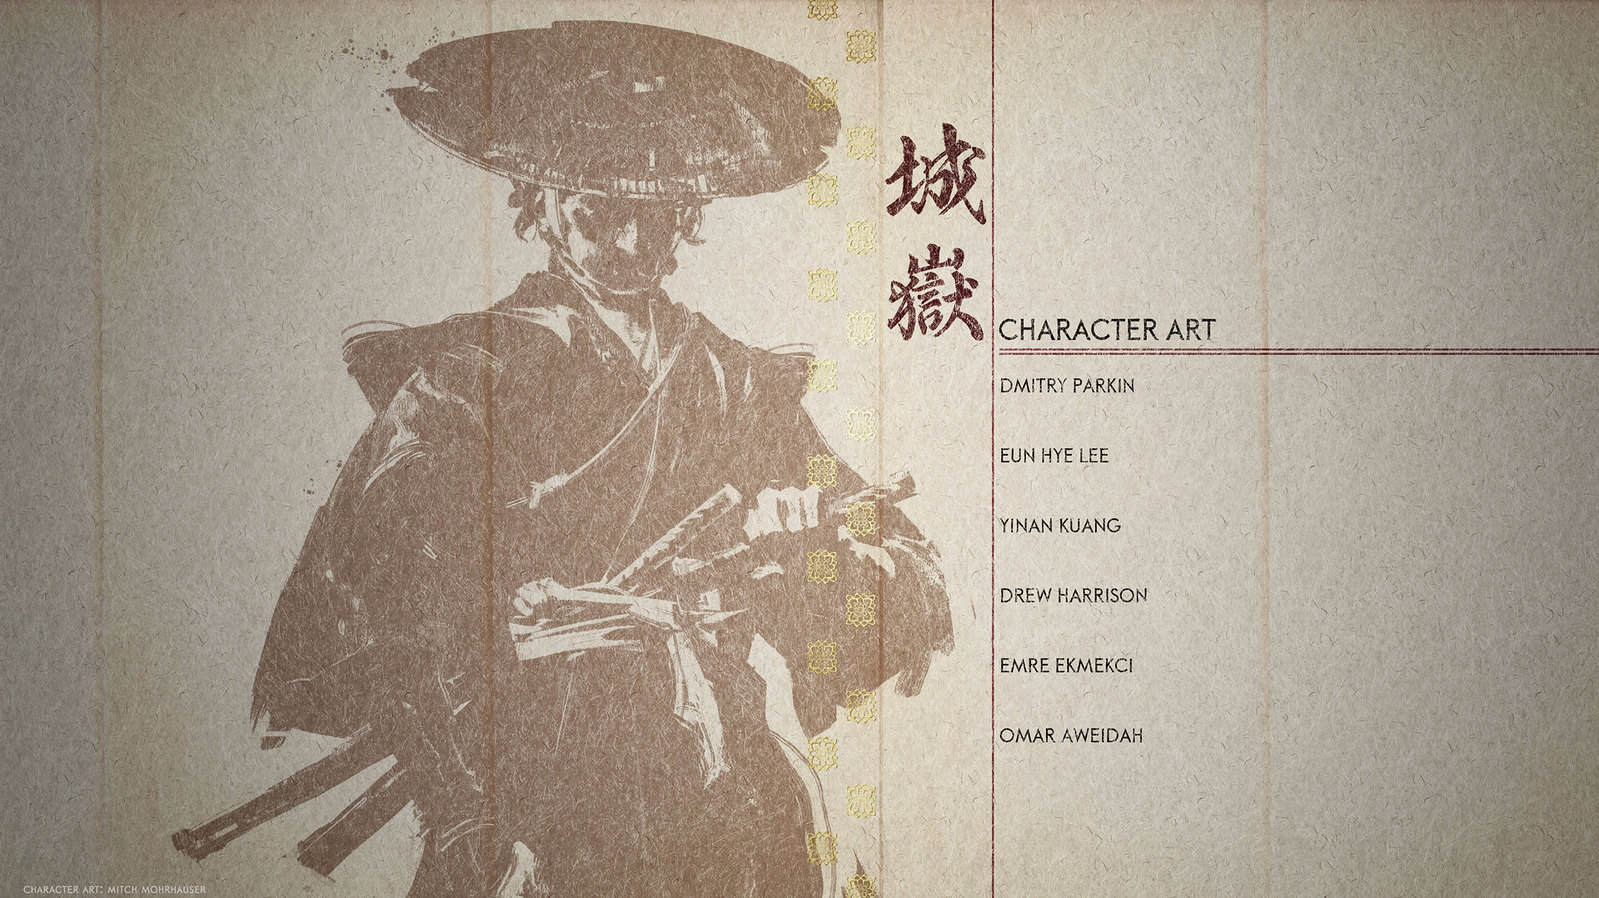
    Wir wussten schon sehr früh, dass wir eine moderne, klassische Ästhetik einer rein traditionellen Herangehensweise vorziehen wollten. In der frühen Konzeptphase ließen wir uns von alten Postern für Samurai-Filme, modernem und traditionellem Grafikdesign sowie der Aufmachung inspirieren. Diese Ästhetik integrierten wir in unsere Benutzeroberfläche, Logos, 2D-Sequenzen und sogar in unser Merchandise und die Marketing-Materialien. Weiter unten finden sich einige Konzepte für das Steelbook sowie den Abspann.

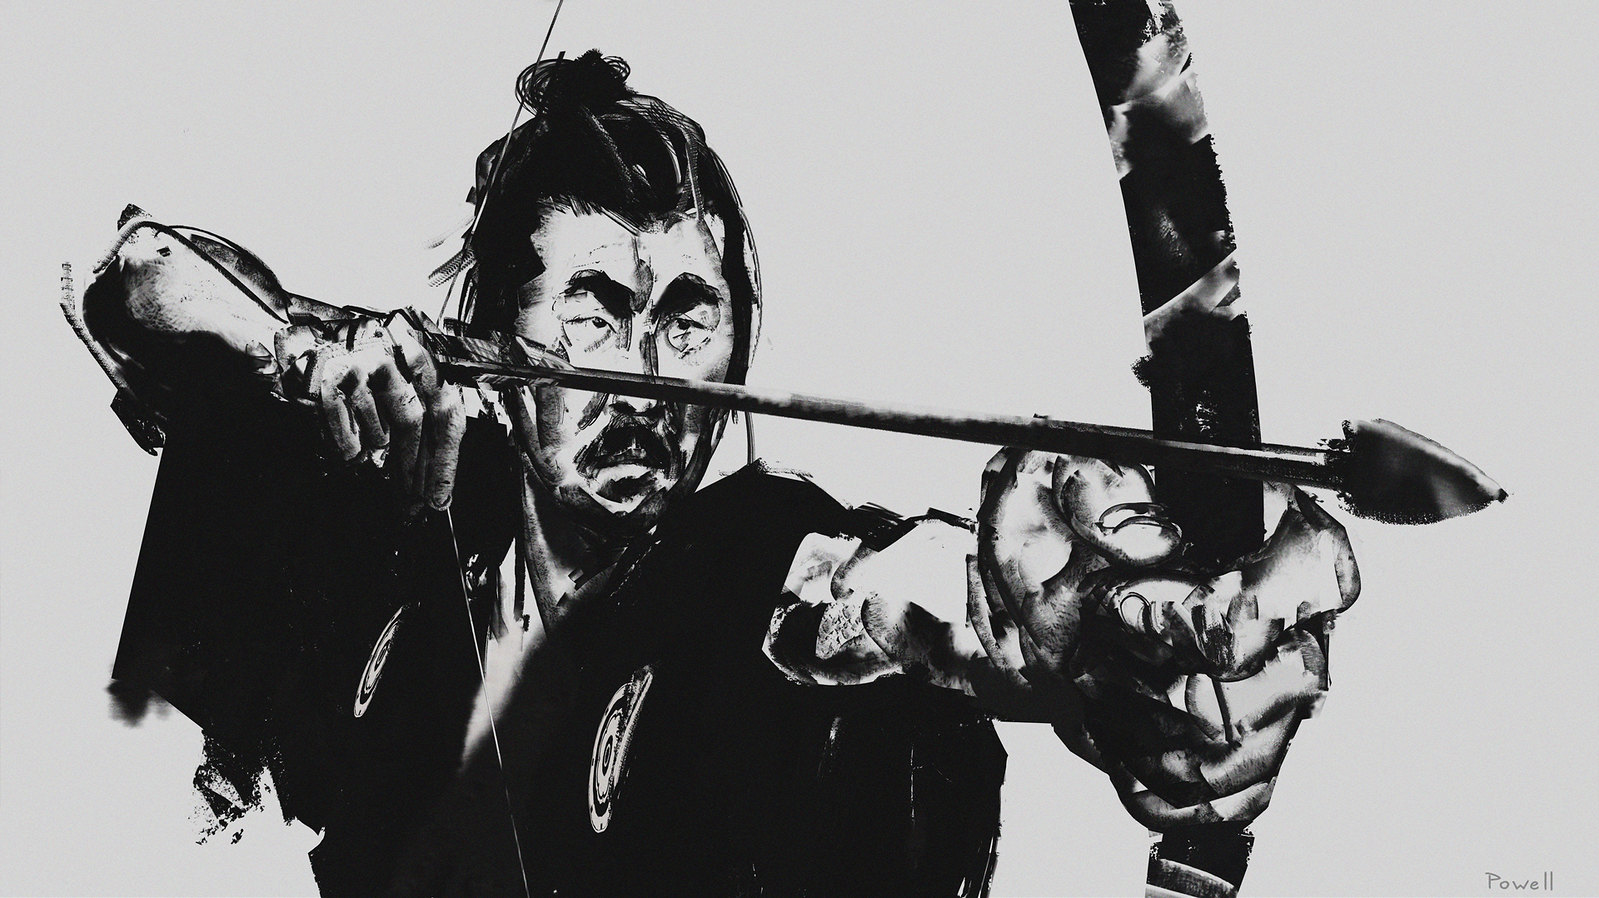
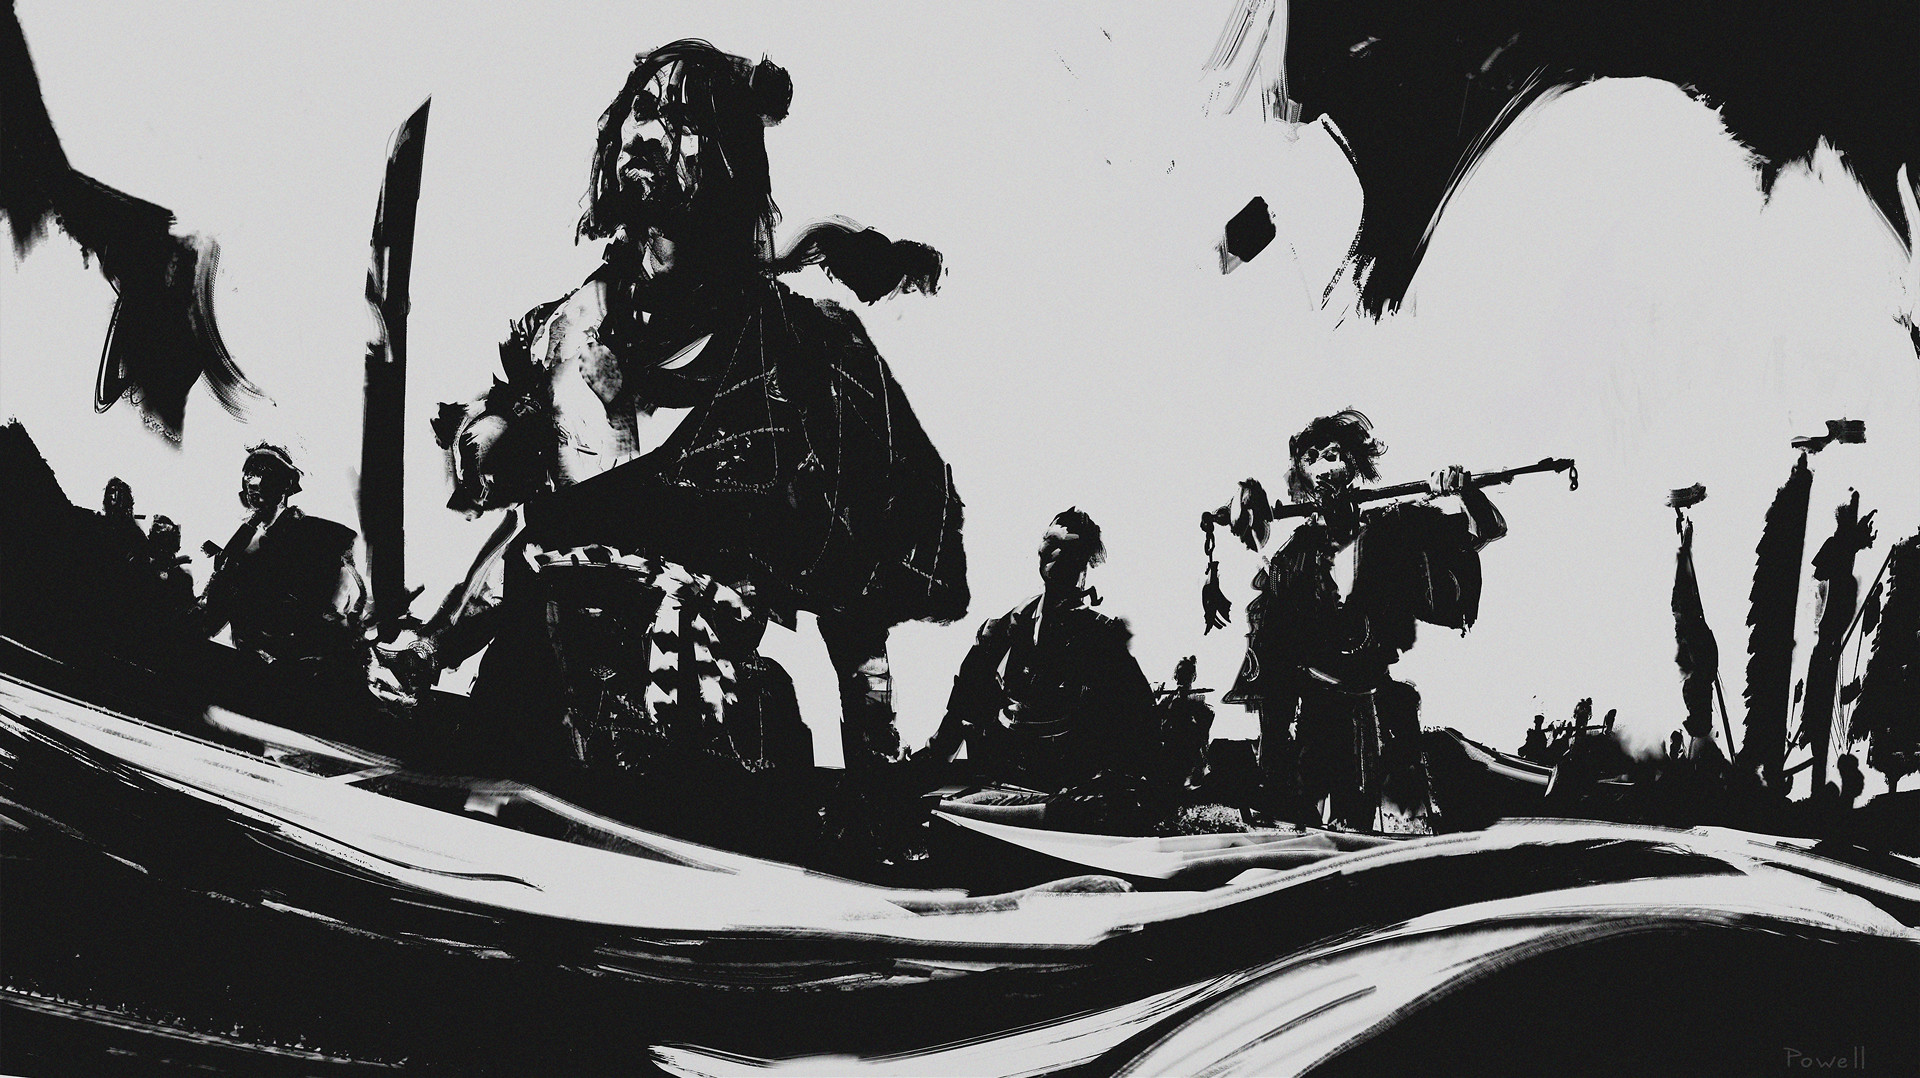
    Die Arbeit an den zweidimensionalen Tuschesequenzen hat großen Spaß gemacht. Wir ließen die traditionelle Ästhetik von Sumi-e hinter uns und entschieden uns für einen krasseren, aggressiveren Stil. Wir setzten nicht auf weiche Kanten und dünne Tuschestriche, sondern eher auf Kontrast mit harten Kanten und dicken Pinseln. Es ging mit der Erzählung und dem Skript los, dann erstellten wir das Szenenbuch, malten die Einzelbilder und gaben schließlich alles an das Animationsteam und die Nachbearbeitung weiter.

    ABSCHLIESSENDE GEDANKEN

    Konzeptkunst ist nur ein Teil des gesamten Entwicklungsprozesses, der direkt am Anfang beginnt. Um die Ästhetik von Ghost of Tsushima festzulegen, arbeiteten wir mit Künstlern aus verschiedenen Abteilungen zusammen und setzten gemeinsam unsere einheitliche Vision um. Diese Vision entstand in Zusammenarbeit unter anderem mit dem Team für 3D-Charaktere und Umgebungen, dem Team für Texturen, dem Team für die Beleuchtung, dem Technikteam, dem Designteam, dem Animationsteam, dem Team für die Benutzeroberfläche und dem Team für visuelle Effekte. 

    Website: LINK

  • Official PlayStation Podcast Episode 379: Spooky Scary

    Official PlayStation Podcast Episode 379: Spooky Scary

    Reading Time: < 1 minute

    Email us at PSPodcast@sony.com!

    Subscribe via Apple Podcasts, Spotify, Google or RSS, or download here


    Welcome back! This week Sid and Kristen share their thoughts on the PS5 UX first look, before diving into their favorite spooky games. 

    Stuff We Talked About

    • Ghost of Tsushima: Legends
    • Ray’s the Dead
    • Among Us
    • Amnesia: Rebirth
    • Soma
    • Bioshock

    The Cast

    Sid Shuman – Senior Director of Content Communications, SIE


    Thanks to Cory Schmitz for our beautiful logo and Dormilón for our rad theme song and show music.

    [Editor’s note: PSN game release dates are subject to change without notice. Game details are gathered from press releases from their individual publishers and/or ESRB rating descriptions.]

    Website: LINK

  • New Chair and Trustees of the Raspberry Pi Foundation

    New Chair and Trustees of the Raspberry Pi Foundation

    Reading Time: 4 minutes

    I am delighted to share the news that we have appointed a new Chair and Trustees of the Raspberry Pi Foundation. Between them, they bring an enormous range of experience and expertise to what is already a fantastic Board of Trustees, and I am really looking forward to working with them.

    New Chair of the Board of Trustees: John Lazar 

    John Lazar has been appointed as the new Chair of the Board of Trustees. John is a software engineer and business leader who is focused on combining technology and entrepreneurship to generate lasting positive impact.

    Formerly the Chairman and CEO of Metaswitch Networks, John is now an angel investor, startup mentor, non-executive chairman and board director, including serving as the Chair of What3Words. He is a Fellow of the Royal Academy of Engineering and played an active role in developing the programme of study for England’s school Computer Science curriculum. John has also spent many years working on tech-related non-profit initiatives in Africa and co-founded Enza Capital, which invests in early-stage African technology companies that solve pressing problems.

    John takes over the Chair from David Cleevely, who has reached the end of his two three-year terms as Trustee and Chair of the Foundation. David has made a huge contribution to the Foundation over that time, and we are delighted that he will continue to be involved in our work as one of the founding members of the Supporters Club.

    New Trustees: Amali de Alwis, Charles Leadbeater, Dan Labbad

    Alongside John, we are welcoming three new Trustees to the Board of Trustees: 

    • Amali de Alwis is the UK Managing Director of Microsoft for Startups, and is the former CEO of Code First: Girls. She is also a Board member at Ada National College for Digital Skills, sits on the Diversity & Inclusion Board at the Institute of Coding, is an Advisory Board member at the Founders Academy, and was a founding member at Tech Talent Charter.
    • Charles Leadbeater is an independent author, a social entrepreneur, and a leading authority on innovation and creativity. He has advised companies, cities, and governments around the world on innovation strategy and has researched and written extensively on innovation in education. Charles is also a Trustee of the Paul Hamlyn Foundation.
    • Dan Labbad is Chief Executive and Executive Member of the Board of The Crown Estate. He was previously at Lendlease, where he was Chief Executive Officer of Europe from 2009. Dan is also a Director of The Hornery Institute and Ark Schools.

    New Member: Suranga Chandratillake 

    I am also delighted to announce that we have appointed Suranga Chandratillake as a Member of the Raspberry Pi Foundation. Suranga is a technologist, entrepreneur, and investor.

    Suranga Chandratillake

    He founded the intelligent search company blinkx and is now a General Partner at Balderton Capital. Suranga is a Fellow of the Royal Academy of Engineering and a World Economic Forum Young Global Leader, and he serves on the UK Government’s Council for Science and Technology.

    What is a Board of Trustees anyway? 

    As a charity, the Raspberry Pi Foundation is governed by a Board of Trustees that is ultimately responsible for what we do and how we are run. It is the Trustees’ job to make sure that we are focused on our mission, which for us means helping more people learn about computing, computer science, and related subjects. The Trustees also have all the usual responsibilities of company directors, including making sure that we use our resources effectively. As Chief Executive, I am accountable to the Board of Trustees. 

    We’ve always been fortunate to attract the most amazing people to serve as Trustees and, as volunteers, they are incredibly generous with their time, sharing their expertise and experience on a wide range of issues. They are an important part of the team. Trustees serve for up to two terms of three years so that we always have fresh views and experience to draw on.

    How do you appoint Trustees? 

    Appointments to the Board of Trustees follow open recruitment and selection processes that are overseen by the Foundation’s Nominations Committee, supported by independent external advisers. Our aim is to appoint Trustees who bring different backgrounds, perspectives, and lived experience, as well as a range of skills. As with all appointments, we consider diversity at every aspect of the recruitment and selection processes.

    Formally, Trustees are elected by the Foundation’s Members at our Annual General Meeting. This year’s AGM took place last week on Zoom. Members are also volunteers, and they play an important role in holding the Board of Trustees to account, helping to shape our strategy, and acting as advocates for our mission.

    You can see the full list of Trustees and Members on our website.

    Website: LINK

  • Take a tour of Nioh 2’s latest expansion, Darkness in the Capital, out today

    Take a tour of Nioh 2’s latest expansion, Darkness in the Capital, out today

    Reading Time: 4 minutes

    Greetings yokai hunters! I’m proud to announce the release of Nioh 2’s second DLC expansion- Darkness in the Capital. And to commemorate this latest installment, we wanted to share some insights into our development process for creating a fresh new perspective into Japan’s distant past. 

    While The Tengu’s Disciple brought the protagonist to the end of the Heian Period (794 – 1185), our latest chapter brings them dead center into the middle of this era. We hope that by experiencing events from Japan’s past in the world of Nioh, you can all gain an even more detailed picture of the series’ lore. Instead of merely expressing this unique mythology simply via dialogue and text, we wanted to take all of our players that braved their way through the main game on a brand new and extensive adventure throughout these three DLC expansions.

    Nioh 2

    One of the most notable aspects of Darkness in the Capital are the two renowned historical figures that make their grand appearance: Minamoto no Yorimitsu and Abe no Seimei, the famed yokai hunter and the most powerful Onmyo mage of antiquity. Yorimitsu’s four major subordinates also made names for themselves as fearless warriors for defeating yokai in many tales passed down through generations. These acclaimed individuals were very active during the midpoint of the Heian Period, an age where the world was in a state of disorder and yokai ran rampant. 

    In the world of Nioh where heroes take up their swords and make full use of Onmyo magic in order to battle hordes of yokai fiends, leaving out this significant and thrilling period from Japan’s history wasn’t even an option for us in the development team. This story, from this particular period, was a MUST!

    Nioh 2

    One of the major challenges that we faced in creating Darkness in the Capital was that while samurai and Onmyo mages did exist during this period, it was also a time in history where more attention was placed on the Heian nobles.

    While this focal point may differ from other parts of the Nioh series, this particular era can be seen as the quintessential depiction of the Heian period. Beneath the elegant surface of this period lied degeneration and deep-seated grudges, and as such we made sure to represent this period as one filled with curses and peril. We accomplished this through various aspects such as incorporating these elements into the visuals, text, as well as through the actions of the enemies you will encounter on your journey. We carefully researched the historical aspects of Darkness in the Capital, as stories from this time period are comparatively less well known to those from the Sengoku period. We also wanted to ensure that they were properly represented in order for players to learn more about Japanese history. 

    I also wanted to leave you with one small hint regarding the story: be on the lookout for some notable bosses you may have encountered from your previous journey through the Nioh series…

    Take a tour of Nioh 2’s latest expansion, Darkness in the Capital, out today


    Last but not least, we’ve put a lot of thought and effort into designing a new weapon that fans of other Team Ninja titles, including our fighting games, have definitely been hoping for. I’m happy to introduce the latest additions to your arsenal- The Fists and Clawed Fists. 

    These weapons allow you to literally take the fight into your own hands and pummel even the toughest yokai into submission! We wanted to capture the feeling of fighting in a no-holds-barred fist fight with this new weapon, and we hope you’ll take them out for a spin. Our team carefully thought through many different scenarios for combat in order to present these new weapons to our fighters. In particular, the dilemma to choose the new Fists weapon or to go for a more traditional armed equipment was definitely something we contemplated over. We knew we had to ensure that Fists had its own sense of uniqueness and strength to stand out among the wide selection of other weapons in our roster. With that said, we look forward to the exciting new encounters players can experience as they explore all of the new capabilities that both Fists and Clawed Fists have to offer!

    Please stay tuned for further details regarding the third and final DLC expansion for Nioh 2 in the near future. We’re anxiously looking forward to providing you guys with even more engaging boss battles and memorable missions to complete, along with the anticipated conclusion to the epic tale of Nioh 2. As always, please stay safe out there and keep your blades sharpened for the final battle to come! 

    *Nioh 2 required to play “The Tengu’s Disciple” and “Darkness in the Capital” (sold separately or as part of the Nioh 2 Season Pass)

    Website: LINK

  • AI-Man: a handy guide to video game artificial intelligence

    AI-Man: a handy guide to video game artificial intelligence

    Reading Time: 9 minutes

    Discover how non-player characters make decisions by tinkering with this Unity-based Pac-Man homage. Paul Roberts wrote this for the latest issue of Wireframe magazine.

    From the first video game to the present, artificial intelligence has been a vital part of the medium. While most early games had enemies that simply walked left and right, like the Goombas in Super Mario Bros., there were also games like Pac-Man, where each ghost appeared to move intelligently. But from a programming perspective, how do we handle all the different possible states we want our characters to display?

    Here’s AI-Man, our homage to a certain Namco maze game. You can switch between AI types to see how they affect the ghosts’ behaviours.

    For example, how do we control whether a ghost is chasing Pac-Man, or running away, or even returning to their home? To explore these behaviours, we’ll be tinkering with AI-Man – a Pac-Man-style game developed in Unity. It will show you how the approaches discussed in this article are implemented, and there’s code available for you to modify and add to. You can freely download the AI-Man project here. One solution to managing the different states a character can be in, which has been used for decades, is a finite state machine, or FSM for short. It’s an approach that describes the high-level actions of an agent, and takes its name simply from the fact that there are a finite number of states from which to transition between, with each state only ever doing one thing.

    Altered states

    To explain what’s meant by high level, let’s take a closer look at the ghosts in Pac-Man. The highlevel state of a ghost is to ‘Chase’ Pac-Man, but the low level is how the ghost actually does this. In Pac-Man, each ghost has its own behaviour in which it hunts the player down, but they’re all in the same high-level state of ‘Chase’. Looking at Figure 1, you can see how the overall behaviour of a ghost can be depicted extremely easily, but there’s a lot of hidden complexity. At what point do we transition between states? What are the conditions on moving between states across the connecting lines? Once we have this information, the diagram can be turned into code with relative ease. You could use simple switch statements to achieve this, or we could achieve the same using an object-oriented approach.

    Figure 1: A finite state machine

    Using switch statements can quickly become cumbersome the more states we add, so I’ve used the object-oriented approach in the accompanying project, and an example code snippet can be seen in Code Listing 1. Each state handles whether it needs to transition into another state, and lets the state machine know. If a transition’s required, the Exit() function is called on the current state, before calling the Enter() function on the new state. This is done to ensure any setup or cleanup is done, after which the Update() function is called on whatever the current state is. The Update()function is where the low-level code for completing the state is processed. For a project as simple as Pac-Man, this only involves setting a different position for the ghost to move to.

    Hidden complexity

    Extending this approach, it’s reasonable for a state to call multiple states from within. This is called a hierarchical finite state machine, or HFSM for short. An example is an agent in Call of Duty: Strike Team being instructed to seek a stealthy position, so the high-level state is ‘Find Cover’, but within that, the agent needs to exit the dumpster he’s currently hiding in, find a safe location, calculate a safe path to that location, then repeatedly move between points on that path until he reaches the target position.

    FSMs can appear somewhat predictable as the agent will always transition into the same state. This can be accommodated for by having multiple options that achieve the same goal. For example, when the ghosts in our Unity project are in the ‘Chase’ state, they can either move to the player, get in front of the player, or move to a position behind the player. There’s also an option to move to a random position. The FSM implemented has each ghost do one of these, whereas the behaviour tree allows all ghosts to switch between the options every ten seconds. A limitation of the FSM approach is that you can only ever be in a single state at a particular time. Imagine a tank battle game where multiple enemies can be engaged. Simply being in the ‘Retreat’ state doesn’t look smart if you’re about to run into the sights of another enemy. The worst-case scenario would be our tank transitions between ‘Attack’ and ‘Retreat’ states on each frame – an issue known as state thrashing – and gets stuck, and seemingly confused about what to do in this situation. What we need is away to be in multiple states at the same time: ideally retreating from tank A, whilst attacking tank B. This is where fuzzy finite state machines, or FFSM for short, come in useful.

    This approach allows you to be in a particular state to a certain degree. For example, my tank could be 80% committed to the Retreat state (avoid tank A), and 20% committed to the Attack state (attack tank B). This allows us to both Retreat and Attack at the same time. To achieve this, on each update, your agent needs to check each possible state to determine its degree of commitment, and then call each of the active states’ updates. This differs from a standard FSM, where you can only ever be in a single state. FFSMs can be in none, one, two, or however many states you like at one time. This can prove tricky to balance, but it does offer an alternative to the standard approach.

    No memory

    Another potential issue with an FSM is that the agent has no memory of what they were previously doing. Granted, this may not be important: in the example given, the ghosts in Pac-Man don’t care about what they were doing, they only care about what they are doing, but in other games, memory can be extremely important. Imagine instructing a character to gather wood in a game like Age of Empires, and then the character gets into a fight. It would be extremely frustrating if the characters just stood around with nothing to do after the fight had concluded, and for the player to have to go back through all these characters and reinstruct them after the fight is over. It would be much better for the characters to return to their previous duties.

    “FFSMs can be in one, none,

    two, or however many states

    you like.”

    We can incorporate the idea of memory quite easily by using the stack data structure. The stack will hold AI states, with only the top-most element receiving the update. This in effect means that when a state is completed, it’s removed from the stack and the previous state is then processed. Figure 2 depicts how this was achieved in our Unity project. To differentiate the states from the FSM approach, I’ve called them tasks for the stackbased implementation. Looking at Figure 2, it shows how (from the bottom), the ghost was chasing the player, then the player collected a power pill, which resulted in the AI adding an Evade_Task – this now gets the update call, not the Chase_Task. While evading the player, the ghost was then eaten.

    At this point, the ghost needed to return home, so the appropriate task was added. Once home, the ghost needed to exit this area, so again, the relevant task was added. At the point the ghost exited home, the ExitHome_Task was removed, which drops processing back to MoveToHome_Task. This was no longer required, so it was also removed. Back in the Evade_Task, if the power pill was still active, the ghost would return to avoiding the player, but if it had worn off, this task, in turn, got removed, putting the ghost back in its default task of Chase_Task, which will get the update calls until something else in the world changes.

    Figure 2: Stack-based finite state machine.

    Behaviour trees

    In 2002, Halo 2 programmer Damian Isla expanded on the idea of HFSM in a way that made it more scalable and modular for the game’s AI. This became known as the behaviour tree approach. It’s now a staple in AI game development. The behaviour tree is made up of nodes, which can be one of three types – composite, decorator, or leaf nodes. Each has a different function within the tree and affects the flow through the tree. Figure 3 shows how this approach is set up for our Unity project. The states we’ve explored so far are called leaf nodes. Leaf nodes end a particular branch of the tree and don’t have child nodes – these are where the AI behaviours are located. For example, Leaf_ExitHome, Leaf_Evade, and Leaf_ MoveAheadOfPlayer all tell the ghost where to move to. Composite nodes can have multiple child nodes and are used to determine the order in which the children are called. This could be in the order in which they’re described by the tree, or by selection, where the children nodes will compete, with the parent node selecting which child node gets the go-ahead. Selector_Chase allows the ghost to select a single path down the tree by choosing a random option, whereas Sequence_ GoHome has to complete all the child paths to complete its behaviour.

    Code Listing 2 shows how simple it is to choose a random behaviour to use – just be sure to store the index for the next update. Code Listing 3 demonstrates how to go through all child nodes, and to return SUCCESS only when all have completed, otherwise the status RUNNING is returned. FAILURE only gets returned when a child node itself returns a FAILURE status.

    Complex behaviours

    Although not used in our example project, behaviour trees can also have nodes called decorators. A decorator node can only have a single child, and can modify the result returned. For example, a decorator may iterate the child node for a set period, perhaps indefinitely, or even flip the result returned from being a success to a failure. From what first appears to be a collection of simple concepts, complex behaviours can then develop.

    Figure 3: Behaviour tree

    Video game AI is all about the illusion of intelligence. As long as the characters are believable in their context, the player should maintain their immersion in the game world and enjoy the experience we’ve made. Hopefully, the approaches introduced here highlight how even simple approaches can be used to develop complex characters. This is just the tip of the iceberg: AI development is a complex subject, but it’s also fun and rewarding to explore.

    Wireframe #43, with the gorgeous Sea of Stars on the cover.

    The latest issue of Wireframe Magazine is out now. available in print from the Raspberry Pi Press onlinestore, your local newsagents, and the Raspberry Pi Store, Cambridge.

    You can also download the PDF directly from the Wireframe Magazine website.

    Website: LINK

  • Scroll text across your face mask with NeoPixel and Raspberry Pi

    Scroll text across your face mask with NeoPixel and Raspberry Pi

    Reading Time: 3 minutes

    Have you perfected your particular combination of ‘eye widening then squinting’ to let people know you’re smiling at them behind your mask? Or do you need help expressing yourself from this text-scrolling creation by Caroline Dunn?

    The mask running colourful sample code

    What’s it made of?

    The main bits of hardware need are a Raspberry Pi 3 or Raspberry Pi 4 or Raspberry Pi Zero W (or a Zero WH with pre-soldered GPIO header if you don’t want to do soldering yourself), and an 8×8 Flexible NeoPixel Matrix with individually addressable LEDs. The latter is a two-dimensional grid of NeoPixels, all controlled via a single microcontroller pin.

    Raspberry Pi and the NeoPixel Matrix (bottom left) getting wired up

    The NeoPixel Matrix is attached to a cloth face that which has a second translucent fabric layer. The translucent layer is to sew your Raspberry Pi project to, the cloth layer underneath is a barrier for germs.

    You’ll need a separate 5V power source for the NeoPixel Matrix. Caroline used a 5V power bank, which involved some extra fiddling with cutting up and stripping an old USB cable. You may want to go for a purpose-made traditional power supply for ease.

    Running the text

    To prototype, Caroline connected the Raspberry Pi computer to the NeoPixel Matrix via a breadboard and some jumper wires. At this stage of your own build, you check everything is working by running this sample code from Adafruit, which should get your NeoPixel Matrix lighting up like a rainbow.

    The internal website on the left

    Once you’ve got your project up and running, you can ditch the breadboard and wires and set up the key script, app.py, to run on boot.

    Going mobile

    To change the text scrolling across your mask, you use the internal website that’s part of Caroline’s code.

    And for a truly mobile solution, you can access the internal website via mobile phone by hooking up your Raspberry Pi using your phone’s hotspot functionality. Then you can alter the scrolling text while you’re out and about.

    Caroline wearing the 32×8 version

    Caroline also created a version of her project using a 32×8 Neopixel Matrix, which fits on the across the headband of larger plastic face visors.

    If you want to make this build for yourself, you’d do well to start with the very nice in-depth walkthrough Caroline created. It’s only three parts; you’ll be fine.

    Website: LINK

  • Haunted House hacks

    Haunted House hacks

    Reading Time: 3 minutes

    Spookify your home in time for Halloween with Rob Zwetsloot and these terror-ific projects!

    We picked four of our favourites from a much longer feature in the latest issue of The MagPi magazine, so make sure you check it out if you need more Haunted House hacks in your life.

    Raspberry Pi Haunted House

    This project is a bit of a mixture of indoors and outdoors, with a doorbell on the house activating a series of spooky effects like a creaking door, ‘malfunctioning’ porch lights, and finally a big old monster mash in the garage.

    A Halloween themed doorbell

    MagPi magazine talked to its creator Stewart Watkiss about it a few years ago and he revealed how he used a PiFace HAT to interface with home automation techniques to create the scary show, although it can be made much easier these days thanks to Energenie. Our favourite part, though, is still the Home Alone-esque monster party that caps it off.

    Check it our for yourself here.

    Eye of Sauron

    It’s a very nice-looking build as well

    The dreaded dark lord Sauron from Lord of the Rings watched over Middle-earth in the form of a giant flaming eye atop his black tower, Barad-dûr. Mike Christian’s version sits on top of a shed in Saratoga, CA.

    The eye of sauron on top of a barn lit in red lights
    Atop the shed with some extra light effects, it looks very scary

    It makes use of the Snake Eyes Bonnet from Adafruit, with some code modifications and projecting onto a bigger eye. Throw in some cool lights and copper wires and you get a nice little effect, much like that from the films.

    There are loads more cool photos on Mike’s original project page.

    Raspberry Pi-powered Jack-o-Lantern

    We love the eyes and scary sounds in this version that seem to follow you around

    A classic indoor Halloween decoration (and outdoor, according to American movies) is the humble Jack-o’-lantern. While you could carve your own for this kind of project (and we’ve seen many people do so), this version uses a pre-cut, 3D-printed pumpkin.

    3D printed pumpkin glowing orange
    The original 3D print lit with a single source is still fairly scary

    If you want to put one outside as well, we highly recommend you add some waterproofing or put it under a porch of some kind, especially if you live in the UK.

    Here’s a video about the project by the maker.

    Scary door

    You’re unlikely to trick someone already in your house with a random door that has appeared out of nowhere, but while they’re investigating they’ll get the scare of their life. This door was created as a ‘sequel’ to a Scary Porch, and has a big monitor where a window might be in the door. There’s also an array of air-pistons just behind the door to make it sound like someone is trying to get out.

    [youtube https://www.youtube.com/watch?v=LL48k6GSOrM?feature=oembed&w=500&h=281]

    There are various videos that can play on the door screen, and they’re randomised so any viewers won’t know what to expect. This one also uses relays, so be careful.

    This project is the brainchild of the element14 community and you can read more about how it was made here.

    The MagPi magazine is out now, available in print from the Raspberry Pi Press onlinestore, your local newsagents, and the Raspberry Pi Store, Cambridge.

    You can also download the PDF directly from the MagPi magazine website.

    Website: LINK

  • Build an e-paper to-do list with Raspberry Pi

    Build an e-paper to-do list with Raspberry Pi

    Reading Time: 3 minutes

    James Bruxton (or @xrobotosuk on Instagram) built an IoT-controlled e-paper message board using Raspberry Pi. Updating it is easy: just edit a Google sheet, and the message board will update with the new data.

    [youtube https://www.youtube.com/watch?v=cGsRJhoF5yY?feature=oembed&w=500&h=281]

    Harnessing Google power

    This smart message board uses e-paper, which has very low power consumption. Combining this with the Google Docs API (which allows you to write code to read and write to Google Docs) and Raspberry Pi makes it possible to build a message board that polls a Google Sheet and updates whenever there’s new data. This guide helped James write the Google Docs API code.

    We’ll do #4 for you, James!

    Why e-paper?

    James’s original plan was to hook up his Raspberry Pi to a standard monitor and use Google Docs so people could update the display via mobile app. However, a standard monitor consumes a lot of power, due to its backlight, and if you set it to go into sleep mode, people would just walk past it and not see updates to the list unless they remember to wake the device up.

    Raspberry Pi wearing its blue e-paper HAT on the left, which connects to the display on the right via a ribbon cable

    Enter e-paper (the same stuff used for Kindle devices), which only consumes power when it’s updating. Once you’ve got the info you want on the e-paper, you can even disconnect it entirely from your power source and the screen will still display whatever the least update told it to. James’s top tip for your project: go for the smallest e-paper display possible, as those things are expensive. He went with this one, which comes with a HAT for Raspberry Pi and a ribbon cable to connect the two.

    The display disconnected from any power and still clearly readable

    The HAT has an adaptor for plugging into the Raspberry Pi GPIO pins, and a breakout header for the SPI pins. James found it’s not as simple as enabling the SPI on his Raspberry Pi and the e-paper display springing to life: you need a bit of code to enable the SPI display to act as the main display for the Raspberry Pi. Luckily, the code for this is on the wiki of Waveshare, the producer of HAT and display James used for this project.

    Making it pretty

    A 3D-printed case, which looks like a classic photo frame but with a hefty in-built stand to hold it up and provide enough space for the Raspberry Pi to sit on, is home to James’s finished smart to-do list. The e-paper is so light and thin it can just be sticky-taped into the frame.

    The roomy frame stand

    James’s creation is powered by Raspberry Pi 4, but you don’t need that much power, and he’s convinced you’ll be fine with any Raspberry Pi model that has 40 GPIO pins.

    Extra points for this maker, as he’s put all the CAD files and code you’ll need to make your own e-paper message board on GitHub.

    If you’re into e-paper stuff but are wedded to your handwritten to-do lists, then why not try building this super slow movie player instead? The blog squad went *nuts* for it when we posted it last month.

    Website: LINK

  • Raspberry Pi robot prompts proper handwashing

    Raspberry Pi robot prompts proper handwashing

    Reading Time: 3 minutes

    Amol Deshmukh from the University of Glasgow got in touch with us about a social robot designed to influence young people’s handwashing behaviour, which the design team piloted in a rural school in Kerala, India.

    [youtube https://www.youtube.com/watch?v=DBFy3LI890s?feature=oembed&w=500&h=281]

    In the pilot study, the hand-shaped Pepe robot motivated a 40% increase in the quality and levels of handwashing. It was designed by AMMACHI Labs and University of Glasgow researchers, with a Raspberry Pi serving as its brain and powering the screens that make up its mouth and eyes.

    How does Pepe do it?

    The robot is very easy to attach to the wall next to a handwashing station and automatically detects approaching people. Using AI software, it encourages, monitors, and gives verbal feedback to children on their handwashing, all in a fun and engaging way.

    Amol thinks the success of the robot was due to its eye movements, as people change their behaviour when they know they are being observed. A screen displaying a graphical mouth also meant the robot could show it was happy when the children washed their hands correctly; positive feedback such as this promotes learning new skills.

    Amol’s team started work on this idea last year, and they were keen to test the Pepe robot with a group of people who had never been exposed to social robots before. They presented their smiling hand-face hybrid creation at the IEEE International Conference on Robot & Human Interactive Communication (see photo below). And now that hand washing has become more important than ever due to coronavirus, the project is getting mainstream media attention as well.

    What’s next?

    The team is now planning to improve Pepe’s autonomous intelligence and scale up the intervention across more schools through the Embracing the World network.

    Pepe had a promising trial run, as shown by these stats from the University of Glasgow’s story on the pilot study:

    • More than 90% of the students liked the robot and said they would like to see Pepe again after school vacation.
    • 67% of the respondents thought the robot was male, while 33% thought it was female, mostly attributing to the robot’s voice as the reason
    • 60% said it was younger than them, feeling Pepe was like a younger brother or sister, while 33% thought it was older, and 7% perceived the robot to be of the same age
    • 72% of the students thought Pepe was alive, largely due to its ability to talk

    Website: LINK

  • Ultrasonically detect bats with Raspberry Pi

    Ultrasonically detect bats with Raspberry Pi

    Reading Time: 3 minutes

    Welcome to October, the month in which spiderwebs become decor and anything vaguely gruesome is considered ‘seasonal’. Such as bats. Bats are in fact cute, furry creatures, but as they are part of the ‘Halloweeny animal’ canon, I have a perfect excuse to sing their praises.

    baby bats in a row wrapped up like human babies
    SEE? Baby bats wrapped up cute like baby humans

    Tegwyn Twmffat was tasked with doing a bat survey on a derelict building, and they took to DesignSpark to share their Raspberry Pi–powered solution.

    UK law protects nesting birds and roosting bats, so before you go knocking buildings down, you need a professional to check that no critters will be harmed in the process.

    The acoustic signature of an echo-locating brown long-eared bat

    The problem with bats, compared to birds, is they are much harder to spot and have a tendency to hang out in tiny wall cavities. Enter this big ultrasonic microphone.

    Raspberry Pi 4 Model B provided the RAM needed for this build

    After the building was declared safely empty of bats, Tegwyn decided to keep hold of the expensive microphone (the metal tube in the image above) and have a crack at developing their own auto-classification system to detect which type of bats are about.

    How does it work?

    The ultrasonic mic picks up the audio data using an STM M0 processor and streams it to Raspberry Pi via USB. Raspberry Pi runs Alsa driver software and uses the bash language to receive the data.

    Tegwyn turned to the open-source GTK software to process the audio data

    It turns out there are no publicly available audio records of bats, so Tegwyn took to their own back garden and found 6 species to record. And with the help of a few other bat enthusiasts, they cobbled together an audio dataset of 9 of the 17 bat species found in the UK!

    Tegwyn’s original post about their project features a 12-step walkthrough, as well as all the code and commands you’ll need to build your own system. And here’s the GitHub repository, where you can check for updates.

    Website: LINK

  • Code a Rally-X-style mini-map | Wireframe #43

    Code a Rally-X-style mini-map | Wireframe #43

    Reading Time: 4 minutes

    Race around using a mini-map for navigation, just like the arcade classic, Rally-X. Mark Vanstone has the code

    In Namco’s original arcade game, the red cars chased the player relentlessly around each level. Note the handy mini-map on the right.

    The original Rally-X arcade game blasted onto the market in 1980, at the same time as Pac‑Man and Defender. This was the first year that developer Namco had exported its games outside Japan thanks to the deal it struck with Midway, an American game distributor. The aim of Rally-X is to race a car around a maze, avoiding enemy cars while collecting yellow flags – all before your fuel runs out.

    The aspect of Rally-X that we’ll cover here is the mini-map. As the car moves around the maze, its position can be seen relative to the flags on the right of the screen. The main view of the maze only shows a section of the whole map, and scrolls as the car moves, whereas the mini-map shows the whole size of the map but without any of the maze walls – just dots where the car and flags are (and in the original, the enemy cars). In our example, the mini-map is five times smaller than the main map, so it’s easy to work out the calculation to translate large map co‑ordinates to mini-map co-ordinates.

    To set up our Rally-X homage in Pygame Zero, we can stick with the default screen size of 800×600. If we use 200 pixels for the side panel, that leaves us with a 600×600 play area. Our player’s car will be drawn in the centre of this area at the co-ordinates 300,300. We can use the in-built rotation of the Actor object by setting the angle property of the car. The maze scrolls depending on which direction the car is pointing, and this can be done by having a lookup table in the form of a dictionary list (directionMap) where we define x and y increments for each angle the car can travel. When the cursor keys are pressed, the car stays central and the map moves.

    A screenshot of our Rally-X homage running in Pygame Zero

    Roam the maze and collect those flags in our Python homage to Rally-X.

    To detect the car hitting a wall, we can use a collision map. This isn’t a particularly memory-efficient way of doing it, but it’s easy to code. We just use a bitmap the same size as the main map which has all the roads as black and all the walls as white. With this map, we can detect if there’s a wall in the direction in which the car’s moving by testing the pixels directly in front of it. If a wall is detected, we rotate the car rather than moving it. If we draw the side panel after the main map, we’ll then be able to see the full layout of the screen with the map scrolling as the car navigates through the maze.

    We can add flags as a list of Actor objects. We could make these random, but for the sake of simplicity, our sample code has them defined in a list of x and y co-ordinates. We need to move the flags with the map, so in each update(), we loop through the list and add the same increments to the x and y co‑ordinates as the main map. If the car collides with any flags, we just take them off the list of items to draw by adding a collected variable. Having put all of this in place, we can draw the mini-map, which will show the car and the flags. All we need to do is divide the object co-ordinates by five and add an x and y offset so that the objects appear in the right place on the mini-map.

    And those are the basics of Rally-X! All it needs now is a fuel gauge, some enemy cars, and obstacles – but we’ll leave those for you to sort out…

    Here’s Mark’s code for a Rally-X-style driving game with mini-map. To get it running on your system, you’ll need to install Pygame Zero. And to download the full code and assets, head here.

    Get your copy of Wireframe issue 43

    You can read more features like this one in Wireframe issue 43, available directly from Raspberry Pi Press — we deliver worldwide.

    And if you’d like a handy digital version of the magazine, you can also download issue 43 for free in PDF format.

    Wireframe #43, with the gorgeous Sea of Stars on the cover.

    Make sure to follow Wireframe on Twitter and Facebook for updates and exclusive offers and giveaways. Subscribe on the Wireframe website to save up to 49% compared to newsstand pricing!

    Website: LINK