Schlagwort: tech articles
-

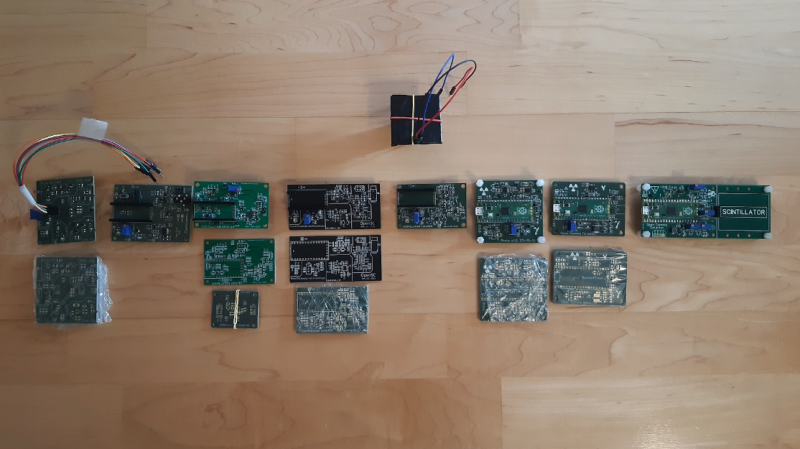
Open-Source Gamma Spectrometer
Reading Time: 2 minutesIt uses a mixture of Arduino code and Pico hardware, with processing done entirely on Pico itself. It makes use of a silicon photomultiplier (SiPM) and scintillator crystal which interact with the detector board to manage this, whereas other solutions need USB sound cards and up to a kilovolt of power. This…
-

POP CAMERA 360-degree camera review
Reading Time: 3 minutesThe version we received was pre-assembled; however, the assembly instructions are simple and very well illustrated on the website – all you need to do is attach everything to the case and PCB and you’re just about ready to go. You may notice that the website uses a lot of large UI…
-

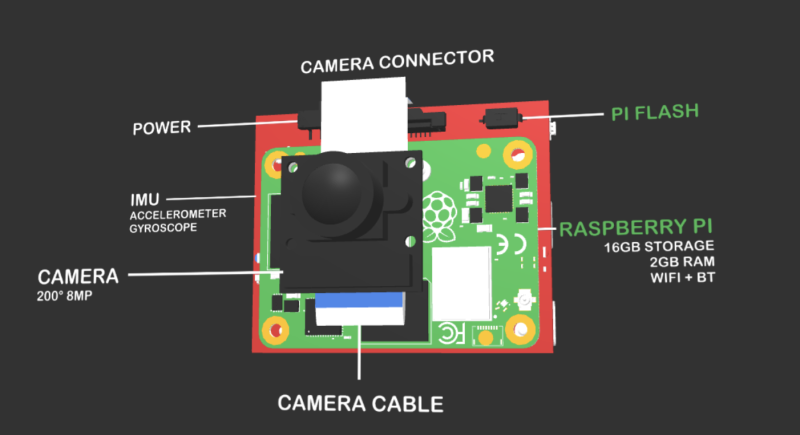
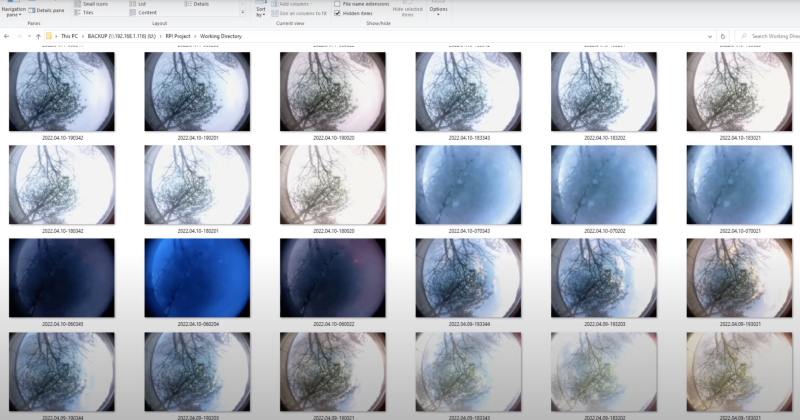
Observing trees through the seasons with ForestryPi
Reading Time: 3 minutesIn a further twist, Ed has recently handed over the tree surgery business to his brother and is currently training as a primary school teacher. He has taken one of his ForestryPi monitoring kits with him and will use it to inspire pupils as citizen scientists, reporting on the trees at school…
-

Being part of the Raspberry Pi community
Reading Time: 2 minutesHowever, as I write this, the future of a certain bird-themed social media service seems a little uneasy. While many refer to it as ‘The Hellsite’ (for very valid reasons) in my personal life, and professional life, I’ve had a lot of fun with it and made many great connections. I love…
-

Raspberry Pi Buyers Guide 2023 in The MagPi magazine #124
Reading Time: 3 minutesRaspberry Pi Buyers Guide 2023 Treat yourself this holiday season with our guide to sourcing the latest Raspberry Pi hardware, official accessories and third-party kits and projects. We’ve got gifts for every budget, so whether you’re just looking to get started or dreaming of a big build for the new year; we’ve…
-

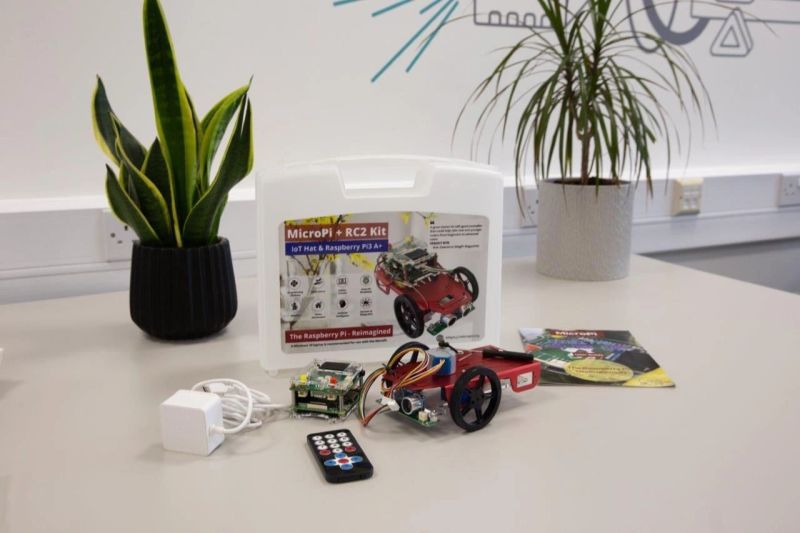
Win a MicroPi Starter Kit
Reading Time: < 1 minuteThe MicroPi is a little computer that is build from a Raspberry Pi 3A+, using a compact HAT to add a load of functions out of the box. This new Starter Kit takes it a step further by introducing a lot of projects for beginners to try out. We quite like…
-

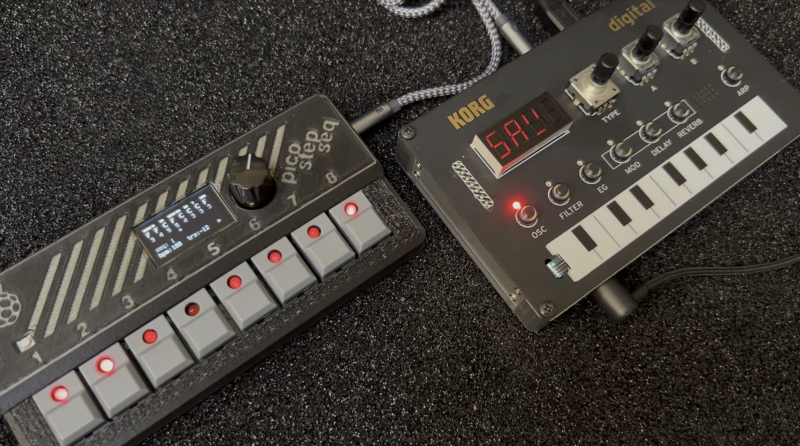
PicoStepSeq – RP2040 music maker
Reading Time: 3 minutesPrior to his adventures in Raspberry Pi Pico programming, Tod’s company, ThingM, had launched a “simple but popular” USB LED notification light known as blink(1). This provides a visual indication that you’ve received a message, email, retweet, and so on. The idea behind the PicoStepSeq is also visual: using GPIO pins, Tod planned to…
-

Sophy Wong interview: Meet the queen of wearable tech
Reading Time: 3 minutes“The great thing about design is that it’s a framework that can be applied to any kind of making,” Sophy explains. “So, being interested in lots of different mediums and techniques, I took as many art electives as I could squeeze into my schedule. I took printmaking, ceramics, photography, drawing, sculpture, video…
-

Cyberdog Smart Saddle
Reading Time: 3 minutesBrighter, later Kevin McAleer’s work may be familiar: he hosts a popular Sunday YouTube robot design channel. Among other intriguing makes, we’ve recently featured both Kevin’s Billy Bass remotely flappable fish and his PIKON DIY camera. While both those projects upcycle existing hardware, the idea behind the delightful doggie Day-Glo jacket was “to create…
-

Pi without borders
Reading Time: 2 minutesWhile we haven’t run an event calendar in The MagPi for a while now, this, and other recent tech events and online interactions, have reminded me just how much Raspberry Pi tech is used around the world, and how differently it can be used as well. Cultural differences As you may know,…
-

NB100 Cyberdeck
Reading Time: 3 minutes“I found an affordable Amstrad NC100 and I thought this was the form factor I wanted at an affordable price,” he says. “It also looked similar to the cyberdeck I imagined when reading William Gibson’s Neuromancer novel. It didn’t take long to find a purpose.” Sugar coating The Amstrad NC100 was an…
-
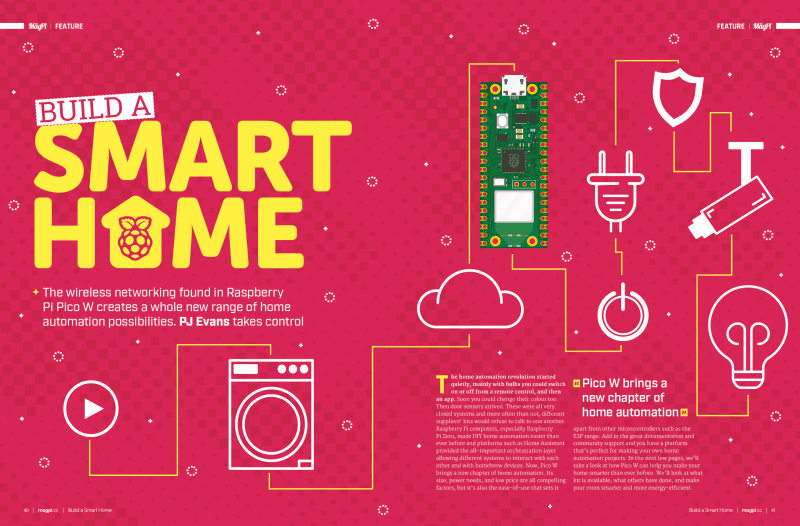
Build a Raspberry Pi Pico smart home with The MagPi magazine #123
Reading Time: 3 minutesBuild a Smart Home There’s been a boom smart home projects that feature Pico W at the heart. Use the new Wi-Fi connectivity found in the new Pico W microcontroller board to wirelessly control devices around the home. This month, PJ takes a look at the best home automation kit, projects and…
-

Win! One of five Tufty 2040s
Reading Time: < 1 minuteElectronic badges are gaining popularity thanks to new technology, such as RP2040! Tufty 2040 is an RP2040 powered, full colour LCD screen that you can use to display your own custom badge design. Great for makerspaces, cons, and more! Check below to enter our competition to win one…
-

AuraLock automatic door opener
Reading Time: 3 minutesAlthough enterprise-level facial recognition security systems can connect to automatic sliding doors, they are very expensive, so Dillon and Erin looked to create a go-between. “We wanted something to theoretically cost the same as current consumer facial recognition door locking devices,” Dillon says. “It would be connected to your home’s power and…
-

Automation 2040 W review
Reading Time: 2 minutesAt the bottom of the board, three relays (all with the option of a normally closed or open connection) can output up to 40 V at 1 A, or 24 V at 2 A. Next to them are three (switchable) sourcing outputs that can provide up to 4 A at up to 40 V for things like larger…
-

PicoKenbak
Reading Time: 3 minutesKosmas is a fan of low-level programming and, when asked to write a paper on how computer programming has evolved over the decades, he decided to dig deep and go the extra mile. “As I was researching about the beginnings of personal computers, I came across the Kenbak-1, and apparently this was…
-

10 amazing Raspberry Pi cases
Reading Time: 3 minutesSmartiPi Touch Pro Case and stand This enclosure allows you to create an entire Raspberry Pi system and put it anywhere around your house. magpi.cc/smartipi | £30 / $25 Official Raspberry Pi 4 Case Simple and clean This sleek and simple case is the official case for Raspberry Pi, acting as a…
-
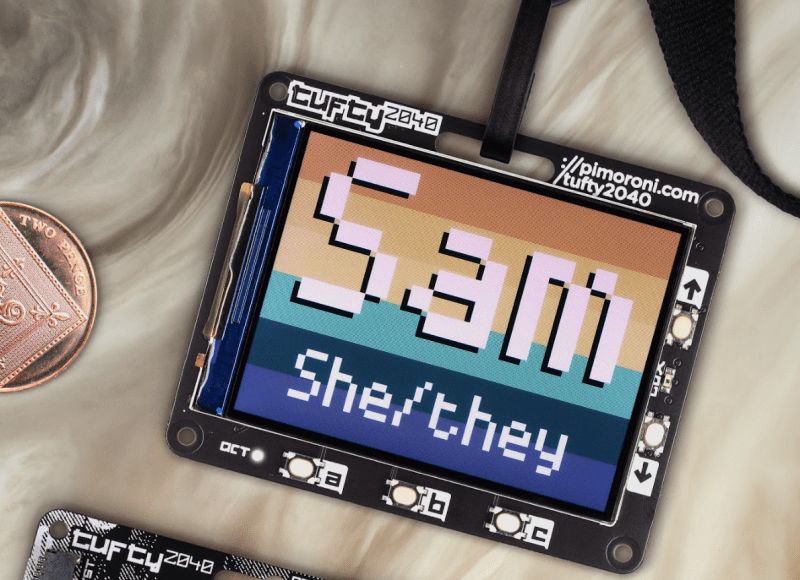
Tufty 2040 interactive name badge review
Reading Time: 2 minutesConnecting the Tufty 2040 to a computer via USB enables you to program it in MicroPython or C++. The PicoGraphics library makes it relatively easy to write text and draw shapes. JPEGs can also be rendered, and sprites imported from a sprite sheet. Wear it well For portable use, a JST-PH battery…
-

Chasing your tail: anti-stalking digital tracker
Reading Time: 3 minutesChasing Your Tail creator Matt notes that there are plenty of options if you want to track someone’s movements or digital activities, but few ways to identify whether it’s happening and pinpoint who’s behind it. “It’s very depressing to see how many devices are out there to spy on people, versus how…
-

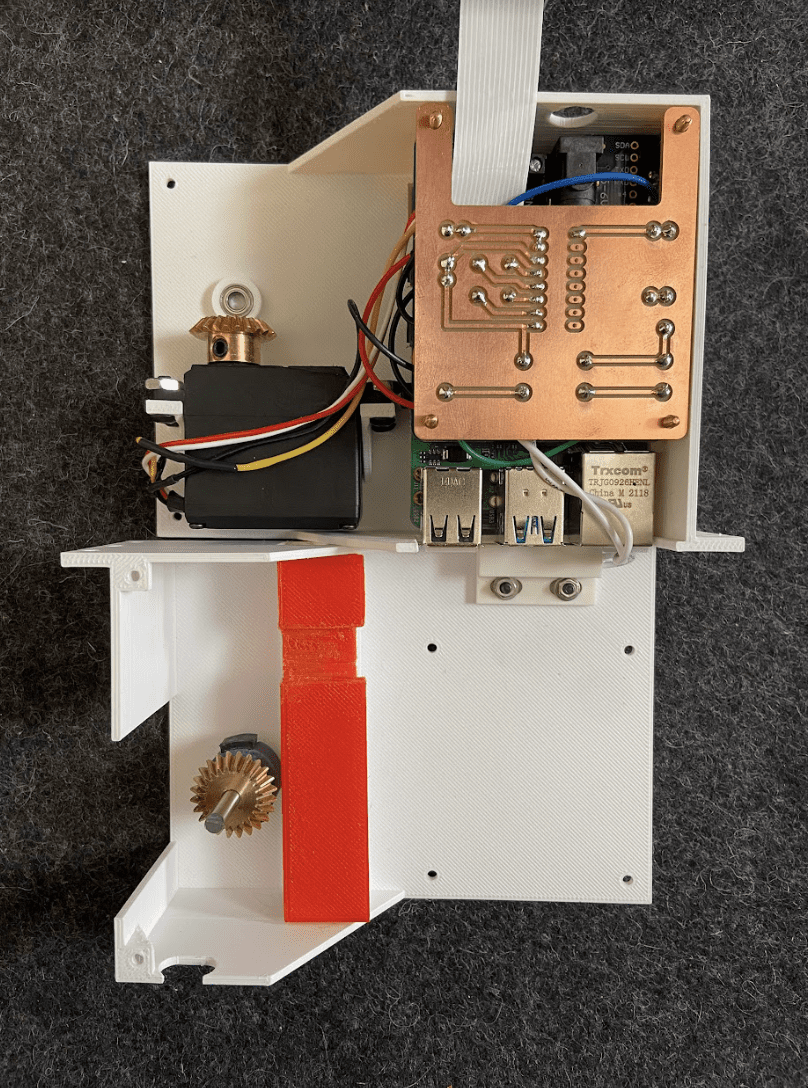
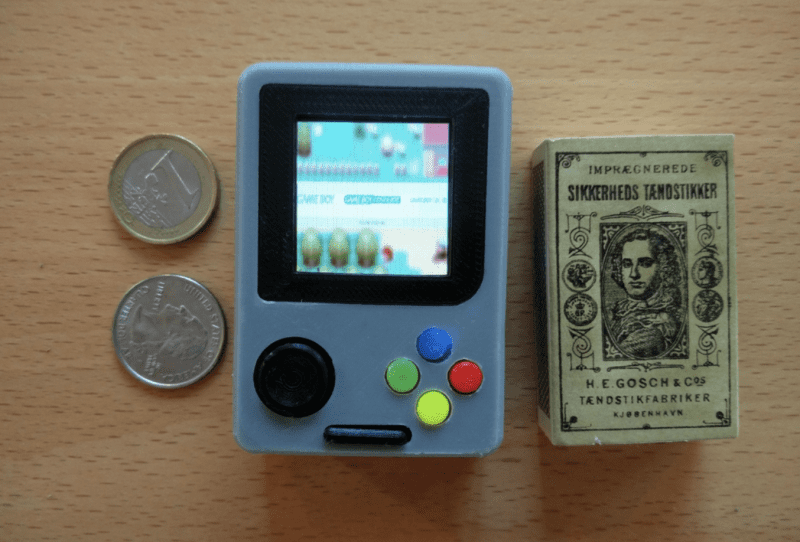
Pico Pocket Gamer
Reading Time: 3 minutesNewcomers welcome As the hardware encompasses just a Pico, a 320×240 touchscreen display, and five mechanical switches, Grgo sees this as a very achievable make. All that’s required is connecting several Pico pins to the display and mechanical switches. “No resistors, no capacitors, no battery, no external power supplies… I would call…
-

Retro education
Reading Time: 2 minutesWhen I wasn’t reading books or playing adventure games, I was learning BASIC and making my own creations. Computing classes covered everything from acid-etched circuits to PASCAL programming. As I worked my way through school, the computer became less about exploring the potential of a wonderful new gizmo and more about fitting…
-

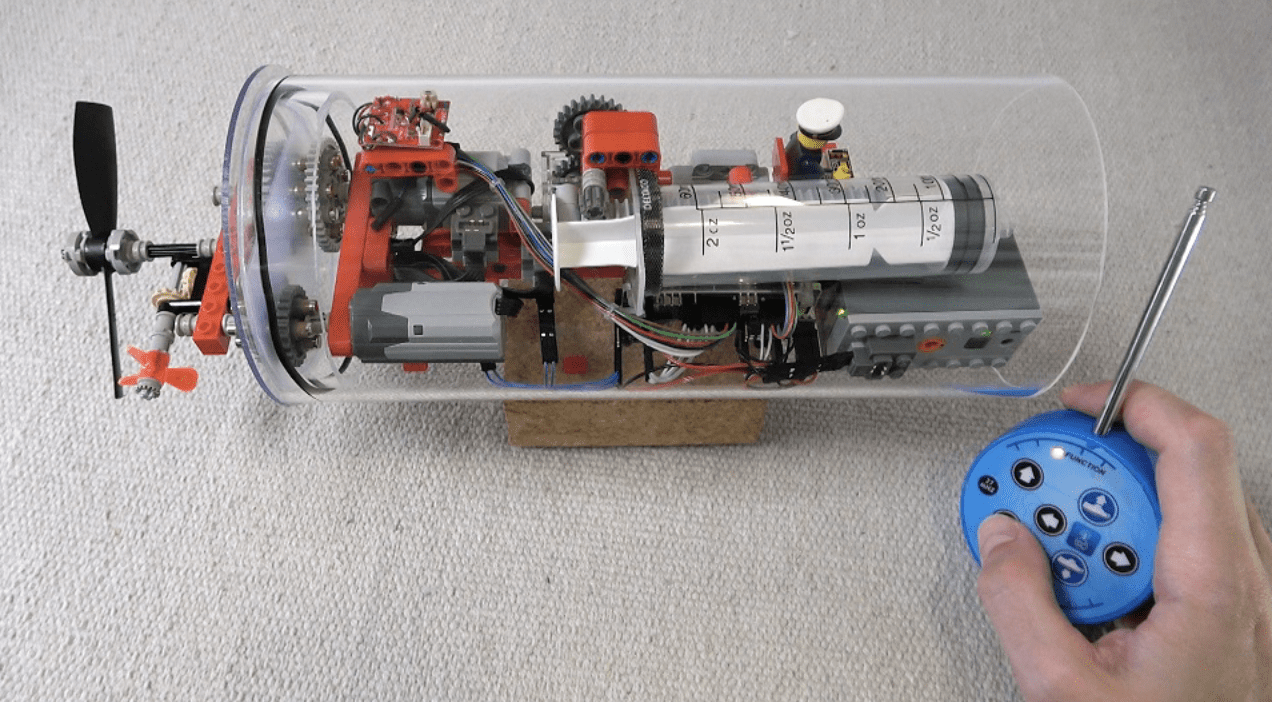
LEGO Submarine 4.0
Reading Time: 4 minutesThis is the fourth LEGO submarine design he has completed. The first three variously used propellers to add or reduce buoyancy (“gravity and buoyancy stay always the same while the propellers exert force”); a balloon, and an air compressor to adjust the amount of water displaced, thereby controlling whether the submarine sinks…