Schlagwort: robot

  • Using Smart Home Tech to Care for Your Pets

    Using Smart Home Tech to Care for Your Pets

    Reading Time: 5 minutes
    Using Smart Home Tech to Care for Your Pets

    Smart home technology has a ton of useful and fascinating use cases for humans, but what about our pets? For most of us, our furry friends are members of the family, and if we can make modifications to our home to help them, we do it.

    The good news here is that there are tons of home automation tools that you can use to make life easier and more fun for your pets, and many of them can be done with just a handful of starting materials and basic knowledge.

    In this article, we’ll take a look at some of the ways smart homes can benefit pets, and explore some projects from the Arduino community.

    Here are just a few of the ways smart home technology can improve your pets’ quality of life:

    • Control the temperature through tools like automatic sensors and heating systems, ensuring the room is perfect for pets even when you’re not around
    • Observe pets when you’re away, allowing you to quickly notice if they’re distressed or in trouble (or making trouble)
    • Keeping your pets fed by automatically filling their bowls at the right times
    • Keeping your pets entertained with robotic toys and activities
    • Prevent theft with monitoring and tracking tools, alongside existing smart home security systems

    Some examples of smart home pet tech

    Now let’s take a look at some projects from the Arduino community geared toward making life easier for pets.

    Remote pet feeder

    Community member Amal Mathew designed this project to make it possible to feed pets using a remote control. It’s pretty simple to get started — all you need is an Arduino Uno board (or similar), a plastic bottle, a servo motor, a TV remote, IR receiver (TS0P1738) and a small piece of cardboard.

    With just a few clicks of the remote, you can instruct the plastic bottle of food to release a certain amount to be enjoyed by your pet — without even leaving the sofa. Check out the full project here.

    Pet entertainment centre

    Vítor Barbosa was inspired by the Alexa and Arduino Smart Home challenge to build the pet entertainment centre along with two friends. As well as feeding pets, it also keeps them entertained with the use of a laser toy — although this is better suited to cats than dogs.

    Every pet owner knows how useful it is to have a toy to keep your pets distracted when you need to focus on something else, and Vitor’s project uses smart home technology to build the perfect automated solution. 

    Pet feeder with 3D printed parts

    Before COVID-19, russo08 was working long, unpredictable hours and often ended up getting home late due to flooding and other disruptions. This made it tricky to feed his dog on time every day.

    To ensure his pet was fed at the right times every day, russo08 decided to build an automated solution. He used an Arduino microcontroller and a handful of other components — including 3D printed parts — to build a custom dog feeder. Because of random power outages in the area, it was essential that the feeder had a solution for power outage recovery and food getting stuck in the dispensing mechanism. 

    Here’s the full list of features on russo08’s feeder:

    • Two feedings per day
    • Accurate timekeeping with real-time clock
    • Manual time change of real-time clock
    • Manual feeding option
    • LED indication of hall sensor and real-time clock failure
    • Overview of feed times, current time, and feeding completions on the main screen
    • Easy to navigate menu
    • Power outage feeding resume (will feed when the power comes back on)
    • Feeding times and completions are safely stored in EEPROM
    • Servo “jiggle” in the event of food getting stuck while dispensing

    Improve your pet’s life with Arduino

    Arduino’s solutions make it easier than ever to build your own smart home projects with relatively few starting materials and without the need to be a seasoned expert. Our community is filled with examples of DIY home automation projects that improved our makers’ lives in all kinds of ways.

    When it comes to pets, Arduino’s technology can be used to build smart solutions like the ones in this article, making it easy to feed, water, protect, and care for our pets even when we aren’t physically present.

    Check out this article where we look at how home automation can make it easier to care for your pets. We’ll also share some examples of projects from the Arduino Community, where many members have developed their own devices to keep their pets safe and happy.

    Find out more about how Arduino works and get started with your own projects by checking out the main website.

    Abstract: Caring for pets is one of the most important — if not THE most important — job you do at home. The good news is that technology can help in this area. Home automation can make it easier to feed, entertain, and care for your furry friends — find out some of the ways Arduino can help you do this.

    Social post: Making sure your pets are fed, watered, and entertained can be a demanding job at times, especially when you’re busy with other things. The good news is that technology can shoulder some of the burden by automating some important pet care tasks.

    Website: LINK

  • Standalone Arduino Nano RP2040 Connect-controlled computer runs BASIC for IoT development

    Standalone Arduino Nano RP2040 Connect-controlled computer runs BASIC for IoT development

    Reading Time: 3 minutes

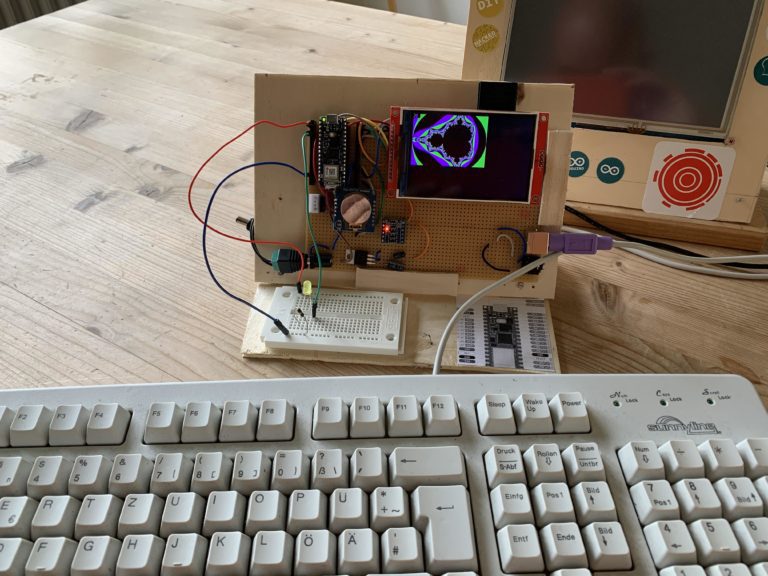
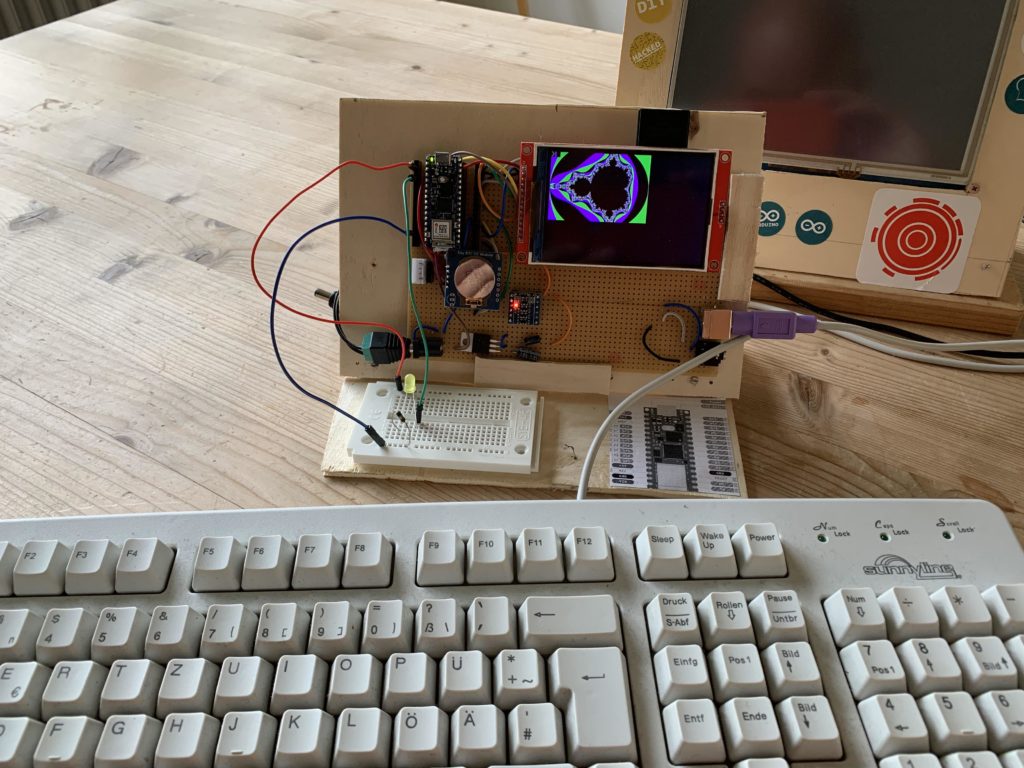
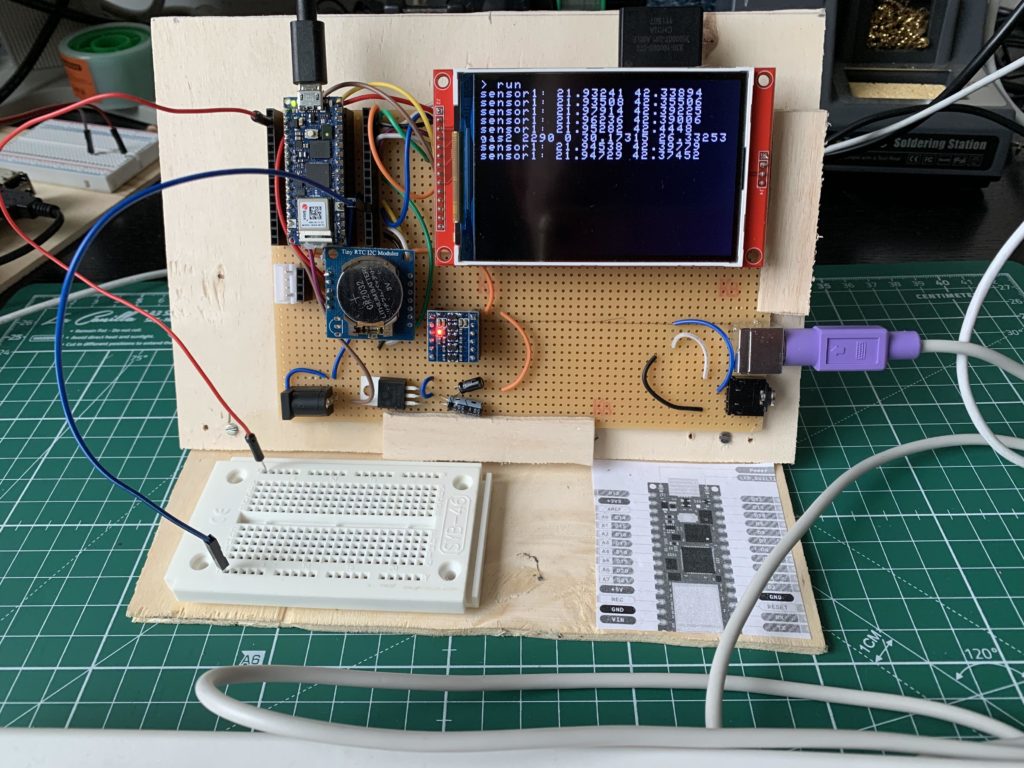
    If you’re more than 30 years old, then there is a good chance that BASIC (Beginners’ All-purpose Symbolic Instruction Code) was the first programming language you used. Many early computers shipped with a BASIC interpreter in firmware, so it was the first thing users saw when they booted up their computer. While other languages are more useful for most tasks today, BASIC still has benefits. To take advantage of it, Stefan Lenz used a Nano RP2040 Connect to build a standalone computer that runs BASIC for Internet of Things applications.

    The Raspberry Pi RP2040 is a powerful microcontroller that immediately became popular after it hit the market in January 2021. The Arduino Nano RP2040 Connect is one of the newest boards in the Arduino lineup and gives users access to the RP2040 within the friendly Arduino ecosystem. In addition the MCU, this board also contains a u-blox WiFi and Bluetooth® adapter, a six-axis IMU, a microphone, 16MB of flash memory, and even a CryptoAuthentication chip. The u-blox adapter was particularly useful for this project, since it enables IoT control over a wireless network.

    To turn the Arduino into a complete computer, Lenz connected an ILI9488-based 480×320 TFT LCD screen with built-in SD card slot, a real-time clock, and a PS2 keyboard. The use of the PS2 keyboard eliminated the need for the Arduino to act as a USB host, but the PS2 connection does require a voltage level converter to go from 5V to 3.3V. Lenz also connected a small thermal printer to output logs of sensor data. 

    Lenz developed his own BASIC interpreter from scratch specifically for Arduinos and other microcontroller development boards. The cool thing about BASIC is that, like Python, the interpreter allows for interactive programming without compilation. This lets users create IoT programs one piece at a time while seeing the results immediately, instead of compiling and flashing each revision.

    Categories:Arduino

    Website: LINK

  • Count elevator passengers with the Nicla Vision and Edge Impulse

    Count elevator passengers with the Nicla Vision and Edge Impulse

    Reading Time: 3 minutes

    Modern elevators are powerful, but they still have a payload limit. Most will contain a plaque with the maximum number of passengers (a number based on their average weight with lots of room for error). But nobody has ever read the capacity limit when stepping into an elevator or worried about exceeding it. In reality, manufacturers build their elevators to a size that prevents an excessive number of passengers. But as a demonstration, Nekhil R. put together a tutorial that explains how to use the Edge Impulse ML platform with an Arduino Nicla Vision board to count elevator passengers.

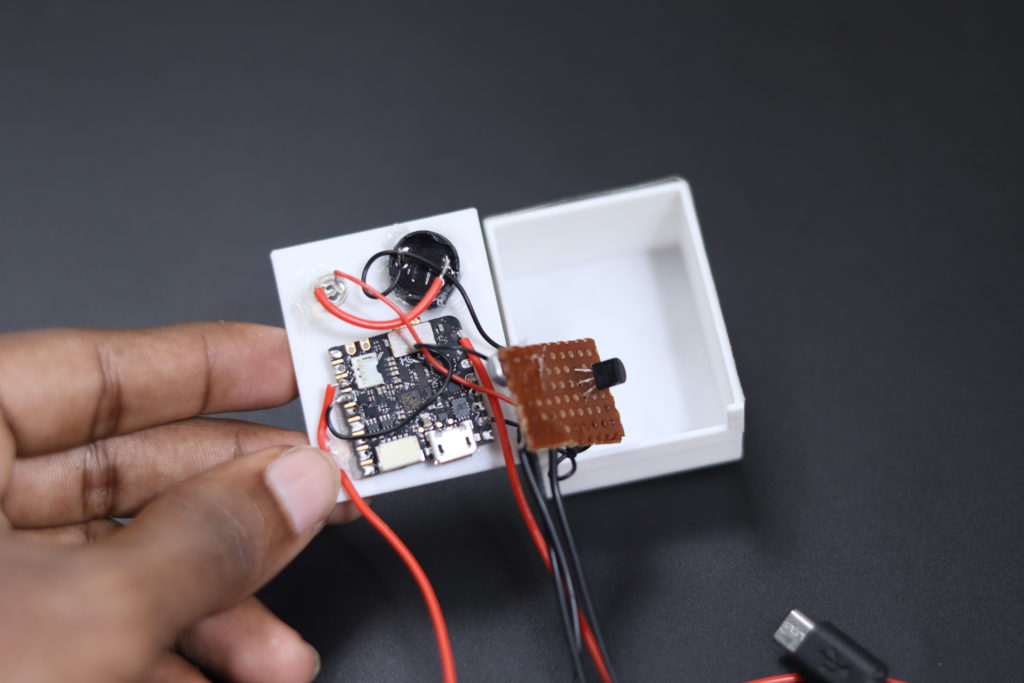
    The Nicla Vision is a new board built specifically for computer vision applications — especially those that incorporate machine learning. In its small footprint (less than a square inch), there is a powerful STM32H747AII6 microcontroller, a 2MP color camera, a six-axis IMU, a time of flight sensor, a microphone, WiFi and Bluetooth, and an onboard LiPo battery charger — and it’s officially supported by Edge Impulse, making it well suited for ML projects.

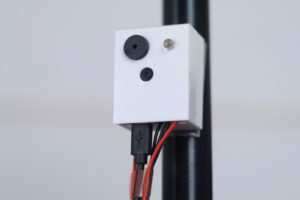
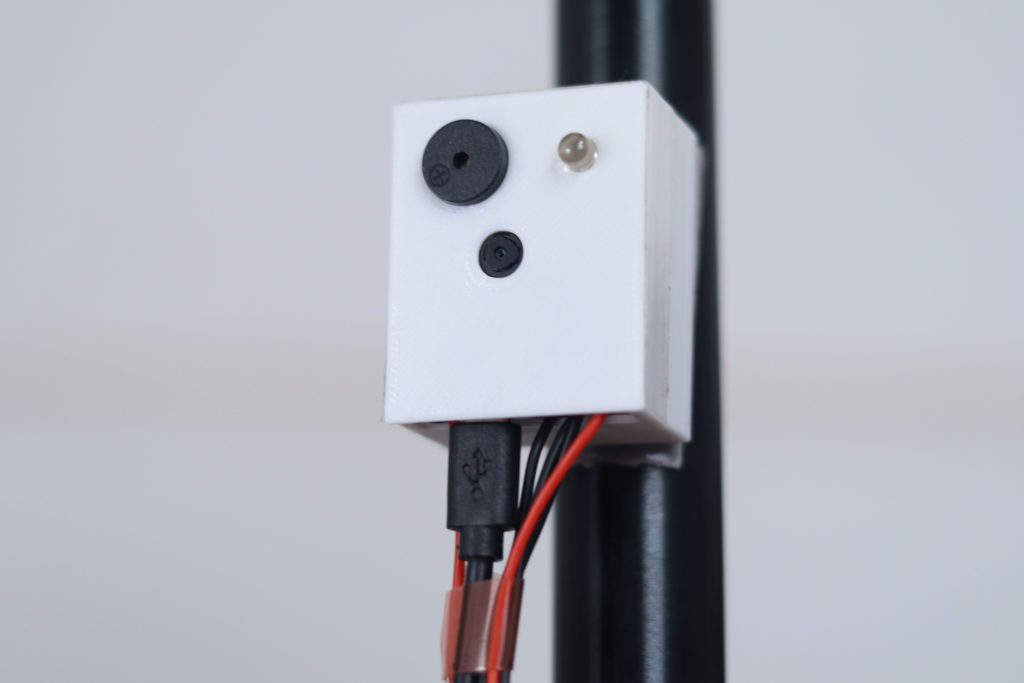
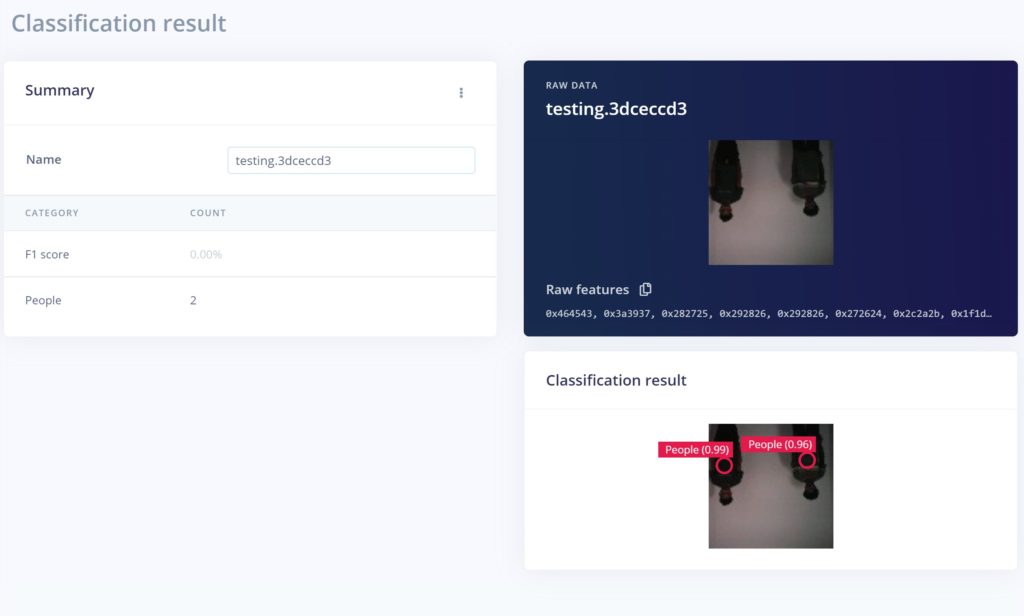
    To build this passenger counter, all you need is the Nicla Vision, a buzzer, an LED, a push button, a power source, and the 3D-printable enclosure. The guide will walk you through how to train and deploy the object detection model, which is what Edge Impulse excels at. It lets you train a model optimized for microcontrollers and then outputs code that is easy to flash onto an Arduino. There are many optimization tricks involved, such as lowering the video resolution and processing the video as grayscale, but Edge Impulse takes care of all of the difficult work for you.

    After deploying your model to the Nicla Vision, you can mount this device anywhere in an elevator that gives you a view of the whole car. It keeps a running log of passenger counts, which you can visualize later in graphs or as raw data. If the device sees a passenger count that exceeds the set limit, it will flash the LED and sound the buzzer.

    You probably don’t have a reason to count elevator passengers, but this is a fantastic demonstration of what you can accomplish with the Nicla Vision board and Edge Impulse.

    [youtube https://www.youtube.com/watch?v=yD8CJGDpgfY?feature=oembed&w=500&h=281]

    Website: LINK

  • A DIY non-contact digital tachometer for machinists

    A DIY non-contact digital tachometer for machinists

    Reading Time: 3 minutes

    A tachometer is a device that counts the revolutions of a rotating object, with the most well-known example being the automotive tachometer that monitors the revolutions per minute (RPMs) of an internal combustion engine. But tachometers are useful, and sometimes a requirement, in many other applications. RPM is a very important datum when working with machine tools like lathes and milling machines, which is what this DIY non-contact digital tachometer was designed to accommodate.

    The term “feeds and speeds” refers to the parameters a machinist uses to achieve the ideal tool load. A vertical milling machine’s end mill, for example, can only remove a certain amount of material with each stroke of each cutting flute. For that reason, it is imperative that a machinist know how fast the end mill is rotating. Most modern machine tools (not just CNC tools, but also manual tools) include a digital RPM display. But many older machines and some modern machines with low-cost VFDs (variable-frequency drives) do not and that makes it very difficult to maintain optimal load. This DIY device addresses those shortcomings in an affordable way.

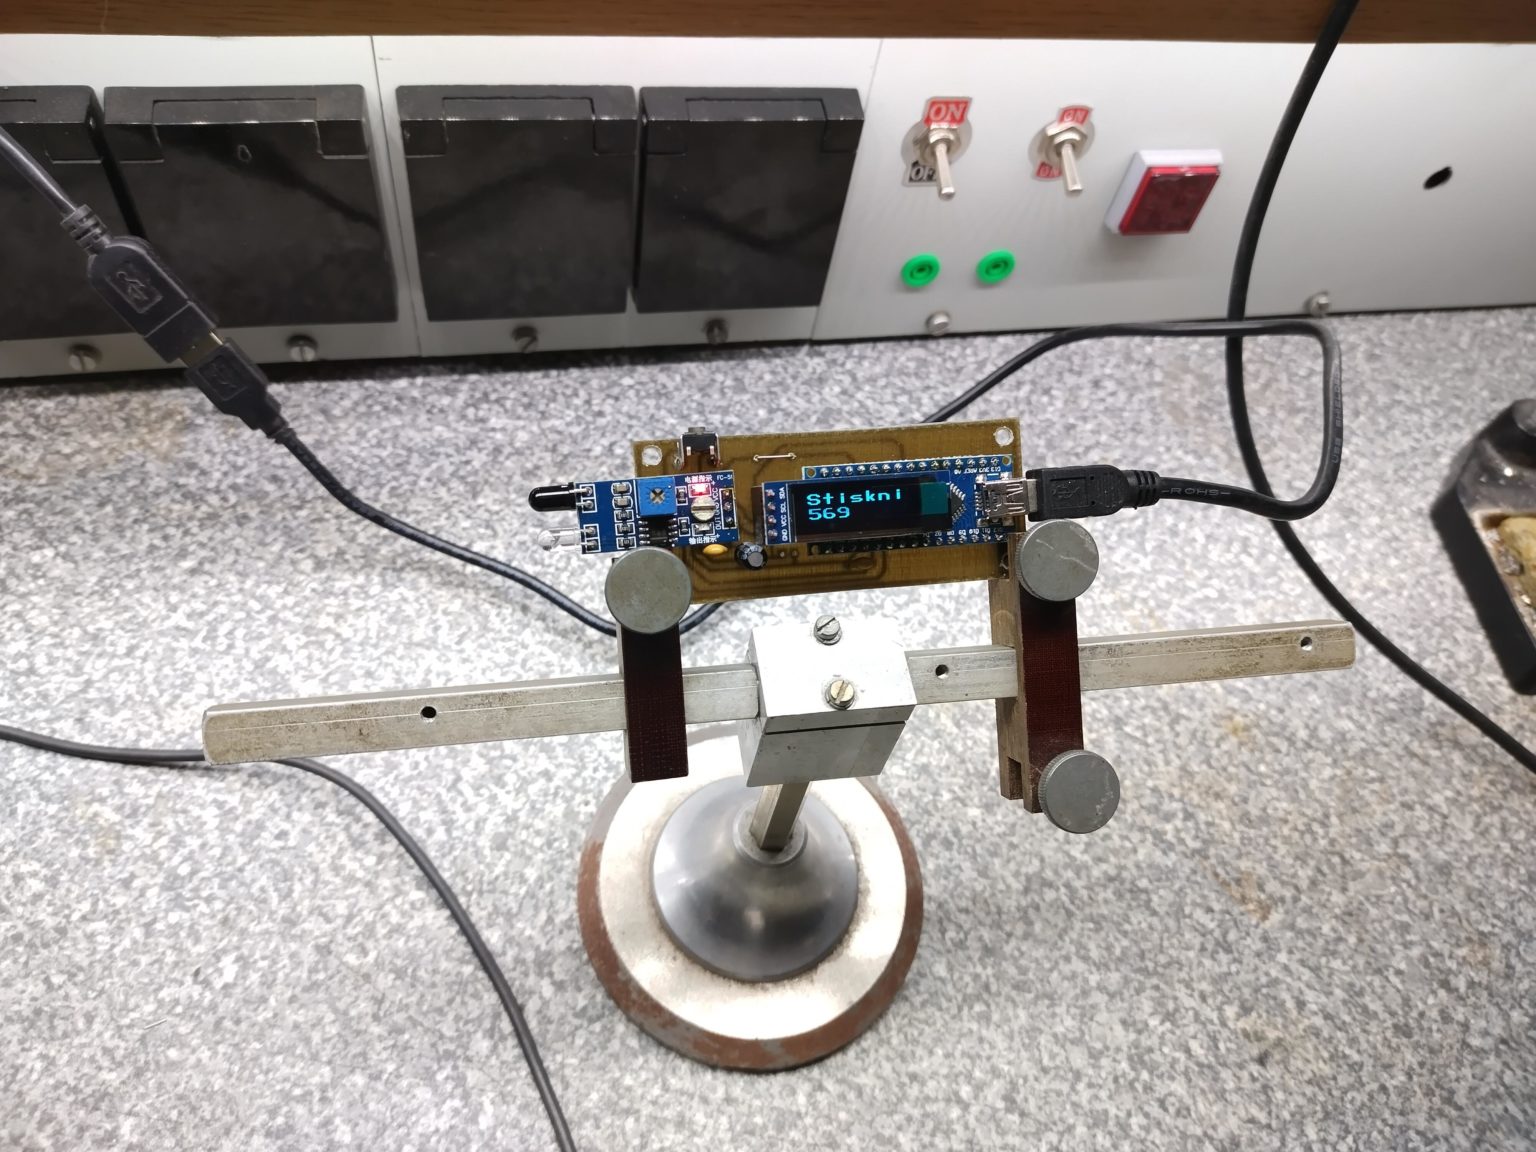
    Inside of the device’s 3D-printed enclosure are an Arduino Nano board, an infrared distance sensor module, a 0.91” 128×32 OLED screen, a lithium-ion battery, and a TP4056 lithium battery charging module. Any time the infrared sensor sees a strong reflection of its emitted light, it counts a pulse. But timing the delay between pulses, the Arduino can calculate the RPM and then display that number on the OLED screen. The user only needs to mount the device in front of the object to monitor, like a mill’s spindle or a lathe’s chuck, and put a 6mm-wide piece of white tape in front of the infrared sensor. Every time that white tape passes in front of the sensor, it reflects a lot of light for the sensor to detect as a pulse.

    This doesn’t require any physical modification of the machine tool, because it runs on battery and doesn’t need to make physical contact with the spindle, so it is perfect for machinists working on an employer’s equipment. 

    Boards:Nano
    Categories:Arduino

    Website: LINK

  • Zen sand garden in a suitcase doubles as MIDI controller

    Zen sand garden in a suitcase doubles as MIDI controller

    Reading Time: 3 minutes

    At the shallow end of the pool, a MIDI (musical instrument digital interface) controller can be as simple as a handful of buttons that correspond to different notes. But even as one wades into the deep end of the pool, MIDI controllers tend to still look like hunks of plastic with some knobs and keys. Redditor Gilou_ wanted something that felt more organic (actually, “inorganic” if we want to be technical) and so they built this unusual MIDI controller that looks like a Japanese-style sand garden in a suitcase.

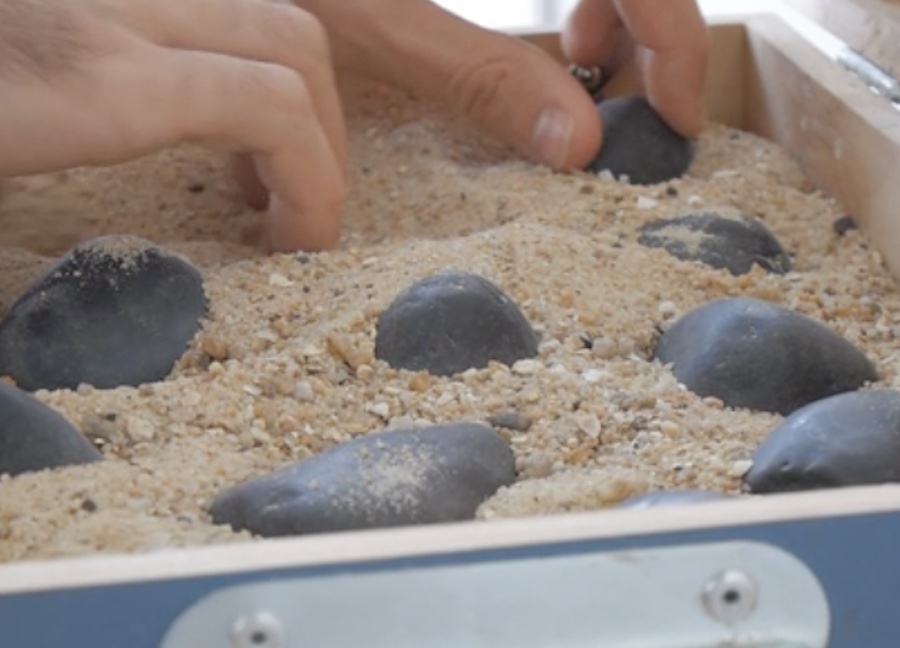
    If you stumbled across this device without any context, you would assume that is exactly what it is: some kind of portable sand garden. Opening the top of the suitcase reveals a handful of dark stones resting in a bed of sand. Traditional rakes and scoops hang in straps on the lid of the suitcase. But underneath the sand there are a few electronic components that turn the sound garden into a functional instrument. A piezoelectric pickup, like the kind you’d see on some acoustic-electric guitars, in the sand translates the vibrations of sand raking and sifting into an audio signal that feeds into a computer’s sound card.

    The sound from the piezoelectric pickup might be interesting to a foley artist, but it wouldn’t be very musical on its own. To make this a useful electronic instrument, Gilou_ added an Arduino Micro board as a MIDI controller. The dark stones are knobs that sit on potentiometers, which lets the musician adjust the sound of the sand as it plays through the computer. Each potentiometer controls a different effect, such as reverb or delay, that dramatically alters the sound of the sand. Instead of something that sounds like a lapel mic rubbing on a shirt, the musician can create ambient music that is quite pleasant to hear.

    Boards:Micro
    Categories:ArduinoMIDI

    Website: LINK

  • Mokey is an affordable DIY laser engraver

    Mokey is an affordable DIY laser engraver

    Reading Time: 3 minutes

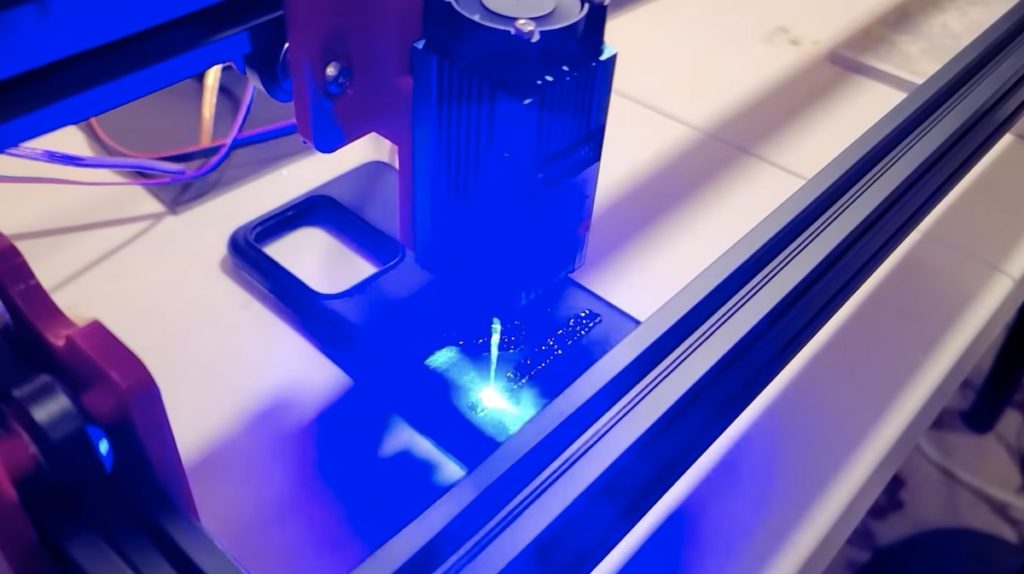
    All makers love lasers and they make great shop tools. Even low-power lasers can engrave a variety of materials. Cutting material requires more power, with the most popular cutting lasers being CO2 with power between 10W-100W. But the small, affordable solid state laser modules can cut some materials, like acrylic, if you get a powerful enough model. If you want an affordable way to use one of those, then the Mokey Laser v1.0 is worth looking at.

    Lasers like these can engrave and cut material, which means they can absolutely hurt you — your eyes are especially vulnerable. If you’re going to build something like this, make sure you understand how to operate it safely. It isn’t shown in the video, but you should absolutely use some kind of shielded enclosure that can handle the wavelength and power of the laser you use. Even with such an enclosure, you should wear the appropriate safety goggles.

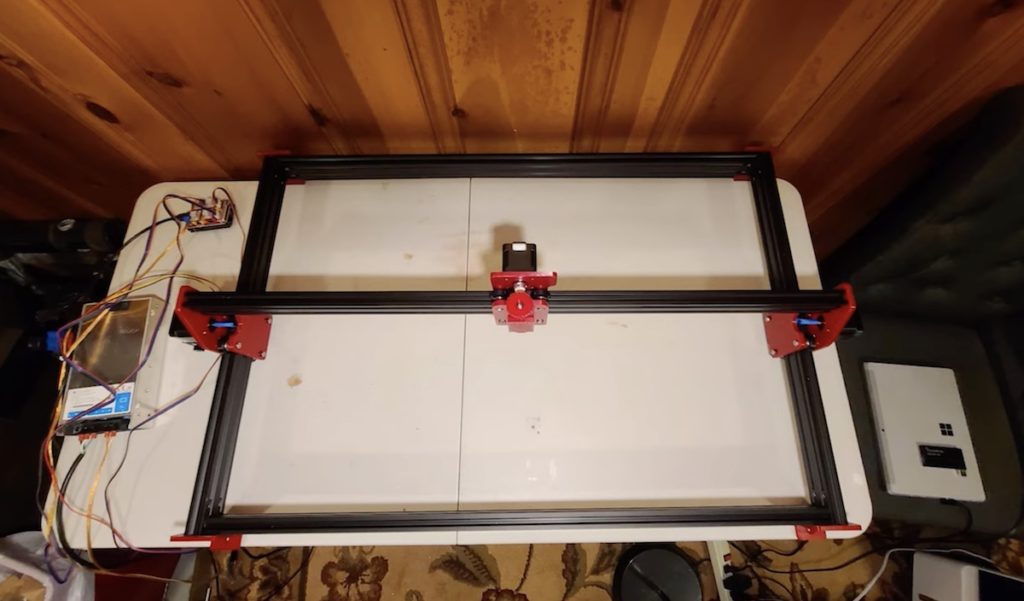
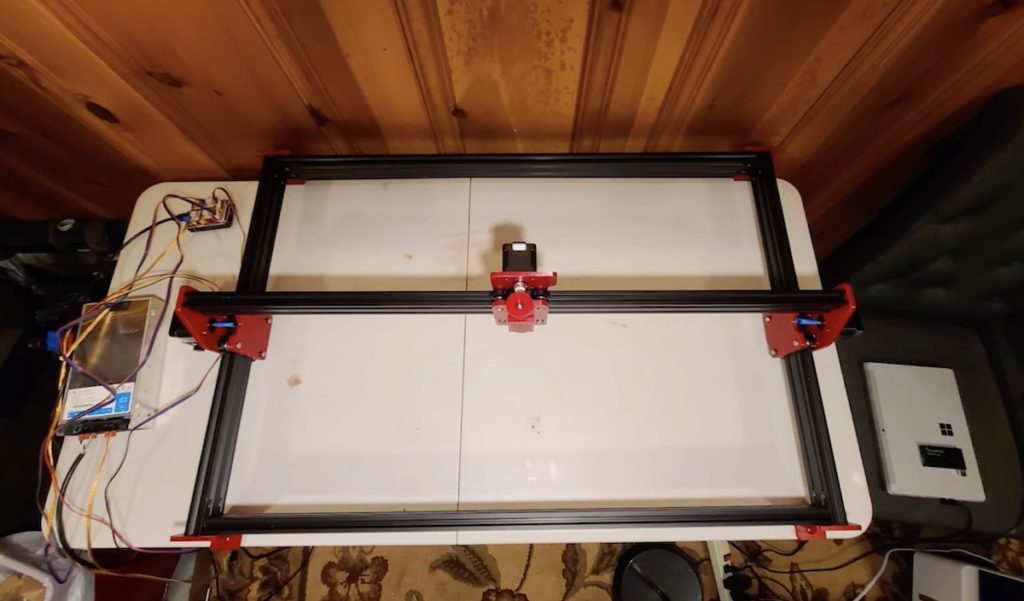
    This design cuts costs by utilizing 3D printer-style parts and by omitting the optics that are necessary for CO2 lasers. Because solid state laser modules are so compact, it is practical to move them on a gantry in the same way as a 3D-printer’s extruder instead of redirecting the laser beam with mirrors and lenses.

    The structure of the Mokey Laser v1.0 is 8020 aluminum extrusion, which also acts as rails for the V-roller wheels on which the gantry rides. Most of the other parts are 3D-printed, with standard stepper motors and GT2 belts providing motion. An Arduino Uno board controls those stepper motors through a CNC Shield V3 with A4988 drivers. If you build this, you’ll have many software options. As shown, it runs GRBL 1.1 and that is compatible with almost every open source g-code sender out there, including some that are add-ons for Inkscape so you can control the laser from the same software you use to create toolpaths.

    The total build cost with the bill-of-materials presented is $402.61, which makes this quite affordable for the size and capability.

    [youtube https://www.youtube.com/watch?v=OrmquzFItJM?feature=oembed&w=500&h=281]
    Boards:Uno
    Categories:Arduino

    Website: LINK

  • Shop fan automatically activates when airborne particulates are present

    Shop fan automatically activates when airborne particulates are present

    Reading Time: 2 minutes

    Even if you’re one of the few people in the world who is consistent about wearing a respirator in the shop, it’s a good idea to run a filtration fan. Not only is that good for your own health and comfort, it can help keep your equipment running well — the last thing you want is something overheating and catching fire because its cooling ducts are clogged. To avoid running a fan when it isn’t needed, Brandon of the YouTube channel Honest Brothers built a system to automatically activate his filtration fan when airborne particulates are present.

    The first half of this video provides detail on building the fan itself, including an explanation of filtration fundamentals and what particulates different standards can handle. If you don’t have an interest in building a fan from scratch and would prefer to buy something off the shelf, you can skip ahead. The important thing to take away before Brandon gets to the low-voltage section is that the fan receives AC mains voltage and you’ll switch it on via a relay.

    An Arduino Leonardo board will activate that relay. It will do so when it detects particulates in the air. It is able to do that using a PMS5003 digital particulate sensor that can monitor the concentration of airborne particulates using a laser. The sensor scatters the laser through a volume of air and has its own built-in microprocessor to calculate the results. It can detect particulates with a diameter as small as 0.3?m, which is perfect for what you’d expect to find in a typical maker’s shop. The Arduino displays the results from the PMS5003 on a small LCD screen, but will also activate the fan relay when they exceed a set threshold. Because filtration fans can consume a lot of power, this will keep both your electric bills and your future to a minimum. 

    [youtube https://www.youtube.com/watch?v=ccPqfBEu5PI?feature=oembed&w=500&h=281]
    Boards:Leonardo
    Categories:Arduino

    Website: LINK

  • Art class stinks! Learn with smell in art class using this olfactory display

    Art class stinks! Learn with smell in art class using this olfactory display

    Reading Time: 3 minutes

    By Maria Nikoli, Interaction Designer, MSc., Malmö University

    Smelling is crucial to our everyday living. But how well do we really understand the role that smells play in our day-to-day? Ask someone who temporarily lost their sense of smell because of COVID-19. They’ll probably tell you about how incredibly boring eating became all of a sudden, and how their roomies saved them from eating a foul-smelling, spoiled block of cheese that had zero mold on it. 

    The sense of smell is super important, as it makes life pleasurable, and helps us detect danger. It’s also intrinsically connected to memory and emotion. You probably know what it’s like to smell something and get an instant flashback – it almost feels like time travel. 

    Yet, olfaction (a fancy word for the sense of smell) is often overlooked in both HCI and art education. Building on that, “Art Class Stinks!” is an interactive system for learning with smell in art class while helping the students become more aware of their sense of smell.

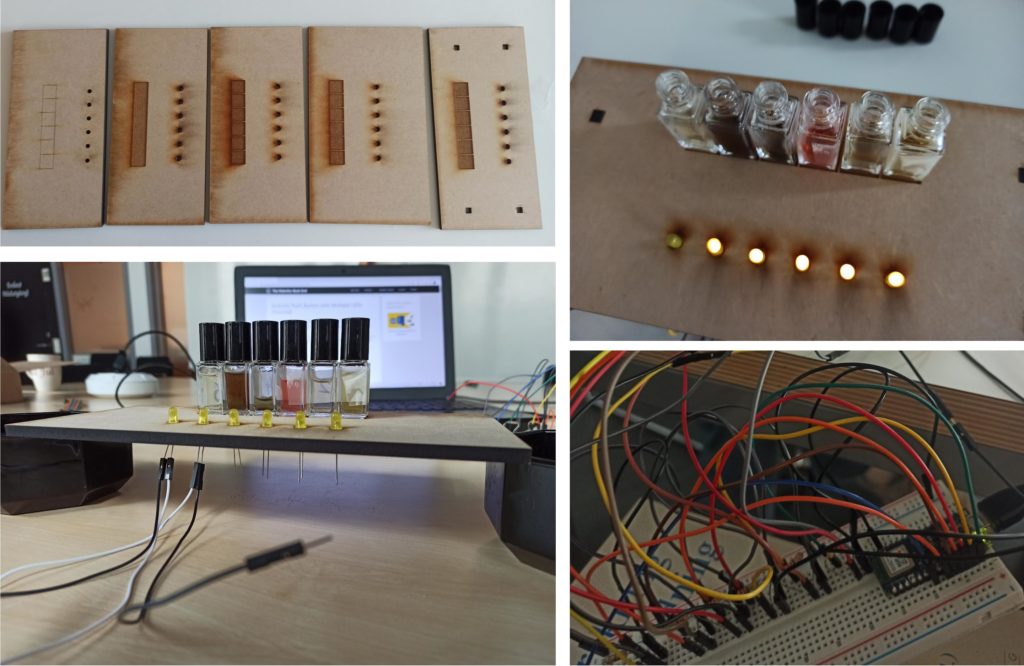
    The prototype consists of two components. The first component is a mobile app that guides the user through processes of learning and being creative with smell, gives instructions for creative tasks and smell awareness tasks, and archives the users’ art. The second component is an olfactory display (OD). The OD consists of a scent kit and an Arduino-powered interactive board equipped with LED lights and RFID tag readers. Navigating the app, the user gets prompted to do several creative tasks using the scents for inspiration. They also get prompted to do smell identification tasks to raise their own awareness of their sense of smell. The interactive board links each scent note to the software and also indicates the ways in which the user can sniff the scent notes. 

    [youtube https://www.youtube.com/watch?v=-0P8fpRPwz4?feature=oembed&w=500&h=281]

    Find out more about this project on Instagram (@marianikolistudio) and Malmö University’s digital archive.

    Categories:Arduino

    Website: LINK

  • Beating unscrupulous arcade owners at their own games

    Beating unscrupulous arcade owners at their own games

    Reading Time: 2 minutes

    Mark Rober isn’t just a talented mechanical engineer and entertaining personality, he is also something of a champion of justice for the common man. He’s already proved that several times with his famous yearly porch pirate-targeted pranks, but now he’s taking on the corrupt fat cats running arcades for children. Those arcades are often full of rigged games that are either more difficult than they seem or downright unwinnable. In his most recent video, Rober built machines that could beat several of those games with ease.

    We don’t have enough space here to provide detail on every contraption that Rober created, but they all accomplish a common goal of defeating rigged arcade games. Some of those, like Skee-Ball, are only nefarious in the sense that have misleading difficulty and rely on misdirection to swindle players. Others, like Quik Drop, are almost impossible for humans to win. For good measure, Rober even made a robot that can block every shot a human opponent takes in air hockey.

    The exact nature of each machine depends on the game it was intended to beat and a few of them utilized Arduino development boards for control. The Quik Drop-beating machine, for example, uses an Arduino to rapidly actuate a solenoid that presses the button to drop the balls. That speed was necessary to sink all of the balls in the short amount of time allotted. His basketball robot — literally a robot disguised as a basketball — has pneumatic pins and an infrared beam-blocking pop-out section controlled by an Arduino.

    For entertainment, a look into the mind of a very clever engineer, and a peek behind the curtain of arcade odds-stacking, be sure to watch Rober’s YouTube video.

    [youtube https://www.youtube.com/watch?v=Rsxao9ptdmI?feature=oembed&w=500&h=281]
    Boards:Nano
    Categories:Arduino

    Website: LINK

  • Driving a arduino robot car with nothing but your voice

    Driving a arduino robot car with nothing but your voice

    Reading Time: 2 minutes

    Arduino TeamJuly 15th, 2022

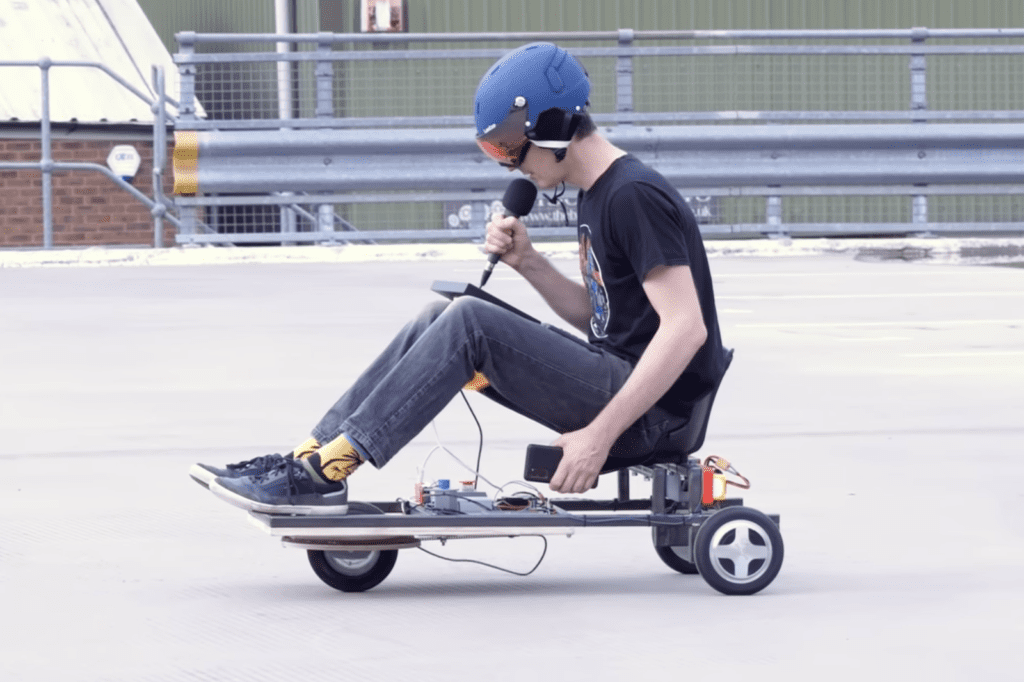
    Traditional control of RC cars and other small vehicles has typically relied on some kind of joystick-based solution, often with one for adjusting direction and the other for speed. But YouTuber James Bruton wanted to do something different: make a rideable go-kart that is entirely driven with one’s voice.

    His solution is based around Deepgram’s speech recognition service, which enables users to send small snippets of audio samples up to its cloud via an API and receive replies with a transcript of what was said.


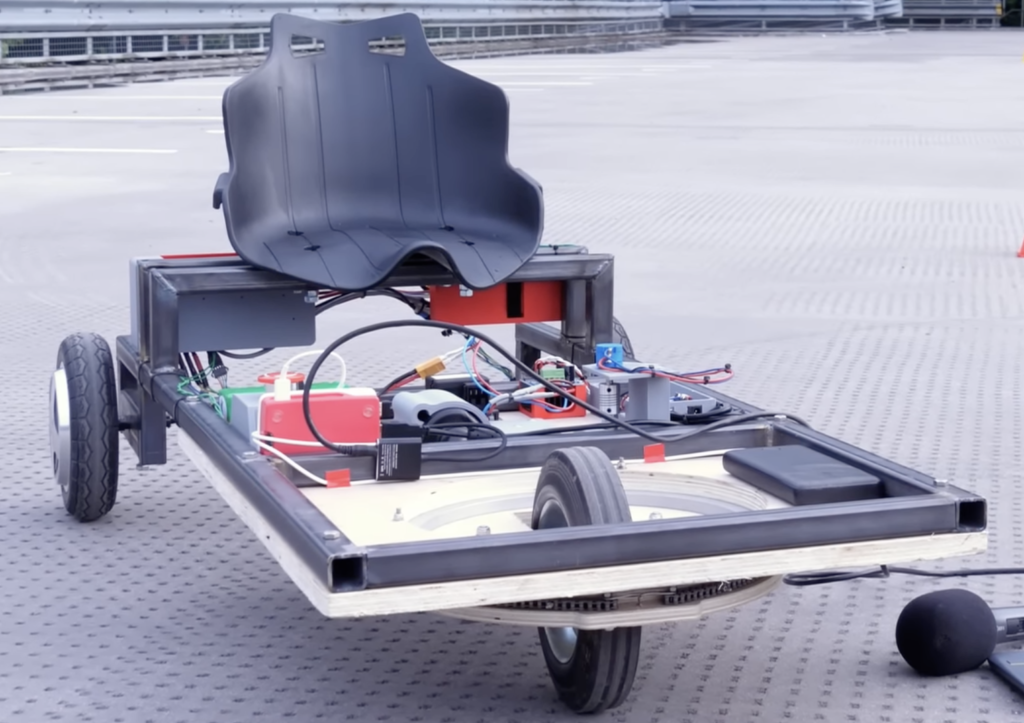
    As for the kart itself, its chassis was created by first welding together several steel tubes and attaching a based of thick plywood on top. The front cutout allows for a large caster wheel to spin left or right with the aid of a chain driven by a repurposed windshield wiper motor assembly. Absolute positioning of this wheel was achieved by measuring the voltage of a potentiometer that spins along with the chain.


    And finally, a pair of hub motor wheels, akin to the ones found on hoverboards and scooters, were placed at the rear for propulsion. Each motor was connected to its specific driver, and in turn, were connected to an Arduino Uno.

    When the user wishes to move a certain direction or change their speed. They simply have to speak into the accompanying USB microphone.
    That lets a Raspberry Pi receive a transcript and pass a command to the Arduino.

    As seen in the video below, Bruton’s voice-controlled go-kart is a blast to use, albeit a bit dangerous too.

    [youtube https://www.youtube.com/watch?v=k-0nsVijPaU?feature=oembed&w=500&h=281]

    Deepgram has a speech recognition API that lets developers get fast and accurate transcripts for both pre-recorded and live audio. Deepgram has a whole set of SDKs to make it even easier to get started in your language of choice. Features include profanity filtering, redaction, and individual speaker detection to make your transcripts as useful as possible. Deepgram can be run locally or using the Deepgram cloud service. I’m going to be using the cloud service with this Raspberry Pi computer to control some hardware. But first I need to build something!

    Website: LINK

  • Robotic waiter learning to serve drinks

    Robotic waiter learning to serve drinks

    Reading Time: 2 minutes

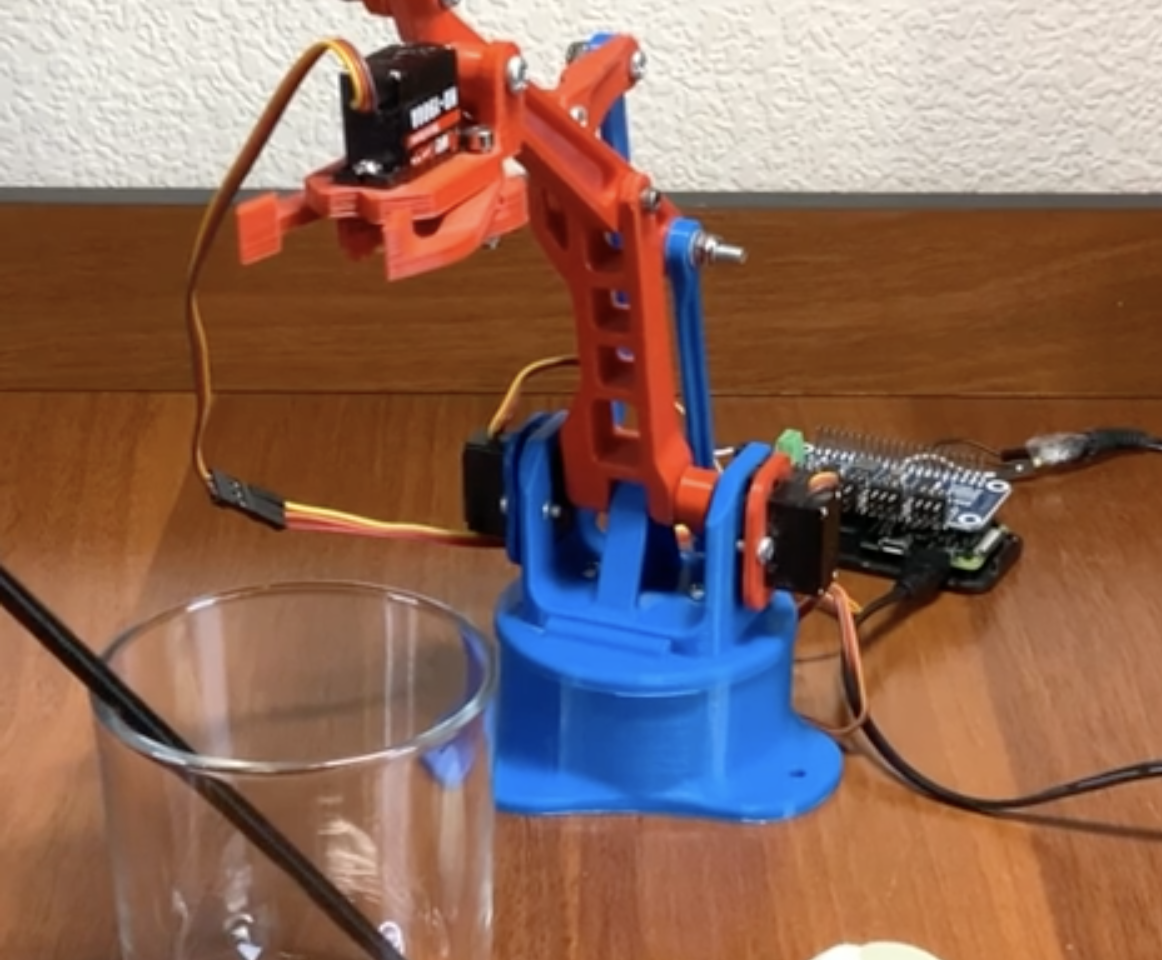
    The maker of this robotic waiter had almost all of the parts for this project just sat around collecting dust on a shelf. We’re delighted they decided to take the time to pick up the few extra bits they needed online, then take the extra hour (just an hour?!) to write a program in Python to get this robotic waiter up and running.

    It’s learning! Bartending is hard

    We are also thrilled to report (having spotted it in the reddit post we found this project on) that the maker had “so much fun picking up and sometimes crushing small things with this claw.” The line between serving drinks and wanting to crush things is thinner than you might imagine.

    And in even better news, all the code you need to recreate this build is on GitHub.

    Robo arm, HAT, and Raspberry Pi all together

    Parts list

    First successful straw-drop. Perfecto!

    reddit comments bantz

    One of our favourite things about finding Raspberry Pi-powered projects on reddit is the comments section. It’s (usually) the perfect mix of light adoration, constructive suggestions, and gateways to tangents we cannot ignore.

    Like this one recalling the Rick and Morty sketch in which a cute tiny robot realises their sole purpose is to pass butter:

    [youtube https://www.youtube.com/watch?v=X7HmltUWXgs?feature=oembed&w=500&h=281]

    No swears in this scene! But it is an adult cartoon in general

    And also this one pointing us to another robotic arm having a grand old time picking up a tiny ball, sending it down a tiny slide, and then doing it all over again. Because it’s important we know how to make our own fun:

    [youtube https://www.youtube.com/watch?v=qovZKW0DxWk?feature=oembed&w=500&h=281]

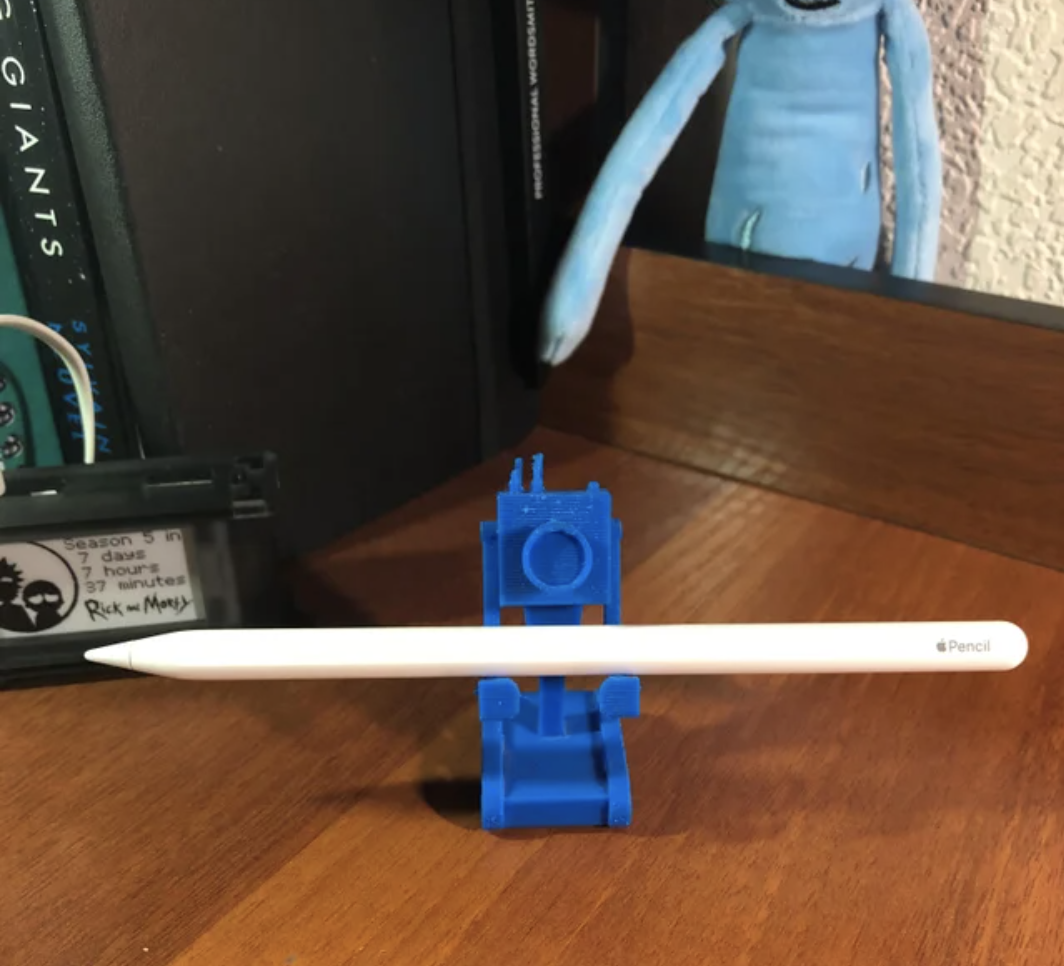
    We also greatly enjoyed the fact that the original maker couldn’t use the Rick and Morty “what is my purpose” line to share this project because they are such an uber fan that they already used it for a project they posted just the day before. This cute creation’s sole reason for existing is to hold an Apple pencil while looking fabulous. And we are HERE for it:

    Website: LINK

  • Raspberry Pi robot prompts proper handwashing

    Raspberry Pi robot prompts proper handwashing

    Reading Time: 3 minutes

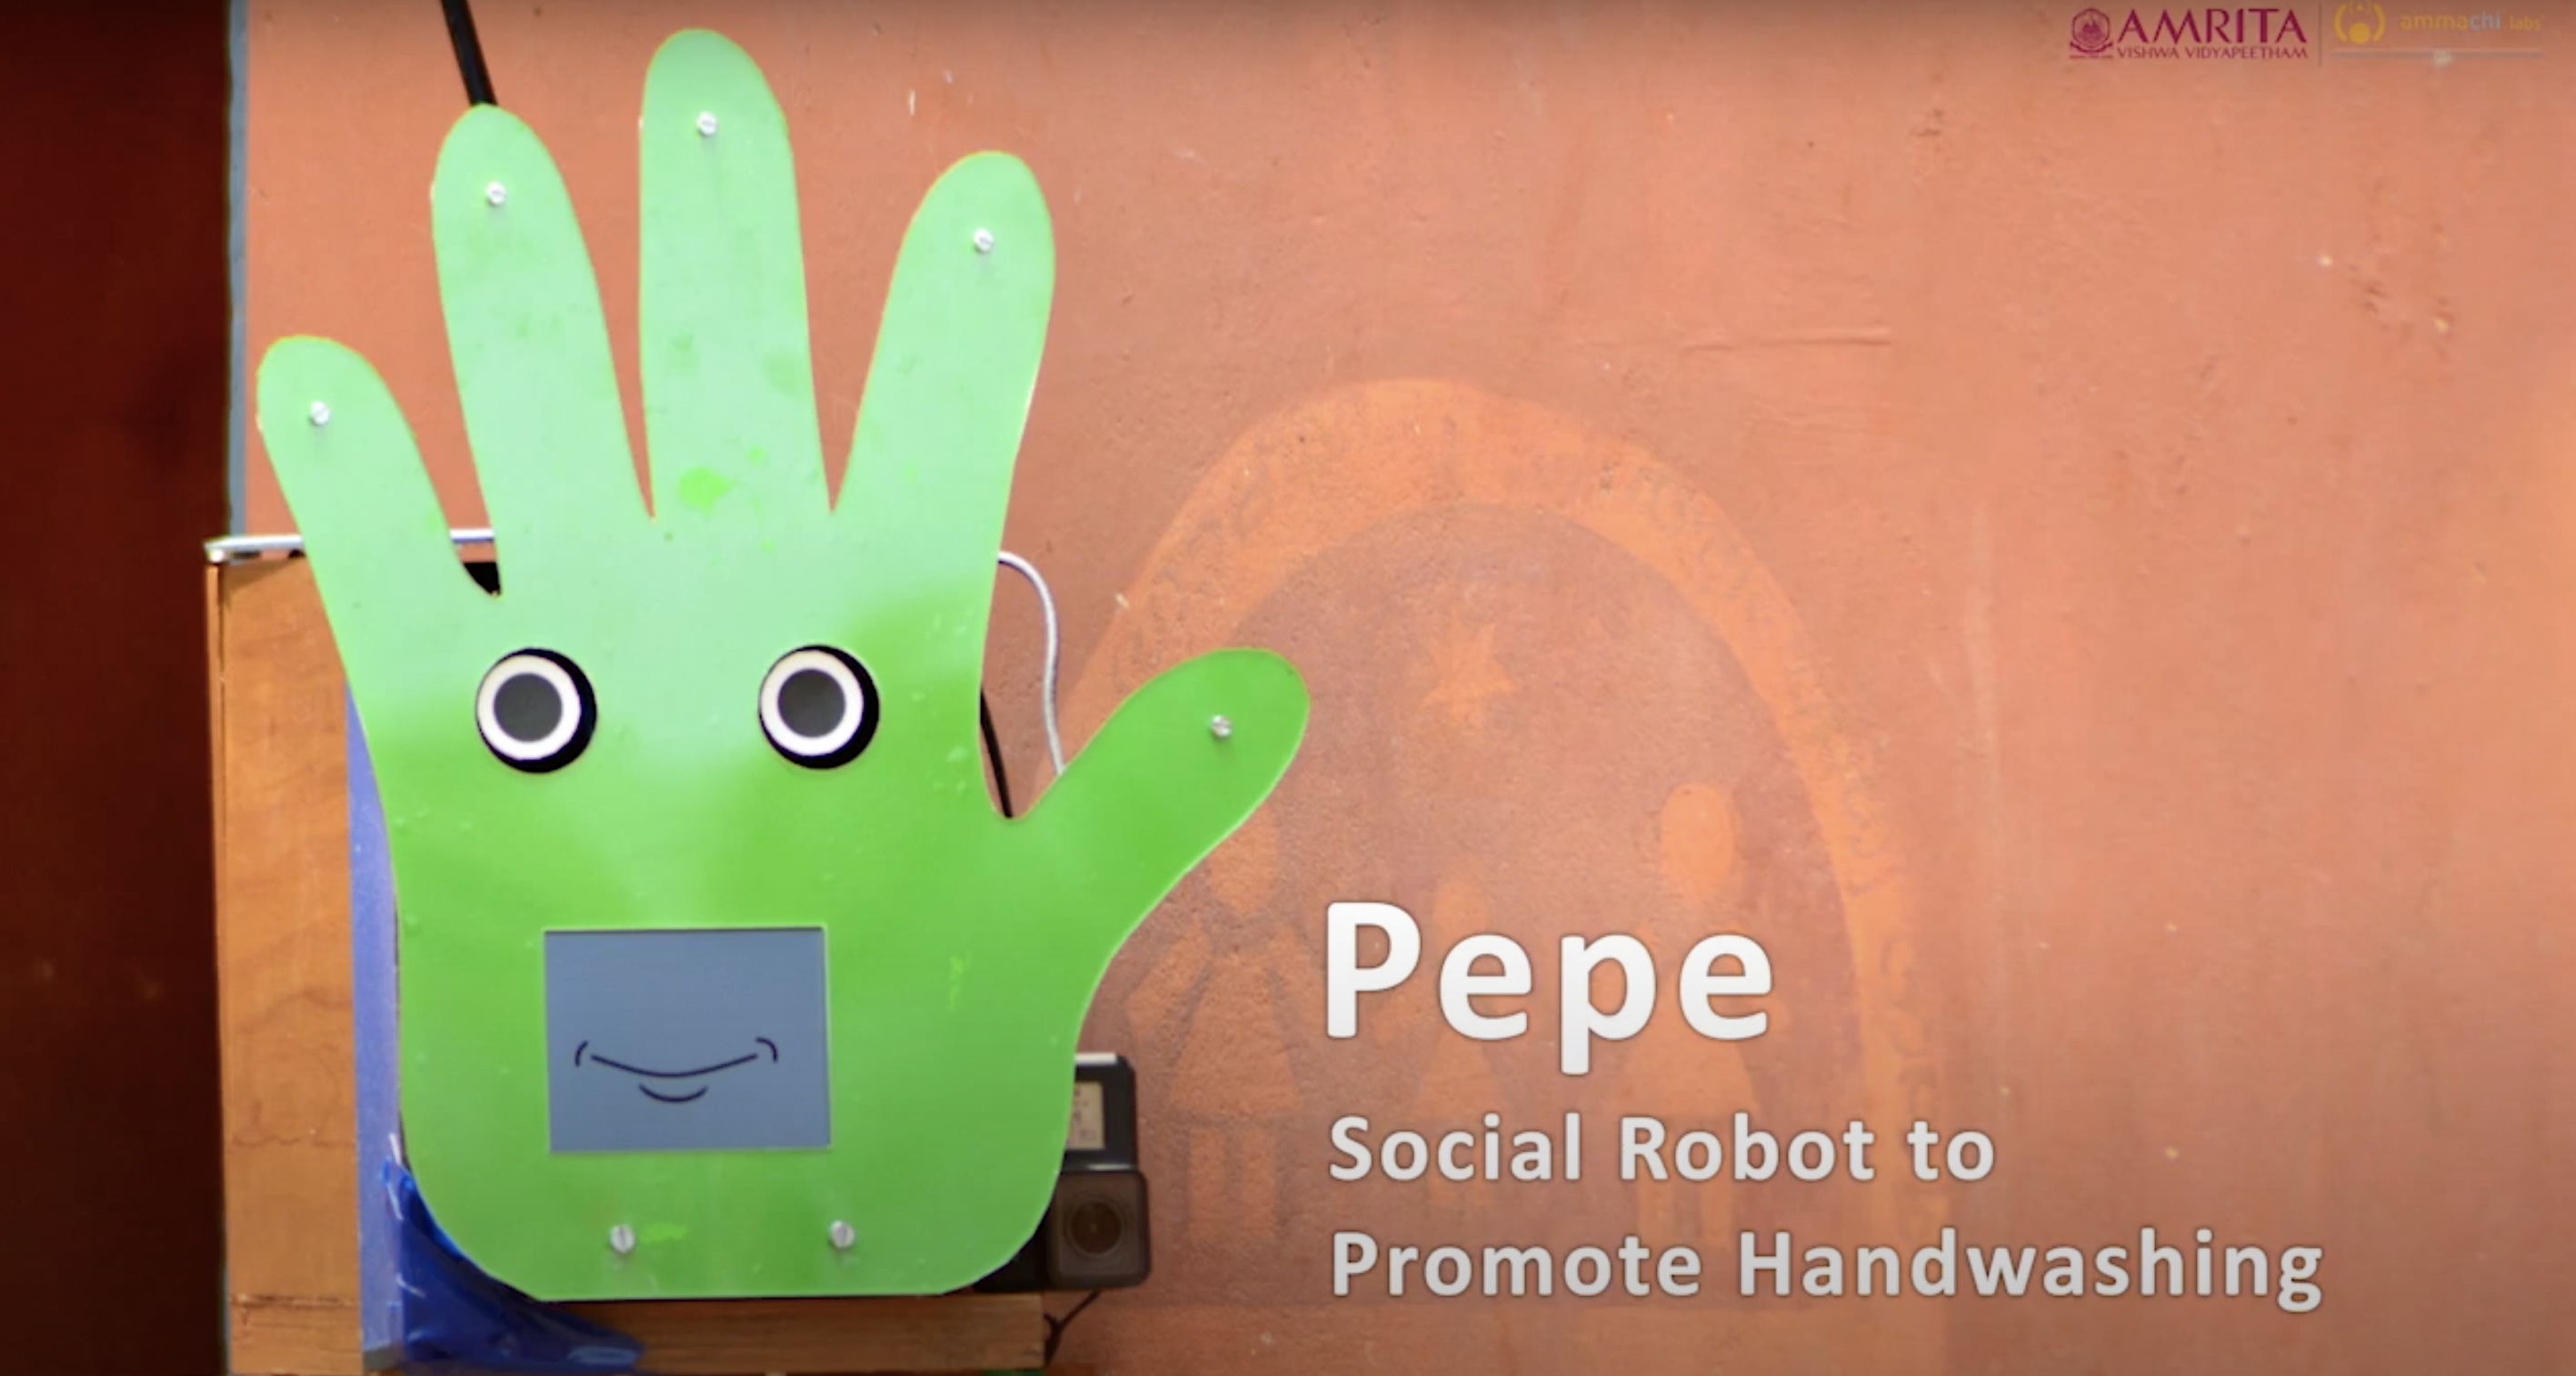
    Amol Deshmukh from the University of Glasgow got in touch with us about a social robot designed to influence young people’s handwashing behaviour, which the design team piloted in a rural school in Kerala, India.

    [youtube https://www.youtube.com/watch?v=DBFy3LI890s?feature=oembed&w=500&h=281]

    In the pilot study, the hand-shaped Pepe robot motivated a 40% increase in the quality and levels of handwashing. It was designed by AMMACHI Labs and University of Glasgow researchers, with a Raspberry Pi serving as its brain and powering the screens that make up its mouth and eyes.

    How does Pepe do it?

    The robot is very easy to attach to the wall next to a handwashing station and automatically detects approaching people. Using AI software, it encourages, monitors, and gives verbal feedback to children on their handwashing, all in a fun and engaging way.

    Amol thinks the success of the robot was due to its eye movements, as people change their behaviour when they know they are being observed. A screen displaying a graphical mouth also meant the robot could show it was happy when the children washed their hands correctly; positive feedback such as this promotes learning new skills.

    Amol’s team started work on this idea last year, and they were keen to test the Pepe robot with a group of people who had never been exposed to social robots before. They presented their smiling hand-face hybrid creation at the IEEE International Conference on Robot & Human Interactive Communication (see photo below). And now that hand washing has become more important than ever due to coronavirus, the project is getting mainstream media attention as well.

    What’s next?

    The team is now planning to improve Pepe’s autonomous intelligence and scale up the intervention across more schools through the Embracing the World network.

    Pepe had a promising trial run, as shown by these stats from the University of Glasgow’s story on the pilot study:

    • More than 90% of the students liked the robot and said they would like to see Pepe again after school vacation.
    • 67% of the respondents thought the robot was male, while 33% thought it was female, mostly attributing to the robot’s voice as the reason
    • 60% said it was younger than them, feeling Pepe was like a younger brother or sister, while 33% thought it was older, and 7% perceived the robot to be of the same age
    • 72% of the students thought Pepe was alive, largely due to its ability to talk

    Website: LINK

  • Nandu’s lockdown Raspberry Pi robot project

    Nandu’s lockdown Raspberry Pi robot project

    Reading Time: 2 minutes

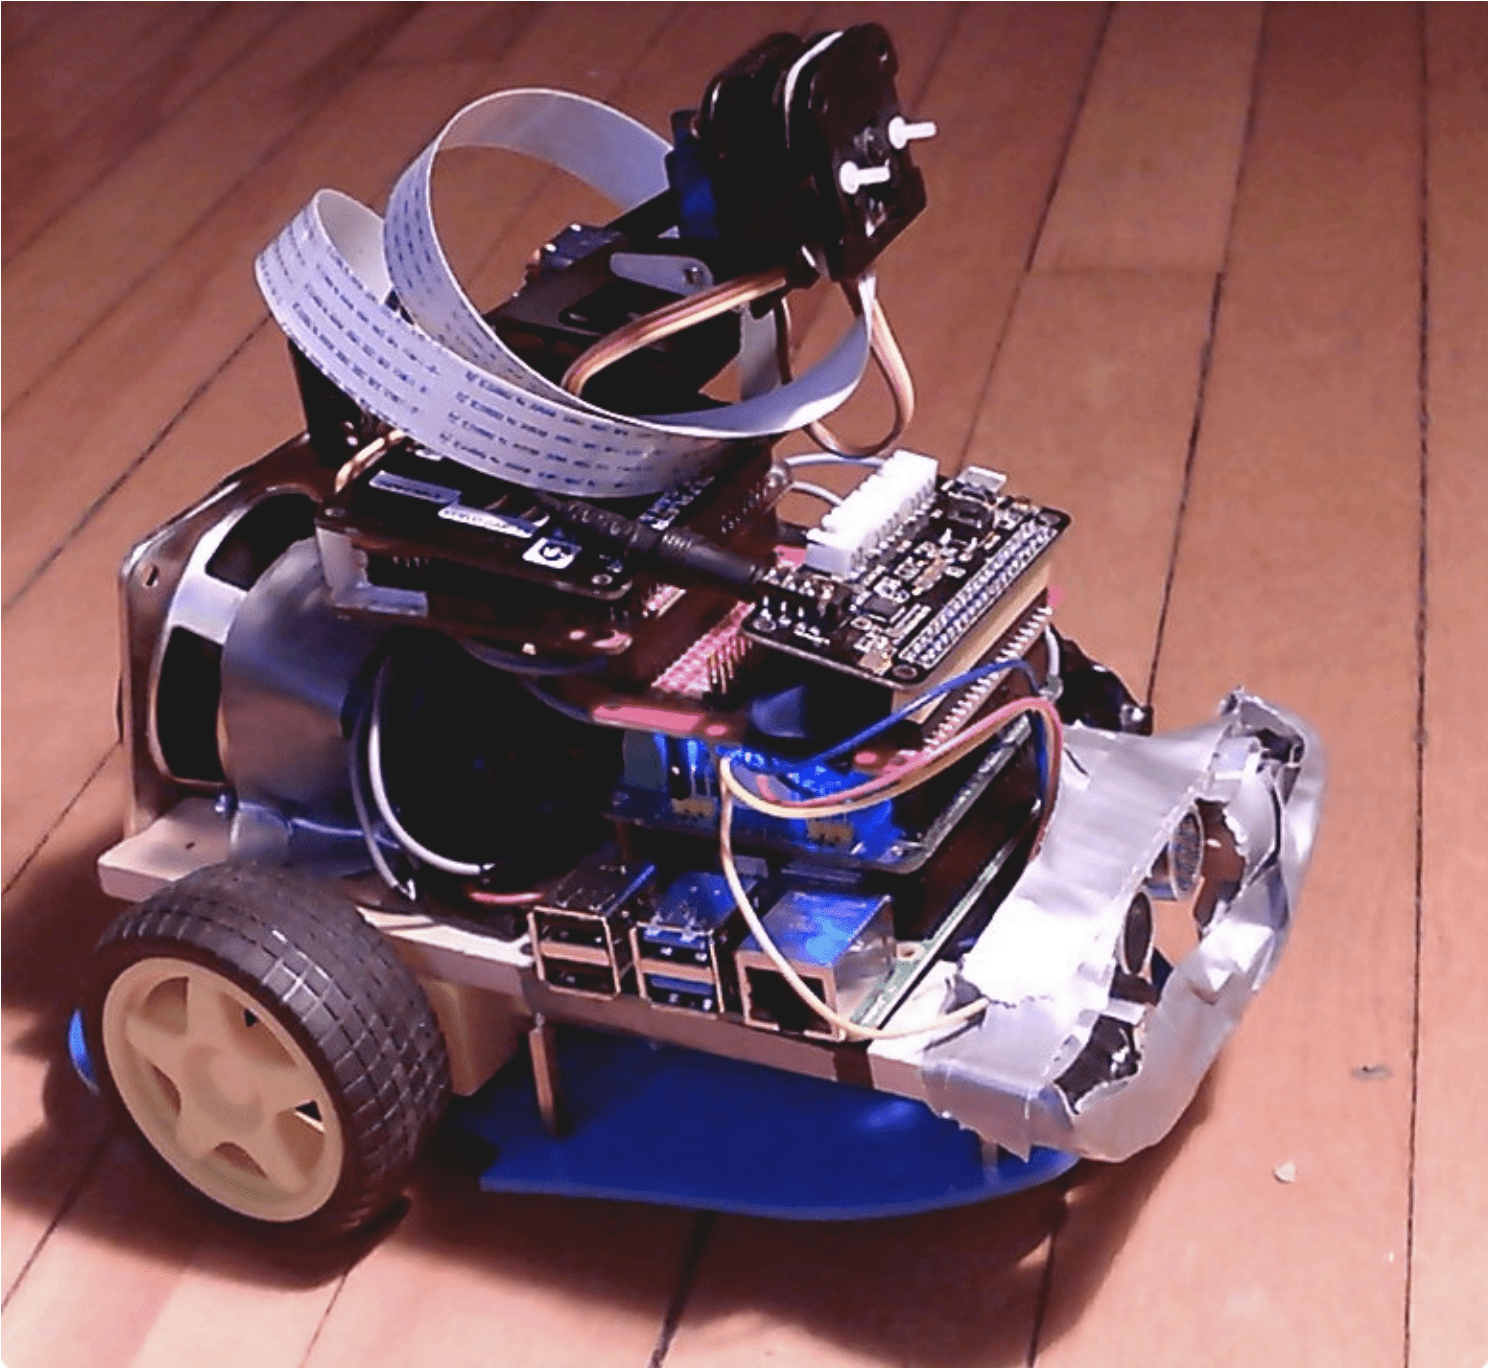
    Nandu Vadakkath was inspired by a line-following robot built (literally) entirely from salvage materials that could wait patiently and purchase beer for its maker in Tamil Nadu, India. So he set about making his own, but with the goal of making it capable of slightly more sophisticated tasks.

    [youtube https://www.youtube.com/watch?v=Y5zBCSHnulc?feature=oembed&w=500&h=281]

    “Robot, can you play a song?”

    Hardware

    [youtube https://www.youtube.com/watch?v=7HJzhZYlHhU?feature=oembed&w=500&h=281]

    Robot comes when called, and recognises you as its special human

    Software

    Nandu had ambitious plans for his robot: navigation, speech and listening, recognition, and much more were on the list of things he wanted it to do. And in order to make it do everything he wanted, he incorporated a lot of software, including:

    [youtube https://www.youtube.com/watch?v=KTHh8QU70nc?feature=oembed&w=500&h=281]

    Robot shares Nandu’s astrological chart
    • Python 3
    • virtualenv, a tool for creating isolating virtual Python environments
    • the OpenCV open source computer vision library
    • the spaCy open source natural language processing library
    • the TensorFlow open source machine learning platform
    • Haar cascade algorithms for object detection
    • A ResNet neural network with the COCO dataset for object detection
    • DeepSpeech, an open source speech-to-text engine
    • eSpeak NG, an open source speech synthesiser
    • The MySQL database service

    So how did Nandu go about trying to make the robot do some of the things on his wishlist?

    Context and intents engine

    The engine uses spaCy to analyse sentences, classify all the elements it identifies, and store all this information in a MySQL database. When the robot encounters a sentence with a series of possible corresponding actions, it weighs them to see what the most likely context is, based on sentences it has previously encountered.

    Getting to know you

    The robot has been trained to follow Nandu around but it can get to know other people too. When it meets a new person, it takes a series of photos and processes them in the background, so it learns to remember them.

    Nandu's home made robot
    There she blows!

    Speech

    Nandu didn’t like the thought of a basic robotic voice, so he searched high and low until he came across the MBROLA UK English voice. Have a listen in the videos above!

    Object and people detection

    The robot has an excellent group photo function: it looks for a person, calculates the distance between the top of their head and the top of the frame, then tilts the camera until this distance is about 60 pixels. This is a lot more effort than some human photographers put into getting all of everyone’s heads into the frame.

    Nandu has created a YouTube channel for his robot companion, so be sure to keep up with its progress!

    Website: LINK

  • Make it rain chocolate with a Raspberry Pi-powered dispenser

    Make it rain chocolate with a Raspberry Pi-powered dispenser

    Reading Time: 5 minutes

    This fully automated M&M’s-launching machine delivers chocolate on voice command, wherever you are in the room.

    [youtube https://www.youtube.com/watch?v=hsGhCl0y1FY]

    A quick lesson in physics

    To get our head around Harrison McIntyre‘s project, first we need to understand parabolas. Harrison explains: “If we ignore air resistance, a parabola can be defined as the arc an object describes when launching through space. The shape of a parabolic arc is determined by three variables: the object’s departure angle; initial velocity; and acceleration due to gravity.”

    Harrison uses a basketball shooter to illustrate parabolas

    Lucky for us, gravity is always the same, so you really only have to worry about angle and velocity. You could also get away with only changing one variable and still be able to determine where a launched object will land. But adjusting both the angle and the velocity grants much greater precision, which is why Harrison’s machine controls both exit angle and velocity of the M&M’s.

    Kit list

    The M&M’s launcher comprises:

    • 2 Arduino Nanos
    • 1 Raspberry Pi 3
    • 3 servo motors
    • 2 motor drivers
    • 1 DC motor
    • 1 Hall effect limit switch
    • 2 voltage converters
    • 1 USB camera
    • “Lots” of 3D printed parts
    • 1 Amazon Echo Dot

    A cordless drill battery is the primary power source.

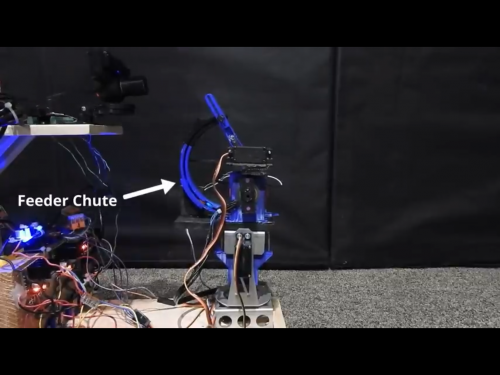
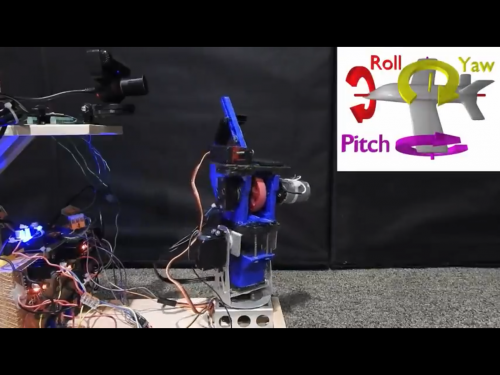
    The project relies on similar principles as a baseball pitching machine. A compliant wheel is attached to a shaft sitting a few millimetres above a feeder chute that can hold up to ten M&M’s. To launch an M&M’s piece, the machine spins up the shaft to around 1500 rpm, pushes an M&M’s piece into the wheel using a servo, and whoosh, your M&M’s piece takes flight.

    Controlling velocity, angle and direction

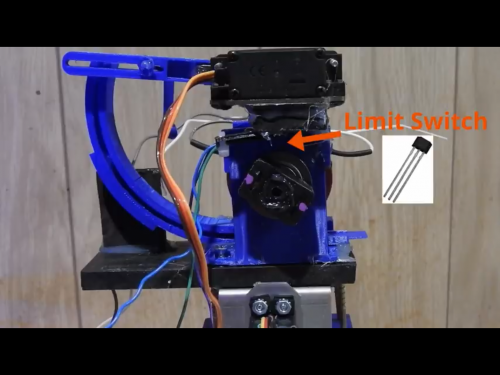
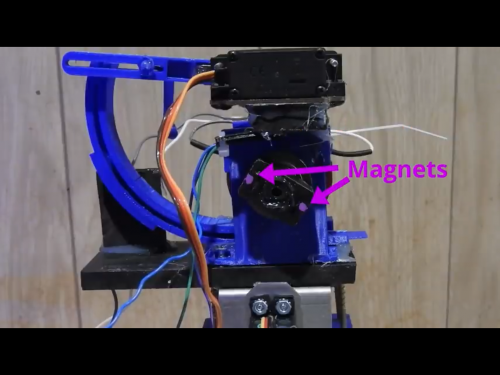
    To measure the velocity of the fly wheel in the machine, Harrison installed a Hall effect magnetic limit switch, which gets triggered every time it is near a magnet.

    Two magnets were placed on opposite sides of the shaft, and these pass by the switch. By counting the time in between each pulse from the limit switch, the launcher determines how fast the fly wheel is spinning. In response, the microcontroller adjusts the motor output until the encoder reports the desired rpm. This is how the machine controls the speed at which the M&M’s pieces are fired.

    Now, to control the angle at which the M&M’s pieces fly out of the machine, Harrison mounted the fly wheel assembly onto a turret with two degrees of freedom, driven by servos. The turret controls the angle at which the sweets are ‘pitched’, as well as the direction of the ‘pitch’.

    So how does it know where I am?

    With the angle, velocity, and direction at which the M&M’s pieces fly out of the machine taken care of, the last thing to determine is the expectant snack-eater’s location. For this, Harrison harnessed vision processing.


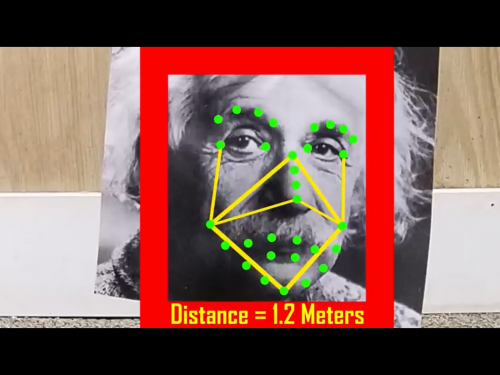
    Harrison used a USB camera and a Python script running on Raspberry Pi 3 to determine when a human face comes into view of the machine, and to calculate how far away it is. The turret then rotates towards the face, the appropriate parabola is calculated, and an M&M’s piece is fired at the right angle and velocity to reach your mouth. Harrison even added facial recognition functionality so the machine only fires M&M’s pieces at his face. No one is stealing this guy’s candy!

    So what’s Alexa for?

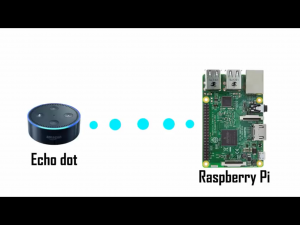
    This project is topped off with a voice-activation element, courtesy of an Amazon Echo Dot, and a Python library called Sinric. This allowed Harrison to disguise his Raspberry Pi as a smart TV named ‘Chocolate’ and command Alexa to “increase the volume of ‘Chocolate’ by two” in order to get his machine to fire two M&M’s pieces at him.


    Drawbacks

    In his video, Harrison explaining that other snack-launching machines involve a spring-loaded throwing mechanism, which doesn’t let you determine the snack’s exit velocity. That means you have less control over how fast your snack goes and where it lands. The only drawback to Harrison’s model? His machine needs objects that are uniform in shape and size, which means no oddly shaped peanut M&M’s pieces for him.

    He’s created quite the monster here, in that at first, the machine’s maximum firing speed was 40 mph. And no one wants crispy-shelled chocolate firing at their face at that speed. To keep his teeth safe, Harrison switched out the original motor for one with a lower rpm, which reduced the maximum exit velocity to a much more sensible 23 mph… Please make sure you test your own snack-firing machine outdoors before aiming it at someone’s face.

    Go subscribe

    Check out the end of Harrison’s videos for some more testing to see what his machine was capable of: he takes out an entire toy army and a LEGO Star Wars squad by firing M&M’s pieces at them. And remember to subscribe to his channel and like the video if you enjoyed what you saw, because that’s just a nice thing to do.

    Website: LINK

  • Competition robot picks up (almost) all the balls

    Competition robot picks up (almost) all the balls

    Reading Time: < 1 minute

    Competition robot picks up (almost) all the balls

    Arduino TeamNovember 9th, 2019

    For the Warman Design and Build Competition in Sydney last month, Redditor ‘Travman_16 and team created an excellent Arduino-powered entry. The contest involved picking up 20 payloads (AKA balls) from a trough, and delivering them to a target trough several feet away in under 60 seconds.

    Their autonomous project uses Mecanum wheels to move in any direction, plus a four-servo arm to collect balls in a box-like scoop made out of aluminum sheet. 

    An Arduino Mega controls four DC gear motors via four IBT-4 drivers, while a Nano handles the servos. As seen in the video, it pops out of the starting area, sweeps up the balls and places them in the correct area at an impressive ~15 seconds. 

    It manages to secure all but one ball on this run, and although that small omission was frustrating, the robot was still able to take fifth out of 19 teams. 

    Website: LINK
  • Competition robot picks up (almost) all the balls

    Competition robot picks up (almost) all the balls

    Reading Time: < 1 minute

    Competition robot picks up (almost) all the balls

    Arduino TeamNovember 9th, 2019

    For the Warman Design and Build Competition in Sydney last month, Redditor ‘Travman_16 and team created an excellent Arduino-powered entry. The contest involved picking up 20 payloads (AKA balls) from a trough, and delivering them to a target trough several feet away in under 60 seconds.

    Their autonomous project uses Mecanum wheels to move in any direction, plus a four-servo arm to collect balls in a box-like scoop made out of aluminum sheet. 

    An Arduino Mega controls four DC gear motors via four IBT-4 drivers, while a Nano handles the servos. As seen in the video, it pops out of the starting area, sweeps up the balls and places them in the correct area at an impressive ~15 seconds. 

    It manages to secure all but one ball on this run, and although that small omission was frustrating, the robot was still able to take fifth out of 19 teams. 

    Website: LINK

  • The robotic teapot from your nightmares

    The robotic teapot from your nightmares

    Reading Time: 3 minutes

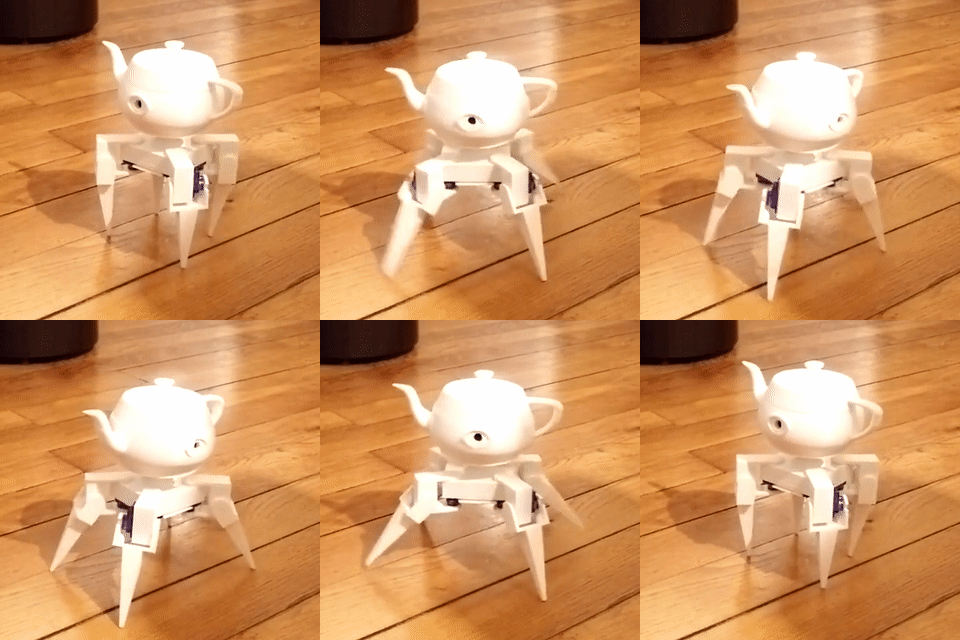
    For those moments when you wish the cast of Disney’s Beauty and the Beast was real, only to realise what a nightmare that would be, here’s Paul-Louis Ageneau’s robotic teapot!

    Paul-Louis Ageneau Robotic teapot Raspberry Pi Zero

    See what I mean?

    Tale as old as time…

    It’s the classic story of guy meets digital killer teapot, digital killer teapot inspires him to 3D print his own. Loosely based on a boss level of the video game Alice: Madness Returns, Paul-Louis’s creation is a one-eyed walking teapot robot with a (possible) thirst for blood.

    Kill Build the beast

    “My new robot is based on a Raspberry Pi Zero W with a camera.” Paul-Louis explains in his blog. “It is connected via a serial link to an Arduino Pro Mini board, which drives servos.”

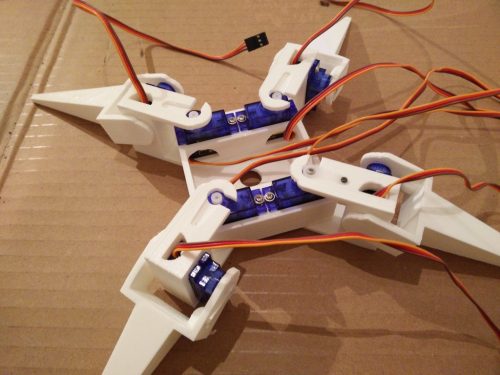
    Each leg has two points of articulation, one for the knee and one for the ankle. In order to move each of the joints, the teapot uses eight servo motor in total.

    Paul-Louis Ageneau Robotic teapot Raspberry Pi Zero

    Paul-Louis designed and 3D printed the body of the teapot to fit the components needed. So if you’re considering this build as a means of acquiring tea on your laziest of days, I hate to be the bearer of bad news, but the most you’ll get from your pour will be jumper leads and Pi.

    While the Arduino board controls the legs, it’s the Raspberry Pi’s job to receive user commands and tell the board how to direct the servos. The protocol for moving the servos is simple, with short lines of characters specifying instructions. First a digit from 0 to 7 selects a servo; next the angle of movement, such as 45 or 90, is input; and finally, the use of C commits the instruction.

    Typing in commands is great for debugging, but you don’t want to be glued to a keyboard. Therefore, Paul-Louis continued to work on the code in order to string together several lines to create larger movements.

    Paul-Louis Ageneau Robotic teapot Raspberry Pi Zero

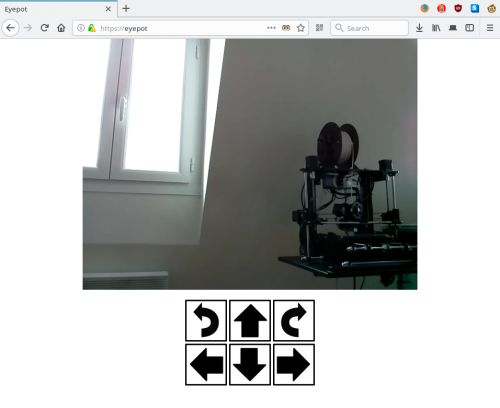
    The final control system of the teapot runs on a web browser as a standard four-axis arrow pad, with two extra arrows for turning.

    Something there that wasn’t there before

    Jean-Paul also included an ‘eye’ in the side of the pot to fit the Raspberry Pi Camera Module as another nod to the walking teapot from the video game, but with a purpose other than evil and wrong-doing. As you can see from the image above, the camera live-streams footage, allowing for remote control of the monster teapot regardless of your location.

    If you like it all that much, it’s yours

    In case you fancy yourself as an inventor, Paul-Louis has provided the entire build process and the code on his blog, documenting how to bring your own teapot to life. And if you’ve created any robotic household items or any props from video games or movies, we’d love to see them, so leave a link in the comments or share it with us across social media using the hashtag #IBuiltThisAndNowIThinkItIsTryingToKillMe.

    Website: LINK
  • Entertainment Robot „aibo“ Announced – Sony aibo 2017 Announcing Trailer – AI Dog Robot

    Entertainment Robot „aibo“ Announced – Sony aibo 2017 Announcing Trailer – AI Dog Robot

    Reading Time: 6 minutes

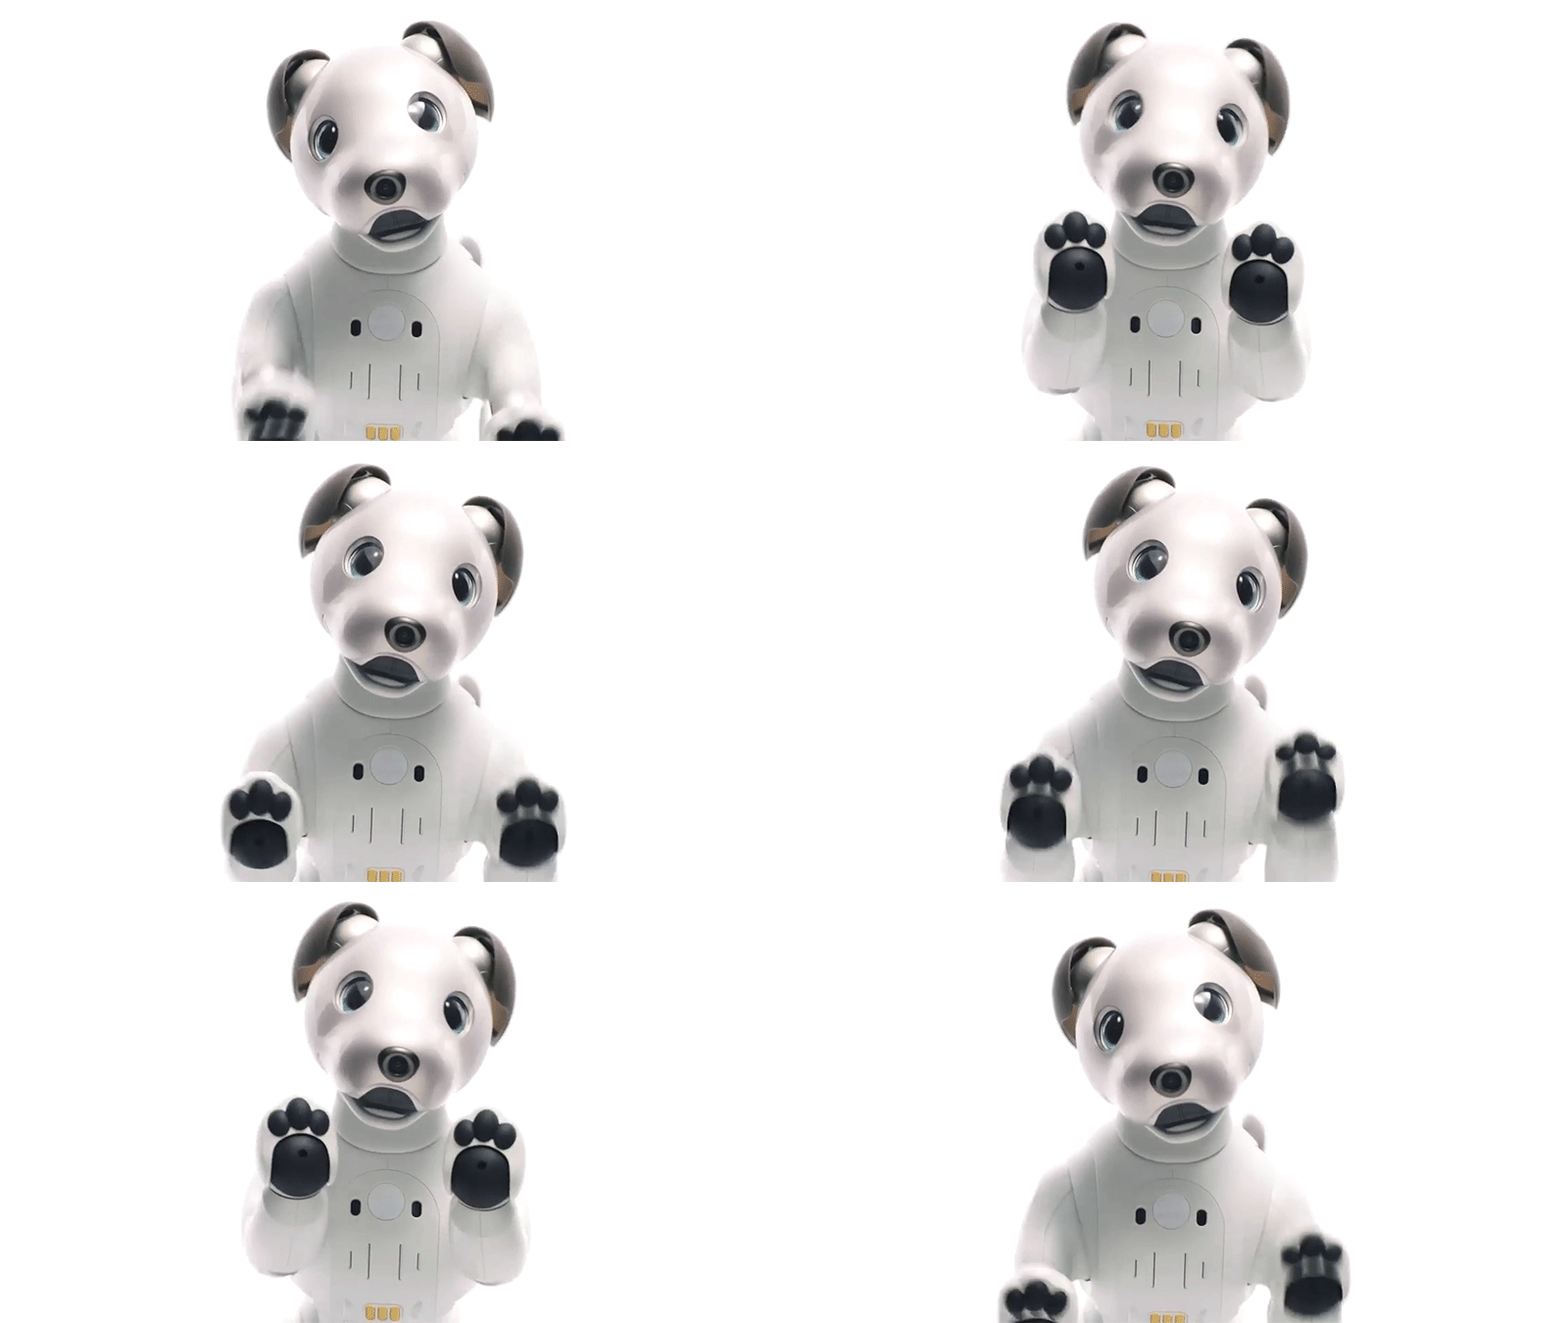
    Sony Corporation (Sony) is today proud to announce „aibo,“ the evolution of its autonomous entertainment robot that brings fun and joy to the entire family.

    aibo can form an emotional bond with members of the household while providing them with love, affection, and the joy of nurturing and raising a companion. It possesses a natural curiosity, and we hope it will bring joy into the everyday lives of our customers while growing alongside them as a partner.

    As the latest iteration of the beloved robotic companion, aibo features an adorable appearance, vibrant movements, and a responsiveness that is sure to delight. It will also develop its own unique personality through everyday interactions as it grows closer and closer to its owners.

    Primary Features

    1. Irresistible Cuteness, Rich Expressiveness, and Dynamic Range of Movements

    Its cute, rounded appearance makes you want to reach out and pet it, while its seamless design is captivating and brimming with life.

    aibo shows its love for its owners through lifelike expressions and a dynamic array of movements. Its body language is expressed through a combination of eye, ear, and tail movements as well as different voice sounds. This lovable behavior brings warmth and delight to the everyday lives of its owners.

    In order to bring aibo to life and allow it to express its emotions, Sony developed ultracompact 1- and 2-axis actuators. These give aibo’s compact body the freedom to move along a total of 22 axes and make its smooth, natural movements possible. Furthermore, its eyes utilize two OLEDs to allow for diverse, nuanced expressions.

    2. The Ability to Bond with its Owners, Leading to Constant Fun and Discovery.

    Not content with merely waiting around to be called, curious little aibo will actively seek out its owners. What’s more, aibo can detect words of praise, smiles, head and back scratches, petting, and more, allowing it to learn and remember what actions make its owners happy. Slowly but surely, aibo will also become more aware of its environment, and as it gains confidence it will learn to walk around an increasingly wider area and respond to situations accordingly.

    This adaptable behavior is made possible through Sony’s well-cultivated deep learning technology, in the form of inbuilt sensors that can detect and analyze sounds and images. aibo also comes with fish-eye cameras that utilize simultaneous location and mapping (SLAM) technology, allowing it to lead its life in close conjunction with its owners.

    3. Changes Over Time, Maturing and Growing into a One-of-a-kind Companion

    As it interacts with people over time, aibo’s behavior slowly changes and adapts in response to its unique environment. It eventually becomes able to respond to its owners‘ affection in kind, and when it feels loved, it will display even more love and affection in return, nurturing a bond that only deepens as time goes on.

    These perpetual changes are brought about through Sony’s unique AI technology, which allows aibo to interface with the cloud. aibo’s AI learns from interactions with its owners and develops a unique personality over time. Further, with its owners‘ permission, aibo can collect data from these interactions, then connect to the cloud and access the knowledge accumulated from interactions between different owners and their aibo to become even more clever.

    We at Sony hope that our customers will develop precious and deeply personal bonds with their aibo and create cherished stories that will last a lifetime.

    Related Services and Accessories

    „My aibo“ App* *Service scheduled to start from January 11, 2018

    „My aibo“ is an app designed to help owners enjoy life with their aibo by providing support and convenience. In addition to accessing system settings and owner information, other features include „aibo Photos,“ which lets users view any pictures taken, a feature to „Play“ with a virtual aibo inside the app, and the „aibo Store,“ where users can add additional Tricks to their aibo. Some of these features are also accessible to users who do not own an aibo.

    • *1: „My aibo“ can be downloaded from Google Play and the App Store. A web browser version is also available at http://aibo.com
    • *2: aibo and „aibo basic plan“ subscription required to fully enjoy all features of „My aibo.“

    aibo exclusive accessory „aibone“* *Release scheduled for January 11, 2018

    Model Number ERA-1020   Sony Store price (tax not included): 2,980 yen (tentative)
    A bone-shaped toy accessory that spices up your life with aibo.

    aibo Basic Plan

    An aibo Basic Plan subscription is necessary to utilize aibo. By subscribing to the aibo Basic Plan, you can use a Wi-Fi connection at home or a mobile connection on the go to enjoy the full arrange of aibo features. These include aibo being able to access information stored in the cloud to grow and learn as well as the „My aibo“ app (aibo Photos, aibo Store). Additionally, your aibo’s data will periodically be backed up in the cloud. A planned future service will allow owners to restore this backed up data onto a new aibo even in the event of an accident resulting in irreparable damage.

    aibo Support Care

    Sony is also providing aibo Support Care, which offers discounts on repair fees in the event of damage or malfunctions. Subscription to this service is optional.

    • 50% discount on repair fees (incl. examination fees, part replacements, and exchanging of broken or depleted components).
    • 50% discount on checkups and inspections
    * All above fees do not include shipping or taxes

    Pre-orders and Availability

    • aibo will be available for purchase exclusively through the Sony Store, Sony’s direct retailer.
    • Pre-orders will be available starting from 11:01 P.M. on Wednesday, November 1, 2017 through the Sony Store website(Some parts of website only accessible in Japanese, pre-order numbers are limited).
    • More information about aibo will be made available through http://aibo.com/en and Sony Store Online.
    Product/Service Sony Store Price (tax not included) Release Date
    aibo Entertainment Robot (ERS-1000) 198,000 JPY January 11, 2018
    aibo Basic Plan 3 Year Subscription One-time Price Monthly Plan
    90,000 JPY
    (approx. 2,500/month)
    2,980 JPY/month
    (x 36 months)
    aibo Support Care 3 years 1 year
    54,000 JPY
    (1,500 JPY/month)
    20,000 JPY
    (1,667 JPY/month)

    * As of the time of this release, product launch is only scheduled for Japan.

    Product Details

    Note: Information is current as of the day of the announcement. Please note that product and service details are subject to change without notice.

    Product Name aibo
    Color Ivory White
    Model Number ERS-1000
    Processor 64bit Quad-Core CPU
    Freely Movable Parts Head:3 axes、Mouth:1 axis、Neck:1 axis、Loin:1 axis、
    Forepaws/Back paws:3 axes per leg、Ear:1 axis per ear、
    Tail:2 axes (Total of 22 axes)
    Display 2 OLEDs (eyes)
    Sound Speaker, 4 Microphones
    Camera 2 Cameras(Front camera, SLAM camera)
    Sensors ToF sensor、2 PSD sensors、
    Pressure sensitive/capacitive type touch sensor(Back sensor)、
    Capacitive type touch sensor(Head sensor, jaw sensor)
    6 axis detection system(3 axis gyro/3 axis acceleration)×2 (Head、Torso)
    Motion sensor, Light sensor, 4 Paw pads
    Switches Power button, Volume button, Network switch
    Indicators Status LED, Network LED
    Terminals Charging pins, SIM card slot
    Communications Mobile Network Communication Function(Data transmission):LTE
    Wi-Fi:IEEE 802.11b/g/n
    Outside dimensions Approx. 180 × 293 × 305 mm
    ((While standing: width×height×depth *Not including protruding parts)
    Weight Approx. 2.2 kg
    Power Consumption Approx. 14 W
    Battery Duration Approx. 2 hours
    Recharge Time Approx. 3 hours
    Main Accesories Charging Station (Charging stand, Charging mat)、AC adapter, Power cord, Pink ball,
    SIM card, Printed Materials

    Please visit the product website http://aibo.com/en for more details.

    • *1: „aibo“ and „aibo logo“ are trademarks of Sony Corporation.
    • *2: All other listed companies and product names are the trademarks or registered trademarks of their respective companies.

    Website: LINK
  • Low-tech Raspberry Pi robot

    Low-tech Raspberry Pi robot

    Reading Time: 2 minutes

    Robot-builder extraordinaire Clément Didier is ushering in the era of our cybernetic overlords. Future generations will remember him as the creator of robots constructed from cardboard and conductive paint which are so easy to replicate that a robot could do it. Welcome to the singularity.

    Bare Conductive on Twitter

    This cool robot was made with the #PiCap, conductive paint and @Raspberry_Pi by @clementdidier. Full tutorial: https://t.co/AcQVTS4vr2 https://t.co/D04U5UGR0P

    Simple interface

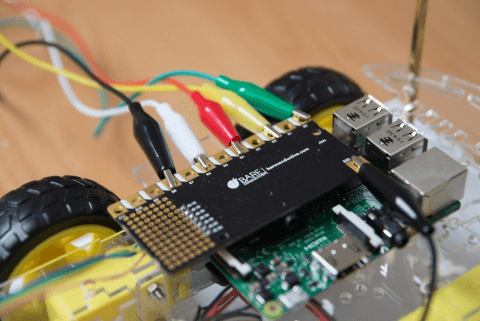
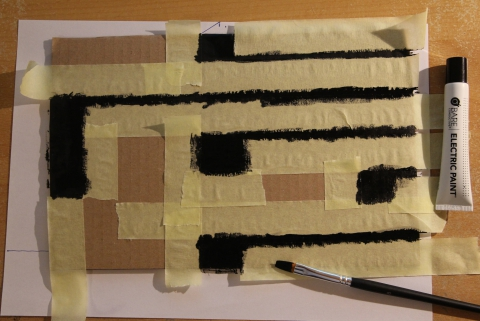
    To assemble the robot, Clément made use of a Pi Cap board, a motor driver, and most importantly, a tube of Bare Conductive Electric Paint. He painted the control interface onto the cardboard surface of the robot, allowing a human, replicant, or superior robot to direct its movements simply by touching the paint.

    Clever design

    The Raspberry Pi 3, the motor control board, and the painted input buttons interface via the GPIO breakout pins on the Pi Cap. Crocodile clips connect the Pi Cap to the cardboard-and-paint control surface, while jumper wires connect it to the motor control board.

    Raspberry Pi and bare conductive Pi Cap

    Sing with me: ‘The Raspberry Pi’s connected to the Pi Cap, and the Pi Cap’s connected to the inputs, and…’

    Two battery packs provide power to the Raspberry Pi, and to the four independently driven motors. Software, written in Python, allows the robot to respond to inputs from the conductive paint. The motors drive wheels attached to a plastic chassis, moving and turning the robot at the touch of a square of black paint.

    Artistic circuit

    Clément used masking tape and a paintbrush to create the control buttons. For a human, this is obviously a fiddly process which relies on the blocking properties of the masking tape and a steady hand. For a robot, however, the process would be a simple, freehand one, resulting in neatly painted circuits on every single one of countless robotic minions. Cybernetic domination is at (metallic) hand.

    The control surface of the robot, painted with bare conductive paint

    One fiddly job for a human, one easy task for robotkind

    The instructions and code for Clément’s build can be found here.

    Low-tech solutions

    Here at Pi Towers, we love seeing the high-tech Raspberry Pi integrated so successfully with low-tech components. In addition to conductive paint, we’ve seen cardboard laptops, toilet roll robots, fruit drum kits, chocolate box robots, and hamster-wheel-triggered cameras. Have you integrated low-tech elements into your projects (and potentially accelerated the robot apocalypse in the process)? Tell us about it in the comments!

    Website: LINK
  • Transformers 5: The Last Knight – Autobot Sqweeks RC Review Video

    Transformers 5: The Last Knight – Autobot Sqweeks RC Review Video

    Reading Time: 2 minutes

    Transformers 5: The Last Knight – Autobot Sqweeks RC Review Video

    Im explosiven Film Transformers: The Last Knight müssen neue Helden in einem epischen Kampf aufsteigen, um eine Zukunft für alle zu formen. AutoRoute Squeaks ist der kleinste in der Gruppe Bots, aber oho. Obwohl er reparaturbedürftig ist, erhält sich AutoRoute Squeaks, ständig motiviert, allen Lebewesen zu helfen.

    Stellen Sie sich vor, in die Action von Transformers: The Last Knight einzusteigen mit dieser ferngesteuerten AutoRoute Squeaks-Figur. Der ferngesteuerte AutoRoute Squeaks kann sich bewegen und Soundeffekte produzieren, die Fans dazu inspirieren werden „Chihuahua“ zu rufen, genau wie der liebenswürdige Auto-Route-Freund. Bereiten Sie diese ferngesteuerte AutoRoute Squeaks-Figur für den Kampf vor, indem Sie mit einem durch den Film inspirierten Blaster-Zubehör in den Blaster-Modus wechseln.

    Oder aktivieren Sie einen energiegeladenen Boogie mit Musik und Sätzen im Tanzmodus.

    2016 Hasbro Alle Rechte vorbehalten. © 2016 Paramount Pictures Corporation. Alle Rechte vorbehalten. Transformers und alle damit verbundenen Charaktere sind Warenzeichen von Hasbro.

  • Unity engine 2016 demo – VR Realismus wird 2016 hoch geschrieben!

    Unity engine 2016 demo – VR Realismus wird 2016 hoch geschrieben!

    Reading Time: < 1 minute

    [mbYTPlayer url=“https://www.youtube.com/watch?v=iXkHoHHS7Gk“ opacity=“.5″ quality=“medium“ ratio=“auto“ isinline=“false“ showcontrols=“false“ realfullscreen=“true“ printurl=“true“ autoplay=“true“ mute=“true“ loop=“true“ addraster=“true“ stopmovieonblur=“false“ gaTrack=“false“]


    Unity GDC demo – Adam – Part I

    This is the first part of our real-time rendered short film “Adam”, created with the Unity engine by Unity’s Demo team. The full length short will be shown at Unite Europe 2016 in Amsterdam. http://unity3d.com/pages/adam?utm_sou…

  • BB8 How to Charge your Droid – Sphero STARWARS BB8

    BB8 How to Charge your Droid – Sphero STARWARS BB8

    Reading Time: < 1 minute

    [mbYTPlayer url=“https://www.youtube.com/watch?v=ypdoFg4fbwI“ opacity=“.5″ quality=“medium“ ratio=“auto“ isinline=“false“ showcontrols=“false“ realfullscreen=“true“ printurl=“true“ autoplay=“true“ mute=“true“ loop=“true“ addraster=“true“ stopmovieonblur=“false“ gaTrack=“false“]


    ► BLOGDOTTV abonnieren: http://goo.gl/5DVteO
    ► Mehr Informationen zu BLOGDOTTV unter: http://facebook.com/blog.dot | http://twitter.com/blogdottv | http://instagram.com/blogdottv

    «STAR WARS BB8 App-Enabled Droid»

    All Details about Charging, and How to Use your BB8 you gonna find here:

    http://www.blogdot.tv/2015/09/24/how-to-use-your-bb8-bb-8-training-video-tutorial-video-by-sphero/
    http://www.blogdot.tv/2015/09/24/all-details-about-sphero-star-wars-bb8-droid-how-to-reset-your-droid-you-always-wanted/

    And as many people post that the side button is the Charge Button this is wrong, the button on the Side is for Reseting the BB-8 Toy!!

    «STAR WARS BB8»
    Video von BLOGDOTTV (2015)
    Offizielle Seite: http://blogdot.tv
    WEITERE KANÄLE:

    BLOGDOTTV bei Facebook: http://www.facebook.com/blo…
    BLOGDOTTV bei Twitter: http://twitter.com/blogdottv
    BLOGDOTTV bei Instagram: http://instagram.com/blogdottv
    BLOGDOTTV bei Twitch: http://twitch.tv/blogdottv — Watch live at http://www.twitch.tv/blogdottv


    Source: https://sphero.zendesk.com/hc/en-us/categories/200376374-BB-8