Schlagwort: raspberrypi

  • Hot Spotter

    Hot Spotter

    Reading Time: 3 minutes

    Made from off-the-shelf hardware, including a Raspberry Pi 3A+, the Hot Spotter can survey an area to create a heat map. “As the drone flies over an area, it records average temperatures of spots on the ground,”explains Jason. “The size of the spot depends on how high the drone is flying, in the same way the spot size from a flashlight depends on how far away it is from a surface.”

    The software creates an imaginary grid of points, spaced about one metre apart, to be used for the heat map. When the drone takes a temperature reading of a spot, it’s recorded for all the points contained within it. Then, when the heat map is generated, all the readings for a given point are averaged together. “This method helps to localise heat sources and distinguish between large warm regions versus hot spots.”

    As the drone flies a cross-hatch pattern to survey the area, its on-board GPS is used to determine its precise position while a lidar module measures the distance to the ground. This results in more accurate heat mapping than when estimating the height, as well as opening up the possibility of terrain following and obstacle avoidance.

    Preparing for take-off, the Hot Spotter drone is pictured in front of a charcoal fire used for testing purposes

    Altitude testing

    “For my tests, the drone flew about 20 metres above the ground,” says Jason. “I would like to test at other altitudes. Since the size of the spot being measured increases with altitude, the drone can cover more area from higher altitudes at the expense of heat map fidelity. Ideally I would like to create a quick map from a high altitude followed by a higher fidelity map at a lower altitude for regions that look like potential hot spots.”

    The on-board Raspberry Pi 3A+ communicates with the drone’s flight controller (using the MAVLink protocol) to receive information such its GPS position and orientation. “Raspberry Pi handles all of the calculations necessary to generate a heat map from sensor data recorded by the drone and from sensors attached directly to the GPIO using an I²C hub,” says Jason. “Raspberry Pi can also command any autonomous functions such as setting a waypoint and returning to its launch point.”

    It sends the data in real-time – using a wireless serial connection via a 500 mW transmitter – to a ground station laptop via another Raspberry Pi used as a wireless hotspot for a laptop.

    Crash landing

    It took Jason three months to build and program the Hot Spotter. However, after numerous successful test flights, disaster struck when the drone crash-landed due to a malfunctioning rotor. “It was a bummer to say the least,” he says. “I have rebuilt the drone. Better than it was before. Better… stronger… faster.”

    While he thinks the drone’s practicality is solid from a cost standpoint, its practicality ‘in the wild’ remains to be seen. “I would like to do further testing that includes real-world scenarios. There is a fire science laboratory near me and if they find it useful, the project might have a future there.”

  • ZX Spectrum Next Accelerated review

    ZX Spectrum Next Accelerated review

    Reading Time: 2 minutes

    The keyboard is a thing of beauty. The keys are responsive, although the layout is a bit weird after years of muscle memory bonded to PC.

    It’s packed with connections: HDMI and VGA for video out; 3.5 mm ear and mic mini-jacks; PS/2 for keyboard and mouse; plus the mini HDMI and micro USB ports of Raspberry Pi Zero; and two 9B9 joystick ports (compatible with Kempston, Cursor, and ZX Interface 2 Protocols). To the left of the device sits a full-size SD card slot and three buttons: Reset, Drive, and NMI. And the original Expansion port provides compatibility with classic hardware.

    The NMI button opens a menu that enables you to flick between turbo modes: 3.5MHz, 7MHz, 14MHz, and 28MHz. You can also enter POKE files, browse memory banks, and adjust various sound, graphical, and memory settings. Some period games become wonderfully playable when cranked up to 28MHz: Sentinel, originally an achingly slow trudge, becomes a fast-paced and tense 3D puzzler.

    Z80 and beyond

    The heart of the Spectrum Next is a Xilinx Spartan-6 XC6SLX16 FPGA (field-programmable gate array, magpi.cc/spartan6). FPGA isn’t emulation: the programmable logic blocks create a perfect representation of the Z80 chip.

    You can take the FPGA beyond the Z80 with processor cores. We turned our ZX Spectrum Next into a BBC Micro B and BBC Master using BeebFPGA (magpi.cc/beebfpga). Victor Trucco has made a range of Intel 8080 cores available, including MSX, NES, and Colecovision.

    A separate Anti-Brick core protect users from breaking the machine when messing around with cores, and can be used at any time to switch back to its original state.

    Alongside this sits a Raspberry Pi Zero, which enables you to load digital .tzx files as analogue cassette tape (screeches, loading screen, and all). It also brings SID (Sound Interface Device) support to the table, enabling better audio for games. There are plans afoot for Raspberry Pi Zero’s micro USB port to act as a digital joystick port, and the mini HDMI output may be used down the line to add a second display. Beyond that, Raspberry Pi Zero adds a 1GHz CPU and 512MB of RAM to the hardware – plenty of extra headroom for ambitious game developers.

    We’re impressed. From a design and build quality perspective, ZX Spectrum Next has achieved all we wanted from a new Spectrum. And it’s a great example of using the power of Raspberry Pi to add oomph to a project. From a licensing and business perspective, managing to maintain this purity of focus while blending multiple open-source and proprietary software projects, all while juggling licensing owned by (to our count) 15 separate organisations including Amstrad/Sky, is seriously impressive stuff. Bravo, SpecNext, bravo!

    Verdict

    9/10

    The ZX Spectrum Next is a lovely piece of kit. Well-designed and well-built: authentic to the original, and with technology that nods to the past while remaining functional and relevant in the modern age.

  • Make a Sense HAT rainbow display for your window

    Make a Sense HAT rainbow display for your window

    Reading Time: 9 minutes

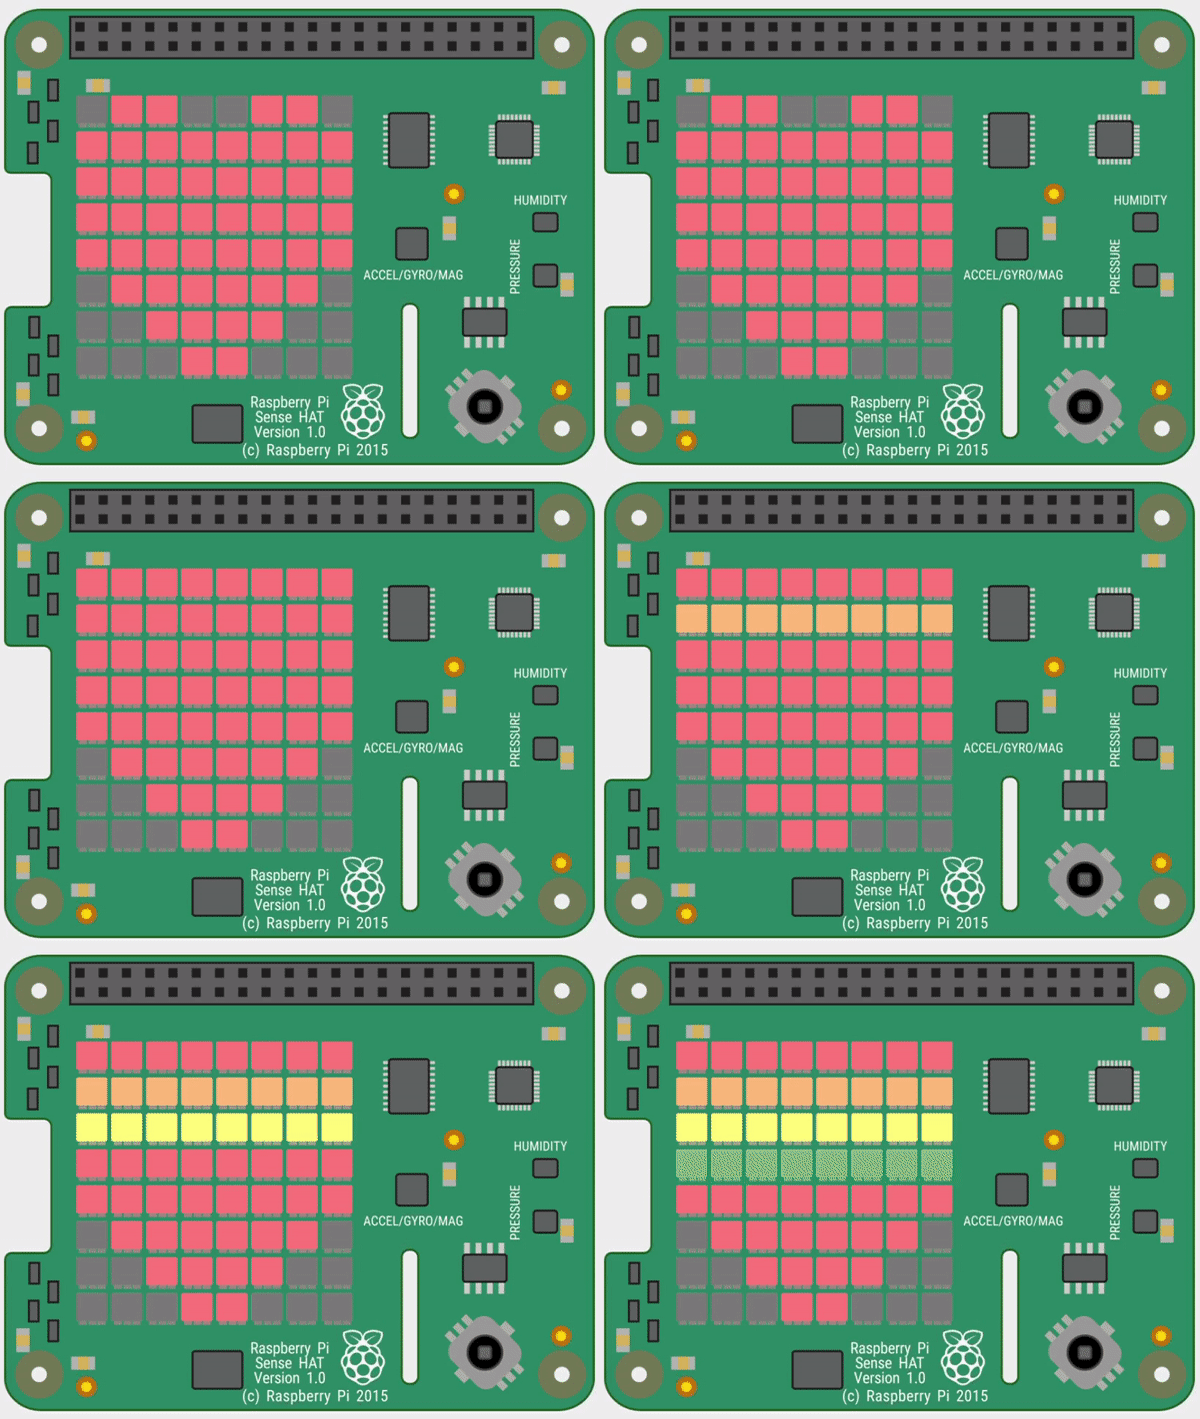
    The Sense HAT displaying a rainbow and thank you message

    By following our step-by-step guide, you will discover how to light up rainbow and heart images on the Sense HAT’s LED matrix, as well as showing a custom scrolling message. If you don’t have a Sense HAT, you can still try out the code using the Sense HAT Emulator in Raspbian.

    Click here to download the code used in this project

    Why use a Sense HAT?

    The Sense HAT sits on top of your Raspberry Pi and adds the ability to sense and report details about the world around it. It can measure noise, temperature, humidity, and pressure, for example. The Sense HAT can show readings on an 8×8 LED matrix, but first needs to be instructed, using Python code, what sort of data it should look for. The Sense HAT’s visual display can also be programmed to show specific details including simple images. In this tutorial we’ll look at how to control the LED matrix. Don’t worry if you don’t have a Sense HAT as you can use the Sense HAT Emulator and try out the code in Raspbian.

    Attach the Sense HAT to Raspberry Pi

    Shut down your Raspberry Pi (if it isn’t already) before attaching the Sense HAT to it. Hold the Sense HAT above your Raspberry Pi and line up the yellow holes at each corner with the corresponding ones on Raspberry Pi; make sure the header on Sense HAT lines up with the GPIO pins on Raspberry Pi. The white LED matrix should be at the opposite end of your Raspberry Pi from the USB ports. Gently push the Sense HAT onto Raspberry Pi’s GPIO pins and then screw the two boards together with standoffs. Now power up your Raspberry Pi as usual.

    Open Thonny UDE

    We’re going to use a program called Thonny to instruct our Sense HAT and tell it what to do. When Raspbian loads, select Programming from the top-left raspberry menu, then choose Thonny Python IDE. Click the New icon to open a new, untitled window. We need to get our program to recognise the Sense HAT module. To do this, type these two lines of code into the Thonny window:

    from sense_hat import SenseHat sense = SenseHat() 

    Click the Save icon and name your file rainbow.py.

    Say something

    From now on, Thonny will know to use the Sense HAT whenever you type ‘sense.’ followed by a ‘.’ and a command. Let’s get the Sense HAT to say hello to us. Add this line of code to line 4 in Thonny:

    sense.show_message("Hello Rosie") 

    Of course, you can use your own name. Click Run and the letters should scroll across the LED display. If you get an error in the Shell at the bottom of the Thonny window, check your code carefully against the sense_hello.py listing. Every letter has to match.

    sense_hello.py

    from sense_hat import SenseHat
    sense = SenseHat() sense.show_message("Hello Rosie")

    Choose your colours

    We are going to get the Sense HAT to light up a rainbow and display a heart. We do this with the set_pixel() function.

    We need to tell set_pixel() which LEDs we want to light up, using x and y variables to correlate to the axes of the Sense HAT’s 8×8 grid of LEDs – see Figure 1. We also need to tell set_pixel() the colour using a three-digit code that matches the RGB (red, green, blue) value for each light.

    Figure 1 Sense HAT uses a co-ordinate system to locate each LED on the matrix. The blue light is at (0, 2) and the red light is at (7, 4)

    We’re also going to start with sense.clear(), which clears any currently lit up LEDs. The 8×8 LED display is numbered 0 to 7 in both the x (left to right) and y (top to bottom) axes. Let’s make the top-left LED red. Delete the show_message() line from your code and enter:

    sense.clear() sense.set_pixel(7, 4, 255, 0, 0) 

    The 7, 4, locates the pixel in the last column, and four rows down, and then the RGB value for red is 255, 0, 0 (which is 255 red, 0 blue, 0 green).

    Now let’s add a third line, to light up another pixel in blue:

    sense.set_pixel(0, 2, 0, 0, 255) 

    Check your code against the sense_pixels.py listing. Click Run to see your two dots light up. To add more colours, repeat this step choosing different shades and specifying different locations on the LED matrix.

    sense_pixels.py

    from sense_hat import SenseHat
    sense = SenseHat() sense.clear()
    sense.set_pixel(7, 4, 255, 0, 0)
    sense.set_pixel(0, 2, 0, 0, 255)

    Colour variables

    Working with the RGB values soon becomes frustrating. So it is much easier to create a set of variables for each three-number value. You can then use the easy-to-remember variable whenever you need that colour.

    r = (255, 0, 0) # red o = (255, 128, 0) # orange y = (255, 255, 0) # yellow g = (0, 255, 0) # green c = (0, 255, 255) # cyan b = (0, 0, 255) # blue p = (255, 0, 255) # purple n = (255, 128, 128) # pink w = (255, 255, 255) # white k = (0, 0, 0) # blank 

    Then you can just use each letter for a colour: ‘r’ for red and ‘p’ for purple, and so on. The # is a comment: the words after it don’t do anything to the code (they are just so you can quickly see which letter is which colour).

    How to pick any colour

    If you’re looking for a colour, then use the w3schools RGB Color Picker tool. Choose your colour and write down its RGB number.

    Make a heart

    Light up a pattern of RED leds on the Sense HAT matrix to form a heart.

    Now we’ve got our colours, let’s make a heart. The code in sense_heat.py enables us to draw a heart using ‘r’ letters for red lights, and ‘k’ for blank. This line of code then draws the heart:

    sense.set_pixels(heart) 
    from sense_hat import SenseHat sense = SenseHat() r = (255, 0, 0) # red
    o = (255, 128, 0) # orange
    y = (255, 255, 0) # yellow
    g = (0, 255, 0) # green
    c = (0, 255, 255) # cyan
    b = (0, 0, 255) # blue
    p = (255, 0, 255) # purple
    n = (255, 128, 128) # pink
    w =(255, 255, 255) # white
    k = (0, 0, 0) # blank heart = [ k, r, r, k, k, r, r, k, r, r, r, r, r, r, r, r, r, r, r, r, r, r, r, r, r, r, r, r, r, r, r, r, r, r, r, r, r, r, r, r, k, r, r, r, r, r, r, k, k, k, r, r, r, r, k, k, k, k, k, r, r, k, k, k ] sense.set_pixels(heart)

    Check your code against the sense_heart.py listing. Click Run and you will see a heart.

    Draw a rainbow

    We light up each row of the matrix a different colour of the rainbow using loops

    Creating a rainbow is a little tricker. We could just draw out each line, like a heart. But we want ours to build up line by line. For this we’ll need to light up each pixel in a row, then pause.

    On the second row (underneath from sense_hat import SenseHat), add this line of code:

    from time import sleep 

    We now have the sleep() function to slow down our program. To add a three-second pause before new pixels are lit up, you would type:

    sleep(3) 

    You can change the number of seconds by changing the number in brackets.

    Create blocks of colour

    To turn an entire row on the LED matrix red, you could type:

    for x in range(8): sense.set_pixel (x, 0, r)
    

    Press TAB to indent the second line. This loops over each LED in the first row (x, 0), replacing x with the numbers 0–7.

    We could repeat this, to set the second line to yellow, with this command:

    for x in range(8): sense.set_pixel (x, 1, y) 

    …And repeat this step until you have eight different coloured lines of LEDs. But this seems a bit clunky.

    Make a rainbow on command

    We think it’s neater to create two nested for loops for the x and y columns. Enter this code:

    for y in range(8): colour = rainbow[y] for x in range(8): sense.set_pixel(x, y, colour) sleep(1)
    

    Take a look at the sense_rainbow.py listing to see how the code should look. Click Run and a rainbow will build up line by line.

    sense_rainbow.py

    from sense_hat import SenseHat
    from time import sleep sense = SenseHat() r = (255, 0, 0) # red
    o = (255, 128, 0) # orange
    y = (255, 255, 0) # yellow
    g = (0, 255, 0) # green
    c = (0, 255, 255) # cyan
    b = (0, 0, 255) # blue
    p = (255, 0, 255) # purple
    n = (255, 128, 128) # pink
    w =(255, 255, 255) # white
    k = (0, 0, 0) # blank rainbow = [r, o, y, g, c, b, p, n] sense.clear() for y in range(8): colour = rainbow[y] for x in range(8): sense.set_pixel(x, y, colour) sleep(1)

    Write a message

    Writing messages in Python to show on your Sense HAT is really straightforward. You just need to decide on a few words to say and type them into a sense.show_message() command, as we did right at the start.

    You can easily specify the text and background colours, too. Choose a contrasting colour for the background. To use your colours in a message, type: sense.show_message(„text here“ text_colour = , followed by the colour value you chose for the text, back_colour = , followed by the colour value you chose for the background.

    Since we have already defined several colours, we can refer to any of them by name in our code. If you haven’t already consulted our rainbow colour list, take a look at the sense_rainbow.py listing and add them to your code.

    For instance, type:

    sense.show_message("THANK YOU NHS!", text_colour = w, back_colour = b) 

    Click Run and your rainbow, followed by your message, should appear on your Sense HAT’s display.

    Bring it together

    We’re now going to take the three things we have created – the heart, the rainbow, and the text message – and bring them together in an infinite loop. This will run forever (or at least until we click the Stop button).

    while True: 

    All the code indented underneath the while True: line will replay as a loop until you press Stop. Inside it we will put our code for the heart, rainbow, and text message.

    By now, you will be able to see the potential of making patterns to display on your Sense HAT. You can experiment by making the colours chase each other around the LED matrix and by altering how long each colour appears.

    Enter all the code from rainbow.py and press Run to see the final message.

    rainbow.py

    from sense_hat import SenseHat
    from time import sleep sense = SenseHat() r = (255, 0, 0) # red
    o = (255, 128, 0) # orange
    y = (255, 255, 0) # yellow
    g = (0, 255, 0) # green
    c = (0, 255, 255) # cyan
    b = (0, 0, 255) # blue
    p = (255, 0, 255) # purple
    n = (255, 128, 128) # pink
    w =(255, 255, 255) # white
    k = (0, 0, 0) # blank rainbow = [r, o, y, g, c, b, p, n] heart = [ k, r, r, k, k, r, r, k, r, r, r, r, r, r, r, r, r, r, r, r, r, r, r, r, r, r, r, r, r, r, r, r, r, r, r, r, r, r, r, r, k, r, r, r, r, r, r, k, k, k, r, r, r, r, k, k, k, k, k, r, r, k, k, k ] while True: sense.clear() sense.set_pixels(heart) sleep(3) for y in range(8): colour = rainbow[y] for x in range(8): sense.set_pixel(x, y, colour) sleep(1) sleep(3) sense.show_message("THANK YOU NHS!", text_colour = w, back_colour = b) sleep(3)

    Sense HAT Emulator

    You can try out this tutorial using the Sense HAT Emulator in Raspbian. To install it, search for ‘sense’ in the Recommended Software tool. Note: If using this Emulator, you’ll need to replace from sense_hat with from sense_emu at the top of your Python code (but not if using the online Sense HAT emulator).

    The Sense HAT displaying the rainbow message in a window display

  • The Official Raspberry Pi Camera Guide out now!

    The Official Raspberry Pi Camera Guide out now!

    Reading Time: 2 minutes

    To coincide with the launch of the High Quality Camera, Raspberry Pi Press has released a new 132-page book to show you how to set it up, shoot great photos and videos, and use it in a range of inspiring projects.

    A step-by-step illustrated guide reveals how to attach a lens to the camera and adjust its focus and aperture settings. You’ll then learn how to control the camera by issuing terminal commands – or with Python code using the picamera library – and discover the many image modes and effects available.

    To inspire you further, an exciting range of Raspberry Pi projects are showcased across the book’s 17 chapters. Take selfies and stop-motion videos, build a wildlife camera trap, experiment with high-speed and time-lapse photography, create a Minecraft photo booth, set up a security camera, use ANPR to identify vehicles, take your camera underwater, and a whole lot more!

    And if you don’t have a High Quality Camera yet, don’t worry: you can use a standard Raspberry Pi Camera Module with all the projects.

    Click here to snap up a copy of the Official Raspberry Pi Camera Guide from the Raspberry Pi Press store.

    Camera Guide - Getting started
    Camera Guide - Connecting and using
    Camera Guide - High-speed photography

  • Hamster Feeder

    Hamster Feeder

    Reading Time: 3 minutes

    “I’d made a video about controlling servo motors using a Raspberry Pi and I wanted to follow that up with a simple, practical project that would put Raspberry Pi-controlled servos into action,” he explains. To that end, the Hamster Feeder was created as a tutorial for his YouTube channel, ExplainingComputers. “It would just need a little refinement to be used to feed a real hamster,” he readily admits.

    Air pods

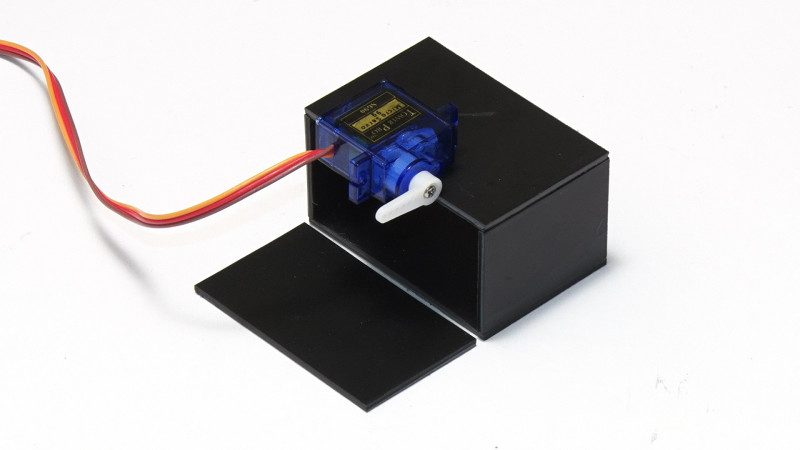
    Since his channel focuses on single-board computers, he decided to use a Raspberry Pi Zero running Raspbian for his project. He also handmade two little food pods, mounting a servo on the side of each one.

    “The most difficult part of the project was progressing from the idea of ‘let’s use a servo as a catch to open a door at the base of a container’, to actually having two of those little doors on two small containers suspended in the air,” Chris says.

    “I happened to have some plasticard sheet and solvent adhesive, but it was very much a situation of working out what I could design and build in a few hours, with the added complication of how to show the process in a video. I remember a very intense and frantic morning!”

    As well as sticky-taping the lid to the rest of the box, double-sided tape is used to position the servo

    Nutty coding

    After connecting the servos to his Raspberry Pi Zero, Chris turned to Python and broke his code down into three sections. “The first loads in the GPIO, time, and datetime libraries, before setting up board numbering for the GPIO pins,” he explains. “It then sets up pins 11 and 12 as GPIO outputs with software pulse-width modulation, or PWM, which is what is needed to control servos.”

    The second is dedicated to nut loading: “Here the user is invited to close (and hold shut) each pod bay door in turn, and press the ENTER key to allow the servo to move and function as a latch. To maintain a record of each door being closed, variables pod1 and pod2 are set to a value of 1 to indicate when their respective doors are shut.”

    Finally, there is a ‘main while’ loop – a control flow statement that can execute statements when a condition is true. “An if and an elif statement compare the current date and time with two hard-coded dates and times in order to check if a pod door should be opened. They also see if a door is still shut by checking its pod1 or pod2 value, and setting this to 0 once a door is opened.”

    Feeding frenzy

    Of course, improvements could be made. Servos, Chris says, could swing the doors open and closed. “It would also need some chutes to direct the nuts into a hamster cage with the pods and servos entirely separated from a live animal outside of the cage,” he continues. There’s scope to regulate the number of nuts dispensed and to remove hard-coded dates and times in the code.

    “I did think of using another servo to raise a flag saying ‘lunchtime’ every time a pod bay released some nuts,” he adds. “This said, I’m not sure that most hamsters can read and which languages they are most familiar with.”

  • Automation HAT Mini review

    Automation HAT Mini review

    Reading Time: 2 minutes

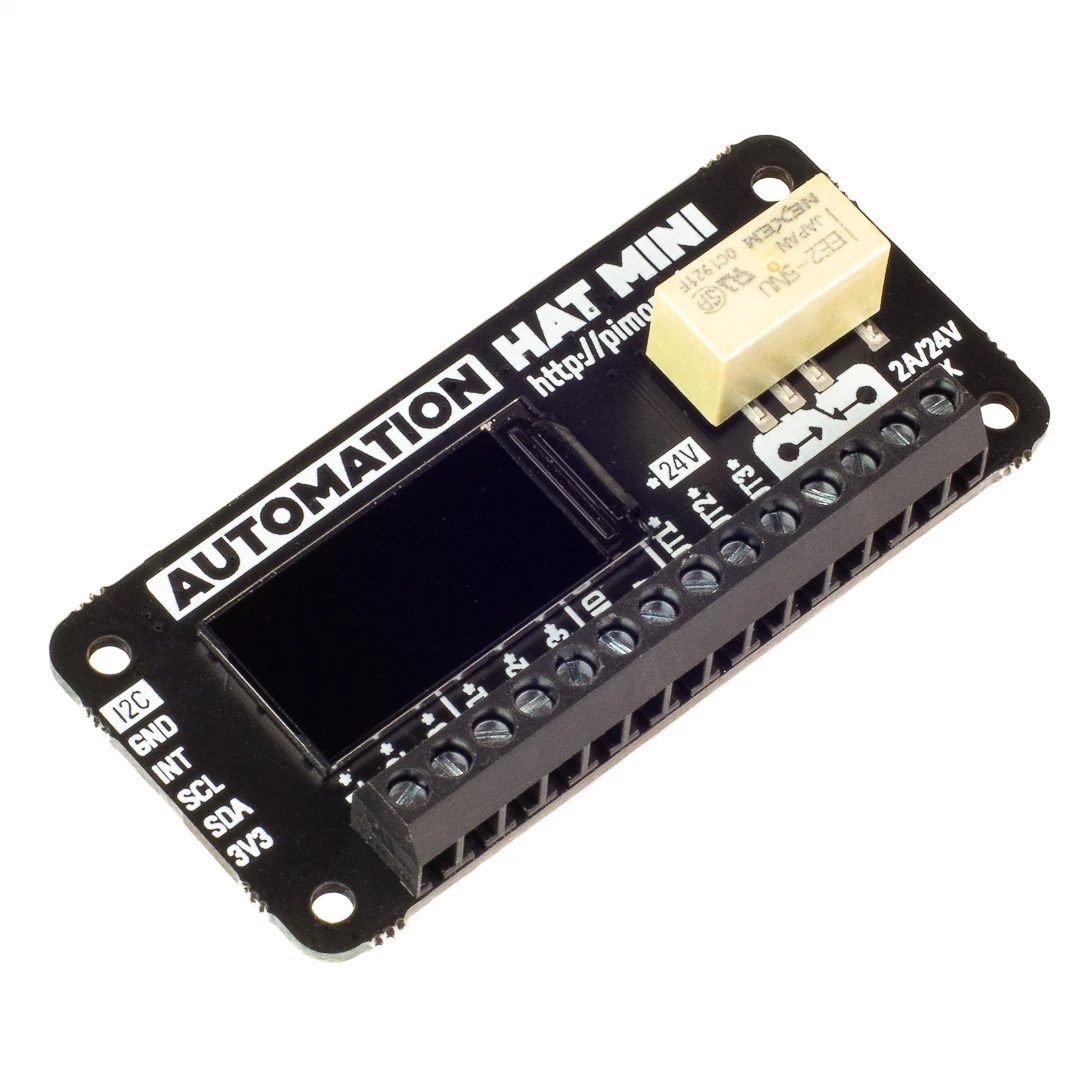
    The board’s main connections for inputs and outputs are 3.5 mm screw terminals. As well as a single relay, there are three analogue inputs, three buffered inputs, and three sinking outputs. All of these are tolerant to voltages up to 24 V – which is fine for controlling a plethora of household devices that typically have a 12 V or 24 V control board. But make sure you don’t use the board to switch mains voltages!

    Inputs and outputs

    Read via a 12-bit ADC, the analogue inputs have an accuracy of ±2%, which is fine for most purposes when you need to read a variable voltage. The digital inputs are used to tell if a connected device is on (signal above 3 V) or off (below 1 V).

    For turning devices on and off, you have a choice of the three sinking outputs and the relay. For the former, you connect your device load on the ground side; a maximum of 500 mA can be sunk between the three outputs. With a tolerance of up to 2 A, the relay can be connected on the NC (normally closed) or NO (normally open) side, depending on whether your device spends more time switched on or off respectively.

    Although created for the original Automation HAT/pHAT, Pimoroni’s getting started guide shows you how to use the board’s Python library – instead of using the curl command, you’ll need to clone it from GitHub to get the up-to-date version. The relevant code examples show the status of inputs/outputs on the LCD, including bar graphs for analogue inputs. If you’re new to the world of home automation and its terminology, you should also check out Tanya Fish’s excellent explainer on the Pimoroni blog.

    Verdict

    9/10

    It’s ideal for most home automation purposes, and we love the mini LCD, although if you need more relays you might prefer the full-size Automation HAT.

  • How to use Raspberry Pi temperature & light sensors

    How to use Raspberry Pi temperature & light sensors

    Reading Time: 4 minutes

    Temperature & Light sensor projects: You’ll need

    Both projects in this tutorial make use of the PiAnalog Python library that lets you connect analogue sensors to Raspberry Pi without special hardware.

    Although these projects sense temperature and light, you could easily adapt them to use other types or resistive sensor, including stress sensors, variable resistors, and even some types of gas sensor.

    The thermometer project
    : Install the code

    Before fetching the code from the internet, you should run Mu, which you will find in the Programming section of your main menu. If it’s not there, update your system to the latest version of Raspbian.

    Running Mu ensures that the mu_code directory is created, into which we will now copy the program code. To do this, open a Terminal window and run the commands:

    wget http://monkmakes.com/downloads/pb1.sh sh pb1.sh 

    This will copy the programs used in this tutorial into the mu_code directory, along with some others.

    Place components onto breadboard

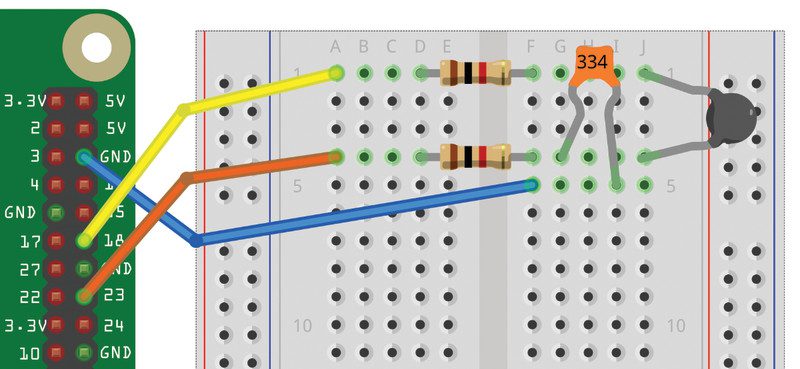
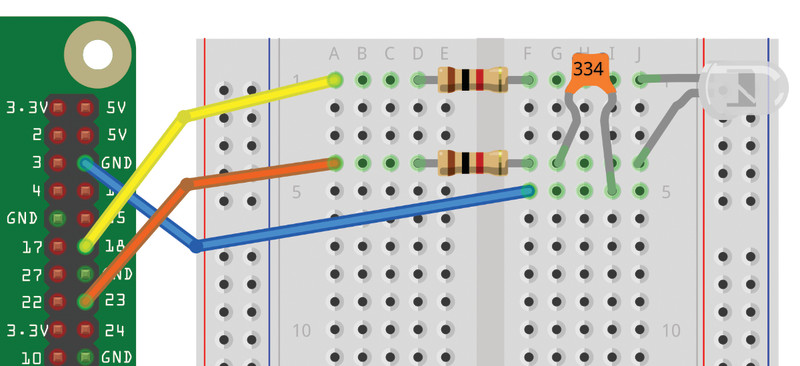
    Using Figure 1 as a reference, push the jumper wires into the breadboard at the positions shown. Bend the resistor legs so that they fit into the holes.

    The five holes in each row on the breadboard are connected together under the plastic, so it’s very important to get the correct row for your component leg. In this project, none of the components needs to be a particular way around.

    Figure 1 The thermometer wiring diagram

    Connect breadboard to Raspberry Pi

    Again, using Figure 1 as a reference, connect the GPIO pins on Raspberry Pi to the breadboard. A GPIO template will make this easier – if you don’t have one, you’ll need to carefully count the pin positions. It doesn’t matter what colour jumper wires you use, but if you stick to the colours used in the diagram, it’s easier to check that your wiring is correct. Running the program

    Load and run the 05_thermometer.py program using Mu.

    # 05_thermometer.py
    # From the code for the Box 1 kit for the Raspberry Pi by MonkMakes.com from PiAnalog import *
    from guizero import App, Text
    import time p = PiAnalog() # Update the temperature reading
    def update_temp(): temperature = p.read_temp_c() temperature = "%.2f" % temperature # Round the temperature to 2 d.p. temp_text.value = temperature temp_text.after(1000, update_temp) # Create the GUI
    app = App(title = "Thermometer", width="400", height="300")
    Text(app, text="Temp C", size=32)
    temp_text = Text(app, text="0.00", size=110)
    temp_text.after(1000, update_temp) # Used to update the temperature reading
    app.display()

    The code is configured for the thermistor supplied with the MonkMakes Project Box 1 kit. If you look near the top of the file, you will see the line:

    temperature = p.read_temp_c().
    

    If you are using your own thermistor, you will need to add two new parameters to the method call. The first parameter is the value of Beta for the thermistor, and the second the value to R25 (resistance at 25°C). You will find both of these values in the thermistor’s datasheet. For example, if Beta is 3800 and R25 is 1 kΩ, you would use: p.read_temp_c(3800, 1000).

    After a few seconds, a window will appear, like the one in Figure 2, displaying the temperature. If you would rather have the temperature displayed in degrees Fahrenheit, then run the program 05_thermometer_f.py instead.

    Figure 2 Displaying the temperature using guizero

    Changing the temperature

    The easiest way to change the temperature of the thermistor is to pinch it between your fingers so that your body warmth heats it up. You should see the temperature steadily increase and then decrease back to room temperature when you let go of the thermistor.

    Light meter project
    : Disconnect the breadboard

    This project has almost the same layout as the thermometer, and we are just going to swap the thermistor for a phototransistor, but it is still a good idea to disconnect the breadboard from your Raspberry Pi. First, pull the jumper wires off the GPIO pins on Raspberry Pi and then take the thermistor off the breadboard.

    Place phototransistor onto breadboard

    This time, using Figure 3 as a guide, put the phototransistor legs into the breadboard. The phototransistor must go the correct way around: the longer leg should go to row 4.

    Figure 3 The light meter wiring diagram

    Connect breadboard to Raspberry Pi

    Using Figure 3 as a reference, connect the GPIO pins on Raspberry Pi to the breadboard using three female-to-male jumper wires.

    Running the program

    To use the light meter, load and run the program 08_light_meter.py in Mu.

    # 08_light_meter.py
    # From the code for the Box 1 kit for the Raspberry Pi by MonkMakes.com from guizero import App, Text
    from PiAnalog import *
    import time, math p = PiAnalog() def light_from_r(R): # Log the reading to compress the range return math.log(1000000.0/R) * 10.0 # group together all of the GUI code
    # Update the reading
    def update_reading(): light = light_from_r(p.read_resistance()) reading_str = "{:.0f}".format(light) light_text.value = reading_str light_text.after(200, update_reading) app = App(title="Light Meter", width="400", height="300")
    Text(app, text="Light", size=32)
    light_text = Text(app, text="0", size=110)
    light_text.after(200, update_reading)
    app.display()
    

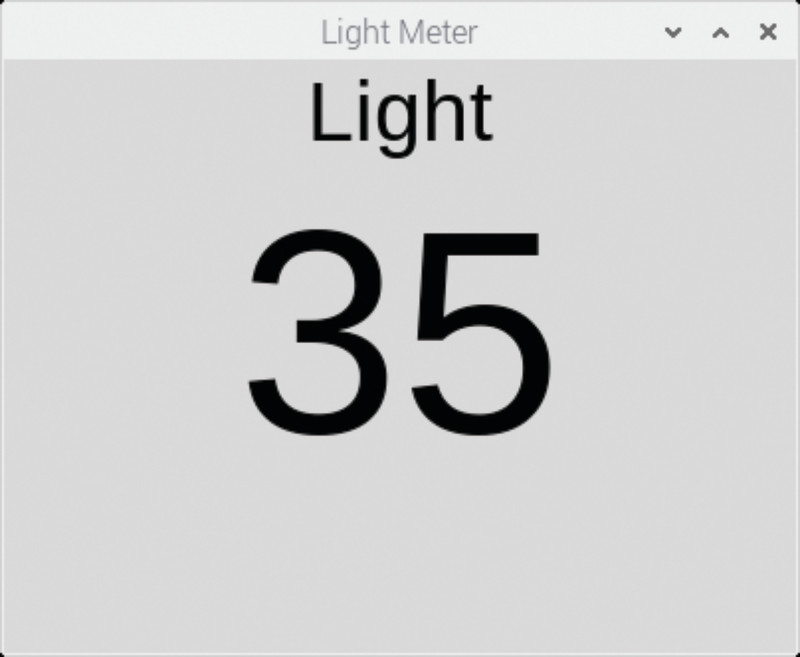
    When the program starts, a window like that in Figure 4 will appear, showing the light level. Try shading the phototransistor with your hand or shining a light on it to see how the readings change.

    Figure 4 Displaying the light level

  • Work from Home and new High Quality Camera in The MagPi #93

    Work from Home and new High Quality Camera in The MagPi #93

    Reading Time: 2 minutes

    Click here to buy The MagPi magazine issue #93

    How to work from home with Raspberry Pi

    Work from home with Raspberry Pi

    Raspberry Pi 4 is seeing a boom in use as a desktop computer for the home. Whether you’re working with Raspberry Pi, or learning, or looking to do video chat; Gareth Halfacree’s Work from home feature has all the information you need
    .

    High Quality camera

    Get started with the High Quality Camera

    There’s a new official camera in town. The High Quality Camera is capable of capturing higher-resolution images than the standard Camera Module. And it works alongside a CS-mount lens, making it ideal for photography and macro photography. Our tutorial explains how the camera works, and how to start capturing images.

    Hot Spotter

    Hot Spotter and other amazing projects

    This amazing Hot Spotter project uses a Raspberry Pi drone to detect smouldering points after a wildfire. It surveys a large area and creates a heat map from temperature readings. These hot points can re-ignite, and Hot Spotter can send the data in real-time to people on the ground. The MagPi magazine is packed with projects like this.

    At home with the Internet of Things

    At home with the Internet of Things

    Upgrade your home with these amazing IoT projects. From controlling sockets, to monitoring temperature and humidity, hacking your doorbell, and automating your lights. There’s a project here for every home.

    ZX Spectrum Next Accelerated

    ZX Spectrum Next Accelerated reviewed

    We take a look at the all-new ZX Spectrum Next Accelerated. A modern re-thinking of a classic computer that uses Raspberry Pi Zero alongside an FPGA (Field Programmable Gate Array) to mimic analog tape-loading to perfection.

    We deliver to your door

    Buy The MagPi magazine issue #93 from the Raspberry Pi Press store and we will deliver it straight to your door. Plus! Take a 12-month subscription in print and we’ll give you a free Raspberry Pi Zero computer and starter kit worth £20.

  • Win one of five Raspberry Pi High Quality Camera and lens!

    Win one of five Raspberry Pi High Quality Camera and lens!

    Reading Time: < 1 minute

    Subscribe

  • Digital Making at Home

    Digital Making at Home

    Reading Time: 2 minutes

    Thousands of people have started engaging with Digital Making at Home. They’ve also had kids sharing their projects.

    Digital Making at Home is for kids who want to get into making things with technology and need a few pointers. If you or your friends are looking for ideas of how to entertain youngsters or simply want new project ideas, the Raspberry Pi project portal comes highly recommended.

    Like all Raspberry Pi projects, the tutorials are both step-by-step and free. Videos explain all about coding platforms such as Scratch and Python, helping kids to quickly catch up.

    Digital Making at Home features instructor-led tutorials

    Young coders rule!

    For families with no prior digital coding or making experience, Raspberry Pi staff members explain how they first introduced their own children to coding. Their initially tentative kids soon became confident, independent learners.

    Children can use the game-making and coding skills they’ve learned to make their own versions based on their own interests. The Raspberry Pi Foundation’s Senior Learning Manager, Marc Scott, related how his son used his new-found coding skills to create a random karate moves generator which helped him prepare for a karate exam.

    The projects, designed for all levels of experience, are self-contained and can be completed without much need for parental input, although many people tell of how much they enjoyed working through projects alongside their kids. They can be easily adapted to be more sensory, for example, so they suit learners with autism.

    Marc cautions that before kids share their work online, they’re prompted to consider what information they should be sharing about themselves. All schools now teach e-safety, so running through a checklist should be second nature.

    Video tutorials

    There is a Digital Making at Home blog
    which sees makers share the progress of their builds, troubleshoot issues that arise, and discuss ways to express their creativity. New instructor-led video posts are shared each week enabling viewers to code along with others. Subjects include making games and storytelling with code. Parents and carers can also sign up for tailored age-specific content via email sent bi-weekly.

    People can sign up for Digital Making at Home here.

  • 10 amazing Raspberry Pi audio projects

    10 amazing Raspberry Pi audio projects

    Reading Time: 3 minutes

    Wave away music

    We like yelling at our digital home assistant thing to skip the track it’s currently playing. It feels very Star Trek. Sometimes it’s more dramatic to wave the music away – just like with the Wavepad.

    Pathé news, now!

    This radio reads out your notifications from a variety of services. It doesn’t have an old-fashioned news bulletin voice, but it’s the spirit that counts.

    One song only

    Want to listen to one song, and one song only? Close a contact on this Raspberry Pi project for just that. Simple.

    Old-school personal assistant

    Martin Mander made this with the AIY Projects kit that came with The MagPi #57. We love the meta idea of how this has been repurposed.

    Dramatic music player

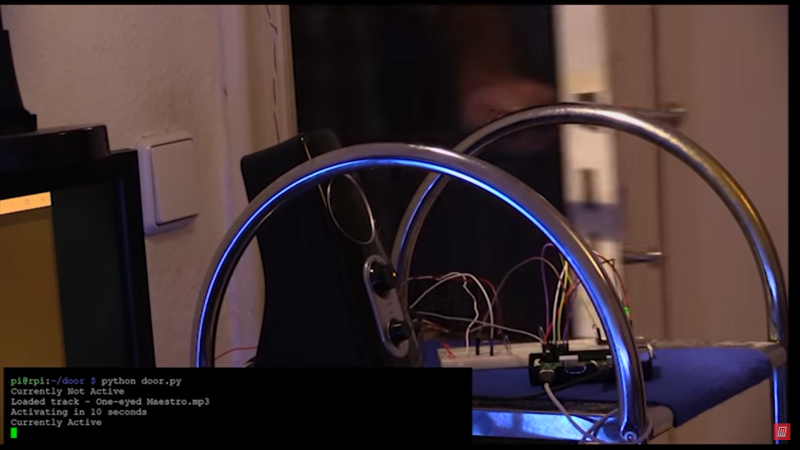
    Feel like a sitcom character and have some slapping bass tunes play as you walk through the door. What’s the deal with theme tunes, anyway?

    Retro internet radio

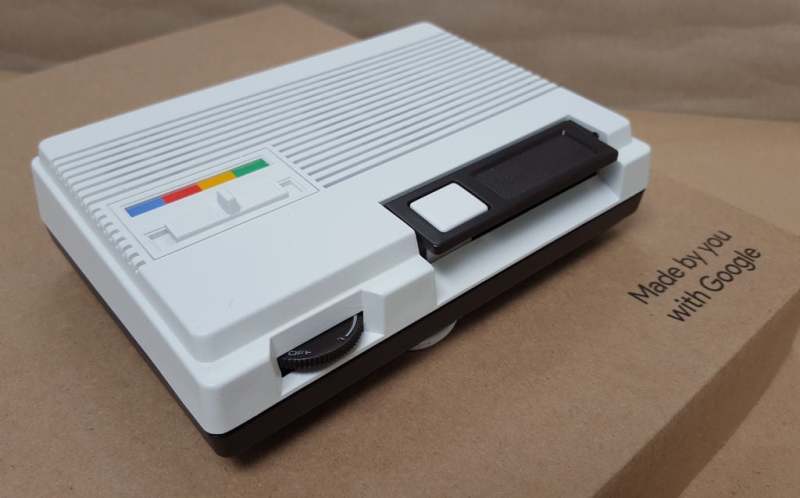
    This is a 1970 Flirt radio that upcycling maestro Martin Mander has turned into a Raspberry Pi-powered internet radio, without sacrificing much of its wonderful aesthetics.

    Tom Hanks inspired

    Using a light tripwire to sense where you are, (carefully) dancing up and down these stairs should help with your scales and arpeggios.

    Finger drumming goodness

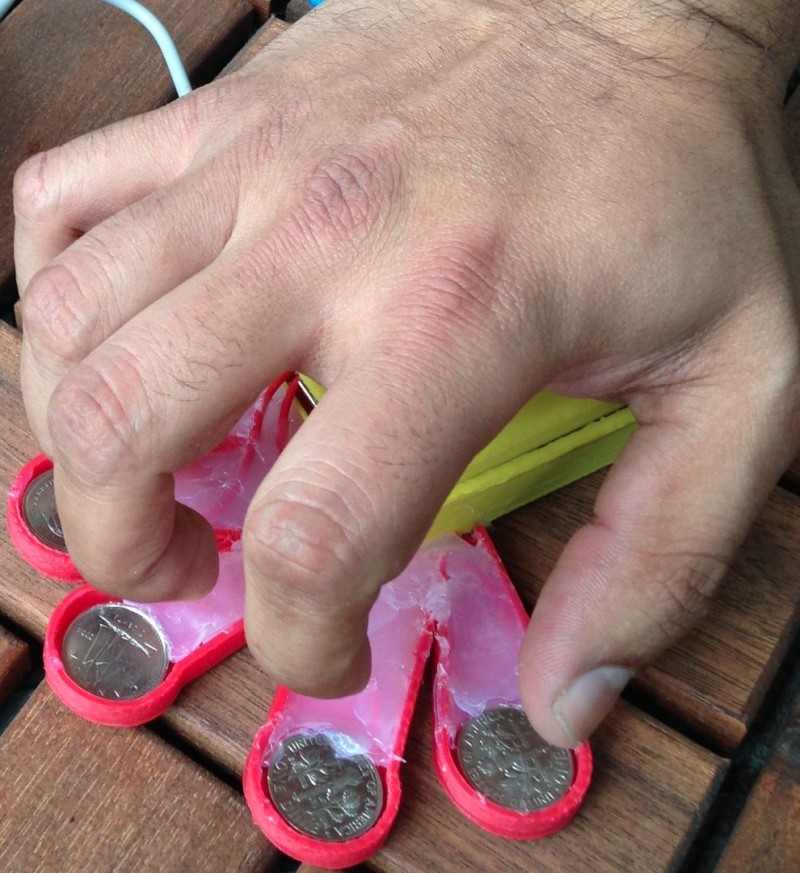
    As well as being a lot of fun, this is a neat little conductivity experiment so you know how capacitive touch works. With a little beat added to it.

    Outer space vibes

    This official Raspberry Pi project uses an ultrasonic distance sensor – something you mostly find on robots – to create a theremin sound as you move your hand through it.

    Accessible sodar

    Using sound to detect distance is pretty standard tech, but it always helps to make it easier. This sodar project helps you do that.

  • PiVidBox

    PiVidBox

    Reading Time: 3 minutes

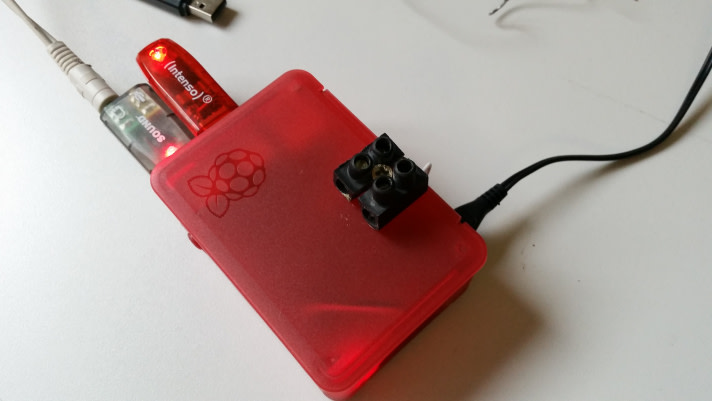
    “My project [PiVidBox] is a simple-to-use Raspberry Pi based media centre that even children as young as three years old can use,” he tells us.

    “It provides a simple, physical interface that’s based on old and most likely discarded hardware. It’s simple, because instead of a full-blown graphical interface that may be too complicated for small kids to operate, it uses a physical interface that relies on a simple action of plugging in USB thumb drives to Raspberry Pi.”

    PiVidBox is a quite ingenious bit of low-tech design, and anyone who has seen a toddler work a DVD player recently will understand how physical interaction is something they can understand.

    PiVidBox: Quick Facts

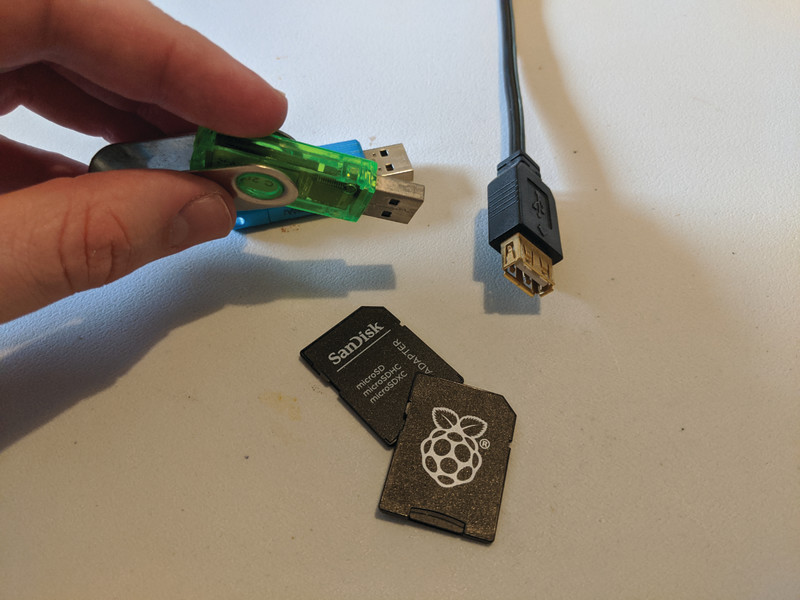
    • PiVidBox can also take SD cards thanks to an adapter

    • STL files are available to 3D-print the parts used

    • It uses OMXPlayer to play videos instead of dedicated HTPC software

    • Labels on the USB sticks and cards are simple images

    • All the code is available on GitHub

    The system works by having the USB drive checked by Raspberry Pi during boot, and then playing a random video from it. You can easily swap it out for other USB drives, as the script can tell: “We have thumb drives with cartoons, anime and youth shows for our kids, but we also made a thumb drive with our old favourite shows when me and my wife want to watch some reruns of nostalgic shows,” says Roiy.

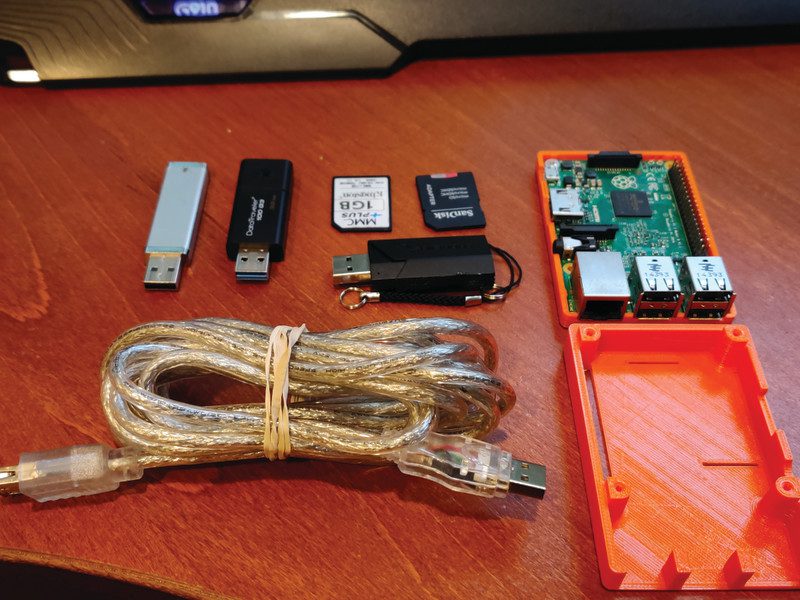
    The list of components is fairly simple – the only slightly quirky part is a USB A male to USB A female cable

    Empowering kids to watch videos they choose

    “Having three kids at home, I wanted to empower them by giving them the ability to choose what video content they want to watch by themselves,” he explains. “But on the other hand, I also wanted to control what kind of content they consume rather than letting them roam freely on video streaming services such as Netflix and YouTube. I also had a pile of old Raspberry Pi [boards] and thumb drives that I wanted to use for something beneficial.

    “I had the aha moment where I was cleaning up my desk, thinking of what to do with a my old Model 1 Raspberry Pi and a bunch of old small-capacity thumb drives (around 1GB to 2GB) when I heard my youngest son calling me to help him with some Baby Shark videos he really wanted to watch.”

    The system has been a success, with Roiy telling us that his kids use it without any problems. It’s so good in fact, he’s started using it more himself when they go to sleep.

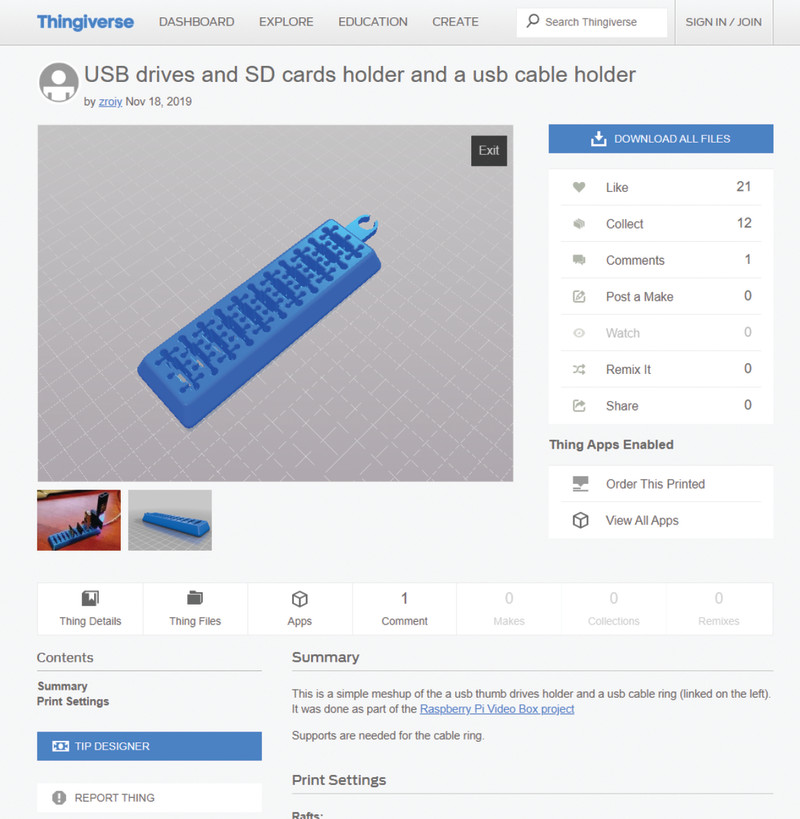
    The 3D-printable files for the USB and SD card rack for this project are available on Thingiverse

    Future plans for PiVidBox

    As with a lot of projects, this is not the end of the tinkering and tweaking. “I have dozens of ideas on how to improve this,” says Roiy. “For example: detecting if the HDMI connection is enabled and resume or pause based on the status. In this case, it pauses and unpauses the video as you switch the TV inputs. Support for extended media formats such as MP3 (so it can also be used to play music), adding Alexa or Google Home support so that skipping to the next video can be enabled by voice commands, and many other ideas.” We might have to put together a version ourselves for smaller relatives – and it’s easy to do with the instructions on the PiVidBox GitHub page.

    Step 1. Select a USB stick and plug it into the PiVidBox. As it boots, it detects the USB drive that has been inserted.
    Step 2. A video is randomly selected and played, followed by a second video, on loop, forever. Great for kids.
    Step 3. If you want to change genre, just remove the USB stick and insert another one. PiVidBox picks up on the change and begins playing anew.

  • Chamber: Sourdough Incubator

    Chamber: Sourdough Incubator

    Reading Time: 2 minutes

    All you knead to know

    Trent decided to take on the challenge of designing a product to meet his culinary needs, and was sure that he wanted to incorporate a small Peltier cooler in his project, as his friend Scott Hutchinson had given him the idea on a camping trip. “He happened to be a spacecraft thermal systems engineer and suggested using the Peltier cooler for both cooling and heating,” says Trent. “I thought this was so slick that I really got moving on the project when I got home.”

    So, how exactly does the incubator work? “The Chamber utilises a Peltier cooler, also known as a thermoelectric cooler, to either pump heat from inside the Chamber to the outside (cooling the interior) or to pump heat from outside the Chamber to the inside (heating the interior),” explains Trent. “The direction that the heat is pumped is simply controlled by alternating the polarity of the voltage applied to the Peltier cooler.”

    He changes the temperature in the Chamber with an H-bridge module driven by a Raspberry Pi Zero. So, if the temperature gets too high, the fan on the outside wall pushes the heat away, and if too cold, another inside fan pulls warm air in. This being Trent’s first Raspberry Pi project, he appears converted, saying the single-board computer “is just such a great tool for personal projects: there is an excellent community offering software libraries, lots of compatible hardware, and helpful guides.”

    The fruit of Trent’s labours: a delicious sourdough loaf

    You say sour, I say sauer

    It’s true that bakers can buy proofing boxes, but Trent thinks that his incubator has clear advantages over commercially available alternatives. “The big advantage my chamber offers is heating and cooling in one package; plus it might be cheaper. Some of the off-the-shelf, heat-only options are almost $200 new, while mine is ~$180.” In addition, Trent’s invention can be used for other foodstuffs: “I enjoy baking, and I really enjoy eating bread, but I’d be lying if I didn’t say that the mad scientist aspect of harnessing the power of fungi and bacteria to create tasty foods didn’t draw me in… we’ve also fermented jars of garlic and jalapeños, sauerkraut, and various peppers. I’m proud to report that everything has tasted good.”

    Trent demonstrated his Chamber at the 2019 Hackaday Superconference, and got a brilliant response from like-minded makers. “Right at the start of my talk I said something like, ‘for those of you who maintain sourdough starters, you might be familiar with specific target temperatures but no means to control to those temperatures,’ and I noticed that a good number of people were smiling and nodding their heads. At that moment, I realised there were more people with this problem than I originally thought,” he says.

  • Use Swarm with Raspberry Shake seismographic data

    Use Swarm with Raspberry Shake seismographic data

    Reading Time: 7 minutes

    In the previous tutorial, we looked at setting up Raspberry Shake, a geophone-based earthquake detector and checking out data with the web-based ShakeNet service.

    See: Build a Seismograph with Raspberry Shake

    Our shake has been running for a while now and we’ve gathered together some data on earthquake activity in our local area. We don’t live in an earthquake-prone part of the world, but it’s good citizen science and we can tap into other Raspberry Shake devices around the globe.

    In this tutorial, we’re going to take a closer look at the data provided by Raspberry Shake devices. We’ll delve into how data is measured, stored, and what you can do with it. We’re going to look at a helicorder and using Swarm to analyse live data.

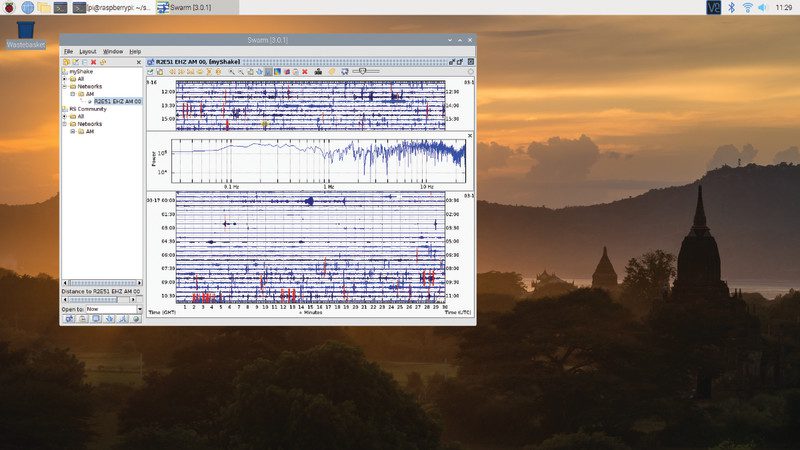
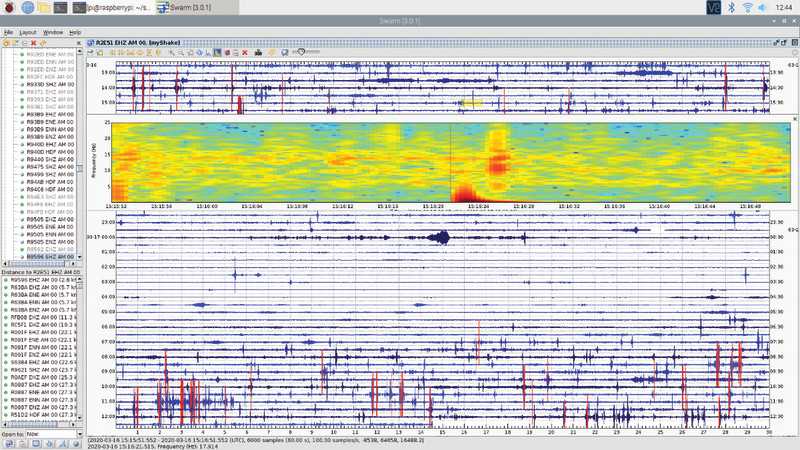
    The main window displays a helicorder from a Raspberry Shake. Select a point on the helicorder to display the Inset panel, here shown in Spectra view, but Wave and Spectrogram views are also used

    Open Raspberry Shake

    We’re going to use two Raspberry Pi devices in this tutorial. The first is used in our assembled Raspberry Shake unit (currently sitting in our conservatory). The second is used to remotely access the Raspberry Shake and investigate its data. You can perform much of this tutorial using another Linux, Windows, or Apple macOS computer if your only Raspberry Pi is being used as Raspberry Shake.

    With both your computer and Raspberry Shake on the same network, Start by opening the web browser and navigate to:

    rs.local/ 

    This will open the Raspberry Shake Config window.

    Open helicorder

    Click on the helicorder icon (shaped as four wavy lines) in the bottom left of the window. You will see 14 blue links, each with a date-stamp followed by either (12) or (00). These represent Raspberry Shake readings for the last seven days, split into 12-hour blocks. The ones marked ‘(00)’ are for the morning hours (midnight to midday), while the ‘12’ ones are for evenings (midday to midnight).

    Click on one of the links to view the helicorder for that time frame. It’ll look like the image in Figure 1. The latter shows seismic data for 12 hours. Each line represents 15 minutes of recording, and the lines vary in colour (black, red, blue, and green). Down the left, you will see the time local to your area; to the right, you’ll see UTC (Coordinated Universal Time). Our Shake unit is located near the Prime Meridian, so both times are the same.

    The main window displays a helicorder from a Raspberry Shake. Select a point on the helicorder to display the Inset panel, here shown in Spectra view, but Wave and Spectrogram views are also used

    Look along the lines to view seismic activity. Lines will typically be stable, and more motion could indicate somebody walking nearby, or other motion. Take a look this Maryland Geological Survey website for more information on how to read helicorder records.

    Adjust helicorder scaling

    We found our helicorder settings initially too intense (see Figure 2); conversely, you may find the helicorder on your Shake to be too mild. Either way, you won’t be able to determine between different periods of intensity.

    Head into your Shake settings and adjust the Helicorder Scaling Value to fine-tune your settings. Click on the Settings icon at http://rs.local and choose the Data tab. Adjust the Helicorder Scaling Value. The default setting is 0.5; adjust it down to 0.1 if the display is too intense, and up to 1.0 if it is too mild. You can fine-tune the levels to your taste as you go.

    Figure 2 Our helicorder setting was too intense, requiring the Scaling Value to be reduced so values could be inspected

    Click Save and Restart to put the new settings in place.

    The helicorder will start displaying new recordings using the new scaling value, but will not retrospectively adjust the previous recordings. So you will need to wait until the end of your 12-hour recording for a fresh helicorder to display wholly adjusted results.

    Using Swarm on Raspberry Pi

    The helicorder is not updated in real-time. For real-time data, you’ll need to use another app. There are many third-party apps available for data analysis, but Swarm (Seismic Wave Analysis / Real-time Monitoring) is the most commonly used by Raspberry Shake owners.

    Swarm was developed by the USGS Volcano Hazards Program and is the most widely used seismological application in the world. Swarm is available for Linux, macOS, and Windows operating systems, and Raspberry Shake provides a version that is preconfigured for Shake devices.

    In the case of Swarm, you can also connect to the Raspberry Shake Community server to see waveforms from all of the other Raspberry Shakes in the world.

    Download Swarm

    Visit rs.local in your web browser and click the SWARM Download button. Open a Terminal window and navigate to the Downloads folder:

    cd Downloads/ 

    Now unzip the downloaded swarm folder and move the unzipped folder to your home folder:

    unzip swarm-3.0.1 mv swarm-3.0.1 ~ 

    (If Swarm has been updated, replace the file name with the appropriate latest version.)

    Open Swarm

    Now open the swarm folder in your home folder and run the swarm.sh file script to start the program.

    cd ~/swarm-3.0.1 sh swarm.sh 

    If you are using a Windows computer, you will need to install Java first and then run Swarm by double-clicking the swarm_console.bat file.

    Access your Raspberry Shake in Swarm

    When you first open Swarm, it will display a blank blue window; to the left, a sidebar will display myShake and RS Community folders. Double-click myShake to reveal further subfolders, then click the ‘+’ sign next to AM to reveal the StationCode for your Raspberry Shake. Ours is R2E51.

    Double-click on the StationCode and the main window will display a helicorder. This time, however, the lines will be blue, with darker blue and red colours used to indicate heavy periods of activity. Each line represents a half-hour of activity, and the helicorder displays live data.

    The inset window

    Click on any part of the helicorder to open the Inset window. This shows a zoomed-in area of the helicorder. The first time you click on it, it will be in Wave view (this is the helicorder wave expanded to make it easier to view). Right-click with the mouse to switch to Spectra view; right-click again to view a Spectrogram. Icons in the Status bar above the helicorder are also used to change views.

    Spectrogram view

    The Spectrogram view (Figure 3) displays the frequency of waveforms concerning time and amplitude (or power). The X-axis (horizontal) of the spectrogram relates to time (as with a regular helicorder plot); the Y-axis (vertical) relates to the frequency of the wave. A third data point is displayed via the colour of the points on the graph: blue is for the weakest energy, and red is for the strongest. So you can see the strength of seismic activity in specific GHz bands. The Spectrogram is a very powerful tool for understanding the seismic activity.

    Ben Ferraiuolo has written a great article called ‘How to understand spectrograms’, which can be used to get a better understanding of how to interpret this data.

    Figure 3 The Spectrogram displays the frequency of waveforms concerning time, and the colour of the data points indicates the amplitude (power) in that frequency

    Helicorder view settings

    All the settings for the helicorder view can be manipulated in the helicorder view settings dialog, which can be opened by clicking on the Helicorder View Settings button in the status bar. The ‘X, minutes’ option adjusts the length of time each horizontal waveform represents (the default is 15 minutes), while the ‘Y, hours’ option determines how many hours are represented on a screen (24 by default).

    The Zoom option adjusts how many seconds are displayed in the Inset panel (the default is 30; set this higher to get a wider view of data when you click on the helicorder.) The Clipping option determines the level at which the red threshold is exceeded. Finally, the ‘Refresh, seconds’ option is used to adjust the update frequency (by default, the heliograph is updated every 15 seconds).

    Wave clipboard

    You may find it useful to compare different sections of the helicorder, or the same time using different views: plot, spectrogram, and so on. The Wave Clipboard is used to hold different clips from several areas at once (even across different Raspberry Shake models). Choose Window > Wave Clipboard to view the current selection (which should be empty).

    Head back to the helicorder and click on an area of interest to open the Inset Panel. Right-click to get a View mode and click the ‘Copy inset to clipboard’ button. The Wave Clipboard will return to focus and now display the clipped wave. You can add multiple waves to the Wave Clipboard and remove them using the ‘X’ delete icon to the right of each wave.

    View another Raspberry Shake

    By now you should have a good understanding of how Swarm is used to distil seismic data. However, you can also use it to access other Raspberry Shake devices that are sharing their data publicly.

    Double-click RS Community in the Data Chooser sidebar and expand (with ‘+’) the Networks folder and the AM folder. This will display all Raspberry Shake devices on the network.

    Choose your Raspberry Shake underneath myShake and the Data Choose will display a list of devices, sorted by distance to yours. Select one of the devices and click the Map icon (at the bottom of the Data Chooser) to view its location. Double-click the device (or click the helicorder icon at the bottom of Data Chooser) to view its data.

  • Get The MagPi, Wireframe, and HackSpace magazines for half price

    Get The MagPi, Wireframe, and HackSpace magazines for half price

    Reading Time: 2 minutes

    Click here to get back issues for half price

    For a short time, you can pick up any of the following magazines for half their usual price:

    • The MagPi – The Official Raspberry Pi magazine

    • Wireframe – Lifting the lid on video games

    • HackSpace magazine – Technology in your hands

    This offer runs until 8 May 2020. The discount is automatically applied at the checkout, so the price you see on the store will be the full price. Add any magazine in the sale to your Cart and when you click Check Out, the discount will be automatically applied.

    There are some great issues in the sale. Here are just three of our favourites:

    The MagPi: Raspberry Pi 4 Starter Guide

    Learn all about the new Raspberry Pi 4 computer and how to get started with it. This guide is the best way to get going with Raspberry Pi computers.

    001 MagPi88 COVER-WEB 900x

    Wireframe: Anniversary Edition – the 25 finest games of the last 12 months

    One year after its hugely successful launch, Wireframe magazine splashes out on this ultra-shiny cover. The feature inside includes in-depth detail on the finest video games being developed.

    WF 26 Cover-FLAT 900x

    HackSpace magazine: Scrap-heap hacking

    Discover the joys of recycling your tech by hacking old kit with brand new electronic components.

    HS 3 Cover 2 1080x

    Head to the Raspberry Pi Press store and pick up your back issues today.

  • SaniaBOX review

    SaniaBOX review

    Reading Time: 2 minutes

    This Kickstarter project brought to life was the idea of a Sania Jain, a 13-year-old who wanted to introduce coding to younger kids where possible. To that end, the all-important add-on board part of the kit includes a series of sensors, LEDs, as well as that big three-digit, seven-segment display.

    Quick build

    Unlike a pi-top or a Piper, you’re not building a laptop or laptop-esque system – instead you’re setting up a Raspberry Pi as normal and popping the HAT-like SaniaBOX add-on on top. Faster than even loading up your favourite streaming service (we’ll catch up with you later, Picard) and it does allow you get stuck in straight away with some coding lessons.

    On the microSD card are a series of coding challenges, and you can find tutorials on the SaniaBOX website if you want to check out how the whole system works before diving in. The code for controlling the add-on bard can be simple (like with the LEDs) or a little more complicated (as with a 120-line script for working the seven-segment displays). The kit comes with some other LEDs, some diodes, and a breadboard so that you can do proper circuit prototyping once you graduate from some of the SaniaBOX add-on’s functions.

    Simple and fun

    The special add-on board works just fine, and has plenty of little sensors and ideas to keep younger folks – and even older folks new to making – entertained. With all the various functions, you can easily make something like a barometer – a great practical use of coding and electronics.

    The price is possibly being reduced by the time you read this as well, so if the cost of it is putting you off a bit, it may well have about £15 / $20 knocked off. Considering that the Raspberry Pi Desktop kit with a very similar selection of components will set you back £100 / $120, we think it’s a pretty good deal.

    Verdict

    8/10

    A great and simple way to get younger makers (and even older newbies) into computing and coding.

  • Solar-powered Raspberry Pi Camera

    Solar-powered Raspberry Pi Camera

    Reading Time: 3 minutes

    One thing led to another. “I wanted to monitor the construction site remotely because we currently live 100 kilometres away,” he says. But rather than buy an off-the-shelf CCTV system, he purchased a dummy camera case, creating his own way of capturing images using a Raspberry Pi 3 Model B computer.

    “From the start, I wanted to keep watch over the building of our home and create a time-lapse of the process for fun,” explains Kaspars. “I knew it had to be a battery-powered and wireless system because getting mains power to the device wasn’t going to be possible on a site like that.”

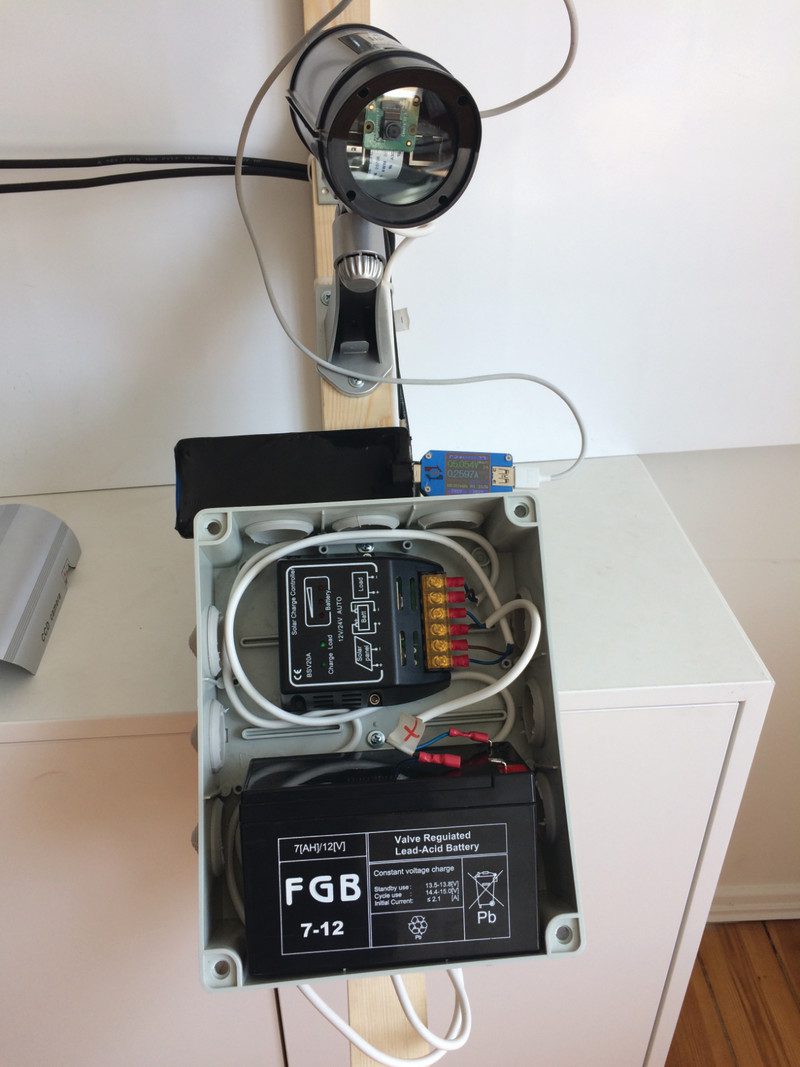
    A 12 V, 7 Ah lead-acid battery has been sufficient to provide an average power consumption of 2 W since it can provide 84 watt-hours of energy

    Seeing the light
    : solar-power

    Kaspars picked up a lightweight 18 V 5 A solar panel that was marketed as being perfect for charging boats and cars. This, he figured, would gather energy from the sun to charge a 12 V battery and, with the use of an inexpensive 12 V-to-5 V buck module, power the Raspberry Pi 3 Model B and an eight-megapixel Raspberry Pi Camera Module v2.

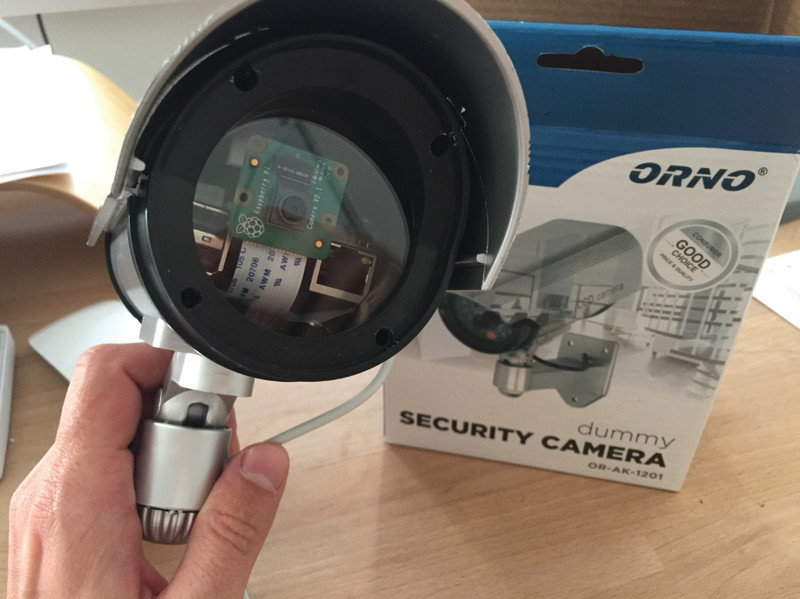
    At first, Kaspars attempted to build a case from a generic project box, but he found it was relatively difficult to find decent clear glass for the camera window. “I then noticed a dummy security camera in a local hardware store which had perfect clear glass on one end, and full weather projection for the battery-powered LED system,” he says. And this worked a treat.

    Using hook-and-loop fasteners, the Camera Module could be attached to Raspberry Pi’s case which, in turn, was secured to the inner housing of the camera casing. “The weather protection proved to be great, even during the winter months, and [my] Raspberry Pi never had issues with the temperature ranges either.”

    To get as much energy as possible, the solar panel and the 12 V battery were positioned up high on a wooden frame, with the security camera device attached too.

    This wasn’t ideal. “The battery was heavy and the frame broke during a storm, so I created two separate frames: one for the solar panel with the camera unit below and another for the battery and the solar charge controller,” he says.

    Dummy security cameras can be picked up cheaply – this one cost Kaspars just $8

    Monitoring from afar

    Kaspars configured his Raspberry Pi to connect to a nearby WiFi access point via a standalone modem plugged in at his neighbour’s house by setting the access credentials in the wpa_supplicant.conf file in the root of the SD card. “The most basic time-lapse functionality was added using a simple Bash script which takes a picture from the raspistill tool at the desired time intervals and stores it on the SD card.” Connecting remotely involved setting up an external server and using the SSH tunnel, autossh. When up and running, a photo is taken every hour and it can be downloaded using SCP when connected to the same WiFi access point as Raspberry Pi. Video capture and real-time feeds can also be viewed in a browser.

    It all means Kaspars is now able to remotely log in to his Raspberry Pi and eventually see his new home come into being. There is still an element of fear, though. “The ability to connect to a Raspberry Pi which is up in a tree powered by the sun and 100 km away is a special feeling,” he says. “Every command you type in the terminal has the potential to break the WiFi connection – and the cost of each mistake is a 200 km drive to restart the device.”

  • Tweet with Morse code

    Tweet with Morse code

    Reading Time: 5 minutes

    You’ll need

    Let’s get set up

    First, select the right Raspberry Pi model for the job. Of course, we would heartily recommend a Raspberry Pi 4, but in fact this project will not be too demanding on even the oldest models, so it is great for upcycling an older Raspberry Pi computer. In fact, it will even work with the original Model A and B.

    Start by installing the latest version of Raspbian. We’ve no need for a graphical user interface, so you can use Raspbian Lite if you wish; whatever is most comfortable. We’ll be doing everything in the command line.

    Configure and update

    This project has several steps, so don’t worry if you just want to practise Morse code – we’ll get to that first. If you want to complete everything here, you’ll need to set up an internet connection (wireless or wired) and enable I2C, which is used to communicate with the LCD screen. By running sudo raspi-config from the command line, you can enable WiFi under ‘Network Options’ and I2C under ‘Interfacing Options’.

    Whatever it is that you’ve decided to do, always make sure you’ve updated the system by running sudo apt update && sudo apt upgrade. This may take some time; once complete, it’s important you reboot so that I2C is properly enabled.

    Get switched on

    Let’s try to emulate the Morse key by using a tactile switch. These widely available and inexpensive switches make a satisfying ‘click’ when pressed (hence the name). They have four pins – two pairs that are connected on the longer side, so the switching is done between those with the shorter gap. Bearing this in mind, place the switch into the breadboard so the longer edge follows the connected rows. Don’t worry if you make a mistake: nothing can be damaged. Now connect the breadboard to your Raspberry Pi’s GPIO. Run jumper leads on each side of the switch to the last two pins at the end (nearest the USB ports) of the GPIO header: GND and GPIO 21.

    Coding time

    Once you’ve checked all your connections, download the morse.py code from GitHub. The code will listen for changes to the button’s ‘state’ (whether it is pressed or not) and measure the time differences to work out whether you made a ‘dot’ or a ‘dash’. It will then convert the pattern into a letter and display it on the screen.

    First, install these dependencies (libraries that help us):

    sudo apt install python3-pip
    pip3 install gpiozero

    Then run python3 morse.py.

    Practise dots and dashes

    Using the chart below (Figure 1), see if you can spell your name out by clicking the button. Use a quick press for a ‘dot’ and a slightly longer press for a ‘dash’. Leave the button untouched for a slightly longer time to tell the code you’ve finished your letter. Once you’re happy everything is working and you’ve had some fun, CTRL+C will stop the program.

    If you’re not happy with the timings, you can adjust them to suit your ‘fist’ (the name operators give their style of keying). You can adjust the timings for a dot, dash, and interval between letters by changing the timings in the variables dot_timeout and dash_timeout at the start of the code. Don’t be afraid to experiment.

    Figure 1: The Morse code alphabet. Although it appears random, there is an underlying structure that helps you understand and memorise the patterns

    Build the LCD

    To allow us to create Morse code without the need for a full display, we’ve selected a bright, crisp and slightly-retro LCD screen from Adafruit. These popular panels normally require a lot of GPIO pins to be driven natively, but this HAT uses an input extender so that only two pins are needed. Better yet, it comes with five tactile switches on-board so we can use them for input.

    This LCD kit arrives unassembled, so it’s time to get the soldering iron out. There are excellent assembly instructions. As always, read through them before doing anything and take your time.

    Set up the display

    Once your display is assembled, you can attach it to your Raspberry Pi (make sure the latter is switched off!). Due to the close proximity of some of the resistors, cover the top of the USB ports and Ethernet port with insulation tape if they are close to the PCB of the display.

    Test the display is working by installing its Python libraries:

    sudo pip3 install adafruit-circuitpython-charlcd

    Now create a new file called lcd.py and enter the code from the listing here. Save it and run it using python3 lcd.py. The display should show your message. If it lights up but you can’t see anything, adjust the ‘Contrast’ potentiometer until the text appears.

    Version 2

    It’s time for a more advanced version of our original code, so download lcd_morse.py from GitHub. This time we’re reading input from the LCD’s on-board tactile keys, so the code needs to be a bit different. The time measurement variables are still there. Run it using python3 lcd_morse.py.

    You should be able to key away and see the interpreted letters appear on screen. You now have a functioning standalone Morse code trainer.

    Let’s tweet

    We’d like to be able to send our messages to Twitter. For security reasons, we need to create a Twitter ‘application’ which gives the code unique credentials for posting on our behalf. We’re using the python-twitter library – see the docs for an excellent tutorial on how to set it up. You will be given four strings: a consumer key, consumer secret, access token, and access token secret. Enter all the values in the equivalent variables in the first few lines of lcd_morse_twitter.py (download the code from GitHub). Now save the file.

    Tweet with Morse!

    Run python3 lcd_morse_twitter.py. As before, you can construct your message by tapping on the right-hand cursor button of the LCD display. Your message will be displayed at the top, and the current dots and dashes in the ‘buffer’ at the bottom. Made a mistake? No problem: click the left-hand cursor to delete the previous character or the ‘up’ key to delete the entire message and start again. When you’re happy, click on ‘Select’ to send. Your message will be posted to your account for all of Twitter to read.

    Add a Morse key

    Let’s take the authenticity up a notch by adding a real Morse key. These keys are nothing more than a simple on/off switch. That said, some can be surprisingly expensive as they are built using precision components to allow the operator to go faster and faster with fewer mistakes. We’ve selected a more affordable training key that has two contacts that can be directly connected. To use the existing code, solder two wires to the underneath of the rightmost tactile switch on the LCD board and connect them to the key using its screw terminals. Now you can key away using the real thing!

    If you don’t fancy the expense of buying a Morse key, you can make your own! Check out: magpi.cc/diymorsekey

    Going further

    Now you have the basics as Python code, you can repurpose your tweeting Morse key for anything you can imagine. Add a second key and create Morse code challenge games. How about Morse code hangman? Add timing in to see how many letters per minute you can key. Could two identical setups send messages to each other?

    Although initially challenging, learning Morse code is rewarding and can inspire operators to go on to the rich and fascinating world of amateur radio. Over to you.

  • Maker pHAT review

    Maker pHAT review

    Reading Time: 2 minutes

    Cytron’s Maker pHAT attempts to solve these issues and make it a lot simpler to get started with physical computing on Raspberry Pi.

    Purple PCB

    The cool-looking purple PCB has some common components already on board and connected to certain GPIO pins. Along with three small push-buttons, there’s an active buzzer and eight tiny LEDs – we were slightly disappointed that they’re all blue and not a range of colours. A nice touch is the inclusion of a fully labelled, 24-pin breakout header for connecting external components when you’re done playing with the on-board ones.

    While you can simply mount the board on your Raspberry Pi’s GPIO header – with or without the supplied 40-pin stacking header – and start coding, the pièce de résistance is the inclusion of a USB to serial module. This enables you to connect the board to a laptop and control (and power) it and Raspberry Pi remotely from there, eliminating the need for a separate monitor and keyboard.

    A comprehensive online manual explains how to install a special driver and get the serial connection working using PuTTY on Windows, though not on a Mac. For the latter, use Terminal and enter ls /dev/cu.usbserial-* to find the device number, then screen /dev/cu.usbserial-XXXXXXXX 115200 –L to log in (after pressing ENTER repeatedly). The manual includes a Python demo program, which makes use of GPIO Zero, to get you started – it even enables you to safely shut down Raspberry Pi by pressing two of the buttons together.

    Verdict

    9/10

    An inexpensive and well-designed board for physical computing newbies. We particularly like the option to control it from a USB-connected laptop.

  • Reachy

    Reachy

    Reading Time: 3 minutes

    Which part of Reachy you’ll love, however, will mostly depend on the configuration you decide to buy – assuming you have enough money, given that the prices start at €9990.

    The basic model, for instance, comes with just a torso and one arm, while ‘expressive’ adds a Johnny Five-like head. An advanced option gives Reachy an extra arm, but in each case there’s a fine heart beating inside: a Raspberry Pi 4 running the Raspbian operating system.

    Reachy Robot: Quick facts

    • Reachy is designed to be plug‑and‑play

    • It includes a microphone and speaker

    • The innards are covered by fabric

    • Google’s Coral AI accelerator is also inside

    • Only a handful are initially being made

    Ideal choice

    According to Pierre Rouanet, co-founder and CTO of Reachy creator Pollen Robotics, the decision to use Raspberry Pi 4 came after much debate. “We wanted to provide a simple and well-known setup with a supportive community that would let our users quickly understand, adapt, and modify the basic tool we were providing. Raspberry Pi has always been a very good solution for this.”

    Reachy is open-source and developers can program it using Python, which opens up the possibilities of what it can potentially do. Indeed, Pollen Robotics initially created the robot to help researchers study arm-control in humans, but it’s evolved a lot since.

    See also: Build a low-cost Robot with Raspberry Pi

    Reachy played tic-tac-toe against humans at CES 2020, running entirely on Raspberry Pi. Reachy would image-analyse the board, recognise the pawns, and use simple AI to choose what to play next. It would use higher-level control to grasp a pawn and place it

    “When we started Reachy in 2016, our former researcher colleagues had wanted to see how an amputee could easily control a prosthetic arm, and they needed something that could closely reproduce human motion and shape,” Pierre says. “But we developed new features, including using machine learning for control. We also wanted to work on its ease-of-use to extend the range of its potential users.”

    To that end, Pollen Robotics has pre-installed its own Python API and some extra tools for communicating with all the motors and sensors via USB-to-serial communication.

    “[Raspberry] Pi is actually running the whole synchronisation loop that retrieves all of the sensors values, and it publishes new commands for the effector (it runs at ~100Hz for Reachy, which is higher than most synchronisation loops in humans),” says Pierre. “On top of that, we run a higher-level application.”

    A 2GB Raspberry Pi 4 runs Raspbian and makes use of an open-source Python library

    Machine learning

    Key to the robot is its built-in artificial intelligence. “We wanted to provide high-end and efficient tools for machine learning,” Pierre continues. “Our users require lots of power to perform analysis from the sensors, such as live object recognition and tracking, voice recognition, complex trajectory generation, and so on.”

    See: Top ten AI projects

    As luck would have it, work on Reachy coincided with the arrival of the Google Coral AI accelerator and the new USB 3 ports in Raspberry Pi 4. “It was perfect timing,” says Pierre.

    “We could run all the machine learning we needed, while still providing a simple ready-to-use setup and on top of that, we don’t need to rely on a cloud service.”

    Pierre says Reachy currently shines best when it is manipulating simple objects and interacting with humans. As such, it’s primarily intended for use in food and customer service, research, and development. But Pollen Robotics envisages a lower-cost version for hobbyists at some stage which would make for a rather exciting development for the Raspberry Pi community. “This is definitely something that I would like to encourage and see emerge,” Pierre says.

  • Getting started with electronics: LEDs and switches using Raspberry Pi

    Getting started with electronics: LEDs and switches using Raspberry Pi

    Reading Time: 5 minutes

    Install the code and run Mu on Raspberry Pi

    Before fetching the code from the internet, you should run Mu, which you will find in the Programming section of your main menu. If it’s not there, update your system to the latest version of Raspbian (magpi.cc/raspbianupdate).

    Running Mu ensures that the mu_code directory is created, into which we will now copy the program code. To do this, open a Terminal window and run the commands:

    wget http://monkmakes.com/downloads/pb1.sh
    
    sh pb1.sh 

    This will copy the programs used in this tutorial into the mu_code directory, along with some other programs.

    You’ll need

    Note: These components are all included in a MonkMakes kit.

    Place the components onto a breadboard

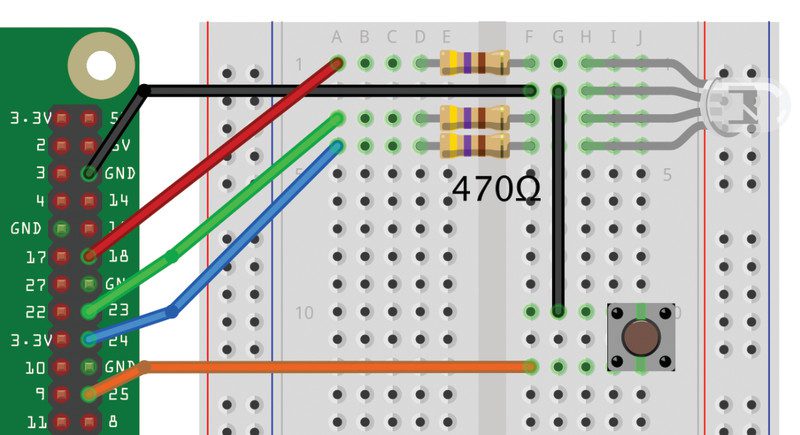
    Using Figure 1 as a reference, push the component legs into the breadboard at the positions shown. Bend the resistor legs so that they fit into the holes.

    Each hole in a row of five holes on the breadboard is connected together under the plastic. So, its very important to get the right row for your component leg.

    The resistors can go either way around, but the RGB LED must go the right way around, with its longest leg to row 2 (the one without a resistor). The push-button used in the MonkMakes kit has just two legs, but many similar buttons have four legs. If you have a four-legged version, put it on the breadboard in the orientation that leaves just one free row between the pins. You will also need to place a linking male-to-male jumper wire between rows 2 and 10.
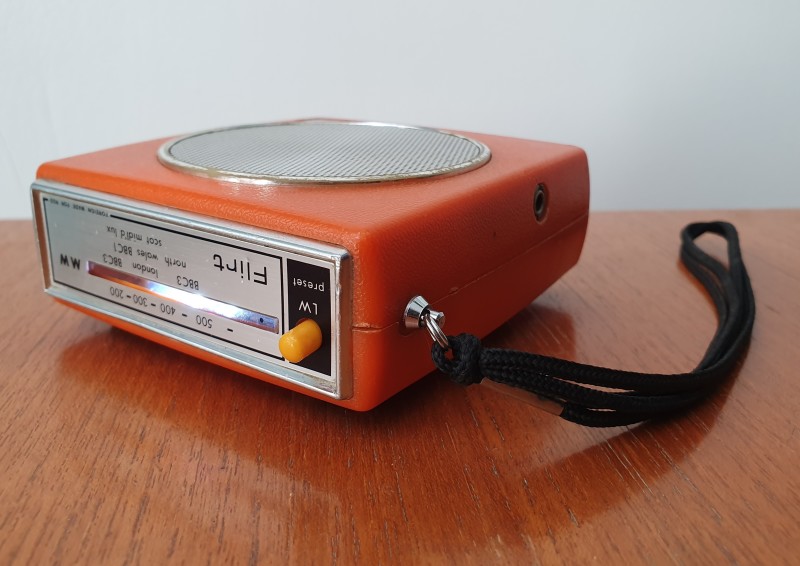
    Figure 1 The Cheerlights wiring diagram

    Connect breadboard to Raspberry Pi

    Again, using Figure 1 as a reference, connect the GPIO pins on the Raspberry Pi to the breadboard. A GPIO template will make this easier – if you don’t have one, you will need to carefully count the pin positions. It doesn’t matter what colour jumper leads you use, but if you stick to the colours used in the diagram, it’s easier to check that your wiring is correct.

    Running the program

    To use this project, your Raspberry Pi must be connected to the internet. Load and run the program 04_cheerlights.py using Mu. After a few seconds, the LED will automatically set itself to the current Cheerlights colour, checking every ten seconds. Pressing the button will turn the LED off until the Cheerlights colour changes.

    Click here to download the code

    # 04_cheerlights.py # From the code for the Box 1 kit for the Raspberry Pi by MonkMakes.com from gpiozero import Button, RGBLED from colorzero import Color import time, requests update_period = 10 # seconds led = RGBLED(red=18, green=23, blue=24) button = Button(25) cheerlights_url = "http://api.thingspeak.com/channels/1417/field/2/last.txt" old_color = None def pressed(): led.color = Color(0, 0, 0) # LED off button.when_pressed = pressed while True: try: cheerlights = requests.get(cheerlights_url) color = cheerlights.content # the color as text if color != old_color: led.color = Color(color) # the color as an object old_color = color except Exception as e: print(e) time.sleep(update_period) # don't flood the web service 

    Tweet a new colour

    Now that your Raspberry Pi is looking out for changes to the Cheerlights colour, anyone can simply send a tweet mentioning @cheerlights and the name of a colour; your LED should then change to that colour. You can test this out by sending a tweet such as ‘@cheerlights red’ and after a few seconds your LED should change colour. You will find that after a few minutes, the colour probably changes as someone else sets the Cheerlights colour.

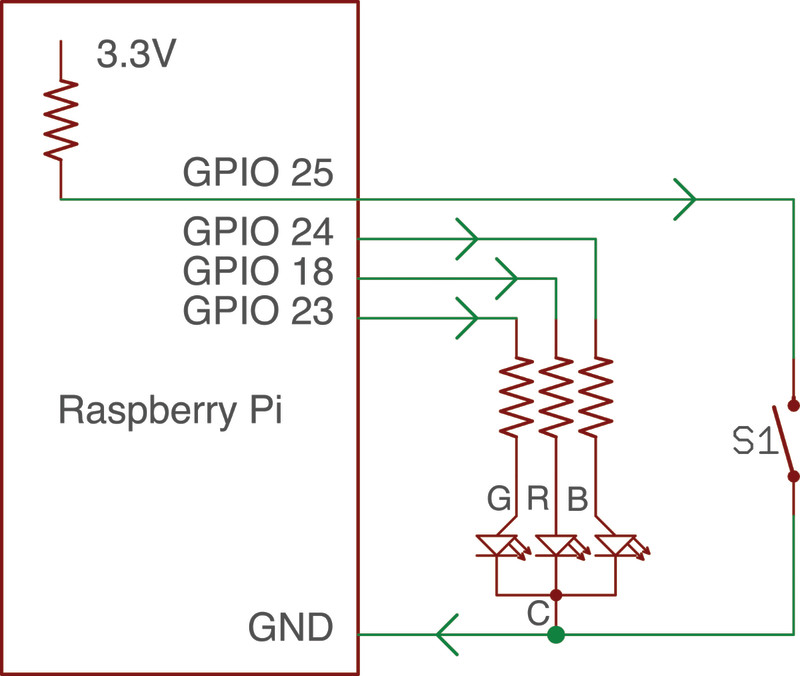
    A schematic diagram of the Cheerlights project

    1. The RGB LED is actually three LEDs in one: red, green, and blue. Changing the power going to each LED (controlled by a separate GPIO pin) changes the overall colour.

    2. GPIO 24 acts as an output. Current flows out of GPIO 24, through the resistor, through the blue LED and back to Raspberry Pi’s GND (ground connection).

    3. An LED will draw as much current as it can, so each LED needs a resistor to reduce the current, protecting the LED and/or the GPIO pin of Raspberry Pi.
    4. When the switch is pressed, it connects GPIO pin 25 (acting as an input) to GND (0V).

    5. An internal pull-up resistor keeps GPIO 25 at 3.3 V until the switch is pressed – that overrides the effect of the resistor, making GPIO 25 0 V. Without this, GPIO 25 would be a floating input liable to false triggering from electrical noise.

    First, pull the jumper leads off the GPIO pins on the Raspberry Pi and then pull all the components and wires off the breadboard so that it is ready for the next project.

    Dismantle the breadboard and place the new components

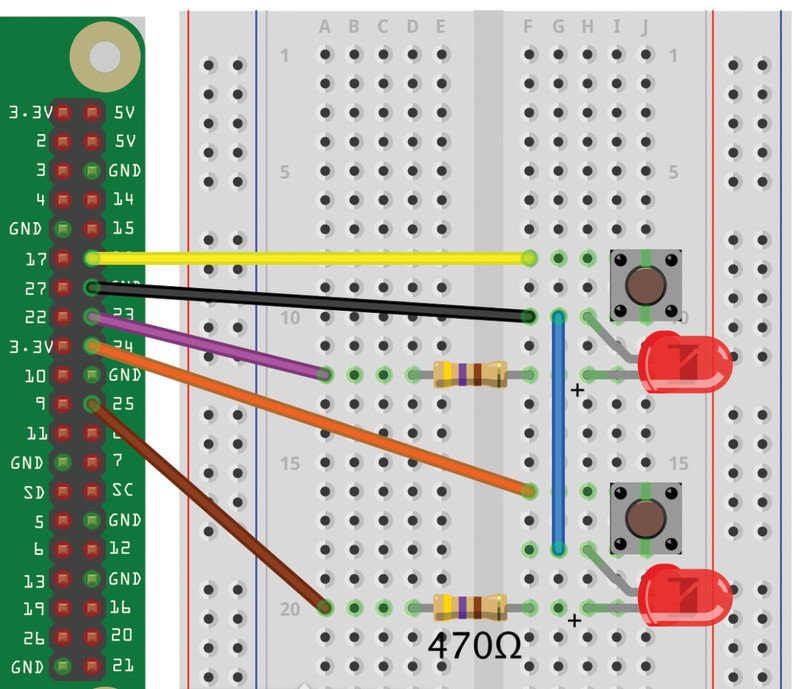
    This time, using Figure 2 as a guide, push all the component legs into the breadboard at the positions shown. It doesn’t matter which way round the resistors and buttons go, but the LEDs have a positive and negative end, so must go the correct way around. The positive end of the LED (marked ‘+’ on the diagram) is the longer leg and this should go to the same row on the breadboard as the resistor.

    Figure 2 The Reaction Timer wiring diagram

    Connect breadboard to Raspberry Pi

    Using Figure 2 as a reference, connect the GPIO pins on the Raspberry Pi to the breadboard using five female-to-male jumper wires.

    Running the program

    To use the reaction timer, load and run the program 07_reactions.py in Mu. When the program starts, you will notice that the bottom part of the Mu window shows a message telling you to ‘Press the button next to the LED that lights up’ (Figure 3).

    After a random amount of time, one of the LEDs will light, and you should press the button next to that LED as quickly as possible. You will then get a message telling you how many milliseconds you took to press the button.

    The code includes checks to make sure you don’t try to cheat by pressing both buttons at once, or pressing the buttons before an LED has lit.

    # 07_reactions.py # From the code for the Box 1 kit for the Raspberry Pi by MonkMakes.com from gpiozero import LED, Button import time, random left_led = LED(25) right_led = LED(23) left_switch = Button(24) right_switch = Button(18) # find which buttons pressed 0 means neither, -1=both, 2=right, 1=left def key_pressed(): # if button is pressed is_pressed will report false for that input if left_switch.is_pressed and right_switch.is_pressed: return -1 if not left_switch.is_pressed and not right_switch.is_pressed: return 0 if not right_switch.is_pressed and left_switch.is_pressed: return 1 if right_switch.is_pressed and not left_switch.is_pressed: return 2 while True: left_led.off() right_led.off() print( "Press the button next to the LED that lights up") delay = random.randint(3, 7) # random delay of 3 to 7 seconds led = random.randint(1, 2) # random led left=1, right=2 time.sleep(delay) if (color == 1): print("left") left_led.on() else: print("right") right_led.on() t1 = time.time() while not key_pressed(): pass t2 = time.time() if key_pressed() != led : # check the correct button was pressed print("WRONG BUTTON") else: # display the response time print("Time: " + str(int((t2 - t1) * 1000)) + " milliseconds")