Schlagwort: raspberrypi

  • PiBoy DMG review

    PiBoy DMG review

    Reading Time: 2 minutes

    Even on paper it has some interesting features – sure, it has a ton of buttons and a battery etc., but it also has an active cooling fan, an analogue joystick, and even a brightness control wheel for the screen – something very reminiscent of the contrast control on the original Game Boy.

    Usually, a lot of these kits can feel very cheap and rough, using standard 3D-printed parts for everything that can feel uncomfortable and flimsy and don’t really have the nicest aesthetic. The PiBoy feels more like the real deal: the main case is sturdy, the buttons are nice to use, and even the analogue stick has a little click-down thing. Unfortunately, like a lot of Game Boy form factor builds, the ‘shoulder’ buttons on the rear are a bit fiddly. With six face buttons, though, you’re probably set for playing any games up until the Mega Drive / SNES era.

    Pocket emulation

    Speaking of playing games, the software on the PiBoy is a slightly modified version of RetroPie, with specific Experimental Pi splash screens and branding to the startup. Thanks to this, you’re only really limited by your Raspberry Pi choice, with Raspberry Pi Zero, Raspberry Pi 3/3B+, and Raspberry Pi 4 supported.

    Because of this, the kind of games you’d be running on RetroPie systems run as smoothly as you’d expect. The LCD screen outputs at a fairly reduced resolution anyway, which reduces some of the load. With the fan on the rear of the PiBoy, we didn’t find it getting too hot with a Raspberry Pi 4 in it, although the whining of the fan is slightly unnerving for a handheld and sounds like a CD. Although you can play the PiBoy in any position you wish without scratching anything, thankfully.

    The various adapters and such for the PiBoy allow for all the output and input options of the installed Raspberry Pi to be accessible. As well as USB sticks which can be used for storage, and easy access to the microSD card, you can even plug in headphones and use a (regular size) HDMI cable to plug it into your TV. Use the available USB ports for some USB controllers and you have a very portable plug-and-play box.

    Amazingly, it also has a special Steam Link function. You’ll likely be connected to wireless LAN on the PiBoy and if you have a decent connection, it’s amazing to play some games in your hands in your own home.

    It’s a pretty fantastic piece of kit, and we think it earns its price tag. Just don’t rely on the shoulder buttons.

    Verdict

    10/10

    An incredible portable retro gaming build, this has just about everything you’d want from a Raspberry Pi-based Game Boy clone.

  • 3D printing, laser cutting, and PCB design with Raspberry Pi

    3D printing, laser cutting, and PCB design with Raspberry Pi

    Reading Time: 6 minutes

    Tim Richardson has been involved with the Raspberry Pi community from almost the start. He is part of the Pi Wars organising team and a course designer/builder, as well as writing the CamJam EduKit worksheets, CamJam organiser, and now a PCB designer.

    After seeing his first 3D printer at a Raspberry Jam back in 2014, Tim Richardson bought one. They were just starting to become affordable, albeit £600 for a ‘budget’ one back then! They are much more affordable now, as little as £150–£200 for a decent one. He has some advice for those new to or thinking about getting one.

    See also

    3D printing and making in The MagPi magazine 97

    Use a 3D printer with Raspberry Pi

    50 Raspberry Pi tips & tools

    OctoPrint

    Tim suggests that one of the best upgrades you can do is to add a Raspberry Pi computer running OctoPrint. It’s free and open-source and has been continuously developed by Gina Häußge since 2012. OctoPrint is used to control and monitor your printer, even remotely, and uses a Raspberry Pi Camera Module for creating a time-lapse video of your prints..

    OctoPrint runs on almost any Raspberry Pi computer, but you will get the best UI response from a Raspberry Pi 3 or newer.

    OctoPrint supports most consumer printers on the market, so it is likely to work with yours. Installation is a breeze! Just download OctoPi, an OS image with OctoPrint pre-installed, write it to a microSD card, boot up, connect your printer, and that’s it!

    Once you have set up OctoPrint for your printer, you can start moving the print head around (essential for bed levelling) and see the temperature of your print bed (if it is heated) and the extruder.

    During printing you can watch the temperatures, see the G-code as it is executed, and watch the progress of the print on your phone or computer.

    Tinkercad

    Tim uses Tinkercad for most of his designs; it’s simple and easy to use. He has a few tips which may help you design objects in this online tool from Autodesk.

    On starting a new design, add the ruler to the workplane. Every selected shape will show dimensions which can be edited with exact sizes. This even works for rotation.

    When designing a mount or case for something, Tim first models the item itself, simplified but accurately measured. He places solid blocks where ports or buttons need to be accessed. He then enlarges the model by 1 mm in each direction. After that, he changes the shape to be a ‘hole’ and uses it to remove material from simple blocks.

    Use the ruler tool to enable precise sizing of objects in the workplane

    Laser cutting with Raspberry Pi

    Laser cutters are the mainstay of almost all makerspaces. Tim is fortunate enough to have a large one of his own that he uses for building Pi Wars courses, but for most people the smaller cutters are more than enough, and cost around £300. Tim has a few bits of advice if you are using one for the first time.

    Laser cutters can be used for plastic, wood, and other materials. Some plastics just melt or burn, while some wood is hard to cut and you may end up breaking Rule Zero (don’t be on fire). Only buy materials designated as laser safe.

    Before cutting expensive materials, always do a test cut in cardboard first. While the thickness will usually not be right, you will be able to line up all the holes to ensure that everything fits. There is nothing more frustrating than carefully designing something only to find that it won’t fit together, or you cannot bolt your Raspberry Pi computer in place because you have forgotten about the space the cables take!

    Inkscape is a free and great tool to start with, which of course runs on Raspberry Pi. However, for some cutters the SVG files have to be exported to a different format. Dominic Morrow, from Smoke and Mirrors, recommends using Lightburn. It is commercial software, but updated regularly. It is able to connect directly to many laser cutters and control them, all in one tool. Inkscape does have some specific plug-ins which are very useful, though – especially the ‘living hinge’ tool for cutting ‘bendable’ wood and plastic.

    PCB design with Raspberry Pi

    Before Raspberry Pi, Tim knew nothing about electronics. Since Raspberry Pi, though, he has brought out three CamJam EduKits to help others learn. Tim says, “It helped that I knew nothing when writing the worksheets as I had to explain things in a way that noobs would understand.”

    He thought PCBs were something he could never do, but reading an article in HackSpace magazine gave him an idea. For Tim, the height of a Raspberry Pi Zero with micro-HAT (μHAT) was higher than he wanted; how about mounting a Raspberry Pi Zero and μHAT on the same plane?

    Designing PCBs might not be as hard as you think

    He found a μHAT template for KiCad (an open-source tool for designing PCBs) which has a single header and holes in place. With a second header, surely it was a simple case of ‘joining the dots’? Not quite – it’s advisable to connect all ground pins together. Tim had to move tracks to give space for ‘vias’ (channels that go between layers of the PCB).

    Once confident the connections were correct, it was time for manufacture. Tim searched for PCB makers, but for a simple board he didn’t want to pay much. PCBWay had an easy-to-use interface and instructions on preparing KiCad designs for manufacture.

    PCB design tips

    While waiting for the first PCB to be manufactured, Tim started designing the second. He wanted to control WS2812 LEDs (aka NeoPixels) with Raspberry Pi.

    When designing a PCB, you first have to find components that do what you want. For WS2812 LEDs, the 3.3 V from the

    GPIO pins must be increased to 5 V. The 74HCT125 chip has four ‘level shifters’ for that.
    The next task is to breadboard the circuit, and write code to control the electronics – open‑source software can help with this.

    Before designing the PCB, you have to design the schematic diagram: how each component connects to other components. It doesn’t have to be pretty, but it has to have all the right connections.

    Often, specific GPIO pins have to be used. Other pins seem to be logical on the breadboard, but when routing the tracks on the PCB you may find it is not quite as simple! “Be ready to change the design multiple times to make routing of tracks easier,” Tim advises. If you have to make any changes during the PCB design, always go back and rework the breadboard.
    Eventually Tim got a PCB that looked like it would work. He showed the design to some friends – an invaluable part of designing a PCB. For Tim, they suggested he should break out unused pins and add a button for turning Raspberry Pi off.

    After a redesign, Tim asked a PCB expert to check it. They came back with lots of advice.
    Firstly, protect the Raspberry Pi computer from powering the LEDs. It cannot supply much current, so a Schottky diode between the PCB’s power input and Raspberry Pi will stop that.
    There were ‘unsightly gaps’ on the PCB; the ground plain did not flow into spaces where tracks were too close. They also advised capacitors to help smooth power supply fluctuations, as well as button ‘bounce’ for the off button.

    Always breadboard your circuits

    Tim says, “Designing PCBs takes multiple iterations, especially if it is your first. Even experts don’t get it right the first time.”

    He ordered this second PCB from PCBWay and, with the express service, had the new boards within a week! However, as often happens, things were not perfect. Tim had placed the silk screen (printing) over components on the bottom of the board. A simple cosmetic mistake, fortunately.

    “I soldered the first PCB and… it didn’t work,” he recalls. “Raspberry Pi Zero did not boot.”He tested the supply and then, with a multimeter, worked through the PCB. The barrel jack had power, but the ground was the wrong leg! The ‘footprint’ Tim used was not the same as the physical jack.

    Fortunately, the fix was simple: soldering a wire between the ground and mounting pins was all that was needed. The rest worked perfectly!

  • Build a portable computer in The MagPi magazine #98

    Build a portable computer in The MagPi magazine #98

    Reading Time: 2 minutes

    Haunted House Hacks

    It’s the most wonderful time of the year. (Or the second most wonderful, depending on which The MagPi team member you talk to.) Get ready for Halloween and bonfire night with Rob’s collection of terror-ific projects. Haunt your house and make it a Halloween to remember.

    Haunted House

    Play classic games legally with Raspberry Pi

    Playing retro games and building retro consoles is a fun project, and we’re constantly on the lookout for better ways to play games. KG Orphanides is our retro expert and this month KG looks into ways to legally play classic Sega games, alongside new games for retro machines.

    Play classic console games legally on Raspberry Pi

    DIY Score Counter

    We’re endlessly impressed by how Raspberry Pi makers build incredible things with the world’s best computer. DIY Score Counter is a scoreboard that can be used to keep score in any kind of game. Built by the maker to rate beers in a head-to-head contest, the project can be used for any sport.

    DIY Score Counter

    CubeSat

    Raspberry Pi Compute Module is the amazing industrial computer behind a technical revolution. The CubeSat project builds a dual-redundant computer for space exploration using two Compute Modules.

    CubeSat

    PiBoy DMG review

    We’ve tested many fine gaming kits here at The MagPi. And this PiBoy DMG has Rob excited with its combination of analogue and digital controls, screen adjustment, high-quality finish, and excellent design. The perfect retro gaming kit? Certainly the highest rated so far.

    PiBoy DMG review

  • Win one of three M.A.R.S. Rover robot kits!

    Win one of three M.A.R.S. Rover robot kits!

    Reading Time: < 1 minute

    Sponsored! Add AI to your project & pi3g will supply the kit

    about 22 hours ago.

    Sponsored! Tell us what you’d like to make! Then pi3g will send five makers an AIY Voice Kit v2, AIY Vision Kit, or Coral USB Accelerator. Plus! Your project can appear in The MagPi

  • RadioGlobe

    RadioGlobe

    Reading Time: 3 minutes

    “It’s a globe which you spin to search web radio stations,” creator Jude Pullen summarises. “It’s really simple to use (even my four-year-old son gets it!), but the tech inside is pretty clever to make it work. It has a very special component called a rotary encoder, which has the ability to know the position of a rotating axis (in this case the longitude and latitude) to an accuracy of 0.3 degrees. It means we can navigate to all the major cities in the world and listen to their local stations.”

    Bringing radio to life

    The idea for the project arose through a combination of concepts that were on Jude’s mind at once. “I think I’d been reading books about space travel, and the emergence of communications while working on a Channel 4 show called David Jason’s Great British Inventions,” he says. “My job was to build a replica of the Bell telephone (using some scrap wood, piping, wires, tracing paper, and vinegar!), and it kinda blew my mind to consider the advent of this technology in the world. This led me to explore a lot of technology we take for granted, like radio. I was discussing this with a friend who then mentioned a website called RadioGarden which allows you to look up all radio stations on Google Earth. It’s a clever mash-up of two powerful technologies, and I guess my ‘build’ on this was to make it physical.”

    Just a few of the tools and items you need to build such a device

    Proof is in the concept

    The world is a big place – Jude tells us there are 44,000 radio stations around the world, and not all of them have great broadcast quality. For what he’s managed to achieve, he seems pretty happy, though.

    “There is a phrase in design called ‘proof of concept’ or in code it’s sometimes called ‘minimum viable product’,” he notes. “RadioGlobe is that in terms of its physical design (3D-printed) and code (V1.0 on GitHub). It works really well in that most of the 2000-odd radio stations do play, but yes there are bugs – in that some radio station links are in countries where broadcast is not perfect, so this can ‘trip up’ the code, and it stops playing.”
    Jude has some updates in the works for the RadioGlobe, some of which sound fairly obvious and genuinely useful, such as a recall function for favourites in case you stumble upon a K-pop station you really like, as well as a Shazam button to identify the latest Austrian hit.

    “This is possible because the project is open source, and the code can be contributed to be total strangers from around the world,” Jude explains. “I love the poetic-loop of this! And this has very much been the best of my experience in working with exciting companies like DesignSpark and Raspberry Pi who have championed new ideas that literally might come from anyone, anywhere in the world. Perhaps we’ll have RadioUniverse one day! I joke, but of course RadioGlobe would have seemed crazy 100 years ago too.”

    Self-proclaimed ‘prototyping expert’ and ‘technologist’ with an impressive resume of work designing concepts for Dyson, Sugru, Lego, DesignSpark, and even TV.

  • Retro TV MakeCode Arcade Machine

    Retro TV MakeCode Arcade Machine

    Reading Time: 3 minutes

    “I wanted to make a physical arcade machine with an Adafruit Metro M4,” he recalls. “However, [Microsoft MakeCode] does not have a firmware for this exact board… I didn’t know how to do soldering back then, so I didn’t pick ItsyBitsy or Feather M4.” Adafruit projects are almost unheard of in Taiwan, where Alan lives.

    Based in Taiwan, Alan is a former book translator and currently a junior editor in a local programming book publisher. He makes stuff like the Retro TV MakeCode Arcade Machine as a hobby.

    “Later I found out there’s a firmware for Raspberry Pi Zero, which I happened to have one [of]. Compared to microcontrollers, the firmware for Raspberry Pi Zero is surprisingly easy to install.” Add in a small HDMI LCD screen, some cables, and a button module for game controls, and Alan was nearly there.

    Hidden inside the case, a Raspberry Pi Zero powers the project

    Tiny controls

    Not too complicated to put together, Alan explains that once the MakeCode Arcade firmware is loaded, Raspberry Pi Zero will boot to the Arcade system. “Quick and easy. Buttons need to be connected to Raspberry Pi Zero.” For this, he connected a button module with a tiny joystick, adding an extra push-button. “I wish I knew how to make stuff with 3D printing or laser cutting, otherwise I would make my own arcade controller too.”

    It proved a very quick make for Alan. He says most of the time spent was in trying to fit the Raspberry Pi Zero and LCD into the tiny vintage-TV-style wooden housing, and the only coding required involved modifying the config.txt file in the Raspberry Pi firmware to make the LCD screen work.

    A 4-inch LCD is connected via HDMI, but enlarged by the magnifying plate

    Screen magnifier

    The physical appearance of the mini machine was important in order to really capture that crucial retro feel, so Alan chose to house the inner workings inside a WOODSUM 3D Puzzle Smartphone TV. Originally designed for use with smartphones, this case magnifies the screen for watching videos and so on.

    Alan immediately recognised the possibilities, as he shares: “Since small HDMI LCDs for Raspberry Pi [computers] are more or less the same size as smartphone screens, in theory I can use them in the TV box as well, right?”

    What’s more, the effect achieved using this particular case added to the vintage feel. “The magnifying plate of the TV box would enlarge and slightly distort the LCD. It would look a bit like an old cathode-ray tube TV,” explains Alan.

    Now, you may be wondering how easy it is to play games on such a tiny screen, but Alan says he’s found it pretty simple. “MakeCode Arcade is designed for devices with 160×120 TFT displays, which are smaller than my 800×480 LCD. And the magnifying plate makes it look like four times bigger.”

    All in all, Alan has found his make very reliable so far, although he says some games downloaded from the MakeCode Arcade website may crash it: “It’s software compatibility issues I guess; I can avoid them if I am writing and testing my own games.” And, surely a lot of the fun is in writing and testing your own games – why not give it a go?

    The button module is quite tiny, but Alan says it’s fine for playing games

  • Retro gaming NES frame

    Retro gaming NES frame

    Reading Time: 3 minutes

    Today, pixel art invokes pangs of nostalgia and it has evolved into a much-loved digital aesthetic in its own right. Ashley Green is certainly a huge fan, which is why he sought a quirky way of displaying his favourite pixel art, hitting on an idea that also paid homage to the past.

    “I’m the proud owner of a few Raspberry Pi computers and I’m always looking for new and interesting ways of using them, with retro gaming being the main driver,” he says. “Having previously used Raspberry Pi 3 in a mini-replica NES case, I always thought something was missing: the classic NES cartridge itself. There’s something extremely satisfying about handling physical media that you don’t quite get with emulation.”

    The project uses a 3.5-inch 320×480 LCD HDMI screen to display the retro footage

    Playing with power

    Rather than amass a large collection of cartridges – “I didn’t want to break the bank or shelves with stacks of old games” – Ashley felt that a single cart could be used to showcase the style of art he loves. 

    Inspired by a project that turned an NES case into a full handheld system complete with screen and controller, he decided to turn a cartridge into an art frame which could then be placed in his study as a constant reminder of the past. 

    “I thought it would allow me to appreciate the time and effort that went into the artwork and give me a little preview of classic NES games,” he reveals.

    Be careful: the case will need to be cut. Ashley has also used black vinyl for a finishing touch

    Let’s-a-go!

    Grabbing a Raspberry Pi Zero W and a 3.5-inch screen that he was using for another project, he got to work. “Not wanting to destroy an original cart, I searched online and found a new blank cartridge shell. All I then needed was the USB and HDMI cables as well as a slim battery pack.”

    Since the screen is placed in the area usually reserved for the cartridge label, the build required some cutting into the plastic. Most of the project, however, involved setting up the software, with Ashley using the cloud-based digital signage app Yodeck. This allowed him to create, schedule, and upload videos and images from his computer or smartphone, although he says OXMPlayer would work well for offline creations.

    “I found the best process was to upload media and create a playlist that I could place on a layout that suited the screen,” he says. “I’ve chosen to use mine to show a mix of artwork, game footage and classic NES commercials, but I’ve also used it to show off an action RPG called Induction Quest, which I created in Unity. It certainly makes for a great conversation piece – I’ve had a few people ask me what it is during my work video calls.”

  • Atomic TV

    Atomic TV

    Reading Time: 3 minutes

    Maker Ryan Cochran’s project evokes such memories of the past. “I have a passion for vintage modern design and early NASA aesthetics and I wanted to make something which would merge the two into an art piece that could fit on my shelf,” he recalls. “The first thing I could think of was a small television.” And so the idea for the Atomic TV came into being.

    Atomic TV: Made of wood

    Made of wood and using spare tech parts left over from a couple of past projects, it’s a television that’s as compelling to look at when it’s turned off as when it’s playing videos on a loop. “My main concern was fit and finish,” he says. “I didn’t want this thing to look amateurish at all. I wanted it to look like a professionally built prototype from 1968.”

    Raspberry Pi 4 sits neatly inside the project’s bespoke housing, secured using 3mm standoffs

    Before he began planning the look of the project, Ryan wanted to make sure everything would connect. “The parts sort of drove the direction of the project so the first thing I did was mock everything up without a cabinet to make sure everything worked together,” he says.

    This posed some problems. “The display is 12 volts and I would have preferred to simplify things by using one of the 5 volts displays on the market, but I had what I had so I figured a way to make it work,” Ryan explains, discovering the existence a dual 5V-12V power supply.

    Powered by Raspberry Pi 4

    With a Raspberry Pi 4 computer, the LCD display, a driver board, and a pair of USB speakers borrowed from his son all firmly in hand, he worked on a way of controlling the volume and connected everything up.

    “Power comes in and goes to an on/off switch,” he begins. “From there it goes to the dual voltage power supply with the 12V running the display and the 5V running Raspberry Pi 4 and the small amp for the speakers. Raspberry Pi runs Adafruit’s Video Looper script and pulls videos from a USB thumb drive. It’s really simply and there are no physical controls other than on/off switch and volume.”

    The bulk of the work came with the making of the project’s housing. “I wanted to nod the cap to Tom Sachs, an artist who does a lot of work I admire and my main concern was fit and finish,” Ryan reveals. 

    The speakers are plugged into the USB port and sound is drawn via the 3.5mm jack

    He filmed the process from start to end, showing the intricate work involved, including a base created from a cake stand and a red-and-white panel for the controls. To ensure the components wouldn’t overheat, a fan was also included.

    “The television runs 24/7 and it spends 99 percent of its time on mute,” says Ryan. “It’s literally just moving art that sits on my shelf playing my favourite films and video clips and, every now and then, I’ll look over, notice a scene I love, and turn up the volume to watch for a few minutes. It’s a great way to relax your brain and escape reality every now and then.”

  • Black Lives Matter projection

    Black Lives Matter projection

    Reading Time: 3 minutes

    Historical significance

    Kareem explains: “The idea was to display a juxtaposition of peaceful protestors with violent, oppressive police and elevating the names of Black people who have been killed by police in America.” Having had the germ of an idea for such a project, New York-based Kareem tweeted asking for someone to help him make it happen. Minnesotan David, who he’d worked with a decade previously, responded. The two worked remotely until the time came to install their project at its location.

    David suggested making use of Raspberry Pi. He describes it as his “go-to for small projects and display dashboards” at the gyms he administers, rather than politically charged public statements. “I’ve never done anything outside the realm of the strictly practical, so this was a cool opportunity to be a part of,” he says.

    Raspberry Pi Zero’s low cost appealed partly because the setup might get confiscated or destroyed

    Due to the nature of the project, there was always a risk that “the setup could get confiscated or destroyed,” says David. “So it was a huge advantage to have hardware that was cheap enough to be practically disposable.”

    Kareem is also a newcomer to public art displays, though he did help produce a projection mapping project for The Museum of Pizza in New York!

    For the Black Lives Matter projection, Kareem says: “We wanted to do something that would shock people a little bit, make them uncomfortable, and take advantage of this period of calm that was happening at night-time due to politicians successfully suppressing protests.” They worked with producer Hayley Pappas, creative director Smiley Stevens, and editor Khalil Anderson in Los Angeles to produce the first set of images and videos. Subsequent sets of content for the display were suggested by the local community in Minneapolis, as well as including transcribed speeches by Malcom X, James Baldwin, and leaders.

    Long-distance protest piece

    Minnesota-based David already had all the parts the project required. “I chose the non-wireless Raspberry Pi Zero specifically so there were no remote attack vectors possible. It’s more than powerful enough to play the content with no issue.”

    He built a small tiltable platform for the projector from wood scraps in his garage. The setup runs off a small generator, so it’s mobile and not dependent on a power outlet.

    Because it’s a public performance, it was important that the projection autoplays in a loop, with nothing to interrupt the Black Lives Matter message

    The software side worked perfectly from the first go, he says. The advice of other Raspberry Pi and commodity hardware users “cannot be overstated” says David, who admits he’s not the most talented coder or software engineer.

    Any tweaking needed was to get the optimum projection location so it covered the entire Gold Medal Flour building. “The site is historic, iconic, and massive. It’s also central to Minneapolis and can be seen from different parts of the city,” explains Kareem. With protests in cities across the US resulting in government imposed 10pm curfews, their projection was a risk.

    Responses to the projection were immediate and very enthusiastic. “We’re very happy with how the idea has been received and hope that our project has inspired others,” says Kareem. “We’d love to see others replicate the idea, especially with permanent installations!”

    Warning! Public Projection

    Be mindful of local laws regarding public screening in your area. Seek permission from the owner of the wall or projection surface, or provide your own screen. Adhere to public safety regulations. And be mindful of broadcasting regulations in your area. You need a ‘non-theatrical’ film licence to show films and TV programmes in public in the UK.

    Projection law

    Showing films in public

    Film licenses

  • Make a Raspberry Pi audio player with Mopidy Music

    Make a Raspberry Pi audio player with Mopidy Music

    Reading Time: 6 minutes

    Expand your local library collection

    Let’s start by looking again at our local collection. Storing music locally allows you reliable playback and complete control over how your music is organised. The downside is storage costs, so before embarking on ripping all your CDs, have a think about how you want to store them. Last month we discussed using abcde (A Better CD Encoder) to rip to FLAC, which produces large files with no quality loss. You can also consider using Ogg Vorbis. This open-source codec does involve quality loss, but produces much smaller files, and there’s every chance you won’t be able to tell the difference. To rip a CD to Ogg Vorbis:

    abcde -o ogg
    

    Warning! Where you live may or may not allow the copying of data from a CD. Check here for more info.

    Tag, you’re it

    Many CD rippers, abcde included, will use online services to find information about your CD and automatically name files after the artist, album, and track name. They will also record that information inside the file itself so servers like Mopidy can display details about what’s playing. This is called tagging. Unfortunately, the online services don’t always get it right, so if you find a tag is misnamed or contains mistakes, you can use Kid3 to set the tags yourself. To install from the command line:

    sudo apt install kid3
    

    This desktop app provides easy bulk retagging of files and can even import artwork.
    Figuring configuring

    In the following steps, we’ll be setting up a number of online services to interface directly with your Mopidy installation. In many cases, you’ll need to make changes to the Mopidy config file, so it’s worth explaining how it’s formatted. Each extension is named ‘Mopidy-Extension’. In the config file located at /etc/mopidy/mopidy.conf, Extension becomes [extension] and any relevant options go underneath that line in the form ‘key = value’. For example:

    [local]
    media_dir = /home/pi/Music

    We’ve provided an example config file to help make sure things are properly set up.

    Add Spotify to your Raspberry Pi audio streaming system

    Now your local collection is set up, let’s move on to the first of our extensions. Spotify is an amazing collection of music. Wouldn’t it be great to be able to access not only Spotify’s archive but also your playlists and tagged artists? If you’ve got a Spotify Premium account, you can do just that. Start by installing the extension from the command line:

    sudo apt install mopidy-spotify
    

    We now need to authorise Mopidy to use your account by visiting magpi.cc/mpdyspotify. Once you’re authorised, a config file will be displayed. Cut and paste this into /etc/mopidy/mopidy.conf and add your Spotify username and password. See the code listing overleaf for an example.

    Now restart Mopidy:

    sudo systemctl restart mopidy
    

    Go back to Iris and the world of Spotify is literally at your fingertips.

    Add audio services, like Spotify, SomaFM, and YouTube for a fully-fledged modern music system

    Radio waves with TuneIn and RadioNet

    How about adding radio stations to your Mopidy setup? There is easy and free access to thousands of radio stations streaming across the planet, catering for all interests. We have the option of two extensions for playing radio: TuneIn and RadioNet. The TuneIn extension provides access not only to live stations, but also historical recordings and is more suited to the curious browser rather that just getting to your favourite station. RadioNet is a simpler but easier-to-navigate service that allows you to create a list of favourite stations. To install:

    sudo apt install mopidy-tunein
    sudo pip3 install Mopidy-RadioNet
    sudo systemctl restart mopidy
    

    Playing podcasts

    If you prefer your radio programmes ‘on demand’, you’re probably a fan of podcasts. You’ve got two options for listening to your favourite shows on Mopidy. If you like to subscribe direct to podcast RSS feeds, then it’s as easy as this:

    sudo pip3 install Mopidy-Podcast
    sudo systemctl restart mopidy
    

    To use it, you need to point to an OPML file (a list of podcast locations), as shown in the listing. Most podcast clients can generate this for you. If you prefer to browse a huge catalogue of programming, then additionally install the iTunes plug-in:

    sudo pip3 install Mopidy-Podcast-iTunes
    sudo systemctl restart mopidy
    

    Now you can use Browse to find your favourite show and listen on demand.

    Listen to all your favourite podcasts directly from Mopidy and discover new shows with the iTunes Podcast catalogue

    SomaFM

    SomaFM was one of the early pioneers of internet audio streaming. Working through a donations model, it has expanded to over 30 channels, all with the theme of ambience but covering different genres from electronica to jazz. Often SomaFM makes for perfect background music. To add SomaFM to Mopidy (you’ve probably spotted a pattern emerging by now):

    sudo pip3 install Mopidy-SomaFM
    sudo systemctl restart mopidy
    

    SoundCloud

    SoundCloud is an excellent online showcase of music and other forms of audio. As well as providing a way for bands to sell direct to their fans, it’s a platform for new and upcoming material from unsigned musicians. You can browse SoundCloud’s vast collection from Mopidy, but as with Spotify, you need to have an account (it’s free to join) and authorise your installation.

    First, visit mopidy.com/ext/soundcloud and follow the instructions to authorise Mopidy. Copy and paste the resulting config file, and add it to /etc/mopidy/mopidy.conf. Now install the SoundCloud extension:

    sudo pip3 install Mopidy-SoundCloud
    sudo systemctl restart mopidy

    YouTube

    The ubiquitous YouTube contains countless hours of audio-specific content. Either listen to one of the many audio recordings uploaded or just the soundtrack of a favourite video. Again, the standard installation pattern applies:

    sudo pip3 install Mopidy-YouTube
    sudo systemctl restart mopidy
    

    One difference with this extension is the need to specifically enable it in /etc/mopidy/mopidy.conf. Make sure this is in the file or YouTube files will not appear in search results:

    [youtube]
    enabled = true
    

    Digging through the archives

    The Internet Archive (archive.org) is one of the crowning achievements of the internet. This vast resource aims to preserve anything that can be expressed in digital form. Unsurprisingly, its audio collection is vast, containing thousands of hours or public domain recordings, from vintage music to public speeches, documentaries, and a massive catalogue of Grateful Dead recordings! You can access all of these from your Mopidy system:

    sudo pip3 install Mopidy-InternetArchive
    sudo systemctl restart mopidy
    

    We recommend using the ‘Browse’ feature of Iris to navigate this resource. Search results can be overwhelming!

    Party time, excellent!

    You now have access to a mind-boggling array of music and audio. Time to celebrate. We’ve been using Iris as our interface to Mopidy, but in fact you can install different interfaces and even run them concurrently. If you’re having a few friends around, Mopidy-Party allows you to safely give everyone access to your music collection from their phones and add their picks to a playback queue. Now, who put Showaddywaddy on?

    Make your own

    Something missing from your collection? Is there no access to the latest and greatest streaming service? If you’re handy with a bit of Python coding, then you’re free to make your own Mopidy extensions and share them with users all over the world. Not only have the Mopidy developers provided detailed documentation, they have also provided a ‘cookiecutter’ project at magpi.cc/mpdycookie which will get you up and running in no time. Contributions to improve existing extensions are also welcomed.

    Click here to download the full code

    [http]
    # Make sure the web interface can be accessed by the local network
    hostname = 0.0.0.0 
    # Direct audio to the DAC, not HDMI
    output = alsasink # The File extension isn't of much use, so we can disable it
    [file]
    enabled = false # If enabled, this adds support for M3U playlists
    [m3u]
    enabled = false # Location of local music
    [local]
    media_dir = /home/pi/Music # Replace with the information given when you authorise
    # then add in you Spotify username and password
    [spotify]
    username = <Spotify username>
    password = <Spotify password>
    client_id = <Client ID>
    client_secret = <Client secret> # Getting to many results in TuneIn? Add this so you only get stations.
    [tunein]
    filter = station # Once authorised, add the provided token here
    [soundcloud]
    auth_token = <Auth token> # Most extensions are enabled by default. You must explicitly enable YouTube.
    [youtube]
    enabled = true
  • OpenFlexure Microscope

    OpenFlexure Microscope

    Reading Time: 3 minutes

    Dr Richard Bowman is spearheading the creation of an open-source, 3D-printed microscope that’s able to be adapted for use in labs, schools, and the home. He was inspired by his time as a Research Fellow in the NanoPhotonics Centre at the University of Cambridge, where an early attempt at such a project was falling short because most of the mechanism was based on linear bearings and metal rods.

    “The bulk of the components weren’t printable and I became curious as to how much of a microscope’s mechanism you could print,” he says. “My first version had basic focus control and an extension tube for a Raspberry Pi Camera Module to turn the stock webcam lens into a basic, but functional, microscope objective lens.” The aim is to create an easily replicable scientific instrument.

    The microscope uses three screws for fine control so that the sample can be moved along the X and Y axes and focused by moving on the Z axis. The microscope uses plastic flexures to ensure motion is free from friction and vibration; the condenser mount at the top houses a condenser lens and illumination LED

    Time to focus

    Initially, Richard sought an ideal way of moving a sample around and picking a region to view. Rather than use sliding rails which require precise machining to be smooth, the eventual design was based on the flexibility of plastic: samples are placed on a table with bendable legs that allow for controlled focus and movement on the X and Y axes.

    “It uses some fairly simple geometry to convert flexible hinges into linear motion,” explains Dr Joel Collins, who later joined the project at its home at the University of Bath. “It also means we can achieve really fine sample manipulation of tens of nanometres, for orders of magnitude cheaper than most commercial microscopes.”

    Unlike traditional microscopes, the project uses an upside-down design. The camera is at the base and the viewing lens is above with the light source at the top. It makes the microscope more stable. “You can arrange things so the sample is consistently close to being in focus when you place it on the microscope’s stage, which is nice,” Richard says.

    Such work has helped to keep costs down. As a consequence, a student group that became WaterScope saw its potential for cheaply identifying early-stage bacterial contamination in water. Another student project demonstrated how it could be produced in Tanzania by STICLab. This led to a study which found the microscope could be used for malaria diagnosis.

    Funding from the Royal Academy of Engineering and the Royal Society is being used to develop educational materials to enable the microscope to be used in schools

    Lighting the way

    In creating the project, Richard’s team has benefited from Raspberry Pi’s bustling community. “There are great libraries for interacting with physical hardware, such as picamera and GPIO Zero,” says Joel.

    “We created an HTTP API in Python and a graphical client in JavaScript that are both served by a Raspberry Pi,” he continues. “Since we have a full, powerful Linux machine in the microscope, we have many new ways to interact with the software.”

    It’s possible to create an offline, standalone microscope with a fully featured interface. “If you connect it directly to your laptop via Ethernet, you can control it ‘headless’ like that, or you could have a fleet of microscopes connected to a LAN, and our software will discover all the nearby microscopes and let you control them all from a single machine,” reveals Joel.

    There no doubting its impact. OpenFlexure Microscopes have been recorded on every continent, including Antarctica. The biggest challenge, however, is documentation and communication. Richard says: “Building a piece of hardware is more involved than installing pre-built software and I have a new respect for anyone who works at IKEA – their instructions must have been so carefully tested and optimised.”

  • Preston Raspberry Jam 100: Alan O’Donohoe interview

    Preston Raspberry Jam 100: Alan O’Donohoe interview

    Reading Time: 3 minutes

    Is there a particular flavour to activities at a Preston Jam?

    The activities include workshops, hands-on sessions, support, talks, project demonstrations, discussions about new hardware and software, and something that one of our regulars Simon calls a ‘gather round’ where people gather round a table to learn more about something. In the early days, most projects had a very strong link to the Raspberry Pi computer, but less so nowadays. In recent years there has been more emphasis on low-cost and affordable technologies like micro:bit, Arduino, and Linux. We regularly have children lead workshops, or present lightning talks on a project they’ve been working on.

    What are some of the challenges running an event like this for so long?

    When we first started, we’d never expected that it would run every month for eight years or more. I think we were all amazed, to be honest, how many people would turn up month after month after month. We’ve had to move and adapt with the times and to suit younger audiences and changing interests. In the early days, people used to bring along a Raspberry Pi computer with them, asking for help to set it up, or to show us something they had done with it.

    2014: A young Josh Lowe presents at the Raspberry Jam – he’d go on to make EduBlocks

    How have attendees changed over the last eight years?

    If you look at the photos of our first Jams, you’ll see it was mostly adults with only a handful of children. After some parents suggested we start the Jam events earlier in the evening, we noticed more families attending. We tried some Saturday morning Jams in 2012, but we found these difficult to sustain as we had lots of children and very few adults able to support the activities. We have some people who only attend once or twice a year, and others who attend every month without fail.

    What was the 100th Jam like in these odd times?

    About a year ago we started talking about what we should do for our 100th Jam celebration, but our plans had to change when social distancing restrictions were introduced. Instead we invited [a group of] people who have been on our #RJam journey right from the start to join us for a series of panel discussions in an online jam. That was Martin [Bateman, Senior Lecturer, Computing, UCLan]’s idea and it worked an absolute treat. Since March we’ve been holding all our #RJam events online. We increased the frequency to two Jams a month, one with lightning talks and another with workshops. It’s been incredible to see how our numbers have grown rapidly to about 100 every month as enthusiasts have joined us from areas way beyond Preston. We’ve had many attendees join us from Scotland that have long wanted to attend our Jams, but can now take an active part online.

    2020: The Centenary Raspberry Jam had a huge number of guests from around the Raspberry Pi community

  • Strictly legal game emulation with Innoextract and GOG

    Strictly legal game emulation with Innoextract and GOG

    Reading Time: 6 minutes

    You’ll need

    Build innoextract

    We’re going to build innoextract from source as, at time of writing, the main Raspberry OS repo has an older version.

    sudo apt install build-essential cmake libboost-all-dev liblzma-dev
    wget https://constexpr.org/innoextract/files/innoextract-1.8.tar.gz
    tar xzf innoextract-1.8.tar.gz
    cd innoextract-1.8
    mkdir -p build && cd build
    cmake ..
    make
    sudo make install

    Version check

    If your copy of innoextract is older than the file you’re trying to extract, then the process may fail. At the Terminal, type:

    innoextract -v

    This will give you the version number and which Inno Setup files it can handle.

    To confirm that you’re using the current version, go to the innoextract website to confirm what that is. If there’s any disparity, download the latest source code and follow the instructions above.

    Get a game

    If you don’t already have a GOG account, visit login.gog.com/register to create one. You’ll have to be 16 or over. If you’ve got an account, log in and move on.

    To make sure innoextract works, we’re going to start by downloading one of the free retro games available on GOG. Go to GOG to see a list of all the freebies on the service.

    You’ll probably want to grab all of these, but for now select Jill of the Jungle: The Complete Trilogy, click on the shopping cart icon towards the top right of the screen, and check out for zero pounds.

    Eye of the Beholder is a classic dungeon crawler, but remember to make a map to avoid getting lost in the sewers of Waterdeep

    Download a game

    Go to your games library and click on – or, if you’ve got lots of games in there, search for – ‘Jill’. On the download screen, make sure System is shown as Windows and ignore the prominent download button (that’s for GOG’s Galaxy manager).

    Instead, click on the heading further down that says ‘download offline backup game installers’ to open up the file list. Now click on the line below it that says ‘Jill of the Jungle: The Complete Trilogy’. While you’re here, download the manual from the link towards the right of the download screen.

    Extract a game

    In a Terminal window, enter:

    mkdir -p Games/{Jill,}
    cd Downloads
    cp setup_jill_of_the_jungle_1.0_cs_\(28162\).exe /home/pi/Games/Jill/
    cd /home/pi/Games/Jill
    innoextract setup_jill_of_the_jungle_1.0_cs_\(28162\).exe
    

    The version number of this file could change, so it’s easiest to just type setup_jill and press TAB to autocomplete the command when calling upon it.

    Play a game

    If you’ve not already installed DOSBox (or DOSBox-X) during one of our previous tutorials, you’ll need it for this, so:

    apt install dosbox

    Once your DOS emulator is installed, type:

    dosbox jill1.exe

    Jill of the Jungle is a classic platformer from an era when shareware ruled the genre on MS-DOS. If you have a USB controller plugged in, press C on the initial setup screen to configure it – it’s a bit easier to get used to than arrow keys if you’re a regular WASD user.

    The extraction process is the same for any of GOG’s Inno Setup packaged games, which includes most of their DOS era titles. If you’re working with games for Windows 95 through ME, such as Diablo, then you may need to follow our Windows 98 emulation feature. However, many now work smoothly with the ScummVM emulator, which runs natively on Raspberry Pi OS.

    A hive of Scumm and villainy

    If you want to play some games, rather than accurately emulating a full operating system, ScummVM, originally developed to play LucasArts point-and-click adventures such as The Secret of Monkey Island, is an outstanding tool with massive scope. Over the years, it’s expanded to emulate virtually every graphical adventure game out there, and the latest versions even support classic RPGs and text adventures.

    ScummVM was originally designed to run LucasArts/LucasFilm Games releases, such as Sam & Max Hit the Road

    At the time of writing, ScummVM is at version 2.1.1, and we strongly recommend always using the latest version to ensure the widest possible support for newly added games. The current version available in Raspberry Pi OS’s repositories is 2.0.0, which lacks some of the cooler features of its successor.

    So let’s head to the Terminal for a source install:

    wget https://www.scummvm.org/frs/scummvm/2.1.1/scummvm-2.1.1.tar.gz
    tar xzf scummvm-2.1.1.tar.gz
    cd scummvm-2.1.1
    apt install g++ make git libsdl2-dev liba52-dev libjpeg62-turbo-dev libmpeg2-4-dev libogg-dev libvorbis-dev libflac-dev libmad0-dev libpng-dev libtheora-dev libfaad-dev libfluidsynth-dev libfreetype6-dev zlib1g-dev libfribidi-dev libsdl2*
    ./configure
    make clean
    make -j4
    make install

    Even better for legal retronauts, you can find a range of classic games, re-released as freeware, to download at scummvm.org/games, including Revolution Software’s Beneath a Steel Sky and Lure of the Temptress, as well as other once-commercial releases like Creative Reality’s cyberpunk adventure DreamWeb and Interactive Binary Illusions’ Flight of the Amazon Queen. You’ll also find some of these in Raspberry Pi OS’s official repositories. If you want them, enter:

    sudo apt install lure-of-the-temptress beneath-a-steel-sky drascula flight-of-the-amazon-queen

    Just as re-releases of retro DOS games are frequently bundled with a functional copy of DOSBox, point-and-click re-releases often use ScummVM. When extracting files bought from GOG, you can delete or ignore the Windows version of the emulator that’s included and just point your own at the game files.

    Games for free

    Ensuring that your retro games are legally sourced can be a challenge online, but as well as digital storefronts, a number of free software sites are also committed to sharing only fully legit content, from shareware, homebrew, and demos to games made freeware by their publishers.

    All vetted for licensing, you’ll find everything from shareware FPS classics to game makers and freeware re-releases. A well-supplied kids’ section and a violence warning system are handy for both parents and anyone who’s all Grimdarked out.

    While there’s some replication between this and DOSGames, the inclusion of non-playable demos makes this archive an interesting stop for games history buffs.

    People are still making games for DOS, and you can find almost 20 years’ worth of those homebrew projects here, from the outré to the winningly sincere.

    Top tips

    Remember to check that the game you want to play is supported by your emulator of choice. DOSBox and ScummVM publish lists of supported titles, and GOG store pages list the emulator they use at the very bottom.

    Make sure the re-release includes any manuals, maps, and multimedia material you’ll need – some digital re-releases have been created with more care than others, and manual-based copy protection was common in the DOS era.

    GOG isn’t the only place to buy retro games, but it has a wide range of titles and its installers are easy to extract. However, if you already own some classics on Steam, there’s generally no DRM on these, so you can simply copy their files over to Raspberry Pi.

    Use the biggest microSD card you can. As games move into the full-speech era, you’ll find plenty that come in at around a gigabyte each.

    ‘Abandonware’ is a term used online for old software that players believe has been ‘abandoned’ by its rights holders. Although this scene has been important for games preservation, there’s no legal basis for abandonware in most countries, and downloading it is still software piracy. We stick to legal software.

    ‘Homebrew’, on the other hand, is new, independent, and generally non-commercial software made for traditionally closed or nominally defunct platforms. While homebrew titles can often be played on original hardware, they’re ideal for emulation. They’re generally fully legal, although some fan games have been known to appropriate graphical assets.

    Three to buy

    Loom | Price: £5

    With a soundtrack and imagery inspired by Tchaikovsky’s Swan Lake, Brian Moriarty’s Loom is a beautifully woven adventure game with a compelling magical setting. The CD version has full speech, but there’s a bit more game to play if you opt for the EGA original.

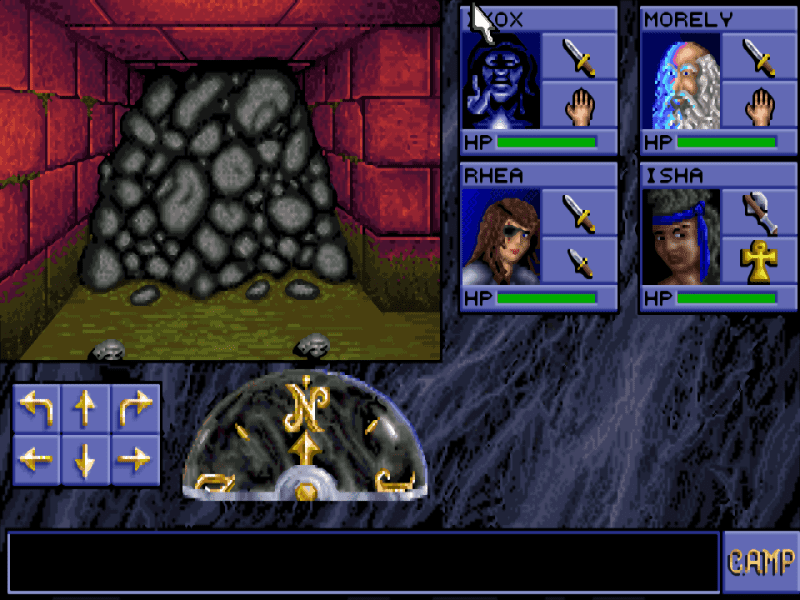
    Eye of the Beholder | Price: £8

    A classic of the flick-screen dungeon crawling genre, Eye of the Beholder is one of the most approachable Advanced Dungeons & Dragons RPGs and oozes atmosphere. Perhaps unexpectedly, it works perfectly through ScummVM, making for a particularly easy emulation experience. Both its sequels are included in the bundle.

    Blade Runner | Price: £8

    As dark and gritty as Blade Runner’s cinematic universe, and features some of the cast from Ridley Scott’s 1982 film, the Blade Runner adventure game was for years effectively lost to licensing disputes and lack of format support until it appeared in GOG’s catalogue in 2019. It’s a unique and much-lauded work that contributes to the series’ mythos in its own right, but carries content warnings off the bat for extremely mature subject matter.

  • Pi Wars 2021 lays down double challenge

    Pi Wars 2021 lays down double challenge

    Reading Time: 2 minutes

    Mike explains that rather than risk having to cancel an in-person version of Pi Wars 2021, they decided to turn a negative into a positive and hold two online events. The Virtual Pi Wars Conference will be on Saturday 23 January and will be a live-streamed event hosted by CamJam’s Rob Bricheno. Attendees get an insight into what makes a successful Pi Wars robot, which may or may not help them in their endeavour to vanquish rivals during Pi Wars itself. Sign up at Pi Wars 2021.

    See also: Pi Wars: How to win the Olympics of robotics

    Audrey III - Amy Willis and her dad’s robot tribute to Audrey II from Little Shop of Horrors, made its debut at this year’s Virtual Pi Wars event

    Home advantage

    Pi Wars @Home, meanwhile, will see teams first build their own challenge courses, then record their best attempt at completing it. The resulting challenge attempts will be broadcast online over the weekend of 20-21 March.

    Courses will have a ‘home’ theme and must be constructed from readily available household objects, with assembly instructions sent out well in advance to all teams who pay the £15 entry fee. Competitors can take part from anywhere in the world, since each team has to submit their challenge attempt videos at least 72 hours ahead of the competition weekend. Entry is open already and closes on 12 October. Teams that accepted and paid their entry fee for Pi Wars 2020 will be able to take part in the 2021 @Home event at no extra charge. You will still need to apply but will be automatically accepted.

    The makers of this Reliant Raspberry robot may have had Mr Bean’s calamitous exploits in mind

    2020 re-vision

    Despite having to become a virtual event in 2020, Pi Wars attracted plenty of online attention with more than 350 visitors watching the live-streamed competition at once. The Disaster Zone theme that was to have been the focus of Pi Wars 2020 may instead loom back into view in 2022. This will mean would-be competitors from 2020 will still be able to impress us all with their appropriately apocalyptic robots. For course building instructions and to sign up, go to the Virtual Pi Wars website.

  • Sonos / Spotify Vinyl Emulator

    Sonos / Spotify Vinyl Emulator

    Reading Time: 3 minutes

    For his very first Raspberry Pi project, Mark Hankinson has created a solution. “I listen to a lot of music through streaming services,” he tells us, “but I never really felt like I had a ‘collection’ – it was a stream of tracks chosen for me by an algorithm, rather than me making real choices. I can’t remember the last time I listened to an album all the way through. Like a lot of people, that led me to the idea of building a vinyl collection, but the idea of buying something I could already listen to through streaming seemed wasteful.”

    Aiming to replicate the ‘collection’ aspects and tactile, screen-free nature of vinyl, Mark came up with an intriguing solution involving the use of cardboard album art with NFC tags. When placed on a box containing an NFC reader connected to a Raspberry Pi, the card triggers playback of the relevant music via Spotify on a Sonos sound system.

    Each NFC tag can be easily programmed with an identifier for a Spotify playlist, an Apple Music album, or a TuneIn radio station, etc. “My script loops endlessly waiting until it gets an NFC input, then works out what kind of input that is and passes it to the Sonos API to do something with.”

    • Build instructions are on Hackster

    • The code is on Mark’s GitHub

    • It uses Jishi’s node-sonos-http-api package for the Sonos API

    • A sister project displays album art on a HyperPixel Square

    • Mark is working on a super-simple online logging tool called Scrap

    Raspberry Pi is secreted in the box along with an NFC reader

    Create the album art

    Rather than using full-size album sleeves, Mark elected to use mini versions. “I’ve got about 100, which I got printed for £25 and look great. I decided to go with 4-inch square photo cards as they’re easy to handle, but really there’s no limit to what you can do because the tags are so tiny and inexpensive.”

    For that extra touch of nostalgia, he even has NFC tags for his favourite playlists stuck to old cassette tape boxes so that they resemble eighties‑style mix tapes!

    An impressive debut Raspberry Pi project for Mark, it took him just a few days to get the whole system up and running. “Luckily, a lot of the building blocks (a Python library to interface with NFC and an API to interface with Sonos) already existed, so really all I was doing was wrapping them together,” he says, modestly. “There are also some similar projects created several years ago to do things through a Raspberry Pi with RFID: this is an older technology than NFC, a lot bulkier and not as flexible, but they were still really useful to see how others have approached the issues.”

    Fancy a bit of Belle and Sebastian? Just place the album art card on the box to play it on the Sonos speaker

    Playing Sonos tracks from RFID tags

    Mark says the system could easily be adapted to use a sound system other than Sonos. “It just depends on whether there is an API available for whichever speaker setup you have running. The PyChromecast library looks pretty helpful for Google, for instance. But that will all be a project for someone else to build! I would be delighted to incorporate their code into the GitHub repo if someone does build it.”

    Mark has set up a forum on reddit (r/vinylemulator) for people to post their implementations, and says it’s great to see what some people have done with this code. “One person hid the tags inside Disney toys so that his daughter can play her favourite music from different films. Another built a mini record player out of Lego to hide the reader, and put the tags on tiny Lego discs.”

  • M.A.R.S. Rover review

    M.A.R.S. Rover review

    Reading Time: 3 minutes

    Start building

    Packed in a cardboard box, the kit features a large array of components, including six motors, five servos, and no fewer than 30 PCB shapes to create the structure. In large kits like these, finding the right components and tiny screws can be a pain, so it’s a great help that they’re sorted into ten plastic bags relating to each step of the assembly process.

    The latter is detailed in an online guide featuring plenty of photos, making it easy to follow. Even so, you’ll need plenty of time to build such a serious kit. 4tronix reckons it will take even an experienced kit builder around two hours; for others, you can at least double that time.

    In the event, it took us several hours to assemble, partly due to an issue with screwing the bogies onto the rocker arms on either side using a small screw and nyloc nut. We found it impossible to screw it on tightly enough using the supplied mini screwdriver and spanner, so had to resort to using a larger, sturdier screwdriver.

    Other than that hiccup, it was a fairly straightforward if lengthy process. Some of the PCB pieces have nuts pre-installed, which does make things a lot easier.

    Steering servos

    Four servos are used to steer the front and rear wheels. A handy little ServoZero board is included to connect to the servos during assembly and set them to zero before attaching the horn and motor mount at approximately 90 degrees to the Rover’s body. Fine adjustments may be made to the wheel alignment later in the software.

    A differential system, connecting the rocker arms, keeps the rover body level as the wheels on one side or the other traverse uneven terrain.

    Fitting the motors is easy enough, as each is pre-wired with a JST connector that fits into one of the ports on the main board.

    With the main body and suspension system assembled, and chunky wheels attached, the final touch is to add a mast with an ultrasonic distance sensor to the top. This even has a servo so you can rotate it with code.

    Rolling Rover

    Insert four AA batteries (not supplied) in the holder at the bottom the main board and mount a Raspberry Pi Zero on top and you’re ready to install the software. A Python library is accompanied by several code examples, including one that enables you to control the Rover remotely (via SSH) with your keyboard. There’s also an example to test an optional keypad (£9/$12) that fits onto the rear.

    While the Rover moves at fairly sedate pace, the steering servos allow it to turn quickly and more smoothly than with the typical tank steering on other wheeled robots. Best of all, that rocker-bogie suspension system enables it to roll over an obstacle, even when only one set of wheels is traversing it, with all six wheels magically maintaining contact with the ground – it’s fascinating to watch in action and far superior to fixed-wheel buggies at handling difficult terrain.

    Verdict

    9/10

    A little pricey, but this is a high-quality kit. The Rover looks cool and can traverse the toughest terrain with its six driven wheels, servo steering, and clever suspension system.

  • Connect Raspberry Pi 4 to iPad Pro with a USB-C cable

    Connect Raspberry Pi 4 to iPad Pro with a USB-C cable

    Reading Time: 5 minutes

    Clean install of Raspberry Pi OS

    We start with a fresh installation of Raspberry Pi OS (32-bit) flashed to a microSD card using Raspberry Pi Imager.

    Set up Raspberry Pi with a monitor, keyboard, and mouse (we won’t need these by the end of the tutorial). Power up and go through the setup process. Make sure you change the default password during setup.

    Open a Terminal window and make sure everything is up to date with:

    sudo apt update
    sudo apt full-upgrade
    sudo reboot
    

    Turn on SSH and VNC

    Click the Raspberry Pi menu icon and choose Preferences > Raspberry Pi Configuration. Click Interfaces and set both SSH and VNC to Enabled. Click OK to close the Raspberry Pi Configuration tool.

    Adjust config

    Now you need to adjust the resolution and ensure that dtoverlay=dwc2 is at the end of your config.txt file.

    sudo nano /boot/config.txt
    

    Uncomment both framebuffer lines (remove the # before them) and change the resolution to 1024×768.

    framebuffer_width=1024
    framebuffer_height=768
    

    Head to the end of the config.txt file and ensure that dtoverlay=dwc2 is present:

    [all]
    dtoverlay=dwc2
    

    Save and close the config.txt file with CTRL+O, then CTRL+X.

    Adjust cmdline

    Open the cmdline.txt file:

    sudo nano /boot/cmdline.txt
    

    Add a new line below console=serial0, … and add the following:

    modules-load=dwc2
    

    Adjust modules

    Next, we adjust the modules file:

    sudo nano /etc/modules
    

    Add this command to the end:

    libcomposite
    

    Save and close.

    Fix the IP address

    Now we need to prevent Raspberry Pi from choosing its internet address. Edit the dhcpcd.conf file:

    sudo nano /etc/dhcpcd.conf
    

    Add this to the end of the file: denyinterfaces usb0

    Choose an IP range

    Install dnsmasq:

    sudo apt install dnsmasq -y
    

    Now create a usb file:

    sudo nano /etc/dnsmasq.d/usb
    

    And place the following script in it:

    interface=usb0
    dhcp-range=10.55.0.2,10.55.0.6,255.255.255.248,1h
    dhcp-option=3
    leasefile-ro
    

    Choose an address

    Now it’s time to pick a static IP address. This can be used to connect to Raspberry Pi from the iPad Pro.

    sudo nano /etc/network/interfaces.d/usb0 

    And add the following script:

    auto usb0
    allow-hotplug usb0
    iface usb0 inet static address 10.55.0.1 netmask 255.255.255.248
    

    Save and close the file. Our IP address is 10.55.0.1. We will use this (or raspberrypi.local) to SSH and VNC into Raspberry Pi.

    Copy and pate the usb.sh script

    Now we need to download and run the usb.sh script on our Raspberry Pi.

    Cut-and-paste the usb.sh code from Ben Hardill’s website. If you want to cut and paste, it’s better to use Text Editor to edit the file:

    sudo mousepad /root/usb.sh
    

    …and fill out the code from usb.sh. Save and exit.

    Now make the usb.sh file executable with: sudo chmod +x /root/usb.sh

    The usb.sh script

    Run the script at launch

    We’re going ensure the usb.sh script runs when we boot up Raspberry Pi, to ensure we can always access it. Use crontab:

    sudo crontab -e
    

    The first time we do this, it’ll ask us to select an editor; we’re going to use nano: enter 1.
    Now add the following line to the end of crontab.

    @reboot bash /root/usb.sh
    

    Save and exit with CTRL+O and CTRL+X.

    Swap to iPad

    Shut down Raspberry Pi:

    sudo shutdown -h now
    

    Disconnect Raspberry Pi from the power source and connect the USB-C cable to your iPad Pro. It’s a good idea to keep the screen connected while you test everything is working.
    Not all USB-C cables work, and we didn’t get it to work with the Apple USB-C cable. We’re using an Anker cable. It should reboot as normal (with the screen resolution size from earlier).

    Check the connection

    If all is working correctly, you will see your Raspberry Pi as a new Ethernet connection in iPadOS’s Settings app.

    You should see a new option, Ethernet, beneath WiFi. Click it to see ‘Pi4 USB Device‘. Click Pi4 and you will see the Pi4 USB Device settings.

    You’re now ready to use SSH and VNC to access Raspberry Pi from your iPad Pro.

    iPad Pro Ethernet settings

    VNC Viewer

    VNC Viewer is available from the App Store. Open it and click Add. Enter 10.55.0.1 in the address field and give it a name (we called ours Raspberry Pi 4 iPad Pro). Click Save and click Connect.

    Enter ‘pi’ in the Username field and your password, then click Continue. You will now see your desktop in VNC on iPad Pro.

    Screens

    The Screens app is a better VNC solution because you can point and click the pointer directly on the screen (instead of pushing a virtual pointer around). You’ll need to adjust your VNC Server settings to use it.

    Open VNC Server on Raspberry Pi (click on the VNC Server icon) and click on the menu icon, then choose Options. Change the authentication from UNIX password to VNC. Click Users & Permissions and click Password. Enter a custom VNC password in both fields and click OK.

    Back in Screens, click the ‘+’ icon and choose New Screen. Click Custom and enter 10.55.0.1 in the Address field. Change the operating system to Raspberry Pi, and enter ‘pi’ in the Username field. Click Done. Click on the screen icon to start a connection.

    Termius iPad Pro

    Termius for SSH

    There are many SSH apps from iPadOS, and we find Termius to be our favourite. Open Termius and click the Add icon (‘+’) and choose New Host. Enter 10.55.0.1 in the Hostname field. Enter ‘pi’ in the Username field. Now click Save and click on the new Host to connect to it.

    There are other ways to interact with Raspberry Pi from an iPad, but SSH and VNC will be enough to get you started.

    Raspberry Pi makes the ideal companion for iPad Pro, enabling you to program, code, and learn with the convenience of iPad Pro’s long battery life and superb display.

    Thanks

    Thanks to Bill Hardill and Sau Sheong for their articles on setting up Raspberry Pi with iPad Pro.

  • 3D printing and making in The MagPi magazine #97

    3D printing and making in The MagPi magazine #97

    Reading Time: 3 minutes

    Hear world music with RadioGlobe

    We love this project by Jude Pullen. Raspberry Pi is added to a toy globe and tuned into internet radio stations. Spin the globe and find a radio station playing anywhere in the world. It uses rotary encoders to know exactly where the globe is positioned at any time.

    RadioGlobe

    Play the Oktoberfest Pinball Machine 

    Pinball halls may not be open this year but this Oktoberfest Pinball Machine can be played online, and it’s all thanks to Raspberry Pi. Stan Dmitriev has attached a webcam to the pinball table, and uses a Raspberry Pi and custom HAT to control the pinball plunger and flippers. Log in online and you can play this pinball machine today.

    Oktoberfest Pinball

    Play GOG classics with DOSBox-X 

    KG Orphanides continues a series of tutorials that look at running classic Windows and DOS software on Raspberry Pi. This month KG looks at getting games from GOG, and using Innoextract, DOSBox, and ScummVM to run PC gaming classics from Zork to Blade Runner.

    Play GOG classics with DOSBox-X

    Build the ultimate home music system: streaming with Mopidy

    PJ continues to work on the ultimate home music system. This month we take a Raspberry Pi DAC with a touchscreen and use it with Mopidy. This enables streaming services such as Spotify and Internet Archive to play audio through the system.

    Home Music System

    Develop a touch interface: Tap-an-LED

    Ever wondered how a touch interface works? Mike Cook can enlighten you with the Tap-an-LED matrix. By combining an LED matrix and resistive touchscreen sensor, Mike walks us through the process of building our own Monome music interface. It’s a complex but do-able build that’s informative and fun.

    Tap-an-LED

    Make games on Raspberry Pi 

    Start out with Scratch and graduate up to more complex game-making systems with Rob’s guide to releasing fully-fledged games. 

    Make games with Raspberry Pi

    Learn electronic computing with CrowPi2

    We review the latest Raspberry Pi laptop-esque build. This time CrowPi2 impresses us with a removable keyboard that houses dozens of electronic components. 

    CrowPi2 review

    A taste of Raspberry Jam with Alan O’Donohoe

    On the eve of its 100th meeting, we chat to one of the organisers of the Preston Raspberry Jam. If you’ve ever wanted to form a Raspberry Pi event, Alan explains why the Preston Jam is such a success.

    Alan O'Donohoe interview

  • Win one of five PiCar-V 2.0 kits!

    Win one of five PiCar-V 2.0 kits!

    Reading Time: < 1 minute

    Subscribe

  • LEDWeatherBoard

    LEDWeatherBoard

    Reading Time: 2 minutes

    Today’s forecast

    “Raspberry Pi is the perfect device to both call a public API for weather forecast and drive via GPIO the 32 metres of LED strips,” Diego explains. “I can access my Raspberry Pi via SSH and control the logging of the workflow that I implemented using Node-RED and Docker, in order to have a repeatable and consistent environment to provide to anyone interested in using my Docker image.”

    While it may look and sound a little simple, Diego did have a few issues with ensuring enough current can be supplied to the LEDs. “If all the 1920 LEDs are set to white, then I need to provide two power supplies, each providing 5 V 50 A 200 W,” he says. “I chose the WS2812B-eco LEDs strips that require less current but are more sensitive to bad connections, so I had to use a resistor between the initial input of the 32 LED strips and the pin of the Raspberry Pi.” He even had to use a level-shifter to boost the signal from the GPIO pins to the input of the LED strips.

    There’s a gap of just over a centimetre between strips

    “I had to try different libraries to drive the LEDs because initially I experienced the flickering of the LEDs,” he adds. “Raspberry Pi has the capability to drive two PWM pins, so I had to split the 32 metres in two segments. After all this hardware setup, now the LEDWeatherBoard is a working project with the level of perfection that I require from my projects!”

    Predicting tomorrow

    Diego isn’t quite finished with the project yet, wanting to add positioning hardware and interactivity.

    “I also programmatically change the LED brightness if the request to the weather API is made after sunset or after sunrise,” he reveals. “I would like to change this last hard-coded logic using a photoresistor that can read the environmental brightness and adjust [it] accordingly.”

    We think it’s a great project, and it turns out his friends agreed – one of whom had it installed in his hotel lobby in the centre of Milan, near the Duomo (cathedral). Make sure it’s not raining before you head out.

    A 1920-element array is calculated, so each LED is lit reading the content of the weather array

  • Ren’py game engine review

    Ren’py game engine review

    Reading Time: 2 minutes

    We think Ren’py might be a good answer. Not because it’s mainly used for creating visual novels (VN) – while easy to deride, they’re a legitimate genre and difficult to make in their own way – but because it’s designed to make it easier to develop. Not only does it have great starter guides, but it also has very advanced functions for more complex game elements, like game-generated animations.

    While it’s been compatible with Raspberry Pi for years, it’s never worked as well as it might. On earlier models you needed to tweak some of the memory usage settings as Ren’py could try to use more than was available. Now that Raspberry Pi 4 is here with much more RAM, it works far better – nearly comparable to full-fat desktop machines.

    Creating a game

    Your humble reviewer spent the last few weeks making a game with it – an item management sim called BBQ DAD – and discovered a huge and helpful community rivalling the one found around Raspberry Pi. Games can easily transcend the intended VN style without too much wrestling, and it has great tools for testing and building your final product. Although you can’t quite release to Raspberry Pi just yet.

    They're a dad that likes to cook on a grill, or as we like to call it, the grillification of video games

    Verdict

    9/10

    A great starting point to learn about game development, and even get your first game out into the world.

    Run Ren’py games on Raspberry Pi

    Ren’py games can be run on Raspberry Pi with some tweaks. After downloading and configuring the launcher for Raspberry Pi, and getting a game, run the Ren’py launcher. Hit Preferences and change the Projects Directory to the folder with the game in. Click Return, select the game from the menu, and hit Launch Project.

  • Build a home music system with Raspberry Pi

    Build a home music system with Raspberry Pi

    Reading Time: 6 minutes

    What you’ll need to build this home music system

    Hardware assembly


    The JustBoom DAC (digital-to-analogue converter) HAT provides high-quality audio output for our project. It also blocks the GPIO header, which we need to power the touchscreen. Luckily, the HAT has a GPIO breakout, so we soldered a two-pin header to the 5V and GND for the touchscreen so the whole system can be powered by a single connector. You can also use two power supplies if you prefer. Mount the DAC HAT on the GPIO pins and secure. We used 20mm 2.5M screws to secure the HAT to the computer and screen controller standoffs. Connect the 5V and GND pins for the touchscreen to their partners on the DAC HAT.

    The DAC HAT provides high-resolution output at line level. You can swap this with an amplifier HAT and use passive speakers instead

    Prepare Raspberry Pi OS

    The case prevents access to the microSD card, so make sure you’ve got a basic setup of Raspberry Pi OS before assembling everything. For this project we’re going to be using Chromium, so we need the ‘standard’ OS image with a Desktop (but we don’t need the Recommended Software version). Burn this image with your preferred method and make sure you’re connected to the network with SSH enabled or hook up a mouse and keyboard if you prefer. Finally, as ever, make sure you’re running the latest version of everything with sudo apt update && sudo apt upgrade.

    Mount into the case


    The Raspberry Pi 4B case used here will not accept the assembly with the DAC HAT. If you’re not using a HAT, you can skip this step. Otherwise, carefully remove the two wall mounting screw holes and then line up the HAT with the top ventilation spacers and remove any that are blocking the two phono sockets and the 3.5mm socket from sitting flush in the case. Measure twice and cut once! The plastic is soft, so it’s fairly easy to do. Once the assembly is sitting comfortably in the case, you can screw in the touchscreen and it should now sit up securely.

    We’ve modified the case and removed the back so everything fits. The screen takes its 5V feed from the GPIO breakout on the DAC HAT.

    Enable DAC output

    No sound will come from the DAC HAT by default. Luckily, the required drivers are already installed and waiting to be enabled. From the command line, run the following:

    sudo nano /boot/config.txt
    

    Find the line that reads:

    dtparam=audio=on
    

    Remove the line (or add a # to the front to comment it out) then add these lines:

    dtparam=audio=off
    dtoverlay=justboom-dac
    lcd_rotate=2
    

    That last line flips the screen if you’ve found, as we did, that the touchscreen display is now upside down. Reboot your Raspberry Pi computer and from the command line, test audio output:

    aplay /usr/share/sounds/alsa/Front_Center.wav
    

    You should hear a calm voice say ‘front centre’.

    Install Mopidy


    Mopidy is a headless music server. This means it has no user interface of its own, so we’ll add one later. To install Mopidy, we need to add its repository to APT. Run the following commands one-by-one:

    wget -q -O - https://apt.mopidy.com/mopidy.gpg | sudo apt-key add -
    sudo wget -q -O /etc/apt/sources.list.d/mopidy.list https://apt.mopidy.com/buster.list
    sudo apt update
    

    Now install Mopidy and set its user’s permissions:

    sudo apt install mopidy
    sudo adduser mopidy video
    

    Finally, set Mopidy to run as a background service on boot:

    sudo systemctl enable mopidy
    

    Configure and test Mopidy

    Before Mopidy can be run, we need to configure a few things. The default settings are sensible but if you want to access the web interface (once installed) from another device, we’ll need to allow that.

    sudo nano /etc/mopidy/mopidy.conf
    

    The file will be empty except for some comments. After the comment block, add this:

    [http]
    hostname = 0.0.0.0 
    output = alsasink 

    Save the file with CTRL+X and then start Mopidy:

    sudo systemctl enable mopidy
    

    In a browser, go to http://:6680/ (replace with the name of your Raspberry Pi – it’s ‘raspberrypi.local’ by default). If you get a rather boring welcome page displayed, all is working well.

    Install the UI & file support


    Mopidy is made up of modules. Out of the box it can’t do very much, but with some add-ons it becomes powerful. Next we’re going to install Iris, a user interface, and support for playing music stored on the local system. Run these commands:

    sudo pip3 install Mopidy-Iris
    sudo pip3 install Mopidy-Local
    sudo sh -c 'echo "mopidy ALL=NOPASSWD: /usr/local/lib/python3.7/dist-packages/mopidy_iris/system.sh" >> /etc/sudoers’
    sudo systemctl restart mopidy
    

    This installs the Iris and Local modules then gives Iris permission to run Mopidy commands as the superuser. Finally, we restart Mopidy to pick up the changes. In a web browser, go to http://:6680/iris/ to see our shiny new interface. The Iris interface works exceptionally well with the touchscreen set up in kiosk mode

    Just add music

    Our installation is now ready to play music, so we should probably get some! Mopidy supports a wide range of formats including MP3 and FLAC. Whatever you decide to use, create a space for your music and upload some files there. You’ll find a Music folder already exists in your home directory. We need to tell Mopidy where to look for your files. Edit the Mopidy configuration file:

    sudo nano /etc/mopidy/mopidy.conf
    

    Add append the following:

    [local]
    media_dir = /home/pi/Music
    

    Restart Mopidy to pick up the configuration changes and then initiate the first music scan:

    sudo mopidyctl local scan
    

    Now in Iris, you should be able to see your albums appear. Try playing one!

    Kiosk mode

    To get Iris running on the touchscreen, we can make Chromium run in ‘kiosk’ mode so no other elements of Raspberry Pi OS Desktop can be seen. The first step is to install ‘unclutter’, a handy app for hiding the mouse pointer when not in use.

    sudo apt install unclutter
    

    Now we’ll create a script to launch Chromium with all the correct settings:

    nano ~/kiosk.sh
    

    Add the code shown in the listing. When run this will enable cursor hiding, prevent some Chromium error messages from being displayed and then start Chromium in kiosk mode, going directly to the Iris website in full-screen.

    Implement the kiosk script

    Before we can use the script, it needs to be flagged as an executable:

    chmod +x ~/kiosk.sh
    

    Now try it out by running ~/kiosk.sh. If you’re entering commands remotely via SSH, use this command instead:

    DISPLAY=:0 ~/kiosk.sh
    

    All being well, Iris should start full-screen and be controllable by touch. We recommend going into settings and enabling ‘Wide scrollbars’ to make it easier to control with fingers. You can also choose between light and dark themes, the darker theme being a little kinder on the eyes when used with the touchscreen.

    Run on boot


    The final step for our music system is to make it run on boot and go straight into kiosk mode. We’ll ask the Desktop itself to do this. Enter the following in the command line:

    sudo nano /etc/xdg/lxsession/LXDE-pi/autostart
    

    Add this line, including the ‘@‘ sign:

    @/home/pi/kiosk.sh
    

    Save the file and reboot your system. The desktop will appear and then Iris will boot full-screen. Your touchscreen music system is now ready for use. You can control everything from either the touchscreen, a web browser on any device, or your smartphone.

    #!/bin/bash
    unclutter -idle 0.5 -root &
    sed -i 's/"exited_cleanly":false/"exited_cleanly":true/' /home/pi/.config/chromium/Default/Preferences
    sed -i 's/"exit_type":"Crashed"/"exit_type":"Normal"/' /home/pi/.config/chromium/Default/Preferences
    /usr/bin/chromium-browser --noerrdialogs --disable-infobars --kiosk http://127.0.0.1:6680/iris &
    

    Load up the music

    If you want to add some audiophile-grade music to your collection, you can use your Raspberry Pi computer to rip CDs to FLAC, a lossless compression system. The files are are large, but no music detail is lost. A very easy-to-use ripper is ‘A Better CD Encoder’ aka ‘abcde’.

    sudo apt install abcde
    

    Hook up a CD drive to the USB port, insert a CD, and enter this:

    abcde -o flac
    

    Abcde will guide you through the whole process, including automatically naming the tracks. Place the resulting directory in your Music directory and go to Settings in Iris to initiate a rescan.