Clean install of Raspberry Pi OS
We start with a fresh installation of Raspberry Pi OS (32-bit) flashed to a microSD card using Raspberry Pi Imager.
Set up Raspberry Pi with a monitor, keyboard, and mouse (we won’t need these by the end of the tutorial). Power up and go through the setup process. Make sure you change the default password during setup.
Open a Terminal window and make sure everything is up to date with:
sudo apt update
sudo apt full-upgrade
sudo reboot
Turn on SSH and VNC
Click the Raspberry Pi menu icon and choose Preferences > Raspberry Pi Configuration. Click Interfaces and set both SSH and VNC to Enabled. Click OK to close the Raspberry Pi Configuration tool.
Adjust config
Now you need to adjust the resolution and ensure that dtoverlay=dwc2 is at the end of your config.txt file.
sudo nano /boot/config.txt
Uncomment both framebuffer lines (remove the # before them) and change the resolution to 1024×768.
framebuffer_width=1024
framebuffer_height=768
Head to the end of the config.txt file and ensure that dtoverlay=dwc2 is present:
[all]
dtoverlay=dwc2
Save and close the config.txt file with CTRL+O, then CTRL+X.
Adjust cmdline
Open the cmdline.txt file:
sudo nano /boot/cmdline.txt
Add a new line below console=serial0, … and add the following:
modules-load=dwc2
Adjust modules
Next, we adjust the modules file:
sudo nano /etc/modules
Add this command to the end:
libcomposite
Save and close.
Fix the IP address
Now we need to prevent Raspberry Pi from choosing its internet address. Edit the dhcpcd.conf file:
sudo nano /etc/dhcpcd.conf
Add this to the end of the file: denyinterfaces usb0
Choose an IP range
Install dnsmasq:
sudo apt install dnsmasq -y
Now create a usb file:
sudo nano /etc/dnsmasq.d/usb
And place the following script in it:
interface=usb0
dhcp-range=10.55.0.2,10.55.0.6,255.255.255.248,1h
dhcp-option=3
leasefile-ro
Choose an address
Now it’s time to pick a static IP address. This can be used to connect to Raspberry Pi from the iPad Pro.
sudo nano /etc/network/interfaces.d/usb0 And add the following script:
auto usb0
allow-hotplug usb0
iface usb0 inet static address 10.55.0.1 netmask 255.255.255.248
Save and close the file. Our IP address is 10.55.0.1. We will use this (or raspberrypi.local) to SSH and VNC into Raspberry Pi.
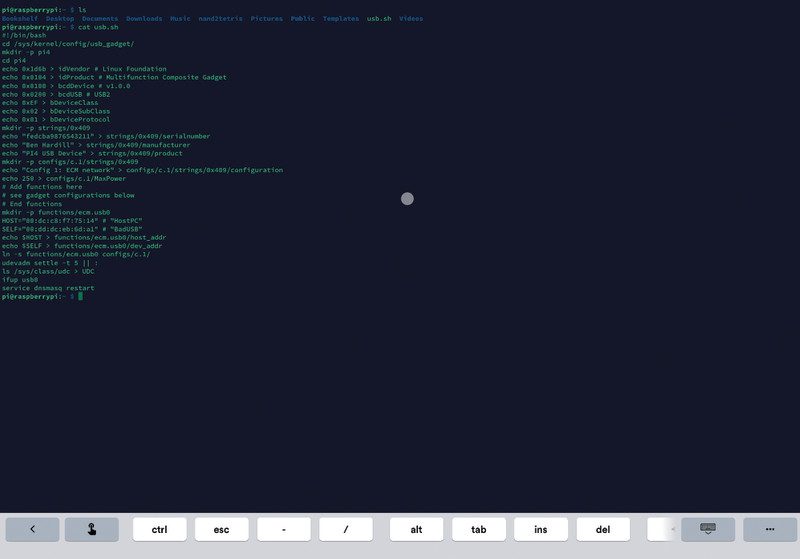
Copy and pate the usb.sh script
Now we need to download and run the usb.sh script on our Raspberry Pi.
Cut-and-paste the usb.sh code from Ben Hardill’s website. If you want to cut and paste, it’s better to use Text Editor to edit the file:
sudo mousepad /root/usb.sh
…and fill out the code from usb.sh. Save and exit.
Now make the usb.sh file executable with: sudo chmod +x /root/usb.sh

Run the script at launch
We’re going ensure the usb.sh script runs when we boot up Raspberry Pi, to ensure we can always access it. Use crontab:
sudo crontab -e
The first time we do this, it’ll ask us to select an editor; we’re going to use nano: enter 1.
Now add the following line to the end of crontab.
@reboot bash /root/usb.sh
Save and exit with CTRL+O and CTRL+X.
Swap to iPad
Shut down Raspberry Pi:
sudo shutdown -h now
Disconnect Raspberry Pi from the power source and connect the USB-C cable to your iPad Pro. It’s a good idea to keep the screen connected while you test everything is working.
Not all USB-C cables work, and we didn’t get it to work with the Apple USB-C cable. We’re using an Anker cable. It should reboot as normal (with the screen resolution size from earlier).
Check the connection
If all is working correctly, you will see your Raspberry Pi as a new Ethernet connection in iPadOS’s Settings app.
You should see a new option, Ethernet, beneath WiFi. Click it to see ‘Pi4 USB Device‘. Click Pi4 and you will see the Pi4 USB Device settings.
You’re now ready to use SSH and VNC to access Raspberry Pi from your iPad Pro.

VNC Viewer
VNC Viewer is available from the App Store. Open it and click Add. Enter 10.55.0.1 in the address field and give it a name (we called ours Raspberry Pi 4 iPad Pro). Click Save and click Connect.
Enter ‘pi’ in the Username field and your password, then click Continue. You will now see your desktop in VNC on iPad Pro.
Screens
The Screens app is a better VNC solution because you can point and click the pointer directly on the screen (instead of pushing a virtual pointer around). You’ll need to adjust your VNC Server settings to use it.
Open VNC Server on Raspberry Pi (click on the VNC Server icon) and click on the menu icon, then choose Options. Change the authentication from UNIX password to VNC. Click Users & Permissions and click Password. Enter a custom VNC password in both fields and click OK.
Back in Screens, click the ‘+’ icon and choose New Screen. Click Custom and enter 10.55.0.1 in the Address field. Change the operating system to Raspberry Pi, and enter ‘pi’ in the Username field. Click Done. Click on the screen icon to start a connection.

Termius for SSH
There are many SSH apps from iPadOS, and we find Termius to be our favourite. Open Termius and click the Add icon (‘+’) and choose New Host. Enter 10.55.0.1 in the Hostname field. Enter ‘pi’ in the Username field. Now click Save and click on the new Host to connect to it.
There are other ways to interact with Raspberry Pi from an iPad, but SSH and VNC will be enough to get you started.
Raspberry Pi makes the ideal companion for iPad Pro, enabling you to program, code, and learn with the convenience of iPad Pro’s long battery life and superb display.
Thanks
Thanks to Bill Hardill and Sau Sheong for their articles on setting up Raspberry Pi with iPad Pro.
Schreibe einen Kommentar
Du musst angemeldet sein, um einen Kommentar abzugeben.