This 3D-printed tourbillon was modeled after Jacob & Co’s Twin Turbo Furious watch
Arduino Team — June 1st, 2021
It seems like everyone who has a substantial net worth carries around a few luxury watches, but none are perhaps as mechanically enthralling as the Twin Turbo Furious watch from Jacob & Co., which houses a pair of spinning orbs called tourbillons that increase the watch’s accuracy. However, they’re quite small and intricate, so seeing exactly how they work is difficult. This is why mcmaven on Instructables wanted to create a huge 3D-printed version that shows every detailed component.
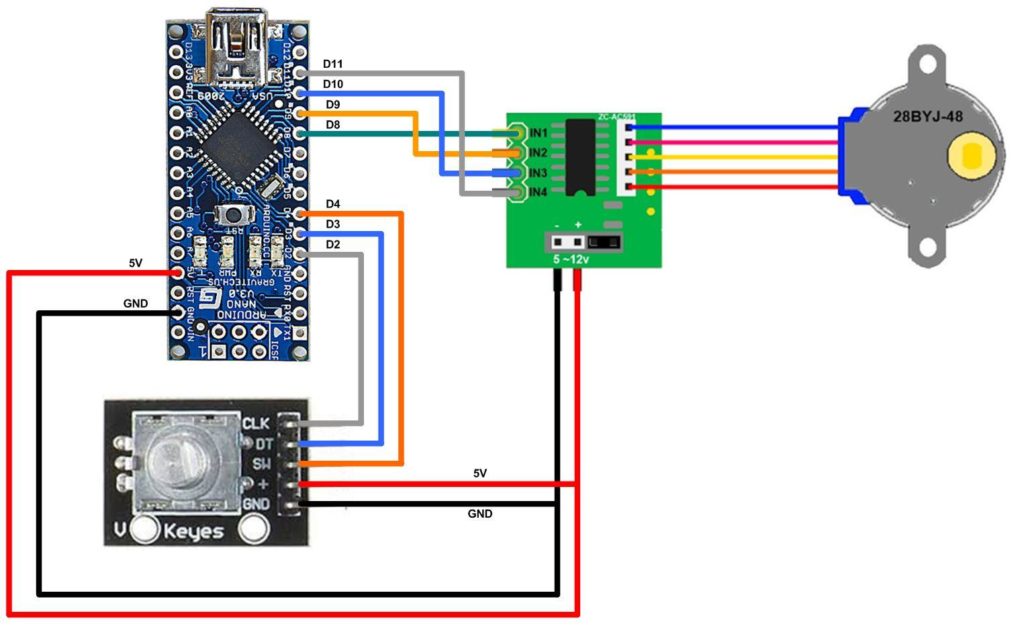
At the heart is the balance wheel and spring which tick along and keep the time. Further up, the escape wheel works in a ratchet mechanism to slowly load and release the spring as the tourbillon spins. These core components are then placed into the two halves of the body that spins around on the base.
To produce movement, a single 28BYJ-48 stepper motor turns a gear underneath the base to spin the tourbillon. One nice feature of this project is the assembly’s ability to keep a consistent speed through the use of a rotary encoder, as the previous speed is stored within EEPROM and loaded upon boot. A single Arduino Nano is responsible for controlling the entire system, and as seen in the video, it looks incredible.
Bike locks have not changed that much in the last few decades, even though our devices have gotten far smarter, so they seem in need of an update. Designed with this in mind, the TapLock is able to intelligently lock and unlock from either Bluetooth or taps on the enclosure. It uses a Nano 33 BLE Sense to detect tap patterns via an onboard accelerometer as well as BLE capabilities to communicate with the owner’s phone.
Because taps are not necessarily directional, the TapLock’s creators took an average of each accelerometer axis and charted the time between the peaks. After collecting a large sample of data, they used Edge Impulse to process the data and then train a model with an accuracy of 96.4%. This allows the owner to have some wiggle room when trying to lock or unlock the bike.
The team also developed a mobile app, which provides another way for the bike’s owner to lock or unlock the bike, along with some extra features too. After connecting to the TapLock, the app loads the previous state of the lock device and updates itself if needed. If the user wants to lock the bike, the app will send a “lock” command to the TapLock and store the current location to show on a map. This way the owner won’t forget where their bike is when trying to retrieve it.
Currently, the TapLock doesn’t have a physical locking mechanism, but the team states that one can be added and then electronically activated from one of the Nano 33 BLE Sense’s GPIO pins. You can see a demo of this project in the video below and read about it on Hackster.io.
Makers love Nerf guns, but Nathan Li takes foam-based home security to a new level with his mini Nerf tank. Naturally there’s an Arduino Uno in there, powering the mobile dart launcher.
Scruffy lookin’ Nerf tank herder
This miniature roving robot, known as M.A.T. (Modular Arduino Tank), is beautifully built. Not only is it remarkably accurate, but the dart launching mechanism is a triumph of non-lethal weapon design.
Unlike the majority of Nerf mods out there, this tank doesn’t actually use any parts from a toy gun. Attached to the front of the dart turret is a pair of flywheel motors. These spin the flywheels in opposite directions, at a pretty fast rate. An arm mounted on a servo feeds a dart into the flywheels, which propel it at an impressive lick!
The next dart is gravity fed, and simply falls into place, making it quite a rapid firing micro tank.
Testing the tank
Li takes his tank through a series of batteries, all of which show impressive results. Accuracy is spot on, which isn’t easy with notoriously unreliable Nerf darts. A five-foot muzzle velocity test achieves a whopping 35MPH dart speed. The distance test sends foam projectiles an impressive 44 feet.
Then there’s a demonstration of some excellent grouping in the accuracy test.
It’s sparked up a whole conversation over on Reddit about how the firing mechanism can be modified. The flywheel thrower operates much like baseball launchers (and this dog toy, for example), which has really captured the maker community’s imagination. Shooting dried peas seems to be a popular idea. As does the idea of building in object detection for pest control.
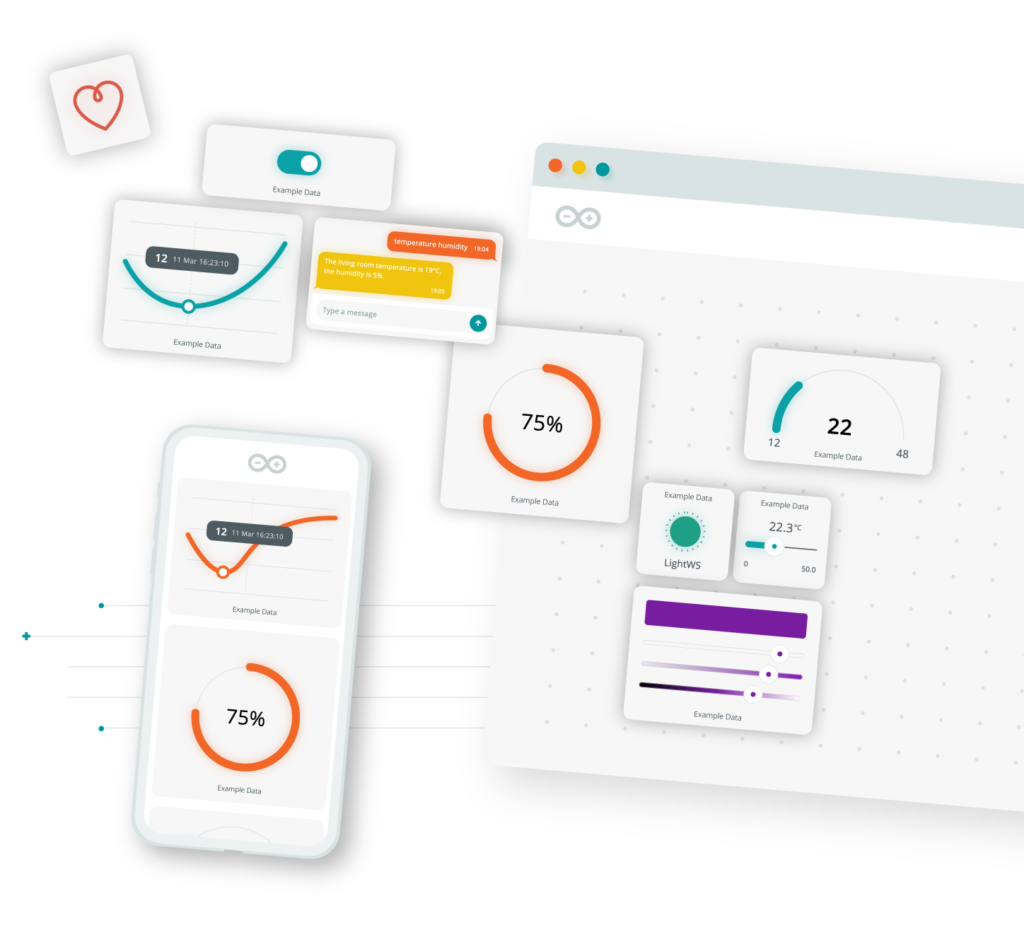
Support for ESP32 devices is now available on the Arduino IoT Cloud. It’s a huge step forward in bringing IoT devices of all kinds together, and giving them a way to get connected, communicate with each other, and offer new levels of convenience and control.
A new world of IoT connectivity
Arduino’s been working on this for some time, and we’re really excited to introduced ESP32 support by including the Arduino Core developed by Espressif on the Arduino Cloud platform. This opens up cloud-connected projects to a whole new world of IoT devices, projects and possibilities. Web Editor is by far the most convenient way to program an ESP32, and to connect it and control it via a cloud platform.
Support for ESP8266 devices is already available, and was recently moved into the free Arduino Cloud tier. The addition of ESP32 boards, along with the wide range of Cloud-compatible Arduino devices, adds some serious power to a Cloud account.
It’s all about communication. There’s never been an easier way to program your boards, or implement device-to-device communication in IoT. Once your devices are hooked up to an IoT Cloud account, they can talk to each other, sync variables, share data and be combined into powerful dashboards. You even get seamless smartphone control through the Arduino IoT Remote apps. Or if you just want a simpler, easier way to program your ESP32 boards, the Arduino Cloud Web Editor makes it a walk in the park.
It’s the next step in making Arduino Cloud into a secure, ubiquitous platform for all connected devices. It’s still early days, but that’s where the community comes in. We want you guys to get on there, hook up your boards, and test the limits of what’s possible in Cloud-connected projects.
Connect your ESP32 to the Cloud
There are only a couple of things you need to get an ESP32 board onto Arduino Cloud.
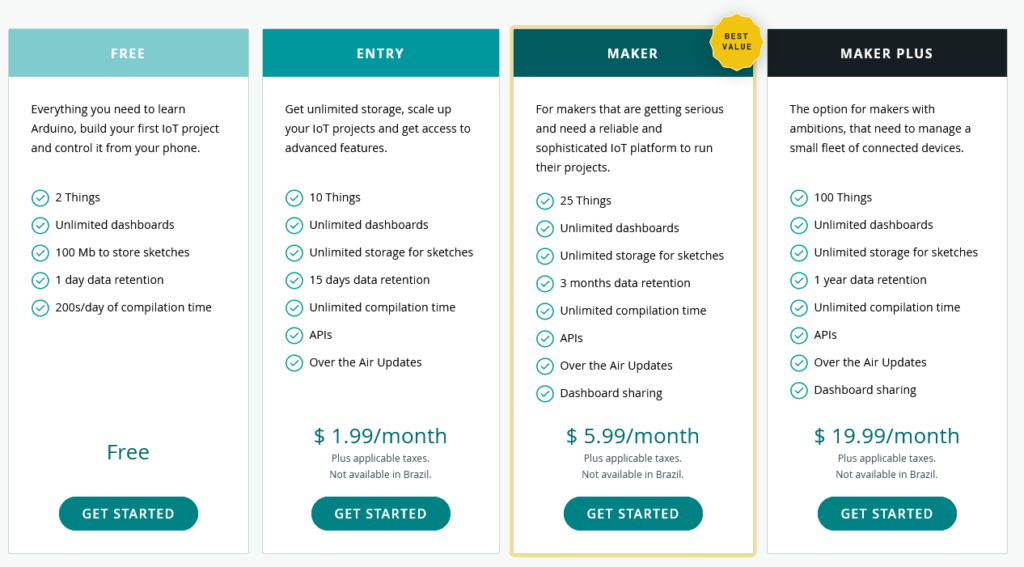
An account on the Arduino IoT Cloud, of course. You’ve got multiple options, so plenty of ways to tailor the subscription to exactly what you need. Get started with the free plan, and then just bump it up to the next level once you’re ready.
Grab the Arduino Create Agent, which runs in the background on your computer. It lets Arduino IoT Cloud detect and communicate with supported boards. It makes it a doddle to upload sketches from your web browser using the Web Editor IDE, as well as read and write data.
Note: It’s possible your computer might need drivers to recognize your ESP32 board on the serial port. If you’re having difficulties, check in with the board manufacturer to get the necessary drivers.
And then you’re good to go! Follow the Arduino IoT Cloud process just as you would with any other board. Create a device, select “ESP32 device”, and take note of your secret key during this setup process.
Your contribution and tests will really help to build on this exciting evolution of Arduino IoT Cloud. So we want to hear all about it. Join us over on the forum to share your experiences.
This is a great way to upgrade existing projects, home automation or other applications. It makes it so easy to take advantage of IoT Cloud’s powerhouse features. With almost no code, you can have any combination of Arduino, ESP8266 and ESP32 boards communicating and working together seamlessly and wirelessly. It’ll cut the time it takes to build adventurous new projects while expanding the possibilities and significantly reducing the legwork.
Once you’re in the Cloud, there’s no looking back!
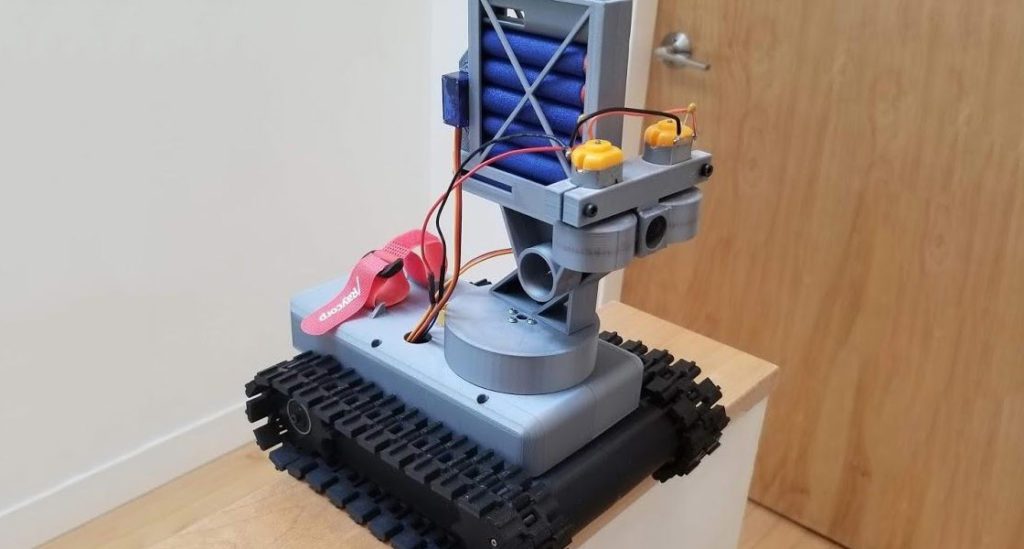
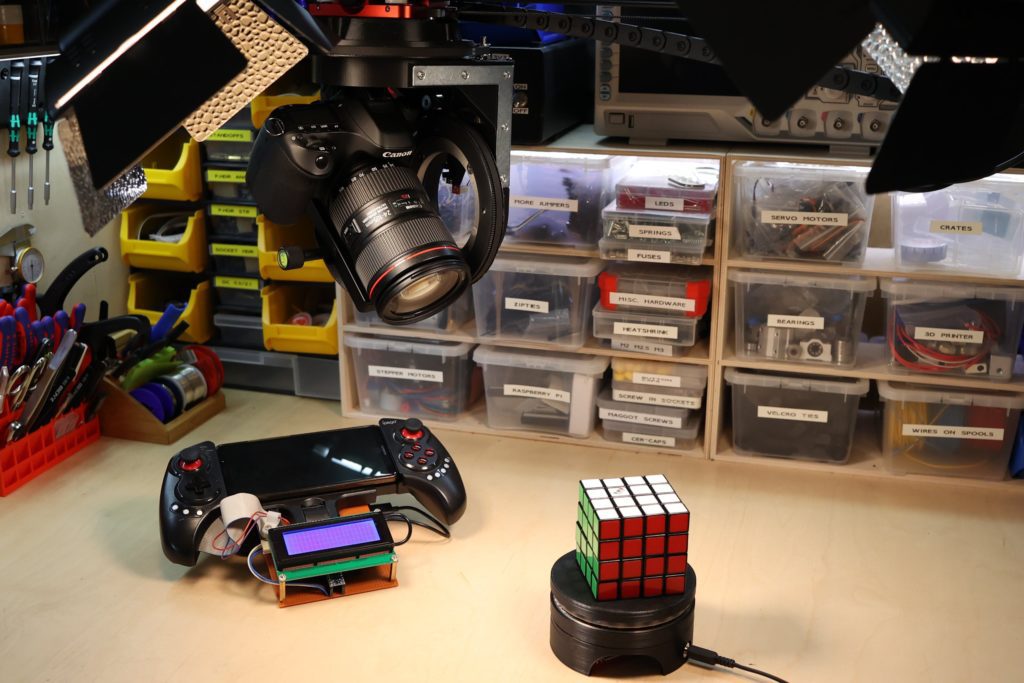
Being a camera operator is tough. Having to move the camera and maintain a smooth motion can be tricky, and the speed at which it’s done is never consistent. That’s what prompted Andy to create his own motorized robotic camera rig that can move in up to four different axes simultaneously. The camera gets attached to a standard mounting plate and then placed into the gimbal. The gimbal is able to both pitch the camera up (rotate around the X axis) and rotate it side to side (called ‘yaw’ or Z-axis rotation). In order to prevent a bunch of wires from tangling around each other while spinning, each rotational axis uses a slipring to transfer electrical power and signals continuously.
Most of the magic is housed in the electronics and software. Andy went with an Arduino Uno running Grbl firmware to translate GCODE commands into concrete actions with the stepper motors. He used a set of opto-interrupting modules that detect when an object has passed between an emitter and detector to signal when the axis is homed. And finally, a Raspberry Pi runs his custom program that takes in keyframe data, parses it, and sends it to the Uno.
As you can see from his excellent video, the camera rig is amazing at capturing smooth, continuous shots along multiple axes. You can view more about this project on its Hackaday write-up.
Turn signals are becoming more and more popular with cyclists. So it’s no surprise that we’re seeing more and more Arduino projects that give people the tools they need to ride safely on our busy roads.
Motorized Turn Signals
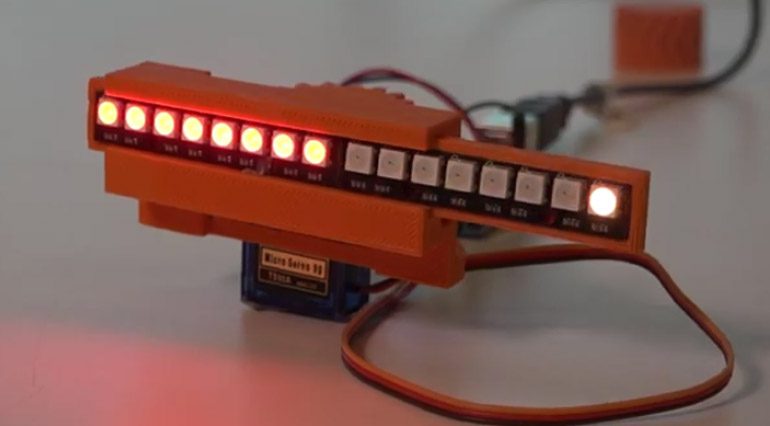
The first question you might ask about Tom Ouwerkerk’s latest Arduino project is why it’s motorized. His objective was to make a turn signal unit that’s as compact as possible. When you consider the amount of space you have on a bicycle frame, it makes a lot of sense.
His solution was to use two 8-LED Neopixel strips, side-by-side. The small housing they’re mounted in has a servo that’s driven by an Arduino Uno. The servo slides the LED strips side to side as Ouwerkerk make a turn signal.
The LEDs run in the turn direction to add a bit of movement to the signal as they slide to the side. It’s a great way to draw a bit of extra attention to the lights from the vehicles behind. This means the LED strips return to the center position to work as a break light when not turning. All of this in a 3D-printed unit that’s no wider than the bicycle’s saddle. So you’re not going to kick (and break) as you get on and off.
3D Printing Practice
As much as a turn signal project, this was a 3D printing design project for Ouwerkerk. He was experimenting with creating herringbone gears, which transfer power smoothly with excellent torque. But creating the chevron pattern is tricky, due to the precision required.
Clearly Ouwerkerk nailed it, though. You can see from the video of his turn signal project that the servo is moving the LEDs easily and smoothly.
We’d be interested in seeing the controls Ouwerkerk’s using, too. Presumably handlebar mounted switches or buttons for the turn signals and brakes. It’d also be interesting to know if it’s something that can run from batteries and a dynamo.
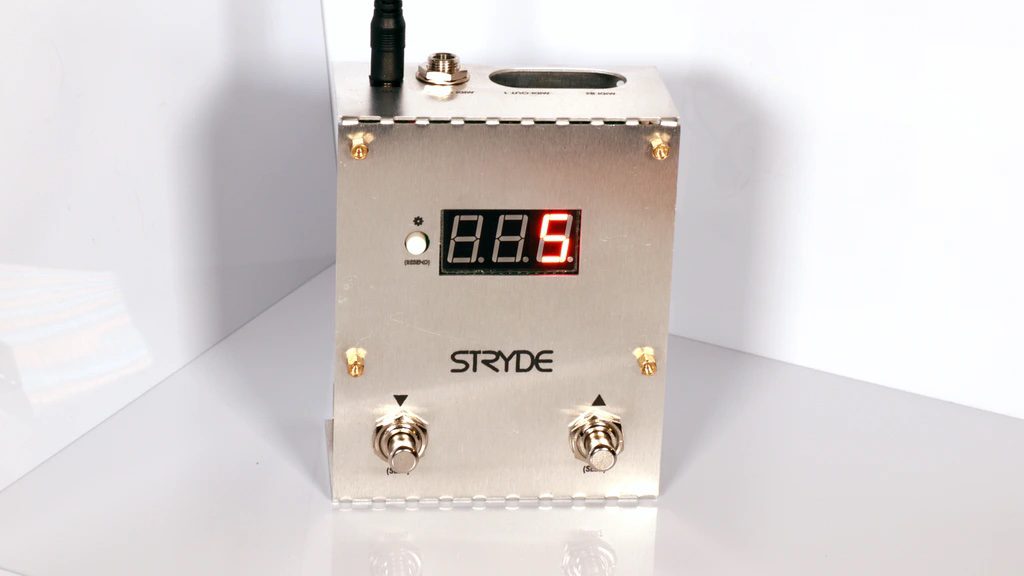
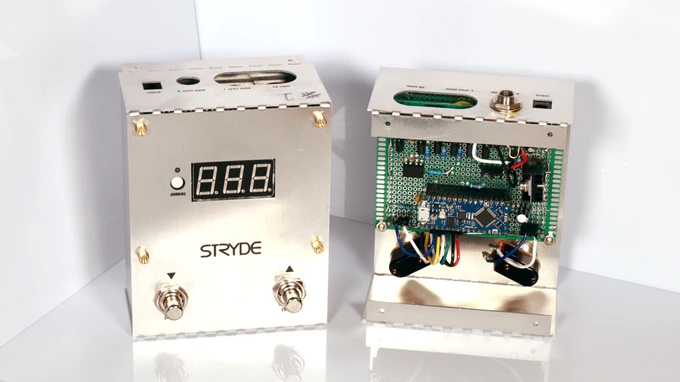
MIDI-controlled instruments are awesome, as custom sounds can be loaded and dynamically changed while you play. However, accessing these effects often requires an external controller that can get expensive and complicated. That is why music enthusiast Joe King created the Stryde, which is a fully integrated MIDI preset loader within a small enclosure. Stryde uses an Arduino Nano Every at its core to store presets, display information, and select effects.
As seen in King’s video below, the Nano Every has room for up to 128 total presets that can be scroll through with the help of a pair of buttons. There is also the ability to use a MIDI pedal as an input to switch which presets are currently active. The back of the Stryde contains a single port for MIDI IN and two ports for MIDI OUT with DIN connectors. Even though the device has plenty of connectivity, the best feature is probably the fact that it is open source, therefore letting users completely rewrite the firmware if they want.
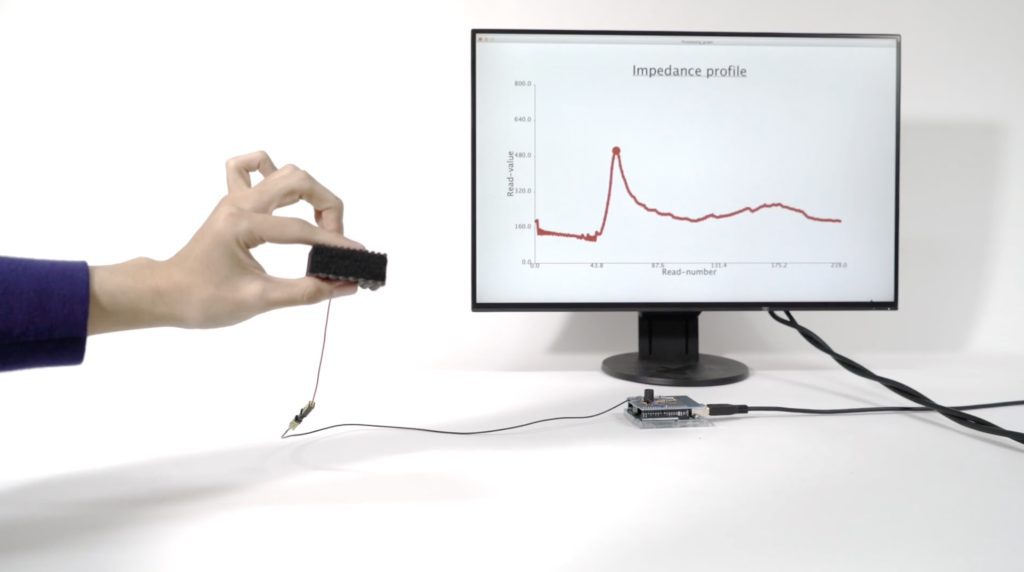
The field of soft tactile sensors is fascinating, as they grant robots the ability to move more freely or have greater granularity. Soft sensors also allow for human-computer interfaces to feel more interactive. However, previous sensors like these required multiple devices or complex wiring, making them difficult to use. To address these challenges, researchers from the University of Tokyo and Mercari R4D were able to come up with a way to integrate touch-sensitive pads onto a piece of foam, which they call “foamin.”
Foamin consists of a small piece of foam that has a series of conductive rows on its surface. These strips are separated by air, which is an insulator, thus creating a capacitor. When a human’s finger glides across, both the capacitance of the overall circuit and the resistance change. This impedance is measured by a single wire with an Arduino Uno, and after some data filtering, the team had a set of 60 data points per gesture. They then trained a model with this data and were able to achieve an accuracy of 100% when a mesh shield was attached.
This system is amazing for a whole host of possible applications. The researchers suggested using foamin as a musical instrument (similar to a launchpad), a numeric keypad, and even as a smart cushion to sense which posture the sitter is currently in.
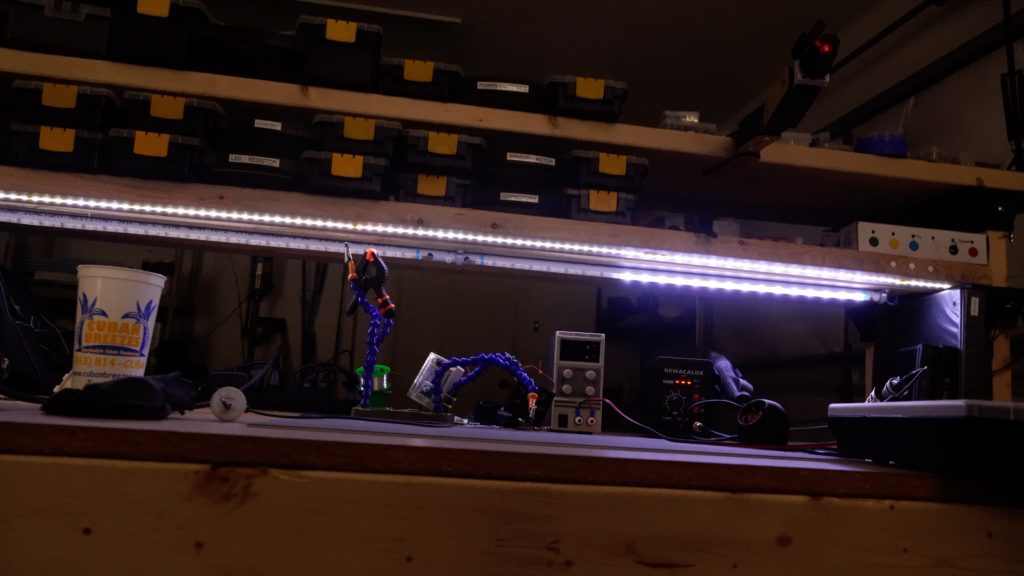
Jeremy Cook recently constructed a workbench out of wood and plastic supports, and after several iterations, he’s enhanced it with LEDs to selectively shine light where he’s working. Initially, this meant a simple strip of 12V non-addressable lighting that turned on and off. He then augmented it further using an Arduino Nano, with a pair of buttons for PWM brightness control and a PIR sensor to activate the lights when presence is detected.
Not one to leave well enough alone, afterwards he supplemented this fixed color lighting with a strip of addressable LEDs mounted to a length of tubing. The lights are programmed to stay white – though other colors would be possible – and a total of three PIR sensors are utilized to light sections of the LEDs when motion is detected.
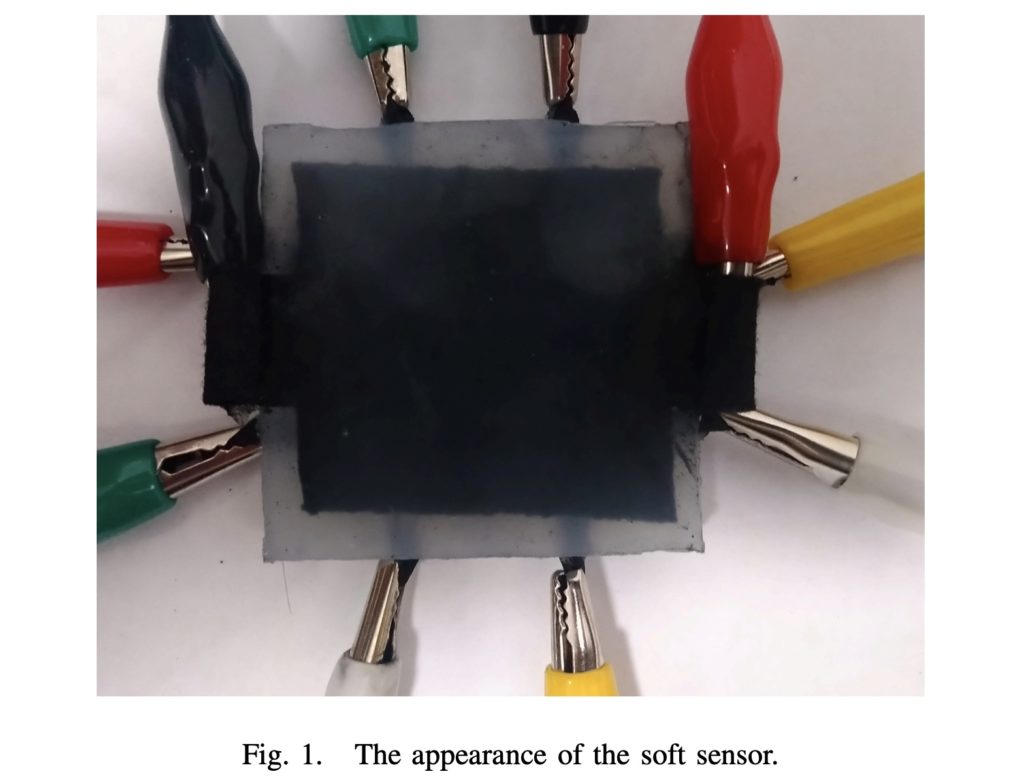
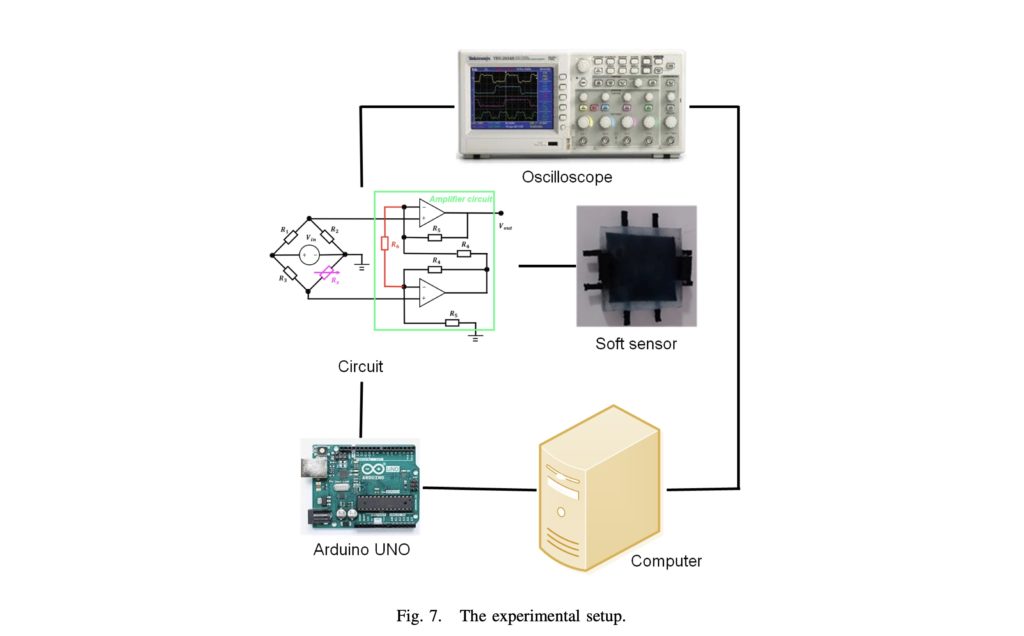
Robots are often filled with a myriad of different sensors but being able to detect touch is still fairly tough. This is primarily due to needing a large sensing area, flexible surfaces, and usually having complex circuitry. Imagine a robotic gripper that uses several “fingers” to lift and manipulate produce, or a humanoid that can respond to feedback on its hands. Other technologies such as capacitive and vision sensors have been tried in the past, but both use complicated and expensive components. A team at the Department of Mechanical Engineering at UC Berkeley was able to engineer a solution to this problem by utilizing a novel combination a two-layer structure. The first layer is a conductive fabric that is responsible for sensing the contact force, whereas the second layer of four rubber elements senses where the touch took place.
On its own, the resulting signal is quite noisy, so the researchers used an Arduino to read in the raw analog data, filter it, and then send it to a computer for extra processing. Once this was done, a machine learning regression model was created to fine-tune the detection capabilities.
To test their device, the team placed weights of varying sizes on each corner to simulate a touch. As seen in the graphs below, the system is already quite accurate, and with more training it can become even better over time.
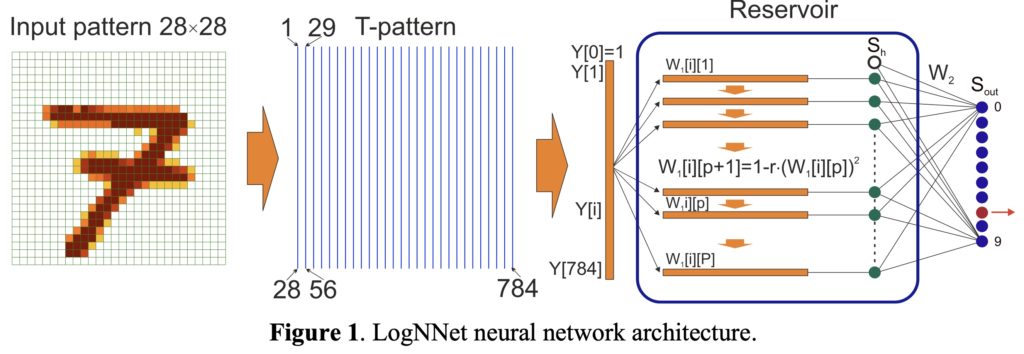
The Arduino Uno is famous for its ease of use and compact size, yet its microcontroller, the ATmega328P, is quite small. The 328P contains a mere 32KB of flash storage for programs and 2KB of RAM, which has traditionally made it unsuitable for machine learning applications. However, a team at the Institute of Physics and Technology at Petrozavodsk State University was able to cram an algorithm that can recognize the handwritten digits within the MNIST dataset. Without getting too complicated, the Uno takes in an array of pixels that range in value from 0 to 255, or one byte. The entire 28 by 28 grid is then flattened to a single array of 784 elements that is passed into a reservoir that holds the weights for each pixel. As the model continues to get trained, these weights are gradually adjusted until the output matches the correct digit.
Input data is read from the serial port and stored within an array, where it is then used within the LogNNet library to compute the layer values. Once everything has been passed through the neural network the resulting digit is printed to the serial monitor. Overall, the neural network’s variables in RAM are quite space-efficient and account for just over a kilobyte.
As seen below, the researchers were able to achieve an accuracy of 82% with an inferencing time of around seven seconds, which is quite impressive for such a small chip. To read more about how the LogNNet reservoir neural network operates, be sure to check out the team’s paper.
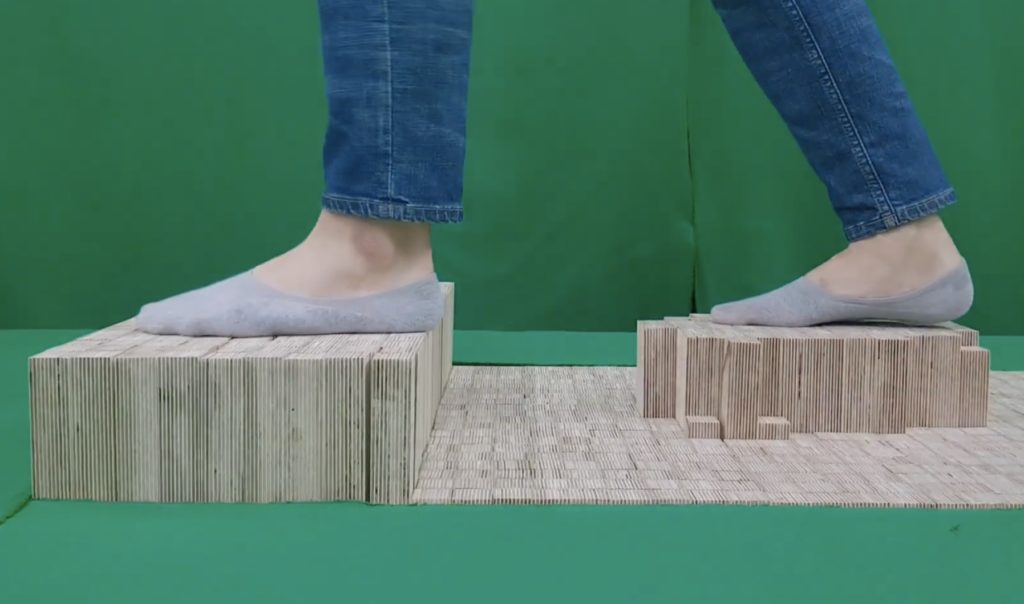
Virtual reality technology has come a long way in the last decade, but there are still some major things that could be done to make it even more interactive and immersive. For one, what if VR users could actually feel the ground they walk on rather than simply see it? A team of students from KAIST in South Korea and the University of Chicago set out to tackle this by creating a fairly large 1.8 by 0.6 meter platform that can accurately create the feeling of varied terrain. Called the Elevate, this device uses a total of 1,200 pins that can individually raise and lower with 15mm of resolution.
Each pin is comprised of a block of wood that protrudes from the platform, a comb-shaped section that is used to move the pin, and a locking bar to prevent unintended movement. At the core of the device is the shape generator, and its job is to individually actuate each pin. This is accomplished by moving row-by-row across the 60 rows to push or pull all of the pins within it via a timing belt and DC motor. There are 10 actuator modules in total that each contain an Arduino Nano, a regulator, two geared DC motors, a hall effect sensor, and a pair of magnets. The locking mechanism is controlled with an Arduino Uno and two servo drivers, and horizontal movements are done with an Uno as well and two microstepper controllers.
The resulting terrain is quite spectacular, as this much granularity means really fine details can be replicated. When paired with the VR game, participants who were testing the device consistently rated their experience on the Elevate to be far better than simply playing in VR.
To learn more about this project, check out the video below and the team’s paper here.
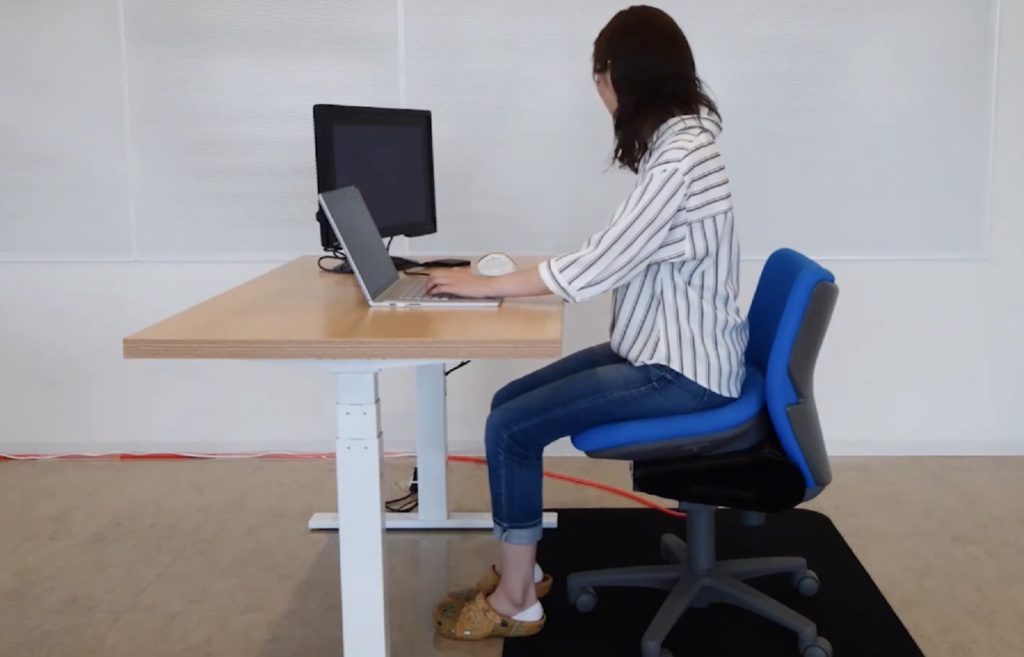
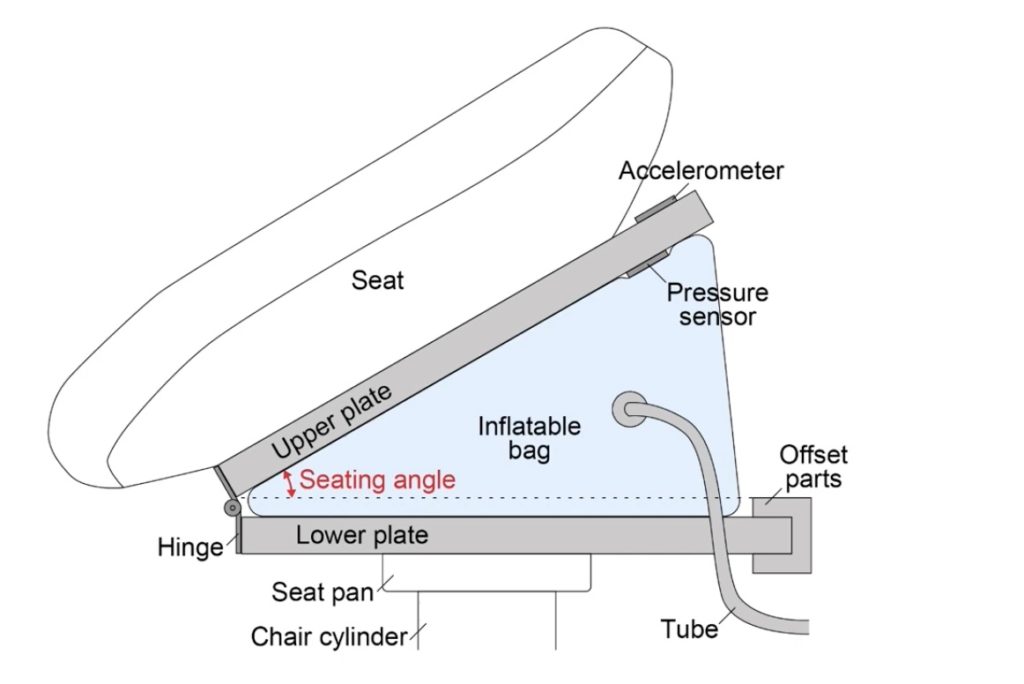
While designing and building projects, we probably find ourselves sitting far longer than we should, which poses a problem. Bad posture leads to all sorts of health issues, including back pain, limited circulation, and even headaches. A team of students at Tohoku University in Japan wanted to fix this by creating a new type of office chair, dubbed the TiltChair, that is able to dynamically adjust the user’s seating position. This helps to minimize strain on the body from prolonged sitting.
The TiltChair system uses an Arduino Uno that communicates with an MPU-6050 IMU to measure the current inclination of the seat. Additionally, a BME280 pressure sensor monitors if someone is occupying the chair. To tilt the seat, the Uno employs a pair of servos that both regulate an air compressor to inflate an air bladder, thus pushing up the upper plate, or activating a vacuum pump to lower the angle. From this setup, the seat can move up to 55 degrees!
The researchers then conducted two studies to find out just how well the seat works. In their first experiment, they had 12 participants perform a text-typing task at a desk. During this, the seat would move between nine different angles, and their resulting efficiency would be recorded. In the second test, they wanted to know which rates were best for inflating the seat, so using the same participants, the seat adjusted from 5 deg/min all the way up to 80 deg/min. As expected, the lower rates and angles were better for the users. But the chair also encouraged them to move around a bit more and sit up straighter, thereby achieving the initial goal.
Plants certainly add a nice ambiance to the environment, but at the end of the day, you can’t really “connect” with them as you do with a pet. As a solution to this problem, Gediminas Kirdeikis decided to anthropomorphize his houseplant using an Arduino Nano, along with a moisture sensor and an OLED display.
When the Tamagotchi-like setup detects that the soil has been watered, a happy animation is played on the screen; conversely, a sad animation is shown when dry. Electronics are integrated into a custom pot, 3D-printed in two sections. This gives the project a nice clean look, with a USB cable implemented to provide power.
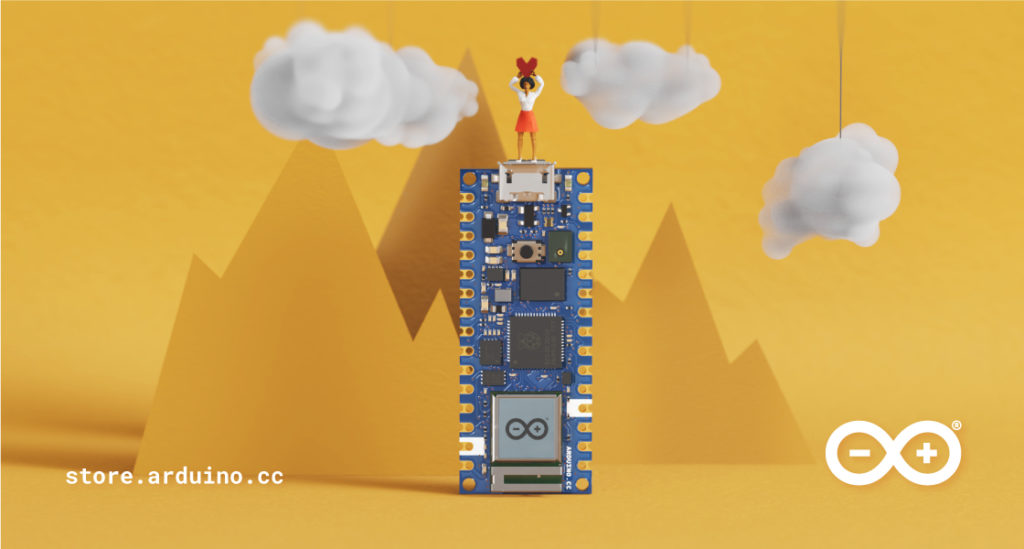
It was back in January that we first introduced you to the Arduino Nano RP2040 Connect. The first Arduino board to include Raspberry Pi silicon. It’s been a roller coaster ride getting it to you, and enthusiasm during the wait has been incredibly encouraging. The wait, you’ll be glad to hear, is over.
The RP2040 Processor
Working with the Raspberry Pi Foundation is nothing short of a pleasure. The teams there make some incredible devices, and their first in-house silicon is no exception. These guys get it.
This system-on-a-chip is a 32-bit dual-core Arm Cortex-M0+ microcontroller, clocked at 133MHz and is powerful enough to run TensorFlow Lite. It’s young, but proving to be incredibly popular with makers, as well as electronics manufacturers. It’s going to be incredibly exciting to see how the Arduino community reacts to it. We can only imagine what you guys can achieve with the extra features of the Nano RP2040 Connect board.
Welcome the Arduino Nano RP2040 Connect
So it was an easy choice for Arduino to put an RP2040 at the core of a new board. We felt so strongly about the excellence of this new chip that we knew it deserved a powerful, premium Nano board that is unrivalled in terms of features.
First and foremost is the inclusion of the u-blox NINA-W102 WiFi and Bluetooth radio module. Nano users are probably quite familiar with this excellent module already.
Coupled with a six-axis machine learning-capable IMU motion sensor, on-board microphone for sound and voice activation, an RGB LED and loads of multi-function GPIO pins, this is the project maker’s dream come true. And all on such a tiny board.
NanoRP2040 Connect in the Cloud
Just like everything Arduino, the hardware of the Nano RP2040 Connect is only half the story.
Right off the bat this device is fully compatible with the Arduino Cloud. It landed at just the right moment, as Arduino Cloud plans were given an overhaul. These offer a lot more on the free tier, while bringing in a new Entry Plan that really unlocks the power of the cloud.
Because the Nano RP2040 Connect is a connected device, this opens up all kinds of possibilities. Not least of all over-the-air updates and programming. This alone can make a Cloud accompaniment to the board worthwhile. It gives you full, incredibly easy access to the hardware. This is true even after it’s been deployed, installed or buried in the guts of a project. If it’s got a WiFi signal, you can do everything as if it was plugged in by USB. Furthermore, it has the added bonus of smartphone control through the Arduino IoT Remote app.
The plug-and-play nature of the Arduino Core means you can use existing sketches you made for, say, a Nano 33 BLE Sense on your brand new Nano RP2040 Connect. So you can have this little workhorse up and running within minutes, if you’ve already been working on some project sketches. Plus, it’s compatible with the entire RP2040 software ecosystem, so if this is an upgrade for an existing RP2040 board, you’re good to go.
If you’re just getting started on sketches for the device, it offers full support for MicroPython. There’s even a free OpenMV license bundled in, for any machine vision projects you might have planned.
Go Get Your Arduino Nano RP2040 Connect
Yes, there’s a limited supply at launch. We built as many as possible for the first run. But a lot have been sent out to our reseller partners. So head on over to the store right now if you want to be one of the first to get this premium RP2040 board.
If you want to stay up to date on all things Arduino Nano RP2040 Connect, make sure you’re signed up to our email list. From there we’ll keep you advised on restocking, new updates, special offers and everything else to do with this tiny, but mighty, board.
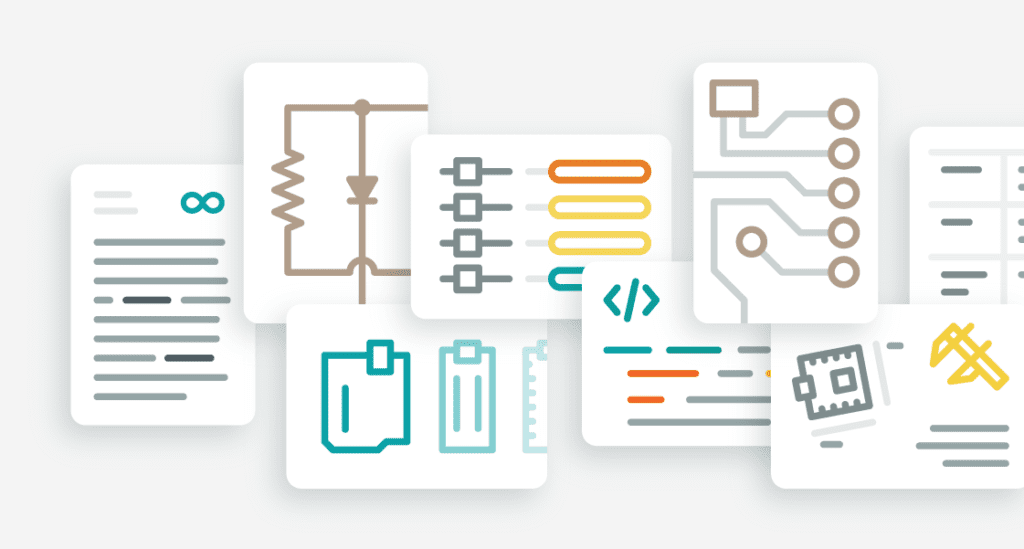
The truth is, we never entirely got to grips with Arduino documentation. Until now. Now there’s a new standard for gathering together product info, tech specs and tutorials, that we’re calling Arduino Docs. We’re excited to share it with the Arduino community who’ll soon be able to help it grow.
It Began with the Uno
When the Arduino Uno was launched around 15 years ago, its detailed documentation was a vital part of its success. It wouldn’t be at all unreasonable to say that its online resources were a driving factor in the establishment and growth of the primordial Arduino community.
But you’re probably quite aware of Arduino’s history, and the rapid growth that followed. Creating, organizing and maintaining that level of documentation around each and every board became a huge task. The complexity was one thing, but the open-source nature also meant that a lot of third party content was generated. Which is great, and is still very much encouraged, but it also muddied the waters of supporting content.
So getting all that essential info together in one place, while providing a great experience for the users, has been a passion project for a lot of people at Arduino. And now, it’s ready.
Which brings us back to today, and the launch of a whole new approach to the online presence of Arduino boards. Welcome to Arduino Docs.
The All New Arduino Docs Site
The new Arduino Docs site launches with a detailed, but easy-to-use breakdown of everything you ever wanted to know about the official boards and products.
Every product will get its own page, broken down into standardized sections so you have instant, easy access to what you need.
Overview: You’ll begin here when you take a look at a board on the Arduino Docs site. It’s a bird’s-eye-view of the board’s description and purpose, its main features, tech specs, revision logs (where applicable) and compatibility options.
Essentials: This section gets you started with using the board in question. Here you’ll find quick start guides, suggestions for libraries, and useful basics on using Arduino. Perfect for newcomers or anyone needing a refresher.
Tutorials: Any and all tutorials connected to the board will be marshalled here. You’ll never have to go hunting when you’re looking to build something awesome. These tutorials will showcase the different features of each board, giving you a full understanding of what’s possible.
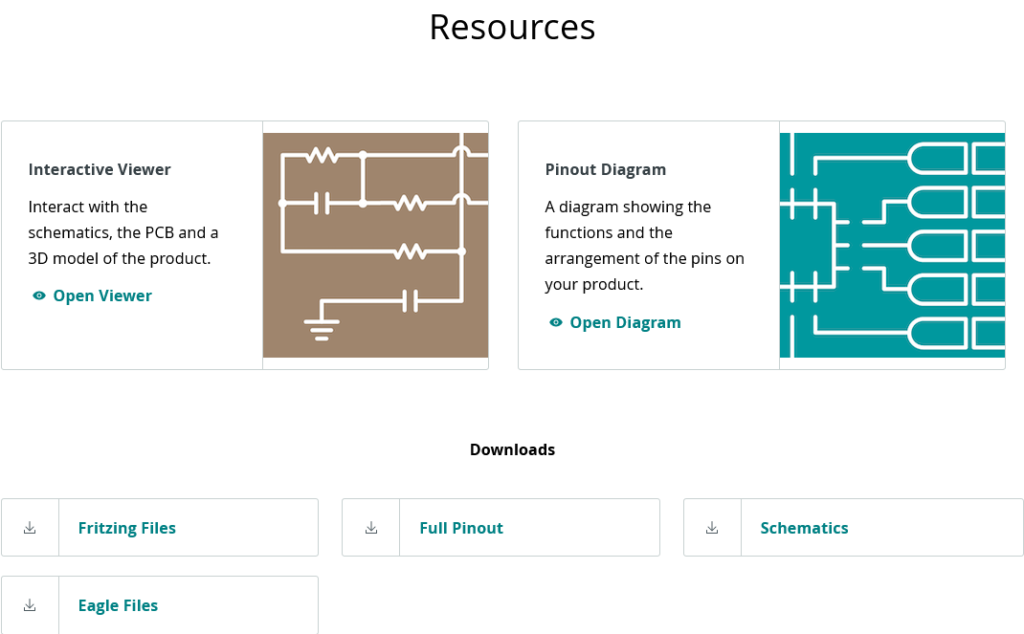
Resources: This is where we’ll keep the datasheets, downloads, pinout diagrams, schematics and other useful documents and files.
It’s been no small feat collating all this information, and reformatting into something that’s as useful for beginners as it is for experts and engineers. It’ll kick off with over 130 tutorials, dozens of boards, and a great selection of shields, all given a brand new home.
But it’s not just about the hardware. The new Arduino Docs site aims to be the most encyclopedic resource we’ve ever compiled, so it includes sections for software (such as the IDEs), Cloud (for the web editor and other Arduino Cloud tools) and a great asset for understanding the foundations of Arduino’s approach to electronics.
Cool Community Content
Lots of companies say they’re all about community. But in our case it’s actually true! Arduino isn’t a company or a board or a platform. It’s a community.
You guys created much of the content, tutorials and documentation out there. That’s not going to change now that we’ve launched Arduino Docs. GitHub is home to the whole system (we’re tech nerds, we can’t help it). That means members of the community will soon be able to add, edit and influence the Arduino Docs content.
The content team will review and approve submissions and branches made through GitHub. So what you’re seeing right now is the embryonic stage of Arduino Docs. We envisage amazing things once the community is able to get involved. Sign up to our newsletter so we can keep you posted on when that becomes possible, and about updates, leaks and more.
We’re very proud of the work that the various internal teams have done in making this happen. We hope you are too, and as always we really want any and all feedback you have on this new and valuable Arduino resource.
Please go and take a look, and do stop by the forums to tell us all about your experience.
We recently invited José Antonio Bagur to join us on EDUvision, to talk about his work on Quetzal-1; Guatemala’s first satellite. It was a hugely popular show with the Arduino and edutech communities, and we ran out of time before we could ask José all your space-based questions!
The range of questions you guys had around open-source, custom-built satellites were too good to go unanswered. So we brought him back for an EDUvision EXTRA. Melissa and Roxana teamed up to dig deeper into his amazing project.
José Antonio Bagur, and Quetzal-1
You can check out José’s first interview, which took place during the EDUvision livestream. But to quickly get you up to speed, let’s give José, and his pride and joy Quetzal-1, a quick introduction.
He’s a mechatronics engineer, university researcher and professor from Guatemala. He’s no stranger to the Arduino community either, as he regularly joins the Arduino team to host the Spanish-language Explore IoT webinars.
There are no formal aerospace science education programs in Guatemala, so José and his colleagues really had their work cut out designing and building the country’s first satellite! Over 100 people were involved in its development, which, of course, made plenty of use of Arduino.
In the EDUvision EXTRA video interview below, you can find out all about the incredible work they achieved. He talks about how they managed to get it into space, how it works, and what kind of challenges they faced throughout the project. Feel free to add any other questions you might have in the comments, over on the forum, or on social media.
Oh, and you’ll also find out where the name Quetzal-1 comes from!
Enjoy this extra slice of EDUvision goodness, and remember to join us on 20th May, 2021, for the next livestream. If you have a project you’d like to see featured live on EDUvision, let us know all about it. If it’s picked to be showcased, we’ll even send you some free Arduino swag.
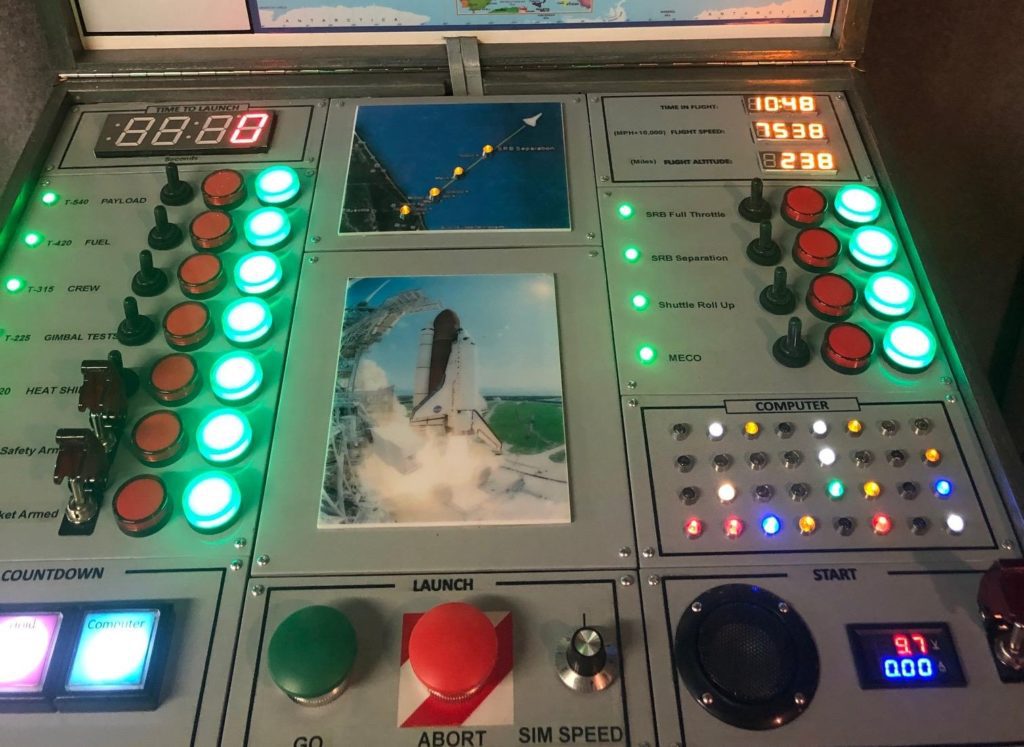
Becoming an astronaut is probably one of the top careers on any child’s list, but it’s not all that practical, especially when they’re still seven years old. That’s why Gordon Callison wanted to create a virtual shuttle mission control game that simulates a space shuttle launch with tons of different features for his kid to use.
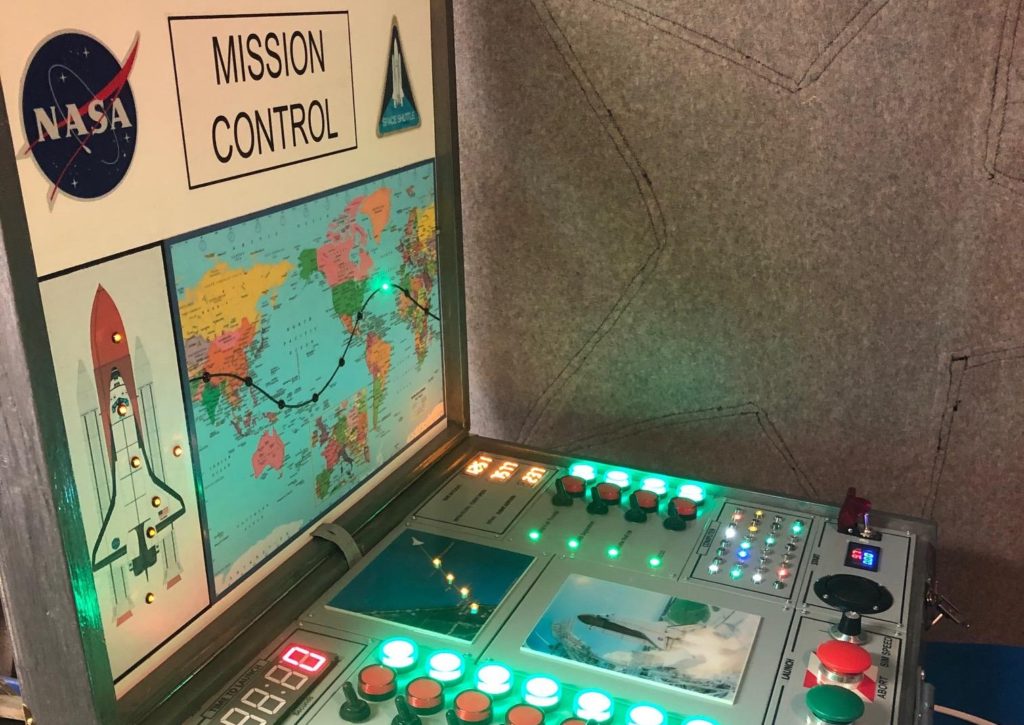
The project he made is composed of many different panels that compose a box with three main surfaces that display/control various aspects of the shuttle’s journey. These include pre-flight checks on the right, launching the shuttle in the middle, and telemetry displays on the right. The whole thing fits neatly into a briefcase, but don’t let that relatively small size mislead you- it’s packed with plenty of LEDs and buttons. To control all of these, Gordon went with an Arduino Mega, along with a couple of shift registers for toggling a bank of 32 LEDs on and off. Sound effects can also be played through an Uno and Adafruit Sound Board whenever the shuttle takes off or is done orbiting.
This system is a great showcase of what is possible by just using a bunch of simpler components, and Callison plans on expanding it even more with a possible fourth panel to show mock interior data. More details on the mission control box can be found over on Instructables.
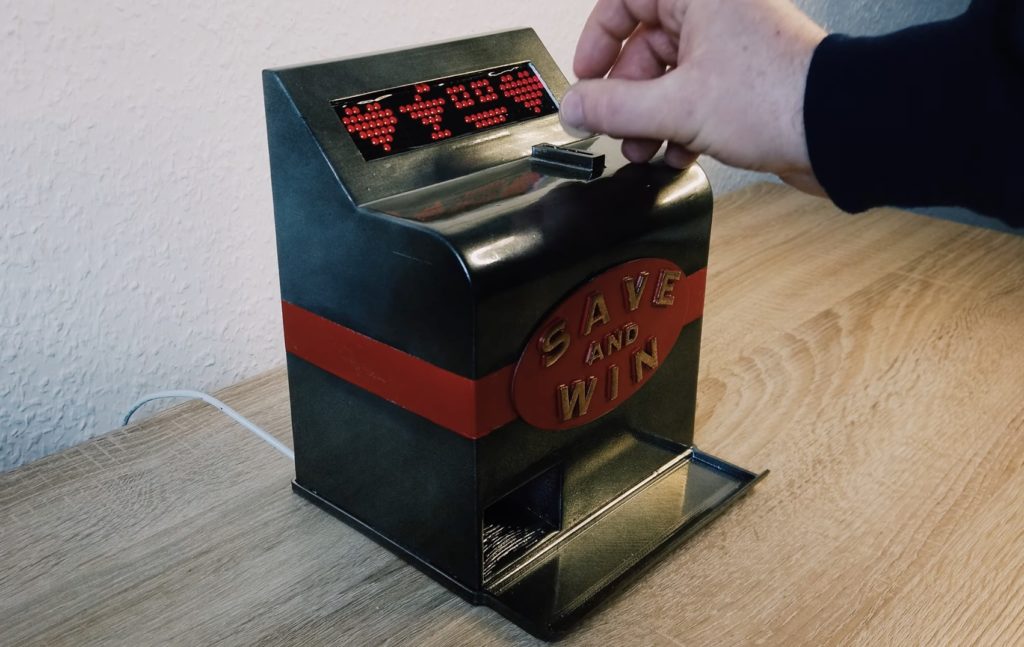
There’s really no joy in saving money until it comes time to spend it, of course. But in an effort to gamify things a bit, YouTuber “Max 3D Design” has come up with a beautiful slot machine that surely puts a spin on traditional piggy banks.
The device itself was modeled in Fusion 360 and the fairly substantial design took a week of printing to produce. It features four LED matrices that rotate reel symbols, obscured by a thin film to make it appear as one display. Inside a screw conveyor system is used to transport coins, which eventually pop out of an opening at the end. This screw is actuated by a small stepper motor, and the gaming process is started by dropping a coin past a pair of wires under the control of an Arduino Uno.
If you want to create your own slot machine bank, more details can be found in Max 3D Design’s video below. The best part? By leaving it out in your home and letting family and friends play with it, you’ll save more money in no time!
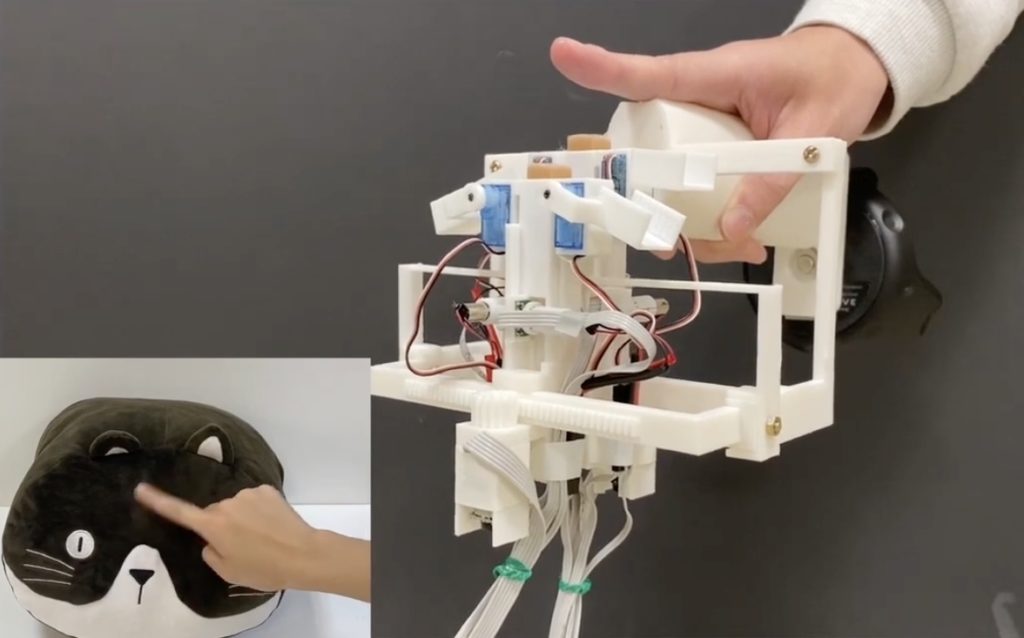
When it comes to virtual reality, the challenge isn’t displaying convincing visuals — VR headset manufacturers have already figured that out. The real challenge is how to tickle our other senses, like smell, taste, and especially touch. To give people the ability to feel the fur of animals in VR, engineers have built this strange haptic device, called HairTouch, equipped with adjustable hair.
HairTouch, which is controlled by an Arduino Mega board, serves a very specific purpose: to let VR users feel hair or fibers of varying lengths. That is an absurdly narrow goal and this device definitely won’t ever make it to market, but that doesn’t make it any less interesting. If you’ve ever wanted to feel the difference between a virtual tabby cat and a virtual Maine Coon, this is the haptic feedback gadget that you’ve been looking for.
Using a series of servo motors, HairTouch adjusts the bristles of a brush. It can control how far those bristles protrude, which is also related to their rigidity. It also adjusts the angle of the bristles, so the user can differentiate the feel of a Pomeranian from a Collie. Those adjustments correspond to the VR object that the user is currently touching. The engineers designed HairTouch to attach to VR controllers, so, at least theoretically, it can work with existing VR systems.
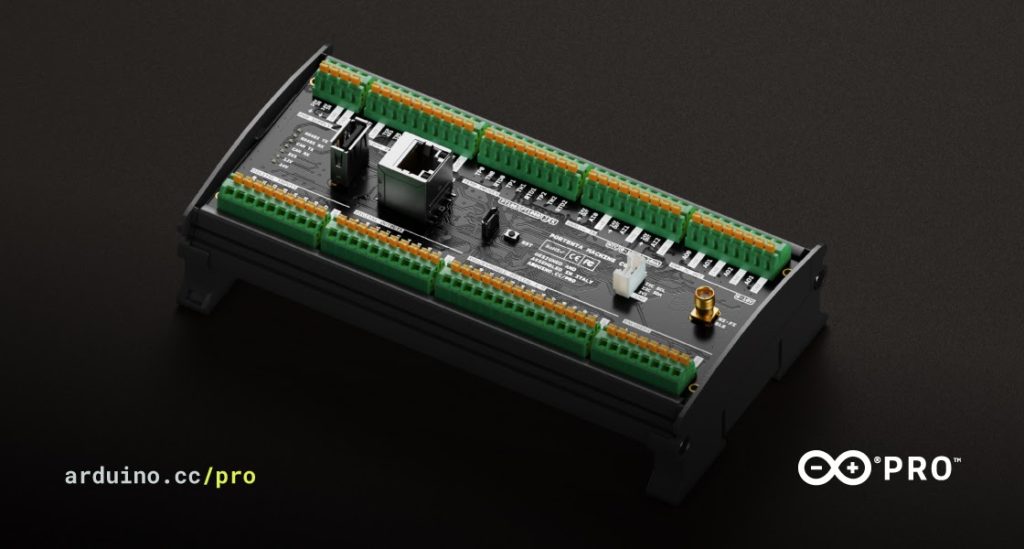
Arduino Pro is introducing a powerful new member of the Portenta product family, the Portenta Machine Control. It’s a fully-centralized, low-power, industrial control unit able to drive equipment and machinery. Plus, you can program it using the Arduino framework or other embedded development platforms.
Thanks to its computing power, the Portenta Machine Control enables a wide range of predictive maintenance and AI use cases. It enables the collection of real-time data from the factory floor, while supporting remote control of equipment, including from the cloud.
Key benefits include:
Shorter time-to-market
Enhance existing products
Add connectivity for monitoring, as well as control
Each I/O pin can be configured, so you can tailor it to your needs
Make equipment smarter, as well as AI-ready
Provide security and robustness from the ground up
Open new business model opportunities (such as servitization)
Interact with your equipment with advanced human-machine interfaces (HMI)
Modular design for adaptation, expansion and upgrades
Business as a Service
The Portenta Machine Control allows companies to enable new business-as-a-service models. You can monitor customer usage of equipment for predictive maintenance while gathering valuable production data.
The device enables industry standard soft-PLC control. Because of this, it’s able to connect to a range of external sensors and actuators. For example, the following options are all available.
Isolated digital I/O, 4-20mA compatible analog I/O
Three configurable temperature channels
Dedicated I2C connector.
Multiple choices are available for network connectivity, including USB, Ethernet and WiFi and BLE. Furthermore, it offers impressive compatibility through industry specific protocols such as RS485. All I/O are protected by resettable fuses, but on-board power management ensures maximum reliability in harsh environments.
The Portenta Machine Control core runs an Arduino Portenta H7 microcontroller board. This is a highly reliable design operating at industrial temperature ranges (-40 °C to +85 °C). Firstly, it boasts a dual-core architecture that doesn’t require any external cooling. Secondly, thanks to this versatile processor, you can also connect external human-machine interfaces. These include displays, touch panels, keyboards, joysticks and mice to enable on-site configuration of state machines and direct manipulation of processes.
The Portenta Machine Control’s design addresses a large variety of use cases. It’s possible to configure a selection of the I/O pins in software. Because of this, it stands out as a powerful computer to unify and optimize production where one single type of hardware can serve all your needs.
Additional Portenta Machine Control Features
Furthermore, it offers these other outstanding features.
Industrial performance leveraging the power of Arduino Portenta boards
DIN rail compatible housing
Push-in terminals for fast connection
Compact size (170 x 90x 50 mm)
Reliable design, operating at industrial temperature rates (-40 °C to +85 °C) with a dual-core architecture and no external cooling
Embedded RTC (real time clock), for perfect synchronization of processes
Leverage embedded connectivity without any external equipment
CE, FCC and RoHS certified
The Portenta Machine Control can be used in multiple industries, across a wide range of machine types. For example, labelling machines, form and seal machines, cartoning machines, gluing machines, electric ovens, industrial washers and dryers, mixers and more.
As a result, adding the Portenta Machine Control to your existing processes mean you become the owner of your own solutions in the market of machines.
The Portenta Machine Control is now available for €279/$335.
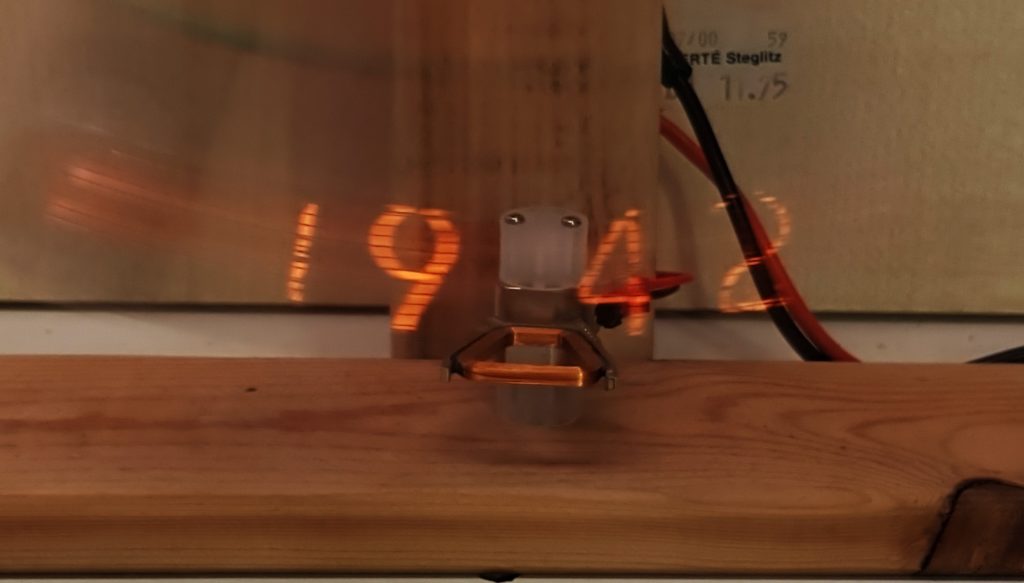
Clock pendulums are generally mechanical devices that time each second as it ticks away, but do little else. Jason Oeve’s concept, however, places the face itself – a single IN-12B Nixie tube – onto its large wooden pendulum. As it swings back and forth, four digits are progressively displayed on the tube for a unique timepiece.
An Arduino Nano is the brains of the operation, along with an RTC module and an accelerometer that senses the pendulum’s position. When it’s straight up and down, an electromagnetic coil gives it a boost, keeping it ticking along “forever.”
Um dir ein optimales Erlebnis zu bieten, verwenden wir Technologien wie Cookies, um Geräteinformationen zu speichern und/oder darauf zuzugreifen. Wenn du diesen Technologien zustimmst, können wir Daten wie das Surfverhalten oder eindeutige IDs auf dieser Website verarbeiten. Wenn du deine Einwillligung nicht erteilst oder zurückziehst, können bestimmte Merkmale und Funktionen beeinträchtigt werden.
Funktional
Immer aktiv
Die technische Speicherung oder der Zugang ist unbedingt erforderlich für den rechtmäßigen Zweck, die Nutzung eines bestimmten Dienstes zu ermöglichen, der vom Teilnehmer oder Nutzer ausdrücklich gewünscht wird, oder für den alleinigen Zweck, die Übertragung einer Nachricht über ein elektronisches Kommunikationsnetz durchzuführen.
Vorlieben
Die technische Speicherung oder der Zugriff ist für den rechtmäßigen Zweck der Speicherung von Präferenzen erforderlich, die nicht vom Abonnenten oder Benutzer angefordert wurden.
Statistiken
Die technische Speicherung oder der Zugriff, der ausschließlich zu statistischen Zwecken erfolgt.Die technische Speicherung oder der Zugriff, der ausschließlich zu anonymen statistischen Zwecken verwendet wird. Ohne eine Vorladung, die freiwillige Zustimmung deines Internetdienstanbieters oder zusätzliche Aufzeichnungen von Dritten können die zu diesem Zweck gespeicherten oder abgerufenen Informationen allein in der Regel nicht dazu verwendet werden, dich zu identifizieren.
Marketing
Die technische Speicherung oder der Zugriff ist erforderlich, um Nutzerprofile zu erstellen, um Werbung zu versenden oder um den Nutzer auf einer Website oder über mehrere Websites hinweg zu ähnlichen Marketingzwecken zu verfolgen.