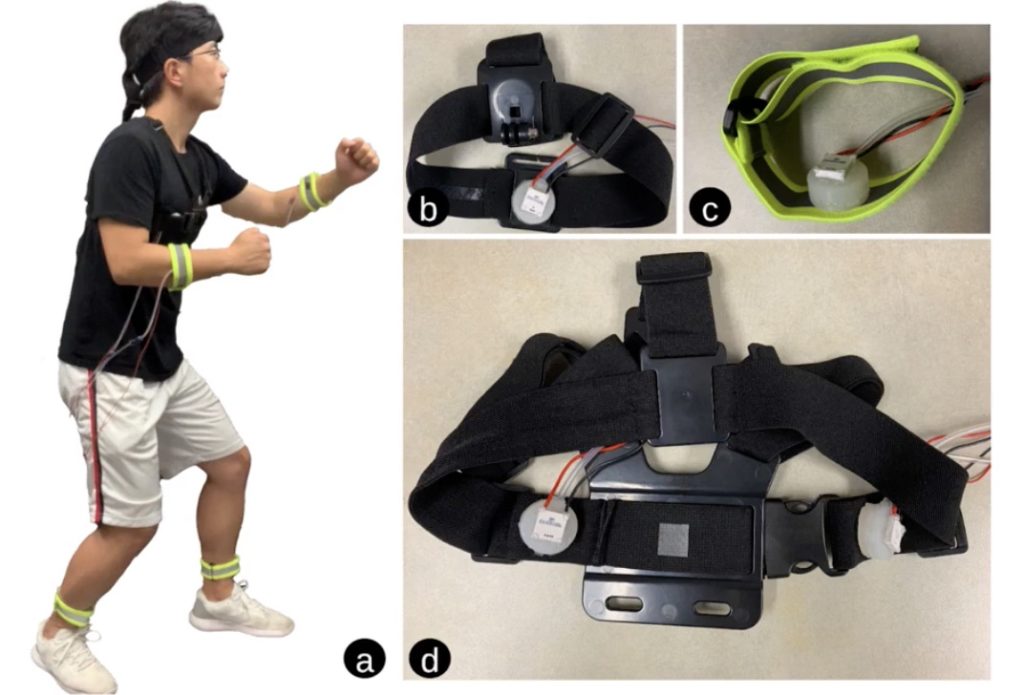
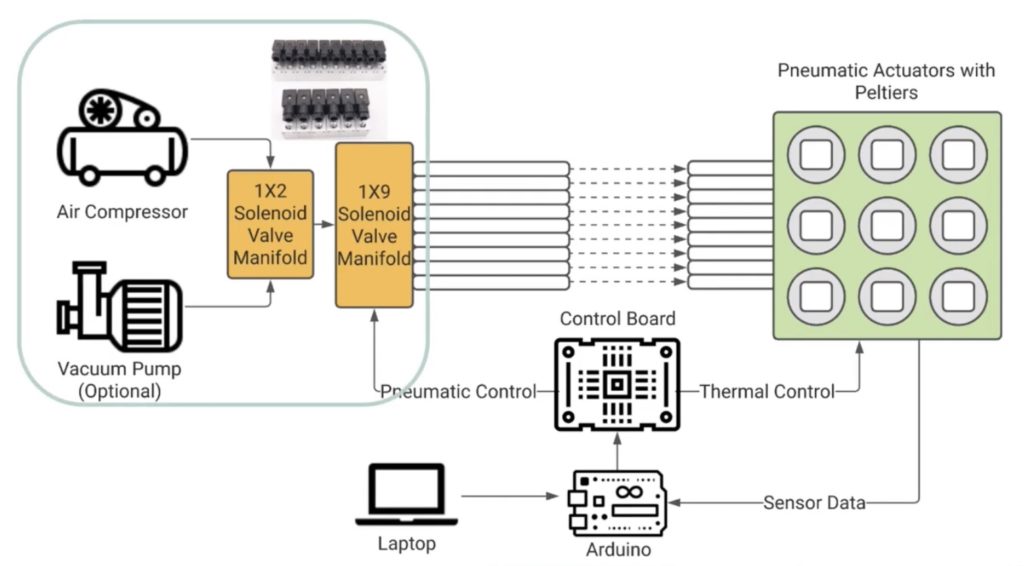
When trying to imagine a new way of interacting with either a video game or even another person remotely, being able to feel both temperature and touch sensations isn’t what most people would have in mind. However, thanks to some very interesting research being done by University of California, Santa Barbara student Bowen Zhang and professor Misha Sra, a novel method for interacting with the virtual world could come quite soon.
The project, which Zhang calls the “PneuMod,” is a modular system of tiny air bladders that each have a Peltier element on their surface. Then using an Arduino Mega and a custom-designed control board, commands can be sent from a laptop that open or close solenoid valves to let air inflate/deflate the air bladders, thus creating pressure against the wearer’s skin. Different temperatures are safely produced by combining the Peltier elements with temperature sensors, and by adjusting the polarity of the current headed to these elements, both hot and cold can be achieved with the exact same hardware.
Currently, the PneuMod can be fitted into a forearm cuff, ankle/wrist bands, and a headband. This led Zhang to begin experimenting with virtual reality gaming integrations where the user can physically experience when they have been hit with an object, along with its temperature. You can read more about this project here in its paper and watch his explanation video below.
We’re looking for you to help with the Arduino IDE 2.0 Release Candidate (RC), which is available right now. Whether you’re an Arduino power user or new to microcontroller coding, there are a variety of ways that you can contribute to this exciting new release.
Arduino IDE 2.0 Comes Out of Beta
It seems like only two minutes since the beta of Arduino IDE 2.0 was released. In fact, it was back at the very beginning of March. Now it’s ready to exit its beta phase, and you can update to the latest release candidate version right now.
And this is a really important step, not just because of some great new features that are bundled in (see below). It’s where the Arduino community is brought into the equation. It’s where you lend your techno-muscle towards helping us refine the release candidate.
There’s support for localization, for one thing. Any and all help in crafting the best experience in different languages is great for everyone. After all, it’s an important part of truly user-centric software. So please put your multilingual skills to use by providing translation contributions through Transifex.
This crowd-focused process is the same for testing the functionality, as well as the localization. We’ve got a feedback form where we’d like you to make us aware of any and all changes you feel IDE 2.0 RC needs. Of course, the forum is also available. Join us there for bug reports or tweaks that warrant a quicker, more conversational report.
Finally, remember that the IDE is now built around web technologies like HTML and Typescript (rather than Java), so everyone’s welcome, and encouraged, to contribute to its development. Here’s the GitHub repository for you to dig into.
What’s new in IDE 2.0 RC?
So, onto the new features of the release candidate.
First up we have the serial plotter. Using this, you can pull in data from your boards and projects, and map it out as waveforms in a graph. You can even print multiple variables at once, to be visualized all on the same graph.
There’s a high performance serial monitor to help with your debugging efforts. It’s also handy for monitoring the status of your boards and/or projects, and it’s been re-engineered to work very efficiently for optimal usability.
And as we mentioned above, localization into languages other than English is also now supported. Remember you can help out in translating the Arduino IDE through Transifex.
So please update to Arduino IDE 2.0 RC now. Then you can get to work helping us craft the first, fully stable version of the second generation platform. Keep that feedback coming!
A fidget spinner might entertain you for a short time, but unless you’re an astronaut you will only be able to experience it in Earth gravity. Wouldn’t it be fun if you could play with a fidget toy in a variety of planetary gravity magnitudes? Now you can, thanks to the Original Solarfidget.
The Original Solarfidget is a DIY desk toy similar to a fidget spinner. Pick up the puck-like device and give it a little jostle to start the LEDs spinning. They’ll spin for a while before slowly coming to halt. If you tilt it, the LED will settle at the bottom of the puck like a pendulum. But here’s where the fun comes in: it can react to different gravity levels. That means you can see how the LEDs would spin in the heavy gravity of Jupiter or the miniscule gravity of Pluto.
To build your own Original Solarfidget, you will need an Arduino Nano or Nano 33 IoT. It detects movement and the direction of gravity using an MPU6050 triple-axis accelerometer and gyroscope sensor on a breakout board. The spinner shows on a strip of WS2812B individually addressable RGB LEDs. Power comes from a 380mAh LiPo battery. The case is 3D-printable and there is even a 3D-printed magnetic charger to top off the battery.
This is the kind of gizmo that is perfect for fidgeting at your desk or for giving young students a demonstration of how gravity works on other planets.
As familiar as we all are with the UNO, there’s probably a lot you don’t know about the iconic Arduino microcontroller board. Put on your rose-tinted spectacles, and let’s wax poetic about the origins of this beloved maker board.
Rise of the Techno-Hippies
By 2009, the team that would become Arduino was gathering steam. A team that Make: Magazine once referred to as “designers, teachers, artists, and techno-hippies.”
I don’t think anyone on that team would object to such a definition.
Forged in the crucible of a classroom, the idea of an accessible, affordable electronics development platform was under serious investigation. It would eventually give birth to the Arduino UNO, but despite its name meaning “one,” this is far from Arduino’s first board. Moreover, its name was chosen to mark a point in Arduino’s story where the business itself came out of beta and into version 1.0.
“The UNO is an arrival point of a large number of small experimentations and incremental improvements,” says co-founder Massimo Banzi.
These experiments weren’t just a learning experience for electronics design. They were useability tests, and even marketplace research. Each little quirk, unexpectedly popular feature and, of course, mistake helped to define what makers wanted and needed.
This was a time when the maker movement was still unrepresented by a defining brand or killer product. But not for long.
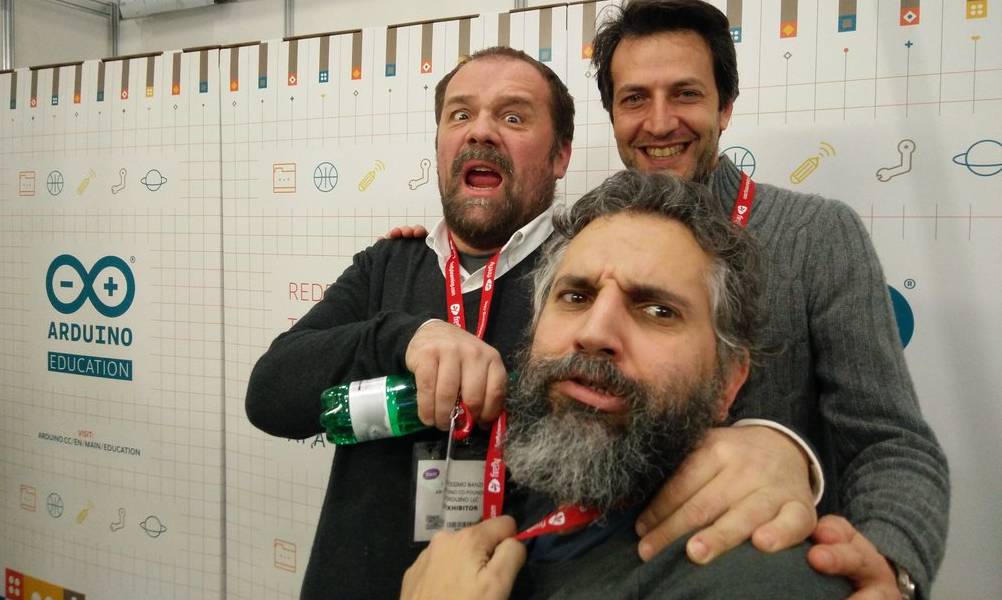
Massimo and David with Arduino CEO, Fabio Violante
Driving Towards the Future
The journey to the UNO wasn’t short, but it did have a distinct destination. The notion of an enhanced user experience was very prominent, although the people who would become the founders of Arduino hadn’t necessarily articulated it even to themselves. Looking back, it’s easy to see that this guiding principle was there from the beginning.
“On the original Arduino serial board, look at the components,” says co-founder David Cuartielles, talking about the earliest of Arduino’s self-assembly boards, which were used almost exclusively in the classroom. “They’re sorted by value. I made sure that components of a similar type and value were together, to minimize mistakes during assembly. For example, there were two diodes. In terms of operation, they’re working in opposite directions to each other. But to reduce errors when populating the board by hand, I set the diodes facing in the same direction, and the PCB’s tracks take care of orientation. So it’s optimized for education, not for electronic operation!”
“Back in the day we used to use FTDI chips,” Massimo recalls. “A Scottish company, now in Singapore. Great chips, but you had to install drivers to get your computer to recognize devices when you plugged them in.”
“Which is when we realized there was this thing called CDC (communications device class) protocol, which was embedded into operating systems. It’s the reason you don’t need a driver for a USB serial port. We found that you could develop a firmware for some simple Atmel processors that worked just the same as FTDI chips, but would liberate us from needing a driver.”
This opened the door to reprogramming the firmware and making the boards do other things. Some people created MIDI firmware to send notes to a computer. Others made HID firmware so they could emulate computer peripherals. It was the herald of dual processor experimentation, which piqued the interest of both Arduino users and its designers.
Press On with the UNO
These proto-UNOs also required you to press a reset button before uploading new code. It was a pretty standard requirement for any prototyping platform at the time. Most designers had simply never questioned this apparent necessity. But when the Arduino team found themselves placing more and more emphasis on user experience, this small requirement was identified as an obstacle to useability.
It was at a workshop in Germany when Massimo figured out an alternative.
“It turned out that if you put a capacitor between the reset pin of the microcontroller and one of the serial port pins,” he explains, “it would reset the board automatically whenever you opened the port.” This small tweak became a vital and very popular aspect of the UNO’s useability.
But there were a lot of other factors that went into making the UNO so recognizable that it’s become indistinguishable from the overall Arduino brand.
The Power of One
Early Arduino boards required a more active participation when it came to powering them up.
They already offered flexibility in choosing your power source. But if you wanted to power the board from the USB or the external power jack, you had to move a jumper. Not a lot to ask, but as many of the design experiments proved, these seemingly insignificant requirements had a disproportionate effect on usability.
People would forget to set the jumper in the first place. Or have it in the wrong position when trying to power on, and frustrations ensued. So a small circuit was implemented that detected where the power was coming from, and switched to it automatically. Simple, but essential.
Tweaks to the power options didn’t stop there. On other boards there had been some experimentation with microUSB ports, not realizing how fragile they can be. So when it came to the UNO, the USB connector was carefully chosen for its reliability. “It’s like a Russian tank,” Massimo laughs. “It’s indestructible.”
Feeling Blue
“Going from the original design we had on a rectangular green board, to the shaped blue board that everyone recognizes now, took two days,” David recalls, musing on how Arduino could move so fast because of its focus on simplicity. “And in between we went to a party. Because the designs are very simple.”
“The original board, before it became the Arduino UNO, was a typical green PCB,” Massimo explains, lavishing mediocrity on the state of pre-Arduino prototyping platforms. “Not so exciting. The PCB manufacturer we were talking to went on and on about how he was making blue PCBs because they were apparently easier on the eye for production line workers. We thought, ‘Hey! Blue is better, because everyone else is using green!’”
You can see a pattern in the way Arduino was beginning to question the norms of its industry. Those shades of blue and teal have become synonymous with Arduino devices, and that didn’t happen by accident. At the time, PCBs were green. Maybe beige, if they were still bare fibreglass.
But no longer, once the UNO arrived.
Arduino didn’t just have its eye fixed on usability. It was also searching for an identity that makers would associate with enhanced experience and quality. It just so happened that the UNO was destined to become the vessel that gave that identity a tangible shape.
The beautiful blue board, with the first appearance of the brand new Arduino logo
Taking Shape
“I was teaching and I had to draw PCBs on a white board all the time,” recalls David. “And all boards were square or rectangular. So how do you tell people which is left and which is right? In order to avoid errors in plugging things in and building the boards, which originally were self-assembly, I thought it needed to be a non-symmetrical shape. Then the students could see that this is left and this is right. It wasn’t a creative decision, so much as a functional one for education purposes.”
Around that same time, the school where he was teaching in Ivrea was issuing everyone with business cards. They arrived on Massimo’s desk in a small plastic box. “So that seemed like a good starting place for sizing,” Massimo remembers, “as it seemed like a great idea if we could fit the UNO in a plastic box like the one my business cards came in.”
It was taking shape as a very recognizable product. And you want to put your name on products you’re proud of. Typically any branding on a PCB was added using the standard font that came with the Eagle PCB design software. Essentially vector lines, not graphics. This change was enacted by a former student of the Ivrea classroom, Giorgio Olivero. He was entrusted with the new Arduino identity.
“The strength of our current image depends entirely on the outstanding work Giorgio’s done,” David notes. “Giorgio understands not only graphic design, but the importance of designing the whole user experience. He understood interaction design really well. He understood the nature of the Arduino project intimately, and the needs of the end user.”
An UNO in its original packaging, designed by Giorgio Olivero. Photo courtesy of Francesco Balducci.
The UNO was the moment when quality came home in every respect. The boards were given an appealing new color, precision engineering, high quality manufacturing, and an emblem that made sure you knew you were holding an Arduino.
“The response was fantastic,” David continues, reflecting on the reception that the new Arduino and its flagship device received. “Nowadays it’s really common to do these kinds of things, but back then on the maker scene it was really unusual to put so much into making things look good, and putting a focus on the user experience.”
One Small Mistake
“When I was designing the board I made a mistake that we still have to live with,” admits Massimo. “I moved the connectors in the top right of the board half a step to the left, so the gap between the connectors is non-standard. It’s 1.27mm out. Which is fine on the connectors at the bottom, but that’s why you struggle to use a veroboard to develop shields, because the connectors aren’t quite aligned as they were meant to be.”
It’s a mistake that had a silver lining, though. That slight misalignment also (inadvertently, perhaps) gave us a key for attaching shields the right way around. So, just between you and me, let’s pretend it was deliberate and say no more about it.
Even the first batch of UNOs that came off the production line weren’t quite where Arduino wanted them to be, quality wise. The process for milling the PCBs into the iconic UNO shape wasn’t as reliable as it is now.
A small number of the boards had rough edges where they were snapped out of the sheet after cutting. Nothing that affected the operation of the board, but not so good when your focus is on achieving a distinctive level of quality.
“A friend and I spent the weekend at the PCB manufacturers,” Massimo remembers, semi-fondly, “sandpapering the edges of the first batch of UNO boards. What else could we do?”
Ten Thousand and UNO
Makers responded very positively to the ethos behind the UNO. And that enthusiasm was directly reflected in the number of Arduino boards sold.
“I remember an article in a magazine celebrating that Arduino had sold 10,000 boards,” Massimo recalls. “Arduino was here to stay, they said, because back then if anyone sold 10,000 boards you were boss!”
Arduino itself celebrated this milestone back in 2007, with a predecessor to the UNO called the Arduino Diecimila, meaning “ten thousand”. Interestingly enough, this was also the board that introduced automatic software resets when uploading a sketch, so you no longer had to press a reset button. Without the Diecimila, the UNO couldn’t have been born.
The Arduino Diecimila
Now Arduino’s selling in the region of 10,000 boards a week. As you can imagine, magazines and blogs have stopped writing about every maker device that hits the 10,000 milestone now. The UNO itself, in fact, has recently crossed the 10 million mark.
The Day of the UNO
It wasn’t just the Arduino UNO that was unveiled at the Maker Faire New York in 2010. It was the new Arduino. Colors, branding, logos and a refined focus on usability and recognizable quality across everything Arduino did, from the UNO to the website and the packaging.
“I was the only one not present at that event in New York,” David laughs. “I was in a hotel in my home town of Malmö, because I had to launch the new website. At the time we were running the whole Arduino server in a $5-per-month VPS, because we had no money. Whenever we announced a new product, the website was going down. So to try and avoid this happening while Massimo was up on stage announcing the Arduino UNO, I was waiting to flip the website to Giorgio’s fantastic new design.”
The UNO’s launch signaled a transition from DIY success story to the primary platform for makers, engineers and creators around the world.
“We didn’t create a computer that allowed people to continue to do their job but at a cheaper price,” David continues. “We created a computer that empowered people who had no idea about electronics to start using technology, and this represented a huge life change for a lot of people. When I hear people say they started with an Arduino UNO, and now they’ve become the IT teacher at their school, it’s just amazing. And there are hundreds of stories like this.”
“There are some products in history that just work,” Massimo concludes. “That simply do what people need. So they endure. They last for a long time.”
Although smartphone users have had the ability to quickly translate spoken words into nearly any modern language for years now, this feat has been quite tough to accomplish on small, memory-constrained microcontrollers. In response to this challenge, Hackster.io user Enzo decided to create a proof-of-concept project that demonstrated how an embedded device can determine the language currently being spoken without the need for an Internet connection.
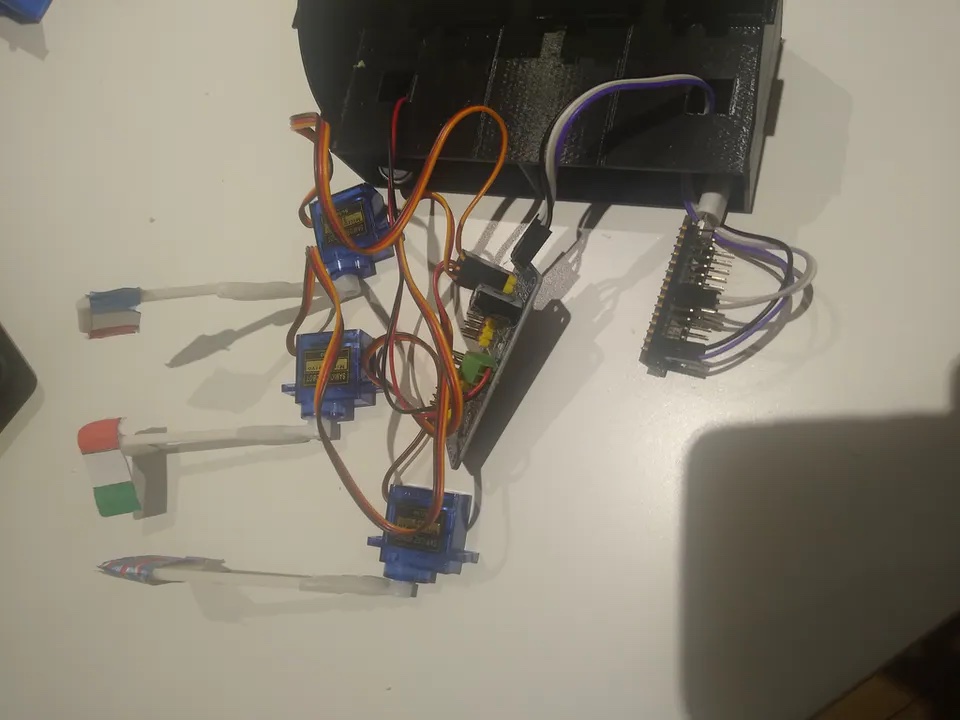
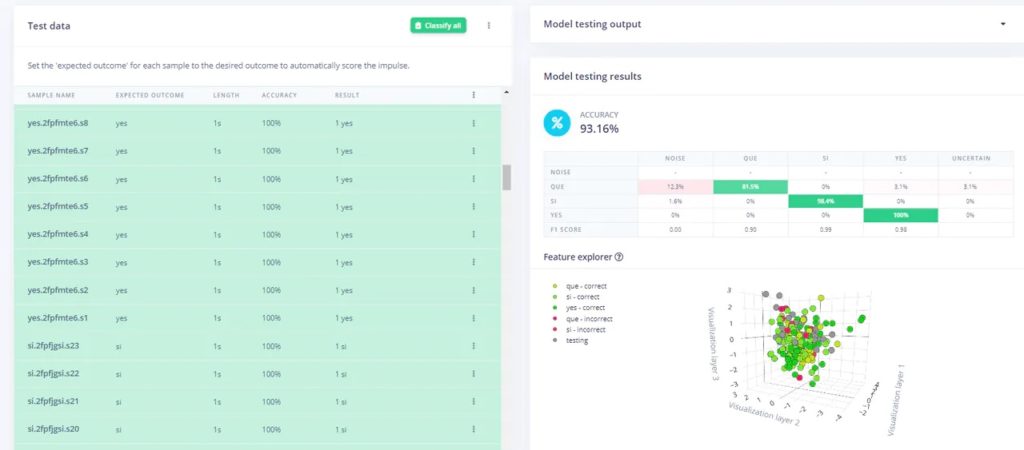
This so-called “language detector” is based on an Arduino Nano 33 BLE Sense, which is connected to a common PCA9685 motor driver that is, in turn, attached to a set of three micro servo motors — all powered by a single 9V battery. Enzo created a dataset by recording three words: “oui” (French), “si” (Italian), and “yes” (English) for around 10 minutes each for a total of 30 minutes of sound files. He also added three minutes of random background noise to help distinguish between the target keywords and non-important words.
Once a model had been trained using Edge Impulse, Enzo exported it back onto his Nano 33 BLE Sense and wrote a small bit of code that reads audio from the microphone, classifies it, and determines which word is being spoken. Based on the result, the corresponding nation’s flag is raised to indicate the language.
You can see the project in action below and read more about it here on Hackster.io.
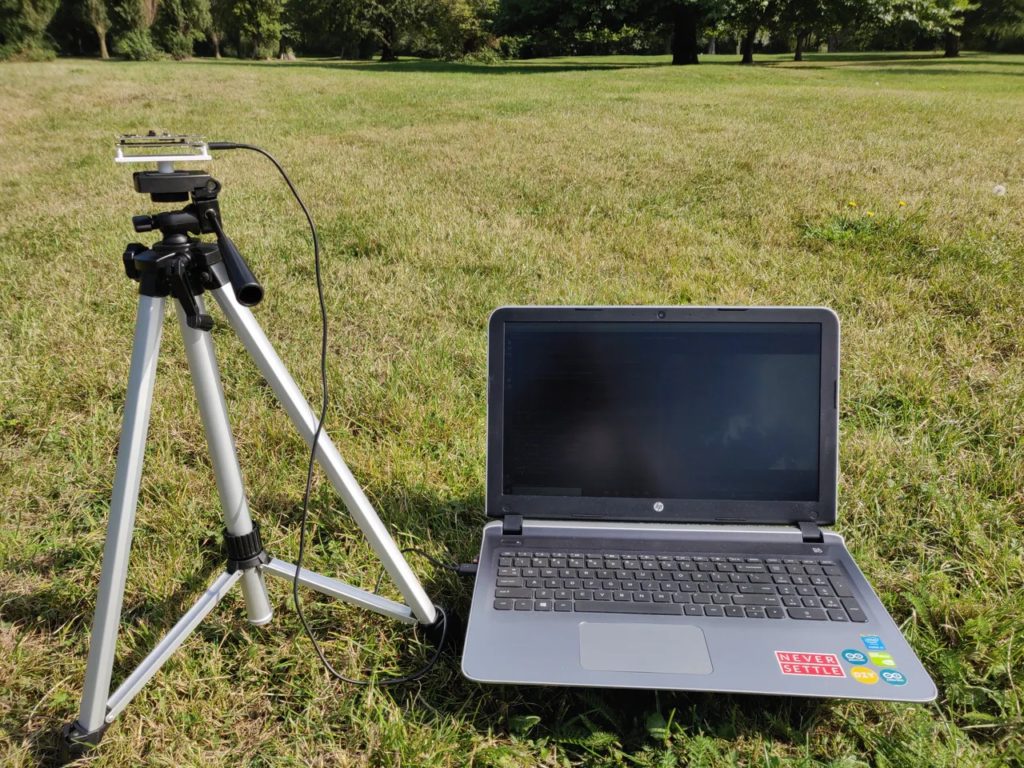
At the basis of each weather forecast is data — and a lot of it. And although the vast majority of atmospheric data collection is fully automated, determining cloud volumes and types are still done manually. This problem is what inspired Swapnil Verma to create a project that utilizes machine learning to categorize six different classes of clouds.
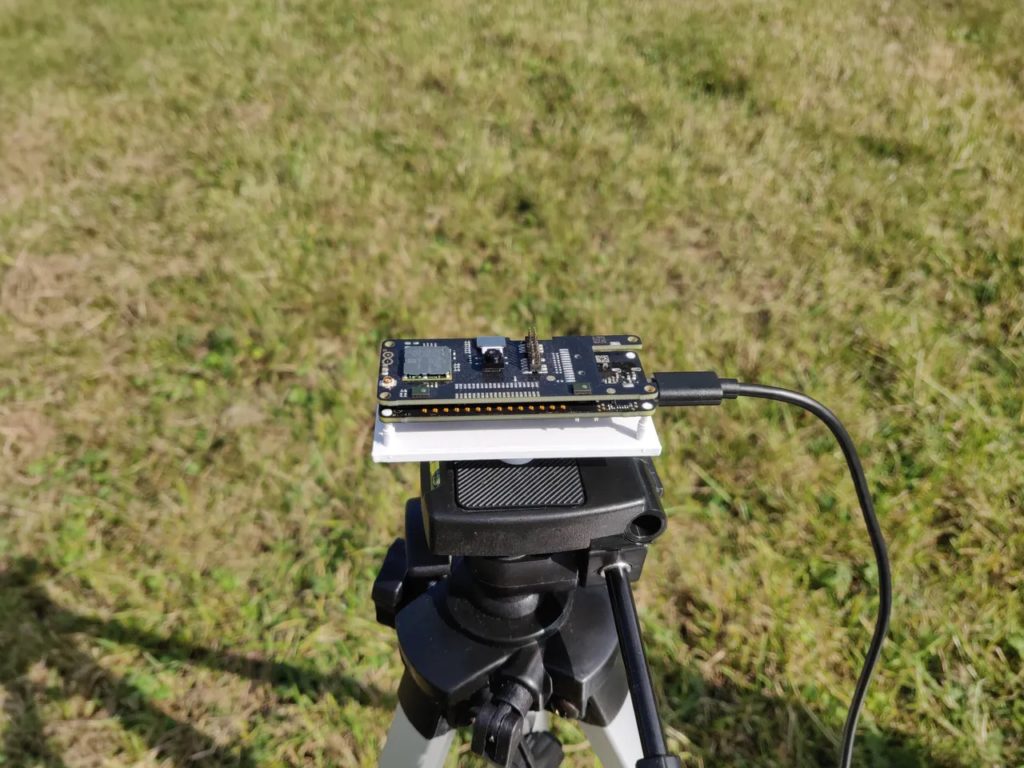
The hardware for this system consists of an Arduino Portenta H7 due to its powerful processor and array of connectivity features, along with a Portenta Vision Shield for the camera. Both of these boards were mounted to a custom base on top of a tripod and powered by a battery bank over USB-C.
The MicroPython software installed on the Portenta H7 relies on the OpenMV library for capturing images from the Vision Shield and performing a small amount of processing on them. From there, Verma trained an image classification model on nearly 2,100 images of various labeled cloud types — clear sky, patterned cloud, thin white cloud, thick white cloud, thick dark cloud, and veil cloud — using Edge Impulse and deployed it back to the board. As the Portenta runs, it collects an image, classifies it locally, and then sends the result via MQTT to client devices, which lets them read the incoming data remotely. Verma even included a mode that takes images at a slow rate and sleeps in between to save battery power.
To read more about the Verma’s cloud classifier project, you can visit its writeup here on Hackster.io and watch the demo below.
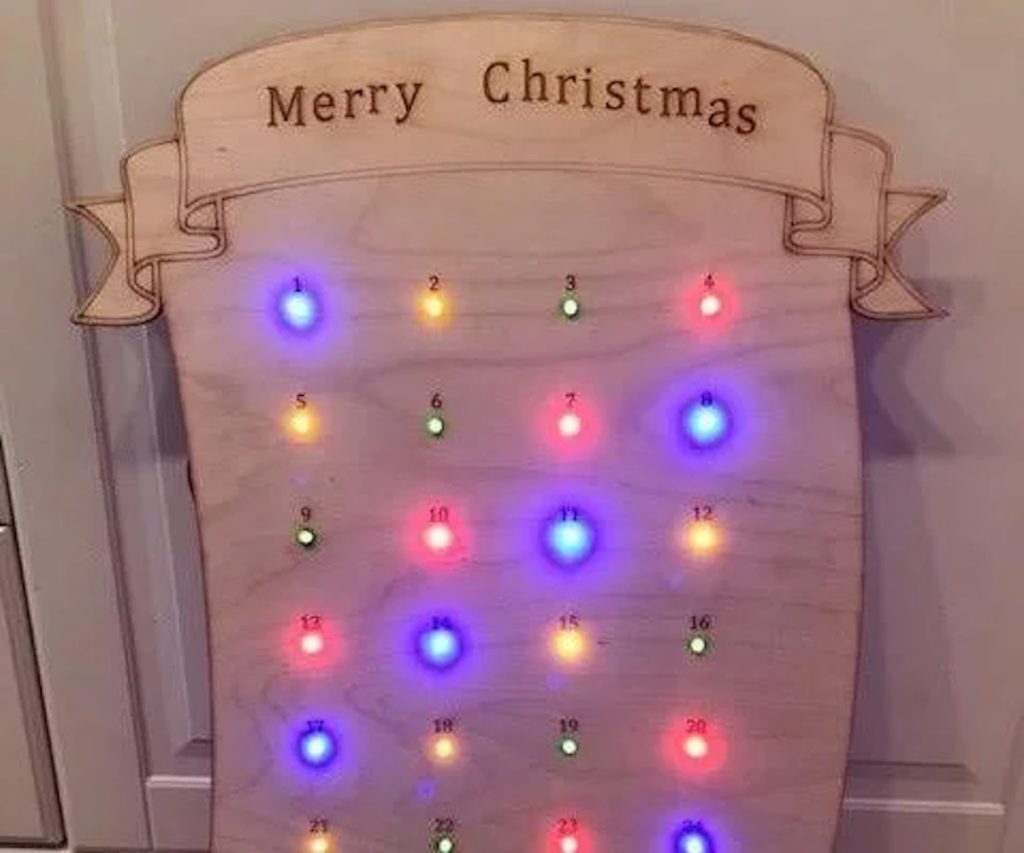
Along with the typical Christmas decorations of trees and elves sitting on shelves Tom Goff was motivated to build a DIY “Hackvent” calendar after being inspired by his son’s request for one. The design differed from the traditional Advent calendar in that it features an array of 25 lights, one for each day, that light up sequentially whenever a button is pressed. After the final day is reached, the system begins to play a song and makes the lights dance around.
To create the calendar’s housing, Goff designed a 2D panel with cutouts for all the LEDs and an additional one for a single button. After laser cutting a piece of plywood, he got to work coming up with a circuit. The components included an Arduino Mega, 25 LEDs and resistors that are directly driven by the Mega’s GPIO pins, an ISD 1760 module that plays music from its embedded ROM, and a small 2W speaker.
After loading the code onto the Arduino, Goff tested his new Hackvent calendar by pressing the button 25 times and then stepping back to watch the resulting light show. You can read more about his project here on Instructables or watch his demonstration video below.
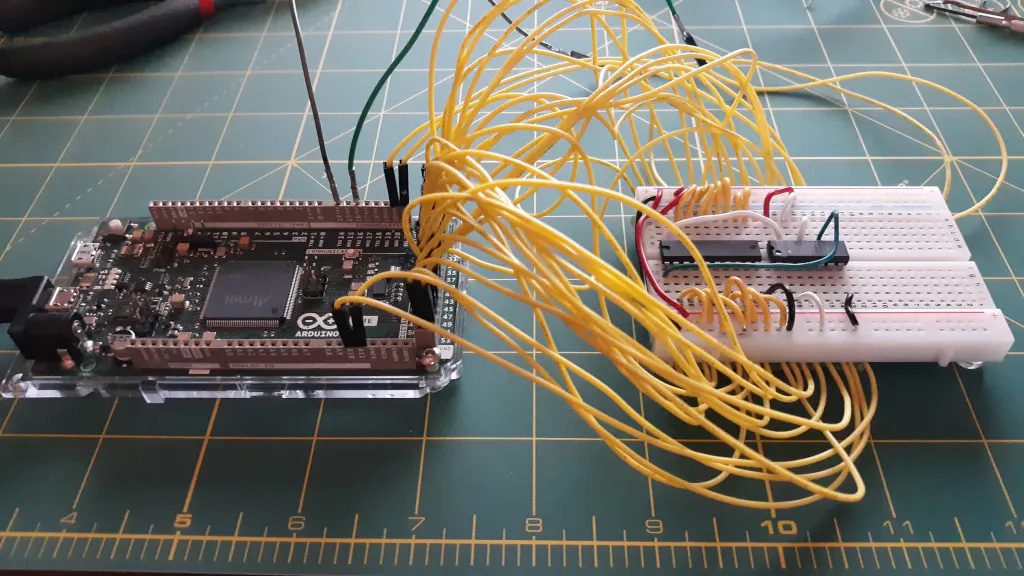
Breadboards are the first tool you break out in any prototyping journey and almost every project will utilize a breadboard at some point. Those breadboards often turn into a rats’ nest of overlapping wires that are difficult to trace, which makes it difficult to create an accurate schematic when it is time to design your PCB. To make your life easier, Nick Bild came up with a script that analyzes your physical breadboard to automatically generate a KiCAD schematic.
A breadboard is, at its core, a series of connectors. This script’s purpose is to identify every connection and associate it with the corresponding pin on a component. It is able to do that using a special breadboard that has every row of pins connected to an Arduino Due board I/O pin. A Python script running on a connected PC then checks every row for continuity. The user then inputs the component located at connection, and the script will draw a KiCAD schematic with wires between every component’s pins.
This script does have some serious limitations. The most obvious is that many ICs either don’t have internal continuity for every pin or only have internal continuity in certain states. To overcome that, the user must insert jumpers in place of some components. The user must also enter the component associated with each connection, because the script has no way of identifying components — it only checks for continuity. But even with those limitations, Schematic-o-matic can save you a lot of time and effort when you create schematics for particularly complex breadboard circuits.
If you’re a maker, engineer or any other kind of tech-head, there’s a vast number of great electronics gifts you can choose from. But if you’re not as immersed in maker culture as your partner, kids, friends or family, and you’re looking for the perfect gifts for the makers in your life, we’ve got you covered.
Over on the Arduino Store is a selection of gift guides to help you pick up the perfect stocking stuffers.
Under €50
If you’re looking to put a few extra bits and pieces under your maker’s tree this year, start here.
Every budget is accounted for. There’s so much choice from components, cases, Arduino boards, shields and sensors, that you could fill a whole fireplace of stockings with this treasure trove of affordable gadgetry.
$wag IoT
Here’s the chic side of electronics. All the coolest gear for people who like their projects to have a bit of extra bling.
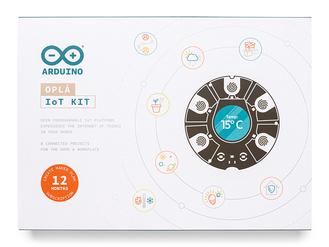
If you’re looking to impress a maker this holiday, browse through this sensational selection. Pay particular attention to the Oplà IoT Kit (perfect for home automation enthusiasts), CircuitMess Spencer (a kind of DIY Alexa) and the LYRA (for the retro gamers).
To Learn
It’s a total myth that educational gifts have to be boring! To prove that point, we’ve compiled an educational gift guide. It’s perfect for parents who want something that’ll give their kids a new set of skills or a creative outlet.
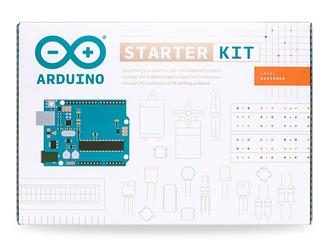
You simply can’t go wrong with the Arduino kits if you want to inspire the next generation of makers, artists and engineers. The Starter Kit for newcomers, the Student Kit if they’re already studying STEM subjects, and the Engineering Kit to help them to the next level.
To Create
If you’re looking for gifts on the Arduino Store, you probably already know someone who’s dripping with boards, gadgets and bits of tech. Someone who’s always working on a new project, improving old ones or dismantling something to “make it better”.
If that’s the case, there’s plenty here that would make their festive season. Creatives can never have too many accessories for their workshops.
To Perform
It’s all pretty high tech here, but this gift guide is for those who ride on the cutting edge. If you’ve heard the words “machine learning” or “intelligent sensing” floating around, take a look here for your gift-giving inspiration.
What you’re looking at are the more powerful kinds of devices. Great for those who are studying or working in high level electronics. You can be sure they’ll be thrilled and astounded if they open a present from you that turns out to be a Nicla Sense ME or a Portenta H7 with machine vision.
Arduino Gift Cards
Still not quite sure what you’re looking for? You’re in luck!
This is the first year that we’ve introduced digital Arduino gift cards. So if you’ve got a maker on your nice list and they’re either too far remote to send something, or you just can’t decide which Arduino goodies they’d love the most, a gift card means they’ll always get what they want.
The UNO wasn’t Arduino’s first board, and it won’t be its last. There have been many varieties of microcontroller and maker boards before and after the UNO, but none have been as iconic. As we cross the epic milestone of 10 million UNOs sold and the launch of the UNO Mini Limited Edition, we decided it was time to take a look back at some of our favorite UNO projects from the last 10 years.
And we want to hear about yours, too. Join us over on social media to share your favorite UNO projects, whether you built them yourself or marveled at someone else’s electronic creation.
The Toothbrush Machine
The queen of terrible tech Simone Giertz casually blew the internet’s mind back in 2015 with her robotic skateboard helmet with an automated toothbrush mounted on the front.
Arduino GRANDE
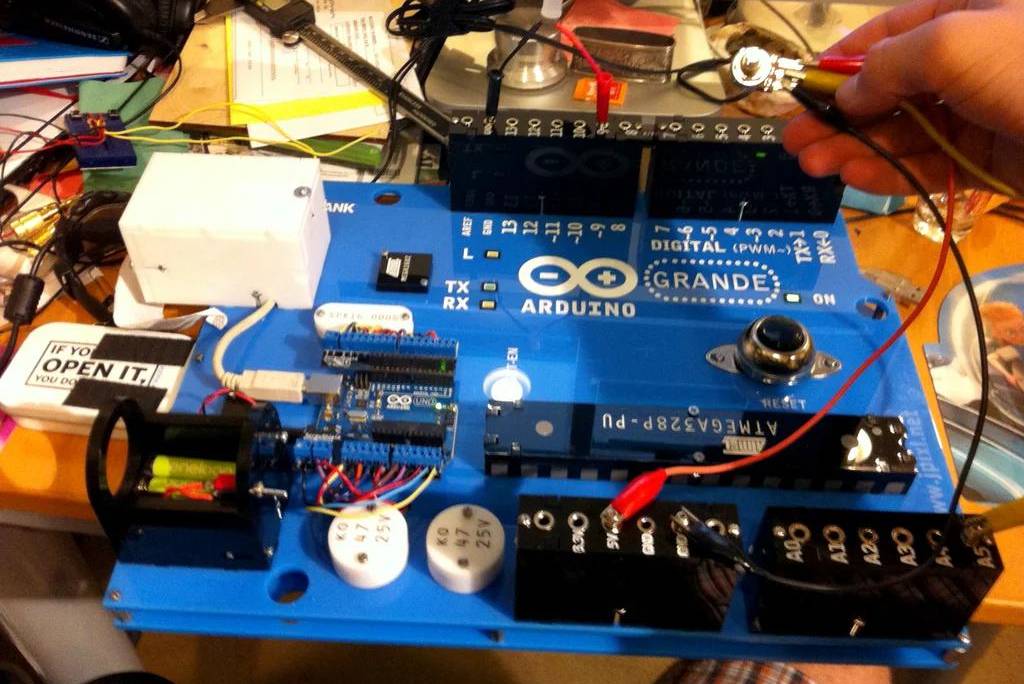
Spend more than five minutes Googling “Arduino UNO” and you’re bound to find yourself looking at the Arduino GRANDE. A fully operational UNO that’s six time bigger than it should be.
Coffee Printer
If you’ve ever left a coffee ring on your notepad or table top, you’ll appreciate how effective it is at leaving a mark. This UNO project put that annoying side effect of coffee to artistic use.
Autonomous “Follow Me” Cooler
Why carry your own beer and sandwiches around like a sucker, when you can “simply” connect a robotic cooler to your smartphone’s Bluetooth, hook it up with GPS and let if follow you around.
Skeleton Arduino Uno
This Arduino UNO is its own project, which is so meta it’s impossible not to love it! It’s a PCB without the PCB, and takes “open” source more literally than any other maker board has ever achieved.
Gaming Microwave
Microwave’s used to be considered the fastest way to cook things. But in today’s CPA-addled world, even one-minute noodles take too long. Problem solved; game while you’re waiting.
Floppotron
This UNO project takes the concept of “everything is a drum” to new levels by turning devices like hard drives, floppy drives, scanners and more into a techno-orchestra.
pedalSHIELD UNO
This programmable guitar pedal built from an UNO lets you create all your own effects and digital sounds, with an ever-growing repository of pre-built effects from the Arduino music community.
Automated Dust Collection
Master maker and craftsman I Like to Make Stuff has created some incredible carpentry projects, and underneath it all is an Arduino UNO keeping his awesome workshop clean.
Useless Box
Useless machines are a wonderful maker project rabbit hole to fall down. This is a great example, and even though they’re useless, you can learn so much from building one. Which means it’s not actually useless, right?
Drumcube
Drumcube is a drummer in a box, so as long as you’ve got an Arduino UNO and a small box, you’ll always have someone down in the boiler room when you play at a gig.
Petoi Bittle
This highly maneuverable little palm-sized robot runs, jumps and plays to become your very own robotic pet. Some stunning design work, and it can even carry up to half a kilogram as it skips around!
Mounts in the video game Final Fantasy XIV act like how cars or horses do in our world since they allow players to travel around the map much faster than would otherwise be possible. But even better, mounts are ways to express personality and have some fun, which is especially evident with the infamous “Fatter Cat” mount, as it got so widely beloved that Square Enix, the game’s publisher, decided to start selling a plushie version of it in their store.
With his own Fatter Cat cushion, FFXIV modder Louis Hamilton (SuperLouis64 on YouTube) decided to add some extra functionality by attaching both a touch sensor and a passive infrared module that lets it sense when someone has sat on it. This in turn causes an Arduino Micro board to send out a keystroke that activates a macro in the game, thus causing the Fatter Cat mount to appear.
You can watch SuperLouis64’s video below for a short demonstration of how this fun system works.
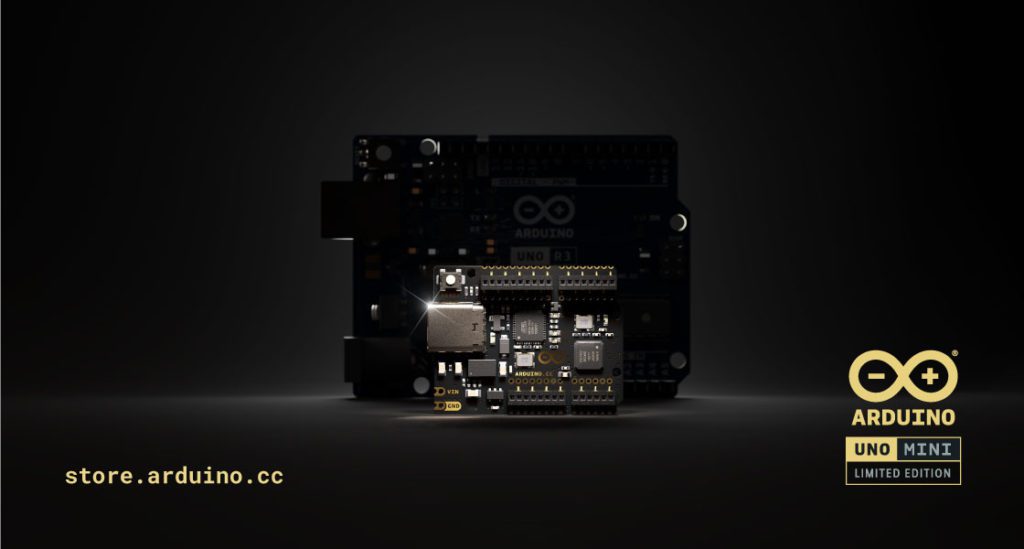
The iconic Arduino board is back, in the shape of the UNO Mini Limited Edition. Pre-orders have just gone live, so don’t dawdle if you want to get your hands on this stunning piece of Arduino history.
10 Million Makers Can’t Be Wrong
The UNO Mini Limited Edition is here to celebrate a pretty epic milestone in Arduino’s history. The iconic board, which first launched back in 2010, has become synonymous with Arduino itself. It’s like the company and the board are inextricably linked in the minds of makers around the world. For many, Arduino is the UNO.
There was a feature in Make: Magazine once, which declared Arduino was here to stay because it had just crossed the 10,000 sales threshold. Back then (and it’s not even that long ago), the idea that you could sell 10,000 maker boards was pretty epic.
The UNO has now sold over 10 million units.
It’s impossible to guess how many projects that equates to. Just like us, many of you will have owned a lot of UNOs over the last decade, and some of those will have been used in multiple projects. Can you still remember your first UNO, or your first UNO project? Share them with us!
So we wanted something super cool to celebrate this new maker board milestone. And that something is the UNO Mini Limited Edition.
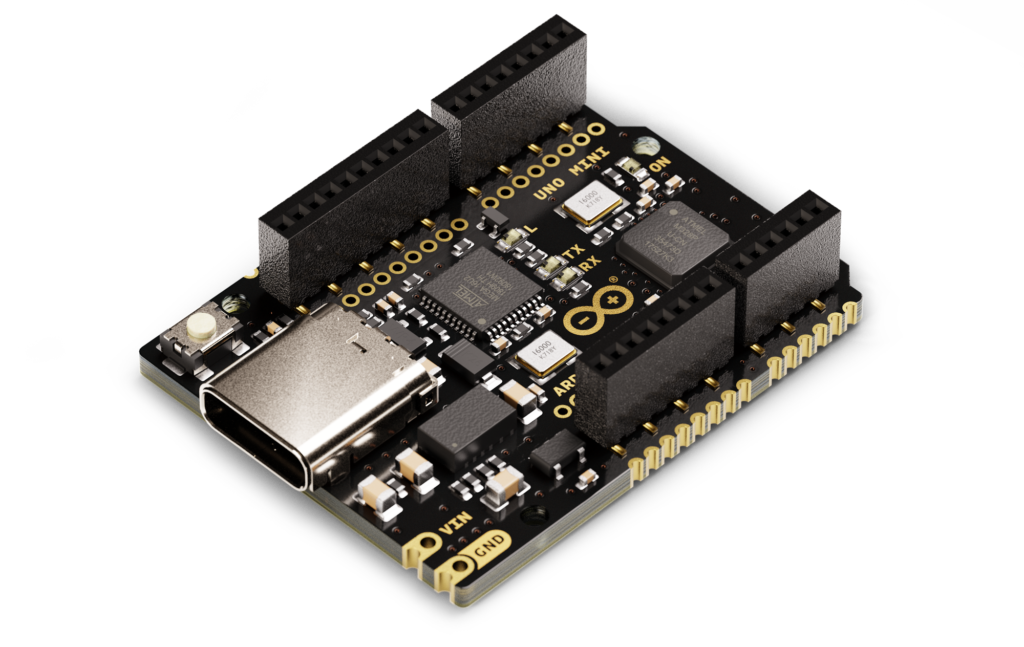
Meet the UNO Mini Limited Edition
First and foremost, this is an UNO like any other. It’s (almost) the same specs, with the same processor, pinouts and performance that made the UNO so popular. But there are a couple of cool tweaks we think you’ll love.
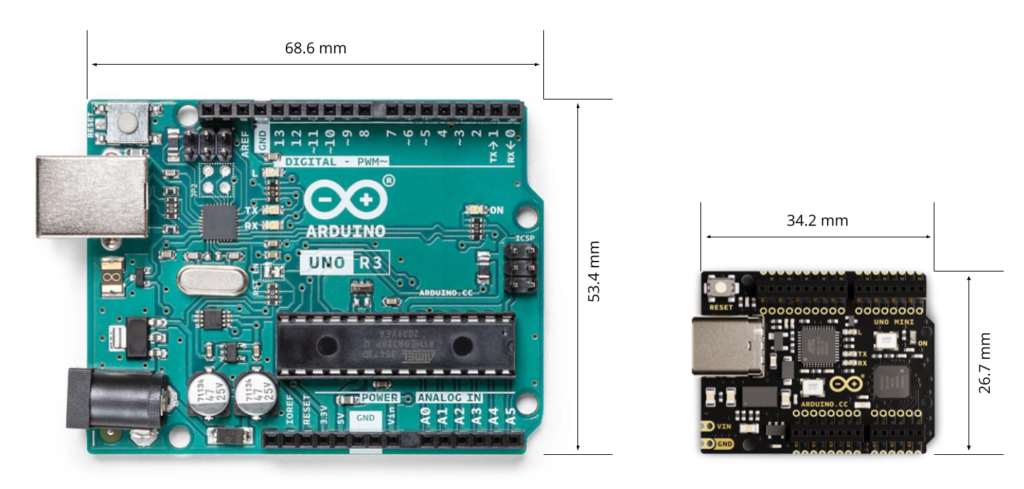
Probably one of the first things you noticed was that the USB port has been updated to USB-C. An update we’re confident you’ll appreciate, and not just because it helps with the reduced form factor. Most of us have an abundance of spare USB-C cables kicking around these days, so it’s decidedly more convenient.
And then there’s the form factor. The UNO Rev 3 is, more or less, the same size as its predecessors, dating back to the original design. As you expect, the UNO Mini Limited Edition is half the size of the original footprint, measuring 34.2mm x 26.7mm x 8mm.
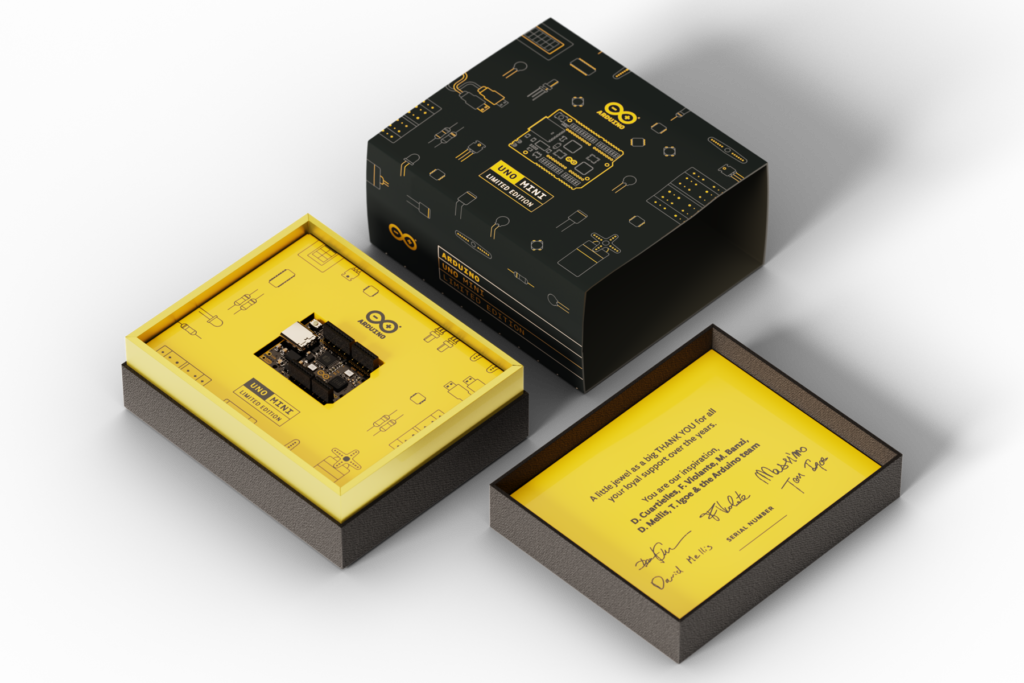
Limited Edition, for Serious Collectors
It’s not just the beautiful new black and gold design that makes the board so desirable. This is a limited edition, with each board individually numbered.
All the features you’ve come to know and love are still there, so this is a fully functional UNO in every respect. But hardcore Arduino lovers will also appreciate its desirability and collectability. Everything about the UNO Mini Limited Edition screams quality, from the device to the assembly, the packaging to the printing. Who knows what an unopened UNO Mini Limited Edition (R@RE! Mint, still in box!) will be worth in the years to come.
Make sure you join us on social media (#UNOmini) to share your thoughts and first impressions when you get it in your hands, and we’d love to see your videos of this beautiful new board being unboxed when it lands on your doorstep.
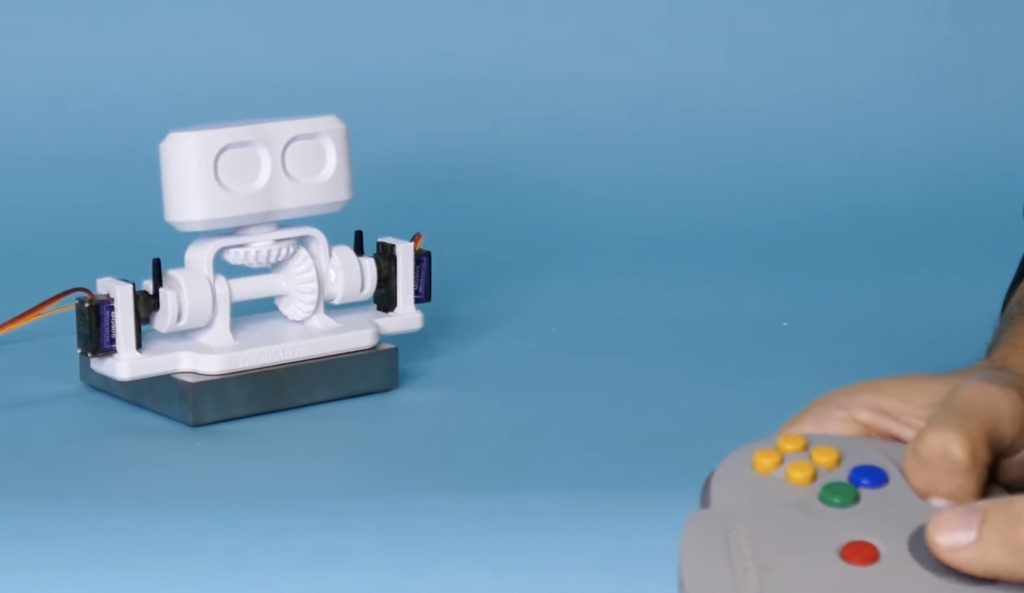
Inspired by a special two-axis mechanism that uses a pair of beveled gears to create panning and tilting motions, maker and YouTuber JBV Creative wanted to integrate it into a larger kinetic sculpture that could move electromechanically while also looking great at the same time. This led to the creation of RobBob, which is essentially a robot-shaped head that has been placed onto a pan/tilt system.
Initially, RobBob could only move with the help of a person turning a pair of opposing knobs — one for each axis. But after some minor additions, including mounts on each side for a single servo motor and adapters that allow servo horns to attach to the knobs, RobBob could now move on its own power. At first, JBV considered using a serial monitor to send rotation commands, although he eventually settled on an N64 joystick since it was a more natural choice for fluid motion.
After writing a small program, which takes in joystick data from the N64 controller and converts it into positional data for the servos, JBV loaded it onto an Arduino Uno. To see RobBob in action, check out JBV Creative’s demo/build video below or read more about the project on his website.
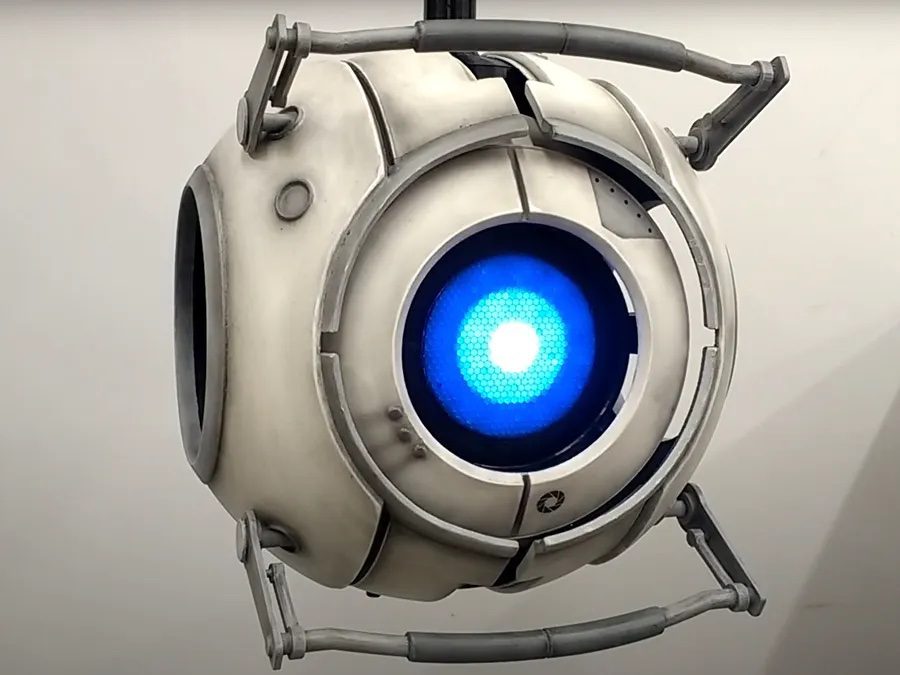
The video game Portal 2 is widely regarded as a classic that introduced players to several memorable characters, including one of the main protagonists-turned-antagonists, Wheatley. This anthropomorphized personal assistance robot was able to move, speak, and listen/respond to speech from a user, which is exactly what Steve Turner was trying to recreate when he built his own version of Wheatley. His animatronic device starts by waking up, and from there it selects a folder of audio files to play at random. Additionally, its AI-powered interactivity is provided by an Amazon Echo Dot via Alexa and the Arduino Cloud.
In order to generate eye movements, Wheatley’s five servo motors are controlled by a single Nano 33 IoT, where three are dedicated to moving the eye and two move the eyelids up and down. As for storing the nearly 900 audio files, a DFPlayer Mini and an SD card hold them all for later playback by a BC127 Bluetooth audio module. This package is able to read files from the SD card and output them over Bluetooth to the Echo Dot, which in this case acts as a wireless speaker. Finally, the central “eye” can change colors via three independently addressable RGB LED rings to show Wheatley’s current status.
When put together, all these components comprise a project that closely mimics Wheatley from Portal 2 and having a way to interact with it through voice commands makes it even better. You can see this project in action below, or watch its build log here.
Hopefully you’ve been with us during the roller-coaster ride of Arduino EDUvision season 4, which just came to a close. We’ve had a wonderful time, and the response from the community has been outstanding.
Arduino EDUvision began life as a way to compensate for the lack of in-person events during 2020. And now we’ve already live streamed 40 episodes, with thousands of viewers tuning in each week as we interview guests from across education, tech, science and STEM.
EDUvision Season 4 Podcast
This latest season, which wrapped on 11th November, also broke out into an accompanying podcast.
Over the months, and with so many episodes under the EDUvision umbrella, we’ve had some amazing guests. The conversations you see in the episodes are only the tip of the interview iceberg. The new podcast gives Arduino fans the opportunity to listen to the full conversations that Melissa and Roxana have with the guests.
The subjects go so much deeper, and there’s so much more to learn from these amazing, entertaining thought leaders who share their time with us all.
You can listen to the Arduino EDUvision podcast anywhere you like. Here are a few links so you can catch up on the exciting edtech, STEM and science subjects we’ve delved into this season.
EDUvision Live Show
The good news is that all the EDUvision live streams remain online. So you can still watch them at your convenience. It’s been a really exciting season thanks to the diverse and fascinating guests who’ve shared their insights, work and projects with us.
Educational technology expert Damien Kee joined us to celebrate International Programmers’ Day in the first episode. Stick around until the end, when he took the opportunity to show off his amazing DIY R2-D2.
There was an outpouring of excitement from the Arduino community when Locomation’s Çetin Meriçli showed us what the future has in store for self-driving trucks and cars.
And Dr. Erica Colón from YouTube’s Nitty Gritty Science rounded out the season. She dazzled us with an amazing array of science projects you can do at home.
The famous and fabulous Hip Hop Scientist visited us for Halloween. We had a great discussion about bridging the gap between music and science by bringing it into everyday pop culture.
This tinyML system helps soothe your dog’s separation anxiety with sounds of your voice
Arduino Team — November 17th, 2021
Due to the ongoing pandemic, Nathaniel Felleke’s family dog, Clairette, had gotten used to having people around her all the time and thus developed separation anxiety when the family would leave the house. But thanks to some clever thinking, Felleke came up with the idea to automatically detect when his dog started to bark and play some sounds of his family speaking to calm her down.
In order to detect when the dog is barking, Felleke collected plenty of audio samples from Google’s Bark Audioset, his own samples, speech commands, and miscellaneous cat and dog noises to distinguish background audio from a bark. After passing them into Edge Impulse’s Studio and creating a keyword spotting model, he downloaded the resulting model, which was then loaded onto a Nano 33 BLE Sense. If a bark is detected using the BLE Sense’s onboard microphone, it toggles a pin high to alert a separate Arduino Nano that a random human speech sound needs to be played by sending a command an attached Music Maker Feather Board.
To see this project in action, you can watch Felleke’s demonstration video below. For the code and resulting tinyML model, his files are available here on GitHub.
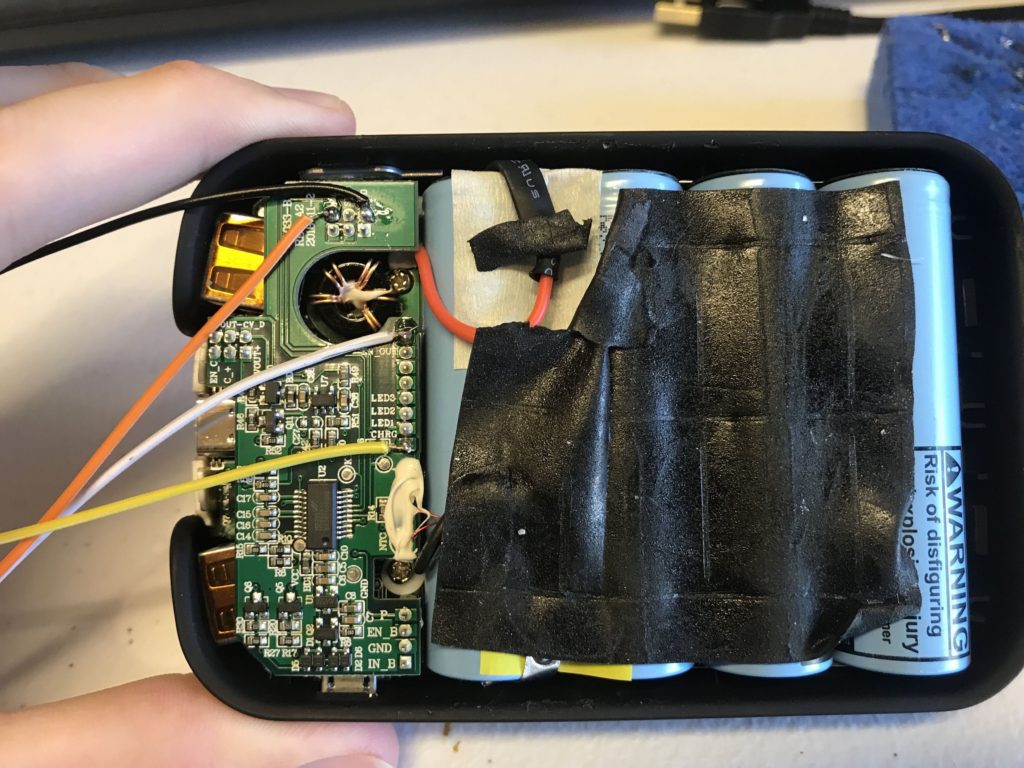
USB battery banks are a dime-a-dozen and useful for recharging all of those devices in your life. But the typical cheap battery banks don’t provide you with much information about their status. You usually just get a few LEDs that provide a very general idea of how much battery life remains. Keenan Johnson needed more info for an upcoming project and so he hacked a USB battery bank to gather telemetry.
The most useful data about a USB battery bank is its voltage at any given time, which tells you approximately how much longer the batteries will last. But there is other telemetry that Johnson wanted to have, including the charging current and output current. This USB battery bank contains an HT66F018 microcontroller to monitor the battery cells and control charging/discharging, but it runs custom firmware and doesn’t make the telemetry accessible through a standard interface like I2C or SPI.
Fortunately for Johnson, the PCB inside the battery bank has handy pins marked P+, LOAD, and CHRG. Those correspond to battery voltage, output current, and charging current respectively. Johnson could measure those with a multimeter, but needed a better way to monitor the telemetry. To gather that, he connected a MKR WiFi 1010 board to the test points via an ADC (Analog-to-Digital Converter) module. Johnson programmed a simple interface that he could access remotely that shows him battery voltage, load current, and charge current, and also added an Adafruit NeoPixel LED status indicator.
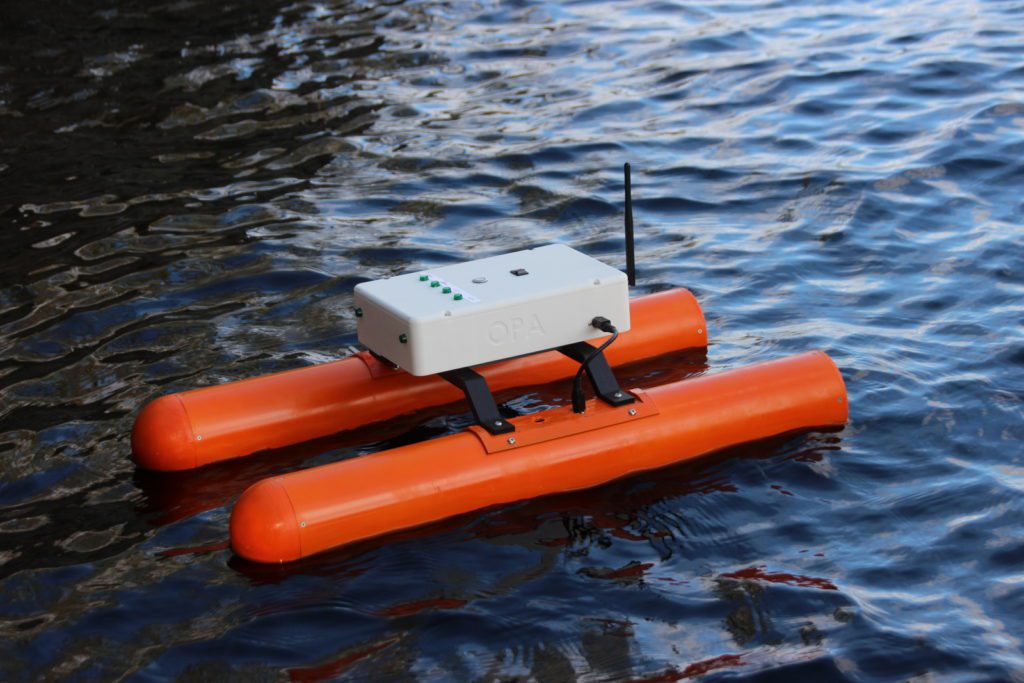
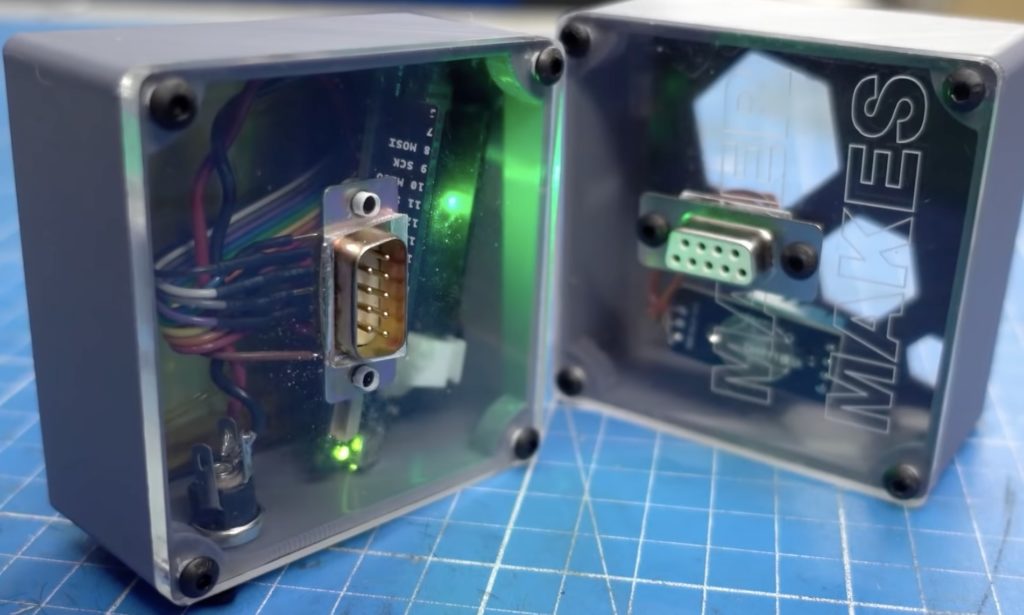
Starting with an idea in 2019, Redditor wesgood has been steadily working on the Opa — an autonomous 3D-printed boat that can navigate open water while relaying its telemetry back in real-time to a client device over WiFi. After creating a small prototype, Wes built a second one that featured a pair of pontoons held together with a couple of struts and a central platform. This design contains a single water jet that is situated in the back of each pontoon that takes in water and shoots it out at a high velocity, similar to a jet ski. Best of all, they can be independently throttled which eliminates the need for a rudder.
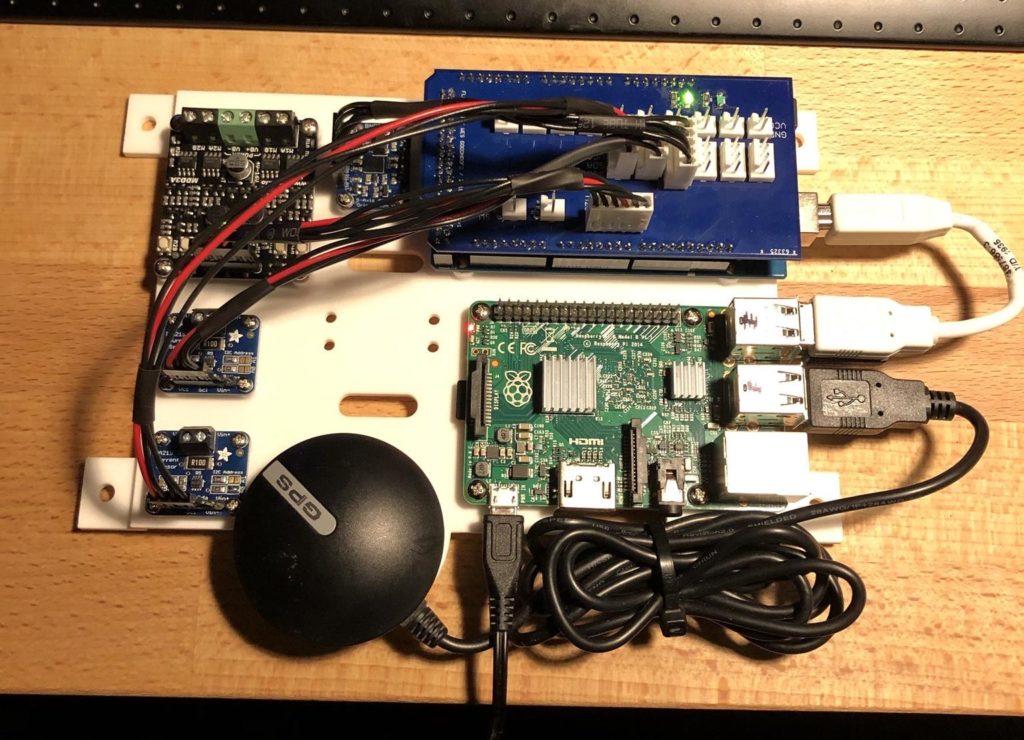
As far as circuitry goes, the Opa houses an Arduino Mega that has a custom shield on the top for controlling the pump motors and reading data from the onboard 9-DOF IMU and battery voltage/current sensors. An auxiliary Raspberry Pi runs Ubuntu Server, and its job is to coordinate data coming from a GPS receiver and information from the Arduino Mega with a wireless client device.
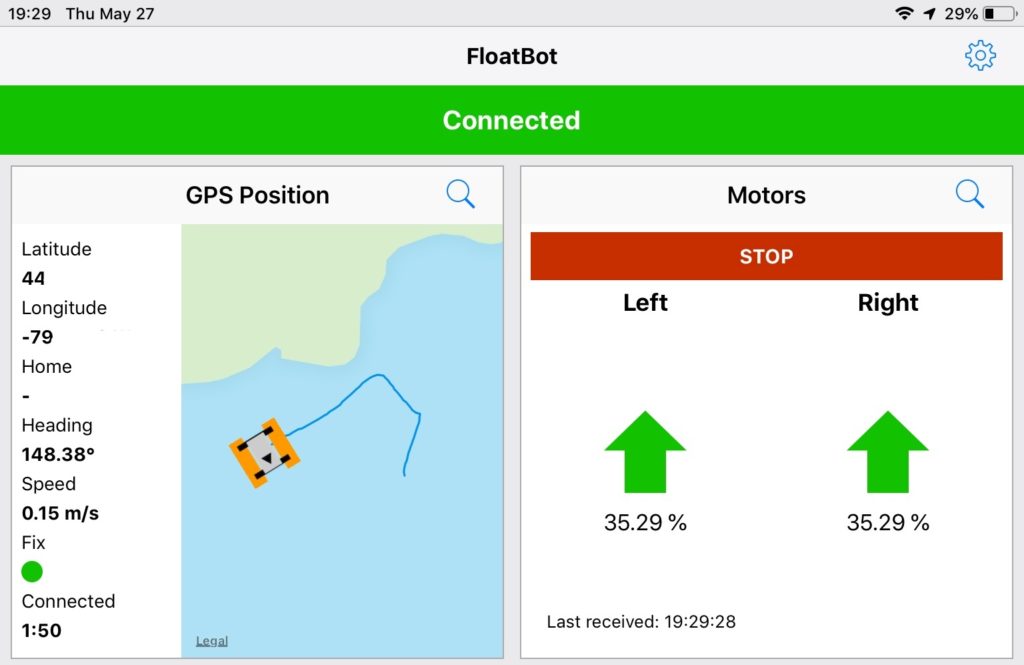
After getting the necessary software loaded onto the Arduino and Raspberry Pi, Wes placed them inside of a watertight enclosure on the top of the boat. His mobile app could then be used to see relevant telemetry, power consumption, and the current location of the raft overlaid on a map. Additionally, the user has the option to manually pilot the boat if they so desire as well.
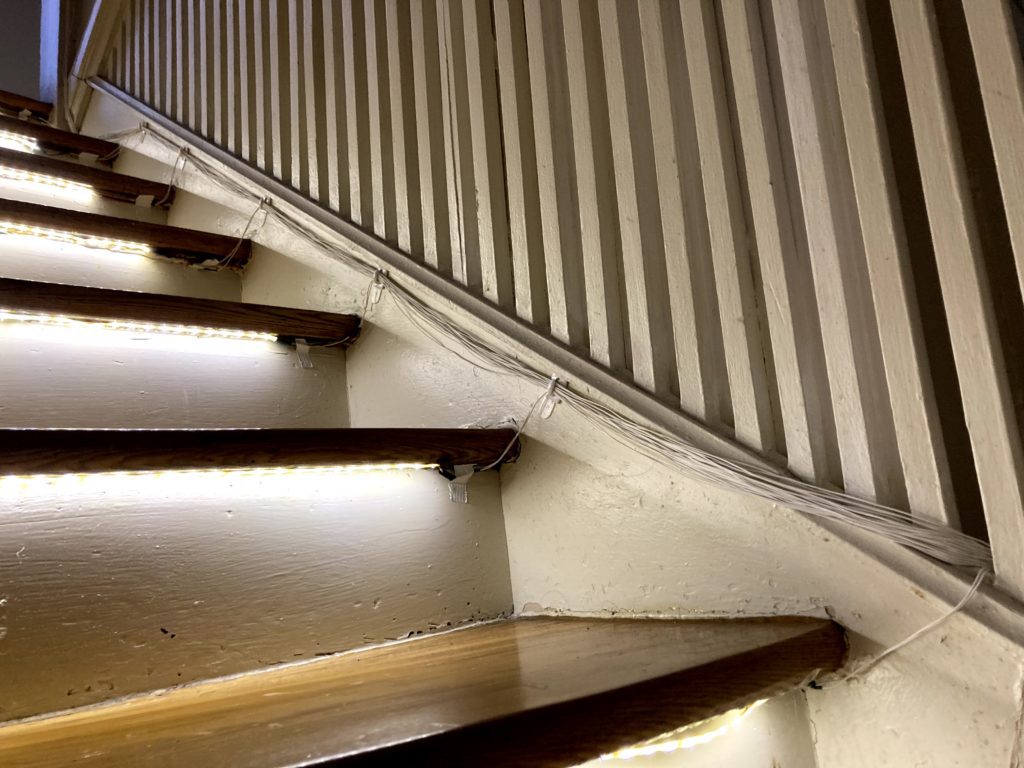
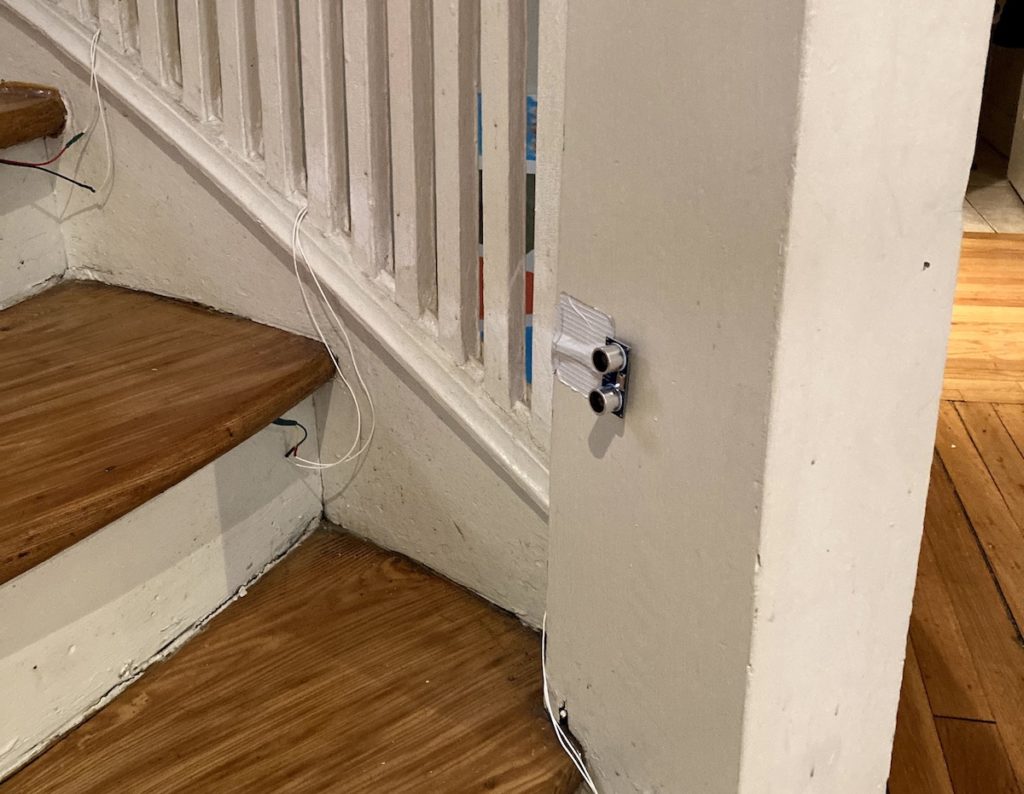
Stephen Gidge and his roommate have a poorly-lit flight of stairs in their home. That isn’t a big deal during the day, but it is a recipe for late night tumbles. They could have setup some nightlights or installed a new hall light, but they were both experienced with Arduino and so they created these cascading LED star lights instead.
Under each step on their staircase, Gidge and his roommate mounted a strip of white LEDs. When someone approaches the bottom stair, each step lights up in a sequence starting from the bottom and going up. If someone approaches the top stair, the opposite happens and the sequence goes down. In either case, all of the stairs will remain lit for a little while to give the climber enough time to complete their journey. There is also a cooldown delay, so the “down” sequence doesn’t activate when someone reaches the top step as they’re ascending the stairs.
An Arduino Mega controls each LED strip individually via one of 16 transistors, though all of the strips share power. The Arduino detects people using a pair of ultrasonic sensors — one at the top of the stairs and the other at the bottom. That was enough to provide lighting for safe midnight snack runs, but the duo took it one step further by adding music-reactive effects that are great for parties. The Arduino listens for music through a MAX9814 microphone module and flashes the stairs like a massive bass visualizer, enhancing shindig ambiance.
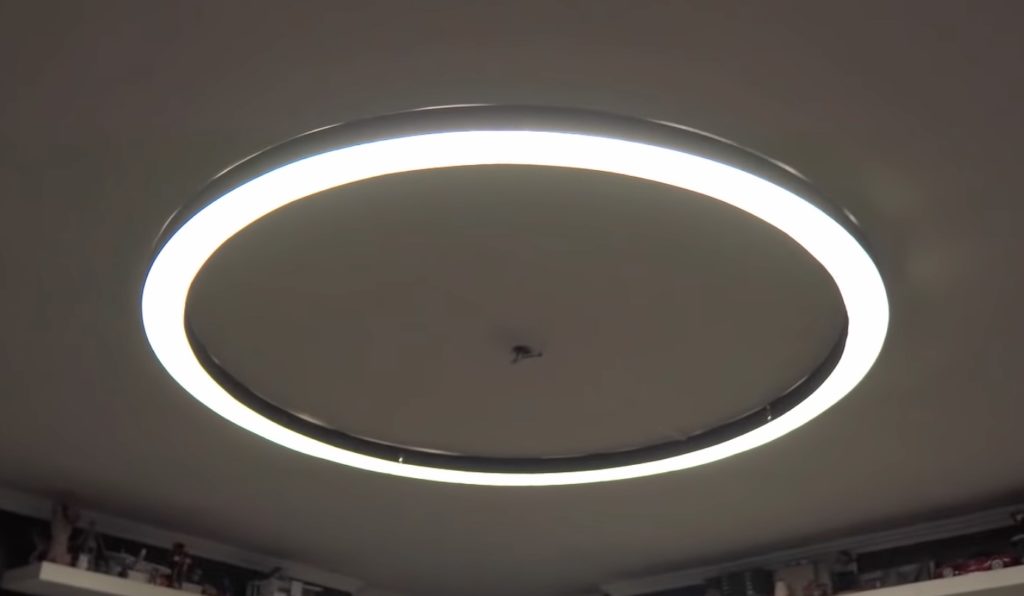
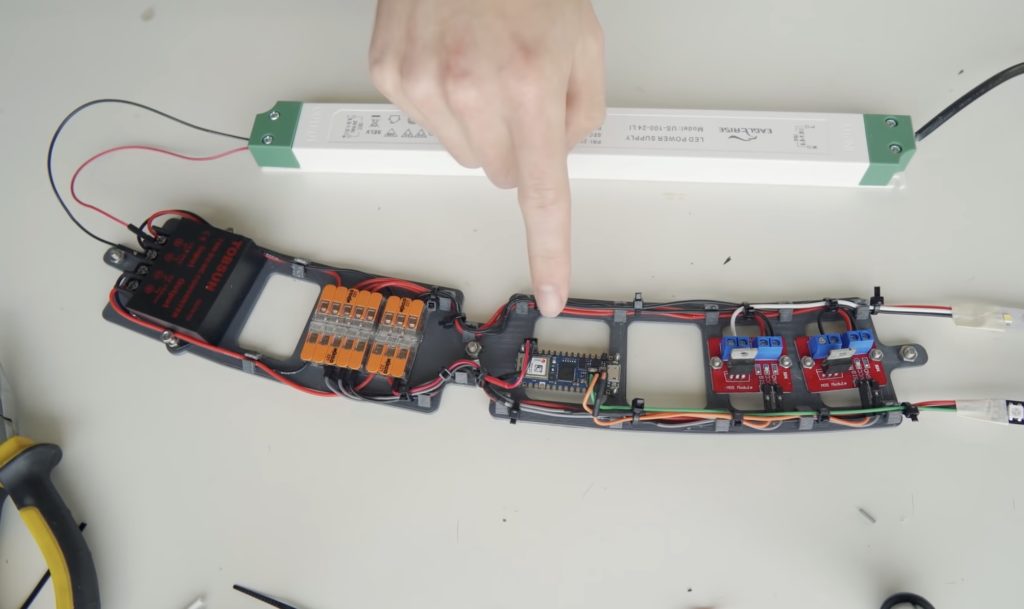
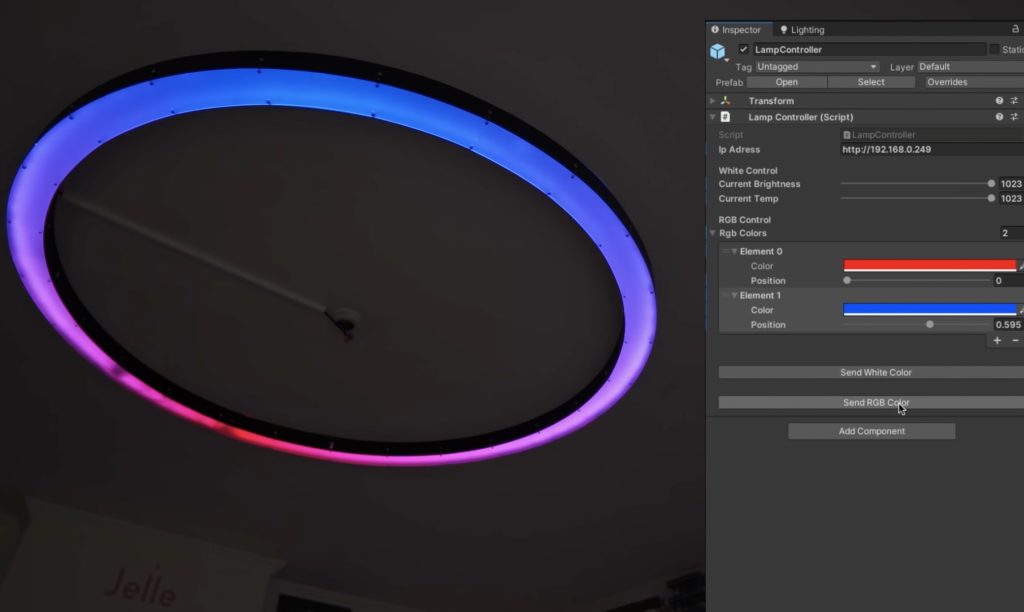
Integrating a green screen into a video or image is not as simply as merely tossing a green sheet onto a wall and calling it a day since the subject’s lighting also needs to match the lighting in the scene behind them. But rather than spending a fortune on specialty lighting or taking way too much time in editing software, YouTuber Jelle Vermandere wanted to create his own DIY ring light that can illuminate in one of millions of different colors.
The core of this project was the microcontroller, as it would be responsible for taking incoming requests from a client device over WiFi and converting them into tangible colors. By using a Nano 33 IoT, Vermandere could serve several webpages to connected devices while also having the ability to use standard WS2812B LED libraries. Whenever a new HTTP GET request comes in, the web server reads the requested path and parses the values accordingly. For example, an RGB color can be read from a string that contains values for the position, hue, saturation, and value which are all used to create a gradient.
As for the physical enclosure, the ring light houses one strip of 5V WS2812B LEDs that face inwards for subject lighting and another strip of 12V white LEDs that face outwards for scene lighting. This combination provides even coloration and prevents bright spots from appearing on the subject.
With the ring light mounted on his ceiling, Vermandere tested it out by placing himself within a virtual world with ARKit and Unity3D, and as seen in his build/demonstration video below, it works great. To see the code for this project, you can visit his GitHub repository here.
Constructing your very own IoT weather monitoring station can be a complicated ordeal, as getting values from the embedded device to some kind of web server in a secure manner takes a lot of effort and time to complete. For his system, Clem Mayer from element14 Presents was able to use a MKR WiFi 1010 that sends relevant weather information at a set interval, which can then be viewed from anywhere in the world with an Internet connection.
Aside from the Arduino as the main control board, Mayer went with a DHT11 temperature and humidity sensor for collecting weather data and a LiPo battery cell that lets this device sit outside for extended periods of time. In the future, Mayer speculated that he might add light or gas sensors for even more in-depth readings. All of the electronics were placed into a watertight enclosure, which has a clear acrylic top for viewing the status RGB LED.
The Arduino Cloud service was used to configure the MKR WiFi 1010, set up several cloud variables, and create a virtual dashboard for keeping tabs on both current and historical readings. After making the processor sleep for eight seconds to conserve battery power, a reading is taken from the onboard sensor and written to the cloud where it can then be seen in the dashboard.
Did you know that Arduino Education offers official certification?
It’s aimed at educators who use (or want to use) Arduino kits in their middle school or high school classrooms. Arduino Certification is an online exam that tests your knowledge of electronics and programming. Students, makers, professionals and everyone in between can take the exam, too.
Why take the exam?
Adding official Arduino certification to your resumé demonstrates your knowledge of electronics, programming, and coding.
You can boost your confidence in Arduino-related electronics, programming, and physical computing.
Become part of a wider professional network and thriving edtech community.
Add highly sought after and in-demand technical skills to your portfolio. Great for job applications!
Even better, you don’t need any prior coding or electronics experience, and it’s really easy to get started.
What does Arduino Certification cover?
When you take the Arduino Certification, you’ll be learning about the fundamental concepts of electronics and programming.
Key learning outcomes include:
Key electricity concepts, such as resistance and voltage, and how to measure and calculate them.
How electronics are represented visually, and reading and analyzing electronic circuits.
The functionality of the Arduino development environment (called Arduino IDE), serial communication, libraries, and errors.
The constitution and capabilities of an Arduino board and how it functions.
How various electronic components, such as LEDs, sensors, and motors work, and how to use them in a circuit.
The building blocks of the Arduino programming language, such as functions, arguments, variables, and loops.
How to program various electronic components.
Reading, analyzing, and troubleshooting Arduino code.
Want to see how it works? Take a look at the exam demo.
How to take the Arduino Certification exam
There are two ways to earn the official Arduino Certification.
Um dir ein optimales Erlebnis zu bieten, verwenden wir Technologien wie Cookies, um Geräteinformationen zu speichern und/oder darauf zuzugreifen. Wenn du diesen Technologien zustimmst, können wir Daten wie das Surfverhalten oder eindeutige IDs auf dieser Website verarbeiten. Wenn du deine Einwillligung nicht erteilst oder zurückziehst, können bestimmte Merkmale und Funktionen beeinträchtigt werden.
Funktional
Immer aktiv
Die technische Speicherung oder der Zugang ist unbedingt erforderlich für den rechtmäßigen Zweck, die Nutzung eines bestimmten Dienstes zu ermöglichen, der vom Teilnehmer oder Nutzer ausdrücklich gewünscht wird, oder für den alleinigen Zweck, die Übertragung einer Nachricht über ein elektronisches Kommunikationsnetz durchzuführen.
Vorlieben
Die technische Speicherung oder der Zugriff ist für den rechtmäßigen Zweck der Speicherung von Präferenzen erforderlich, die nicht vom Abonnenten oder Benutzer angefordert wurden.
Statistiken
Die technische Speicherung oder der Zugriff, der ausschließlich zu statistischen Zwecken erfolgt.Die technische Speicherung oder der Zugriff, der ausschließlich zu anonymen statistischen Zwecken verwendet wird. Ohne eine Vorladung, die freiwillige Zustimmung deines Internetdienstanbieters oder zusätzliche Aufzeichnungen von Dritten können die zu diesem Zweck gespeicherten oder abgerufenen Informationen allein in der Regel nicht dazu verwendet werden, dich zu identifizieren.
Marketing
Die technische Speicherung oder der Zugriff ist erforderlich, um Nutzerprofile zu erstellen, um Werbung zu versenden oder um den Nutzer auf einer Website oder über mehrere Websites hinweg zu ähnlichen Marketingzwecken zu verfolgen.