How does a flat sheet of material, like plastic or an airtight textile, become an inflatable structure with a three-dimensional shape? The traditional process involves creful design with a lot of trial and error in order to place seams between two or more sheets. That involves a lot of labor, so a team of engineers from the Hasso Plattner Institute developed a new machine called AirTied which can automatically fabricate inflatable structures.
AirTied structures consist of tubular inflatable trusses, which are just flat sheets folded over with the edges welded. Without the machine’s intervention, that material would produce one very long cylinder when inflated. But the AirTied machine can form those tubes into 3D structures by placing knot-like nodes in specific locations, like a clown making balloon animals for kids at a party.
The material comes from a single spool, but AirTied can produce up to five parallel trusses at any time. It accomplishes that by rotating the spool to one of five slots that can either fold the tube or crimp it with a wire tie to create a node. It can, for example, crimp two trusses together in their middles to create an X-shaped structure. The machine controls the lengths of the trusses between nodes by folding each truss over until they’re all ready for crimping.
An Arduino UNO Rev3 board manages that process and the coordination of the motors using a modified version the popular GRBL CNC firmware. That lets it run G-code generated by the AirTied software, which helps users easily and quickly design structures by specifying the lengths of trusses and positions of nodes. The software even estimates the total cost of materials required for a particular structure.
That cost is quite low and the demonstrates the primary advantage of AirTied: its ability to automatically fabricate affordable structures at speed unmatched by other techniques.
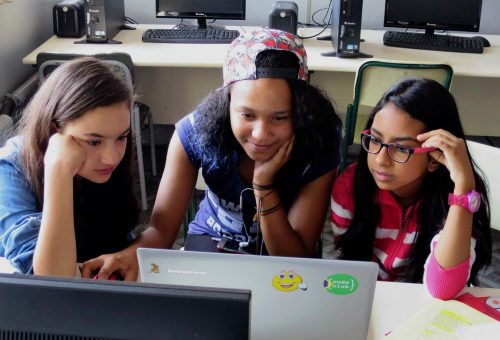
Today we’re calling all young people who are excited to explore coding and space science, and the mentors who want to support and inspire them on their journey. Astro Pi Mission Space Lab is officially open again, offering young people all over Europe the amazing chance to have their code for a science experiment run in space on the International Space Station (ISS).
Aurora Borealis as seen from the ISS
With this year’s Mission Space Lab, astronauts from the European Space Agency are setting young people a task: to write a computer program that runs on the ISS and calculates the speed at which the ISS is orbiting planet Earth. Participation in Mission Space Lab is completely free.
Here’s ESA astronaut candidate Rosemary Coogan to introduce this year’s mission:
Mission Space Lab invites young people up to age 19 to work in teams of 2 to 6 and write a Python program for the Astro Pi computers on board the ISS to collect data and calculate the speed at which the ISS is travelling.
Your role as a mentor is to support teams as they design and create their program — with our free guidance resources to help you and your young creators.
We want as many young people as possible to have the chance to take part in Mission Space Lab, so the way in which teams solve the task set by the ESA astronauts can be different depending on the experience of your team:
Beginner programmers can follow the guided project we provide (more info below) to write their program.
Teams with more programming experience can get creative to come up with their own innovative solution and calculate the speed of the ISS as accurately as possible.
The Astro Pis are two Raspberry Pi computers stationed on the ISS, each equipped with a High Quality Camera, a Sense HAT add-on board with a number of sensors, and a Coral machine learning accelerator. Each Astro Pi has a hard casing designed especially for space travel.
The Astro Pi computers inside the International Space Station.
There are lots of ways to use sensor data from the Astro Pis to calculate the speed of the ISS, so young people can get creative solving their Mission Space Lab task while learning fascinating facts about physics and the inner workings of the ISS.
All Mission Space Lab participants whose programs run on the ISS will receive a certificate recognising their achievement, and they’ll get the chance to attend a Q&A webinar with an ESA astronaut. Teams also receive back data from the ISS based on their Mission Space Lab programs, for example photos or sensor measurements. That means you’ll have the option to explore and use that data in follow-on activities with your young people.
The coastline of Chile photographed by an Astro Pi on the ISS
Support for you to get started with Mission Space Lab
We are providing lots of supporting materials to help you and your team with Mission Space Lab:
A new Mission Space Lab mentor guide helps you assemble and support teams of young people who want to take part. It gives you as a mentor everything you need to answer your team’s questions and help them solve problems. It also includes tips on how to structure the Mission for your team. So young and your young people can make the most of Mission Space Lab, we suggest you run a series of sessions where your team can learn about the ISS, think about how they could use the different Astro Pi sensors, and design and create a program. The guide shows you how to help them use a design thinking approach during the Mission and develop problem solving and collaboration skills that are very important for careers in tech.
The Mission Space Lab creator guidehelps young people design and create their Python programs. It contains all of the information they need to write a program that can be run on the Astro Pis. It includes discussion points for the team’s planning and design process. The technical instructions support young people to create a program that accomplishes its goal in the allocated runtime of 10 minutes.
We’re also providing a ISS speed project guidethat shows one way for teams to complete the Mission Space Lab task: writing a program that calculates the ISS speed using photos taken by the Astro Pi’s camera.
Mission Space Lab is open for submissions from today, 6 November 2023, until 19 February 2024.
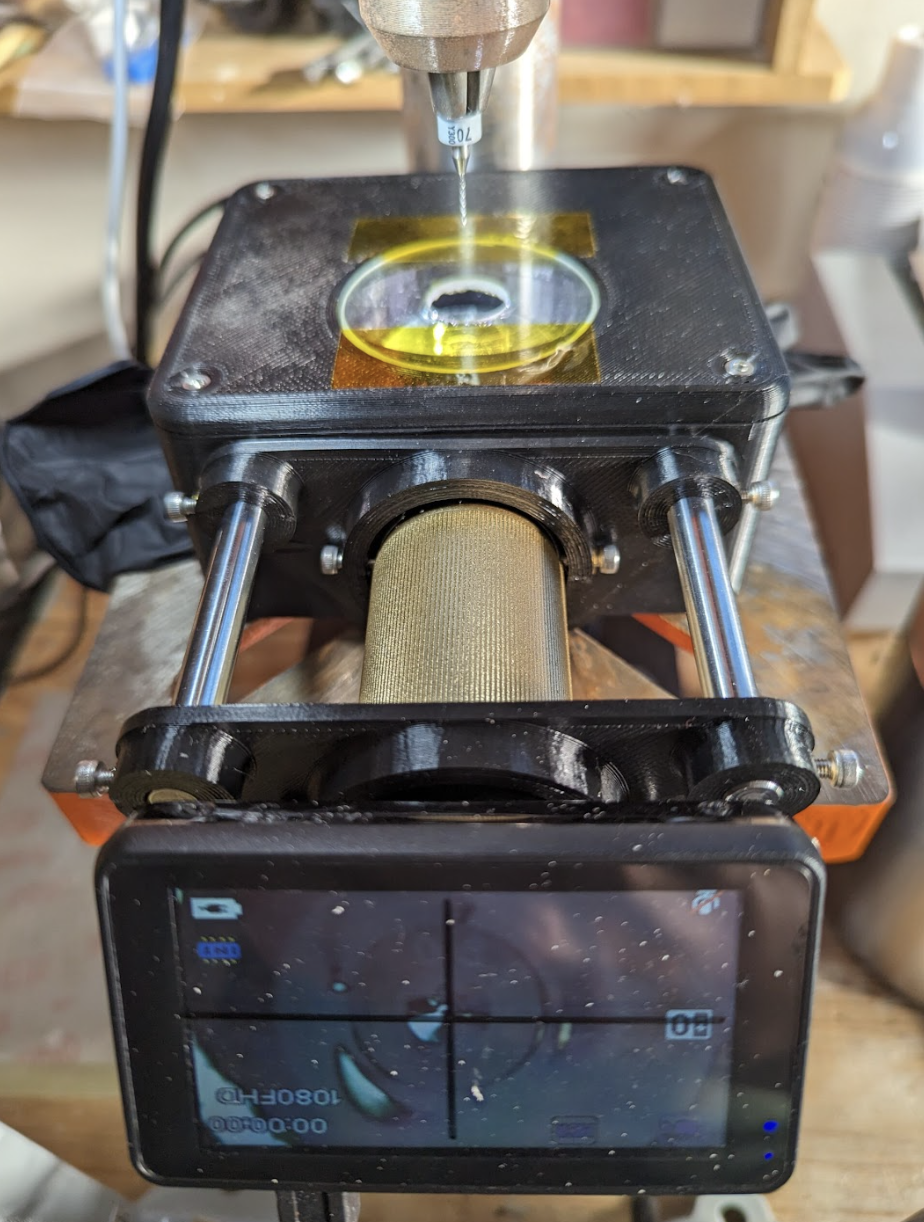
John’s project works by using an angled, mirrored periscope to point a microscope camera at the underside of a drilling platform. “The position of the Drill Press Camera is adjusted until the crosshairs on its screen are lined up with the centre of the drill bit,” he says. “Once a PCB is placed on top of the drilling platform, the user can see a magnified view of the traces and intended drilling location.” Since the position where the drill bit will make a hole is indicated by the crosshairs on the camera screen, “lining up holes with the centre of the drill bit is about as easy as point and shoot.”
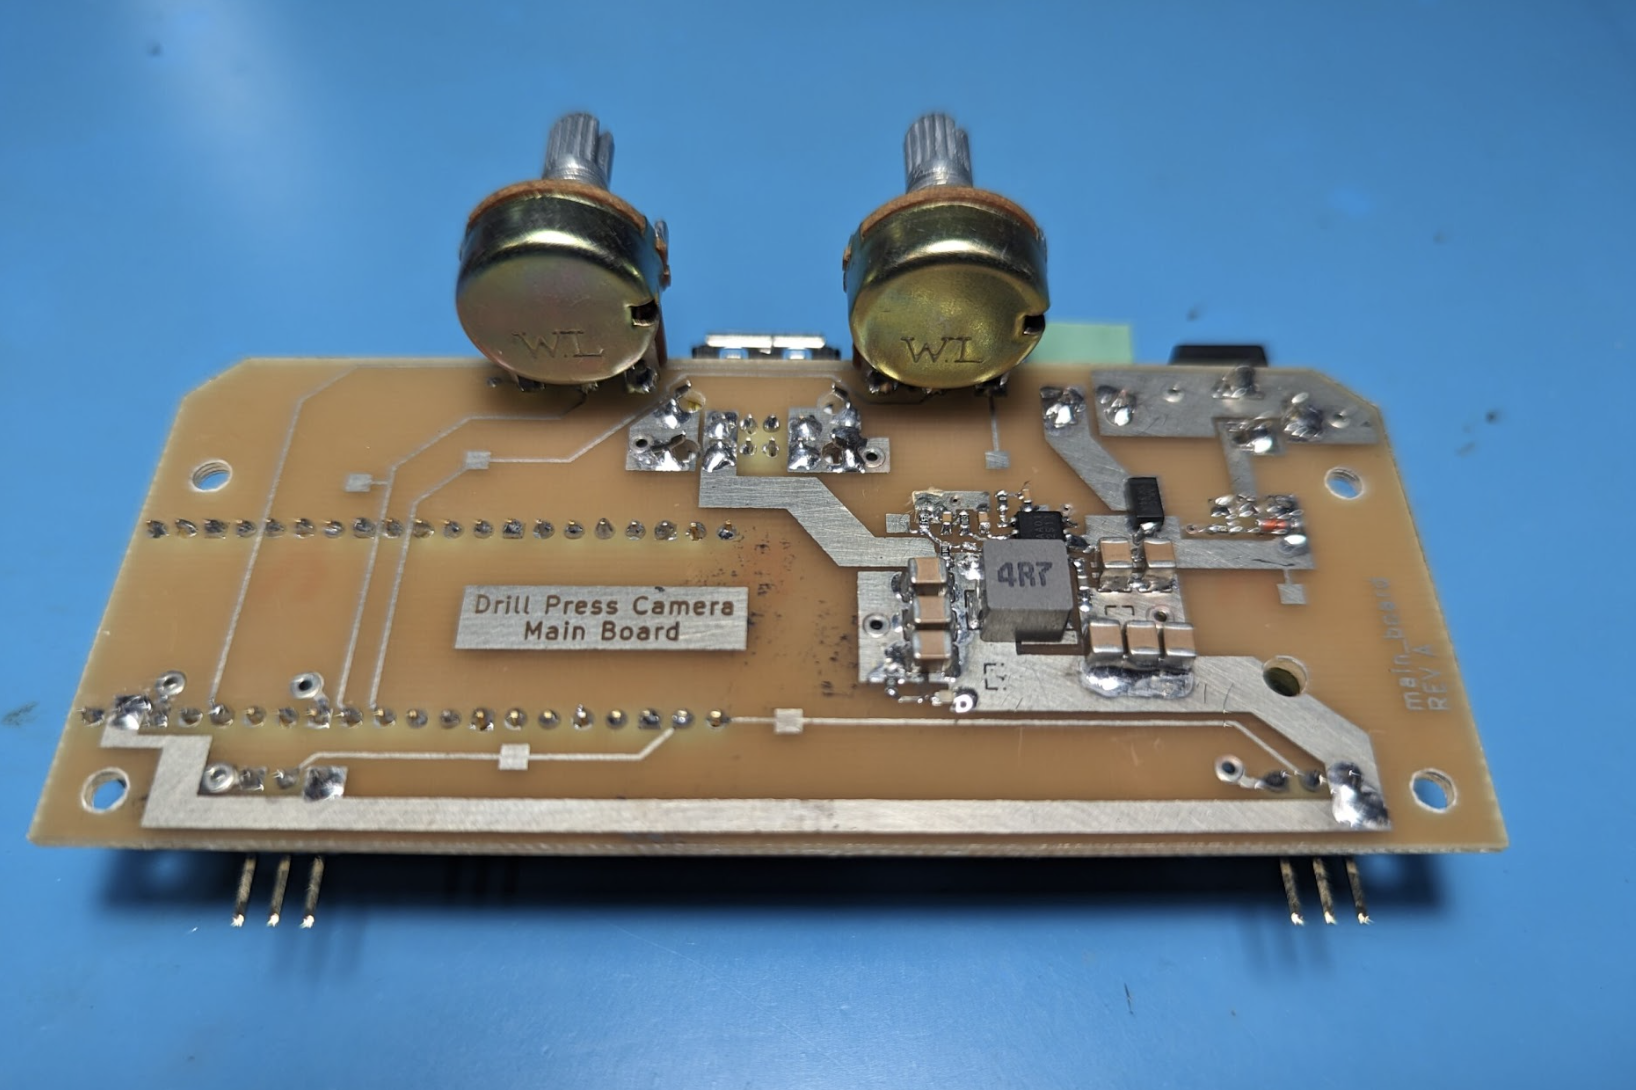
A Raspberry Pi Pico is used to control the LED strips that illuminate the underside of the PCB, and John has written a simple MicroPython script that “reads brightness and hue values from two potentiometers on the control board, and sends the corresponding NeoPixel commands to the high-density LED strips embedded in the periscope.” John wanted the ability to dim the LEDs and also added colour control: “With some experimentation, I found out that controlling the colour of the LEDs was a cool way to improve contrast on some material types.”
Reviving concepts
John estimates that he is now twice as fast at drilling holes than when he was aligning by eye, and “my holes are also much more accurate.” Unsurprisingly, the project has garnered a good deal of enthusiastic reaction, especially regarding the periscope configuration. “One [Hackaday] user pointed out that I had pretty much reinvented something from the 1970s called a ‘Target Drill’, which is pretty cool.”
John is more than happy to have reintroduced a drilling concept to a new generation: “There’s a lot of really neat fabrication equipment from the good old days, when people made PCBs by hand, that has since faded away.” After taking this project to Open Sauce in San Francisco earlier this year, he found that “lots of maker types were curious about it, and then quite enthusiastic about the concept once they saw how it worked! Drilling precise holes in flat things is apparently not a problem that is unique to PCB fabrication.”
If you’d like to build your own, John is more than encouraging, claiming this design is easy to build if you have access to a 3D printer and some soldering supplies. “Most of the stuff is pretty easy to get, but I’ve only been able to find one supplier for 2-inch glass circles of the right thickness. Since the microscope camera’s field of view passes almost entirely through the hole drilled in the glass disc, I think that a 3D-printed disc with a hole in it could substitute for the custom glass part just fine.” Go forth and create, as John would love to see what you come up with.
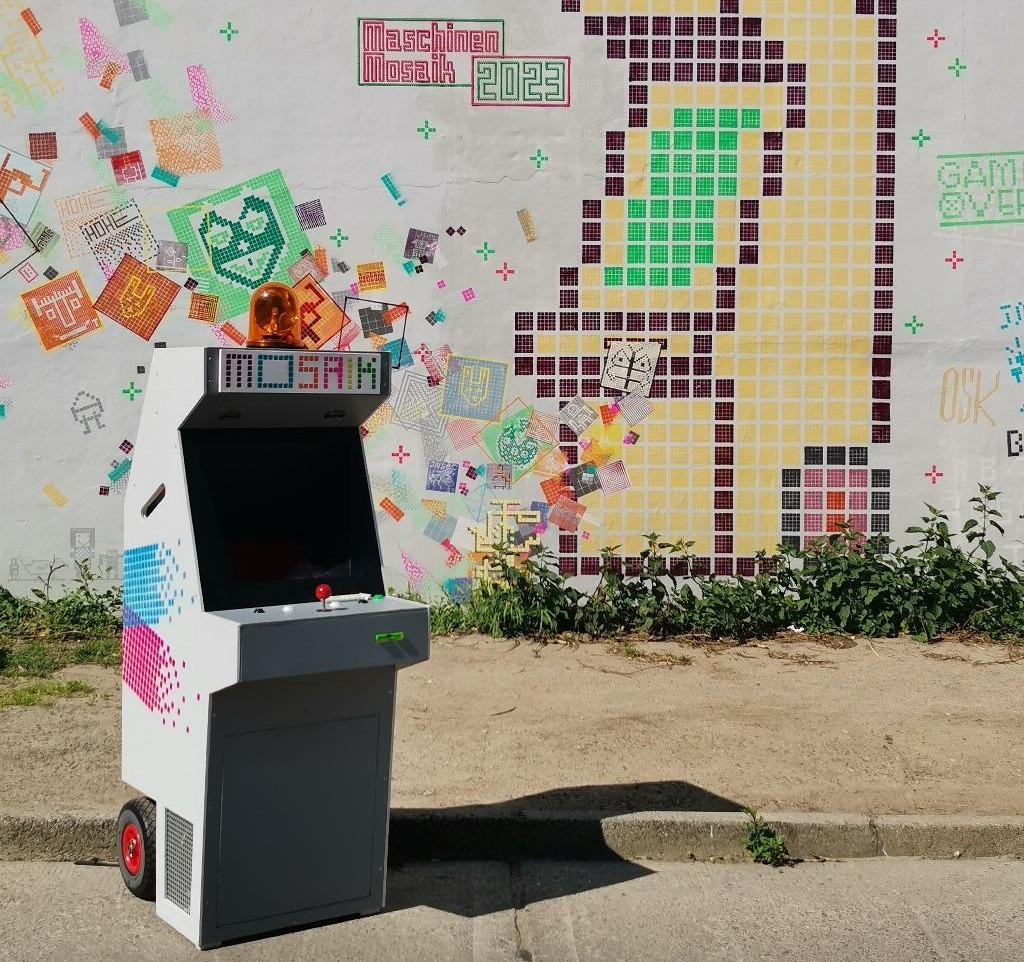
A good mural can really capture the identity of a community and it is typically up to an artist to figure out how to accomplish that. But what if every individual in a community could contribute a design that would become a piece of the larger mural? Niklas Roy was able to make that reality with the “Mosaikmaschine.”
To create collaborative pieces of permanent artwork, Roy had to do two things. First, he needed a way to get a small design from every person that wanted to be part of the project. Second, he needed a way to physically paint those designs onto walls.
For the sake of simplicity, Roy decided that each user design would be a single square image with a resolution of 32 by 32 pixels. He then built a portable machine designed to look like an arcade cabinet. That machine has an arcade-style joystick and buttons that residents used to move a cursor and fill in the pixels of their designs. The controls connect through an Arduino board to a laptop that runs the drawing software.
Roy wheeled that machine around the community, letting everyone draw their designs. Once he had a big enough collection, he used a Silhouette Cameo Pro large-format craft cutting machine to fabricate pixelated stencils of the designs. With a stack of stencils in hand, Roy and a team of volunteers were able to spray paint hundreds of designs onto walls around the neighborhood.
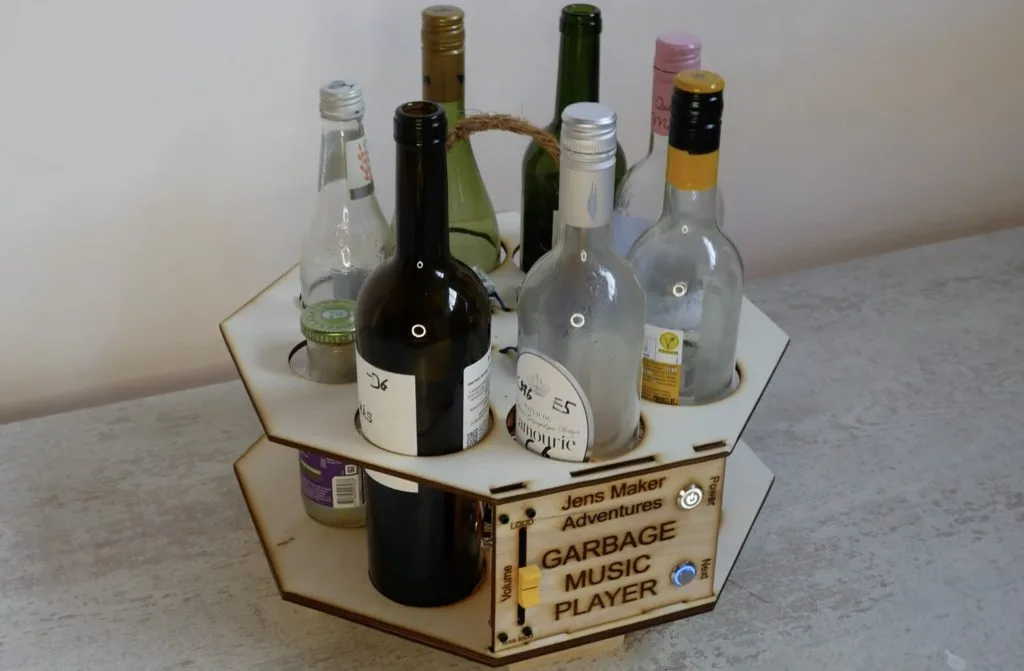
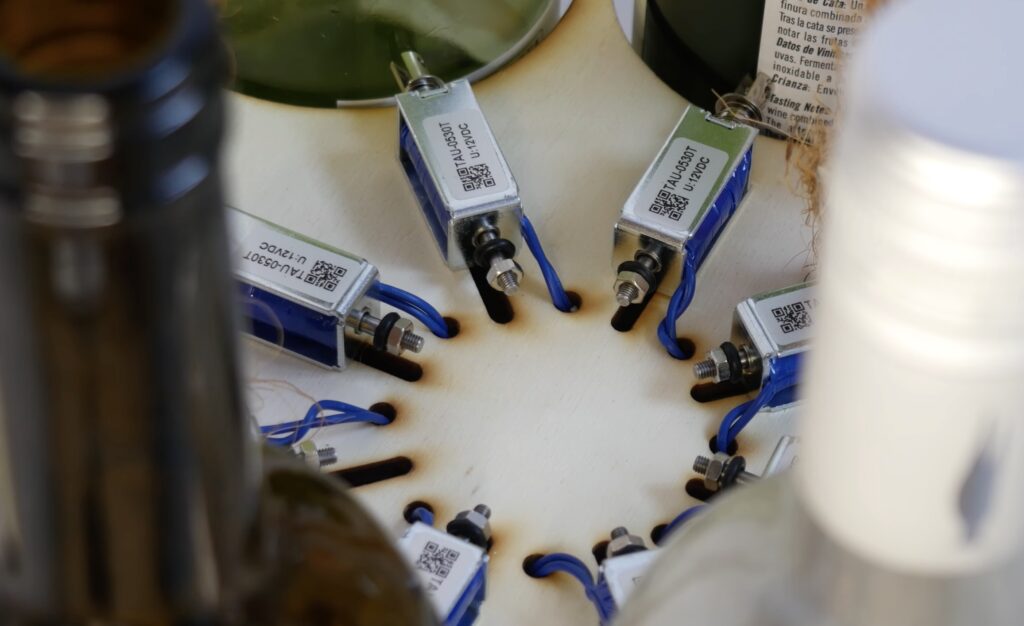
Percussion instruments are likely the first kind that humanity invented, because they’re quite simple: hit a thing and a noise happens. Different things produce different frequencies with different timbres, and glass bottles have a nice xylophonic sound to them. Because glass bottles are easy to find among discarded garbage, Jens of the Jens Maker Adventures YouTube channel took advantage of them to build this awesome robotic instrument.
Jens started by collecting a bunch of different bottles. He tapped each to while searching to get a sense of the notes they produced, which he could then lower by adding some water to fine tune the pitch. Once he had enough bottles to cover a range of notes, he set out to construct a robot to play them.
Solenoid actuators tap each bottle and an Arduino UNO Rev3 board controls that tapping. It does so according to MIDI files created in the popular Ableton software. Jens matched the available notes in Ableton to those produced by the glass bottles, so he could simply compose melodies using those notes knowing that the robot could play them. The Arduino reads the MIDI files output by Ableton and strikes the corresponding bottles.
Finally, Jens laser-cut a plywood frame and enclosure that holds the bottles, the Arduino, and the solenoids. It works with seven bottles, which is the number of notes this machine can play.
Jens demonstrated that by playing a guitar along with the robotic instrument and the result sounds very pleasant — especially for something made with garbage.
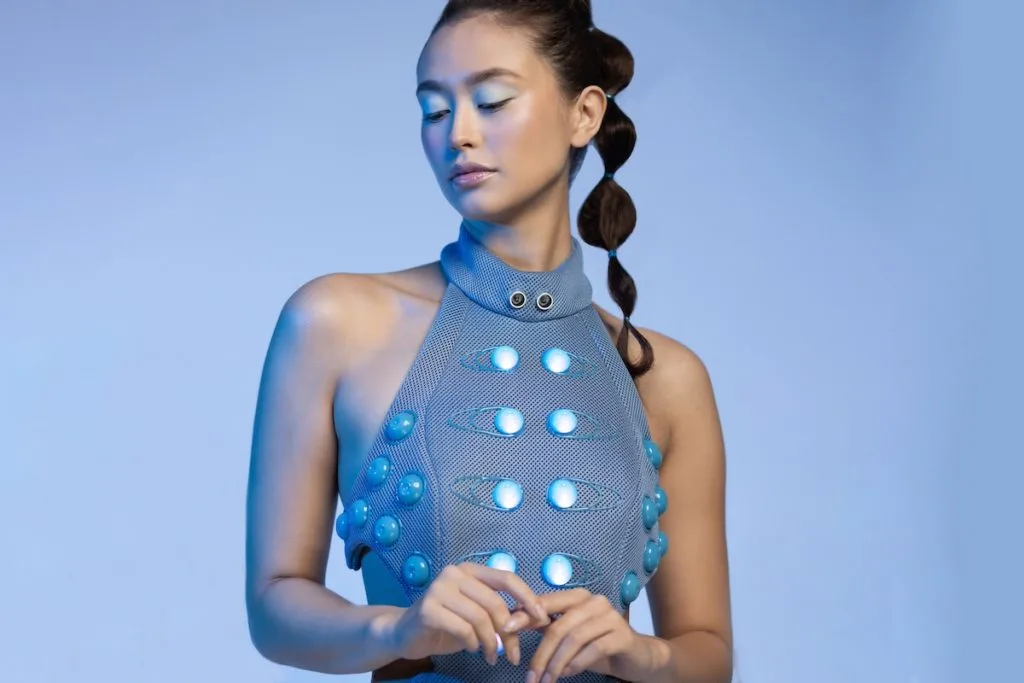
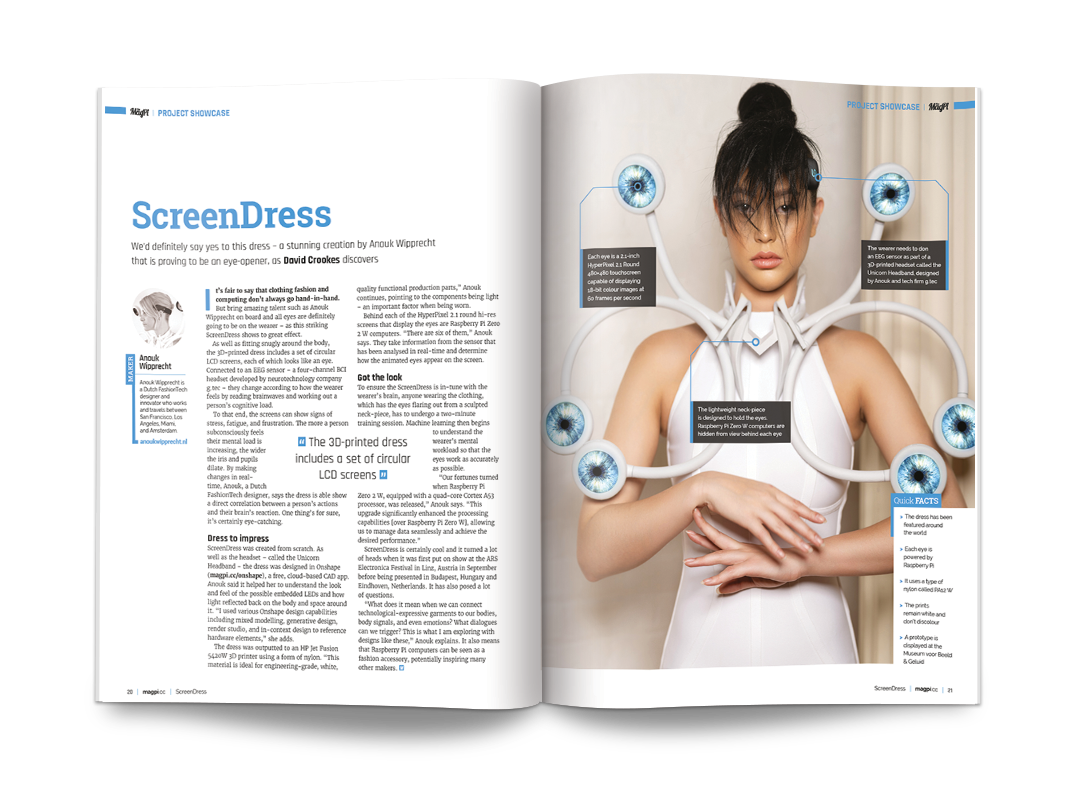
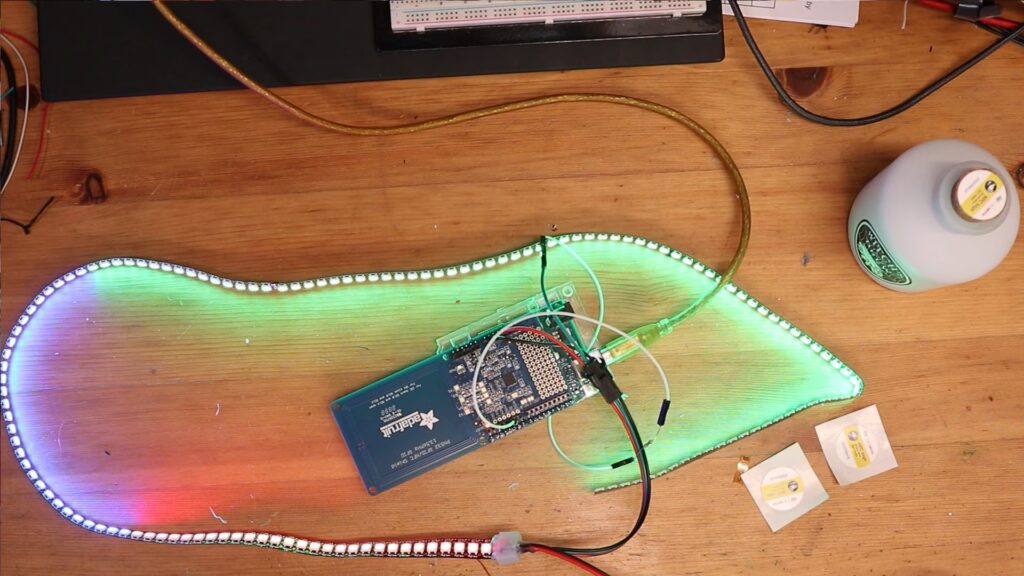
Integrating electronic components into textiles is usually a challenge, as they are rigid and most textile applications require flexibility. But new materials and fabrication processes are changing that dynamic. FashionTech designer Anouk Wipprecht and Chromatic 3D Materials were able to take advantage of those to develop this futuristic, motion-activated dress illuminated by embedded LEDs and circuitry.
75 soft, flexible domes cover the body of the dress. Those contain LEDs and light up in response to people around it. And unlike similar designs, this garment is able to conform to the wearer thanks to the use of innovative new materials.
The most notable of those materials is Chromatic’s ChromaFlow 70, which is a type of polyurethane resin meant for Reactive Deposition Modeling (RDM) 3D printing. The RDM process combines the benefits of conventional resin 3D printing with Fused Deposition Modeling (FDM) by extruding layers of viscous resin that are immediately cured. ChromaFlow 70 is very strong and flexible, making it perfect for this application. And RDM is the ideal process, as it is possible to print directly onto the underlying textile while pausing to allow for placement of the electronic components.
The illumination comes from Adafruit Flora RGB NeoPixel V2 LEDs, controlled by an Arduino UNO R4 and Nano board. Those are able to detect movement via a proximity sensor.
Wipprecht and Chromatic 3D created this stunning dress for the Formnext convention in Frankfurt, Germany, where it will be on display from November 7th to November 10th in Hall 12.1.
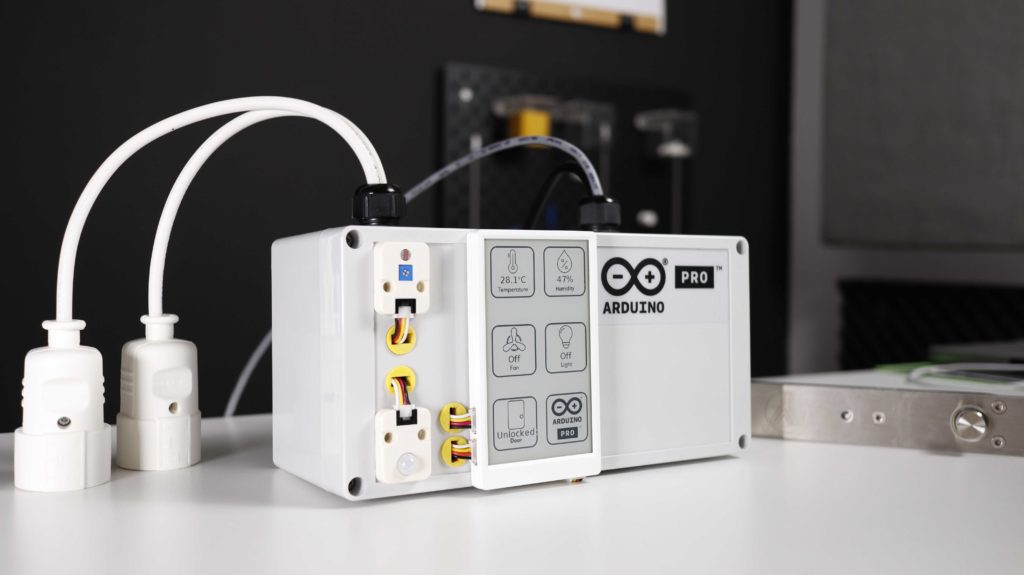
Hospitality professionals are constantly looking for ways to offer guests an enhanced experience while improving operational efficiency and optimizing energy management. To achieve this, they require cost-effective solutions that are easy to install and maintain while also providing the scalability of future-ready systems – such as automating hotel rooms or B&B rentals to increase safety, comfort, and energy savings.
Indeed, automation can be integrated seamlessly in various aspects including climate control, lighting, security, and entertainment. Upgrading these functions allows guests to enjoy customization and convenience throughout their stay, and staff to efficiently manage room settings remotely. Moreover, hoteliers can achieve substantial energy savings through optimized control and scheduling, contributing to sustainability goals.
Long-term scalability and future-proofing of automation systems, however, can be an issue. As hotels and rental properties undergo renovations or expansions, the ideal solution should accommodate changes without requiring substantial modifications or replacements. Adopting open and standardized protocols, as well as selecting flexible and modular automation projects, can help mitigate these challenges and provide a foundation for future enhancements.
Our solution
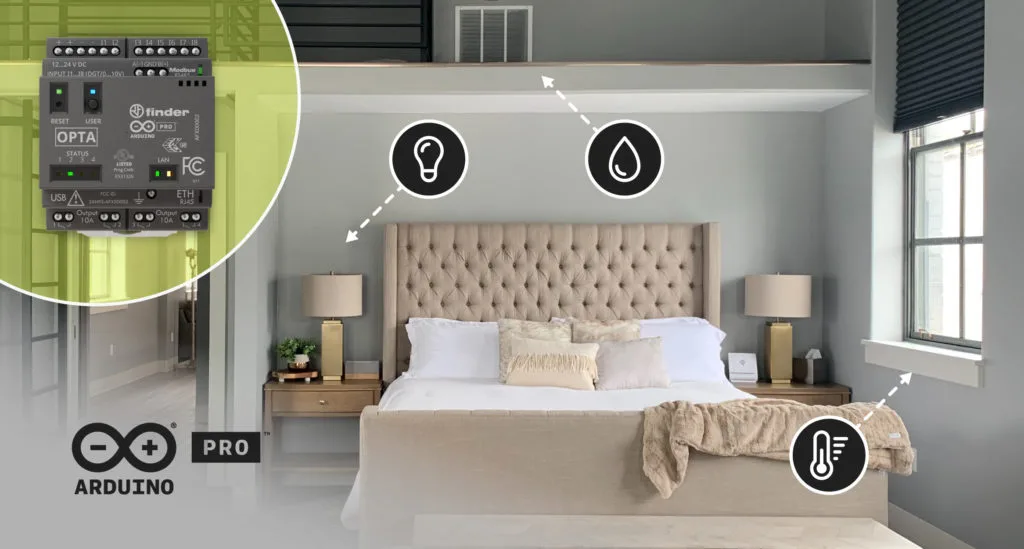
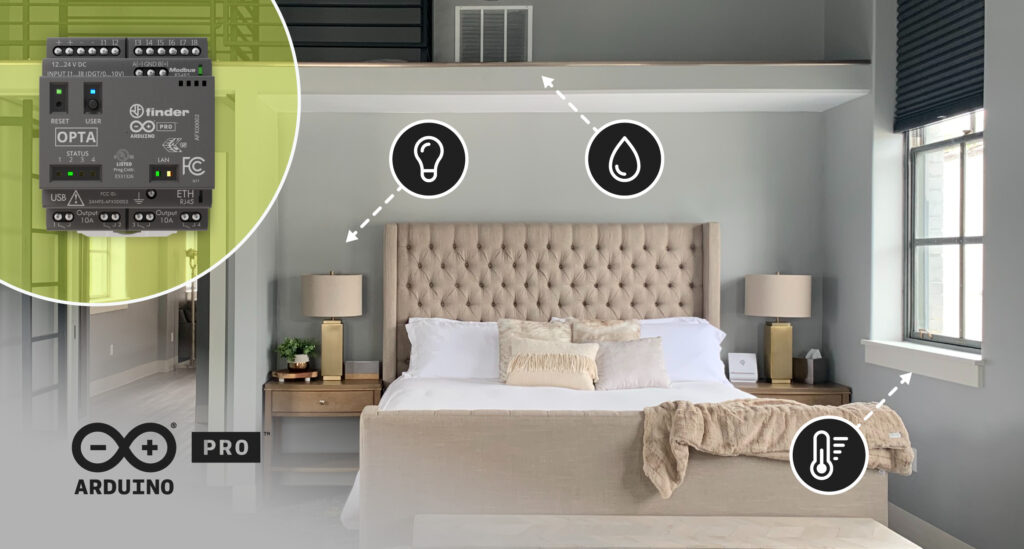
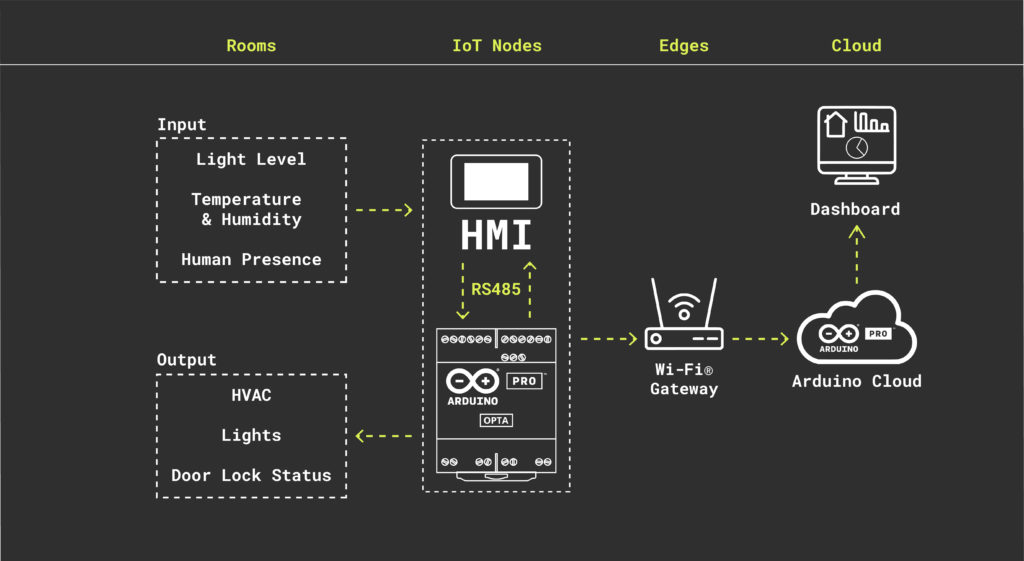
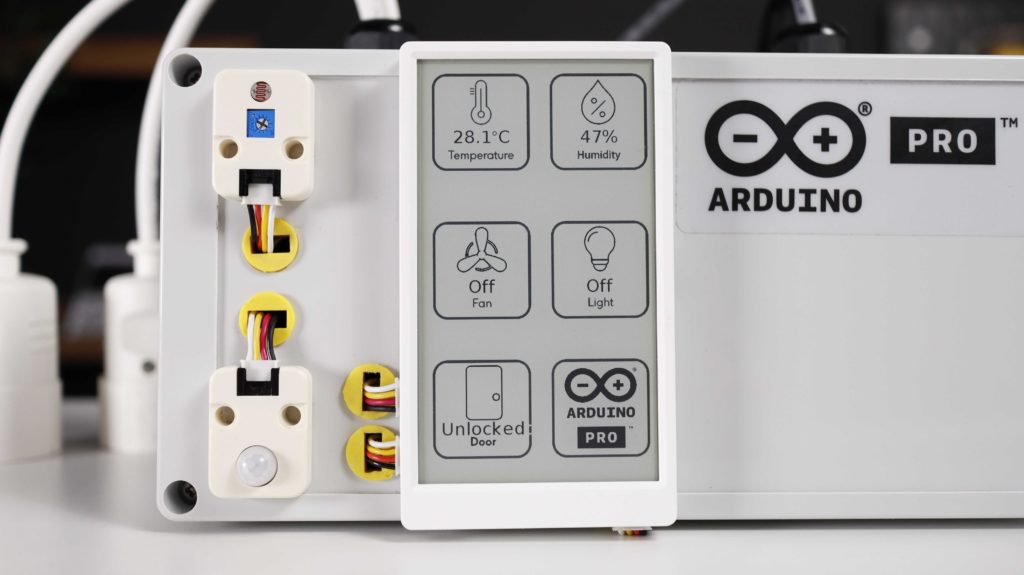
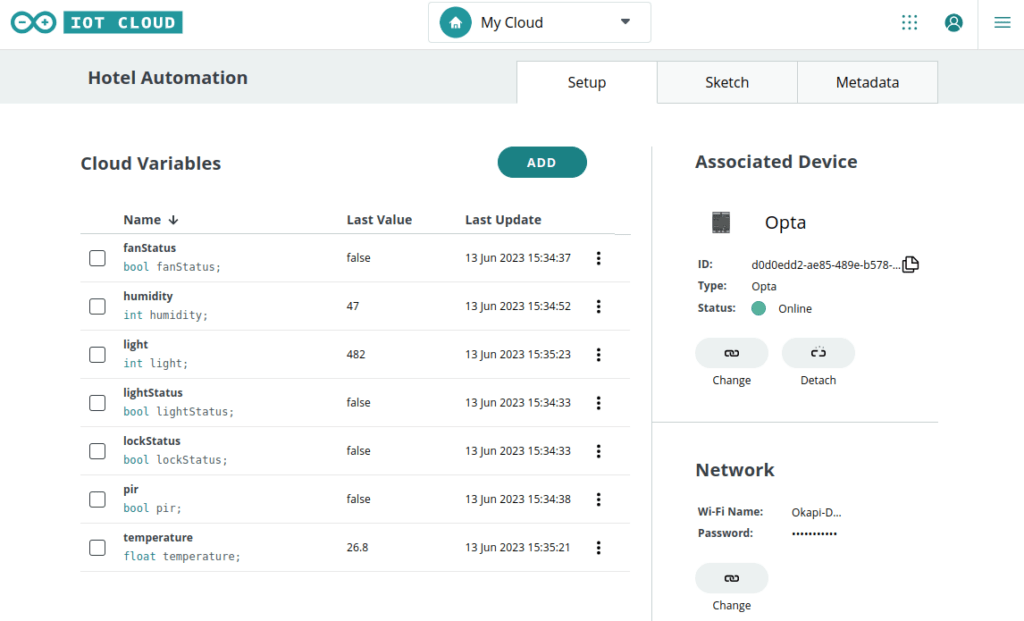
A comprehensive IoT automation solution can address these challenges effectively by aggregating sensor and user data and then intelligently managing lighting, cooling/heating and more – for a smart, connected experience. The elements required to achieve this kind of outcome are environmental sensors, a programmable logic controller (PLC), a human-machine interface (HMI), and cloud connectivity.
Programmable logic controller (PLC)
PLC-based automation systems are widely used due to their reliability, flexibility, and ability to handle complex tasks. Arduino Pro’s Opta microPLC can serve as the central control unit for hotel room automation by connecting and monitoring various devices and subsystems such as HVAC (heating, ventilation, and air conditioning), lighting, and door locks. The microPLC receives data from sensors and users and processes them to trigger appropriate actions or adjustments in the room.
Human-machine interface (HMI)
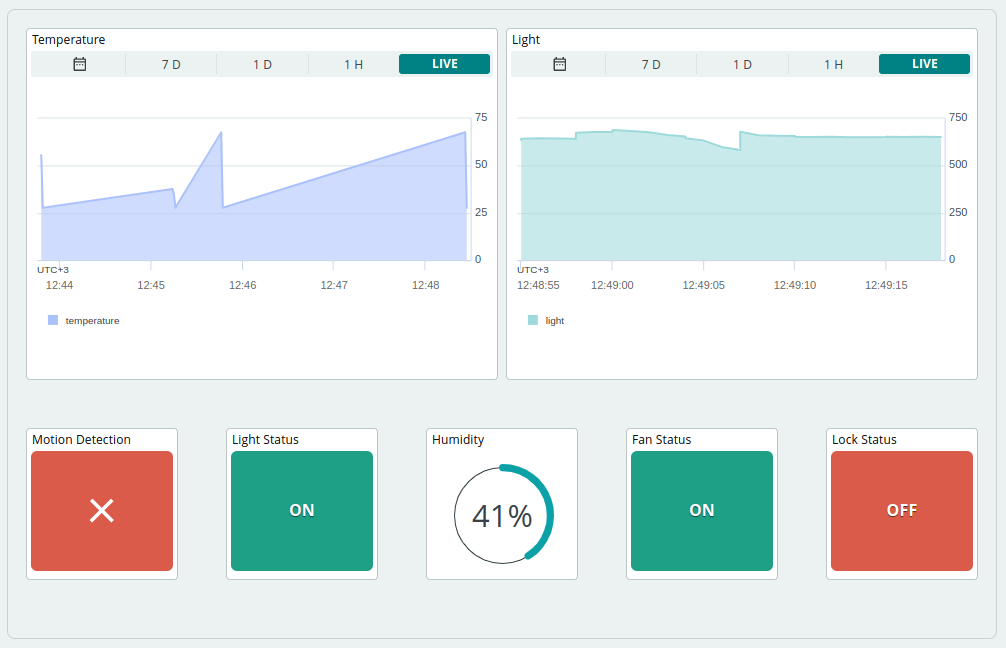
A touchscreen panel through which guests and staff can control various room parameters – such as lighting status, fan status, and door lock status – provides a user-friendly and intuitive interface to interact with the automation system. This HMI also communicates data to the microPLC for execution.
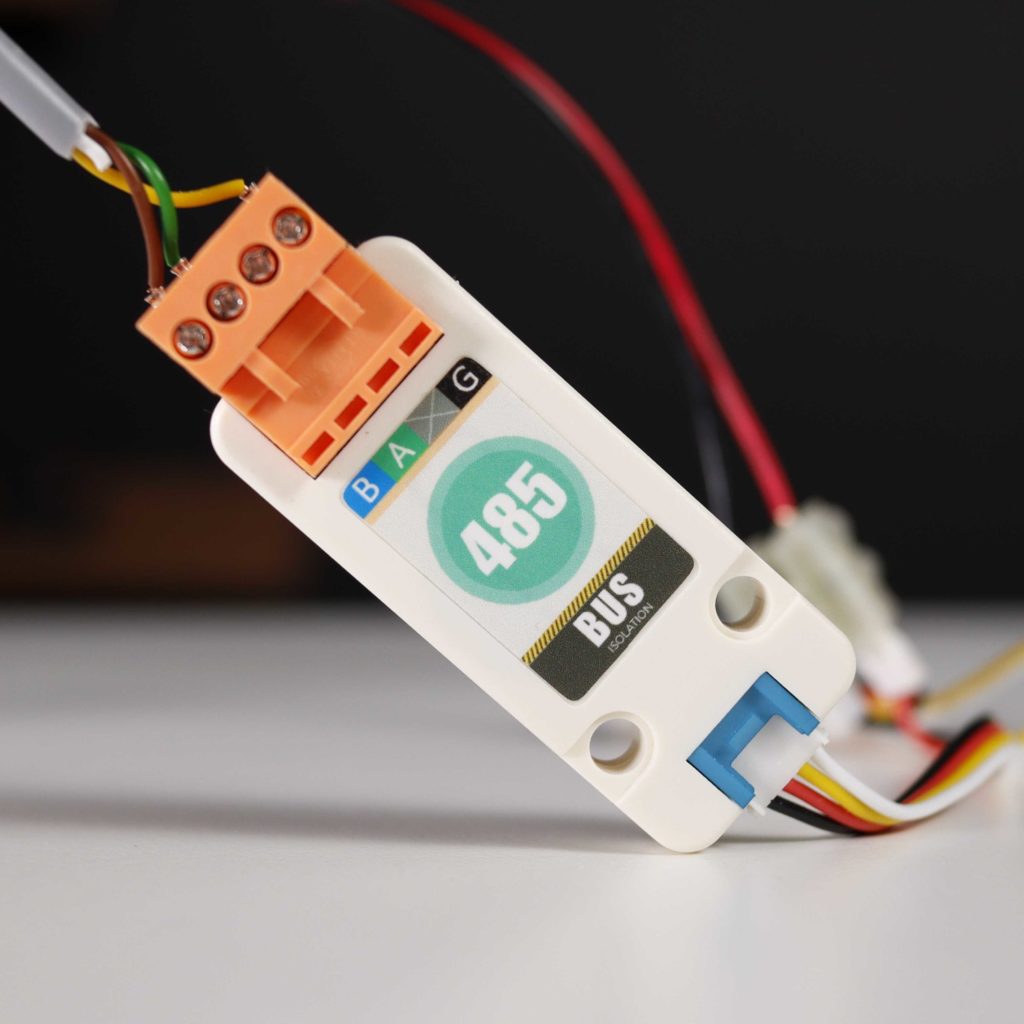
The Modbus communication protocol
The HMI and Opta PLC communicate via Modbus RTU over RS-485. Modbus RTU communication protocol is widely adopted in industrial applications due to its reliability, provided by the physical layer strength and by the cyclic redundancy check included in the data packets. It allows for multiple devices to be connected to the same bus, forming a multidrop network where each device has a unique address, used to identify the recipient of the transmitted data. The Arduino Opta can communicate with other Modbus devices, such as sensors, actuators, or traditional PLCs, by addressing them individually.
IoT Cloud solution
Cloud connectivity enables seamless communication between the hotel room or rental property’s automation system and the central management system. The Opta and HMI connect to the cloud infrastructure, allowing remote access, monitoring, and control of multiple locations. The solution also enables data logging and analytics for better energy management, predictive maintenance, and guest experience personalization.
Solving it with Arduino Pro
Let’s get into the details of how this solution can be put into action, and identify the hardware and software resources needed for deployment. Arduino Opta is a great option for deploying building automation solutions, as it offers simple integration with current systems, real-time control capabilities, support for Over-The-Air (OTA) firmware updates, and hardware-to-cloud data security. The Arduino Pro ecosystem allows users to benefit from easy integration, along with a range of scalable, secure, and professionally supported services.
The Arduino IDE 2.0 can be used to program Opta using C/C++. Opta acts as the main controller, communicating with the HMI via the Modbus RTU protocol. The HMI gathers data from various sensors – including light, temperature and humidity, and PIR (movement sensor) – as well as user inputs from its interface buttons related to room climate, lights, and door lock status. It then forwards this data to Opta, which controls the relay outputs that will activate the lights, thermostat or door lock.
Opta also sends this data via Wi-Fi® to the Arduino IoT Cloud. After connecting it to the Arduino Cloud using the Arduino Create Agent, cloud variables corresponding to the sensor data being monitored can be defined.
Arduino Pro’s Opta microPLC offers an ideal solution for the automation of hotel rooms and B&Bs or rental properties. By leveraging standard communication protocols, easy integration, real-time control capabilities, secure hardware-to-cloud data exchange, and remote access to multiple rooms from a centralized location, Opta provides the cornerstone of a comprehensive platform for smart hospitality.
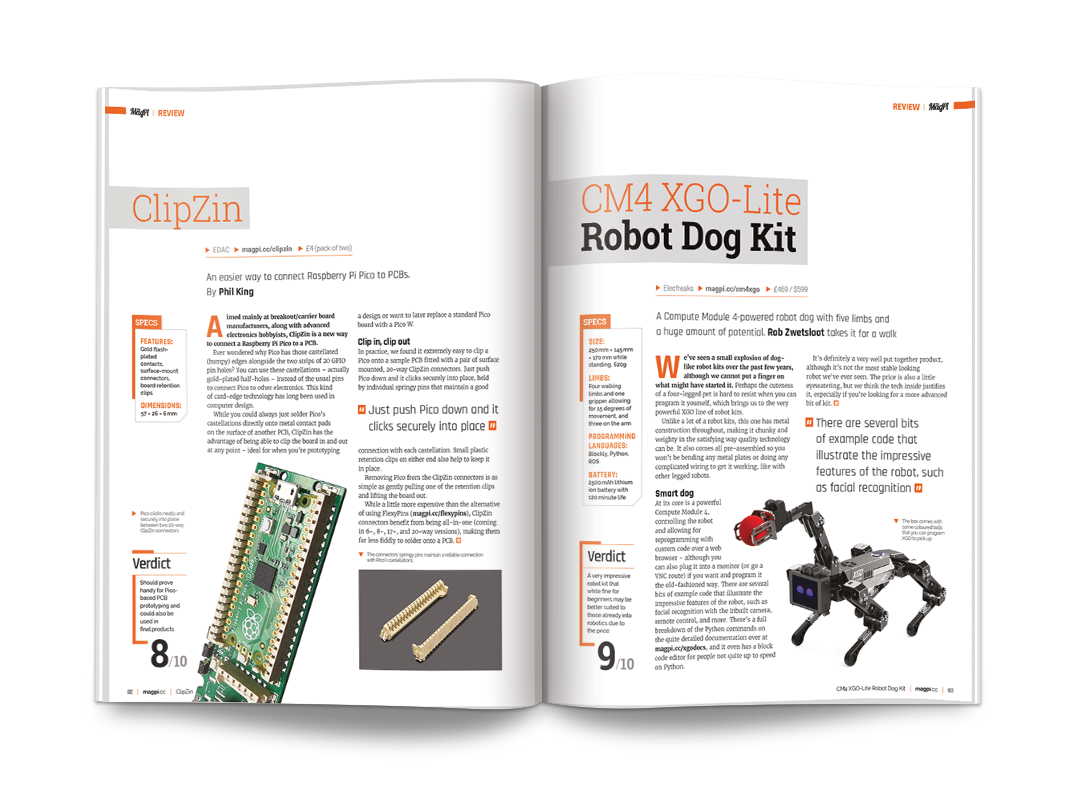
At its core is a powerful Compute Module 4, controlling the robot and allowing for reprogramming with custom code over a web browser – although you can also plug it into a monitor (or go a VNC route) if you want and program it the old-fashioned way. There are several bits of example code that illustrate the impressive features of the robot, such as facial recognition with the inbuilt camera, remote control, and more. There’s a full breakdown of the Python commands on the quite detailed documentation, and it even has a block code editor for people not quite up to speed on Python.
It’s definitely a very well put together product, although it’s not the most stable looking robot we’ve ever seen. The price is also a little eyewatering, but we think the tech inside justifies it, especially if you’re looking for a more advanced bit of kit.
Verdict
9/10
A very impressive robot kit that while fine for beginners may be better suited to those already into robotics due to the price.
Specs
Size: 250 mm × 145 mm × 170 mm while standing, 620g
Limbs: Four walking limbs and one gripper allowing for 15 degrees of movement, and three on the arm
Programming languages: Blockly, Python, ROS
Battery: 2500 mAh lithium ion battery with 120 minute life
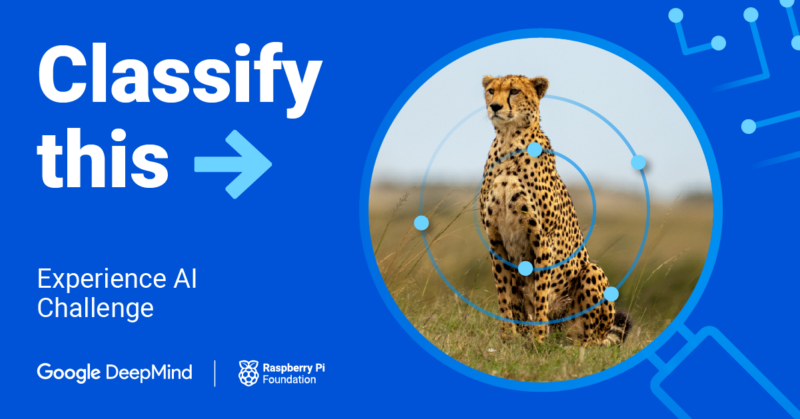
We are pleased to announce a new AI-themed challenge for young people: the Experience AI Challenge invites and supports young people aged up to 18 to design and make their own AI applications. This is their chance to have a taste of getting creative with the powerful technology of machine learning. And equally exciting: every young creator will get feedback and encouragement from us at the Raspberry Pi Foundation.
As you may have heard, we recently launched a series of classroom lessons called Experience AI in partnership with Google DeepMind. The lesson materials make it easy for teachers of all subjects to teach their learners aged up to 18 about artificial intelligence and machine learning. Now the Experience AI Challenge gives young people the opportunity to develop their skills further and build their own AI applications.
Key information
Starts on 08 January 2024
Free to take part in
Designed for beginners, based on the tools Scratch and Machine Learning for Kids
Open for official submissions made by UK-based young people aged up to 18 and their mentors
Young people and their mentors around the world are welcome to access the Challenge resources and make AI projects
Tailored resources for young people and mentors to support you to take part
For the Experience AI Challenge, you and the young people you work with will learn how to make a machine learning (ML) classifier that organises data types such as audio, text, or images into different groupings that you specify.
The Challenge resources show young people the basic principles of using the tools and training ML models. Then they will use these new skills to create their own projects, and it’s a chance for their imaginations to run free. Here are some examples of projects your young tech creators could make:
An instrument classifier to identify the type of musical instrument being played in pieces of music
An animal sound identifier to determine which animal is making a particular sound
A voice command recogniser to detect voice commands like ‘stop’, ‘go’, ‘left’, and ‘right’
A photo classifier to identify what kind of food is shown in a photograph
All creators will receive expert feedback on their projects.
To make the Experience AI Challenge as familiar and accessible as possible for young people who may be new to coding, we designed it for beginners. We chose the free, easy-to-use, online tool Machine Learning for Kids for young people to train their machine learning models, and Scratch as the programming environment for creators to code their projects. If you haven’t used these tools before, don’t worry. The Challenge resources will provide all the support you need to get up to speed.
Training an ML model and creating a project with it teaches many skills beyond coding, including computational thinking, ethical programming, data literacy, and developing a broader understanding of the influence of AI on society.
The three Challenge stages
Our resources for creators and mentors walk you through the three stages of the Experience AI Challenge.
Stage 1: Explore and discover
The first stage of the Challenge is designed to ignite young people’s curiosity. Through our resources, mentors let participants explore the world of AI and ML and discover how these technologies are revolutionising industries like healthcare and entertainment.
Stage 2: Get hands-on
In the second stage, young people choose a data type and embark on a guided example project. They create a training dataset, train an ML model, and develop a Scratch application as the user interface for their model.
Stage 3: Design and create
In the final stage, mentors support young people to apply what they’ve learned to create their own ML project that addresses a problem they’re passionate about. They submit their projects to us online and receive feedback from our expert panel.
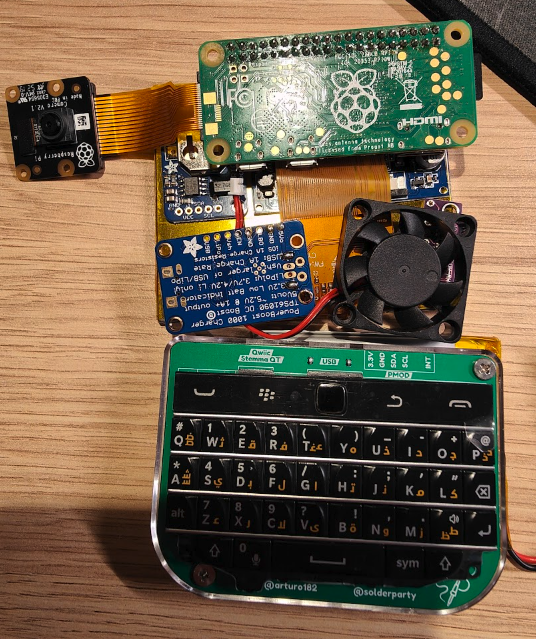
“The idea started from my Game Boy Zero Plus build that was based on a stripped Raspberry Pi 3A computer,” Zhou explains, referring to a project in which a new Game Boy handheld was built by inserting a thinned-down Raspberry Pi 3A into an original case. “After completing it, I decided that I would then love to make use of Raspberry Pi in a handheld format for testing and debugging in the field. But I did not have a clear plan for the keyboard design until I recently found the BBQ20KBD from Solder Party.”
Key components
The BBQ20KBD is a QWERTY keyboard and optical track pad device powered by an RP2040 microcontroller. Identical to the BB Q20 used in the BlackBerry Classic released in 2014, the tiny set of keys is placed onto a custom-printed circuit board and, because it has a USB Type-C socket, it’s easy to hook up to Raspberry Pi.
The keyboard gave Zhou’s Blackberry Pi a strong direction. “The design was heavily inspired by many other Raspberry Pi handheld projects, such as Beepy and ClockworkPi,” he adds. There were some other requirements. “One of the aims for this design was to test an SDR radio antenna in my backyard. A battery-powered handheld is so much easier for this job,” he says.
Zhou chose a 2500 mAh LiPo battery, as well as an Adafruit PowerBoost 1000C power supply. He also took a GearBest 3.5 composite LCD display out of his Game Boy Zero Plus build, and added a Raspberry Pi Camera Module 2 NoIR. Of all the components, though, selecting to use a Raspberry Pi Zero W was the easiest decision.
“I started playing with Raspberry Pi with the original version so I’m very comfortable tinkering with the config files and soldering the pins,” Zhou says. “Even though many Raspberry Pi models were still out of stock at the time when I started this project, I still wanted to use one (and I’ll be upgrading to Raspberry Pi Zero 2 W). I find the comprehensive documentation provided by the Raspberry Pi Foundation is so much more useful than starting from scratch on the other counterparts.”
Mod man
Rather than use an existing case to fit the components, Zhou felt he would have much more control if he designed his own. As such, he drafted a case using the 3D CAD package SolidWorks, with the aim of outputting the design to his Creality Ender-3 3D printer.
“Ever since my Game Boy project, I find it so much easier to build things from the ground up,” he explains. “Modding an existing enclosure can take quite some extra effort and I’m now getting more confident in CADing.
“Besides, if I’d have used an existing BlackBerry case, squeezing the components in there would be very challenging. That said, recently I’ve started to teach myself to use KiCad for designing customised PCBs. Perhaps it would be possible to make one that fits in a BlackBerry case using a [Raspberry] Pi Compute Module 4.”
Not that the project is any worse for having a freshly designed case. In fact, it looks amazing, made all the prettier by having the classic rainbow stripes as seen on the Sinclair ZX Spectrum from 1982. “That was a bit of a random decision,” Zhou says. “ZX matches my initials and I’ve always liked retro-style designs.”
Clever case
A lot of thought went into the case. “I’m pretty proud to point out that all the GPIO pins are accessible from the top of the screen and I have added a few peripheral mounting points around the enclosure for future add-ons such as [Raspberry] Pi HATs,” Zhou adds. “I’m also very excited about the outcome of the enclosure printing. This was the first time I have ever played with the six-colour manual change on my Klipperised Ender-3 printer.”
It nevertheless proved very challenging. “I spent quite some time trying to optimise the arrangement of different components, especially the position of the GPIO pins and other connection ports so that they can be easily accessible,” he continues. “It was also very tricky to squeeze all the components into such a tight space. But I guess one thing that differentiates this project from the others is that all of the components can be purchased off-the-shelf, and it does not require any PCB design experience.”
The end result is a stunning, expandable machine that boots, by default, into the command-line interface. The frame buffer is enabled in the /boot/config.txt file to display 320×240 resolution and, as well as being great for entering code, the Blackberry Pi is able to capture photos. It’s proving to be quite a useful Linux handheld.
But Zhou is not yet finished. “As I mentioned earlier, I’ll be adding a Sense HAT and an SDR dongle. I also recently added a light guide to the USB charging port using translucent 3D-printing filament, so that the Adafruit PowerBoost status LED lights can be visible from outside the enclosure (green being fully charged, orange charging, and red showing low battery).
“Unfortunately, the progress has been slow lately because there are a few other projects which have been keeping me busy, including using a Raspberry Pi to remote-control an electron microscope and optical filters, but everything seems to be working very well.”
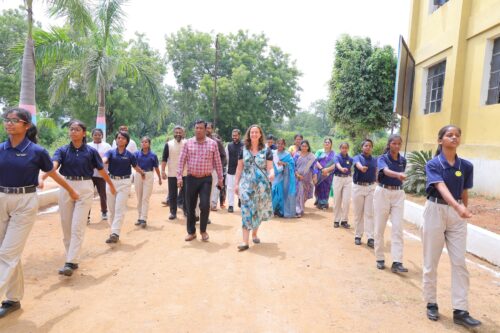
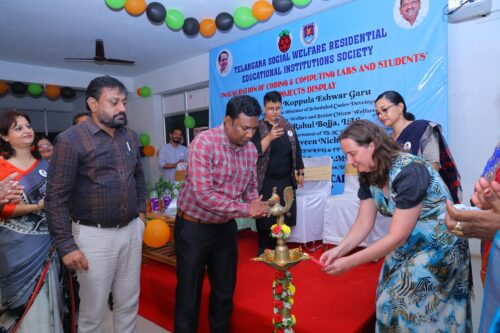
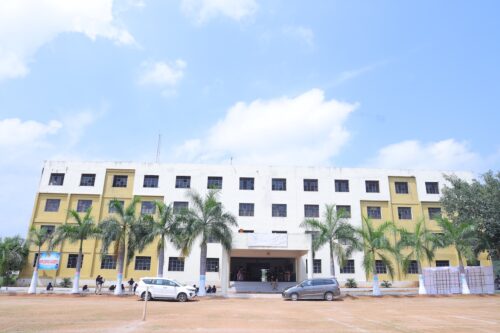
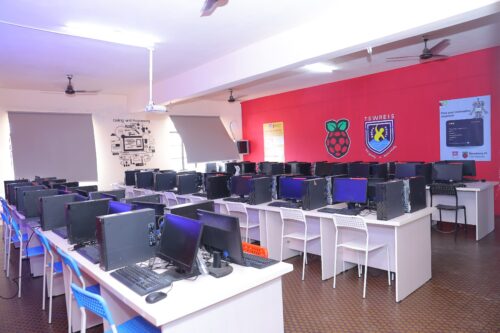
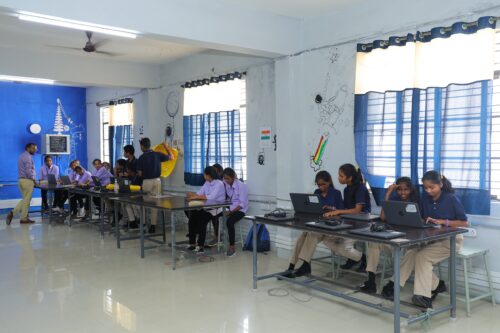
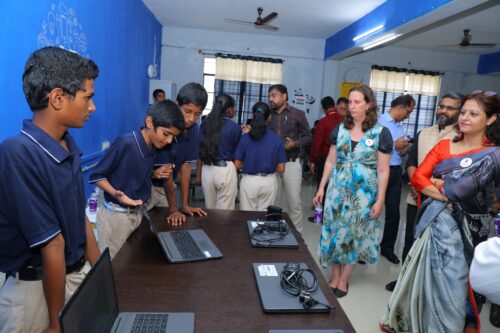
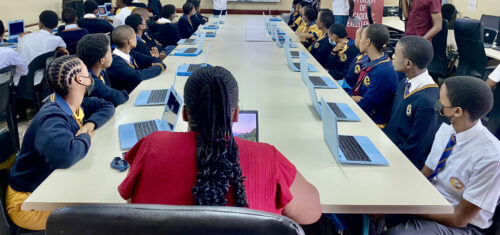
On September 29 2023, amidst much excitement and enthusiasm, a significant event took place at a unique school in Moinabad, Telangana: the teams of the Raspberry Pi Foundation and Telangana Social Welfare Residential Educational Institutions Society (TSWREIS) gathered to celebrate our partnership on the esteemed Coding Academy of TSWREIS.
This event marked a special project for us where we are piloting a distinctive, progression-based computing curriculum in a government school and a degree college in India.
Partnering with TSWREIS to bring computing education to Telangana
At the Foundation, our goal is to work closely with schools, tailoring our offerings to their contexts. Our objective is to design and evaluate unique learning experiences by integrating content from our diverse range of high-quality educational products. Through these efforts, we aim to drive significant advancements in education and technology, benefiting both students and education systems across the world.
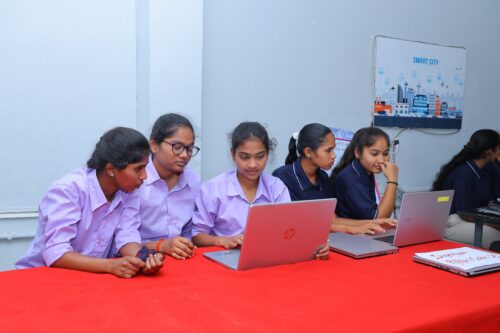
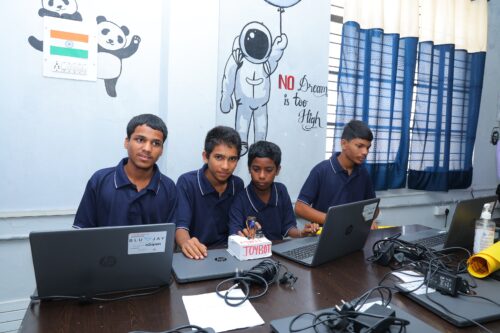
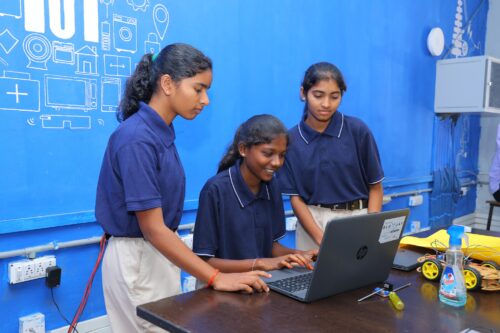
TSWREIS manages 268 residential educational institutions in Telangana, with a primary focus on delivering quality education to under-resourced young people, particularly children from scheduled castes and tribes in rural areas. Among these institutions is the Coding Academy school, located in Moinabad, which operates as a fully residential co-ed school for grades 6 to 12, accommodating around 800 students. Additionally, TSWREIS oversees another centre of excellence, the Coding Academy degree college in Shamirpet catering to 600 undergraduate female students.
We joined forces with TSWREIS to form a collaborative partnership with their Coding Academy units at both high school and college. We’re committed to sharing our expertise in computing and coding curriculum for students from Grade 6 to intermediate at the school, and across all courses at the college.
The exciting model for our partnership with TSWREIS
We took on the challenge of directly delivering a comprehensive curriculum at the Coding Academy school and college through our own educators, exclusively hired and trained for this project. This is an exciting new approach for us, because up to this point, we have never directly delivered a curriculum anywhere in the world. However, we know we have created a world-class computing curriculum for educators in formal (and non-formal) settings, and we have many years’ experience of training teachers, so we are well-prepared to face this project and its potential challenges head-on and make it a success.
To begin the project, our team members based in India conducted a thorough study of the Coding Academy students’ interests and learning levels. Based on this, our Curriculum team in the UK and India customised and localised the content in our curriculum. We will be observing the curriculum’s delivery in classrooms and collecting students’ responses, and based on this data we’ll further refine the localised curriculum.
Throughout the project’s lifespan, we’ll measure the effectiveness of our curriculum and the impact of learning on the students. To do this, we’ll collect data from classroom observations, periodic assessments, and focused group discussions with students and educators.
Starting from the second year of the project, we will build capacity within the system. In collaboration with TSWREIS, we’ll select teachers from within the organisation based on their interest and competence, and initiate their training. Our objective is that by the project’s fifth year, TSWREIS will have achieved self-sufficiency in delivering computing education to students at the Coding Academy as well as other institutions in its purview.
The promise of this project for our work in India
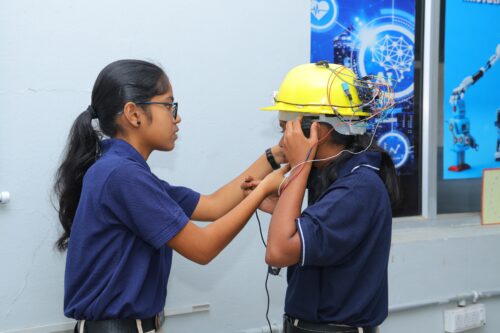
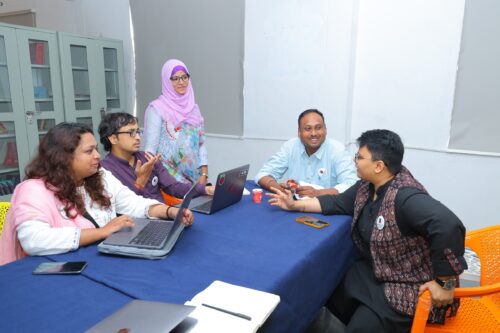
We began delivering lessons at the Coding Academy college and school in July, and it’s worth mentioning that it’s been a rollercoaster ride so far. We’ve been working closely with the TSWREIS team to equip both the academic units with the resources needed for seamless implementation of the project. Our India-based team has been able to ensure continuity in the project’s momentum and plug every gap, and is working tirelessly to make this big, challenging, and exciting project blossom and succeed. When it comes to the students’ energy, enthusiasm, and the sparkle in their eyes for their learning, it’s unmatched, and everyone feels proud of their achievements so far.
This work with TSWREIS holds immense importance for us, representing our dedication to shaping a brighter educational landscape especially for young people from under-resourced communities. We hope to replicate similar initiatives across various regions in India, enabling widespread access to quality education. We also aspire to take forward our initiatives in much larger dimensions for the entirety of India.
In addition to our partnership with TSWREIS, we are actively engaged in several other impactful projects in India, such as our partnership with Mo School Abhiyan in Odisha to serve the government’s schools across Odisha state, and our collaboration with Pratham Foundation, which is helping us reach under-resourced communities and furthering our commitment to enhancing educational experiences.
We look towards the future
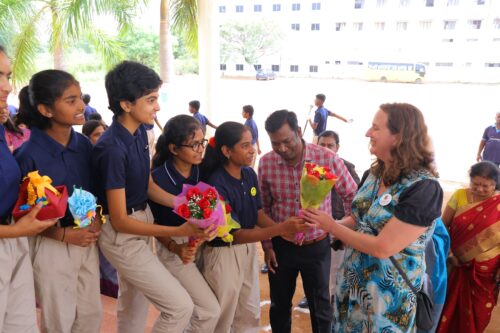
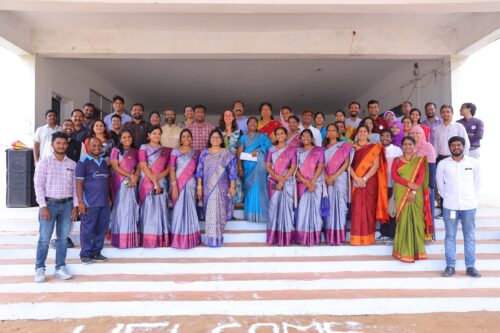
In reflection, the voices at the launch event on September 29 echoed the anticipation and optimism that filled the air on that memorable day. Chief guests who graciously attended the event were Shri. E Naveen Nicholas, IAS, Secretary at TSWREIS & TTWREIS, and Rachel Bennett, our Managing Director at the Raspberry Pi Foundation. Heartfelt gratitude to them for their presence and blessings. We also extend our thanks to our funding partner in this work, Ezrah Charitable Trust, and our delivery partners for their invaluable support.
The energy felt on the event day continues to drive our determination to do the work that lies ahead. As we look forward to the future, our hope and the hope of both the Coding Academy team and students are aligned: hope for a brighter, technologically empowered future, where education becomes a beacon of opportunity for all.
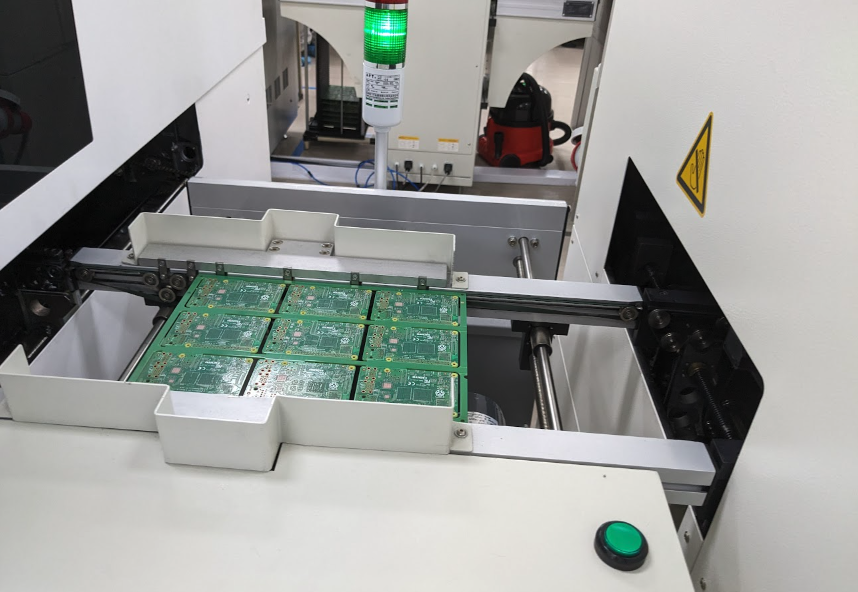
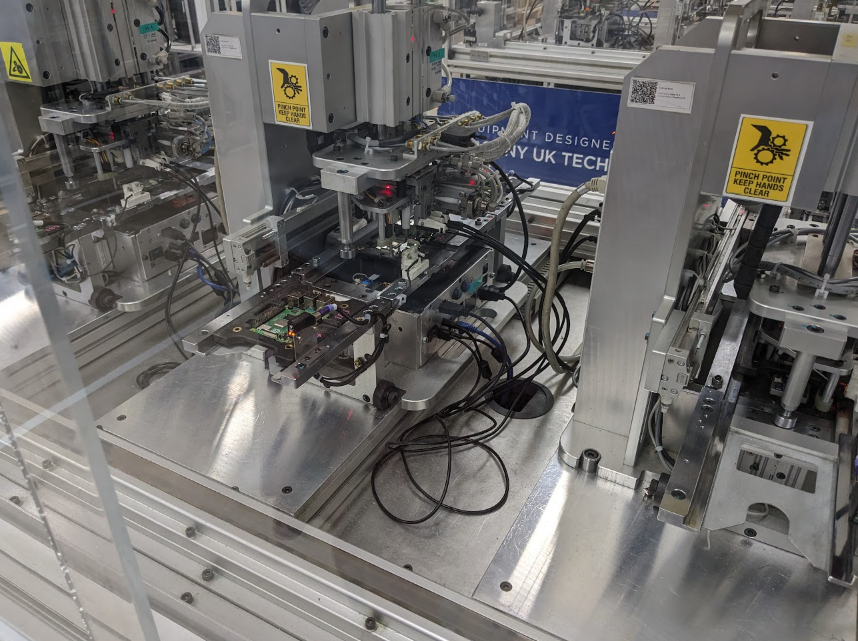
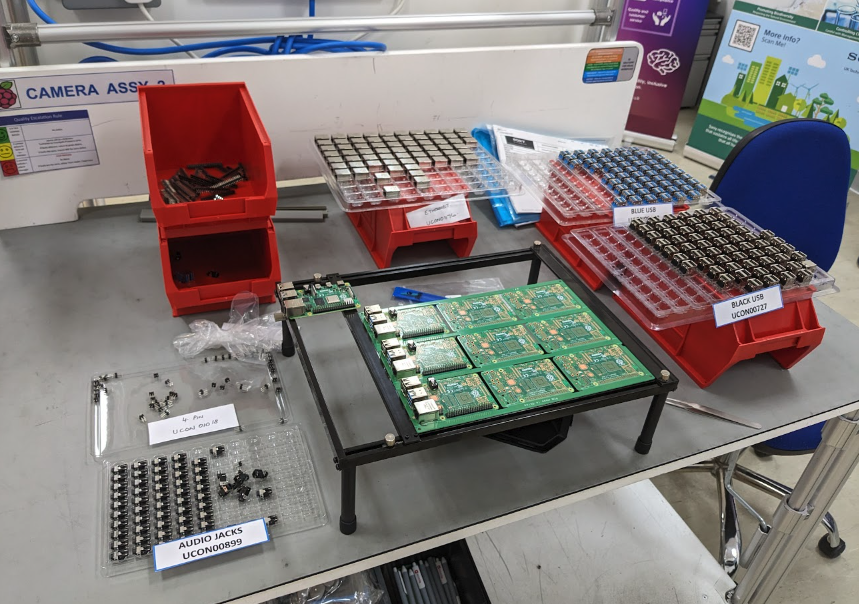
We were lucky to be given a tour of the facilities where machines, robot arms, and real people make 250,000 Raspberry Pi computers a week – from board to box. Have you ever seen a machine put a little computer in a box? It’s very cute, and the mechanism to fold the lid is a very simple angled piece of metal that runs along the line, maintaining the key engineering philosophy of KISS (keep it super-simple, as our friends at the Raspberry Pi Foundation like to say it).
Eco friendly
A (rightful) concern of many people is the environmental impact of manufacturing products, and a key part of the operation of the Pencoed site is meeting sustainability targets which are set every five years. From using more green energy to reducing waste of all kinds, Sony is taking active steps towards reducing its environmental impact.
You can see this along the lines, with (human-supervised) automated checks to make sure all chips are installed correctly. Misaligned chips can usually be reset which cuts down on waste and overall improve yield, and the reflow soldering methods (described in our engineering interview in The MagPi 134 in the new Raspberry Pi 5 manufacturing process (referred to by a codename of Hydrogen in the factory) that also improve the number of working boards.
The factory floor itself is divided up into areas with clear signs on what section is which. On one station you’ll have someone building a broadcast camera from scratch, with two a week going out the doors, and in another section you’ll have people snapping boards off runners to be fed into the boxing machine. The complexity is impressive to behold, with a lot of custom machines built and maintained by Sony to make the humble Raspberry Pi.
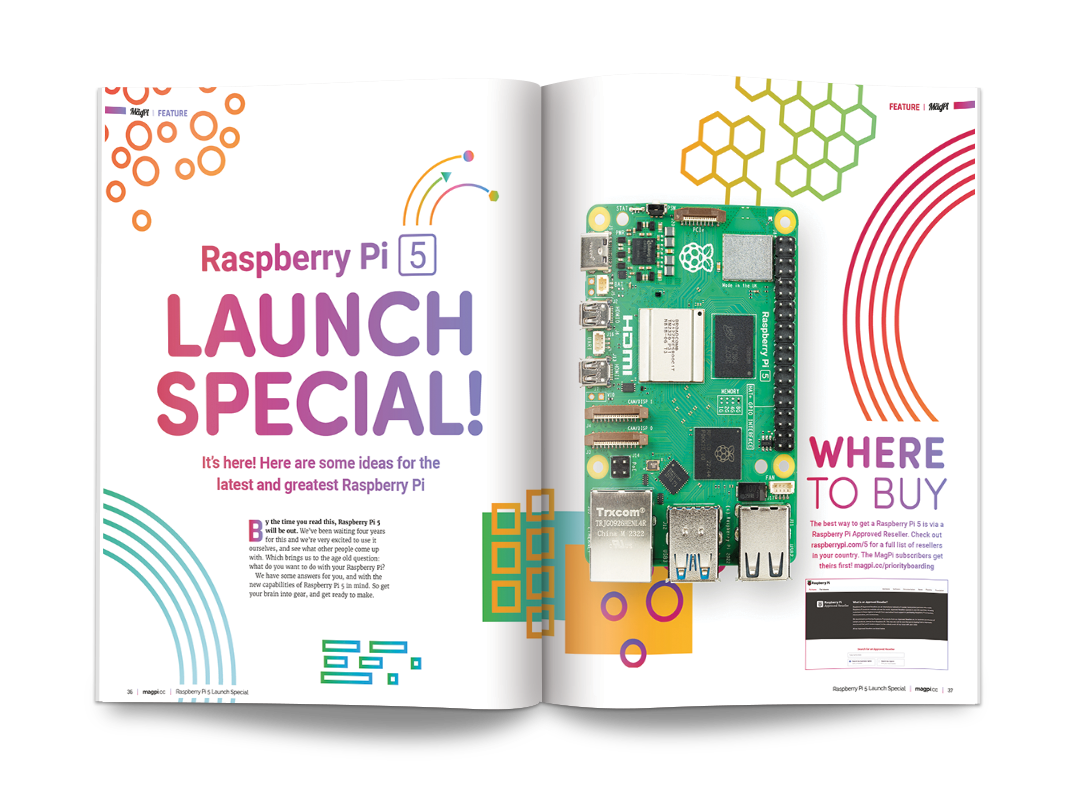
The highlight of this issue is undoubtedly the launch of Raspberry Pi 5. We’ve got a special launch feature celebrating this innovative piece of technology that brings speed parity with traditional desktop computers. The feature starts on page 36, promising to fuel your creativity with quickstart setup guides, build ideas, and an accessories guide.
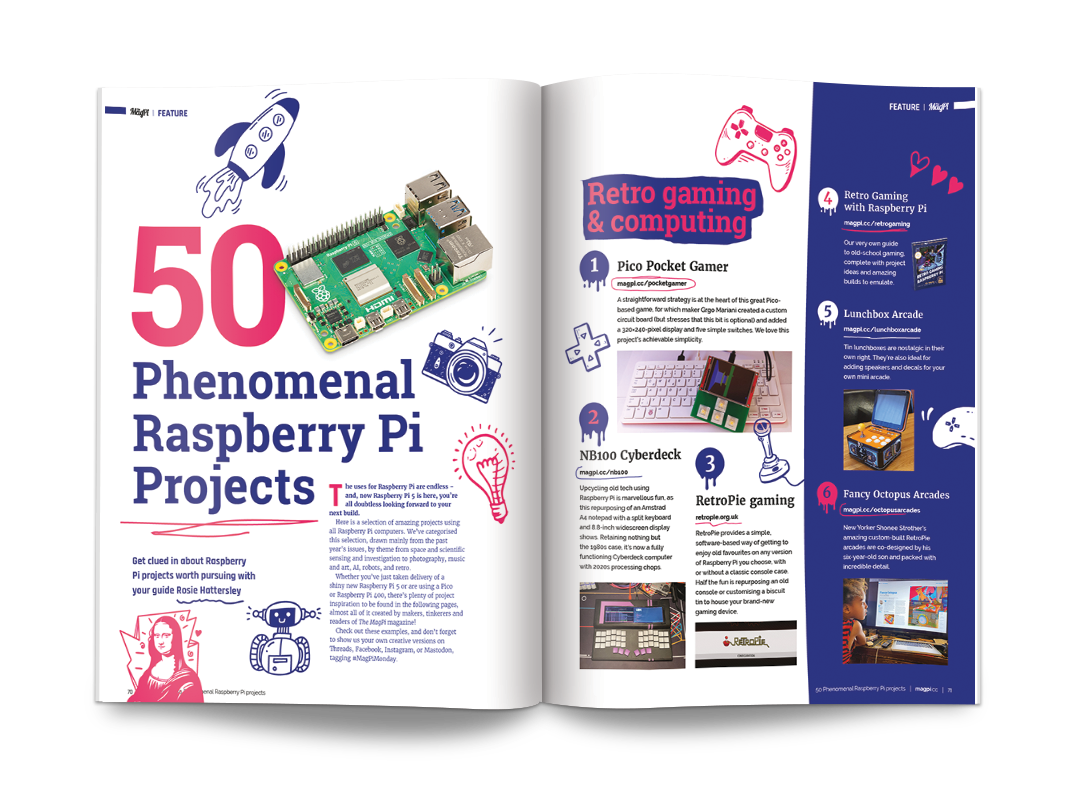
50 Phenomenal Raspberry Pi Projects
If you’re looking for inspiration, check out these 50 Raspberry Pi project ideas. Whether you’re a beginner or a seasoned maker, these projects are sure to spark your imagination, ranging from music, and gaming, to space and robotics projects.
The latest innovative projects
This issue spotlights several creative projects from the community. This stunning ScreenDress adds animated eyes to fashion with LED screens. The Blackberry Pi project combines nostalgia with modern tech, featuring a Raspberry Pi Zero W computer operating on a BlackBerry-style keyboard. Meanwhile, the Drill Press Camera enhances precision in creating holes in PCB boards.
Learn to make with our tutorials
For those eager to learn, the tutorials section is a treasure trove. It includes an introduction to MQTT, guidance on building a Mecanum robot, and a starter guide to using Ubuntu as an alternative Raspberry Pi operating system.
Reviews and resources
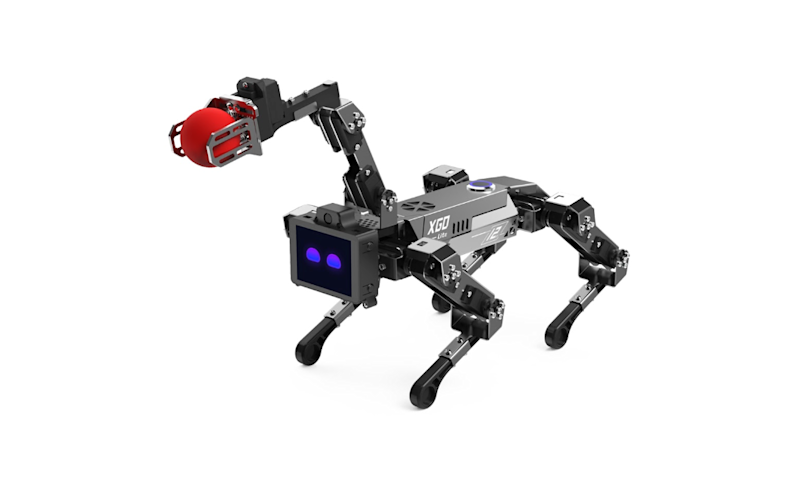
Don’t miss out on the comprehensive reviews, including an in-depth look at the CM4 XGO-Lite robot dog kit and ClipZin kit. Plus discover the best learning resources available for circuit and electronic projects.
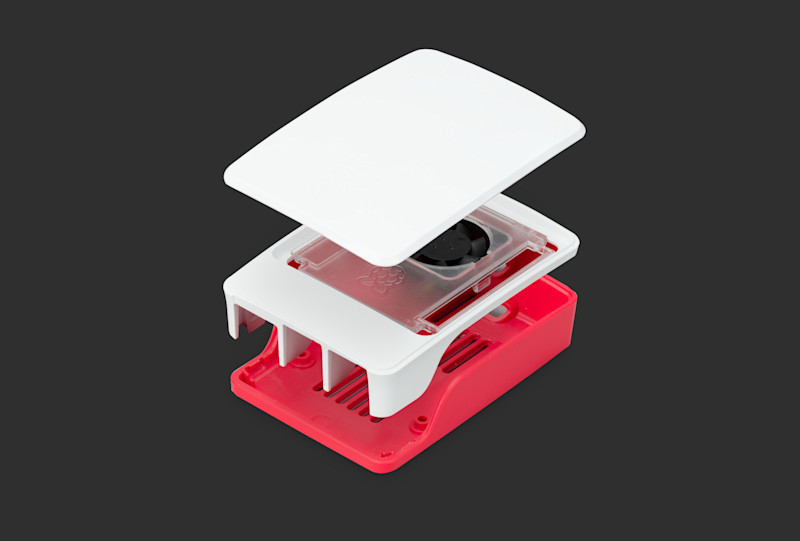
When the case fan for Raspberry Pi 4 was released, it was a sign to come of better airflow and ventilation for Raspberry Pi cases going forward. You can see this in the new official case for Raspberry Pi 5, which includes advanced ventilation with a blower and space for air to flow. You can enter to win one below…
You don’t need to go back more than a century to find people who carried the job title “scientist” without any qualifiers. But as STEM fields advanced, people had to become increasingly specialized in more niche disciplines. In recent years, however, we’ve seen a bit of a reversal in that trend and modern occupations often require interdisciplinary knowledge. To foster such knowledge, the open-source SPEERLoom encourages interdisciplinary learning.
Created by a team of researchers from Carnegie Mellon University and UC Irvine, the SPEERLoom is an open-source robotic Jacquard loom kit that, after assembly, can produce complex textile weaves. Looms like this certainly have practical applications in the textile industry, but SPEERLoom’s true purpose is educational. By building a SPEERLoom and learning the skills to operate it, students can develop ingrained knowledge and experience that crosses the boundaries of traditional disciplines to yield a well-rounded STEM base.
To encourage that education, SPEERLoom’s designers wanted the machine to be accessible and affordable for classroom environments. Most of the machine’s parts are available off-the-shelf and the custom parts can be fabricated using basic tools and 3D-printing.
Jacquard looms are complex machines with many moving parts, but the accessible design extends to the electronic components and actuators. SPEERLoom requires 40 linear actuators and an Arduino Mega 2560 board controls those through MCP23017 I2C port expanders and 40 EasyDriver modules. A custom GUI written in Python lets users send weave patterns, stored as CSV files, to the Arduino to get the process started.
For well over one hundred years, people have been constructing machines that dispense fortunes to those who ask at the insertion of a coin and the push of a button. In modern days, this has taken the form of mobile apps that can be far more expansive, albeit with a lack of physical interaction. Seeing an opportunity to use an embedded speech recognition model in this kind of application, the Electronic Cats team built the aptly named Fortune Cat just in time for some Halloween fun.
This small device, based on the Arduino Nano 33 BLE Sense, takes advantage of the onboard microphone to listen for words being spoken at the small cube. Performing the language processing is Cyberon’s Arduino Speech Recognition Engine, which was configured to listen for the wake phrase “Fortune Cat” and then later respond to “tell me my future” as its command phrase. After generating the model online, it was incorporated into the code via the DSpotter software development kit that lets the program check if either the wake or action phrase has been said and then act accordingly.
In this case, asking Fortune Cat for your future will present one of 20 random phrases that get displayed on the OLED mounted to the top of the 3D-printed enclosure. To read more about how the Electronic Cats crew created and configured Fortune Cat, you can check out their write-up here on Hackster.io or watch their video below!
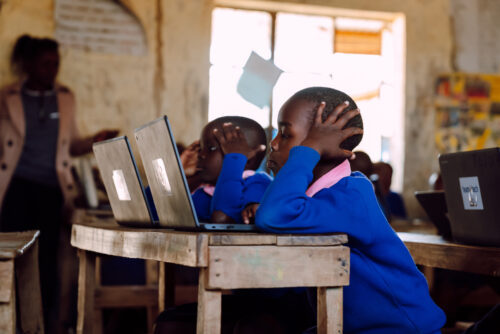
Increasing access to computing education is a global challenge, and at the Raspberry Pi Foundation we take a global approach in addressing it. One way we do this is to partner with organisations around the world and support them to introduce Code Clubs and CoderDojos in their local or national communities.
Code Club and CoderDojo are the two global networks of free, volunteer-led coding clubs for young people that we support. They are a great fit for a lot of organisations that share our vision and values and work with young people from backgrounds that are currently under-represented in computing. Right now, our Global Clubs Partner network involves more than 50 organisations in over 40 different countries around the world. Seven new partners have joined us since August.
New members in the Global Clubs Partner network
We send a warm welcome to our seven new partners. Here is some of what they are working on:
CSEd Botswana is training 25 teachers in rural areas to run Code Clubs in their schools
Hacedores in Mexico is working towards establishing CoderDojos in their 80 makerspaces, and Code Clubs in the local schools of their community members.
Code Club Luxembourg is already running several clubs and also hosts a number of workshops each year to encourage children to carry on their coding journey by joining a Code Club or CoderDojo.
Light Into Europe works with the Deaf community in Romania. They plan to open up coding to children with hearing impairments through accessible Code Clubs, supported by interpreters and adults who are also deaf.
KIT Hub in Burundi have plans to establish CoderDojos to support children from underserved areas, including a sizable community of Congolese young people living in refugee camps in Burundi.
Orientations Training Centre in Sudan will be setting up clubs in Khartoum and Darfur, and they are planning a special passion for supporting young people to submit entries to the Coolest Projects online showcase in 2024.
Savanna Developer Network will establish CoderDojos in northern Ghana to narrow the income and infrastructure gap between the north and the south by ensuring that children in the north aren’t left behind in computing education.
We are really excited that these organisations have chosen to join the Global Clubs Partner network.
Benefits of partnering with us
When they join our Global Clubs Partner network, organisations work with us to grow the Code Club and CoderDojo communities around the world. Our Global Clubs Partners share our mission to enable young people to realise their full potential through the power of computing and digital technologies, and they commit to working towards this mission with our support.
Our new partners are as glad as we are to have joined our network.
Abdelmoneim Mohammed of Orientations Training Centre in Sudan is excited by the impact Code Club will have on his young coders, telling us:
I expect this can help to make our citizens a global citizen, [by] learning from a well-established and developed educational system.
For Ethel Tshukudu of CSEd Botswana, it is the community focus and available support network that is important. She tells us:
The strong sense of community and the availability of mentorship opportunities are particularly appealing, as they ensure that CSEdBotswana can consistently access the support needed to enhance our coding clubs and create a more significant impact.
Our partner from KIT Hub in Burundi, Ferdinand Alimasi, values how establishing clubs promotes collective learning and engagement in the community. He says:
Education and preparation of [the] future workforce require collective work and responsibilities, so these clubs will bring the change in communities by offering opportunities to learn for kids and teens, as well as opportunities for everyone to be involved in building a better future for all.
What we learn from our partnerships
Our partners work in lots of different circumstances all around the world. A key learning for us is that there is no ‘one size fits all’ approach to computing education. We support our partners to adapt and deliver our resources in a way that they know will best engage their learners. This highlights how important it is to work in a culturally sensitive way, and to prioritise providing opportunities for learners to use digital technology to make things that matter to them. That looks very different depending on where you are in the world, and who you are working with.
Through working with our partners, we also see just how much world events can impact the already unequal access young people have to learning new digital skills. Climate crisis events such as floods and wildfires, and political crises such as war, conflict, and changes in government have affected many of our global partners this year. The resulting closures of schools and other educational venues, electricity blackouts, and funding challenges cause further educational disadvantage to the children in the affected areas. Our partners play a key role in providing additional educational opportunities for young people when it is safe to do so.
Young tech creators at a Code Club in Brazil.
The experiences and perspectives we’ve gained through our partnerships with global organisations are extremely important to us and our mission. They help to inform the work we do to make computing education truly accessible for all learners and educators around the globe.
Could your organisation become a Global Clubs Partner?
You can find out more about how your organisation could join our Global Clubs Partner network on the CoderDojo and Code Club websites, or contact us directly with your questions or ideas about a partnership.
Since we launched Google Play Games in Beta, gamers from all over the world have jumped on to play their favorite mobile games on Windows 10 and 11 PCs. Now we’re sharing a few updates to Google Play Games for even better gameplay — including more games, a new search feature and support for game controllers.
Play more than 3,000 games, including Clash of Clans and Clash Royale
We’ve brought more than 3,000 games to the Google Play Games catalog, and we continue to add top requested games from our incredible player community. We are excited to announce that starting today, you can play the massively successful mobile games, Clash of Clans and Clash Royale, on Windows 10 and 11 PCs. And your progress syncs no matter where you play – whether it’s on your mobile phone, Windows PC, or your Chromebook.
Quickly search for your game
A big request from our players was an easier way to search within Google Play Games. So we recently rolled out a search feature to help you easily and quickly find what you’re looking for. In the “All Games” section, navigate to the search bar at the top and just type in the game you are looking for.
Recent developments in artificial intelligence are changing how the world sees computing and challenging computing educators to rethink their approach to teaching. In the brand-new issue of Hello World, out today for free, we tackle some big questions about AI and computing education. We also get practical with resources for your classroom.
Teaching and AI
In their articles for issue 22, educators explore a range of topics related to teaching and AI, including what is AI literacy and how do we teach it; gender bias in AI and what we can do about it; how to speak to young children about AI; and why anthropomorphism hinders learners’ understanding of AI.
Our feature articles also include a research digest on AI ethics for children, and of course hands-on examples of AI lessons for your learners.
A snapshot of AI education
Hello World issue 22 is a comprehensive snapshot of the current landscape of AI education. Ben Garside, Learning Manager for our Experience AI programme and guest editor of this issue, says:
“When I was teaching in the classroom, I used to enjoy getting to grips with new technological advances and finding ways in which I could bring them into school and excite the students I taught. Occasionally, during the busiest of times, I’d also look longingly at other subjects and be jealous that their curriculum appeared to be more static than ours (probably a huge misconception on my behalf).”
It’s inspiring for me to see how the education community is reacting to the opportunities that AI can provide.
Ben Garside
“It’s inspiring for me to see how the education community is reacting to the opportunities that AI can provide. Of course, there are elements of AI where we need to tread carefully and be very cautious in our approach, but what you’ll see in this magazine is educators who are thinking creatively in this space.”
Download Hello World issue 22 for free
AI is a topic we’ve addressed before in Hello World, and we’ll keep covering this rapidly evolving area in future. We hope this issue gives you plenty of ideas to take away and build upon.
Also in issue 22:
Vocational training for young people
Making the most of online educator training
News about BBC micro:bit
An insight into the WiPSCE 2023 conference for teachers and educators
And much, much more
You can download your free PDF issue now, or purchase a print copy from our store. UK-based subscribers for a free print edition can expect their copies to arrive in the mail this week.
Send us a message or tag us on social media to let us know which articles have made you think and, most importantly, which will help you with your teaching.
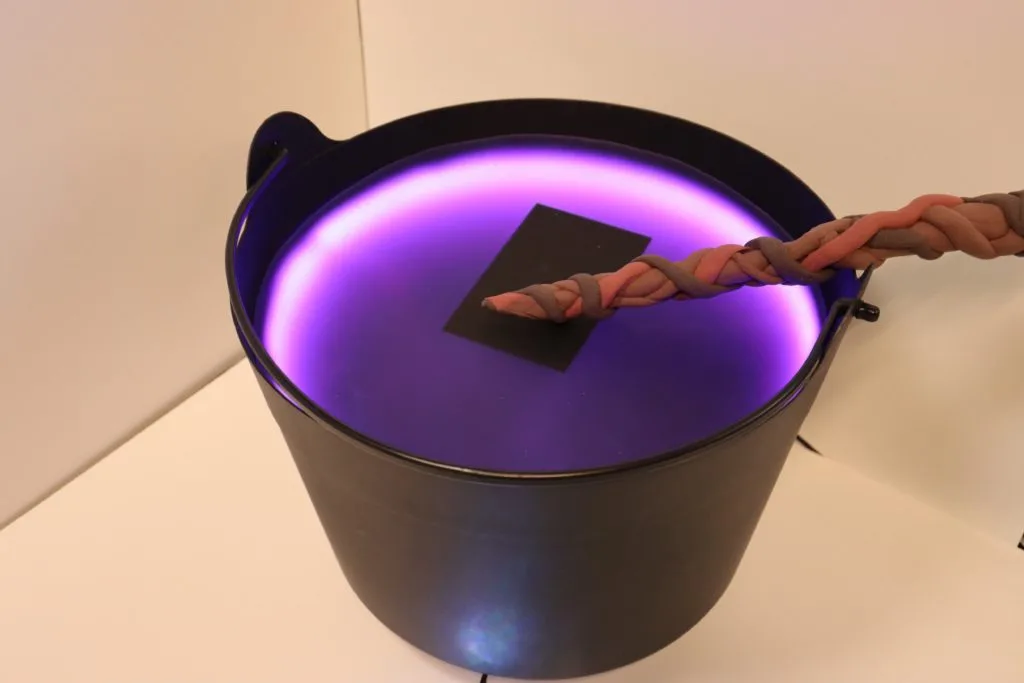
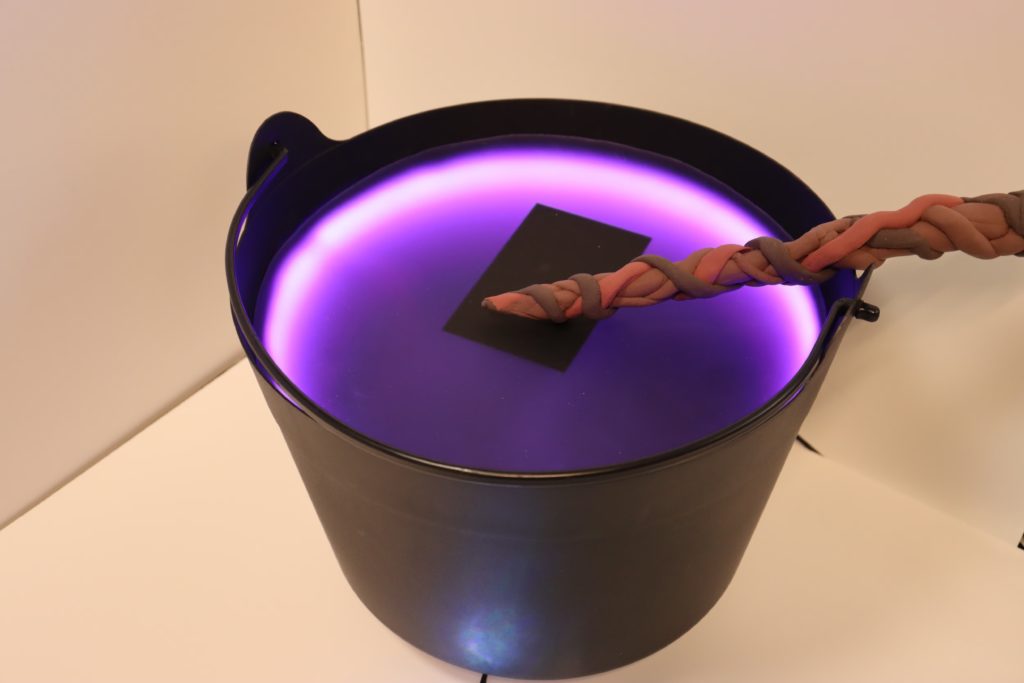
The large, bubbling cauldron is a classic mainstay in our Halloween decorations as it evokes imagery of devious witches and their mysterious concoctions. Fed up with this being a mere display piece, element14 Presents’ Katie Dumont created an enchanted cauldron that allows visitors to brew their own digital potions from an array of distinct ingredients using a whimsical “wand” and NFC-tagged bottles.
To test her idea of mixing ingredients, Dumont began by connecting an Adafruit NFC reader to an Arduino UNO Rev3 along with a strip of RGB LEDs. The code she wrote checks which NFC tag is present every second, and depending on the color, will either add another color or increase/decrease the overall brightness. After the special wand tag has been detected, each pixel along the strip is mixed into a shared, uniform color across all of them.
Upon the heels of this successful experiment, Dumont included another layer of interactivity in the form of a small game where players are presented with a certain color and must try to use the potion bottles to replicate it as close as possible with only red, green, and blue inputs. After selecting a sequence of three colors, tapping the wand will display the result and either flash red or white to indicate failure or success, respectively.
To see more about how Dumont designed her cauldron, you can read the build log here and watch her demo video below!
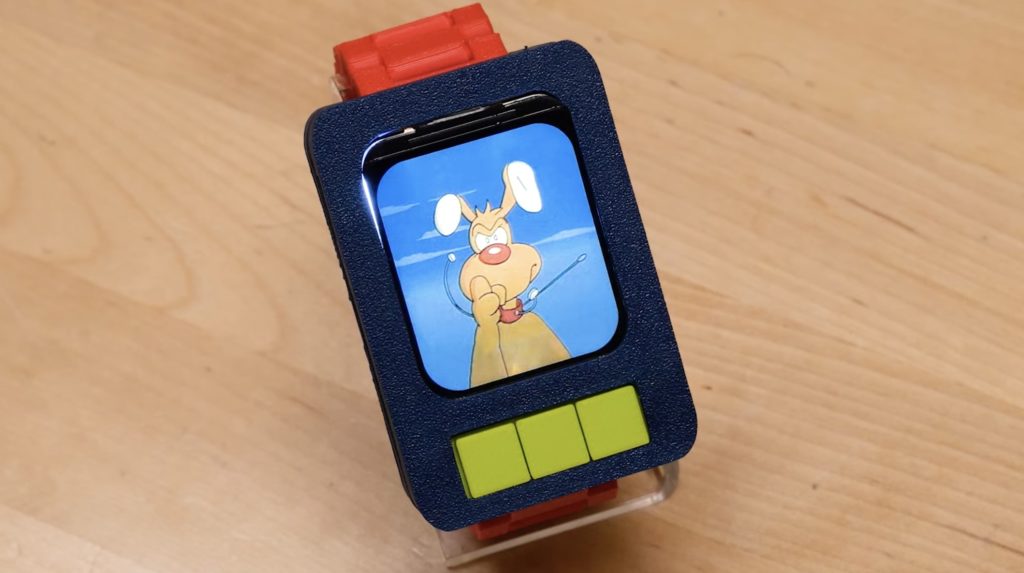
We recently showed you Becky Stern’s recreation of the “computer book” carried by Penny in the Inspector Gadget cartoon, but Stern didn’t stop there. She also built a replica of Penny’s most iconic gadget: her watch. Penny was a trendsetter and rocked that decades before the Apple Watch hit the market. Stern’s replica looks just like the cartoon version and even has some of the same features.
The centerpiece of this project is an Arduino Nicla Voice board. The Arduino team designed that board specifically for speech recognition on the edge, which made it perfect for recognizing Penny’s signature “come in, Brain!” voice command. Stern used Edge Impulse to train an AI to recognize that phrase as a wake word. When the Nicla Voice board hears that, it changes the image on the smart watch screen to a new picture of Brain the dog.
The Nicla Vision board and an Adafruit 1.69″ color IPS TFT screen fit inside a 3D-printed enclosure modeled on Penny’s watch from the cartoon. That even has a clever 3D-printed watch band with links connected by lengths of fresh filament. Power comes from a small lithium battery that also fits inside the enclosure.
This watch and Stern’s computer book will both be part of an Inspector Gadget display put on by Digi-Key at Maker Faire Rome, so you can see it in person if you attend.
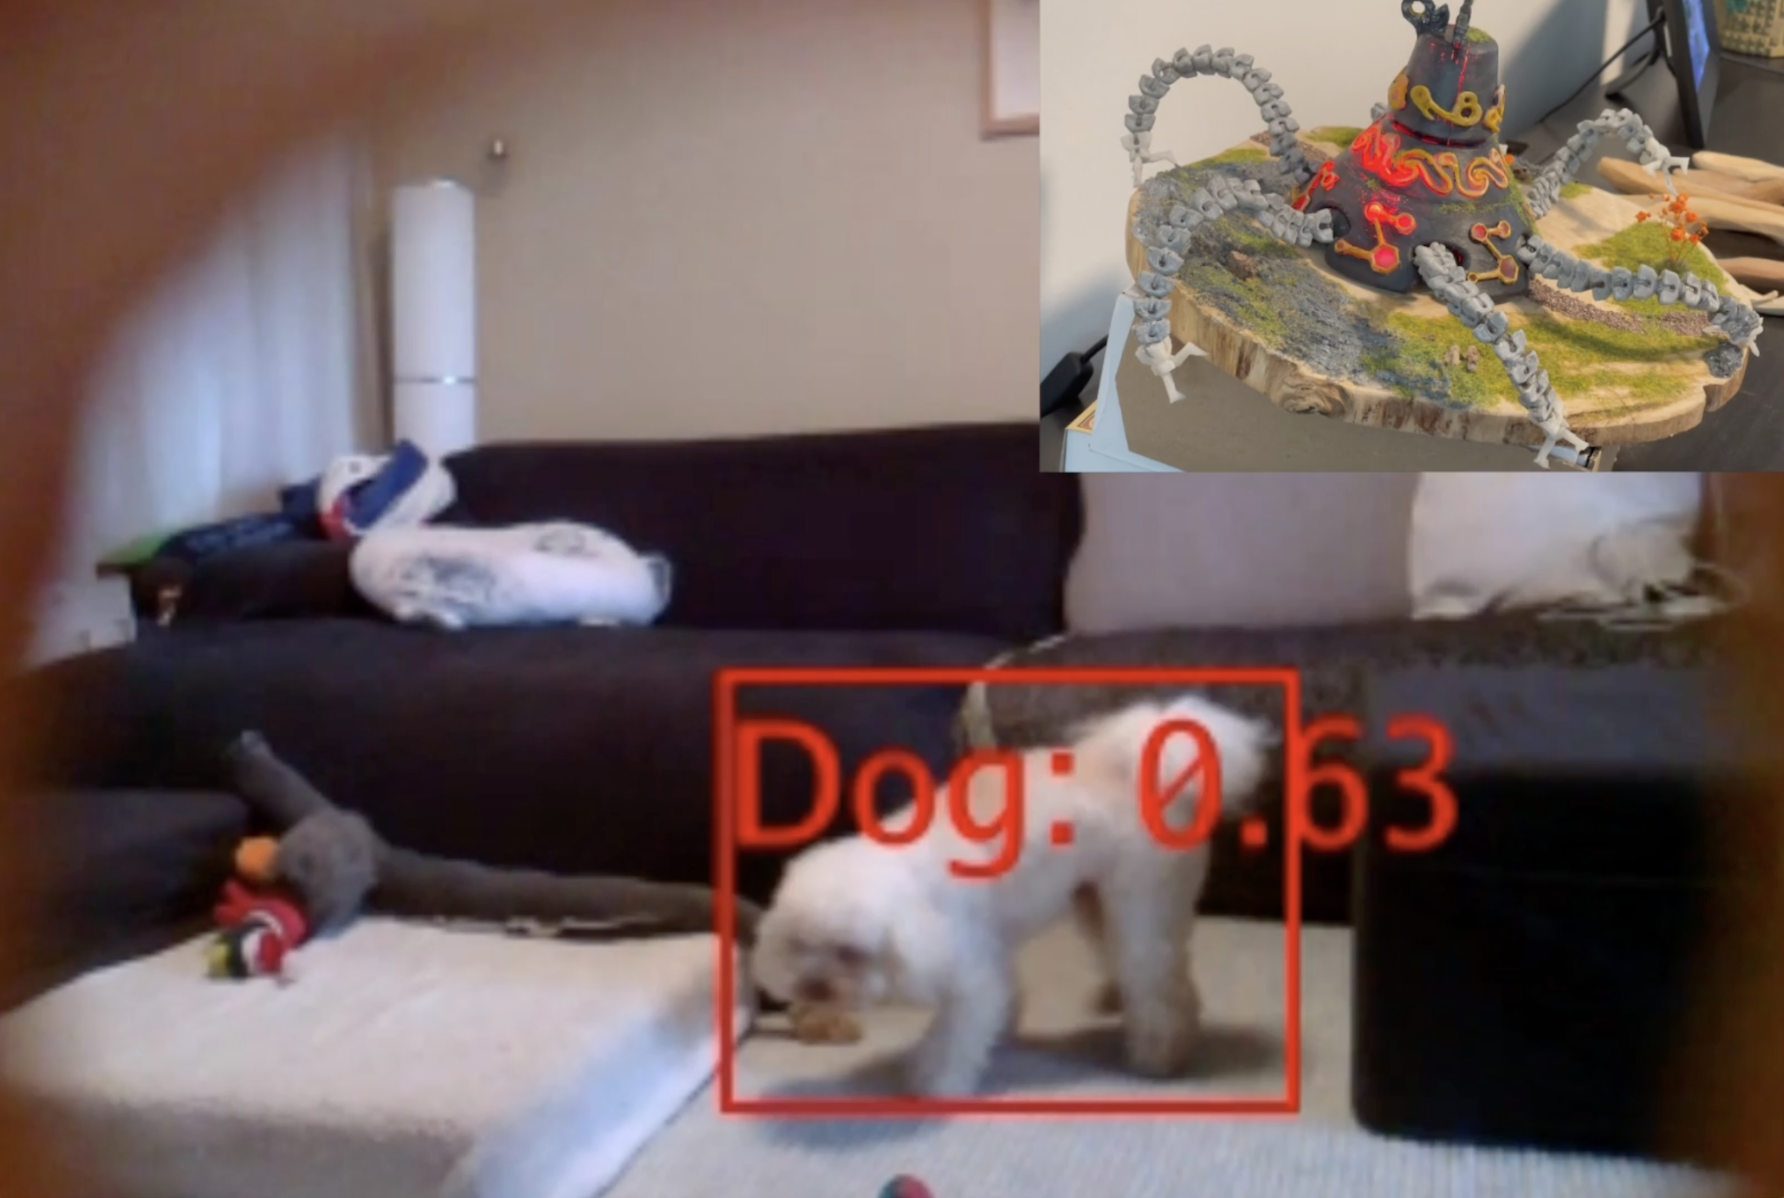
Although Naomi and her partner can’t bear to be parted from their poodle, when they are they generally set up an old phone through which they can watch him. However, “our living room is connected to a kitchen and there is no way to set up a phone camera to capture the entire room. If Ernie moves out of view of the camera, we can’t see him,” she explains.
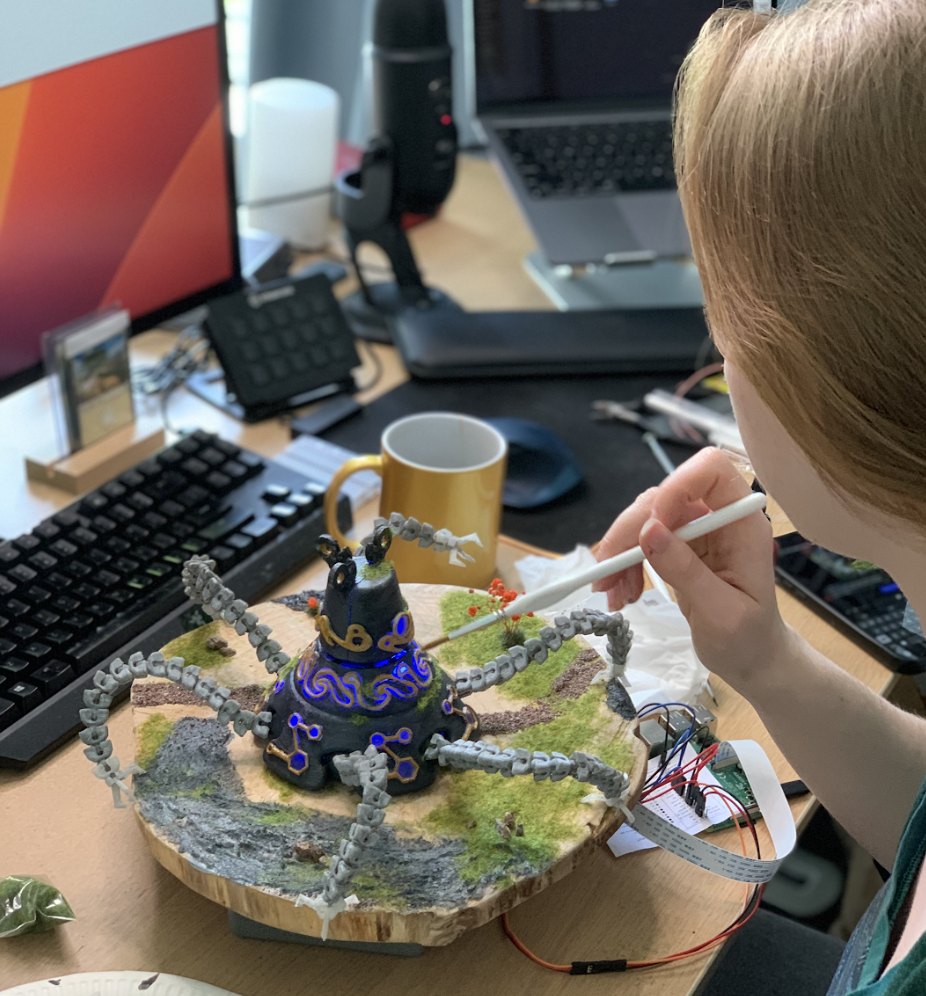
Not long before the latest version of The Legend of Zelda launched, Naomi found herself looking at a picture of a guardian robot – an eight-legged machine that can be either stationary or able to move about. In the game, these guardians can rotate their heads and attack you with a laser. Obviously, it was only the former aspect that Naomi wanted to copy.
Naomi decided to 3D-print a Guardian model and place a camera where the laser is. She would mount the Guardian head on a servo, connect everything to Raspberry Pi, and create a functional Zelda Guardian to monitor her dog.
Naomi’s first Raspberry Pi project, back in her student days, paired a Raspberry Pi with a camera to create a web-based security system, so she knew what to expect when planning this setup. Decorating the Zelda Guardian would be the real challenge and a great creative outlet. To add to the challenge, Naomi also decided to run Viam software on Raspberry Pi, and use a TensorFlow Lite machine learning model to detect her dog and program the Guardian to rotate the head to follow him around the room.
Raspberry Pi seemed a good choice since “it’s powerful enough to run the machine learning model I needed, and it was easy to get a ribbon camera for it.”
Team effort
“Luckily, I am not the first one to have the idea to build a Zelda Guardian and there was already a brilliant Guardian 3D model on Thingiverse with space for LEDs and a servo,” says Naomi. She chose a different Guardian head.
Naomi asked her friend Hugh Rawlinson to help with the 3D printing using a filament that allows the light to shine through. Naomi then painted the parts that shouldn’t let any light through.
Next, came the dual challenges of fitting components such as Raspberry Pi 4 and ensuring the camera stayed inside the head. Hugh helped her tweak the Guardian head’s design to include mount holes so she could attach a ribbon to a Raspberry Pi Camera Module v1.3. “Because they’d used the ribbon cable, the head couldn’t spin freely. However, for the space I wanted the Guardian for, 180 degrees of movement is enough, so I used a 180-degree servo,” explains Naomi.
Raspberry Pi itself needed some form of box to keep it upright inside the Guardian’s head. She hit on the idea of slotting it inside a tranche of tree trunk, and was able to recruit her partner to assist with the woodwork, cutting into the tree slice and giving the Guardian a beautiful base. Naomi then put it all together and painted it to look like the real thing.
Einwilligung verwalten
Um dir ein optimales Erlebnis zu bieten, verwenden wir Technologien wie Cookies, um Geräteinformationen zu speichern und/oder darauf zuzugreifen. Wenn du diesen Technologien zustimmst, können wir Daten wie das Surfverhalten oder eindeutige IDs auf dieser Website verarbeiten. Wenn du deine Einwillligung nicht erteilst oder zurückziehst, können bestimmte Merkmale und Funktionen beeinträchtigt werden.
Funktional
Immer aktiv
Die technische Speicherung oder der Zugang ist unbedingt erforderlich für den rechtmäßigen Zweck, die Nutzung eines bestimmten Dienstes zu ermöglichen, der vom Teilnehmer oder Nutzer ausdrücklich gewünscht wird, oder für den alleinigen Zweck, die Übertragung einer Nachricht über ein elektronisches Kommunikationsnetz durchzuführen.
Vorlieben
Die technische Speicherung oder der Zugriff ist für den rechtmäßigen Zweck der Speicherung von Präferenzen erforderlich, die nicht vom Abonnenten oder Benutzer angefordert wurden.
Statistiken
Die technische Speicherung oder der Zugriff, der ausschließlich zu statistischen Zwecken erfolgt.Die technische Speicherung oder der Zugriff, der ausschließlich zu anonymen statistischen Zwecken verwendet wird. Ohne eine Vorladung, die freiwillige Zustimmung deines Internetdienstanbieters oder zusätzliche Aufzeichnungen von Dritten können die zu diesem Zweck gespeicherten oder abgerufenen Informationen allein in der Regel nicht dazu verwendet werden, dich zu identifizieren.
Marketing
Die technische Speicherung oder der Zugriff ist erforderlich, um Nutzerprofile zu erstellen, um Werbung zu versenden oder um den Nutzer auf einer Website oder über mehrere Websites hinweg zu ähnlichen Marketingzwecken zu verfolgen.