
Blackberry Pi
“The idea started from my Game Boy Zero Plus build that was based on a stripped Raspberry Pi 3A computer,” Zhou explains, referring to a project in which a new Game Boy handheld was built by inserting a thinned-down Raspberry Pi 3A into an original case. “After completing it, I decided that I would then love to make use of Raspberry Pi in a handheld format for testing and debugging in the field. But I did not have a clear plan for the keyboard design until I recently found the BBQ20KBD from Solder Party.”

Key components
The BBQ20KBD is a QWERTY keyboard and optical track pad device powered by an RP2040 microcontroller. Identical to the BB Q20 used in the BlackBerry Classic released in 2014, the tiny set of keys is placed onto a custom-printed circuit board and, because it has a USB Type-C socket, it’s easy to hook up to Raspberry Pi.
The keyboard gave Zhou’s Blackberry Pi a strong direction. “The design was heavily inspired by many other Raspberry Pi handheld projects, such as Beepy and ClockworkPi,” he adds. There were some other requirements. “One of the aims for this design was to test an SDR radio antenna in my backyard. A battery-powered handheld is so much easier for this job,” he says.
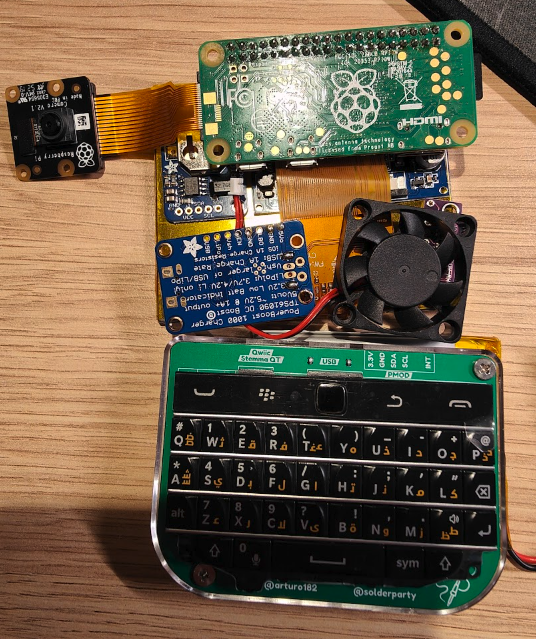
Zhou chose a 2500 mAh LiPo battery, as well as an Adafruit PowerBoost 1000C power supply. He also took a GearBest 3.5 composite LCD display out of his Game Boy Zero Plus build, and added a Raspberry Pi Camera Module 2 NoIR. Of all the components, though, selecting to use a Raspberry Pi Zero W was the easiest decision.
“I started playing with Raspberry Pi with the original version so I’m very comfortable tinkering with the config files and soldering the pins,” Zhou says. “Even though many Raspberry Pi models were still out of stock at the time when I started this project, I still wanted to use one (and I’ll be upgrading to Raspberry Pi Zero 2 W). I find the comprehensive documentation provided by the Raspberry Pi Foundation is so much more useful than starting from scratch on the other counterparts.”
Mod man
Rather than use an existing case to fit the components, Zhou felt he would have much more control if he designed his own. As such, he drafted a case using the 3D CAD package SolidWorks, with the aim of outputting the design to his Creality Ender-3 3D printer.

“Ever since my Game Boy project, I find it so much easier to build things from the ground up,” he explains. “Modding an existing enclosure can take quite some extra effort and I’m now getting more confident in CADing.
“Besides, if I’d have used an existing BlackBerry case, squeezing the components in there would be very challenging. That said, recently I’ve started to teach myself to use KiCad for designing customised PCBs. Perhaps it would be possible to make one that fits in a BlackBerry case using a [Raspberry] Pi Compute Module 4.”
Not that the project is any worse for having a freshly designed case. In fact, it looks amazing, made all the prettier by having the classic rainbow stripes as seen on the Sinclair ZX Spectrum from 1982. “That was a bit of a random decision,” Zhou says. “ZX matches my initials and I’ve always liked retro-style designs.”
Clever case
A lot of thought went into the case. “I’m pretty proud to point out that all the GPIO pins are accessible from the top of the screen and I have added a few peripheral mounting points around the enclosure for future add-ons such as [Raspberry] Pi HATs,” Zhou adds. “I’m also very excited about the outcome of the enclosure printing. This was the first time I have ever played with the six-colour manual change on my Klipperised Ender-3 printer.”
It nevertheless proved very challenging. “I spent quite some time trying to optimise the arrangement of different components, especially the position of the GPIO pins and other connection ports so that they can be easily accessible,” he continues. “It was also very tricky to squeeze all the components into such a tight space. But I guess one thing that differentiates this project from the others is that all of the components can be purchased off-the-shelf, and it does not require any PCB design experience.”

The end result is a stunning, expandable machine that boots, by default, into the command-line interface. The frame buffer is enabled in the /boot/config.txt file to display 320×240 resolution and, as well as being great for entering code, the Blackberry Pi is able to capture photos. It’s proving to be quite a useful Linux handheld.
But Zhou is not yet finished. “As I mentioned earlier, I’ll be adding a Sense HAT and an SDR dongle. I also recently added a light guide to the USB charging port using translucent 3D-printing filament, so that the Adafruit PowerBoost status LED lights can be visible from outside the enclosure (green being fully charged, orange charging, and red showing low battery).
“Unfortunately, the progress has been slow lately because there are a few other projects which have been keeping me busy, including using a Raspberry Pi to remote-control an electron microscope and optical filters, but everything seems to be working very well.”