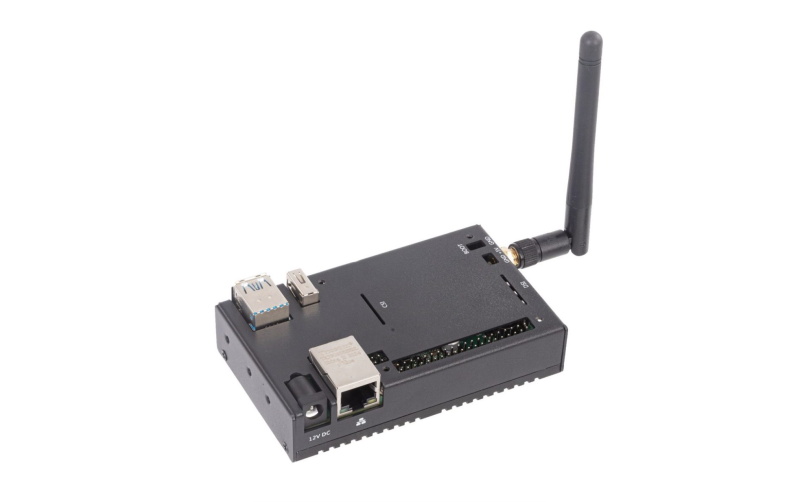
The device is available with optional Wi-Fi and Bluetooth – with an external screw-in antenna to boost the signal – and in several storage and RAM configurations.
On-board OS
The on-board eMMC storage (from 8GB to 32GB) is pre-installed with standard 32-bit Raspberry Pi OS and a BSP (board support package). It’s updatable in the usual ways (including Apt), but the OS can be re-flashed if you need a different version (such as 64-bit).
There’s also a microSD slot, purely for extra storage, although we found it tricky to insert the card without opening the case – ditto for the CSI (camera) and DSI (touchscreen) connections.
Once powered up, the unit boots up with the usual desktop GUI, although we needed to manually enable Wi-Fi in the taskbar. SSH is enabled by default, but you’ll want to change the password for the default ‘pi’ user for security reasons.
Apart from a slight hum, it all worked similarly to a Raspberry Pi 4. The CM4 Nano’s main advantage is that it’s more suited to industrial settings, with an improved ambient temperature range of -25 to 60°C.
Verdict
8/10
A CM4-based, ruggedised alternative to Raspberry Pi 4 with plenty of configuration options for your exact needs.
Specs
Features: CM4 with 8GB, 16GB, or 32GB eMMC storage; 1GB, 2GB, 4GB, or 8GB RAM; optional Wi-Fi/Bluetooth
Ports: 2 × USB 3.0, 1 × USB 2.0, 1 × USB-C, Ethernet, GPIO, CSI, DSI, PoE, 5 V output
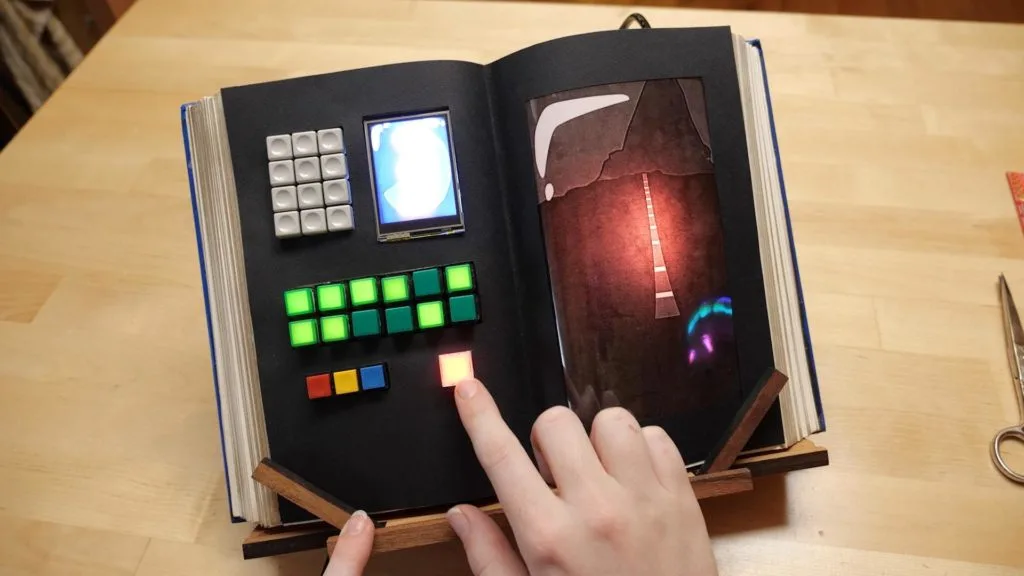
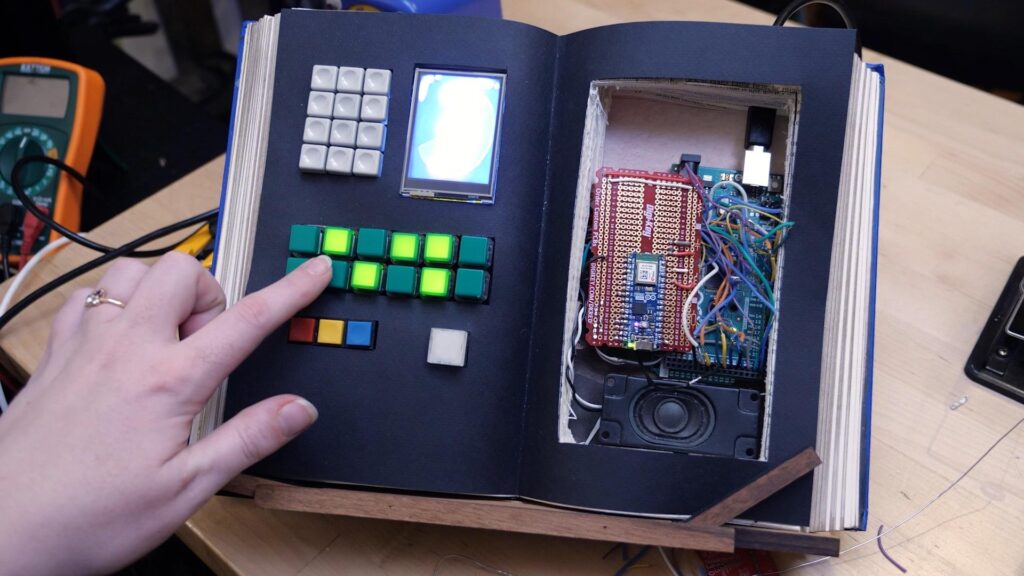
The Inspector Gadget cartoon was, naturally, full of fun gadgets. Even the eponymous inspector’s niece, Penny, got some nifty gizmos. One notable example was her computer book, which was exactly what it sounds like. To pay homage to the classic cartoon, Becky Stern recreated Penny’s computer book using a pair of Arduino boards.
It isn’t clear exactly which functions Penny’s computer book possesses within the canon of the Inspector Gadget cartoon, so Stern got a chance to exercise her own creativity. She referenced the cartoon to get a sense of the device’s aesthetics, design, and some of its capability. That helped her define the look of the replica device and how it should act. She determined that it should have several buttons (including a grid of illuminated buttons), a small screen on one side, and a big screen on the other side — all inside of a book.
Stern used two different boards to bring the device to life: an Arduino Nano ESP32 and a Mega 2560. The former monitors some of the buttons and controls the LCD panel on the left side. The latter monitors the green buttons and controls their LEDs. It also drives the LEDs behind the right “screen,” which is actually a static semi-transparent image. The LEDs light up in sequence to create an effect similar to what we see in the cartoon.
Most of the buttons lack actual functions, but Stern did add some interactivity by utilizing the Nano ESP32. The board hosts a web interface that users can access after connecting to the Wi-Fi network. That interface lets the user select images to show on the left screen, like a video call from Brain the dog, to really sell the visuals.
Today, we are excited to share that Avnet and Arduino announced a global partnership to support equipment manufacturers and machine builders in moving toward a more modular future. The new agreement combines the strength of Avnet’s worldwide embedded design services and distribution support with Arduino’s robust embedded technology ecosystem of hardware and software.
Many of you may already know Avnet as the parent company of Hackster and Element 14. Avnet also includes several significant global technology distributors and solution providers serving individuals and businesses worldwide. Both companies decided to partner after seeing a global trend of professional customers moving towards modular boards over custom chip-down designs to accelerate product development.
The use of Arduino products among professional engineers has grown significantly over the last few years since Arduino PRO was introduced. From workbench prototyping to volume production, business customers report development time drops between 20% and 50% from incorporating Arduino software, firmware libraries, and microcontroller modules. This efficiency increase is one reason we are seeing an encouraging trend among enterprises to adopt open-source embedded technology.
“Design engineers will be able to quickly move from initial prototype and preproduction to high volume designs through Arduino’s open-source software and open hardware design approach,” said Alex Iuorio, senior vice president of Supplier Development at Avnet. “Not every customer has the time, resources, or capability to perform a chip-down design, which often is a manual, hands-on process to design, engineer, prototype, source and produce. Using Arduino’s PRO product line offerings and Avnet’s support will greatly reduce time to market.”
To support the shift to open modular design in product development, Arduino will be offering several engineer evaluation kits exclusively through Avnet. The evaluation kits target use cases in Predictive Maintenance, Environmental Sensing, Robotics, Vision, and Industrial Gateways integrating AI on the edge. Each kit provides a path for businesses to experience the benefits of Arduino in product development for commercial applications.
While there is an emphasis on supporting businesses in adopting open hardware, both companies are committed to creators at every level. We are excited to see what will come as the partnership launches and the developer communities grow together.
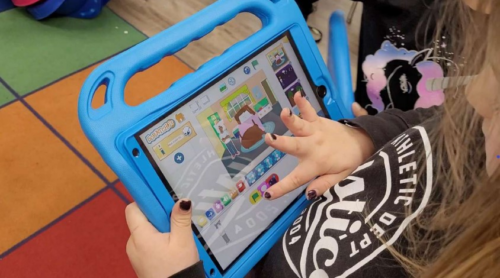
Block-based programming applications like Scratch and ScratchJr provide millions of children with an introduction to programming; they are a fun and accessible way for beginners to explore programming concepts and start making with code. ScratchJr, in particular, is designed specifically for children between the ages of 5 and 7, enabling them to create their own interactive stories and games. So it’s no surprise that they are popular tools for primary-level (K–5) computing teachers and learners. But how can teachers assess coding projects built in ScratchJr, where the possibilities are many and children are invited to follow their imagination?
Aim Unahalekhala
In the latest seminar of our series on computing education for primary-aged children, attendees heard about two research studies that explore the use of ScratchJr in K–2 education. The speaker, Apittha (Aim) Unahalekhala, is a graduate researcher at the DevTech Research Group at Tufts University. The two studies looked at assessing young children’s ScratchJr coding projects and understanding how they create projects. Both of the studies were part of the Coding as Another Language project, which sees computer science as a new literacy for the 21st century, and is developing a literacy-based coding curriculum for K–2.
How to evaluate children’s ScratchJr projects
ScratchJr offers children 28 blocks to choose from when creating a coding project. Some of these are simple, such as blocks that determine the look of a character or setting, while others are more complex, such as messaging blocks and loops. Children can combine the blocks in many different ways to create projects of different levels of complexity.
Selecting blocks for a ScratchJr project
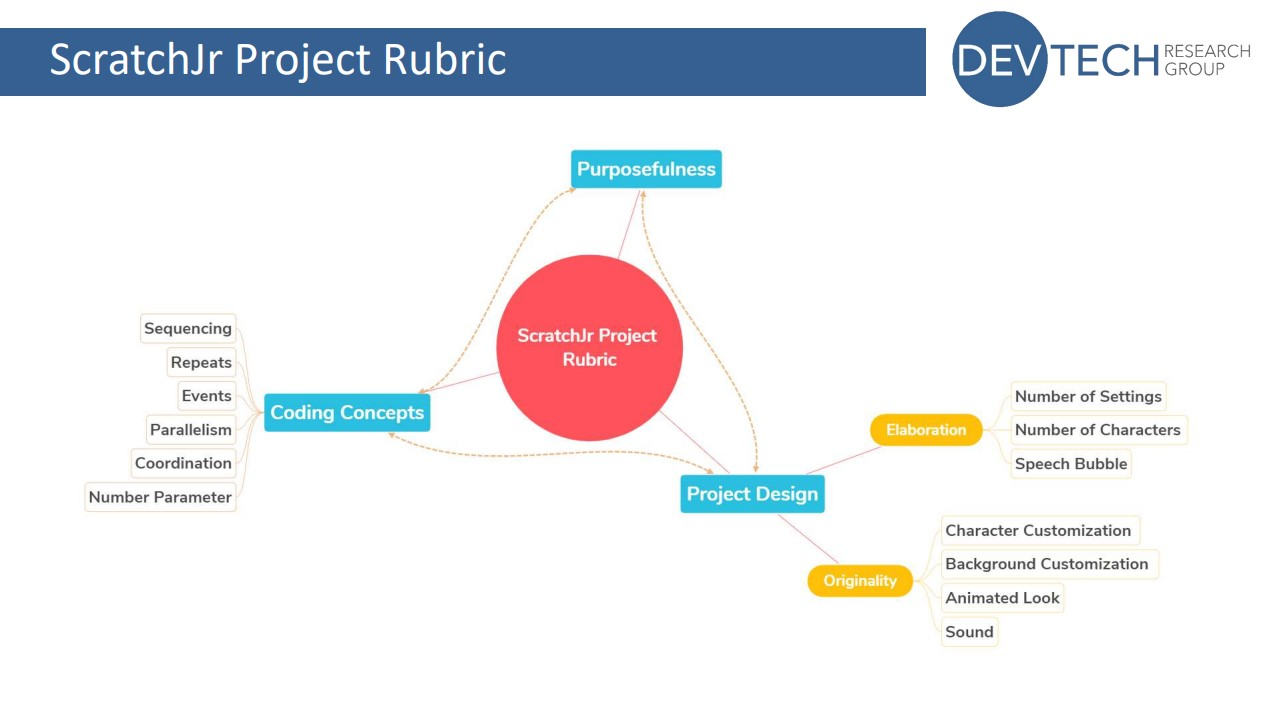
At the start of her presentation, Aim described a rubric that she and her colleagues at DevTech have developed to assess three key aspects of a ScratchJr coding project. These aspects are coding concepts, project design, and purposefulness.
Coding concepts in ScratchJr are sequencing, repeats, events, parallelism, coordination, and the number parameter
Project design includes elaboration (number of settings and characters, use of speech bubbles) and originality (character and background customisation, animated looks, sounds)
The rubric lets educators or researchers:
Assess learners’ ability to use their coding knowledge to create purposeful and creative ScratchJr projects
Identify the level of mastery of each of the three key aspects demonstrated within the project
Identify where learners might need more guidance and support
The elements covered by the ScratchJr project evaluation rubric. Click to enlarge.
As part of the study, Aim and her colleagues collected coding projects from two schools at the start, middle, and end of a curriculum unit. They used the rubric to evaluate the coding projects and found that project scores increased over the course of the unit.
They also found that, overall, the scores for the project design elements were higher than those for coding concepts: many learners enjoyed spending lots of time designing their characters and settings, but made less use of other features. However, the two scores were correlated, meaning that learners who devoted a lot of time to the design of their project also got higher scores on coding concepts.
The rubric is a useful tool for any teachers using ScratchJr with their students. If you want to try it in your classroom, the validated rubric is free to download from the DevTech research group’s website.
How do young children create a project?
The rubric assesses the output created by a learner using ScratchJr. But learning is a process, not just an end outcome, and the final project might not always be an accurate reflection of a child’s understanding.
By understanding more about how young children create coding projects, we can improve teaching and curriculum design for early childhood computing education.
In the second study Aim presented, she set out to explore this question. She conducted a qualitative observation of children as they created coding projects at different stages of a curriculum unit, and used Google Analytics data to conduct a quantitative analysis of the steps the children took.
A project creation process involving iteration
Her findings highlighted the importance of encouraging young learners to explore the full variety of blocks available, both by guiding them in how to find and use different blocks, and by giving them the time and tools they need to explore on their own.
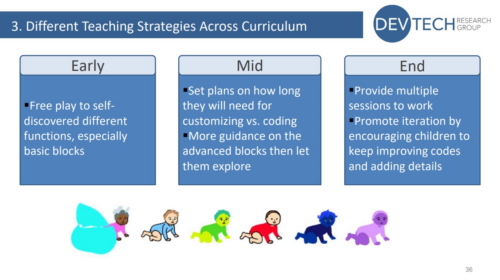
She also found that different teaching strategies are needed at different stages of the curriculum unit to support learners. This helps them to develop their understanding of both basic and advanced blocks, and to explore, customise, and iterate their projects.
Early-unit strategy:
Encourage free play to self-discover different functions, especially basic blocks
Mid-unit strategy:
Set plans on how long children will need on customising vs coding
More guidance on the advanced blocks, then let children explore
End-of-unit strategy:
Provide multiple sessions to work
Promote iteration by encouraging children to keep improving code and adding details
Teaching strategies for different stages of the curriculum
Join our next seminar on primary computing education
At our next seminar, we welcome Aman Yadav (Michigan State University), who will present research on computational thinking in primary school. The session will take place online on Tuesday 7 November at 17:00 UK time. Don’t miss out and sign up now:
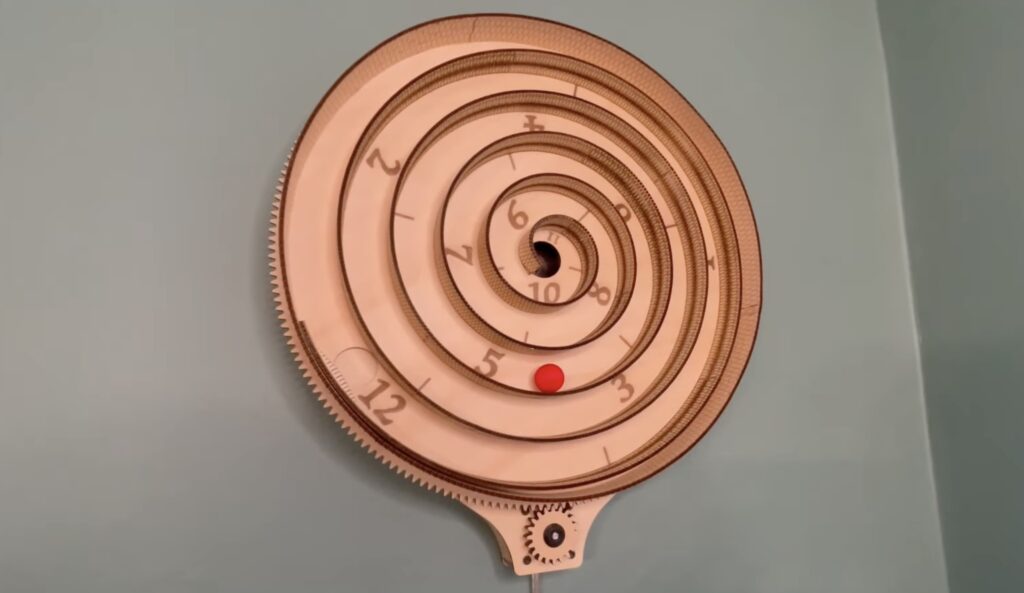
Sometimes makers come across products that they’d love to buy, but which are too expensive to justify. When that happens, the natural inclination of the maker is to build a DIY version. Such projects often end up costing way more — in both time and literal currency — than the product would have. But when we get lucky, we can save some money. That’s the case with this spiral clock built by Kelton.
Kelton based this design on the Aspiral Clock. That product was quite expensive at $542 and the company that made it seems to be defunct now anyway. Kelton’s version looks similar and works in the same way, but only requires about $60 in materials.
This clock is a giant spiral and indicates the time with a ball that rolls along the spiral. The entire spiral rotates at a constant speed, causing the ball to move towards the center. Numbers marked along the path show the time. When the ball reaches the center, it drops through a chute that puts it back at the beginning of the spiral. That repeats endlessly in 12-hour cycles.
The electronics are very simple: an Arduino Nano ESP32 board tells a stepper motor to spin at the exact rate that Kelton calculated. That stepper motor turns the spiral, keeping the ball in motion. Because this development board has an ESP32, it would have been possible to connect it to a WiFi network to find the time and keep everything in sync. But Kelton didn’t think that was necessary, so the spiral just rotates at a constant rate.
The real trick with this clock was the woodworking. All of the parts are laser-cut plywood and Kelton made heavy use of kerf cuts. Those break up a length of wood into many segments, so the wood can easily bend. That technique was perfect for creating the smooth spiral path and the result looks fantastic.
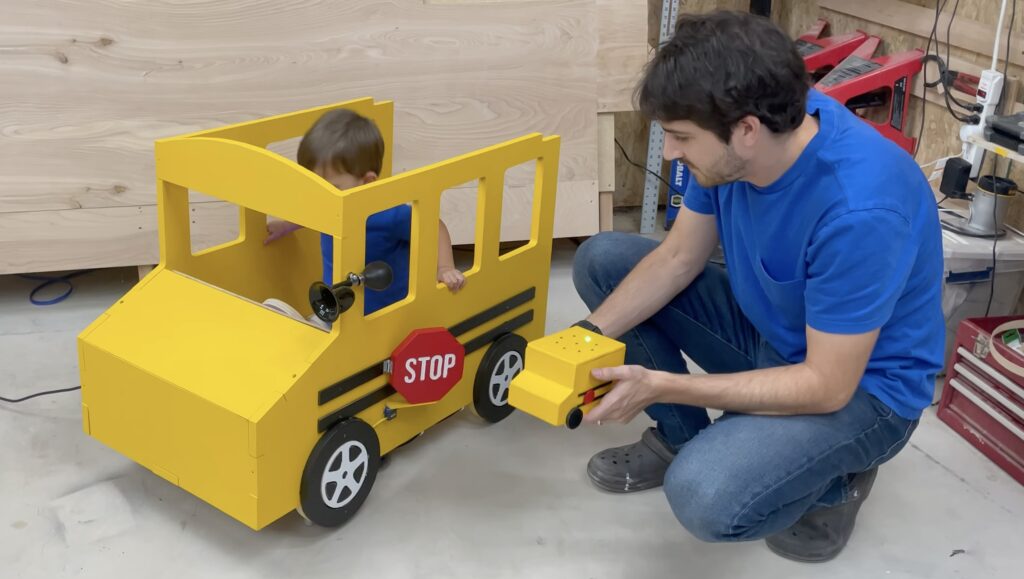
We all know that a child’s love can be bought. But how can working class parents compete with the lavish gifts that wealthy parents can afford? The answer is simple: by building toys that aren’t purchasable. Not only will a DIY gift have far more meaning, but it will impart a sense of superiority that comes from the knowledge that other parents can’t simply outspend you. That motivated Firth Fabrications to construct this school bus ride for his toddler.
This resembles one of those coin-operated rides that we used to see in front of every grocery store. The bright yellow wood school bus is big enough for a toddler to sit comfortably inside. When powered on, it begins rocking around on linear actuators. A dashboard inside the school bus gives the “driver” buttons and switches to play with, but they don’t actually move the vehicle. Instead, the linear actuators move according to commands sent by a remote control unit.
The remote looks like a small version of the school bus, which hints at its operation. It monitors its own orientation, then tells the linear actuators to move so that the ride matches. The remote unit contains an Arduino Nano board and an IMU module. It communicates with the Arduino Mega 2560 in the school bus via RF modules. Another Nano handles the dashboard functions, including swinging out the stop sign with a servo motor.
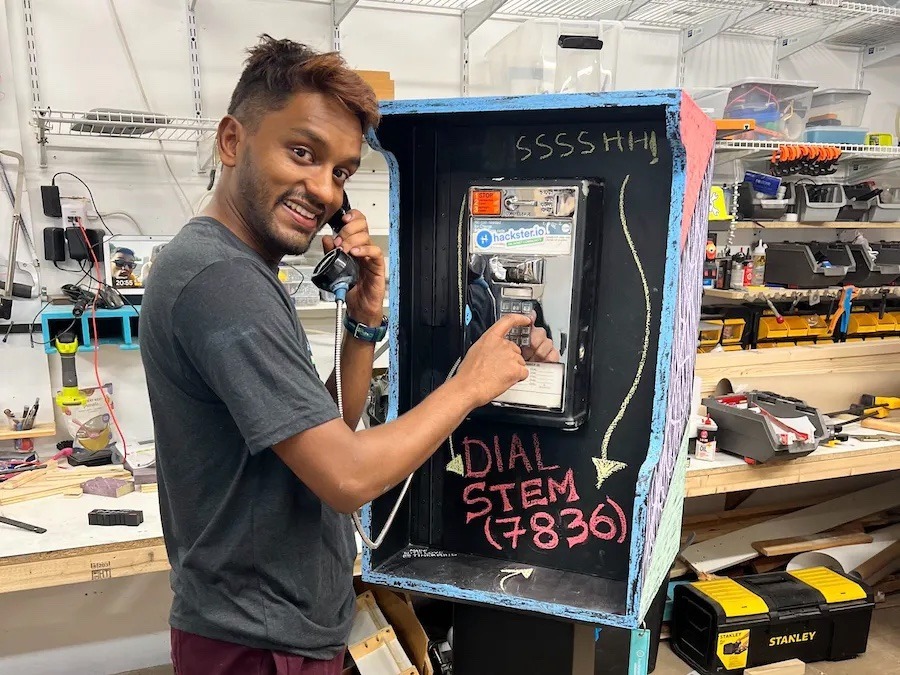
If you live in a nice neighborhood that has a sense of community, you may have come across a Little Free Library. Those are small cabinets filled with books that anyone can take. Ideally, people will also leave books for others. They’re usually situated next to sidewalks where passersby can stumble across them. Hackster.io currently has a contest challenging participants to build such a library dedicated to STEM and this inspired Amitabh Shrivastava to create a payphone that provides speakeasy-like access to his library.
Payphones are rare these days, so its mere existence should garner some attention. Anyone who looks at the payphone will then notice a message imploring them to dial 7836 for “STEM.” If they do so, the payphone will pop open to reveal the library inside. That is, of course, filled with books that can help people expand their knowledge on science, technology, engineering, and math. It adds a fun, interactive layer to the standard Little Free Library, while also demonstrating what a person can achieve with the knowledge within.
Shrivastava started this project with a real payphone that came from a laundromat. He then cracked that open to access the electronics inside and a score of $3.25 in loose change. Shrivastava added an Arduino Nano board to monitor the phone’s keypad and look for the numbers “7836.” If it sees those, it disengages a solenoid lock and the library door can swing open.
A custom cabinet ties the whole project together, providing plenty of space for books and conveying the desired aesthetic. This payphone will make its debut at Maker Faire Bay Area 2023 so you can see it for yourself if you’re heading to Mare Island this weekend or next, and will then inhabit the Avnet HQ building.
Stephen Hawking once said, “No one undertakes research in physics with the intention of winning a prize. It is the joy of discovering something no one knew before.” That joy is exactly what we hope to ignite with Arduino’s Science Kit R3, bridging theory with practical exploration with a complete toolbox that science teachers can use to develop hands-on and engaging STEM experiments in the classroom.
From the relationship between color and temperature to the effects of electrical currents on magnetic fields, the kit provides a comprehensive learning experience that allows students to interact with the very core of scientific investigations – also through real-time data collection and analysis. By measuring, recording, and interpreting data with theArduino Science Journal app, the learning process becomes interactive and dynamic.
So, how does the Science Kit R3 make physics the coolest subject in school?
Enhanced understanding of physics: No more passive reading. Dive deep into physics, understanding complex concepts through hands-on experimentation.
Promotion of scientific literacy: The real-time data collection and analysis features nurture scientific inquiry skills, priming students to thrive in our data-driven world.
User-friendly design: No prior coding or electronics knowledge is required, ensuring educators and students can jump straight into experiments with minimal setup.
Designed for education: The kit has been designed with teachers, for teachers and students.
Critical thinking stimulation: The kit’s design encourages students to apply what they’ve learned to real-world situations, sharpening their problem-solving abilities.
Self-directed learning: Through open-ended investigations, we’re giving students the reins, allowing their curiosity to guide their learning process.
Comprehensive teaching support: The Science Kit R3 isn’t just for students. We’ve also equipped educators with an intuitive guide to streamline the teaching process.
I was first recognized as being neurodivergent (dyslexic) at university. I struggled with reading and writing, but it was something that I still enjoyed and found ways to make happen despite my unknown issues. Once I was able to put a name on it, get the support I needed, and not feel so bad about myself and how I learned, I was able to be successful. A friend suggested I take an intro to education course and see how I liked it. From there, I found my passion in helping students who have a passion for learning, but struggle like I did. I want to support those learners that never matched the perfect learning profile many people expected from students.
When did you learn about Raspberry Pi?
I started a design class for grade 11 and 12 students and we would explore problems in the school and find creative ways to solve them. I had never coded or worked with electronics before, so when a student suggested using Raspberry Pi to create an automated system for students to use to check them in and out of the classroom, I was very intrigued. I dove into Python coding and loved what I saw. The first North American Picademy was announced shortly after the students introduced me to [Raspberry] Pi and I signed up and had one of the very best professional development experiences in my career.
How did you bring Raspberry Pi into class?
I took what I learned from Picademy and explored how project-based learning, with and without Raspberry Pi, can be executed in a technology-based class and my Literature classes. I spent time with my students exploring the different ways Raspberry Pi could be leveraged to solve problems, and how we can code sensors to interact with Raspberry Pi and observe the environment around us and track that data.
“Going to Picademy and learning to code for the first time, and taking that skill into physical computing, is something that will stay with me. Matt Richardson, Carrie Anne Philbin, Ben Nuttall, James Robinson, and others really made an impact on me and how I view instruction and the value of code.”
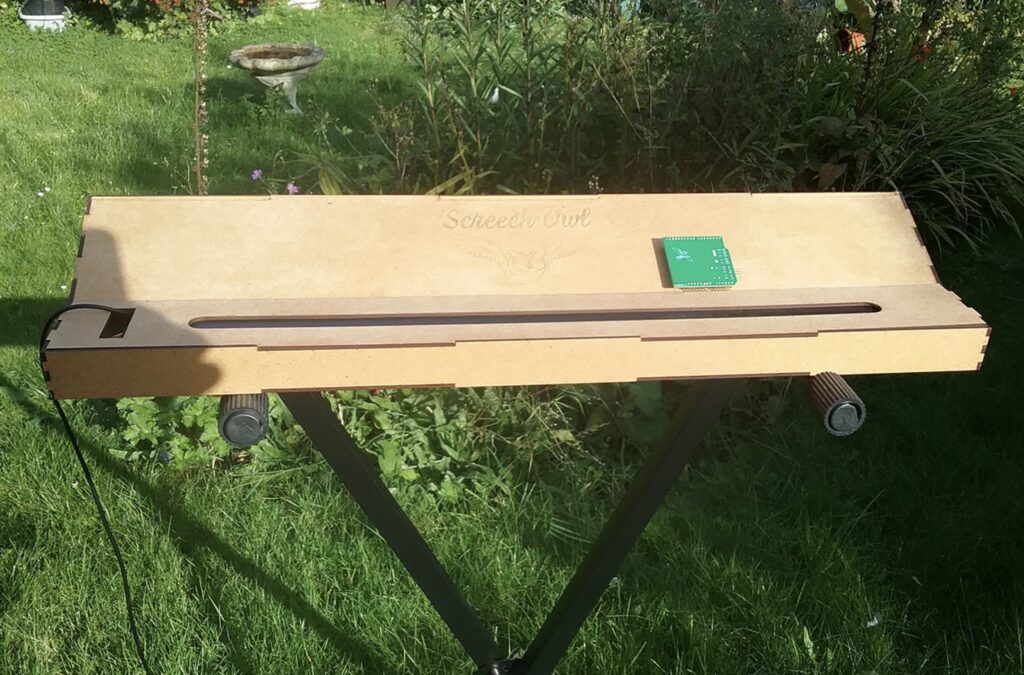
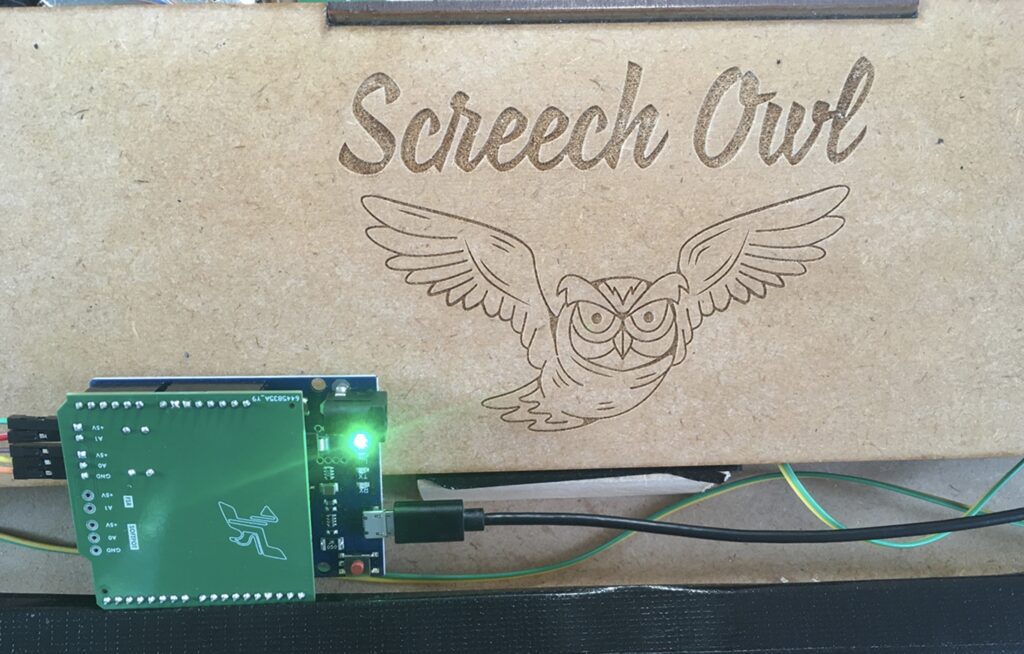
The Eowave Persephone was an interesting ribbon synthesizer that let musicians control frequency by moving their fingers across a long touch sensor. Ben Glover used to own one, but sold it. During shipping to the buyer, it got lost in the mail and so Glover can’t even buy it back. He regretted losing his Eowave Persephone, so he decided to create his own ribbon synthesizer called the Screech Owl.
If you could even find one, buying a used Eowave Persephone today would likely set you back at least a thousand dollars. But the Screech Owl is affordable to build, operates in the same manner, and sounds very similar. Glover is a novice maker and was able to pull of this project by outsourcing much of the work to ChatGPT and vendors on Fiverr.
One part that Glover designed himself was the custom PCB that acts as a shield for an Arduino Leonardo board. The Arduino handles the synthesis according to the input coming from the ribbon. That ribbon is actually two sensors: a SoftPot 500mm-long membrane potentiometer for position and thin film pressure sensor to measure force for aftertouch. Those components fit into a simple but attractive, laser-cut MDF enclosure.
Our exclusive fall offer is here, and it’s packed with incredible savings.
With this promotion, you can enjoy a special 30% discount on the Arduino Cloud Maker yearly plan using the code “CLOUDNANO32.” Plus, when you select any other Arduino Cloud yearly plan (Entry, Maker, or Maker Plus), you can grab a Nano ESP32 for just $1!*
How to redeem the offer:
1. Select your yearly plan: Keep in mind that only the Yearly Maker plan is on sale. If you select the yearly Maker plan, be sure to apply the code “CLOUDNANO32” during checkout to unlock an amazing 30% discount.
2. Activate email notifications: To stay in the loop and receive your invitation for the Nano ESP32 at $1, activate your email notification.
3. Get your Nano ESP32 email invitation: Shortly after completing your Cloud subscription purchase, you will receive a special voucher via email, granting you access to the Nano ESP32 for just $1*.
Whether you’re an experienced IoT developer or a newcomer to the IoT world, this promotion offers something for everyone. Upgrade, save, and take your IoT projects to new heights. Act now before the offer expires on October 27th, 2023.
*To be eligible, you shall not have any active Arduino Cloud paid plan. Please note that the Nano ESP32 offer is exclusively available to the first 300 customers who purchase any Arduino Cloud yearly plan (Entry, Maker, or Maker Plus). Shipping fees and taxes apply. Please refer to our Terms & Conditions.
Xylophones are popular kids’ toys because they’re simple, affordable, and cheery. The name is also fun to say and gives us something to fill in the X spot in alphabet books. But while many of us banged on xylophones as children, few learned how to play them properly. To make such learning unnecessary, Rachad El Moutaouaffiq built this automatic xylophone.
If you listen to the melody in the video, you can hear that this sounds far more pleasant than any toddler smacking their toy xylophone while their parents pretend their ears don’t work. That’s because it is fully computer-controlled. Each bar has its own solenoid that acts as a mallet, for a perfect strike every time. Those operate according to MIDI files, so the automatic xylophone can play any tune.
To gain some experience with electromagnetism, El Moutaouaffiq constructed all of the solenoids himself. Each one consists of a nail, a short length of flexible tube, a couple of washers, and a hand-wound coil of wire.
An Arduino Mega 2560 controls all of the DIY solenoids through bipolar junction transistors (BJTs). It has a sketch that activates the solenoids according to incoming MIDI notes received via serial. Those come from a computer running LMMS MIDI software and are sent through serial by Hairless MIDI. El Moutaouaffiq simply had to define a pin for each MIDI note and connect the proper transistor to each pin.
El Moutaouaffiq hopes to add some AI functionality to send MIDI notes based on sheet music, but that isn’t working yet. For now, the automatic xylophone can play existing MIDI files.
Named Visionary by Gartner for the third year in a row, Elastic is the world’s leading platform for search-powered solutions – and a company we are proud to partner with.
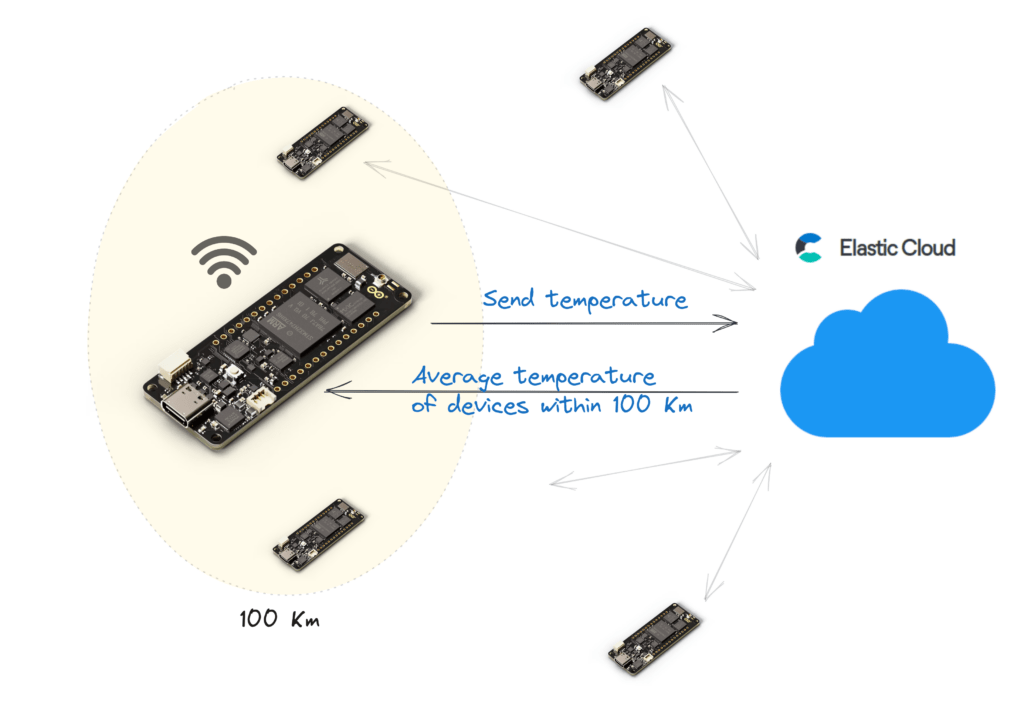
Recently, we collaborated with this data powerhouse on a Portenta H7-based R&D project to provide a simple Elasticsearch client library (written in C++) that runs on Arduino modules. That’s right: you can now communicate with an Elasticsearch server directly from an Arduino board!
Among the many ways we immediately tested this new opportunity, we tried developing an IoT device that sends temperature data captured by sensors every five minutes to Elastic Cloud. This, combined with Elasticsearch’s geo features, could be the first step in building a solution that provides the current average temperature from all sensors 5 km away upon request.
Want to find out more? Here is a simple tutorial with all the details.
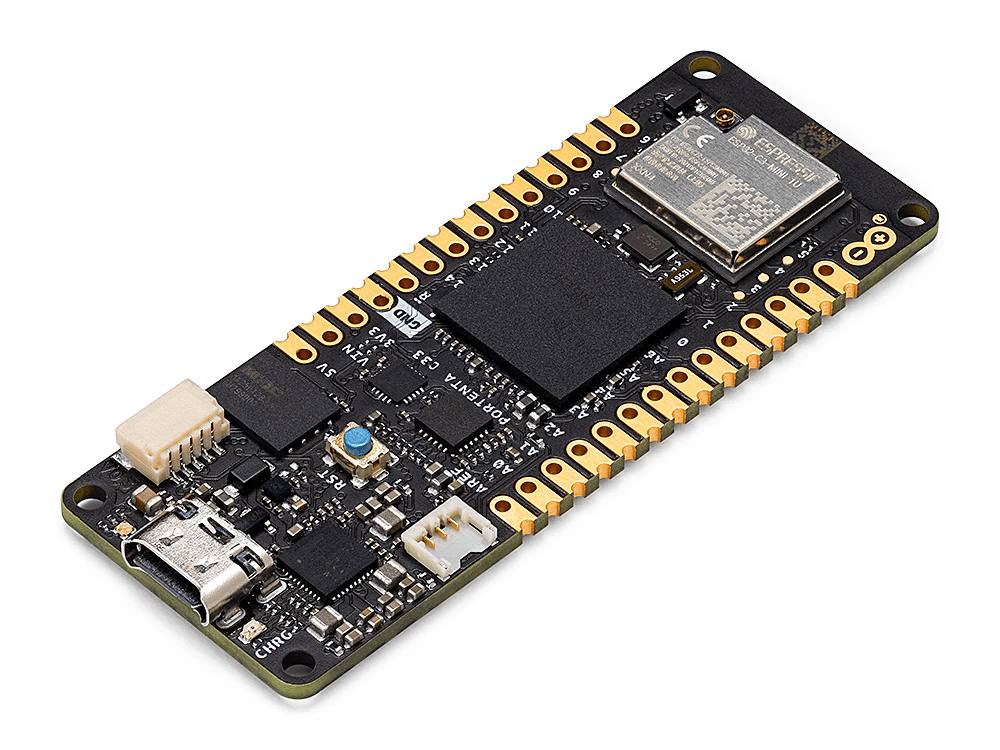
Portenta C33
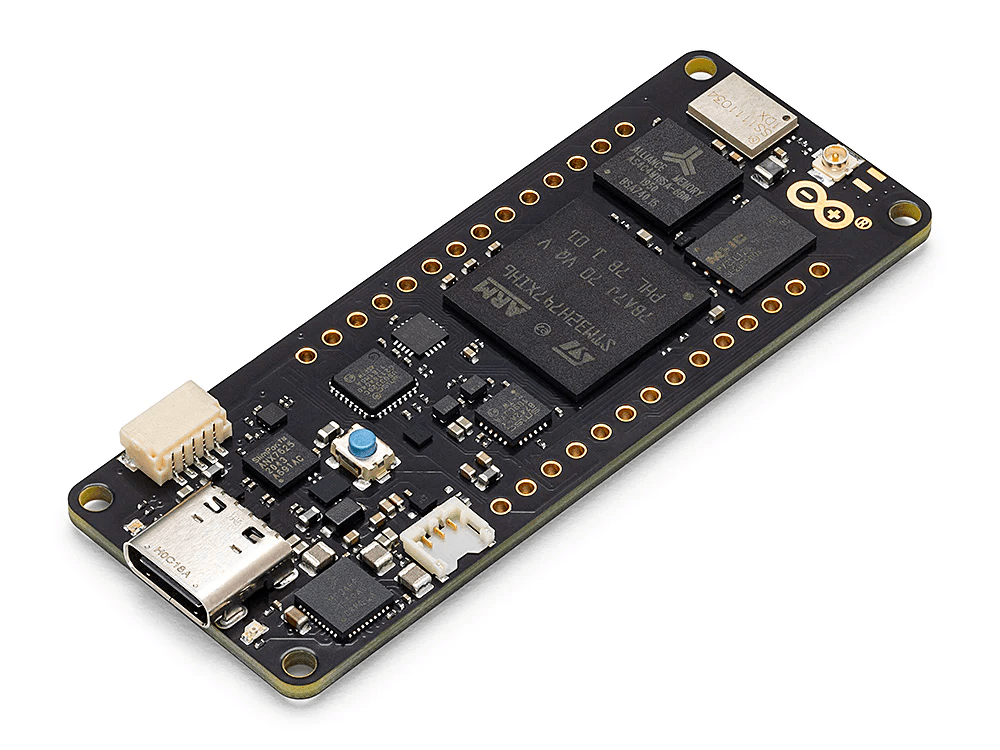
Portenta H7
What’s more, Arduino Pro’s industrial-grade offerings fit in with the entire Arduino ecosystem, which includes Cloud services, countless software libraries and ready-to-use sketches shared by the community, and of course a wide variety of components to meet any need. These include popular products such as the MKR WiFi 1010 and Nano RP2040 boards – veritable cornerstones of the maker movement.
Use case: temperature feedback from multiple IoT devices
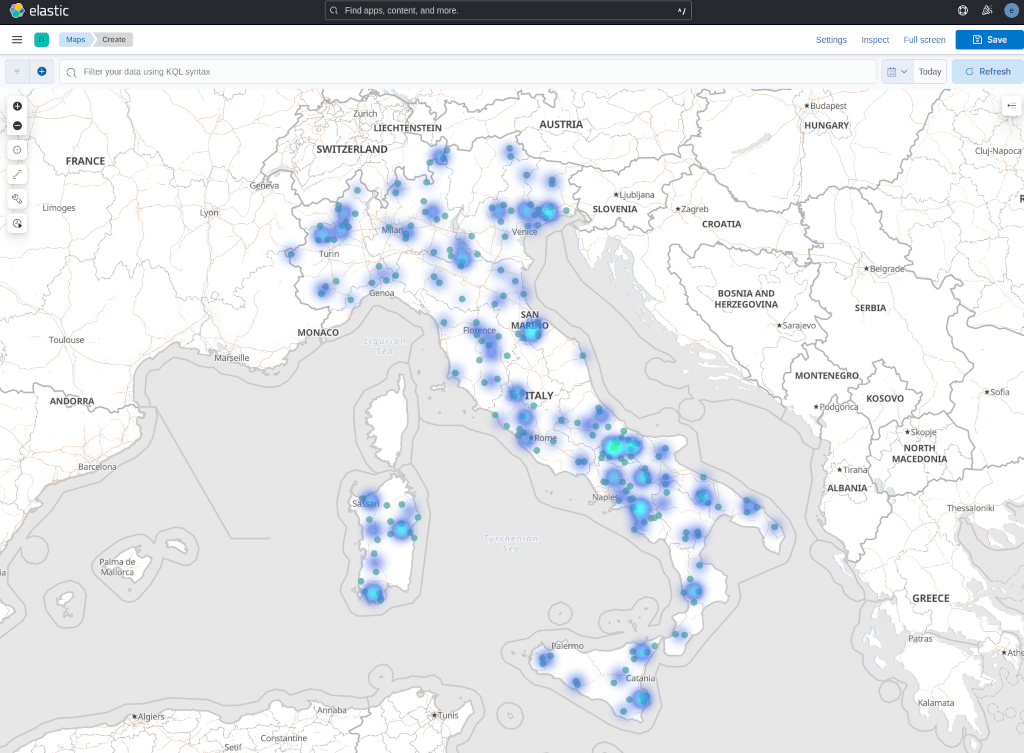
We designed a use case for a company that needed to manage multiple IoT devices located in Italy. Each device sends data coming from sensors (e.g. temperature) to Elastic Cloud. Using Elastic Cloud the company can manage any scale of IoT devices, without the need of managing a dedicated infrastructure. Moreover, the company needs to adjust some internal parameters of each device from the average temperature of neighboring devices, in a range of 100 km. This is a typical scenario in control engineering applications.
Using Kibana, the UI available in Elastic Cloud, we can easily create a dashboard to monitor the data coming from all the devices. Since we also have geo-data we can represent this information on a map.
This is a heat map created with different colors representing different temperatures (blue is cold and green, red are hot).
Setup of Elastic Cloud
The first step is to have an account for Elastic Cloud. If you don’t have one you can register for a trial here (no credit card required). Once you login you can create a new deployment, choosing the size of the Elasticsearch instances that you want to use.
Once you have created a deployment, you need to retrieve the endpoint URL and generate an API key of Elasticsearch. You can read this guideline for support on obtaining this information.
Preparing Elasticsearch index
We need to create an index to store the data coming from the Arduino boards. We want to store temperature values, position of the device using geo-location (latitude and longitude), a device identifier name, and a timestamp.
We can create an index “temperature” with the following HTTP request to Elasticsearch:
To send this HTTP request you can use the Dev Tools of Kibana in Elastic Cloud.
We want to store the timestamp of the operation each time a device sends data. This can be done using the ingest pipeline feature of Elasticsearch. An ingest pipeline is an action that Elasticsearch executes before indexing (storing) a document. For instance, a pipeline can assign the value of a specific document field, based on some calculation.
In our case, we just need to store the timestamp and we can create a “set-timestamp” pipeline:
PUT _ingest/pipeline/set-timestamp
{ "description": "sets the timestamp", "processors": [ { "set": { "field": "timestamp", "value": "{{{_ingest.timestamp}}}" } } ]
}
Using this pipeline we can then send data to Elasticsearch as follows:
Here the device-id H7-001 is the name of the Arduino board and location is the geographic point expressed with 12.4923 (longitude) and 41.8903 (latitude), that is the position of the Colosseum in Rome (Italy).
Notice that we did not specify the timestamp value because this is automatically generated using the “set-timestamp” pipeline (specified in the URL as query string).
Geo-distance query
To retrieve the average temperature of the devices distance up to 100 km we can use the following Elasticsearch query:
This query will return an “avg_temp” aggregation field containing the average temperature of all devices within a radius of 100 km.
Usage of the Elasticsearch client for Arduino
It’s finally time to show some Arduino code! Below is a simple sketch that sends a temperature value to Elastic Cloud, gets the average temperature performing a geo-distance query and waits for 30 seconds.
The code reported here is available online in the examples folder of the elastic/elasticsearch-arduino github repository. The sketch uses an elasticsearch_config.h file as follows:
In our example, we used Wi-Fi to connect the Arduino board to the internet.
The WIFI_SECRET_SSID and the WIFI_SECRET_PASS are the name of the SSID network to use and the Wi-Fi password.
The ELASTIC_ENDPOINT is the URL of the Elastic Cloud endpoint, the ELASTIC_PORT is 443 since Elastic Cloud uses TLS (https). The ELASTIC_CLOUD_API_KEY is the API key to be generated in the Elastic Cloud admin interface.
This file also contains other information related to the Arduino device. We have the longitude (DEVICE_GEO_LON) and latitude (DEVICE_GEO_LAT), the ID (DEVICE_ID) and the distance (DEVICE_GEO_DISTANCE) for the geo-query.
After filling all the previous information, we can have a look at the sketch, reported as follows:
#include <ArduinoJson.h>
#include <WiFi.h>
#include <WiFiSSLClient.h>
#include "ESClient.h" #include "elasticsearch_config.h" // WiFi settings
char ssid[] = WIFI_SECRET_SSID;
char pass[] = WIFI_SECRET_PASS; // Elastic settings
char serverAddress[] = ELASTIC_ENDPOINT;
int serverPort = ELASTIC_PORT; WiFiSSLClient wifi; ESClient client = ESClient(wifi, serverAddress, serverPort); int status = WL_IDLE_STATUS; void setup() { Serial.begin(9600); Serial.println("Started"); while (status != WL_CONNECTED) { Serial.print("Attempting to connect to Network named: "); Serial.println(ssid); // Connect to WPA/WPA2 network: status = WiFi.begin(ssid, pass); } // print the SSID of the network you're attached to: Serial.print("SSID: "); Serial.println(WiFi.SSID()); // print your WiFi shield's IP address: IPAddress ip = WiFi.localIP(); Serial.print("IP Address: "); Serial.println(ip); client.setElasticCloudApiKey(ELASTIC_CLOUD_API_KEY);
} void loop() { float temperature; // Set the temperature from a sensor (removing the randomness) temperature = random(10,30) + random(0,100)/100.00; // Prepare the JSON with temperature and geopoint for Elasticsearch StaticJsonDocument<200> doc; doc["temperature"] = temperature; doc["device-id"] = DEVICE_ID; doc["location"]["type"] = "Point"; doc["location"]["coordinates"][0] = DEVICE_GEO_LON; doc["location"]["coordinates"][1] = DEVICE_GEO_LAT; String temp; serializeJson(doc, temp); Serial.println("Sending to Elasticsearch:"); Serial.println(temp); ESResponse indexResult; // Send the temperature to Elastic Cloud indexResult = client.index("temperature", temp, "pipeline=set-timestamp"); DynamicJsonDocument result(1024); deserializeJson(result, indexResult.body); if (result["result"] == "created") { Serial.println("Created with _id: " + result["_id"].as<String>()); } else { Serial.println("Error sending data: " + indexResult.body); } StaticJsonDocument<512> query; query["query"]["bool"]["filter"]["geo_distance"]["distance"] = DEVICE_GEO_DISTANCE; query["query"]["bool"]["filter"]["geo_distance"]["location"][0] = DEVICE_GEO_LON; query["query"]["bool"]["filter"]["geo_distance"]["location"][1] = DEVICE_GEO_LAT; query["aggs"]["avg_temp"]["avg"]["field"] = "temperature"; query["size"] = 0; String search; serializeJson(query, search); Serial.println("Geo-location query:"); Serial.println(search); ESResponse searchResult; // Send the temperature to Elastic Cloud searchResult = client.search("temperature", search); DynamicJsonDocument avg(512); deserializeJson(avg, searchResult.body); float avgTemp = avg["aggregations"]["avg_temp"]["value"]; int numDevices = avg["hits"]["total"]["value"]; Serial.println("Average temperature of " + String(numDevices) + " devices in " + DEVICE_GEO_DISTANCE + ": " + String(avgTemp)); Serial.println("Wait 30 seconds"); delay(30000);
}
This sketch requires Wi-Fi, WiFiSSLClient (for connecting using TLS) for the internet connection, the EsClient for connecting to Elasticsearch and the ArduinoJson library for serializing and deserializing Json data structure.
In the setup() function we start the Wi-Fi connection and we set the API key of Elastic Cloud using client.setElasticCloudApiKey(ELASTIC_CLOUD_API_KEY) function call. The client object is initialized in the main area passing the Wi-Fi object, the server address (endpoint) and the HTTP port. In the loop() function we have the code that sends the temperature to Elastic Cloud. The temperature here is just a random float number between 10 and 30, typically coming from a sensor attached to the Arduino board. To prepare the document to send to Elasticsearch, we used the ArduinoJson library.
We used the following code to create a “doc” object:
This object is serialized in a JSON string as follows:
String temp;
serializeJson(doc, temp); Finally, the document, stored in the “temp” variable, can be sent to Elasticsearch using the index API, as follows: ESResponse indexResult;
indexResult = client.index("temperature", temp, "pipeline=set-timestamp"); This API adds the “temp” document in the index “temperature” using the “set-timestamp” pipeline. The result is stored in the “indexResult” variable that is a struct type as follows: struct ESResponse { int statusCode; String body;
};
The “statusCode” is the HTTP status code of the response and “body” is the response body. The index operation is successful if the response contains a “result” field with value “created”.
To get the average temperature of the devices within a radius of 100 km, we used the following geo-distance query, expressed using ArduinoJson.
The response of the search contains the average temperature, as an aggregation value. Moreover, we can retrieve the number of devices retrieved by the query using the [‘hits’][‘total’][‘value’] field in the JSON response from Elasticsearch.
Conclusion
Thanks to the collaboration with Arduino, we developed a very simple library that allows the usage of Elasticsearch directly from an Arduino board. In a few lines of code we can send data to Elasticsearch and execute complex elaborations, using geolocation and more.
We can’t wait to see what Arduino users will come up with, using Elasticsearch! For instance, if you are interested in generative AI you will certainly enjoy Elastic’s newest features. Give Elastic Cloud and the elasticsearch-arduino library a try!
The answer, he figured, would be a system that made image-sharing simple, so he came up with the concept for a pair of custom-made digital photo frames that made use of e-ink displays. Although the couple would be limited to sharing black-and-white images, this approach had many benefits, notably low power consumption and simplicity.
“It had to be energy-efficient because Nunavik is mostly powered by diesel that’s brought in by boat,” Olivier says. “It also needed to require very little bandwidth as my fiancée’s internet would probably come from an unstable satellite link. The project had to be easy to use too and required, at most, a couple of seconds to share a picture, much like texting or writing an email. And I didn’t want my fiancée to fuss with a complicated app after completing a night shift and on-call duty.”
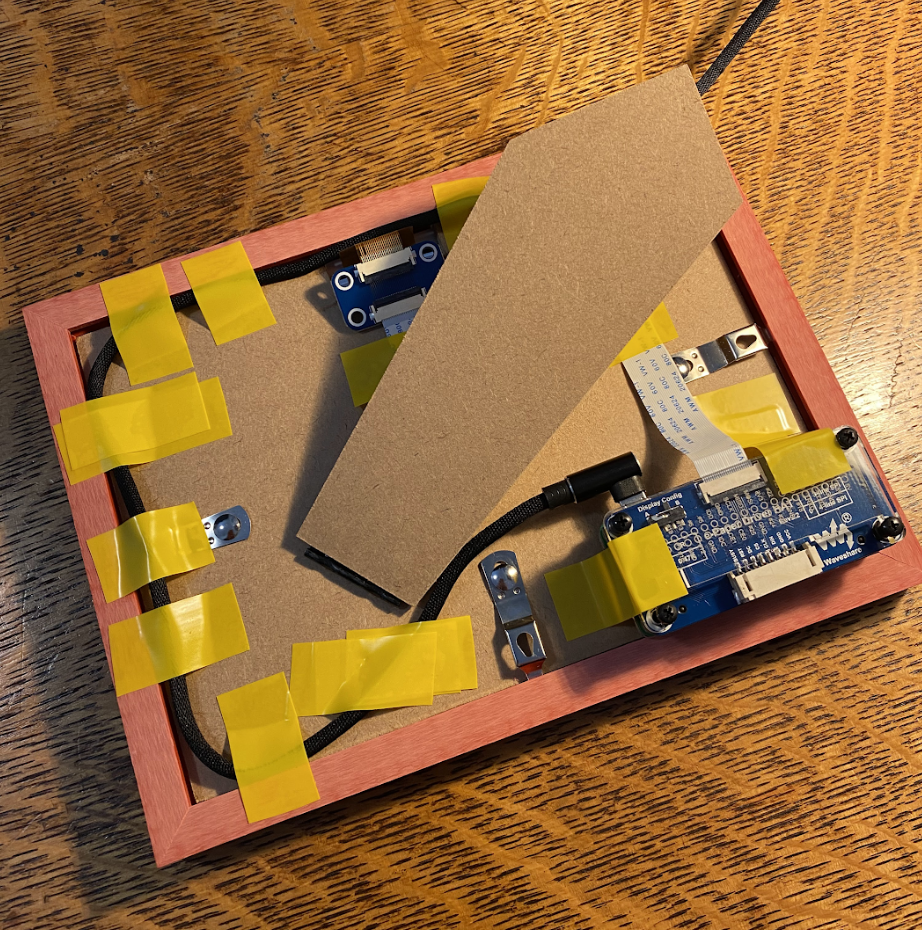
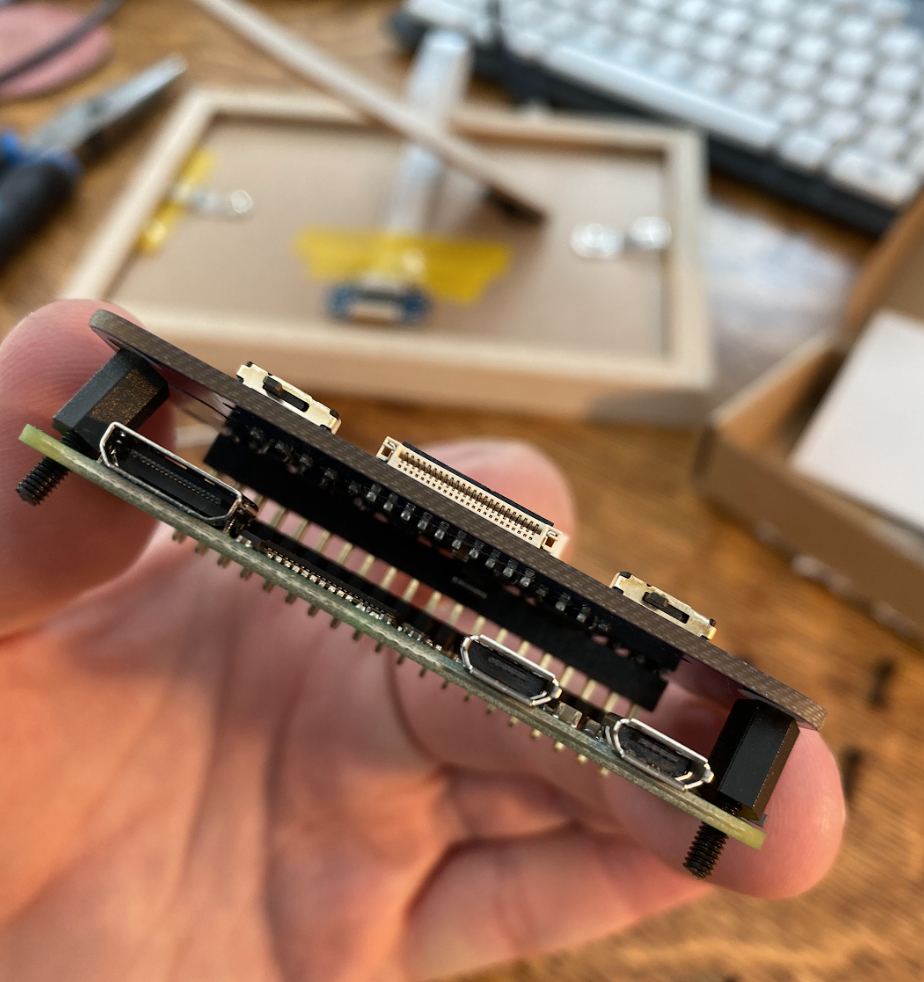
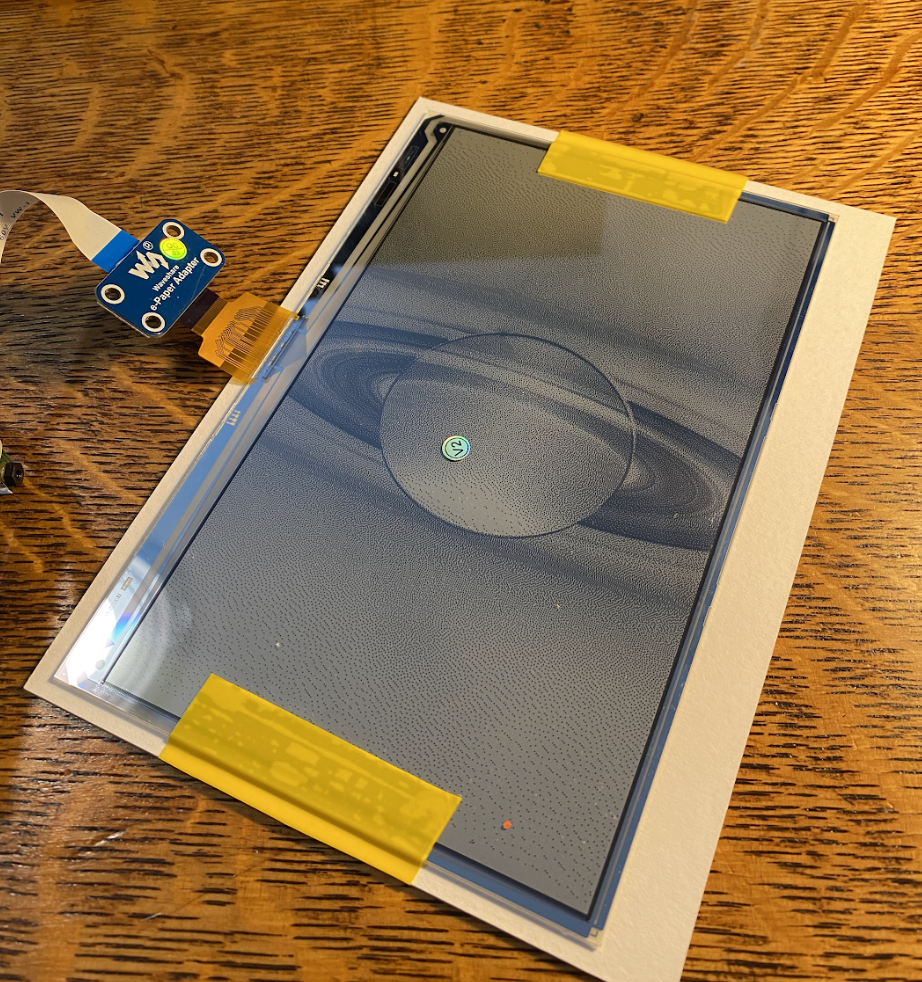
With that in mind, Olivier began to plan. A frame would consist of a Raspberry Pi Zero W computer and a 7.5-inch Waveshare e-ink display, and the idea was to allow images to be emailed to a Google inbox with a program written to make use of them at regular intervals.
“I like e-ink technology,” Olivier continues. “Each pixel on an e-ink display hosts tiny pigments that are physically jolted around by an electrical charge and they stay in place even if power is disconnected, which means the screen will continue displaying the same image until it is refreshed.”
Life through a lens
Olivier thought the project would be straightforward. It wasn’t. “I didn’t think writing a script to automatically read attachments from a Gmail inbox would prove so tricky,” he laments. “I definitely underestimated this part of the project because it took me a long time to figure out how a Flash web application written in Python can use and refresh Google authentication tokens.”
He used the industry-standard protocol for authorisation, OAuth 2.0, instead of a simpler email-password login strategy. “It was a way of future-proofing the project because it’s a robust and secure protocol directly supported by Google,” he says. He also added the ability to include custom messages which would be overlaid on to the images. “It was hard to speak on the phone, and internet audio calls were patchy, so I wanted a way to explain the context of each photo,” he adds.
For greater user-friendliness, Olivier created iPhone shortcuts too. “It simplified the process of selecting and emailing a recent image to the dedicated Gmail inbox,” Olivier says. “A click is enough to launch the whole process.” This addition proved an elegant way of stitching together all of the application’s parts and it proved effective.
“My fiancée was delighted when I gave it to her as a Christmas present,” Oliver recalls. “We spent a year swapping pictures to and fro, and I was able to discover the north through her lens as well before flying up to visit her.”
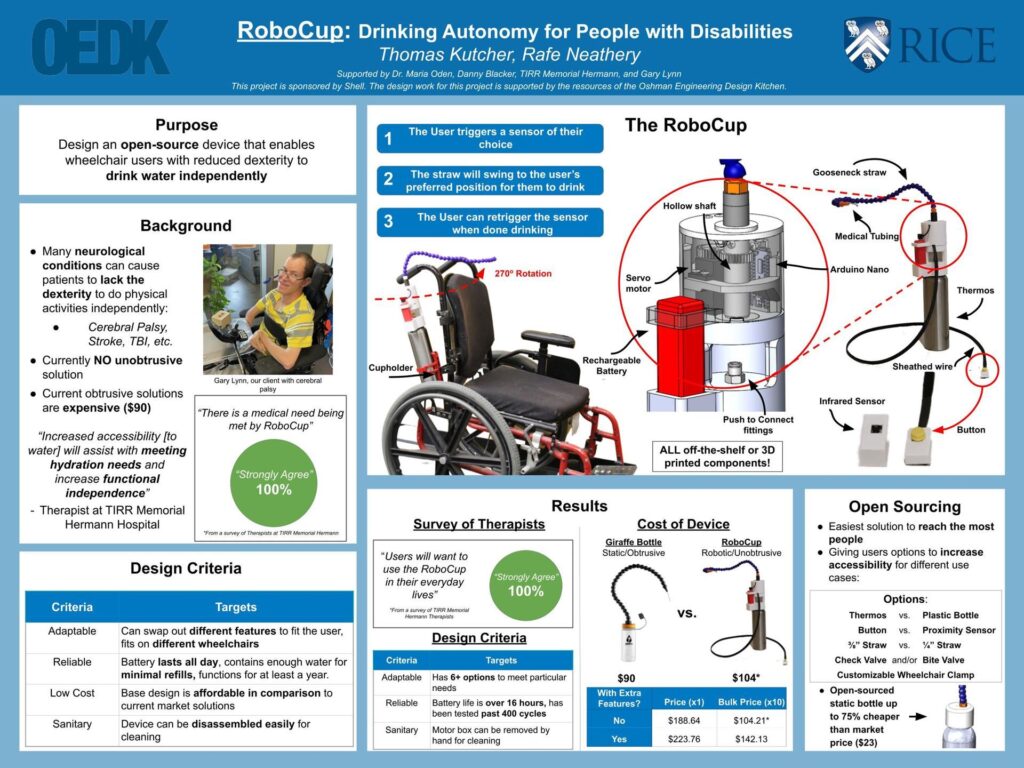
One of the many realities of living with cerebral palsy is limited upper body dexterity, as almost every activity requires the help of a caregiver. That includes something that most of us take for granted: drinking water. To restore at least that little bit of independence, Rice University engineering students Thomas Kutcher and Rafe Neathery designed the RoboCup.
A typical solution for letting people with cerebral palsy drink without assistance is a “giraffe bottle.” That is a water bottle with a long gooseneck straw that extends in front of the user’s mouth. But while that does give them the ability to drink on their own, it is obtrusive and leaves a bulky straw in front of their face. RoboCup eliminates that issue by rotating the straw out of the way when it isn’t in use. To take a drink, the user just needs to push a button or move their finger over a sensor. The straw will then rotate back over to their mouth.
The best part is that RoboCup is open source, so anyone with a 3D printer and some basic skill with electronics can build one for around $100. The key component is an Arduino Nano board. It monitors the tactical button or distance sensor (whichever is appropriate for the user’s capability) and controls a servo motor that rotates the straw. Power comes from a small rechargeable battery and all of the components, aside from the 3D-printed parts, are off-the-shelf and readily available.
If there’s one place in the world you want to feel safe, it’s inside your home.
And yet, the unfortunate reality is that our homes can sometimes be a source of danger. From burglaries to fires, it’s important to take precautions to make sure your house remains a sanctuary and not a deathtrap.
Home automation can be a huge help here. Today’s homeowners (and renters) have a ton of tools at their disposal to stay safe from a range of hazards and risks. Some of these tools you can even build yourself, with minimal cost and effort.
In this article, we’ll look at some of the main dangers people face at home, and how automation can minimize the risk.
5 common home security threats
What are the biggest dangers facing us at home? Apart from dropped Lego pieces and precariously-stacked crockery, here are some of the main dangers facing our homes and why they’re so serious.
Burglaries
Home burglaries are actually decreasing in frequency as time goes on, but they’re still a threat.
In the U.S., for example, over one million burglaries take place every year, and property crimes are the most common type of crime. Burglars use a range of techniques and methods to gain entry and steal your hard-earned possessions, and often leave behind a legacy of trauma and shock — even when you weren’t at home.
Fires
A house fire is a nightmare scenario, but this is also a very real concern.
Research shows that 24.2% of all fires worldwide occur in residential buildings. Some of the main causes include:
Unattended cooking (this is the most common cause of house fires)
Even when you manage to escape a house fire, the damage can still be enormous. On top of the financial cost, you have to deal with the loss of items that can never really be replaced. The best option when it comes to house fires is to do whatever it takes to prevent them.
Environmental dangers
Extreme weather events are on the rise around the world, and this is a problem for the safety of your home.
Hurricanes, earthquakes, floods, and wildfires can be devastating, and wherever you are in the world there’s almost certainly some kind of environmental risk facing your home. Repairing a damaged home can become extremely costly, and can cause massive disruptions to your life.
Cybersecurity threats
One of the biggest downsides to an increasingly tech-savvy world is the rise in cyber crime, which is much more widespread than it was in past decades.
The days of clumsy spam emails being the biggest threat to ordinary people are long gone — cyber attacks are now incredibly sophisticated and constantly evolving.
With the rise in smart home devices, typically as part of the Internet of Things, cyber criminals now have a new avenue to exploit. Many home automation systems aren’t properly protected, in fact one study found that many had major design flaws putting them at risk of cyber attacks like data leaks and break-ins.
Home automation as a solution
Although home automation can be a target for attackers, it can also function as a highly effective defence against many of the threats to your home.
The home automation market is growing fast, and is predicted to reach $163 billion by 2025. As this technology becomes more advanced, more possibilities for protecting your home keep emerging.
Let’s take a look at some of the ways you can harness the power of home automation to keep your home safe from multiple dangers.
Enhanced security features
The best place to start with smart home security is with the basics — the locks, keys, and alarms we’ve been using to keep our houses safe since time immemorial.
With home automation, you can take these security features to the next level, adding a new layer of safety and convenience to your home, such as:
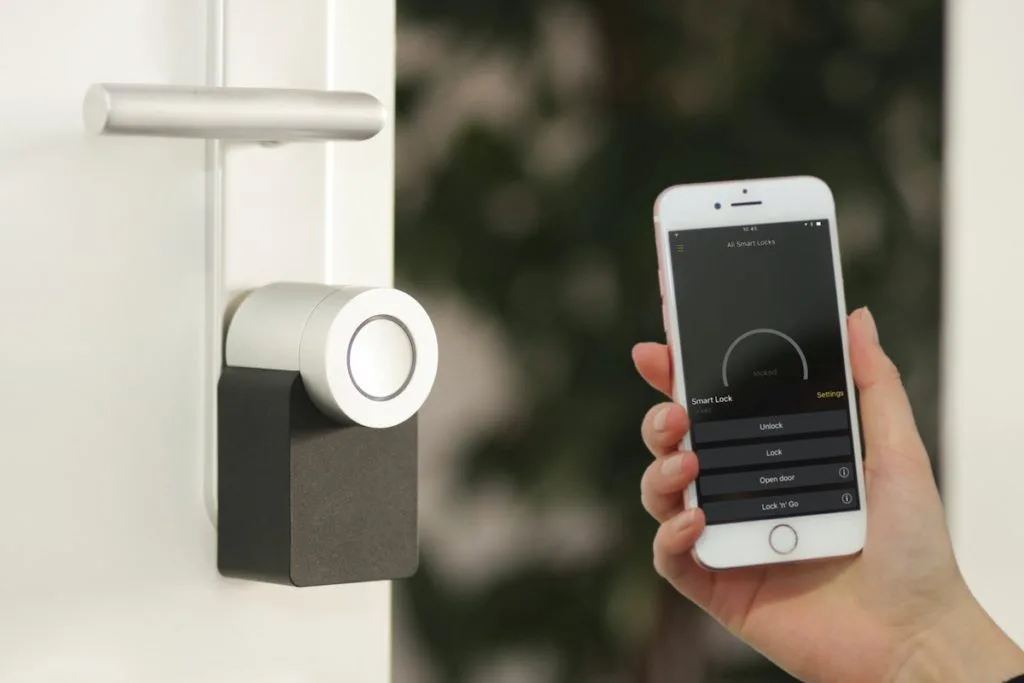
Smart locks and keyless entry systems, for instance based on biometric data like your fingerprints, eliminate the need for keys (which are easily lost), and make it much harder for an unwanted visitor to gain entry to your home.
Surveillance cameras and video doorbells allow you to see who’s at the door without going to check, even when you’re not at home. Research suggests that homes with security cameras are 300% safer from burglaries than those without.
Motion sensors and alarms. While they might not be cutting-edge smart home tech, these time-tested devices have been in use for decades and are still very much around because they work so well.
Fire and environmental safety
House fires and environmental disasters are often treated as freak accidents — something we have no control over and that we should simply hope never happens to us.
However, we’re not powerless here, and home automation can actually offer some solid defences against the raging elements. Some examples include:
Smart smoke detectors. Like traditional smoke detectors, these pick up on unusual smoke in your home and issue an alert. But these smarter models can also send warnings to your smartphone, wherever you are. They can detect the difference between, for example, carbon monoxide and smoke, and some can tell you where the smoke is coming from.
Flood sensors and leak detectors can help you locate and identify water leakages while they’re still small and fixable, before they turn into destructive and expensive problems.
An uninterrupted power supply (UPS) can ensure the lights and power stay on even when the main grid has been disabled by a storm or other natural disaster, so you can keep your essential functions running.
Cybersecurity measures
While home automation tech is becoming more advanced all the time, there are also vulnerabilities here though, and some cyber criminals target IoT and smart home devices.
To keep your smart home as secure as possible, it pays to take security seriously here. Let’s take a look at some basic steps everyone can take to keep their devices safe from cyber attacks.
Make sure your WiFi network is secure, with a strong password and encryption. Try to find a router with a security protocol of WPA2 or ideally WPA3.
Regularly update the firmware that runs on your smart home devices — this will ensure they’re protected against any new threats and have the most up-to-date security features installed.
Replace any outdated technology including routers.
Change your passwords frequently, and don’t use common or easily guessed passwords.
DIY vs. professional installation
When it comes to smart home security, it’s common to wonder if you should pay for a professional to take care of your needs, or do it yourself.
Security is, of course, a serious matter. It’s not an area you want to leave to chance, or risk leaving your home with safety flaws because you did something wrong.
If you’re a beginner to building and maintaining your own home automation devices, it’s best to leave the important security jobs to a trusted professional. And even if you have some experience with these jobs, it might still be a good idea to use a specialist for the really important stuff — things like alarm systems and smart locks.
However, it’s possible to take the DIY approach to many smart home safety devices, with only a handful of easy-to-acquire components and some basic coding and design knowledge. The Arduino Project Hub has plenty of examples here. Let’s take a look at just a few.
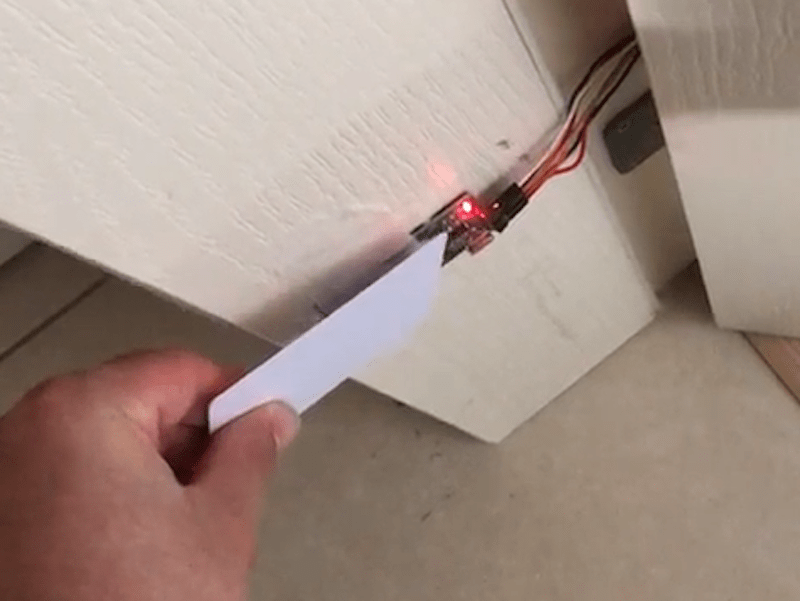
RFID card door lock
Arduino user mehmetefepekerr created this project — a radio frequency identification (RFID) card designed to add an extra layer of security to their home. The card enables you to unlock your door by tapping the card on your way in. RFID key cards are typically safer than magnetic cards since they’re more resistant to the elements, and unlike traditional locks they can’t be picked by thieves.
Ultrasonic security system
This system by theridgeguy is meant to keep your home safe by detecting the presence of intruders and sounding an alarm.It employs an ultrasonic distance sensor to detect how far someone is from the doorway, and then uses flashing lights and noises to deter them from getting any closer. Trusted guests and family members can enter a four-digit code to disarm the alarm.
Smoke detector using gas sensor
When it comes to preventing house fires, time is always of the essence. This smoke detector, developed by srajandikshit147, picks up on any unexpected smoke in the environment and then warns the user by sounding a buzzer and flashing a red LED if the smoke density is higher than the safe limit.
These ideas are just the tip of the iceberg when it comes to using Arduino to make your own smart home devices, including ones that protect you from various risks and dangers in your home.
By tapping into the power of home automation, you can build your own devices to do all kinds of things. You don’t need to be a coding mastermind or have access to expensive gear — pretty much anyone can get started with their own basic projects today.
Get in touch with us to learn more about what’s possible with home automation and get started on your own journey.
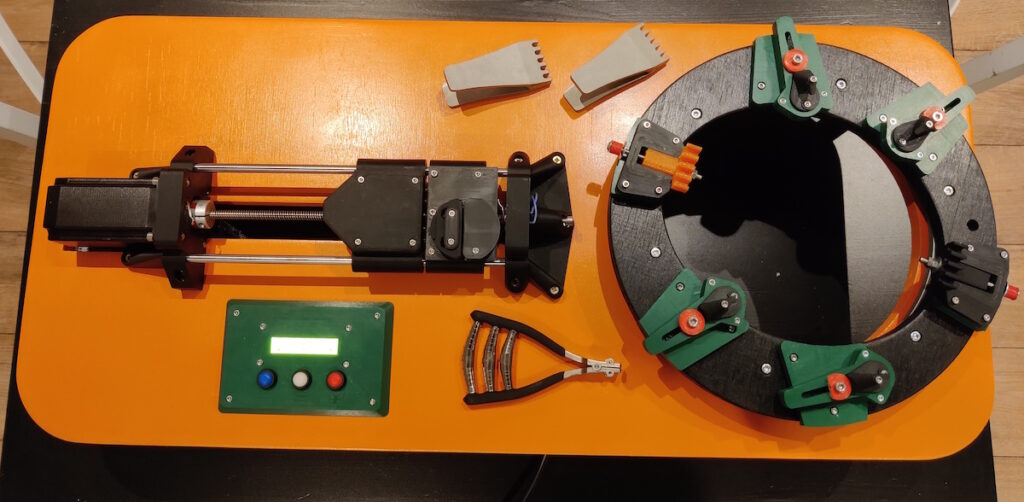
Tennis and badminton racquets look pretty simple; just string woven around a hoop like a basket, right? But those strings are under massive tension, which is necessary to get good rebound on the ball or shuttlecock. Maintaining string tension while weaving the string usually requires a big and expensive machine. But the DIY KhordUino is both compact and affordable, making it realistic for hobbyists and even small businesses to string badminton racquets on a budget.
The KhordUino is a designed specifically for stringing badminton racquets, though the process seems fairly similar for tennis racquets. Antoine Colin took care to make the machine as flat as possible for easy storage and it uses mostly 3D-printed parts, keeping the cost down. That is possible because Colin put the tensioning mechanism inline with the clamps that hold the hoop in place. This directs all the stress along the long axis of the machine, which is a compression force that the 3D-printed frame and clamps can handle.
An Arduino Nano board tensions the string using a stepper motor that drives a lead screw. That provides a lot of torque to get very tight strings. To keep it from breaking strings or the machine itself, the Arduino monitors a load cell from a luggage scale through an HX711 amplifier. The user can set the tension to apply, then press a button to start the mechanism. It will pull the string taught, then the user can clamp it in place, loop it around, and repeat.
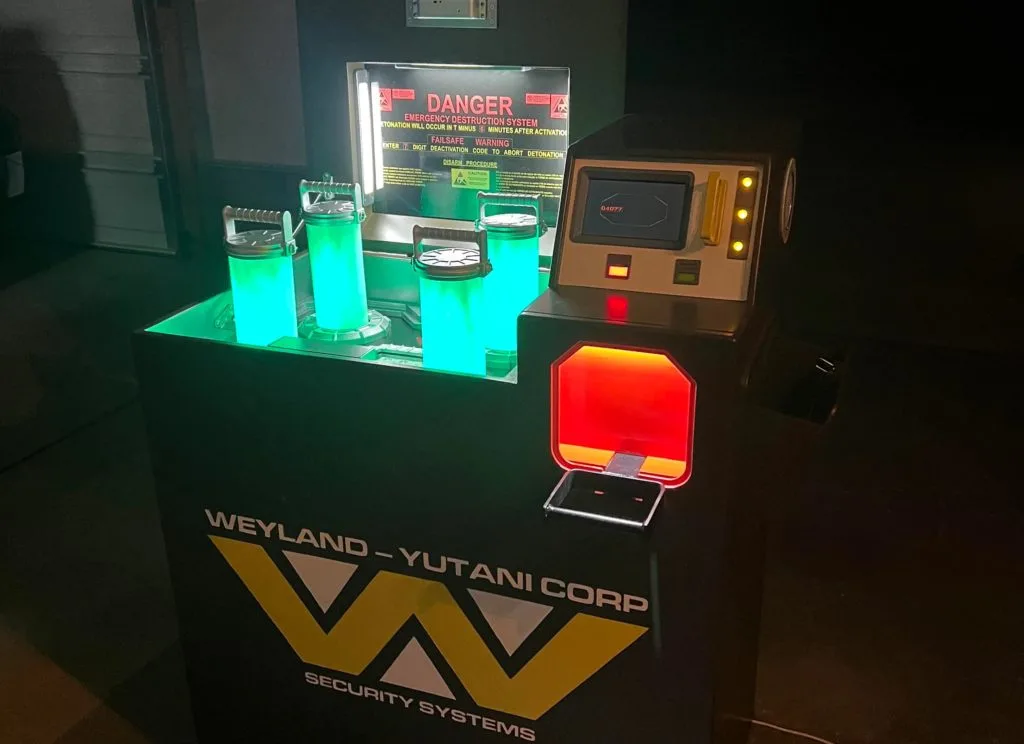
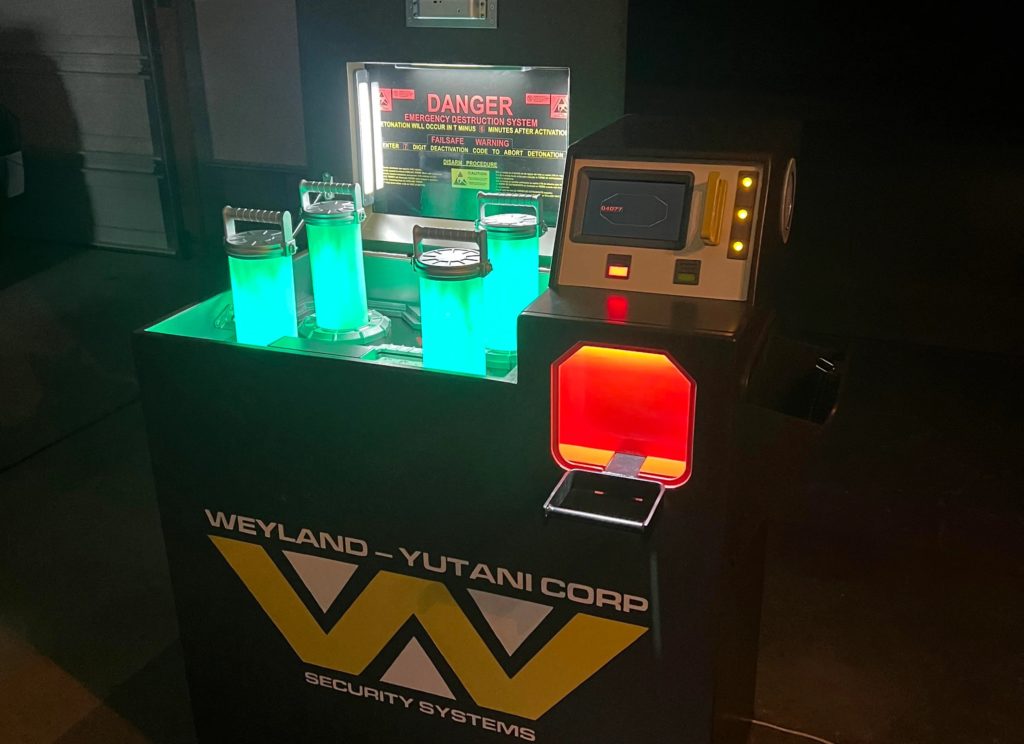
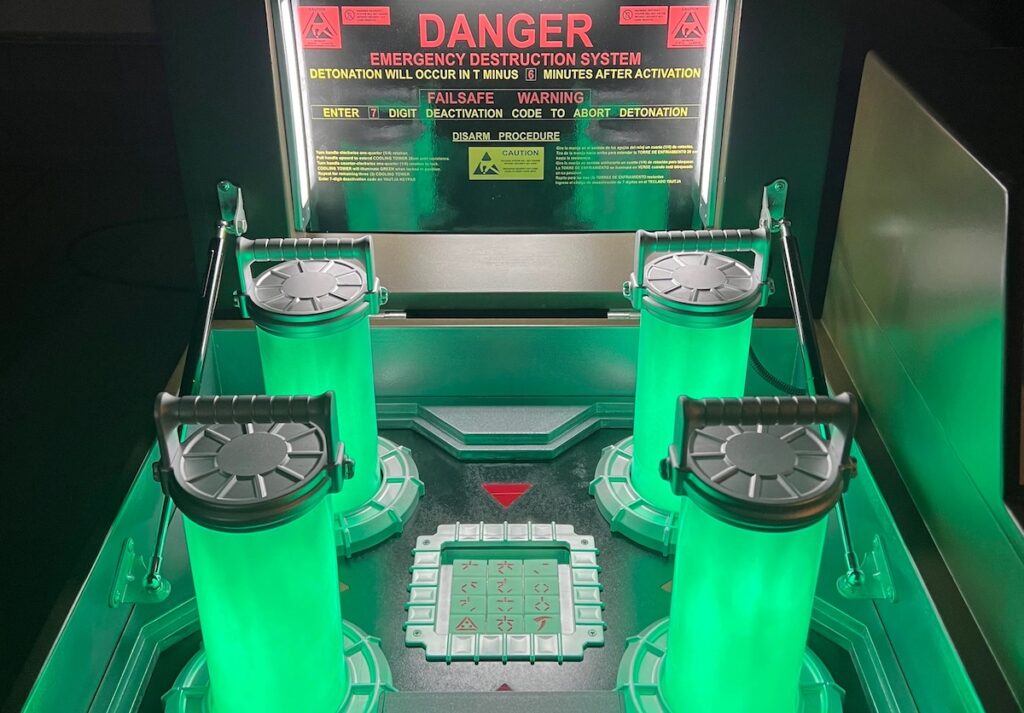
Alien is an icon of the sci-fi horror genre and it owes its status to the legendary design work of H. R. Giger. He was responsible for the very original xenomorph and much of the set design throughout franchise. Alien and its sequels have a distinct visual aesthetic that inspired Redditor Wired_Workshop to build this escape room puzzle.
Wired_Workshop attended the Maker Alliance Summer Camp event in Kentucky and was tasked with contributing a puzzle to that event’s ’80s-themed escape room. Being a massive Alien fan, Wired_Workshop chose to borrow the design aesthetic and some of the effects from that franchise. The puzzle itself takes sequences from the films and even has a Predator Easter egg, since both franchises exist within the same cinematic universe.
This project required several different fabrication techniques, including 3D printing, CNC routing, and welding. An Arduino Mega 2560 board controls LEDs and monitors user input through a keypad, a huge switch lever, and glowing canisters that the player must lift. There’s also a fog machine to produce a smoke effect, driven by an Arduino Nano. Because this is a puzzle, the player has to complete those in the right order by following the available clues. And because this is just one part of an escape room, solving this puzzle provides a clue for the next puzzle developed by another attendee.
Be sure to watch Wired_Workshop’s full video on this project to learn about all the details and to see the various Alien references. Eagle-eyed viewers should be able to spot some homages to specific scenes and props from the films.
Everything old is new again! Arduino users always amaze us with how they put a fresh spin on the most common objects around us: a clock, a board game, a computer… anything can inspire the exciting new entries they share on Project Hub. These are the three builds we selected from August’s uploads to highlight our community’s advanced skills, resourcefulness, and creativity.
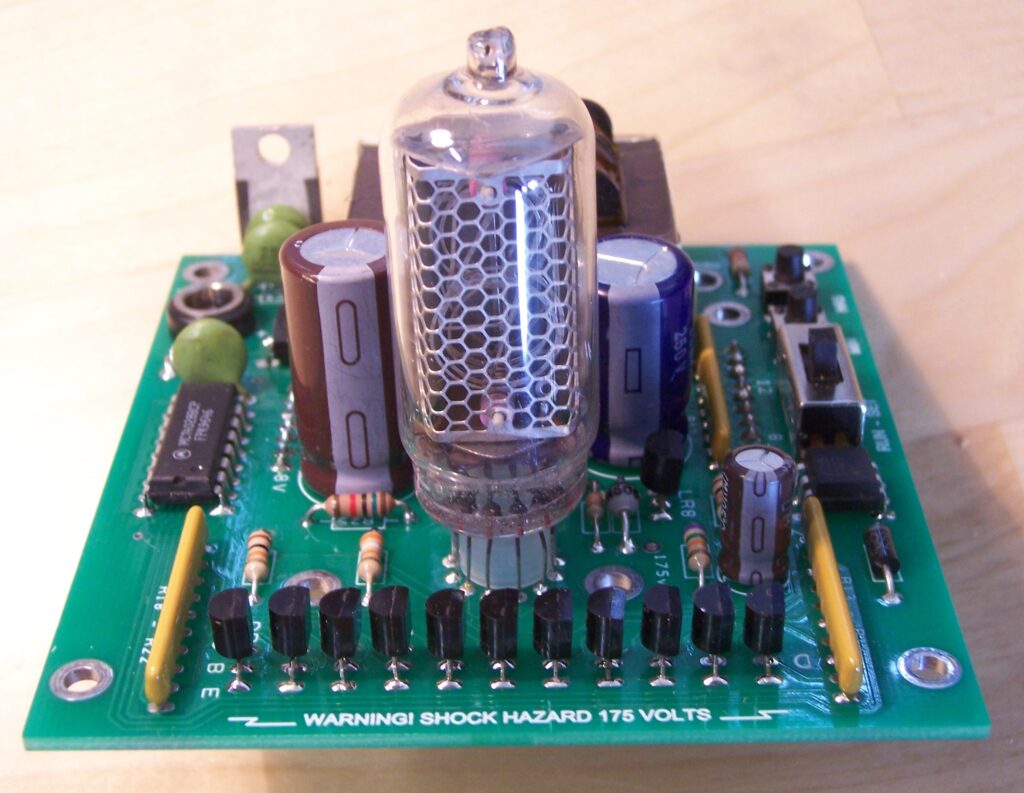
As the saying goes, “With great power comes great responsibility.” if you have the electronics knowledge to work in total safety, assembling this fun retro clock is a great opportunity to show off your skills and ingenuity at the same time. Using an Arduino UNO and a Nixie tube – which, unlike an LED, operates at high voltage and therefore must be handled with care – you can read the time off a unique display, even from across the room. Combine multiple tubes to showcase different information!
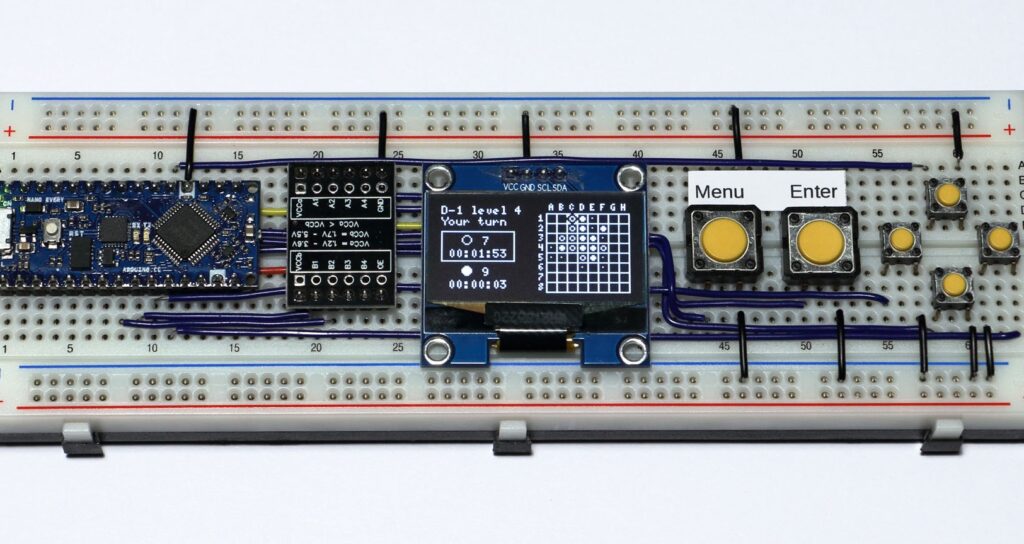
To make or not to make was never the question! We have no doubt you can follow this tutorial to create your own digital version of the traditional Othello game: learn to play, practice, and win – even with minimal hardware. In fact, you can get away with only the Arduino Nano Every board, the Arduino IDE, and a cable to connect the two.
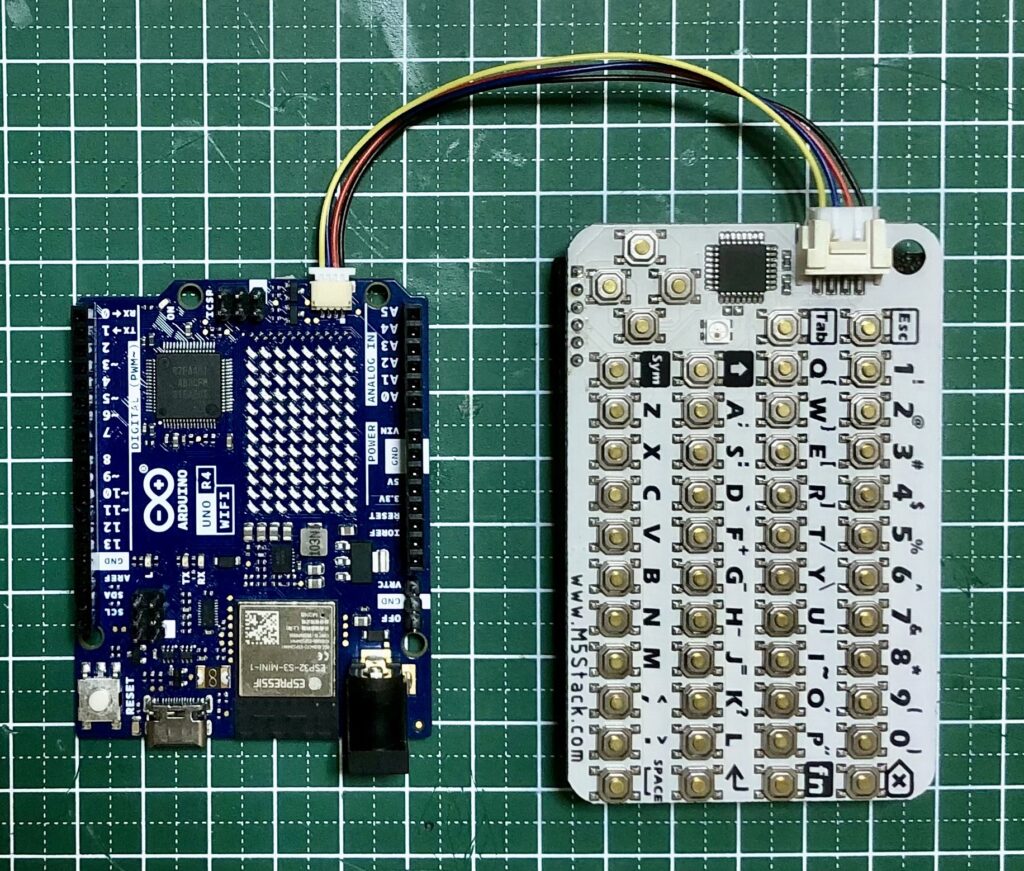
It’s the stuff of vintage spy movies, but blends into today’s reality – where custom technology can truly be at your fingertips at all times thanks to new, accessible components. Based on two 2023 releases from Arduino – the Nano ESP32 and UNO R4 – yokonav’s debut contribution to Project Hub demonstrates how to stack hardware to form a small, functional computer that runs on Linux.
For your chance to be selected for a $100, $300 or even $500 gift card to spend on the Arduino Store, submit your best project on Project Hub! We will be awarding three new entries every month, as detailed in the complete terms and conditions. Good luck!
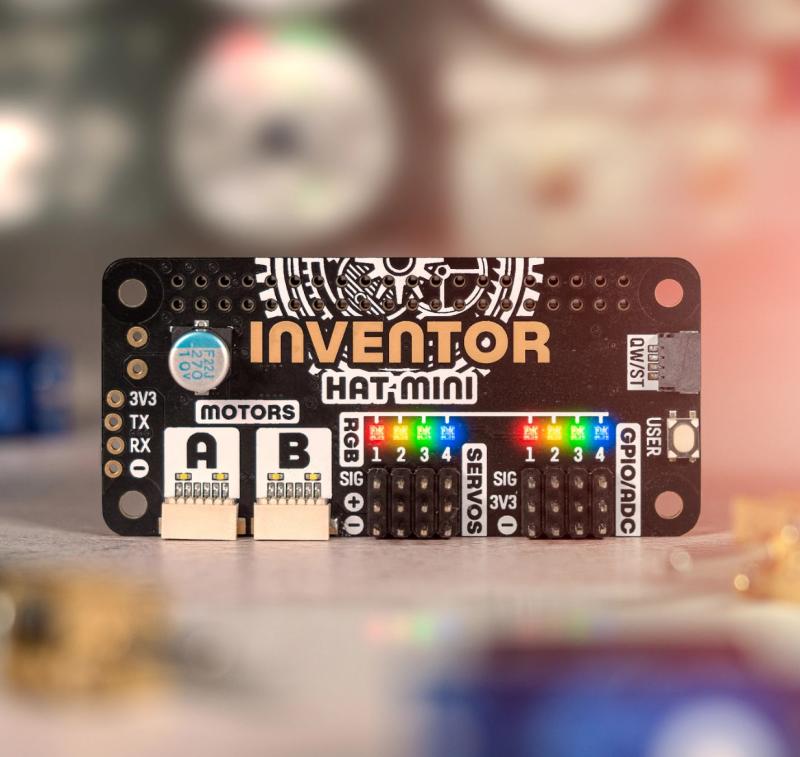
Four extra GPIO channels, each with a three-pin header, are ADC capable, so can be used as analogue inputs for sensors etc. Best of all, the board’s Nuvoton microcontroller handles all I/O, so the board only uses a handful of GPIO pins on Raspberry Pi – and it has a pass-through header so you could stack another board on top by using a stacking header.
Light and sound
Each set of header pins even has its own RGB NeoPixel, while the motor ports have direction LEDs. There’s also a user button and other connections include a single Qwiic/STEMMA QT for breakouts, external power and UART serial headers (both unpopulated), and an audio port (two-pin Picoblade) to connect a mini speaker.
Pimoroni’s comprehensive Python library makes programming the board easy, and a bunch of code examples help you get started. We can see this board being used with a Raspberry Pi Zero for fun mini robots, but it’s versatile enough for many other electronics projects.
Verdict
9/10
Packing an impressive array of features into a small footprint, this versatile board is ideal for mini robots and a lot more.
With some 100,000 attendees a year, Maker Faire Rome has been Europe’s biggest maker event since 2013. At Arduino, we are proud to have been part of it since its first edition, and to have grown with it – and with the maker community – year after year. In fact, we have grown so much that for the 11th edition we needed more space!
In addition to being Gold Sponsor of the event, Arduino will have an entire pavilion this year: more room to display our user-friendly and flexible solutions, inspire visitors with demos at all levels, and more importantly showcase outstanding projects created by our community.
No matter where you are on your maker journey, you’ll find something interesting and fun for you at the Arduino Village:
Get to know our full offering, with highlights from Arduino Pro, Arduino Education, and Arduino Cloud.
Enjoy interactive applications that put Arduino into action: try our RC car, play a memory game, create your own cocktail recipe at a smart bar, and more!
Meet our experts and ask them anything.
Tickets to the Maker Faire Rome are available on the website. Need an extra reason to join us? Keep your eye out for Arduino staff around the venue, handing out a special discount for our online store!
Come visit us in the Arduino Village, right at the heart of the event in Fiera di Roma, October 20th-22nd. Meeting you will make our day!
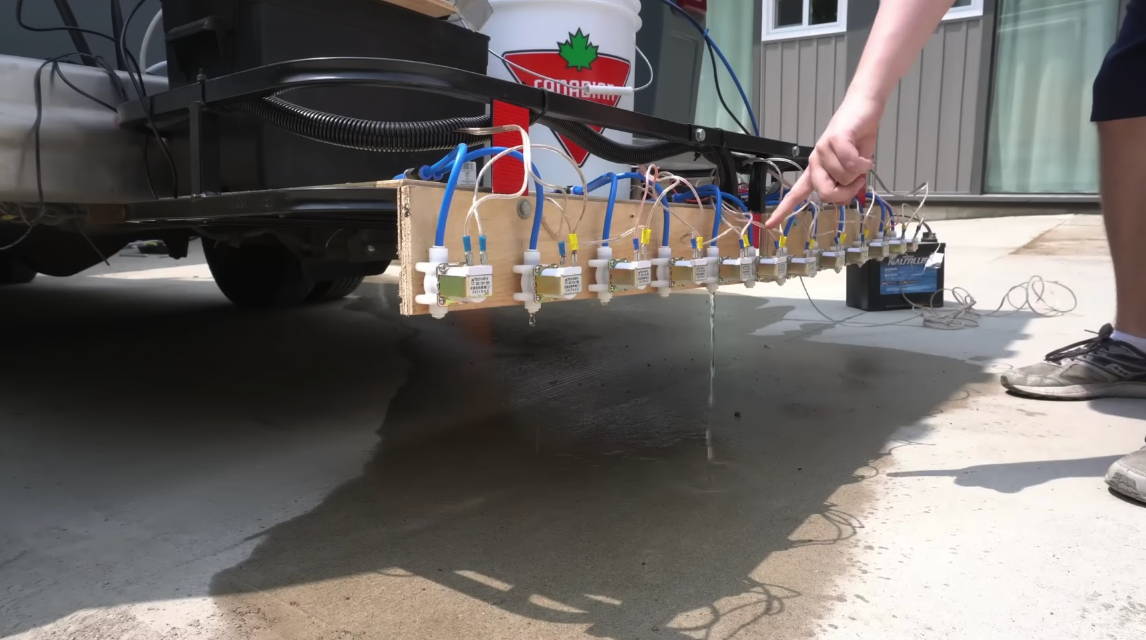
Armed with, amongst other things, some solenoid valves, wood to attach the valves to his truck, a good length of hosing, speaker wire, hose splitters, and a bilge pump, Ryder set to work.
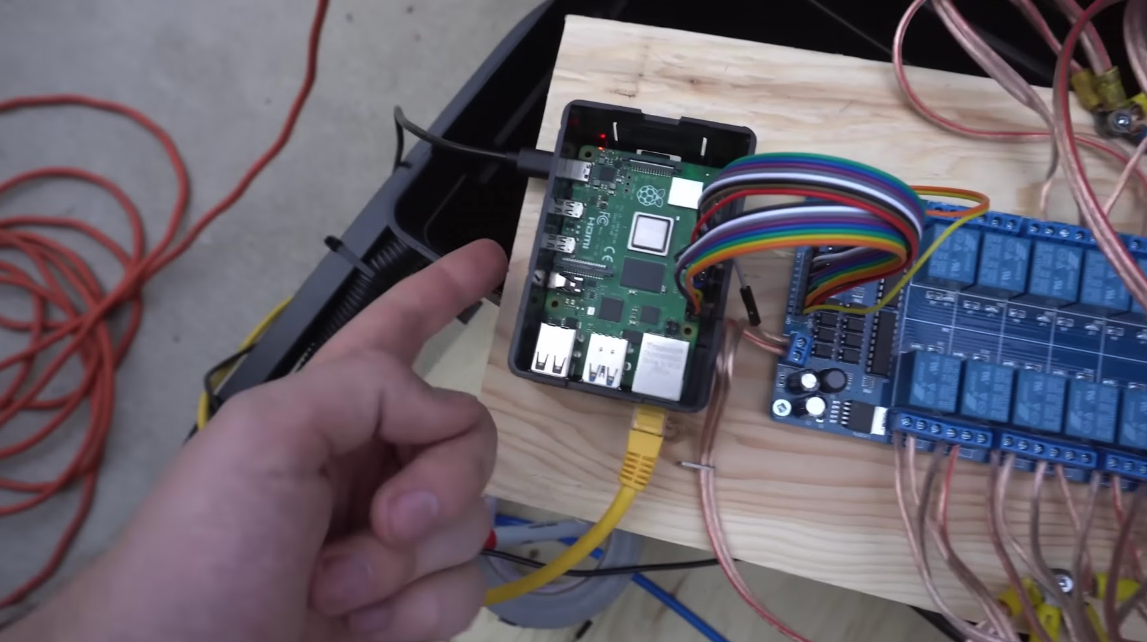
“The ‘printer’ runs off 12 V direct from the car’s cigarette lighter,” he explains. “There’s a Raspberry Pi 4 that runs a web server that accepts input text, an input speed and font and, from that, turns the text into a picture and iterates over it left-to-right to create a bit of a map. From that map, it then determines which solenoid valve (1–12) to open or close, at a particular time.”
Raspberry Pi’s GPIO pins are used to open and close valves via a relay board to manage the higher voltage. It also controls a windshield washer pump that turns on just before printing and just after completion to pressurise the lines. The water is then pumped out of a large bucket, into the lines, and out through the solenoid valves onto the road.
Writing the required Python code himself, Ryder didn’t find it the most challenging part of the build. “Code is my talent; that part comes easy to me. Wiring, debugging wiring, and everything electrical on the other hand, I struggle with and it takes me a while.”
The solenoid valves are situated about 1.5 ft above the ground on a trailer hitch, but this height will vary depending on the vehicle. In terms of the amount of water utilised, Ryder says it’s “surprisingly efficient. I can usually write messages for about 10–15 minutes before it runs out.”
Interestingly, he claims that you can drive any speed, “as long as it’s a constant speed, and you input it into the web server before you drive. We tested it up to about 20 km/h, and I’m hoping to get the speed way up in version two.”
Truckloads of inspiration
Ryder describes this make as being of “moderate difficulty”, but would encourage anyone to have a go, “maybe trying a project with one pump and one solenoid (like a sprinkler).”
Looking to make new versions of the printer, he has ordered a considerably more powerful pump in the hope it will improve the aesthetic of the printing. “I’m even looking at doing colour in some way that I’ve yet to figure out – I don’t want to have to clean up a mess or leave anything behind.”
While feedback from the maker community has been wholeheartedly positive, some locals were a little bemused. “My neighbours have seen me doing a lot weirder projects, so they’re used to it, but I did get some weird looks from people on the street, as the machine itself – with its wires, hoses, and dripping water – looks a bit strange.”
Ryder confirms that we can expect more offbeat Raspberry Pi-linked projects from him, but “I’m keeping them secret until I actually build them.” Watch this space…
Einwilligung verwalten
Um dir ein optimales Erlebnis zu bieten, verwenden wir Technologien wie Cookies, um Geräteinformationen zu speichern und/oder darauf zuzugreifen. Wenn du diesen Technologien zustimmst, können wir Daten wie das Surfverhalten oder eindeutige IDs auf dieser Website verarbeiten. Wenn du deine Einwillligung nicht erteilst oder zurückziehst, können bestimmte Merkmale und Funktionen beeinträchtigt werden.
Funktional
Immer aktiv
Die technische Speicherung oder der Zugang ist unbedingt erforderlich für den rechtmäßigen Zweck, die Nutzung eines bestimmten Dienstes zu ermöglichen, der vom Teilnehmer oder Nutzer ausdrücklich gewünscht wird, oder für den alleinigen Zweck, die Übertragung einer Nachricht über ein elektronisches Kommunikationsnetz durchzuführen.
Vorlieben
Die technische Speicherung oder der Zugriff ist für den rechtmäßigen Zweck der Speicherung von Präferenzen erforderlich, die nicht vom Abonnenten oder Benutzer angefordert wurden.
Statistiken
Die technische Speicherung oder der Zugriff, der ausschließlich zu statistischen Zwecken erfolgt.Die technische Speicherung oder der Zugriff, der ausschließlich zu anonymen statistischen Zwecken verwendet wird. Ohne eine Vorladung, die freiwillige Zustimmung deines Internetdienstanbieters oder zusätzliche Aufzeichnungen von Dritten können die zu diesem Zweck gespeicherten oder abgerufenen Informationen allein in der Regel nicht dazu verwendet werden, dich zu identifizieren.
Marketing
Die technische Speicherung oder der Zugriff ist erforderlich, um Nutzerprofile zu erstellen, um Werbung zu versenden oder um den Nutzer auf einer Website oder über mehrere Websites hinweg zu ähnlichen Marketingzwecken zu verfolgen.