We’re only a few short weeks away from Halloween and that means we’re starting to see the creative projects that makers come up with to celebrate the holiday. Movement, lights, and sound effects are the name of the game when it comes to Halloween decor and the Treat Trough of Terror is the perfect example.
Gord Payne’s Treat Trough of Terror is a fun and unique way to doll out candy to the kids on Halloween while practicing social distancing. Payne can stand on his front stoop and when a trick-or-treater comes along, he can drop candy down the chute to their eager little hands. To turn that into a fun experience, the chute passes through a decorative jack o’ lantern. As the candy slides down the chute, the whole thing lights up and places spooky sound effects.
The chute itself is just PVC pipe cut in half lengthwise and resting on a patio chair. The lights are WS2812B LEDs driven by an Arduino Nano board. The Arduino also controls the sound effects played by a small MP3 player module, with audio output going to a pair of powered speakers. An ultrasonic sensor detects the candy as it slides past on the chute, which tells the Arduino to activate the light and sound effects.
Solar power is awesome, but it takes a long to recoup the investment on hardware. The more output you can squeeze from a solar panel, the faster you’ll cross that line into actual monetary savings on energy. You can achieve decent output through most of the day with smart placement, but a sun tracker like this single-axis design from Shawn Murphy will dramatically increase your output.
This is a single-axis sun tracker and so it doesn’t increase output quite as much as a tracker that moves on two axes. But if one orients that axis properly, this will still be a significant improvement over a static solar panel.
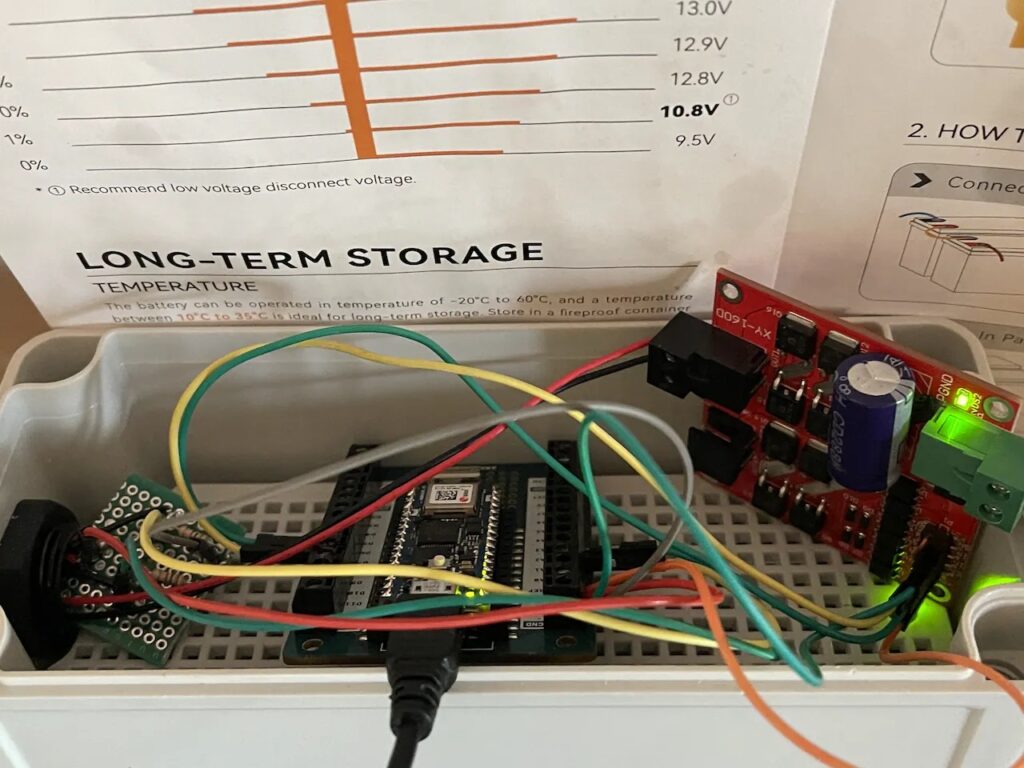
Murphy has two 300 watt solar panels mounted on the roof of a shed that they use as an art studio. That roof has a slight downward slope, so the panels only receive full sunlight when the sun is low in the sky. To account for that, a pair of powerful linear actuators lift up the entire roof of the shed to keep the solar panels perpendicular to the sun’s rays as much as possible. Gas struts help to lighten the load on the actuators.
An Arduino Nano RP2040 Connect board controls the linear actuator motors through a Drok DC motor controller. The Arduino looks at a pair of LDRs (light dependent resistors) and calculates the differential between them to determine if the panels should tilt further. Murphy connected the Nano to the Arduino Cloud to log the readings, which lets him check to see the movement throughout the day.
Developing your skill set is all about pushing the boundaries of your current knowledge and experience, but that inevitably leads to occasional failure. When that happens, you need to know how to pivot and complete the project. A great example of that is James Bruton’s Star Wars speeder bike built from a repurposed hoverboard.
Bruton started this project with the idea of taking the electronics and motors from a hoverboard and reconfiguring them to create a self-balancing bike. His intention was to control the movement by shifting his weight and by tilting the back half of the bike relative to the front half, so the hoverboard electronics would act just like they normally would. But that proved to be very difficult to ride, so Bruton had to pivot to a new control method that would give him better maneuverability.
To save the project, Bruton turned to an Arduino UNO Rev3. It monitors the rotation angle and tilt angle of the handlebars using potentiometers, then uses servo motors to tilt the hoverboard controller boards accordingly. As far as the hoverboard electronics know, this is just the movement of the rider shifting their weight or moving their feet. This causes the bike to roll side-to-side or rotate in place through input through the handlebars.
The bike rides on omni wheels, so Bruton also needed a way to move forwards. He chose to use hobby jet thrusters that are also under the control of the Arduino, with a throttle turning a third potentiometer. Those thrusters don’t have quite enough force for the job, so Bruton needs a push to get started. But they do let him continue on once he’s moving.
A lot of people here at Raspberry Pi are very excited for the addition of PCI Express. NVME storage is one thing, a very cool thing that will make for some very low-profile home file servers, but we’re looking forward to seeing what people connect to it over time. How soon until someone has an RTX 4090 hooked up to it? Then we’ll truly be playing with power.
While I’ll definitely be using it myself for retro game stuff, desktop computing, and media server stuff (the new VideoCore is very nice!), what I’m most excited for is to see what folks in the community come up with. Alasdair Allan, Head of Documentation here at Raspberry Pi, has already mentioned wanting to do more machine learning tests on it using the extra oomph the chipset provides. What else will you all come up with? As always, flood The MagPi social media accounts with what you do make so that I can see.
Out soon
I have to remind myself that, although everyone knows about it, it’s not out just yet! For the next issue, we’re already working on cool stuff you can do with Raspberry Pi 5, so you will be well fed with inspiration and tutorials to get you started. In the meantime, what do you want to make with Raspberry Pi 5? We’re all ears/eyes. Drop us a social media message or an email – we’re on Mastodon, Threads, Facebook, etc.
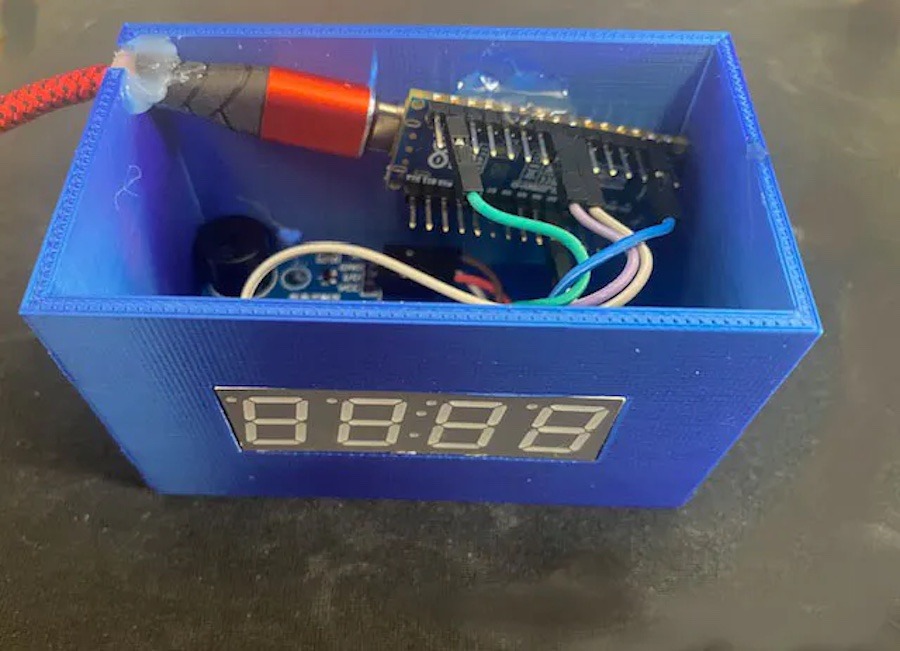
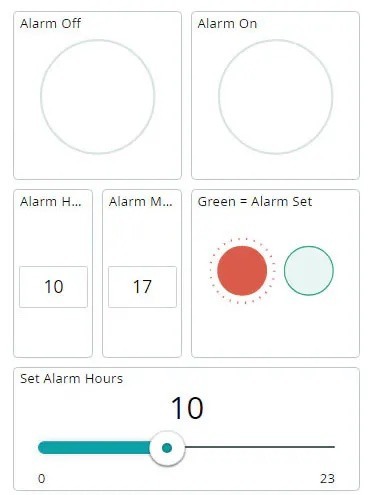
When Arduino first hit the maker scene, the world of embedded electronics was largely unconnected and offline. But as the IoT, home automation, and smart technology advanced, Arduino kept up. Today, there are a variety of Arduino development boards that offer built-in networking capability and you can use the Arduino Cloud to take advantage of them. To demonstrate that, Doug Domke built this button-free alarm clock.
User interface design is a complex field that has to balance usability, simplicity, and practicality. Take a look at the radio alarm clocks of the 1990s to see how bad user interfaces can make device interaction frustrating. Domke’s alarm clock goes in the complete opposite direction and omits buttons altogether. It lets the user “set it and forget it” through a simple Arduino Cloud dashboard. The time automatically updates based on the configured time zone and daylight savings settings.
This requires very little hardware. Power comes in through USB to an Arduino Nano ESP32 board, with a connected piezo buzzer module and four-digit seven-segment display. Those fit inside a basic 3D-printed enclosure. All the magic happens through the Arduino Cloud and Domke explains how to set up an Arduino Cloud account, create a dashboard, and connect the Nano ESP32 to that dashboard.
If you want a dedicated alarm clock, this is a quick and easy project that will help you get acquainted with the Arduino Cloud for future IoT projects.
The future we were promised was supposed to include robot maids and flying cars. The future we got has Roomba vacuums and Southwest Airlines. But at least those Roomba vacuum robots work pretty well for keeping floors slightly cleaner. Sadly, they leave elevated surfaces untouched and dust-ridden. To address that limitation, Jared Dilley built this tiny DIY Roomba to clean his desk.
Dilley is a dog owner and so his desk ends up with quite a bit of dust and loose hair, even though his dog is large and doesn’t sit on the desk — a mystery all pet owners will find relatable. Fortunately, Dilley is an engineer and had already created a small Arduino-controlled tank robot a while back. That operated a bit like a Roomba and would drive around until its ultrasonic sensor detected an obstacle, at which point it would turn. Dilley just needed to repurpose that robot into small mean cleaning machine.
The 3D-printed robot operates under the control of an Arduino UNO Rev3 through a motor driver shield. Originally, it only had the ultrasonic sensor, which was enough to detect obstacles in front of the robot. But because its new job is to patrol desks and countertops, Dilley had to add “cliff” sensors to keep it from falling off. He chose to put an infrared sensor at each of the front two corners. The Arduino will register the lack of a reflection when one of those sensors goes past an edge, and will then change course. A Swiffer-like attachment on the back of the robot wipes up dust and dog hair.
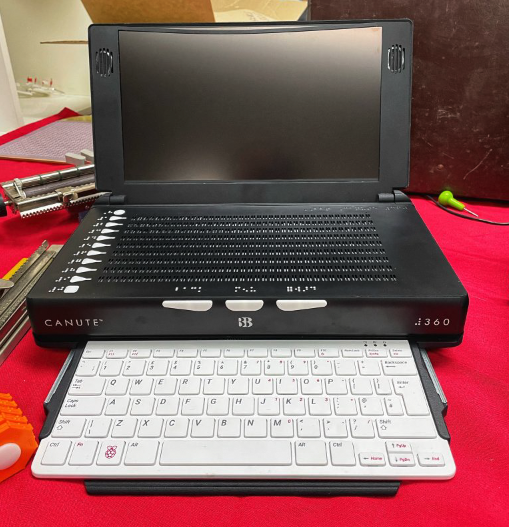
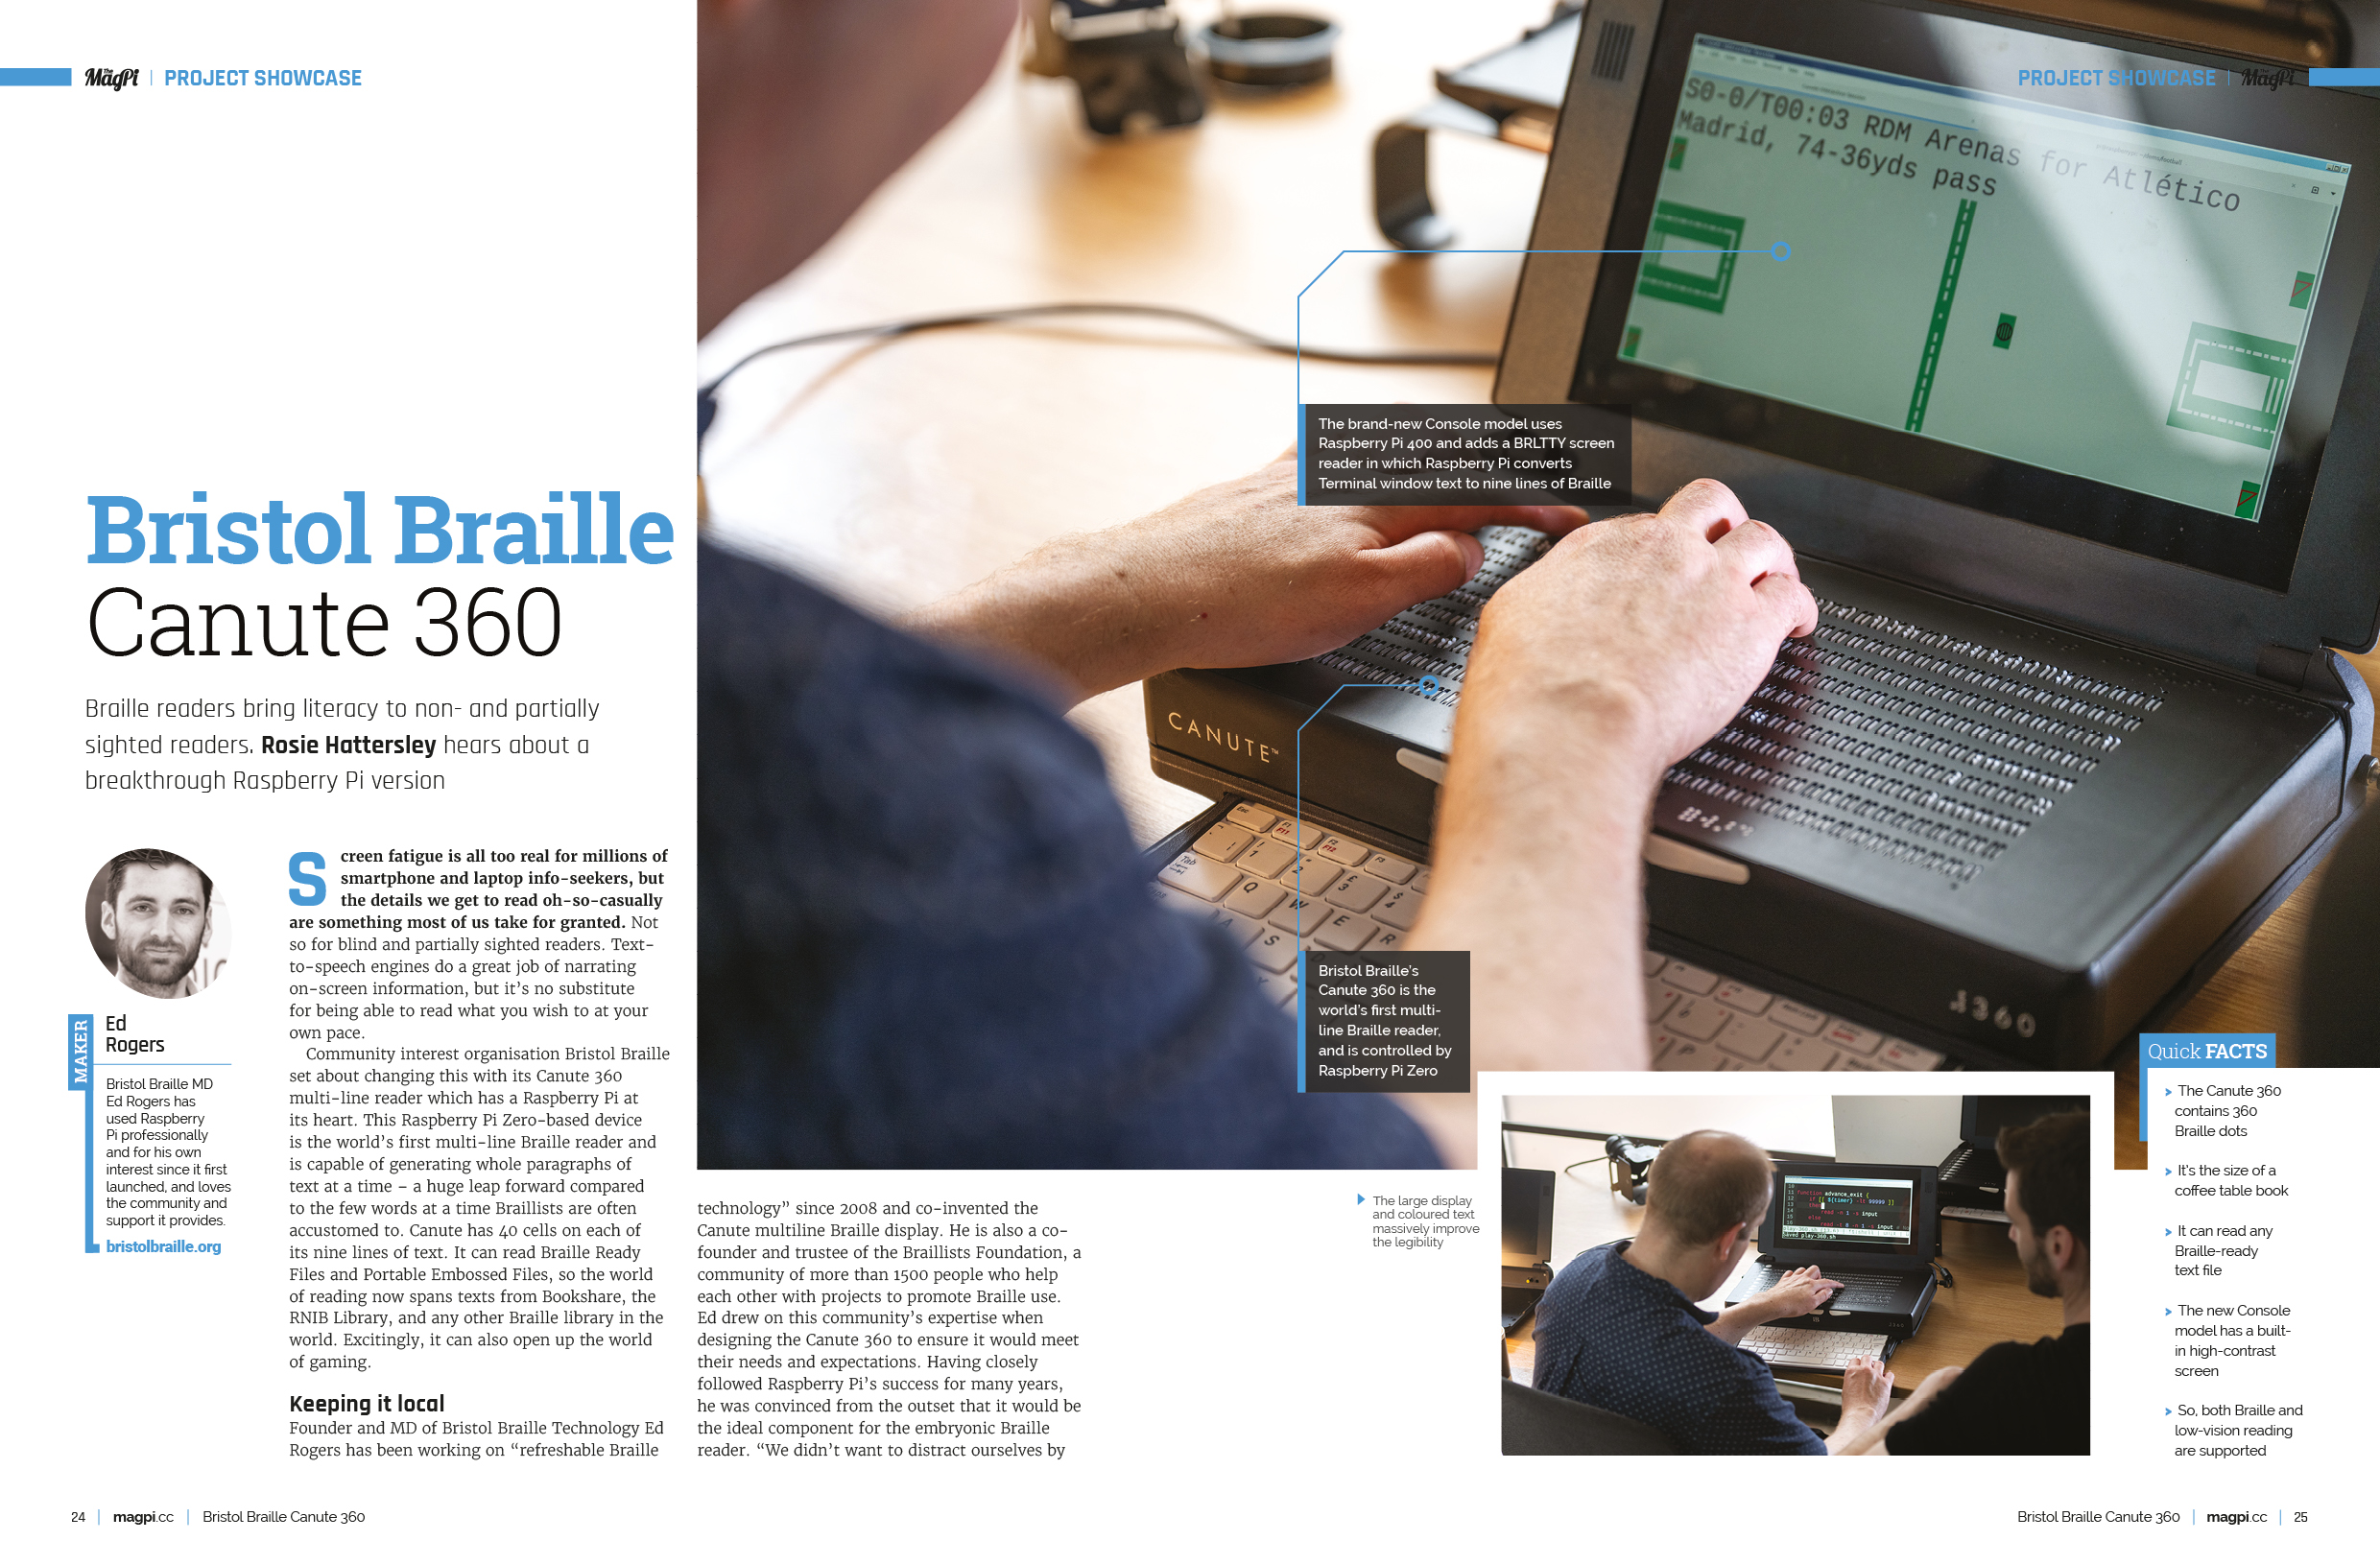
Founder and MD of Bristol Braille Technology Ed Rogers has been working on “refreshable Braille technology” since 2008 and co-invented the Canute multiline Braille display. He is also a co-founder and trustee of the Braillists Foundation, a community of more than 1500 people who help each other with projects to promote Braille use. Ed drew on this community’s expertise when designing the Canute 360 to ensure it would meet their needs and expectations. Having closely followed Raspberry Pi’s success for many years, he was convinced from the outset that it would be the ideal component for the embryonic Braille reader. “We didn’t want to distract ourselves by reinventing the wheel, or having to support our own OS,” so the dedicated OS and thriving Raspberry Pi community were vital factors.
Bristol Braille started with a standalone, “functional” book-reading prototype, says Ed, and the 14 major revisions over an eight-year development cycle each involved Raspberry Pi and Python. The folks at Raspberry Pi loved the concept, and Ed says individuals “bent over backwards” in a bid to ensure Canute made it to market. This is refreshing for a small company working in a supply chain that likes scale. While some components for the Canute are made in places such as China and India, the circuit boards are made by Philtronics in Wales, and the final build is done in-house in Bristol and Exeter. “By taking advantage of the proximity, we are able to be much more hands-on,” says Ed.
Ed describes Raspberry Pi Zero as Canute’s ‘brains’. It runs Raspberry Pi OS, along with the Braille custom user interface. The interface was Bristol Braille’s biggest design hurdle, especially since the final product needed to be relatively affordable. Although it has a £2000 price tag, many are destined for libraries and educational institutes and, thus, will have multiple users.
Raspberry Pi Zero is connected to media ports on the main circuit board, and is able to read the BRF (Braille Ready Files), interpret them as Braille, and send them to an Atmel chip on the main board to convert into dot patterns. Each Braille cell is made up of six dots which can either be up or down. There is virtually no margin for error, and a stuck dot can change the entire meaning of a word.
Incredible touch
Bristol Braille’s Canute 360 has been enthusiastically embraced by the Braillist community, with several hundred already sold. This summer, the team embarked on a roadshow demonstrating the 360 and its successor, the Canute Console. This is based around Raspberry Pi 400, meaning greater processing power as well as an integrated keyboard. A hardware add-on that includes a Canute 360, it adds a BRLTTY screen-reader. Ed says the Console enables them to do “far more exciting things with tactile graphics, using Raspberry Pi 400 to interpret sports matches as tactile animated pitches [and] to draw maps of cities in a top-down GTA 2 fashion.”
This recently launched model has a technical graphics focus, and is aimed at computer science students and those familiar with using Linux or willing to learn it. Every pre-existing multi-line Linux terminal application shows up in digital Braille for the first time. The new device has generated much excitement, with the first pre-orders currently being delivered. Watch the demo video showing a football match replay.
Makers always find a good reason to make: to learn or to enjoy, to share or to find a solution, they can play around all day, and work around anything. Proud of our community’s resourcefulness, this month we celebrate three projects uploaded to Project Hub in July that embed IoT, robotics, and home automation into approachable and fun tutorials. It just takes equal parts passion, creativity, and willingness to try something new…
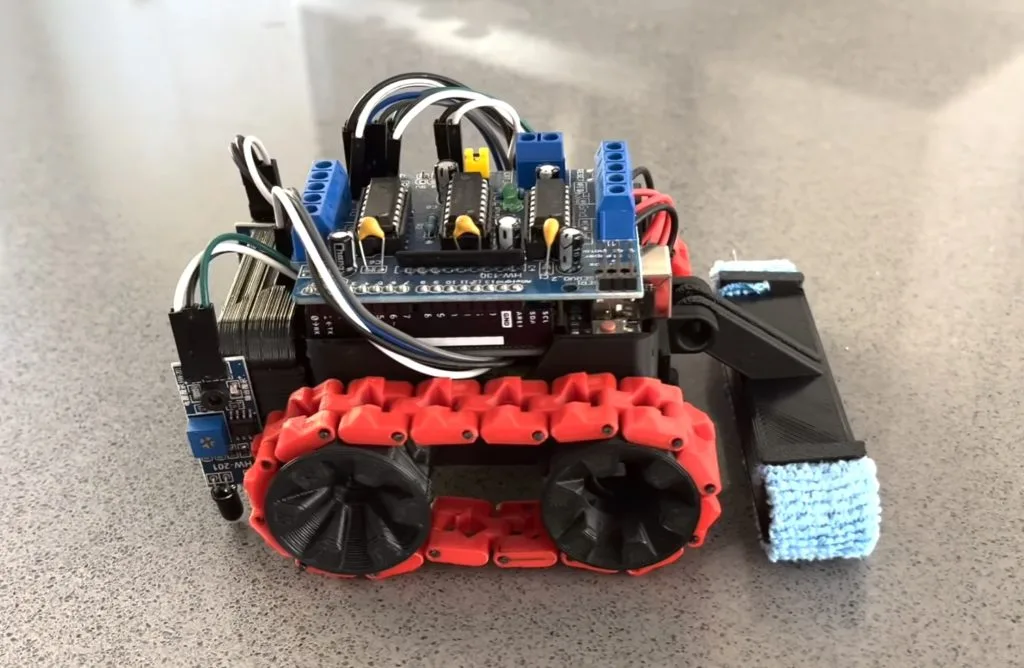
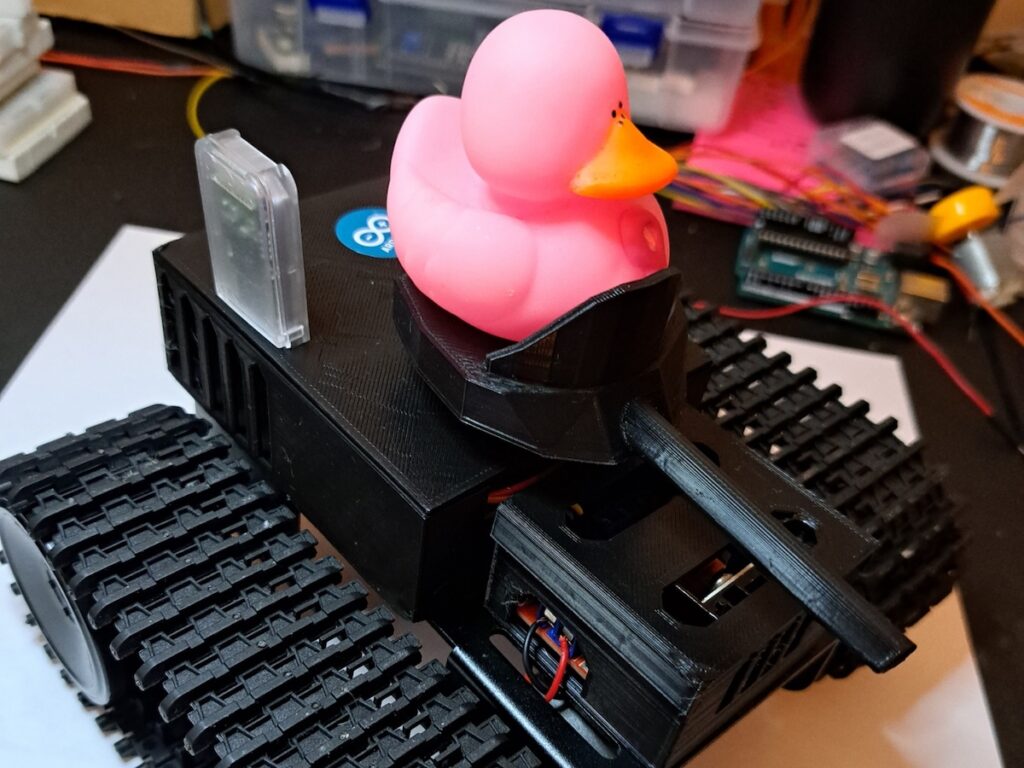
Adding custom enclosures can make your project look neater, protect its inner workings, and allow you to hone your designs for functionality and fun! It’s the finishing touch that makes any project really stand out – including this one, for an Arduino Nano Every tank that can be controlled remotely via Bluetooth®. You can find all the instructions you need in its Project Hub write-up: add a handful of components, and go call that friend who has a 3D printer!
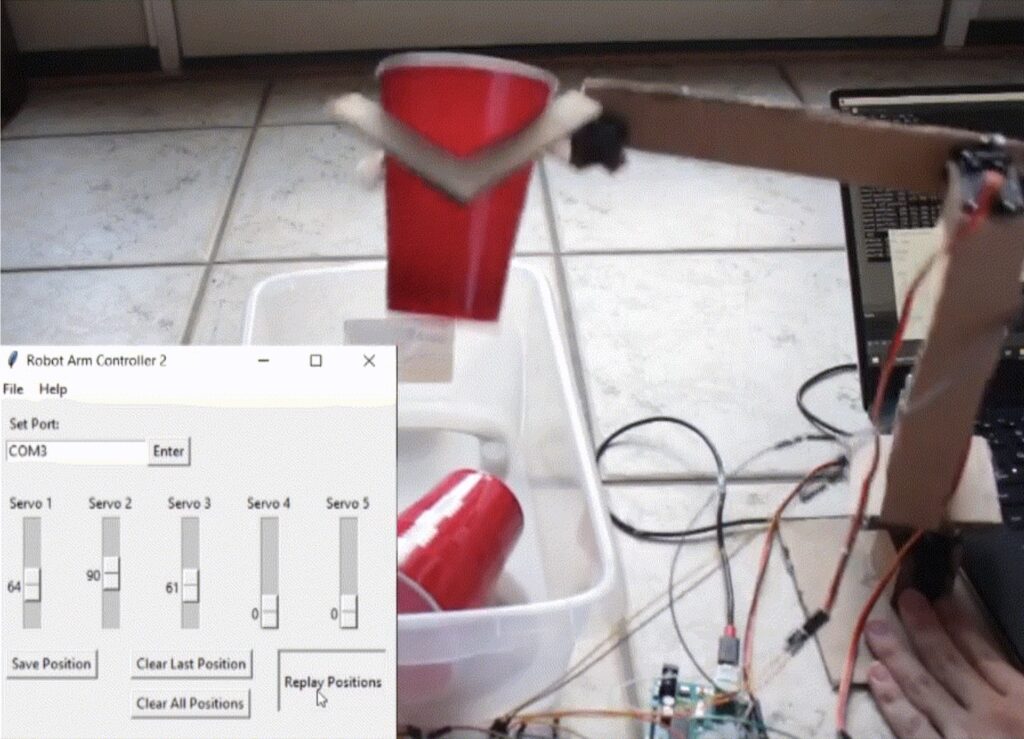
This Arduino UNO Rev3 project gives anyone approaching robotics a leg up – in building their first robotic arm! Using ready available and inexpensive materials like cardboard, you can follow the tutorial and replicate the simple Arduino and Python code to program the arm: it will record and replay positions, which you can easily control from a graphical interface.
Why just casually feed the little creatures, when you can construct a system that also automatically reports back on their activity? Peter Stuhr’s first tutorial on Project Hub combines a solar-powered MKR WiFi 1010 with Google Sheets, using the simple IFTTT web hook: every time the feeder is opened, the board wakes up for 10 minutes and fills out a few rows in the spreadsheet. His solution could be adapted to monitor many other events in the garden, but we love that he has invested his skills and resourcefulness to ensure hungry squirrels always have enough food.
For your chance to be selected for a $100, $300 or even $500 gift card to spend on the Arduino Store, submit your best project on the Project Hub! We will be awarding three new entries every month, as detailed in thecomplete terms and conditions. Good luck!
Modern engineering is increasingly cross-disciplinary, so today’s students often take courses that would have seemed to be “outside their field” a couple of decades ago. Pelochus and their classmates at the University of Granada are studying computer engineering, but had a class that challenged them to build battlebots in order to get some hands-on learning with microcontrollers and embedded systems. To dominate the competition, they used an Arduino to create the Rockobot.
This is a play on a meme that was popular in the 3D printing community recently. For laughs, people would slap a bust of Dwayne “The Rock” Johnson — wrestler and actor extraordinaire — onto just about anything that could be 3D-printed. Pelochus and their team figured that such adornment would increase their chances of success in a battle, and we can smell what they’re cooking.
Below the studly noggin, the Rockobot is a pretty standard tank-style battlebot. It has bent sheet metal plows in the front and back, which are the primary offense and defense. An Arduino Nano board controls the motors that drive the tank treads through a custom PCB populated with L289N H-bridge drivers. Power comes from a 1550mAh 14.8V battery through a step-down converter. Ultrasonic sensors on the front and back, along with infrared sensors on the sides, help the Rockobot navigate autonomously while avoiding collisions.
The spirit of Mr. Johnson must have been inhabiting the Rockobot, because it blew through the competition and took the top position in the class tournament.
Remote control cars have been popular toys for children and adults alike for decades now. And while there is plenty of fun to be had cruising around, a little bit of healthy competition can add another layer of enjoyment. To race or practice racing, you’ll want some way to time your laps. If you don’t have anyone to operate a stopwatch for you, then you should check out Tom Goff’s tutorial on how to create a non-contact lap timer.
Goff built this specifically for his son to time laps when racing his RC car. It is a simple, affordable, and portable device that is easy to take to any paved area and set up. It acts as both the start and finish line, so it triggers the timer the first time the RC car passes through and stops the timer the second time.
It recognizes the passing RC car using a DIY break beam sensor. Instead of using an off-the-shelf infrared module, Goff made his own sensor. One side has a very bright LED with the beam kept tight by PVC pipe and a convex lens. The other side has an Arduino Nano board that detects that beam using a light-dependent resistor (LDR). The Arduino utilizes the millis() function to count the elapsed time between beam breaks, then displays the results on an LCD screen. An 18650 lithium battery cell and charge controller in each unit provide power.
Now, we are happy to announce you can step up your game even further, with the introduction of theArduino GIGA Display Shield — an innovative touchscreen solution enabling all makers to effortlessly deploy fast and highly responsive graphic interfaces to their GIGA R1 WiFi projects.
Featuring a 3.97” 480×800 RGB touchscreen, an MP34DT06JTR digital microphone, a Bosch BMI270 six-axis IMU, an Arducam® 20-pin camera connector, and an RGB LED, the GIGA Display Shield is perfect for easily creating handheld devices or dashboards you can control with a touch.
It basically adds intuitive interfaces, high-level user experiences, and cutting-edge technology to your strengths in this game we call making.
With the GIGA Display Shield, you can quickly add a cool UI to your hardware projects without extra wiring, have graphics adjust automatically according to device orientation or audio commands, or leverage computer vision as your solution’s input. If that’s not enough, GIGA R1 WiFi’s new set of top-facing connectors leave the top header available for expansion, attaching other shields to boost your possibilities even more.
Ready, player one? Find out more about how the GIGA Display Shield can give you a boost. We think you’ll have a lot of fun with this…
Save 35% off the cover price with a subscription to The MagPi magazine. UK subscribers get three issues for just £10 and a FREE Raspberry Pi Pico W, then pay £30 every six issues. You’ll save money and get a regular supply of in-depth reviews, features, guides and other Raspberry Pi enthusiast goodness delivered directly to your door every month.
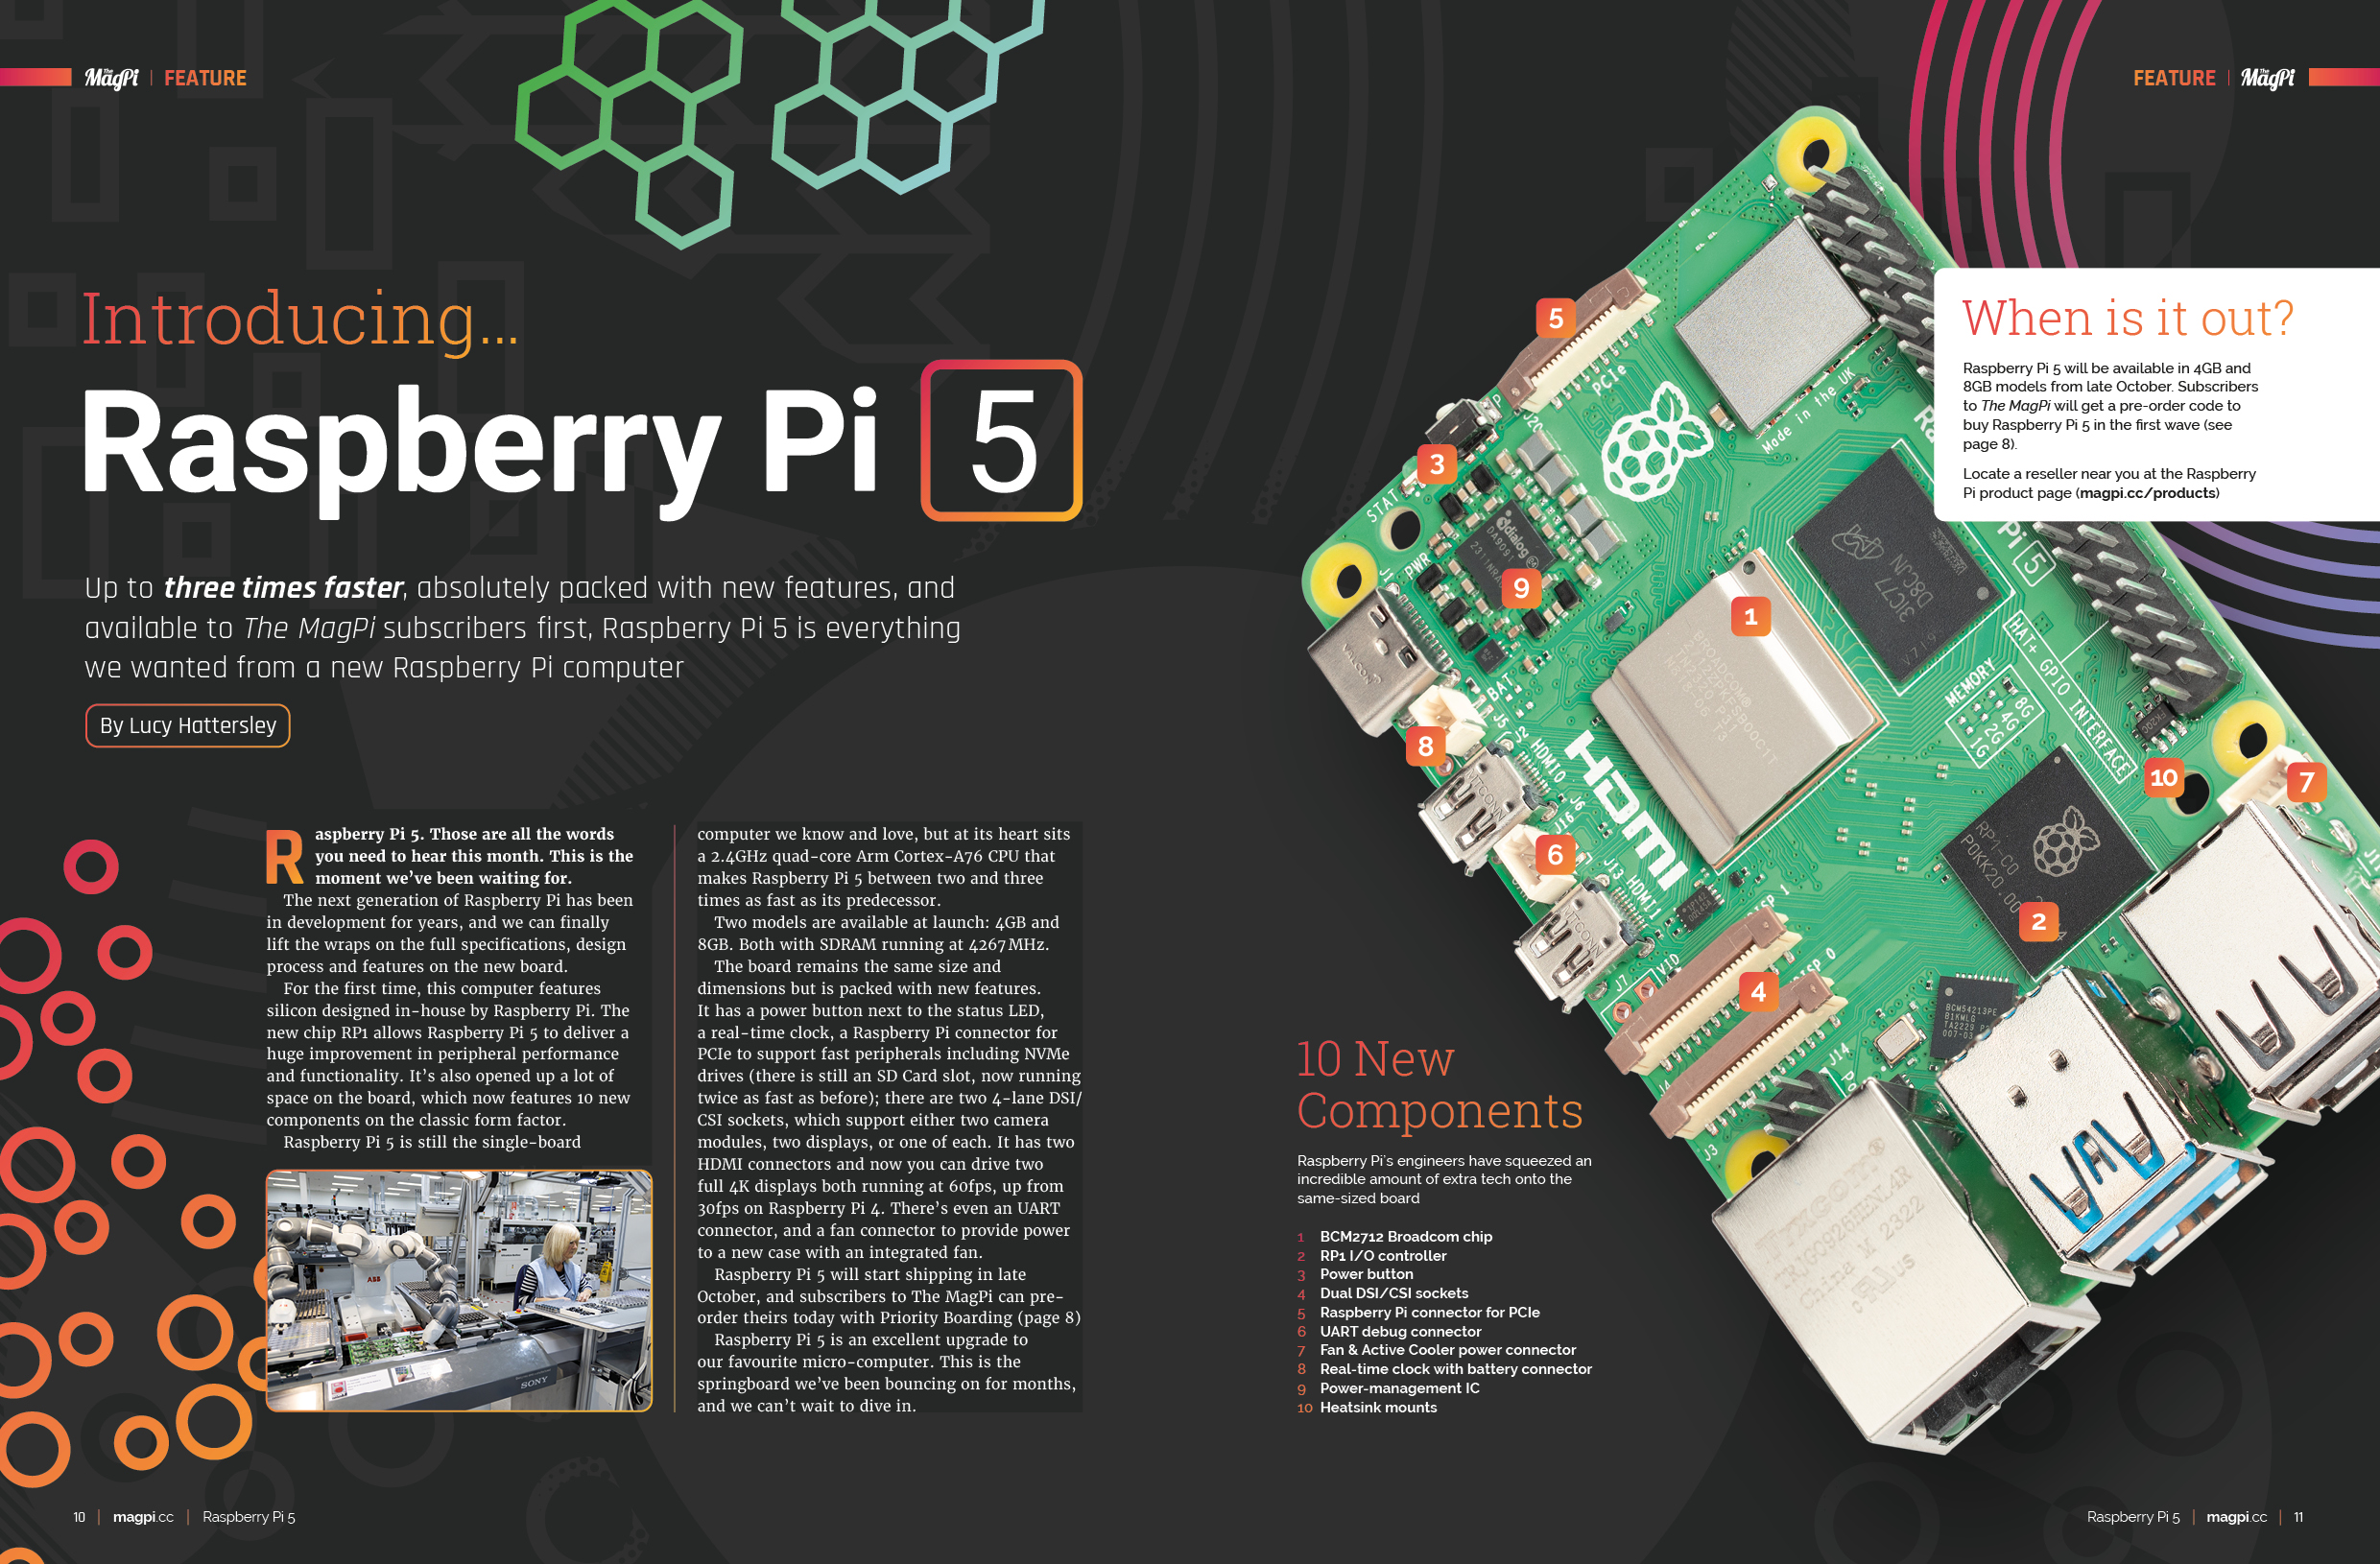
Raspberry Pi has reserved a massive stock of Raspberry Pi 5 units specifically for subscribers of The MagPi and HackSpace magazines. Every subscriber to these publications will get a code via email to pre-order Raspberry Pi 5.
Subscribe today to The MagPi or HackSpace magazine and your Priority Boarding code will be emailed to you when your subscription starts. Current subscribers will start getting their codes soon.
How Priority Boarding works
If you’re a print subscriber of The MagPi or HackSpace magazine, your email is already on our records. Expect a unique Priority Boarding code in your inbox soon. This link will guide you to the pre-order page for the Raspberry Pi 5. US and Canadian subscribers will be directed to PiShop, while those in the UK, Europe, and elsewhere will be directed to The Pi Hut. Enter your Priority Boarding code and pay for Raspberry Pi 5. A board will be sent to you as soon as delivery starts (in late October).
Don’t miss out! Subscribe now to pre-order your Raspberry Pi 5, and you get a free Raspberry Pi Pico along with invaluable Raspberry Pi tutorials, projects, and monthly community events every month. Don’t miss your chance to be at the forefront of the Raspberry Pi movement!
Terms & Conditions. Your Priority Boarding code will be emailed to everybody with a print subscription to The MagPi or HackSpace magazine. People who subscribe to both magazines will get two codes. Print only! Priority Boarding does not apply to people with App Store, Google Play, Zinio, PDF contributions, or other paid-for subscriptions. Each code will entitle you to purchase 1x (one) Raspberry Pi 5 model (either 4 GB or 8 GB) for the standard retail price and delivery. Multiple codes need to be used individually. This is a limited offer and is subject to change or withdrawal at any time.
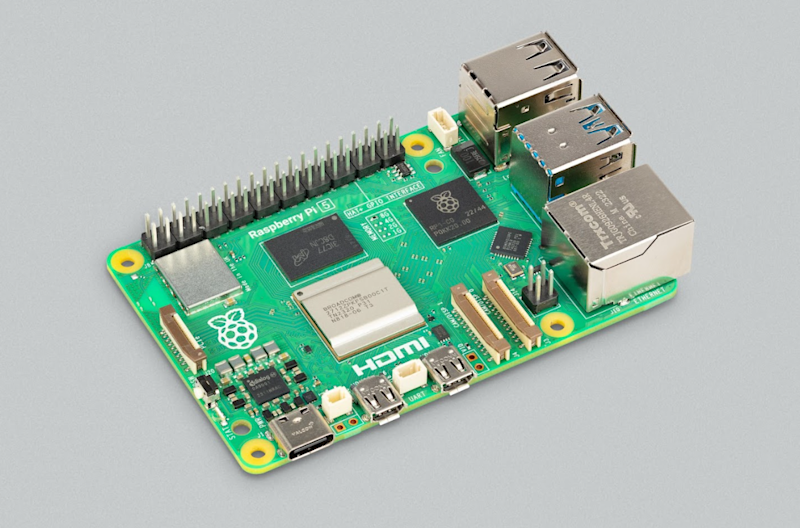
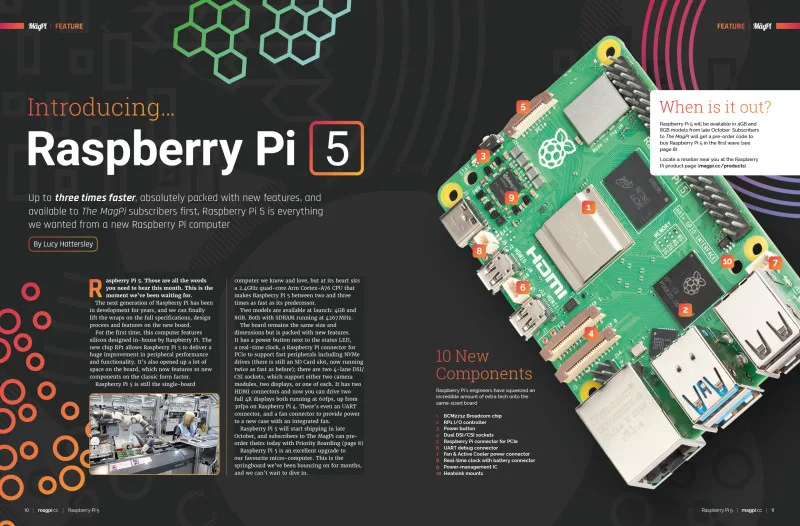
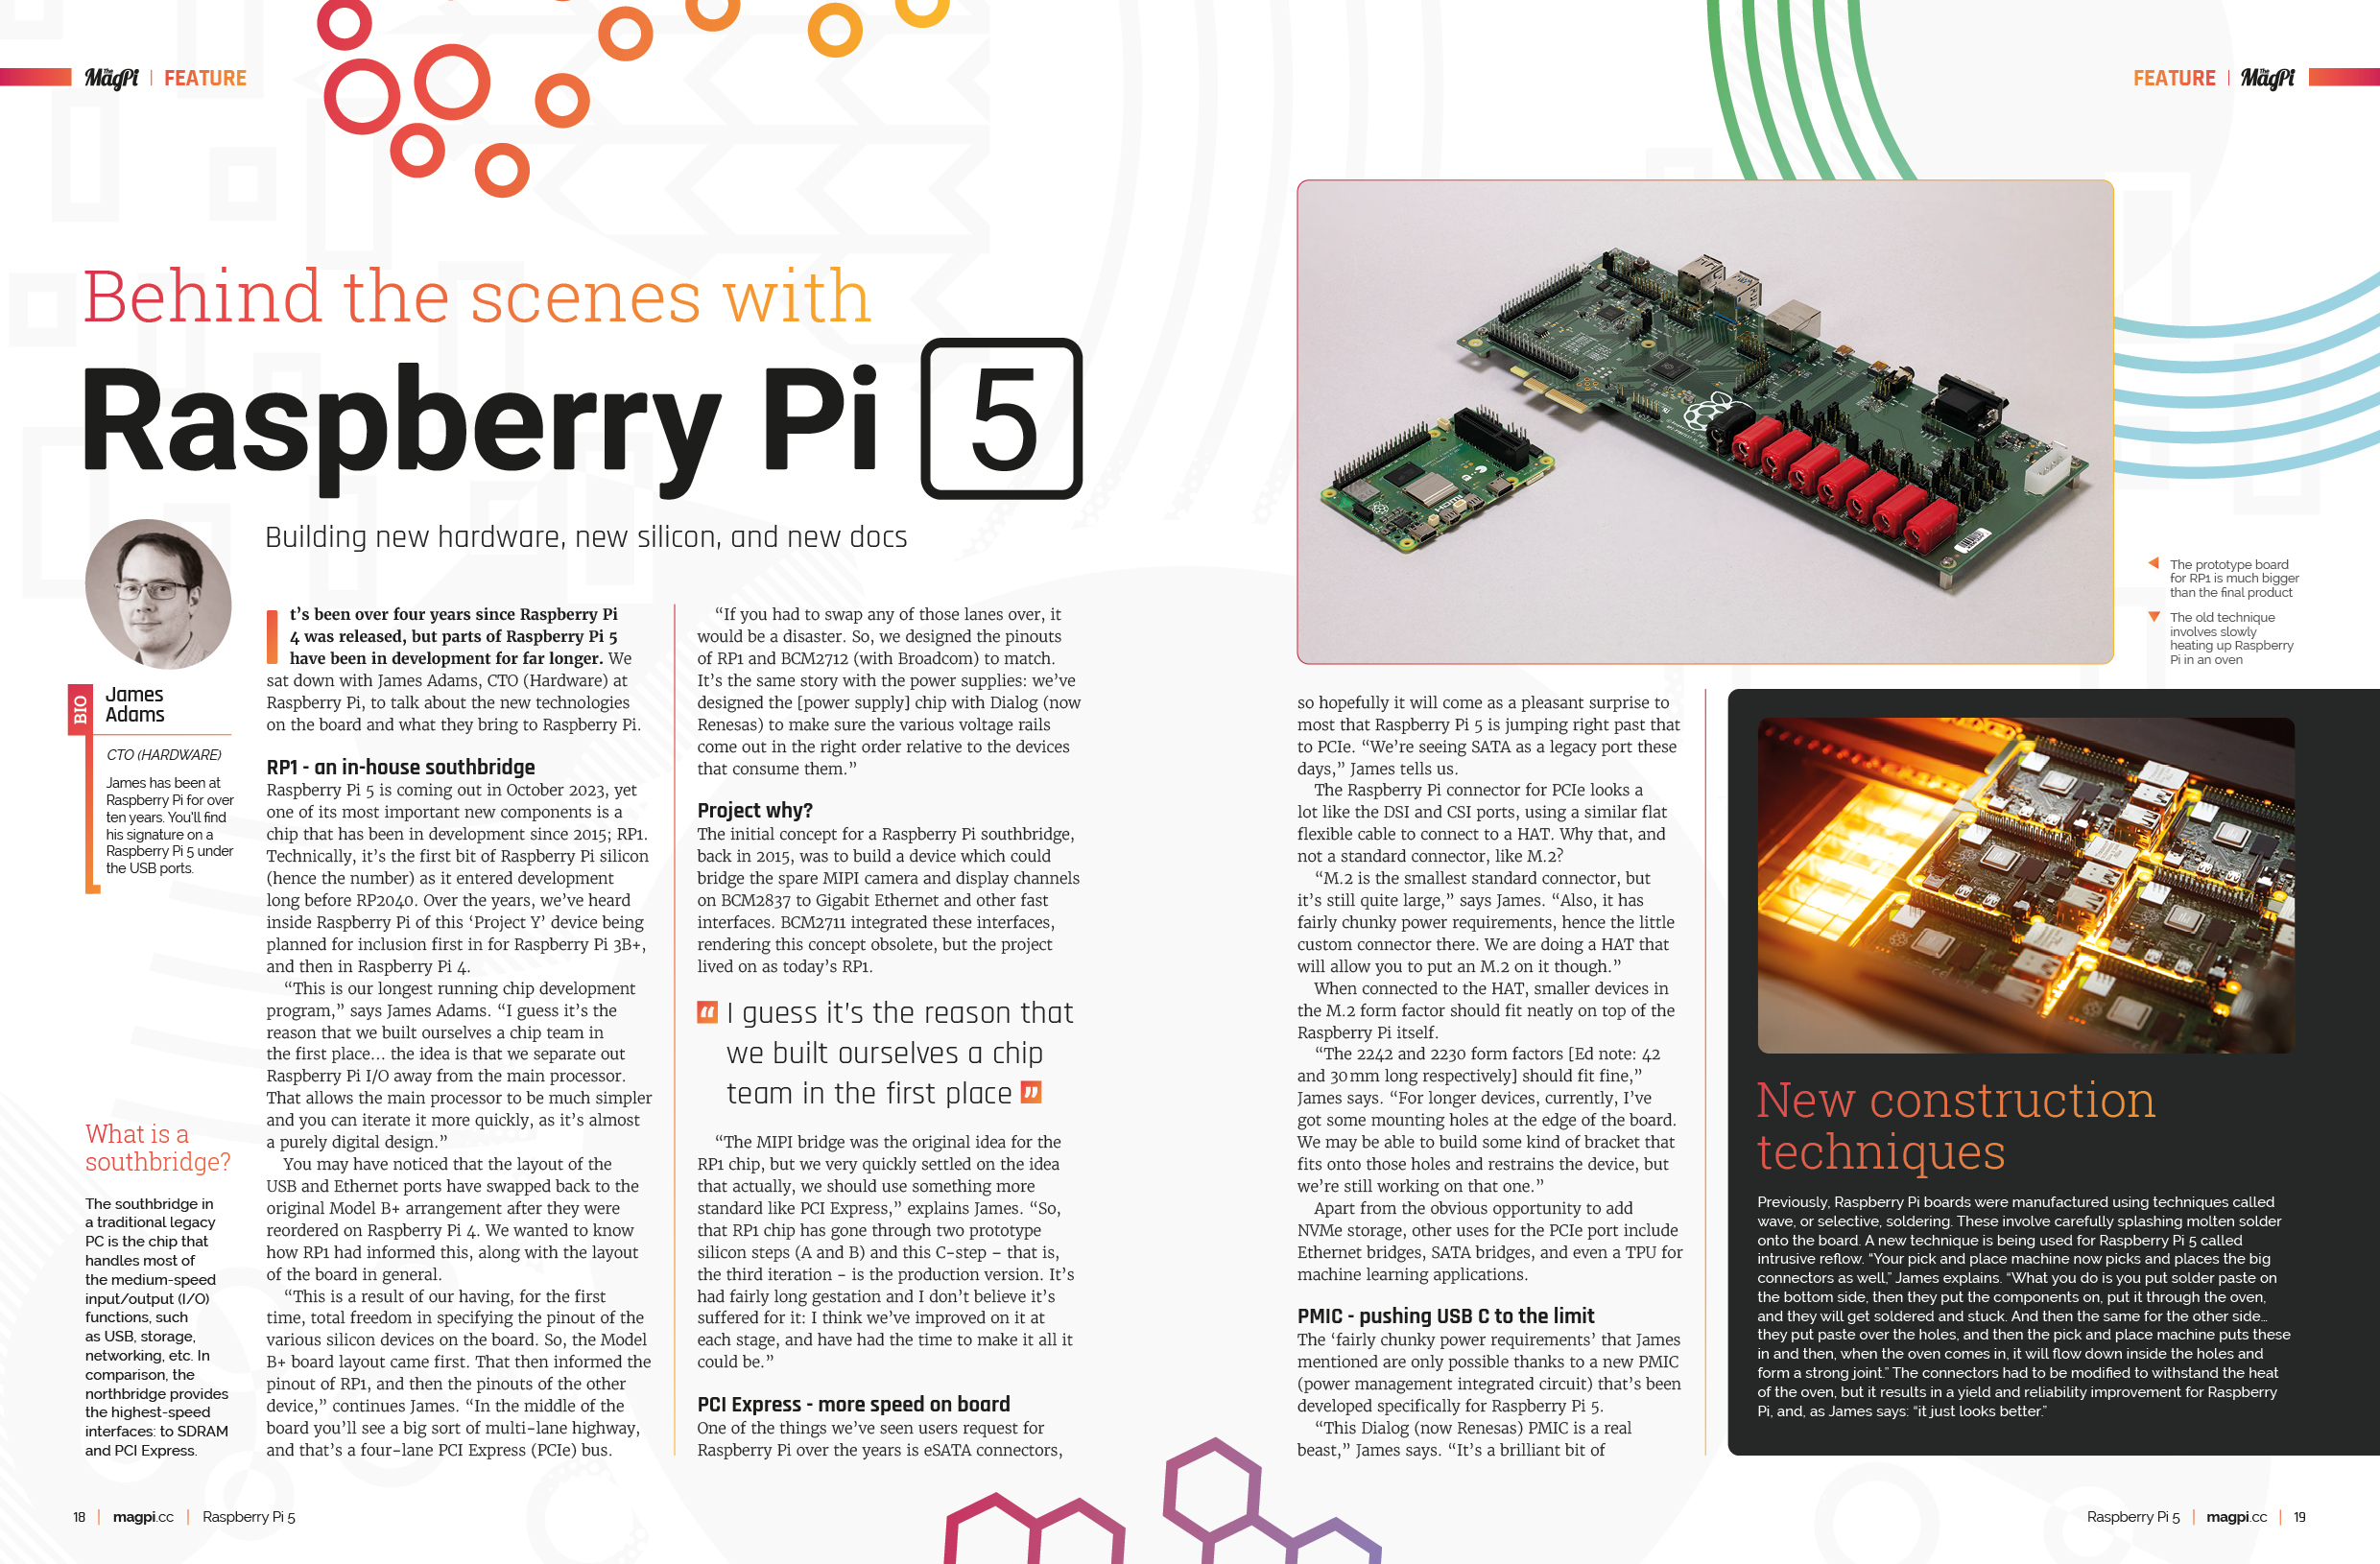
The incredible new computer from Raspberry Pi is a giant leap forward in features and performance. Now running a 2.4GHz ARM CPU inside a brand new BCM2712 Broadcom chip, Raspberry Pi is up to three times faster than Raspberry Pi 4. And a new Raspberry Pi RP1 chip takes over most of the I/O, freeing up space for a raft of new features: a power button, Dual DSI/CSI sockets, a Raspberry Pi connector for PCIe (along with an upcoming HAT to offer super-fast M.2 drive storage), a real-time clock with a battery connector and a custom power management chip. All this alongside amazing new accessories including a redesigned Raspberry Pi Case with fan, an Active Cooler attachment, and PoE and M.2 accessories coming soon.
There’s a lot to learn about this exciting new computer, and you’ll find out all about it in this month’s edition of The MagPi.
Raspberry Pi 5 Priority Boarding
We’ve reserved Raspberry Pi 5 boards for subscribers to The MagPi magazine and HackSpace to pre-order. If you’ve got a print subscription to one of our magazines, you’ll be able to buy your Raspberry Pi 5 first. See Priority Boarding for more information.
Engineering and documentation interviews
Rob sat down with James Adams, CTO (Hardware) and Alasdair Allan (Head of Documentation) for an exclusive interview on the new hardware. They cover in-depth the new RP1 chip, and why it’s such an important feature in Raspberry Pi 5 and with the new Raspberry Pi connector for PCIe and M.2 implementations. The new power chip is explained in depth. Our feature digs deep into the Raspberry Pi 5 hardware and explains why it’s designed just the way it is.
Bristol Braille Canute 360
We’re incredibly proud of the variety of projects the Raspberry Pi community comes up with. Bristol Braille, developed the Canute 360, is the world’s first multi-line Braille reader and is powered by Raspberry Pi Zero. This innovative device generates entire paragraphs of copy, and converts a Terminal window into Braille for non- and partially-sighted people. It provides a significant advance over traditional Braille devices.
Zelda Guardian Security Camera
Naomi has recreated a model of a Guardian from The Legend of Zelda to monitor her dog. This working model has a rotating head and uses a Raspberry Pi Camera instead of firing a laser. The result is a fantastic camera project that’s lovingly recreated and painted to look just like the real thing.
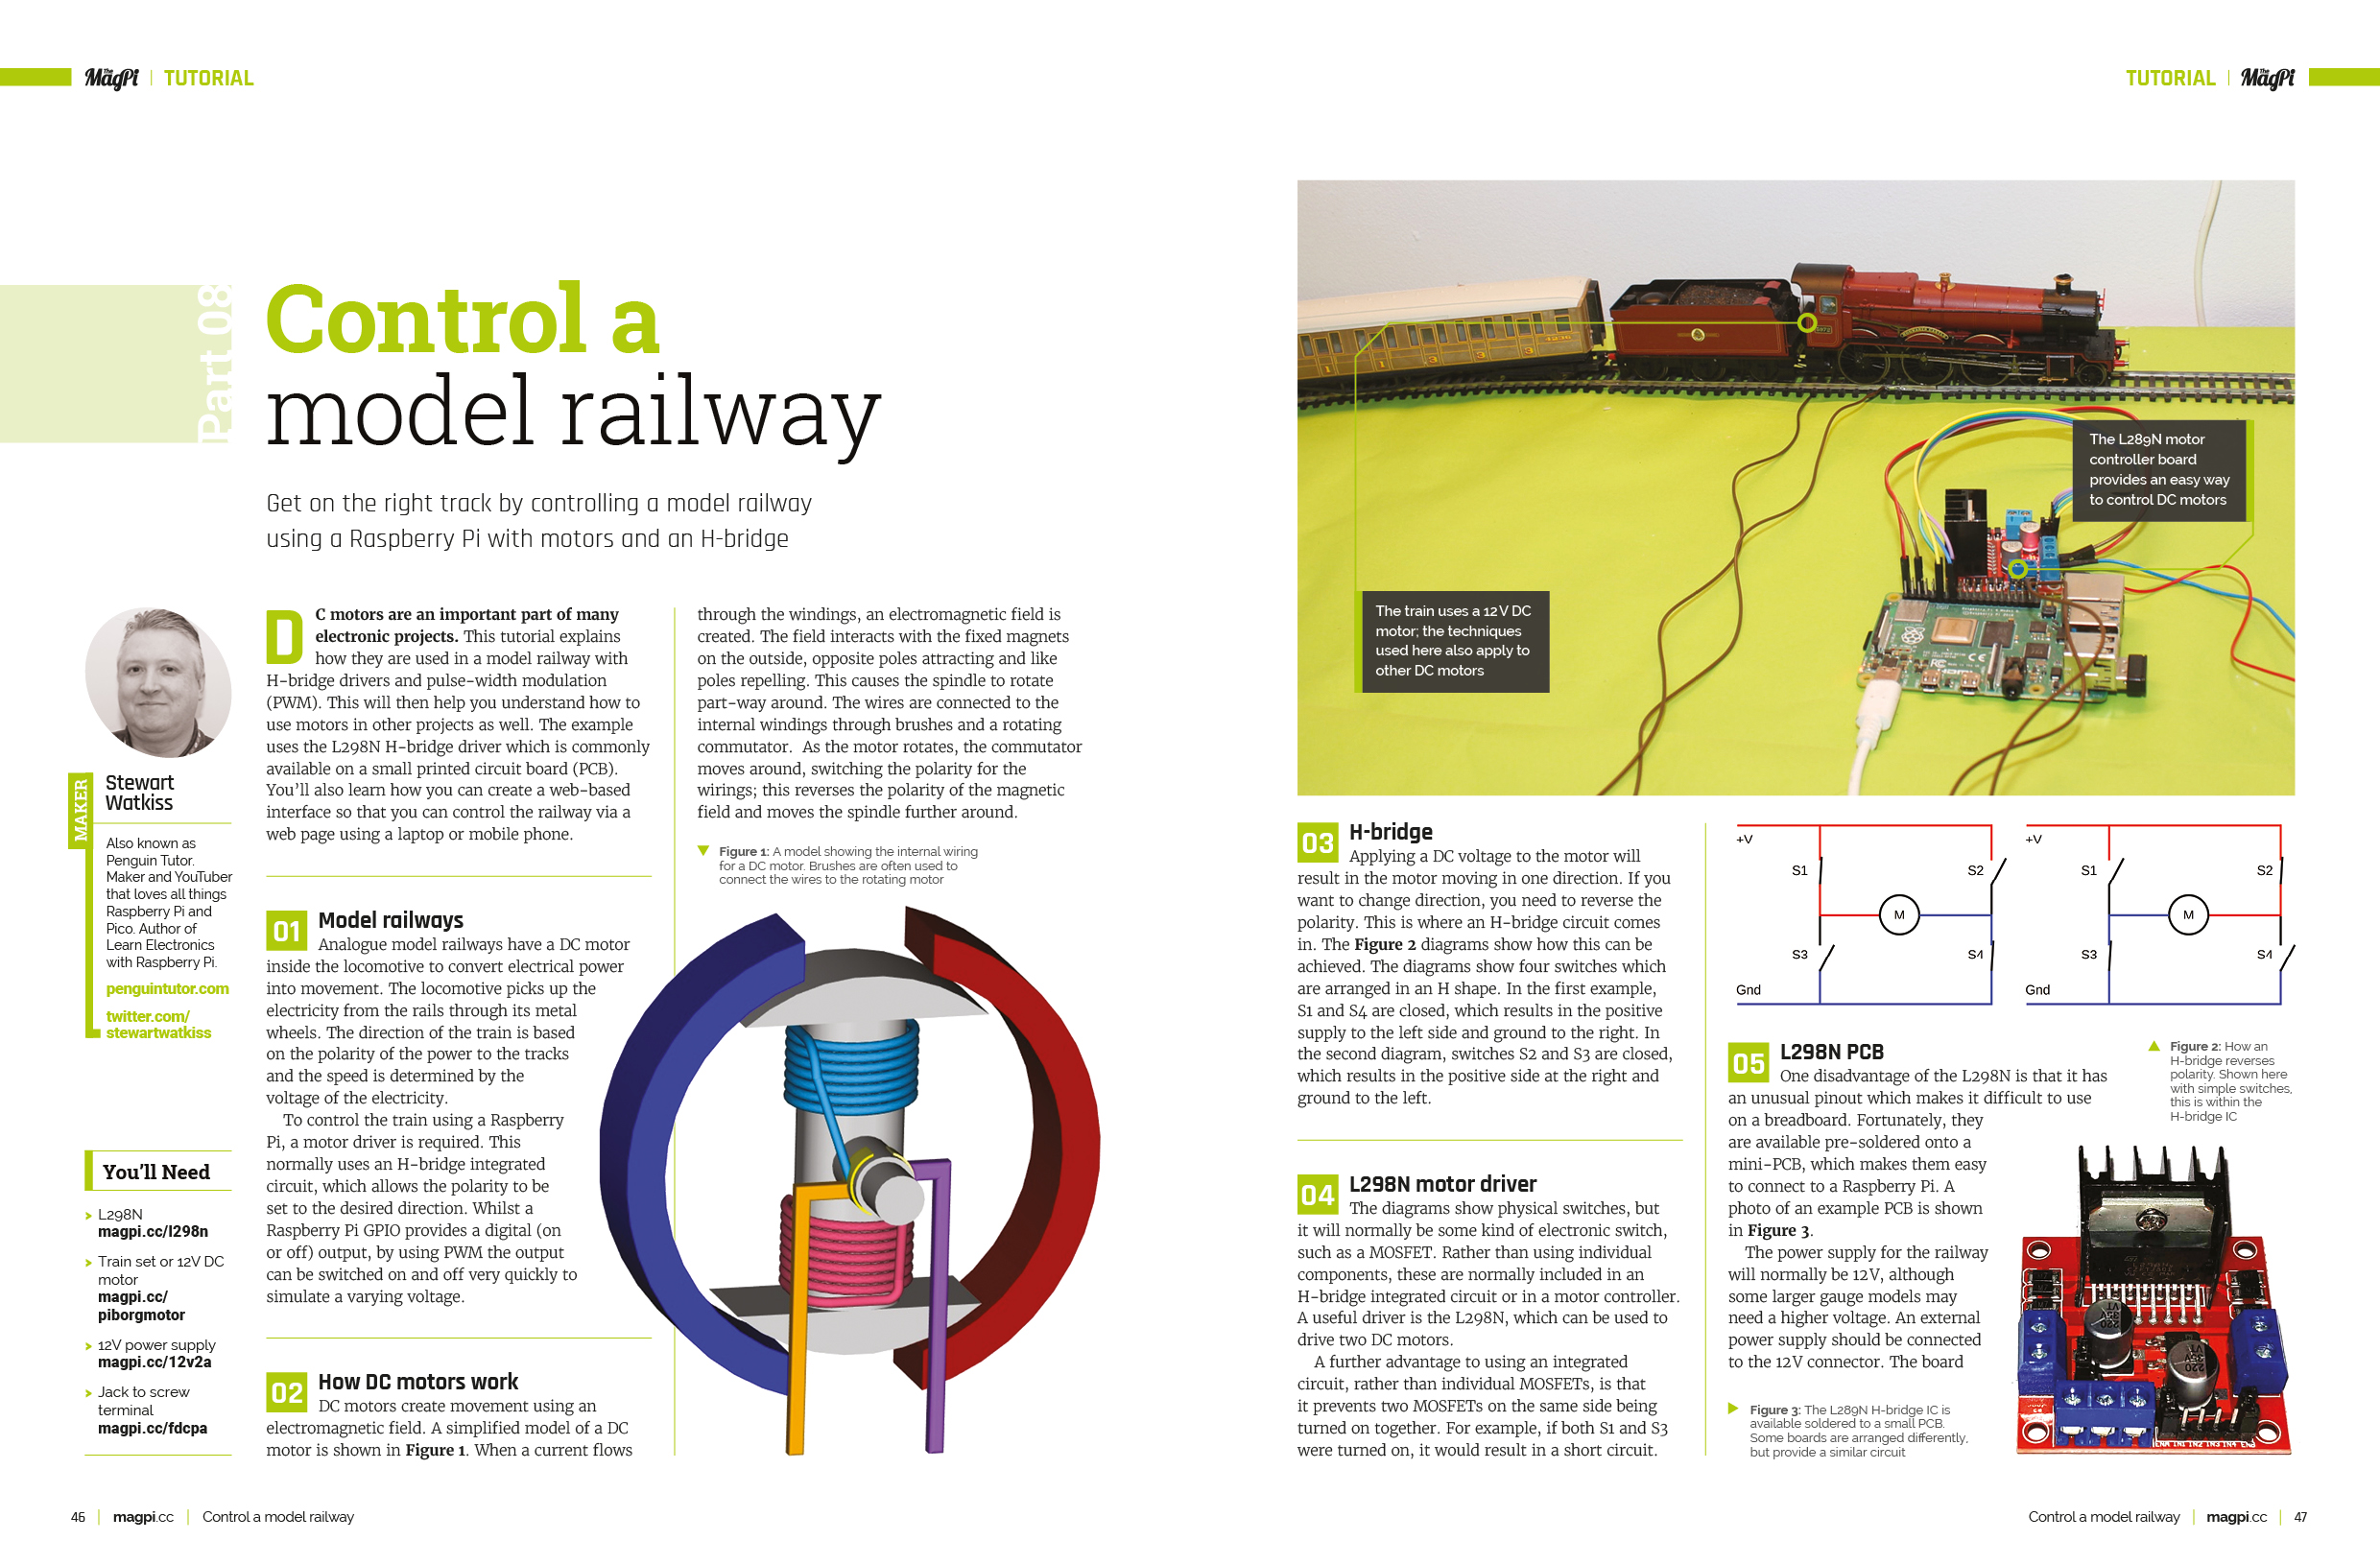
Control a model railway
Stewart Watkiss has spent the last few issues of The MagPi explaining electronics and circuit control. Now it’s time to put it to use by controlling a model railway. This tutorial features servo motors and Raspberry Pi along with an L289N H-bridge driver on a motor control board. This enables Raspberry Pi to power and control the train directly on the track.
Trick or Treat
It’s nearly time for Halloween and Rob has created this fangtastic feature packed with ghoulish projects. It’s got everything from haunted mirrors to talking doorbells and an automated candy dispenser.
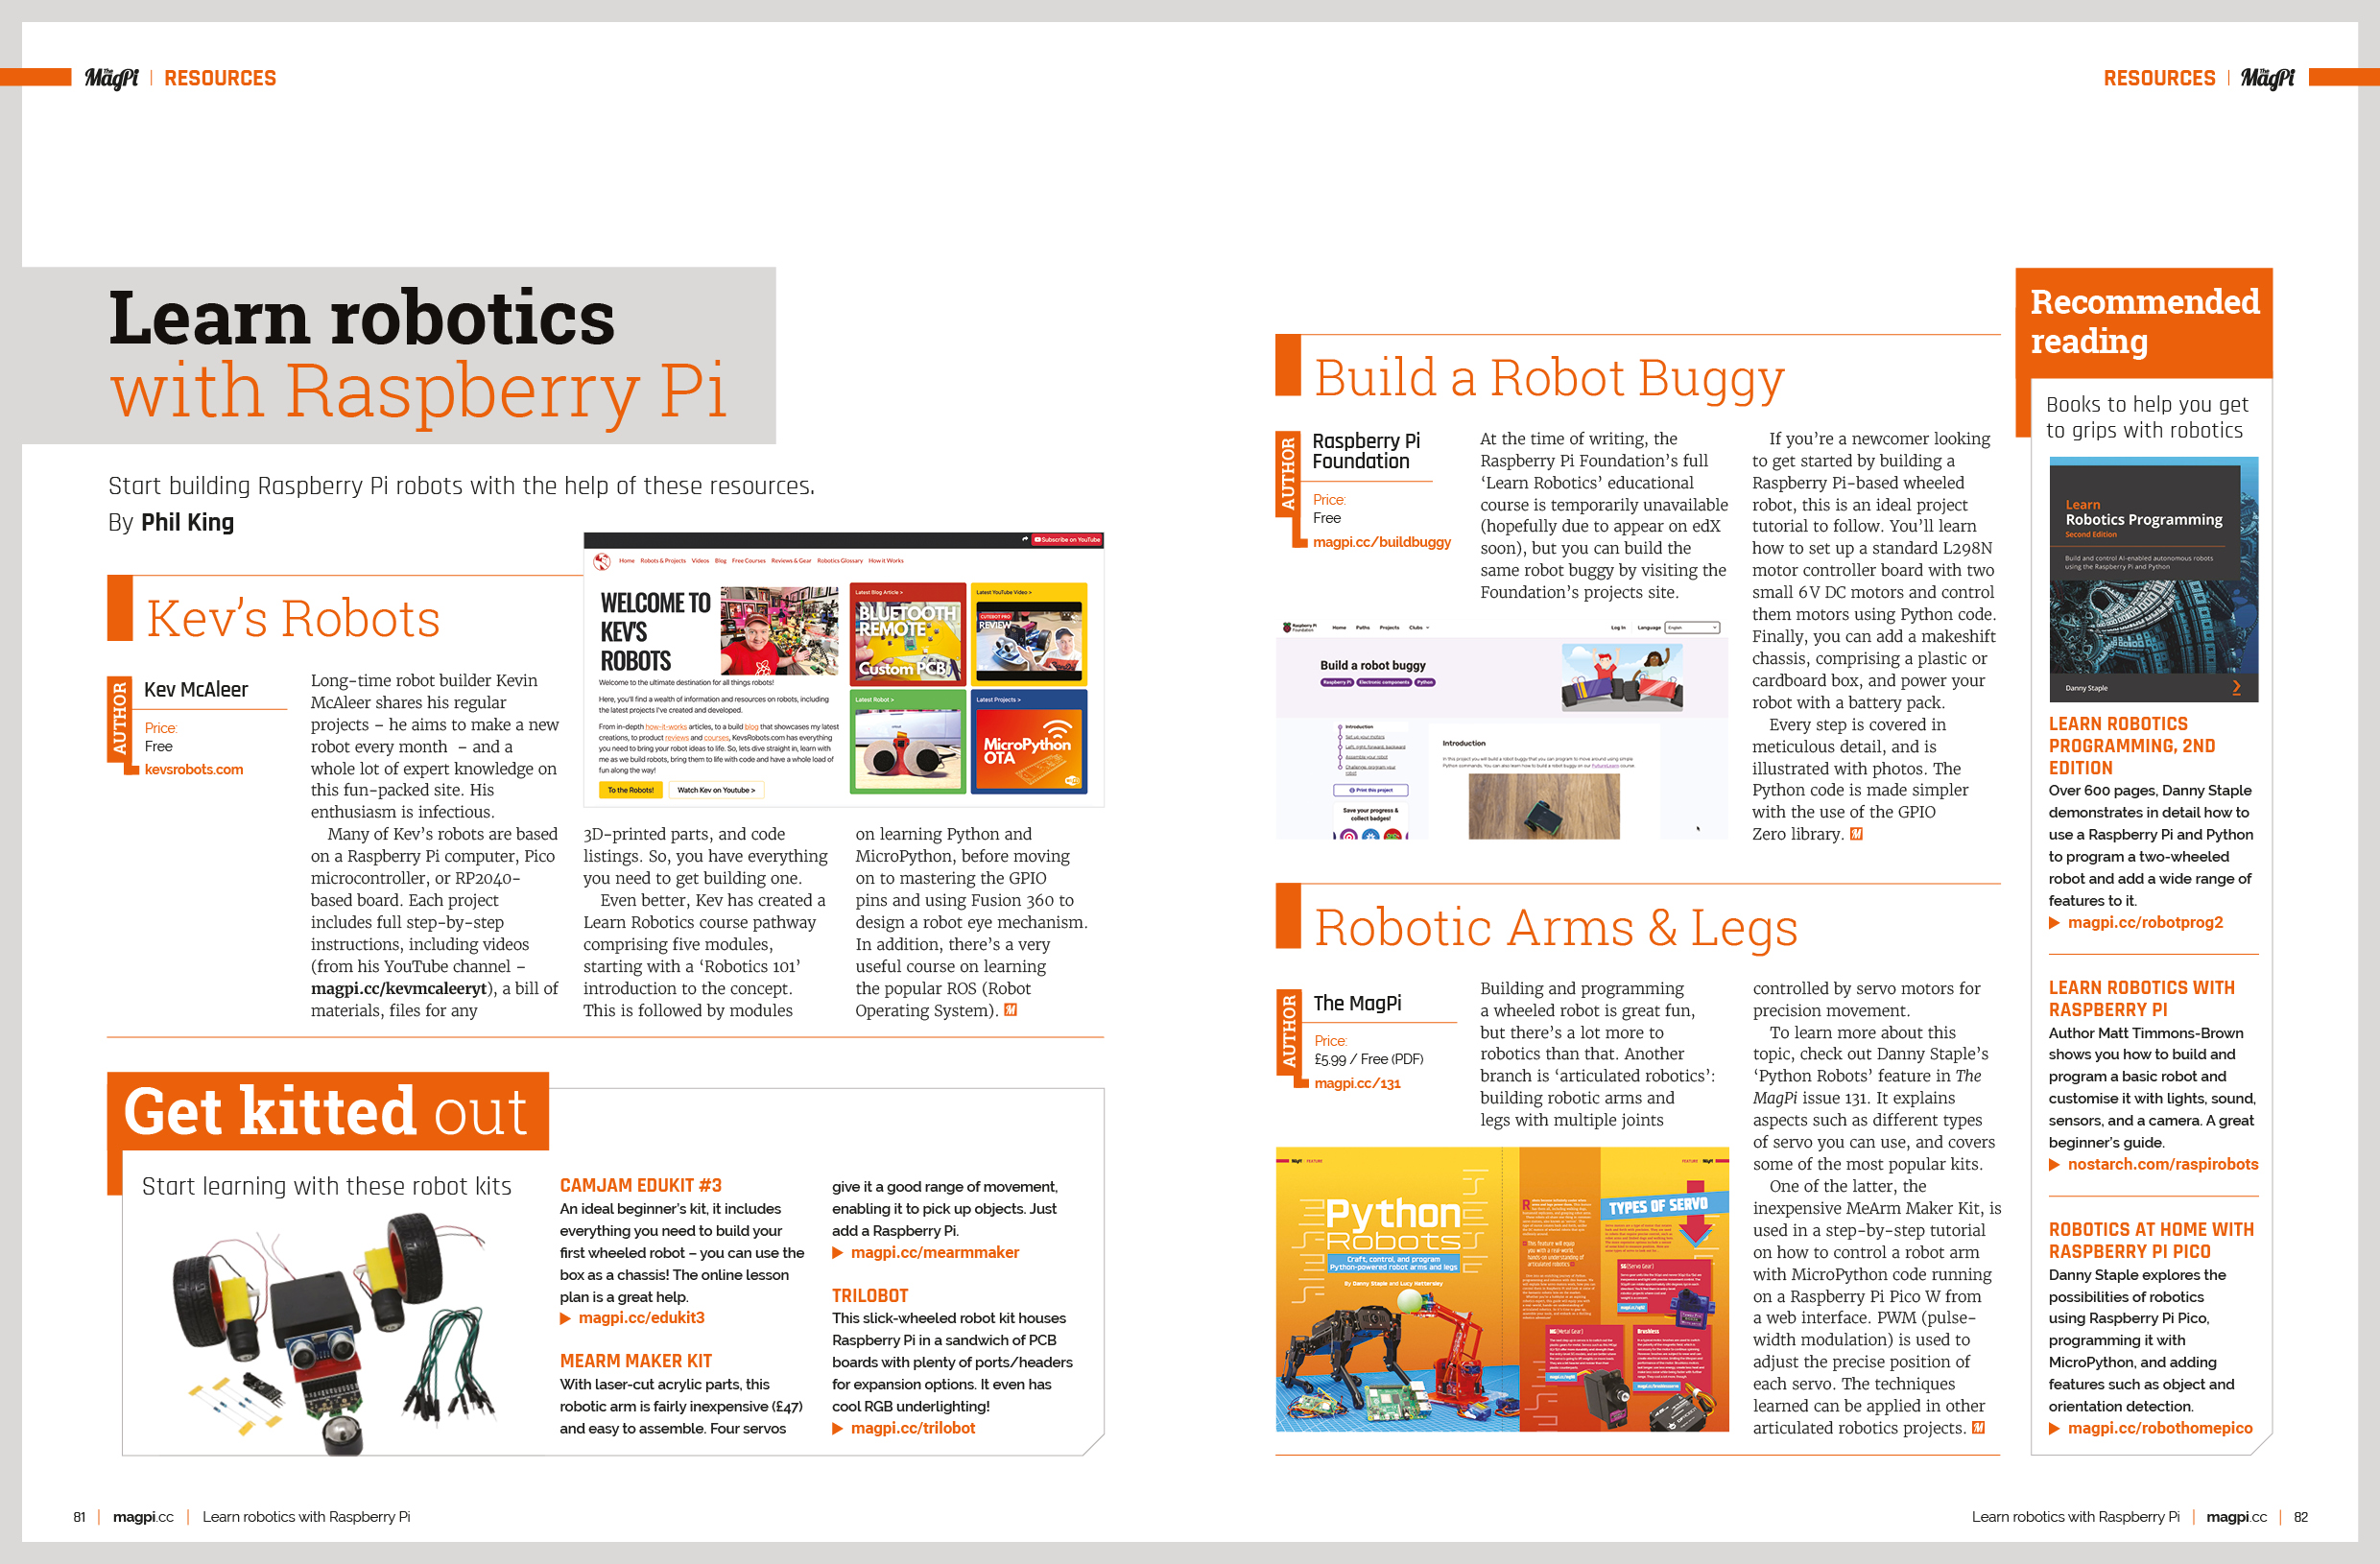
Learn robotics with Raspberry Pi
If you’ve ever fancied making a robot, either the wheeled variety or one with arms and legs, then our Learn Robotics spread has all the resources you need. Discover some of the best makers around, along with easy-to-use kits and tutorials, books and websites
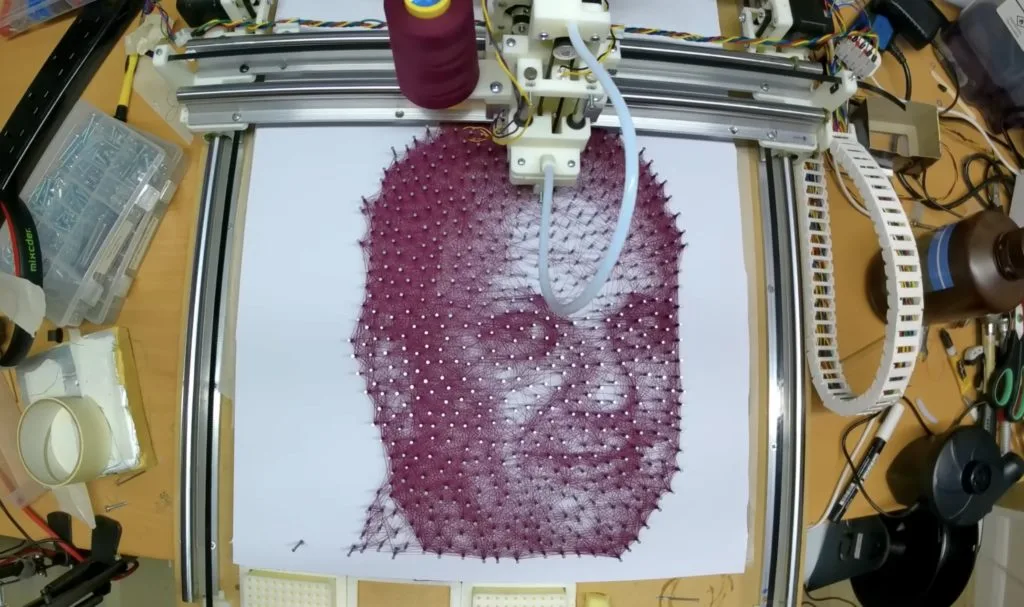
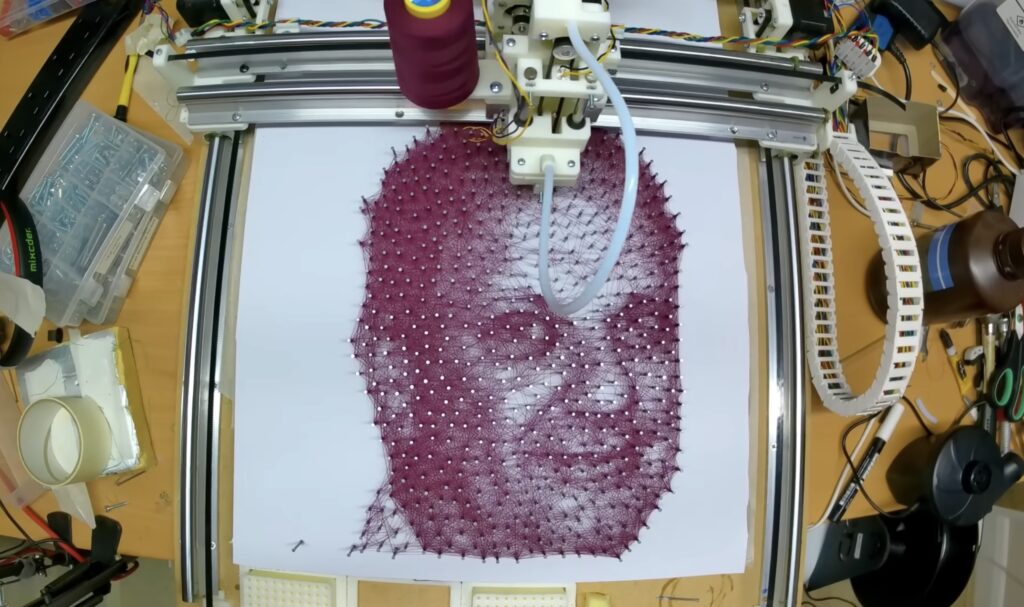
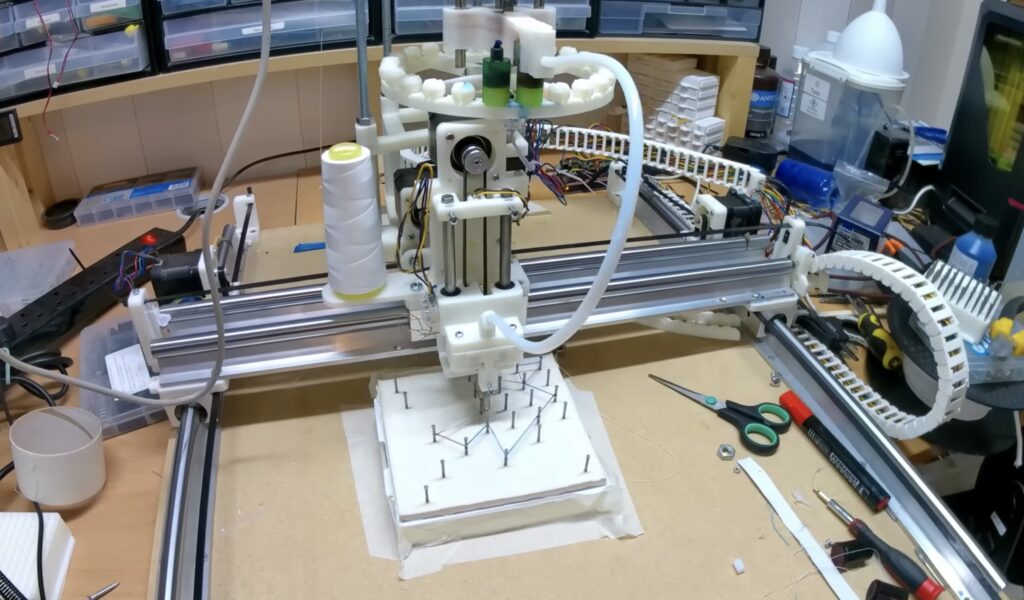
String art is impressive precisely because it is so difficult to make. Even a simple piece of string art will contain hundreds of feet of thread carefully looped around posts to create areas of varying density that act as shading. Everything from calculating the string’s path to physically laying down the string is a challenge. But after an immense amount of work, Paul MH was able to develop a machine that can produce string art at the touch of a button.
Paul spent years working on this project and it shows. Every step of the process required trial-and-error with different prototypes. To create an art piece, the machine first has to insert dozens or hundreds of nails into the foam bed. That necessitated the invention of a mechanism to feed nails and a neural network to verify that each nail feeds properly. The machine then has to convert an image into a string path, with that path avoiding collisions with nails, looping around nails enough to maintain tension, generating the proper string density, and preventing any tangles.
At its heart, this is a CNC machine that accepts custom g-code generated by Paul’s software. That G-code runs on an Arduino Mega 2560 board, which controls the machine’s motors through a RAMPS 1.4 shield. The concept is similar to a conventional DIY CNC router and the kinematic system is familiar, but this machine needed a multitude of custom parts. Most of those were 3D-printed over many iterations until Paul had a working machine.
As you can see in Paul’s recent video update, the machine can produce very nice string art. It can take any image as input, but high-contrast pictures without a lot of fine detail work the best.
Good old-fashioned tabletop games are a lot of fun to play, but they’re a pain in the butt to set up. We all know the pain of divvying out Monopoly money and organizing tiny plastic houses. Connect Four players might spend as much time organizing pieces between games as they do actually playing. To facilitate Connect Four speed runs, Jared Dilley built this board that automatically sorts the pieces after a game.
A normal Connect Four board just dumps all the pieces out of the bottom after a game, forcing players to classify them by color. Dilley’s updated board does all of that automatically. At the push of a button, it will begin ejecting pieces from the bottom. Little motorized flaps cause the falling pieces to drop one way or the other. The machine repeats that process for all the rows and each player ends up with a pile of the appropriate pieces on their side of the board, ready for a new game.
An Arduino Mega 2560 detects whether a piece is red or black using an infrared sensor. Dilley adjusted the sensor so that it registers an infrared reflection for red pieces, but not black pieces. Each column has its own sensor, so the Arduino can recognize the colors of the entire bottom row. It then sets the positions of the flaps accordingly using servo motors controlled through a servo shield. Finally, another servo quickly releases the bottom row and then moves back to block the following row. That process repeats until all the pieces have been sorted.
We can’t imagine that many people play enough Connect Four to make this worthwhile, but it is still a lot of fun to see in action and crosses into “oddly satisfying” territory.
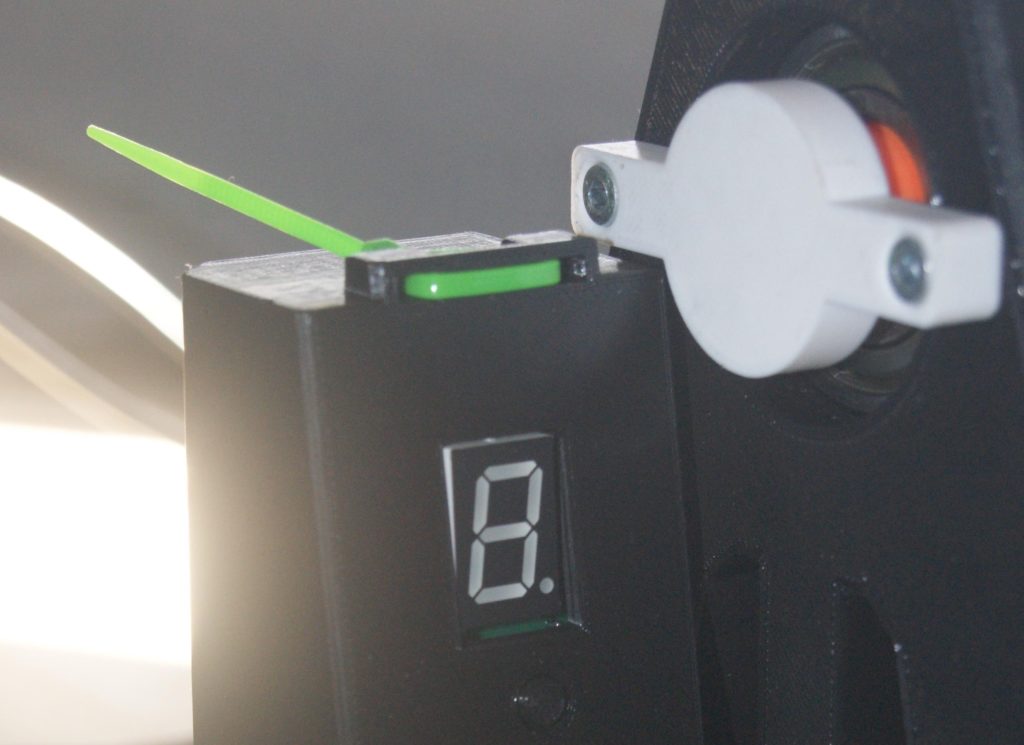
A sequential transmission is one that only allows you to move up or down by a single gear at a time. They’ve always been the norm for motorcycles, because they’re lightweight and compact. And Formula One cars have sequential transmissions for the same reasons. But unlike motorcycles, which require manual shifting, Formula One cars have lightning-fast electronic systems. To recreate that for racing sims, Carlos Almeida designed this sequential gear shift controller.
Real Formula One cars have paddle shifters, so that drivers can shift while keeping their hands on their steering wheels. This is a little bit different and looks more like a conventional shifter at first glance. It is a large lever that the user can push forward to move up a gear, or pull back to move down a gear. A seven-segment display shows the current gear number.
Most of the mechanical components are 3D-printable and an Arduino MKR1000 WiFi board is the primary component. Moving the shift lever pushes a switch, which the Arduino registers. Almeida developed the sketch using PlatformIO. It sets the Arduino up as a standard USB HID that will work with any racing sim or game, because it sends key presses like any keyboard or gamepad. It doesn’t receive feedback from the PC, so it has to keep track of the current gear and let the user set the number of gears available using small buttons below the readout display.
If you want a physical sequential shifter for racing sims, this will make a great weekend project.
The Internet of Things has the power to transform your home into a futuristic web of cutting-edge gadgets, working together to make life easier, safer, and more entertaining.
And while the IoT has a bunch of day-to-day applications like watering your plants and keeping your cupboards stocked, you can also use it to throw a killer party.
Done right, you can build a smart home that leaves your guests gobsmacked, talking for months about their experience and frantically searching for ways to recreate it in their own homes.
In this article, we’ll look at a few of the ways you can use the IoT to enhance your guests’ experiences and become the talk of the town (in a good way).
What exactly is the Internet of Things?
The IoT is a way of connecting multiple everyday devices to the internet and each other, enabling them to perform smarter tasks such as collecting, processing, and exchanging data of different kinds.
For example, while an ordinary kettle is only good for boiling water, a smart kettle connected to the IoT can be controlled from your smartphone, set to automatically start boiling at a specific time, and be asked to do different things like keep the water at a certain temperature.
When it comes to throwing a party that will go down in legend, the IoT can be a big asset.
Impress your guests with the Internet of Things
1. Smart home ambiance
The first step to throwing a great party is setting the mood, and that applies to small gatherings, dinner parties, and even just hangouts.
The IoT can be a big help here, allowing you to tap into smart lighting with the help of color-changing bulbs and synchronized effects. At the tap of a button or your smartphone, you can produce customized lighting patterns and hues, engineering exactly the right environment to fit the vibe.
You can also integrate your lighting systems with voice control assistants, so you and your guests can change the ambience with simple commands.
2. Interactive entertainment systems
With the IoT, you can take entertainment to the next level.
Use smart speakers to create fully immersive music and sound, perfectly adapted to the mood of the room and the desired noise level. Switch from soft background music to a lively dance floor with a simple voice command.
If you have a home theater or a gaming room, you can integrate these with the IoT to build a more customizable and personalized setup for guests.
3. Smart food and beverage management
If you really want to impress your guests, fill them up with delicious food and get them tipsy.
This is yet another place where technology can help — an IoT-connected kitchen can revolutionize the catering process, allowing you to host truly unforgettable cookouts and dinner parties.
Smart refrigerators with inventory tracking and recipe suggestions work alongside automated cocktail mixers and cupboards that send an alert to your phone whenever you’re running low on a certain ingredient.
You’ll go from being a stressed, overwhelmed amateur chef to the master of your kitchen, effortlessly commanding your army of tech tools to run the show confidently.
4. Intelligent climate control
The only thing worse than a party where everyone is sweltering hot, is one where they’re all too cold to even peel off their winter coats.
The good news for any aspiring host is that home automation can solve this age-old problem once and for all. Smart thermostats and HVAC systems are designed to keep your home in the perfect state of equilibrium — using automated adjustments to make a Goldilocks zone where all your guests feel just right, all the time.
The best smart homes can do this in an energy-efficient way, too, ensuring you don’t waste fuel and money keeping a room warmer than it needs to be for everyone’s optimal comfort. And you can easily adjust the temperature from your smartphone, a remote control, or voice commands.
5. Personalized guest experiences
The best parties are the ones where everyone feels welcome, and there’s no better way to create that vibe than with personalization.
The IoT can come in very useful here, helping you install things like smart mirrors which greet your guests personally and share information about the party like important times to remember and directions to specific places.
How well do you know your guests? If you can create a small profile on each one, your smart home can even put together tailored entertainment recommendations, ensuring the mood of the party fits the mood of the guests, and that there’s a bit of something for everyone on the playlist and the menu.
6. Automated home security
Parties can be a ton of fun, but they come with a few risks as well. When everyone is distracted and occupied, it’s sometimes easy for unwanted visitors to sneak in under cover of the crowd.
With IoT-driven security cameras and automated monitoring systems, you can keep your guests and property safe at all times, not just when the party is in full swing. You can program your smart security system to provide real-time alerts when something isn’t right, and even gain remote access.
If security is a key concern for you, you can give trusted guests their own digital keys and temporary access, gaining more control over who leaves and enters your event.
7. Smart party planning
If you aren’t much of a planner, putting a first-rate shindig together can be a stressful experience.
With the right tech solutions though, even the most disorganized among us can become expert event coordinators, piecing together seamless itineraries and dazzling guests by taking every tiny detail into consideration.
Some examples here include:
Automated guest invitations and RSVP tracking
Integrated calendars, to-do-lists and reminders
AI-powered suggestions for how to plan and organize your event
8. Entertain your guests with AR and VR
Virtual reality and augmented reality are two emerging technologies that have the power to keep your guests engaged for hours.
Gone are the days when a two-dimensional console was the only source of gaming-based fun — now your guests can strap on a headset and immerse themselves in a detailed and incredibly entertaining fictional world, even competing with other guests.
It’s not just about gaming, either — AR and VR can be used to create beautiful cyber experiences for your guests, from interactive works of art to guided tours of faraway places.
9. Smart furniture and layouts
Equipping your seating areas with charging ports and built-in displays will delight your guests and create a much more comfortable and convenient place to chill out.
As time goes on, furniture will likely get even smarter. For instance, smart furniture could soon detect the number of guests and available space and automatically adjust, folding away or expanding certain sections as needed.
10. Eco-friendly hosting
Parties — especially the big ones — can pack quite the environmental footprint if you aren’t careful.
If you’re concerned about the impact of your party, there are several home automation tools that can help reduce your energy expenditure and help you plan a greener and more eco-friendly event.
For example, you can use smart energy management tools to track your usage over time and make adjustments to avoid wastage, like turning down the lights and heat in a room that hasn’t been occupied in a while.
Many up-to-date IoT devices will have these kinds of features built in, and will already automatically monitor and adjust their activity to use energy more optimally.
(Bonus tip) Preparing for hiccups
One of the risks of relying too heavily on tech for your party is that tech can sometimes go wrong.
Things like glitching devices, network issues, and features that are difficult to use can all get in the way of your guests having the best time possible. It’s important to be prepared for the possibility of things going wrong and have plans in place.
It’s always a good idea, for example, to have backup entertainment options in place. Is your VR system playing up? If so, having a more traditional console on hand can work as a great alternative while you get things back up and running.
Ultimately, you don’t want your party to be too tech-centric. It’s always smart to balance your high-tech features with more traditional hosting and entertainment activities — not just because tech can sometimes go wrong but because guests will always appreciate a human touch.
Host a party from the future
Home automation, driven by technologies like the IoT, can transform your next party into something your guests will never forget.
From big, show-stopping features like augmented reality works of art, to small but no less revolutionary tools like a smart dishwasher — home automation is the perfect party assistant.
With Arduino, you can even start building your very own automated party tools, using just a handful of easy-to-find components and a bit of coding knowledge. Check out a few projects below!
Bluetooth lighting system
Arduino user akk47 made this project allowing users to build a lighting system that can be controlled with nothing more than taps from your phone, wherever you are in the building.
It uses Bluetooth® and can be put together with just a handful of components. Projects like this are the first step towards your very own smart lighting system, making your home the envy of any guests.
Multi-zone heating controller
This project was built by Arduino user erkr because his rooms were either too hot or too cold when using a single thermostat.
It allows you to split your home into zones and control the temperature for each zone separately. It’s not only a great way to save on energy bills and create a more comfortable living environment, but it’s also a fantastic tool when hosting parties where rooms have different temperature needs.
PCB gyro gaming wheel
A good gaming setup can turn a good party into an unforgettable one. Arduino user ashraf_minhaj built this project — a gaming steering wheel that can add a new dimension to racing games.
This shouldn’t be too difficult to replicate for anyone with some background in making their own smart projects, and is a cheaper (and more fun) alternative to highly advanced gaming gadgets.
These are just a few ideas to give you some inspiration — with Arduino the sky really is the limit when it comes to creating fun and original new gadgets for your smart home. Get in touch with us to learn more and get started.
The UK Bebras Challenge is back and ready to accept entries from schools for its annual event, which runs from 6 to 17 November.
More than 3 million students from 59 countries took part in the Bebras Computational Thinking Challenge in 2022. In the UK alone, over 365,000 students participated. Read on to find out how you can get your school involved.
“This is now an annual event for our Year 5 and 6 students, and one of the things I actually love about it is the results are not always what you might predict. There are children who have a clear aptitude for these puzzles who find this is their opportunity to shine!”
Bebras is a free, annual challenge that helps schools introduce computational thinking to their students. No programming is involved, and it’s completely free for schools to enter. All Bebras questions are self-marking.
We’re making Bebras accessible by offering age-appropriate challenges for different school levels and a challenge tailored for visually impaired students. Schools can enter students from age 6 to 18 and know they’ll get interesting and challenging (but not too challenging) activities.
The winners of the Oxford University Computing Challenge 2023, with Professor Peter Millican at the OUCC Prize Day in the Raspberry Pi Foundation office.
What is the thinking behind Bebras?
We want young people to get excited about computing. Through Bebras, they will learn about computational and logical thinking by answering questions and solving problems.
Bebras questions are based on classic computing problems and are presented in a friendly, age-appropriate way. For example, an algorithm-based puzzle for learners aged 6 to 8 is presented in terms of a hungry tortoise finding an efficient eating path across a lawn; for 16- to 18-year-olds, a difficult problem based on graph theory asks students to sort out quiz teams by linking quizzers who know each other.
“This has been a really positive experience. Thank you. Shared results with Head and Head of Key Stage 3. Really useful for me when assessing Key Stage 4 options.”
– Secondary teacher, North Yorkshire
Can you solve our example Bebras puzzle?
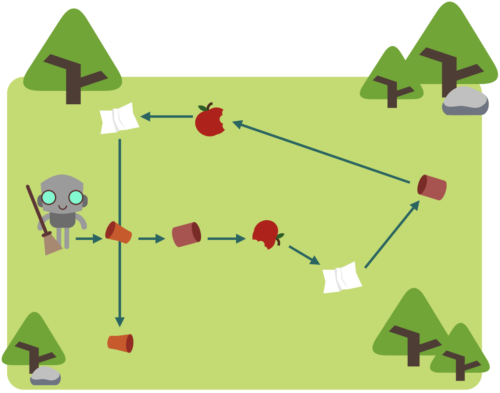
Here’s a Bebras question for the Castors category (ages 8 to 10) from 2021. You will find the answer at the end of this blog.
Cleaning
A robot picks up litter.
The robot moves to the closest piece of litter and picks it up.
It then moves to the next closest piece of litter and picks it up.
It carries on in this way until all the litter has been picked up.
Question: Which kind of litter will the robot pick up last?
How do I get my school involved in Bebras?
The Bebras challenge for UK schools takes place from 6 to 17 November. Register at bebras.uk/admin to get free access to the challenge.
By registering, you also get access to the Bebras back catalogue of questions, from which you can build your own quizzes to use in your school at any time during the year. All the quizzes are self-marking, and you can download your students’ results for your mark book. Schools have reported using these questions for end-of-term activities, lesson starters, and schemes of lessons about computational thinking.
Puzzle answer
The answer to the example puzzle is:
The image below shows the route the robot takes by following the instructions:
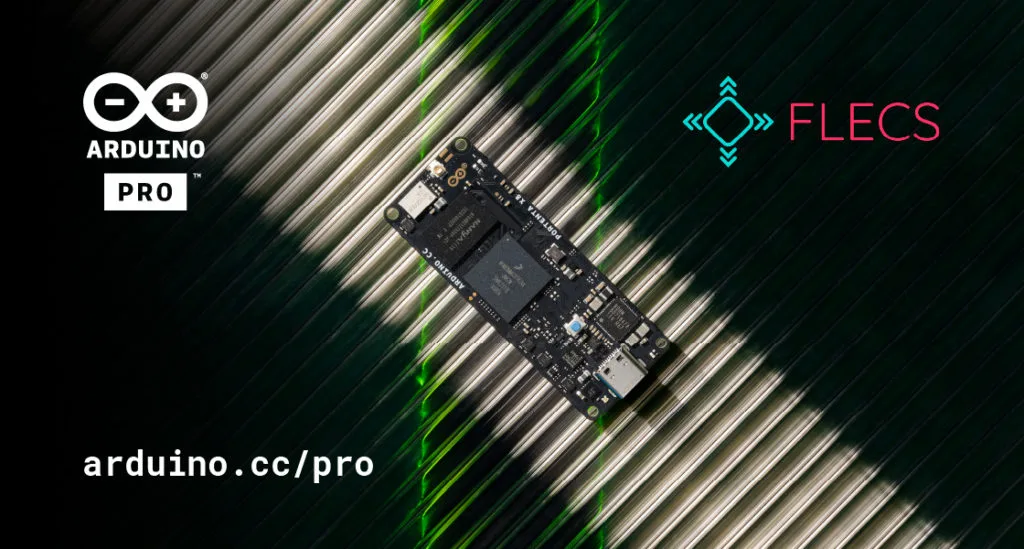
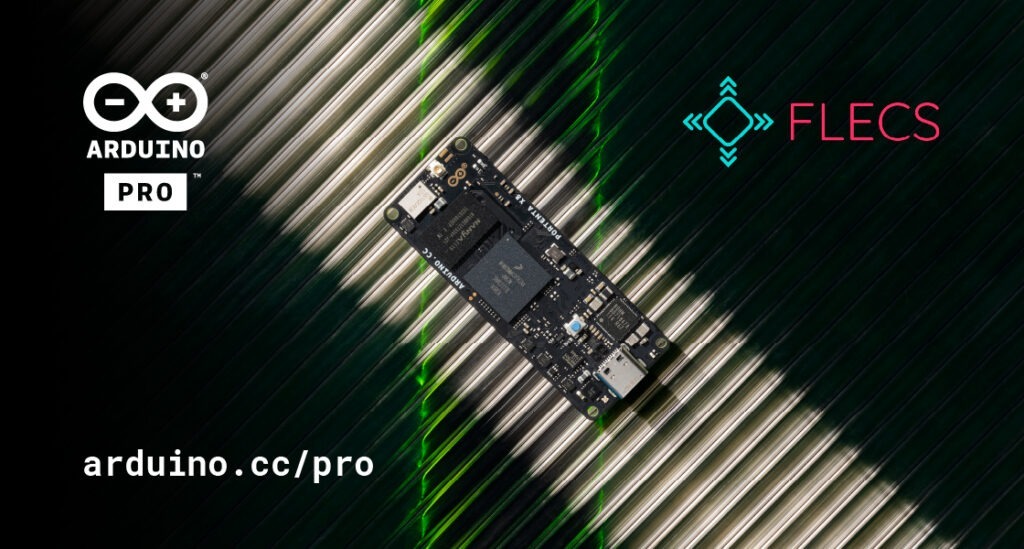
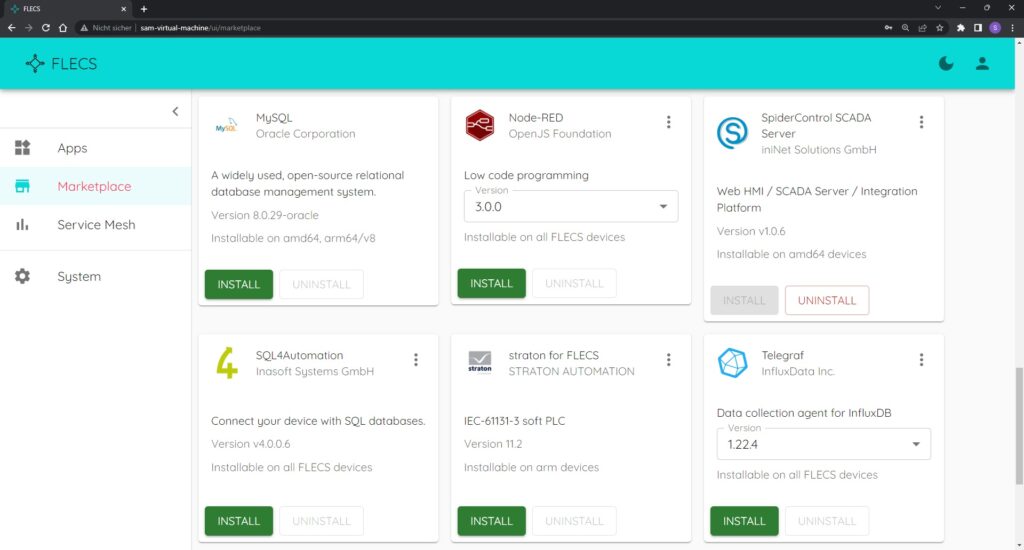
FLECS and Arduino Pro are partnering to make Industry 4.0 easier for you. FLECS is the easy-to-configure and open-source platform that allows industrial users to work with automation solutions dedicated to their machinery just as easily as we all handle the apps on our phone: install, manage and configure via web interface, and let the system keep track of versions and ensure updates.
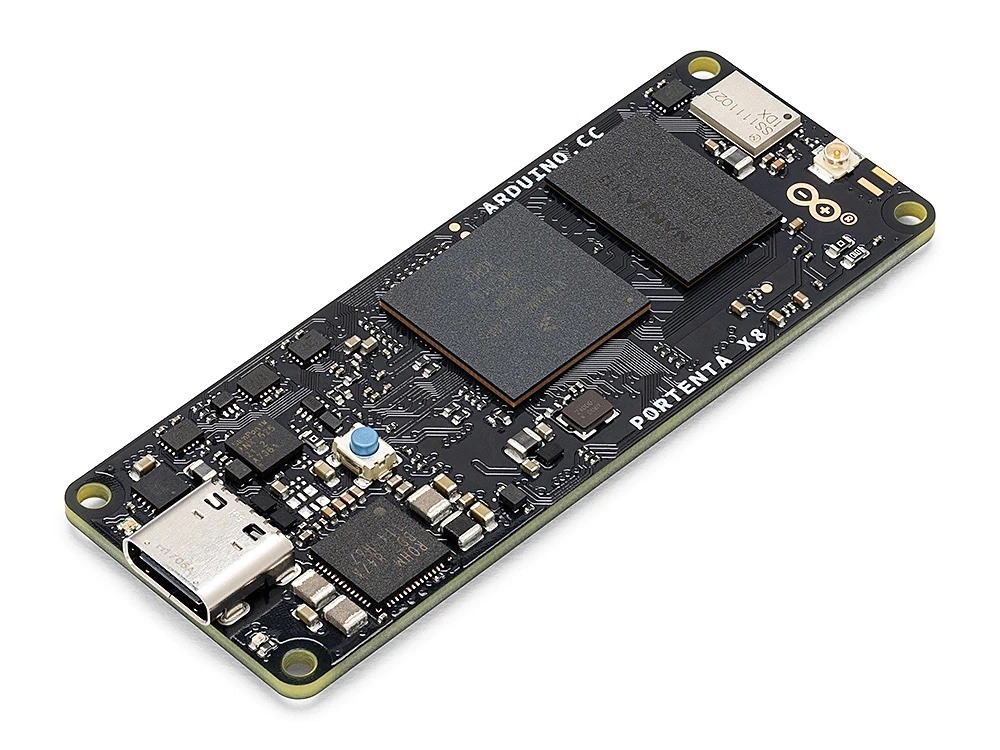
All you need is a Portenta X8 – our powerful, industrial-grade SOM with Linux OS preloaded onboard: connect it to your computer via USB, install FLECS for free (with, literally, one line of code), and access the FLECS UI to pick the right solution for production control, communication, SCADA (Supervisory Control And Data Acquisition), data analysis, fleet management and more.
“We are excited to offer the huge Arduino user community immediate access to our automation applications, so anyone can build and boost a wide variety of solutions for industrial contexts. It’s all made possible by Portenta X8, a groundbreaking product bringing Linux into the Arduino ecosystem.”
– Patric Scholz, Managing Director at FLECS
Indeed, while on one side you can now leverage all FLECS solutions in a few commands and clicks, on the other you will be working with one of Arduino Pro’s highest-performance modules: Portenta X8 is basically two industrial products in one, with the power of no less than 9 cores (an NXP i.MX 8M Mini Arm® Cortex®-A53 quad-core, up to 1.8GHz per core + 1x Cortex-M4 up to 400MHz, plus the STMicroelectronics STM32H747 dual-core Cortex-M7 up to 480MHz +M4 32-bit MCU up to 240MHz). And of course, the “superpower” of all Arduino products: being part of a comprehensive ecosystem of open-source hardware, software solutions, Cloud services and amazing community-based support.
The build process for Pironman is long and fiddly. The case itself comes partially assembled, but immediately requires disassembly to fit your Raspberry Pi inside. There then follows a 24-step assembly process that involves multiple flat conductor cables (FCC) to wire together the OLED display, SD card extender, and GPIO connector.
There are also multiple standoffs to connect the Pironman board underneath your Raspberry Pi 4 board. In total, we counted 28 different types of component in the case.
There are multiple opportunities for the build to go wrong. In this instance, however, ours booted up and worked the first time. Still, the build took us around three careful hours to complete.
The end result is cute, in a slightly hacked-together way with plenty of screws and gaps. It’s nowhere near as polished as some of the other cases on the market. But it is packed with components with a unique charm.
Verdict
8/10
A complex build results in a charming, if slightly hacky, micro PC-tower-style case with a range of interesting components.
Specs
Case: Aluminium tower case for Raspberry Pi 4 Model B (not compatible with Raspberry Pi 3)
Internals: Ice tower cooler with 5 mm copper pipe; Silent RGB fan with temperature control; On-board USB to M.2 SATA SSD, Supports TRIM and UASP; Available SSD Lengths: 22 mm × 30 mm, 42 mm, 60 mm, and 80 mm; Programmable 0.96˝ OLED
I/O: IR receiver for media centre; Power button for safe shutdown
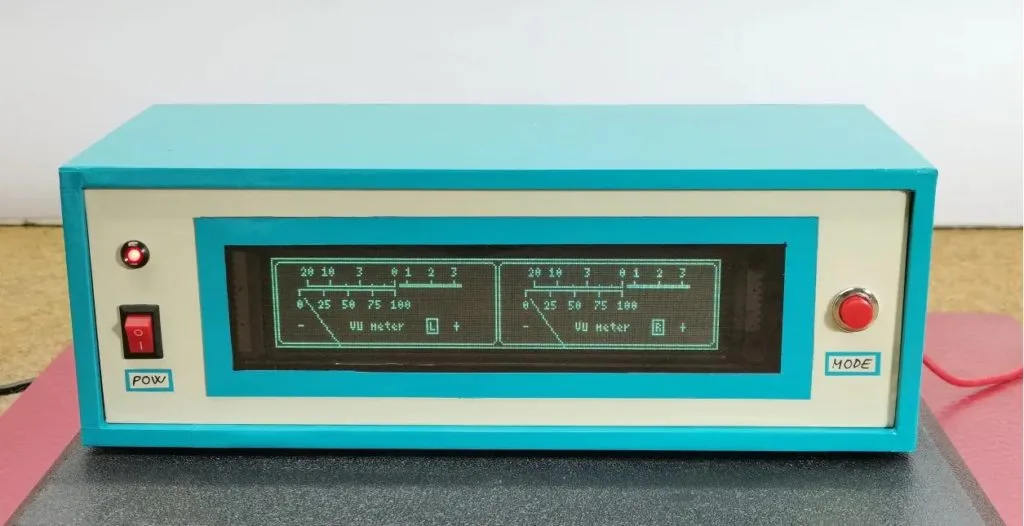
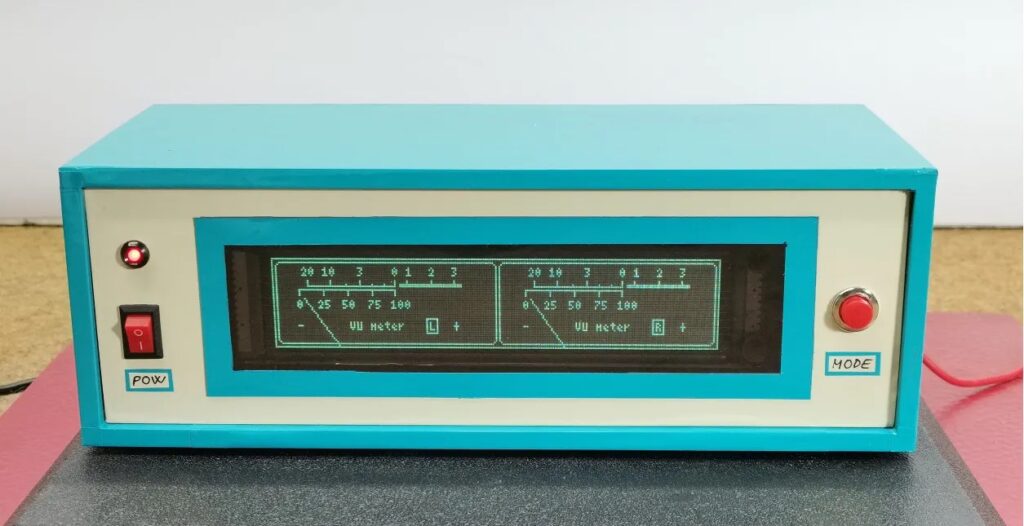
A volume unit (VU) meter is a simple gauge that indicates the amplitude of an audio signal, so higher decibels move the needle further. They’re common in the field of audio engineering and music production, with traditional VU meters being analog. But tuning an analog gauge is a challenge, so Mirko Pavleski designed a VU meter that looks analog and comes with all the benefits of a digital device.
Monitoring the amplitude of a signal (like an audio signal) with a microcontroller is very easy — if that microcontroller has an ADC (analog-to-digital converter). MCU processors only understand digital ones and zeros, so the ADC is necessary to translate an infinitely granular analog signal into digital values that approximate it. The Arduino Nano board has eight analog input pins monitored by the ATmega328’s ADC and this project uses two of them: one for the left audio channel and one for the right.
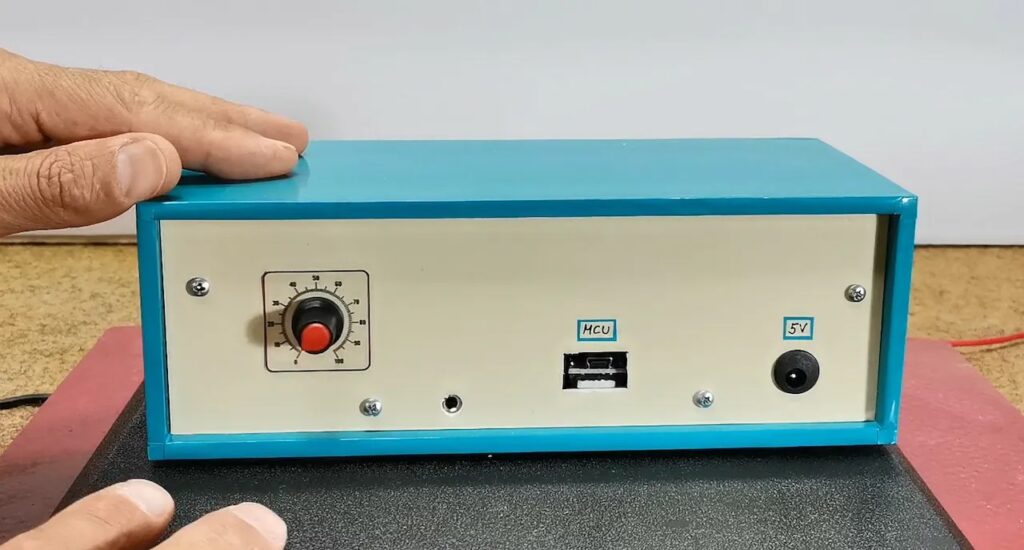
The only other major component for this project is an GP1287 VFD (vacuum fluorescent display), which Pavleski chose for its high contrast and fast response time. It has a resolution of 256×50 and that is wide enough to show two virtual gauges side-by-side. The Nano simply performs an analog read for each audio channel, then updates the graphical gauge using the U8g2 library for monochrome displays. This VFD draws quite a lot of power and that necessitates the use of dedicated power supply. The only other components necessary are resistors, capacitors, and a rotary potentiometer.
Um dir ein optimales Erlebnis zu bieten, verwenden wir Technologien wie Cookies, um Geräteinformationen zu speichern und/oder darauf zuzugreifen. Wenn du diesen Technologien zustimmst, können wir Daten wie das Surfverhalten oder eindeutige IDs auf dieser Website verarbeiten. Wenn du deine Einwillligung nicht erteilst oder zurückziehst, können bestimmte Merkmale und Funktionen beeinträchtigt werden.
Funktional
Immer aktiv
Die technische Speicherung oder der Zugang ist unbedingt erforderlich für den rechtmäßigen Zweck, die Nutzung eines bestimmten Dienstes zu ermöglichen, der vom Teilnehmer oder Nutzer ausdrücklich gewünscht wird, oder für den alleinigen Zweck, die Übertragung einer Nachricht über ein elektronisches Kommunikationsnetz durchzuführen.
Vorlieben
Die technische Speicherung oder der Zugriff ist für den rechtmäßigen Zweck der Speicherung von Präferenzen erforderlich, die nicht vom Abonnenten oder Benutzer angefordert wurden.
Statistiken
Die technische Speicherung oder der Zugriff, der ausschließlich zu statistischen Zwecken erfolgt.Die technische Speicherung oder der Zugriff, der ausschließlich zu anonymen statistischen Zwecken verwendet wird. Ohne eine Vorladung, die freiwillige Zustimmung deines Internetdienstanbieters oder zusätzliche Aufzeichnungen von Dritten können die zu diesem Zweck gespeicherten oder abgerufenen Informationen allein in der Regel nicht dazu verwendet werden, dich zu identifizieren.
Marketing
Die technische Speicherung oder der Zugriff ist erforderlich, um Nutzerprofile zu erstellen, um Werbung zu versenden oder um den Nutzer auf einer Website oder über mehrere Websites hinweg zu ähnlichen Marketingzwecken zu verfolgen.