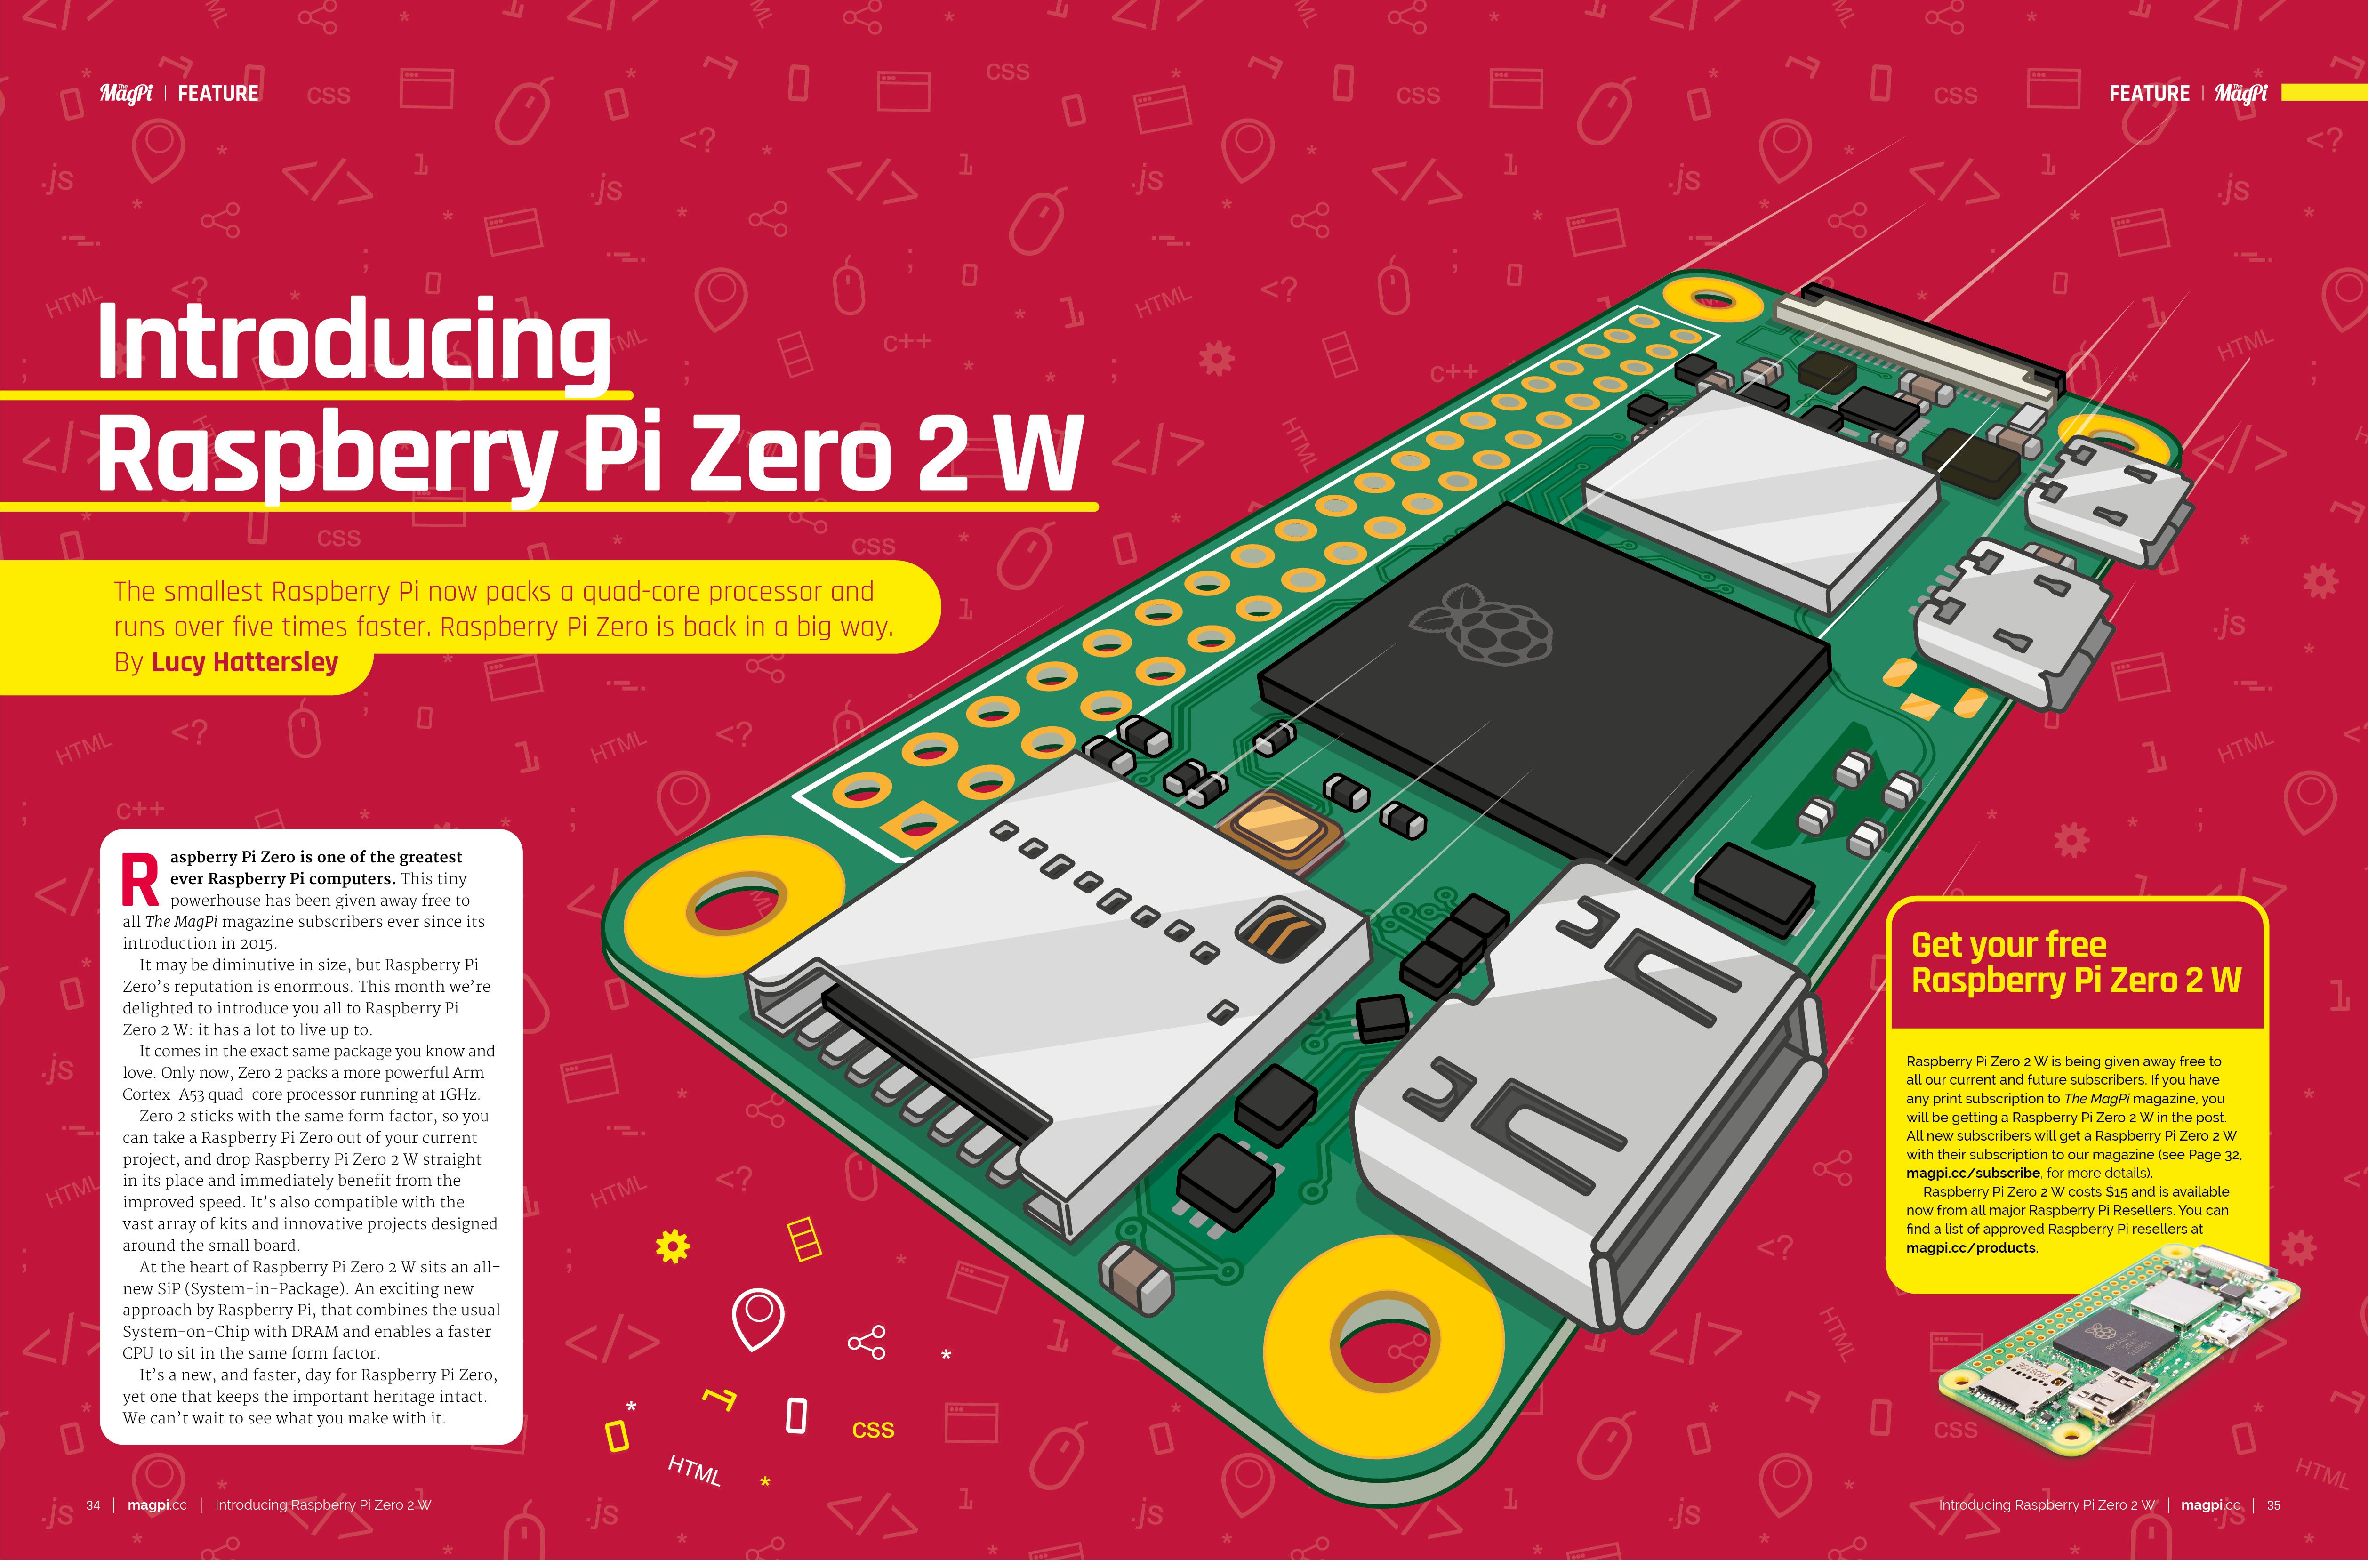
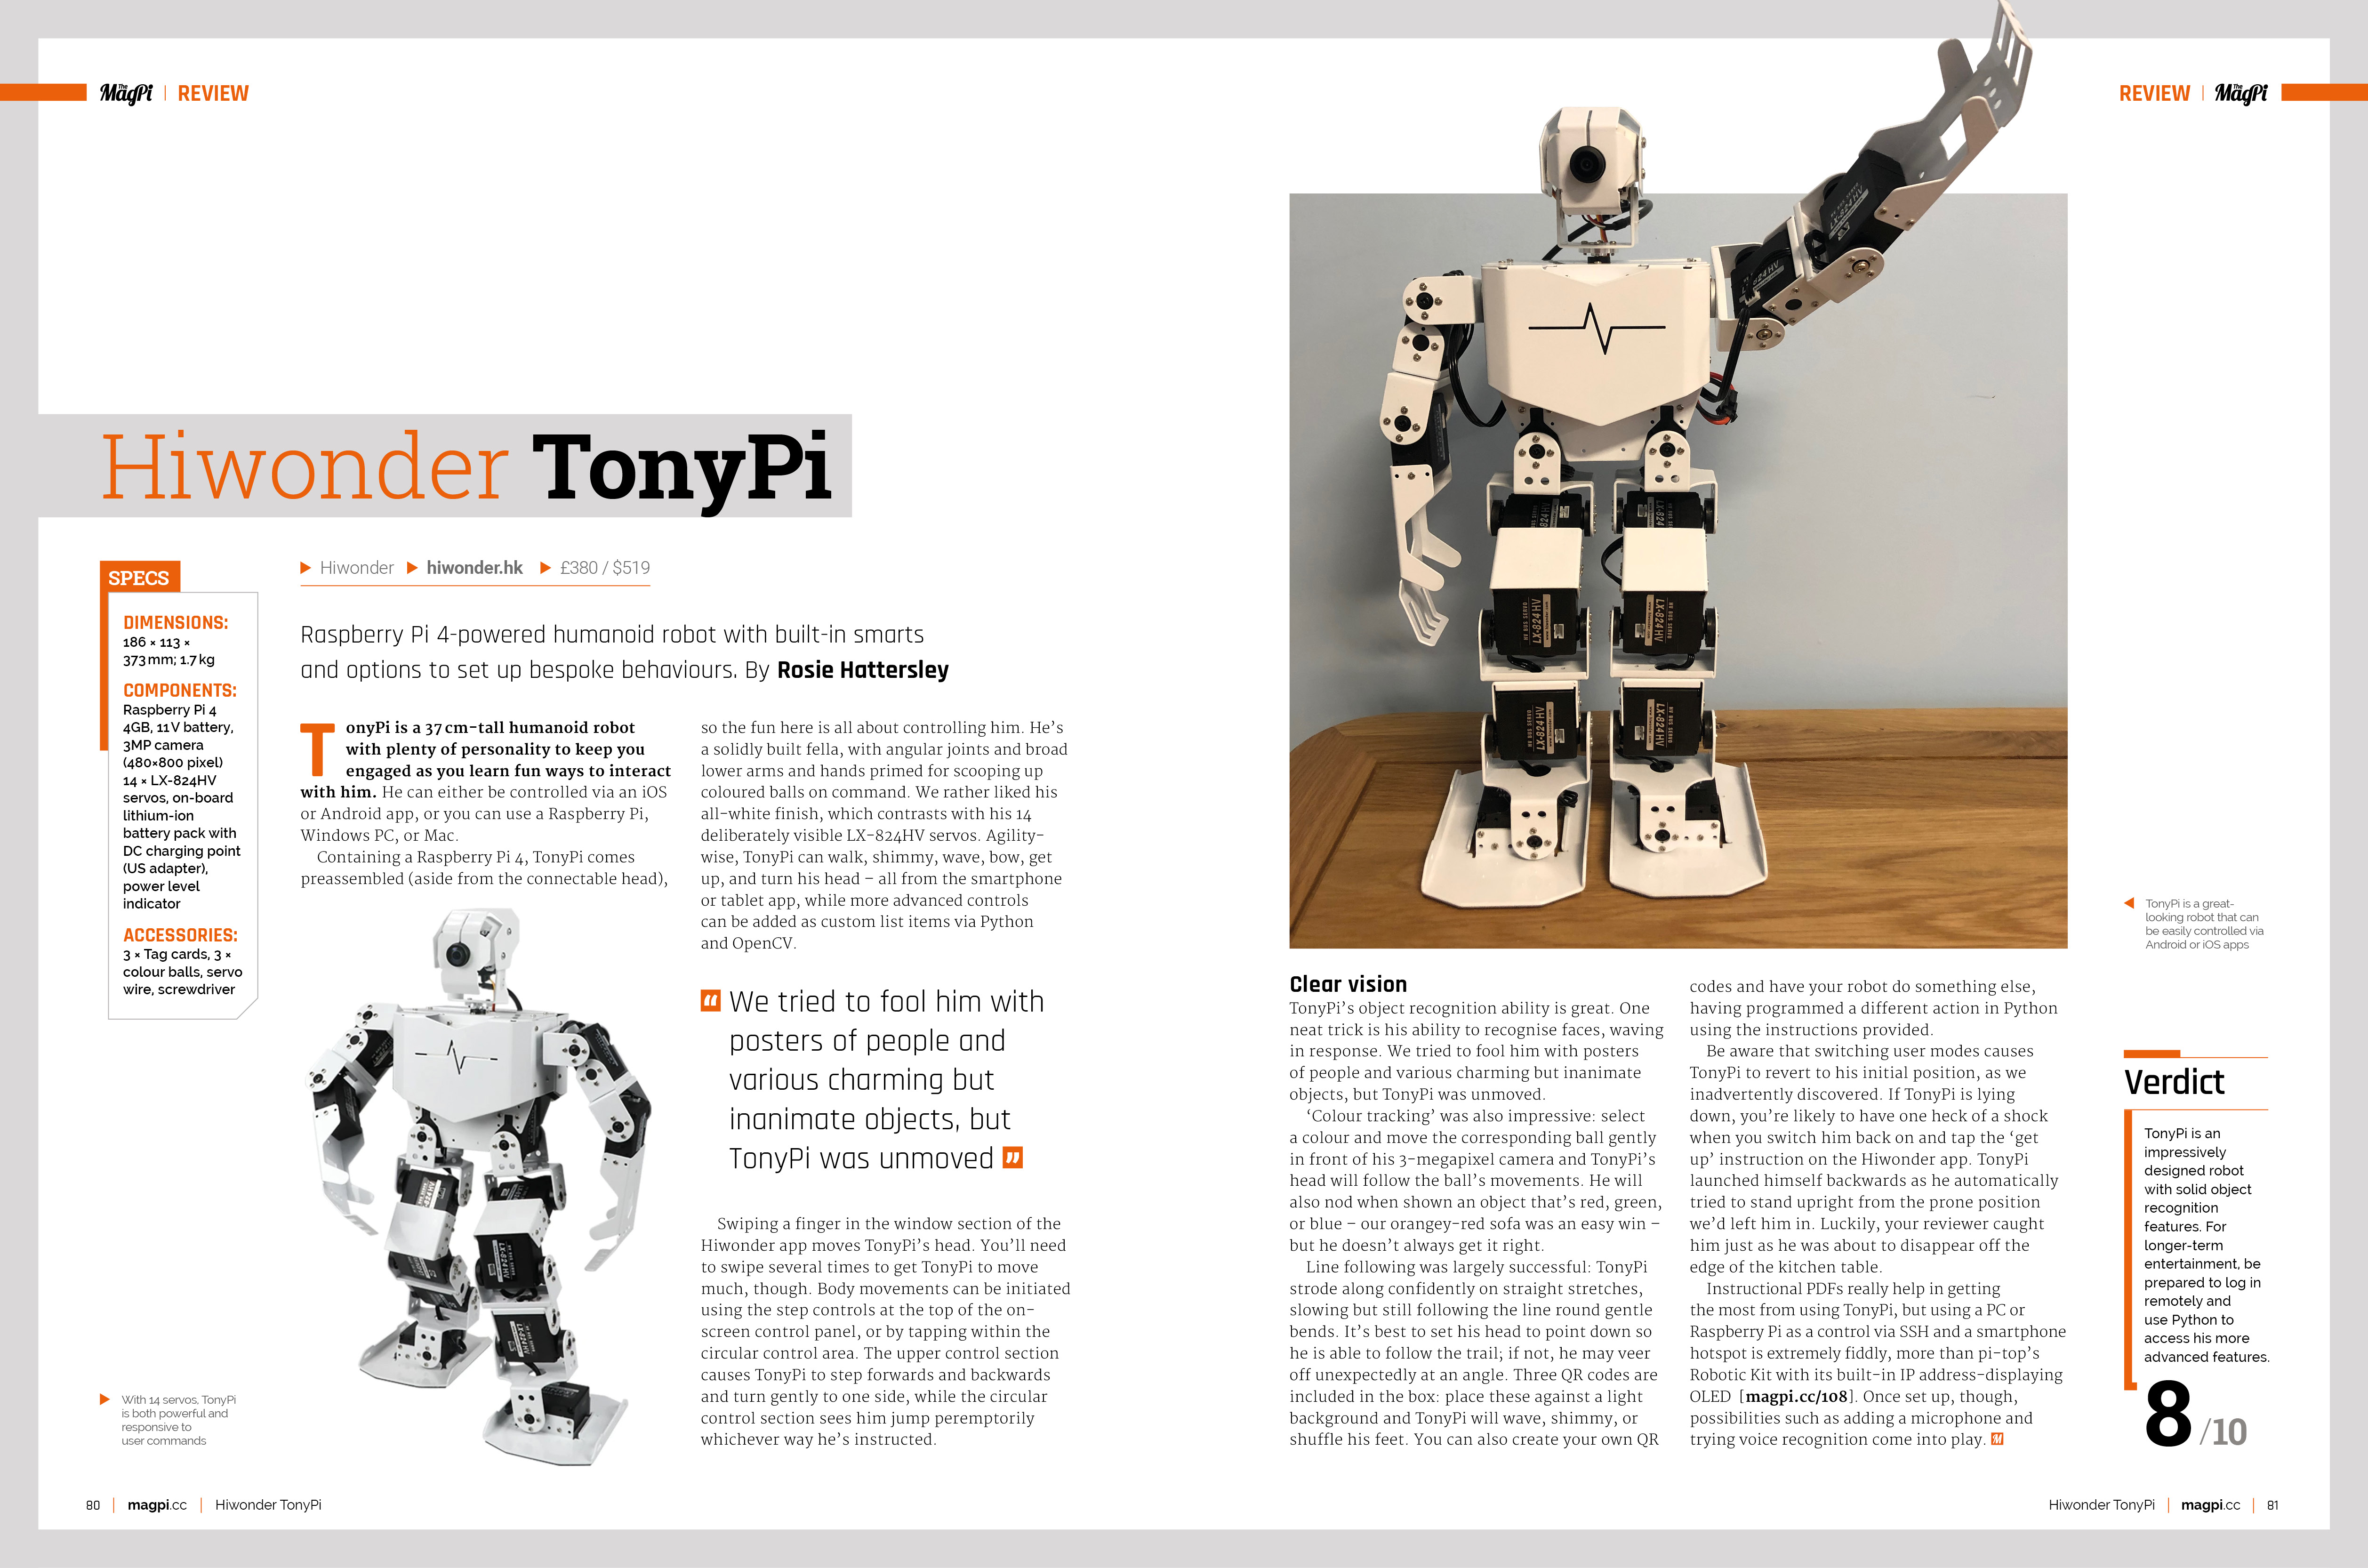
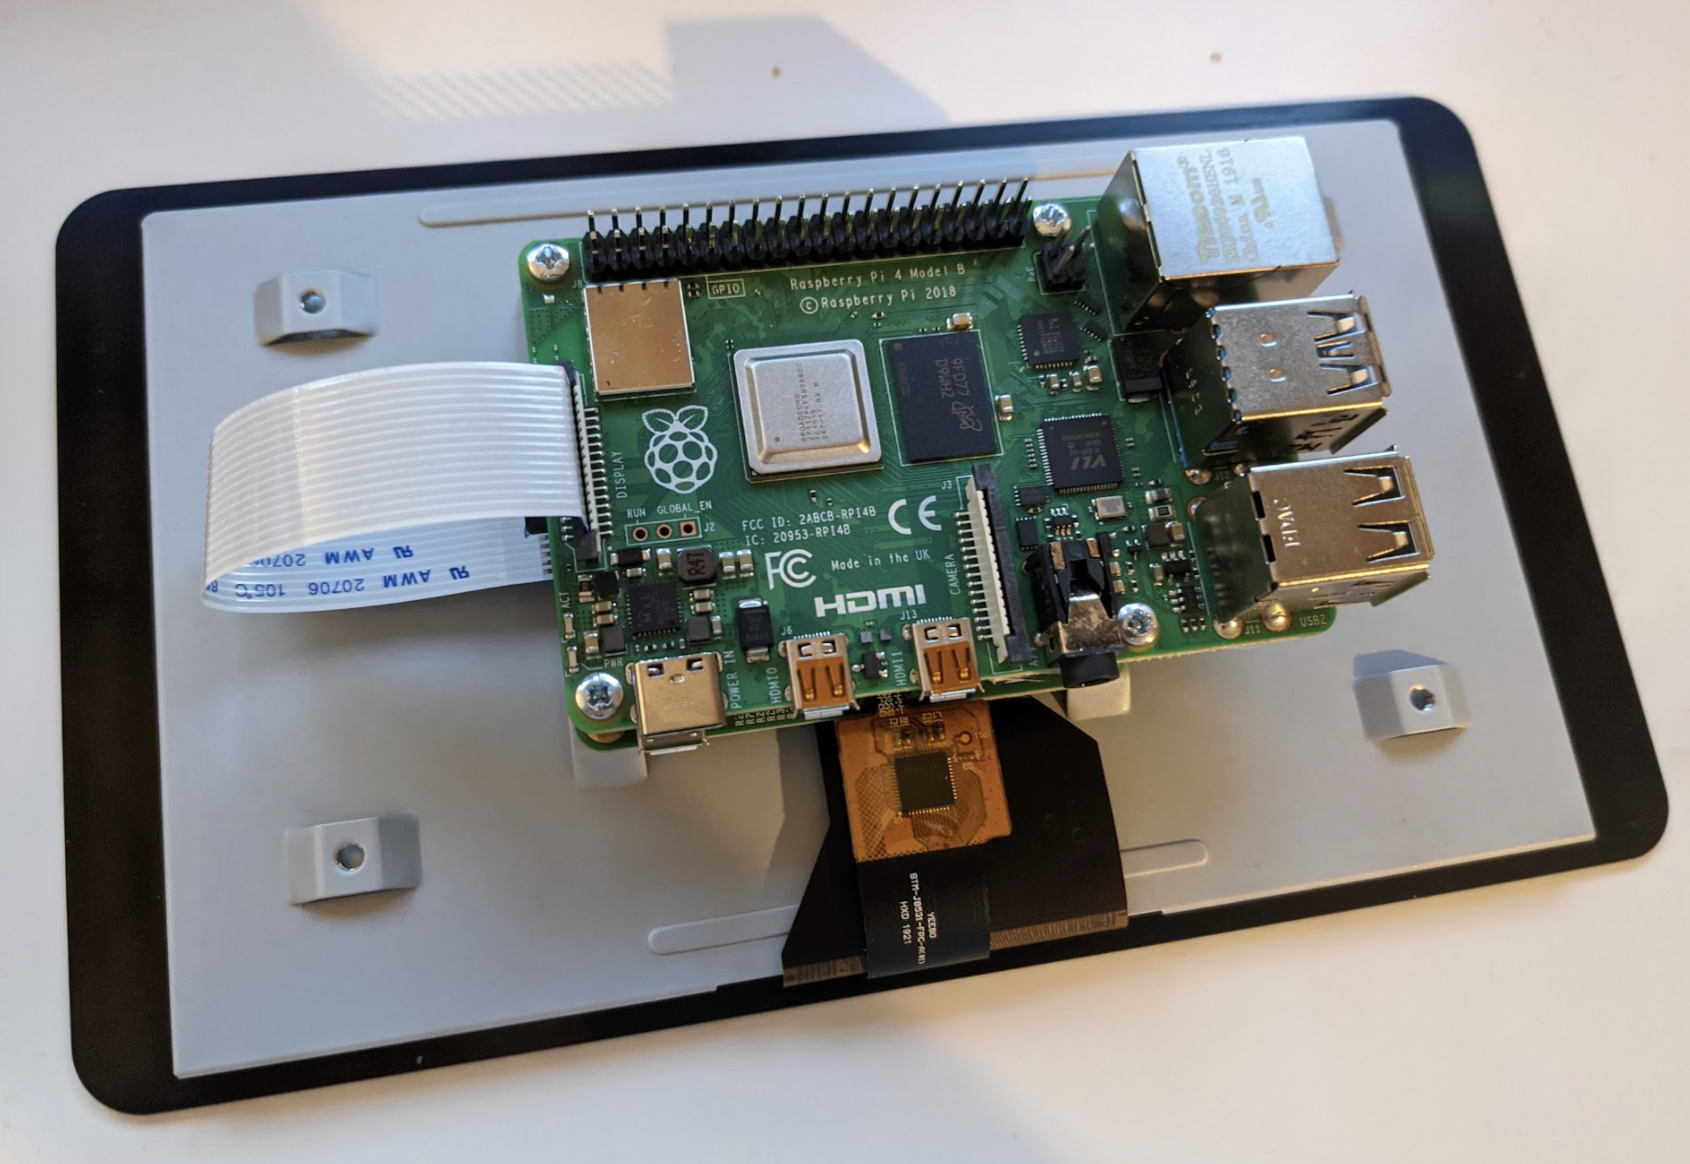
Kategorie: Reviews

  • Interview: Akkie

    Interview: Akkie

    Reading Time: 3 minutes

     “Although the term ‘IoT’ was not common in 2009, I combined the optical drive, cardboard, and springs to create a thing that could feed the hamster or control the power switch of the air conditioner by [moving] the tray of the optical drive,” Akkie tells us. “It is quieter, easier, and smarter to implement similar functions with a Raspberry Pi, server monitor, and infrared LED nowadays.”

    When did you learn about Raspberry Pi?

    I discovered Raspberry Pi on the RS Components’ website on 12 March 2012 – I found this from my Twitter [Ed, see photo]. At that time I used a Linux netbook for my optical drive IoT project to demonstrate at some events. I thought Raspberry Pi could make it compact the demo stuff. After replacing the netbook with Raspberry Pi, I created a wearable optical drive attached on the top of a helmet, and Raspberry Pi built-in optical drive.

    What are your favourite things that you’ve made with Raspberry Pi?

    My fave is a Plarail (Japanese train toy for kids) project that can be controlled from a smartphone. A Raspberry Pi Zero and camera are mounted to the carriage, [along with a] built-in motor driver and LiPo battery.

    I enjoyed using the motor driver to control acceleration and deceleration, and the design of the web UI.

    What differences have you noticed in the Japanese maker community compared to the USA/UK?

    I don’t know much about overseas maker communities (or Japanese communities even), but when I saw maker events in US or the UK, I found there were more huge (literally!) projects than in Japan. It might be hard for us to create huge projects in Japan because, in many cases, there is not enough space in our house to work in.

    Furthermore, Japan has its own certification system for power supplies and radio waves, and it often takes a long time for foreign products to become available in Japan. Sometimes they cannot be used in Japan because the manufacturer often does not obtain certification in Japan. Compared to the certification system in US or UK, I assume it makes things less flexible for Japanese makers’ projects which use radio waves…

    Apart from our country’s system, I think it’s amazing the sense of unity a community can feel when they get their hands on a junk part. In early 2021, it was very popular for Japanese makers on Twitter to take out a 640×48 pixel LCD that was built into a children’s toy and analyse it. No matter if they knew each other or not, makers brought information they had to Twitter and GitHub, and made controlling the LCD possible in a few weeks. That was really amazing. It is available for Raspberry Pi as well. I followed those instructions, bought the toy, and made it work too.

    Translation by Satoka Fujita.

  • Oasis-grow

    Oasis-grow

    Reading Time: 3 minutes

    Such nonconformity “is a mindset that many programmers and engineers find difficult to accept,” says Mike, explaining why he and his PhD student co-founder Aviel Stein set about improving the odds of a successful harvest. Their response, Oasis-grow, is a ‘smart agriculture engine’ that runs on Raspberry Pi and collects detailed information about whatever the user cares to grow in a bid for more predictable results.

    Oasis-grow is now on Kickstarter.

    The system provides visual and sensor data, plus controls for heat, humidity, airflow, light, and watering cycles. The selling point is a system that “keeps your plants, mushrooms, and Petri dishes happy, and remotely monitors the grow space so you can identify and address problems before they get serious.”

    Make room for mushrooms

    Mike and Aviel met at the 2019 Pennsylvania Maker Faire where, among other projects of his own devising, Mike presented his first Raspberry Pi project: a dashboard camera with buttons and a remote, back-window LED screen for signalling other cars. “It was very cool but perhaps a bit too dangerous for the road (the other cars did not react … well),” he admits. Nonetheless, the pair decided to work together, and quickly formed Oasis-X (magpi.cc/oasisx) having identified a market for a smart agriculture monitoring tool. 

    Aware that DIY plant monitoring and sensor kits were already available, Mike and Aviel needed to be sure they were offering something that fulfilled the scalability promise it would need to be of interest to agriculture, and merit a commercial launch. Mike explains it was important for Oasis-X to take an “open-source first approach” to developing agriculture technology. “Technology vendor lock-in is such a big issue for farmers,” he continues. “Our systems must collect and store lots of different information while communicating with the network and managing multiple independent processes, [so] a full-fledged operating system is close to required.” 

    Ploughing ahead

    Oasis-grow’s makers took inspiration from older projects, and chose Raspberry Pi because of its multitasking capabilities and a file system that they found made organising and retrieving complex data a much simpler task. Most of the hardware they use for prototyping was bought from the usual online retailers, with Raspberry Pi running Bash alongside Raspberry Pi OS and Python. Their web interface was created in Python and uses AWS (Amazon Web Services).

    “We’ve spent the last year nailing down the core functionality and are in the process of making it faster, more modular, and easier to use,” Mike explains. The system went through more than 20 iterations and was developed in close consultation with farmers and home horticulturists. This process helped Mike and Aviel realise that the vision, sensing, and environmental helper modules were valuable individually as well as collectively. As a result, the pair are soon set to offer an open-source version of the GUI integrating machine learning, decision support, and smart notification prototypes.

    As an agri-business system, Oasis-grow had to prove its worth and has undergone successful long-term, large-scale field tests in farms in the eastern US over the past year. These ‘turn-key growing systems’ have recently been distributed to the company’s early backers, with a Kickstarter campaign fundraising towards its ‘smaller helper modules’ currently running. However, Oasis-X is also keen to make the concept available for hobbyists and home horticulturists, providing source code and hardware architecture details via GitHub.

  • Community Jams

    Community Jams

    Reading Time: 3 minutes

    Over the course of last year, the way they play together had to change. Mainly, they had to move outside and that caused some problems.

    Community Jams couldn’t play music indoors using our web‑based chords and lyrics application,” says Bob Steele, a retired programmer and current Community Jams member. “Outdoors, I put the app on a Raspberry Pi so we didn’t need an internet connection. Raspberry Pi had a web server to deliver the application from Apache. Unfortunately, the projector was too weak in bright sunlight and was always subject to having its screen blow over in the wind. I figured out that if the app was delivered from [Apache] Tomcat, I could create a web socket protocol that would share the current song and position to many tablets. So now the musicians are outside, masked, separated by a good distance, and all able to share the same display on their personal tablets.”

    Early adopter

    Although Bob has been programming and working with computers for several decades, he’s mainly worked with software projects: “In the early 1980s I designed or help design a number of internal hardware projects for the video industry.

    “I heard about [Raspberry Pi] from the internet in the early days,” he says. “I’ve ended up buying at least one of every model. Don’t know why, but they are good platforms for small projects. I first used UNIX in 1975 and my personal machine has been Linux for many decades … so Raspberry Pi seems like home. In fact, most of them never get connected to a keyboard, mouse, or display. SSH or VNC is all I usually need.”

    Can’t beat it

    It’s a simple project with a simple goal – to display music for musicians, and it works well in that regard according to Bob: “The musicians are happy that: 1) they get to play music in the park and 2) they know next to nothing about how it works.”

    The whole setup is just a Raspberry Pi 3 with Bob’s software, an access point to connect to a local wireless LAN, and a battery to run it.

    “I should have installed DNS instead of the fixed IP address,” Bob ruminates. “The fixed IP address helps when Raspberry Pi is not in the park. It gets plugged in, attaches to the local WiFi, and updates itself using crontab jobs.”

    While its humble use as a way to get some friends to play music together is great, we feel the technology is simple yet powerful enough to be expanded to larger groups. Check out Bob’s website, for more about Community Jams and his other projects

  • Pico Light Arcade

    Pico Light Arcade

    Reading Time: 3 minutes

    “It was a small arcade and my friend and I had so much fun with a game like this, I just knew I wanted to have one for our parties,” he says. In his case, the ‘moles’ he was bashing were a set of LED lights and Thomas reckoned it would be relatively easy to replicate. “I spent zero time planning it,” he continues. “I came back from the arcade, ordered the arcade buttons and, once they arrived, I drilled 20 holes into a board I had lying around.”

    The holes were arranged so that each player would have one button immediately in front of them, followed by a row of three and then a further five – making for nine each. Two buttons were placed in the centre: one to start the game and the other to select a playing mode. “I screwed in the buttons and wired them up in a 3×7 matrix,” Thomas says. “There was no soldering involved.”

    Keeping score

    Once done, Thomas began to program the game and he reckoned a Raspberry Pi Pico microcontroller would be more than capable of running it. “I really like the simplicity of Raspberry Pi Pico,” he says. “Firmware updates are drag-and-drop, it’s super-easy to code for, it’s really cheap, and it boots up immediately, too.” 

    At first, he flexed his C programming skills to code what he describes as “a high-speed Whac-A-Mole” with the goal being to hit any buttons that light up as fast as possible. “Whoever manages to press the most buttons in 45 seconds wins,” he smiles, adding that he then wanted a way of displaying the score.

    “I didn’t have a nice display lying around so I built a Web Serial-based website that also shows a scoreboard,” he says. “This is completely optional, though, and the table will run happily without it.”

    Mind games

    Once the rules of Whac-A-Mole were established and coded, he then moved on to create a second mode: replicating a game of Simon. “The table shows a sequence and both players have to remember and repeat it. The sequence gets longer and longer, and whoever first presses a wrong button loses.”

    He’s not ready to stop there, though. “I would love to have more game modes and I’d also love to see someone hook up a seven-segment display to show the score,” he reveals. “I’m also designing a PCB to make the underside a bit cleaner – as it is, there are 20 buttons with four wires to each and it looks messy.”

    Even so, it also looks like a heap of fun. “It certainly is, and it should be a great project for anyone to do with kids,” Thomas adds. “In fact, two friends of mine have already decided to build their own with their children, but adults will have a fantastic time with it too.

  • Opinion: Tapping into tech

    Opinion: Tapping into tech

    Reading Time: 2 minutes

    School meant Casio watches and LED displays; sometimes built into pleasingly flexible, twangable rulers; sometimes embedded into the shaft of a pen. Resetting the time and date was the ideal excuse to linger in a classroom while chatting to (aka flirting with) nerdy, but nice, schoolmates. Almost without fail, an overlooked friend would interject with a rude word spelled out on their fancy scientific calculator screen. 

    The arrival of two BBC Micros in the school library caused a stir. As a wannabe journalist, I became the editor of the newspaper we put together as a class. Getting to use one at school meant taking business and information studies so I could get at the Acorn computers in the commerce suite. Unfortunately, I had to spend the first half-term learning to touch-type – anathema for an impatient and less than dextrous teenager. 

    Commodore coding

    Thankfully, a brilliant Commodore 64 made it into our home. I spent hours learning to play a musical keyboard which sat above the computer’s own keyboard, and typing in game code from books. I taught myself BASIC and set up modest databases to organise my growing record collection, but was often ousted from the C64 by my games-hungry brother, keen to thrash another joystick in the service of Daley Thompson’s Decathlon. 

    Our Dad spent an apocryphal £3000 on a Elonex 386 laptop, heavier even than the Smith Corona typewriter with the three-page text memory that I would write my university essays on. 

    My first computer was a second-hand Mac, so I could brush up the QuarkXpress and Photoshop skills I used in my first job in publishing, indirectly taking me to a writing role at home computing title PC Advisor where I got to try out, review, and write about using hundreds of gadgets, games, apps and programs and, eventually, learn about an intriguing product known as Raspberry Pi and its aim to put computers and computing skills in the reach of the world. The global success of maker faires, Raspberry Jams, Pi Wars, Code Clubs and dojos, as well as the dozens of individual projects that I’ve been lucky enough to learn about first hand and write about for The MagPi, show that Raspberry Pi has brilliantly delivered.

  • Electronic nose

    Electronic nose

    Reading Time: 2 minutes

    After learning about the different and weird things dogs have been trained to identify by smell at the airport, Luis asked the question of whether he could do something similar with low-cost gas sensors.

    “The purpose of the project is to show that low-cost sensors can be reliable in detecting odours and that they can possibly be used in clinical settings.” Luis tells us. “Testing was done using samples of beer and brewed coffee. A K-Nearest Neighbours (KNN) algorithm was used in MATLAB to create a classification model that was used to predict the aromas of beer and coffee, and was validated using a 10-fold cross validation (k-fold)… A 98 percent classification accuracy was achieved in the testing process.”

    Smell test

    With only four types of gas sensors, extensive testing and training of the model was required.

    “A training data set was created by taking measurements of air, beer, and coffee independently.” Luis explains. “Each sample was taken, on average, for 15 minutes at one second intervals, producing over 900 sample readings per test and the data was exported into CSV files. For classification purposes, an additional column was manually added to label the sample (i.e., coffee, beer, air). The three datasets were imported and combined in MATLAB. This data was used to create a k-nearest neighbour model, k was selected to be 5, this was determined by trial and error. A 10-fold cross-validation was used to validate the model, and a Principal Component Analysis (PCA) was used as an exploratory technique to verify the model and the results, similar to the work shown in past research.

    “A test dataset was gathered by taking 17 new samples of two-minute readings at one second intervals to assess the classification model. Each sample was independent of each other (only air, beer, or coffee was measured at a time), and they were manually labelled accordingly, resulting in over 2500 measurements. This data was imported, combined, and randomly rearranged in MATLAB. Using the classification model created from the training dataset, the testing data was classified and the results from the classification model represent 97.7% accuracy.”

    A near 98% accuracy is extremely impressive for the three test subjects, and it’s all done on a Raspberry Pi 3.

    “Raspberry Pi was introduced to me in the fall of 2020 during one of my university courses,” Luis said. “I quickly realized how easy, efficient, and capable Raspberry Pi boards are.”

    It’s a cool, working concept, so we hope to see more like it in the future.

  • Automatic Guitar Tuner

    Automatic Guitar Tuner

    Reading Time: 3 minutes

    Guyrandy Jean-Gilles is a musical maker who took Raspberry Pi Pico and created something rather special. “The goal of the project was to make a low-cost, automatic guitar tuner,” he tells us. “I’d been meaning to do a project with Pico and there are few development boards as cheap and well-documented.”

    Pico power

    Guyrandy developed his idea over a two-month period, and the result is a very useful device. The guitarist chooses whichever string they want to tune and then places the tuner on the appropriate tuning peg. A button on the automatic tuner is held down by the user which then activates the microphone, and the tuner begins to determine the pitch of the tone coming from the plucked string. It then twists/adjusts the peg as necessary to ensure accurate tuning for sweet sounds.

    Guyrandy tells us that Pico is the brains of the entire tuner: “It samples an electret microphone at 4096 samples per second, computes an FFT (fast Fourier transform), finds the strongest magnitude frequency in the audio, then turns a DC motor clockwise or counter-clockwise until the target frequency and the strongest frequency in the audio match.” 

    Change your tune

    As with all electronic makes, this was a learning experience with a few bridges to be crossed, and the trickiest part of the build was determining a guitar string’s pitch from audio. “There’s a lot of academic research in the area that I wasn’t aware of before starting the project,” says Guyrandy. “This version found the strongest magnitude in a fast Fourier transform, and assumed that was the fundamental frequency.”

    In terms of accuracy, he found a few blips that he had to even out. “The tuner’s frequency detection is repeatable but inaccurate. It will mistakenly think harmonics are the fundamental frequency for almost all cases. I had to hard-code harmonic frequencies into the firmware to make the tuner work appropriately,” he explains. 

    That said, the tunings are reliably inaccurate so they can be used to correctly tune a guitar. “For example, the low E string is 82.4 Hz in standard tuning, but the project repeatable thinks it’s 250 Hz. Currently alternate tunings aren’t possible, but with a firmware change, drop tunings can be achieved.”

    Guyrandy has had plenty of suggestions from other makers in terms of potential improvements, including adding a vibration sensor so the tuner can be used in a noisy setting, and also “to make a tuner that fits over all the tuning heads of the guitar and tunes all the strings simultaneously. While this is cool, I’m not sure how I’d separate two different fundamental frequencies from one audio signal.”

    He is currently working on a second version of the tuner and will be trying the YIN algorithm to detect frequency, as well as incorporating some piezo-electric sensors to pick up vibrations, along with a stronger motor.

    If you’d like to have a go at making your own version of the tuner, Guyrandy has generously made his code open-source, and information on exactly what you need in order to build it can be found on his GitLab page. Why not dust off that old guitar and get making?

  • Review: TonyPi

    Review: TonyPi

    Reading Time: 3 minutes

    Containing a Raspberry Pi 4, TonyPi (£380 / $519) comes preassembled (aside from the connectable head), so the fun here is all about controlling him. He’s a solidly built fella, with angular joints and broad lower arms and hands primed for scooping up coloured balls on command. We rather liked his all-white finish, which contrasts with his 14 deliberately visible LX-824HV servos. Agility-wise, TonyPi can walk, shimmy, wave, bow, get up, and turn his head – all from the smartphone or tablet app, while more advanced controls can be added as custom list items via Python and OpenCV. 

    Swiping a finger in the window section of the Hiwonder app moves TonyPi’s head. You’ll need to swipe several times to get TonyPi to move much, though. Body movements can be initiated using the step controls at the top of the on-screen control panel, or by tapping within the circular control area. The upper control section causes TonyPi to step forwards and backwards and turn gently to one side, while the circular control section sees him jump peremptorily whichever way he’s instructed. 

    Clear vision

    TonyPi’s object recognition ability is great. One neat trick is his ability to recognise faces, waving in response. We tried to fool him with posters of people and various charming but inanimate objects, but TonyPi was unmoved. 

    ‘Colour tracking’ was also impressive: select a colour and move the corresponding ball gently in front of his 3-megapixel camera and TonyPi’s head will follow the ball’s movements. He will also nod when shown an object that’s red, green, or blue – our orangey-red sofa was an easy win – but he doesn’t always get it right.  

    Line following was largely successful: TonyPi strode along confidently on straight stretches, slowing but still following the line round gentle bends. It’s best to set his head to point down so he is able to follow the trail; if not, he may veer off unexpectedly at an angle. Three QR codes are included in the box: place these against a light background and TonyPi will wave, shimmy, or shuffle his feet. You can also create your own QR codes and have your robot do something else, having programmed a different action in Python using the instructions provided. 

    Be aware that switching user modes causes TonyPi to revert to his initial position, as we inadvertently discovered. If TonyPi is lying down, you’re likely to have one heck of a shock when you switch him back on and tap the ‘get up’ instruction on the Hiwonder app. TonyPi launched himself backwards as he automatically tried to stand upright from the prone position we’d left him in. Luckily, your reviewer caught him just as he was about to disappear off the edge of the kitchen table. 

    Instructional PDFs really help in getting the most from using TonyPi, but using a PC or Raspberry Pi as a control via SSH and a smartphone hotspot is extremely fiddly, more than pi‑top’s Robotic Kit with its built-in IP address-displaying OLED. Once set up, though, possibilities such as adding a microphone and trying voice recognition come into play.

    Verdict

    8/10

    TonyPi is an impressively designed robot with solid object recognition features. For longer-term entertainment, be prepared to log in remotely and use Python to access his more advanced features.

  • SPY-DER Robot

    SPY-DER Robot

    Reading Time: 3 minutes

    Team leader Arijit Das explains that SPY-DER is so-named because of its ability to walk like an arachnopod – much to the consternation of some observers. The robot’s main purpose is for live video surveillance, streaming footage that can be viewed remotely via a dedicated web browser. SPY-DER can be controlled in two ways, either through voice commands or from the web interface. Riffing on one of the favourite items of prey for real-life spiders, Arijit uses ‘bumblebee’ as the robot’s wake word, prompting its LED eyes to light up. 

    “Whenever I call it by its name, it starts listening to me and then, based on my voice command, it will act,” he clarifies. These commands cover both speech recognition and ‘intent detection’. “I can give SPY-DER the same command in different ways, i.e. ‘Wave your hands’ or ‘Say hello’. Both commands make it wave its legs,” says Arijit. The online control panel, meanwhile, lets the user control all of SPY‑DER’s actions. If such movements don’t make you tense up, you can take a look at SPY-DER in action.

    Evolutionary process

    The first version of SPY-DER was an Arduino Nano-based device, controllable via an Android smartphone or web browser, but lacking the voice recognition aspect Arijit was keen to add. “Obviously I needed a small computer here,” he comments. Several of his previous projects, including the Sudoku‑solving robot we featured in The MagPi #98, were based around Raspberry Pi. Size constraints led Arijit to choose Raspberry Pi Zero W this time. Wireless connectivity and the ability to connect to a Raspberry Pi Camera Module were also critical features. 

    The limited RAM provision of Raspberry Zero W presents a challenge for Arijit’s hope of eventually implementing a local speech and intent recognition system from scratch. The speech recognition system would need to be highly optimised, otherwise it will take a lot of time to recognise the speech, he acknowledges. For now, SPY-DER uses an amended version of Picovoice speech recognition, but in time Arijit also aims to add image processing and AI-based features, such as object tracking and face recognition. 

    Building it 

    Rather than designing SPY-DER’s body from scratch, and having recently got his first 3D printer, Arijit adapted an existing spider robot chassis, changing its dimensions to accommodate Raspberry Pi Zero W, microphone, and the Camera Module. He tweaked the spider robot’s Arduino code, but wrote the Python code for Raspberry Pi to be able to control SPY-DER. The web controls use a Flask framework with a web page coded in HTML, CSS, and jQuery. “For the live video streaming, I used RPi-Cam-Web-Interface, due to the fact that the latency is very low here,” Arijit explains. Helpfully, he provides diagrams and code.

  • Introducing Raspberry Pi Zero 2 W in The MagPi 111

    Introducing Raspberry Pi Zero 2 W in The MagPi 111

    Reading Time: 3 minutes

    Introducing Raspberry Pi Zero 2 W

    Raspberry Pi Zero 2 W packs far more power into the same space. The new quad-core 1GHz CPU is up to five times as fast as the original Zero and Raspberry Pi Zero 2 W is compatible with all current Zero projects and kits. In this month’s edition of The MagPi:

    • Complete specifications and hardware guide with all major components outlined in full detail.
    • Discover the new system in a package (SiP) process (a first for Raspberry Pi). This enables both the CPU and DRAM to share the same chip.
    • See X-ray images of Zero 2 W. A picture says 1,000 words: especially when it reveals a unique Easter Egg behind the SiP.
    • Eben Upton and Simon Martin talk us through Zero 2 W’s design. We chat with Raspberry Pi’s CEO and Founder and Principal Hardware Engineer.

    Raspberry Pi operating systems

    We love Raspberry Pi OS and it’s just one of many different OSes you can use with a Raspberry Pi computer. This month, we look at Ubuntu, RISC OS, LibreELEC, RetroPie and a wealth of other OSes. So turn your Raspberry Pi into something new with a different operating system.

    Turn Keybow 2030 into a stream deck

    Streaming video across the internet is much easier with a Stream Deck. These clever dedicated keyboards contain LEDs that light up and enable shortcuts at the touch of a button. This month, Rob Zwetsloot shows us how to turn a Keybow 2040 into a stream deck for video control.

    Pico Light arcade

    Every issue of The MagPi magazine is packed with Raspberry Pi and Raspberry Pi Pico projects. This Light Arcade is a physical recreation of the Whac-a-Mole games found in seaside arcades across the world.

    Ultimate home server: enhance your network

    Find and control smart devices on your home network using a Raspberry Pi connected to your television. PJ Evans takes a media streaming home server and adds smart networking functionality. The result is an incredibly versatile tool that entertains and looks after your house at the same time.

    Hiwonder TonyPi

    We love a good robot at The MagPi, and Hiwonder’s TonyPi is one of the most spectacular we’ve seen in a while. Discover this fully articulated walking robot with arms and a face-detecting camera.

    The MagPi magazine is available as a free digital download, or you can purchase a print edition from the Raspberry Pi Press store. Subscribe to The MagPi in print for 12-months and get a free Raspberry Pi Zero 2 computer.

  • Win one of five Waveshare E-ink Display PHATs

    Win one of five Waveshare E-ink Display PHATs

    Reading Time: < 1 minute

    Subscribe

  • PoE USB Hub HAT for Raspberry Pi Zero

    PoE USB Hub HAT for Raspberry Pi Zero

    Reading Time: 2 minutes

    The PoE USB HUB HAT for Raspberry Pi is a double-decker board that features an Ethernet port and fully isolated SMPS (Switch Mode Power Supply) on the bottom board, with a second board stacked on top holding the three USB ports. Coming already assembled, the two boards are held together by hex pillars.

    Extra pillars and screws are supplied to mount your Raspberry Pi Zero on the top – maybe this should be called a HAB (Hardware Attached on Bottom) rather than a HAT!
    PoE USB

    Power over Ethernet for Raspberry Pi Zero

    The USB board has four pogo pins that connect to test pads on the underside of Raspberry Pi Zero, so you need to ensure it’s mounted tightly and accurately to make solid connections.

    An obvious advantage of mounting the HAT underneath Raspberry Pi Zero is that it leaves the latter’s GPIO header free to connect other boards or electronic components.

    One caveat is that you’ll need an 802.3af compatible router for Power over Ethernet to work. If not, you could always add a PoE switch or injector between the router and HAT. With an input voltage of 37 to 57 V DC and output of 5 V 2 A, up to around 13 W of power can be supplied, which should be plenty for most uses. Alternatively, if you don’t need PoE, you could simply power Raspberry Pi Zero normally via micro USB, which will in turn power the HAT.

    While we’ve seen DIY solutions for adding PoE or standard Ethernet connectivity to Raspberry Pi Zero, and USB ports via a hub, this HAT offers a neat all-in-one solution. 

    • Power over Ethernet: IEEE 802.3af-compliant PoE, 37 V ~ 57 V DC input, 5 V 2 A output

    • Connectivity: 10M/100M RJ45 Ethernet port, 3 × USB-A ports

    • Dimensions:23.1 × 65 mm

    PoE USB HAT for Raspberry Pi Zero verdict

    Adds both PoE and extra USB ports to Raspberry Pi Zero without using the GPIO header.
    8/10

  • Cyberdeck portable entertainment system

    Cyberdeck portable entertainment system

    Reading Time: 3 minutes

    Encouraged by the success of his first electronics project in which he revived and added capacity to the HDMI ports of his Onkyo audio receiver, Justin began to cast around for what to make next. “The versatility, affordability, and size of Raspberry Pi really made it a smart buy during a time when I wasn’t sure what my next project would be,” he says. He knew it was to be something practical. He also found the entertainment factor of RetroPie and other retro gaming emulators intriguing, and had seen examples in portable cases. 

    Electric dreams

    “Somewhere around this time” he began reading the novel Neuromancer, “which elicited images of clandestine hackers whipping out cases that contain computers with powerful capabilities. I’ve always been a fan of James Bond and Mission Impossible. This definitely helped put my head in the right place for making something fun and useful.”

    Not content building a ‘toy without a real-world application’, he decided to make use of the word processing and internet access possibilities of Raspberry Pi OS, and to combine that with a gaming pad inside a ruggedised case. “A self-contained system with wireless access also has value in an emergency situation,” he reasons, suggesting it’s a practical option to take on a camping, fishing, or sailing trip. What would make his idea less like reinventing the laptop was having the game station and PC parts sit alongside each other, plus some serious attention to the Cyberdeck’s aesthetics.

    Raspberry Pi’s size offers perfect portability for a project in which space management was critical: “The challenge [was] to arrange the components in such a way that they are attractive and conveniently oriented in relation to one another.”

    Case study

    He sourced a Nanuk 910 waterproof case from C4Labs, which has a fan inside and pins to connect to Raspberry Pi, “so that when the board receives power, it’s also being cooled”. Furthermore, the case design meant “I could throw this entire project in the river, pull it out and open it, and the setup would be dry and ready for use.” 

    Next, Justin decided his Cyberdeck would look “so much cooler” with a keyboard. The Rii K12 model he chose, along with a 10.1-inch 1080p screen and 30,000 mAh portable battery left room for a “small framing” of protective foam and a little wriggle room, if needed, to adjust the position of the cables. To his delight, there was even room for a control board for the funky light strip he’d got his eye on.  

    This adds to the atmosphere when the Cyberdeck is being used in retro game emulation mode to play the legal ROMs he acquired online. Since he’s largely satisfied with its look and its practical, portable qualities, Justin says any future refinements are likely to be along the lines of small solar panels to boost the battery power even further, and a possible new version with a Faraday cage inside. “As to Raspberry Pi, itself, I do have a couple of ideas in the works, but I’ll keep quiet for now!” he tantalises.

  • Review: Electronic Clock for Raspberry Pi Pico

    Review: Electronic Clock for Raspberry Pi Pico

    Reading Time: 2 minutes

    Lifting off the rear panel reveals the electronics and two female headers to mount your Raspberry Pi Pico (not included). First, however, you’ll need to flash Pico with the software. The online manual is confusing, as there’s no need to compile anything with terminal commands if using a Raspberry Pi: just drag the downloadable UF2 across to the mounted Pico.

    You can then mount Pico onto the rear headers, close the rear panel (securing it with the supplied screws), plug it in, and the clock will start working.

    Customisable clock

    With settings adjusted using three push-buttons on the side, standard clock functions include two alarms, a timer, and an hourly chime option, all using the on-board piezo buzzer. There’s also the option of scrolling the display every three minutes to show the date and temperature (in °C or °F, read from the on-board RTC chip’s built-in sensor).

    That RTC (real-time clock), along with a CR2032 coin cell battery, means the clock will remember the correct time even if disconnected from 5 V power (via the supplied USB to micro USB cable), although you’ll lose any custom settings. There’s also an option to automatically adjust the LED brightness based on the built-in photoresistor.

    The unique selling point of this clock is the ability to customise the example code and add extra functions, which is done solely in the C/C++ programming languages – there’s no official MicroPython support.

  • Interview: Matt Gray

    Interview: Matt Gray

    Reading Time: < 1 minute

    A YouTuber with a penchant for making, with an amazing Raspberry Pi-powered Game Boy Camera

  • Zippy

    Zippy

    Reading Time: 3 minutes

    Tomasz Burzy is among those enthralled by NASA’s endeavour. “I became interested in robotics a while ago and love seeing the work of NASA’s Jet Propulsion Laboratory and Boston Dynamics,” he says. “The Mars rovers quickly became my favourite pieces of engineering and when I saw Perseverance, I wanted to build a replica.”

    Unfortunately, Tomasz had no experience of making a remote-control vehicle, so his partner suggested he should work on something a little smaller first. This led to the creation of a tinier tank called Zippy which he based around a Raspberry Pi Zero W computer. “It’s helped me become acquainted,” he says – although his dream of replicating the rover is still very much in mind.

    Game on

    Since starting the project, Zippy has evolved and the latest version – 3.0 – is an impressive build. It makes use of a printable modular tank model designed by Nahuel Taibo. It also uses an L298N H-bridge motor driver to operate 12 V high-torque metal gear motors, powered by an 11.4 V lithium polymer battery. 

    One version of his code uses a web server to access Zippy remotely; another allows the tank to be controlled using an Xbox One gamepad. The decision to use Raspberry Pi Zero W was primarily driven by the small amount of available room inside the plastic model, but Tomasz found it works perfectly well.

    “Zippy doesn’t have a lot of space inside of him after you put in the motors – once the motor driver and the battery are in there, it gets pretty cramped,” he explains. “But Raspberry Pi Zero W fits in perfectly and it’s a powerful enough computer to allow me to add features later on.”

    To get things moving, Tomasz had to spend time writing the code. “I only learned Python at the start of 2020, but I’ve been working with electronics on and off for a while,” he tells The MagPi. He used a Python library called approxeng.input to get the Xbox One controller working. “It lets me connect almost any control to Raspberry Pi and use its inputs,” he says.

    Room for a view

    To top things off nicely, a camera has been placed onto Zippy. “I mounted an action camera because Zippy has an interesting low-to-the-ground point-of-view,” Tomasz explains. “During one of the test drives, a fox became interested in Zippy and we got some great close-ups. Sadly, that footage was lost when my NAS failed.”

    Despite such a setback, Tomasz hasn’t lost heart and he intends to continue to persevere with his Perseverance-inspired build by making future improvements. As it stands, Zippy struggles to ride over sand, rocks, and long grass, but it makes light work of carpets and flat ground and can zip around at a fair old speed. “I’d like to add headlights or a first-person-view camera,” Tomasz reveals. The sky really is the limit for a project such as this.

  • Build an Android tablet with Raspberry Pi

    Build an Android tablet with Raspberry Pi

    Reading Time: 6 minutes

    01 Raspberry Pi hardware

    You’ll need a Raspberry Pi 4 for this project so that you can make the most out of your custom tablet, although you can use a Raspberry Pi 3B+, Raspberry Pi 400, and Compute Module 3 with emteria. Emteria also supports HDMI on Raspberry Pi so you can connect it to a monitor, TV, or other kind of small display depending on if you want to use it as a tablet for development.

    With an official touchscreen, you can cut down on some wires and have it work in a traditional Android way.

    02 Build your tablet – part 1

    To make sure everything is working before fully committing to our build, we suggest just connecting Raspberry Pi 4 to the display at first. You may need to construct your screen, however that is quite simple and there are full instructions here.

    You do not need to add the jumper wires between the control board and Raspberry Pi though, as you will need to power Raspberry Pi and the display separately. You can use the special USB splitter cable that came with the SmartiPi Touch 2 case if you wish to make it easier down the road, however you will at least need a micro USB power supply and a USB C power supply.

    03 emteria.OS Installer

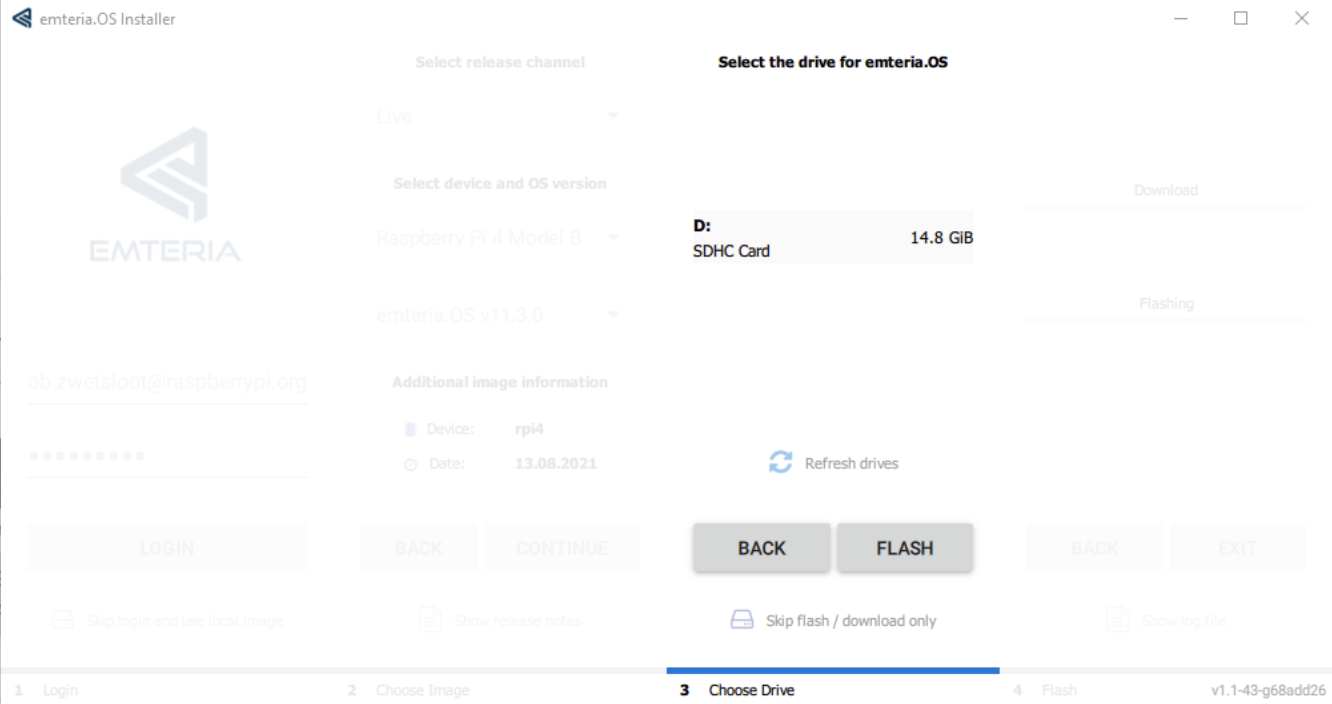
    You’ll need to create an account for emteria.OS, which you can do at Emteria’s website. Once you’ve done that, you can head to the download page and download the installer. Run the program once it’s downloaded to install – you may need to tell Windows to ‘run the software anyway’ if a warning window pops up.

    Once this is done, open the Emteria installer app, and you will be asked to login using the account details you created earlier. From there, select your hardware (Raspberry Pi 4), choose the right SD card if you have multiple plugged in, and then click flash for the installer to do its job.

    04 Initial emteria.OS boot

    Once the install has finished, plug your SD card into your Raspberry Pi connected to the touchscreen. Put the power in for the screen (the micro USB on the controller board), and then plug the power into Raspberry Pi 4.

    It will cycle through the boot a few times before finally showing the emteria logo pulsing – after a while this will transition to a grey screen and do some set up before allowing you to click on next, where you’ll perform the classic Android setup.

    05 Initial emteria.OS setup

    The touchscreen will be working at this point, however you can always connect a mouse and keyboard if you want to run through the process a little quicker. After setting your time zone time, and date, you then need to select your WiFi network to connect to. Once again, if you’ve used Android this should be familiar.

    Now you need to activate your install (although you can test it out for eight hours at a time before a reboot). We logged in via our account, but you can enter a key if that’s easier for you. Skip the next two steps, agree to the EULA, and hit reboot for everything to be applied.

    06 Build the tablet – part 2

    If installation and setup went fine, you can install your Raspberry Pi and screen into the SmartiPi case. Once again there is a handy build guide on how to do this.

    At this point you can add a Raspberry Pi Camera Module to the whole case build, however at the time of writing it is not supported in the OS. The emteria team are working on it though, and some USB webcams are supported right now, so if you’re desperate to take photos there are ways.

    07 Install extra software

    As emteria is not an official version of Android, you’ll not have access to the standard Play Store. You can still sideload APK files if you download files to the device though, and there is F-Droid which is a free and open-source app store for Android. Opening up this app will prompt you to do an update before installing any apps, just like you would on the Play Store. You will have to allow it to install third-party apps from the system settings, which it will help you do.

    08 Advanced settings

    You’ve probably noticed that the tablet is currently set to landscape. With no gyro inside, you cannot automatically change the orientation. Bringing up the emteria settings allows you change the orientation to portrait (90 degrees), or even flip the entire screen over (180 degrees). You’ll also notice there are a load of the developer settings sitting in here, such as keeping the screen awake (useful if you have it plugged into a power supply for this stage), along with other settings for remote work, Ethernet connections, launching apps at boot, etc.

    09 Other Android differences

    While many parts of emteria work like stock Android, there are a few differences that are worth noting. First of all, as there is no dedicated off button on a Raspberry Pi, you’ll find there is a shutdown app in the library that allows you to turn off, reboot, and head to recovery. The browser is not Chrome, and other default apps are swapped with non-Google based ones. You can still login to Google services using the browser though, and there are other browsers you can try as well.
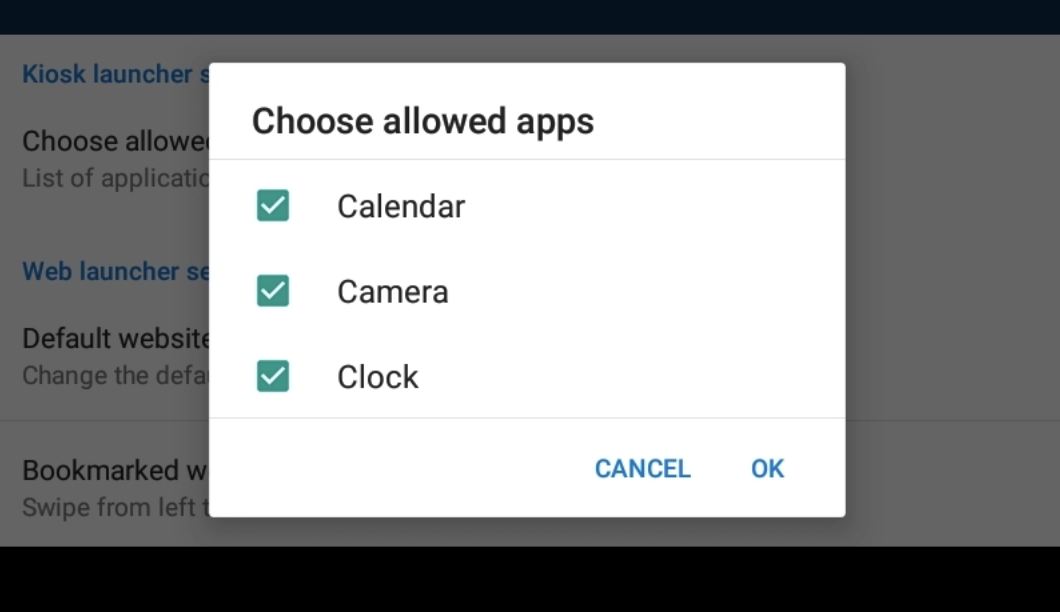
    10 Kiosk mode

    One of the great features of emteria is its ability to act as a kiosk – a terminal with limited functions that you set yourself. It’s meant for more public places that might require people to sign up to a service, or get directions in a large area.

    To turn it on, go to the emteria settings and toggle Kiosk state. Set a password so you can turn it back off, and then select Kiosk or Web launcher. In Kiosk launcher you can choose ‘approved apps’, which will be the only apps the users can use. Similarly, web launcher sets a selection of bookmarked websites that are the only ones that can be visited. Tapping ten times on the screen will bring back the Kiosk settings menu.

    11 Portability

    As well as a portable battery, taking a power supply with you can also work in case you stop in a place with power. SmartiPi Touch 2 also has a stand, making it easier to use on the go as well, however it does mean it’s not quite as slim when folded up – the stand part can actually be removed with a screw to cut down on this size, making the whole thing a little easier to take with you. 

    12 Development tips

    Emteria is based on the latest version of Android – Android 11 – making it a great development environment for Android apps. Even just connecting it to a monitor, or using the VNC functions, will allow you to test out apps you’re creating.

    Heading to developer.android.com will give you some great beginner tutorials and sample code on how to start, as well as the tools needed to build apps.

  • Keybow 2040 review

    Keybow 2040 review

    Reading Time: 2 minutes

    It comes with one of three sets of key switch types depending on your preference: mechanical (clicky-clacky), linear (silent), and tactile (silent with some resistance). All versions have an LED in the switch which is fully programmable, and the keys are standard sized so you can easily swap them out for others if you’d like. There’s also a cheaper base kit for which you’ll need to provide your own switches and keycaps.

    Lock on

    Some construction is required, but it’s very minimal – add the switches, sandwich the layers together, and then put the keys on. We were done in a couple minutes, at which point you can actually start using the Keybow as a number pad by plugging it in.

    Unlike a standard Pico, the Keybow is connected via a USB-C cable to your computer of choice. There doesn’t seem to be any technical advantage to having USB-C; however, it does mean the basic design has some forward compatibility for Pimoroni. Also, it’s nice to have more stuff making use of USB-C. A couple of hardware buttons are also included: one to reset the Keybow, and one to hold down to do the boot selection if you want to tinker with the code.

    Custom combo

    The code itself is written in CircuitPython, which is derived from the MicroPython – both can be used on a regular Pico and they’re largely similar as well. Whatever changes you need can be gleaned from the abundant example programs that are installed on Keybow 2040.

    With little effort we were able to change the way the keys work – with constantly lit buttons that change when pressed, and passing along a specific combos of keys for when they’re pressed rather than a single numpad key. Due to the way it loads scripts, you can immediately test out your edits, making for very quick prototyping and bug fixing.

    We’ve been using a linear version for weeks now during streams as a custom stream deck, and it works perfectly with our custom setup (the code for which we’ll drop on magpi.cc/github). It’s sturdy, turns on quickly, the LEDs are bright, and we’ve had no noticeable lag on a button press. With the removable caps, you can add custom ones with specific labels like a mute icon or specific scene modes, etc., making it perfect for this, and much cheaper and more hackable than some of the commercial alternatives.

    Verdict

    10/10

    A premium-feeling product that is easily customisable and priced much more fairly than less-open alternatives.

  • Package Thief Deterrent

    Package Thief Deterrent

    Reading Time: 3 minutes

    Flour power

    Following the theft of a package from his porch earlier in the year, Ryder decided to take action. “It had never happened to me before and I was a little frustrated,” he recalls. “I’d been doing some image classification work at the time, and figured this would be a great opportunity to build something to deter people from stealing packages from my porch.”

    Armed with a Raspberry Pi 4, a security camera, and various other ingredients, he set about making something that certainly caused a stir in the neighbourhood, as his must-watch YouTube video demonstrates. “I built the project more for entertainment value than actual use (since I’ve only ever had one package stolen), but I consider it a success either way,” he tells us.

    So, how does the alarm system work? Using a security camera pointed at Ryder’s door, images from the camera are pulled by his Raspberry Pi and processed by a custom machine learning model to detect if there is or isn’t a package. 

    “If a package has been taken unexpectedly, Raspberry Pi sends signals to a relay (via its GPIO pins) to activate a variety of alarms to entice the ‘thief’ to drop the package,” Ryder explains.  Those surprises for thieves include a sprinkler, a loud truck horn, and a flour shower. 

    “This is definitely a great project if you’re looking to get your feet wet into machine learning – though I don’t recommend you implement the sprinkler, flour, or air horn components,” he says. “All the participants in my video were friends and neighbours of mine, and implementing the exact same setup for the public will likely get you into some sort of trouble,” he cautions. However, he does suggest that you can modify the project to send you an email when a package arrives, or has been taken unexpectedly, which may be a more prudent route to take!

    Averting a cat-astrophe

    Computer vision is central to Ryder’s project, and he used Google Cloud AutoML to train the machine learning model. “I wanted something to include in my video that was easiest for those getting started with machine learning to use,” he reveals. “Training a model yourself can be quite intimidating.” 

    It wasn’t plain sailing to get this system working as he wanted. Ryder originally had all alarms and sprinklers go off at the same time, but decided to move them to separate threads with separate timings in order to best soak his very obliging friends and neighbours. “The model [is] great at detecting whether there is or is not a package,” he says “but it also sometimes recognises my cats as packages!” He also sensibly trained the system to disarm when he arrived to pick up his parcels.

    Many co-operative friends and neighbours have embraced his undertaking, “though I did buy my neighbours a few boxes of chocolate afterwards to say sorry for the noise”, Ryder admits. For the time being, he has dismantled this project, “since I don’t really have the need for it, but I’m brainstorming some version two ideas – one of which involves a net.” Any future front-step felons may be in for a shock!

  • OPINION: A life in electronics

    OPINION: A life in electronics

    Reading Time: 2 minutes

    This, in turn, enabled me to take a combined Physics & Electronics degree at Newcastle upon Tyne Polytechnic. When I went for an interview, my first encounter with a strong Geordie accent did leave me wondering where the hell I was. The maths module had three lectures about programming in Fortran II, these were the only lessons I had in programming, but I was hooked!

    After graduation, I worked on a form of audio compression called adaptive delta, pulse code modulation or ADPCM, later to be used by Microsoft and Apple.

    I was in the right place at the right time. In 1976 I built my first computer from just the information in the data sheet of the Signetics 2650 microprocessor. I got a lecturing position at Manchester Polytechnic’s Physics department, and one day I was contacted out of the blue by Mike Bibby. He had been asked to start a magazine about home computers and an ex-student had told him about me. I agreed to do four articles, convinced the magazine would not go further. Well, it did go further: 210 issues in total with my articles under the titles of ‘Body Building Course’ (BBC), and ‘Run the RISC’.

    When Raspberry Pi took over the running of The MagPi magazine, I was approached to see if I could write for it. Previously I had one article published in The MagPi magazine issue #5, which made the front cover. However, ‘Mike’s Pi Bakery’ began in The MagPi issue #33, and ran all the way to issue #109.

    Having reached the grand old age of 70, I felt it was time to catch up on all those projects I had been wanting to do for years but never had the time. The first one is to convert all the Sony 8 videotapes of my children growing up into a digital format. However, I am not going for good, I expect to return for the occasional ad-hoc article.

    It has been an absolute privilege to write in The MagPi magazine, and attending various Raspberry Pi events, and shows, meeting some of my readers. Thanks for having me.

  • miniLIGO gravitational wave detector

    miniLIGO gravitational wave detector

    Reading Time: 4 minutes

    Understanding space has always interested Husni Almoubayyed, so he was attracted to the idea of something that can monitor gravitational effects “stretching and contracting space around us on a very tiny scale”. While there was no expectation of building their own LIGO device, not least because of the expense involved, Husni and fellow students wanted to help communicate to a wide audience how LIGO works. miniLIGO is designed to be a “simplistic and affordable” prototype mimicking the laser-interferometer gravitational wave observatory experiment that won the Nobel Prize in physics in 2017.

    Sensitive subject

    The team had an advantage because Husni had worked on the original LIGO project when he was studying at Glasgow University as part of a scientific collaboration. “While I mostly worked on data analysis at that time, I wanted to experience some of LIGO’s engineering challenges,” he says, of which one is creating an interferometer (magpi.cc/ligoifm) for highly detailed analysis work. For example, CalTech’s LIGO interferometers can measure a distance 1/10,000th the width of a proton!

    “LIGO is an extremely expensive and large-scale experiment,” says Husni, and some major decisions were needed about how to create a prototype cost-effectively. With the aim of building the miniLIGO project for less than $1000, it was clear that some compromises would be needed, while mimicking the original LIGO concept as closely as possible.

    “LIGO has an extremely accurate damping system that works to shield it from vibrations and seismic changes,” Husni explains. “We considered using a six-axes motion sensor as a low-cost alternative, and to correct the signal computationally using the sensor, but ultimately decided to leave it out as we deemed that it would not be a good use of time and resources as stronger sources of noise would still dominate the signal.” 

    Having used microcontrollers and Raspberry Pi for wearable computing and music-based projects, the possibilities of single-board computers were clear. (One of the other projects you’ll find on the husni.space website is a graphical tablet that makes music with a corresponding artistic visualisation.) “Raspberry Pi allows us to easily connect all the pieces of the project, and has enough processing power to do signal processing in real time,” he says. Raspberry Pi provides easy interaction with the light sensor, while also having plenty of processing power to analyse and process wave signals in real-time. It also meant the project could be portable – the team successfully ran miniLIGO from a battery pack.

    Getting set up

    A Raspberry Pi 3B, connected to a portable battery and a Bluetooth speaker, and a GPIO library are at the heart of miniLIGO. The team used an Adafruit High Dynamic Range Light Sensor and optical equipment, including the lenses and laser from Edmund Optics, then added a monitor and a speaker. Access to the university 3D printing lab meant they were able to 3D-print their own case. 

    When it came to writing software for miniLIGO, they decided to use Python code, largely because of the “mature and easy-to-use” Python library, from which they chose some of the common scientific computing libraries such as numpy, scipy, and matplotlib. 

    When miniLIGo’s sensors detect a signal, its software analyses it, visualises it in real-time and plays a sound representation of it in Python. The team also wrote the software to simulate a gravitational wave signal whenever the red button on the device is pressed. 

    Husni explains: “miniLIGO is based on a Michelson interferometer setup that has several applications in physics and astronomy. Although it is nowhere near precise enough for gravitational wave detection, miniLIGO can be used to detect sources of noise that LIGO encounters, such as when lightning strikes nearby.”

  • Discover Smart Gadgets in The MagPi 110

    Discover Smart Gadgets in The MagPi 110

    Reading Time: 3 minutes

    Raspberry Pi Smart Gadgets

    Raspberry Pi Smart Gadgets

    This month we look at hacking home appliances, smart food and drink setups, super projects for pets, health & fitness gadgets and wearable tech. There’s a wealth of ideas for making fun Raspberry Pi gadgetry.

    Spook up your Raspberry Pi

    Spook up your Raspberry Pi for Halloween 

    It’s the time of year to take your projects and make them scary. Rob Zwetsloot has malicious mirrors, shocking detectors, spooky artworks, and a frightening photo booth.

    miniLIGO

    The miniLIGO gravitational wave detector

    How a bunch of PhD students are using Raspberry Pi to recreate a Nobel-prize winning concept by building a gravitational wave tracker. The miniLIGO fires lasers to create an interferometer for subatomic analysis.

    Zippy

    The best projects: meet Zippy the tiny tank

    We love a robot here at The MagPi magazine, and Zippy’s colourful looks and trundling tracks quickly stole our hearts. Maker, Tomasz Burzy talks to us about how his modular build uses Raspberry Pi Zero, a webcam and Xbox controller to trundle around.

    Make retro noises with Raspberry Pi

    Make retro noises with Raspberry Pi

    Following in the footsteps of Simon Martin’s SID Synth6581 project is this accessible build by retro expert KG Orhphanides. This retro noises build uses an OPL2 Audio Board with Raspberry Pi to generate classic 8-bit noises. 

    Keybow 2040

    Keybow 2040

    We’re starting to see the first products built on RP2040, Raspberry Pi’s custom silicon microcontroller (the heart of Raspberry Pi Pico). Keybow 2040 is a square keyboard with backlit keys that Rob Zwetsloot has been using as a stream deck (a controller used during video and game streaming). It’s much cheaper and more hackable than the commercial alternatives.

    Matt Gray interview

    Community interview with Matt Gray

    We talk with the YouTuber with a penchant for making and an amazing array of gadgets including a Freddie Mercury thermometer and a HoverPub. Matt talks to us about his latest hack, a Raspberry Pi-powered Game Boy Camera.

    Pick up your copy of The MagPi magazine #109

    The MagPi magazine is available as a free digital download, or you can purchase a print edition from the Raspberry Pi Press store.