Kit you’ll need
See also: Build a home music system with Raspberry Pi and Make a audio system with Mopidy
Tip! Choose your DAC
There are a wide range of digital-audio convertors out there catering for every budget from £12 to thousands – choose wisely.
Going multi-room
Sure, playback from our Mopidy setup is great, but you don’t want to be carrying that setup around the house. With Snapcast we can play music anywhere in perfect sync so you can wander around your home without interruption. This clever piece of open-source software sends out audio in ‘frames’, each one with a time code attached. Any device that’s part of the stream matches the frame’s time code to its own internal clock to ensure playback happens at the same time, providing in-sync audio. The only downside is a short delay in starting playback as everything syncs up.
Snap to it
Before we can add Snapcast clients, our original Mopidy needs to become one itself, so it can keep in sync with everything else. We start by installing the Snapcast client and server on the same machine (it’s effectively streaming to itself). Enter the following on the command line to download the client:
wget https://github.com/badaix/snapcast/releases/download/v0.20.0/snapclient_0.20.0-1_armhf.debsudo dpkg -i snapclient_0.20.0-1_armhf.debIf you get an error here, run this to fix it:
sudo apt -f installThis automated install sets everything up and will restart the service on reboot.
Snappy service
We have the client running on your Mopidy system, but nothing to serve music. So, now install the server:
wget https://github.com/badaix/snapcast/releases/download/v0.20.0/snapserver_0.20.0-1_armhf.debsudo dpkg -i snapserver_0.20.0-1_armhf.debThis will also restart on boot. The client will automatically find the server as its local. Now tell Mopidy to send its audio stream to the Snapcast server instead of the DAC.
sudo nano /etc/mopidy/mopidy.confChange…
output = autoaudiosink…to (on one line):
output = audioresample ! audioconvert ! audio/x-raw,rate=48000,channels=2,format=S16LE ! wavenc ! filesink location=/tmp/snapfifoNow restart Mopidy:
Tell Iris about it
Iris comes with full control over the Snapcast system. After restarting Mopidy, go to the Iris interface and into Settings. You’ll see a Snapcast icon. Click on it and then click ‘Enable’. You should see a ‘Connected’ message appear. There will also be a group which represents your local Mopidy setup. Click the group to rename it to something memorable. Before proceeding further, make sure that playback still works. It’ll take a second or two longer to start as Snapcast syncs up, but should otherwise be unaffected. If it works well, your local Mopidy setup is complete.

Just add clients
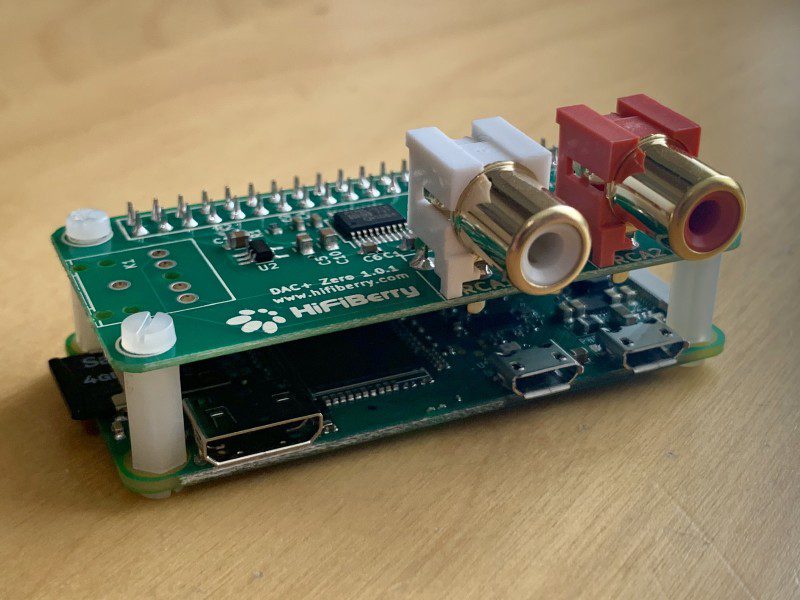
Your system is now in effect streaming to itself, which means it can play in sync with other devices, so let’s add one. We’re using the HiFiBerry DAC+Zero, a great DAC for a small price. Start by connecting the DAC to a Raspberry Pi Zero W, ideally using standoffs to ensure a secure fit. Install Raspberry Pi OS Lite on this device as we’re going to be running it headless. Using raspi-config make sure you’ve configured wireless LAN and set a suitable hostname. Now update everything to the latest version using:
sudo apt -y update && sudo apt -y full-upgradeMake some noise
To enable the DAC+ Zero, get command-line access to your Raspberry Pi Zero W (using SSH or connect up a monitor and keyboard) and edit the main configuration file:
sudo nano /boot/config.txtNear the end of the file, find the line reading:
dtparam=audio=onDelete it (or comment out with a #) and add:
dtoverlay=hifiberry-dacSave (CTRL+X) and reboot your computer. Once back up, connect the phono sockets on the DAC to an amplifier and test the output:
aplay /usr/share/sounds/alsa/Front_Center.wavIf everything is working well, a nice person will say “front centre”.

Join the band
To get streaming working, we now repeat the process for installing the Snapcast client. Start by downloading and installing the client:
wget https://github.com/badaix/snapcast/releases/download/v0.20.0/snapclient_0.20.0-1_armhf.debsudo dpkg -i snapclient_0.20.0-1_armhf.debIf you see errors at the end of the process with the line ‘dependency problems – leaving unconfigured’, run the following command:
sudo apt -f installThis will detect and install all the dependencies required and then finish configuration. Snapcast will be configured to automatically start on boot.

Configure and test
The Snapcast client is now running, but we need to tell it where the server is. Edit the configuration file:
sudo nano /etc/default/snapclientFind the line that reads SNAPCAST_OPTS=““ and add your Mopidy server hostname as follows:
SNAPCLIENT_OPTS="--host jukebox.local”Replace ‘jukebox.local’ with whatever you named your server. Save and exit, then restart the client:
sudo systemctl restart snapclientIn a web browser, open up Iris on your main server and go to Settings, then click on Snapcast. You should see a new group (something like ‘Group 8ec’); that’s your device.

Play, tweak, repeat
Now try playing something from Mopidy with your new client hooked up to an amplifier or active speaker. Everything should be in sync. If not, you can adjust latency under your group settings to fine-tune the playback. At the bottom of the screen, you can click the speaker icon to control which devices are playing and set their individual volume levels.
You can add as many Snapcast clients as you like. It’s a great use for an older Raspberry Pi and you don’t have to use a DAC, you can just use the standard audio/video jack to an active speaker. We built another client using Pimoroni’s Speaker pHAT and a battery for portable tunes.
Add some Apple
Snapcast supports multiple streams, allowing clients to switch between them. We can add Apple AirPlay 2 support as a Snapcast stream that runs alongside Mopidy. We can’t just install a package, though: we have to build and install Shairport Sync with the following commands:
cdsudo apt install build-essential git xmltoman autoconf automake libtool libpopt-dev libconfig-dev libasound2-dev avahi-daemon libavahi-client-dev libssl-dev libsoxr-devgit clone https://github.com/mikebrady/shairport-sync.gitautoreconf -fi./configure --with-stdout --with-avahi --with-ssl=openssl --with-metadatamakesudo make installMultistream!
The final step is to configure Snapcast to enable Shairport Sync as a stream. Open up the Snapcast configuration file as follows:
sudo nano /etc/snapserver.confIn the section starting [stream] you’ll see an entry starting stream =. Directly under there add the following line:
stream = airplay:///shairport-sync?name=Airplay&devicename=Jukebox(You can change the names to anything you like.) Now restart everything:
sudo systemctl restart snapserver.servicesudo systemctl restart mopidy.serviceIn Iris, go to the Snapcast settings and change the default stream to AirPlay. You can now push audio from iOS devices and Macs to your music system or any other Snapcast client.

Going further
If you’ve played along and built this setup, you how have a pretty sweet audio player setup. The great thing about this project is the wider range of budgets and platforms for which it caters. You can reuse older hardware, upcycle speakers, and turn just about anything with a processor into a streaming client. You can also get HATs with pure digital S/PDIF or coaxial output so you can use an amplifier’s DAC if you prefer. How about using a USB audio capture device to stream audio around the house from your record player? As ever, it’s over to you.
Tip! DAC’s not for me
If you’re on a tight budget, you don’t need a DAC at all. The line-out found on board most Raspberry Pi computers will suffice for smaller projects.
Schreibe einen Kommentar
Du musst angemeldet sein, um einen Kommentar abzugeben.