Kategorie: PC

  • Back to School VR sale! Join the Education Evolution

    Back to School VR sale! Join the Education Evolution

    Reading Time: 3 minutes

    Whether you’re a parent sending a child back to school, a student yourself or just someone who never lost the love of learning, we want to evolve your education in VR! You can save up to 90% on selected titles in our Back to School Sale, on now.

    Back to school - Overview

    An incredible, awe-inspiring experience that is a consistent favorite of Viveport Subscription members, OVERVIEW is a journey through our universe that will take your breath away. We like it so much we’re offering it for FREE, right now, to any existing Viveport Subscription members – and anyone who signs up for a free trial (or pre-paid plan!) between now and the end of the sale.

    [youtube https://www.youtube.com/watch?v=CaNI2vY2E14]

    Why try Viveport Subscription? For anyone interested in VR education, it’s a great value way to get access to hundreds of VR experiences for one monthly price (which gets even cheaper if you pre-pay!). Every month you pick up to 5 titles to experience, then use them as much as you want. You can keep playing the same titles over and over if you like, or switch it up every month to mix and match old favorites and new experiences. We’re adding more titles all the time, so your selection just keeps on growing.

    As a Viveport Subscription member, to add OVERVIEW to your Library, just visit the product page and click ‘Free’ to add it. If you enjoy OVERVIEW, don’t forget to leave a review!


    Back to School VR sale

    To make finding the perfect educational VR experience a little easier, we’ve broken down our educational offerings into easy to browse categories. This should cover the whole educational spectrum – and includes a wide selection of free titles. Not everything is on sale, but we recommend everything you’ll see. It’s all been hand-picked to represent some of the best titles available in VR.

    Back to school VR sale

    Here’s just some of what’s on offer:

    Travel around the globe and visit Tokyo without leaving your VR headset. Parachute down to pierce the rainforest’s canopy. Dive beneath the waves to swim with sharks. Or go nose-to-nose with dinosaurs.

    Whether it’s in music, animation or art, there are amazing ways to bring creativity to life in VR.

    With interest in space exploration on the increase, and the possibility of a mission to Mars inside your children’s lifetimes… isn’t it a good idea to get them prepared for that in VR? Don’t forget to go back and look at the origins of the modern space program, too.

    VR can be a formidable time machine, transporting you to times and places you’d never be able to see. From seeing Pearl Harbor through the eyes of someone who was there, or visiting incredible virtual museums, you can bring history and art to life in VR in a spectacular way.

    Back to School

    Of course, you can’t be at school and be learning all the time – that’s one of the reason ‘recess’ and ‘physical education’ exist. Which is why we’ve also got some great physical VR experiences on sale too, allowing you to play table tennis, box and kick the old soccer ball around in VR.

    Who needs a interior design or shop class when you can virtually design just about anything you want? Craft precision 3D content to print or use in other apps, or create fully interactive versions of your dream home with these intuitive VR design experiences.

    Are you ready to evolve your education? Class is in session!

    Website: LINK

  • Daily Deal – PC Building Simulator, 25% Off

    Daily Deal – PC Building Simulator, 25% Off

    Reading Time: < 1 minute

    Today’s Deal: Save 25% on PC Building Simulator!*

    Look for the deals each day on the front page of Steam. Or follow us on twitter or Facebook for instant notifications wherever you are!

    *Offer ends Sunday at 10AM Pacific Time
    Website: LINK

  • Now Available on Steam – F1 2018

    Now Available on Steam – F1 2018

    Reading Time: < 1 minute

    F1 2018 is Now Available on Steam.

    MAKE HEADLINES in F1® 2018. F1 2018 is the official videogame of the 2018 FIA FORMULA ONE WORLD CHAMPIONSHIP™. The new game immerses players into the world of Formula 1® more than ever before.

    Website: LINK

  • Introducing the PoE HAT – available now!

    Introducing the PoE HAT – available now!

    Reading Time: 3 minutes

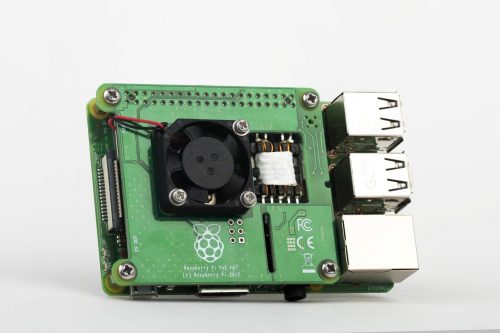
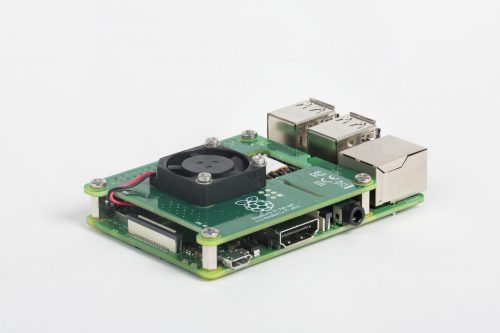
    In March 2018 we announced the launch of Raspberry Pi 3 Model B+. One of the many features added to the new board was the ability to be powered through Power over Ethernet (PoE) with a HAT. We are really pleased to announce that the PoE HAT is on sale from today.

    Raspberry Pi PoE HAT Power over ethernet

    The HAT connects to the Raspberry Pi 3+’ 0.1” headers; the 40-way GPIO; and the new 4-pin header near the USB connectors, which allows you to power the system using your Ethernet cable.

    Power over Ethernet

    Power over Ethernet is a widely adopted standard that places power on the Ethernet cable along with the data. It has no effect on the data, so you won’t lose bandwidth by using PoE. There are various standards of PoE; this HAT uses the most common standard 802.3af, which allows delivery of up to 15W. This means that the HAT is capable of providing all the power needed for running your Raspberry Pi. You will need power sourcing equipment to power your Pi. This is either provided by your network switch or with power injectors on an Ethernet cable.

    Raspberry Pi PoE HAT Power over ethernet

    Using the PoE HAT

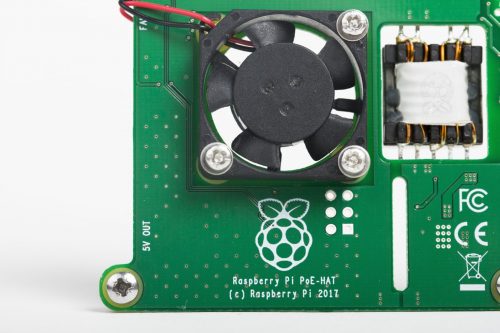
    The HAT is a compact, single-sided board that sits within the footprint of the Raspberry Pi. It will fit comfortably inside an official Raspberry Pi case. A small (25mm) fan is pre-installed on the board. We see the product as a useful component for people building systems that may be in tougher environments, so the addition of the fan helps with cooling. The fan is controlled over I2C via a small ATMEL processor which allows for it to be temperature-controlled: when your Raspberry Pi processor hits certain temperatures, the fan will be turned on to cool it down. To enable this you will need to get the latest firmware (sudo rpi-update).

    Raspberry Pi PoE HAT Power over ethernet

    Because the fan is controlled over I2C, none of the GPIO are used, so you can stack a second HAT on top of the connector. To do this you will need to buy some longer pass-through headers that expose the pins on the other side of the PoE HAT. You will need one for the 40-way and one for the 4-way connector that has the PoE splitters on it.

    We’ve tested a variety of pass-through headers and can recommend the 2×20 pin header from Pimoroni and the 4-way risers from RS and element14.

    Getting mains power to remote areas of buildings is often tricky. PoE support enables this with just an Ethernet cable, allowing you to provide power (and data) to your Pi wherever it is located. With the improved network booting you can now dispense with not only the power supply but also the SD Card, making deployment even cheaper for a Raspberry Pi based system in your factory or workplace.

    Get ahead, get a HAT

    We are very excited to see what new projects this enables for you. The Raspberry Pi Power over Ethernet HAT is available for sale now at $20, from Farnell, RS and The Approved Reseller Network.

    Edit: I just saw this online and thought it was cool – Alex

    Chris Burton on Twitter

    Official @Raspberry_Pi PoE HAT powering the #ClusterHAT. With “temp_soft_limit=70” set, running #dnetc on all Pi Zeros and 4 cores of the #3Bplus looks to max out at 68.8C with no throttling 🙂

    Website: LINK

  • Weekend Deal – Hollow Knight, 34% Off

    Weekend Deal – Hollow Knight, 34% Off

    Reading Time: < 1 minute

    Save 34% on Hollow Knight as part of this week’s Weekend Deal*!

    *Offer ends Monday at 10AM Pacific Time
    Website: LINK

  • HackSpace magazine 10: build a drone

    HackSpace magazine 10: build a drone

    Reading Time: 3 minutes

    If you’re a subscriber to HackSpace magazine you’ll already know all about issue 10. For the rest of you who’ve yet to subscribe, issue 10 is out today!

    HackSpace magazine 10 Raspberry Pi Press

    Build a drone

    Ever since Icarus flew too close to the sun, man has dreamed of flight. Thanks to brushless motors, cheaper batteries than ever before, and smaller, more powerful microcontrollers, pretty much anyone with the right know-how can build their own drone. Discover the crucial steps you need to get right; find the right motors, propellers, and chassis; then get out there while the weather is still good and soar like a PCB eagle.

    Rocket-launching robot

    If you prefer to keep your remote-controlled vehicles on the ground, we have an inspiring tale of how one maker combined a miniature strandbeest with our other great obsession (fire, obviously) to create a unique firework launcher. Guy Fawkes would surely be pleased.

    HackSpace magazine 10 Raspberry Pi Press

    Hardware hacking for the environment

    In less frivolous project news, we’re reporting from the Okavango Delta in Botswana, where open hardware, open data, and the hard work of volunteers are giving ecologists more information about this essential wetland region. Makers are bringing science out of labs and classrooms, and putting it into the hands of citizen scientists who want to understand and protect their local environment – that’s something we should be proud of.

    HackSpace magazine 10 Raspberry Pi Press

    PCBs win prizes

    The Hackaday Prize: the Academy Awards of open hardware. Enter your project today and you stand a chance of winning $50,000. The competition is fierce, so before you do, read our interview with Stephen Tranovich. Stephen is the Technical Community Lead at the Hackaday Prize and decides who gets the chance to win the glittering prizes. Learn from their words!

    HackSpace magazine 10 Raspberry Pi Press

    Food

    Our editor Ben loves to eat, so this month he’s been eating lamb kebabs cooked in his home-made tandoor. This ancient cooking method is used all over the Indian subcontinent, and imparts a unique flavour with its combination of heat and steam. Best of all, you can make your own tandoor oven with a Dremel and a few plant pots.

    HackSpace magazine 10 Raspberry Pi Press

    Tutorials

    Add push notifications to your letterbox (so your dog doesn’t eat your new passport), write a game for an Arduino, add a recharging pocket to a bag so you can Instagram on the go, and learn everything there is to know about capacitors. All this and more, in HackSpace magazine issue 10!

    Get your copy of HackSpace magazine

    If you like the sound of this month’s content, you can find HackSpace magazine in WHSmith, Tesco, Sainsbury’s, and independent newsagents in the UK. If you live in the US, check out your local Barnes & Noble, Fry’s, or Micro Center next week. We’re also shipping to stores in Australia, Hong Kong, Canada, Singapore, Belgium, and Brazil, so be sure to ask your local newsagent whether they’ll be getting HackSpace magazine. And if you’d rather try before you buy, you can always download the free PDF.

    Subscribe now

    Subscribe now” may not be subtle as a marketing message, but we really think you should. You’ll get the magazine early, plus a lovely physical paper copy, which has really good battery life.

    HackSpace magazine 10 Raspberry Pi Press

    Oh, and twelve-month print subscribers get an Adafruit Circuit Playground Express loaded with inputs and sensors and ready for your next project. Tempted?

    Website: LINK

  • For Honor Starter Edition – Free for a Limited Time!

    For Honor Starter Edition – Free for a Limited Time!

    Reading Time: < 1 minute

    Get the Starter Edition of FOR HONOR™ FREE for a limited time, and save 75% on the Standard, Deluxe and Gold Editions as part of this week’s Weekend Deal!*

    *Offer ends Monday at 10AM Pacific Time
    Website: LINK

  • Daily Deal – Ancestors Legacy, 30% Off

    Daily Deal – Ancestors Legacy, 30% Off

    Reading Time: < 1 minute

    Today’s Deal: Save 30% on Ancestors Legacy!*

    Look for the deals each day on the front page of Steam. Or follow us on twitter or Facebook for instant notifications wherever you are!

    *Offer ends Friday at 10AM Pacific Time
    Website: LINK

  • Build a social media follower counter

    Build a social media follower counter

    Reading Time: 9 minutes

    In this tutorial from HackSpace magazine issue 9, Paul Freeman-Powell shows you how to keep track of your social media followers, and encourage subscribers, by building a live follower counter. Get your copy of HackSpace magazine in stores now, or download it as a free PDF here.

    Issues 10 of HackSpace magazine is available online and in stores from tomorrow!

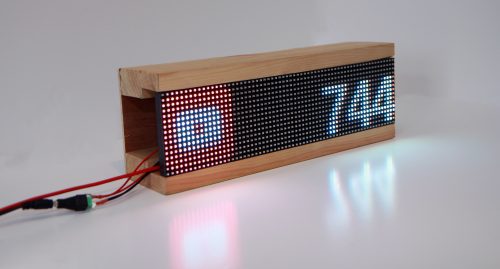
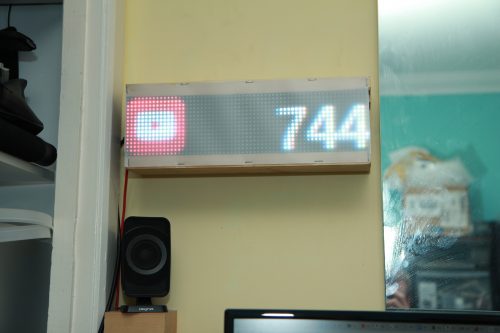
    The finished build with all components connected, working, and installed in the frame ready for hanging on the wall

    If you run a local business like an electronics shop or a café, or if you just want to grow your online following and influence, this project is a fun way to help you keep track of your progress. A counter could also help contribute to growing your following if you hang it on the wall and actively ask your customers to like/follow you to see the numbers go up!

    You’ve probably seen those social media follower counters that feature mechanical splitflap displays. In this project we’ll build a counter powered by RGB LEDs that scrolls through four social profiles, using APIs to pull the number of followers for each account. I’m using YouTube, Twitter, Facebook, and Instagram; you can, of course, tailor the project to your needs.

    This project involves a bit of electronics, a bit of software coding, and a bit of woodwork, as well as some fairly advanced display work as we transfer a small portion of the Raspberry Pi’s HDMI output onto the LED matrices.

    Let’s get social

    First, you need to get your Raspberry Pi all set up and talking to the social networks that you’re going to display. Usually, it’s advisable to install Raspbian without any graphical user interface (GUI) for most electronics projects, but in this case you’ll be actively using that GUI, so make sure you start with a fresh and up-to-date installation of full-fat Raspbian.

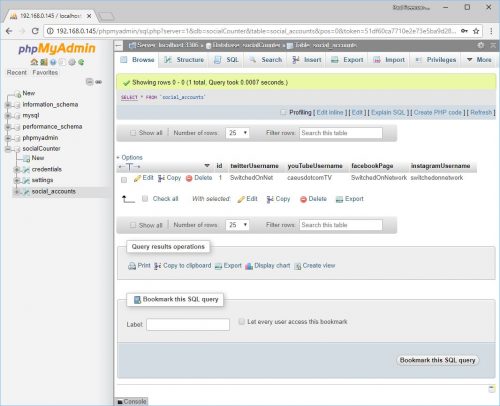
    phpMyAdmin gives you an easy web interface to allow you to access and edit the device’s settings – for example, speed and direction of scrolling, API credentials, and the social network accounts to monitor

    You start by turning your humble little Raspberry Pi into your very own mini web server, which will gather your credentials, talk to the social networks, and display the follower counts. To do this, you need to install a LAMP (Linux, Apache, MySQL, PHP) stack. Start by installing the Apache web server by opening a Terminal and typing:

    sudo apt-get install apache2 -y

    Then, open the web browser on your Pi and type http://localhost — you will see a default page telling you that Apache is working. The page on our little ‘website’ will use code written in the PHP language, so install that by returning to your Terminal and typing:

    sudo apt-get install php -y

    Once that’s complete, restart Apache:

    sudo service apache2 restart

    Next, you’ll install the database to store your credentials, settings, and the handles of the social accounts to track. This is done with the following command in your Terminal:

    sudo apt-get install mysql-server php-mysql -y

    To set a root password for your database, type the following command and follow the on-screen instructions:

    sudo mysql_secure_installation

    Restart Apache again. Then, for easier management of the database, I recommend installing phpMyAdmin:

    sudo apt-get install phpMyAdmin -y

    At this point, it’s a good idea to connect your Pi to a WiFi network, unless you’re going to be running a network cable to it. Either way, it’s useful to have SSH enabled and to know its IP address so we can access it remotely. Type the following to access Pi settings and enable SSH:

    sudo raspi-config

    To determine your Pi’s IP address (which will likely be something like 192.168.0.xxx), type either of the following two commands:

    ifconfig # this gives you lots of extra info
    hostname -I # this gives you less info, but all we need in this case

    Now that SSH is enabled and you know the LAN IP address of the Pi, you can use PuTTY to connect to it from another computer for the rest of your work. The keyboard, mouse, and monitor can now be unplugged from the Raspberry Pi.

    Social media monitor

    To set up the database, type http://XXX/ phpmyadmin (where XXX is your Pi’s IP address) and log in as root with the password you set previously. Head to the User Accounts section and create a new user called socialCounter.

    You can now download the first bit of code for this project by running this in your Terminal window:

    cd /var/www/html

    sudo apt-get update

    sudo apt-get install git -y

    sudo git clone https://github.com/paulfp/social- media-counter.git

    Next, open up the db.php script and edit it to include the password you set when creating the socialCounter user:

    cd ./social-media-counter

    sudo nano db.php

    The database, including tables and settings, is contained in the socialCounter.sql file; this can be imported either via the Terminal or via phpMyAdmin, then open up the credentials table. To retrieve the subscriber count, YouTube requires a Google API key, so go to console.cloud.google.com and create a new Project (call it anything you like). From the left-hand menu, select ‘APIs & Services’, followed by ‘Library’ and search for the YouTube Data API and enable it. Then go to the ‘Credentials’ tab and create an API key that you can then paste into the ‘googleApiKey’ database field.

    Facebook requires you to create an app at developers.facebook.com, after which you can paste the details into the facebookAppId and facebookSecret fields. Unfortunately, due to recent scandals surrounding clandestine misuse of personal data on Facebook, you’ll need to submit your app for review and approval before it will work.

    The ‘social_accounts’ table is where you enter the user names for the social networks you want to monitor, so replace those with your own and then open a new tab and navigate to http://XXX/socialmedia-counter. You should now see a black page with a tiny carousel showing the social media icons plus follower counts next to each one. The reason it’s so small is because it’s a 64×16 pixel portion of the screen that we’ll be displaying on our 64×16 LED boards.

    GPIO pins to LED display

    Now that you have your social network follower counts being grabbed and displayed, it’s time to get that to display on our screens. The first step is to wire them up with the DuPont jumper cables from the Raspberry Pi’s GPIO pins to the connection on the first board. This is quite fiddly, but there’s an excellent guide and diagram on GitHub within Henner Zeller’s library that we’ll be using later, so head to hsmag.cc/PLyRcK and refer to wiring.md.

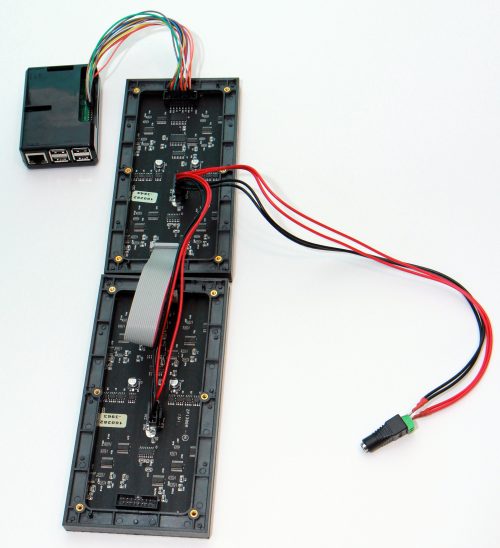
    The Raspberry Pi connects to the RGB LED screens with 14 jumper cables, and the screens are daisy-chained together with a ribbon cable

    The second screen is daisy-chained to the first one with the ribbon cable, and the power connector that comes with the screens will plug into both panels. Once you’re done, your setup should look just like the picture on this page.

    To display the Pi’s HDMI output on the LED screens, install Adafruit’s rpi-fb-matrix library (which in turn uses Henner Zeller’s library to address the panels) by typing the following commands:

    sudo apt-get install -y build-essential libconfig++-dev

    cd ~

    git clone --recursive https://github.com/ adafruit/rpi-fb-matrix.git

    cd rpi-fb-matrix

    Next, you must define your wiring as regular. Type the following to edit the Makefile:

    nano Makefile

    Look for the HARDWARE_DESC= property and ensure the line looks like this: export HARDWARE_DESC=regular before saving and exiting nano. You’re now ready to compile the code, so type this and then sit back and watch the output:

    make clean all

    Once that’s done, there are a few more settings to change in the matrix configuration file, so open that up:

    nano matrix.cfg

    You need to make several changes in here, depending on your setup:

    • Change display_width to 64 and display_height to 16
    • Set panel_width to 32 and panel_height to 16
    • Set chain_length to 2
    • Set parallel_count to 1

    The panel array should look like this:

    panels = ( 
 ( { order = 1; rotate = 0; }, { order = 0; rotate = 0; } )
    )

    Uncomment the crop_origin = (0, 0) line to tell the tool that we don’t want to squish the entire display onto our screens, just an equivalent portion starting right in the top left of the display. Press CTRL+X, then Y, then ENTER to save and exit.

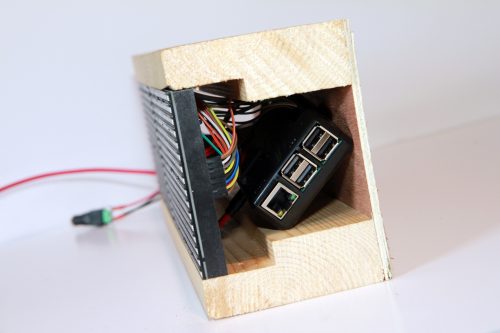
    It ain’t pretty…but it’s out of sight. The Raspberry Pi plus the power supply for the screens fit nice and neatly behind the screens. I left each end open to allow airflow

    Finally, before you can test the output, there are some other important settings you need to change first, so open up the Raspberry Pi’s boot configuration as follows:

    sudo nano /boot/config.txt

    First, disable the on-board sound (as it uses hardware that the screens rely on) by looking for the line that says dtparam=audio=on and changing it to off. Also, uncomment the line that says hdmi_force_hotplug=1, to ensure that an HDMI signal is still generated even with no HDMI monitor plugged in. Save and then reboot your Raspberry Pi.

    Now run the program using the config you just set:

    cd ~/rpi-fb-matrix

    sudo ./rpi-fb-matrix matrix.cfg

    You should now see the top 64×16 pixels of your Pi’s display represented on your RGB LED panels! This probably consists of the Raspberry Pi icon and the rest of the top portion of the display bar.

    No screensaver!

    At this point it’s important to ensure that there’s no screensaver or screen blanking enabled on the Pi, as you want this to display all the time. To disable screen blanking, first install the xscreensaver tool:

    sudo apt-get install xscreensaver

    That will add a screensaver option to the Pi’s GUI menus, allowing you to disable it completely. Finally, you need to tell the Raspberry Pi to do two things each time it loads:

    • Run the rpi-fb-matrix program (like we did manually just now)
    • Open the web browser in fullscreen (‘kiosk’ mode), pointed to the Social Counter web page

    To do so, edit the Pi’s autostart configuration file:

    sudo nano ~/.config/lxsession/LXDE-pi/autostart

    Insert the following two lines at the end:

    @sudo /home/pi/rpi-fb-matrix/rpi-fb-matrix /home/ pi/rpi-fb-matrix/matrix.cfg\

    @chromium-browser --kiosk http://localhost/ social-media-counter

    Et voilà!

    Disconnect any keyboard, monitor, or mouse from the Pi and reboot it one more time. Once it’s started up again, you should have a fully working display cycling through each enabled social network, showing up-to-date follower counts for each.

    It’s now time to make a surround to hold all the components together and allow you to wall-mount your display. The styling you go for is up to you — you could even go all out and design and 3D print a custom package.

    The finished product, in pride of place on the wall of our office. Now I just need some more subscribers…!

    For my surround, I went for the more rustic and homemade look, and used some spare bits of wood from an internal door frame lining. This worked really well due to the pre-cut recess. With a plywood back, you can screw everything together so that the wood holds the screens tightly enough to not require any extra fitting or gluing, making for easier future maintenance. To improve the look and readability of the display (as well as soften the light and reduce the brightness), you can use a reflective diffuser from an old broken LED TV if you can lay your hands on one from eBay or a TV repair shop, or just any other bit of translucent material. I found that two layers stapled on worked and looked great. Add some hooks to the back and — Bob’s your uncle — a finished, wall-mounted display!

    Phew — that was quite an advanced build, but you now have a sophisticated display that can be used for any number of things and should delight your customers whilst helping to build your social following as well. Don’t forget to tweet us a picture of yours!

    Website: LINK

  • Daily Deal – BioShock Collection

    Daily Deal – BioShock Collection

    Reading Time: < 1 minute

    Today’s Deal: Save on BioShock: The Collection!*

    Look for the deals each day on the front page of Steam. Or follow us on twitter or Facebook for instant notifications wherever you are!

    *Offer ends next Tuesday at 10AM Pacific Time
    Website: LINK

  • Now Available on Steam – Shenmue I & II

    Now Available on Steam – Shenmue I & II

    Reading Time: < 1 minute

    Shenmue I & II is Now Available on Steam!

    SEGA®’s most requested re-release of all time finally comes to a new generation. Shenmue delivers an epic story of revenge within a unique open world that is still unrivalled in depth and detail. Return to the epic saga that defined modern gaming. The saga begins…again.
    Website: LINK

  • Machine learning and rock, paper, scissors

    Machine learning and rock, paper, scissors

    Reading Time: 3 minutes

    Use a Raspberry Pi and a Pi Camera Module to build your own machine learning–powered rock paper scissors game!

    Rock-Paper-Scissors game using computer vision and machine learning on Raspberry Pi

    A Rock-Paper-Scissors game using computer vision and machine learning on the Raspberry Pi. Project GitHub page: https://github.com/DrGFreeman/rps-cv PROJECT ORIGIN: This project results from a challenge my son gave me when I was teaching him the basics of computer programming making a simple text based Rock-Paper-Scissors game in Python.

    Virtual rock paper scissors

    Here’s why you should always leave comments on our blog: this project from Julien de la Bruère-Terreault instantly had our attention when he shared it on our recent Android Things post.

    Julien and his son were building a text-based version of rock paper scissors in Python when his son asked him: “Could you make a rock paper scissors game that uses the camera to detect hand gestures?” Obviously, Julien really had no choice but to accept the challenge.

    “The game uses a Raspberry Pi computer and Raspberry Pi Camera Module installed on a 3D-printed support with LED strips to achieve consistent images,” Julien explains in the tutorial for the build. “The pictures taken by the camera are processed and fed to an image classifier that determines whether the gesture corresponds to ‘Rock’, ‘Paper’, or ‘Scissors’ gestures.”

    How does it work?

    Physically, the build uses a Pi 3 Model B and a Camera Module V2 alongside 3D-printed parts. The parts are all green, since a consistent colour allows easy subtraction of background from the captured images. You can download the files for the setup from Thingiverse.

    rock paper scissors raspberry pi

    To illustrate how the software works, Julien has created a rather delightful pipeline demonstrating where computer vision and machine learning come in.

    rock paper scissors using raspberry pi

    The way the software works means the game doesn’t need to be limited to the standard three hand signs. If you wanted to, you could add other signs such as ‘lizard’ and ‘Spock’! Or ‘fire’ and ‘water balloon’. Or any other alterations made to the game in your pop culture favourites.

    rock paper scissors lizard spock

    Check out Julien’s full tutorial to build your own AI-powered rock paper scissors game here on Julien’s GitHub. Massive kudos to Julien for spending a year learning the skills required to make it happen. And a massive thank you to Julien’s son for inspiring him! This is why it’s great to do coding and digital making with kids — they have the best project ideas!

    Sharing is caring

    If you’ve built your own project using Raspberry Pi, please share it with us in the comments below, or via social media. As you can tell from today’s blog post, we love to see them and share them with the whole community!

    Website: LINK
  • HTC Vive Cuts the Cable With Debut of Vive Wireless Adapter

    HTC Vive Cuts the Cable With Debut of Vive Wireless Adapter

    Reading Time: 3 minutes

    Pre-order for device launches Sept. 5; Global on shelf date set for Sept. 24

    HTC VIVE™ today is meeting the promise of wireless premium VR with the official announcement and pre-order of the Vive Wireless Adapter. The adapter frees VR users from the tether back to their PC, while maintaining the performance requirements for premium VR on both the HTC Vive and Vive Pro. Pre-order starts Sept. 5. For customers in the U.S., pre-orders will be available at Amazon, Best Buy, Microsoft, NewEgg and Vive.com.

    [youtube https://www.youtube.com/watch?v=B6BUiCkBFcA?feature=oembed&wmode=opaque&w=730&h=411]

    The Vive Wireless Adapter retails for $299 (USD). Installed in just minutes, the base adapter works with both Vive and Vive Pro. Vive Pro owners will need an additional compatibility pack with a connection cable for the Vive Pro, as well as foam padding and an attachment device unique to Vive Pro. The Vive Pro compatibility pack retails for $60 (USD).

    “Since the first demos of Vive, we’ve known that to deliver on the best of premium VR, we wanted it to be wireless,” said Daniel O’Brien, GM Americas, HTC Vive. “But we learned that delivering a great wireless experience takes time and really smart partners. We’ve brought the engineering expertise together to deliver a truly first of its kind wireless VR experience. Thanks to Intel and DisplayLink for helping to make this vision a reality.”

    Installation of the Vive Wireless Adapter occurs in minutes by installing a PCI-e card and attaching a sensor from the PC that broadcasts to and from the newly wireless Vive headset. The adapter has a broadcast range of 6 meters with a 150 degree field of view from the sensor and runs in the interference-free 60Ghz band using Intel’s WiGig specification, which, combined with DisplayLink’s XR codec, means low latency and high performance with hours of battery life.

    The Adapter is powered by the HTC QC 3.0 PowerBank, which can also double as a charge pack for a smartphone. The retail package ships with one PowerBank and additional PowerBanks will be purchasable at Vive.com.

    “I congratulate HTC and we are excited to see a flagship device and new user experience enabled by Gigabit, low-latency wireless,” said Dr. Cormac S.G. Conroy, Corporate Vice President and General Manager, Intel Communication and Devices Group. “In building this mmWave solution, we had our eyes on the demands of VR and leveraged our deep 5G wireless experience. We understood the performance needs of VR and the gaming and enterprise markets. We can’t wait for everyone to bring what we’ve been working on into their homes and into their VR arcades.”

    “DisplayLink’s heritage is in solving complex problems for enterprises all over the world,” said John Cummins, Senior Vice President Sales and Marketing, DisplayLink. “We’re very excited to deliver the freedom and complete immersion of wireless VR to businesses and the application development community that serves them. For gaming, arcades, training, and future applications yet to be developed, the promise of low latency, high quality wireless VR is available now.”

    “Wireless represents the true promise of VR and Seeking Dawn,” said Freeman Fan, Founder & CEO, Multiverse Entertainment. “Our gameplay in Seeking Dawn capitalizes on the freedom of wireless, and we can’t wait to showcase how wireless changes the expectations around VR content.”

    To celebrate the launch, all Vive Wireless Adapter purchases will include a two-month trial to Viveport Subscription, offering access to nearly 500 titles, including Seeking Dawn.

    Website: LINK

  • Daily Deal – Cultist Simulator, 25% Off

    Daily Deal – Cultist Simulator, 25% Off

    Reading Time: < 1 minute

    Today’s Deal: Save 25% on Cultist Simulator!*

    Look for the deals each day on the front page of Steam. Or follow us on twitter or Facebook for instant notifications wherever you are!

    *Offer ends Wednesday at 10AM Pacific Time
    Website: LINK

  • Astronaut-made virtual co-pilot

    Astronaut-made virtual co-pilot

    Reading Time: 3 minutes

    This project features several of our favourite things. Astronauts! Machine learning! High-altitude danger! Graphs! (It could only get slightly better with the addition of tap-dancing centaurs.) Read on to have your nerdliest pleasure centres tickled.

    Solar Pilot Guard - wing of a plane in flight

    Your interest should be focussed on the strange fin with the red tip. Although we agree the mountains look nice too.

    Solar Pilot Guard, a Foale family project

    Michael Foale is a former astronaut with dual British/American citizenship; and thanks to that dual citizenship was revered by British kids like me as some kind of Superman when he spent time on the Russian Mir space station back in the 1990s. It’s always great to see one of our heroes using the Raspberry Pi, but it’s doubly great when the use it’s being put to is so very, very cool.

    Foale’s daughter Jenna is a PhD candidate in computational fluid dynamics, and together they have engineered a machine-learning system called Solar Pilot Guard to help prevent aircraft crashes, using the Wolfram Language on a Raspberry Pi. A solar-powered probe (that fin in the image above) detects changes in acceleration and air pressure to spot potential loss-of-control (LOC) events in flight, calculating the probability of each pressure/acceleration event representing a possible LOC event.

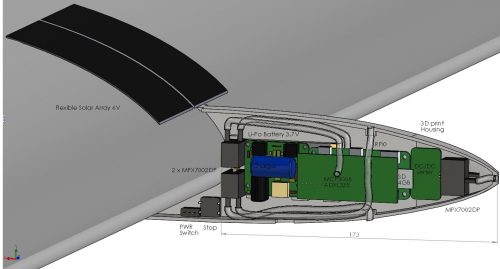
    Solar Pilot Guard schematic cross-section

    Click to embiggen

    If it detects a possible LOC event, the system issues a voice command to the pilot over Bluetooth speakers, using machine learning to tell the pilot what corrective measures they should take.

    Here it is in action:

    Solar Pilot Guard use in-flight

    An example of in-flight operation of the Solar Pilot Guard (SPG), issuing commands for correction of flight behavior that could lead to loss of control (LOC). Demonstrated commands: Push, Power – Left, Left – Right, Right Submitted to EAA AirVenture, Oshkosh 2017.

    Losing control to generate training data

    In order to train the network, Michael Foale had to feed the machine data about what LOCs and normal flight look like — which meant flying the kit in ways which would make the plane lose control, not just once, but over and over, until the neural net had the data it needed to differentiate different sorts of LOC events. Told you he was a superhero.

    A stack of different machine learning functions at different levels of abstraction are working together here. This is a training set from one of the (presumably terrifying) training flights:

    Solar Pilot Guard training set

    The Pi processes and learns from this data; if you’re interested in a very deep dive into the way this all works, and how you can build your own neural networks using the Wolfram Language, there’s a very comprehensive treatment over at the Wolfram blog.

    We love seeing projects like this that recognise just how robust and powerful a little Raspberry Pi can be. Jenna and Michael: thank you for sharing what you’ve been working on here. It’s one of the coolest and most audacious projects we’ve seen in a long time.

    Website: LINK

  • HTC VIVE & Immersive Factory Provide World Infrastructure Leader with Innovative Safety Solutions

    HTC VIVE & Immersive Factory Provide World Infrastructure Leader with Innovative Safety Solutions

    Reading Time: 3 minutes

    Like most infrastructure companies, Colas Group is not necessarily a household name—though they should be. With 55,000 employees on five continents and an average of 80,000 road construction and maintenance projects every year, Colas’ work and presence are felt the world over. In 2017, their consolidated revenue totaled 11.7 billion euros—with international markets accounting for 48% of this figure.

    As a world leader in infrastructure, Colas are at the cutting edge of seemingly everything in their industry, be it recovering and recycling waste, reducing their carbon footprint, or limiting the impact of their production sites on the local environment and community.

    Colas is also at the cutting edge of the thing they value most: safety. More than 50% of their budget is dedicated to it. Believing that any company that runs on human capital has a duty to look out for its employees, they have invested significant time and resources in safety audits, site safety briefings, dedicated prevention courses, and first aid with over one-third of the company trained.

    “It is not acceptable for an employee to be injured in the course of his or her work. Our goal is zero accidents, and to achieve it we use a range of levers, including safety training. Our ambition is to bring about lasting change in people’s behavior,” said Philippe Simarik, Director of Prevention, Health, and Safety at Work at Colas.

    While both the frequency and severities of workplace injuries are steadily diminishing, Colas took their efforts a step further in order to hit their lofty, but noble zero accident goal.

    Their approach was two-fold. One: focus on new employees. Internal research showed that over the past several years, almost 60% of lost-time accidents at Colas involved people who have been on the job for less than two years. Two: employ the use of HTC VIVE’s professional-grade VR systems and Immersive Factory’s active-learning training programs in their safety training.

    “We met with four companies to develop virtual reality training courses,” said Simarik. “And it is Immersive Factory that we selected, for the quality of the graphics, the sensations experienced during the VR experience, and sheer ‘playability.’ It was also an opportunity to co-construct and co-finance the creation of this module on worksite crush hazards.”

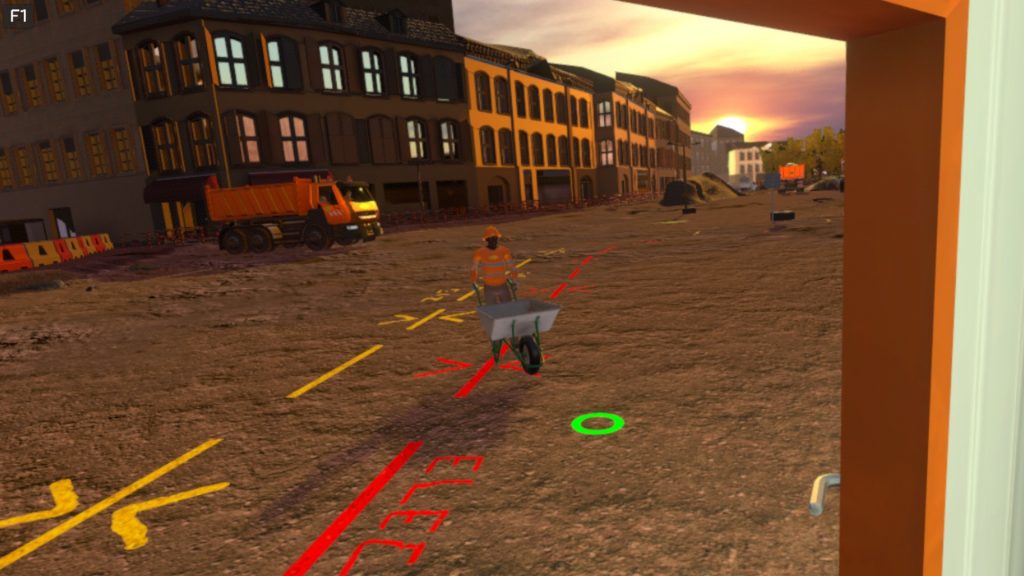
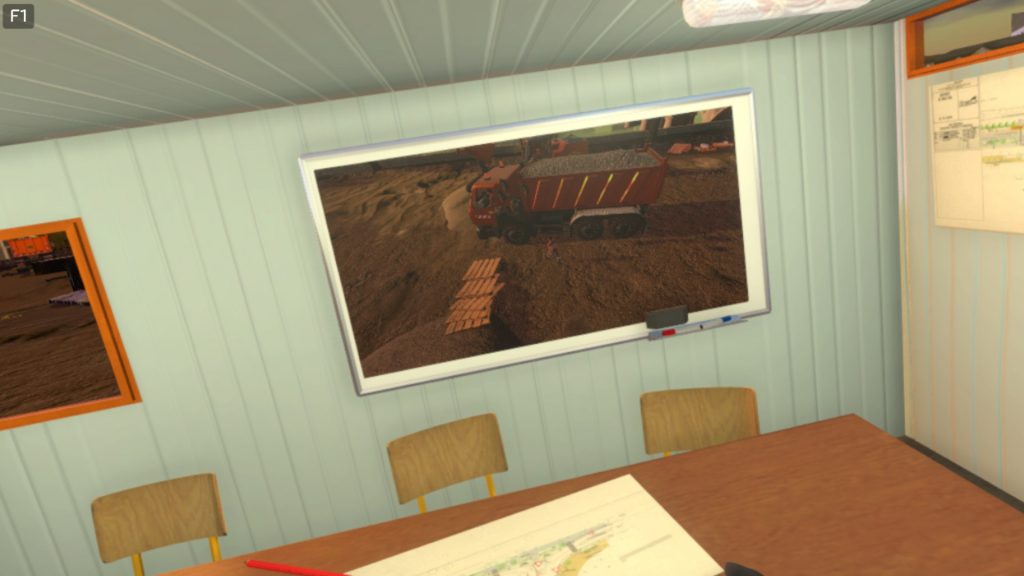
    Immersive Factory, working in collaboration with Colas, developed a virtual model construction site based off a real one in Nantes, France as well as a virtual scenario based on the feedback of prevention staff, field workers, and even the regional director. After development was completed and approved, Colas was quickly able to test the course out at one of their training sites.

    The result was not only an innovative take on safety training, but a fun and engaging one, too. Immersive Factory’s program appealed to both journeyman and manager; a digital native new to their infrastructure career and the veteran hungry for a new educational experience. Finalized in early 2018, the program was integrated into the newcomer safety days at the Colas Centre-Ouest subsidiary.


    “With virtual reality, we can experience hazardous situations without danger, but keep them in memory,” says Simarik. “The feedback from every level of the company is excellent. Most of the trainees react after the course by saying things like ‘from now on, I’ll be careful about…’; it’s a sign that the message is getting across.”

    Though Colas co-constructed and co-financed this virtual worksite and software, they want Immersive Factory to be able to offer exercise to other infrastructure companies.

    “When it comes to safety,” says Simarik, “good practices must be shared.”

    While the Immersive Factory’s program can be used across a wide range of VR systems, co-founder Olivier Pierre recommends one in particular.

    We recommended that Colas use the HTC VIVE Pro range of VR headsets for their comfort, ergonomics, and professional resolution. Aside from the reliability of their devices, we and the HTC VIVE teams share a common vision of innovation and of the quality our customers expect.”

    [youtube https://www.youtube.com/watch?v=g1NbZFxKoqI?feature=oembed&wmode=opaque&w=730&h=411]

    Website: LINK

  • Daily Deal – Train Simulator, 77% Off

    Daily Deal – Train Simulator, 77% Off

    Reading Time: < 1 minute

    Today’s Deal: Save 77% on Train Simulator!*

    Look for the deals each day on the front page of Steam. Or follow us on twitter or Facebook for instant notifications wherever you are!

    *Offer ends Tuesday at 10AM Pacific Time
    Website: LINK

  • Daily Deal – Middle-earth™: Shadow of Mordor™, 60% Off

    Daily Deal – Middle-earth™: Shadow of Mordor™, 60% Off

    Reading Time: < 1 minute

    Today’s Deal: Save 60% on Middle-earth™: Shadow of Mordor™!*

    Look for the deals each day on the front page of Steam. Or follow us on twitter or Facebook for instant notifications wherever you are!

    *Offer ends Monday at 10AM Pacific Time
    Website: LINK

  • Daily Deal – Space Hulk: Deathwing – Enhanced Edition, 50% Off

    Daily Deal – Space Hulk: Deathwing – Enhanced Edition, 50% Off

    Reading Time: < 1 minute

    Today’s Deal: Save 50% on Space Hulk: Deathwing – Enhanced Edition!*

    Look for the deals each day on the front page of Steam. Or follow us on twitter or Facebook for instant notifications wherever you are!

    *Offer ends Sunday at 10AM Pacific Time
    Website: LINK

  • Debian turns 25

    Debian turns 25

    Reading Time: 2 minutes

    Want to feel old? Debian, the popular free Unix-like operating system based on the Linux kernel and GNU userland, is turning 25. Composed entirely of free software, Debian is maintained and packaged entirely by volunteers. Announced to the world by Ian Murdock 25 years ago this week, the first internal release, Debian 0.01, took place in September 1993, followed in June 1996 by a first stable version, Debian 1.1 (code name ‘Bo’).

    The following two decades have seen eight further major releases, the most recent being Debian 9.0 (code name ‘Stretch’), released in June 2017.

    Raspbian

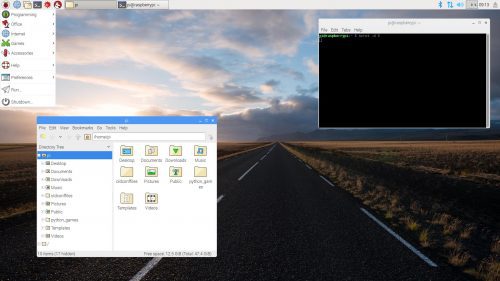
    Raspberry Pi owes a considerable debt to the Debian project. Our operating system images are built on top of Raspbian Stretch, which is a community-led rebuild of Debian Stretch, optimised for the specific ARM cores used in our products.

    The Raspberry Pi desktop environment

    In addition to the core Debian system, we bundle a variety of useful non-Debian software. Some packages, like Simon’s UI mods, and the Chromium web browser, are free as in speech. Others, like Wolfram Mathematica and Minecraft, are free as in beer.

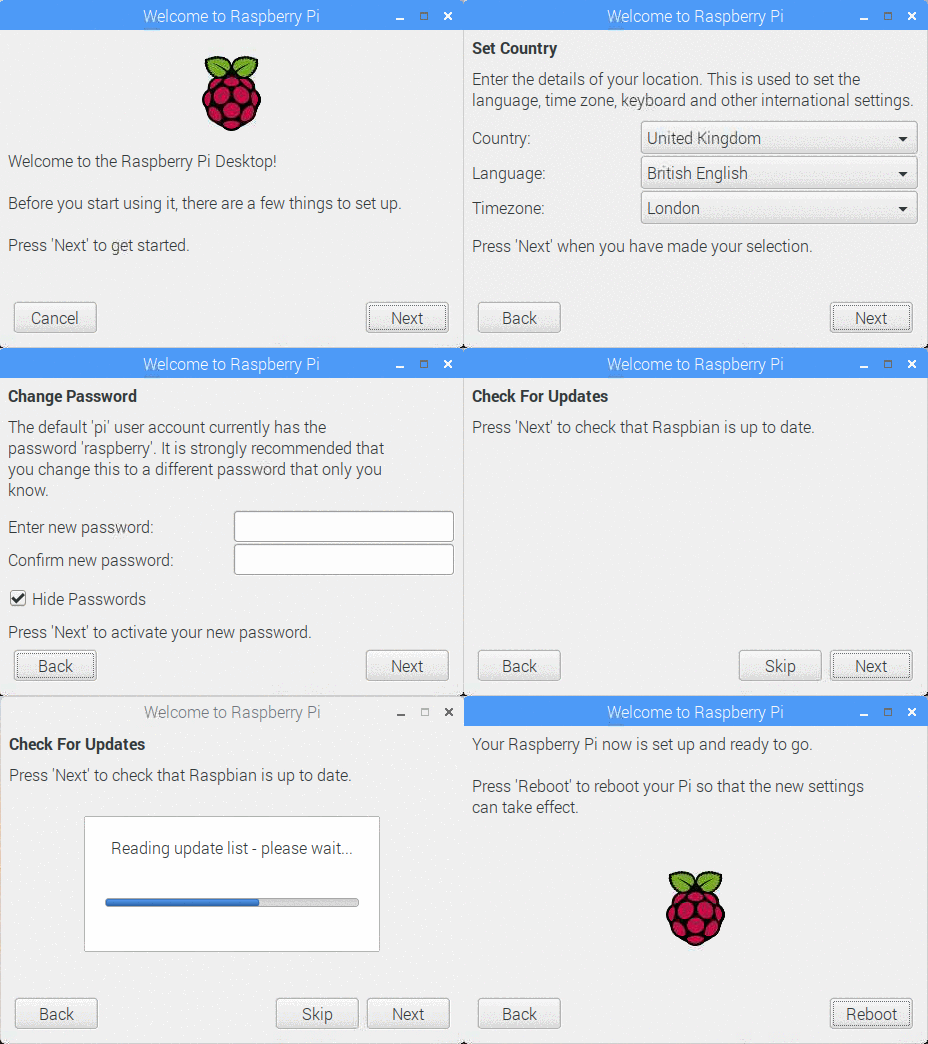
    Our most recent release adds more usability features, including a post-install wizard to simplify the setup process for new users.

    Download Raspbian today!

    If you’ve yet to try Raspbian on your Raspberry Pi, you can download it here. This tutorial from The MagPi demonstrates how to write an image onto a fresh SD card:

    Use Etcher to install operating systems onto an SD card

    Lucy Hattersley shows you how to install Raspberry Pi operating systems such as Raspbian onto an SD card, using the excellent Etcher. For more tutorials, check out The MagPi at http://magpi.cc ! Don’t want to miss an issue? Subscribe, and get every issue delivered straight to your door.

    And those of you who are already using Raspbian, be sure to check you have the most up-to-date version by following this easy video tutorial:

    Updating Raspbian on your Raspberry Pi || Raspberry Pi Foundation

    How to update to the latest version of Raspbian on your Raspberry Pi. Download Raspbian here: https://www.raspberrypi.org/downloads/raspbian/ More informatio…

    Don’t have a Raspberry Pi? Don’t worry: we also make a version of our operating system, based on x86 Debian, that will run on your PC or Mac! With an x86-based computer running our Debian Stretch OS, you can also use the PiServer tool to control a fleet of Raspberry Pis without SD cards.

    Website: LINK

  • Daily Deal – ICEY, 40% Off

    Daily Deal – ICEY, 40% Off

    Reading Time: < 1 minute

    Today’s Deal: Save 40% on ICEY!*

    Look for the deals each day on the front page of Steam. Or follow us on twitter or Facebook for instant notifications wherever you are!

    *Offer ends Monday August 27 at 10AM Pacific Time
    Website: LINK

  • Viveport and Viveport Subscription  Add Oculus Rift Support – Consumer launch set for September 4

    Viveport and Viveport Subscription  Add Oculus Rift Support – Consumer launch set for September 4

    Reading Time: 2 minutes

    As part of Viveport’s commitment to connect content creators to global audiences, we’re excited to announce that Viveport now supports Oculus Rift compatible titles. Developers can opt-in their titles to display as Oculus Rift compatible from today, with the full consumer launch on September 4th.

    Oculus Rift support coming to Viveport

    Adding support for Oculus Rift doubles the potential audience for all Viveport published titles, and opens Viveport Subscription – the best value in VR – to Oculus Rift consumers. Viveport Subscription allows subscribers to experience up to five titles at a time, starting with a free 14-day trial, and continuing after that with one low monthly price.

    With almost 500 titles in the Viveport Subscription library, we’re proud to curate a diverse and engaging range of experiences that appeal to a wide audience. Recent additions and all-time bestsellers in Viveport Subscription include Seeking Dawn, Tilt Brush, Pixel Ripped 1989, Shooty Fruity, A-Tech Cybernetic VR, theBlu and Knockout League. We’re always happy to welcome new developers, with marketing support and promotion for selected titles.

    As well as offering a huge range of available games and apps, Viveport Subscription has also proved popular with VR consumers who are looking to ‘try before they buy’. A Viveport Subscription member choosing five of the six titles shown below for either a 14-day free trial or a month of paid subscription could save almost $140 on retail prices!

    Viveport Subscription

    Rikard Steiber, President of Viveport

    Rikard Steiber, President of Viveport

    “By adding support for Oculus Rift, we’re doubling the potential user base for Viveport developers,” said Rikard Steiber, President of Viveport. “Viveport continues to offer the most opportunities for developers to monetize their VR content. From Viveport and Viveport Subscription, to availability on Amazon and in Viveport Arcade, we’re going to continue to expand and reach the largest global audience possible on developers’ behalf.”

    Developers can start opting in on Viveport to support Oculus Rift today. In many cases, existing builds that have hardware support for Oculus Rift via OpenVR are ready for this update. In the Developer Console, Oculus Rift is now available under ‘Compatible headsets’ in the ‘Viveport Listing’ tab. To opt-in a title, simply check the Oculus Rift box and create a production release under the Submit tab.


    Are you a developer who has questions about Oculus Rift support? Contact our Developer Relations team here.

    Website: LINK