Schlagwort: Uno
-

Two Arduinos are used to control this DIY three-axis CNC plottee
Reading Time: < 1 minuteArduino Team — June 23rd, 2021 We’ve seen a number of homemade CNC machines throughout the years, but Tuenhidiy’s build — made from some discarded materials — is no less impressive. This unique CNC plotter features a frame cleverly constructed out of two wooden wine boxes, which appear to be the…
-
Exerscent is a remote olfactory assessment system
Reading Time: 2 minutesArduino Team — June 21st, 2021 The COVID-19 pandemic has highlighted the need for widespread diagnostic services that can be taken at home, especially those that relate to smell as the loss of that sense is an associated virus side effect. One team from Malmö University and Stockholm University in Sweden has…
-
This Arduino device will sort your M&M’s by color
Reading Time: 2 minutesThis Arduino device will sort your M&M’s by color Arduino Team — June 18th, 2021 If you were challenged to design a device that could sort M&M candies by color, how would you make it work? You might consider using machine learning, which has become accessible in recent years. There are even…
-
The Piano Metronome is key to keeping the beat
Reading Time: 2 minutesArduino Team — June 16th, 2021 In the world of music, being able to keep time accurately is vital when playing a piece, as even small deviations in timing can cause the notes played to sound “off.” Ordinarily a device called a metronome is used to provide consistent ticks that the musician…
-
This Arduino project is counting to a billion
Reading Time: 3 minutesGood design counts for everything Designer Che-Wei Wang built a simple Arduino project that’s counting to a billion, and has been doing so for over 10 years. Could this be the longest continually running Arduino project in the world? Che-Wei has a background in art, architecture and industrial design. He now runs…
-
PneuMat is an interactive shape-changing system to help ensure infants sleep safely
Reading Time: 2 minutesArduino Team — June 3rd, 2021 Every parent knows that babies need to sleep in specific conditions. Sudden Infant Death Syndrome (SIDS) is a very tragic possibility and a number of steps must be taken to prevent it, such as avoiding blankets that can restrict an infant’s breathing. But babies can also…
-

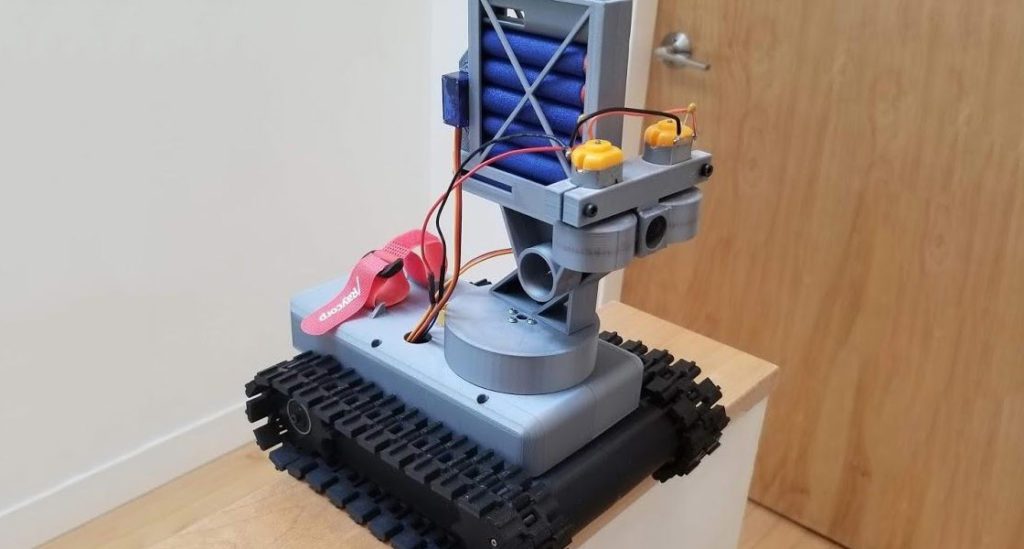
A remote-controlled Arduino Nerf tank
Reading Time: 2 minutesArduino Team — May 31st, 2021 Makers love Nerf guns, but Nathan Li takes foam-based home security to a new level with his mini Nerf tank. Naturally there’s an Arduino Uno in there, powering the mobile dart launcher. Scruffy lookin’ Nerf tank herder This miniature roving robot, known as M.A.T. (Modular Arduino…
-

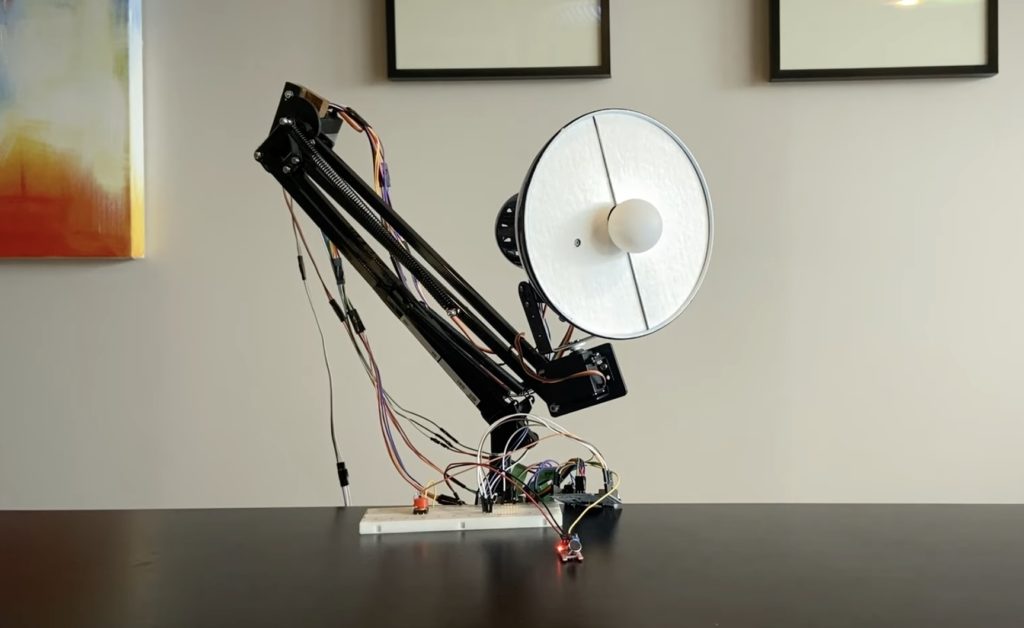
This low-cost motion control rig helps capture high-quality shots
Reading Time: 2 minutesArduino Team — May 25th, 2021 Being a camera operator is tough. Having to move the camera and maintain a smooth motion can be tricky, and the speed at which it’s done is never consistent. That’s what prompted Andy to create his own motorized robotic camera rig that can move in up to four different axes…
-

Super compact motorized turn signals for a bike
Reading Time: 2 minutesArduino Team — May 24th, 2021 Turn signals are becoming more and more popular with cyclists. So it’s no surprise that we’re seeing more and more Arduino projects that give people the tools they need to ride safely on our busy roads. Motorized Turn Signals The first question you might ask about…
-

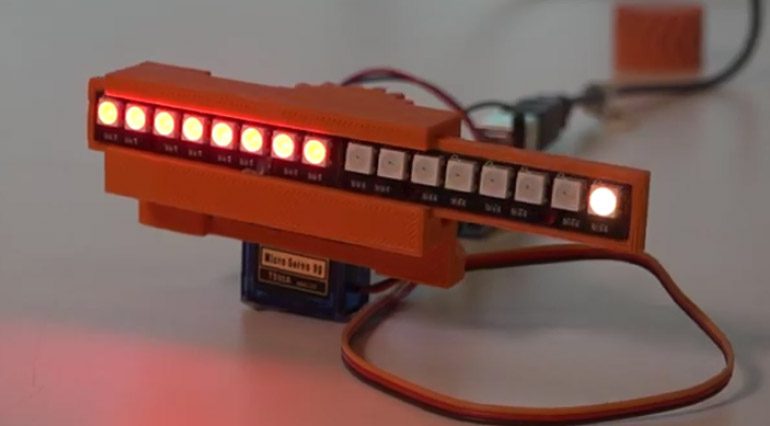
Foamin is a novel sensing method for detecting deformable gestures with conductive foam
Reading Time: 2 minutesArduino Team — May 21st, 2021 The field of soft tactile sensors is fascinating, as they grant robots the ability to move more freely or have greater granularity. Soft sensors also allow for human-computer interfaces to feel more interactive. However, previous sensors like these required multiple devices or complex wiring, making them…
-

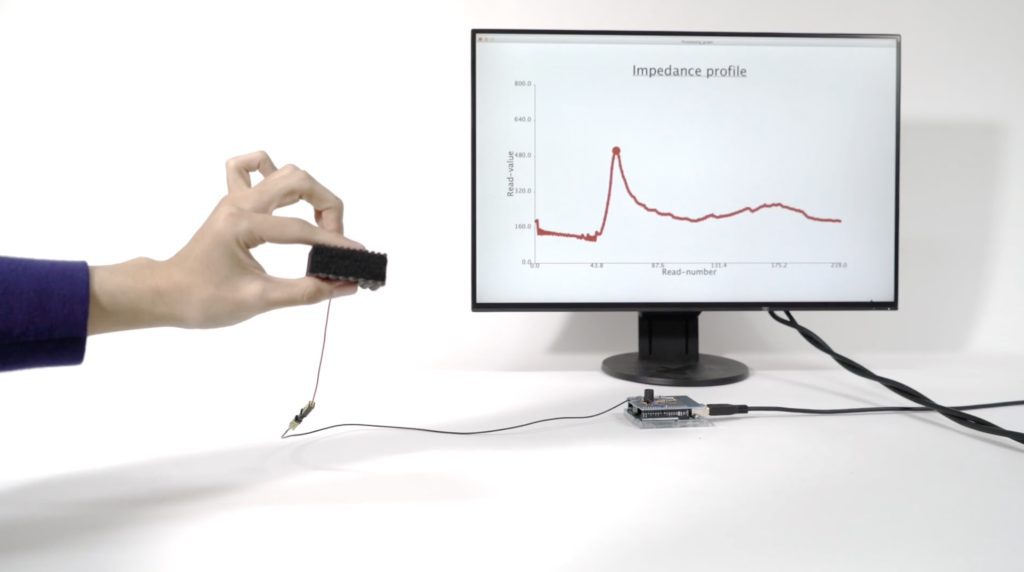
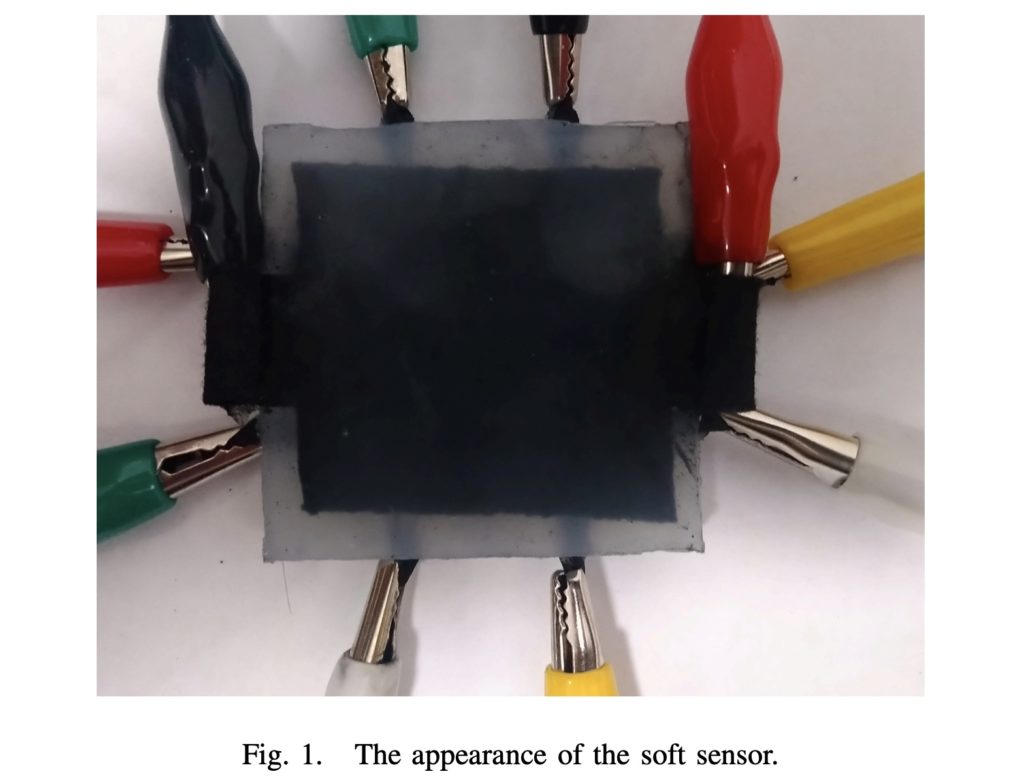
This soft tactile sensor can simultaneously estimate the contact force and location
Reading Time: 2 minutesArduino Team — May 20th, 2021 Robots are often filled with a myriad of different sensors but being able to detect touch is still fairly tough. This is primarily due to needing a large sensing area, flexible surfaces, and usually having complex circuitry. Imagine a robotic gripper that uses several “fingers” to…
-

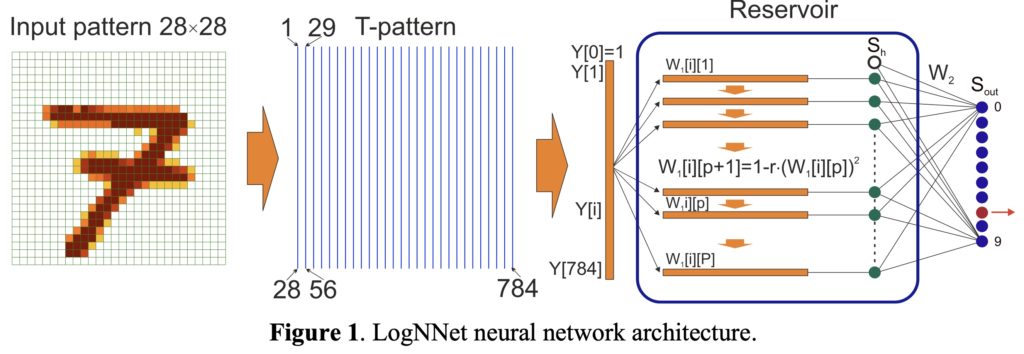
Recognizing handwritten MNIST digits on an Arduino Uno using LogNNet
Reading Time: 2 minutesArduino Team — May 19th, 2021 The Arduino Uno is famous for its ease of use and compact size, yet its microcontroller, the ATmega328P, is quite small. The 328P contains a mere 32KB of flash storage for programs and 2KB of RAM, which has traditionally made it unsuitable for machine learning applications.…
-

Elevate is a walkable pin array floor that generates shape-changing terrains for VR
Reading Time: 2 minutesArduino Team — May 19th, 2021 Virtual reality technology has come a long way in the last decade, but there are still some major things that could be done to make it even more interactive and immersive. For one, what if VR users could actually feel the ground they walk on rather…
-

TiltChair is a smart office chair that will help reduce the strain of sitting all day
Reading Time: 2 minutesArduino Team — May 18th, 2021 While designing and building projects, we probably find ourselves sitting far longer than we should, which poses a problem. Bad posture leads to all sorts of health issues, including back pain, limited circulation, and even headaches. A team of students at Tohoku University in Japan wanted…
-

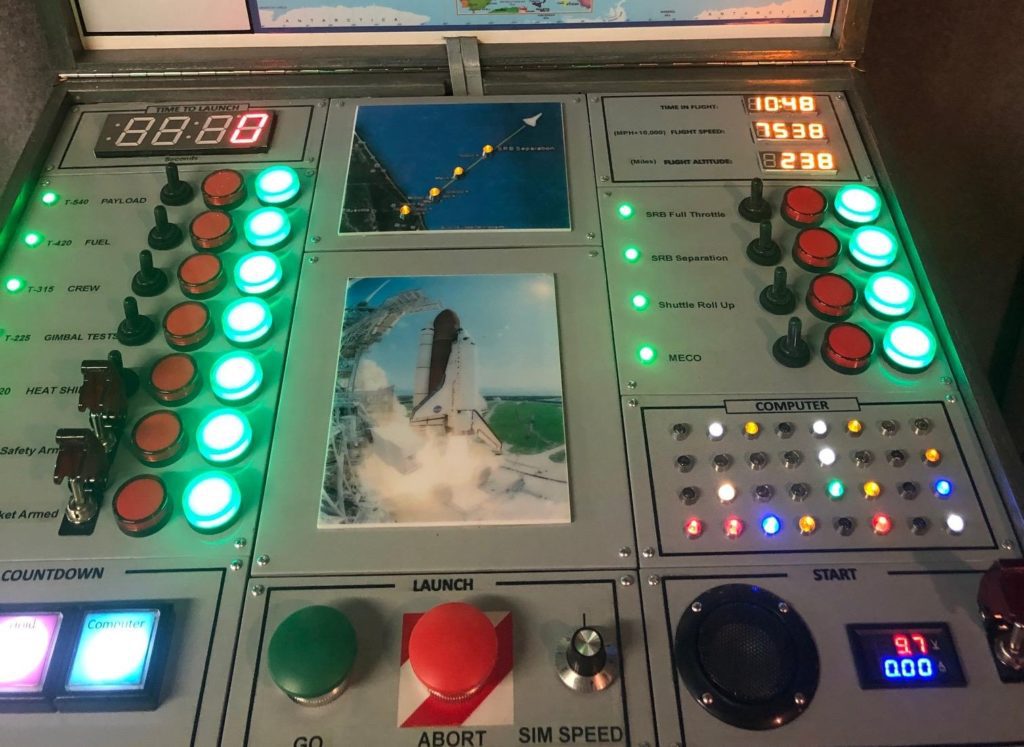
This DIY shuttle mission control box looks like a blast!
Reading Time: 2 minutesArduino Team — May 13th, 2021 Becoming an astronaut is probably one of the top careers on any child’s list, but it’s not all that practical, especially when they’re still seven years old. That’s why Gordon Callison wanted to create a virtual shuttle mission control game that simulates a space shuttle launch with tons of different…
-

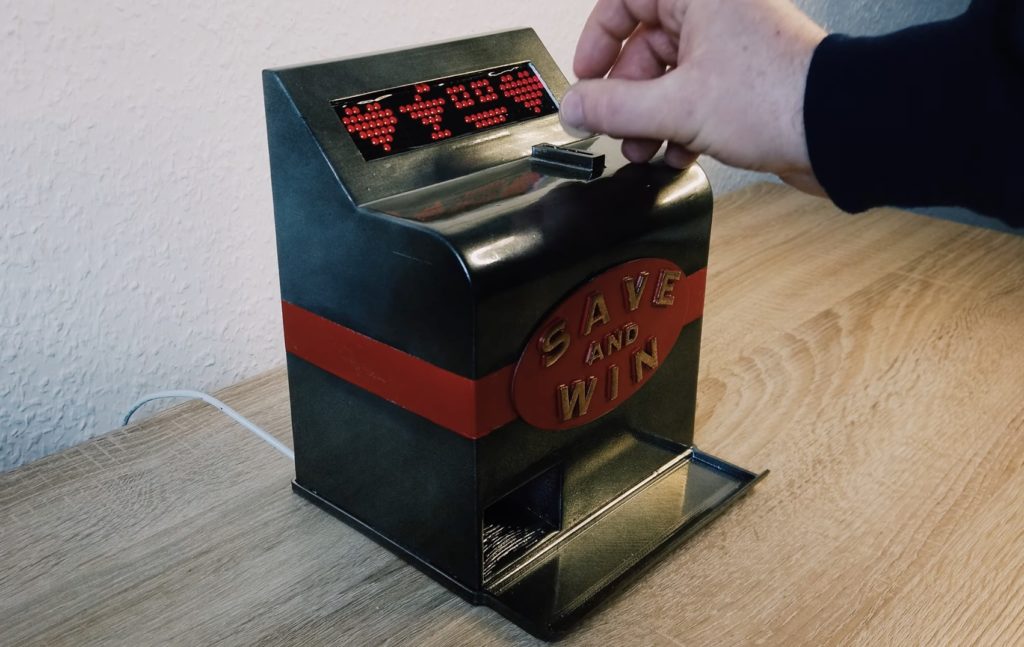
Slot machine piggy bank makes saving your coins more fun
Reading Time: < 1 minuteArduino Team — May 13th, 2021 There’s really no joy in saving money until it comes time to spend it, of course. But in an effort to gamify things a bit, YouTuber “Max 3D Design” has come up with a beautiful slot machine that surely puts a spin on traditional piggy…
-

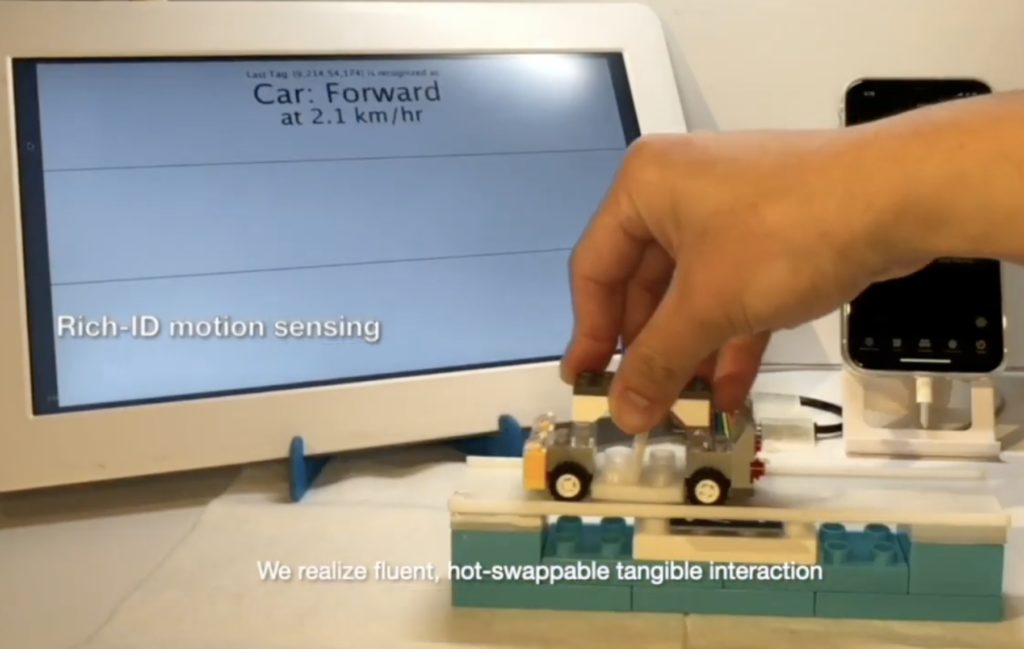
NFCSense can detect the movement of objects using only NFC tags
Reading Time: 2 minutesArduino Team — May 11th, 2021 NFC (Near-Field Communication) technology is generally used for identification, because NFC tags can carry a substantial amount of data, like a unique identifier or a text file, without a battery. But NFC readers are capable of reading tags quite quickly, which is a feature that is…
-

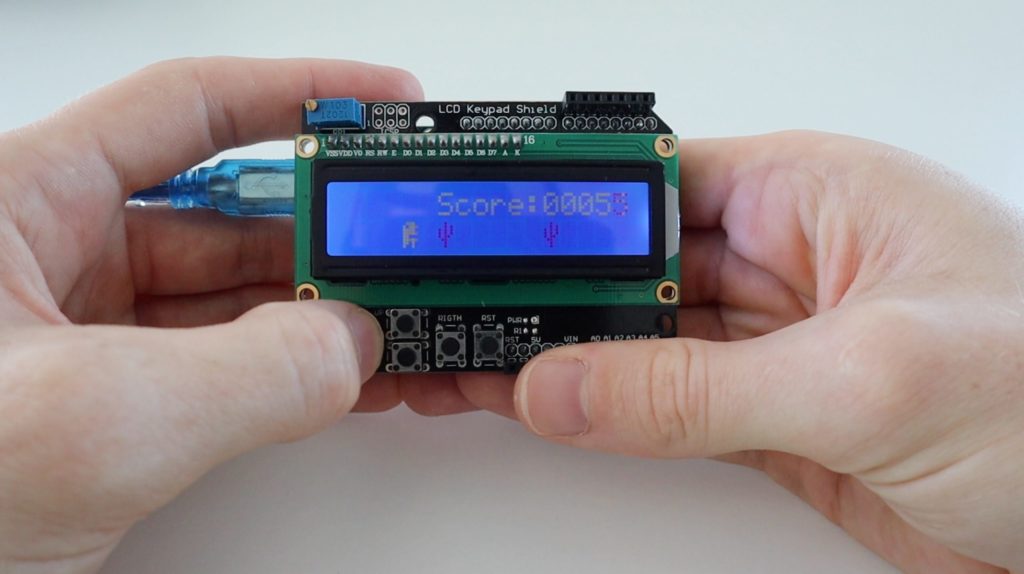
Arduino plays the Chrome Dinosaur Game on another Arduino
Reading Time: 2 minutesArduino Team — May 11th, 2021 There has been a trend over the past few years to automate certain games using microcontrollers — especially mobile ones. But none are perhaps as popular as the Dinosaur Game that shows up whenever the Chrome browser lacks an Internet connection. The game is simple: just…
-

This YouTuber created an Arduino-powered Luxo Jr.
Reading Time: < 1 minuteArduino Team — May 7th, 2021 YouTuber Allyson decided she wanted a real-life version of the Pixar lamp mascot, and actually made one in the video below. Her version uses a servo to raise the modified Luxo lamp up and down via the elbow joint, and another two servos to pan…
-

Building a low-cost flow meter for environmental monitoring projects
Reading Time: 2 minutesArduino Team — April 30th, 2021 Scientific equipment is notoriously expensive, and for schools, there are often monopolies on which suppliers can provide it. Eben Farnworth wanted to do something about this problem. His design for an open flow meter only costs around $60 USD, which pales in comparison to the typical price…
-

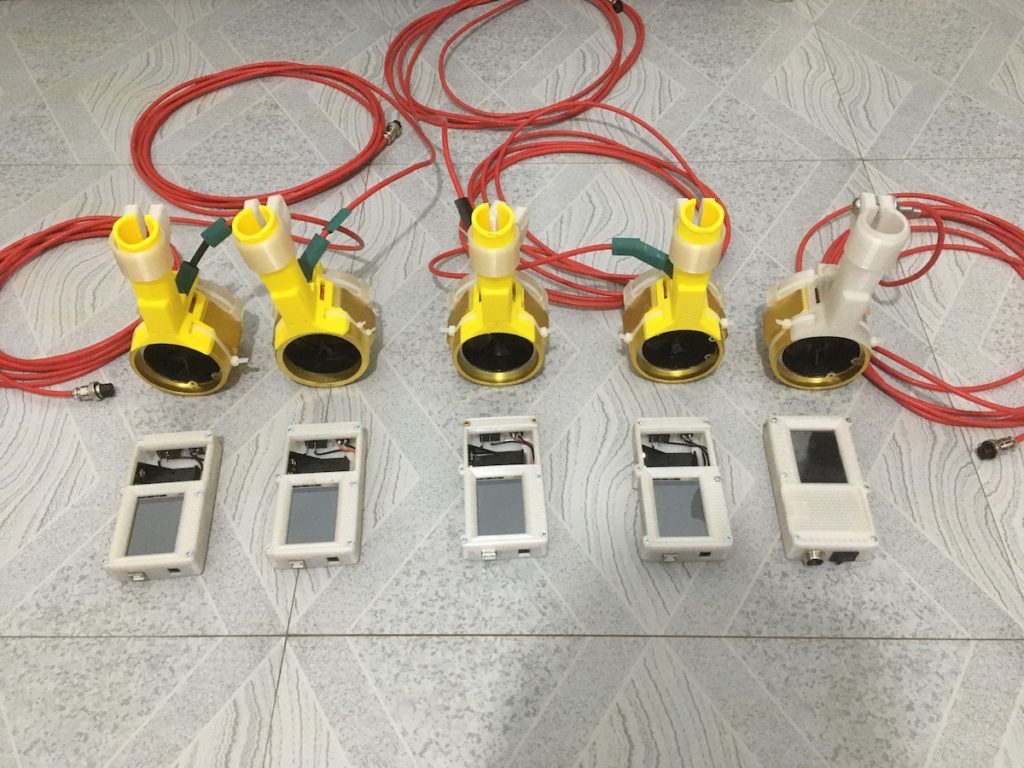
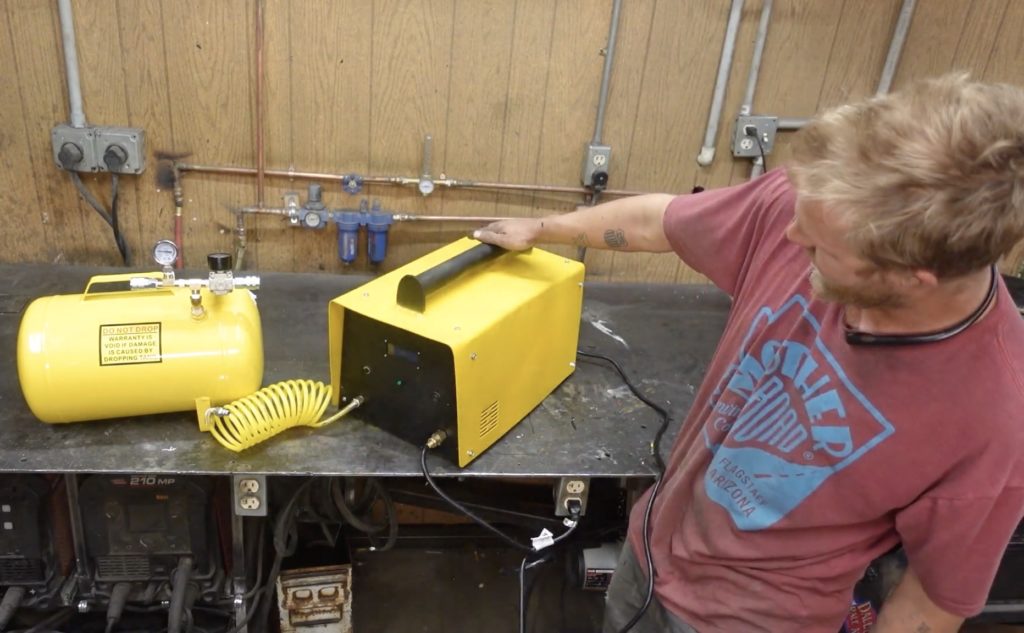
Arduino-controlled gas mixing device fills DIY laser tubes
Reading Time: 2 minutesArduino Team — April 28th, 2021 Lasers come in two varieties: solid-state and gas tube. As the name suggests, the latter types contain gas. That is a mixture of gas in precise proportions. To fill his DIY laser tube, Cranktown City built an Arduino-controlled gas mixer. This device has an Arduino Uno…
-

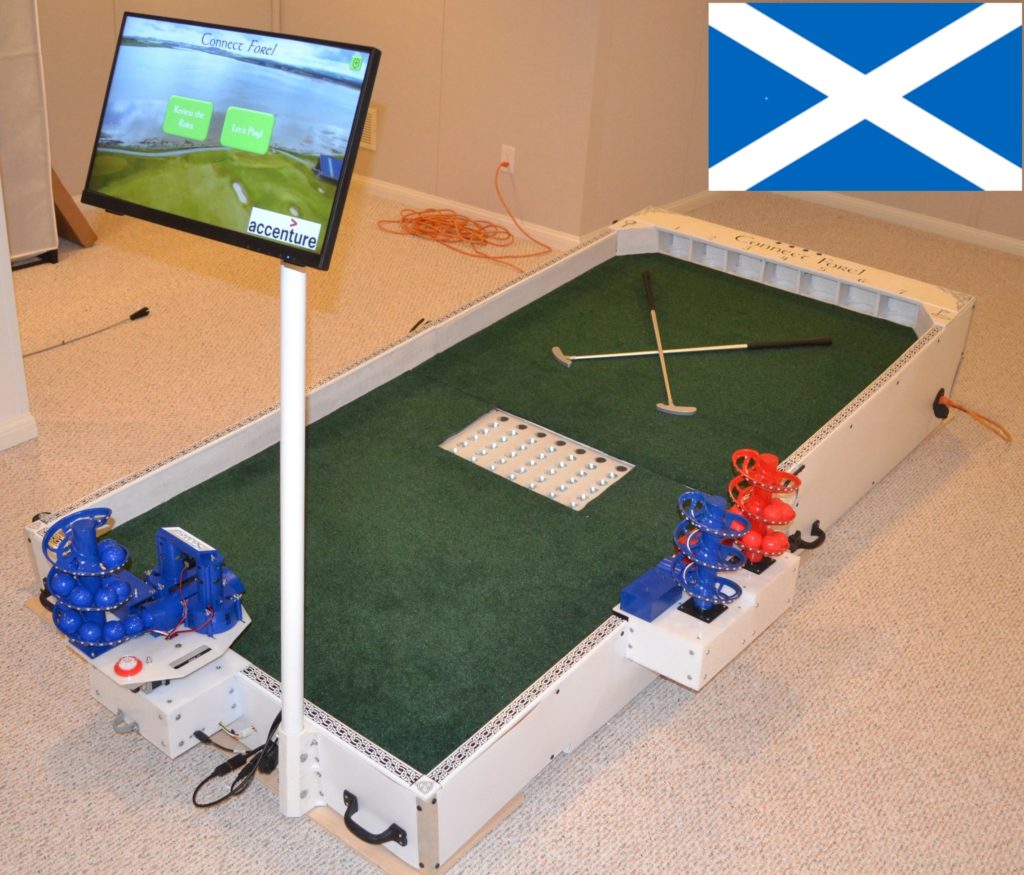
Playing Connect Four against a mini golfing AI opponent
Reading Time: 2 minutesArduino Team — April 27th, 2021 Have you dreamed of combining the two incredible activities putt-putt and Connect Four together into the same game? Well one daring maker set out to do just that. Bithead’s innovative design involves a mini golf surface with seven holes at the end corresponding to the columns. The system…