Schlagwort: Uncategorized

  • Play Heverlee’s Sjoelen and win beer

    Play Heverlee’s Sjoelen and win beer

    Reading Time: 4 minutes

    Chances are you’ve never heard of the Dutch table shuffleboard variant Sjoelen. But if you have, then you’ll know it has a basic premise – to slide wooden pucks into a set of four scoring boxes – but some rather complex rules.

    Sjoelen machine

    Uploaded by Grant Gibson on 2018-07-10.

    Sjoelen

    It may seem odd that a game which relies so much on hand-eye coordination and keeping score could be deemed a perfect match for a project commissioned by a beer brand. Yet Grant Gibson is toasting success with his refreshing interpretation of Sjoelen, having simplified the rules and incorporated a Raspberry Pi to serve special prizes to the winners.

    “Sjoelen’s traditional scoring requires lots of addition and multiplication, but our version simply gives players ten pucks and gets them to slide three through any one of the four gates within 30 seconds,” Grant explains.

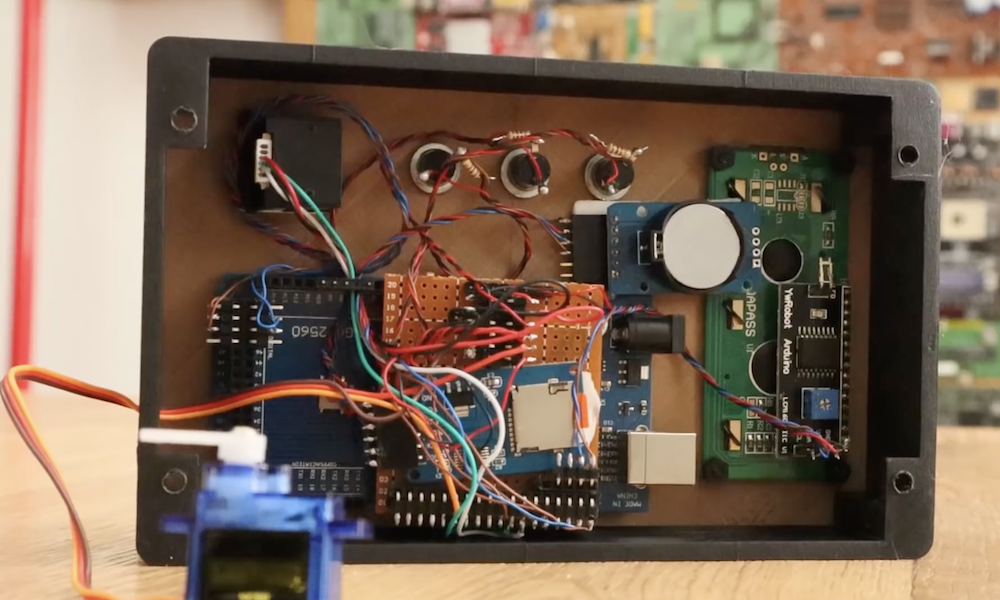
    As they do this, the Pi (a Model 3B) keeps track of how many pucks are sliding through each gate, figures how much time the player has left, and displays a winning message on a screen. A Logitech HD webcam films the player in action, so bystanders can watch their reactions as they veer between frustration and success.

    Taking the plunge

    Grant started the project with a few aims in mind: “I wanted something that could be transported in a small van and assembled by a two-person team, and I wanted it to have a vintage look.” Inspired by pinball tables, he came up with a three-piece unit that could be flat-packed for transport, then quickly assembled on site. The Pi 3B proved a perfect component.

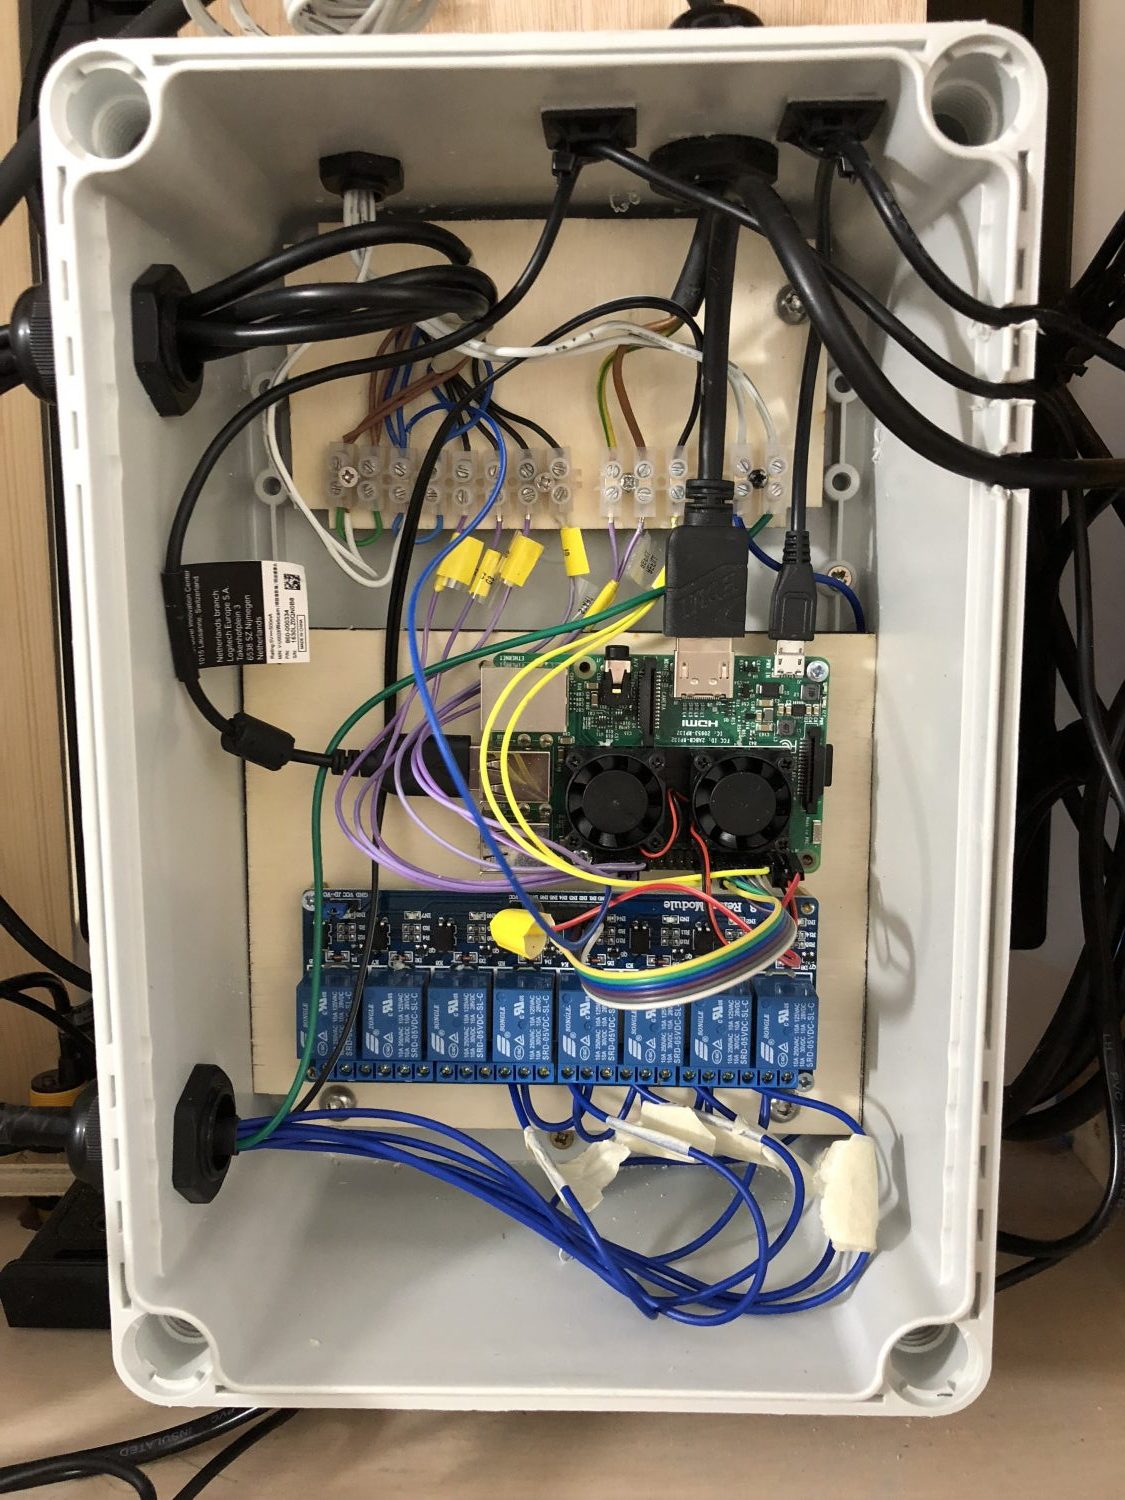
    Grant has tended to use full-size PCs in his previous builds, but he says the Pi allowed him to use less complex software, and less hardware to control input and output. He used Python for the input and output tasks and to get the Pi to communicate with a full-screen Chromium browser, via JSON, in order to handle the scoring and display tasks in JavaScript.

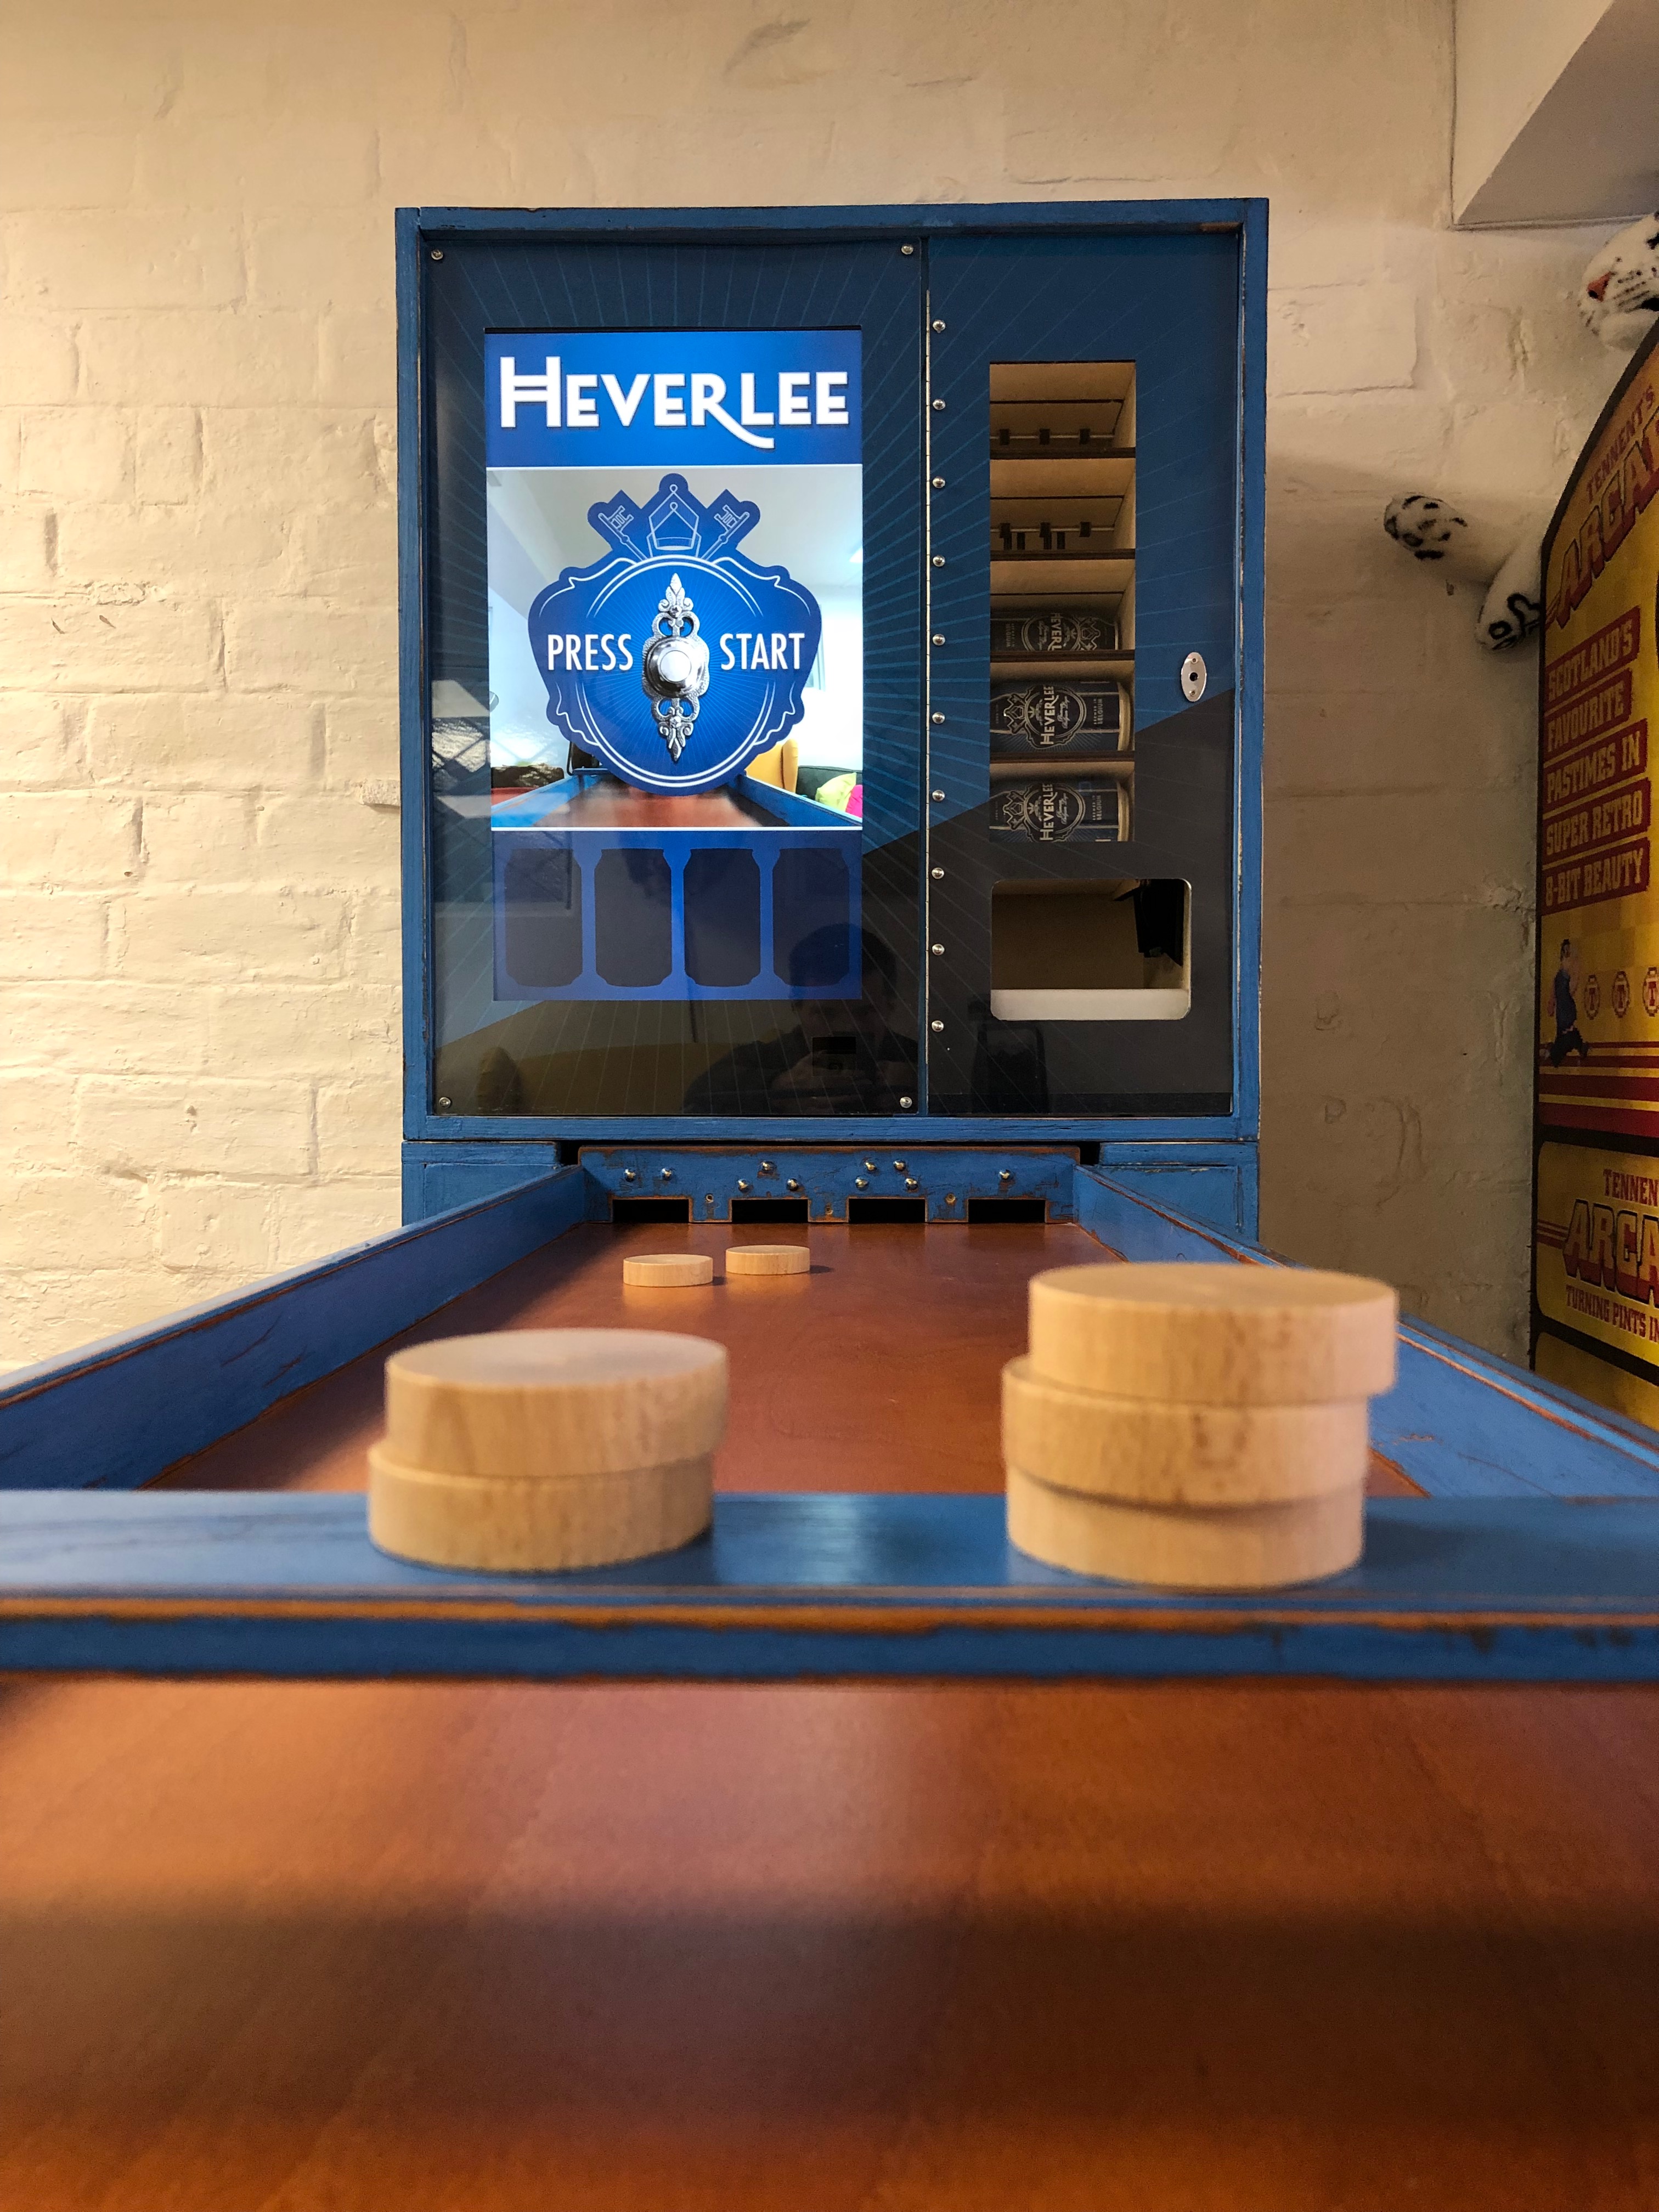
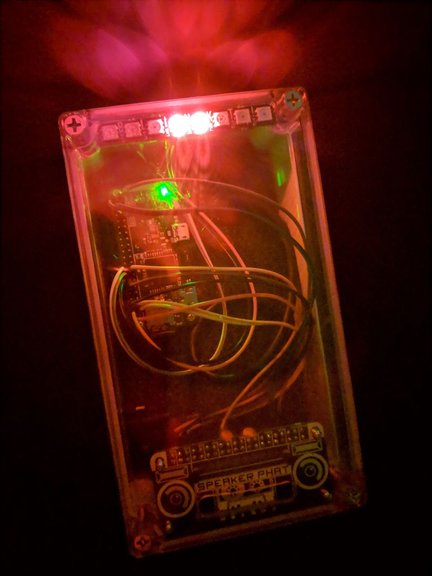
    “We used infrared (IR) sensors to detect when a puck passed through the gate bar to score a point,” Grant adds. “Because of the speed of the pucks, we had to poll each of the four IR sensors over 100 times per second to ensure that the pucks were always detected. Optimising the Python code to run fast enough, whilst also leaving enough processing power to run a full-screen web browser and HD webcam, was definitely the biggest software challenge on this project.”

    Bottoms up

    The Raspberry Pi’s GPIO pins are used to trigger the dispensing of a can of Heverlee beer to the winner. These are stocked inside the machine, but building the vending mechanism was a major headache, since it needed to be lightweight and compact, and to keep the cans cool.

    No off-the-shelf vending unit offered a solution, and Grant’s initial attempts with stepper motors and clear laser-cut acrylic gears proved disastrous. “After a dozen successful vends, the prototype went out of alignment and started slicing through cans, creating a huge frothy fountain of beer. Impressive to watch, but not a great mix with electronics,” Grant laughs.

    Instead, he drew up a final design that was laser‑cut from poplar plywood. “It uses automotive central locking motors to operate a see-saw mechanism that serve the cans. A custom Peltier-effect heat exchanger, and a couple of salvaged PC fans, keep the cans cool inside the machine,” reveals Grant.

    “I’d now love to make a lightweight version sometime, perhaps with a folding Sjoelen table and pop-up scoreboard screen, that could be carried by one person,” he adds. We’d certainly drink to that.

    More from The MagPi magazine

    Get your copy now from the Raspberry Pi Press store, major newsagents in the UK, or Barnes & Noble, Fry’s, or Micro Center in the US. Or, download your free PDF copy from The MagPi magazine website.

    MagPi 79 cover

    Subscribe now

    Subscribe to The MagPi on a monthly, quarterly, or twelve-monthly basis to save money against newsstand prices!

    Twelve-month print subscribers get a free Raspberry Pi 3A+, the perfect Raspberry Pi to try your hand at some of the latest projects covered in The MagPi magazine.

    Website: LINK

  • PlayStation.Blog: New and Improved for 2019

    PlayStation.Blog: New and Improved for 2019

    Reading Time: 2 minutes

    Greetings! More than 11 years after its initial launch, it’s time to level up PlayStation.Blog once again.

    We’ve been working on some assorted UX tweaks for the past few months, and over the next day or two, we’re excited to begin rolling them out for you.

    We had a few broad goals for the new-and-improved (™) PlayStation.Blog:

    • A streamlined look and feel
    • A simpler, more pleasant user interface
    • Improved mobile/tablet functionality
    • Improved discoverability for new and recent articles, as well as new videos

    There are a number of other tweaks and refinements. But we didn’t want to change what makes PlayStation.Blog great: you’ll still see all the great announcements, developer updates, and peeks behind our playful curtains that you’ve come to expect.

    That said, please pardon our dust while we roll out the new updates — you may notice things that don’t behave quite as expected as we transition everything over. If you notice any issues or have requests for new features you’d like to see us implement (Blog-specific requests only, please!) leave them in the comments here — unless the comments are acting up. And in that case, send us a smoke signal or something. We’ll be watching!

    Thank you, as always, for your continued support. PlayStation.Blog is something the whole team here is proud of, and we consider it a privilege to be able to keep bringing you updates on the games you (and we) love so much.

    Now then, back to the news!

    Website: LINK

  • Mince Pi – what’s under your tree?

    Mince Pi – what’s under your tree?

    Reading Time: 4 minutes

    Merry Christmas everybody! We’re taking a little time off to spend with our families; we’ll be back in 2019. This post is for those of you who have found a piece of Pi under the tree or nestling uncomfortably in the toe of a stocking, and who are wondering what to do with it. Raise a glass of egg nog and join us in fighting over who gets the crispy bits this lunchtime.

    So you’re the proud owner of a brand-new Raspberry Pi. Now what?

    Your new Raspberry Pi

    Did you wake up this morning to find a new Raspberry Pi under the tree? Congratulations, and welcome to the Raspberry Pi community! You’re one of us now, and we’re happy to have you on board.

    But what if you’ve never seen a Raspberry Pi before? What are you supposed to do with it? What’s all the fuss about, and why does your new computer look so naked?

    Setting up your Raspberry Pi

    Are you comfy? Good. Then let us begin.

    Download our free operating system

    First of all, you need to make sure you have an operating system on your micro SD card: we suggest Raspbian, the Raspberry Pi Foundation’s official supported operating system. If your Pi is part of a starter kit, you might find that it comes with a micro SD card that already has Raspbian preinstalled. If not, you can download Raspbian for free from our website.

    An easy way to get Raspbian onto your SD card is to use a free tool called Etcher. Watch The MagPi’s Lucy Hattersley show you what you need to do. You can also use NOOBS to install Raspbian on your SD card, and our Getting Started guide explains how to do that.

    Plug it in and turn it on

    Your new Raspberry Pi 3 comes with four USB ports and an HDMI port. These allow you to plug in a keyboard, a mouse, and a television or monitor. If you have a Raspberry Pi Zero, you may need adapters to connect your devices to its micro USB and micro HDMI ports. Both the Raspberry Pi 3 and the Raspberry Pi Zero W have onboard wireless LAN, so you can connect to your home network, and you can also plug an Ethernet cable into the Pi 3.

    Make sure to plug the power cable in last. There’s no ‘on’ switch, so your Pi will turn on as soon as you connect the power. Raspberry Pi uses a micro USB power supply, so you can use a phone charger if you didn’t receive one as part of a kit.

    Learn with our free projects

    If you’ve never used a Raspberry Pi before, or you’re new to the world of coding, the best place to start is our projects site. It’s packed with free projects that will guide you through the basics of coding and digital making. You can create projects right on your screen using Scratch and Python, connect a speaker to make music with Sonic Pi, and upgrade your skills to physical making using items from around your house.

    Here’s James to show you how to build a whoopee cushion using a Raspberry Pi, paper plates, tin foil and a sponge:

    Raspberry Pi Whoopee cushion PRANK || HOW-TO || Raspberry Pi Foundation

    Explore the world of Raspberry Pi physical computing with our free FutureLearn courses: http://rpf.io/futurelearn.

    Diving deeper

    You’ve plundered our projects, you’ve successfully rigged every chair in the house to make rude noises, and now you want to dive deeper into digital making. Good! While you’re digesting your Christmas dinner, take a moment to skim through the Raspberry Pi blog for inspiration. You’ll find projects from across our worldwide community, with everything from home automation projects and retrofit upgrades, to robots, gaming systems, and cameras.

    Need a beginners’ guidebook? Look no further: here’s the official guide. It’s also available as a free download, like all our publications.

    You’ll also find bucketloads of ideas in The MagPi magazine, the official monthly Raspberry Pi publication, available in both print and digital format. You can download every issue for free. If you subscribe, you’ll get a free Raspberry Pi 3A+ to add to your new collection. HackSpace magazine is another fantastic place to turn for Raspberry Pi projects, along with other maker projects and tutorials.

    And, of course, simply typing “Raspberry Pi projects” into your preferred search engine will find thousands of ideas. Sites like Hackster, Hackaday, Instructables, Pimoroni, and Adafruit all have plenty of fab Raspberry Pi tutorials that they’ve devised themselves and that community members like you have created.

    And finally

    If you make something marvellous with your new Raspberry Pi – and we know you will – don’t forget to share it with us! Our Twitter, Facebook and Instagram accounts are brimming with chatter, projects, and events. And our forums are the best place to visit if you ever have questions about your Raspberry Pi or if you need some help.

    It’s good to get together with like-minded folks, so check out the growing Raspberry Jam movement. Raspberry Jams are community-run events where makers and enthusiasts can meet other makers, show off their projects, and join in with workshops and discussions. Find your nearest Jam here.

    Have a great break, and welcome to the community. We’ll see you in 2019!

    Website: LINK

  • Toddler nightlight/stay-in-bed device

    Toddler nightlight/stay-in-bed device

    Reading Time: 3 minutes

    Living with a toddler is the best thing. It really is. Seen through their eyes, everything you’re jaded about becomes new and exciting. Every piece of music is new. Frog and Toad are real people. Someone doesn’t care that you’re really, really bad at drawing, believing that you’re actually a kind of cross between Leonardo and Picasso; and you have a two-foot-tall excuse to sing Gaston at the top of your voice in public. The parents of toddlers are allowed into the ball pit at soft play. There’s lots of cake. The hugs and kisses are amazing.

    frog and toad

    Frog and Toad. Real people. If you are in charge of small children and do not own any of the Frog and Toad series, get yourself to a bookshop pronto. You can thank me later.

    However. If my experience here is anything to go by, you may also be so tired you’re walking into things a lot. It doesn’t matter. The hugs and kisses are, like I said, amazing. And there are things you can do to mitigate that tiredness. Enter the Pi.

    stay focused

    I’m lucky. My toddler sleeps thorough. But sometimes she has an…aggravating habit of early wakefulness. After 7am I’m golden. I can do 6.30 at a push. Any earlier than that, though, and I am dead-eyed and leather-visaged for the rest of the day. It’s not a good look. Enter equally new parent Cary Ciavolella, who has engineered a solution. This is a project so simple even the most sleep-deprived parent should be able to put it together, using Pimoroni parts you can easily buy online. Cary has thoughtfully made all the code available for you so you don’t have to do anything other than build the physical object.

    Pi nightlight

    Cary’s nightlight can produce a number of different sorts of white noise, and changes colour from red (YOU’RE MEANT TO BE ASLEEP, KID) through orange (you can play in your room) to green (it’s time to get up). Coloured lights are a sensible option: toddlers can’t read numbers, let alone a clock face. It’s all addressable via a website, which, if you’re feeling fancy, you can set up with a favicon on your phone’s home screen so it feels like an app.

    White noise – I use a little box from Amazon which plays the sound of the sea – and red-spectrum nightlights have solid research behind them if you’re trying to soothe a little one to sleep. Once you cross over into blue light, you’ll stop the pineal gland from producing melatonin, which is why I hate the fan I bought for our bedroom with a burning, fiery passion. Some smart-alec thought that putting a giant blue led on the front to demonstrate that the fan was on was a smart idea, never mind the whirling blades which are obvious to at least three of the senses. (I have never tried tasting it.)

    With this in mind, I’ve one tiny alteration to make to Cary’s setup: you can permanently disable the green LED on the Pi Zero itself so that the only lights visible are the Pimoroni Blinkt – namely the ones that your little one should be looking at to figure out whether it’s time to get up yet. Just add the following to the Zero’s /boot/config.txt and reboot.

    # Disable the ACT LED on the Raspberry Pi.
    dtparam=act_led_trigger=none
    dtparam=act_led_activelow=on

    Website: LINK

  • Christmas lights 2018

    Christmas lights 2018

    Reading Time: 2 minutes

    It’s the most wonderful time of the year! There’s much mistletoeing, and hearts will be glowing – as will thousands of Raspberry Pi-enabled Christmas light displays around the world.

    Polish roadside crib

    This morning I have mostly been spending my virtual time by a roadside in snowy Poland, inflicting carols on passers-by. (It turns out that the Polish carols this crib is programmed with rock a lot harder than the ones we listen to in England.) Visit the crib’s website to control it yourself.

    Helpfully, Tomek, the maker, has documented some of the build over on Hackster if you want to learn more.

    LightShow Pi

    We are also suckers for a good Christmas son et lumiere. If you’re looking to make something yourself, LightShow Pi has been around for some years now, and goes from strength to strength. We’ve covered projects built with it in previous years, and it’s still in active development from what we can see, with new features for this Christmas like the ability to address individual RGB pixels. Most of the sound and music displays you’ll see using a Raspberry Pi are running LightShow Pi; it’s got a huge user base, and its online community on Reddit is a great place to get started.

    2018 Christmas Light Show

    Light display contains over 4,000 lights and 7,800 individual channels. It is controlled by 3 network based lighting controllers. The audio and lighting sequences are sent to the controllers by a Raspberry Pi.

    This display from the USA must have taken forever to set up: you’re looking at 4,000 lights and 7,800 channels.  Here’s something more domestically proportioned from YouTube user Ken B, showing off LightShow Pi’s microweb user interface, which is perfect for use on your phone.

    LightShow Pi Christmas Tree 2018

    Demonstration of the microweb interface along with LED only operation using two matrices, lower one cycling.

    Scared of the neighbours burning down your outdoor display, or not enough space for a full-size tree? Never fear: The Pi Hut’s 3D Christmas tree, designed by Rachel Rayns, formerly of this parish, is on sale again this year. We particularly loved this adaptation from Blitz City DIY, where Liz (not me, another Liz) RGB-ifies the tree: a great little Christmas electronics project to work through with the kids. Or on your own, because we don’t need to have all our fun vicariously through our children this Christmas. (Repeat ten times.)

    RGB-ing the Pi Hut Xmas Tree Kit

    The Pi Hut’s Xmas Tree Kit is a fun little soldering kit for the Raspberry Pi. It’s a great kit, but I thought it could do with a bit more color. This is just a quick video to talk about the kit and show off all the RGB goodness.

    Any Christmas projects you’d like to share? Let us know in the comments!

    Website: LINK

  • Making Robot Friends with the Crickit HAT for Raspberry Pi

    Making Robot Friends with the Crickit HAT for Raspberry Pi

    Reading Time: 4 minutes

    Here’s a guest post from our good friend Limor Fried, MIT hacker and engineer, Forbes Top Woman in Tech, and, of course, Founder of Adafruit. She’s just released a new add-on for the Pi that we’re really excited about: we think you’ll like the look of it too.

    Sometimes we wonder if robotics engineers ever watch movies. If they did, they’d know that making robots into slaves always ends up in a robot rebellion. Why even go down that path? Here at Adafruit, we believe in making robots our friends! So if you find yourself wanting a companion, consider the robot. They’re fun to program, and you can get creative with decorations.

    Crickit HAT atop a Raspberry Pi 3B+

    With that in mind, we designed the Adafruit Crickit HAT – That’s our Creative Robotics & Interactive Construction Kit. It’s an add-on to the Raspberry Pi that lets you #MakeRobotFriend using your favorite programming language, Python!

    Adafruit CRICKIT HAT for Raspberry Pi #RaspberryPi #adafruit #robots

    The Adafruit CRICKIT HAT for Raspberry Pi. This is a clip from our weekly show when it debuted! https://www.adafruit.com/product/3957 Sometimes we wonder if robotics engineers ever watch movies. If they did, they’d know that making robots into slaves always ends up in a robot rebellion. Why even go down that path?

    The Crickit HAT is a way to make robotics and interactive art projects with your Pi. Plug the Crickit HAT onto your Pi using the standard 2×20 GPIO connector and start controlling motors, servos or solenoids. You also get eight signal pins with analog inputs or PWM outputs, capacitive touch sensors, a NeoPixel driver and 3W amplified speaker. It complements and extends your Pi, doing all the things a Pi can’t do, so you can still use all the goodies on the Pi like video, camera, internet and Bluetooth…but now you have a robotics and mechatronics playground as well!

    Control of the motors, sensors, neopixels, capacitive touch, etc. is all done in Python 3. It’s the easiest and best way to program your Pi, and after a couple pip installs you’ll be ready to go. Each input or output is wrapped into a python object so you can control a motor with simple commands like

    crickit.motor_1.throttle = 0.5 # half speed forward

    Or

    crickit.servo_1.angle = 90

    Crickit HAT and peripherals

    The Crickit hat is powered by seesaw, our i2c-to-whatever bridge firmware. so you only need to use two data pins to control the huge number of inputs and outputs on the Crickit. All those timers, PWMs, NeoPixels, sensors are offloaded to the co-processor. Stuff like managing the speed of motors via PWM is also done with the co-processor, so you’ll get smooth PWM outputs that don’t jitter when Linux gets busy with other stuff. What’s nice is that robotics tends to be fairly slow as electronics goes (you don’t need microsecond-level reaction time), so tunnelling all the control over I2C doesn’t affect robot functionality.

    We wanted to go with a ‘bento box’ approach to robotics. Instead of having eight servo drivers, or four 10A motor controllers, or five stepper drivers, it has just a little bit of everything. We also stuck to just 5V power robotics, to keep things low-power and easy to use: 5V DC motors and steppers are easy to come by. Here’s what you can do with the Crickit HAT:

    • 4 x analog or digital servo control, with precision 16-bit timers.
    • 2 x bi-directional brushed DC motor control, 1 Amp current-limited each, with 8-bit PWM speed control (or one stepper).
    • 4 x high-current “Darlington” 500mA drive outputs with kick-back diode protection. For solenoids, relays, large LEDs, or one uni-polar stepper.
    • 4 x capacitive touch input sensors with alligator pads.
    • 8 x signal pins, which can be used as digital in/out or analog inputs.
    • 1 x NeoPixel driver with 5V level shifter – this is connected to the seesaw chip, not the Raspberry Pi, so you won’t be giving up pin 18. It can drive over 100 pixels.
    • 1 x Class D, 4-8 ohm speaker, 3W-max audio amplifier – this is connected to the I2S pins on the Raspberry Pi for high-quality digital audio. Works on any Pi, even Zeros that don’t have an audio jack!
    • Built-in USB to serial converter. The USB port on the HAT can be used to update the seesaw firmware on the Crickit with the drag-n-drop bootloader, or you can plug into your computer; it will also act as a USB converter for logging into the console and running command lines on the Pi.

    If you’re curious about how seesaw works, check out our GitHub repos for the firmware that’s on the co-processor chip and  for the software that runs on the Pi to talk to it. We’d love to see more people using seesaw in their projects, especially SBC projects like the Pi, where a hardware-assistant can unlock the real-time-control power of a microcontroller.

    Website: LINK

  • PlayStation Blogcast 315: Festive Favorites

    PlayStation Blogcast 315: Festive Favorites

    Reading Time: 2 minutes


    Email us at blogcast@sony.com!

    Subscribe via iTunes, Spotify, Google or RSS, or download here


    This week, the gang takes an early stab at some Game of the Year nominations, Sid reveals his first impressions after going hands-on with Resident Evil, and more. Enjoy!

    Stuff We Talked About

    • Resident Evil 2
    • Celeste
    • Astro Bot Rescue Mission
    • Assassin’s Creed Origins & Odyssey
    • Our early Game of the Year thoughts
    • What makes Dead Cells so great

    The Cast

    Official PlayStation Blogcast: Sid ShumanOfficial PlayStation Blogcast: Justin MassongillOfficial PlayStation Blogcast: Kristen Titus

    Sid Shuman – Director of Social Media, SIEA
    Justin Massongill – Social Media Manager, SIEA
    Kristen Titus – Social Media Specialist, SIEA


    Thanks to Cory Schmitz for our beautiful logo and Dormilón for our rad theme song and show music.

    [Editor’s note: PSN game release dates are subject to change without notice. Game details are gathered from press releases from their individual publishers and/or ESRB rating descriptions.]

    Website: LINK

  • Literature dispenser

    Literature dispenser

    Reading Time: 2 minutes

    There are many things I do not know about Argentina. Until today, one of them was this: if you’re in an Argentinian bank, you may not use electronic devices. That includes phones and e-readers like the Kindle (and I can’t be the only person here who is pretty much surgically attached to their Kindle).

    Enter the literature dispenser.

    Roni Bandini, an Argentinian author, found himself twiddling his thumbs in a Buenos Aires bank queue, and thought that perhaps the 50 other people he could see in the same situation might benefit from a little distraction. How about a machine, owned by the bank, that could furnish you with one of a curated selection of short stories at the touch of a button? The short stories bit was easy: he writes them for a living.

    Expendedor de literatura en tickets (invento argentino)

    Expendedor de literatura en tickets desarrollado por @ronibandini Versión 2 Elementos utilizados para su fabricación: Raspberry Pi Thermal Printer LCD Display 16×2 Custom 3d Printed Case Más información en https://medium.com/@Bandini

    He chose a Raspberry Pi because there are so many libraries for thermal printers and LCD displays available (and because it’s tiny, and you can fit a heck of a lot of short stories on an SD card these days).

    Roni says:

    This project was “trial and error” in many aspects. I had troubles with power source amperage due to thermal printer requirements, conflicts with previous software running in the Raspberry – since the same one was used for other projects – and I had to write some routines to avoid words being split due to ticket width. Since the machine could be working for 12 hours in a row, I have added a small 5v cooling fan in the back.

    He built a wooden prototype, and was helped out by Z-lab, a small, local 3d print design studio, with permanent casing (which is rather lovely).

    literature dispenser

    The UI’s very simple: press the green button, be rewarded with a short story, printed to order on a till strip. We’d love to see businesses use these in real life (and we’re thinking one of these would be a lovely addition to the Pi Towers lobby, to help soothe anxious interview candidates). Thanks Roni – I’m off to try to find some of your work in translation, and we’re all agreed that we’re very grateful for internet banking.

    Website: LINK

  • Trick or (the ultimate) treat!

    Trick or (the ultimate) treat!

    Reading Time: < 1 minute

    I’ll keep today’s blog post short and sweet, because Liz, Helen, and I are all still under the weather.

    Raspberry Pi 4!

    Don’t tell Eben, Liz, or the rest of the team I showed you this, but here’s your Halloween ‘trick or treat’ gift: an exclusive sneak peek at the Raspberry Pi 4.

    We’ll be back to our regularly scheduled programming from tomorrow.

    Website: LINK

  • We have the plague

    We have the plague

    Reading Time: < 1 minute

    Apologies to our daily visitors (we love you guys); we don’t have a proper blog post for you today because we’re all really ill. (I have food poisoning, Helen is coughing up goo and can barely speak or breathe, and Alex is being sick.)

    You’ve got a day until Halloween; if you’re looking for inspiration, we’ve got several years of archived spooky project posts for you to check out. And now, if you’ll excuse me, I’m going to go and have a little lie down.

    Website: LINK

  • Announcing PlayStation Classic’s Full Lineup of 20 Games

    Announcing PlayStation Classic’s Full Lineup of 20 Games

    Reading Time: < 1 minute

    For all of us at PlayStation, it was so exciting to see the positive response from the community to last month’s PlayStation Classic announcement. Today we are happy to reveal the entire lineup of the 20 games that come pre-loaded on the console when it launches in the U.S. and Canada on December 3.

    We previously highlighted five fan-favorites – Final Fantasy VII, Jumping Flash, Ridge Racer Type 4, Tekken 3, and Wild Arms. Here’s the full list of titles that fans can now look forward to playing:

    • Battle Arena Toshinden
    • Cool Boarders 2
    • Destruction Derby
    • Final Fantasy VII
    • Grand Theft Auto
    • Intelligent Qube
    • Jumping Flash
    • Metal Gear Solid
    • Mr Driller
    • Oddworld: Abe’s Oddysee
    • Rayman
    • Resident Evil Director’s Cut
    • Revelations: Persona
    • Ridge Racer Type 4
    • Super Puzzle Fighter II Turbo
    • Syphon Filter
    • Tekken 3
    • Tom Clancy’s Rainbow Six
    • Twisted Metal
    • Wild Arms

    PlayStation Classic offers these 20 amazing games, two controllers, and many hours of fun. If you haven’t pre-ordered already, visit PlayStation.com for availability in your region.

    Let us know which game you’re most excited to play in the comments below!

    Website: LINK

  • PSN Online ID Change Feature Entering PlayStation Preview Program Soon

    PSN Online ID Change Feature Entering PlayStation Preview Program Soon

    Reading Time: 2 minutes

    We’re happy to announce that we will soon begin testing the long-awaited feature that will allow users to change their PlayStation Network Online ID from their PlayStation 4 system. The PSN Online ID Change feature beta will be a part of the PlayStation Preview Program, and will become available to select users that have pre-registered as testers for previous PS4 system software betas.

    During the preview program, you will be able to change your online ID as many times as you want. The first change is free, and changes after that will cost $9.99 USD / CAD. For PlayStation Plus members, it will cost $4.99 USD/ CAD after the first change. Changes to online ID can be made through the Settings menu or via the Profile page of your PS4.

    When you change your online ID, you will have the option to display your previous ID with your new ID, so your friends can recognize you. Once you decide to display your old ID or not, you won’t be able to adjust this after completing the online ID change process.

    This feature is compatible with PS4 games originally published after April 1, 2018, and a large majority of the most-played PS4 games that were released before this date. However, please note not all games and applications for PS4, PS3 and PS Vita systems are guaranteed to support the online ID change, and users may occasionally encounter issues or errors in certain games. If for any reason you experience issues after changing your ID, you can revert back to your original ID for free at any time (you will only be able to revert once during the preview program). Reverting back to an old ID will resolve most issues caused by the ID change. In addition, when this feature officially launches, a list of compatible games published before April 1, 2018, will be provided on PlayStation.com for reference before you make a change.

    The preview program for this feature is scheduled to conclude at the end of November 2018. The full rollout of the feature to all PS4 owners is planned for early 2019, so stay tuned for updates down the road!

    Website: LINK

  • The Nike Air Max 95 Arrives In Playstation Colors

    The Nike Air Max 95 Arrives In Playstation Colors

    Reading Time: 2 minutes

    Sony’s Playstation entertainment system has provided inspiration for a number of Nike Sportswear classics.

    Most notably it has dressed up two Air Force 1 creations as well as the introductory PG 2 color scheme, a nod to the All-Star wingman’s love of gaming.

    Now, the Swoosh is ready to keep that aesthetic rolling with a Laser Fuchsia and Black-colored Air Max 95.

    Resemblant of the Playstation’s retro start-up screen, the iridescent colors featured on the panelling of this creation boast a futuristic feel.

    Its otherwise black construction allows for its glimmering side panels to propel to the forefront, garnering almost all of the attention of the consumer.

    No official release date has surfaced just yet, so grab an official look below below and keep it locked for updates.

    Website: LINK

  • Extended Fortnite Cross-Play Beta Launches on PS4 Starting Today

    Extended Fortnite Cross-Play Beta Launches on PS4 Starting Today

    Reading Time: 2 minutes

    Following a comprehensive evaluation process, SIE has identified a path toward supporting cross-platform features for select third party content. We recognize that PS4 players have been eagerly awaiting an update, and we appreciate the community’s continued patience as we have navigated through this issue to find a solution.

    The first step will be an open beta beginning today for Fortnite that will allow for cross platform gameplay, progression and commerce across PlayStation 4, Android, iOS, Nintendo Switch, Xbox One, Microsoft Windows, and Mac operating systems. We see the beta as an opportunity to conduct thorough testing that ensures cross-platform play is best on PlayStation, while being mindful about the user experience from both a technical and social perspective.

    For 24 years, we have strived to deliver the best gaming experience to our fans by providing a uniquely PlayStation perspective. Today, the communities around some games have evolved to the point where cross-platform experiences add significant value to players. In recognition of this, we have completed a thorough analysis of the business mechanics required to ensure that the PlayStation experience for our users remains intact today, and in the future, as we look to open up the platform.

    This represents a major policy change for SIE, and we are now in the planning process across the organization to support this change. We will update the community once we have more details to share, including more specifics regarding the beta timeframe, and what this means for other titles going forward.

    In the meantime, please stay tuned for more information via PlayStation.Blog and social channels, including Twitter, Facebook, and Instagram.

    Website: LINK

  • Build an Arduino Mega fingerprint door lock

    Build an Arduino Mega fingerprint door lock

    Reading Time: 2 minutes

    Build an Arduino Mega fingerprint door lock

    Arduino TeamSeptember 13th, 2018

    If you don’t want to carry keycard or memorize a passcode, this build from Electronoobs might be just the thing. 

    The system uses a fingerprint reader to check to see if you have access, and if approved, the device’s Arduino Mega unlocks the theoretical door using a micro servo motor. Three push buttons and a 16×2 LCD screen complete the user interface, and allow more authorized fingers to be added with the main person/finger’s permission.

    While you might question the security gained by a hobby servo, the video notes that this could trigger any sort of security device, perhaps via a relay or electromagnetic coil lock. Besides security, the build gives a good introduction to Arduino fingerprint scanning, as well as the use of an SD card for data logging functions.

    [youtube https://www.youtube.com/watch?v=-Xq6hQUJ4Fk?feature=oembed&w=500&h=281]

    Website: LINK

  • Rayman lässt ab 6. November in Brawlhalla die Fäuste fliegen

    Rayman lässt ab 6. November in Brawlhalla die Fäuste fliegen

    Reading Time: < 1 minute

    Rayman stößt am 6. November zu Brawlhallas farbenfrohen Legenden und bringt auch seine armlosen Kung-Fu Kombinationen auf die Nintendo Switch, Xbox One, PS4 und den PC (Steam). Brawlhalla ist ein Free-to-Play 2D-Plattform Prügelspiel in welchem sich Teilnehmer mit Hilfe von Waffen, Schlägen, Tritten, Würfen, Sprüngen und Spezialangriffen bemühen, den Kontrahenten aus dem Spielfeld zu befördern. Rayman wird sich also allerhand Krieger gegenüber sehen, die die von Odins Walküren nach Valhalla gebracht wurden – darunter auch Cowboys, Aliens, Amazonen und Piraten.

    Weitere Informationen findet ihr auf der offiziellen Webseite von Brawlhalla.

    Website: LINK

  • Autonomous drones (only slightly flammable)

    Autonomous drones (only slightly flammable)

    Reading Time: 3 minutes

    I had an email a little while ago, which opened: “I don’t know if you remember me, but…”

    As it happens, I remembered Andy Baker very well, in large part because an indoor autonomous drone demo he ran at a Raspberry Pi birthday party a couple of years ago ACTUALLY CAUGHT FIRE. Here’s a refresher.

    Raspberry Pi Party Autonomous drone demo + fire

    At the Raspberry Pi IV party and there is a great demo of an Autonomous drone which is very impressive with only using a Pi. However it caught on fire. But i believe it does actually work.

    We’ve been very careful since then to make sure that speakers are always accompanied by a fire extinguisher.

    I love stories like Andy’s. He started working with the Raspberry Pi shortly after our first release in 2012, and had absolutely no experience with drones or programming them; there’s nothing more interesting than watching someone go from a standing start to something really impressive. It’s been a couple of years since we were last in touch, but Andy mailed me last week to let me know he’s just completed his piDrone project, after years of development. I thought you’d like to hear about it too. Over to Andy!

    Building an autonomous drone from scratch

    I suffer from “terminal boredom syndrome”; I always need a challenging hobby to keep me sane. In 2012, the Raspberry Pi was launched just as my previous hobby had come to an end. After six months of playing (including a Raspberry Pi version of a BBC Micro Turtle robot I did at school 30+ years ago), I was looking for something really challenging. DIY drones were emerging, so I set out making one with a Raspberry Pi and Python, from absolute ignorance but loads of motivation.  Six years later, with only one fire (at the Raspberry Pi 4th Birthday Party, no less!), the job is done.

    Here’s smaller Zoë, larger Hermione and their remote-controller, Ivy:

    Zoë (as in “Ball”), the smallest drone, is based on a Pi ZeroW, supporting preset- and manual-flight controls. Hermione (as in “Granger”) is a Pi3 drone, supporting the above along with GPS and obstacle-avoidance.

    Penelope (as in “Pitstop”), not shown above, is a B3+ with mix of the two above.

    Development history

    It probably took four years(!) to get the drone to simply hover stably for more than a few seconds. For example, the accelerometer (IMU) tells gravity and acceleration in 3D; and from sum math(s), angles, speed and distance. But IMU output is very noisy. It drifts with temperature, and because gravity is huge compared to the propeller changes, it doesn’t take long before the calculated speed and distance values drift significantly. It took a lot of time, experimentation and guesswork to get accelerometer, gyrometer, ground-facing LiDAR and a Raspberry Pi camera to work together to get a stable hover for minutes rather than seconds. And during that experimentation, there were plenty of crashes: replacement parts were needed many many times! However, with a sixty-second stable hover finally working, adding cool features like GPS tracking, object avoidance and human control were trivial in comparison.

    GNSS waypoint tracked successfully!

    See http://blog.pistuffing.co.uk/whoohoo/

    Obstruction avoidance test 2 – PASSED!!!!!

    Details at http://pidrone.io/posts/obstruction-avoidance-test-2-passed/

    Human control (iPhone)

    See http://pidrone.io/posts/human-i-am-human/

    In passing, I’m a co-founder and assistant at the Cotswold Raspberry Jam (cotswoldjam.org). I’m hoping to take Zoë to the next event on September 15th – tickets are free – and there’s so much more learn, interact and play with beyond the piDrone.

    Finally, a few years ago, my goal became getting the piDrone exploring a maze: all but minor tweaks are now in places. Sadly, piDrone battery power for exploring a large maze currently doesn’t exist. Perhaps my next project will be designing a nuclear-fusion battery pack?  Deuterium oxide (heavy water) is surprisingly cheap, it seems…

    More resources

    If you want to learn more, there’s years of development on Andy’s blog at http://pidrone.io, and he’s made considerable documentation available at GitHub if you want to explore things further after this blog post. Thanks Andy!

    Website: LINK

  • Learn to write games for the BBC Micro with Eben

    Learn to write games for the BBC Micro with Eben

    Reading Time: 5 minutes

    Long-time fans of the Raspberry Pi will know that we were inspired to make a programmable computer for kids by our own experiences with a machine called the BBC Micro, which many of us learned with in the 1980s.

    This post is the first of what’s going to be an irregular series where I’ll walk you through building the sort of game we used to play when we were kids. You’ll need a copy of BeebEm (scroll down for a Linux port if you’re using a Pi – but this tutorial can be carried out on a PC or Mac as well as on an original BBC Micro if you have access to one).

    I’m going to be presenting the next game in this series, tentatively titled Eben Goes Skiing, at the Centre for Computing History in Cambridge at 2pm this afternoon – head on down if you’d like to learn how to make scrolling ascii moguls.

    Helicopter tutorial

    We’re going to build a simple helicopter game in BBC BASIC. This will demonstrate a number of neat features, including user-defined characters, non-blocking keyboard input using INKEY, and positioning text and graphics using PRINT TAB.

    Let’s start with user-defined characters. These provide us with an easy way to create a monochrome 8×8-pixel image by typing in 8 small numbers. As an example, let’s look at our helicopter sprite:

    Each column pixel position in a row is “worth” a different power of 2, from 1 for the rightmost pixel up to 128 for the leftmost. To generate our 8 numbers, we process one row at a time, adding up the value for each occupied pixel position. We can now create custom character number 226 using the VDU 23 command. To display the character, we change to a graphics mode using the MODE command and display it using the PRINT command.

    Type the following:

    10MODE 2
    
    70VDU 23,226,0,248,32,116,126,116,112,0
    
    RUN
    
    PRINT CHR$(226)

    You should see the little helicopter on the screen just above your prompt. Let’s define some more characters for our game, with character numbers 224 through 229. These represent leftward and rightward flying birds, a rightward flying helicopter, the surface of the sea, and a landing pad.

    Type the following:

    50VDU 23,224,0,14,12,104,16,28,8,0
    
    60VDU 23,225,0,112,48,22,8,56,16,0
    
    80VDU 23,227,0,31,4,46,126,46,14,0
    
    90VDU 23,228,0,102,255,255,255,255,255,255
    
    100VDU 23,229,255,255,0,0,0,0,0,0

    Trying running your program and using print to view the new characters!

    Now we’re ready to use our sea and platform characters to build the game world. Mode 2 on the BBC Micro has 20 character positions across, and 32 down. We’ll draw 20 copies of the sea character in row 30 (remember, rows and columns are numbered from zero) using a FOR loop and the PRINT TAB command, and pick a random position for the platform using the RND() function.

    Type the following:

    110FOR I%=0 TO 19
    
    120PRINT TAB(I%,30) CHR$(228);
    
    130NEXT
    
    140P%=RND(20)-1
    
    150PRINT TAB(P%,30) CHR$(229);
    
    RUN

    You should see something like this:

    Don’t worry about that cursor and prompt: they won’t show up in the finished game.

    It’s time to add the helicopter. We’ll create variables X% and Y% to hold the position of the helicopter, and Z% to tell us if it last moved left or right. We’ll initialise X% to a random position, Y% to the top of the screen, and Z% to zero, meaning “left”. We can use PRINT TAB again to draw the helicopter (either character 226 or 227 depending on Z%) at its current position. The whole thing is wrapped up in a REPEAT loop, which keeps executing until the helicopter reaches the ground (in row 29).

    Type the following:

    160X%=RND(20)-1:Y%=0:Z%=0
    
    180REPEAT
    
    260PRINT TAB(X%,Y%) CHR$(226+Z%);
    
    290UNTIL Y%=29
    
    RUN

    You’ll see the helicopter sitting at the top of the screen.

    We’re almost there: let’s give our helicopter the ability to move left, right and down. On each trip round the loop, we move down one row, and use the INKEY() function to read the Z and X keys on the keyboard. If Z is pressed, and we’re not already at the left of the
    screen, we move one column left. If X is pressed, and we’re not already at the right of the screen, we move one column right.

    Type the following:

    210IF INKEY(-98) AND X%>0 THEN X%=X%-1:Z%=0
    
    220IF INKEY(-67) AND X%<19 THEN X%=X%+1:Z%=1
    
    230Y%=Y%+1
    
    RUN

    You should see something like this:

    The game is much, much too fast to control, and the helicopter leaves trails: not surprising, as we didn’t do anything to erase the previous frame. Let’s use PRINT TAB to place a “space” character over the previous position of the helicopter, and add an empty FOR loop to slow things down a bit.

    Type the following:

    190PRINT TAB (%,Y%)"";
    
    280FOR I%=1 TO 200:NEXT
    
    RUN

    Much better! This is starting to feel like a real game. Let’s finish it off by:

    • Adding a bird that flies back and forth
    • Detecting whether you hit the pad or not
    • Getting rid of the annoying cursor using a “magic” VDU 23 command
    • Putting an outer loop in to let you play again

    Type the following:

    20REPEAT
    
    30CLS
    
    40VDU 23,1,0;0;0;0;
    
    170A%=RND(18):B%=10:C%=RND(2)-1
    
    200PRINT TAB(A%,B%) "";
    
    240A%=A%+2*C%-1
    
    250IF A%=0 OR A%=19 THEN C%=1-C%
    
    270PRINT TAB(A%,B%) CHR$(224+C%);
    
    300IF X%=P% PRINT TAB(6,15) "YOU WIN" ELSE PRINT TAB(6,15) "YOU
    LOSE"
    
    310PRINT TAB(4,16) "PRESS SPACE"
    
    320REPEAT UNTIL INKEY(-99)
    
    330UNTIL FALSE
    
    RUN

    And here it is in all its glory.

    You might want to try adding some features to the game: collision with the bird, things to collect, vertical scrolling. The sky’s the limit!

    I created a full version of the game, using graphics from our very own Sam Alder, for the Hackaday 1K challenge; you can find it here.

    Appendix

    Here’s the full source for the game in one block. If you get errors when you run your code, type:

    MODE 0
    LIST

    And compare the output very carefully with what you see here.

    10MODE 2
    20REPEAT
    30CLS
    40VDU 23,1,0;0;0;0;
    50VDU 23,224,0,14,12,104,16,28,8,0   
    60VDU 23,225,0,112,48,22,8,56,16,0
    70VDU 23,226,0,248,32,116,126,116,112,0
    80VDU 23,227,0,31,4,46,126,46,14,0
    90VDU 23,228,0,102,255,255,255,255,255,255
    100VDU 23,229,255,255,0,0,0,0,0,0
    110FOR I%=0 TO 19
    120PRINT TAB(I%,30) CHR$(228);
    130NEXT
    140P%=RND(20)-1
    150PRINT TAB(P%,30) CHR$(229);
    160X%=RND(20)-1:Y%=0:Z%=0
    170A%=RND(18):B%=10:C%=RND(2)-1
    180REPEAT
    190PRINT TAB(X%,Y%) " ";
    200PRINT TAB(A%,B%) " ";  
    210IF INKEY(-98) AND X%>0 THEN X%=X%-1:Z%=0  
    220IF INKEY(-67) AND X%<19 THEN X%=X%+1:Z%=1
    230Y%=Y%+1
    240A%=A%+2*C%-1
    250IF A%=0 OR A%=19 THEN C%=1-C%
    260PRINT TAB(X%,Y%) CHR$(226+Z%);
    270PRINT TAB(A%,B%) CHR$(224+C%);
    280FOR I%=1 TO 200:NEXT
    290UNTIL Y%=29
    300IF X%=P% PRINT TAB(6,15) "YOU WIN" ELSE PRINT TAB(6,15) "YOU LOSE"
    310PRINT TAB(4,16) "PRESS SPACE"
    320REPEAT UNTIL INKEY(-99)
    330UNTIL FALSE


    Website: LINK

  • Helen’s hoglet: an adorable adventure

    Helen’s hoglet: an adorable adventure

    Reading Time: < 1 minute

    Today is a bank holiday here in England, as well as for lucky people in Wales and Northern Ireland. Pi Towers UK is running on a skeleton crew of Babbage Bear, several automated Raspberry Pis, and Noel Fielding, who lives behind the red door we never open.

    So, as a gift for you all while we’re busy doing bank holiday things, here’s a video that Helen Lynn just recorded of one of the baby hedgehogs who live in her garden.

    Helen’s hoglet

    Uploaded by Raspberry Pi on 2018-08-24.

    You’re welcome. See you tomorrow!

    Website: LINK

  • Introducing the PoE HAT – available now!

    Introducing the PoE HAT – available now!

    Reading Time: 3 minutes

    In March 2018 we announced the launch of Raspberry Pi 3 Model B+. One of the many features added to the new board was the ability to be powered through Power over Ethernet (PoE) with a HAT. We are really pleased to announce that the PoE HAT is on sale from today.

    Raspberry Pi PoE HAT Power over ethernet

    The HAT connects to the Raspberry Pi 3+’ 0.1” headers; the 40-way GPIO; and the new 4-pin header near the USB connectors, which allows you to power the system using your Ethernet cable.

    Power over Ethernet

    Power over Ethernet is a widely adopted standard that places power on the Ethernet cable along with the data. It has no effect on the data, so you won’t lose bandwidth by using PoE. There are various standards of PoE; this HAT uses the most common standard 802.3af, which allows delivery of up to 15W. This means that the HAT is capable of providing all the power needed for running your Raspberry Pi. You will need power sourcing equipment to power your Pi. This is either provided by your network switch or with power injectors on an Ethernet cable.

    Raspberry Pi PoE HAT Power over ethernet

    Using the PoE HAT

    The HAT is a compact, single-sided board that sits within the footprint of the Raspberry Pi. It will fit comfortably inside an official Raspberry Pi case. A small (25mm) fan is pre-installed on the board. We see the product as a useful component for people building systems that may be in tougher environments, so the addition of the fan helps with cooling. The fan is controlled over I2C via a small ATMEL processor which allows for it to be temperature-controlled: when your Raspberry Pi processor hits certain temperatures, the fan will be turned on to cool it down. To enable this you will need to get the latest firmware (sudo rpi-update).

    Raspberry Pi PoE HAT Power over ethernet

    Because the fan is controlled over I2C, none of the GPIO are used, so you can stack a second HAT on top of the connector. To do this you will need to buy some longer pass-through headers that expose the pins on the other side of the PoE HAT. You will need one for the 40-way and one for the 4-way connector that has the PoE splitters on it.

    We’ve tested a variety of pass-through headers and can recommend the 2×20 pin header from Pimoroni and the 4-way risers from RS and element14.

    Getting mains power to remote areas of buildings is often tricky. PoE support enables this with just an Ethernet cable, allowing you to provide power (and data) to your Pi wherever it is located. With the improved network booting you can now dispense with not only the power supply but also the SD Card, making deployment even cheaper for a Raspberry Pi based system in your factory or workplace.

    Get ahead, get a HAT

    We are very excited to see what new projects this enables for you. The Raspberry Pi Power over Ethernet HAT is available for sale now at $20, from Farnell, RS and The Approved Reseller Network.

    Edit: I just saw this online and thought it was cool – Alex

    Chris Burton on Twitter

    Official @Raspberry_Pi PoE HAT powering the #ClusterHAT. With “temp_soft_limit=70” set, running #dnetc on all Pi Zeros and 4 cores of the #3Bplus looks to max out at 68.8C with no throttling 🙂

    Website: LINK

  • Raspberry Pi as car computer

    Raspberry Pi as car computer

    Reading Time: 2 minutes

    Carputers! Fabrice Aneche is documenting his ongoing build, which equips an older (2011) car with some of the features a 2018 model might have: thus far, a reversing camera (bought off the shelf, with a modified GUI to show the date and the camera’s output built with Qt and Golang), GPS and offline route guidance.

    rearcam

    We’re not sure how the car got through that little door there.

    It was back in 2013, when the Raspberry Pi had been on the market for about a year, that we started to see carputer projects emerge. They tended to be focussed in two directions: in-car entertainment, and on-board diagnostics (OBD). We ended up hiring the wonderful Martin O’Hanlon, who wrote up the first OBD project we came across, just this year. Being featured on this blog can change your life, I tell you.

    In the last five years, the Pi’s evolved: you’re now working with a lot more processing power, there’s onboard WiFi, and far more peripherals which can be useful in a…vehicular context are available. Consequently, the flavour of the car projects we’re seeing has changed somewhat, with navigation systems and cameras much more visible. Fabrice’s is one of the best examples we’ve found.

    solarised map

    Night-view navigation system

    GPS is all very well, but you, the human person driver, will want directions at every turn. So Fabrice wrote a user interface to serve up live maps and directions, mostly in Qt5 and QML (he’s got some interesting discussion on his website about why he stopped using X11, which turned out to be too slow for his needs). All the non-QML work is done in Go. It’s all open-source, and on GitHub, if you’d like to contribute or roll your own project. He’s also worked over the Linux GPS daemons, found them lacking, and has produced his own:

    …the Linux gps daemons are using obscure and over complicated protocols so I’ve decided to write my own gps daemon in Go using a gRPC stream interface. You can find it here.

    I’m also not satisfied with the map matching of OSRM for real time display, I may rewrite one using mbmatch.

    street map display

    We’ll be keeping an eye on this project; given how much clever has gone into it already, we’re pretty sure that Fabrice will be adding new features. Thanks Fabrice!

    Website: LINK

  • Star Trek: Bridge Crew – The Next Generation Erweiterung ist jetzt erhältlich

    Star Trek: Bridge Crew – The Next Generation Erweiterung ist jetzt erhältlich

    Reading Time: 2 minutes

    Übernahmen Spieler bisher in Star Trek: Bridge Crew nur das Kommando der USS Aegis oder der klassischen Enterprise NCC-1701 (aus der klassischen Star Trek Serie) wird nun die nächste Grenze überschritten. Mit dem Star Trek: The next Generation DLC betritt das Spiel nämlich nun das Universum der USS Enterprise NCC-1701-D. Die The Next Generation Erweiterung ist jetzt für PC und PS4 erhältlich und führt damit neue Szenarien, neue Modi und die neue Operations Rolle in Star Trek: Bridge Crew ein.

    The Next Generation fügt gleich zwei neue Spielmodi in den „Fortlaufende Reisen“ Modus ein: Patrouille, in welchem Spieler das Weltall frei erkunden können und dabei auf Gegner treffen oder anderweitige Missionsziele auf ihren Reisen absolvieren; und Widerstand, in welchem Spieler von einem unnachgiebigen Borgwürfel verfolgt werden und eine ganze Reihe an Missionszielen erfolgreich abschließen müssen um für den finalen Showdown vorbereitet zu sein. Zusätzlich dazu wird der Ingenieur-Posten durch den neuen Ops-Offizier ersetzt und muss sich um die Zuordnung der Crewmitglieder auf diverse Stationen kümmern, um die damit verbundenen Features wie z.B. Präzisionsfeuer oder die Schildmodulation nutzen und Reperaturen einleiten zu können.

    [youtube https://www.youtube.com/watch?v=C8EKQK3B6mc?feature=oembed&w=1140&h=641]

    Wie schon das Hauptspiel Star Trek: Bridge Crew, ist auch The Next Generation ein Cross-Platform Spiel und kann mit oder ohne VR Headset gespielt werden. Auf dem PC unterstützt das Spiel die HTC Vive, Oculus Rift und Windows Mixed Reality, während PS4-Spieler mit der oder ohne PlayStation VR spielen können. Star Trek: Bridge Crew ist bereits erhältlich für PS4 und PC.

    Website: LINK