Here’s a guest post from our good friend Limor Fried, MIT hacker and engineer, Forbes Top Woman in Tech, and, of course, Founder of Adafruit. She’s just released a new add-on for the Pi that we’re really excited about: we think you’ll like the look of it too.

Sometimes we wonder if robotics engineers ever watch movies. If they did, they’d know that making robots into slaves always ends up in a robot rebellion. Why even go down that path? Here at Adafruit, we believe in making robots our friends! So if you find yourself wanting a companion, consider the robot. They’re fun to program, and you can get creative with decorations.

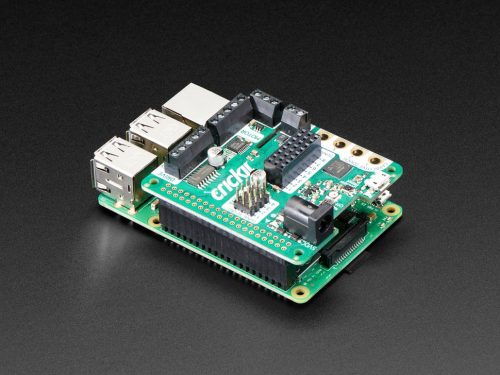
Crickit HAT atop a Raspberry Pi 3B+
With that in mind, we designed the Adafruit Crickit HAT – That’s our Creative Robotics & Interactive Construction Kit. It’s an add-on to the Raspberry Pi that lets you #MakeRobotFriend using your favorite programming language, Python!
Adafruit CRICKIT HAT for Raspberry Pi #RaspberryPi #adafruit #robots
The Adafruit CRICKIT HAT for Raspberry Pi. This is a clip from our weekly show when it debuted! https://www.adafruit.com/product/3957 Sometimes we wonder if robotics engineers ever watch movies. If they did, they’d know that making robots into slaves always ends up in a robot rebellion. Why even go down that path?
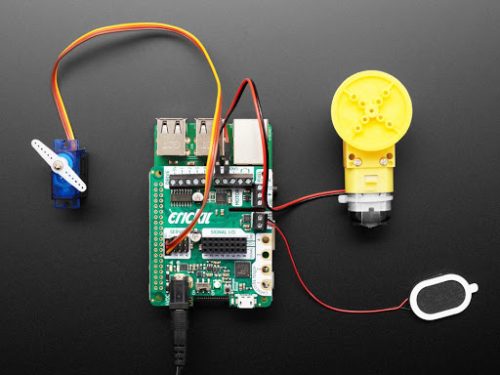
The Crickit HAT is a way to make robotics and interactive art projects with your Pi. Plug the Crickit HAT onto your Pi using the standard 2×20 GPIO connector and start controlling motors, servos or solenoids. You also get eight signal pins with analog inputs or PWM outputs, capacitive touch sensors, a NeoPixel driver and 3W amplified speaker. It complements and extends your Pi, doing all the things a Pi can’t do, so you can still use all the goodies on the Pi like video, camera, internet and Bluetooth…but now you have a robotics and mechatronics playground as well!
Control of the motors, sensors, neopixels, capacitive touch, etc. is all done in Python 3. It’s the easiest and best way to program your Pi, and after a couple pip installs you’ll be ready to go. Each input or output is wrapped into a python object so you can control a motor with simple commands like
crickit.motor_1.throttle = 0.5 # half speed forward
Or
crickit.servo_1.angle = 90
The Crickit hat is powered by seesaw, our i2c-to-whatever bridge firmware. so you only need to use two data pins to control the huge number of inputs and outputs on the Crickit. All those timers, PWMs, NeoPixels, sensors are offloaded to the co-processor. Stuff like managing the speed of motors via PWM is also done with the co-processor, so you’ll get smooth PWM outputs that don’t jitter when Linux gets busy with other stuff. What’s nice is that robotics tends to be fairly slow as electronics goes (you don’t need microsecond-level reaction time), so tunnelling all the control over I2C doesn’t affect robot functionality.
We wanted to go with a ‘bento box’ approach to robotics. Instead of having eight servo drivers, or four 10A motor controllers, or five stepper drivers, it has just a little bit of everything. We also stuck to just 5V power robotics, to keep things low-power and easy to use: 5V DC motors and steppers are easy to come by. Here’s what you can do with the Crickit HAT:
- 4 x analog or digital servo control, with precision 16-bit timers.
- 2 x bi-directional brushed DC motor control, 1 Amp current-limited each, with 8-bit PWM speed control (or one stepper).
- 4 x high-current “Darlington” 500mA drive outputs with kick-back diode protection. For solenoids, relays, large LEDs, or one uni-polar stepper.
- 4 x capacitive touch input sensors with alligator pads.
- 8 x signal pins, which can be used as digital in/out or analog inputs.
- 1 x NeoPixel driver with 5V level shifter – this is connected to the seesaw chip, not the Raspberry Pi, so you won’t be giving up pin 18. It can drive over 100 pixels.
- 1 x Class D, 4-8 ohm speaker, 3W-max audio amplifier – this is connected to the I2S pins on the Raspberry Pi for high-quality digital audio. Works on any Pi, even Zeros that don’t have an audio jack!
- Built-in USB to serial converter. The USB port on the HAT can be used to update the seesaw firmware on the Crickit with the drag-n-drop bootloader, or you can plug into your computer; it will also act as a USB converter for logging into the console and running command lines on the Pi.
If you’re curious about how seesaw works, check out our GitHub repos for the firmware that’s on the co-processor chip and for the software that runs on the Pi to talk to it. We’d love to see more people using seesaw in their projects, especially SBC projects like the Pi, where a hardware-assistant can unlock the real-time-control power of a microcontroller.
Website: LINK

