Schlagwort: #technology

  • Recreate Optimus Prime’s blaster with Arduino

    Recreate Optimus Prime’s blaster with Arduino

    Reading Time: 2 minutes

    Recreate Optimus Prime’s blaster with Arduino

    Arduino TeamFebruary 9th, 2018

    YouTuber Bob Clagett has dreamed of creating his own life-sized Optimus Prime ion blaster for years, and now after hours of 3D printing and finishing, he finally has something worthy of that universe.

    While he opted to construct it in a 1:2 scale, it’s still an impressive physical build, looking comically large, but not entirely unwieldy as a full-sized 8-foot blaster would have been.

    Inside, sound and lighting effects are controlled by an Arduino, which plays clips from the show and flashes in different patterns via an Adafruit sound board and RGB LED strip.

    I wanted the blaster to play sounds and have lights come out of the barrel so I rigged up an Arduino Nano with an Adafruit sound board and amp that would cycle blaster sounds and lights when a button was pressed. And because there’s always more than meets the eye, I had a separate button that played just Transformers sound clips. To defuse the LED strip when the lights fired, I printed a semi-translucent disc that would stand-off from the sides so that sound could still escape, but the light would be diffused. I decided to mount all of the audio components in the barrel so that the cannon could be taken apart to charge the battery back.

    You can see the entire process in the video below, or check out his post for a summary.


    Website: LINK

  • Audio Goes 3D With Brainwavz New Line Of 3D Printed Headphones

    Audio Goes 3D With Brainwavz New Line Of 3D Printed Headphones

    Reading Time: 2 minutes

    Brainwavz, the headphone manufacturer which launched back in 2008, has presented a new pair of earphones for audiophiles – aka lovers of high-quality sound experiences.

    According to the company, the new B400 line offers high performance and a high-quality sound experience.

    The new models feature separate balanced armature drivers on each side. A total of four drivers focus towards a certain frequency range. Therefore, the B400s pick up the full range of music frequencies between 10 Hz to 40,000 Hz. (Human hearing usually stops at 20,000 Hz, but your dog will love the extra high frequencies boost).

    However, the shape is the B400s most novel feature.

    The company created the earphones using a liquid resin 3D printer. By employing a 3D modeling and printing system, Brainwavz crafted a unique earphone shape.

    Originally, Brainwavz tried to craft the new earphones using liquid injection molds. However, the technique failed and instead it turned to liquid resin 3D printing.


    Brainwavz presents its new B400 earphone line. (Image: Brainwavz)

    All the Accessories are Included

    “3D modelling and printing means we can innovate faster and experiment more, enabling us to create a unique system that lets the balanced armatures perform above and beyond expectations,” Brainwavz explained.

    Included with the headphones are MMCX cables that are detachable. They are industry standard cables and can be swapped with other MMCX-based cables. This has significant advantages because if your cable breaks, you can simply buy a new one without having to replace the ear tips. Consequently, you may be saving money in the long run.

    Given their unique design and high sound quality, the price tag of $190 is reasonable for a high-quality in-ear headphone.

    Further accessories that are included are the MMCX cables, a carrying case, a cleaning kit, and silicone tips to adjust the size of the ear tips.

    The B400s are now available in Brainwavz online store.


    MMCX cable. (Image: Brainwavz)

    Source: Brainwavz & Digitaltrends

    Website: LINK

  • Scientists in India are Growing Ears in the Lab using Cartilage and a 3D Printed Scaffold

    Scientists in India are Growing Ears in the Lab using Cartilage and a 3D Printed Scaffold

    Reading Time: 3 minutes

    Doctors in Chennai, India are working on 3D printing transplantable ears. They’ve recently been successful in growing ear cartilage in a culture flask and proving it continues to grow once implanted in rabbits.

    For a couple of years, researchers from the SIMS Hospital and SRM University in Chennai, India, have been working on a 3D printed research project which could help children born with ear related birth defects.

    The researchers have been growing ear cartilage cells in a culture flask and implanting the results. To do this, they are using 3D printing.

    There has recently been a breakthrough in this study. The researchers explained in a press release that their experiments show after cells are implanted in rabbits, they continue to grow.

    Previously, similar experiments failed due to the ear being unfit for transplantation and unable to survive. Although this means they can grow ear cartilage framework in an animal and is a promising start, they still have a way to go. In fact, more tests must be done and medical literature also needs to be published, they explain.


    3D Printing Ear Cartilage to Help Children with Birth Defects

    To begin this project, a small sample of ear cartilage was taken from a rabbit’s ear. In the lab, the researchers would extract cells from the sample. These were grown with the help of nutrients and other components to support the growth.

    After a sufficient amount of growth was complete, the researchers moved the cells to a 3D printed scaffold made from bio-compatible, bio-degradable material in the shape of a human’s ear.

    Next, after the cells were added to the 3D printed ear frame, they continued to grow for another week. Finally, after the cells reached a sufficient number, they were implanted into the rabbit from which the researchers took the cartilage sample.

    “We kept it under the skin in the rabbit’s abdomen for three months. We also left an empty scaffold on the other side of the abdomen,” said Dr. Shantanu Patil, head of translation medicine department, SRM University.

    After this time was over, a vet removed the scaffold. Dr. Patil continues: “A large part of the scaffold had disappeared. If we had left it for a little longer we would have had better results. We are now using this sample to check on the tensile strength and other mechanical properties.”

    The researchers now intend on testing the process further. In fact, the Committee for the Purpose of Control and Supervision of Experiments on Animals (CPCSEA) is giving them permission to test on 18 more rabbits. The plan moving forward is to give more time for the frame to dissolve and see whether the cartilage will become more stable.

    Other teams are also working on creating ears in the lab. Check out how researchers in China bioprinted the first ears from children’s cells.

    Source: Times of India

    Website: LINK

  • [DEAL] ColorFabb Filament – Buy 5, Pay for 4

    [DEAL] ColorFabb Filament – Buy 5, Pay for 4

    Reading Time: < 1 minute

    Dutch filament spinner ColorFabb is celebrating its 5th birthday with a special promo — buy any 5 spools of filament and only pay for 4.

    Five years in business is a long time in the 3D printing world. So to celebrate such a momentous occasion, Dutch filament producer ColorFabb is putting a deal on all spools of filament found on its online store.

    For the whole month of February, any orders of 5 ColorFabb spools (be it mixed individual rolls, or a bulk buy of one specific material) will be automatically discounted at checkout to the price of 4 spools.

    So, if you find yourself printing in bulk or burning through your filament faster than a hot end on the fritz, it could be a good opportunity to stock up.

    DEAL: ColorFabb filament, buy 5 pay for 4

    Also! A deal from a previous deals post is still live — check it out: Monoprice Maker Select Plus, 25% off (now $299 + free shipping)

    All3DP is an editorially independent publication. Occasionally we need to pay our bills, so we affiliate some product links through which we may receive a small commission. For the full spiel, check out our Terms of Use.

    Website: LINK

  • Pour Reception turns water into radio controls

    Pour Reception turns water into radio controls

    Reading Time: 2 minutes

    Pour Reception turns water into radio controls

    Arduino TeamFebruary 8th, 2018

    Using a capacitive sensing arrangement, artists Tore Knudsen, Simone Okholm Hansen, and Victor Permild have come up with a way to interact with music with two glasses of water.

    One pours water into a glass to turn the radio on. Channels can then be changed by transferring water from one glass into the other, and fine-tuned by touching the outside of container. Volume can even be adjusted by poking a finger into the water itself.

    An Arduino Leonardo is used to pick up capacitive signals, and data is then sent a computer where a program called Wekinator decodes user interactions.

    Pour Reception is a playful radio that strives to challenge our cultural understanding of what an interface is and can be. By using capacitive sensing and machine learning, two glasses of water are turned into a digital material for the user to explore and appropriate.

    The design materials that we have available when designing digital artifacts expands along with the technological development, and with the computational machinery it is possible to augment our physical world in ways that challenges our perceptions of the objects we interact with. In this project, we aim to change the users perception of what a glass is – both cultural and technical.

    You can see it in action below, and read more about the project in its write-up here.


    Website: LINK

  • Scribble is an Arduino-controlled haptic drawing robot

    Scribble is an Arduino-controlled haptic drawing robot

    Reading Time: 2 minutes

    Scribble is an Arduino-controlled haptic drawing robot

    Arduino TeamFebruary 8th, 2018

    As part of his master’s studies at Eindhoven University, Felix Ros created a haptic drawing interface that uses a five-bar linkage system to not only take input from one’s finger, but also act as a feedback device via a pair of rotary outputs.

    “Scribble” uses an Arduino Due to communicate with a computer, running software written in OpenFrameworks.

    For over a century we have been driving cars, enabling us to roam our surroundings with little effort. Now with the introduction of automated driving, machines will become our chauffeurs. But how about getting us around a road construction, or finding a friend in a crowded area? Or what if you just want to explore and find new places, will these cars be able to handle such situations and how can you show your intentions?

    Currently there is no middle ground between the car taking the wheel or its driver, this is where Scribble comes in: a haptic interface that lets you draw your way through traffic. You draw a path and the car will follow, not letting you drive but pilot the car. Scribble lets you help your car when in need, and wander your surroundings once again.

    You can learn more about Ros’ design in his write-up here, including the code needed to calculate and output forward kinematics to set the X/Y position, and inverse kinematics to sense user input.

    Be sure to check it out in the video below piloting a virtual car through traffic with ease!


    Website: LINK

  • Immortalize Your Pooch: New Startup Offers 3D Printed Pet Figurines

    Immortalize Your Pooch: New Startup Offers 3D Printed Pet Figurines

    Reading Time: 3 minutes

    The Calgary-based company GravityB 3D is using a 60-camera 3D scanning system to create life-like 3D printed figurines of pets and people.

    For most animal owners, their dog or cat is much more than just a pet, but an integral part of the family. GravityB 3D, a new startup out of Calgary, Canada, is immortalizing man’s best friend with 3D scanning and 3D printing technology.

    GravityB 3D offers 3D printed models of pets, people, and even people with their pets. The models range anywhere from 3 inches to 9 inches in size. Lo and behold, these miniature figurines offer a heart-warming and accurate replica of your beloved dog or cat.

    Brian Burke, managing director of GravityB 3D, recently told CBC News that the models aren’t action figures, but resemble fine china. He initially launched the pet photography and 3D printing business a few years ago.

    “We’ve owned a dog daycare for 14 years. I have been doing pet photography for about 11 years. About two years ago, I came across the idea of doing 3D prints. I’ve spent the last two years to get to this point,” he said.


    Growing From 24 to 60 Camera Systems, GravityB 3D Gets Tails Wagging

    Since its launch, the company has grown immensely. Starting with a 24-camera system, GravityB 3D has slowly expanded to 36 cameras and now a 60-camera system.

    Many skittish pets don’t tend to sit still unless a treat is dangled above their noses. However, the higher number of cameras allow Burke to record images more rapidly. Indeed, fast motion such as the wagging tail of an excited puppy can lead to poor rendering of 3D scans. This makes the capturing speed of the 3D scanning system extremely important to the end-product.

    GravityB 3D also uses special tools to get dogs to engage such as squeaky toys or treats. Burke adds that he also has toys available that are filled with peanut butter, offering an instant treat to pets on their best behavior. The former dog daycare owners have experience keeping these animals calm and collected, a critical factor in obtaining quality scans.

    “It takes a little bit to get the dog comfortable in this environment, but it’s a fast process. If you know how to get the dog to pose and your timing is good, then I am pretty much guaranteed to get a really good pose,” he adds.

    Currently, prices for a human 3D printed figurine start at $125, while dogs cost around $150. It takes about four weeks to complete the final model once the photos of are finished.

    “You can have your dog forever. You have your dog with you when you’re not with your dog. You can bring your dog to work with you, you can bring your dog on a trip with you,” Burke said.

    Even more importantly, the 3D figurines are a great way to immortalize and cherish your beloved furry family member after it passes away.


    Website: LINK

  • 3D Printable Syntactic Foams Could Help Submarines Reach Deeper Depths

    3D Printable Syntactic Foams Could Help Submarines Reach Deeper Depths

    Reading Time: 4 minutes

    A team of researchers from New York University School of Engineering have developed 3D printable syntactic foam materials. These foams are lightweight composites that offer exceptional buoyancy and strength, and are commonly used for submarine components. 

    Scientists at the New York University Tandon School of Engineering have developed the first process to produce 3D printed components from syntactic foams. This industrial-grade material is a lightweight composite that is commonly used for functional parts in airplanes, automobiles, and even submarines.

    The researchers believe that their filaments could offer significant advantages for industries where parts are needed to withstand stress at greater depths. The newly developed syntactic foams are comprised of high-density polyethylene plastic (HDPE)–which is a material used to manufacture industrial-grade parts–and microspheres made of recycled fly ash.

    Traditionally, engineers have had to use injection molding to create components from syntactic foam. To connect different syntactic foam parts together, they’ve also had to utilize adhesives and other fastening methods, which can lead to glaring vulnerabilities in the part design.

    The 3D printable syntactic foams are made from a mixture of billions of microscopic hollow glass or ceramics embedded in an epoxy or plastic resin. This material type provides incredible buoyancy and strength, and is oftentimes used in submarines, such as James Cameron’s famous Deepsea Challenger.

    Additionally, the 3D printable syntactic foam materials can be used to produce parts as a single unit rather than in separate pieces, which adds to the overall stability of components.


    3D Printable syntactic Foam Provides Exceptional Strength to Functional Parts

    The team, led by Nikhil Gupta, an associate professor of mechanical and aerospace engineering at NYU, tested the new syntactic foam filaments using a commercial 3D printer. The researchers also discovered that the filaments are recyclable, making them more environmentally friendly.

    “Our focus was to develop a filament that can be used in commercial printers without any change in the printer hardware,” explained Gupta. “There are a lot of parameters that affect the printing process, including build-plate material, temperature, and printing speed. Finding a set of optimum conditions was the key to making the printing of high-quality parts possible.”

    He added that the hollow spherical particles used in the study were just 0.04 mm to 0.07 mm in diameter. At this tiny scale, the particles will not clog up the 3D printer nozzle. They also had to minimize crushing the hollow particles in order to keep the resin materials at a low density.


    Electron Micrograph of Syntactic Foam With Fly-Ash Microspheres

    Ashish Kumar Singh, a PhD under Gupta, elaborates on this process:

    “We want to add as many hollow particles as possible to make the material lighter, but having a greater number of particles means more of them will break during processing. The survival of hollow particles first during filament manufacturing and then in the 3D-printing process requires a lot of process control.”

    The resulting 3D printable foams demonstrate exceptional strength and density when compared to similar parts made with injection molding. According to Gupta, the team will now shift their focus towards optimizing the material properties for various applications, such as underwater vehicle components that are capable of properly functioning at specific depths.

    The findings have recently been published in the Journal of the Minerals, Metals & Materials Society.


    Ashish Kumar Singh (left) and Nikhil Gupta (right) at NYU. (Image: NYU Engineering)

    Source: NYU Engineering

    Website: LINK

  • Creality CR-10 Review – The Best 3D Printer under $500

    Creality CR-10 Review – The Best 3D Printer under $500

    Reading Time: 3 minutes

    We use a lot of different 3D printers here in the All3DP workshop. And making the jump between them often highlights the quirks and foibles of each one. In the case of the Creality CR-10, one pitfall is the fact that you must auto-home the 3D printer before each print job. Forgetting to do so mostly results in the print head trying to rip the print bed off. You only make that horrifically jarring mistake once or twice before causing irreversible damage.

    Initial prints on the Creality CR-10 exhibited ringing, and some quite noticeable layer skipping. Nothing too troubling for a semi-assembled kit since such printers are usually a work-in-process — you should expect to be making tweaks to the Creality CR-10 as you put more prints under the machine’s belt. For our first few Benchy prints, a once over with hex wrench to tighten screws helped. As did removing some of the comically excessive lubricant on the lead screw.

    Scaling ambitions to match the print volume, you start to see why the Creality CR-10 is so beloved in the community. The mind clears of the tat and trinkets smaller build volumes tend to nurture, and you begin to see handy large-scale inspiration everywhere.

    Creepy wall-mounted hand coat holders? Charming lamp-shades for the kids’ room? Check and check. 1-1 scale Oscars trophy? Well, perhaps not. Of the few print problems encountered using the Creality CR-10, one was minor tangles in filament spools pulling the control box (to which the filament holder is mounted) over onto its side. What might have otherwise cleared with a little pressure from the extruder instead throws part of the printer on its side. Not ideal.

    The other issue lay with warping and print bed adhesion. The Creality CR-10 comes with large individual sheets of painters tape and, curiously, a roll of the stuff too. Its just natural to use what they provide, but we found the Creality CR-10’s glass bed with a spritz of print adhesive more than enough for flawlessly sticking prints.


    Creality CR-10
    Creality CR-10 prints

    That is, of course, for filaments that don’t have a tendency to curl at the first sign of trouble. In our experience, printing ABS with the Creality CR-10 out of the box is difficult, if not impossible. The print bed, while rated for 100 degree Celsius, barely manages to hold this and, as such, has a tough time holding ABS. This fact rings true regardless of which adhesives you use.

    And that’s just the first layers. With 400mm of possible print height completely open to the room and temperature fluctuations, warping and cracks are probably guaranteed. Which is curious then, that stores such as GearBest list it as good for ABS.

    Add an enclosure to keep all that heat in and around the print, and we suspect the Creality CR-10 could handle ABS admirably. But with an open design and large, as well as an exposed heated bed that reaches 100 degrees, it just didn’t seem to go well.

    And speaking of the heated bed, crikey does it take an age to heat to high temperatures. On a couple of occasions, we thought the print had stalled and resorted to a hard resetting the printer to try and fix the “problem”. It turns out at the upper end of its range, it takes a long time to achieve its target temperature.

    But it’s not all doom and gloom. As with most 3D printers, it’ll only print as well as you have the settings dialed in, and we’d like to think we achieved some exceptional prints with the Creality CR-10.

    By no means perfect, the complexity of a large Eiffel Tower proved an impressive demo for the Creality CR-10. Printed twice, once in 3DK Berlin’s purple PLA and once in Verbatim’s transparent PLA, the Creality CR-10 managed to complete both without failure — surviving bridging, severe overhangs and a mind-boggling number of retractions in the process all over some 60 hours of print time combined.

    Website: LINK

  • Ultimaker Cura 3.2 Adds Experimental Supports and Layer Features, Improves UI

    Ultimaker Cura 3.2 Adds Experimental Supports and Layer Features, Improves UI

    Reading Time: 3 minutes

    Ultimaker is releasing its stable version of  Cura 3.2 after a few weeks of beta testing. You can now download the popular 3D slicing software from the company’s website. As usual, the software is free.

    In mid-January,3D printer manufacturer Ultimaker released the beta version of the Cura 3.2, its latest update of the 3D slicer application. A month later they now announced that the stable version is ready to use and the testing period is over.

    The Cura team has added new two major new features to the release of Cura 3.2:

    • Adaptive layers: This experimental feature lets Ultimaker Cura compute a variable layer height based on the model shape. The result? High-quality surface finishes with a marginally increased print time. This setting can be found under the experimental category.
    • Tree support: Also to be thought an experimental feature for 3D printing experts, these support structures use ‘branches’ that ‘grow’ and multiply towards areas that need support. The result gives you fewer points of contact on the model, resulting in more even surface finishes. You can use tree support together with more traditional support structures.

    There’s also improvements in terms of security, for example, the signed binaries for windows preventing irritating unknown application warnings. To find out more about the many other improvements, download Cura 3.2 or read about the features below.


    Cura 3.2

    Many Improvements in the Graphical User Interface in Cura 3.2

    Also, Cura 3.2 now offers several improvements regarding the GUI of the program.

    • Multi-build plate. By enabling multi-build plate in the software preferences, a new panel is added to the workspace. It lets you manage separate build plates with shared settings in a single session. This feature also hooks into the Cura Connect print queue.
    • Faster startup. Cura 3.2 now loads the printer definitions when adding a printer, instead of loading all available printers on startup. This reduces the startup time compared to previous versions.
    • Signed binaries for Windows: Windows installer and binaries have been digitally signed to prevent “Unknown application” warnings and virus scanner false-positives. This makes the software a bit more secure.
    • Improved adjustment meshes: Per model settings have extra options, letting you easily use custom meshes as support structures, or assign different slicing settings to different sections of your model.
    • Backface culling. Cura 3.2 offers more performance in the layer view by only rendering visible surfaces of a model, instead of rendering the entire model. You’ll get an improved frame rate, and reduced GPU strain.
    • Sidebar Improvements: The sidebar to QtQuick 2.0 is now updated with increased speed to achieve a better width and style fit. The sidebar can also be hidden to give greater visibility to wider build plates.
    • Bug Fixes – of course, Ultimaker worked on bug fixes within the software. These were pointed out by the community who noticed incompatible Mirror tool, Center model settings and more.

    You can find out more about the updates and ways in which Ultimaker has optimized Cura by downloading it, here. Also, visit the company website to find out more and keep up with their latest releases.

    Also, we’ve just completed an in-depth tutorial on the hidden Cura settings. Please continue here.


    Website: LINK

  • 3D Print a Universal Cable Fix to Repair any Broken Cables

    3D Print a Universal Cable Fix to Repair any Broken Cables

    Reading Time: 2 minutes

    If you’re faced with a broken cable, maker Marius Taciuc has a 3D printed enclosure solution. Although can’t beat a replacement cable, it’s a great short-term universal cable fix.

    Cables are fragile. They can be cut, ripped apart, or — most commonly — have a loose connection. Most makers just use just some Gaffer tape to repair their broken cables – but there’s a more elegant, 3D printed solution that even offers strain relief.

    Marius Taciuc entered the Hackaday Repairs You Can Print contest with a 3D printed mic cord repair. Rather than attempting to use electrical tape to try and fix the problem, he 3D printed an enclosure which is way more stable.

    Taciuc’s 3D printed enclosure can be used as a join box for both cables or chords. It’s a close-fit but it’s possible to glue everything in place, providing a short-term solution for broken cables.

    Taciuc uses cable ties to provide strain relief and hot glue to hold everything in place. The enclosure mechanically supports the two broken sides making it an interesting project to try out if you have a broken cord or cable.

    What You’ll Need To Repair a Broken Cable

    • A 3D Printer
    • Files available for download from Hackaday.
    • A glue gun & glue
    • Cable ties
    • Heat shrink tube
    • Soldering iron


    How to Fix Your Broken Cord

    To begin, download and use the files to 3D print your enclosure. Make as many as you need. Next, after your enclosure has finished printing, insert both ends of the cable into the box.

    With cable ties, secure the cord or cable in place inside the box. It’ll be important to buy 2mm or thinner cables so they fit inside the enclosure.

    Next, take your heat shrink tube and put this on the wires. Solder the wires until they’re joined and heat the tubes to shrink them too.

    Finally, add glue using your hot glue gun. Fill the box between the wires but do not add more that lid level. Attach the lid while the glue is wet and wait until it’s dry.

    Voila. Your cable is ready to be used again. Watch the process in the video below if you’d like to know more about the universal cable fix.

    Source: Hackaday


    Website: LINK

  • Stratasys & Dassault Systèmes Partner to Develop Low-Cost 3D Printed Prosthetics

    Stratasys & Dassault Systèmes Partner to Develop Low-Cost 3D Printed Prosthetics

    Reading Time: 3 minutes

    Stratasys is partnering with Dassault Systèmes to supply Unlimited Tomorrow with 3D printing and CAD software dedicated to producing affordable, patient-specific prosthetic devices.  

    From surgical models to personalized prosthetics, 3D printing has proven extremely advantageous for a wide variety of medical applications. Among the few pioneers of healthcare-related additive manufacturing is the 3D printing giant Stratasys.

    The company recently launched BioMimics, a platform that enables physicians to reliably 3D print accurate and complex anatomical structures for training purposes. Now, Stratasys is partnering with the leading 3D engineering software company Dassault Systèmes to empower amputees through 3D printing and CAD software.

    The collaborative effort, which was announced this week at SOLIDWORKS World 2018, aims to develop affordable and functional prosthetic arms for amputees. The 3D printed prosthetics company Unlimited Tomorrow will pair Stratasys’ 3D printing solutions and Dassault’s proprietary CAD software.

    Traditional prosthetics usually come at a high price tag, costing anywhere between $20,000-$100,000. Meanwhile, Unlimited Tomorrow’s 3D printed prosthetics only cost around $5,000. The company uses a supply chain that streamlines the parts development and also reduces the number of fittings required.

    “Unlimited Tomorrow is driven by enabling the possible, with unique thinking that results in absolutely incredible ideas. Our intent is always ‘user-first’, meaning the technology serves needs of patients from the outset – and it’s all driven by the most advanced technology,” said Easton LaChappelle, founder of Unlimited Tomorrow.

    The 3D printed prosthetics producer also offers a $2,500 cheaper version for children who are still outgrowing their prosthetics.

    Stratasys and Dassault Systèmes Help Make 3D Printed Prosthetics More Accessible

    Stratasys and Dassault Systèmes will provide dedicated 3D printing and CAD/CAE supplies to this newfound initiative. Additionally, both are providing additional support as part of the program. For instance, both the Stratasys PolyJet and Stratasys Direct Manufacturing teams will actively help develop and produce these 3D printed prosthetics.

    The collaboration further boasts a design-to-creation process by using Dassault Systèmes’ leading CAD software SOLIDWORKS.

    Through the partnership, Unlimited Tomorrow will be able to print prosthetics in any size and also color. The newly developed automated design process makes it easier than ever to customize the prothetic devices for each individual patient.

    First, Unlimited Tomorrow will collect 3D scans of the missing arm and opposite full arm. The software then runs the scans and automatically generates ready-to-3D-print files. Once printed, the engineer will install sensors and wireless chargers to ensure haptic feedback.

    Arita Mattsoff, vice president of corporate social responsibility at Stratasys, explained:

    “We view 3D printing as a catalyst for healthcare innovation to enable better patient care, streamline procedures, and improve learning. One of the most visible impacts is in creation of prosthetics. That’s why a main component of our Corporate Social Responsibility program is focused on accessibility of devices – driving true change, improving quality-of-life, and advancing recipients’ self-esteem.”

    Unlimited Tomorrow is currently hosting a crowdfunding campaign via MicroVenutres, the new equity funding platform from Indiegogo.


    Easton LaChappelle – Founder of Unlimited Tomorrow. (Image: Unlimited Tomorrow)

    Source: Stratasys & Unlimited Tomorrow


    Website: LINK

  • 3-in-1 Snapmaker 3D Printer: Review the Facts Here!

    3-in-1 Snapmaker 3D Printer: Review the Facts Here!

    Reading Time: < 1 minute

    The concept of the Snapmaker 3D printer is a modular machine with three distinct functions. The intended audience is the workshopper pushed for space.

    First and foremost, the Snapmaker is an all-metal 3D printer. The aluminum frame encases all wiring, with the exception of a few tidy ribbon cables.

    But the killer feature is that three interchangeable modules can be swapped onto the Snapmaker’s X-axis rail. In addition to 3D printing, it’s also capable of laser engraving and CNC milling.

    The fused deposition modelling (FDM) 3D printing module accepts a standard 1.75mm filament spool. The bed can be heated up to 80 degrees Celsius. But with a build volume of only 125mm square, prints are going to be strictly limited in size.

    Ease of use is another core proposition with the Snapmaker 3D printer. It has an LCD touchscreen for operation, is simple to assemble, and comes bundled with the proprietary Snap3D software.

    The laser engraving module has a class 200 mW laser. This is capable of burning designs into wood, leather and similar materials. In addition, the CNC milling module has an adjustable spindle speed between 2,000 and 7,000 rpm.

    Website: LINK

  • AstroReality Uses 3D Printing to Create Realistic AR Moons

    AstroReality Uses 3D Printing to Create Realistic AR Moons

    Reading Time: 2 minutes

    After fundraising on IndieGoGo back in the summer, AstroReality is taking its ridiculously realistic model Moons to CES. Fabricated with the help of industrial 3D printers, the tiny celestial bodies use AR to educate and inspire.

    Don’t Miss: New 3D Printer Firmware Uses Raspberry Pi to Speed Up FDM Printing

    Sadly, a personal trip to the moon is the unlikeliest of unlikely things to happen in this lifetime. Perhaps unless you have the personal resources of the rocket-touting Elon Musk (though it seems he’s content to simply shuttle his cars off to Mars, instead).

    Fortunately, at a fraction of the expense of actually blasting off into space, AstroReality has created a painstakingly detailed model of the Moon. Big enough to nestle in your palm, these hand-painted celestial beings boast a pretty neat trick in AR functionality.

    Using AstroReality’s accompanying smartphone app, the LUNAR becomes an interactive encyclopaedia of the Moon’s features and humanity’s missions to explore it.

    The company missed a trick not calling it LunAR, but hey ho. You can see it in action in the video below.

    3D Printing the Moon

    Mass producing 1:43,453,500 scale models of the Moon is no small feat. To help pack in as much detail as possible AstroReality turned to SLA 3D printing tech to create casts based on data captured by NASA’s Lunar Reconnaissance Orbiter.

    Using a 3D Systems ProJet 7000 HD, the model Moon is printed at a mighty fine 0.05mm layer height. This 3D print of the Moon is then used to create a negative mold, into which a polyresin is poured, resulting in the final physical product.

    Except, that’s not quite all. Each LUNAR model is then hand painted to bring out the detail in every topographical feature, from oceans and lakes to the craters and mountains.

    AstroReality will take the LUNAR to the Consumer Electronics Show in Las Vegas, from January 9 – 12. If you happen to be there, you can find them in the North Hall, booth 9208.


    AstroReality Lunar 3D Printed Moon

    Website: LINK

  • Raspberry Pi 3 Alexa DIY Project

    Raspberry Pi 3 Alexa DIY Project

    Reading Time: 7 minutes

    Required hardware

    Before you get started, let’s review what you’ll need.

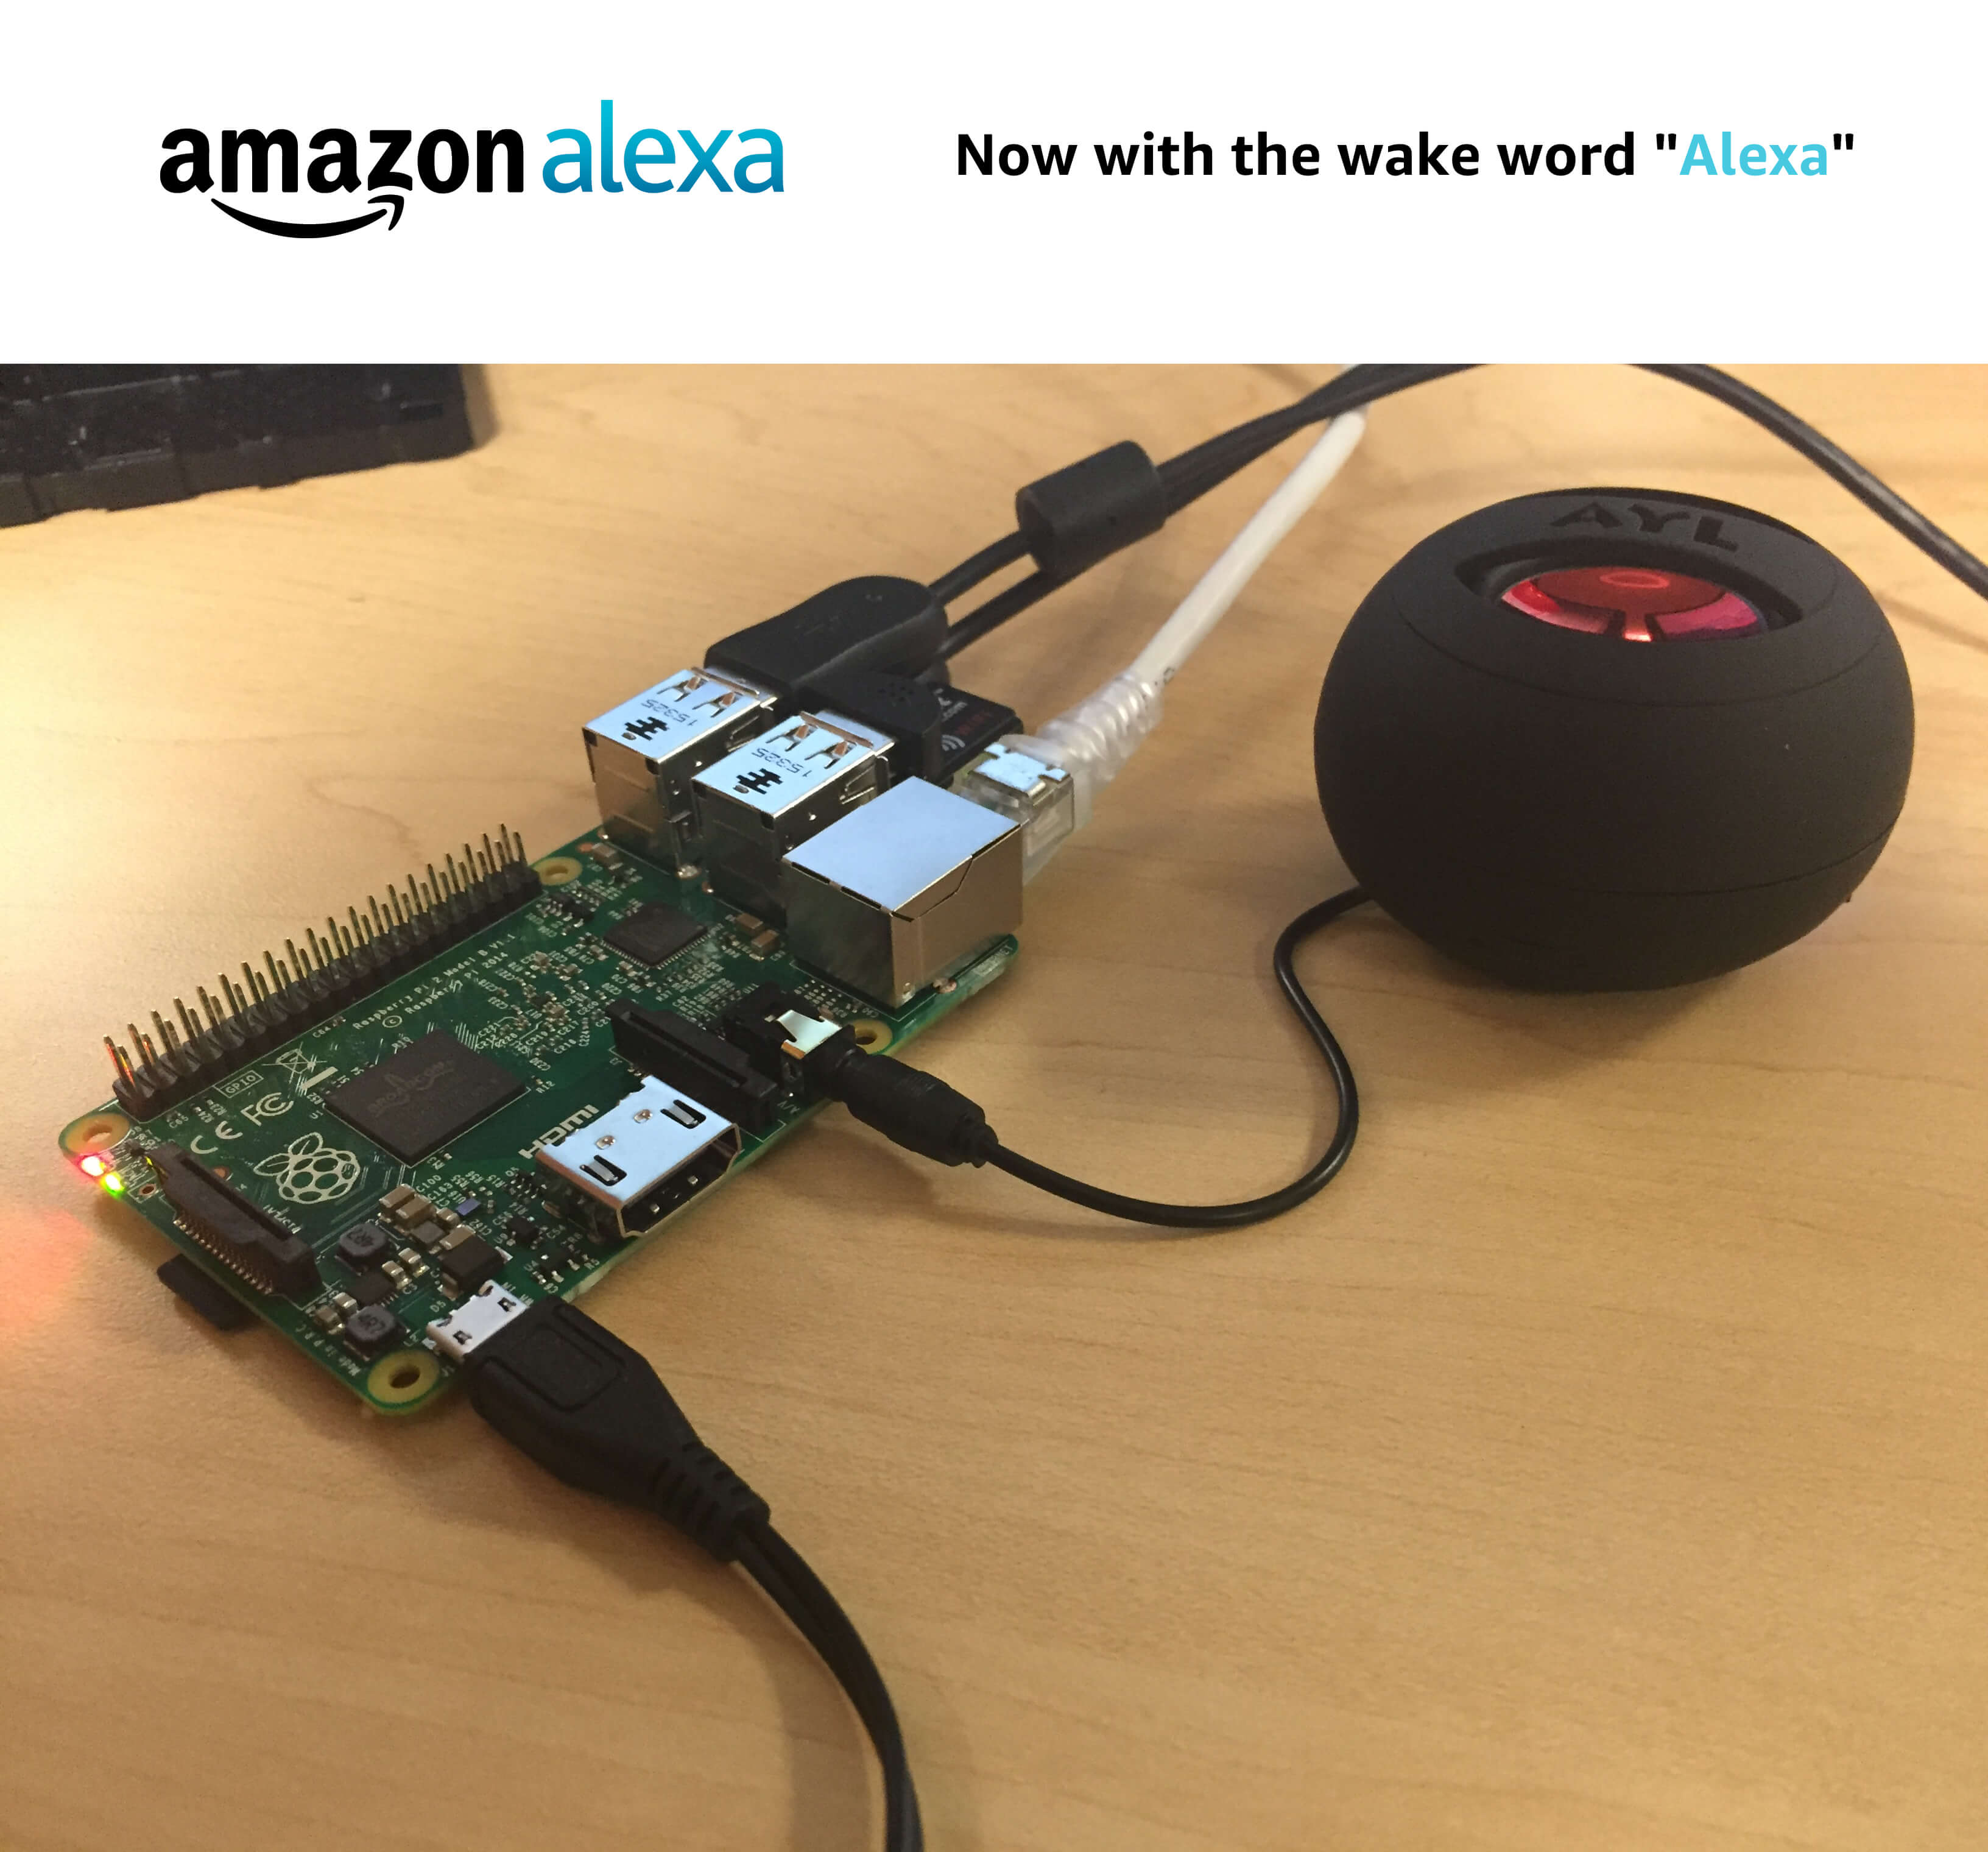
    1. Raspberry Pi 3 (Recommended) or Pi 2 Model B (Supported) – Buy at Amazon – Pi 3 or Pi 2.
    2. Micro-USB power cable for Raspberry Pi.
    3. Micro SD Card (Minimum 8 GB) – You need an operating system to get started. NOOBS (New Out of the Box Software) is an easy-to-use operating system install manager for Raspberry Pi. The simplest way to get NOOBS is to buy an SD card with NOOBS pre-installed – Raspberry Pi 8GB Preloaded (NOOBS) Micro SD Card. Alternatively, you can download and install it on your SD card (follow instructions here).
    4. USB 2.0 Mini Microphone – Raspberry Pi does not have a built-in microphone; to interact with Alexa you’ll need an external one to plug in – Buy on Amazon
    5. External Speaker with 3.5mm audio cable – Buy on Amazon
    6. A USB Keyboard & Mouse, and an external HDMI Monitor – we also recommend having a USB keyboard and mouse as well as an HDMI monitor handy if you’re unable to remote(SSH) into your Pi.
    7. Internet connection (Ethernet or WiFi)
    8. (Optional) WiFi Wireless Adapter for Pi 2 (Buy on Amazon). Note: Pi 3 has built-in WiFi.

    For extra credit, we’ll show you how to remote(SSH) into your device, eliminating the need for a monitor, keyboard and mouse – and how to tail logs for troubleshooting.


    Let’s get started

    The original Alexa on a Pi project required manual download of libraries/dependencies and updating a series of configuration files that were prone to human error. To make the process faster and easier, we’ve included an install script with the project that will take care of all the heavy lifting. Not only does this reduce setup time to less than an hour on a Raspberry Pi 3, it only requires developers to adjust three variables in a single install script –

    Step 1: Setting up your Pi

    Unless you already have Raspbian Jessie installed on your Pi, please follow our guide – Setting up the Raspberry Pi – that will walk you through downloading and installing Raspbian Jessie, and connecting the hardware (if you’re unfamiliar with Raspberry Pi, we highly recommend you follow the guide above to get your Pi up and ready before moving further).

    Step 2: Register for an Amazon developer account

    Unless you already have one, go ahead and create a free developer account at developer.amazon.com. You should review the AVS Terms and Agreements here.


    Step 3: Create a device and security profile

    Follow the steps here to register your product and create a security profile.

    Make note of the following parameters. You’ll need these in Step 5 below.

    • ProductID (also known as Device Type ID),
    • ClientID, and
    • ClientSecret

    Important: Make sure your Allowed Origins and Allowed Return URLs are set under Security Profile > Web Settings (see Create a device and security profile):


    Step 4: Clone the sample app

    Open terminal, and type the following:

    cd Desktop
    git clone https://github.com/alexa/alexa-avs-sample-app.git
    

    Step 5: Update the install script with your credentials

    Before you run the install script, you need to update the script with the credentials that you got in step 3 – ProductID, ClientID, ClientSecret. Type the following in terminal:

    cd ~/Desktop/alexa-avs-sample-app
    nano automated_install.sh
    

    Paste the values for ProductID, ClientID, and ClientSecret that you got from Step 3 above.

    The changes should look like this:

    • ProductID="RaspberryPi3"
    • ClientID="amzn.xxxxx.xxxxxxxxx"
    • ClientSecret="4e8cb14xxxxxxxxxxxxxxxxxxxxxxxxxxxxx6b4f9"

    Type ctrl-X and then Y, and then press Enter to save the changes to the file.


    Step 6: Run the install script

    You are now ready to run the install script. This will install all dependencies, including the two wake word engines from Sensory and KITT.AI.

    Note: The install script will install all project files in the folder that the script is run from.

    To run the script, open terminal and navigate to the folder where the project was cloned. Then run the following command:

    cd ~/Desktop/alexa-avs-sample-app
    . automated_install.sh
    

    You’ll be prompted to answer a few simple questions. These help to ensure that you’ve completed all necessary prerequisites before continuing.

    When the wizard starts, go grab a cup of coffee – it takes about 30 minutes.

    Step 7: Run your web service, sample app and wake word engine

    Now that installation is complete, you’ll need to run three commands in 3 separate terminal windows:

    1. Terminal Window 1: to run the web service for authorization
    2. Terminal Window 2: to run the sample app to communicate with AVS
    3. Terminal Window 3: to run the wake word engine which allows you to start an interaction using the phrase „Alexa“.

    Note: These commands must be run in order.

    Terminal Window 1

    Open a new terminal window and type the following commands to bring up the web service which is used to authorize your sample app with AVS:

    cd ~/Desktop/alexa-avs-sample-app/samples
    cd companionService && npm start


    The server is now running on port 3000 and you are ready to start the client.

    See API Overview > Authorization to learn more about authorization.


    Terminal Window 2

    Open a new terminal window and type the following commands to run the sample app, which communicates with AVS:

    cd ~/Desktop/alexa-avs-sample-app/samples
    cd javaclient && mvn exec:exec
    

    See API Overview > Interfaces to learn more about the messages sent to/from AVS.

    Let’s walk through the next few steps relevant to Window 2.

    1. When you run the client, a window should pop up with a message that says –Please register your device by visiting the following URL in a web browser and following the instructions: https://localhost:3000/provision/d340f629bd685deeff28a917. Would you like to open the URL automatically in your default browser?

      Click on „Yes“ to open the URL in your default browser.

    2. If you’re running Raspbian Jessie with Pixel desktop (and with Chromium browser), you may get a warning from the browser. You can get around it by clicking on Advanced -> Proceed to localhost(unsafe).
    3. You’ll be taken to a Login with Amazon web page. Enter your Amazon credentials.
    4. You’ll be taken to a Dev Authorization page, confirming that you’d like your device to access the Security Profile created earlier.Click Okay.
    5. You will now be redirected to a URL beginning with https://localhost:3000/authresponsefollowed by a query string. The body of the web page will say device tokens ready.
    6. Return to the Java application and click the OK button. The client is now ready to accept Alexa requests.

    Terminal Window 3

    Note: Skip this step to run the same app without a wake word engine.

    This project supports two third-party wake word engines: Sensory’s TrulyHandsFree and KITT.AI’s Snowboy. The -e parameter is used to select the agent and supports two values for {{engine}}: kitt_ai and sensory.

    Open a new terminal window and use the following commands to bring up a wake word engine from Sensory or KITT.AI. The wake word engine will allow you to initiate interactions using the phrase „Alexa“.

    To use the Sensory wake word engine, type –

    cd ~/Desktop/alexa-avs-sample-app/samples
    cd wakeWordAgent/src && ./wakeWordAgent -e sensory
    

    or, type this to use KITT.AI’s wake word engine –

    cd ~/Desktop/alexa-avs-sample-app/samples
    cd wakeWordAgent/src && ./wakeWordAgent -e kitt_ai
    

    Now you have a working hands-free AVS prototype!

    Use the following resources to learn more about available wake word engines:


    Step 8: Talk to Alexa

    You can now talk to Alexa by simply using the wake word „Alexa“. Try the following –

    Say „Alexa“, then wait for the beep. Now say „what’s the time?“

    Say „Alexa“, then wait for the beep. Now say „what’s the weather in Seattle?“

    If you prefer, you can also click on the „Listen“ button, instead of using the wake word. Click the „Listen“ button and wait for the audio cue before beginning to speak. It may take a second or two before you hear the audio cue.

    Source: https://github.com/alexa/alexa-avs-sample-app/wiki/Setting-up-the-Raspberry-Pi

    https://github.com/alexa/alexa-avs-sample-app/wiki/Raspberry-Pi