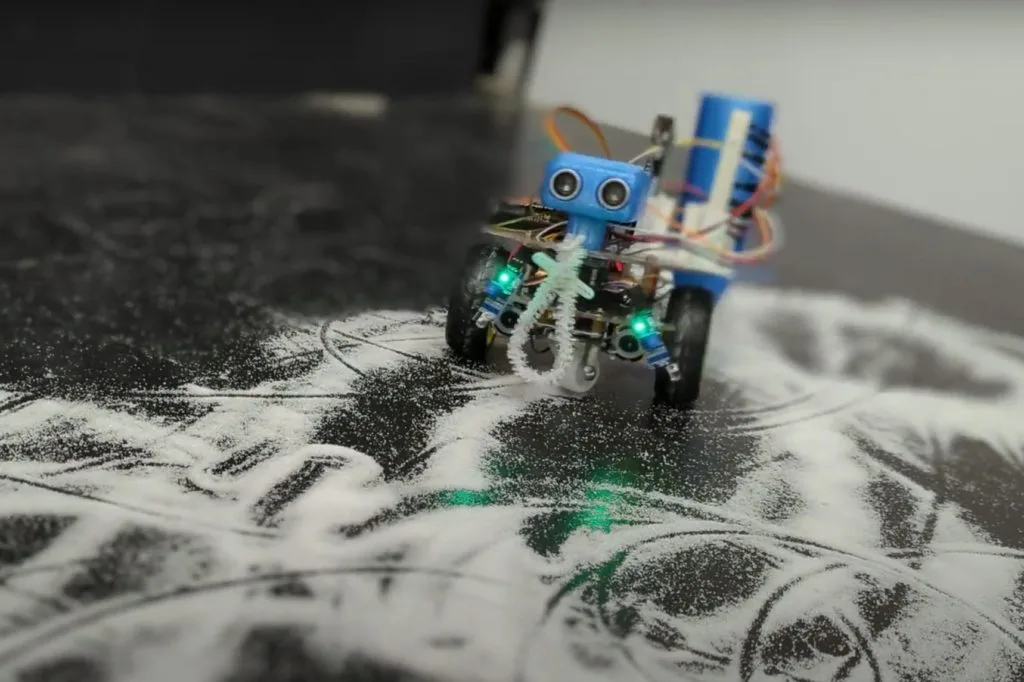
Many people find the subjectivity of art to be frustrating, but that subjectivity is what makes art interesting. Banksy’s self-shredding art piece is a great example of this. The original painting sold at auction for $1.4 million—and then it shredded itself in front of everyone. That increased its value and the now-shredded piece, dubbed “Love Is in the Bin,” sold again at auction in 2021 for a record-breaking $23 million. In a similar vein to that infamous work, this robot destroys the artwork that it produces.
“The Whimsy Artist” is a small robot rover, like the kind you’d get in an educational STEM kit. It is the type of robot that most people start with, because it is very simple. It only needs two DC motors to drive around and it can detect obstacles using an ultrasonic distance sensor and has two infrared sensors for line-following. An Arduino Uno Rev3 board controls the operation of the two motors according to the information it receives from the sensors.
That decision-making is where the artistic elements come into play. When it doesn’t detect any obstacles, the robot will run in “creative” mode. It opens a chute on a dispenser to drop a trail of fine sand while it moves in a pleasant spiral pattern. But if it sees an obstacle with the ultrasonic sensor, it gets angry. In that mode, it reverses direction and uses the IR sensors to follow the line it just created while deploying a brush to destroy its own sandy artwork.
With an array of onboard sensors, Bluetooth® Low Energy connectivity, and the ability to perform edge AI tasks thanks to its nRF52840 SoC, the Arduino Nano 33 BLE Sense is a great choice for a wide variety of embedded applications. Further demonstrating this point, a group of students from the Introduction to Embedded Deep Learning course at Carnegie Mellon University have published the culmination of their studies through 10 excellent projects that each use the Tiny Machine Learning Kit and Edge Impulse ML platform.
Wrist-based human activity recognition
Traditional human activity tracking has relied on the use of smartwatches and phones to recognize certain exercises based on IMU data. However, few have achieved both continuous and low-power operation, which is why Omkar Savkur, Nicholas Toldalagi, and Kevin Xie explored training an embedded model on combined accelerometer and microphone data to distinguish between handwashing, brushing one’s teeth, and idling. Their project continuously runs inferencing on incoming data and then displays the action on both a screen and via two LEDs.
Categorizing trash with sound
In some circumstances, such as smart cities or home recycling, knowing what types of materials are being thrown away can provide a valuable datapoint for waste management systems. Students Jacky Wang and Gordonson Yan created their project, called SBTrashCat, to recognize trash types by the sounds they make when being thrown into a bin. Currently, the model can three different kinds, along with background noise and human voices to eliminate false positives.
Distributed edge machine learning
The abundance of Internet of Things (IoT) devices has meant an explosion of computational power and the amount of data needing to be processed before it can become useful. Because a single low-cost edge device does not possess enough power on its own for some tasks, Jong-Ik Park, Chad Taylor, and Anudeep Bolimera have designed a system where each device runs its own “slice” of an embedded model in order to make better use of available resources.
Predictive maintenance for electric motors
Motors within an industrial setting require constant smooth and efficient operation in order to ensure consistent uptime, and recognizing when one is failing often necessitates manual inspection before a problem can be discovered. By taking advantage of deep learning techniques and an IMU/camera combination, Abhishek Basrithaya and Yuyang Xu developed a project that could accurately identify motor failure at the edge.
Estimating inventory in real-time with computer vision
Warehouses greatly rely on having up-to-date information about the locations of products, inventory counts, and incoming/outgoing items. From these constraints, Netra Trivedi, Rishi Pachipulusu, and Cathy Tungyun collaborated to gather a dataset of 221 images labeled with the percentage of space remaining on the shelf. This enables the Nano 33 BLE Sense to use an attached camera to calculate empty shelf space in real-time.
Dog movement tracking
Fitness trackers such as the FitBit and Apple Watch have revolutionized personal health tracking, but what about our pets? Ajith Potluri, Eion Tyacke, and Parker Crain addressed this hole in the market by building a dog collar that uses the Nano’s IMU to recognize daily activities and send the results to a smartphone via Bluetooth. This means the dog’s owner has the ability to get an overview of their pet’s day-to-day activity levels across weeks or months.
Intelligent bird feeding system
Owners of backyards everywhere encounter the same problem: “How do I keep the squirrels away from a birdfeeder while also allowing birds?” Eric Wu, Harry Rosmann, and Blaine Huey worked together on a Nano 33 BLE Sense-powered system that employs a camera module to identify if the animal at the feeder is a bird or a squirrel. If it is the latter, an alarm is played from a buzzer. Otherwise, the bird’s species is determined through another model and an image is saved to an SD card for future viewing.
Improving one’s exercise form
Exercise, while being essential to a healthy lifestyle, must also be done correctly in order to avoid accidental injuries or chronic pain later on, and maintain proper form is an easy way to facilitate this. By using both computer vision on an NVIDIA Jetson Nano and anomaly detection via an IMU on a Nano 33 BLE Sense, Addesh Bhargava, Varun Jain, and Rohan Paranjape built a project that was more accurate than typical approaches to squatting form detection.
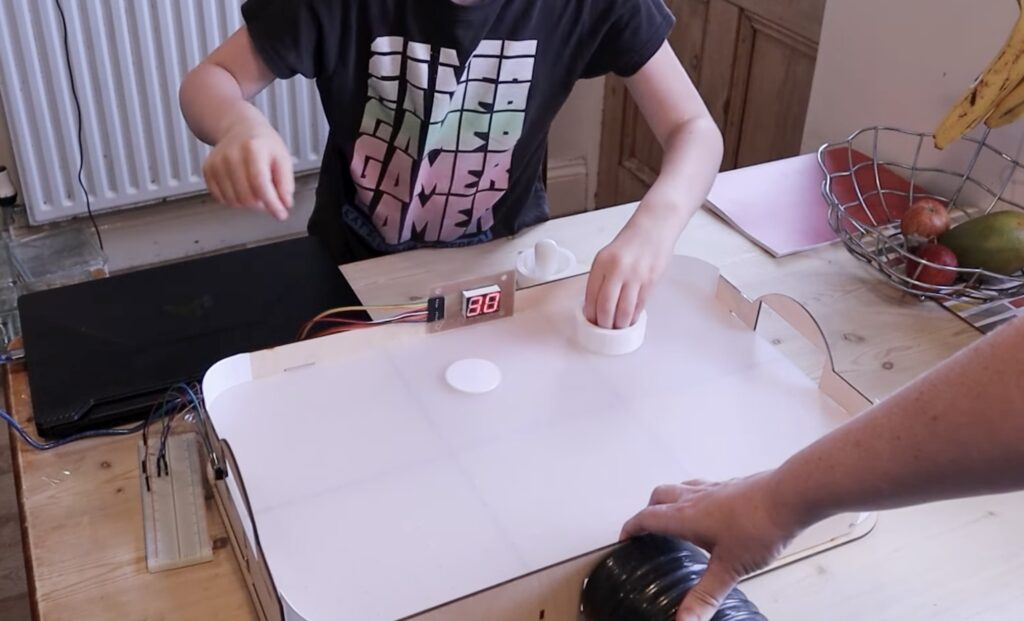
Inspired by game nights with her family, Lorraine Underwood from element14 Presents wanted to build a project that would be both fun and playable many times over. Based on these parameters, she opted to design and construct her own take on an air hockey table that would be capable of keeping score automatically.
The base of the air hockey table was made by first drawing a 2D model of the tabletop, complete with the myriad of holes for air to pass through and a zone at each end for scoring with the 3D printed puck. Below the top are four panels that comprise the four walls, with one having a slot for attaching a high-power fan. Extra rigidity was added by slotting in a grid of struts to buttress the rectangular layout and make it more impervious to accidental bumps or hits.
In terms of scoring, a player receives a point when their puck passes below the opponent’s goal, which meant Underwood needed some way of consistently detecting when the puck crosses the line. To do this, she created a small sketch for an Arduino Uno Rev3 that checked the state of a phototransistor and incremented the score when triggered. Although this worked initially, she did acknowledge that further improvements are needed to prevent false positives.
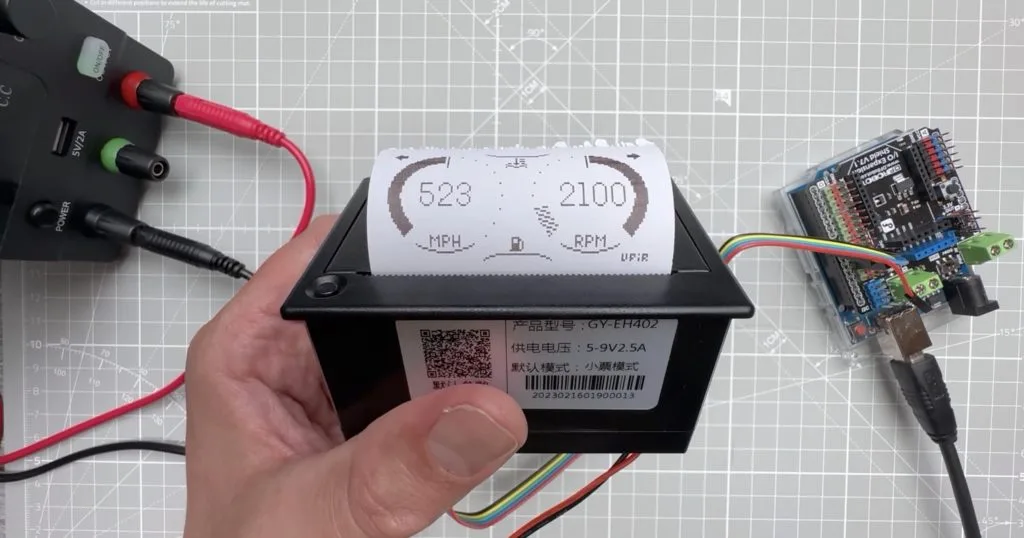
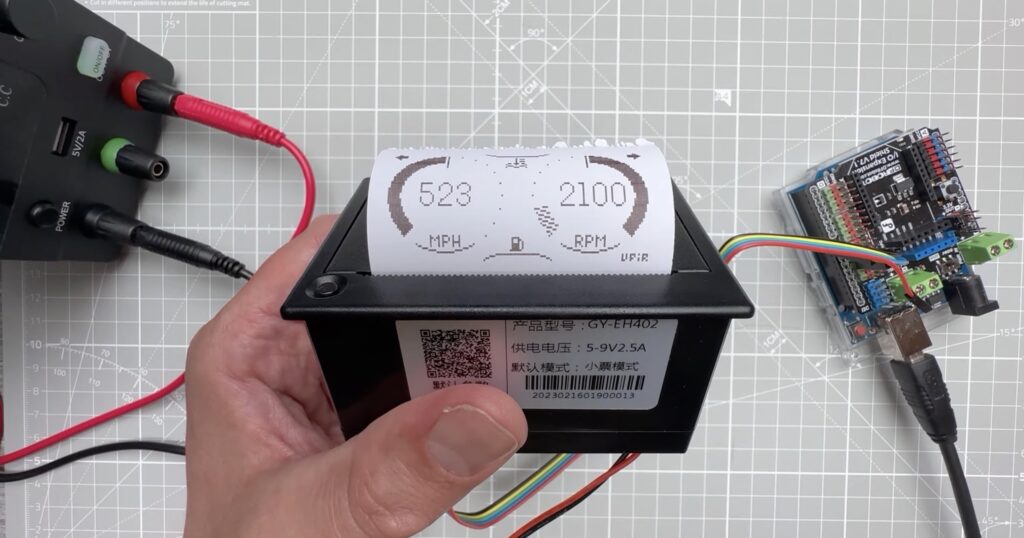
You would probably recognize a thermal printer as the thing that spits out receipts at a cash register. They offer a two key advantages: they do not require ink cartridges and they are compact. But because they print by applying heat to special paper that darkens when hot, they have low resolution and fidelity. If that’s a price you’re willing to pay for your next project, then Vaclav Krejci (AKA Upir on YouTube) has a great video tutorial that will show you how to control a thermal printer with your Arduino.
This model, a QR204, and most others like it, receive print content through an RS232 serial communications port. It has an internal microcontroller that lets it interpret what it receives over serial. If that is simple text, then it will print the text and move to the next line. But it also accepts commands in the form of special characters to modify the output, such as increasing the text size. It can also print low-resolution images sent in the form of bitmap arrays. Krejci explains how to do all of that in the video.
To follow along, you can use an Arduino Uno like Krejci or any other Arduino board. You only need to connect five jumper wires from the printer to the Arduino: ground, RX, TX, DTR, and NC. From there, all you need is a simple Sketch that sends serial output at 9600 baud through the pins you define. To print a line of text, use the standard Serial.println(“your text”) function. When you want to do something more complex, like print an image, Krejci has instructions on how to do so.
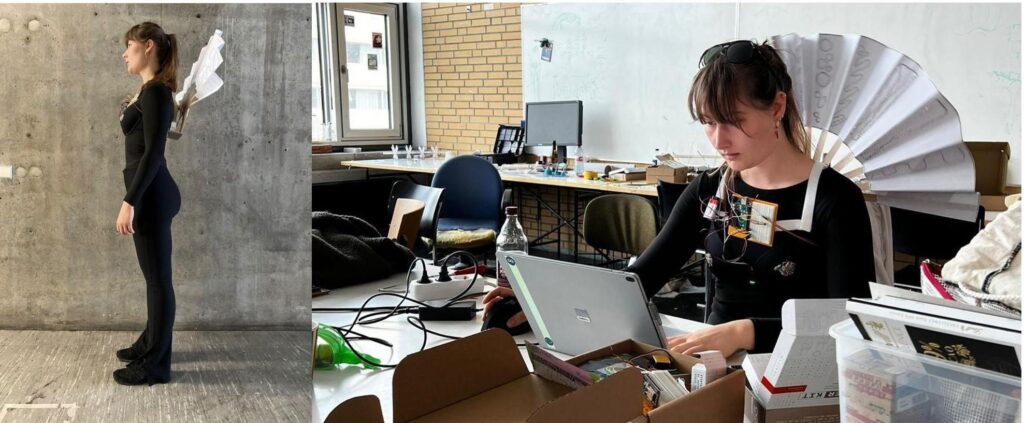
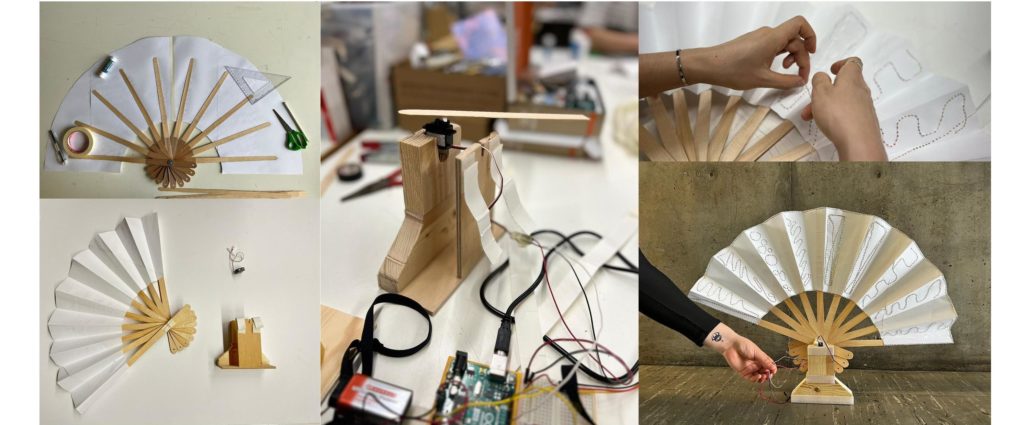
Many people (especially those with autism spectrum disorder) have difficulty communicating with others around them. That is always a challenge, but becomes particularly noticeable when one cannot convey their emotions through body language. If someone can’t show that they’re not in the mood to talk, that may lead to confusing interactions. To help people express their emotions, University of Stuttgart students Clara Blum and Mohammad Jafari came up with this wearable device that makes them obvious.
The aptly named Emotion Aid sits on the user’s shoulders like a small backpack. The prototype was designed to attach to a bra, but it could be tweaked to be worn by those who don’t use bras. It has two functions: detecting the user’s emotions and communicating those emotions. It uses an array of different sensors to detect biometric indicators, such as temperature, pulse, and sweat, to try and determine the user’s emotional state. It then conveys that emotional state to the surrounding world with an actuated fan-like apparatus.
An Arduino Uno Rev3 handles these functions. Input comes from a capacitive moisture sensor, a temperature sensor, and a pulse sensor. The Arduino actuates the fan mechanism using a small hobby servo motor. Power comes from a 9V battery. The assembly process is highly dependent on the way the device is to be worn, but the write-up illustrates how to attach the various sensors to a bra. There are many possible variations, so the creators of the Emotion Aid encourage people to experiment with the idea.
You can read more about the Emotion Aid, which was developed by Blum and Jafari as part of the University of Stuttgart’s ITECH master’s program, here on Instructables.
Spectrum analysis is a technique that allows someone to observe the amplitude of various frequency ranges within a signal. The most common use case is in the world of audio engineering, as it is useful for tuning audio output. It can, for example, show you that a particular audio signal has little amplitude in the low bands and that tells you that you should turn up the bass. If you want to try this for yourself, Sam Dartel designed a DIY spectrum analyzer that is easy for beginners to build.
For a spectrum analyzer to work, it needs to be able to break an electrical signal down into a series of frequency ranges. In an audio signal, frequency is pitch. That means that higher frequency ranges correspond to higher notes in the audio. This spectrum analyzer utilizes an MSGEQ7 IC, which is an equalizer filter, to pull seven frequency ranges from an audio signal. It outputs the peak of each band, giving a real-time reading of each band’s amplitude.
There are two versions of this spectrum analyzer: one powered by a battery and one powered via USB. Both are shields for An Arduino Nano board, which takes the output from the MSGEQ7 and uses the FastLED library to set the number of LEDs lit on seven WS2812B individually addressable RGB LED strips. Each strip is a 2D display and that is enough for the amplitude of each band, but the color and brightness of the LEDs introduce two other possible dimensions. This spectrum analyzer uses those for different effects patterns.
To build this spectrum analyzer, you’ll need to have one of the two shield PCB designs fabricated. All of the components are through-hole to make assembly easy.
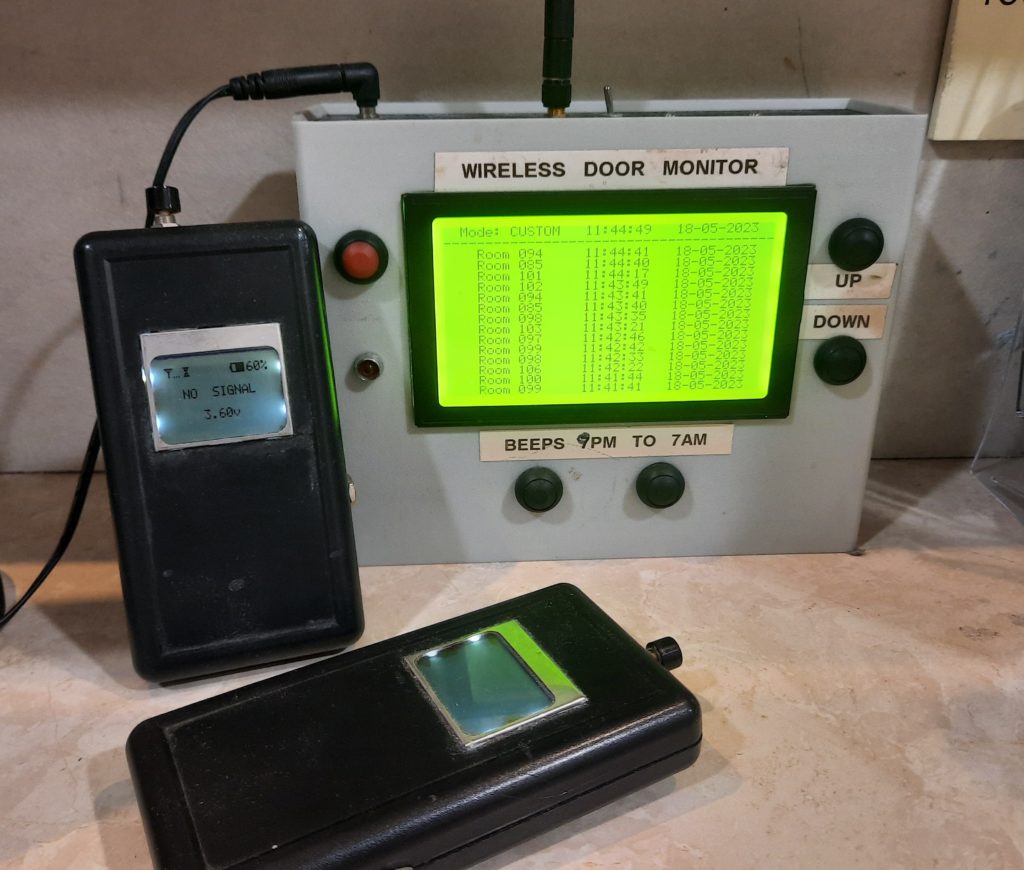
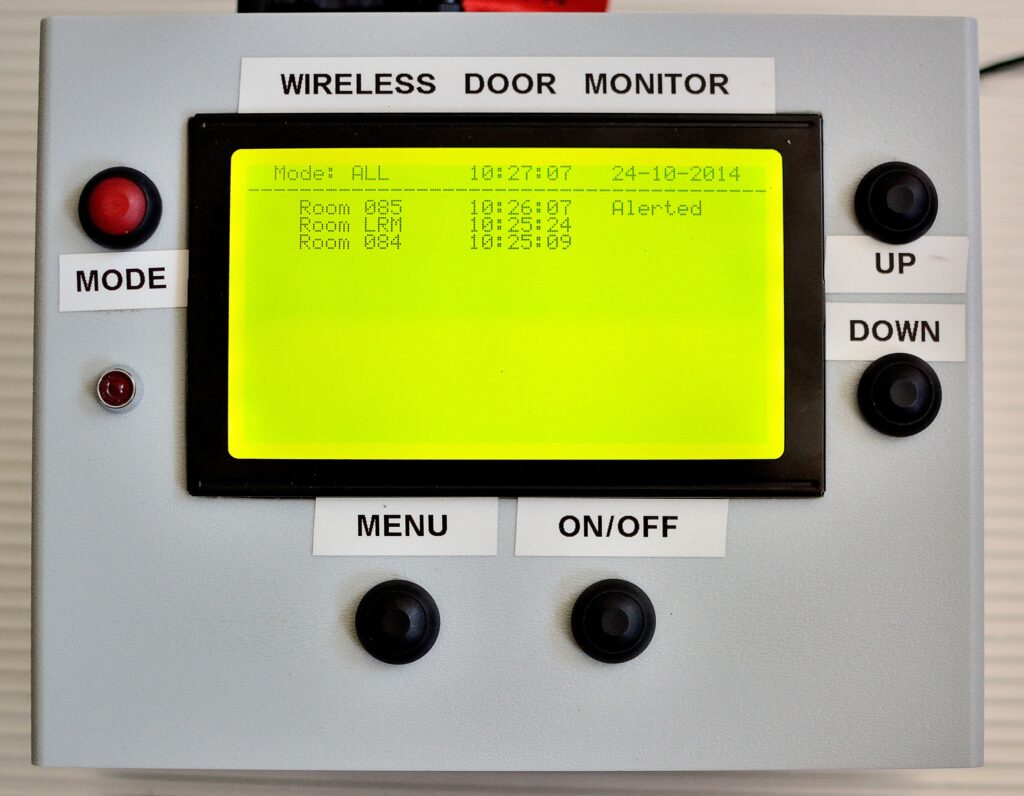
Senior care homes may get a bad rap in popular culture, but they serve a legitimate and important purpose. As people age, their requirements for care can exceed the capability of their families. When that becomes the case, professional care may be prudent. To help those professionals care for residents, Hayden designed this system that can monitor up to 40 doors in a nursing home.
The senior care facility where Hayden works already had a system for monitoring each resident room with a PIR (passive infrared) sensor. But that system was no longer functional and wasn’t serving any purpose. Instead of buying a whole new system, Hayden chose to tap into the existing sensors. To do that, they used five Arduino Mega 2560 boards to create hub units. Those hubs were spread around the building and each one monitors the PIR sensors from a handful of rooms.
Those hub units contain nRF24L01 radio transceiver modules so they can communicate sensor status to a central control unit at the nurses station, also powered by an Arduino Mega. That control unit features a 240×128 LCD to show the status of each room along with a real-time clock, an SD card module for logging data to CSV, and a piezo buzzer and LED for alerts.
But attendants aren’t always near their desk, so Hayden built a handful of handheld devices as well. Those are more rudimentary and only include nRF24 modules, small screens, and batteries. Employees can carry those smaller devices with them at all times and they will display any room with activity that triggers the PIR sensor, ensuring that a resident receives immediate attention if they leave their room when they shouldn’t.
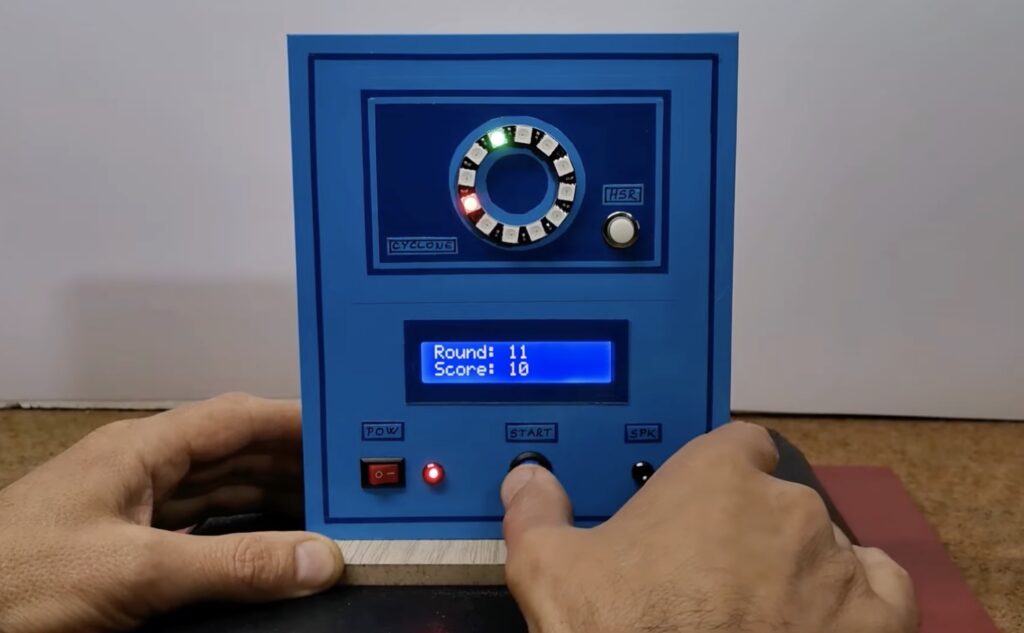
One of the most popular machines in any arcade is the Cyclone game, where a ring of LEDs illuminate in sequence and the player must push a button at the exact moment that a specific LED lights up. Get it just right and you can win a whole pile of tickets to spend in the arcade shop! But the machines in arcades tend to be rigged, with the timing altered slightly to make the game more difficult. This mini Cyclone game saves you a trip to the arcade and doesn’t employ cheats (unless you want it to).
This is the second Cyclone game built by Mirko Pavleski. The first was much larger, with a ring of 60 LEDs. The new version is smaller and simpler. It has a ring of only 12 LEDs. The original increased the speed with each round, but this version sets a random speed (within a predefined range) each time. It tracks the number of rounds completed by a player before they fail and saves that high score in EEPROM storage so it is persistent every time someone turns on the game.
The hardware is affordable and easy to find. It includes an Arduino Nano board, a WS2812B LED ring, a 16×2 character LCD with I2C interface, two buttons, a power switch, and a buzzer. Those components all mount to a basic stand made of PVC board and plywood wrapped in self-adhesive wallpaper. If you’re a fan of Cyclone games, this would make a great weekend project.
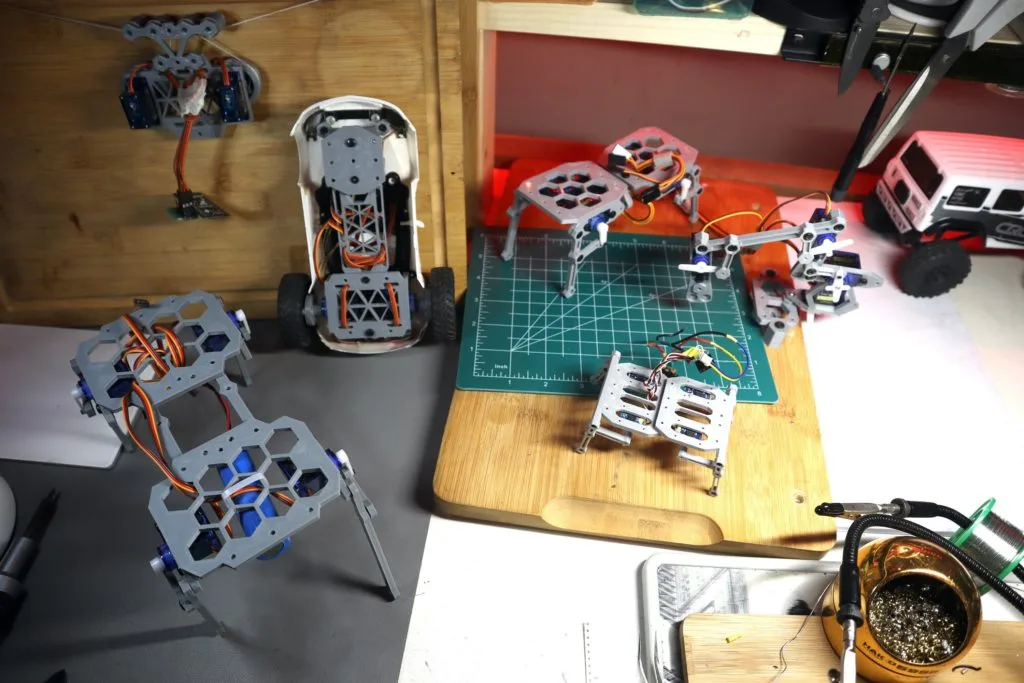
While it is easier now than ever before, getting into robotics is still daunting. In the past, aspiring roboticists were limited by budget and inaccessible technology. But today the challenge is an overwhelming abundance of different options. It is hard to know where to start, which is why Saul designed a set of easy-to-build and affordable robots called Bolt Bots.
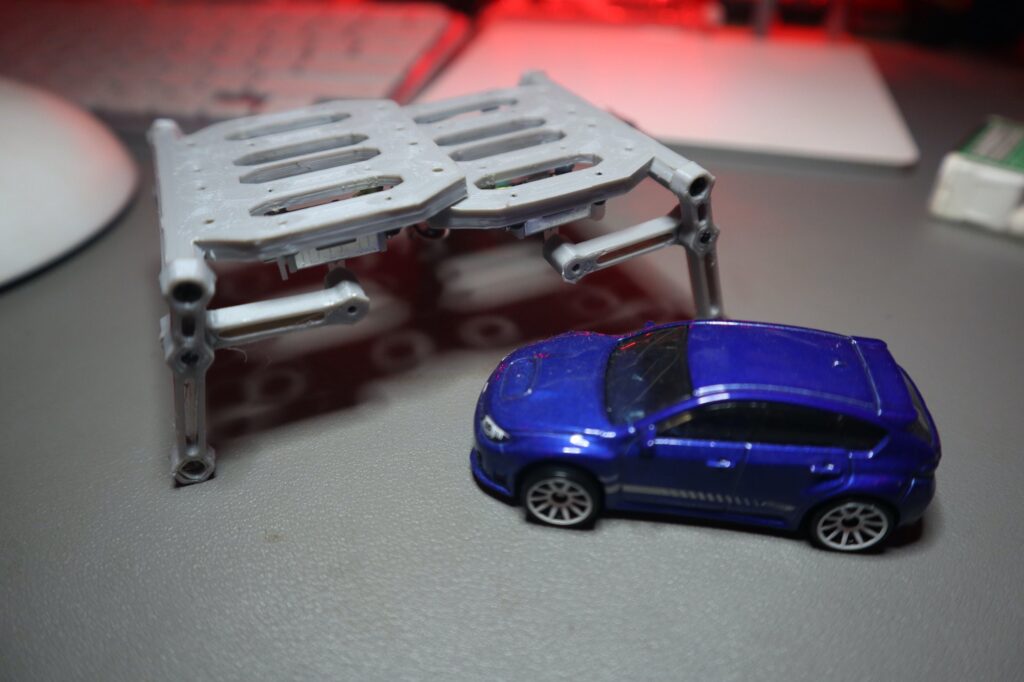
There are currently five different Bolt Bot versions to suit different applications and you can assemble all of them with the same set of hardware. Once you finish one, you can repurpose the components to make another. The current designs include a large four-leg walker (V1), a tiny four-leg walker (V2), a robot arm (V3), a car (V4), and a hanging plotter that can draw (V5). They all have a shared designed language and utilize 3D-printed mechanical parts with off-the-shelf fasteners.
Every robot has an Arduino Micro board paired with an nRF24L01 radio transceiver module for control. Users can take advantage of existing RC transmitters or build a remote also designed by Saul. The other components include servo motors, an 18650 lithium battery, and miscellaneous parts likes wires and screws. Some of the Bolt Bots require different servo motors, like continuous-rotation and mini 1.8g models, but most of them are standard 9g hobby servo motors.
Because there are five Bolt Bot variations that use the same components, this is an awesome ecosystem for getting started in robotics on a budget — especially for kids and teens.
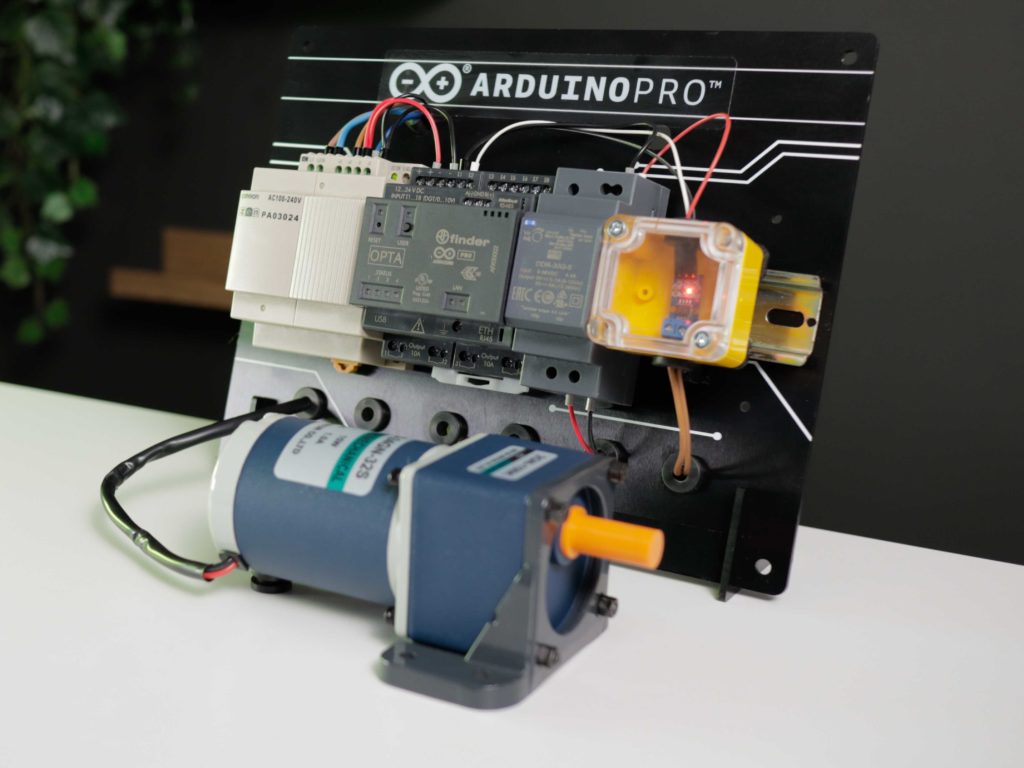
Optimizing manufacturing processes is a requirement in any industry today, with electricity consumption in particular representing a major concern due to increased costs and instability. Analyzing energy use has therefore become a widespread need – and one that can also lead to early identification of anomalies and predictive maintenance: two important activities to put in place in order to minimize unexpected downtime and repair costs.
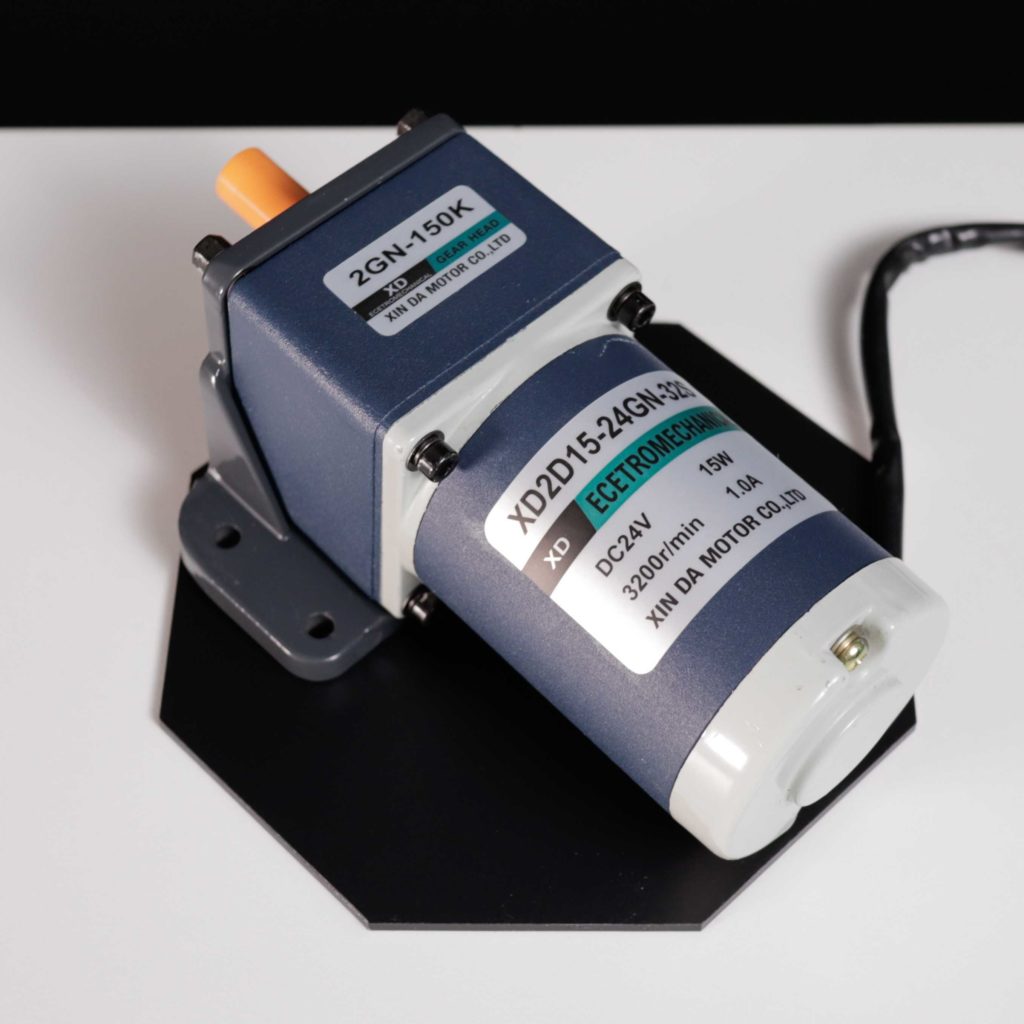
In particular, this approach can be applied to DC motors: used in a wide range of applications, from small household appliances to heavy industrial equipment; these motors are critical components that require regular maintenance to ensure optimal performance and longevity. Unfortunately, traditional maintenance practices based on fixed schedules or reactive repairs can be time-consuming, expensive, and unreliable. This is where energy monitoring-based anomaly detection comes in: it can provide a crucial solution for the early detection of potential issues and malfunctions before they can cause significant damage to the motor.
This more proactive approach to maintenance continuously monitors the energy consumption of the motor and analyzes the data to identify any deviations from normal operating conditions. By tracking energy usage patterns over time, the system can detect early warning signs of potential problems, such as excessive wear and tear, imbalances or misalignments, and alert maintenance personnel to take corrective actions before the issue escalates.
Our solution
This Arduino-powered solution implements an energy monitoring-based anomaly detection system using a current sensor and machine learning models running on edge devices. By capturing the electricity flowing in and out of a machine, it can collect large amounts of data on energy usage patterns over time. This data is then used to train a machine learning model capable of identifying anomalies in energy consumption behaviors and alerting operators to potential issues. The solution offers a cost-effective and scalable method for maintaining equipment health and maximizing energy efficiency, while also reducing downtime and maintenance costs.
Motor Current Signature Analysis (MCSA)
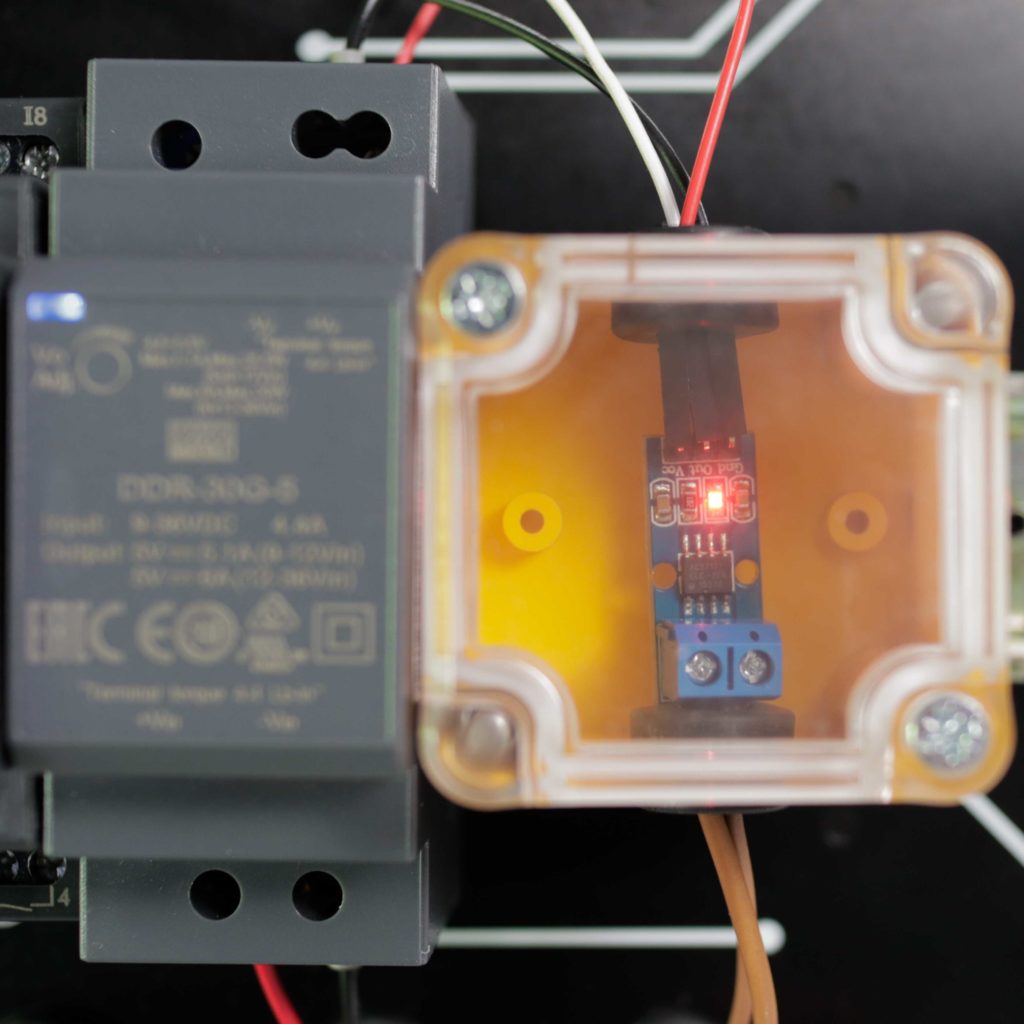
In this application, a technique called Motor Current Signature Analysis is used. MCSA involves monitoring the electrical signature of the motor’s current overtime to detect any anomalies that may indicate potential issues or faults. To acquire real-time data, a Hall effect current sensor is attached in series with the supply line of the DC motor. The data are then analyzed using machine learning algorithms to identify patterns and trends that might indicate a faulty motor operation. MCSA can be used to detect a number of issues like bearings wear, rotor bar bendings or even inter-turn short circuits.
Depending on the dimensions of the motor, using a non-invasive clamp-style current sensor – also known as a Split-Core Current Transformer – is recommended if a larger current draw is expected.
Edge ML
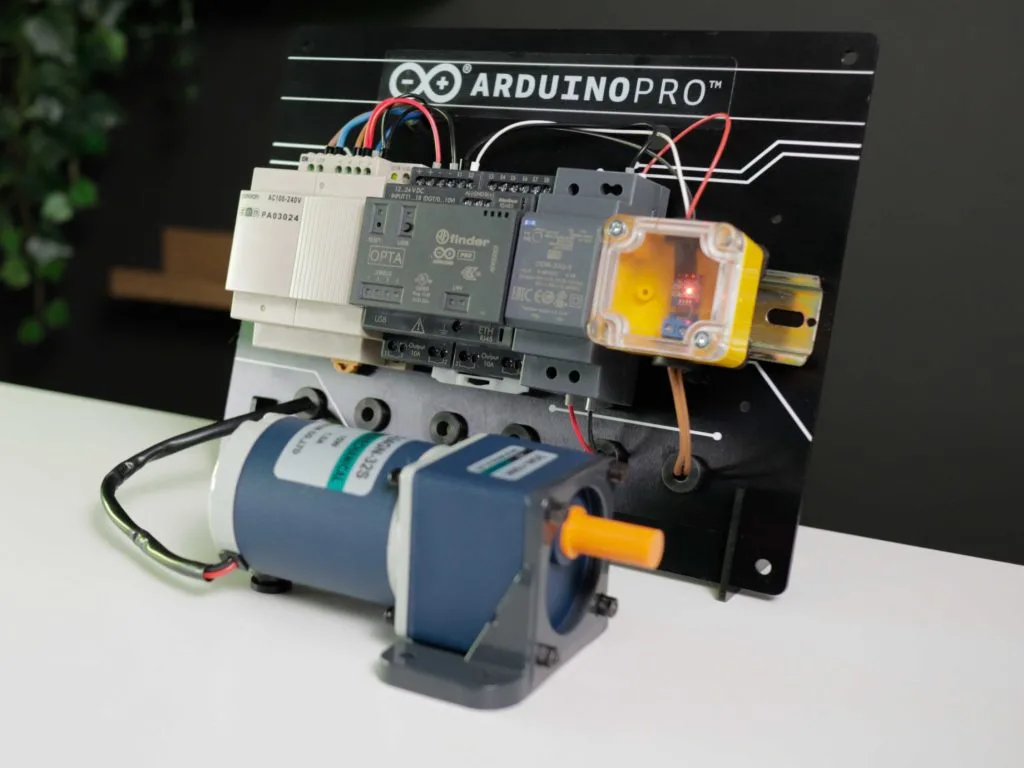
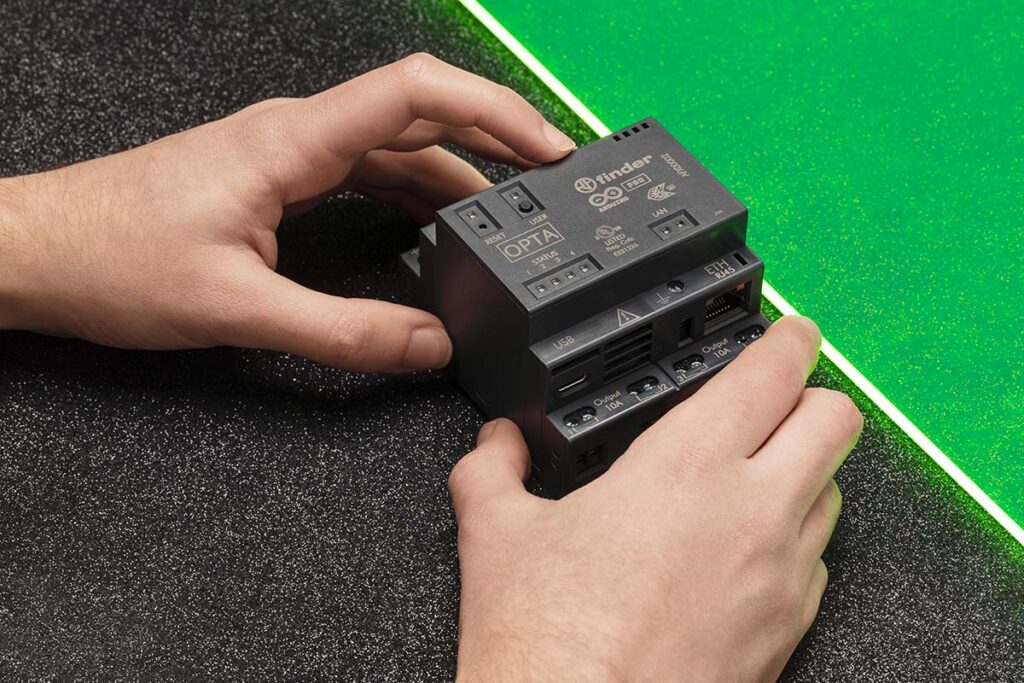
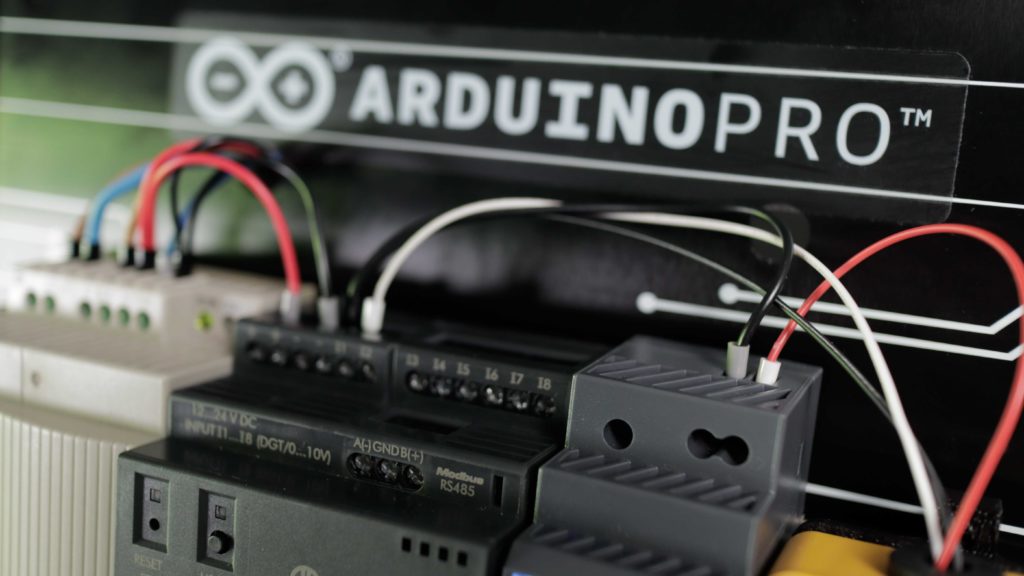
To monitor the current fluctuation and run the anomaly-detecting ML model, the solution uses anArduino Opta WiFi: a micro PLC suitable for Industrial IoT, which is excellent for this project because of its real-time data classification capabilities, based on a powerful STM32H747XI dual-core Cortex®-M7 +M4 MCU. The Arduino Opta WiFi works with both analog and digital inputs and outputs, allowing it to interact with a multitude of sensors and actuators. The Arduino Opta WiFi also features an Ethernet port, an RS485 half duplex connectivity interface and WiFi/Bluetooth® Low Energy connectivity, which makes it ideal for industrial retrofitting applications. You can find the full datasheet here.
To train the anomaly detection model, the project leverages the Edge Impulse platform: being integrated within the Arduino ecosystem, it makes it easy to develop, train, and deploy machine learning models on Arduino devices.
Connectivity
Once the machine learning model was successfully deployed on the Arduino Opta, the anomaly detection results were forwarded via WiFi to the Arduino IoT Cloud. This enables easy monitoring and analysis of the data from multiple sensor nodes in real time.
Solving it with Arduino Pro
Let’s take a look at how we can put all of this together and what hardware and software solutions we would need for deployment. The Arduino Pro ecosystem is the most recent version of Arduino solutions, offering users the benefits of easy integration along with a range of scalable, secure, and professionally supported services.
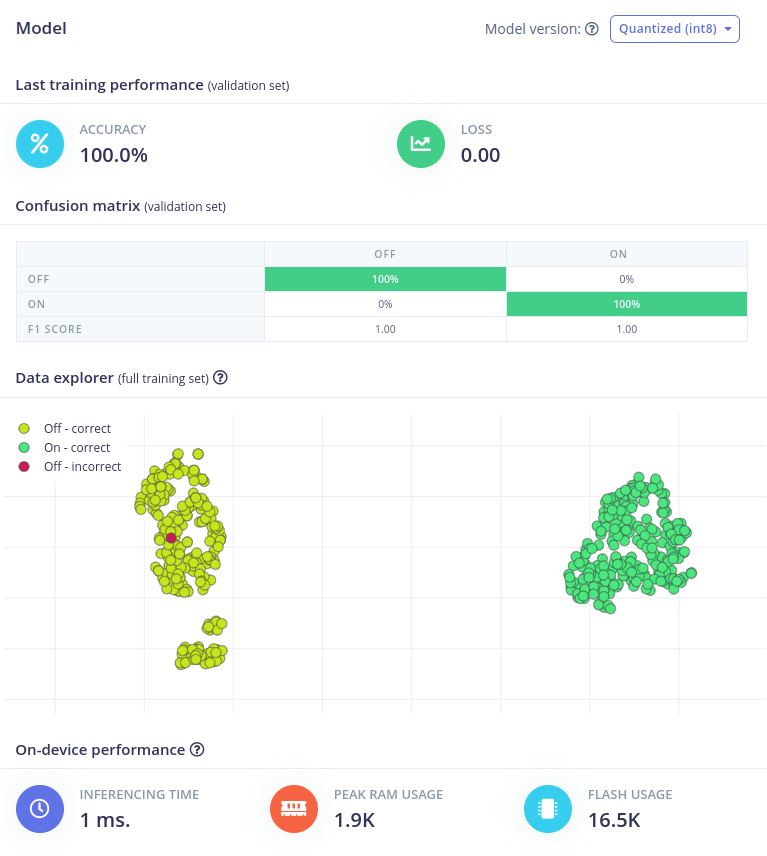
The Arduino IDE 2.0 was used to program the Arduino Opta WiFi using C/C++. To train the Edge Impulse model, data was gathered from the current sensor for two classes: Normal Operation and Machine Off. The Motor Current Signature Analysis (MCSA) technique was implemented by extracting the frequency and power characteristics of the signal through a Spectral Analysis block. Additionally, an anomaly detection block was incorporated to identify any abnormal patterns in the data.
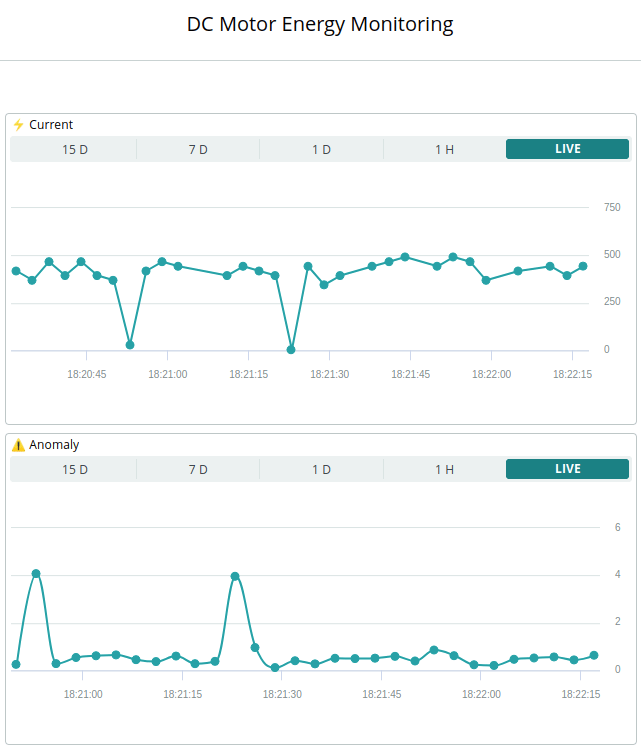
Here is a screenshot from a dashboard created directly in the Arduino Cloud, showcasing data received from the sensor nodes:
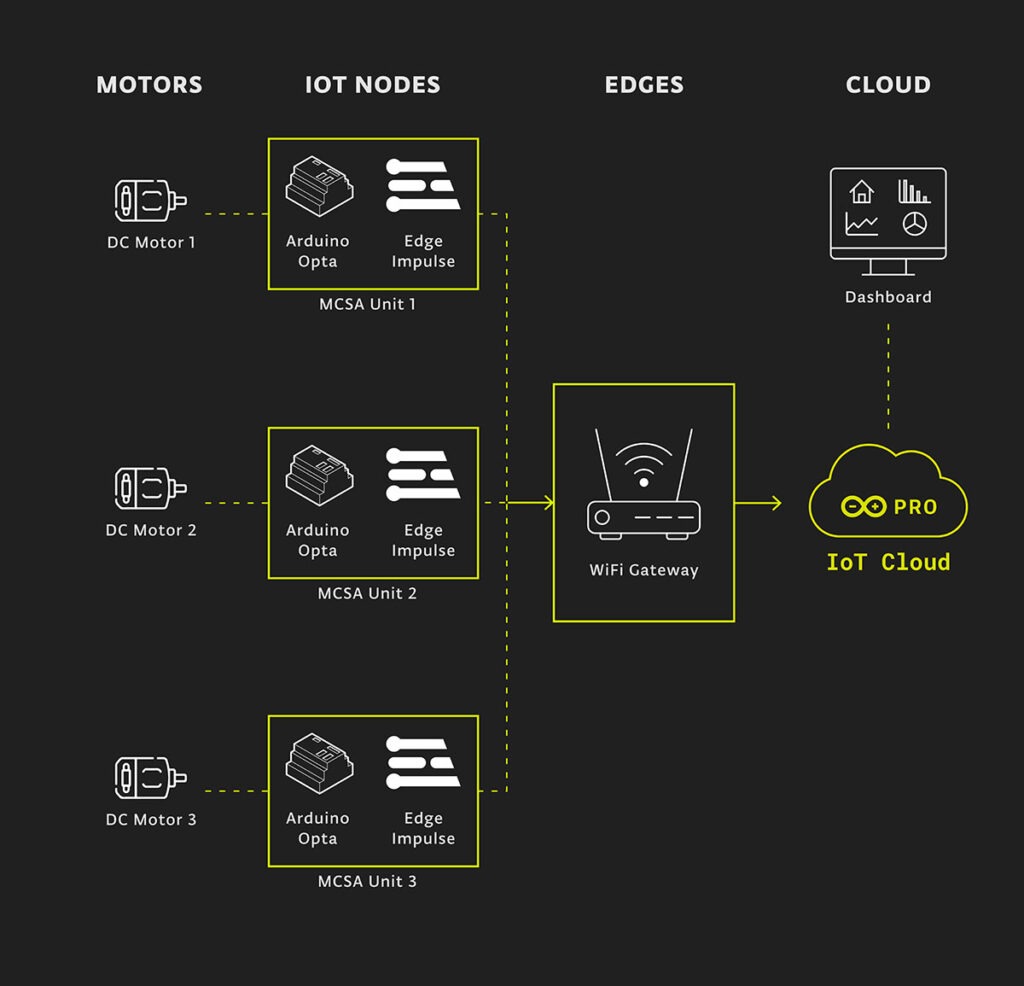
Here is an overview of the software stack and how a minimum deployment with one of each hardware module communicates to fulfil the proposed solution:
Conclusion
Through the implementation of a predictive maintenance system on an Arduino Opta WiFi PLC, using Edge Impulse ML models and the Arduino Cloud, this solution demonstrates the powerful potential of IoT technologies in industrial applications. With the use of current sensors and AI-driven anomaly detection models, the system enables real-time monitoring and fault detection of DC motors, providing valuable insights for predictive maintenance. The flexibility and scalability of the Arduino Opta WiFi platform make it a robust and cost-effective solution for implementing predictive maintenance systems in various industrial processes. Overall, the project highlights the significant advantages that MCSA and machine learning can offer in promoting efficiency, productivity, and cost savings for industrial processes.
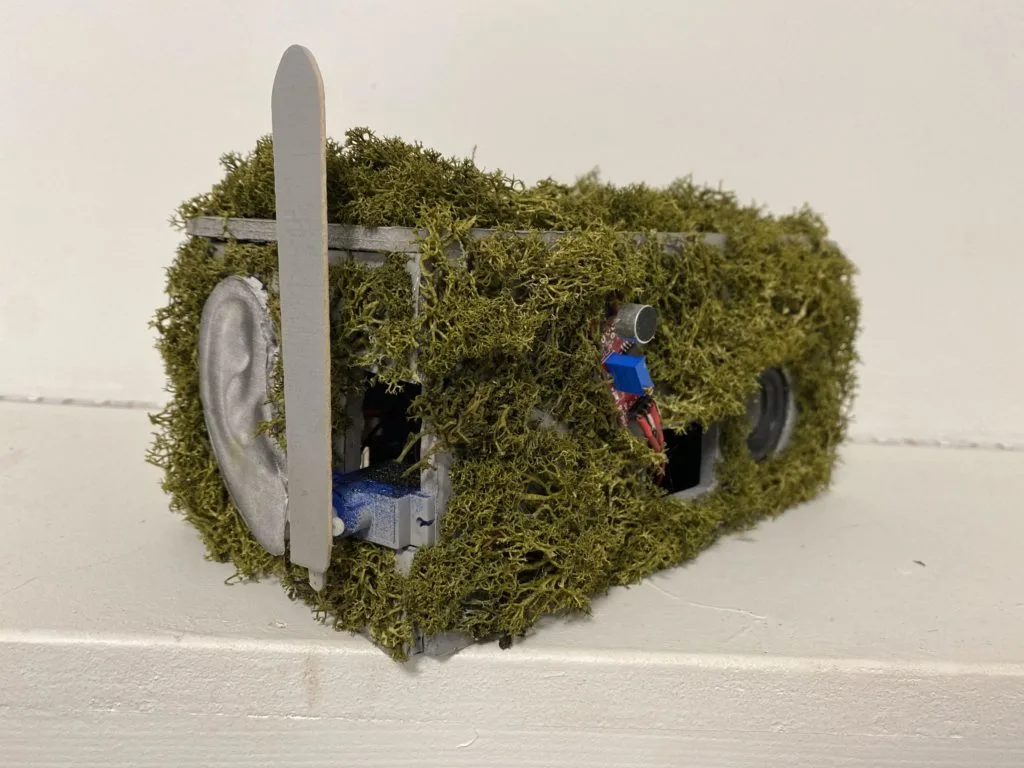
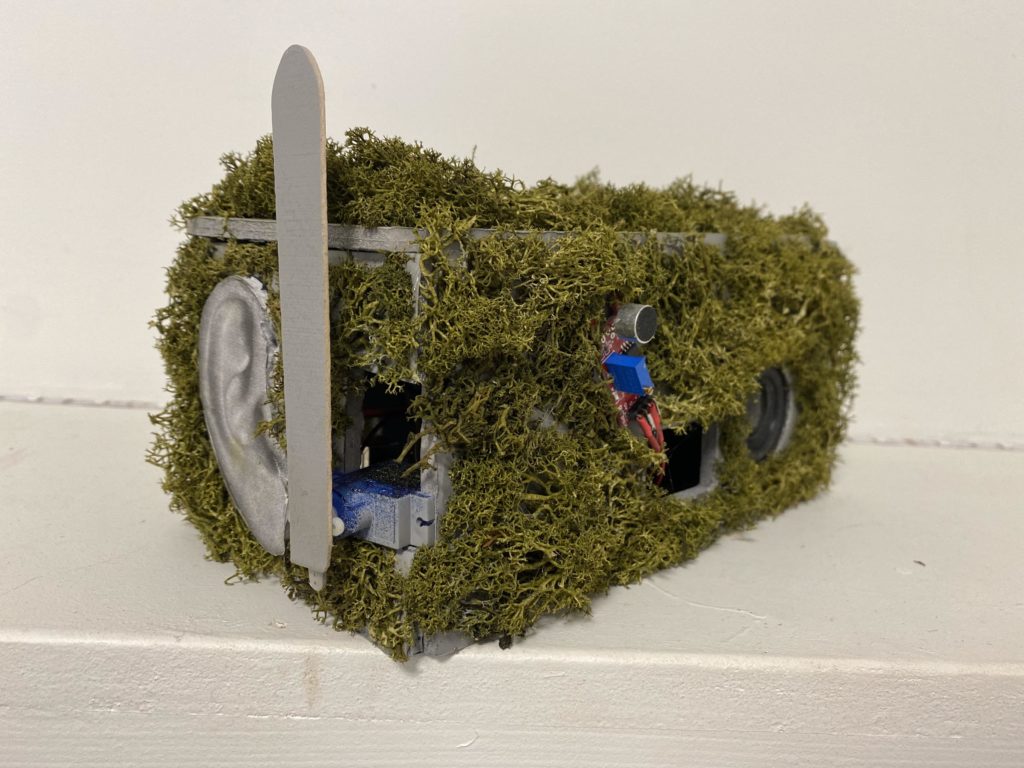
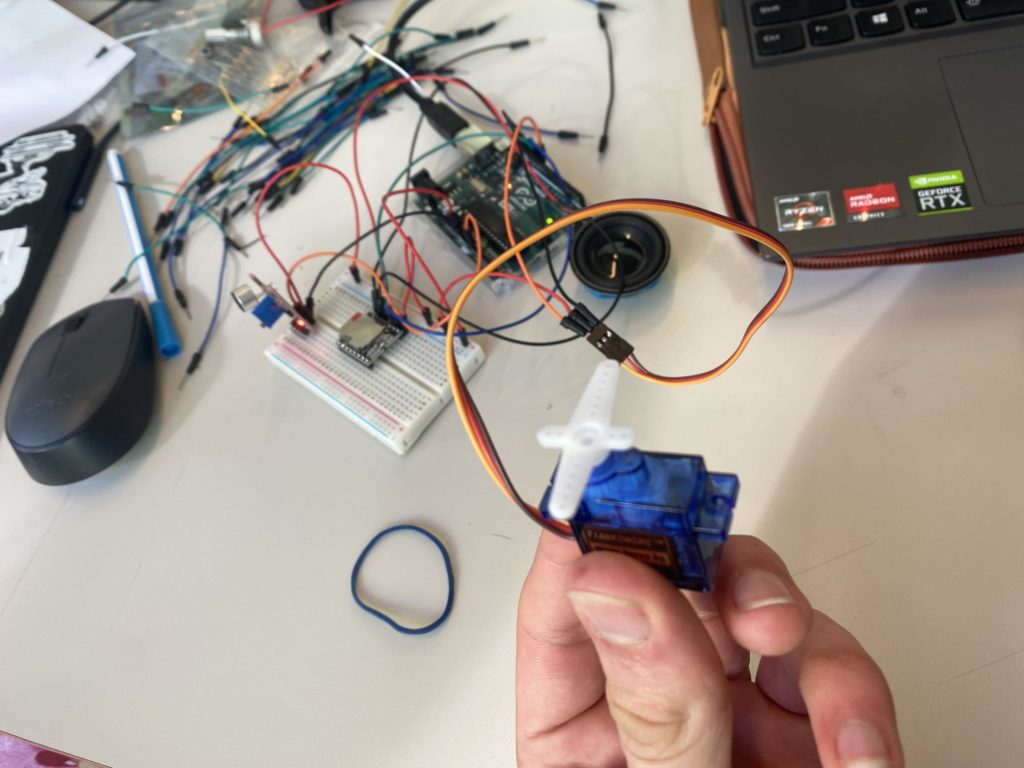
For those who have to put up with a snoring partner or roommate, the scourge of listening to those droning sounds can be maddening and lead to a decrease in the quality of one’s sleep. So, as an attempt to remedy this situation, Flin van Asperen devised an “anti-snoring machine” out of readily accessible components that aims to teach people to stop snoring so much.
The bulk of the device was made by cutting foam boards to size and painting them gray before gluing each piece together to form a box. That enclosure was then given a pair of ears and covered in fake moss (to ‘blend in’ with other houseplants). Next, the circuit was created by connecting an Arduino Uno to a sound sensor element that detects if someone’s snoring has gotten too loud. Once the level has been reached, an MP3 player module is instructed to play a short audio clip via a speaker while a micro servo knocks over a cup onto the snorer’s head below.
Through this combination of sound and physical correction, van Asperen hopes that his anti-snoring contraption will be successful in stopping a person’s snoring. You can read more about the project here in its [translated] Instructables post.
The simplest MIDI (Musical Instrument Digital Interface) input devices use good ol’ fashioned buttons: push a button and the device sends a MIDI message to trigger a specific note. But that control scheme doesn’t replicate the flexibility of a real instrument very well, because a standard button is a binary mechanism. To introduce more range, Xavier Dumont developed this breath-controlled MIDI device.
This looks like a cross between a flute, an ocarina, and an old cell phone. The front face has 35 buttons to trigger specific notes. But there are two ways for the player to gain almost analog control over the output: a mouthpiece with a breath sensor and a linear touch sensor. The breath sensor lets the player control the intensity of a note by blowing into the mouthpiece like a wind instrument. The linear touch sensor, mounted on the bottom of the device, lets the user bend the pitch of the notes with their thumb.
Inside the 3D-printed enclosure is a custom PCB. Almost every component mounts directly onto that board. The exception is the touch sensor, which connects to the PCB through a jumper cable. An Arduino Micro monitors the keypad matrix, the touch sensor, and the breath sensor. It outputs MIDI messages to a computer connected via USB. There is a TFT screen for the control interface, which lets the user change modes, switch octaves, and tweak settings
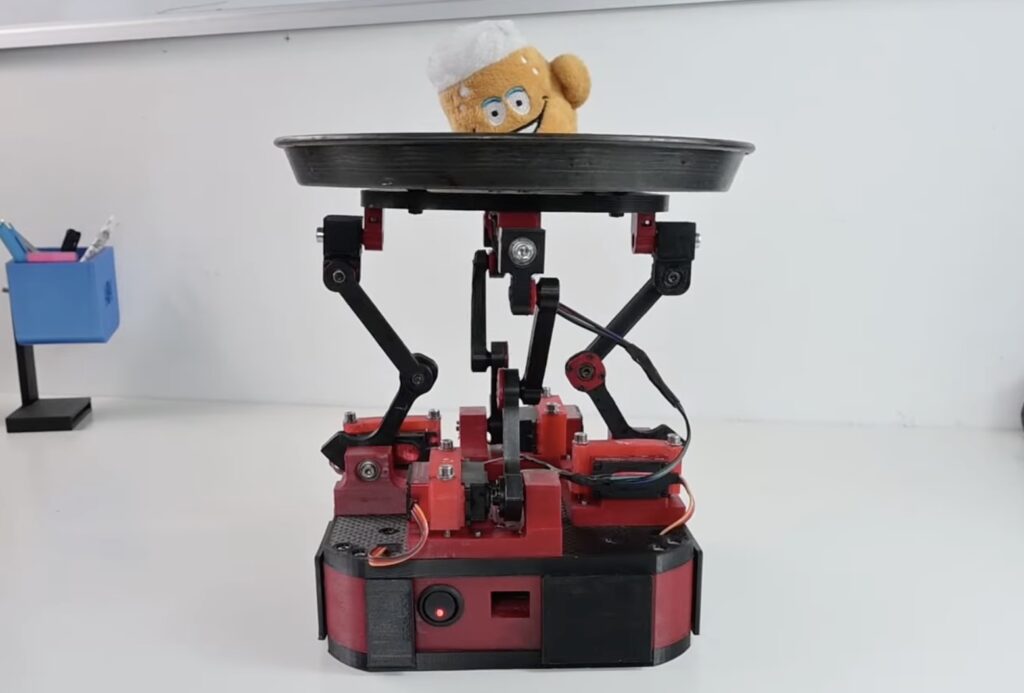
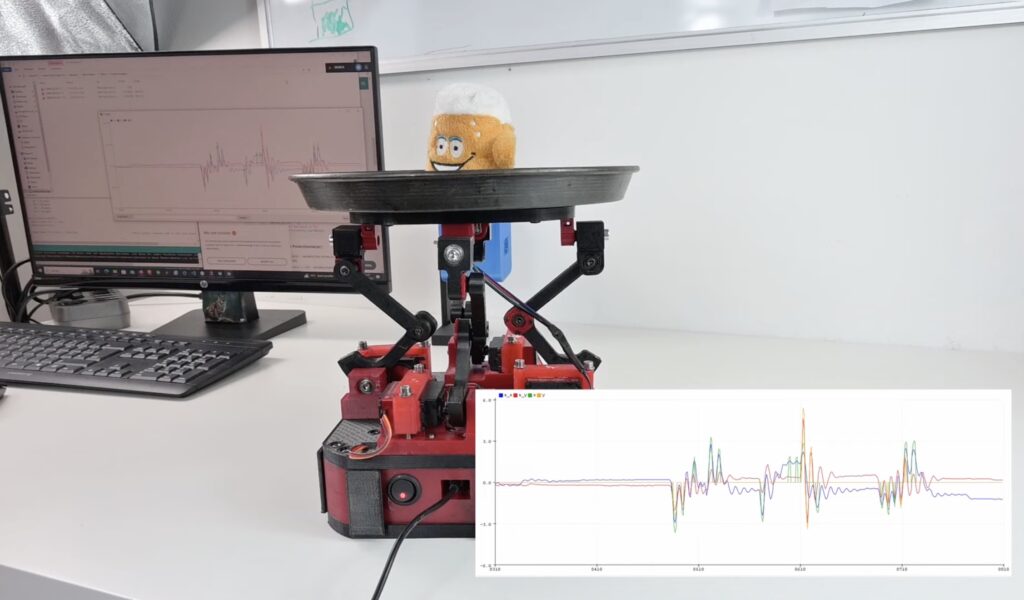
Experienced servers are masters of balance and coordination, being able to carry several full glasses on a tray without spilling a drop. But many of us lack that skill and can’t carry even a single glass across a room without splashing half of it on our feet. To help the clumsy among us, YouTuber The Fedmog Challenge created this robotic beer tray that automatically balances glasses to avoid spills.
This robotic beer tray relies on the same kind of control algorithm used by self-balancing robots and drones: PID (proportional-integral-derivative). That acronym isn’t very informative unless you were a math major, but it means that the robot uses fancy calculations to compensate for movement in real time through a closed-feedback loop. In this case, the beer tray is constantly checking to see if it is level. If it isn’t, then it uses motors to bring itself back to level as fast as it can without overcompensating.
The Fedmog Challenge made this machine using 3D-printed parts. The user holds the base and that connects to the tray on top via four servo-actuated linkages. An MPU6050 gyro/accelerometer module mounts to the tray and to detect its position. An Arduino Nano board monitors the MPU6050 and adjusts the servo motor angles as necessary to keep the tray level.
There are a couple of problems with this design that keep it from being practical, though. First, the servos aren’t strong enough to handle much weight. Second, keeping the tray level isn’t enough to avoid spills. To do that, it would need to tilt to compensate for horizontal inertia. But we still like the idea and the build is fun to watch.
Almost all haptic feedback today comes in the form of vibration. But vibratory haptic feedback is clearly lacking, as it cannot convey information with any kind of precision or granularity. The user notices the vibration and very course patterns may be recognizable, but that is a rudimentary approach that requires a lot of user focus. To help people navigate as they walk through cities, a team from the Max Planck Institute for Intelligent Systems developed a shape-changing interface called S-BAN.
The researchers designed S-BAN (Shape-Based Assistance for Navigation) to work with existing GPS navigation systems, such as Google Maps on smartphones, but to provide a better user experience. The S-BAN device looks like a small remote and the fore end actuates in two dimensions. It can move forward and backward, and pivot left and right to guide the user. If, for instance, the user needs to make an immediate left turn, it will pivot left. This lets people with visual impairments navigate through touch and helps everyone else walk with their eyes up instead of focused on their phones.
The prototype S-BAN unit contains an Arduino Nano board, a Bluetooth module for communication with the user’s smartphone, an IMU to monitor the current orientation of the device, a LiPo battery, and two miniature linear actuators. The complete package, in a 3D-printed enclosure, is very compact and could even double as a smartphone case to make its use more convenient.
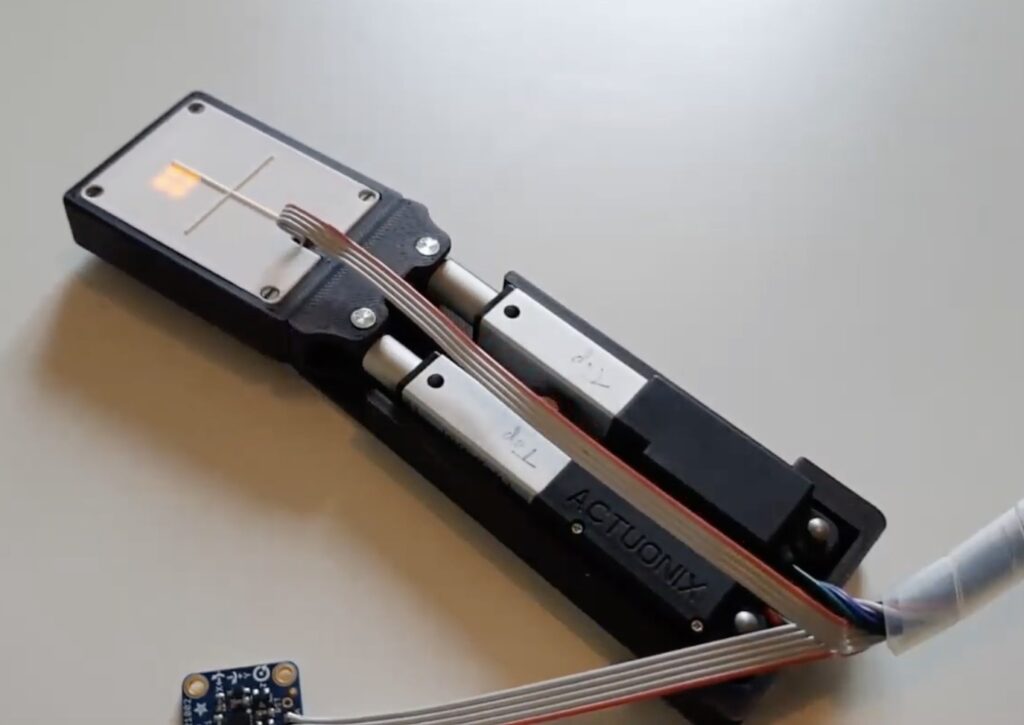
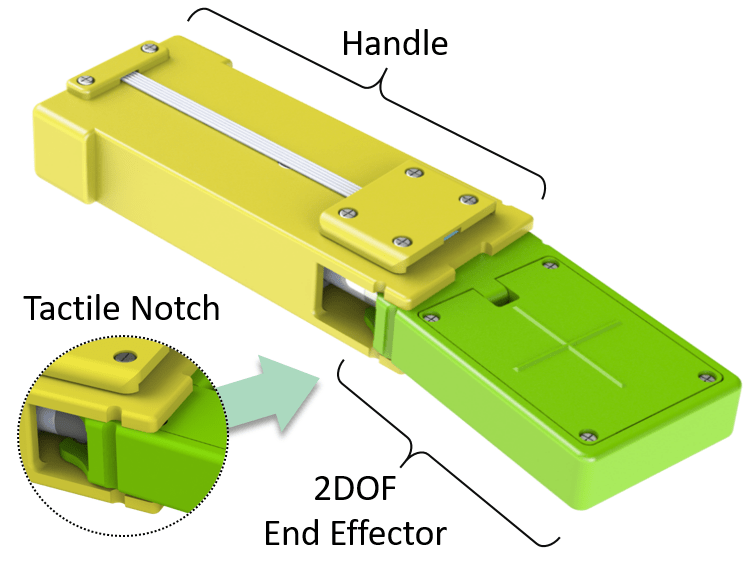
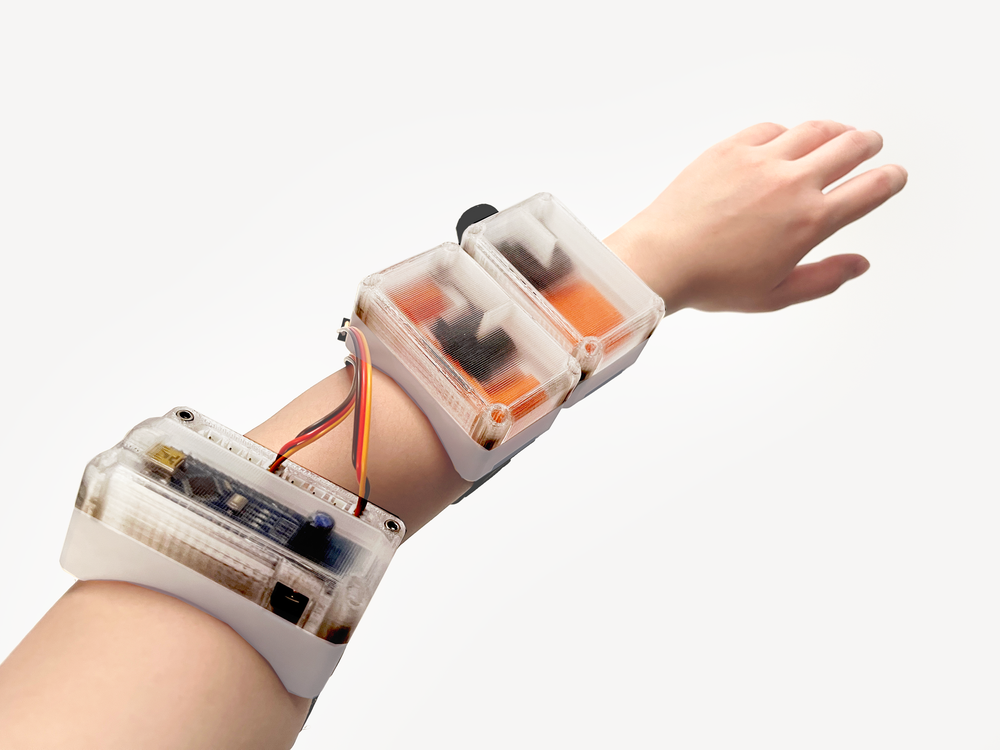
So much of the research and development in the area of haptic feedback focuses on universal devices that can create a wide range of tactile sensations. But that has proven to be a massive challenge, as it is very difficult to package the number of actuators necessary for that flexibility in a device that is practical for the consumer market. That’s why TactorBots — devised by researchers from University of Colorado’s ATLAS Institute and Parsons School of Design — sidesteps the issue with a complete toolkit of robotic touch modules.
TactorBots includes both software and hardware, with the hardware coming in several different modules. Each module is wearable on the user’s wrist and has a unique way of touching their arm. One Tactor module strokes the user’s arm, while another taps them. There are other Tactor modules for rubbing, shaking, squeezing, patting, and pushing. Because each module only needs to perform a single tactile motion, they can do their jobs very well. It is also possible to chain several modules together so the user can feel the different sensations across their arm.
Custom web-based software running on a PC controls the Tactor modules, activating them to match virtual on-screen content, through a host module built around an Arduino Nano board. That host module is also wearable on the arm. Each Tactor module has a servo motor that connects directly to the host module through standard JST wires. The module enclosures, along with the sensation-specific mechanisms, were all 3D-printed. The mechanisms differ based on the sensation they were designed to create, but they’re also simple and only require a single servo to operate.
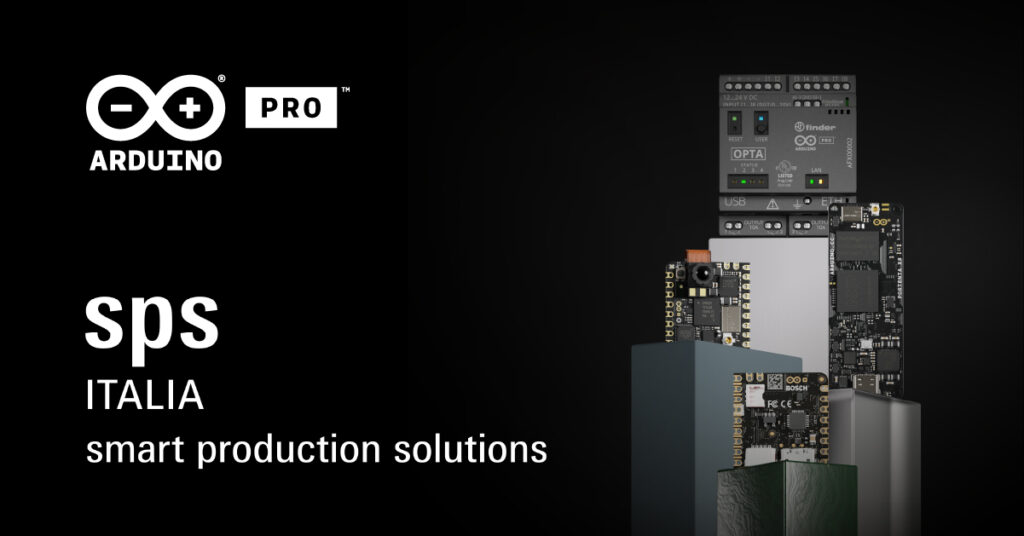
Mark your calendars: May 23rd-25th we’ll be at SPS Italia, one of the country’s leading fairs for smart, digital, sustainable industry and a great place to find out what’s new in automation worldwide. We expect a lot of buzz around AI for IoT applications – and, of course, we’ll come prepared to give our own, open-source perspective on the AIoT trend.
At Arduino Pro’s booth C012, pavilion 7, our experts will be presenting some of the latest additions to our ever-growing ecosystem, which includes everything companies need to fully embrace digital transformation with professional performance paired with Arduino’s ease of use and open-source philosophy. You can explore our complete digital brochure here, but let us point out some recent highlights.
Meet the Arduino Pro ecosystem at SPS Italia 2023
Over the years, Arduino Pro has built quite the presence on the market with SOMs like the Portenta H7 and X8, recently joined by the Portenta C33: a cost-effective, high-performance option that makes automation accessible to more users than ever, based on the RA6M5, an Arm® Cortex®-M33 microcontroller from Renesas.
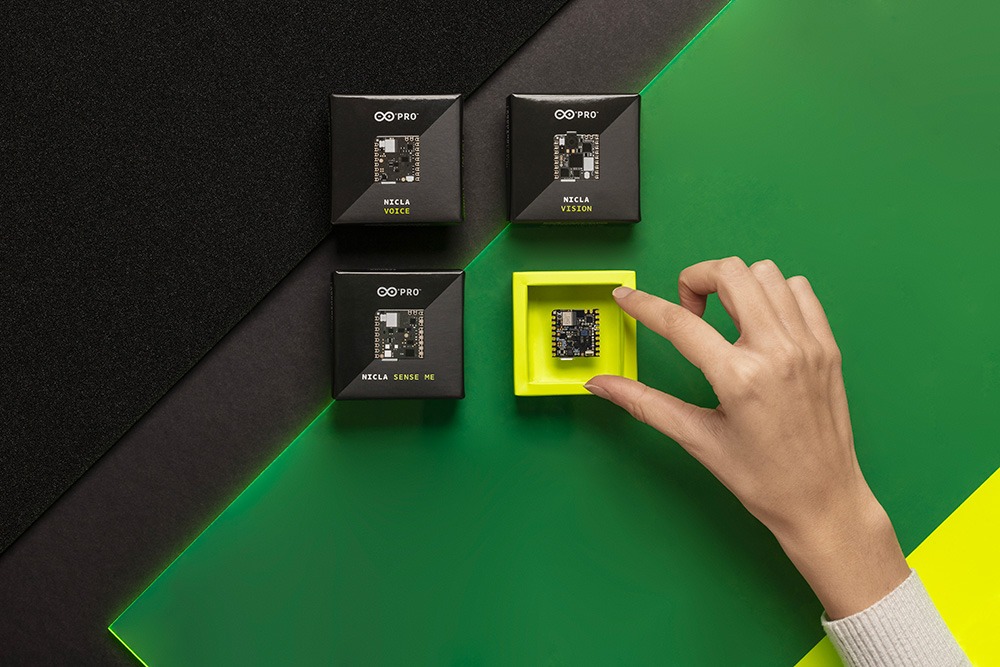
Our Nicla family of ultra-compact boards also expanded: after Nicla Sense ME and Nicla Vision, Nicla Voice packs all the sensors, intelligence and connectivity you need for speech recognition on the edge, leveraging AI and ML.
What’s more, the Arduino ecosystem also includes turnkey solutions like the Portenta Machine Control and the new Opta, our very first microPLC, designed in partnership with Finder to support the Arduino programming experience with the main PLC standard languages – and available in 3 variants with different connectivity features: Opta Lite, Opta RS485, and Opta WiFi. Both the Portenta Machine Control and Opta can be programmed via the new PLC IDE, designed to help you boost production and build automation with your own Industry 4.0 control system.
Finally, since SPS Italy’s last edition we have launched Arduino Cloud for Business: a dedicated Cloud plan for professional users requiring advanced features for secure device management including OTA updates, user-friendly fleet management, and RBAC to safely share dashboards among multiple users and organizations. Specific optional add-ons allow you to further customize your solution with Portenta X8 Manager, LoRaWAN Device Manager or Enterprise Machine Learning Tool – accelerating your IoT success, whatever the scale of your enterprise may be.
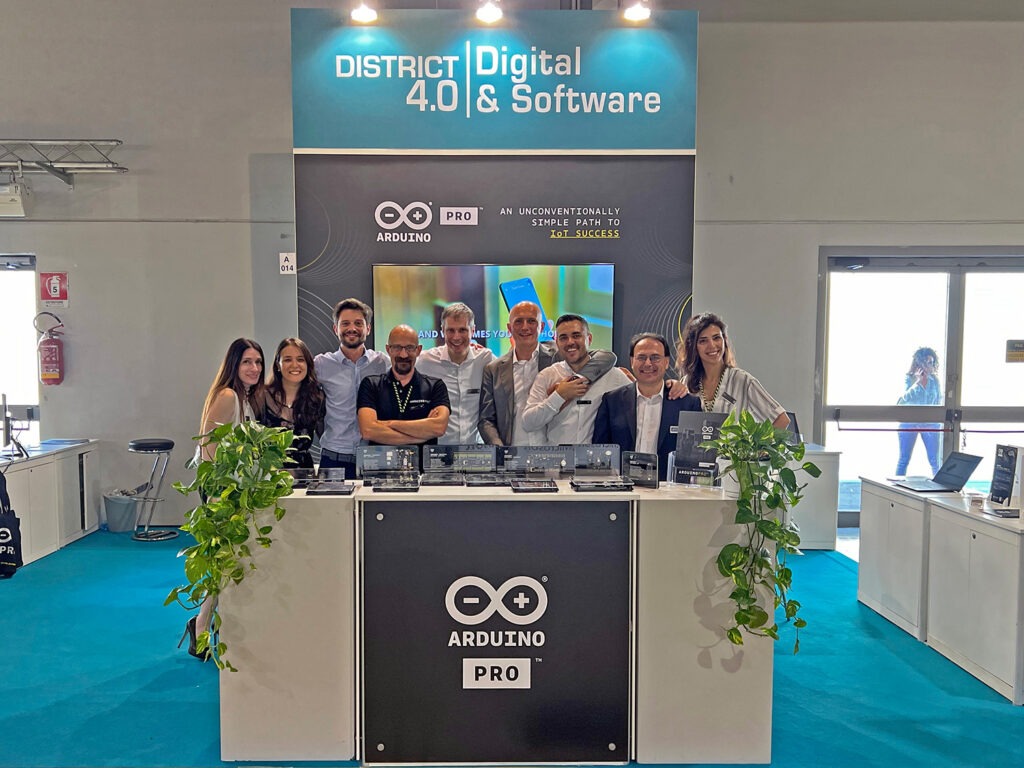
Images from SPS Italy 2022
Team Arduino Pro at SPS Italy 2022
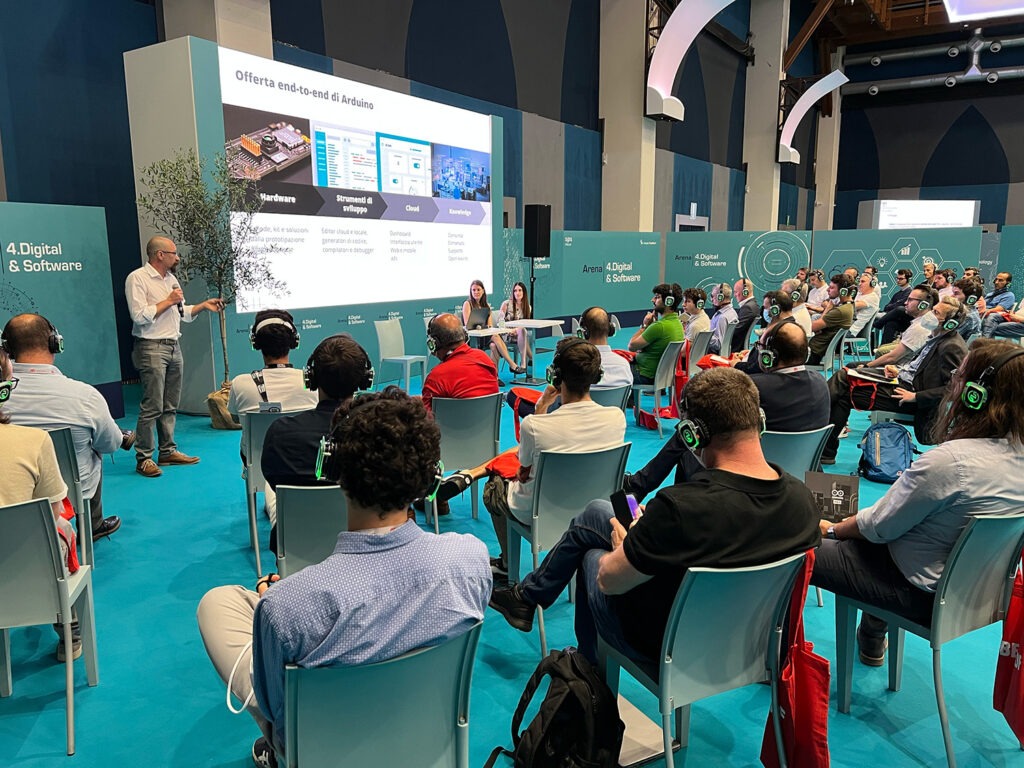
If you are attending SPS Italia, don’t miss the conference by our own Head of Arduino Pro Customer Success Andrea Richetta, joined by Product Managers Marta Barbero and Francesca Gentile (in Italian): on May 24th at 2:30pm they will dive deep on the tools Arduino Pro makes available for all companies ready to take part in the IoT revolution, with a unique combination of performance and ease of use. This is your chance to discover how you too can integrate safe and professional Industry 4.0 solutions in new or existing applications, quickly growing from prototype to large-scale production with sensors, machine vision, embedded machine learning, edge computing, and more.
Curious? Register to access the fair if you are an industry professional, and reach out to book a meeting with a member of our team.
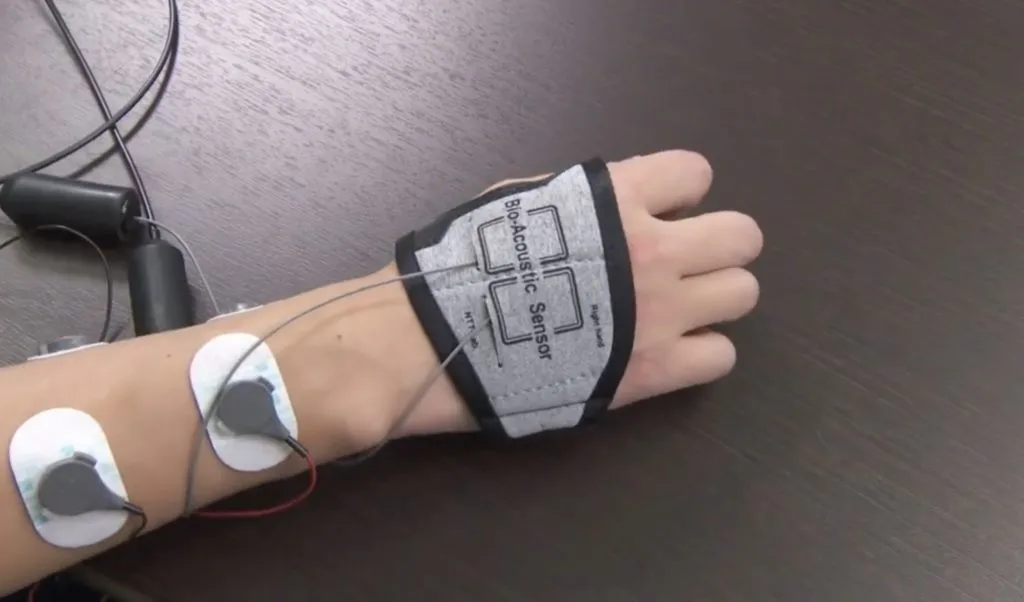
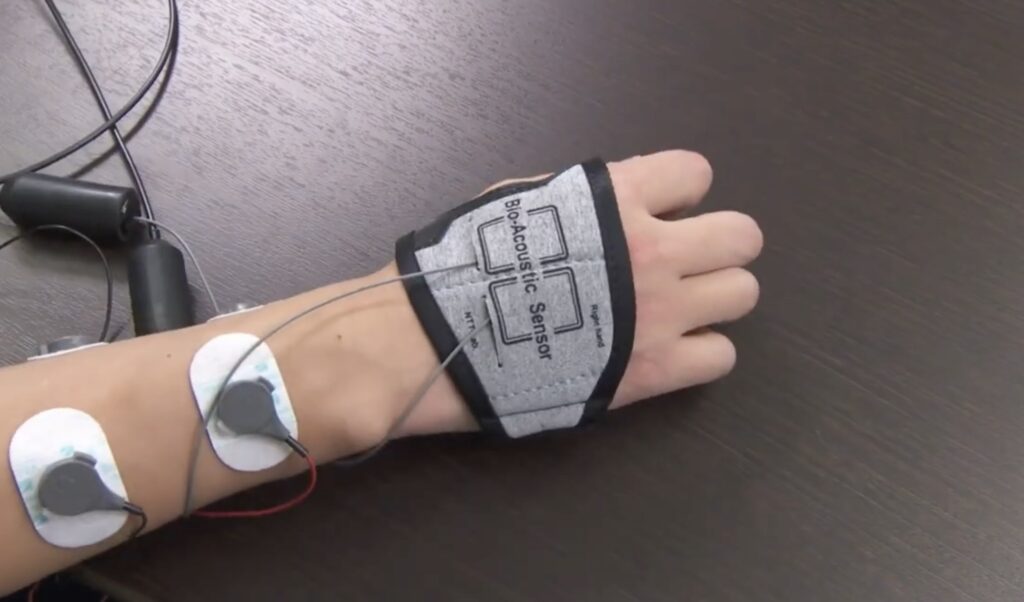
A great number of activities require the precise application of force with the fingertips. When playing a guitar, for example, you must exert the proper amount of force to push a string against the fret board. Training is difficult, because new guitarists don’t know how much force to apply. This wearable system controls fingertip force to help users learn how to perform new activities.
Developed by NTT Corporation researchers, the system needs two parts to enable fingertip force control: stimulation and feedback. EMS (electronic muscle stimulation) handles the former by pulsing a small amount of electric current through the user’s muscles, forcing them to contract. That is commonplace technology today, with uses ranging from legitimate medical therapy to more homeopathic remedies. For feedback, the system utilizes bioacoustic technology (a transducer and piezoelectric sensor) to determine the amount of force applied by a user’s finger.
An Arduino Uno Rev3 board paired with a function generator gives the system precise control over the EMS unit, allowing it to adjust muscle stimulation as necessary. It does so in real-time in response to fingertip force estimated by a machine-learning regression model. An expert in the activity could use the system to train it on the proper amount of force for an action, then the system could provide the amount of stimulation necessary for a new student to replicate the expert’s force. With practice, the student would gain a feel for the force and then could perform the activity on their own without the aid of the system.
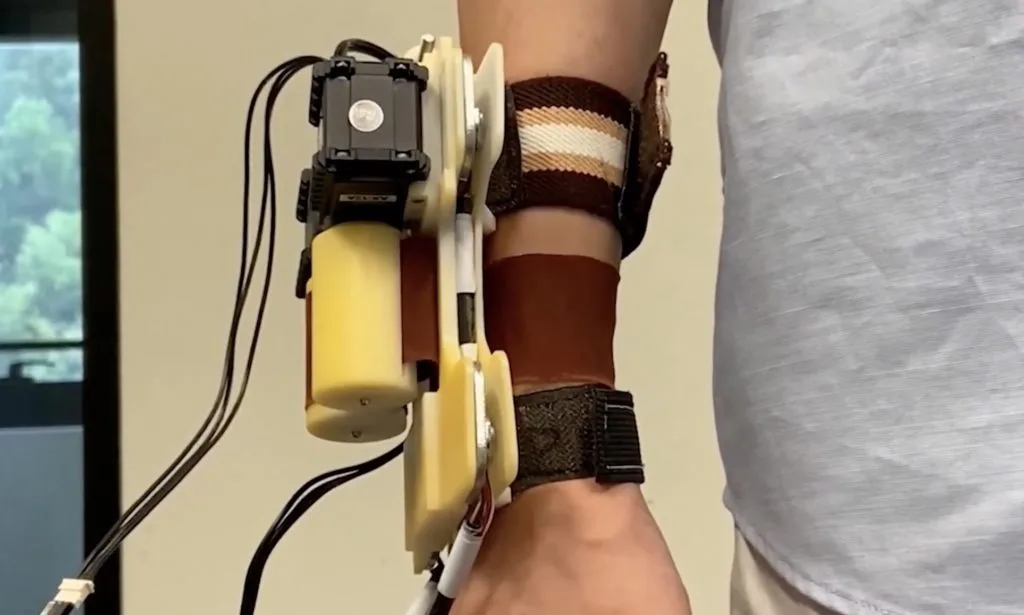
Modern consumer devices are fantastic at providing visual and auditory stimulation, but they fail to excite any of the other senses. At most, we get some tactile sensation in the form of haptic feedback. But those course vibrations do little more than provide an indication that something is happening, which is why researchers look for alternatives. Developed by a team of City University of Hong Kong researchers, Emoband provides a new kind of tactile feedback in the form of stroking and squeezing of the user’s wrist.
Emoband looks a bit like an over-sized smartwatch with three bands. Two of those bands are just normal straps that secure the device to the user’s wrist. The third band, in the middle, can be made of several different materials. It attaches to two spools on the device, which can reel in or out the material. If both reel in the band, then it will squeeze the user’s wrist. If one reels in while the other reels out, then the band strokes the user’s wrist. Depending on the material, those sensations may elicit different emotional responses from the user.
The prototype Emoband unit uses an Arduino Mega 2560 board to control two servo motors that turn the spools for the material band. A laptop communicates with the Arduino through serial, telling it how to move the band to mirror the onscreen content. Two load cells provide feedback on the amount of squeezing pressure. The prototype device’s frame and spools were 3D-printed.
In the future, it could be possible to integrate this functionality into the smartwatches that people already wear—if the general public decided that they want this kind of tactile feedback. Initial testing showed the users certainly noticed the feedback, but it isn’t clear if they thought it was worthwhile or practical. More details on the project can be found in the researchers’ paper here.
The task of gathering enough data to classify distinct sounds not captured in a larger, more robust dataset can be very time-consuming, at least until now. In his write-up, Shakhizat Nurgaliyev describes how he used an array of AI tools to automatically create a keyword spotting dataset without the need for speaking into a microphone.
The pipeline is split into three main parts. First, the Piper text-to-speech engine was downloaded and configured via a Python script to output 904 distinct samples of the TTS model saying Nurgaliyev’s last name in a variety of ways to decrease overfitting. Next, background noise prompts were generated with the help of ChatGPT and then fed into AudioLDM which produces the audio files based on the prompts. Finally, all of the WAV files, along with “unknown” sounds from the Google Speech Commands Dataset, were uploaded to an Arduino ML project.
Training the model for later deployment on a Nicla Voice board was accomplished by adding a Syntiant audio processing block and then generating features to train a classification model. The resulting model could accurately determine when the target word was spoken around 96% of the time — all without the need for manually gathering a dataset.
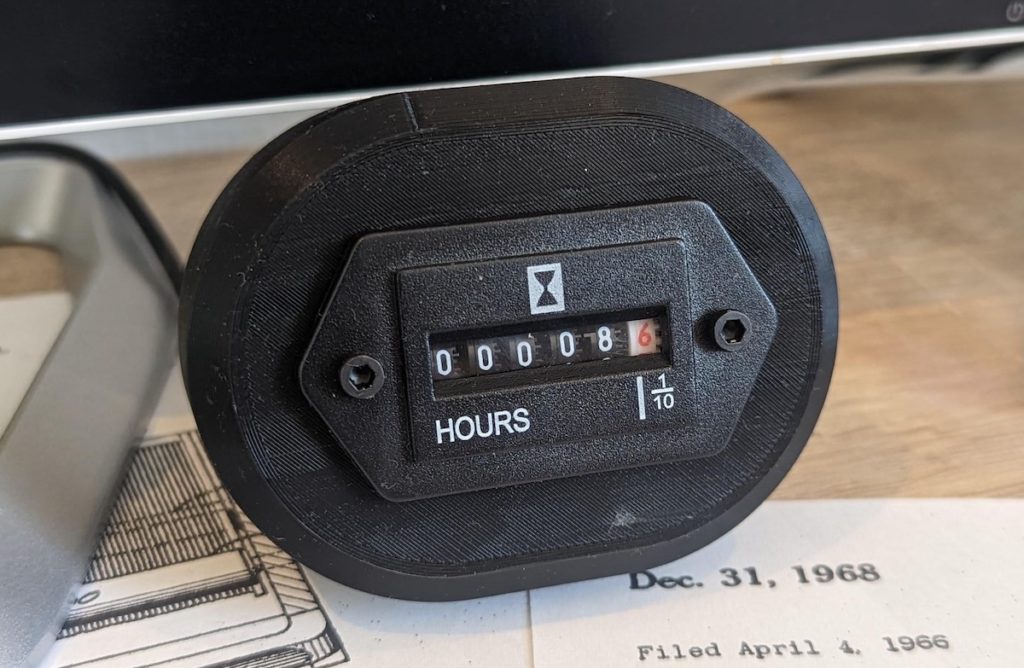
Hour meters are common for many types of machinery, because they serve a similar to purpose as your car’s odometer. When time running is a more important metric than distance, an hour meter is a good choice. And because they’re common, it is easy to find hour meters in any style you can imagine — both vintage and new. This Instructables tutorial from Gautchh will show you how to convert an hour meter into a time tracker for your work or leisure activities.
You could, of course, just use an app or a stopwatch to track your time, but this is much more appealing. The idea is simple: a specific action on your computer triggers the device and it will continue ticking up until another action triggers it to stop. Gautchh provides a Python script that triggers the meter when a specific process runs or stops. The user can choose the process, which should correspond to whatever software they want to track. For it to work properly, however, that process can’t run in the background when the user isn’t actively using the software.
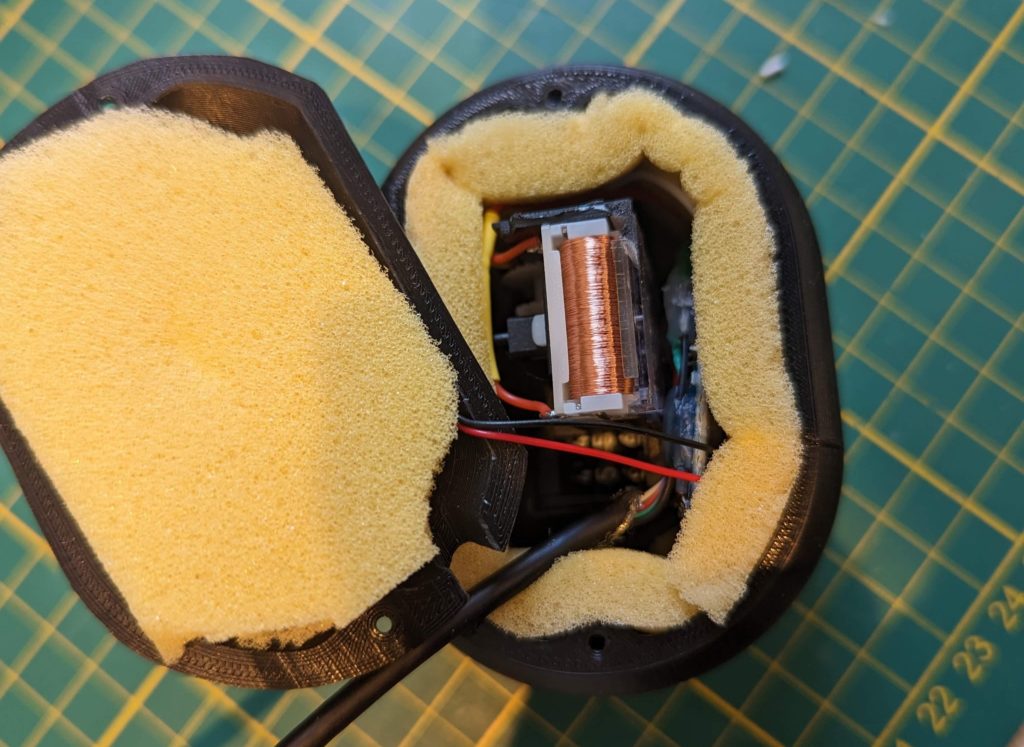
On the hardware side, an Arduino Nano board will accept commands from the connected PC via the Serial connection and will control the hour meter. If you buy the same hour meter as Gautchh, you can follow their instructions and use their code. If you buy another model, you may need to perform some reverse-engineering to figure out the control signals and tweak the code. A simple 3D-printed enclosure houses the meter and the Arduino, putting them in a compact package that can sit unobtrusively on a desk.
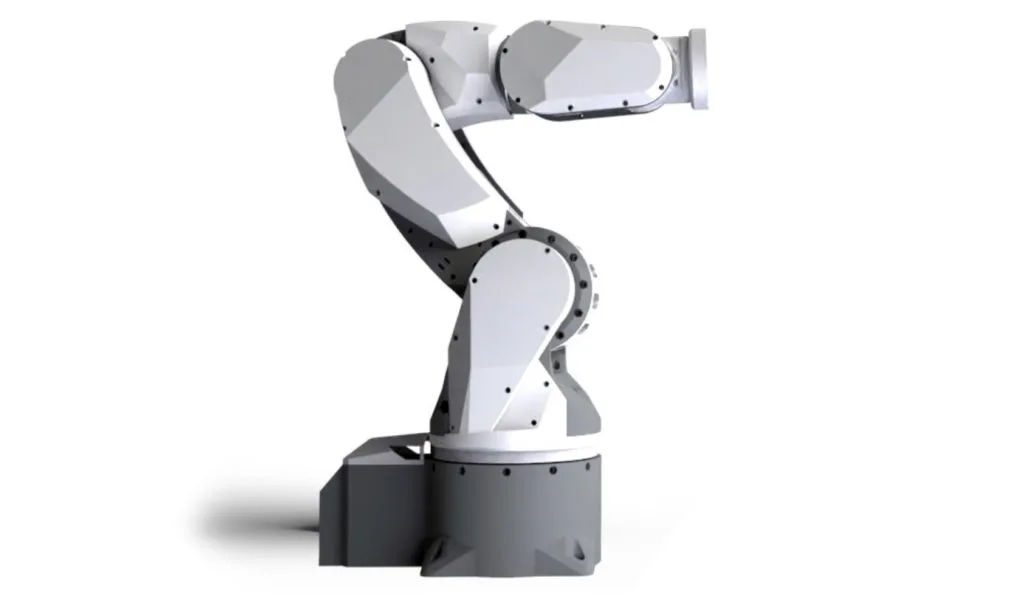
If you want a robot arm, either for some practical job or just fun, you have a lot of options. There are many consumer and industrial robot arms on the market, but the models that aren’t glorified toys tend to be pricey. You can also build your own. If you go that route, you’ll want a design that is well-engineered and well-documented. It isn’t free, but the ARCTOS robot arm is a high-quality option that meets both of those criteria.
Based on aesthetics alone, the ARCTOS robot arm looks fantastic. It resembles something you’d see in a lab in a sci-fi movie. But it also offers more than a pretty package. It has six degrees of freedom and a payload of 500 grams, making it suitable for tasks ranging from pick-and-place to packing boxes. Best of all, you can assemble it using easily sourced hardware and 3D-printed parts. Those parts are PLA and just about any modern 3D printer can handle the fabrication.
The ARCTOS design files will set you back €39.95 (about $44) and sourcing all of the parts for the build will cost around $400. Stepper motors actuate the joints, through simple belt drives and cycloidal gear boxes. An Arduino Mega 2560 controls those through a standard CNC shield. It runs open source firmware based on GRBL that will work with a variety of control software options to suit different tasks.
Personal safety is a growing concern in a variety of settings: from high-risk jobs where HSE managers must guarantee workers’ security to the increasingly common work and study choices that drive family and friends far apart, sometimes leading to more isolated lives. In all of these situations, having a system capable of sensing and automatically contacting help in case of emergency can not only give people peace of mind, but save lives.
A particularly interesting case – as the world population ages – regards the increasing number of elderly people who are still healthy enough to be independent yet must also accept the fact their bodies are becoming weaker and their bones more fragile. This specific target is more prone to falls, which can result in fractures, head injuries, and other serious accidents that can severely impact the quality of life. Detecting falls early can allow for prompt medical attention and prevent serious consequences. Additionally, detecting falls can help identify underlying health issues or environmental factors that may be contributing to accidents, allowing for appropriate interventions to be put in place to avoid future falls.
A variety of person-down systems and fall detection methods exist, ranging from threshold-based algorithms to traditional machine learning applications. The biggest challenge they all share is they suffer from high false-positive triggers. In other words, they cause unnecessary alarm and distress to both the seniors and their caregivers, resulting in unwarranted actions.
Our solution
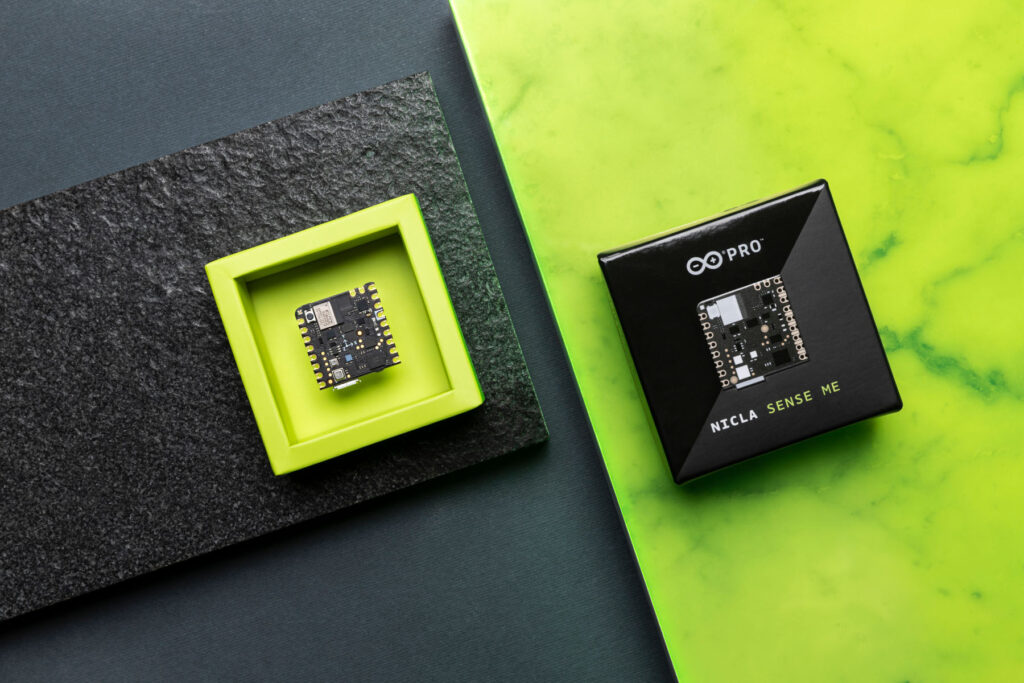
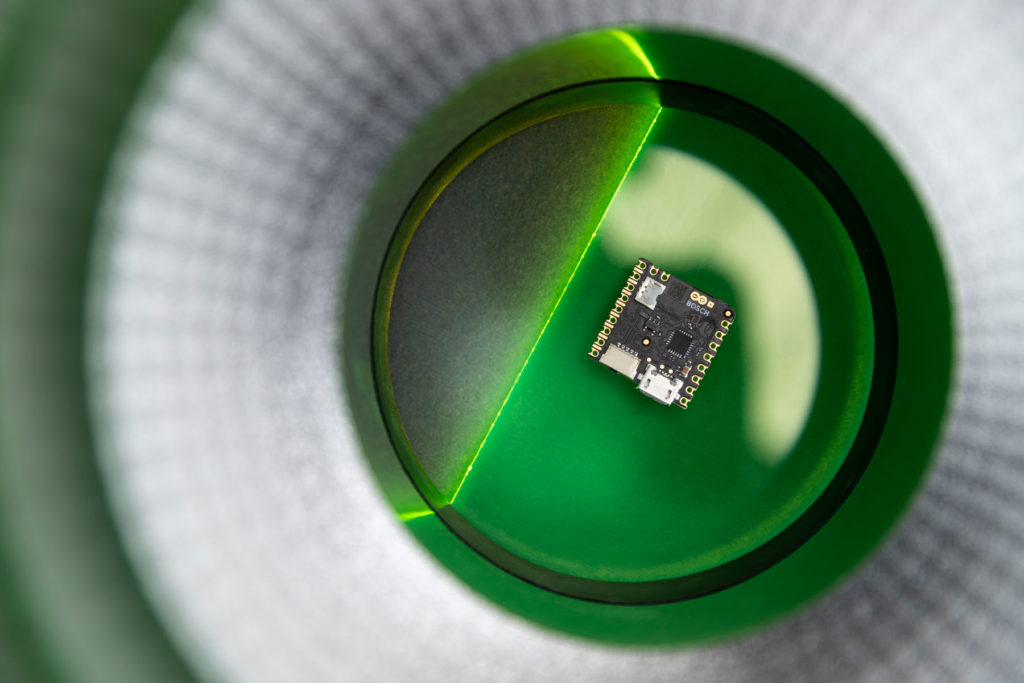
A tiny but mighty deployment device: Nicla Sense ME
For its project, Aizip selected the Nicla Sense ME: a compact module integrating multiple cutting-edge sensors from Bosch Sensortec, enabling sensor fusion applications directly at the edge. Additionally, the module houses an Arm® Cortex®-M4 microcontroller (nRF52832) leveraging Bluetooth® 4.2. Aizip’s neural network model fits right in with the remaining resources of the microcontroller, thanks to its compact footprint. The result? A small and lightweight device that can be clipped onto one’s belt and worn all day without hassle, able to monitor health parameters and immediately alert assistance in case of fall, with near-zero latency and full respect for privacy.
A more accurate fall detection algorithm
Aizip’s fall detection solution integrates a neural network algorithm with sensor fusion to greatly enhance detection accuracy, while also being lightweight enough it can run in real time on a microcontroller. The neural network within the microcontroller continuously processes sensor readings from the accelerometer (BHI260AP) and the pressure sensor (BMP390). Upon detecting a fall, the device sends an alarm via Bluetooth and activates an on-board LED. In order to minimize frequent false alarms that could significantly affect user experience, the neural network is optimized to differentiate real falls from abrupt movements such as jumping, sprinting, and quickly sitting down. The neural network-based algorithm excels at capturing subtle features in inputs, leading to a substantial reduction in false alarm rates compared to threshold-based approaches or traditional machine learning algorithms.
Typical neural networks offer superior performances but also pose additional challenges, when deploying them onto resource-constrained microcontroller devices, due to the extensive computing and memory resources required. The simultaneous need for Bluetooth connectivity and sensor fusion further compounds this issue. However, Aizip’s proprietary efficient neural network architecture makes this solution stand out because it minimizes resource requirements while maintaining high accuracy. The neural network is quantized to 8-bit and deployed onto the microcontroller using Aizip’s automated design tool. The implemented model achieves a 94% fall detection accuracy and a <0.1% false positive rate, all while utilizing less than 3KB of RAM. A perfect fit for the low-consumption Nicla Sense ME!
Solving it with Arduino Pro
Now let’s explore how we could put all of this together and what we would need for deployment both in terms of hardware and software stack. The Arduino Pro ecosystem is the latest generation of Arduino solutions bringing users the simplicity of integration and scalable, secure, professionally supported services.
When personal safety is a concern, smart wearables that leverage AI can help. And processing the data required to monitor health conditions and prevent falls doesn’t have to come at the expense of comfort or privacy. Thanks to extremely efficient models like Aizip’s and compact yet high-performance modules like Arduino Pro’s Nicla Sense ME, you can create a discreet and reliable solution able to immediately call for help when needed (and only when needed).
Um dir ein optimales Erlebnis zu bieten, verwenden wir Technologien wie Cookies, um Geräteinformationen zu speichern und/oder darauf zuzugreifen. Wenn du diesen Technologien zustimmst, können wir Daten wie das Surfverhalten oder eindeutige IDs auf dieser Website verarbeiten. Wenn du deine Einwillligung nicht erteilst oder zurückziehst, können bestimmte Merkmale und Funktionen beeinträchtigt werden.
Funktional
Immer aktiv
Die technische Speicherung oder der Zugang ist unbedingt erforderlich für den rechtmäßigen Zweck, die Nutzung eines bestimmten Dienstes zu ermöglichen, der vom Teilnehmer oder Nutzer ausdrücklich gewünscht wird, oder für den alleinigen Zweck, die Übertragung einer Nachricht über ein elektronisches Kommunikationsnetz durchzuführen.
Vorlieben
Die technische Speicherung oder der Zugriff ist für den rechtmäßigen Zweck der Speicherung von Präferenzen erforderlich, die nicht vom Abonnenten oder Benutzer angefordert wurden.
Statistiken
Die technische Speicherung oder der Zugriff, der ausschließlich zu statistischen Zwecken erfolgt.Die technische Speicherung oder der Zugriff, der ausschließlich zu anonymen statistischen Zwecken verwendet wird. Ohne eine Vorladung, die freiwillige Zustimmung deines Internetdienstanbieters oder zusätzliche Aufzeichnungen von Dritten können die zu diesem Zweck gespeicherten oder abgerufenen Informationen allein in der Regel nicht dazu verwendet werden, dich zu identifizieren.
Marketing
Die technische Speicherung oder der Zugriff ist erforderlich, um Nutzerprofile zu erstellen, um Werbung zu versenden oder um den Nutzer auf einer Website oder über mehrere Websites hinweg zu ähnlichen Marketingzwecken zu verfolgen.