Schlagwort: Python

  • Recreate Flappy Bird’s flight mechanic | Wireframe #29

    Recreate Flappy Bird’s flight mechanic | Wireframe #29

    Reading Time: 3 minutes

    From last year’s issue 29 of Wireframe magazine: learn how to create your own version of the simple yet addictive side-scroller Flappy Bird. Raspberry Pi’s Rik Cross shows you how.

    Flappy Bird: ridiculously big in 2014, at least for a while.

    Flappy Bird was released by programmer Dong Nguyen in 2013, and made use of a straightforward game mechanic to create an addictive hit. Tapping the screen provided ‘lift’ to the main character, which is used strategically to navigate through a series of moving pipes. A point is scored for each pipe successfully passed. The idea proved so addictive that Nguyen eventually regretted his creation and removed it from the Google and Apple app stores. In this article, I’ll show you how to recreate this simple yet time-consuming game, using Python and Pygame Zero.

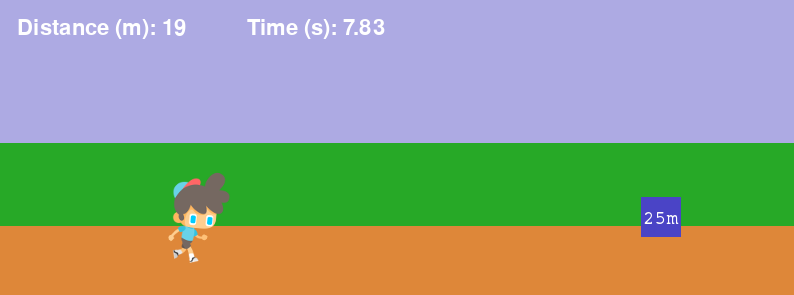
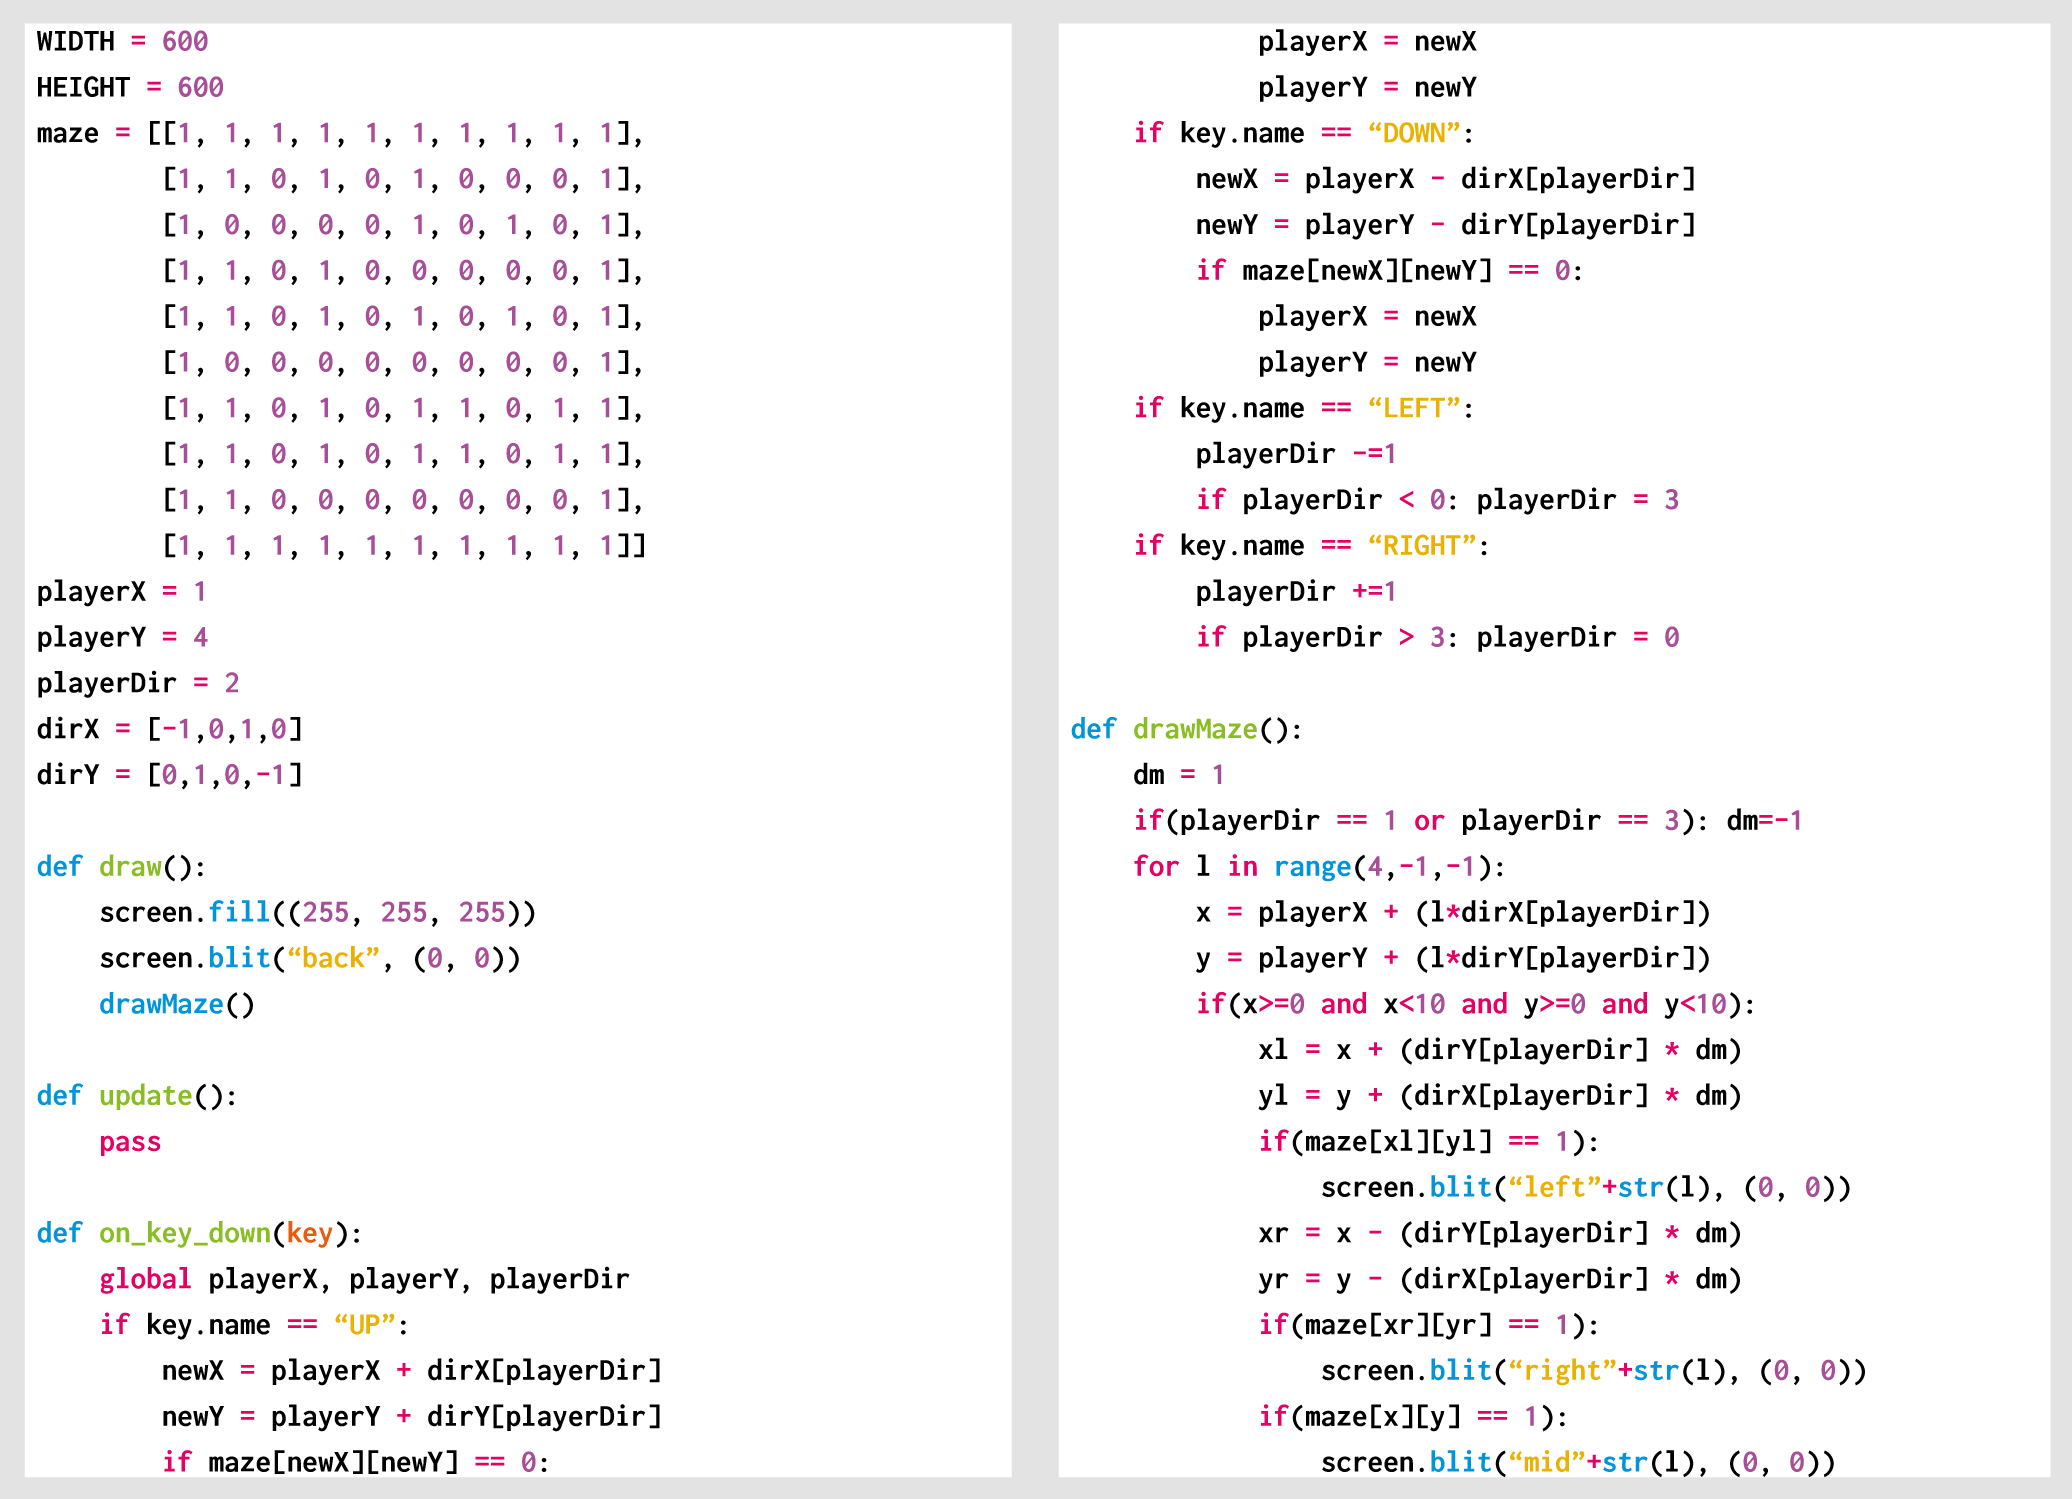
    The player’s motion is very similar to that employed in a standard platformer: falling down towards the bottom of the screen under gravity. See the article, Super Mario-style jumping physics in Wireframe #7 for more on creating this type of movement. Pressing a button (in our case, the SPACE bar) gives the player some upward thrust by setting its velocity to a negative value (i.e. upwards) larger than the value of gravity acting downwards. I’ve adapted and used two different images for the sprite (made by Imaginary Perception and available on opengameart.org), so that it looks like it’s flapping its wings to generate lift and move upwards.

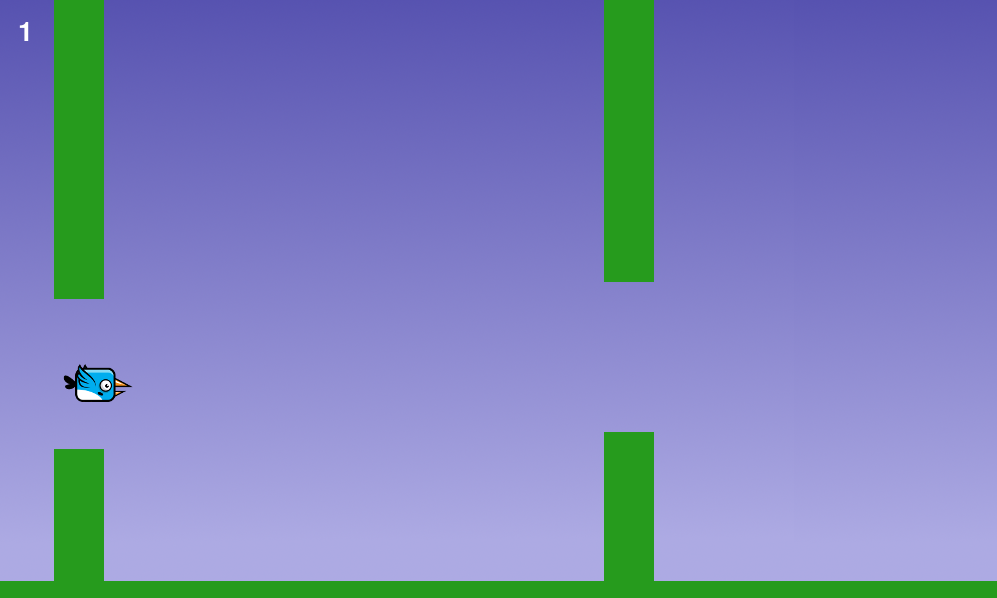
    Pressing the SPACE bar gives the bird ‘lift’ against gravity, allowing it to navigate through moving pipes.

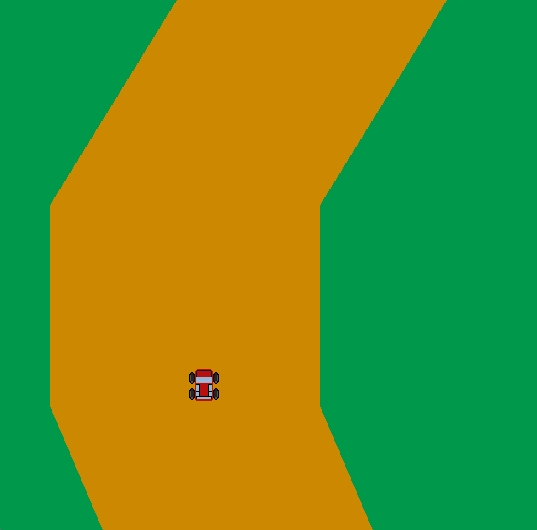
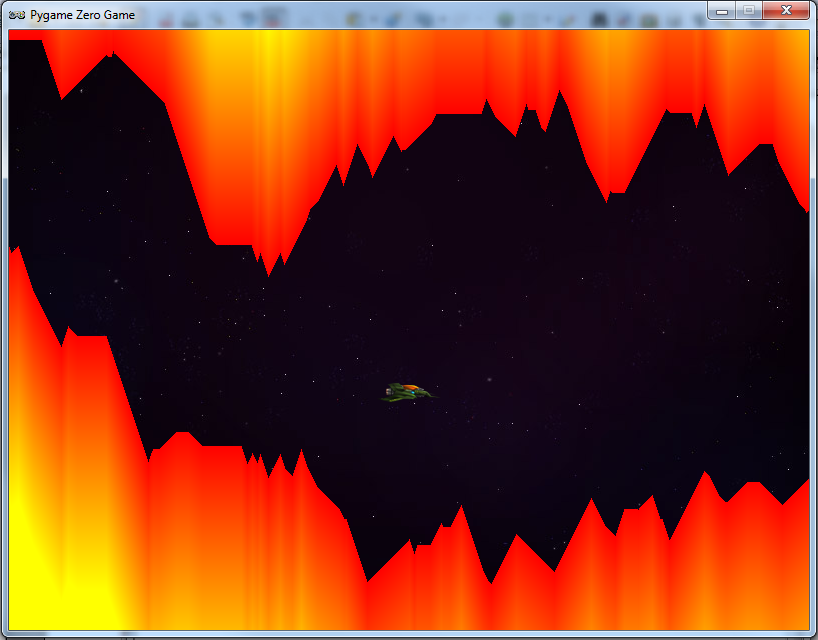
    Sets of pipes are set equally spaced apart horizontally, and move towards the player slowly each frame of the game. These pipes are stored as two lists of rectangles, top_pipes and bottom_pipes, so that the player can attempt to fly through gaps between the top and bottom pipes. Once a pipe in the top_pipes list reaches the left side of the screen past the player’s position, a score is incremented and the top and corresponding bottom pipes are removed from their respective lists. A new set of pipes is created at the right edge of the screen, creating a continuous challenge for the player. The y-position of the gap between each newly created pair of pipes is decided randomly (between minimum and maximum limits), which is used to calculate the position and height of the new pipes.

    The game stops and a ‘Game over’ message appears if the player collides with either a pipe or the ground. The collision detection in the game uses the player.colliderect() method, which checks whether two rectangles overlap. As the player sprite isn’t exactly rectangular, it means that the collision detection isn’t pixel-perfect, and improvements could be made by using a different approach. Changing the values for GRAVITY, PIPE_GAP, PIPE_SPEED, and player.flap_velocity through a process of trial and error will result in a game that has just the right amount of frustration! You could even change these values as the player’s score increases, to add another layer of challenge.

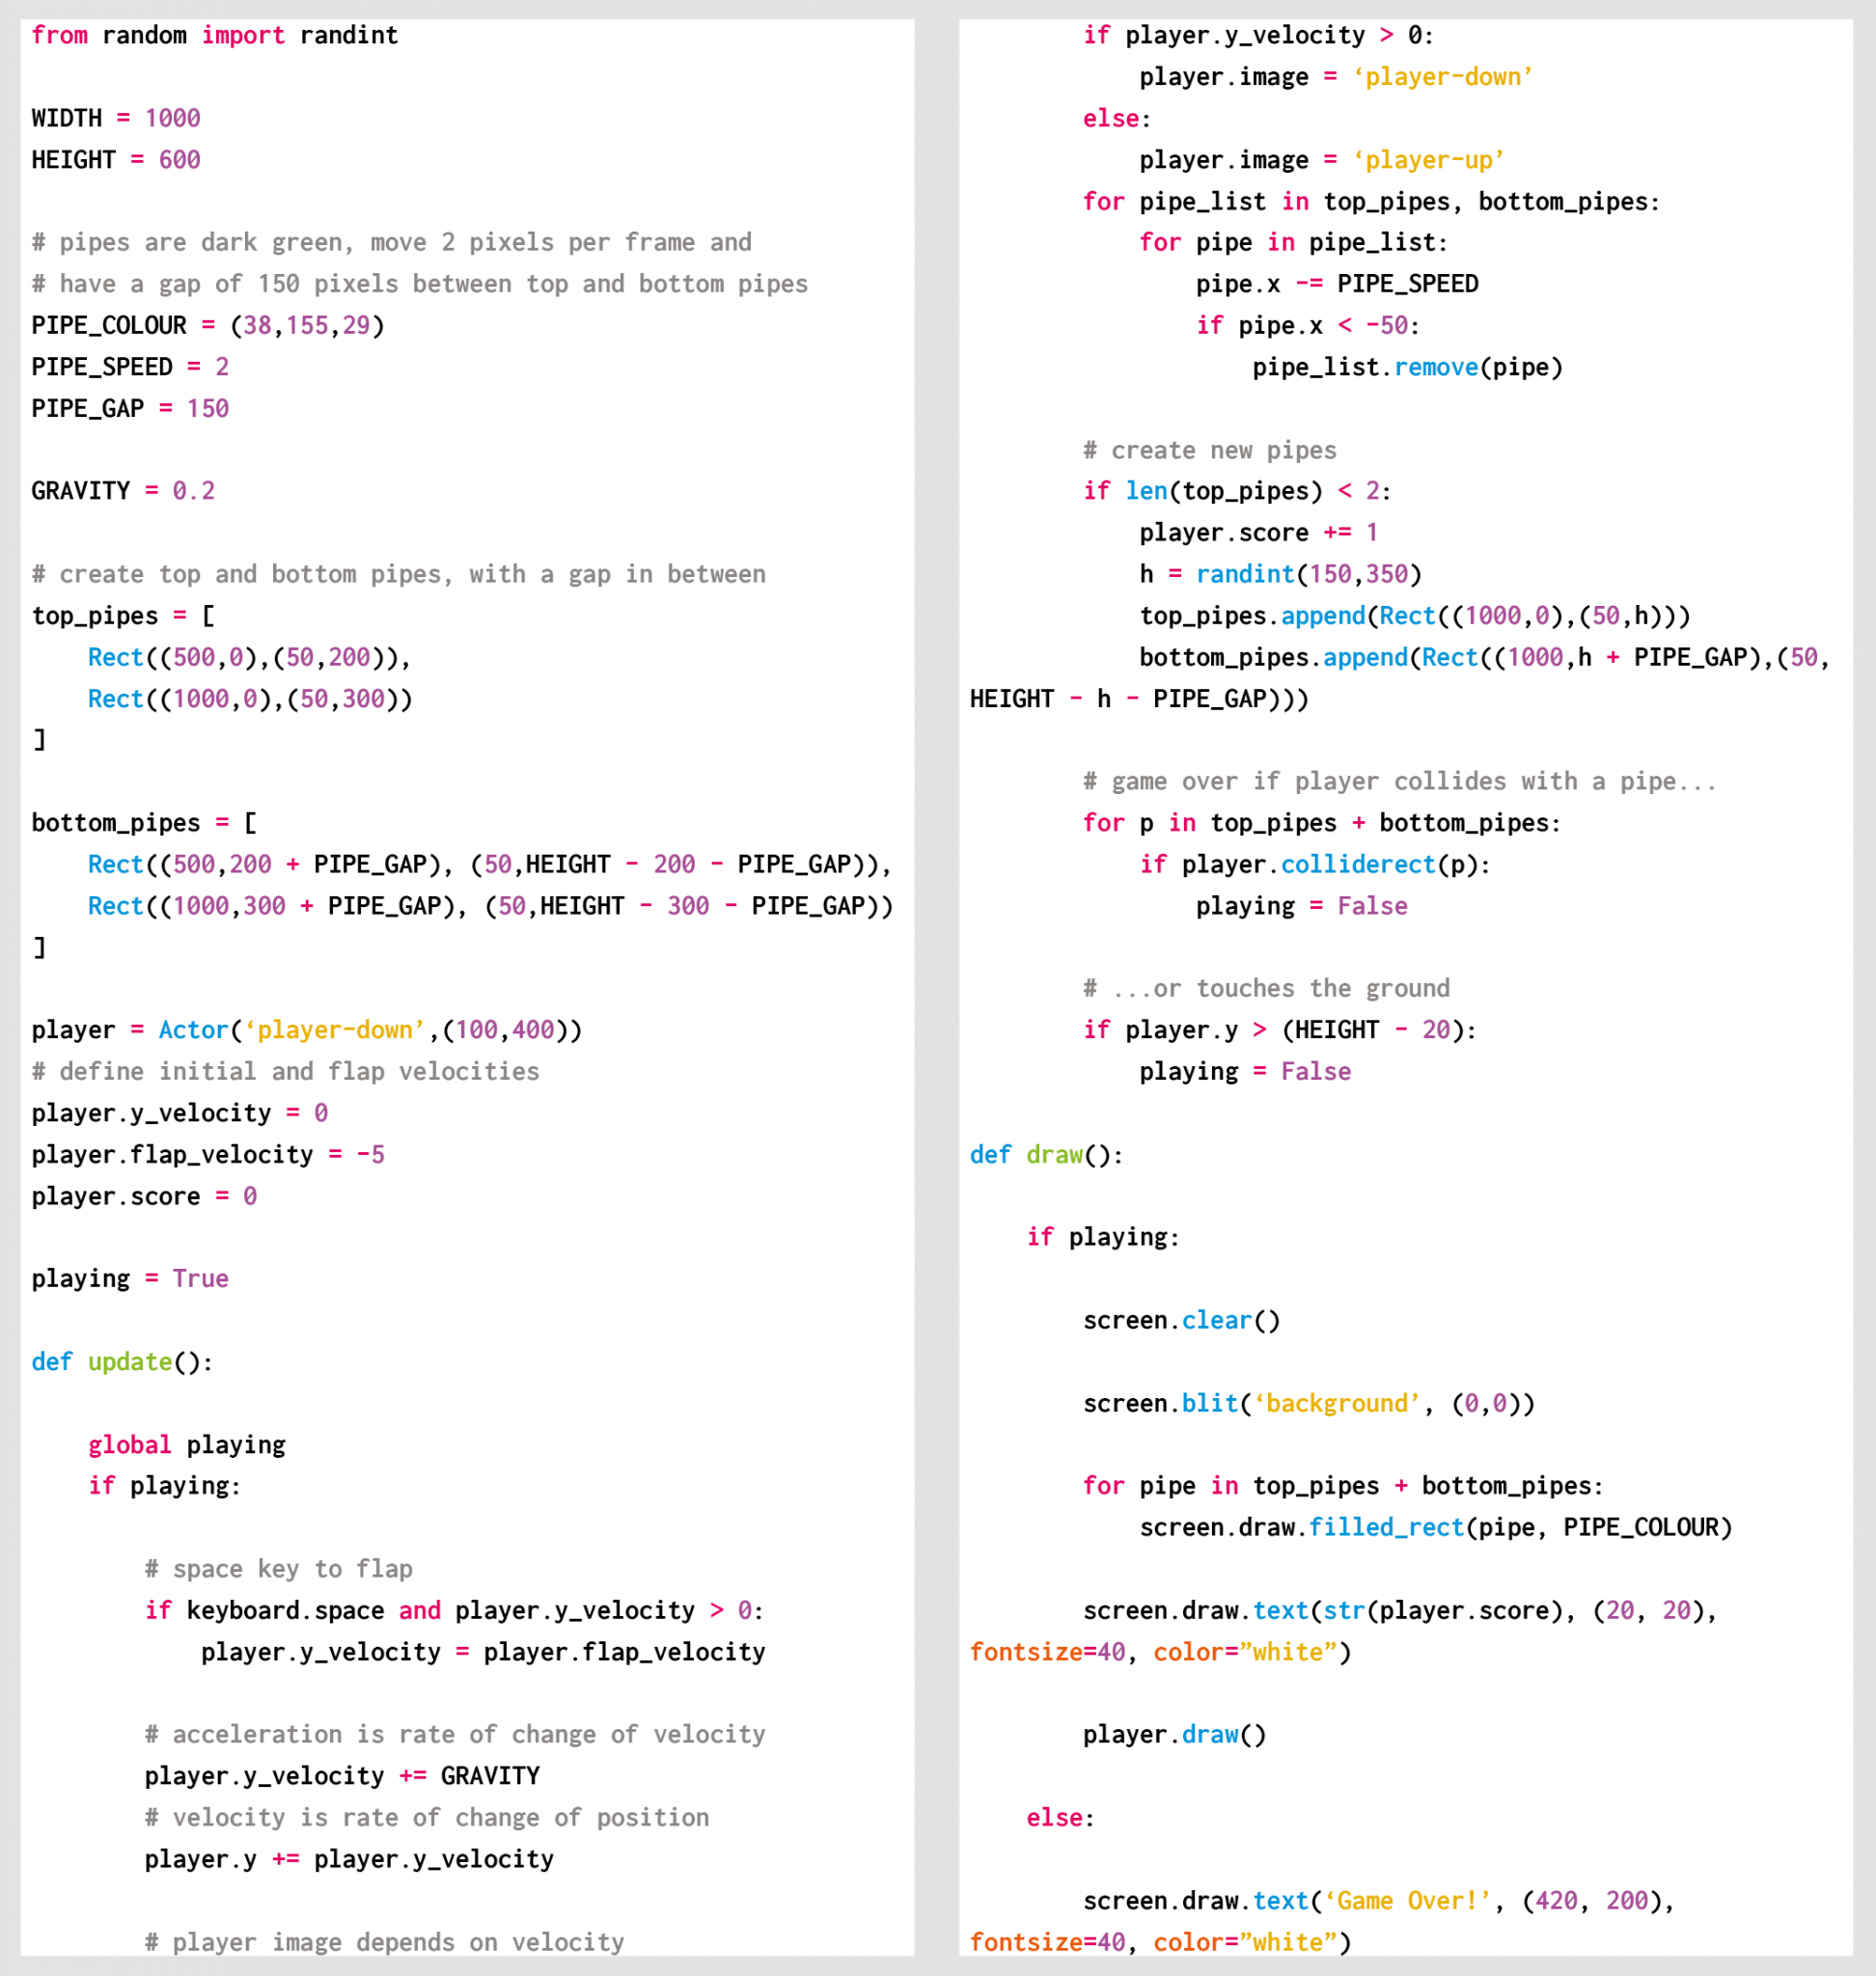
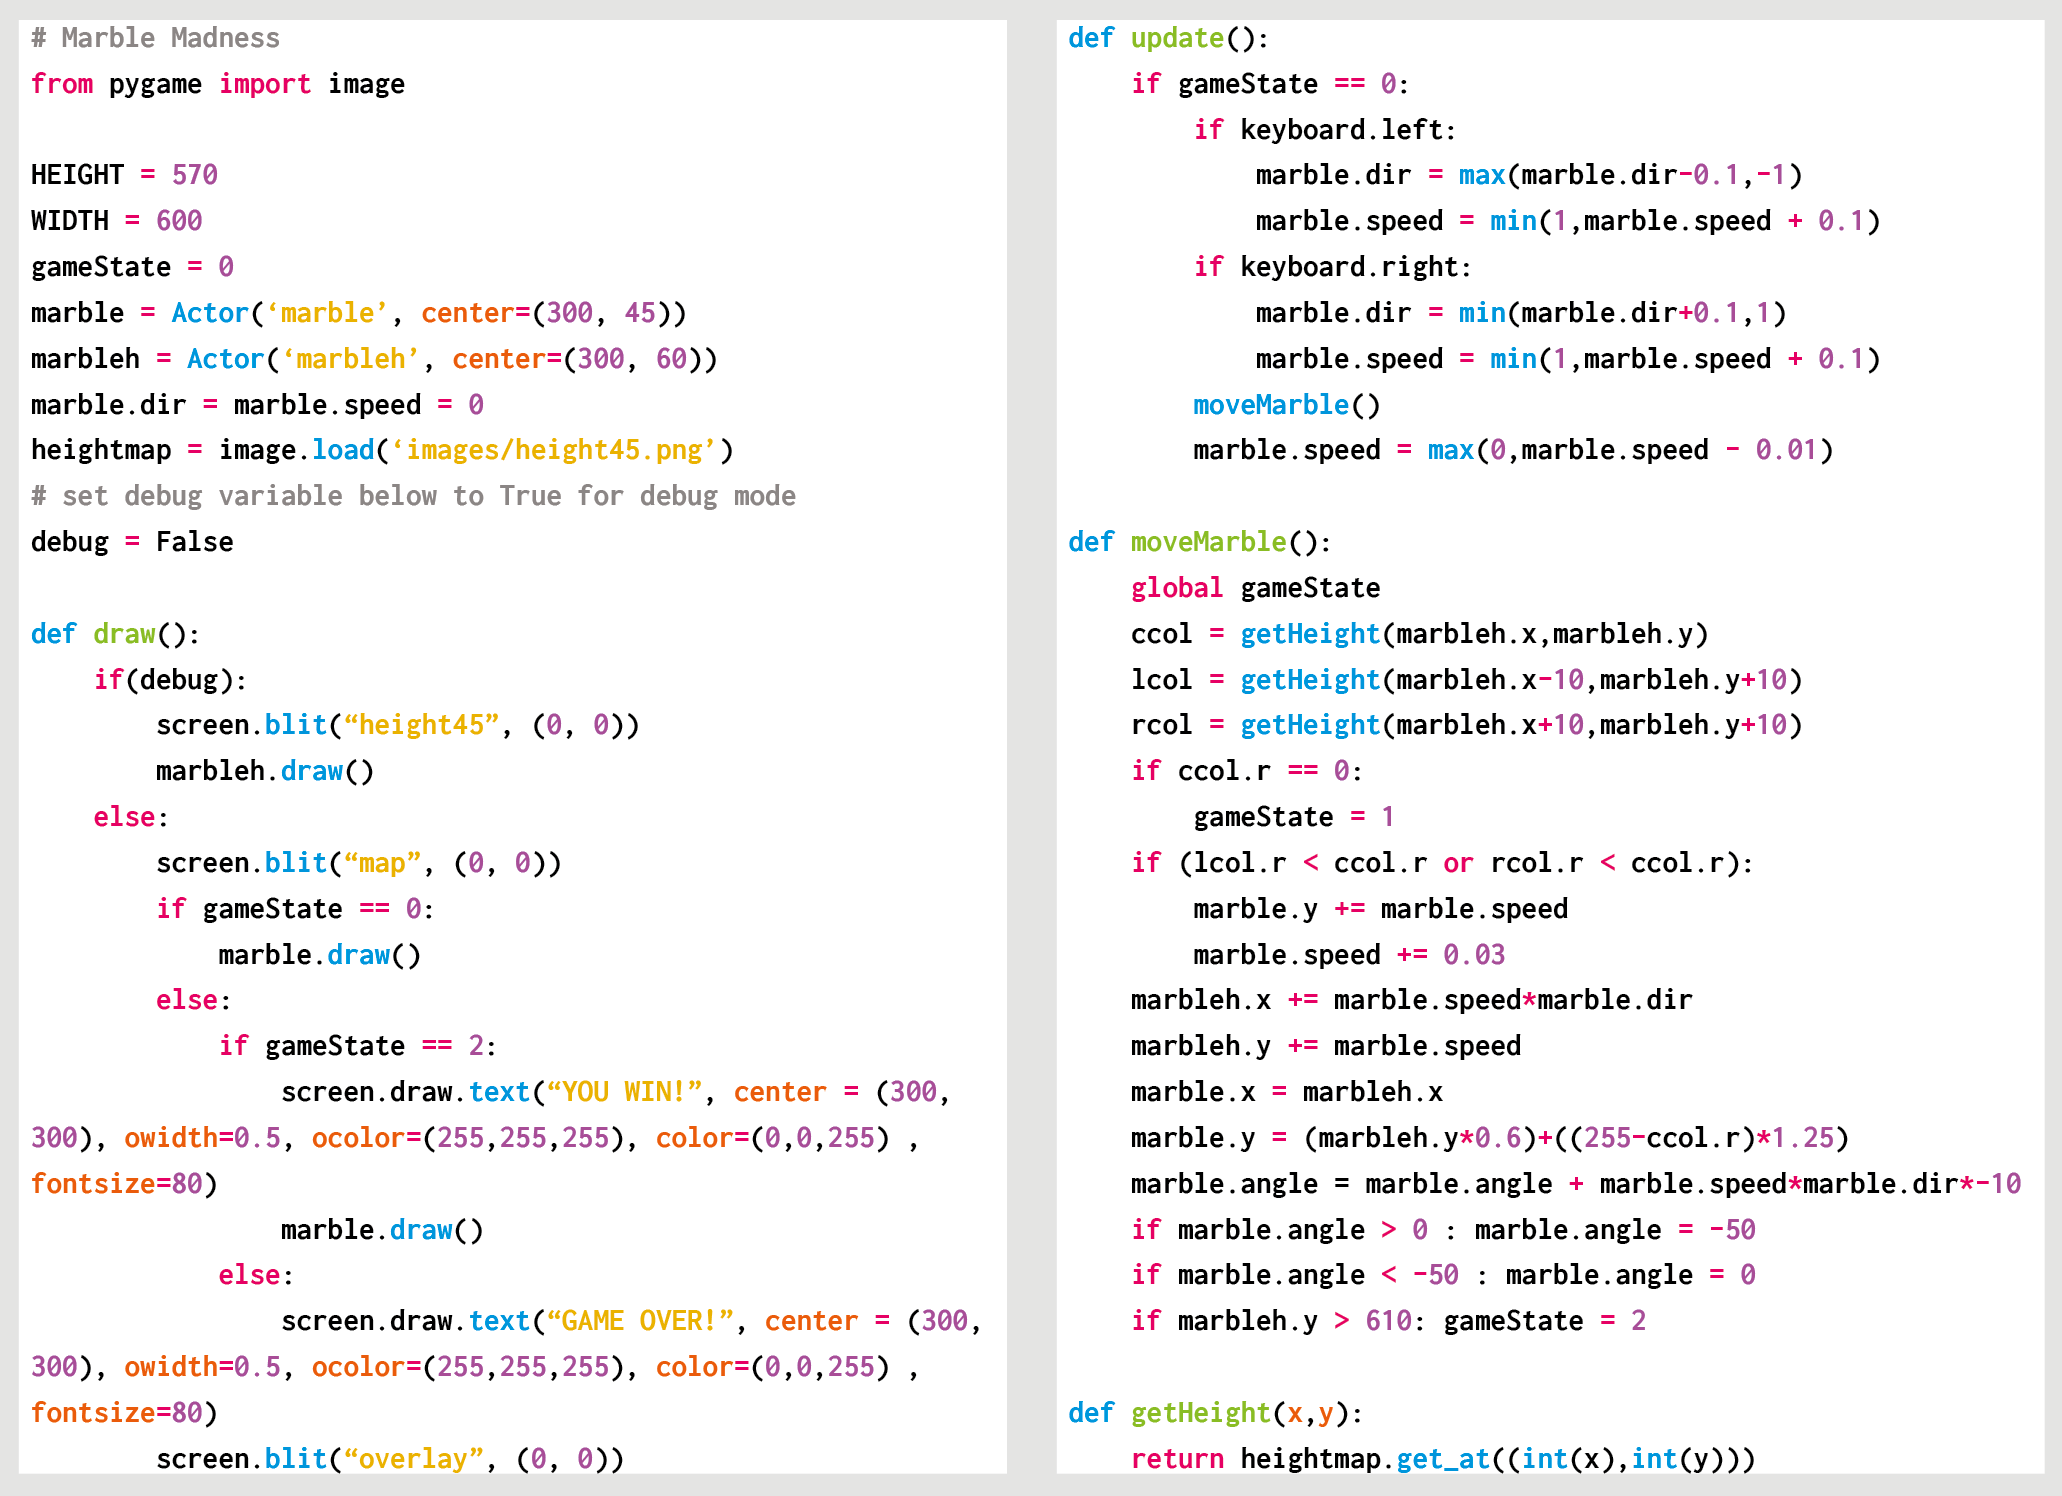
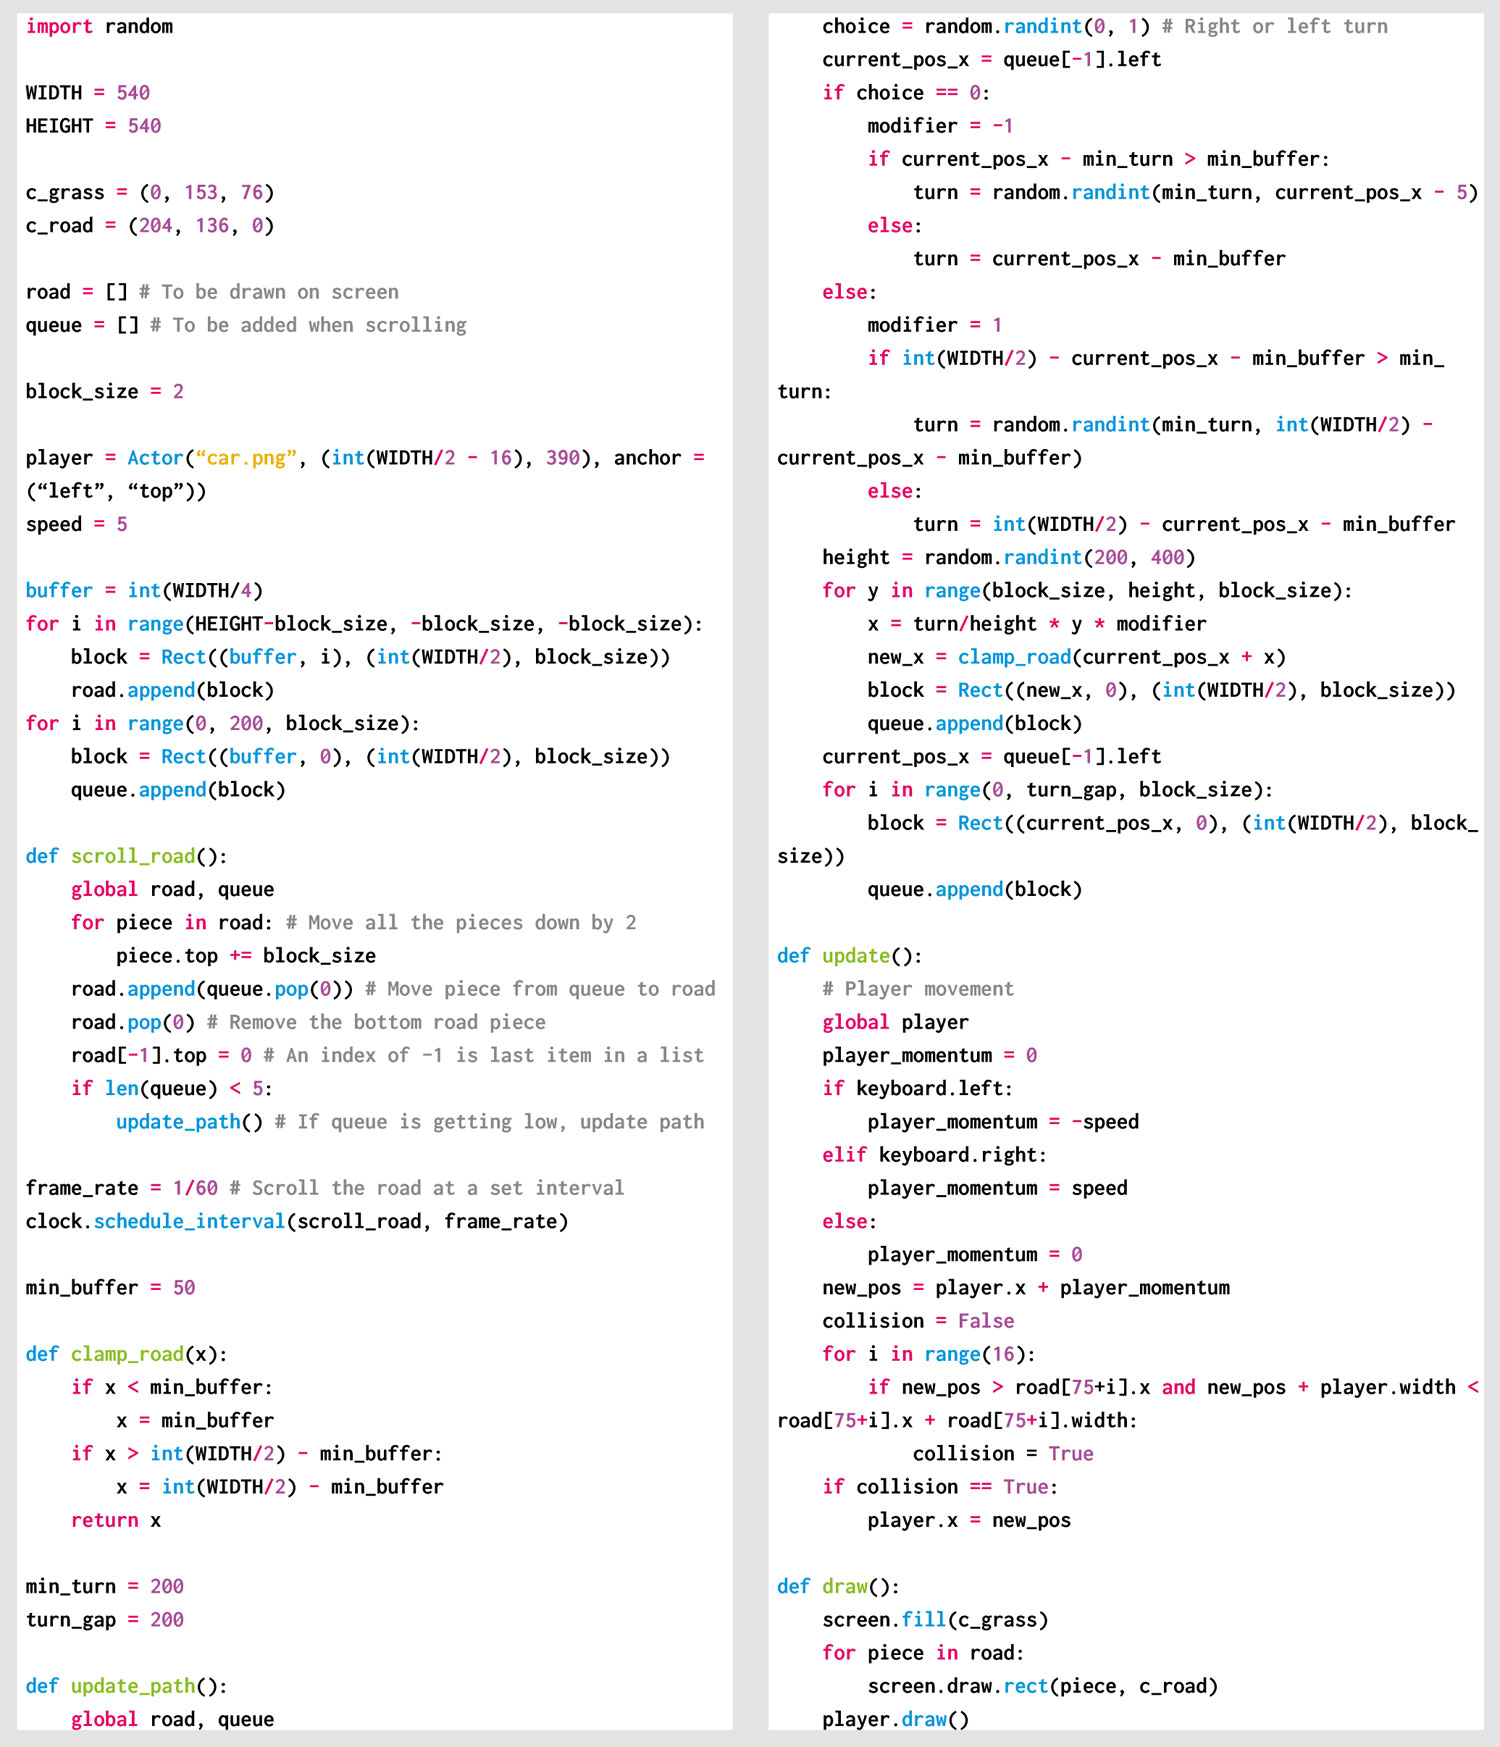
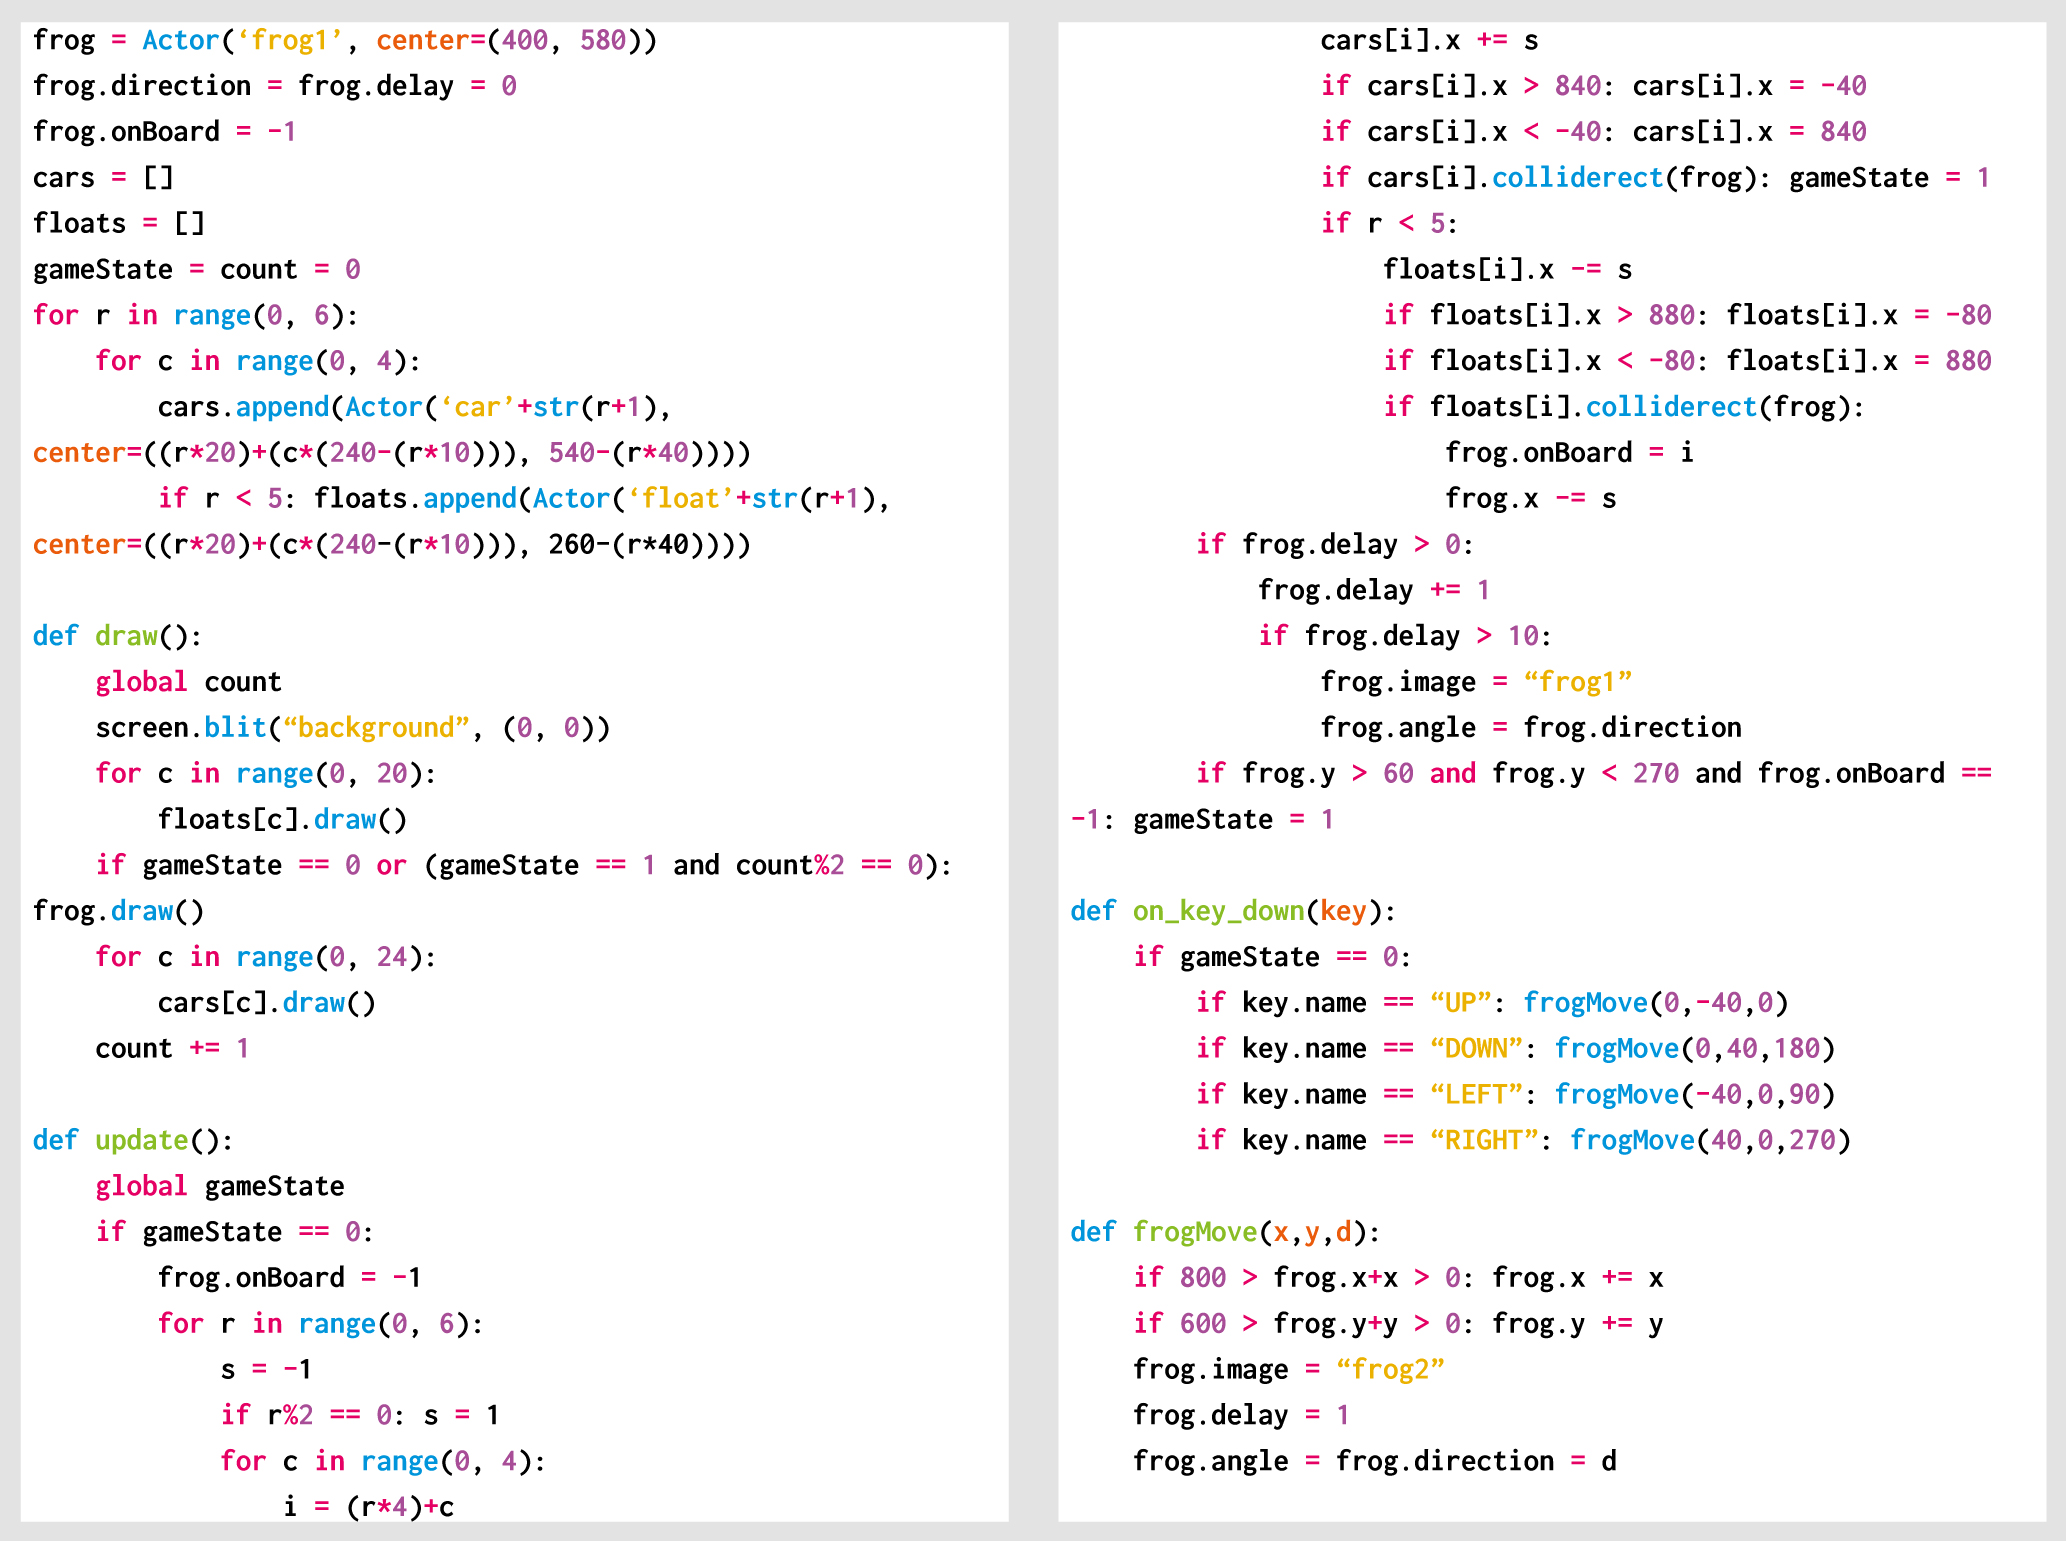
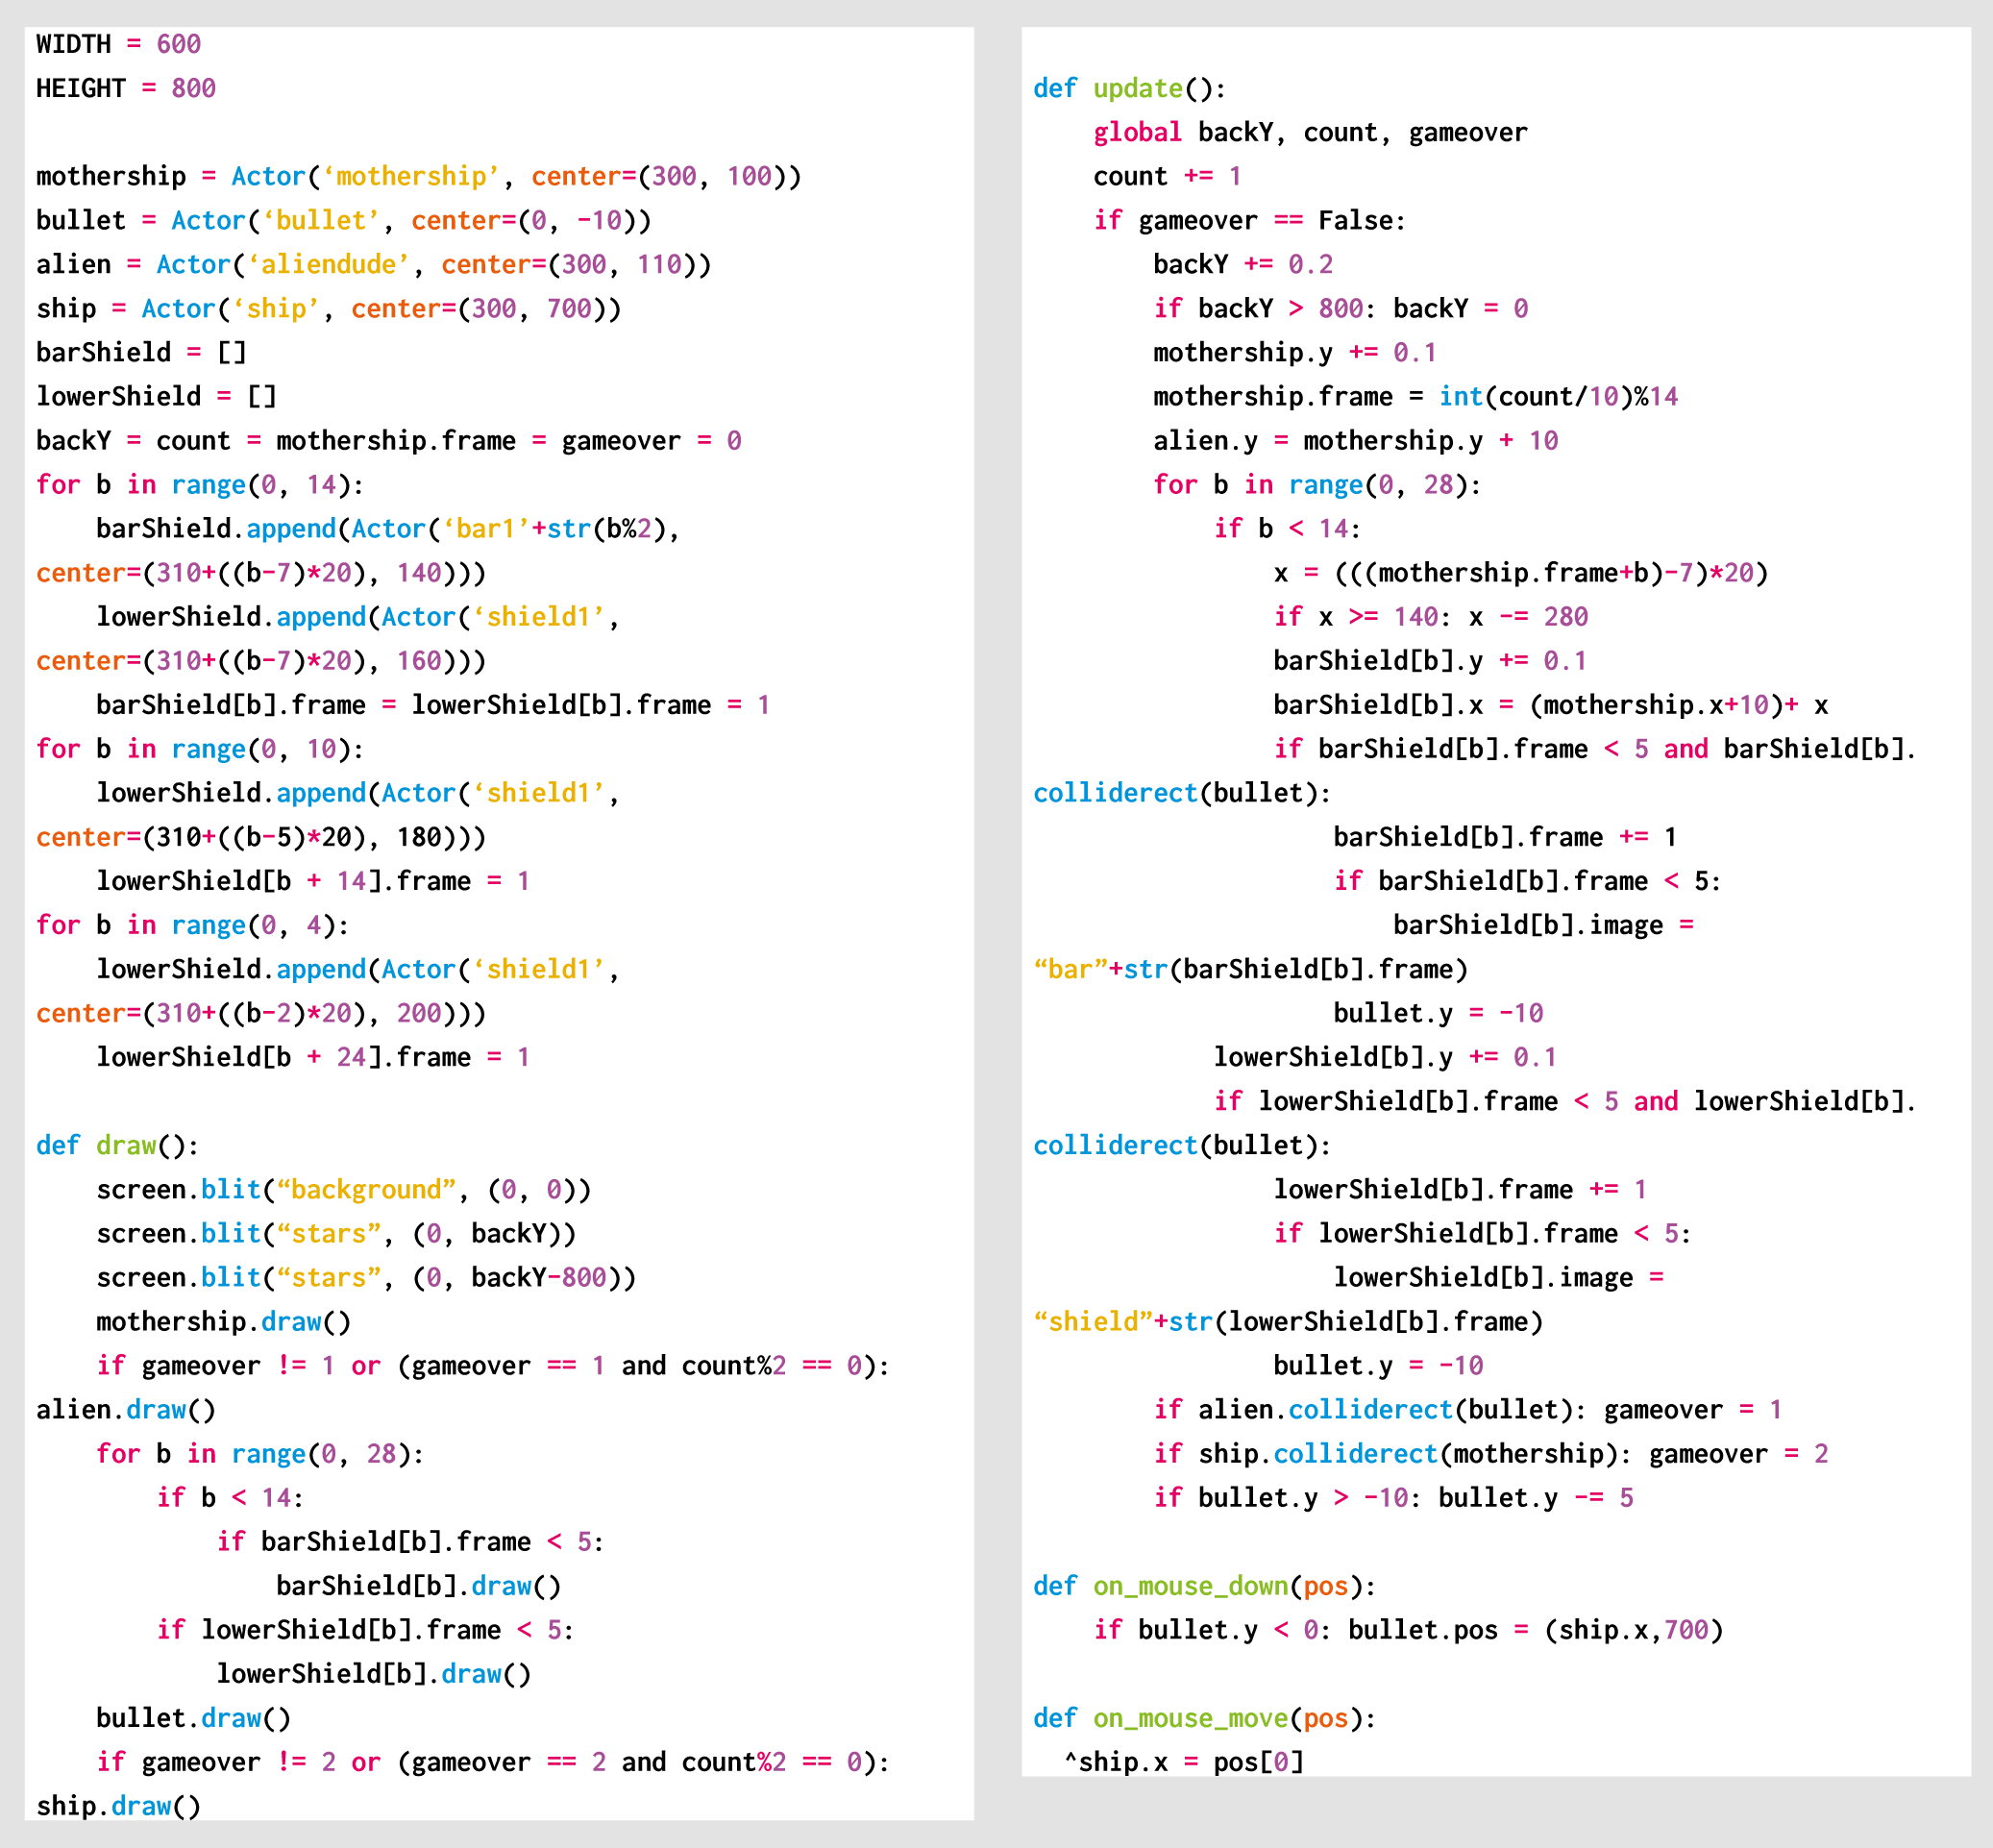
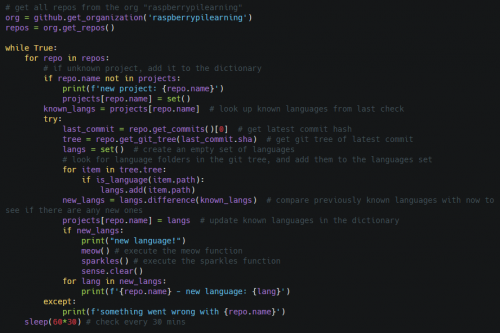
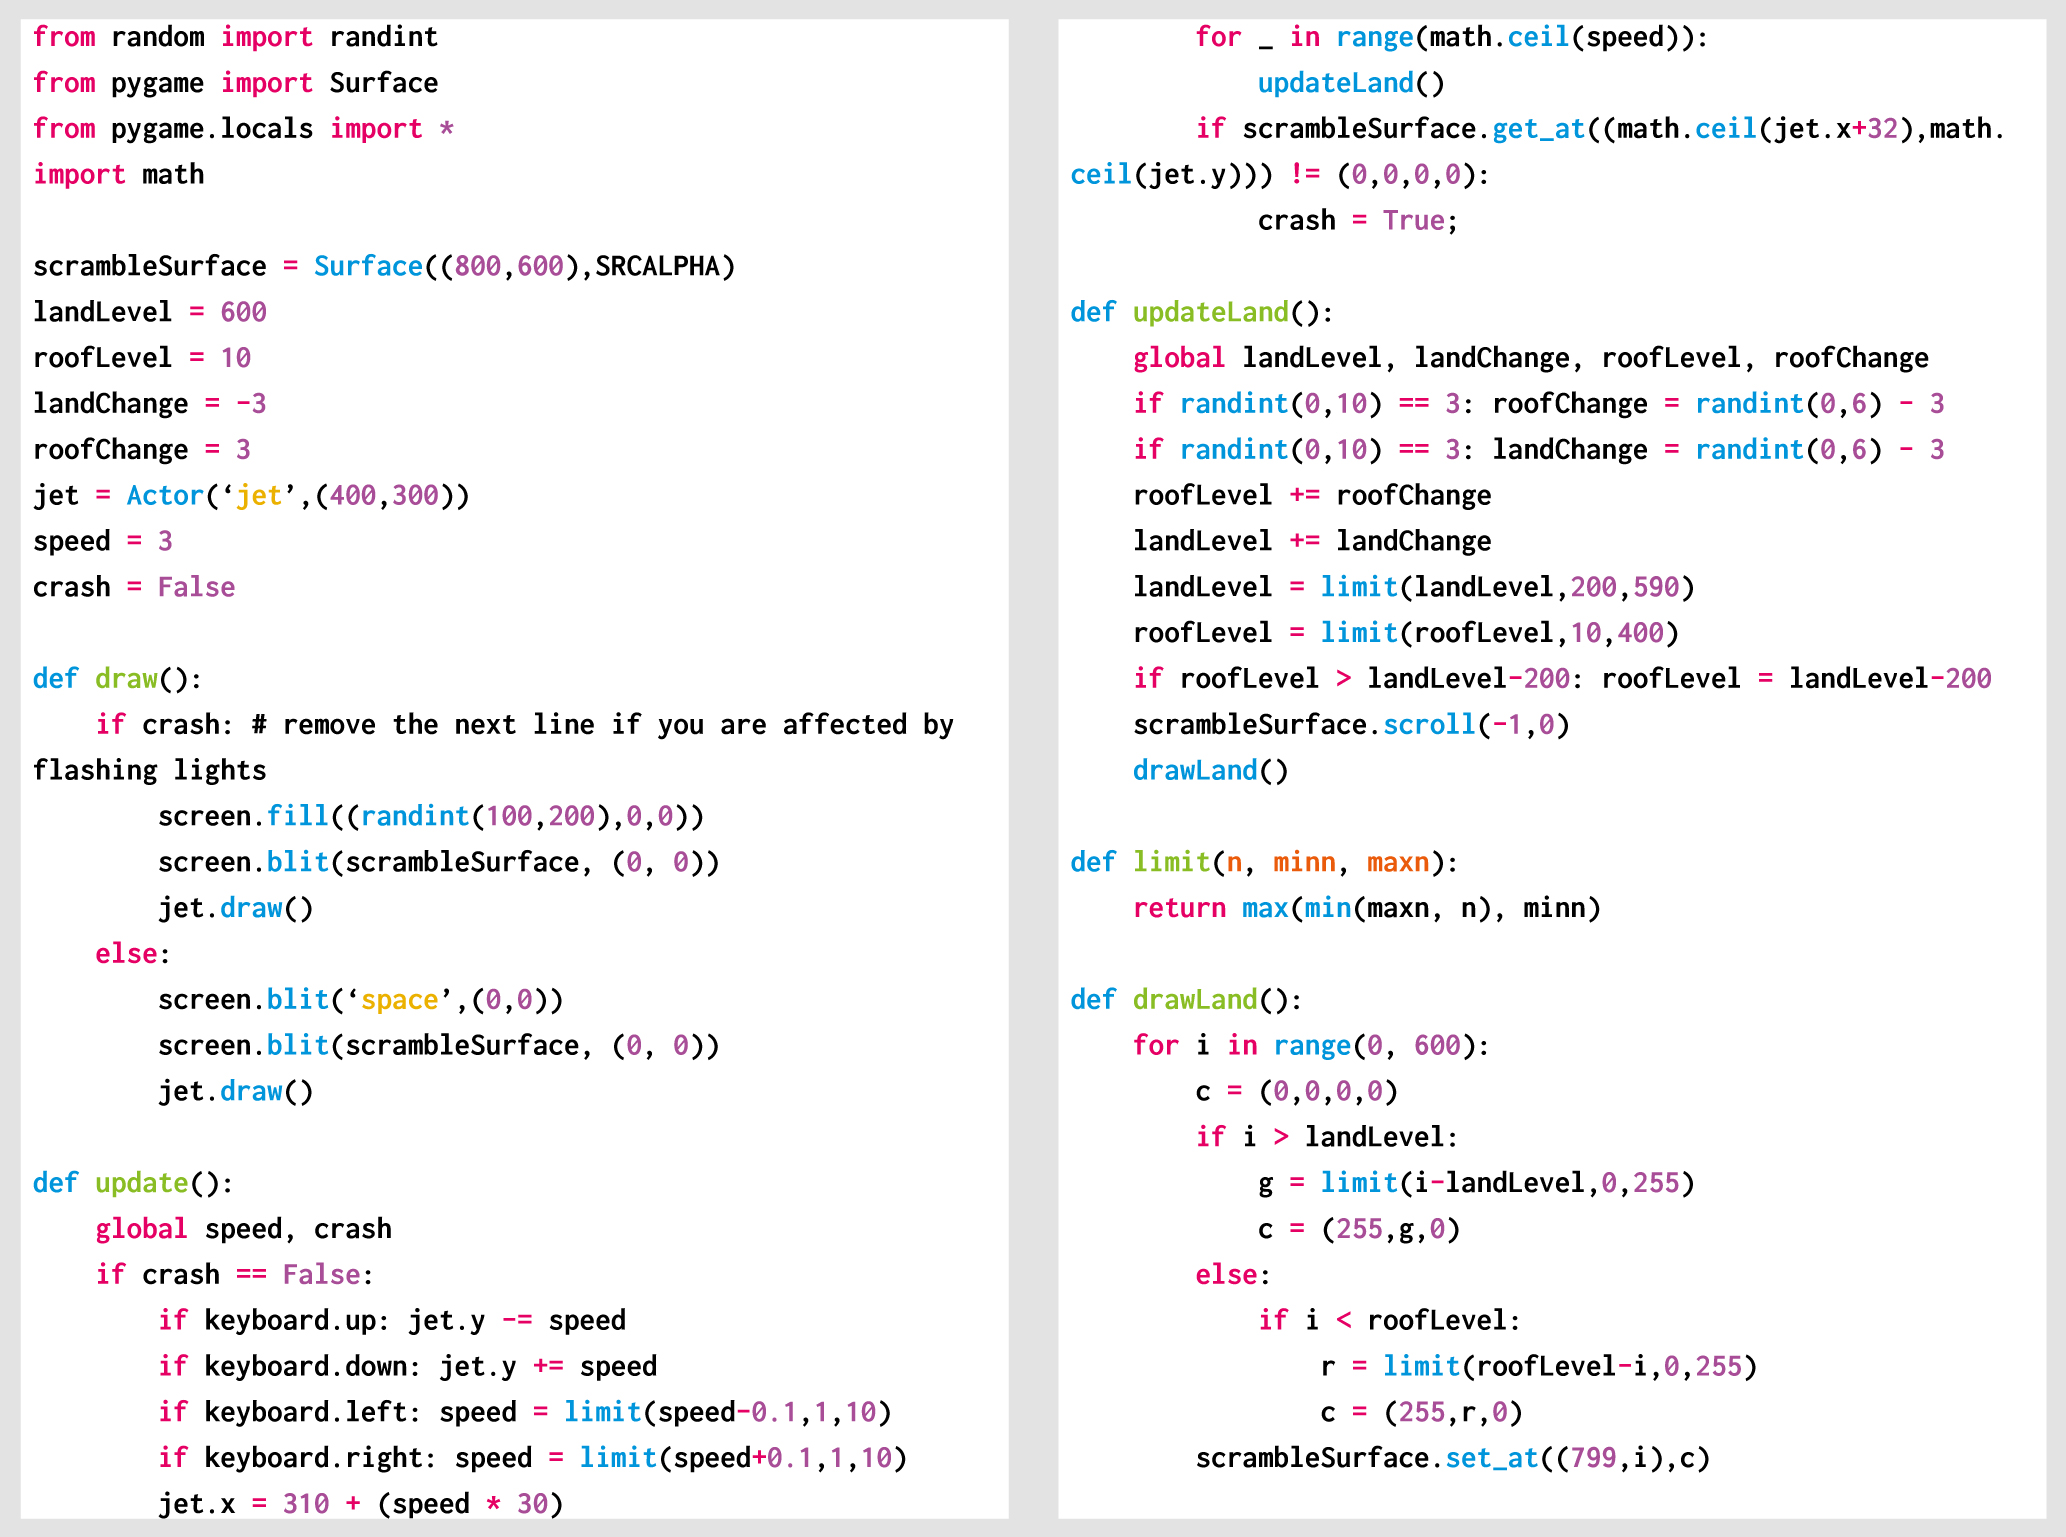
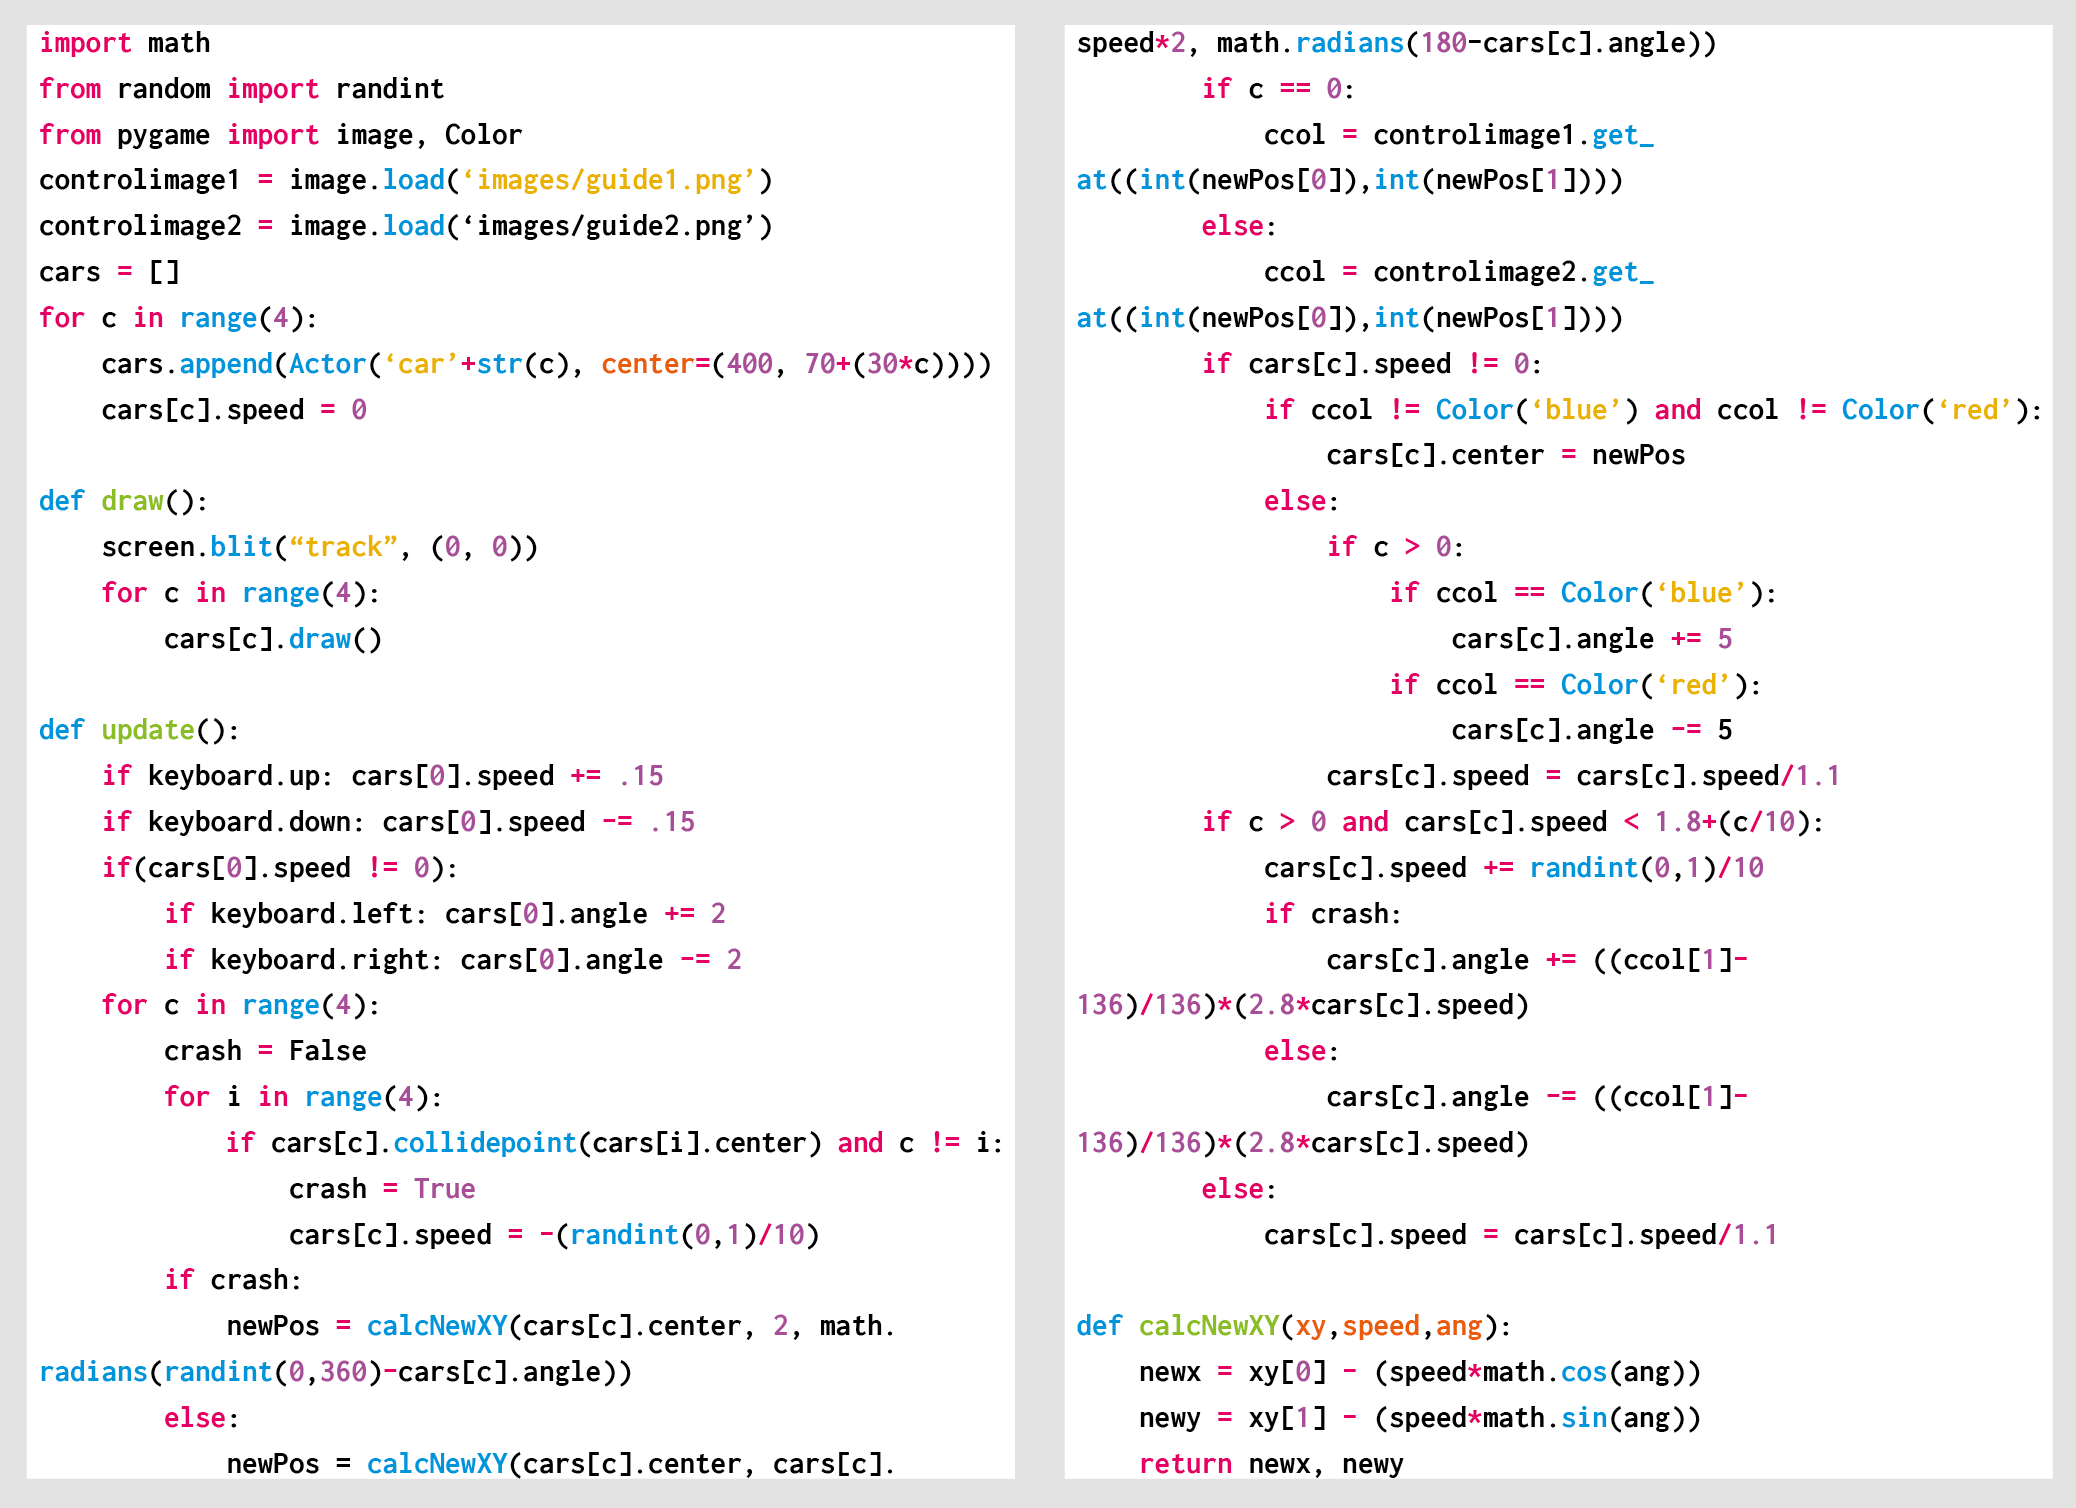
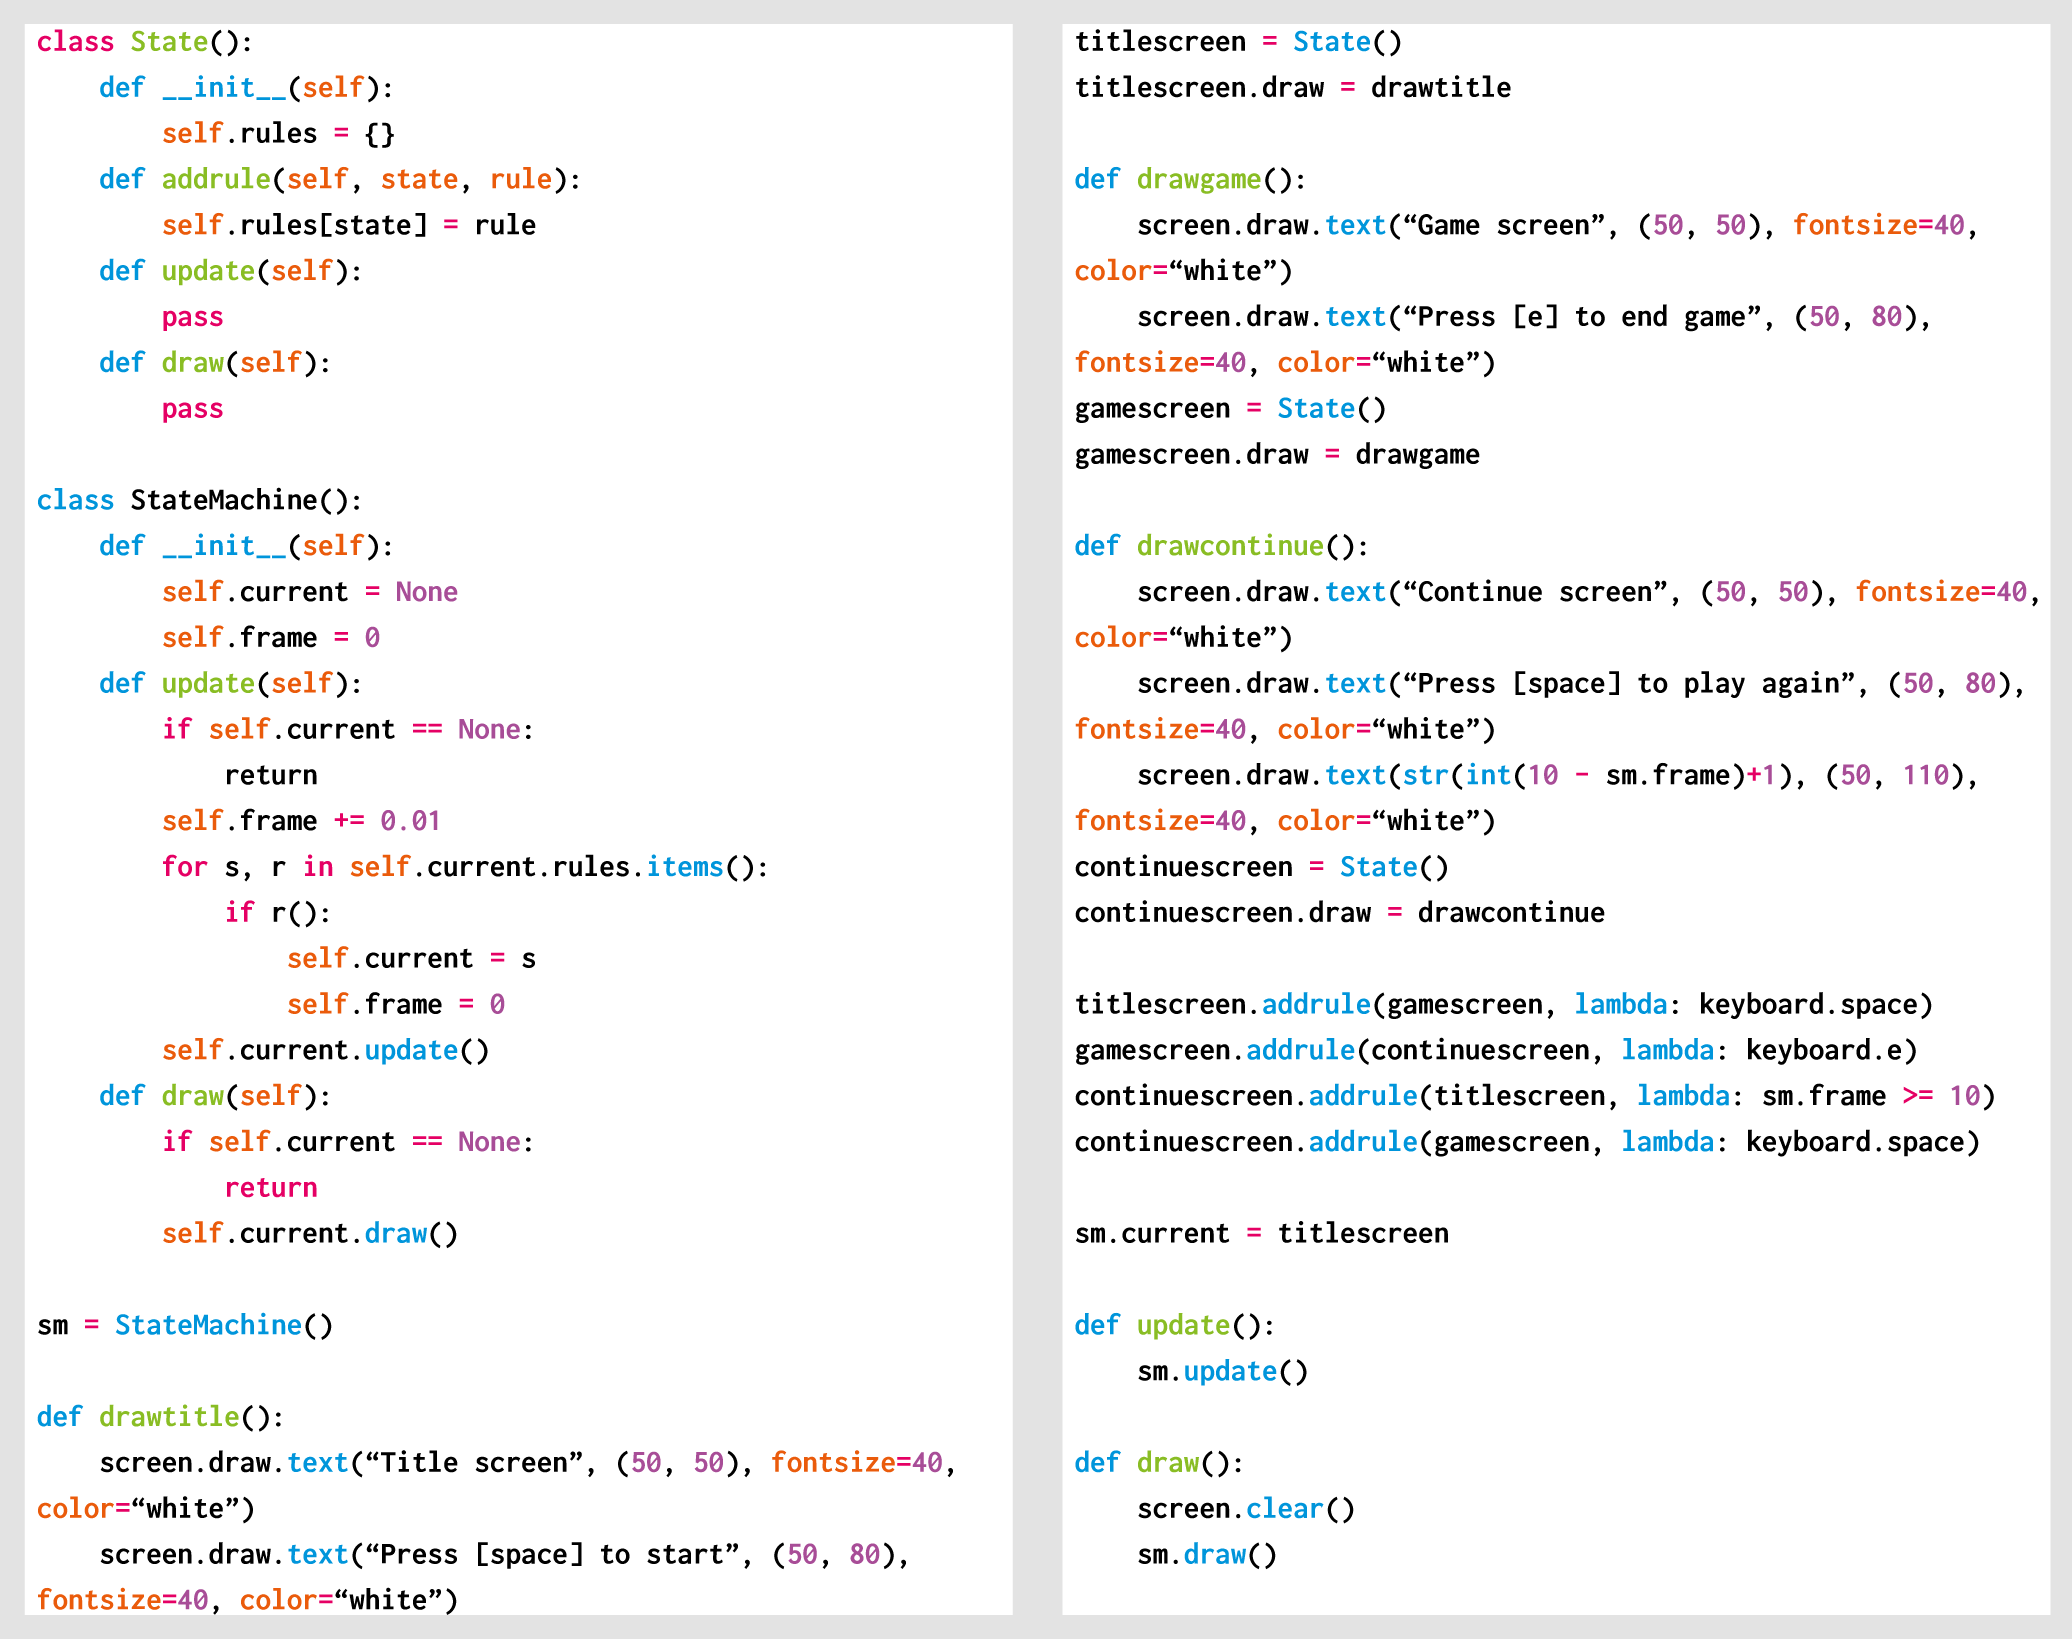
    Here’s Rik’s code, which gets an homage to Flappy Bird running in Python. To get it working on your system, you’ll first need to install Pygame Zero. And to download the full code, go here.

    If you’d like to read older issues of Wireframe magazine, you can find the complete back catalogue as free PDF downloads.

    The latest issue of Wireframe is available in print to buy online from the Raspberry Pi Press store, with older physical issues heavily discounted too. You can also find Wireframe at local newsagents, but we should all be staying home as much as possible right now, so why not get your copy online and save yourself the trip?

    Make sure to follow Wireframe on Twitter and Facebook for updates and exclusive offers and giveaways. And subscribe on the Wireframe website to save up to 49% compared to newsstand pricing!

    Website: LINK

  • Code a homage to Marble Madness | Wireframe #34

    Code a homage to Marble Madness | Wireframe #34

    Reading Time: 4 minutes

    Code the map and movement basics of the innovative marble-rolling arcade game. Mark Vanstone shows you how.

    The original Marble Madness

    Each of Marble Madness’ six levels got progressively harder to navigate and had to be completed within a time limit.

    Marble Madness

    Hitting arcades in 1984, Atari’s Marble Madness presented a rather different control mechanism than other games of the time. The original arcade cabinet provided players with a trackball controller rather than a conventional joystick, and the aim was to guide a marble through a three-dimensional course in the fastest possible time. This meant that a player could change the angle and speed of the marble as it rolled and avoid various obstacles and baddies.

    During development, designer Mark Cerny had to shelve numerous ideas for Marble Madness, since the hardware just wasn’t able to achieve the level of detail and interaction he wanted. The groundbreaking 3D display was one idea that made it through to the finished game: its pre-rendered, ray-traced isometric levels.

    Marble Madness was the first game to use Atari’s System 1 upgradeable hardware platform, and also boasted the first use of an FM sound chip produced by Yamaha to create its distinctive stereo music. The game was popular in arcades to start with, but interest appeared to drop off after a few months – something Cerny attributed to the fact that the game didn’t take long to play. Marble Madness’s popularity endured in the home market, though, with ports made for most computers and consoles of the time – although inevitably, most of these didn’t support the original’s trackball controls.

    Our Python version of Marble Madness

    In our sample level, you can control the movement of the marble using the left and right arrow keys.

    Making our game

    For our version of Marble Madness, we’re going to use a combination of a rendered background and a heightmap in Pygame Zero, and write some simple physics code to simulate the marble rolling over the terrain’s flats and slopes. We can produce the background graphic using a 3D modelling program such as Blender. The camera needs to be set to Orthographic to get the forced perspective look we’re after. The angle of the camera is also important, in that we need an X rotation of 54.7 degrees and a Y rotation of 45 degrees to get the lines of the terrain correct. The heightmap can be derived from an overhead view of the terrain, but you’ll probably want to draw the heights of the blocks in a drawing package such as GIMP to give you precise colour values on the map.

    The ball rolling physics are calculated from the grey-shaded heightmap graphic. We’ve left a debug mode in the code; by changing the debug variable to True, you can see how the marble moves over the terrain from the overhead viewpoint of the heightmap. The player can move the marble left and right with the arrow keys – on a level surface it will gradually slow down if no keys are pressed. If the marble is on a gradient on the heightmap, it will increase speed in the direction of the gradient. If the marble hits a section of black on the heightmap, it falls out of play, and we stop the game.

    That takes care of the movement of the marble in two dimensions, but now we have to translate this to the rendered background’s terrain. The way we do this is to translate the Y coordinate of the marble as if the landscape was all at the same level – we multiply it by 0.6 – and then move it down the screen according to the heightmap data, which in this case moves the marble down 1.25 pixels for each shade of colour. We can use an overlay for items the marble always rolls behind, such as the finish flag. And with that, we have the basics of a Marble Madness level.

    The code you'll need to make Marble Madness

    Here’s Mark’s code snippet, which creates a Marble Madness level in Python. To get it working on your system, you’ll need to install Pygame Zero. And to download the full code, go here.

    Module Madness

    We use the image module from Pygame to sample the colour of the pixel directly under the marble on the heightmap. We also take samples from the left diagonal and the right diagonal to see if there is a change of height. We are only checking for left and right movement, but this sample could be expanded to deal with the two other directions and moving up the gradients, too. Other obstacles and enemies can be added using the same heightmap translations used for the marble, and other overlay objects can be added to the overlay graphic.

    Get your copy of Wireframe issue 34

    You can read more features like this one in Wireframe issue 34, available now at Tesco, WHSmith, all good independent UK newsagents, and the Raspberry Pi Store, Cambridge.

    Or you can buy Wireframe directly from Raspberry Pi Press — delivery is available worldwide. And if you’d like a handy digital version of the magazine, you can also download issue 34 for free in PDF format.

    Wireframe #34

    Make sure to follow Wireframe on Twitter and Facebook for updates and exclusive offers and giveaways. Subscribe on the Wireframe website to save up to 49% compared to newsstand pricing!

    Website: LINK

  • Code a Zaxxon-style axonometric level | Wireframe #33

    Code a Zaxxon-style axonometric level | Wireframe #33

    Reading Time: 4 minutes

    Fly through the space fortress in this 3D retro forced scrolling arcade sample. Mark Vanstone has the details

    A shot from Sega's arcade hit, Zaxxon

    Zaxxon was the first arcade game to use an axonometric viewpoint, which made it look very different from its 2D rivals.

    Zaxxon

    When Zaxxon was first released by Sega in 1982, it was hailed as a breakthrough thanks to its pseudo-3D graphics. This axonometric projection ensured that Zaxxon looked unlike any other shooter around in arcades.

    Graphics aside, Zaxxon offered a subtly different twist on other shooting games of the time, like Defender and Scramble; the player flew over either open space or a huge fortress, where they had to avoid obstacles of varying heights. Players could tell how high they were flying with the aid of an altimeter, and also the shadow beneath their ship (shadows were another of Zaxxon’s innovations). The aim of the game was to get to the end of each level without running out of fuel or getting shot down; if the player did this, they’d encounter an area boss called Zaxxon. Points were awarded for destroying gun turrets and fuel silos, and extra lives could be gained as the player progressed through the levels.

    A shot of our Pygame version of Zaxxon

    Our Zaxxon homage running in Pygame Zero: fly the spaceship through the fortress walls and obstacles with your cursor keys.

    Making our level

    For this code sample, we can borrow some of the techniques used in a previous Source Code article about Ant Attack (see Wireframe issue 15) since it also used an isometric display. Although the way the map display is built up is very similar, we’ll use a JSON file to store the map data. If you’ve not come across JSON before, it’s well worth learning about, as a number of web and mobile apps use it, and it can be read by Python very easily. All we need to do is load the JSON file, and Python automatically puts the data into a Python dictionary object for us to use.

    In the sample, there’s a short run of map data 40 squares long with blocks for the floor, some low walls, higher walls, and a handful of fuel silos. To add more block types, just add data to the blocktypes area of the JSON file. The codes used in the map data are the index numbers of the blocktypes, so the first blocktypes is index 0, the next index 1, and so on. Our drawMap() function takes care of rendering the data into visual form and blits blocks from the top right to the bottom left of the screen. When the draw loop gets to where the ship is, it draws first the shadow and then the ship a little higher up the screen, depending on the altitude of the ship. The equation to translate the ship’s screen coordinates to a block position on the map is a bit simplistic, but in this case, it does the job well enough.

    Cursor keys guide the movement of the spaceship, which is limited by the width of the map and a height of 85 pixels. There’s some extra code to display the ship if it isn’t on the map – for example, at the start, before it reaches the map area. To make the code snippet into a true Zaxxon clone, you’ll have to add some laser fire and explosions, a fuel gauge, and a scoring system, but this code sample should provide the basis you’ll need to get started.

    Code for our Zaxxon homage

    Here’s Mark’s code snippet, which creates a side-scrolling beat-’em-up in Python. To get it working on your system, you’ll need to install Pygame Zero. And to download the full code, go here.

    Get your copy of Wireframe issue 33

    You can read more features like this one in Wireframe issue 33, available now at Tesco, WHSmith, all good independent UK newsagents, and the Raspberry Pi Store, Cambridge.

    Or you can buy Wireframe directly from Raspberry Pi Press — delivery is available worldwide. And if you’d like a handy digital version of the magazine, you can also download issue 33 for free in PDF format.

    Make sure to follow Wireframe on Twitter and Facebook for updates and exclusive offers and giveaways. Subscribe on the Wireframe website to save up to 49% compared to newsstand pricing!

    Website: LINK

  • Code a Kung-Fu Master style beat-’em-up | Wireframe #32

    Code a Kung-Fu Master style beat-’em-up | Wireframe #32

    Reading Time: 4 minutes

    Punch and kick your way through a rabble of bad dudes in a simple scrolling beat-’em-up. Mark Vanstone shows you how

    Although released to tie in with Jackie Chan’s Spartan X, Kung-Fu Master was originally inspired by the Bruce Lee film, Game of Death.

    Kung-Fu Master

    Kung-Fu Master hit arcades in 1984. Its side-scrolling action, punching and kicking through an army of knife-throwing goons, helped create the beat-’em-up genre. In fact, its designer, Takashi Nishiyama, would go on to kickstart the Street Fighter series at Capcom, and later start up the Fatal Fury franchise at SNK.

    In true eighties arcade style, Kung-Fu Master distils the elements of a chop-socky action film to its essentials. Hero Thomas and his girlfriend are attacked, she’s kidnapped, and Thomas fights his way through successive levels of bad guys to rescue her. The screen scrolls from side to side, and Thomas must use his kicks and punches to get from one side of the level to the other and climb the stairs to the next floor of the building.

    Our Kung-Fu Master homage features punches, kicks, and a host of goons to use them on.

    Making our brawler

    To recreate this classic with Pygame Zero, we’ll need quite a few frames of animation, both for the hero character and the enemies he’ll battle. For a reasonable walk cycle, we’ll need at least six frames in each direction. Any fewer than six won’t look convincing, but more frames can achieve a smoother effect. For this example, I’ve used the 3D package Poser, since it has a handy walk designer which makes generating sequences of animation much easier.

    Once we have the animation frames for our characters, including a punch, kick, and any others you want to add, we need a background for the characters to walk along. The image we’re using is 2000×400 pixels, and we start the game by displaying the central part so our hero can walk either way. By detecting arrow key presses, the hero can ‘walk’ one way or the other by moving the background left and right, while cycling through the walk animation frames. Then if we detect a Q key press, we change the action string to kick; if it’s A, it’s punch. Then in our update() function, we use that action to set the Actor’s image to the indicated action frame.

    Our enemy Actors will constantly walk towards the centre of the screen, and we can cycle through their walking frames the same way we do with the main hero. To give kicks and punches an effect, we put in collision checks. If the hero strikes while an enemy collides with him, we register a hit. This could be made more precise to require more skill, but once a strike’s registered, we can switch the enemy to a different status that will cause them to fall downwards and off the screen.

    This sample is a starting point to demonstrate the basics of the beat-’em-up genre. With the addition of flying daggers, several levels, and a variety of bad guys, you’ll be on your way to creating a Pygame Zero version of this classic game.

    The generation game

    Because we’re moving the background when our hero walks left and right, we need to make sure we move our enemies with the background, otherwise they’ll look as though they’re sliding in mid-air – this also applies to any other objects that aren’t part of the background. The number of enemies can be governed in several ways: in our code, we just have a random number deciding if a new enemy will appear during each update, but we could use a predefined pattern for the enemy generation to make it a bit less random, or we use a combination of patterns and random numbers.

    Here’s Mark’s code snippet, which creates a side-scrolling beat-’em-up in Python. To get it working on your system, you’ll need to install Pygame Zero. And to download the full code, go here.

    Get your copy of Wireframe issue 32

    You can read more features like this one in Wireframe issue 32, available now at Tesco, WHSmith, all good independent UK newsagents, and the Raspberry Pi Store, Cambridge.

    Or you can buy Wireframe directly from Raspberry Pi Press — delivery is available worldwide. And if you’d like a handy digital version of the magazine, you can also download issue 32 for free in PDF format.

    Look how lovely and glowy it is.

    Make sure to follow Wireframe on Twitter and Facebook for updates and exclusive offers and giveaways. Subscribe on the Wireframe website to save up to 49% compared to newsstand pricing!

    Website: LINK

  • Make a Spy Hunter-style scrolling road | Wireframe #31

    Make a Spy Hunter-style scrolling road | Wireframe #31

    Reading Time: 4 minutes

    Raspberry Pi’s own Mac Bowley shows you how to make the beginnings of a top-down driving game inspired by 1983’s Spy Hunter.

    Spy Hunter, an arcade game from 1983

    Spy Hunter was one of the very first games with both driving and shooting.

    Spy Hunter

    The 1983 arcade classic Spy Hunter put players at the wheel of a fictitious Interceptor vehicle and challenged them to navigate a vertically scrolling road, destroying enemy vehicles.

    Here, I’ll show you how you can recreate the game’s scrolling road to use in your own driving games. The road will be created using the Rect class from Pygame, with the road built from stacked rectangles that are each two pixels high.

    Making the scrolling road in Python

    First, I create two lists; one to hold the pieces of road currently being drawn on screen, and another to hold a queue of pieces that will be added as the road scrolls. To create the scrolling road effect, each of the current pieces of road will need to move down the screen, while a new piece is added to the end of the list at position y = 0.

    Pygame can schedule functions, which can then be called at set intervals – meaning I can scroll my road at a set frame rate. The scroll_road function will achieve this. First, I loop over each road piece, and move it down by two pixels. I then remove the first item in the queue list and append it to the end of the road. The Pygame clock is then set to call the function at intervals set by a frame_rate variable: mine is set to 1/60, meaning 60 frames per second.

    Our top-down rolling road in Python

    Our code snippet provides a solid basis for your own top-down driving game. All you need now are weapons. And a few other cars.

    My road can either turn left or right, a random choice made whenever the queue is populated. Whichever way the road turns, it has to start from the same spot as the last piece in my queue. I can grab the last item in a list using -1 as an index and then store the x position; building from here will make sure my road is continuous. I use a buffer of 50 pixels to keep the road from moving off the edge of my screen – each time a turn is made, I check that the road doesn’t go beyond this point.

    I want the turn amount to be random, so I’m also setting a minimum turn of 200 pixels. If this amount takes my car closer than the buffer, I’ll instead set the turn amount so that it takes it up to the buffer but no further. I do this for both directions, as well as setting a modifier to apply to my turn amount (-1 to turn left and 1 to turn right), which will save me duplicating my code. I also want to randomly choose how many pieces will be involved in my turn. Each piece is a step in the scroll, so the more pieces, the longer my turn will take. This will make sure I have a good mix of sharp and elongated turns in my road, keeping the player engaged.

    Our rolling road Python code

    Here’s Mac’s code snippet, which creates a winding road worthy of Spy Hunter in Python. To get it working on your system, you’ll need to install Pygame Zero. And to download the full code, go here.

    Speeding up the game

    To make things more exciting, the game can also be speeded up by decreasing the frame_rate variable. You could even gradually increase this over time, making the game feel more frantic the further you get.
    Another improvement would be to make the turns more curvy, but make sure you’re comfortable with algebra before you do this!

    Get your copy of Wireframe issue 31

    You can read more features like this one in Wireframe issue 31, available now at Tesco, WHSmith, all good independent UK newsagents, and the Raspberry Pi Store, Cambridge.

    Or you can buy Wireframe directly from Raspberry Pi Press — delivery is available worldwide. And if you’d like a handy digital version of the magazine, you can also download issue 31 for free in PDF format.

    Make sure to follow Wireframe on Twitter and Facebook for updates and exclusive offers and giveaways. Subscribe on the Wireframe website to save up to 49% compared to newsstand pricing!

    Website: LINK

  • Code a Boulder Dash mining game | Wireframe #30

    Code a Boulder Dash mining game | Wireframe #30

    Reading Time: 4 minutes

    Learn how to code a simple Boulder Dash homage in Python and Pygame. Mark Vanstone shows you how. 

    The original Boulder Dash was marked out by some devious level design, which threatened to squash the player at every turn.

    Boulder Dash

    Boulder Dash first appeared in 1984 for the Commodore 64, Apple II, and the Atari 400/800. It featured an energetic gem collector called Rockford who, thanks to some rather low-resolution graphics, looked a bit like an alien. His mission was to tunnel his way through a series of caves to find gems while avoiding falling rocks dislodged by his digging. Deadly creatures also inhabited the caves which, if destroyed by dropping rocks on them, turned into gems for Rockford to collect.

    The ingenious level designs were what made Boulder Dash so addictive. Gems had to be collected within a time limit to unlock the exit, but some were positioned in places that would need planning to get to, often using the physics of falling boulders to block or clear areas. Of course, the puzzles got increasingly tough as the levels progressed.

    Written by Peter Liepa and Chris Gray, Boulder Dash was published by First Star Software, which still puts out new versions of the game to this day. Due to its original success, Boulder Dash was ported to all kinds of platforms, and the years since have seen no fewer than 20 new iterations of Boulder Dash, and a fair few clones, too.

    Our homage to Boulder Dash running in Pygame Zero. Dig through the caves to find gems – while avoiding death from above.

    Making Boulder Dash in Python

    We’re going to have a look at the boulder physics aspect of the game, and make a simple level where Rockford can dig out some gems and hopefully not get flattened under an avalanche of rocks. Writing our code in Pygame Zero, we’ll automatically create an 800 by 600-size window to work with. We can make our game screen by defining a two-dimensional list, which, in this case, we will fill with soil squares and randomly position the rocks and gems.

    Each location in the list matrix will have a name: either wall for the outside boundary, soil for the diggable stuff, rock for a round, moveable boulder, gem for a collectable item, and finally, rockford to symbolise our hero. We can also define an Actor for Rockford, as this will make things like switching images and tracking other properties easier.

    Here’s Mark’s code, which gets an homage to Boulder Dash running in Python. To get it working on your system, you’ll first need to install Pygame Zero. And to download the full code, go here.

    Our draw() function is just a nested loop to iterate through the list matrix and blit to the screen whatever is indicated in each square. The Rockford Actor is then drawn over the top. We can also keep a count of how many gems have been collected and provide a congratulatory message if all of them are found. In the update() function, there are only two things we really need to worry about: the first being to check for keypresses from the player and move Rockford accordingly, and the second to check rocks to see if they need to move.

    Rockford is quite easy to test for movement, as he can only move onto an empty square – a soil square or a gem square. It’s also possible for him to push a boulder if there’s an empty space on the other side. For the boulders, we need to first test if there’s an empty space below it, and if so, the boulder must move downwards. We also test to see if a boulder is on top of another boulder – if it is, the top boulder can roll off and down onto a space either to the left or the right of the one beneath.
    There’s not much to add to this snippet of code to turn it into a playable game of Boulder Dash. See if you can add a timer, some monsters, and, of course, some puzzles for players to solve on each level.

    Testing for movement

    An important thing to notice about the process of scanning through the list matrix to test for boulder movement is that we need to read the list from the bottom upwards; otherwise, because the boulders move downwards, we may end up testing a boulder multiple times if we test from the beginning to the end of the list. Similarly, if we read the list matrix from the top down, we may end up moving a boulder down and then when reading the next row, coming across the same one again, and moving it a second time.

    Get your copy of Wireframe issue 30

    You can read more features like this one in Wireframe issue 30, available now at Tesco, WHSmith, all good independent UK newsagents, and the Raspberry Pi Store, Cambridge.

    Or you can buy Wireframe directly from Raspberry Pi Press — delivery is available worldwide. And if you’d like a handy digital version of the magazine, you can also download issue 30 for free in PDF format.

    Make sure to follow Wireframe on Twitter and Facebook for updates and exclusive offers and giveaways. Subscribe on the Wireframe website to save up to 49% compared to newsstand pricing!

    Website: LINK

  • How to run a script at start-up on a Raspberry Pi using crontab

    How to run a script at start-up on a Raspberry Pi using crontab

    Reading Time: 2 minutes

    Do you need to run a script whenever your Raspberry Pi turns on? Here’s Estefannie to explain how to edit crontab to do exactly that.

    How to start a script at start-up on a Raspberry Pi // LEARN SOMETHING

    Do you want your Raspberry Pi to automatically run your code when it is connected to power? Then you are in the right place. In this new #LEARNSOMETHING video I show you how to make you Raspberry Pi run your script automatically when it is connected to a power source.

    Running script on startup

    While there are many ways of asking your Raspberry Pi to run a script on start-up, crontab -e is definitely one of the easiest.

    AND, as Estefannie explains (in part thanks to me bugging asking her to do so), if you create a run folder on your desktop, you can switch out the Python scripts you want to run at start-up whenever you like and will never have to edit crontab again!

    Weeeeee!

    Now go write some wonderful and inspiring festive scripts while I take a well-earned nap. I just got off a plane yet here I am, writing blog posts for y’all because I love you THAT DARN MUCH!

    A fluffy cat

    This is Teddy. Teddy is also in the video.

    And don’t forget to like and subscribe for more Estefannie Explains it All goodness!

    Website: LINK

  • Create a turn-based combat system | Wireframe #28

    Create a turn-based combat system | Wireframe #28

    Reading Time: 4 minutes

    Learn how to create the turn-based combat system found in games like Pokémon, Final Fantasy, and Undertale. Raspberry Pi’s Rik Cross shows you how.

    With their emphasis on trading and collecting as well as turn-based combat, the Pokémon games helped bring RPG concepts to the masses.

    In the late 1970s, high school student Richard Garriott made a little game called Akalabeth. Programmed in Applesoft BASIC, it helped set the template for the role-playing genre on computers. Even today, turn-based combat is still a common sight in games, with this autumn’s Pokémon Sword and Shield revolving around a battle system which sees opponents take turns to plan and execute attacks or defensive moves.

    The turn-based combat system in this article is text-only, and works by allowing players to choose to defend against or attack their opponent in turn. The battle ends when only one player has some health remaining.

    Each Player taking part in the battle is added to the static players list as it’s created. Players have a name, a health value (initially set to 100) and a Boolean defending value (initially set to False) to indicate whether a player is using their shield. Players also have an inputmethod attribute, which is the function used for getting player input for making various choices in the game. This function is passed to the object when created, and means that we can have human players that give their input through the keyboard, as well as computer players that make choices (in our case simply by making a random choice between the available options).

    Richard Garriott’s Akalabeth laid the groundwork for Ultima, and was one of the earliest CRPGs.

    A base Action class specifies an action owner and an opponent, as well as an execute() method which has no effect on the game. Subclasses of the base class override this execute() method to specify the effect the action has on the owner and/or the opponent of the action. As a basic example, two actions have been created: Defend, which sets the owner’s defending attribute to True, and Attack, which sets the owner’s defending attribute to False, and lowers the opponent’s health by a random amount depending on whether or not they are defending.

    Players take turns to choose a single action to perform in the battle, starting with the human ‘Hero’ player. The choose_action() method is used to decide what to do next (in this case either attack or defend), as well as an opponent if the player has chosen to attack. A player can only be selected as an opponent if they have a health value greater than 0, and are therefore still in the game. This choose_action() method returns an Action, which is then executed using its execute() method. A few time.sleep() commands have also been thrown in here  to ramp up the suspense!

    After each player has had their turn, a check is done to make sure that at least two players still have a health value greater than 0, and therefore that the battle can continue. If so, the static get_next_player() method finds the next player still in the game to take their turn in the battle, otherwise, the game ends and the winner is announced.

    Our example battle can be easily extended in lots of interesting ways. The AI for choosing an action could also be made more sophisticated, by looking at opponents’ health or defending attributes before choosing an action. You could also give each action a ‘cost’, and give players a number of action ‘points’ per turn. Chosen actions would be added to a list, until all of the points have been used. These actions would then be executed one after the other, before moving on to the next player’s turn.

    Here’s Rik’s code, which gets a simple turn-based combat system running in Python. To get it working on your system, you’ll first need to install Pygame Zero. And to download the full code, go here.

    You can read more features like this one in Wireframe issue 28, available now at Tesco, WHSmith, all good independent UK newsagents, and the Raspberry Pi Store, Cambridge.

    Or you can buy Wireframe directly from Raspberry Pi Press — delivery is available worldwide. And if you’d like a handy digital version of the magazine, you can also download issue 28 for free in PDF format.

    Make sure to follow Wireframe on Twitter and Facebook for updates and exclusive offers and giveaways. Subscribe on the Wireframe website to save up to 49% compared to newsstand pricing!

    Website: LINK

  • Code a Frogger-style road-crossing game | Wireframe #27

    Code a Frogger-style road-crossing game | Wireframe #27

    Reading Time: 4 minutes

    Guide a frog across busy roads and rivers. Mark Vanstone shows you how to code a simple remake of Konami’s arcade game, Frogger.

    Konami’s original Frogger: so iconic, it even featured in a 1998 episode of Seinfeld.

    Frogger

    Why did the frog cross the road? Because Frogger would be a pretty boring game if it didn’t. Released in 1981 by Konami, the game appeared in assorted bars, sports halls, and arcades across the world, and became an instant hit. The concept was simple: players used the joystick to move a succession of frogs from the bottom of the screen to the top, avoiding a variety of hazards – cars, lorries, and later, the occasional crocodile. Each frog had to be safely manoeuvred to one of five alcoves within a time limit, while extra points were awarded for eating flies along the way.

    Before Frogger, Konami mainly focused on churning out clones of other hit arcade games like Space Invaders and Breakout; Frogger was one of its earliest original ideas, and the simplicity of its concept saw it ported to just about every home system available at the time. (Ironically, Konami’s game would fall victim to repeated cloning by other developers.) Decades later, developers still take inspiration from it; Hipster Whale’s Crossy Road turned Frogger into an endless running game; earlier this year, Konami returned to the creative well with Frogger in Toy Town, released on Apple Arcade.

    Code your own Konami Frogger

    We can recreate much of Frogger’s gameplay in just a few lines of Pygame Zero code. The key elements are the frog’s movement, which use the arrow keys, vehicles that move across the screen, and floating objects – logs and turtles – moving in opposite directions. Our background graphic will provide the road, river, and grass for our frog to move over. The frog’s movement will be triggered from an on_key_down() function, and as the frog moves, we switch to a second frame with legs outstretched, reverting back to a sitting position after a short delay. We can use the inbuilt Actor properties to change the image and set the angle of rotation.

    In our Frogger homage, we move the frog with the arrow keys to avoid the traffic, and jump onto the floating logs and turtles.

    For all the other moving elements, we can also use Pygame Zero Actors; we just need to make an array for our cars with different graphics for the various rows, and an array for our floating objects in the same way.
    In our update() function, we need to move each Actor according to which row it’s in, and when an Actor disappears off the screen, set the x coordinate so that it reappears on the opposite side.

    Handling the logic of the frog moving across the road is quite easy; we just check for collision with each of the cars, and if the frog hits a car, then we have a squashed frog. The river crossing is a little more complicated. Each time the frog moves on the river, we need to make sure that it’s on a floating Actor. We therefore check to make sure that the frog is in collision with one of the floating elements, otherwise it’s game over.

    There are lots of other elements you could add to the example shown here: the original arcade game provided several frogs to guide to their alcoves on the other side of the river, while crocodiles also popped up from time to time to add a bit more danger. Pygame Zero has all the tools you need to make a fully functional version of Konami’s hit.

    Here’s Mark’s code, which gets a Frogger homage running in Python. To get it working on your system, you’ll first need to install Pygame Zero. And to download the full code, go here.

    Get your copy of Wireframe issue 27

    You can read more features like this one in Wireframe issue 27, available now at Tesco, WHSmith, all good independent UK newsagents, and the Raspberry Pi Store, Cambridge.

    Or you can buy Wireframe directly from Raspberry Pi Press — delivery is available worldwide. And if you’d like a handy digital version of the magazine, you can also download issue 27 for free in PDF format.

    Make sure to follow Wireframe on Twitter and Facebook for updates and exclusive offers and giveaways. Subscribe on the Wireframe website to save up to 49% compared to newsstand pricing!

    Website: LINK

  • Code a Phoenix-style mothership battle | Wireframe #26

    Code a Phoenix-style mothership battle | Wireframe #26

    Reading Time: 4 minutes

    It was one of gaming’s first boss battles. Mark Vanstone shows you how to recreate the mothership from the 1980 arcade game, Phoenix.

    Phoenix’s fifth stage offered a unique challenge in 1980: one of gaming’s first-ever boss battles.

    First released in 1980, Phoenix was something of an arcade pioneer. The game was the kind of post-Space Invaders fixed-screen shooter that was ubiquitous at the time: players moved their ship from side to side, shooting at a variety of alien birds of different sizes and attack patterns. The enemies moved swiftly, and the player’s only defence was a temporary shield which could be activated when the birds swooped and strafed the lone defender. But besides all that, Phoenix had a few new ideas of its own: not only did it offer five distinct stages, but it also featured one of the earliest examples of a boss battle – its heavily armoured alien mothership, which required accurate shots to its shields before its weak spot could be exposed.

    To recreate Phoenix’s boss, all we need is Pygame Zero. We can get a portrait style window with the WIDTH and HEIGHT variables and throw in some parallax stars (an improvement on the original’s static backdrop) with some blitting in the draw() function. The parallax effect is created by having a static background of stars with a second (repeated) layer of stars moving down the screen.

    The mothership itself is made up of several Actor objects which move together down the screen towards the player’s spacecraft, which can be moved right and left using the mouse. There’s the main body of the mothership, in the centre is the alien that we want to shoot, and then we have two sets of moving shields.

    Like the original Phoenix, our mothership boss battle has multiple shields that need to be taken out to expose the alien at the core.

    In this example, rather than have all the graphics dimensions in multiples of eight (as we always did in the old days), we will make all our shield blocks 20 by 20 pixels, because computers simply don’t need to work in multiples of eight any more. The first set of shields is the purple rotating bar around the middle of the ship. This is made up of 14 Actor blocks which shift one place to the right each time they move. Every other block has a couple of portal windows which makes the rotation obvious, and when a block moves off the right-hand side, it is placed on the far left of the bar.

    The second set of shields are in three yellow rows (you may want to add more), the first with 14 blocks, the second with ten blocks, and the last with four. These shield blocks are fixed in place but share a behaviour with the purple bar shields, in that when they are hit by a bullet, they change to a damaged version. There are four levels of damage before they are destroyed and the bullets can pass through. When enough shields have been destroyed for a bullet to reach the alien, the mothership is destroyed (in this version, the alien flashes).

    Bullets can be fired by clicking the mouse button. Again, the original game had alien birds flying around the mothership and dive-bombing the player, making it harder to get a good shot in, but this is something you could try adding to the code yourself.

    To really bring home that eighties Phoenix arcade experience, you could also add in some atmospheric shooting effects and, to round the whole thing off, have an 8-bit rendition of Beethoven’s Für Elise playing in the background.

    Here’s Mark’s code, which gets a simple mothership battle running in Python. To get it working on your system, you’ll first need to install Pygame Zero. And to download the full code, go here.

    Get your copy of Wireframe issue 26

    You can read more features like this one in Wireframe issue 26, available now at Tesco, WHSmith, all good independent UK newsagents, and the Raspberry Pi Store, Cambridge.

    Or you can buy Wireframe directly from Raspberry Pi Press — delivery is available worldwide. And if you’d like a handy digital version of the magazine, you can also download issue 26 for free in PDF format.

    Make sure to follow Wireframe on Twitter and Facebook for updates and exclusive offers and giveaways. Subscribe on the Wireframe website to save up to 49% compared to newsstand pricing!

    Website: LINK

  • Make a Columns-style tile-matching game | Wireframe #25

    Make a Columns-style tile-matching game | Wireframe #25

    Reading Time: 4 minutes

    Raspberry Pi’s own Rik Cross shows you how to code your own Columns-style tile-matching puzzle game in Python and Pygame Zero.

    Created by Hewlett-Packard engineer Jay Geertsen, Columns was Sega’s sparkly rival to Nintendo’s all-conquering Tetris.

    Columns and tile-matching

    Tile-matching games began with Tetris in 1984 and the less famous Chain Shot! the following year. The genre gradually evolved through games like Dr. Mario, Columns, Puyo Puyo, and Candy Crush Saga. Although their mechanics differ, the goals are the same: to organise a board of different-coloured tiles by moving them around until they match.

    Here, I’ll show how you can create a simple tile-matching game using Python and Pygame. In it, any tile can be swapped with the tile to its right, with the aim being to make matches of three or more tiles of the same colour. Making a match causes the tiles to disappear from the board, with tiles dropping down to fill in the gaps.

    At the start of a new game, a board of randomly generated tiles is created. This is made as an (initially empty) two-dimensional array, whose size is determined by the values of rows and columns. A specific tile on the board is referenced by its row and column number.

    We want to start with a truly random board, but we also want to avoid having any matching tiles. Random tiles are added to each board position, therefore, but replaced if a tile is the same as the one above or to it’s left (if such a tile exists).

    Our board consists of 12 rows and 8 columns of tiles. Pressing SPACE will swap the 2 selected tiles (outlined in white), and in this case, create a match of red tiles vertically.

    In our game, two tiles are ‘selected’ at any one time, with the player pressing the arrow keys to change those tiles. A selected variable keeps track of the row and column of the left-most selected tile, with the other tile being one column to the right of the left-most tile. Pressing SPACE swaps the two selected tiles, checks for matches, clears any matched tiles, and fills any gaps with new tiles.

    A basic ‘match-three’ algorithm would simply check whether any tiles on the board have a matching colour tile on either side, horizontally or vertically. I’ve opted for something a little more convoluted, though, as it allows us to check for matches on any length, as well as track multiple, separate matches. A currentmatch list keeps track of the (x,y) positions of a set of matching tiles. Whenever this list is empty, the next tile to check is added to the list, and this process is repeated until the next tile is a different colour.

    If the currentmatch list contains three or more tiles at this point, then the list is added to the overall matches list (a list of lists of matches!) and the currentmatch list is reset. To clear matched tiles, the matched tile positions are set to None, which indicates the absence of a tile at that position. To fill the board, tiles in each column are moved down by one row whenever an empty board position is found, with a new tile being added to the top row of the board.

    The code provided here is just a starting point, and there are lots of ways to develop the game, including adding a scoring system and animation to liven up your tiles.

    Here’s Rik’s code, which gets a simple tile-match game running in Python. To get it working on your system, you’ll first need to install Pygame Zero. And to download the full code, go here.

    Get your copy of Wireframe issue 25

    You can read more features like this one in Wireframe issue 25, available now at Tesco, WHSmith, all good independent UK newsagents, and the Raspberry Pi Store, Cambridge.

    Or you can buy Wireframe directly from Raspberry Pi Press — delivery is available worldwide. And if you’d like a handy digital version of the magazine, you can also download issue 25 for free in PDF format.

    Make sure to follow Wireframe on Twitter and Facebook for updates and exclusive offers and giveaways. Subscribe on the Wireframe website to save up to 49% compared to newsstand pricing!

    Website: LINK

  • Code your own Donkey Kong barrels | Wireframe issue 24

    Code your own Donkey Kong barrels | Wireframe issue 24

    Reading Time: 4 minutes

    Replicate the physics of barrel rolling – straight out of the classic Donkey Kong. Mark Vanstone shows you how.

    Released in 1981, Donkey Kong was one of the most important games in Nintendo’s history.

    Nintendo’s Donkey Kong

    Donkey Kong first appeared in arcades in 1981, and starred not only the titular angry ape, but also a bouncing, climbing character called Jumpman – who later went on to star in Nintendo’s little-known series of Super Mario games. Donkey Kong featured four screens per level, and the goal in each was to avoid obstacles and guide Mario (sorry, Jumpman) to the top of the screen to rescue the hapless Pauline. Partly because the game was so ferociously difficult from the beginning, Donkey Kong’s first screen is arguably the most recognisable today: Kong lobs an endless stream of barrels, which roll down a network of crooked girders and threaten to knock Jumpman flat.

    Barrels in Pygame Zero

    Donkey Kong may have been a relentlessly tough game, but we can recreate one of its most recognisable elements with relative ease. We can get a bit of code running with Pygame Zero – and a couple of functions borrowed from Pygame – to make barrels react to the platforms they’re on, roll down in the direction of a slope, and fall off the end onto the next platform. It’s a very simple physics simulation using an invisible bitmap to test where the platforms are and which way they’re sloping. We also have some ladders which the barrels randomly either roll past or sometimes use to descend to the next platform below.

    Our Donkey Kong tribute up and running in Pygame Zero. The barrels roll down the platforms and sometimes the ladders.

    Once we’ve created a barrel as an Actor, the code does three tests for its platform position on each update: one to the bottom-left of the barrel, one bottom-centre, and one bottom-right. It samples three pixels and calculates how much red is in those pixels. That tells us how much platform is under the barrel in each position. If the platform is tilted right, the number will be higher on the left, and the barrel must move to the right. If tilted left, the number will be higher on the right, and the barrel must move left. If there is no red under the centre point, the barrel is in the air and must fall downward.

    There are just three frames of animation for the barrel rolling (you could add more for a smoother look): for rolling right, we increase the frame number stored with the barrel Actor; for rolling to the left, we decrease the frame number; and if the barrel’s going down a ladder, we use the front-facing images for the animation. The movement down a ladder is triggered by another test for the blue component of a pixel below the barrel. The code then chooses randomly whether to send the barrel down the ladder.

    The whole routine will keep producing more barrels and moving them down the platforms until they reach the bottom. Again, this is a very simple physics system, but it demonstrates how those rolling barrels can be recreated in just a few lines of code. All we need now is a jumping player character (which could use the same invisible map to navigate up the screen) and a big ape to sit at the top throwing barrels, then you’ll have the makings of your own fully featured Donkey Kong tribute.

    Here’s Mark’s code, which sets some Donkey Kong Barrels rolling about in Python. To get it working on your system, you’ll first need to install Pygame Zero. And to download the full code, go here.

    Get your copy of Wireframe issue 24

    You can read more features like this one in Wireframe issue 24, available now at Tesco, WHSmith, all good independent UK newsagents, and the Raspberry Pi Store, Cambridge.

    Or you can buy Wireframe directly from Raspberry Pi Press — delivery is available worldwide. And if you’d like a handy digital version of the magazine, you can also download issue 24 for free in PDF format.

    Make sure to follow Wireframe on Twitter and Facebook for updates and exclusive offers and giveaways. Subscribe on the Wireframe website to save up to 49% compared to newsstand pricing!

    Website: LINK

  • Your new free online training courses for the autumn term

    Your new free online training courses for the autumn term

    Reading Time: 3 minutes

    Over the autumn term, we’ll be launching three brand-new, free online courses on the FutureLearn platform. Wherever you are in the world, you can learn with us for free!

    Three people looking facing forward

    The course presenters are Pi Towers residents Mark, Janina, and Eirini

    Design and Prototype Embedded Computer Systems

    The first new course is Design and Prototype Embedded Computer Systems, which will start on 28 October. In this course, you will discover the product design life cycle as you design your own embedded system!

    A diagram illustrating the iterative design life cycle with four stages: Analyse, design, build, test

    You’ll investigate how the purpose of the system affects the design of the system, from choosing its components to the final product, and you’ll find out more about the design of an algorithm. You will also explore how embedded systems are used in the world around us. Book your place today!

    Programming 103: Saving and Structuring Data

    What else would you expect us to call the sequel to Programming 101 and Programming 102? That’s right — we’ve made Programming 103: Saving and Structuring Data! The course will begin on 4 November, and you can reserve your place now.

    Illustration of a robot reading a book called 'human 2 binary phrase book'

    Programming 103 explores how to use data across multiple runs of your program. You’ll learn how to save text and binary files, and how structuring data is necessary for programs to “understand” the data that they load. You’ll look at common types of structured files such as CSV and JSON files, as well as how you can connect to a SQL database to use it in your Python programs.

    Introduction to Encryption and Cryptography

    The third course, Introduction to Encryption and Cryptography, is currently in development, and therefore coming soon. In this course, you’ll learn what encryption is and how it was used in the past, and you’ll use the Caesar and Vigenère ciphers.

    The Caesar cipher is a type of substitution cipher

    You’ll also look at modern encryption and investigate both symmetric and asymmetric encryption schemes. The course also shows you the future of encryption, and it includes several practical encryption activities, which can be used in the classroom too.

    National Centre for Computing Education

    If you’re a secondary school teacher in England, note that all of the above courses count towards your Computer Science Accelerator Programme certificate.

    Group shot of the first NCCE GCSE accelerator graduates

    The very first group of teachers who earned Computer Science Accelerator Programme certificates: they got to celebrate their graduation at Google HQ in London.

    What’s been your favourite online course this year? Tell us about it in the comments.

    Website: LINK

  • Estefannie’s Jurassic Park goggles

    Estefannie’s Jurassic Park goggles

    Reading Time: 3 minutes

    When we invited Estefannie Explains It All to present at Coolest Projects International, she decided to make something cool with a Raspberry Pi to bring along. But being Estefannie, she didn’t just make something a little bit cool. She went ahead and made Raspberry Pi Zero-powered Jurassic Park goggles, or, as she calls them, the world’s first globally triggered, mass broadcasting, photon-emitting and -collecting head unit.

    Make your own Jurassic Park goggles using a Raspberry Pi // MAKE SOMETHING

    Is it heavy? Yes. But these goggles are not expensive. Follow along as I make the classic Jurassic Park Goggles from scratch!! The 3D Models: https://www.thingiverse.com/thing:3732889 My code: https://github.com/estefanniegg/estefannieExplainsItAll/blob/master/makes/JurassicGoggles/jurassic_park.py Thank you Coolest Projects for bringing me over to speak in Ireland!! https://coolestprojects.org/ Thank you Polymaker for sending me the Polysher and the PolySmooth filament!!!!

    3D-printing, sanding, and sanding

    Estefannie’s starting point was the set of excellent 3D models of the iconic goggles that Jurassicpaul has kindly made available on Thingiverse. There followed several 3D printing attempts and lots of sanding, sanding, sanding, spray painting, and sanding, then some more printing with special Polymaker filament that can be ethanol polished.

    Adding the electronics and assembling the goggles

    Estefannie soldered rings of addressable LEDs and created custom models for 3D-printable pieces to fit both them and the goggles. She added a Raspberry Pi Zero, some more LEDs and buttons, an adjustable headgear part from a welding mask, and – importantly – four circles of green acetate. After quite a lot of gluing, soldering, and wiring, she ended up with an entirely magnificent set of goggles.

    Here, they’re modelled magnificently by Raspberry Pi videographer Brian. I think you’ll agree he cuts quite a dash.

    Coding and LED user interface

    Estefannie wrote a Python script to interact with Twitter, take photos, and provide information about the goggles’ current status via the LED rings. When Estefannie powers up the Raspberry Pi, it runs a script on startup and connects to her phone’s wireless hotspot. A red LED on the front of the goggles indicates that the script is up and running.

    Once it’s running, pressing a button at the back of the head unit makes the Raspberry Pi search Twitter for mentions of @JurassicPi. The LEDs light up green while it searches, just like you remember from the film. If Estefannie’s script finds a mention, the LEDs flash white and the Raspberry Pi camera module takes a photo. Then they light up blue while the script tweets the photo.

    All the code is available on Estefannie’s GitHub. I love this project – I love the super clear, simple user experience provided by the LED rings, and there’s something I really appealing about the asynchronous Twitter interaction, where you mention @JurassicPi and then get an image later, the next time googles are next turned on.

    Extra bonus Coolest Projects

    If you read the beginning of this post and thought, “wait, what’s Coolest Projects?” then be sure to watch to the end of Estefannie’s video to catch her excellentCoolest Projects mini vlog. And then sign up for updates about Coolest Projects events near you, so you can join in next year, or help a team of young people to join in.

    Website: LINK

  • Pulling Raspberry Pi translation data from GitHub

    Pulling Raspberry Pi translation data from GitHub

    Reading Time: 5 minutes

    What happens when you give two linguists jobs at Raspberry Pi? They start thinking they can do digital making, even though they have zero coding skills! Because if you don’t feel inspired to step out of your comfort zone here — surrounded by all the creativity, making, and technology — then there is no hope you’ll be motivated to do it anywhere else.

    two smiling women standing in front of a colourful wall

    Maja and Nina, our translation team, and coding beginners

    Maja and I support the community of Raspberry Pi translation volunteers, and we wanted to build something to celebrate them and the amazing work they do! Our educational content is already available in 26 languages, with more than 400 translations on our projects website. But our volunteer community is always translating more content, and so off we went, on an ambitious (by our standards!) mission to create a Raspberry Pi–powered translation notification system. This is a Raspberry Pi that pulls GitHub data to display a message on a Sense HAT and play a tune whenever we add fresh translated content to the Raspberry Pi projects website!

    Breaking it down

    There were three parts to the project: two of them were pretty easy (displaying a message on a Sense HAT and playing a tune), and one more challenging (pulling information about new translated content added to our repositories on GitHub). We worked on each part separately and then put all of the code together.

    Two computers and two pastries

    Mandatory for coding: baked goods and tea

    Displaying a message on Sense HAT and playing a sound

    We used the Raspberry Pi projects Getting started with the Sense HAT and GPIO music box to help us with this part of our build.

    At first we wanted the Sense HAT to display fireworks, but we soon realised how bad we both are at designing animations, so we moved on to displaying a less creative but still satisfying smiley face, followed by a message saying “Hooray! Another translation!” and another smiley face. LED screen displaying the message 'Another translation!'

    We used the sense_hat and time modules, and wrote a function that can be easily used in the main body of the program. You can look at the comments in the code above to see what each line does:

    Python code snippet for displaying a message on a Sense HAT

    So we could add the fun tune, we learned how to use the Pygame library to play sounds. Using Pygame it’s really simple to create a function that plays a sound: once you have the .wav file in your chosen location, you simply import and initialise the pygame module, create a Sound object, and provide it with the path to your .wav file. You can then play your sound:

    Python code snippet for playing a sound

    We’ve programmed our translation notification system to play the meow sound three times, using the sleep function to create a one-second break between each sound. Because why would you want one meow if you can have three?

    Pulling repository information from GitHub

    This was the more challenging part for Maja and me, so we asked for help from experienced programmers, including our colleague Ben Nuttall. We explained what we wanted to do: pull information from our GitHub repositories where all the projects available on the Raspberry Pi projects website are kept, and every time a new language directory is found, to execute the sparkles and meow functions to let us and EVERYONE in the office know that we have new translations! Ben did a bit of research and quickly found the PyGithub library, which enables you to manage your GitHub resources using Python scripts.

    Python code snippet for pulling data from GitHub

    Check out the comments to see what the code does

    The script runs in an infinite loop, checking all repositories in the ‘raspberrypilearning’ organisation for new translations (directories with names in form of xx-XX, eg. fr-CA) every 60 minutes. Any new translation is then printed and preserved in memory. We had some initial issues with the usage of the PyGithub library: calling .get_commits() on an empty repository throws an exception, but the library doesn’t provide any functions to check whether a repo is empty or not. Fortunately, wrapping this logic in a try...except statement solved the problem.

    And there we have it: success!

    Demo of our Translation Notification System build

    Subscribe to our YouTube channel: http://rpf.io/ytsub Help us reach a wider audience by translating our video content: http://rpf.io/yttranslate Buy a Raspberry Pi from one of our Approved Resellers: http://rpf.io/ytproducts Find out more about the #RaspberryPi Foundation: Raspberry Pi http://rpf.io/ytrpi Code Club UK http://rpf.io/ytccuk Code Club International http://rpf.io/ytcci CoderDojo http://rpf.io/ytcd Check out our free online training courses: http://rpf.io/ytfl Find your local Raspberry Jam event: http://rpf.io/ytjam Work through our free online projects: http://rpf.io/ytprojects Do you have a question about your Raspberry Pi?

    Our ideas for further development

    We’re pretty proud that the whole Raspberry Pi office now hears a meowing cat whenever new translated content is added to our projects website, but we’ve got plans for further development of our translation notification system. Our existing translated educational resources have already been viewed by over 1 million users around the world, and we want anyone interested in the translations our volunteers make possible to be able to track new translated projects as the go live!

    One way to do that is to modify the code to tweet or send an email with the name of the newly added translation together with a link to the project and information on the language in which it was added. Alternatively, we could adapt the system to only execute the sparkles and meow functions when a translation in a particular language is added. Then our more than 1000 volunteers, or any learner using our translations, could set up their own Raspberry Pi and Sense HAT to receive notifications of content in the language that interests them, rather than in all languages.

    We need your help

    Both ideas pose a pretty big challenge for the inexperienced new coders of the Raspberry Pi translation team, so we’d really appreciate any tips you have for helping us get started or for improving our existing system! Please share your thoughts in the comments below.

    Website: LINK

  • Make a keyboard-bashing sprint game | Wireframe issue 23

    Make a keyboard-bashing sprint game | Wireframe issue 23

    Reading Time: 4 minutes

    Learn how to code a sprinting minigame straight out of Daley Thompson’s Decathlon with Raspberry Pi’s own Rik Cross.

    Spurred on by the success of Konami’s Hyper Sports, Daley Thompson’s Decathlon featured a wealth of controller-wrecking minigames.

    Daley Thompson’s Decathlon

    Released in 1984, Daley Thompson’s Decathlon was a memorable entry in what’s sometimes called the ‘joystick killer’ genre: players competed in sporting events that largely consisted of frantically waggling the controller or battering the keyboard. I’ll show you how to create a sprinting game mechanic in Python and Pygame.

    Python sprinting game

    There are variables in the Sprinter() class to keep track of the runner’s speed and distance, as well as global constant ACCELERATION and DECELERATION values to determine the player’s changing rate of speed. These numbers are small, as they represent the number of metres per frame that the player accelerates and decelerates.

    The player increases the sprinter’s speed by alternately pressing the left and right arrow keys. This input is handled by the sprinter’s isNextKeyPressed() method, which returns True if the correct key (and only the correct key) is being pressed. A lastKeyPressed variable is used to ensure that keys are pressed alternately. The player also decelerates if no key is being pressed, and this rate of deceleration should be sufficiently smaller than the acceleration to allow the player to pick up enough speed.

    Press the left and right arrow keys alternately to increase the sprinter’s speed. Objects move across the screen from right to left to give the illusion of sprinter movement.

    For the animation, I used a free sprite called ‘The Boy’ from gameart2d.com, and made use of a single idle image and 15 run cycle images. The sprinter starts in the idle state, but switches to the run cycle whenever its speed is greater than 0. This is achieved by using index() to find the name of the current sprinter image in the runFrames list, and setting the current image to the next image in the list (and wrapping back to the first image once the end of the list is reached). We also need the sprinter to move through images in the run cycle at a speed proportional to the sprinter’s speed. This is achieved by keeping track of the number of frames the current image has been displayed for (in a variable called timeOnCurrentFrame).

    To give the illusion of movement, I’ve added objects that move past the player: there’s a finish line and three markers to regularly show the distance travelled. These objects are calculated using the sprinter’s x position on the screen along with the distance travelled. However, this means that each object is at most only 100 pixels away from the player and therefore seems to move slowly. This can be fixed by using a SCALE factor, which is the relationship between metres travelled by the sprinter and pixels on the screen. This means that objects are initially drawn way off to the right of the screen but then travel to the left and move past the sprinter more quickly.

    Finally, startTime and finishTime variables are used to calculate the race time. Both values are initially set to the current time at the start of the race, with finishTime being updated as long as the distance travelled is less than 100. Using the time module, the race time can simply be calculated by finishTime - startTime.

    Here’s Rik’s code, which gets a sprinting game running in Python (no pun intended). To get it working on your system, you’ll first need to install Pygame Zero. Download the code here.

    Get your copy of Wireframe issue 23

    You can read more features like this one in Wireframe issue 23, available now at Tesco, WHSmith, all good independent UK newsagents, and the Raspberry Pi Store, Cambridge.

    Or you can buy Wireframe directly from Raspberry Pi Press — delivery is available worldwide. And if you’d like a handy digital version of the magazine, you can download issue 23 for free in PDF format.

    Autonauts is coming to colonise your computers with cuteness. We find out more in Wireframe issue 23.

    Make sure to follow Wireframe on Twitter and Facebook for updates and exclusive offers and giveaways. Subscribe on the Wireframe website to save up to 49% compared to newsstand pricing!

    Website: LINK

  • Create a Scramble-style scrolling landscape | Wireframe issue 22

    Create a Scramble-style scrolling landscape | Wireframe issue 22

    Reading Time: 4 minutes

    Weave through a randomly generated landscape in Mark Vanstone’s homage to the classic arcade game Scramble.

    Scramble was developed by Konami and released in arcades in 1981. Players avoid terrain and blast enemy craft.

    Konami’s Scramble

    In the early eighties, arcades and sports halls rang with the sound of a multitude of video games. Because home computers hadn’t yet made it into most households, the only option for the avid video gamer was to go down to their local entertainment establishment and feed the machines with ten pence pieces (which were bigger then). One of these pocket money–hungry machines was Konami’s Scramble — released in 1981, it was one of the earliest side-scrolling shooters with multiple levels.

    The Scramble player’s jet aircraft flies across a randomly generated landscape (which sometimes narrows to a cave system), avoiding obstacles and enemy planes, bombing targets on the ground, and trying not to crash. As the game continues, the difficulty increases. The player aircraft can only fly forward, so once a target has been passed, there’s no turning back for a second go.

    Code your own scrolling landscape

    In this example code, I’ll show you a way to generate a Scramble-style scrolling landscape using Pygame Zero and a couple of additional Pygame functions. On early computers, moving a lot of data around the screen was very slow — until dedicated video hardware like the blitter chip arrived. Scrolling, however, could be achieved either by a quick shuffle of bytes to the left or right in the video memory, or in some cases, by changing the start address of the video memory, which was even quicker.

    Avoid the roof and the floor with the arrow keys. Jet graphic courtesy of TheSource4Life at opengameart.org.

    For our scrolling, we can use a Pygame surface the same size as the screen. To get the scrolling effect, we just call the scroll() function on the surface to shift everything left by one pixel and then draw a new pixel-wide slice of the terrain. The terrain could just be a single colour, but I’ve included a bit of maths-based RGB tinkering to make it more colourful. We can draw our terrain surface over a background image, as the SRCALPHA flag is set when we create the surface. This is also useful for detecting if the jet has hit the terrain. We can test the pixel from the surface in front of the jet: if it’s not transparent, kaboom!

    The jet itself is a Pygame Zero Actor and can be moved up and down with the arrow keys. The left and right arrows increase and decrease the speed. We generate the landscape in the updateLand() and drawLand() functions, where updateLand() first decides whether the landscape is inclining or declining (and the same with the roof), making sure that the roof and floor don’t get too close, and then it scrolls everything left.

    Each scroll action moves everything on the terrain surface to the left by one pixel.

    The drawLand() function then draws pixels at the right-hand edge of the surface from y coordinates 0 to 600, drawing a thin sliver of roof, open space, and floor. The speed of the jet determines how many times the landscape is updated in each draw cycle, so at faster speeds, many lines of pixels are added to the right-hand side before the display updates.

    The use of randint() can be changed to create a more or less jagged landscape, and the gap between roof and floor could also be adjusted for more difficulty. The original game also had enemy aircraft, which you could make with Actors, and fuel tanks on the ground, which could be created on the right-hand side as the terrain comes into view and then moved as the surface scrolls. Scramble sparked a wave of horizontal shooters, from both Konami and rival companies; this short piece of code could give you the basis for making a decent Scramble clone of your own:

    Here’s Mark’s code, which gets a Scramble-style scrolling landscape running in Python. To get it working on your system, you’ll first need to install Pygame Zero. And to download the full code, go here.

    Get your copy of Wireframe issue 22

    You can read more features like this one in Wireframe issue 22, available now at Tesco, WHSmith, and all good independent UK newsagents, and the Raspberry Pi Store, Cambridge.

    Or you can buy Wireframe directly from Raspberry Pi Press — delivery is available worldwide. And if you’d like a handy digital version of the magazine, you can also download issue 22 for free in PDF format.

    Make sure to follow Wireframe on Twitter and Facebook for updates and exclusive offers and giveaways. Subscribe on the Wireframe website to save up to 49% compared to newsstand pricing!

    Website: LINK

  • Recreate Super Sprint’s top-down racing | Wireframe issue 21

    Recreate Super Sprint’s top-down racing | Wireframe issue 21

    Reading Time: 4 minutes

    Making player and computer-controlled cars race round a track isn’t as hard as it sounds. Mark Vanstone explains all.

    The original Super Sprint arcade machine had three steering wheels and three accelerator pedals.

    From Gran Trak 10 to Super Sprint

    Decades before the advent of more realistic racing games such as Sega Rally or Gran Turismo, Atari produced a string of popular arcade racers, beginning with Gran Trak 10 in 1974 and gradually updated via the Sprint series, which appeared regularly through the seventies and eighties. By 1986, Atari’s Super Sprint allowed three players to compete at once, avoiding obstacles and collecting bonuses as they careened around the tracks.

    The original arcade machine was controlled with steering wheels and accelerator pedals, and computer-controlled cars added to the racing challenge. Tracks were of varying complexity, with some featuring flyover sections and shortcuts, while oil slicks and tornadoes posed obstacles to avoid. If a competitor crashed really badly, a new car would be airlifted in by helicopter.

    Code your own Super Sprint

    So how can we make our own Super Sprint-style racing game with Pygame Zero? To keep this example code short and simple, I’ve created a simple track with a few bends. In the original game, the movement of the computer-controlled cars would have followed a set of coordinates round the track, but as computers have much more memory now, I have used a bitmap guide for the cars to follow. This method produces a much less predictable movement for the cars as they turn right and left based on the shade of the track on the guide.

    Four Formula One cars race around the track. Collisions between other cars and the sides of the track are detected.

    With Pygame Zero, we can write quite a short piece of code to deal with both the player car and the automated ones, but to read pixels from a position on a bitmap, we need to borrow a couple of objects directly from Pygame: we import the Pygame image and Color objects and then load our guide bitmaps. One is for the player to restrict movement to the track, and the other is for guiding the computer-controlled cars around the track.

    Three bitmaps are used for the track. One’s visible, and the other two are guides for the cars.

    The cars are Pygame Zero Actors, and are drawn after the main track image in the draw() function. Then all the good stuff happens in the update() function. The player’s car is controlled with the up and down arrows for speed, and the left and right arrows to change the direction of movement. We then check to see if any cars have collided with each other. If a crash has happened, we change the direction of the car and make it reverse a bit. We then test the colour of the pixel where the car is trying to move to. If the colour is black or red (the boundaries), the car turns away from the boundary.

    The car steering is based on the shade of a pixel’s colour read from the guide bitmap. If it’s light, the car will turn right, if it’s dark, the car will turn left, and if it’s mid-grey, the car continues straight ahead. We could make the cars stick more closely to the centre by making them react quickly, or make them more random by adjusting the steering angle more slowly. A happy medium would be to get the cars mostly sticking to the track but being random enough to make them tricky to overtake.

    Our code will need a lot of extra elements to mimic Atari’s original game, but this short snippet shows how easily you can get a top-down racing game working in Pygame Zero:

    Here’s Mark’s code, which gets a Super Sprint-style racer running in Python. To get it working on your system, you’ll first need to install Pygame Zero. And to download the full code, go here.

    Get your copy of Wireframe issue 21

    You can read more features like this one in Wireframe issue 21, available now at Tesco, WHSmith, and all good independent UK newsagents.

    Or you can buy Wireframe directly from Raspberry Pi Press — delivery is available worldwide. And if you’d like a handy digital version of the magazine, you can also download issue 21 for free in PDF format.

    Make sure to follow Wireframe on Twitter and Facebook for updates and exclusive offers and giveaways. Subscribe on the Wireframe website to save up to 49% compared to news stand pricing!

    Website: LINK

  • Code your own 2D shooting gallery in Python | Wireframe issue 20

    Code your own 2D shooting gallery in Python | Wireframe issue 20

    Reading Time: 5 minutes

    Raspberry Pi’s own Rik Cross shows you how to hit enemies with your mouse pointer as they move around the screen.

    Duck Hunt made effective use of the NES Zapper, and made a star of its sniggering dog, who’d pop up to heckle you between stages.

    Clicky Clicky Bang Bang

    Shooting galleries have always been a part of gaming, from the Seeburg Ray-O-Lite in the 1930s to the light gun video games of the past 40 years. Nintendo’s Duck Hunt — played with the NES Zapper — was a popular console shooting game in the early eighties, while titles such as Time Crisis and The House of the Dead kept the genre alive in the 1990s and 2000s.

    Here, I’ll show you how to use a mouse to fire bullets at moving targets. Code written to instead make use of a light gun and a CRT TV (as with Duck Hunt) would look very different. In these games, pressing the light gun’s trigger would cause the entire screen to go black and an enemy sprite to become bright white. A light sensor at the end of the gun would then check whether the gun is pointed at the white sprite, and if so, would register a hit. If more than one enemy was on the screen when the trigger was pressed, each enemy would flash white for one frame in turn, so that the gun would know which enemy had been hit.

    Our simple shooting gallery in Python. You could try adding randomly spawning ducks, a scoreboard, and more.

    Pygame Zero

    I’ve used two Pygame Zero event hooks for dealing with mouse input. Firstly, the on_mouse_move() function updates the position of the crosshair sprite whenever the mouse is moved. The on_mouse_down() function reacts to mouse button presses, with the left button being pressed to fire a bullet (if numberofbullets > 0) and the right button to reload (setting numberofbullets to MAXBULLETS).

    Each time a bullet is fired, a check is made to see whether any enemy sprites are colliding with the crosshair — a collision means that an enemy has been hit. Luckily, Pygame Zero has a colliderect() function to tell us whether the rectangular boundary around two sprites intersects.

    If this helper function wasn’t available, we’d instead need to use sprites’ x and y coordinates, along with width and height data (w and h below) to check whether the two sprites intersect both horizontally and vertically. This is achieved by coding the following algorithm:

    • Is the left-hand edge of sprite 1 further left than the right-hand edge of sprite 2 (x1 < x2+w2)?
    • Is the right-hand edge of sprite 1 further right than the left-hand edge of sprite 2 (x1+w1 > x2)?
    • Is the top edge of sprite 1 higher up than the bottom edge of sprite 2 (y1 < y2+h2)?
    • Is the bottom edge of sprite 1 lower down than the top edge of sprite 2 (y1+h1 > y2)?

    If the answer to the four questions above is True, then the two sprites intersect (see Figure 1). To give visual feedback, hit enemies briefly remain on the screen (in this case, 50 frames). This is achieved by setting a hit variable to True, and then decrementing a timer once this variable has been set. The enemy’s deleted when the timer reaches 0.

    Figure 1: A visual representation of a collision algorithm, which checks whether two sprites intersect.

    As well as showing an enemy for a short time after being hit, successful shots are also shown. A problem that needs to be overcome is how to modify an enemy sprite to show bullet holes. A hits list for each enemy stores bullet sprites, which are then drawn over enemy sprites.

    Storing hits against an enemy allows us to easily stop drawing these hits once the enemy is removed. In the example code, an enemy stops moving once it has been hit.

    If you don’t want this behaviour, then you’ll also need to update the position of the bullets in an enemy’s hits list to match the enemy movement pattern.

    When decrementing the number of bullets, the max() function is used to ensure that the bullet count never falls below 0. The max() function returns the highest of the numbers passed to it, and as the maximum of 0 and any negative number is 0, the number of bullets always stays within range.

    There are a couple of ways in which the example code could be improved. Currently, a hit is registered when the crosshair intersects with an enemy — even if they are barely touching. This means that often part of the bullet is drawn outside of the enemy sprite boundary. This could be solved by creating a clipping mask around an enemy before drawing a bullet. More visual feedback could also be given by drawing missed shots, stored in a separate list.

    Here’s Rik’s code, which lets you hit enemies with your mouse pointer. To get it running on your system, you’ll first need to install Pygame Zero. And to download the full code, go here.

    Get your copy of Wireframe issue 20

    You can read more features like this one in Wireframe issue 20, available now at Tesco, WHSmith, and all good independent UK newsagents.

    Or you can buy Wireframe directly from Raspberry Pi Press — delivery is available worldwide. And if you’d like a handy digital version of the magazine, you can also download issue 20 for free in PDF format.

    Make sure to follow Wireframe on Twitter and Facebook for updates and exclusive offers and giveaways. Subscribe on the Wireframe website to save up to 49% compared to newsstand pricing!

    Website: LINK

  • Create your own arcade-style continue screen | Wireframe #19

    Create your own arcade-style continue screen | Wireframe #19

    Reading Time: 5 minutes

    Raspberry Pi’s Rik Cross shows you how to create game states, and rules for moving between them.

    Ninja Gaiden’s dramatic continue screen. Who would be cruel enough to walk away?

    The continue screen, while much less common now, was a staple feature of arcade games, providing an opportunity (for a small fee) to reanimate the game’s hero and to pick up where they left off.

    Continue Screens

    Games such as Tecmo’s Ninja Gaiden coin-op (known in some regions as Shadow Warriors) added jeopardy to their continue screen, in an effort to convince us to part with our money.

    Often, a continue screen is one of many screens that a player may find themselves on; other possibilities being a title screen or an instruction screen. I’ll show you how you can add multiple screens to a game in a structured way, avoiding a tangle of if…else statements and variables.

    A simple way of addressing this problem is to create separate update and draw functions for each of these screens, and then switch between these functions as required. Functions are ‘first-class citizens’ of the Python language, which means that they can be stored and manipulated just like any other object, such as numbers, text, and class instances. They can be stored in variables and other data types such as lists and dictionaries, and passed as parameters to (or returned from) other functions.

    the continue screen of SNK’s Fantasy

    SNK’s Fantasy, released in 1981, was the first arcade game to feature a continue screen.

    We can take advantage of the first-class nature of Python functions by storing the functions for the current screen in variables, and then calling them in the main update() and draw() functions. In the following example, notice the difference between storing a function in a variable (by using the function name without parentheses) and calling the function (by including parentheses).

    [Ed. comment: We have to use an image here because WordPress doesn’t seem to allow code indentation. We know that’s annoying because you can’t copy and paste the code, so if you know a better solution, please leave us a comment.]

    The example code above calls currentupdatefunction() and currentdrawfunction(), which each store a reference to separate update() and draw() functions for the continue screen. These continue screen functions could then also include logic for changing which function is called, by updating the function reference stored in currentupdatefunction and currentdrawfunction.

    This way of structuring code can be taken a step further by making use of state machines. In a state machine, a system can be in one of a (finite) number of predefined states, and rules determine the conditions under which a system can transition from one state into another.

    Rules define conditions that need to be satisfied in order to move between states.

    A state machine (in this case a very simplified version) can be implemented by first creating a core State() class. Each game state has its own update() and draw() methods, and a rules dictionary containing state:rule pairs – references to other state objects linked to functions for testing game conditions. As an example, the continuescreen state has two rules:

    • Transition to the gamescreen state if the SPACE key is pressed;
    • Transition to the titlescreen state if the frame timer reaches 10.

    This is pulled together with a StateMachine() class, which keeps track of the current state. The state machine calls the update() and draw() methods for the current state, and checks the rules for transitioning between states. Each rule in the current state’s rules list is executed, with the state machine updating the reference to its current state if the rule function returns True. I’ve also added a frame counter that is incremented by the state machine’s update() function each time it is run. While not a necessary part of the state machine, it does allow the continue screen to count down from 10, and could have a number of other uses, such as for animating sprites.

    Something else to point out is the use of lambda functions when adding rules to states. Lambda functions are small, single-expression anonymous functions that return the result of evaluating its expression when called. Lambda functions have been used in this example simply to make the code a little more concise, as there’s no benefit to naming the functions passed to addrule().

    State machines have lots of other potential uses, including the modelling of player states. It’s also possible to extend the state machine in this example by adding onenter() and onexit() functions that can be called when transitioning between states.

    Here’s Rik’s code, which gets a simple continue screen up and running in Python. To get it working on your system, you’ll need to install Pygame Zero. And to download the full code, visit our Github repository here.

    Get your copy of Wireframe issue 19

    You can read more features like this one in Wireframe issue 19, available now at Tesco, WHSmith, and all good independent UK newsagents.

    Or you can buy Wireframe directly from Raspberry Pi Press — delivery is available worldwide. And if you’d like a handy digital version of the magazine, you can also download issue 19 for free in PDF format.

    Make sure to follow Wireframe on Twitter and Facebook for updates and exclusive offers and giveaways. Subscribe on the Wireframe website to save up to 49% compared to newsstand pricing!

    Website: LINK

  • Recreate 3D Monster Maze’s 8-bit labyrinth | Wireframe issue 18

    Recreate 3D Monster Maze’s 8-bit labyrinth | Wireframe issue 18

    Reading Time: 4 minutes

    You too can recreate the techniques behind a pioneering 3D maze game in Python. Mark Vanstone explains how.

    3D Monster Maze, released in 1982 by J.K. Greye software, written by Malcolm Evans.

    3D Monster Maze

    While 3D games have become more and more realistic, some may forget that 3D games on home computers started in the mists of time on machines like the Sinclair ZX81. One such pioneering game took pride of place in my collection of tapes, took many minutes to load, and required the 16K RAM pack expansion. That game was 3D Monster Maze — perhaps the most popular game released for the ZX81.

    The game was released in 1982 by J.K. Greye Software, and written by Malcolm Evans. Although the graphics were incredibly low resolution by today’s standards, it became an instant hit. The idea of the game was to navigate around a randomly generated maze in search of the exit.

    The problem was that a Tyrannosaurus rex also inhabited the maze, and would chase you down and have you for dinner if you didn’t escape quickly enough. The maze itself was made of straight corridors on a 16×18 grid, which the player would move around from one block to the next. The shape of the blocks were displayed by using the low-resolution pixels included in the ZX81’s character set, with 2×2 pixels per character on the screen.

    The original ZX81 game drew its maze from chunky 2×2 pixel blocks.

    Draw imaginary lines

    There’s an interesting trick to recreating the original game’s 3D corridor display which, although quite limited, works well for a simplistic rendering of a maze. To do this, we need to draw imaginary lines diagonally from corner to corner in a square viewport: these are our vanishing point perspective guides. Then each corridor block in our view is half the width and half the height of the block nearer to us.

    If we draw this out with lines showing the block positions, we get a view that looks like we’re looking down a long corridor with branches leading off left and right. In our Pygame Zero version of the maze, we’re going to use this wireframe as the basis for drawing our block elements. We’ll create graphics for blocks that are near the player, one block away, two, three, and four blocks away. We’ll need to view the blocks from the left-hand side, the right-hand side, and the centre.

    The maze display is made by drawing diagonal lines to a central vanishing point.

    Once we’ve created our block graphics, we’ll need to make some data to represent the layout of the maze. In this example, the maze is built from a 10×10 list of zeros and ones. We’ll set a starting position for the player and the direction they’re facing (0–3), then we’re all set to render a view of the maze from our player’s perspective.

    The display is created from furthest away to nearest, so we look four blocks away from the player (in the direction they’re looking) and draw a block if there’s one indicated by the maze data to the left; we do the same on the right, and finally in the middle. Then we move towards the player by a block and repeat the process (with larger graphics) until we get to the block the player is on.

    Each visible block is drawn from the back forward to make the player’s view of the corridors.

    That’s all there is to it. To move backwards and forwards, just change the position in the grid the player’s standing on and redraw the display. To turn, change the direction the player’s looking and redraw. This technique’s obviously a little limited, and will only work with corridors viewed at 90-degree angles, but it launched a whole genre of games on home computers. It really was a big deal for many twelve-year-olds — as I was at the time — and laid the path for the vibrant, fast-moving 3D games we enjoy today.

    Here’s Mark’s code, which recreates 3D Monster Maze’s network of corridors in Python. To get it running on your system, you’ll need to install Pygame Zero. And to download the full code, visit our Github repository here.

    Get your copy of Wireframe issue 18

    You can read more features like this one in Wireframe issue 18, available now at Tesco, WHSmith, and all good independent UK newsagents.

    Or you can buy Wireframe directly from Raspberry Pi Press — delivery is available worldwide. And if you’d like a handy digital version of the magazine, you can also download issue 18 for free in PDF format.

    Make sure to follow Wireframe on Twitter and Facebook for updates and exclusive offers and giveaways. Subscribe on the Wireframe website to save up to 49% compared to newsstand pricing!

    Website: LINK

  • How to build databases using Python and text files | Hello World #9

    How to build databases using Python and text files | Hello World #9

    Reading Time: 6 minutes

    In Hello World issue 9, Raspberry Pi’s own Mac Bowley shares a lesson that introduces students to databases using Python and text files.

    In this lesson, students create a library app for their books. This will store information about their book collection and allow them to display, manipulate, and search their collection. You will show students how to use text files in their programs that act as a database.

    The project will give your students practical examples of database terminology and hands-on experience working with persistent data. It gives opportunities for students to define and gain concrete experience with key database concepts using a language they are familiar with. The script that accompanies this activity can be adapted to suit your students’ experience and competency.

    This ready-to-go software project can be used alongside approaches such as PRIMM or pair programming, or as a worked example to engage your students in programming with persistent data.

    What makes a database?

    Start by asking the students why we need databases and what they are: do they ever feel unorganised? Life can get complicated, and there is so much to keep track of, the raw data required can be overwhelming. How can we use computing to solve this problem? If only there was a way of organising and accessing data that would let us get it out of our head. Databases are a way of organising the data we care about, so that we can easily access it and use it to make our lives easier.

    Then explain that in this lesson the students will create a database, using Python and a text file. The example I show students is a personal library app that keeps track of which books I own and where I keep them. I have also run this lesson and allowed the students pick their own items to keep track of — it just involves a little more planning time at the end. Split the class up into pairs; have each of them discuss and select five pieces of data about a book (or their own item) they would like to track in a database. They should also consider which type of data each of them is. Give them five minutes to discuss and select some data to track.

    Databases are organised collections of data, and this allows them to be displayed, maintained, and searched easily. Our database will have one table — effectively just like a spreadsheet table. The headings on each of the columns are the fields: the individual pieces of data we want to store about the books in our collection. The information about a single book are called its attributes and are stored together in one record, which would be a single row in our database table. To make it easier to search and sort our database, we should also select a primary key: one field that will be unique for each book. Sometimes one of the fields we are already storing works for this purpose; if not, then the database will create an ID number that it uses to uniquely identify each record.

    Create a library application

    Pull the class back together and ask a few groups about the data they selected to track. Make sure they have chosen appropriate data types. Ask some if they can find any of the fields that would be a primary key; the answer will most likely be no. The ISBN could work, but for our simple application, having to type in a 10- or 13-digit number just to use for an ID would be overkill. In our database, we are going to generate our own IDs.

    The requirements for our database are that it can do the following things: save data to a file, read data from that file, create new books, display our full database, allow the user to enter a search term, and display a list of relevant results based on that term. We can decompose the problem into the following steps:

    • Set up our structures
    • Create a record
    • Save the data to the database file
    • Read from the database file
    • Display the database to the user
    • Allow the user to search the database
    • Display the results

    Have the class log in and power up Python. If they are doing this locally, have them create a new folder to hold this project. We will be interacting with external files and so having them in the same folder avoids confusion with file locations and paths. They should then load up a new Python file. To start, download the starter file from the link provided. Each student should make a copy of this file. At first, I have them examine the code, and then get them to run it. Using concepts from PRIMM, I get them to print certain messages when a menu option is selected. This can be a great exemplar for making a menu in any application they are developing. This will be the skeleton of our database app: giving them a starter file can help ease some cognitive load from students.

    Have them examine the variables and make guesses about what they are used for.

    • current_ID – a variable to count up as we create records, this will be our primary key
    • new_additions – a list to hold any new records we make while our code is running, before we save them to the file
    • filename – the name of the database file we will be using
    • fields – a list of our fields, so that our dictionaries can be aligned with our text file
    • data – a list that will hold all of the data from the database, so that we can search and display it without having to read the file every time

    Create the first record

    We are going to use dictionaries to store our records. They reference their elements using keys instead of indices, which fit our database fields nicely. We are going to generate our own IDs. Each of these must be unique, so a variable is needed that we can add to as we make our records. This is a user-focused application, so let’s make it so our user can input the data for the first book. The strings, in quotes, on the left of the colon, are the keys (the names of our fields) and the data on the right is the stored value, in our case whatever the user inputs in response to our appropriate prompts. We finish this part of by adding the record to the file, incrementing the current ID, and then displaying a useful feedback message to the user to say their record has been created successfully. Your students should now save their code and run it to make sure there aren’t any syntax errors.

    You could make use of pair programming, with carefully selected pairs taking it in turns in the driver and navigator roles. You could also offer differing levels of scaffolding: providing some of the code and asking them to modify it based on given requirements.

    How to use the code in your class

    To complete the project, your students can add functionality to save their data to a CSV file, read from a database file, and allow users to search the database. The code for the whole project is available at helloworld.cc/database.

    An example of the code

    You may want to give your students the entire piece of code. They can investigate and modify it to their own purpose. You can also lead them through it, having them follow you as you demonstrate how an expert constructs a piece of software. I have done both to great effect. Let me know how your classes get on! Get in touch at [email protected]

    Hello World issue 9

    The brand-new issue of Hello World is out today, and available right now as a free PDF download from the Hello World website.

    UK-based educators can also sign up to receive Hello World as printed magazine FOR FREE, direct to their door. And those outside the UK, educator or not, can subscribe to receive new digital issues of Hello World in their inbox on the day of release.

    Website: LINK