
BirdCalls: how an old payphone became a decade-long lesson in what technology is for
Reading Time: 5 minutesThere’s a yellow payphone bolted to a wall in Takoma Park, Maryland. Pick up the…
Reading Time: 4 minutesLou’s Lagoon ist ein Flugabenteuer, das am 27. August für PS5 erscheint. Ihr sucht als junger Pilot nach eurem vermissten Onkel Lou…
> EXECUTE_ARTICLE_VIEW
Reading Time: 5 minutesThere’s a yellow payphone bolted to a wall in Takoma Park, Maryland. Pick up the…
Reading Time: < 1 minutePost written by: blogdottv Reading Time: 5 minutesWir haben noch mehr Spiele, noch mehr…
Reading Time: < 1 minutePost written by: Horst Klein Reading Time: 7 minutesIn The Blood of Dawnwalker, der…
Reading Time: < 1 minutePost written by: Horst Klein Reading Time: 7 minutesIn The Blood of Dawnwalker, der…
Reading Time: 4 minutesOrder of the Sinking Star ist ein Rätselspiel von Jonathan Blows Studio Thekla und erscheint…
Reading Time: 4 minutesMach Dich bereit, Spartan – Halo: Campaign Evolved und viele weitere spannende Titel stehen in…
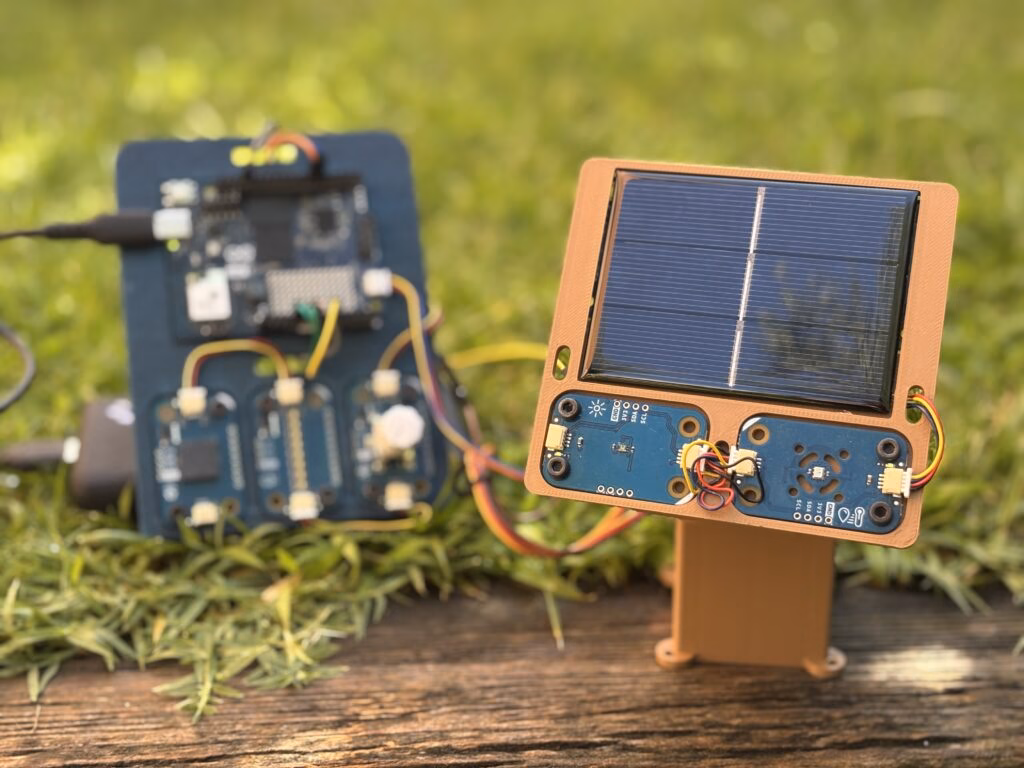
Reading Time: 3 minutesSolar energy is one of the most important technologies of our time, and understanding how…
Reading Time: 6 minutesDie offene Beta von MARVEL Tōkon: Fighting Souls findet im Zeitraum vom 24. Juli bis…
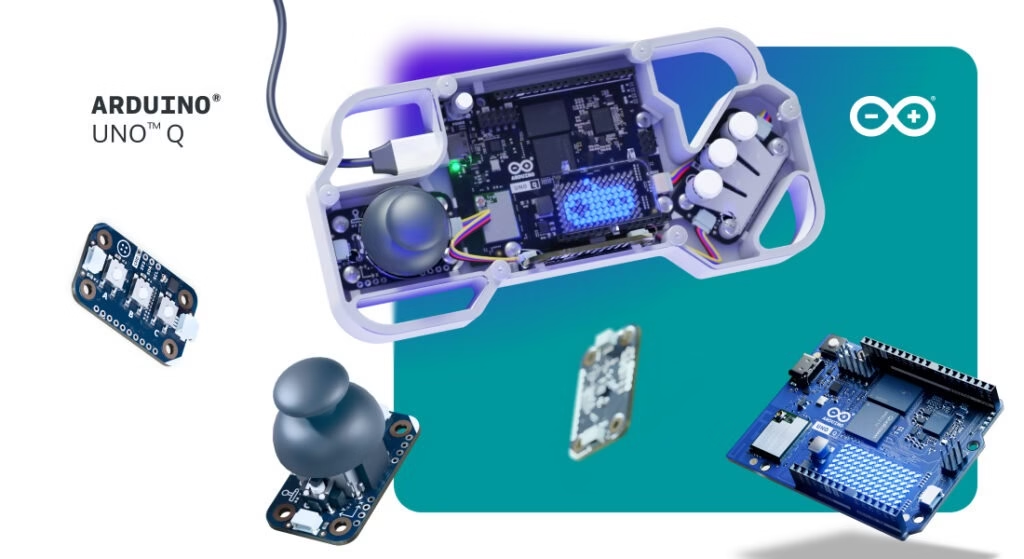
Reading Time: 4 minutesJust a few weeks after launching the UNO Q DIY synth bundle, we’re adding a…
Reading Time: 7 minutesCastlevania: Belmont’s Curse erscheint am 15. Oktober auf PS5, pünktlich zu Halloween. Das Action-Adventure von…

Reading Time: 2 minutesIf you want to build RC airplanes, you’ll need a way to make lightweight wings.…
Reading Time: 5 minutesDas Warten hat bald ein Ende! Die offene Beta von MARVEL Tōkon: Fighting Souls nähert…
Reading Time: 5 minutesPro Jank Footy ist ein chaotisches Arcade-Sportspiel rund um Australian Rules Football und erscheint am…
Reading Time: 4 minutesHallo, ich bin Emil Esov von Saber Interactive, und wir freuen uns sehr, dass Clive…
Reading Time: 4 minutesArknights: Endfield wird im Rahmen des Updates auf Version 1.4 die verbesserte PlayStation Spectral Super…
Reading Time: 4 minutesCall of Duty: Modern Warfare 4 erscheint am 23. Oktober und führt mit „Kill Block“…
Reading Time: 5 minutesUpdate: In einer früheren Version dieses Beitrags wurde fälschlicherweise angegeben, dass eine PS5-Version von Fahrenheit…
Reading Time: 6 minutesDer Free-to-Play-Multiplayer-Helden-Shooter Ratchet & Clank: Ranger Rumble startet offiziell die weltweite Vorabregistrierung für Mobilgeräte im…
Reading Time: 2 minutesMichel Willems runs a photography and print shop in Ontario, Canada. Like all business owners,…
Reading Time: 4 minutesWe work with partners globally to promote AI literacy through Experience AI, our programme created…

Reading Time: 3 minutesThere’s something really special about a Code Club. It’s a unique space for young people…
Reading Time: 5 minutesReichtum, Macht und Ruhm: Der Mann, der nach all diesen Dingen strebt, ist Edward Kenway,…