As announced at CES 2023 in Las Vegas, our tiny form factor family keeps growing: the 22.86 x 22.86 mm Nicla range now includes Nicla Voice, allowing for easy implementation of always-on speech recognition on the edge.
1. The impressive sensor package. Nicla Voice comes with a full set of sensors: microphone, smart 6-axis motion sensor and magnetometer – so it can not only listen to you, your machines, the environment around it, but also recognize gestures, vibrations and other movements.
2. The high-performance AI brains. Nicla Voice runs audio inputs through the powerful Syntiant NDP120 Neural Decision processor, which mimics human neural pathways to run multiple AI algorithms and automate complex tasks. In other words, it hears different events and keywords simultaneously, and is capable of understanding and learning what sounds mean.
3. The easy connectivity features. It connects to existing devices thanks to onboard Bluetooth® Low Energy connectivity.
4. The effortless integration with custom boards. Thanks to its headers and castellated pins, Nicla Voice is ready to go from prototype to industrial-scale production, fitting right into any custom carrier board you develop.
5. The Edge Impulse compatibility. In line with our mission to make complex technologies accessible to all, Nicla Voice is compatible with Edge Impulse, the leading development platform for machine learning on edge devices.
6. The minimal power needs. And last but absolutely not least, it is so ultra-low power it can be the brain of always-on – and even battery-operated – solutions. No need to run dedicated power lines, no switches or interfaces to activate the system. It’s ready to listen, 24/7, anywhere you want to install it.
Speechless? We’re sure you’ll find your voice soon. With Nicla Voice’s ready-to-use combination of sensors and processing power, you can prototype and develop new solutions that leverage voice detection and voice recognition, or interpret any other audio input – from machines that need maintenance to water dripping, and from glass breaking to alarms that must get through headphones’ noise-canceling features. We can’t wait to hear what you’ll create with it!
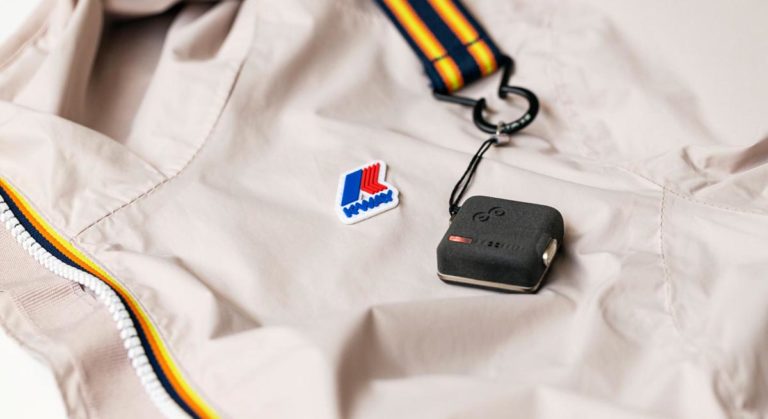
Going for a hike outdoors is a great way to relieve stress, do some exercise, and get closer to nature, but tracking them can be a challenge. Our recent collaboration with K-Way led Zalmotek to develop a small wearable device that can be paired to a jacket to track walking speed, steps taken, and even the current atmospheric conditions.
At its core, the tracker can be split into having three main functions: weather prediction, step/climbing activity, and a way to gather and send raw data over Bluetooth® Low Energy to the Arduino IoT Cloud for additional processing and training machine learning models. Performing these tasks is a Nicla Sense ME board, which contains an advanced six-axis BHI260AP IMU, a three-axis magnetometer, a pressure sensor, and a BME688 four-in-one gas sensor with temperature and humidity capabilities.
Zalmotek first collected data samples using the Edge Impulse Studio from the barometer ranging from rising to falling air pressure, as they predict clear or stormy conditions, respectively. Once finished, a classification model was trained and deployed to the Nicla Sense, where the LEDs could indicate which weather pattern is more likely. The activity tracking model, however, was trained using data collected from the IMU and labeled with either walking, climbing, or staying. After integrating them both into a single sketch, Zalmotek created an Arduino IoT Cloud dashboard for displaying these values in real-time.
Imagine what could happen if you could put your hands on the most iconic rain jacket, paired with a Nicla Sense, and redefine the idea of sensing the surroundings.
Whether you are a professional developer or a beginner, this is your opportunity to stand out. Simply send us your pitch and we’ll select the best ideas to be brought to life with the support of Arduino and Edge Impulse.
Humidity, acceleration, pressure, temperature, CO2 levels, and air quality are just some of the ingredients that you can use to build your personalizedArduino x K-Way experience.
In addition, we can’t wait to see how you will decide to leverage these sensors in combination with the Edge Impulse ML development platform to add AI directly to the jacket.
So, are you up for this challenge?
To participate and receive the tools: share your idea through a video or a PDF and be part of this incredible project. The best ideas will receive the Nicla Sense ME and a K-Way jacket to create the project,, starting the competition on November 24th. The full terms & conditions can be found here.
Curious about what we did?
Attached to the zipper of the K-Way jacket, the Nicla Sense ME recognizes in real-time whenever the air you’re breathing is polluted, can indicate changing weather conditions, and it communicates with you through a LED on the board or even a smartphone app.
Now is your turn: if your proposal is accepted, we’ll provide the jacket and the technology (over $200 in value), you write the next story. Go have fun!
Imagine the possibilities generated by integrating advanced AI and powerful sensors in to one of the most iconic outdoors jackets with a heritage that’s more than 50 years old. You could start sensing and interacting with the surroundings like never before.
This is what we created here at Arduino: enclosing the Nicla Sense ME, the new sensory brain from Arduino, into the K-WAY jacket, powered with Edge Impulse AI, to sense the external world and imagine a new way to conceive smart clothing.
The Nicla Sense ME is beautifully nestled in a custom silicone mold, attached to the iconic coloured zipper of the K-WAY jacket to help you program, monitor, and work with some of the most relevant environmental data that matters to you most.
The Nicla Sense ME on the K-WAY jacket recognizes in real-time whenever the air you’re breathing is polluted, can indicate changing weather conditions, and it communicates with you through a LED on the board or even a smart phone app.
And what would you do with the same technology? If this question is intriguing to you, get ready and pitch your idea. Arduino, with the support of Edge Impulse, will select the best pitch ideas and send over a jacket and a Nicla Sense ME for developing your ideas and make them come true!
The call for developers will officially open on October 18, be sure you won’t miss it!
Wevolver’s previous article about the Arduino Pro ecosystem outlined how embedded sensors play a key role in transforming machines and automation devices to Cyber Physical Production Systems (CPPS). Using CPPS systems, manufacturers and automation solution providers capture data from the shop floor and use it for optimizations in areas like production schedules, process control, and quality management. These optimizations leverage advanced data Internet of Things (IoT) analytics over manufacturing datasets, which is the reason why data are the new oil.
Deployment Options for IoT Analytics: From Cloud Analytics to TinyML
IoT analytics entail statistical data processing and employ Machine Learning (ML) functions, including Deep Learning (DL) techniques i.e., ML based on deep neural networks. Many manufacturing enterprises deploy IoT analytics in the cloud. Cloud IoT analytics use the vast amounts of cloud data to train accurate DL models. Accuracy is important for many industrial use cases like Remaining Useful Life calculation in predictive maintenance. Nevertheless, it is also possible to execute analytics at the edge of the network. Edge analytics are deployed within embedded devices or edge computing clusters at the factory’s Local Area Network (LAN). They are appropriate for real-time use cases that demand low latency such as real-time detection of defects. Edge analytics are more power-efficient than cloud analytics. Moreover, they offer increased data protection as data stays within the LAN.
During the last couple of years, industrial organizations use TinyML to execute ML models within CPU and memory-constrained devices. TinyML is faster, real-time, more power-efficient, and more privacy-friendly than any other form of edge analytics. Therefore, it provides benefits for many Industry 4.0 use cases.
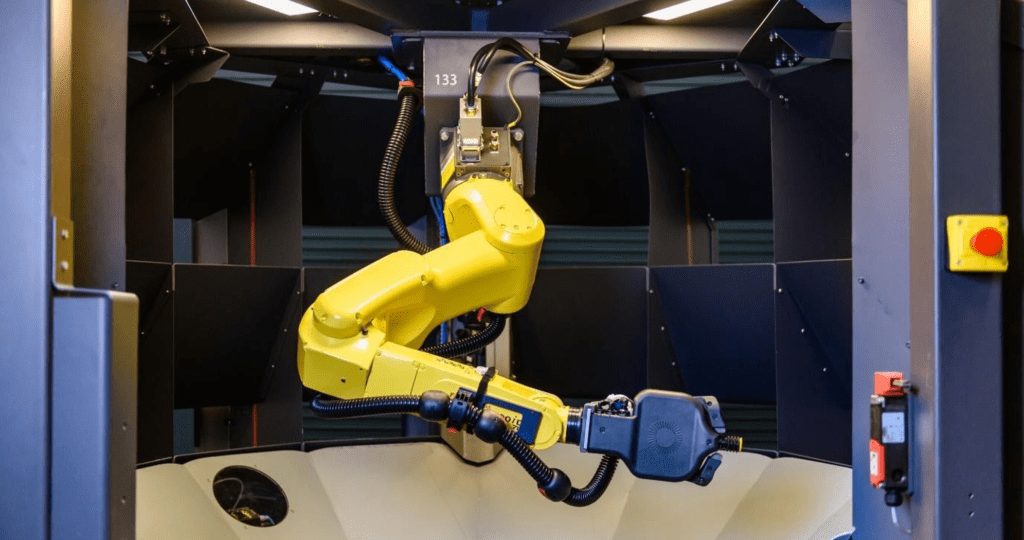
TinyML is the faster, real-time, most power-efficient, and most privacy friendly form of edge analytics. Image credit: Carbon Robotics.
Building TinyML Applications
The process of developing and deploying TinyML applications entails:
Getting or Producing a Dataset, which is used for training the TinyML model. In this direction, data from sensors or production logs can be used.
Train an ML or DL Model, using standard tools and libraries like Jupyter Notebooks and Python packages like TensorFlow and NumPy. The work entails Exploratory Data Analysis steps towards understanding the data, identifying proper ML models, and preparing the data for training them.
Evaluate the Model’s Performance, using the trained model predictions and calculating various error metrics Depending on the achieved performance, the TinyML engineer may have to improve the model and avoid overfitting on the data. Different models must be tested to find the best one.
Make the Model Appropriate to Run on an Embedded Device, using tools like TensorFlow Lite which provides a “converter” library that turns a model into a space-efficient format. TensorFlow Lite provides also an “interpreter” library that runs the converted model using the most efficient operations for a given device. In this step, a C/C++ sketch is produced to enable on device deployment.
On-device Inference and Binary Development, which involves the C/C++ and embedded systems development part and produces a binary application for on-device inference.
Deploying the Binary to a Microcontroller, which makes the microcontroller able to analyse data and derive real-time insights.
Building a Google Assistant using tinyML. Image credit: Arduino.
Leveraging AutoML for Faster Development with Arduino Pro
Nowadays, Automatic Machine Learning (AutoML) tools are used to develop TinyML on various boards, including Arduino boards. Emerging platforms such as Edge Impulse, Qeexo and SensiML, among others, provide AutoML tools and developers’ resources for embedded ML development. Arduino is collaborating with such platforms as part of their strategy to make complex technologies open and simple to use by anyone.
Within these platforms, users collect real-world sensor data, train ML models on the cloud, and ultimately deploy the model back to an Arduino device. It is also possible to integrate ML models with Arduino sketches based on simple function calls. AutoML pipelines ease the tasks of (re)developing and (re)deploying models to meet complex requirements.
The collaboration between Arduino and ML platforms enables thousands of developers to build applications that embed intelligence in smart devices such as applications that recognize spoken keywords, gestures, and animals. Implementing applications that control IoT devices via natural language or gestures is relatively straightforward for developers who are familiar with Arduino boards.
Arduino has recently introduced its new Arduino Pro ecosystem of industrial-grade products and services, which support the full development, production and operation lifecycle from Hardware and Firmware to Low Code, Clouds, and Mobile Apps. The Pro ecosystem empowers thousands of developers to jump into Industry 4.0 development and to employ advanced edge analytics.
Big opportunity at every scale
The Arduino ecosystem provides excellent support for TinyML, including boards that ease TinyML development, as well as relevant tools and documentation. For instance, the Arduino Nano 33 BLE Sense board is one of the most popular boards for TinyML. It comes with a well-known form factor and various embedded sensors. The latter include a 9-axis inertial sensor that makes the board ideal for wearable devices, as well as for humidity and temperature sensors. As another example, Arduino’s Portenta H7 board includes two asymmetric cores, which enables simultaneously runs of high level code such as protocol stacks, machine learning or even interpreted languages (e.g., MicroPython or JavaScript). Furthermore, the Arduino IDE (Integrated Development Environment) provides the means for customizing embedded ML pipelines and deploying them in Arduino boards.
In a Nutshell
ML and AI models need not always to run over powerful clouds and related High Performance Computing services. It is also possible to execute neural networks over tiny memory-limited devices like microcontrollers, which opens unprecedented opportunities for pervasive intelligence. The Arduino ecosystem offers developers the resources they need to ride the wave of Industry 4.0 and TinyML. Arduino boards and the IDE lower the barriers for thousands of developers to engage with IoT analytics for industrial intelligence.
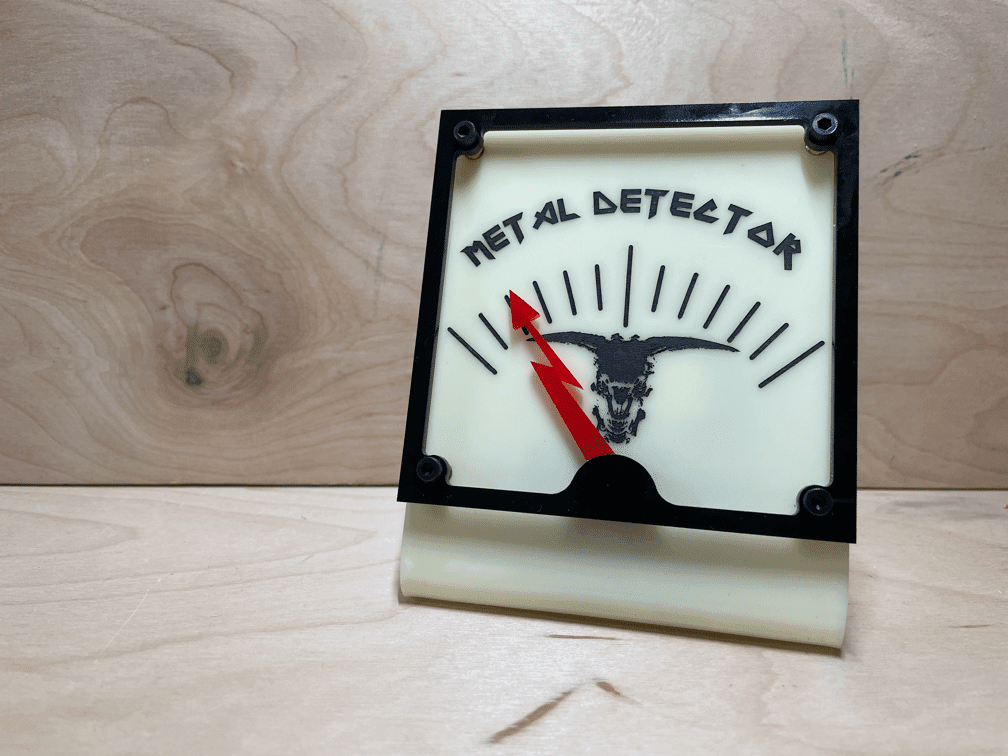
After learning about the basics of embedded ML, industrial designer and educator Phil Caridi had the idea to build a metal detector, but rather than using a coil of wire to sense eddy currents, his device would use a microphone to determine if metal music is playing nearby.
Caridi started out by collecting around two hours of music and then dividing the samples into two labels: “metal” and “non_metal” using Edge Impulse. After that, he began the process of training a neural network after passing each sample through an MFE filter. The end result was a model capable of detecting if a given piece of music is either metal or non-metal with around 88.2% accuracy. This model was then deployed onto a Nano 33 BLE Sense, which tells the program what kind of music is playing, but Caridi wasn’t done yet. He also 3D-printed a mount and gauge that turns a needle further to the right via a servo motor as the confidence of “metal music” increases.
As seen in his video, the device successfully shows the difference between the band Death’s “Story to Tell” track and the much tamer and non-metal song “Oops!… I Did It Again” by Britney Spears. For more details about this project, you can read Caridi’s blog post.
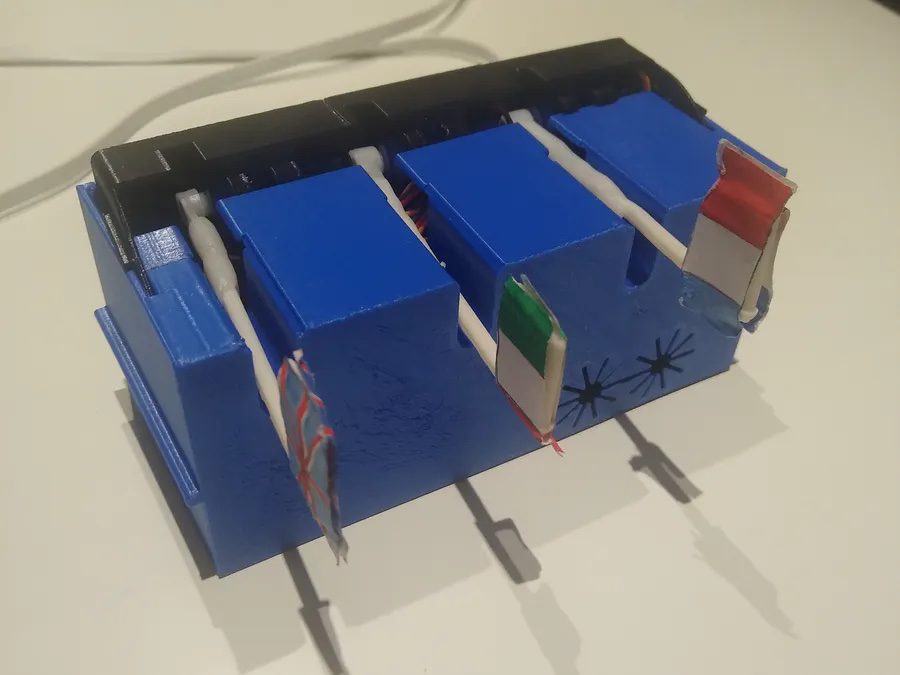
Although smartphone users have had the ability to quickly translate spoken words into nearly any modern language for years now, this feat has been quite tough to accomplish on small, memory-constrained microcontrollers. In response to this challenge, Hackster.io user Enzo decided to create a proof-of-concept project that demonstrated how an embedded device can determine the language currently being spoken without the need for an Internet connection.
This so-called “language detector” is based on an Arduino Nano 33 BLE Sense, which is connected to a common PCA9685 motor driver that is, in turn, attached to a set of three micro servo motors — all powered by a single 9V battery. Enzo created a dataset by recording three words: “oui” (French), “si” (Italian), and “yes” (English) for around 10 minutes each for a total of 30 minutes of sound files. He also added three minutes of random background noise to help distinguish between the target keywords and non-important words.
Once a model had been trained using Edge Impulse, Enzo exported it back onto his Nano 33 BLE Sense and wrote a small bit of code that reads audio from the microphone, classifies it, and determines which word is being spoken. Based on the result, the corresponding nation’s flag is raised to indicate the language.
You can see the project in action below and read more about it here on Hackster.io.
This pocket-sized uses tinyML to analyze a COVID-19 patient’s health conditions
Arduino Team — June 21st, 2021
In light of the ongoing COVID-19 pandemic, being able to quickly determine a person’s current health status is very important. This is why Manivannan S wanted to build his very own COVID Patient Health Assessment Device that could take several data points from various vitals and make a prediction about what they indicate. The pocket-sized system features a Nano 33 BLE Sense at its core, along with a Maxim Integrated MAX30102 pulse oximeter/heart-rate sensor to measure oxygen saturation and pulse.
From this incoming health data, Manivannan developed a simple algorithm that generates a “Health Index” score by plugging in factors such as SpO2, respiration rate, heart rate, and temperature into a linear regression. Once some sample data was created, he sent it to Edge Impulse and trained a model that uses a series of health indices to come up with a plausible patient condition.
After deploying the model to the Nano 33 BLE Sense, Manivannan put some test data on it to simulate a patient’s vital signs and see the resulting inferences. As expected, his model successfully identified each one and displayed it on an OLED screen. To read more about how this device works, plus a few potential upgrades, you can visit its write-up on Hackster.io here or check out the accompanying video below.
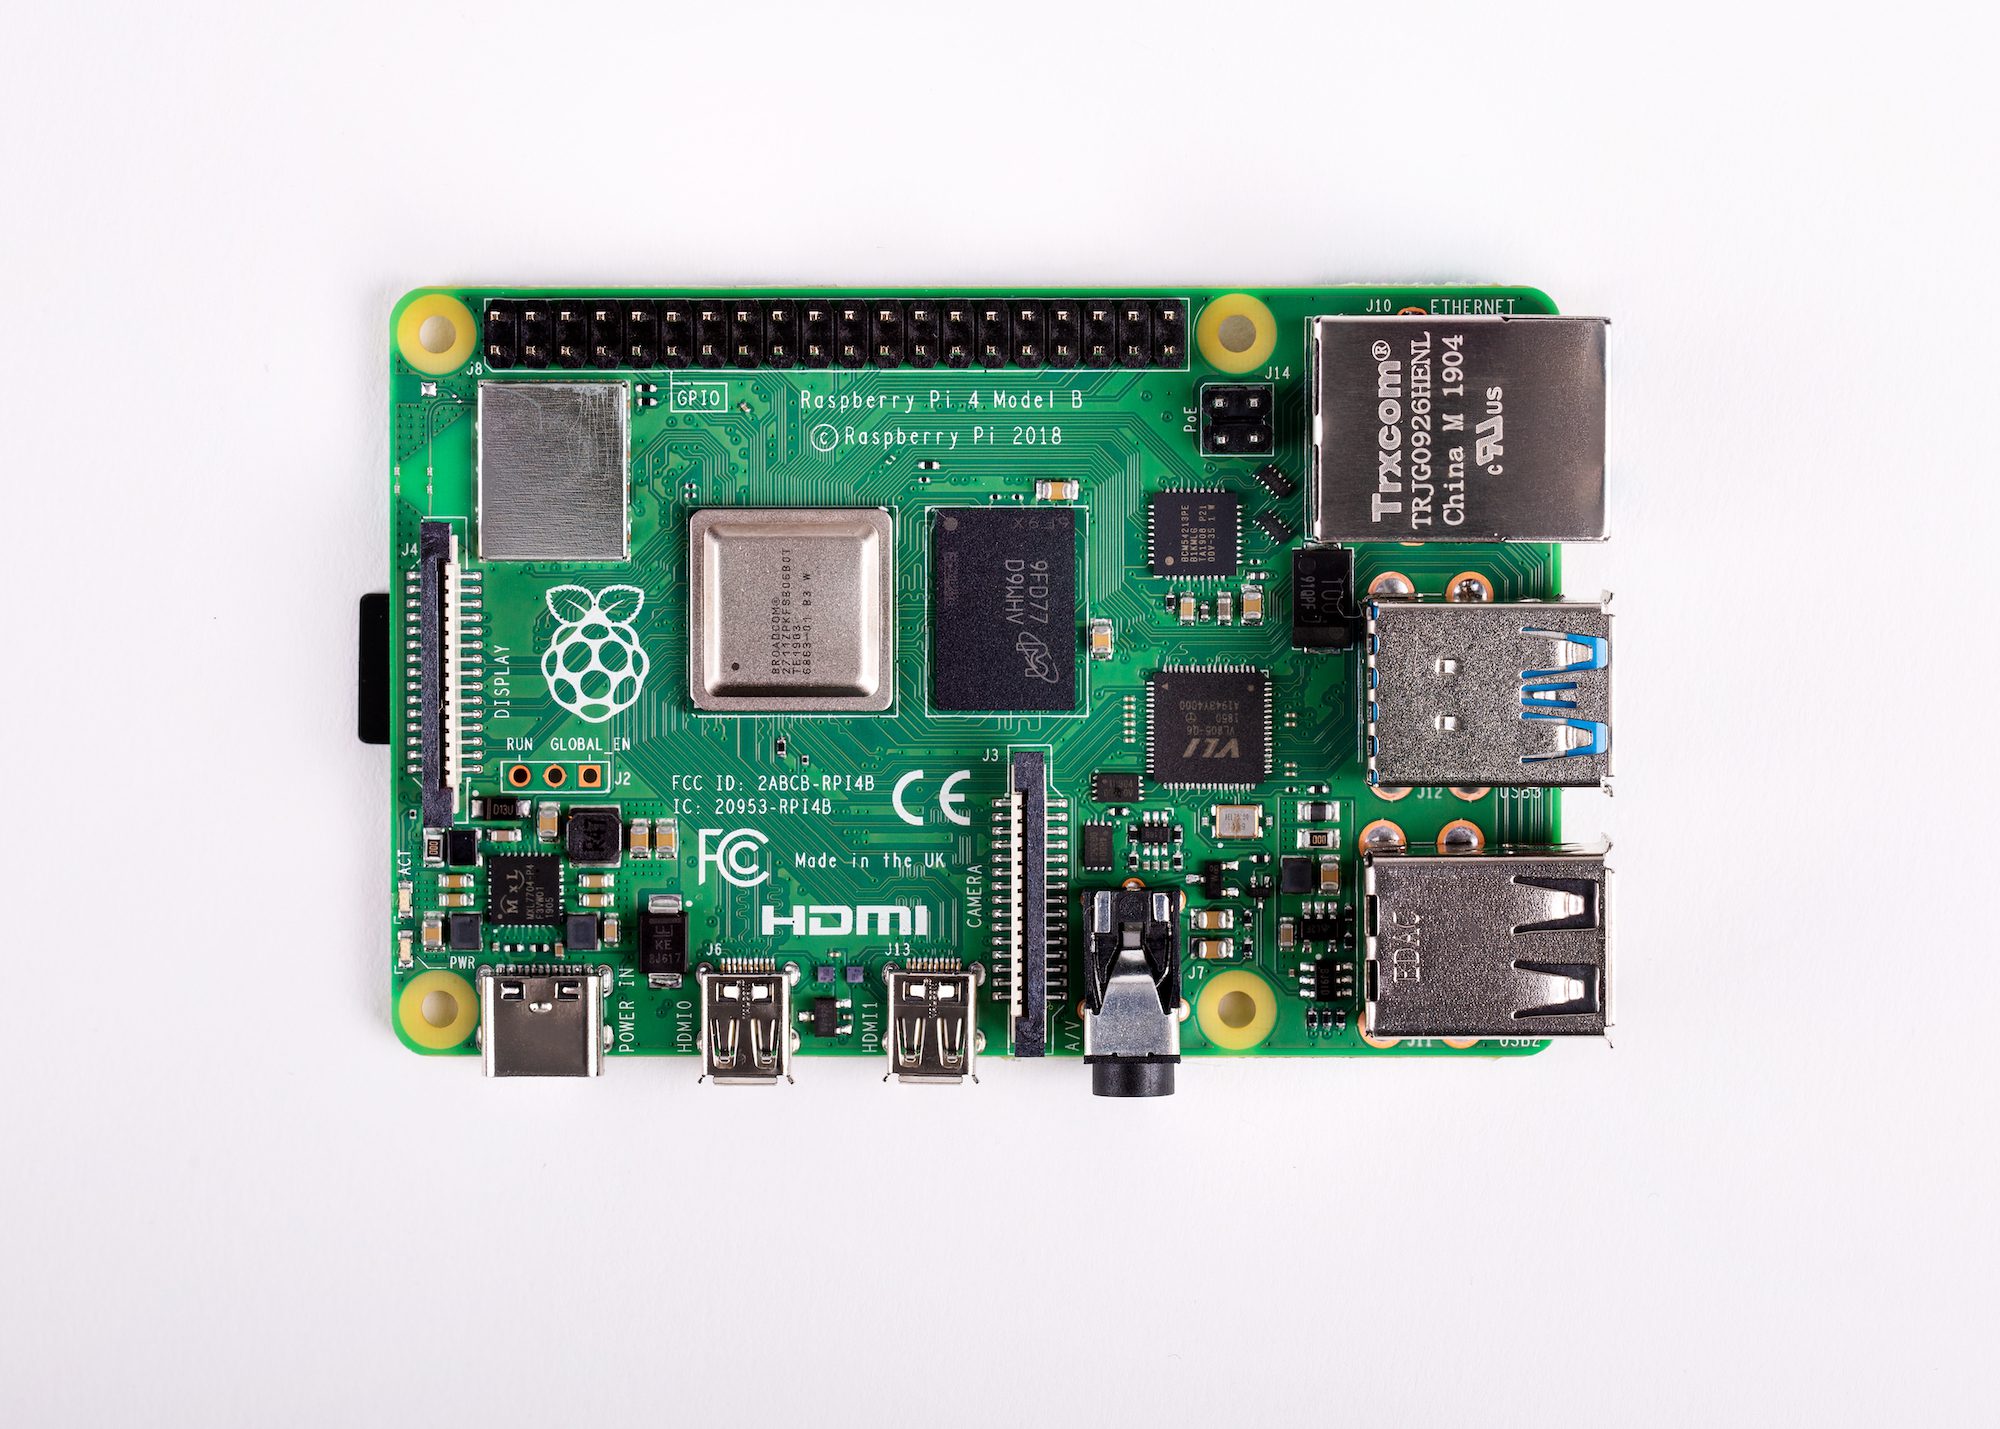
Raspberry Pi is probably the most affordable way to get started with embedded machine learning. The inferencing performance we see with Raspberry Pi 4 is comparable to or better than some of the new accelerator hardware, but your overall hardware cost is just that much lower.
Raspberry Pi 4 Model B
However, training custom models on Raspberry Pi — or any edge platform, come to that — is still problematic. This is why today’s announcement from Edge Impulse is a big step, and makes machine learning at the edge that much more accessible. With full support for Raspberry Pi, you now have the ability to take data, train against your own data in the cloud on the Edge Impulse platform, and then deploy the newly trained model back to your Raspberry Pi.
Today’s announcement includes new SDKs: for Python, Node.js, Go, and C++. This allows you to integrate machine learning models directly into your own applications. There is also support for object detection, exclusively on the Raspberry Pi; you can train a custom object detection model using camera data taken on your own Raspberry Pi, and then deploy and use this custom model, rather than relying on a pretrained stock image classification model.
Because the importance of bananas to machine learning researchers can not be overstated. To test it out, we’re going to train a very simple model that can tell the difference between a banana🍌 and an apple🍎.
Getting started
If you don’t already have an Edge Impulse account you should open up a browser on your laptop and then create an account, along with a test project. I’m going to to call mine “Object detection”.
Creating a new project in Edge Impulse
We’re going to be building an image classification project, one that can tell the difference between a banana 🍌 and an apple 🍎, but Edge Impulse will also let you build an object detection project, one that will identify multiple objects in an image.
$ edge-impulse-linux
Edge Impulse Linux client v1.1.5
? What is your user name or e-mail address (edgeimpulse.com)? alasdair
? What is your password? [hidden]
This is a development preview.
Edge Impulse does not offer support on edge-impulse-linux at the moment. ? To which project do you want to connect this device? Alasdair Allan / Object d
etection
? Select a microphone USB-Audio - Razer Kiyo[SER] Using microphone hw:1,0
? Select a camera Razer Kiyo[SER] Using camera Razer Kiyo starting...
[SER] Connected to camera
[WS ] Connecting to wss://remote-mgmt.edgeimpulse.com
[WS ] Connected to wss://remote-mgmt.edgeimpulse.com
? What name do you want to give this device? raspberrypi[WS ] Device "raspberrypi" is now connected to project "Object detection"
[WS ] Go to https://studio.edgeimpulse.com/studio/XXXXX/acquisition/training to build your machine learning model!
and log in to your Edge Impulse account. You’ll then be asked to choose a project, and finally to select a microphone and camera to connect to the project. I’ve got a Razer Kiyo connected to my own Raspberry Pi so I’m going to use that.
Raspberry Pi has connected to Edge Impulse
If you still have your project open in a browser you might see a notification telling you that your Raspberry Pi is connected. Otherwise you can click on “Devices” in the left-hand menu for a list of devices connected to that project. You should see an entry for your Raspberry Pi.
The list of devices connected to your project
Taking training data
If you look in your Terminal window on your Raspberry Pi you’ll see a URL that will take you to the “Data acquisition” page of your project. Alternatively you can just click on “Data acquisition” in the left-hand menu.
Getting ready to collect training data
Go ahead and select your Raspberry Pi if it isn’t already selected, and then select the Camera as the sensor. You should see a live thumbnail from your camera appear to the right-hand side. If you want to follow along, position your fruit (I’m starting with with the banana 🍌), add a text label in the “Label” box, and hit the “start sampling” button. This will take and save an image to the cloud. Reposition the banana and take ten images. Then do it all again with the apple 🍎.
Ten labelled images each of the banana 🍌 and the apple 🍎
Since we’re building an incredibly simplistic model, and we’re going to leverage transfer learning, we probably now have enough training data with just these twenty images. So let’s go and create a model.
Creating a model
Click on “Impulse design” in the left-hand menu. Start by clicking on the “Add an input block” box and click on the “Add” button next to the “Images” entry. Next click on the “Add a processing block” box. Then click on the “Add” button next to the “Image” block to add a processing block that will normalise the image data and reduce colour depth. Then click on the “Add a learning block” box and select the “Transfer Learning (images)” block to grab a pretrained model intended for image classification, on which we will perform transfer learning to tune it for our banana 🍌 and apple 🍎 recognition task. You should see the “Output features” block update to show 2 output features. Now hit the “Save Impulse” button.
Our configured Impulse
Next click on the “Images” sub-item under the “Impulse design” menu item, switch to the “Generate features” tab, and then hit the green “Generate features” button.
Generating model features
Finally, click on the “Transfer learning” sub-item under the “Impulse design” menu item, and hit the green “Start training” button at the bottom of the page. Training the model will take some time. Go get some coffee ☕.
A trained model
Testing our model
We can now test our trained model against the world. Click on the “Live classification” entry in the left-hand menu, and then hit then the green “Start sampling” button to take a live picture from your camera.
Live classification to test your model
You might want to go fetch a different banana 🍌, just for testing purposes.
A live test of the model
If you want to do multiple tests, just scroll up and hit the “Start sampling” button again to take another image.
Deploying to your Raspberry Pi
Now we’ve (sort of) tested our model, we can deploy it back to our Raspberry Pi. Go to the Terminal window where the edge-impulse-linux command connecting your Raspberry Pi to Edge Impulse is running, and hit Control-C to stop it. Afterwards we can do a quick evaluation deployment using the edge-impulse-runner command.
$ edge-impulse-linux-runner
This is a development preview.
Edge Impulse does not offer support on edge-impulse-linux-runner at the moment. Edge Impulse Linux runner v1.1.5 [RUN] Already have model /home/pi/.ei-linux-runner/models/24217/v2/model.eim not downloading...
[RUN] Starting the image classifier for Alasdair Allan / Object detection (v2)
[RUN] Parameters image size 96x96 px (3 channels) classes [ 'apple', 'banana' ]
[RUN] Using camera Razer Kiyo starting...
[RUN] Connected to camera Want to see a feed of the camera and live classification in your browser? Go to http://XXX.XXX.XXX.XXX:XXXX classifyRes 31ms. { apple: '0.0097', banana: '0.9903' }
classifyRes 29ms. { apple: '0.0082', banana: '0.9918' } . . .
classifyRes 23ms. { apple: '0.0078', banana: '0.9922' }
This will connect to the Edge Impulse cloud, download your trained model, and start up an application that will take the video stream coming from your camera and look for bananas 🍌 and apples 🍎. The results of the model inferencing will be shown frame by frame in the Terminal window. When the runner application starts up you’ll also see a URL: copy and paste this into a browser, and you’ll see the view from the camera in real time along with the inferencing results.
Deployed model running locally on your Raspberry Pi
Success! We’ve taken our training data and trained a model in the cloud, and we’re now running that model locally on our Raspberry Pi. Because we’re running the model locally, we no longer need network access. No data needs to leave the Raspberry Pi. This is a huge privacy advantage for edge computing compared to cloud-connected devices.
Wrapping up?
While we’re running our model inside Edge Impulse’s “quick look” application, we can deploy the exact same model into our own applications, as today’s announcement includes new SDKs: for Python, Node.js, Go, and C++. These SDKs let us build standalone applications to collect data not just from our camera and microphone, but from other sensors like accelerometers, magnetometers, or anything else you can connect to a Raspberry Pi.
Performance metrics for Edge Impulse are promising, although still somewhat below what we’ve seen using TensorFlow Lite directly on Raspberry Pi 4, for inferencing using similar models. That said, it’s really hard to compare performance across even very similar models as it depends so much on the exact situation you’re in and what data you’re dealing with, so your mileage may vary quite a lot here.
However, the new Edge Impulse announcement offers two very vital things: a cradle-to-grave framework for collecting data and training models then deploying these custom models at the edge, together with a layer of abstraction. Increasingly we’re seeing deep learning eating software as part of a general trend towards increasing abstraction, sometimes termed lithification, in software. Which sounds intimidating, but means that we can all do more, with less effort. Which isn’t a bad thing at all.
This post is written by Jan Jongboom and Dominic Pajak.
Running machine learning (ML) on microcontrollers is one of the most exciting developments of the past years, allowing small battery-powered devices to detect complex motions, recognize sounds, or find anomalies in sensor data. To make building and deploying these models accessible to every embedded developer we’re launching first-class support for the Arduino Nano 33 BLE Sense and other 32-bit Arduino boards in Edge Impulse.
The trend to run ML on microcontrollers is called Embedded ML or Tiny ML. It means devices can make smart decisions without needing to send data to the cloud – great from an efficiency and privacy perspective. Even powerful deep learning models (based on artificial neural networks) are now reaching microcontrollers. This past year great strides were made in making deep learning models smaller, faster and runnable on embedded hardware through projects like TensorFlow Lite Micro, uTensor and Arm’s CMSIS-NN; but building a quality dataset, extracting the right features, training and deploying these models is still complicated.
Using Edge Impulse you can now quickly collect real-world sensor data, train ML models on this data in the cloud, and then deploy the model back to your Arduino device. From there you can integrate the model into your Arduino sketches with a single function call. Your sensors are then a whole lot smarter, being able to make sense of complex events in the real world. The built-in examples allow you to collect data from the accelerometer and the microphone, but it’s easy to integrate other sensors with a few lines of code.
Download the Arduino Nano 33 BLE Sense firmware — this is a special firmware package (source code) that contains all code to quickly gather data from its sensors. Launch the flash script for your platform to flash the firmware.
Launch the Edge Impulse daemon to connect your board to Edge Impulse. Open a terminal or command prompt and run:
Your device now shows in the Edge Impulse studio on the Devices tab, ready for you to collect some data and build a model.
Once you’re done you can deploy your model back to the Arduino Nano 33 BLE Sense. Either as a binary which includes your full ML model, or as an Arduino library which you can integrate in any sketch.
Deploying to Arduino from Edge Impulse
Your machine learning model is now running on the Arduino board. Open the serial monitor and run `AT+RUNIMPULSE` to start classifying real world data!
Keyword spotting on the Arduino Nano 33 BLE Sense
Integrates with your favorite Arduino platform
We’ve launched with the Arduino Nano 33 BLE Sense, but you can also integrate Edge Impulse with your favourite Arduino platform. You can easily collect data from any sensor and development board using the Data forwarder. This is a small application that reads data over serial and sends it to Edge Impulse. All you need is a few lines of code in your sketch (here’s an example).
After you’ve built a model you can easily export your model as an Arduino library. This library will run on any Arm-based Arduino platform including the Arduino MKR family or Arduino Nano 33 IoT, providing it has enough RAM to run your model. You can now include your ML model in any Arduino sketch with just a few lines of code. After you’ve added the library to the Arduino IDE you can find an example on integrating the model under Files > Examples > Your project – Edge Impulse > static_buffer.
To run your models as fast and energy-efficiently as possible we automatically leverage the hardware capabilities of your Arduino board – for example the signal processing extensions available on the Arm Cortex-M4 based Arduino Nano BLE Sense or more powerful Arm Cortex-M7 based Arduino Portenta H7. We also leverage the optimized neural network kernels that Arm provides in CMSIS-NN.
A path to production
This release is the first step in a really exciting collaboration. We believe that many embedded applications can benefit from ML today, whether it’s for predictive maintenance (‘this machine is starting to behave abnormally’), to help with worker safety (‘fall detected’), or in health care (‘detected early signs of a potential infection’). Using Edge Impulse with the Arduino MKR family you can already quickly deploy simple ML based applications combined with LoRa, NB-IoT cellular, or WiFi connectivity. Over the next months we’ll also add integrations for the Arduino Portenta H7 on Edge Impulse, making higher performance industrial applications possible.
On a related note: if you have ideas on how TinyML can help to slow down or detect the COVID-19 virus, then join the UNDP COVID-19 Detect and Protect Challenge. For inspiration, see Kartik Thakore’s blog post on cough detection with the Arduino Nano 33 BLE Sense and Edge Impulse.
We can’t wait to see what you’ll build!
Jan Jongboom is the CTO and co-founder of Edge Impulse. He built his first IoT projects using the Arduino Starter Kit.
Dominic Pajak is VP Business Development at Arduino.
Um dir ein optimales Erlebnis zu bieten, verwenden wir Technologien wie Cookies, um Geräteinformationen zu speichern und/oder darauf zuzugreifen. Wenn du diesen Technologien zustimmst, können wir Daten wie das Surfverhalten oder eindeutige IDs auf dieser Website verarbeiten. Wenn du deine Einwillligung nicht erteilst oder zurückziehst, können bestimmte Merkmale und Funktionen beeinträchtigt werden.
Funktional
Immer aktiv
Die technische Speicherung oder der Zugang ist unbedingt erforderlich für den rechtmäßigen Zweck, die Nutzung eines bestimmten Dienstes zu ermöglichen, der vom Teilnehmer oder Nutzer ausdrücklich gewünscht wird, oder für den alleinigen Zweck, die Übertragung einer Nachricht über ein elektronisches Kommunikationsnetz durchzuführen.
Vorlieben
Die technische Speicherung oder der Zugriff ist für den rechtmäßigen Zweck der Speicherung von Präferenzen erforderlich, die nicht vom Abonnenten oder Benutzer angefordert wurden.
Statistiken
Die technische Speicherung oder der Zugriff, der ausschließlich zu statistischen Zwecken erfolgt.Die technische Speicherung oder der Zugriff, der ausschließlich zu anonymen statistischen Zwecken verwendet wird. Ohne eine Vorladung, die freiwillige Zustimmung deines Internetdienstanbieters oder zusätzliche Aufzeichnungen von Dritten können die zu diesem Zweck gespeicherten oder abgerufenen Informationen allein in der Regel nicht dazu verwendet werden, dich zu identifizieren.
Marketing
Die technische Speicherung oder der Zugriff ist erforderlich, um Nutzerprofile zu erstellen, um Werbung zu versenden oder um den Nutzer auf einer Website oder über mehrere Websites hinweg zu ähnlichen Marketingzwecken zu verfolgen.