We’re thrilled to welcome Sachin from Techiesms, who’ll not only share his experiences with Arduino Cloud but also showcase his fantastic home automation project
Secure your seat now for a cozy and engaging IoT session with us. Simply visit our YouTube event page and click “Notify me” to ensure you don’t miss out.
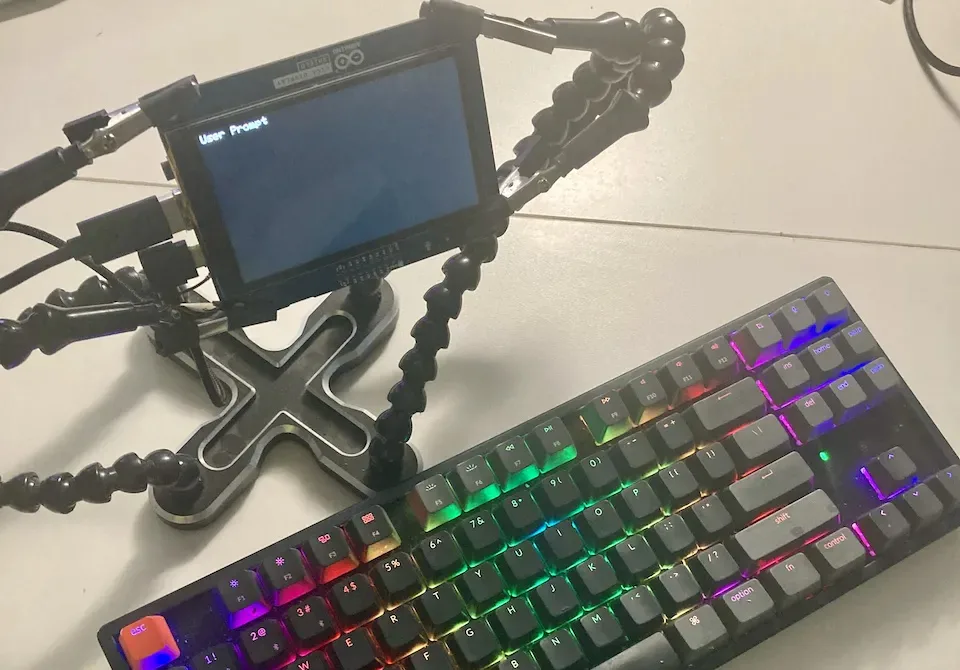
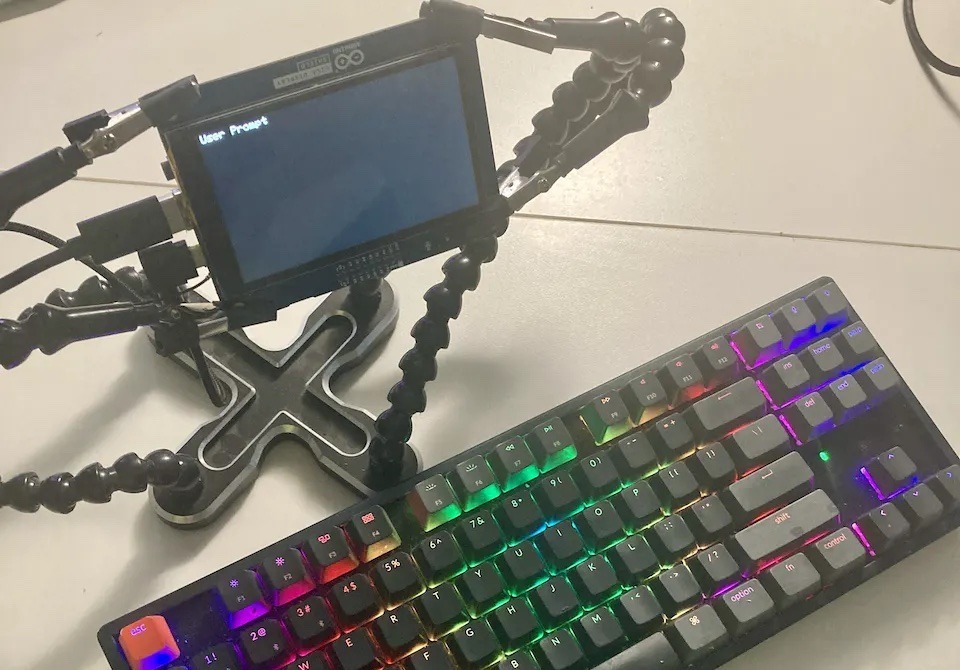
ChatGPT is certainly the best-known large language model (LLM) available today and it has a lot to offer. But you can’t run it locally and instead you must use OpenAI’s online service to access its functionality. That doesn’t, however, mean that you’re out of luck if you want to use ChatGPT on your own DIY devices. As Shakhizat Nurgaliyev shows, you can build your own ChatGPT client powered by Arduino.
Because ChatGPT isn’t available offline, the ArduinoGPT project takes advantage of OpenAI’s API. That lets you access ChatGPT through your sketches if your development board has a network adapter. In this case, Nurgaliyev used an Arduino GIGA R1 WiFi. That can reach the OpenAI API through a wireless network in order to send prompts to ChatGPT and receive responses.
The Arduino GIGA R1 WiFi is also ideal because it possesses a very unique feature: a USB-A port and the ability to act as a USB host. That lets the user connect a standard USB keyboard and type prompts without any other hardware.
Nurgaliyev paired that board with a new Arduino GIGA Display Shield, which provides 3.97″ of LCD touchscreen at a resolution of 480×800. That includes additional hardware, like a microphone and inertial measurement unit (IMU), but they aren’t necessary for this project.
The ArduinoGPT sketch connects to the user’s Wi-Fi network, then lets the user type in a prompt. It sends that prompt to ChatGPT through the OpenAI API and waits for a response. The user can choose to receive the entire response as a single block of text, or as a stream of several blocks sent as ChatGPT generates them.
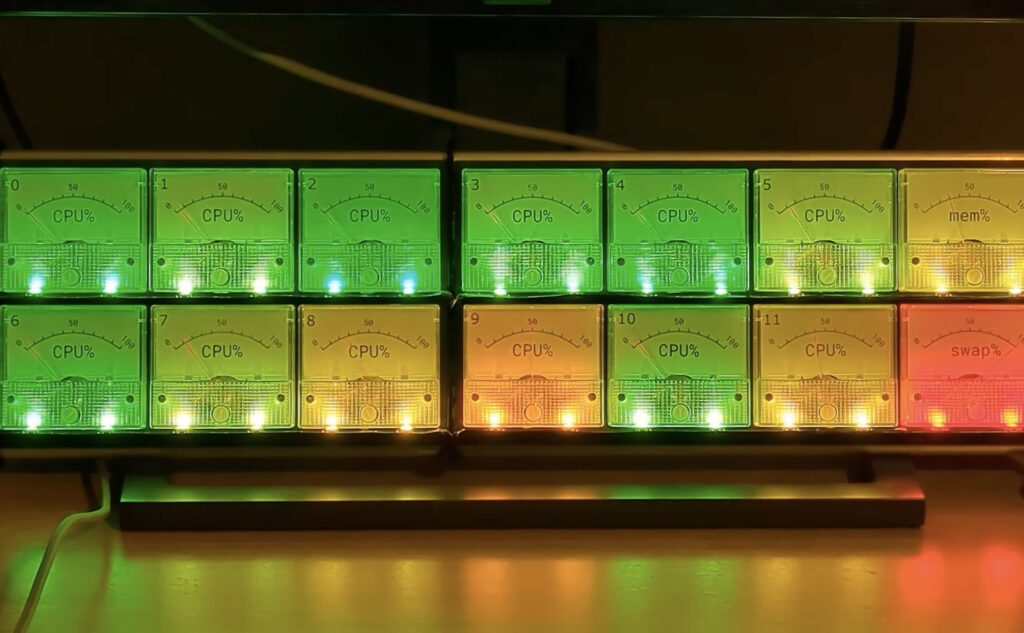
There is an old joke response in the programming industry for whenever you’re caught slacking off: “I’m waiting for the code to compile.” That still holds up, because even today’s blazing fast computers can take ages to compile. That’s true even when the compiler can run tasks across multiple CPU cores. To find out if that is as efficient as it could be, Lex built this analog gauge array that displays the utilization of each core.
Lex created this for their own computer, which has a 12-core CPU. There is one gauge for each of those cores, plus an additional gauge for swap memory and another for RAM. The same basic idea could apply to computers that have CPUs with fewer cores — the device would just need a number of gauges equal to the number of CPU cores, plus two.
The device contains an Arduino Mega 2560 board and it receives utilization data through serial from a PC running a custom Rust program. That program uses some resources, but it is trivial compared to everything else. The Arduino employs pulse-width modulation (PWM) to control the positions of the gauge needles. There is also a strip of WS2812B individually addressable RGB LEDs illuminating the gauges, with the colors corresponding to utilization. So high utilization will move a gauge’s needle to the right and cause it to light up red.
This gives Lex a quick and easy way to visualize how their computer distributes tasks across the CPU cores. That is interesting when compiling code, but it is also useful for other jobs that attempt to parallelize tasks.
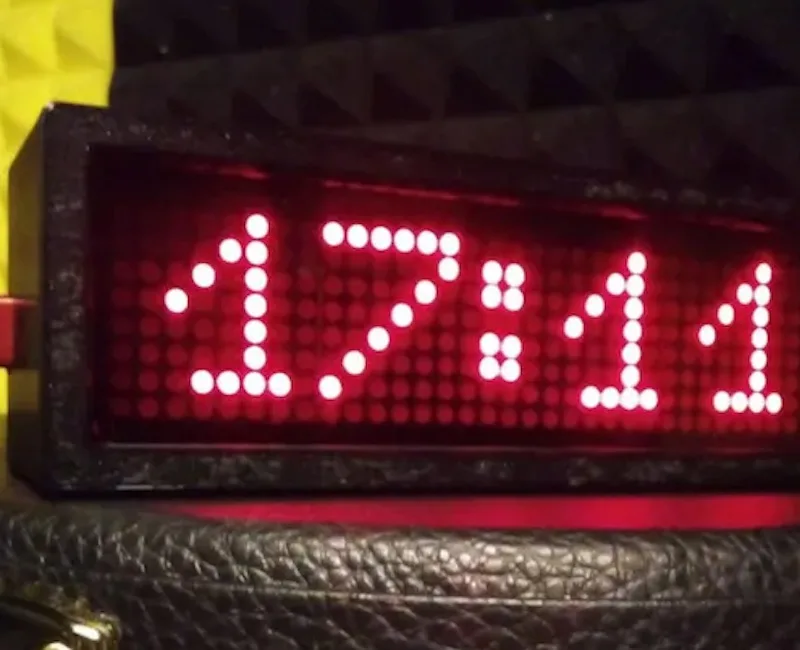
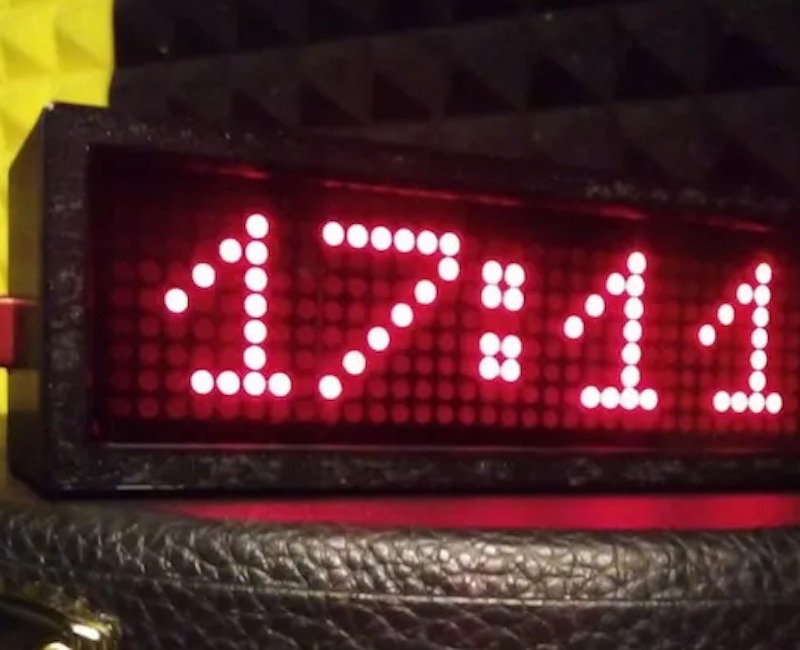
There are almost endless variations of clocks for sale on the internet today, but it is still easy to end up in a situation where you can’t quite find a model with the style and features you want. Marco Zonca ended up with that problem while searching for a new clock to put in his music studio. Nothing on the market fit the bill, so he built this minimalist network-updated digital clock.
Zonca wanted a simple design, the ability to adjust brightness, and NTP (Network Time Protocol) updates. There are clocks available with those features, but nothing in the style Zonca wanted. So he created the perfect clock for himself. It displays 24-hour time across a red LED matrix, lets the user control settings like brightness via Bluetooth® Low Energy communication, and always stays in sync with network time.
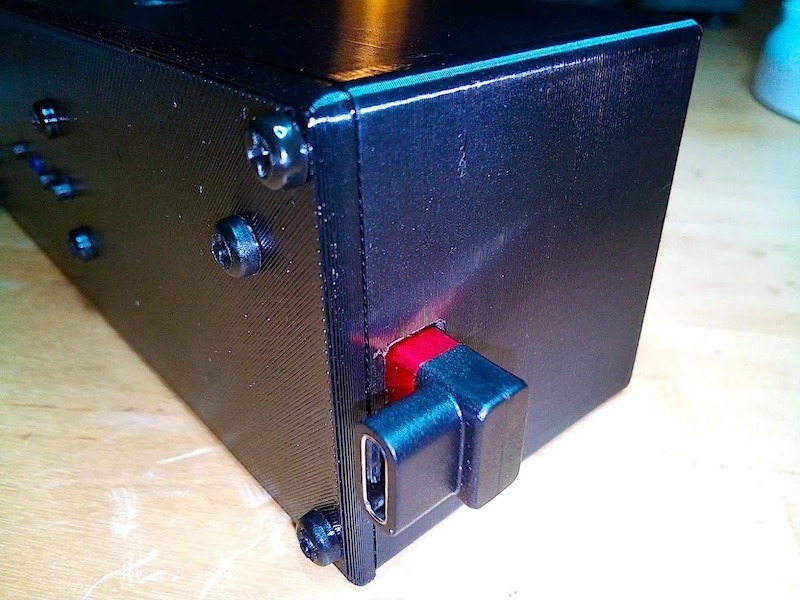
An Arduino Nano ESP32 board, programmed through Arduino Web Editor, controls all of those functions. It mounts onto a custom PCB that Zonca designed for this clock. The PCB also hosts an 8×32 LED matrix display with MAX7219 driver. Three buttons on the PCB let the user select modes. The PCB fits into a black 3D-printed enclosure that reflects the overall minimalist style.
Now Zonca has the perfect clock for his music studio. If you like the look of it, the sketch, PCB files, and 3D enclosure are all available on Hackster.io.
Welcome to the next chapter of our ‘Better, with You’ journey! Now it is time to present the latest updates to the IoT Remote app. These new features are all about making your time with your IoT projects smoother, more fun, and right at your fingertips. Let’s dive in!
If you haven’t caught up on our journey so far, make sure to check out our first blog post of the series, where we reveal a brand new UI on the Arduino Cloud.
Push notifications for real-time alerts
As your list of projects grows and time becomes a rare commodity, checking the status of all your projects on a regular basis is nearly impossible. That’s why having a heads-up for anything significant happening in your deployments is an absolute game-changer. A few months ago, we introduced Triggers and Notifications, a feature that allows you to configure conditions in the Arduino Cloud that trigger email notifications.
Now, with the new IoT Remote app version, you can customize and receive alerts directly on your mobile device. Because we know how life can sometimes get crazy and convenient it is to get notified directly on your phone.
Remember, to unlock this feature, you’ll need the Maker plan ($5.99/month). Make sure you upgrade your plan to use it.
How to use the notifications in your phone
The process is quite straightforward:
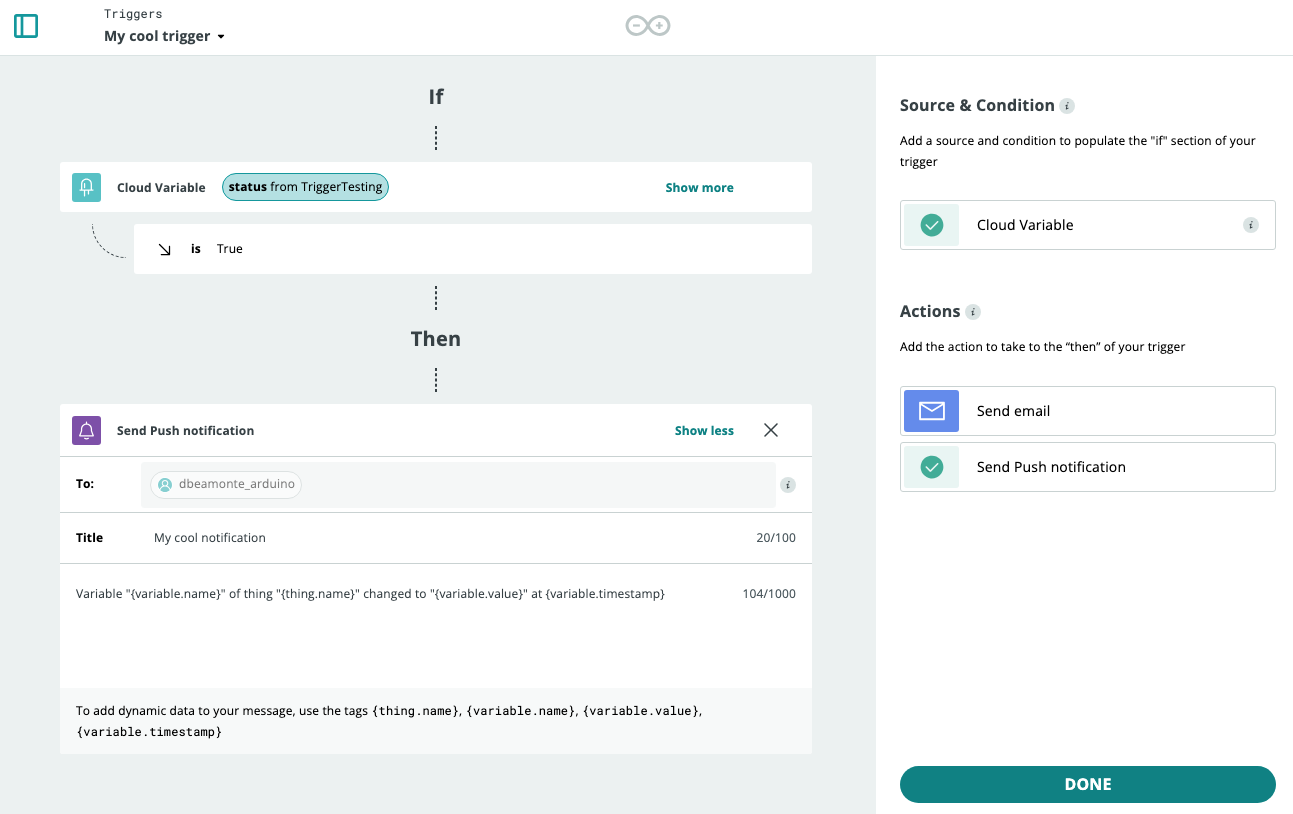
Configure your Triggers and Notifications in the Arduino Cloud
Enable notifications in the IoT Remote app
Configure your Triggers and Notifications in the Arduino Cloud
Click on CREATE TRIGGER to start the creation of the Trigger.
Configure your condition selecting your variable.
Configure your desired action: In this case select “Send Push Notification.” Note that you can additionally configure email notifications as well for the same trigger.
Define the fields of your notification: Title and Body.
Triggers set up process in Arduino Cloud
And that’s it. You are ready to configure notifications on your mobile phone.
Enable notifications on the mobile phone
When you open the app with the new version for the first time, you are prompted to allow the app to send you notifications. If you accept, you are ready to go and you will receive instant alerts.
You can change your settings at any time in the “Manage push notifications” menu to enable or disable the notifications behavior.
Learn more about the full configuration process in the documentation article.
Improved app UI
Activity monitor
Explore the history of your project’s alerts with the Activity tab. It is the ideal companion to push notifications, providing you with a comprehensive overview of your notifications activity.
Activity tab in the Arduino IoT remote app
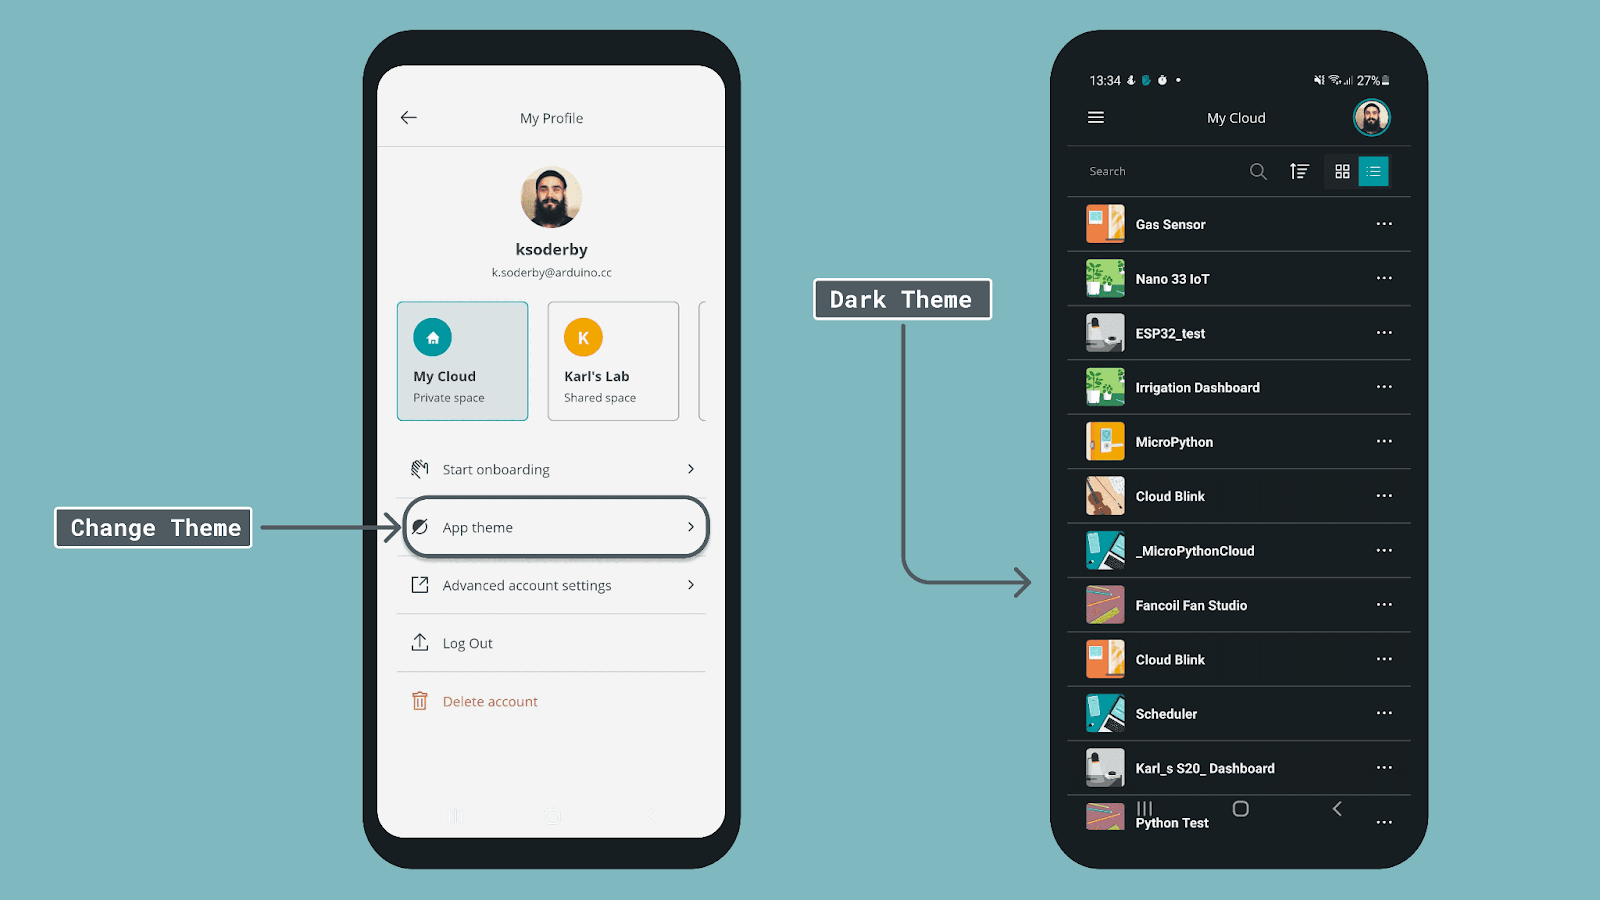
Dark mode
Finally, the long-awaited Dark Mode is here! You can now experience a more comfortable and elegant interface by simply enabling Dark Mode in the IoT Remote app. For a quick guide, refer to the documentation article.
Change theme (light/dark)
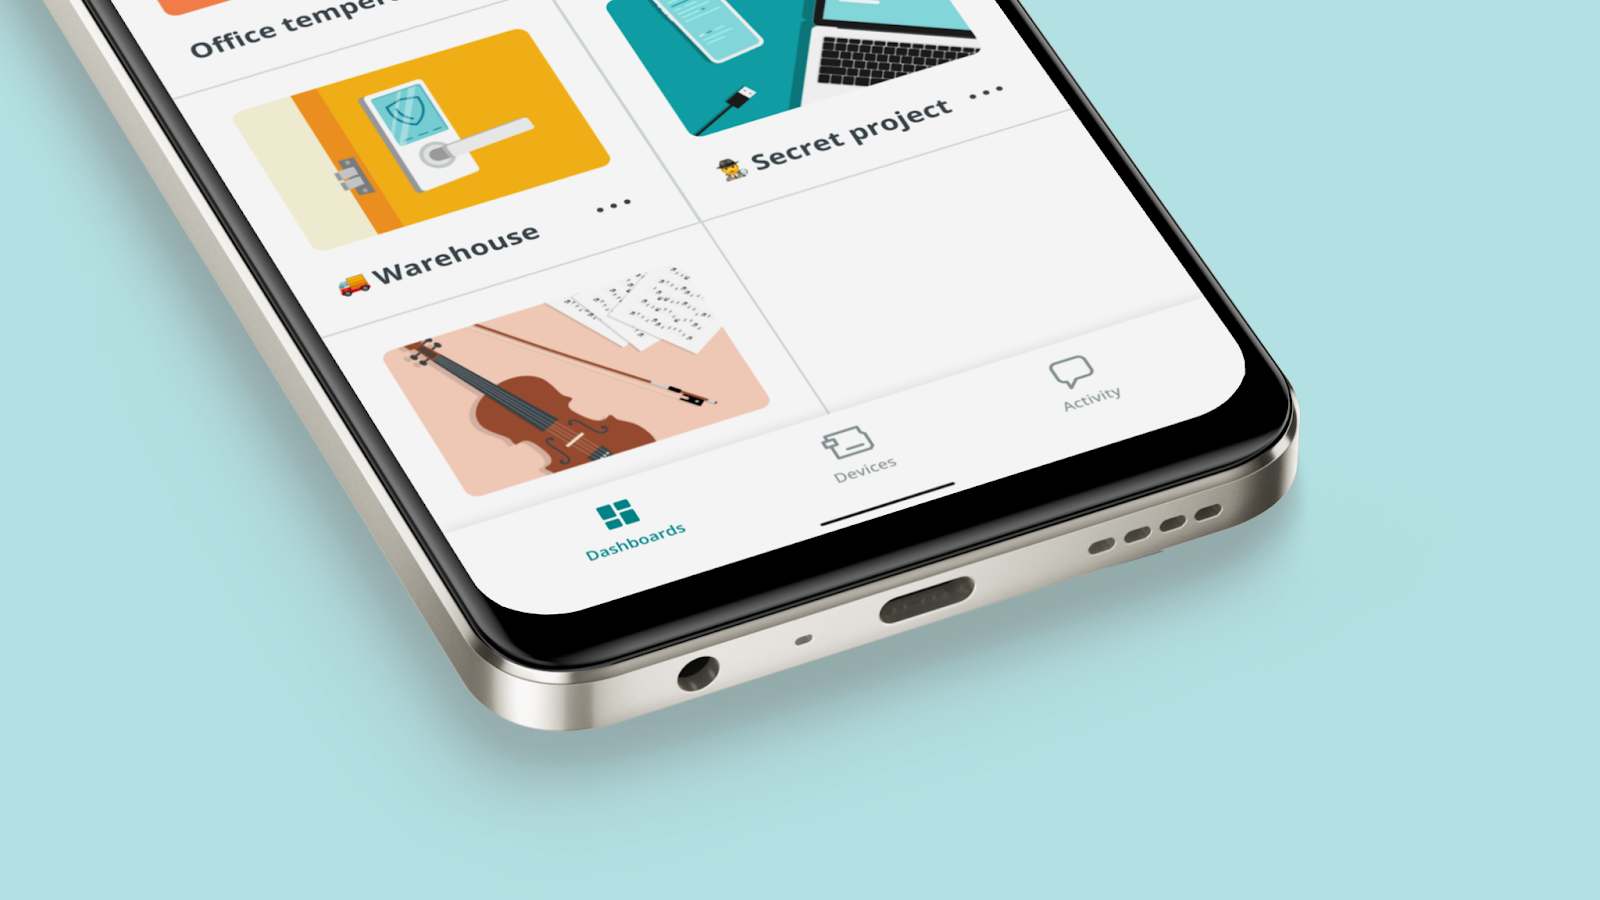
New bottom navigation bar
The new bottom tab bar enhances your user experience simplifying the app navigation. This update is part of the major UX improvements implemented on the Cloud. You can seamlessly switch between sections and enjoy a more intuitive journey within the app.
New UI with enhanced navigation bar in the Arduino IoT Remote app
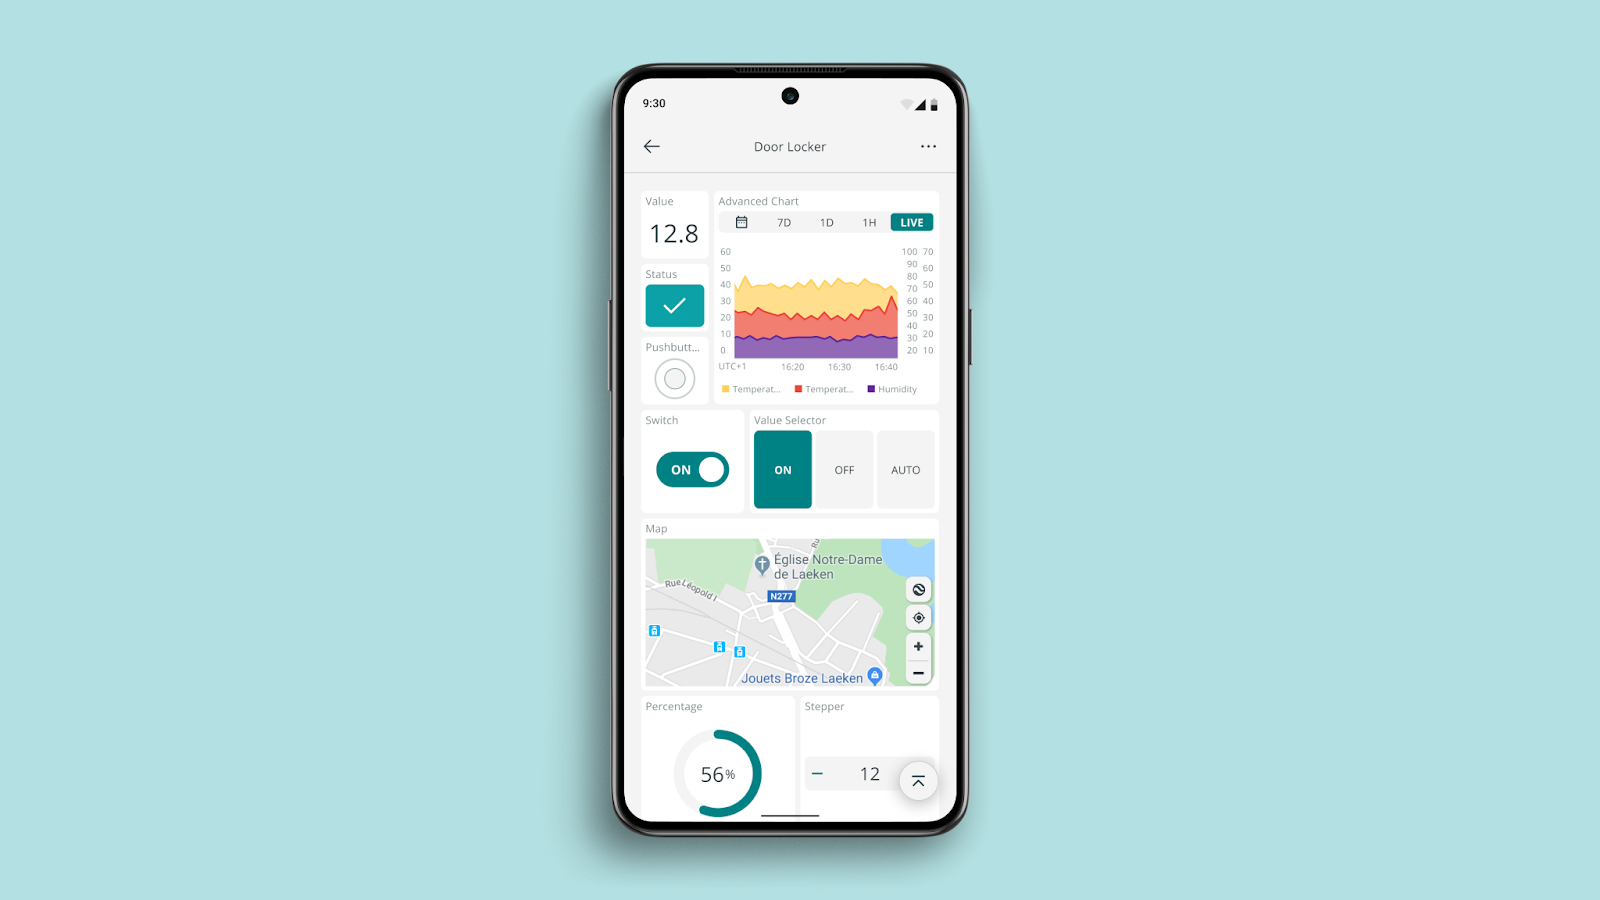
Redesigned widgets
Widgets have been redesigned to provide a clearer and refined data visualization. These improvements are also part of the major UX enhancements implemented on the Cloud.
Enhanced widgets in the Arduino IoT Remote app
Devices list
We understand the importance of simplifying device monitoring. Check the status of your devices and their associated things directly from the IoT Remote app. It’s about bringing convenience to your fingertips, contributing to better IoT project management.
What is Arduino Cloud?
In case you’re new to this whole concept of the Arduino Cloud, we didn’t want to miss the opportunity to remind you of it here. The Arduino Cloud is the next exciting journey for IoT enthusiasts to bring their projects to life quickly. It is an all-in-one intuitive IoT platform, supporting a wide range of hardware and backed by the vibrant Arduino community. The Arduino Cloud removes complexity to empower users from all levels of expertise to create from anywhere, and control and share their projects with amazing dashboards that can be accessible with the IoT Remote app.
The following video provides a comprehensive quick tour of the new UI.
Ready to try alerts in your phone and explore the new look and feel? Learn more about the new IoT Remote app features, download the IoT Remote app (available for Android and iOS), and create a new account to get started with the Arduino Cloud.
And stay tuned for more news. We are creating a better cloud, with you!
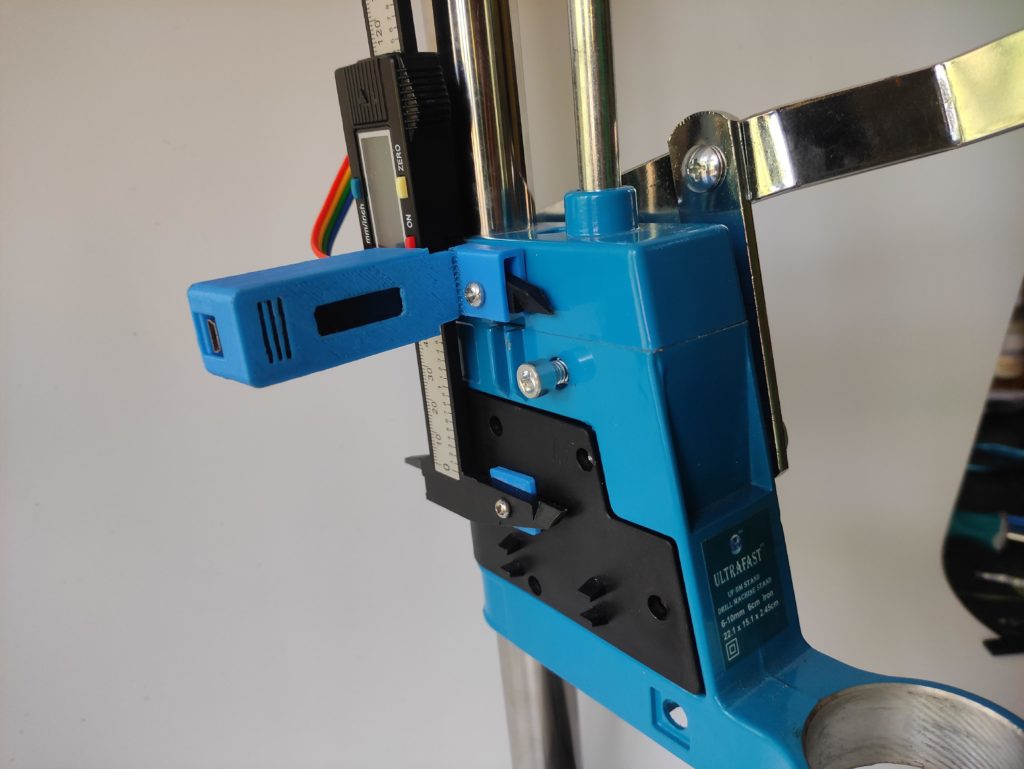
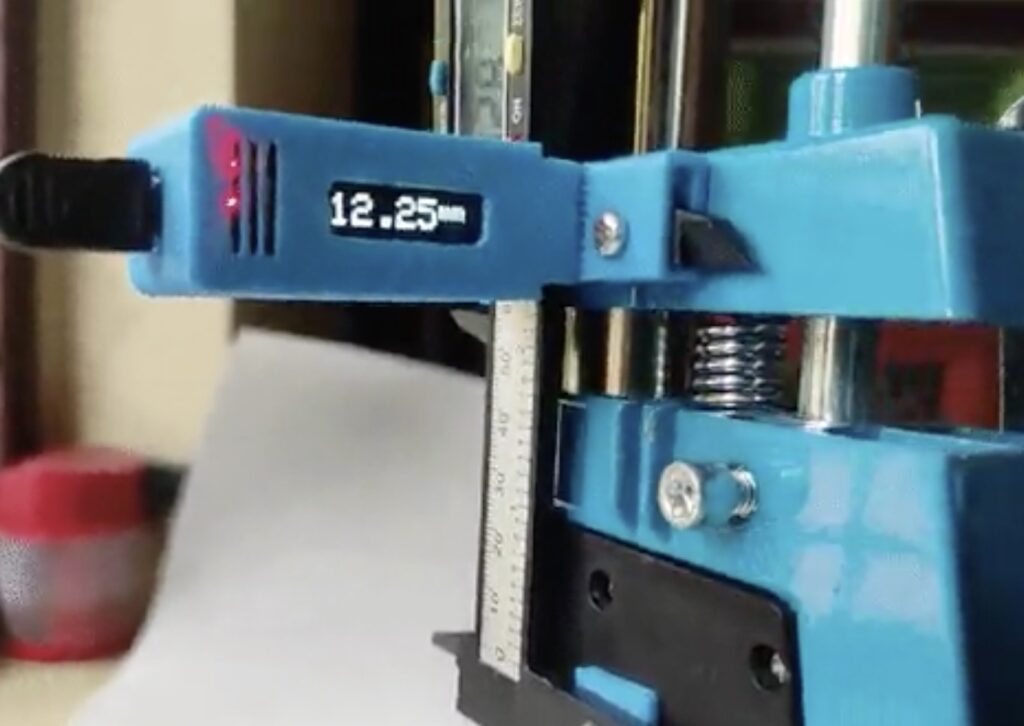
A drill press is a very useful tool that lets you slowly drill holes that are perfectly perpendicular to the work piece. And good drill presses give you a readout that lets you drill to a precise depth. But the cheap drill press stands for hand drills make that difficult. To solve this problem on a budget, Minikk designed an affordable digital readout add-on.
This digital readout is very useful. It shows exactly how far you move the drill, with a precision of 0.01 millimeters. And it lets you set the zero point (typically the top surface of the material) so you don’t have to do any math in your head.
Minikk achieved this with an inexpensive digital caliper. That has an LCD screen without a backlight and it is hard to read, so Minikk hacked it with an Arduino Nano board to add a much more readable OLED screen. That was possible because this digital caliper, like most of the budget models on the market, has a control board that is accessible via I2C. That lets the Arduino pull the measurements to display on the OLED.
With a 3D-printed mount and enclosure to hold everything in place, Minikk now has a reasonably accurate and precise digital readout that didn’t break the back. This lets them drill holes to exactly the required depth without any hassle. Best of all, Minikk uploaded the sketch and 3D files so you can add a digital readout to your drill press.
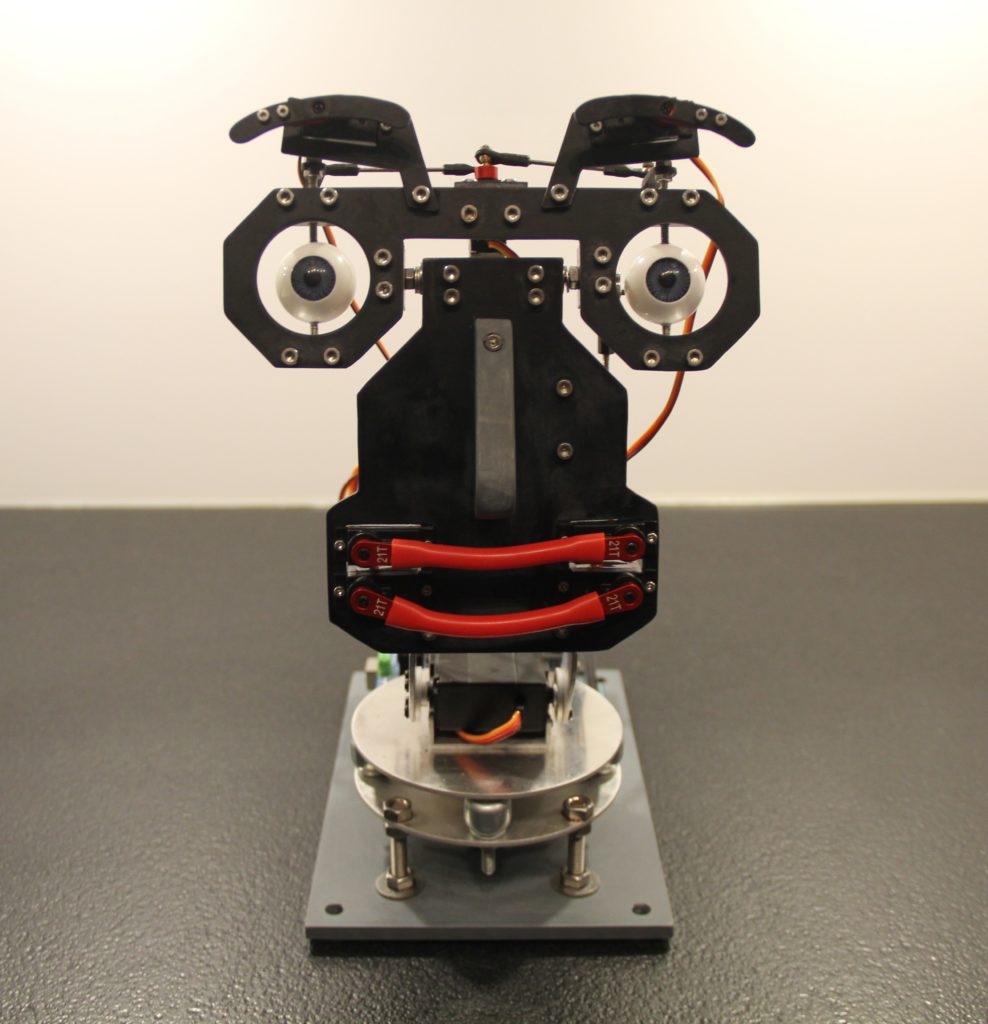
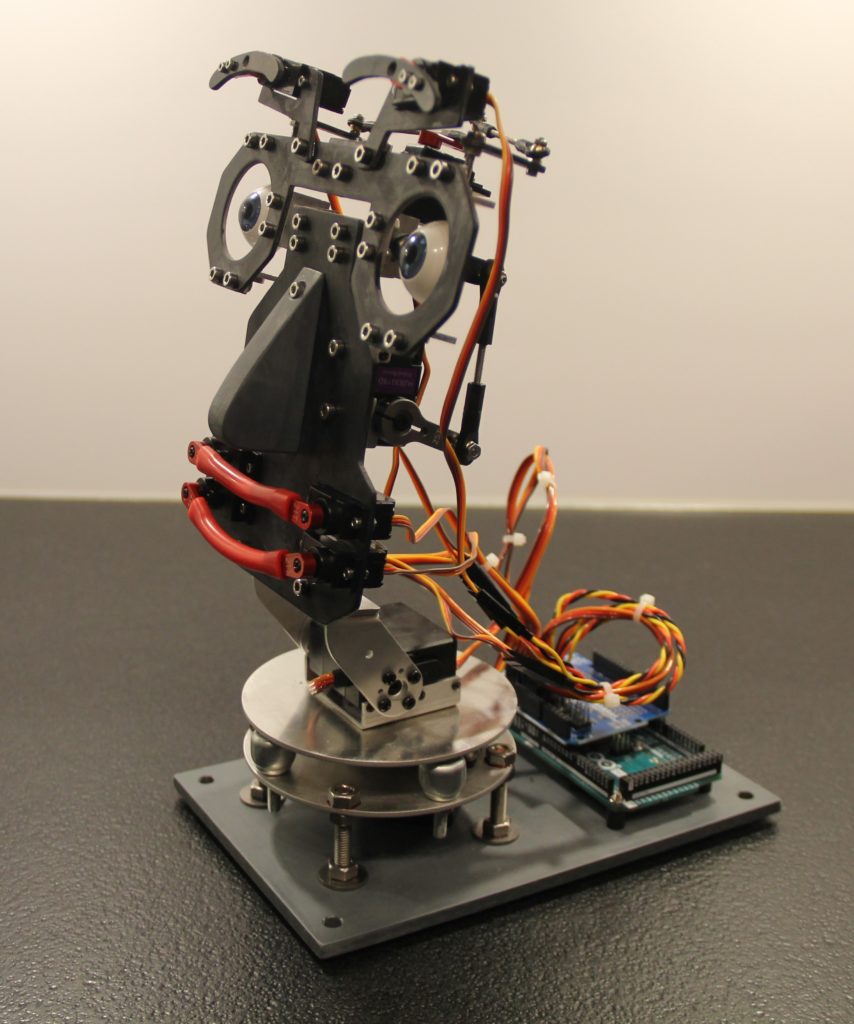
There are many theories that attempt to explain the uncanny valley, which is a range of humanoid realness that is very disconcerting to people. When something looks almost human, we find it disturbing. That often applies to robots with faces — or robots that are faces, as is the case with the TAST-E robot that has a sense of taste and smell.
The TAST-E robot created by M. Bindhammer looks a bit like a human face, sans skin. Servo motors let it pan and tilt, flap its lips, move its unsettlingly realistic eyeballs, and waggle its eyebrows. It can even speak thanks to a Parallax Emic 2 text-to-speech module connected to an Arduino Mega 2560 board.
But TAST-E is most intriguing because of its sense of taste and smell, which let it identify specific compounds and molecules.
Our own tongues can only detect five distinct tastes: saltiness, sweetness, bitterness, sourness, and umami (savoriness). TAST-E can do the same by recognizing the compounds that stimulate those receptors on our tongues. It does so with colorimeters, which detect the color produced when certain reagents mix with those compounds. This is similar to how a woman might look for a blue or pink line on a pregnancy test. TASTE-E has custom colorimeters that look for the reagent colors associated with those taste compounds.
TASTE-E’s sense of smell is a bit more straightforward, but also less analogous to human smell. Its electronic nose uses a Grove gas sensor breakout with four modules: a GM-102B for NO2, a GM-302B for ethanol, a GM-502B for VOCs, and a GM-702B for CO/H2. Those let it analyze the concentration of those compounds in an air sample.
It isn’t clear what M. Bindhammer intends for TAST-E, but this robot is as impressive as it is chilling.
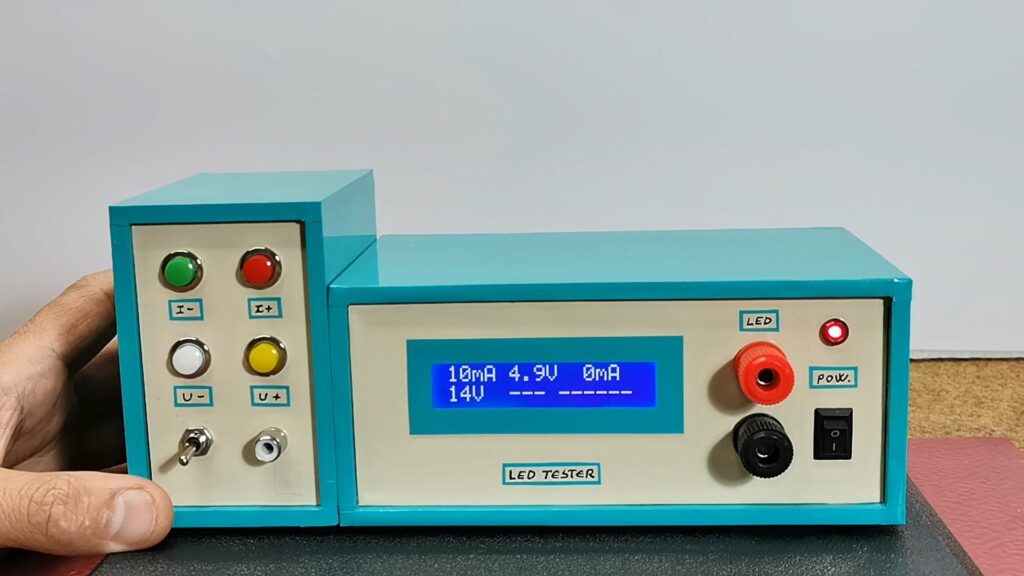
GPIO pins on most microcontrollers operate at low voltages, typically between 3.3V and 5V, and are unable to deliver much current — oftentimes stopping at 20-40mA. This is why, when setting up an LED, series resistors are used to limit the amount of current draw and prevent damage to the pin. Mirko Pavleski created a workbench device that helps figure out the size of this resistor and allows for an LED to be connected for live testing.
Built around an Arduino Nano, the system presents the user with a display for selecting the desired maximum current draw and LED voltage input. The panel of buttons on the left can increment or decrement the ideal voltage/current levels that, in turn, are then used to calculate the value of the series resistor. This value appears on the bottom alongside the part number for ordering the resistor from a distributor.
The values at the top of the LCD indicate how the connected LED currently behaves given a known voltage. By wiring the LED to a couple of sense resistors and an analog input pin, its forward voltage along with its current draw can be determined.
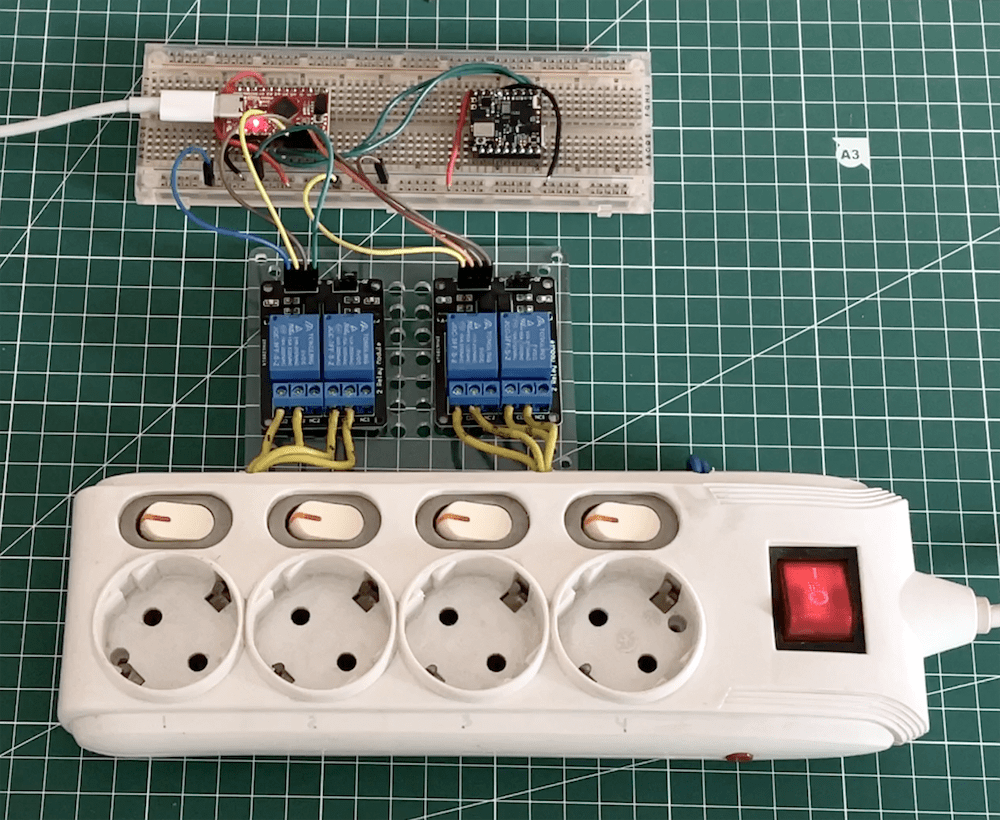
As Jallson Suryo discusses in his project, adding voice controls to our appliances typically involves an internet connection and a smart assistant device such as Amazon Alexa or Google Assistant. This means extra latency, security concerns, and increased expenses due to the additional hardware and bandwidth requirements. This is why he created a prototype based on an Arduino Nicla Voice that can provide power for up to four outlets using just a voice command.
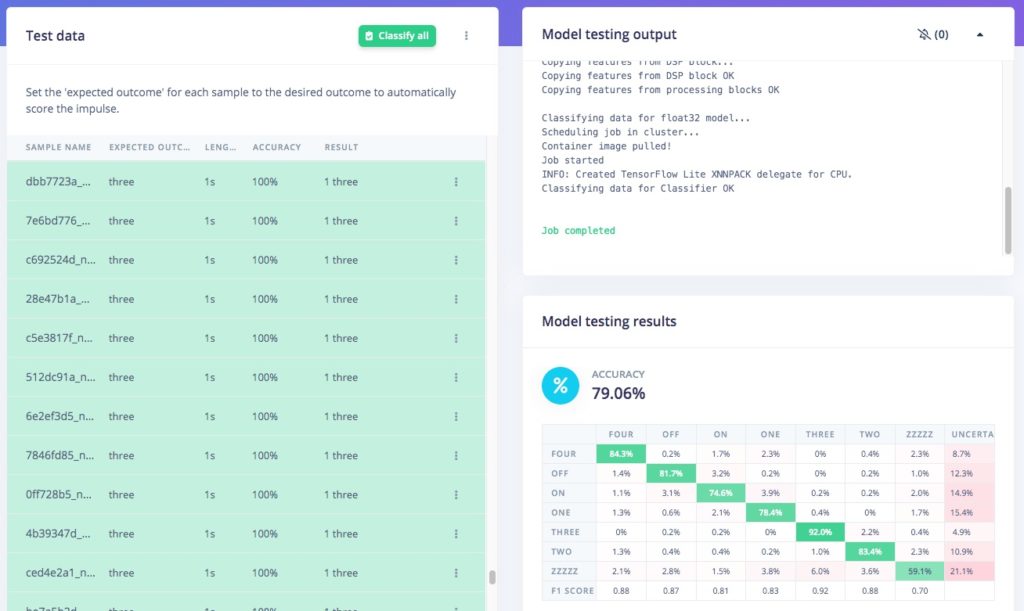
Suryo gathered a dataset by repeating the words “one,” “two,” “three,” “four,” “on,” and “off” into his phone and then uploaded the recordings to an Edge Impulse project. From here, he split the files into individual words before rebalancing his dataset to ensure each label was equally represented. The classifier model was trained for keyword spotting and used Syntiant NDP120-optimal settings for voice to yield an accuracy of around 80%.
Apart from the Nicla Voice, Suryo incorporated a Pro Micro board to handle switching the bank of relays on or off. When the Nicla Voice detects the relay number, such as “one” or “three”, it then waits until the follow-up “on” or “off” keyword is detected. With both the number and state now known, it sends an I2C transmission to the accompanying Pro Micro which decodes the command and switches the correct relay.
The launch of the Arduino UNO R4 marks a huge leap forward for our community. For us, it’s also the chance to celebrate the people who bring our ecosystem to life with their bright ideas, radiant enthusiasm, and shining insight.
That is how the UNO R4 Stars blog post series began: to highlight makers who have not only created amazing projects with Arduino, but who are giving back to the community by sharing as they go and helping others make anything they wish.
We invite you to discover each profile, hoping you might find a North Star to navigate around an expanding galaxy or venture into completely new universes.
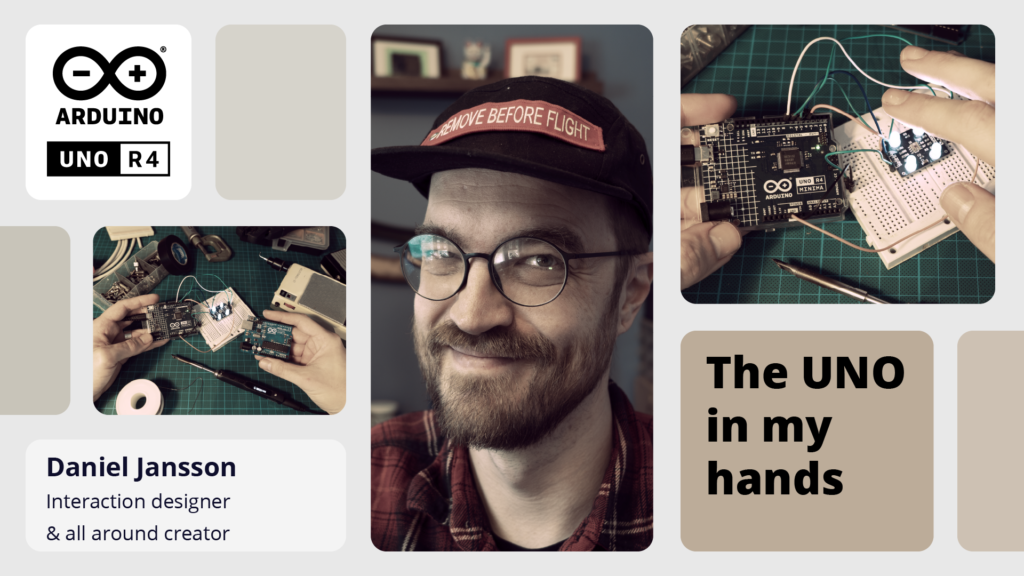
Daniel Jansson first came into contact with Arduino in 2011, while at Umeå Institute of Design for his master’s degree in interaction design. The experience was empowering to the point of being weird: “It was like, now I can create things which only engineers and developers could make before. It felt like I was doing things that I should just not be able to do.”
Curious by nature, he instantly realized that – while the technology could have helped him in his studies – it was a lot more fun to create quirky interactive objects that made people smile. So he kept going, experimenting with various Arduino boards to create big and small devices with connectivity, sound, lights and interactivity.
“There are few things I enjoy more than taking disparate subjects and joining them into new creations, oftentimes with Arduino acting as the glue to help things sense the world around them, or interact in new and unusual ways,” he says.
A great example of this is his favorite maker project: the YouTube Subscriber Levelometer, which repurposes a device once used to measure the level of liquid in tanks using pressure. Adding his signature blend of “physical interaction, programming, sound, connectivity and a healthy dose of humor,” Jansson built a phygital system that keeps track of his key influencer stats. He integrated speech synthesis by combining an Arduino Nano with the Talkie library, which was based on work done by Texas Instruments in the 1980s, and programmed everything via the Arduino IDE.
As a long-time Arduino user, Jansson was excited to try the UNO R4: “It extends the potential for new projects to places where I did not imagine the UNO platform could go. It really feels like a leap forward, without compromising on the vast library of projects created over the last 11 years since the launch of the UNO R3.”
We asked Jansson, “What’s your favorite part of the UNO R4?”
The 12-bit DAC to generate higher fidelity sound, opening up huge possibilities for musical projects – even building entirely new instruments.
The native HID capabilities, which make creating native USB-MIDI super easy.
Compatibility with the UNO R3, allowing users to revisit and update old projects.
Beyond any specific product, it’s the global community that makes Arduino unique: “It doesn’t matter where in the world you are, you can always find someone who has run into the same challenges as you have, and find help to overcome them to make your projects come true. The wealth of knowledge makes Arduino a democratic hardware platform in ways we have never seen before.”
The value of shared knowledge and experiences clearly resonates with Jansson, who hopes to encourage others to learn, enjoy, and broaden their mind with his projects. To keep up with his many fun and interesting ideas – bound to bring a smile to your face – follow his Instagram account or subscribe to his “Switch & Lever” YouTube channel.
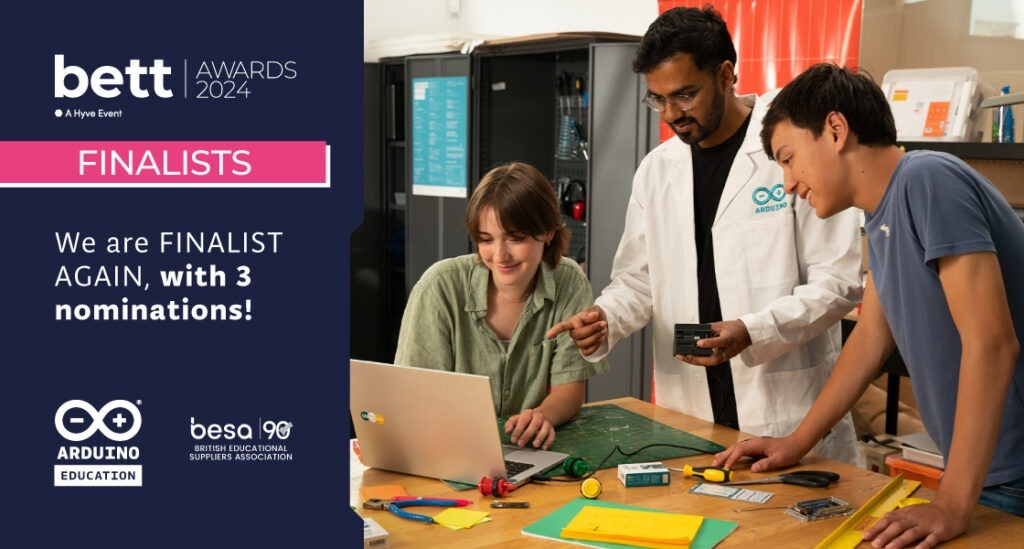
We are proud to announce that Arduino Education has been shortlisted as a finalist in three categories for the Bett Awards 2024:
COMPANY OF THE YEAR (MORE THAN £3M)
COLLABORATION WITH A SCHOOL for the Medellin Challenge with Colegio San Jose de Las Vegas in Colombia
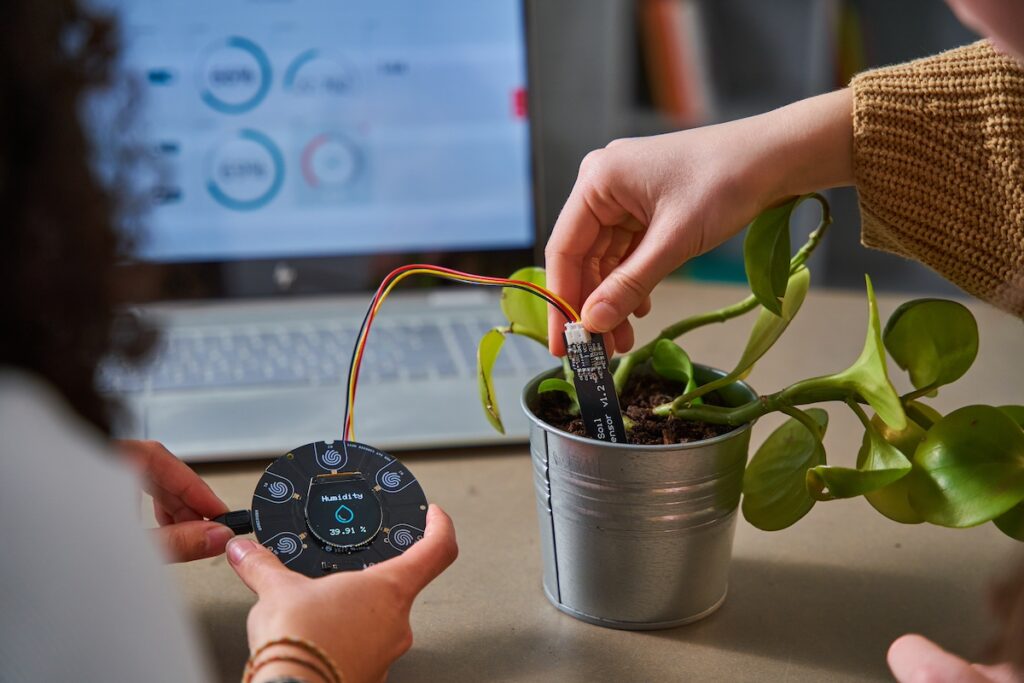
Bett INNOVATION AWARD for innovation on the Internet of Things in education with the Arduino Cloud for Schools, the Explore IoT Kit, and the Greenhouse Kit
The Bett Awards are a celebration of the inspiring creativity and innovation that can be found throughout technology for education. These awards recognize Arduino Education’s efforts to nurture future talent by bringing easy to use, affordable, and skill-oriented solutions for students at school and university.
Let’s take a look at each of the award categories we’ve been nominated for in turn…
Innovation Award
Why have we been shortlisted? At Arduino Education, we epitomize the fusion of cutting-edge technology with purposeful learning. Our revamped Arduino Cloud for Schools revolutionizes STEAM education by merging coding, IoT, and accessibility into a comprehensive ecosystem.
Meanwhile, the renewed Explore IoT Kit R2 is not just technologically advanced; it also aligns with the UN’s Sustainable Development Goals, promoting practical solutions to global challenges. The kit empowers students to delve deep into data communication, management, and societal problem-solving.
Our innovative Greenhouse Kit addresses urban farming issues, turning students into active participants in sustainability endeavors.
Across our products and solutions, Arduino Education’s commitment isn’t merely to educate; it’s to inspire, empower, and lead, paving the way for a brighter, informed, and sustainable future.
Our nomination for the Innovator of the Year award is a testament to this enduring commitment to innovation that truly matters.
Collaboration with a School
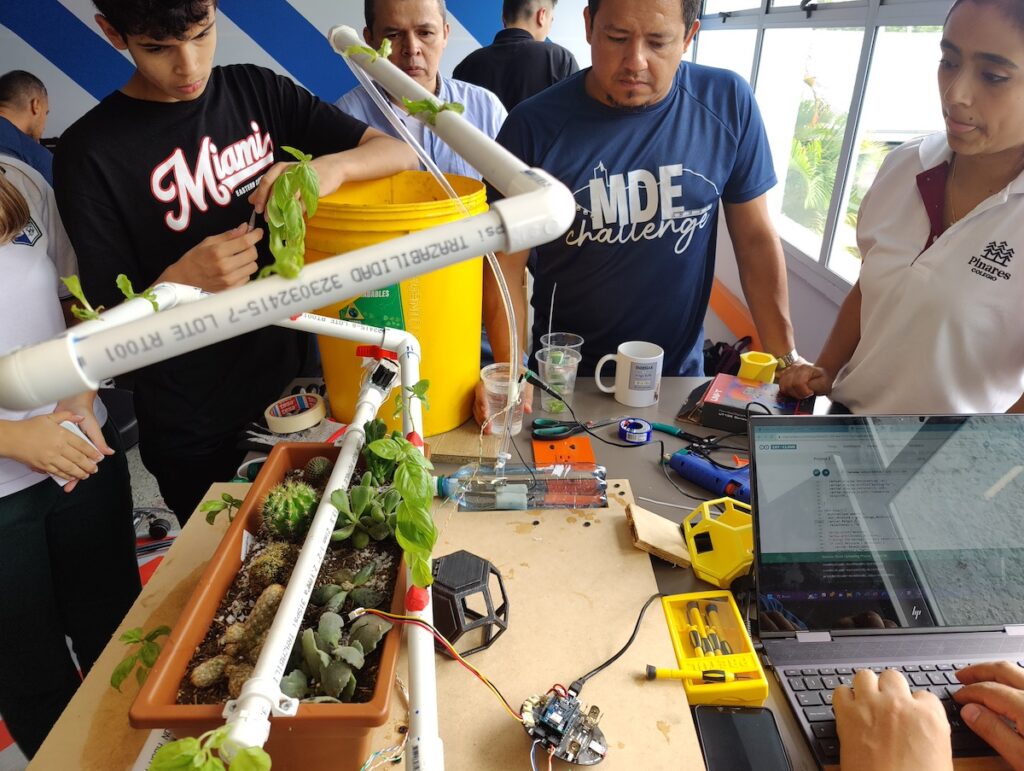
Arduino Education collaborated with the Colegio San Jose de Las Vegas for the Medellín Challenge 2023. Students participating in the challenge experienced a transformative arc during an intensive three months. From the early days of choosing their challenges to turning their innovative ideas into tangible prototypes, their journey was supported at every step by Arduino Education’s state-of-the-art technology resources, including the Explore IoT Kit and the Arduino Cloud.
An experienced Arduino Education trainer teamed up with the teachers and students during the prototyping stage to provide direct in-person technical support throughout the design phase, and provide ongoing feedback.
Just some of the sustainability solutions that the teams of students devised with Arduino included:
Building a smart farm and designing tutorials so children in the Medellín communities could learn how to grow their own food, and potentially create a way to make an income.
Creating a virtual platform linked to a solar-powered car that visits local communities to bring learning experiences, such as environmental, technological, and entrepreneurship education to children.
A device that makes use of the water lost from natural sources in different activities: washing clothes, watering gardens and fish tanks.
Company of the Year (more than £3m)
There’s a significant gap between education and the job market, where technology, methodology, and mindset for educating future talents are generally missing. Arduino Education strives to bring easy-to-use, affordable, and skill-oriented solutions to bridge this gap. We want to continuously redefine the horizons of STEAM education and push for innovation in the classroom.
Always looking forward, we pioneer educational tools that reflect real-world applications, like our collaboration on machine learning content with Harvard, and our Explore IoT Kit which ties to the UN’s Sustainable Development Goals. We champion diversity, sustainability, and corporate social responsibility. Efforts such as supporting ‘Jenga Labs‘ in Ghana and local manufacturing demonstrate our broader vision.
Arduino Education’s focus on customer service and a thriving teacher community are testaments to our commitment to the education sector.
Dan Hubacz, a U.S. high school teacher, sums up Arduino Education’s approach perfectly: “I want my students to be working on things that are real and matter to them, and that also potentially have an impact on the community.”
What’s next for Arduino Education
Further to receiving this recognition from the Bett Awards for our continuous focus on innovative solutions, we’d like to say thank you to all the students and educators who use Arduino Education kits and solutions in their classrooms. It’s your enthusiasm and desire for learning that makes this possible and worthwhile.
With the newly-released Science Kit R3 and even more exciting kits to come in 2024, we’ll keep striving to innovate, bridge the STEM skill gaps, and nurture future talent.
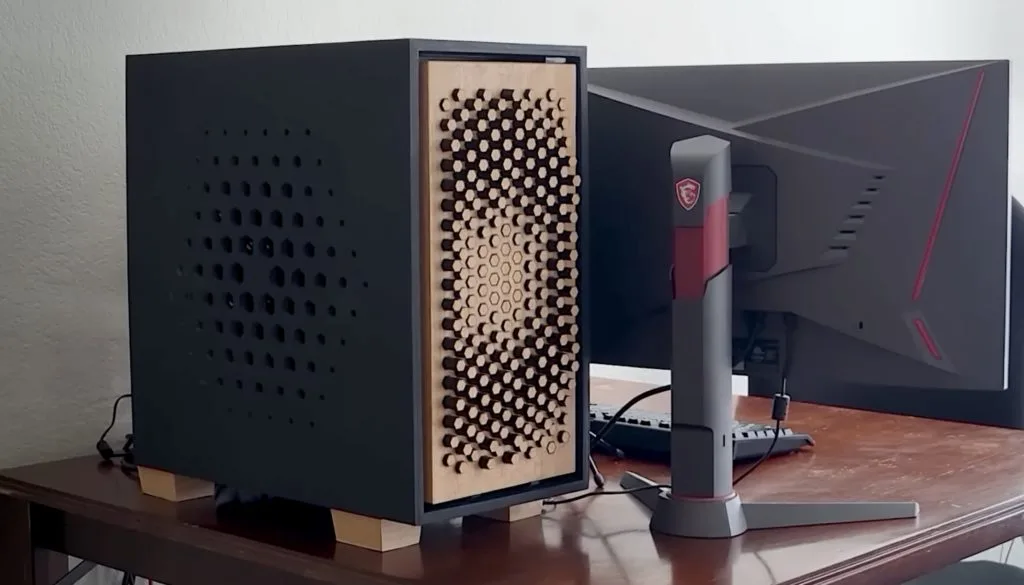
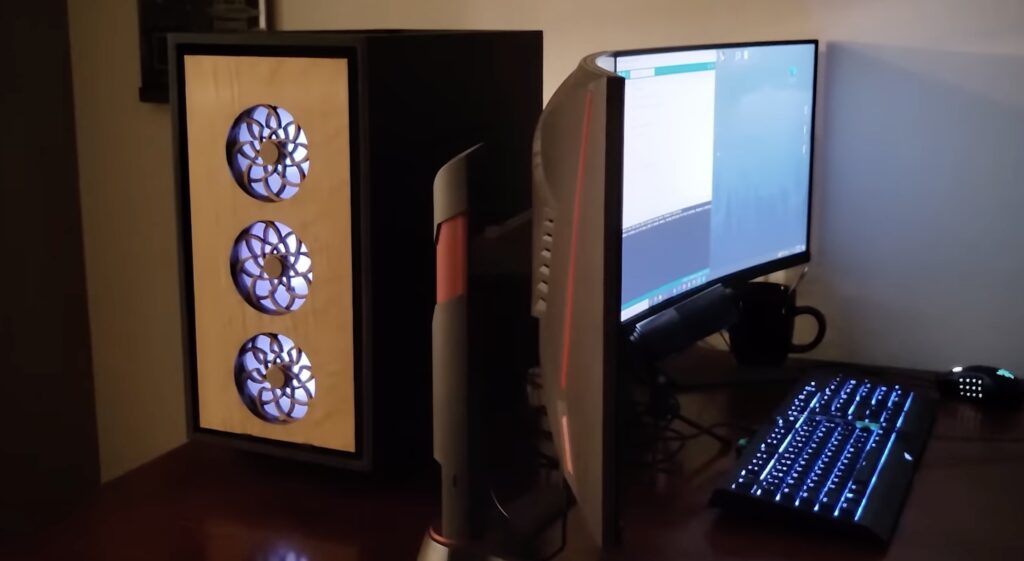
RGB LEDs are sooooo 2015 and the “it” thing today is kinetic art. If a blinking LED is the “hello world” of the microcontroller industry, then making something move is the equivalent of finally fingering out how pointers work. So Robert of the Ideal Idea YouTube channel had to learn a lot of new skills to design this PC case with interchangeable kinetic front panels.
Robert was inspired by CyberPower’s Kinetic Series case, which was on display at CES 2022, then CES 2023, and is now beginning to look like vaporware. Robert wanted to upgrade his PC setup and didn’t want to wait on CyberPower, so he built his own custom kinetic case.
Despite Robert’s claims to the contrary, he certainly appears to be a talented mechanical engineer. He created a pair of kinetic front panels and they’re both mechanical masterpieces. The first consists of three circular windows, each with two spinning wheels rotating in opposite directions. Light shines through from the PC to highlight the effect. The second is an intricate matrix of wood pillars that move in and out in an undulating pattern that entrances us.
Both kinetic panels operate using input from a single stepper motor controlled by an Arduino UNO Rev3 board. Robert constructed the panels’ complex mechanisms using a combination of 3D-printed plastic, laser-cut acrylic, and laser-cut wood. The two panels required hundreds of moving parts and a mastery of mechanical design, resulting in an amazing final product.
The best part is the modularity, as Robert can design and swap in a new kinetic panel whenever he wants.
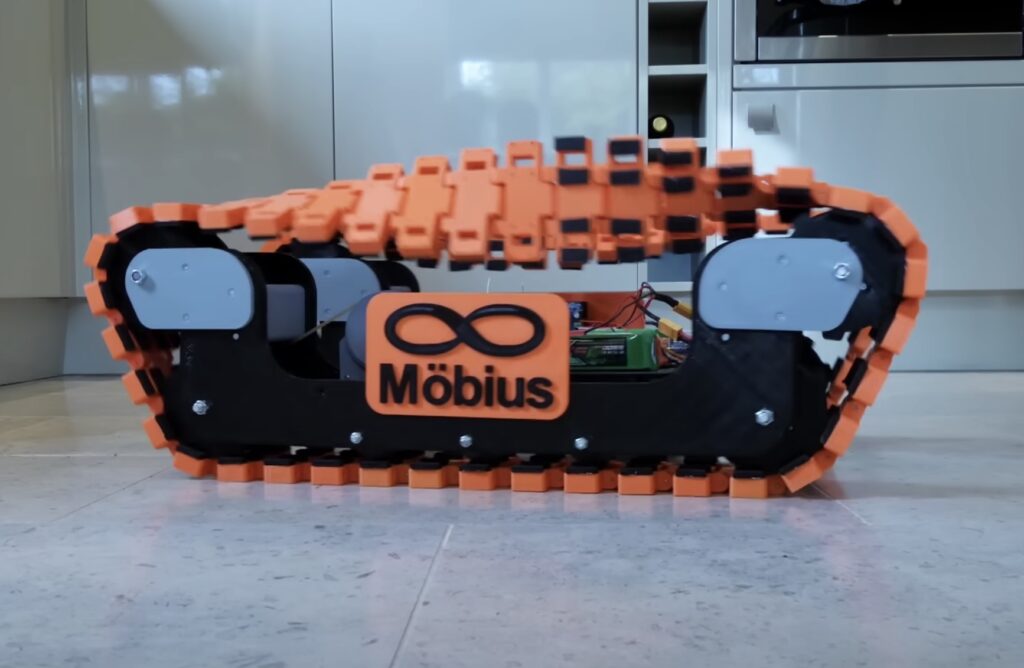
Möbius strips are often used to symbolize infinity, because they are continuous loops with only a single surface. They can’t exist in real life, because every solid object in reality has thickness — even if it is very thin, like a piece of paper. But we can construct similar objects that loop and twist over on themselves. James Bruton demonstrated that concept by building an RC tank with Möbius strip tracks.
This project doesn’t seem to have any real purpose beyond curiosity. Bruton wanted to see how Möbius strip tracks would work and so he constructed this tank to find out. The treads and most of the rest of the tank were 3D-printed, with the tread links getting a special design that lets them pivot relative to each other. They pivot just enough that the each track was able to make a half-twist over the course of 8 or 9 links. That half-twist is what makes the tracks similar to a Möbiusstrip, because the “outer” surface continues endlessly and transitions to being the “inner” surface and then repeats forever.
As is the case for many of Bruton’s creations, this tank has an Arduino Mega 2560 for control. It receives commands from Bruton’s universal remote through an OrangeRX DSM2 radio receiver. A DC gear motor drives each track, providing plenty of torque.
In testing, this tank performed similarly to a standard RC tank—though there is, presumably, more friction to overcome. When the tracks are bare plastic, they slip on hard surfaces a lot. When Bruton added grippy pads, they didn’t slip quite enough. But interestingly, the unique geometry of the tracks means that one “side” can be grippy and the other slick. The track will then alternate between the two, even though that doesn’t seem to provide any real benefit.
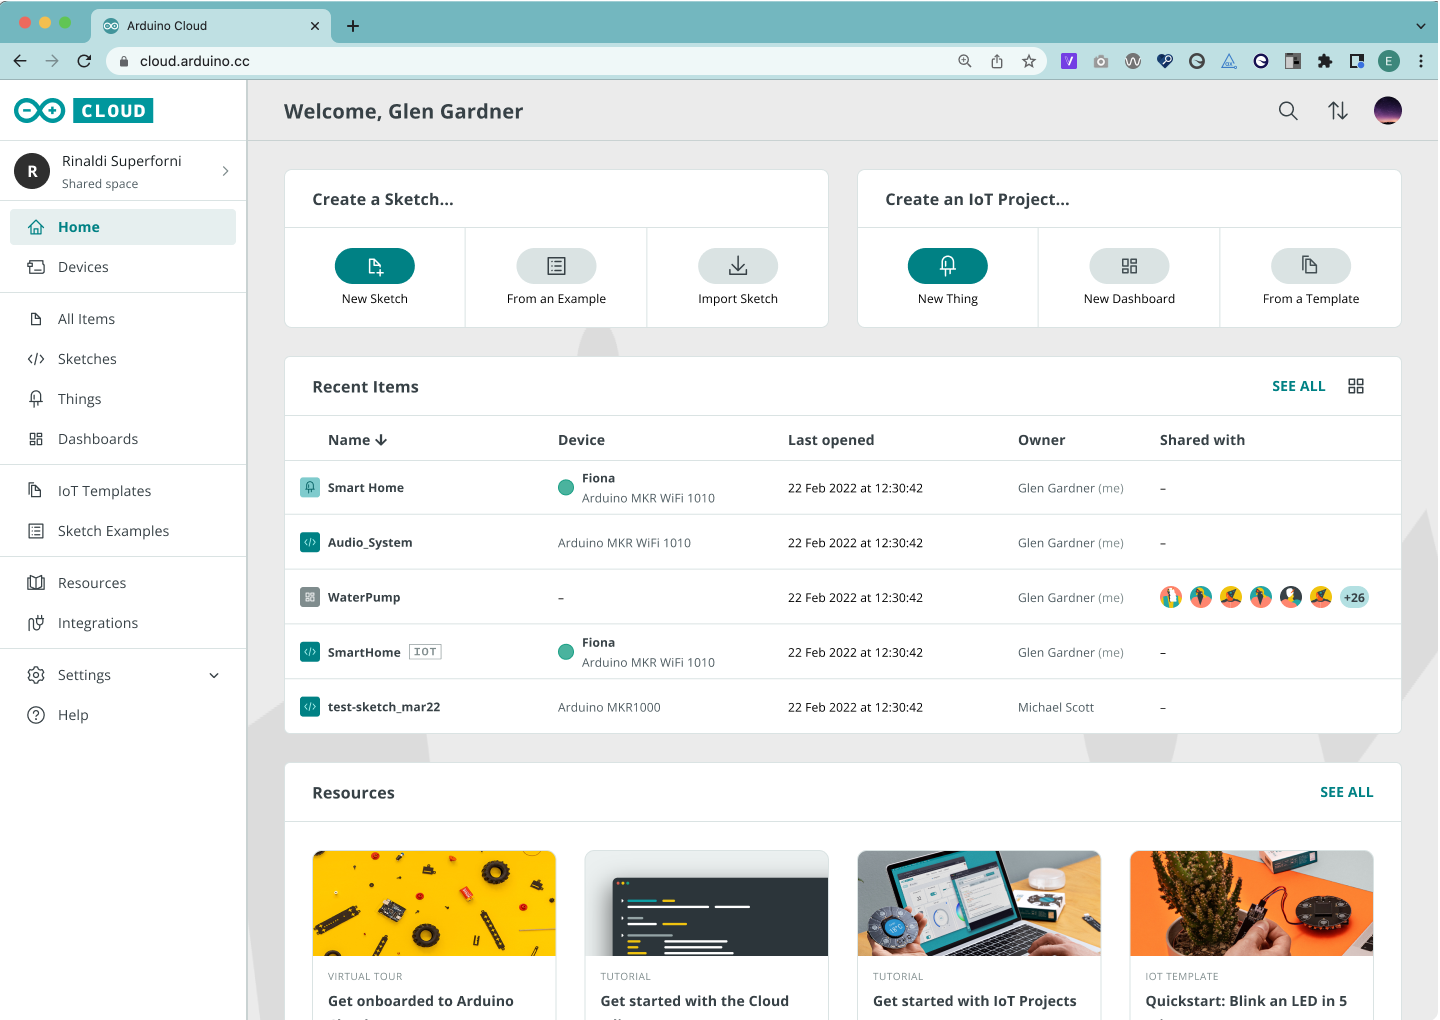
At Arduino, we’ve always believed in the power of community. Our journey has been shaped by the incredible feedback and input we’ve received from our users, and today, we’re thrilled to introduce a renewed and improved Arduino Cloud based on your insights.
This renewal goes beyond just a fresh coat of paint. It impacts not only the new user interface (UI) but also many other aspects of the Cloud, as well as our IoT Remote app. These new features and improvements will be progressively introduced in the coming weeks, so be sure to stay tuned for the next wave of exciting announcements.
It’s better, with you
Arduino Cloud is the platform that Internet of Things (IoT) and do-it-yourself (DIY) enthusiasts use to develop, monitor, and control their creations. It is an increasingly popular platform that was born to democratize the access to IoT, to make it simple and accessible for everyone, pretty much in a similar fashion as Arduino has done with hardware and DIY. Our journey mirrors our core values: open-source, accessibility, and community-driven innovation.
And it’s your contributions that drive our progress. Through our thriving forum, direct feedback channels, and our shared community-driven values, we actively engage with your ideas, questions, and experiences to shape the future of the Arduino Cloud. Your input is invaluable in our quest to create a platform that truly meets your needs and aspirations.
We’ve listened, we’ve learned, and we’ve transformed. The result is a platform that’s more intuitive, powerful, and user-friendly than ever before. It’s better, with you!
New user interface
The first major feature we’re excited to unveil is the brand-new user interface (UI). The UI has been designed with your needs in mind, and we’re confident it will greatly enhance your interaction with the Arduino Cloud.
What’s new in the UI?
New navigation bar: Say hello to a new, sleek navigation bar in the Arduino Cloud. You can now seamlessly jump between your devices, sketches and your dashboards.
Cleaner design: We’ve revamped the design to make it more visually appealing and clutter-free. Your projects and data take center stage, ensuring a distraction-free development environment.
New sketchbook: Discover a new evolution of our sketch management features, turning your sketches into a digital, secure sketchbook. You’ll always be on top of things, whether you’re tinkering with IoT projects, working on standalone sketches, or both.
Quick access to templates: We’ve made it easier for users to find and select pre-built templates from the new navigation bar. Now, you can choose among thermostat control, ventilation, smart garden, and many more to get quickly started with an IoT project.
Shared Spaces home dashboard: We’re introducing a new dashboard view for Shared Spaces, where you can monitor usage of the Cloud instantly.
White labeling: With our new white labeling feature, you can add a custom logo to your dashboard and even customize the Arduino logo on the top left. Make it truly yours!
What’s on the horizon
But this is just the beginning. Over the next few weeks, we have a series of major announcements lined up. Without giving away all the surprises, we can promise you more exciting features and enhancements to make your development experience even easier and your IoT projects even more accessible. Keep an eye out for upcoming blog posts where we’ll reveal these exciting developments.
Try Arduino Cloud today
At Arduino, we’re committed to improving our products and services with your active participation. The renewal of the Arduino Cloud is a testament to the power of community-driven innovation.
We invite you to explore the new UI, experiment with the features, and share your thoughts with us. Your feedback is invaluable as we continue to enhance the Arduino Cloud. Share your feedback, ideas, and experiences with us on social media, forums, and other communication channels.
Thank you for being a part of the Arduino community and making Arduino Cloud better, with you.
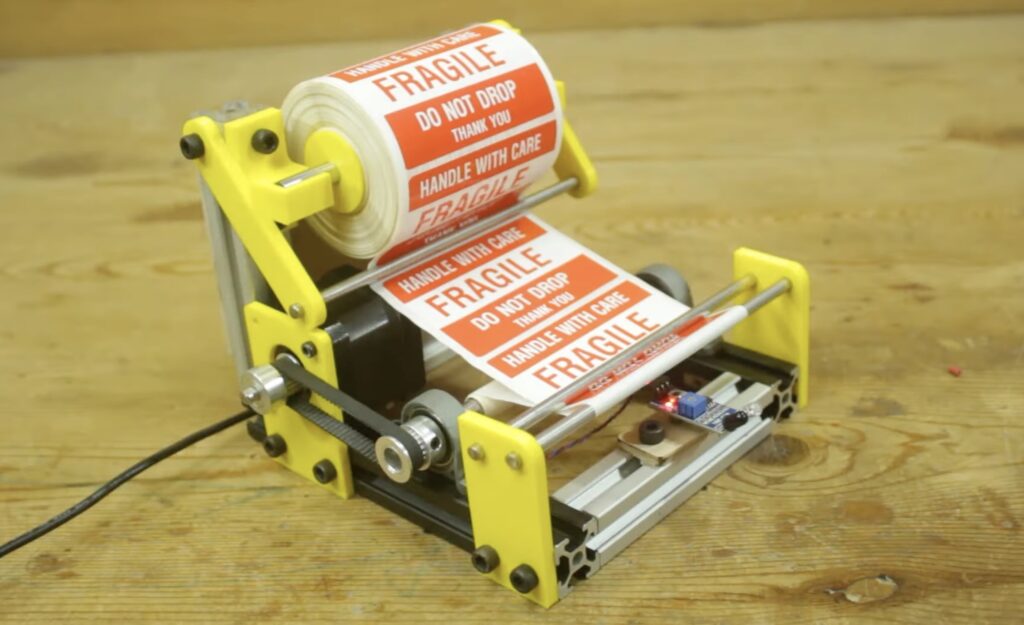
Most of us don’t use label stickers very often, so we can afford to spend several minutes fumbling around with corners to try and peel the labels from their backing paper. But if you’re handling many of them a day, like putting “fragile” stickers on shipping boxes, then that inefficient fumbling will be an issue. To make life easier for you, Mr Innovative built this simple machine that quickly dispenses labels.
Mr Innovative designed this machine for the kinds of label stickers that come on rolls of backing paper. It should work with a wide range of roll sizes and the dimensions are easy to modify if you need to accommodate even larger rolls. The best part is that it doesn’t require any configuration. The machine will pull the paper backing around a roller, releasing the sticker. That causes the sticker to cover an infrared sensor and the machine stops. After the user removes that sticker, the machine pulls the paper backing again until the next sticker is ready.
As with most of Mr Innovative’s projects, this utilizes a custom multipurpose control board that hosts an Arduino Nano board. That drives a single stepper motor, which rotates a spool to pull the backing paper from the roll of labels. The machine’s mechanical parts are all either 3D-printable, off-the-shelf hardware and fasteners, or standard 2020 T-slot aluminum extrusion.
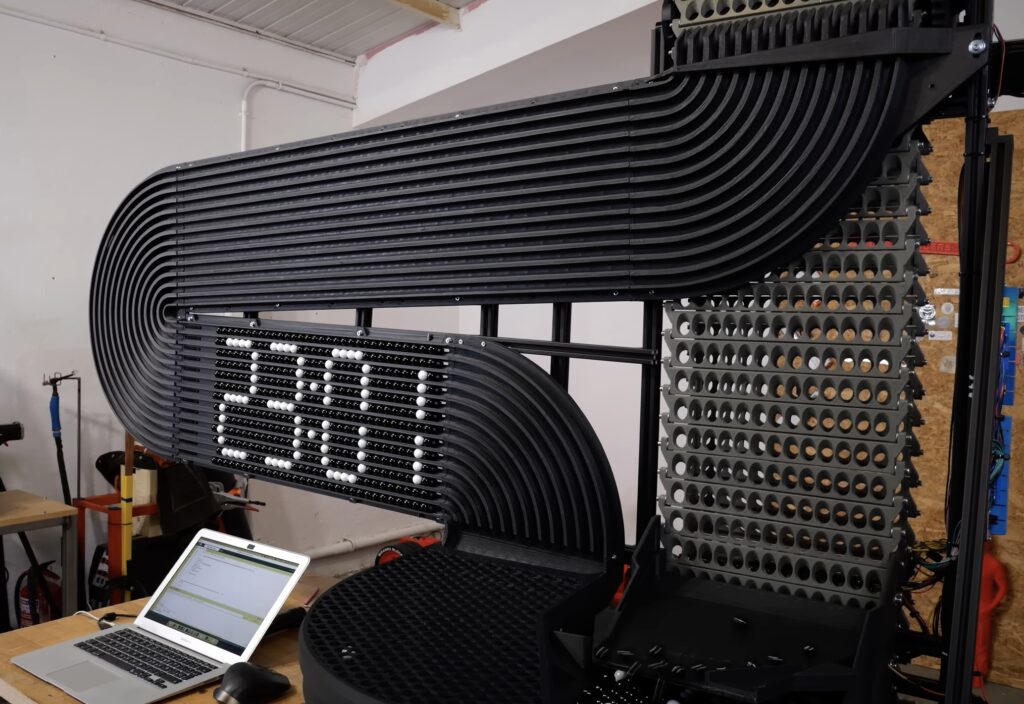
There are a surprising number of marble-based machines out there. Marbles work well in machines because they roll easily, have substantial weight, and are very consistent in diameter. Ivan Miranda was able to take advantage of those characteristics to build this amazing marble clock.
This project uses hundreds of marbles to display the time in numeric digits. To do so, the machine needs to roll specific marbles down tracks — white marbles for “on pixels” and black marbles for “off pixels.” When the time rolls over to the next minute, the clock releases those marbles back into a big hopper where they wait for the next cycle.
The machine carries marbles to the top of the track using an elevator mechanism. It picks up an entire row of marbles at once from the hopper, but their colors are random as far as the machine knows. So Miranda programmed an Arduino board to look at each marble in the row on the elevator. It uses infrared sensors to determine if each marble is black or white. It then triggers solenoids to eject any marbles that are the wrong color.
It is an inefficient trial-and-error process, but the machine can repeat that “lift and check” cycle as many times as it needs to until it sends all the right marbles down the appropriate tracks. Miranda has a few tweaks to make to increase reliability, but the clock is already a marvel!
There’s a lot to love about the fall season, and when it comes to home automation there’s a ton of opportunity here for smart makers to start playing around with new ideas and creations.
In this article, we’ll take a look at some ways you can use home automation to enhance your autumn experience, and we’ll share a few inspiring ideas from the Arduino community.
Automated garden care
If you have a lawn — or any outdoor space — you probably know the never-ending struggle of keeping it in good condition.
On top of your regular tasks of cutting the grass and caring for its quality, you’ll also have to contend with the yearly influx of beautiful but dead leaves cascading down from the trees and forming a crisp blanket over your grass.
This can keep the autumnal gardener much busier than usual, but the good news is that home automation can make things much easier in this department. Let’s find out how!
Smart leaf blowers
Clearing the fallen leaves out of your yard can be a tedious task, but with the power of home automation it gets a lot easier.
Remote-controlled leaf blowers like this one can take care of the laborious work of getting rid of dead leaves while you relax on the porch with a nice cup of coffee. Right now this kind of tech is still mostly in the prototype DIY stage, but the future could see more commercially available models.
Robot lawn mowers
The Roomba revolutionized the world of home maintenance. No longer did you have to devote chunks of your day to walking around the house with a vacuum cleaner — now a neat little robot could take care of it all for you.
Robot lawn mowers are now bringing the same game-changing concept to the world of gardening, automatically whizzing around your lawn and getting it to just the right condition while you hang out and enjoy the cool autumn breeze.
If you’re feeling creative, why not build your own robot lawn mower?
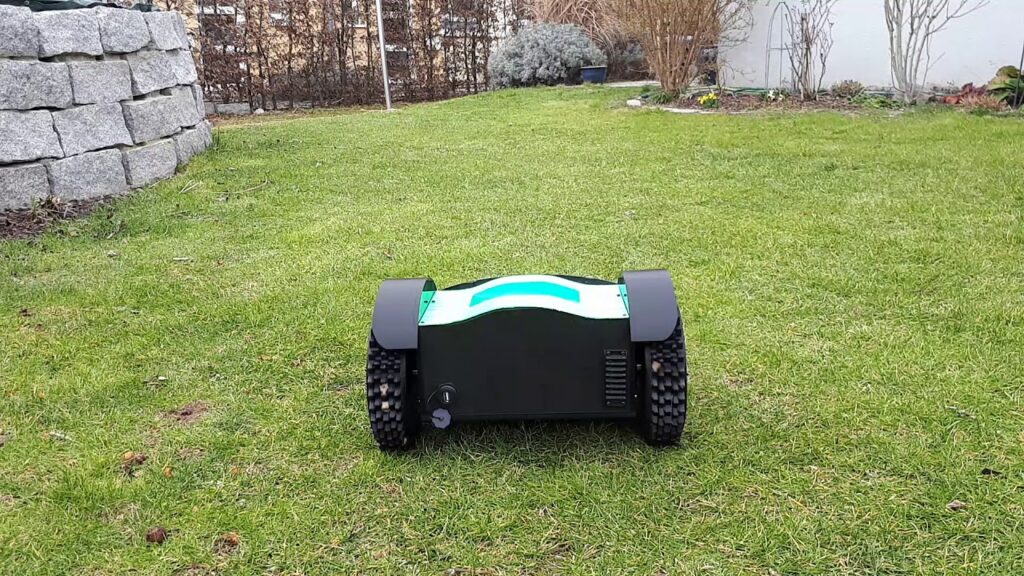
Arduino user ReP_AL decided to do that with this project — an Arduino-controlled lawn mowing robot. Now you can sit inside with a pumpkin spice latte and watch in comfort as your robot leaves your lawn in perfect condition. You can check out a full guide for this project here.
Temperature control and energy efficiency
While it’s not quite winter yet, fall is the period where temperatures start to drop, and some days can get pretty chilly.
This is the perfect opportunity to get on top of your temperature control systems and get prepared for the colder months on the way. Once again, home automation can play a major role here, helping you maintain just the right conditions in your home without wasting any energy.
Smart thermostats
Until recently, controlling the heat in your home required you to actually be at home.
Today, thanks to smart thermostats, that’s no longer the case. These gadgets allow you to check the temperature of your house and make adjustments from wherever you are, by connecting your thermostat to a mobile app.
Smart thermostats can also automatically change the temperature based on when you enter or leave your home, the occupancy of a room at any given time, and your energy usage over time.
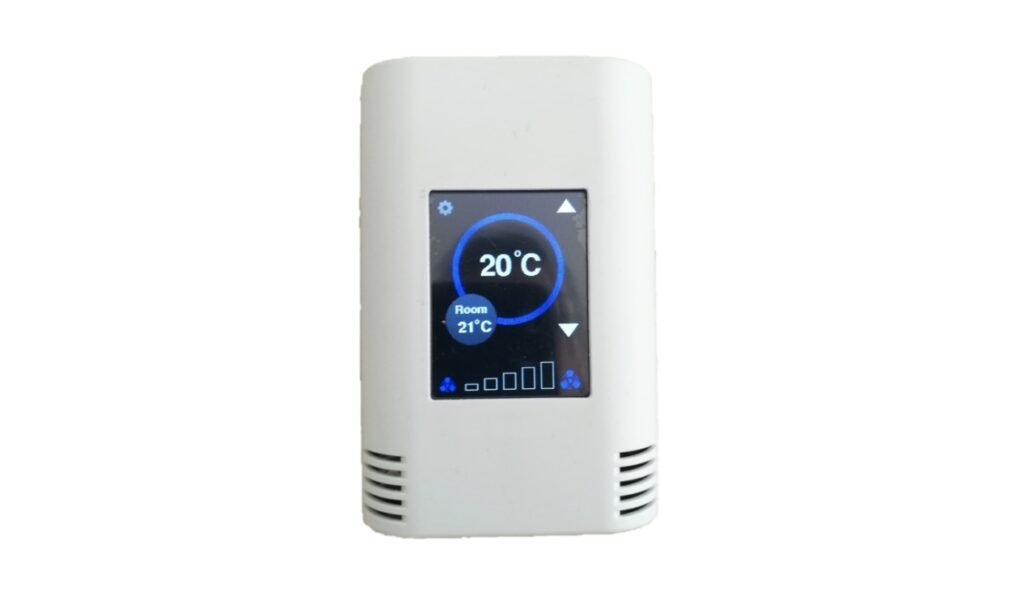
You can even make your own smart thermostat with Arduino. That’s exactly what Hwhardsoft did with this project, combining an Arduino MKR board with a wall mounting enclosure and color TFT touchscreen to create a professional-looking and easy-to-use thermostat for the chilly winter months.
Energy conservation
As the days get shorter and colder in the fall months, it’s tempting to crank up the heating and flood your house with light.
The downside to this is that it takes its toll on your energy bills, especially during a time when costs are high. Home automation can help mitigate this, with the use of monitors that track energy usage, show alerts, and even automatically switch off or turn down lighting, heat, and electrical appliances when they’re not needed.
Lighting and decorations for fall
Fall isn’t all about dark nights and frosty mornings. It’s also a time for celebration, with quite a few big holidays taking place around this time.
Halloween is the most famous, but even if you aren’t a big fan of spooky decorations, adding some light and color to your home can help warm things up as the days get colder.
Smart lighting is a great example here. On top of keeping your living areas cozy and ambient, smart lighting can also help create a more seasonal mood, and can even be used to set up lighting displays for parties and holiday celebrations.
It’s not just indoor lighting, either, you can also set up smart illumination displays on the outside of your home. If you’re feeling particularly ambitious, you can even rig up entire lighting displays to celebrate an occasion of your choice.
Home security
One of the downsides of the darker months is an increase in certain types of crime — specifically burglary.
Criminals like to operate under cover of darkness, and home break-ins are easier to carry out when the world is plunged into night from the afternoon onwards. Fortunately, burglars are fairly easy to deter, and home automation can be a powerful tool here. For instance:
Motion sensors and smart camera systems that can detect any unusual activity and quickly report it to you, wherever you are, via a mobile app. This can also trigger alarms and even notify the police if needed.
Smart locks and security systems that can be controlled remotely from your devices. This way you can ensure your home is secure at all times, giving you peace of mind, and grant trusted people access from afar.
Automated lighting systems that make your home seem occupied even when nobody is around, deterring opportunistic criminals.
Entertainment
The fall season is home to a number of festivals and holidays. Halloween, the Day of the Dead, and Thanksgiving are just a few well-known examples.
Due to the chilly weather, most autumnal festivals tend to take place indoors, which is a great opportunity for you to tap into home automation to host a party nobody will ever forget.
Home automation can give you a ton of the tools to achieve this. With automated lighting to create the perfect ambience, smart speaker systems connected to voice assistants and shared apps, and unique, novel costumes and light displays, you can host the perfect party.
You don’t need to throw a huge celebration to make the most of smart entertainment, however. With the right combination of smart lighting, sound, and interactive entertainment systems you can have a great night in all by yourself.
Preparing for the holidays
On top of the fearful festivities of Halloween, fall also marks the beginning of a long holiday season.
Thanksgiving, Christmas, and New Year are all just around the corner, and major events like Black Friday and Cyber Monday take place around this time, too. This makes fall the perfect season to start laying the foundations for a busy few months of holidays.
Once again, home automation can make life easier and more productive here. For example:
Smart kitchen appliances — like trash cans that sound alerts when they’re full and cupboards that add to your shopping list when ingredients are running low — can make life much easier during big eating and guest-hosting holidays.
Automated travel planning — Tools such as Wonderplan make it easier than ever to create rough starting itineraries, book accommodation and transport ahead of time, and start making preparations for your coming trip.
Automated gift shopping — Tools like ChatGPT can help generate thoughtful ideas for gifts, and you can easily place orders using voice automation software and list-making apps that can handle the entire process of ordering and shipping.
If you’re interested in getting started on your own home automation journey this fall, Arduino is the perfect place to start.
Our Project Hub is full of inspiration, and we have products and guides to help anyone get started, no matter their experience level or comfort with tech. Everyone has to start somewhere, and before long you’ll be putting together some seriously impressive creations.
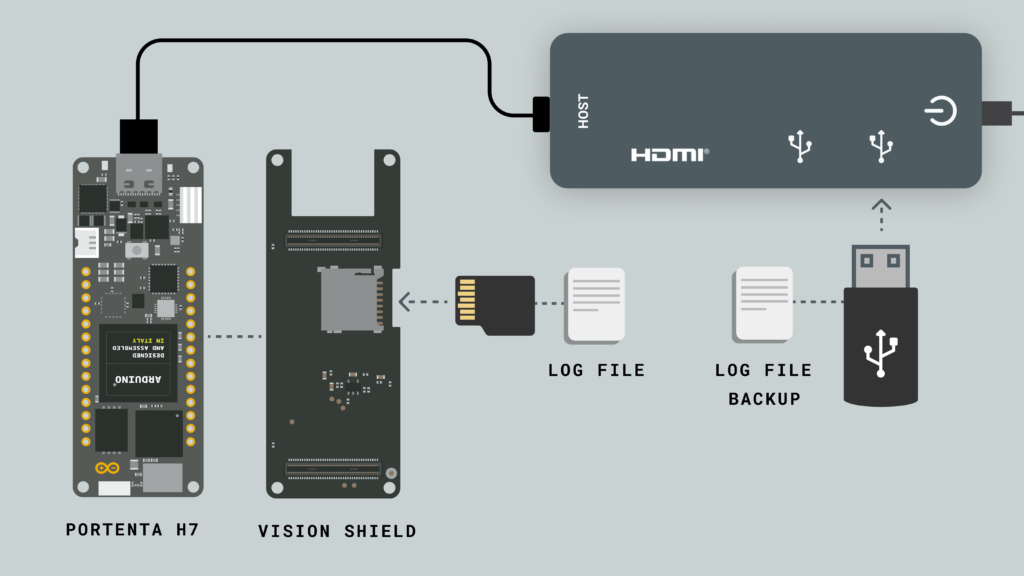
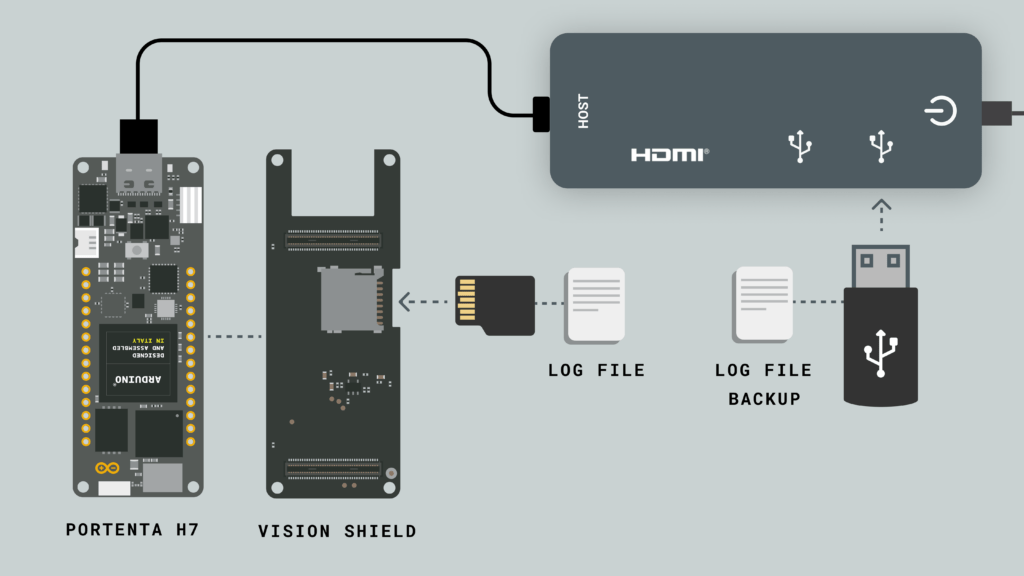
At Arduino, we’re always on a mission to make development easier and more accessible. That’s why we’re excited to introduce two new libraries, Arduino_POSIXStorage and Arduino_UnifiedStorage, designed to simplify how you handle data and storage in your Arduino projects. These libraries empower you to do that faster, and with less complexity.
Simplified data management with Arduino_POSIXStorage
Imagine having an easy way to manage data and files without the headache of low-level operations. Arduino_POSIXStorage is here to simplify that for you. Especially if you’re familiar with the POSIX standard for file operations you will feel right at home. If POSIX doesn’t ring a bell, it’s the standard used for file system functions in Linux, macOS, FreeBSD, or similar operating systems.
What can Arduino_POSIXStorage do for you?
Simplified storage access: No need to wrestle with complex storage operations. Arduino_POSIXStorage provides a straightforward way to manage SD cards, and USB storage.
Your choice of file systems: Whether you prefer FAT32 or LittleFS, you have the freedom to choose the file system that suits your project best.
Hotplug support: Detect and manage USB mass storage devices as you plug them in and out for added convenience.
User-friendly data management with Arduino_UnifiedStorage
Managing data and files shouldn’t be complicated. Arduino_UnifiedStorage takes the complexity out of the equation. Being based on Arduino_POSIXStorage, it offers the same functionality and adds some additional features. For those not familiar with the POSIX set of file functions, this library offers a user-friendly API in the usual Arduino style.
Which additional features does Arduino_UnifiedStorage offer?
Unified storage interface: Gain streamlined access to internal storage, SD cards, and USB storage with a user-friendly interface.
Effortless file handling: Easily move within files and check available data, making file navigation a breeze.
Robust file and folder actions: Rename, delete, copy, and paste files and folders with confidence.
Smooth cross-medium data transfer: Move data between different storage types while controlling how overwriting works.
Advanced file navigation: Navigate through folder structures with ease for straightforward file management.
Partition support: Work with multiple partitions on internal QSPI storage for expanded storage options. Easily re-partition the storage according to your needs.
Real-world use cases: Simplify your projects
Let’s explore how these libraries can simplify real-world scenarios:
Use case 1: Automated data backup for remote monitoring systems
Imagine you’re building a remote monitoring system for an agricultural field or a remote weather station. These systems collect valuable data over time, but they also face the risk of data loss due to unforeseen circumstances like power outages or equipment failures.
With the Arduino_UnifiedStorage library, you can easily set up automated data backup routines. As your system collects data, it can periodically back up that data to an SD card or USB storage device using the library’s intuitive file management features. In the event of an issue, your valuable data remains safe and accessible for analysis.
Use case 2: Rapid firmware updates for IoT devices
If you’re working on an Internet of Things (IoT) project, you may need to install new firmware before deploying devices in the field. Or you may find yourself in a situation that does not allow for Over-the-Air updates on the deployed devices. However, this is crucial for fixing bugs, adding new features, or enhancing security.
With the Arduino_POSIXStorage library, you can streamline the process of firmware updates. Store the updated firmware on an SD card or USB drive, and your IoT device can detect and apply the update automatically. This simplifies the update process and reduces the risk of errors, ensuring your devices always run the latest software.
Use case 3: Data collection and machine learning motel training
Imagine you’re working on a project that involves collecting sensor data from various sensors in a smart environment — maybe it’s a smart home, an industrial automation system, or an environmental monitoring setup. Your goal is to use this data to train a machine learning model for predictive analysis or automation.
The Arduino_UnifiedStorage library can simplify the process of collecting, storing, and managing this sensor data. Use it to efficiently log sensor data to an SD card or USB storage device. With a rich dataset at your disposal, you can now use the collected sensor data to train machine learning models. Whether you’re developing predictive maintenance algorithms, anomaly detection systems, or smart automation routines, having easy access to high-quality data is essential.
Examples and testing: A hassle-free experience
Both libraries come with practical examples that help you dive right in, covering real-life scenarios such as data logging and storage backup. We’ve also rigorously tested these libraries to ensure they work seamlessly on various devices, giving you confidence in their performance and robustness.
Compatibility
The currently supported products are as follows:
Arduino Portenta H7
Arduino Portenta C33
Arduino Opta
Arduino Portenta Machine Control
In the future, we plan to expand support for additional Arduino boards.
Get started today
Ready to simplify data management in your Arduino projects? Download the Arduino_POSIXStorage and Arduino_UnifiedStorage libraries, explore the documentation, and dive into the examples. Whether you’re a beginner or an experienced developer, these libraries are designed to streamline your workflow and help you unlock new possibilities.
Installation
You can conveniently download the libraries in the Arduino IDE using its library manager or download them directly from the following URLs:
Tip: You can find the API documentation of these libraries in the “docs” folder of the corresponding repository.
Join the conversation: Have questions or want to share your experiences with these libraries? Join the Arduino community on our forums and connect with fellow developers.
We can’t wait to see how these libraries empower your projects and help you take your Arduino development to the next level. Happy coding!
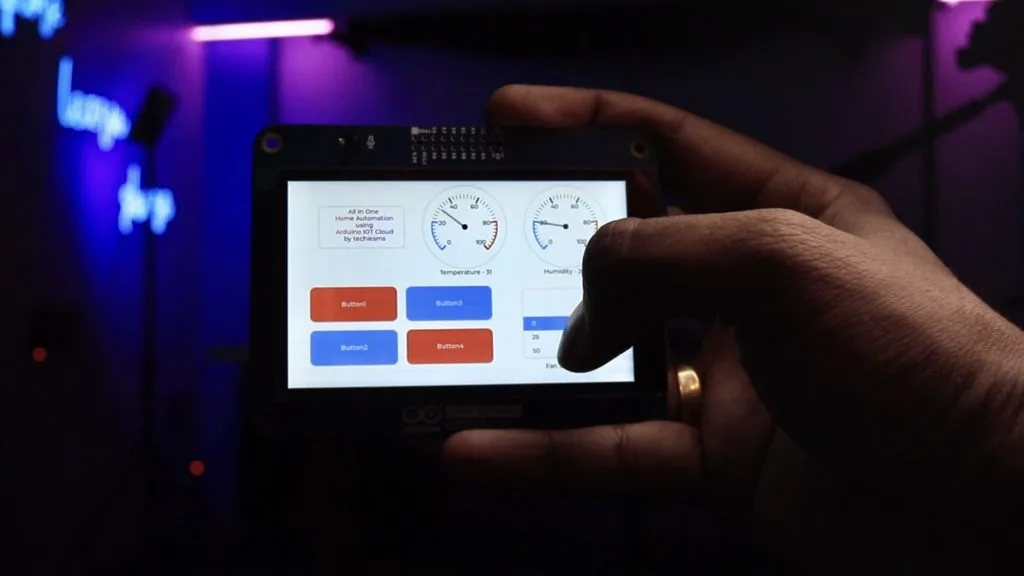
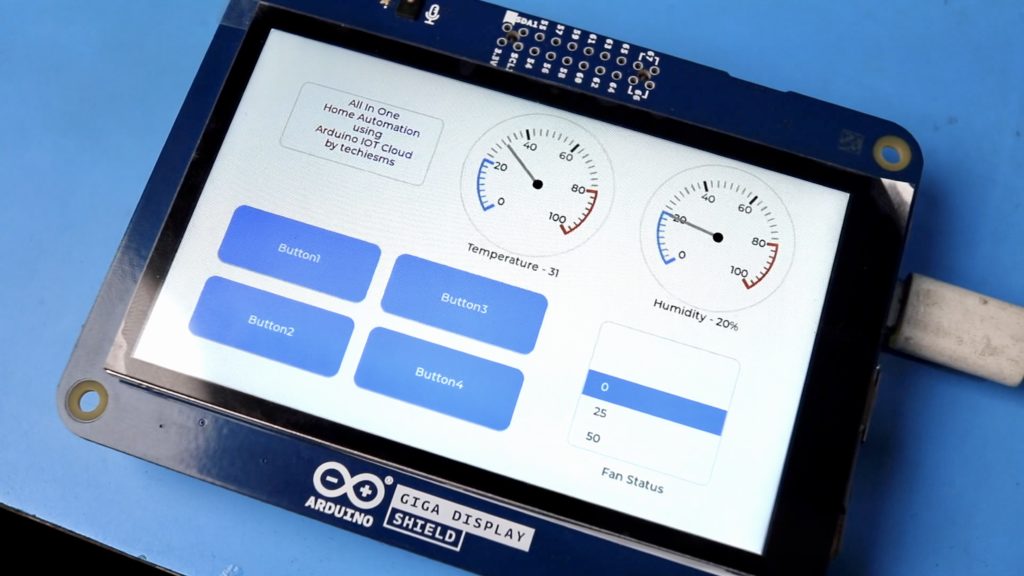
In a previous video about controlling household appliances and lighting fixtures from the Arduino Cloud, Sachin Soni of the techiesms YouTube channel designed a custom PCB that allows an Arduino Nano ESP32 to toggle a series of relays. But since then, he realized that his project needed a faster and more permanent method of getting to the controls, which led him to build a complete home automation dashboard using solely Arduino hardware.
Soni opted for the new Arduino GIGA Display Shield since it contains a 3.97” RGB touchscreen with support for up to five simultaneous touch points and an array of sensors if the functionality were to ever be expanded. On the back, an Arduino GIGA R1 WiFi was attached to act as the display’s controller and leverage its Wi-Fi capabilities to communicate with the system’s Arduino Cloud variables.
The final step in this project involved creating a software-defined graphical user interface (GUI) complete with toggleable buttons for the lights, dials to indicate temperature/humidity levels, and a way to select the fan’s speed from an array of values. Soni was able to finish most of the groundwork by utilizing the LVGL library and its highly customizable GUI components.
After laying out the buttons and dials, synchronizing Cloud variables, and connecting their event handlers to value updates, Soni had a functional tablet that could wirelessly manage his appliances from anywhere.
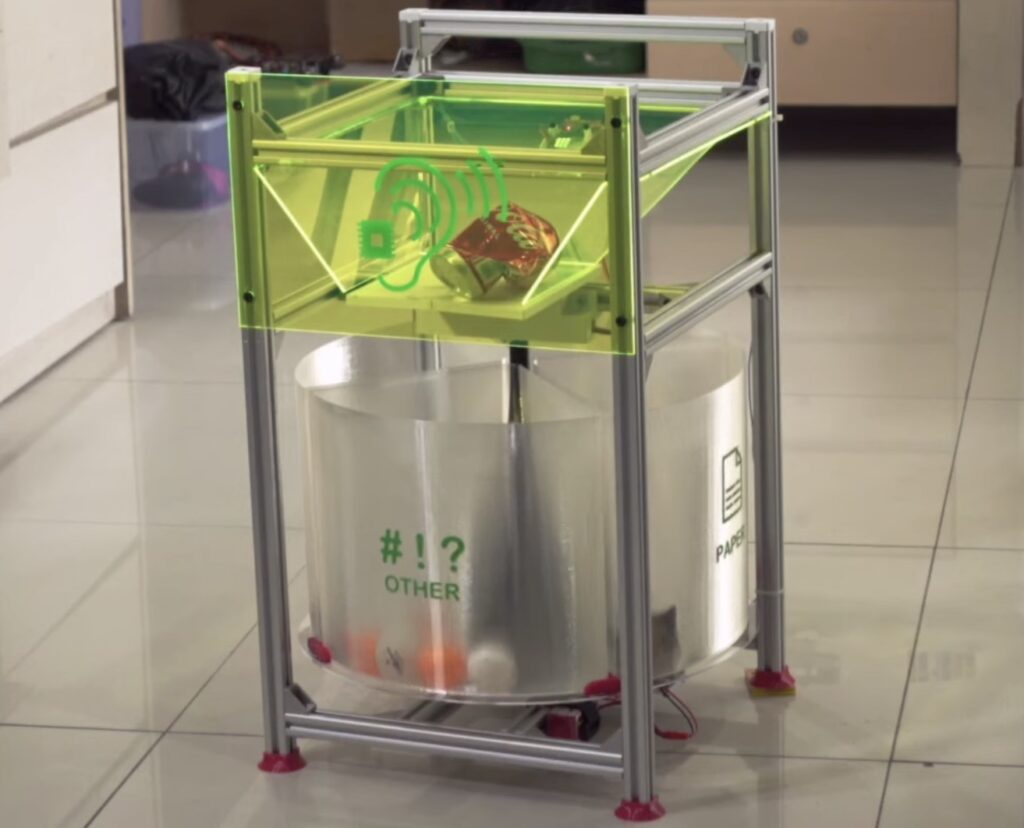
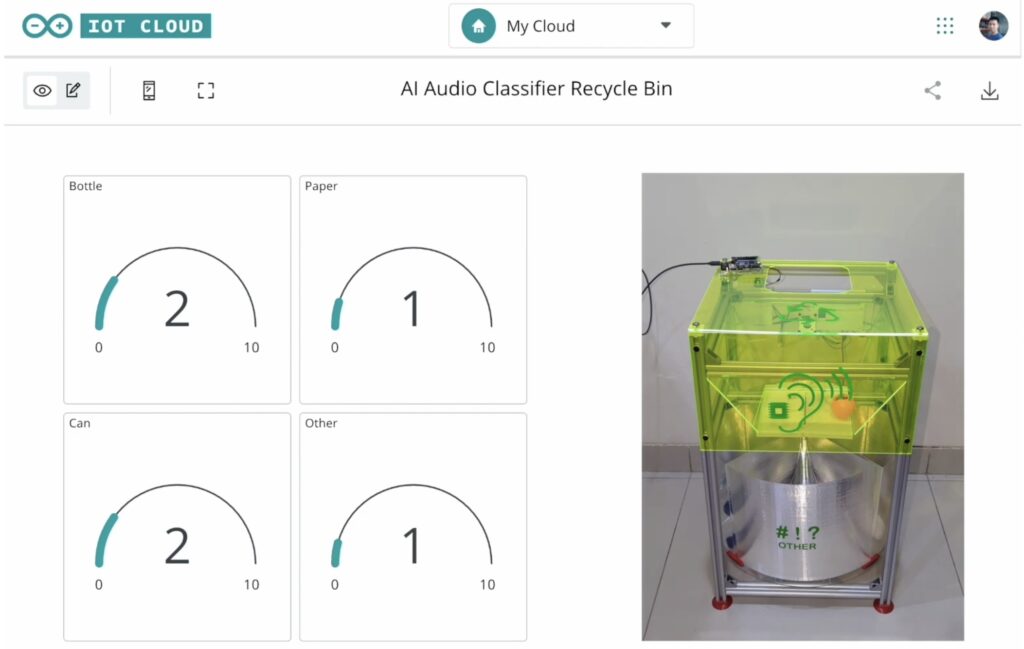
In July 2023, Samuel Alexander set out to reduce the amount of trash that gets thrown out due to poor sorting practices at the recycling bin. His original design relied on an Arduino Nano 33 BLE Sense to capture audio through its onboard microphone and then perform edge audio classification with an embedded ML model to automatically separate materials based on the sound they make when tossed inside. But in this latest iteration, Alexander added several large improvements to help the concept scale much further.
Perhaps the most substantial modification, the bin now uses an Arduino Pro Portenta C33 in combination with an external Nicla Voice or Nano 33 BLE Sense to not only perform inferences to sort trash, but also send real-time data to a cloud endpoint. By utilizing the Arduino Cloud through the Portanta C33, each AI-enabled recycling bin can now report its current capacity for each type of waste and then send an alert when collection must occur.
While not as practical for household use, this integration could be incredibly effective for municipalities looking to create a network of bins that can be deployed in a city park environment or another public space.
Thanks to these upgrades, Alexander was able to submit his prototype for consideration in the 2023 Hackaday Prize competition where he was awarded the Protolabs manufacturing grant. To see more about this innovative project, you can check out its write-up here and watch Alexander’s detailed explanation video below.
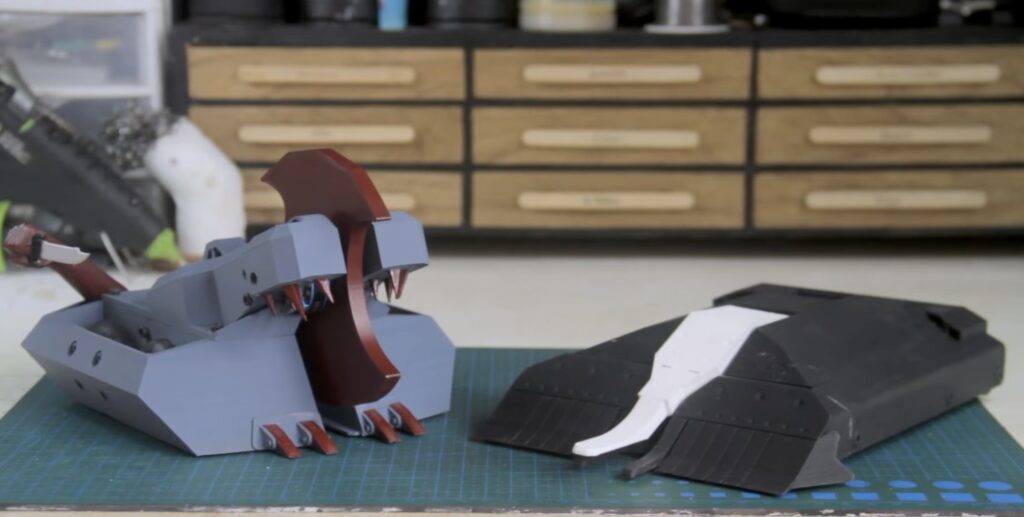
When the BattleBots TV show first hit the airwaves in 2000, it felt like we were finally living in the future. Engineers and enterprising hobbyists from around the world would compete to build the most destructive robots, which then entered into televised mortal combat within an arena. The original series had many notable robots, but two of those most iconic were DeathRoll and Hydra. Max Imagination replicated those on a small scale for mini living room battles.
BattleBots competitors could win their matches by either damaging their opponents to the point where they could no longer operate, or by making them unable to move. The most popular way to achieve that second goal was by flipping over the opposing robot and that is the tactic used by both DeathRoll and Hydra. DeathRoll did so with a spinning disc that catches on its opponents body, while Hydra used a hydraulic arm like a pancake spatula to flip opponents.
Max Imagination wanted to create faithful reproductions of both bots, but at a size small enough to be 3D-printed. Because hydraulics are difficult at this scale, Hydra’s flipping arm is spring-actuated and cocked with a motor-driven gear mechanism. Otherwise, both replicas work in the same way as their bigger ancestors.
Each robot takes advantage of the new Arduino UNO R4 WiFi board for control. Max Imagination programmed those with self-hosted web interfaces, so users can pilot the bots through smartphones. The bodies were designed in Autodesk Fusion 360 to be entirely 3D-printable and Max Imagination is even selling those models for anyone who wants to construct their own fighting robots.
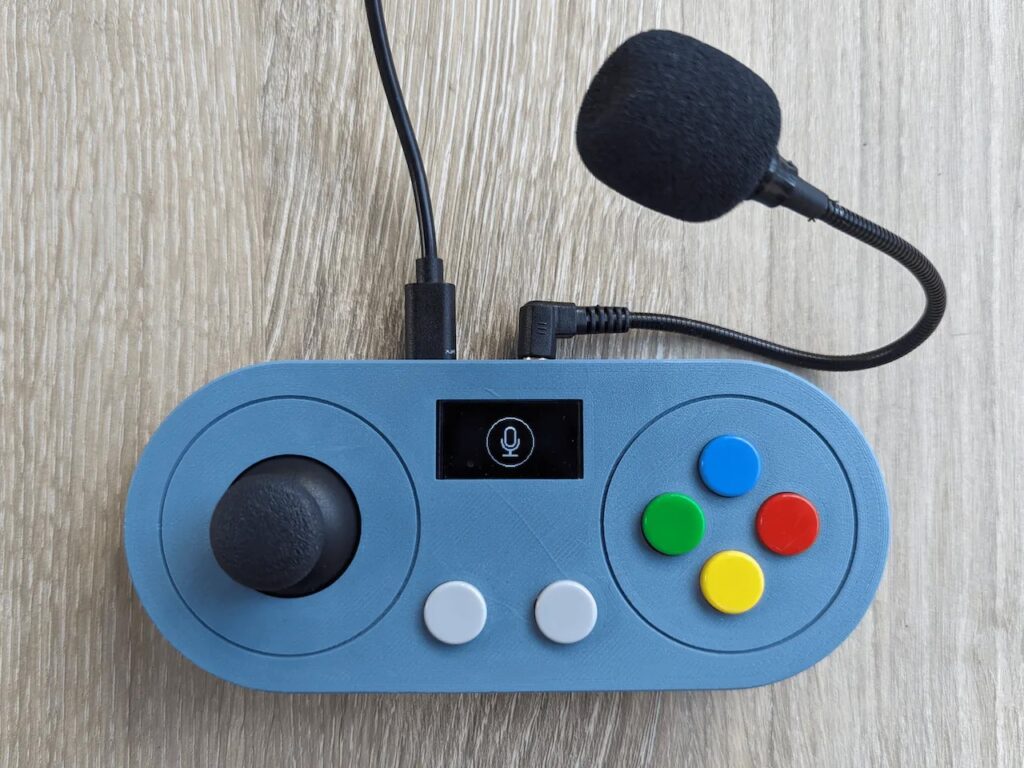
Almost all modern video games require either a gamepad or a keyboard and mouse, which means that they’re inaccessible to many people with disabilities that affect manual dexterity. Bob Hammell’s voice-enabled controller lets some of those people experience the joy of video games.
This is a simplified video game controller with a minimal number of physical buttons, but with special voice-activated virtual buttons to make up the difference. The gamepad only has six physical buttons, plus an analog joystick. That makes it much easier to handle than a typical modern controller, which might have a dozen buttons and two joysticks. If the player has the ability, they can utilize the physical controls and then speak commands to activate the game functions not covered by those buttons.
The controller’s brain is an Arduino Micro board, which Hammell selected because it can be configured to show up as a standard USB HID gamepad or keyboard when connected to a PC. The physical controls are an Adafruit analog two-axis joystick and tactile switches. An Adafruit 1.3″ OLED screen displays information, including the status of the voice activation.
An Elechouse V3 Voice Recognition Module performs the voice recognition and it can understand up to 80 different commands. When it recognizes a command, like “menu,” it tells the Arduino to send the corresponding virtual button press to the connected computer. It takes time for a person to speak a command, so those are best suited to functions that players don’t use very often.
If you know someone that would benefit from a controller like this, Hammell posted a full tutorial and all of the necessary files to Hackster.io so you can build your own.
Um dir ein optimales Erlebnis zu bieten, verwenden wir Technologien wie Cookies, um Geräteinformationen zu speichern und/oder darauf zuzugreifen. Wenn du diesen Technologien zustimmst, können wir Daten wie das Surfverhalten oder eindeutige IDs auf dieser Website verarbeiten. Wenn du deine Einwillligung nicht erteilst oder zurückziehst, können bestimmte Merkmale und Funktionen beeinträchtigt werden.
Funktional
Immer aktiv
Die technische Speicherung oder der Zugang ist unbedingt erforderlich für den rechtmäßigen Zweck, die Nutzung eines bestimmten Dienstes zu ermöglichen, der vom Teilnehmer oder Nutzer ausdrücklich gewünscht wird, oder für den alleinigen Zweck, die Übertragung einer Nachricht über ein elektronisches Kommunikationsnetz durchzuführen.
Vorlieben
Die technische Speicherung oder der Zugriff ist für den rechtmäßigen Zweck der Speicherung von Präferenzen erforderlich, die nicht vom Abonnenten oder Benutzer angefordert wurden.
Statistiken
Die technische Speicherung oder der Zugriff, der ausschließlich zu statistischen Zwecken erfolgt.Die technische Speicherung oder der Zugriff, der ausschließlich zu anonymen statistischen Zwecken verwendet wird. Ohne eine Vorladung, die freiwillige Zustimmung deines Internetdienstanbieters oder zusätzliche Aufzeichnungen von Dritten können die zu diesem Zweck gespeicherten oder abgerufenen Informationen allein in der Regel nicht dazu verwendet werden, dich zu identifizieren.
Marketing
Die technische Speicherung oder der Zugriff ist erforderlich, um Nutzerprofile zu erstellen, um Werbung zu versenden oder um den Nutzer auf einer Website oder über mehrere Websites hinweg zu ähnlichen Marketingzwecken zu verfolgen.