Kategorie: Mobile

  • Bipedal robot walks with a single motor

    Bipedal robot walks with a single motor

    Reading Time: 2 minutes

    A popular goal among roboticists is animal-like locomotion. Animals move with a fluidity and grace that is very hard to replicate artificially. That goal has led to extremely complex robots that require a multitude of motors and sensors, along with heavy processing, to walk. But even those don’t quite match biological movement. Taking a new approach, engineers from Carnegie Mellon University and the University of Illinois Urbana-Champaign created a simple bipedal robot named “Mugatu” that walks using a single actuator.

    This approach is counter-intuitive, but quite sensible when we actually look at the gaits of real animals. Bipedal animals, such as humans, don’t need to engage many muscles when walking on flat surfaces. We achieve that efficiency with balance and body geometry evolved for this purpose. In a sense, a walking human is always falling forward slightly and redirecting their inertia to take a step. This robot walks in a similar manner and only needs a motor to move one leg forward relative to the other.

    The team built Mugatu using 3D-printed legs connected by a servo “hip” joint. An Arduino MKR Zero board controls that motor, moving it with the precise timing necessary to achieve the “continuous falling” gait. This prototype doesn’t utilize it yet, but there is also an IMU in the left leg that could provide useful feedback data in the future. For now, the robot relies on pre-programmed movements.

    While the prototype Mugatu has little utility, the research could prove to be indispensable for developing more natural gaits with fewer actuators.

    Image credit: J. Kyle et al.

    The post Bipedal robot walks with a single motor appeared first on Arduino Blog.

    Website: LINK

  • Tiny Tesla go-kart gains self-driving autopilot

    Tiny Tesla go-kart gains self-driving autopilot

    Reading Time: 2 minutes

    A few years ago, Austin Blake built an electric go-kart that looked like a Tesla Model S. It had the plastic shell from a kid’s Radio Flyer ride-on vehicle, but on top of a custom go-kart frame with a powerful electric motor. That looked like a Tesla, but it didn’t really act like one because it lacked self-driving capability. Now Blake has finally addressed that oversight and given his Tesla go-kart an Arduino-based autopilot.

    Tesla’s autopilot and full self-driving features don’t allow for 100% autonomous driving, but they get pretty close. Blake’s autopilot is much more limited, but still impressive. It can steer the go-kart around a known track while Blake handles the throttle and brakes. However, it can only follow the course it was trained on and can’t deviate from that without issues. It also can’t account for unusual events, like a pedestrian in the “road.”

    Blake’s autopilot works using a machine learning model running on a laptop, which controls the steering and receives steering angle information from a pair of Arduino Nano boards. The laptop looks at the road through a trio of Logitech webcams and those were also used to gather the training images. A large motor from a power chair rotates the steering column and a potentiometer monitors that rotation, so the two work together like a servo motor.

    Many times every second, the machine learning model looks at a frame from the video. Based on its training data, it determines what steering angle best matches the current view. It then turns the steering motor until it reaches that steering angle. The disadvantage of this technique is that it will always attempt to follow the same route as it was trained on and is therefore unable to navigate a new route.

    [youtube https://www.youtube.com/watch?v=PYFKGDfunfY?feature=oembed&w=500&h=281]

    The post Tiny Tesla go-kart gains self-driving autopilot appeared first on Arduino Blog.

    Website: LINK

  • Enviro Grow (Pico W Aboard) review

    Enviro Grow (Pico W Aboard) review

    Reading Time: < 1 minute

    Get your plants to water themselves

  • New deals, rewards and more from Google Play LiveNew deals, rewards and more from Google Play LiveSenior Director of Marketing

    New deals, rewards and more from Google Play LiveNew deals, rewards and more from Google Play LiveSenior Director of Marketing

    Reading Time: 3 minutes

    Today we hosted the second annual Google Play Live, an interactive livestream featuring popular YouTube Creators, hidden gems on the Play Store, PC gaming with Google Play Games and much more.

    This year, we brought the livestream directly to the Play Store and gave viewers the chance to play games and explore apps during the show alongside YouTube Creators like Anna Akana, Crissa Jackson and Arif Zahir. This is part of our ongoing work to help you discover apps and games in new ways. Look out for more ways we’re bringing live entertainment like this to the Play Store.

    Play Live officially kicked off Labor Day Deals Week, with new deals and rewards available now through September 6. Missed the show? Don’t worry, we’ve rounded up some of the biggest offers we announced.

    Deals in top apps and games

    During Google Play Live, we unveiled some of our biggest deals of the year in top apps and games. You can claim them directly in your apps and games or in the Play Store. Here are a few highlights (partner terms apply).

    • Bumble: Enjoy an extended Spotlight special, giving you a whole hour to find your plus one.
    • Candy Crush Saga: Get 2x added value on select rewards, including in-game currency, boosters and semi-durable items.
    • Duolingo: Improve your language skills with a one-month trial of Super Duolingo at no charge.
    • Gardenscapes: Save up to 80% on special events. During a special in-game event, advance levels faster with one of two offer bundles. Bundles include coins, boosters, extra lives and event tickets at no charge.
    • RAID: Shadow Legends: For a limited time, enjoy 50% more material rewards and essential resources to summon and upgrade heroes with the Shard Triple Pack.

    Exclusive rewards through Google Play Points

    Google Play Points is a rewards program that lets you earn points and rewards for the ways you already use Google Play, and you can join free of charge. This week, we’re partnering with 10 game developers so you can redeem your Play Points for exclusive game items. Here are some of the rewards we announced (Play and partner terms apply).

    To see all the games offering exclusive rewards this week, visit “Use” on Play Points Home. You can also activate a Play Points booster that will give you 8x points for any purchases you make in these games for seven days.

    New perks for Google Play Points Platinum members

    In the coming weeks, Google Play Points Platinum members will be able to choose from a set of special perks: 6 months of a Walmart+ membership, 6 months of DashPass by DoorDash, or 6 months of Discord Nitro. Act fast when you see this offer on the “Perks” tab of Play Points Home, because supplies are limited.

    Watch the replay to catch up on all the action from Google Play Live. And be sure to check out other offers available on the Play Store, like $7 off your first purchase on PC with Google Play Games for new users.

    Website: LINK

  • Arduino and AWS team up to bridge hardware and cloud for business

    Arduino and AWS team up to bridge hardware and cloud for business

    Reading Time: 3 minutes

    Today, Arduino officially announced its partnership with Amazon Web Services (AWS), offering a new path for the future of edge hardware and cloud services. The new partnership will provide Arduino products and Arduino Cloud customers more options to integrate AWS into IoT projects.

    One big cloud for all

    It might be news to learn that Arduino Cloud has run on AWS infrastructure from the beginning three years ago. Since that launch, Arduino has increased its investment in the product, growing the team, adding new features, and creating versions for Business and Education. It turned out to be the right decision, as we hear from our customers about how much the progress has helped them achieve both personally and professionally. 

    Speaking of achievements, it is incredible to report that Arduino Cloud has crossed a milestone. Our cloud now process 4 billion device messages each month! This astonishing accomplishment marks us as one of the more significant IoT SaaS platforms deployed on AWS. Thank you to all of our customers and contributors!

    Businesses <3 Arduino Cloud, too

    Our Cloud for Business solution is one of the areas in which we are heavily investing and growing the fastest. We have received great feedback on how quick commercial customers can realize value from the core features and our integrations with Edge Impulse and Foundaries.io. 

    For example, one of our customers, ABM Vapor Monitoring, built a connected contamination monitoring product for commercial buildings using the Arduino Pro Opta PLC. After evaluating different cloud options, they picked Arduino Cloud, and the feedback was great. 

    “Choosing Arduino Cloud for our [regulated air quality] application slashed product development time by six months and saved us over $250,000 in engineering services. Arduino Cloud has been an instrumental partner in our journey to introduce new products to the market.”

    What this partnership means

    Considering our professional customers was the driving motivation behind this partnership announcement with AWS. We continue to hear from businesses how they appreciate our device management, particularly the automatic industrial-grade secure connection and over-the-air firmware updates. 

    As these customers’ business grows and their product offerings evolve, it is easy to understand how some of the excellent cloud services from AWS could benefit their applications. As a company, Arduino wants to support everyone with an open ecosystem, and from that perspective, this partnership with AWS began. 

    Officially, Arduino joined the AWS ISV program. It is a program designed for SaaS providers built on AWS, like Arduino Cloud, to work with AWS in supporting medium to large customers with architecting custom solutions. Joining this program also provides access to a vast network of over 100,000 AWS Partners worldwide. This means both existing AWS and Arduino customers will experience streamlined support for integrating each cloud with one another.

    In addition, Arduino currently has 12 devices in the process of achieving AWS Device Qualification status. This means our devices will officially be recognized by AWS and provide customers architectural documentation to help simplify the complexity of developing an end-to-end solution. 

    Just the beginning

    We hope this article helped convey that this collaboration between Arduino and AWS is not just another partnership; it is a strategic effort that aims to simplify and accelerate the deployment of commercial IoT and cloud-based solutions. It’s an important step forward in connecting the capabilities of edge hardware with the immense potential of cloud computing.

    The future for IoT and cloud computing looks promising, and we are eager to see what innovations this partnership will unlock for our customers.

    The post Arduino and AWS team up to bridge hardware and cloud for business appeared first on Arduino Blog.

    Website: LINK

  • The MagPi magazine issue #133

    The MagPi magazine issue #133

    Reading Time: 3 minutes

    Your complete guide to emulating retro consoles and computers with Raspberry Pi

    Emulate Everything

    Use ready-made emulation distributions to turn Raspberry Pi into an all-in-one emulator that can play the best classic and modern retro games. This total guide to emulation features distributions, BIOS download status, console and desktop emulation. Plus: where to get your game ROMs safely and legally.

    Use Raspberry Pi as your work and educational computer

    Work & Learn with Raspberry Pi

    Raspberry Pi may be a small computer, but it’s packed with power and has a great operating system. In this feature, we look at using Raspberry Pi as your main computer. Discover all the productivity features in Raspberry Pi OS, and how to set up Raspberry Pi for a full day’s work.

    How one journalist became a maker and YouTube star

    HannahMakes

    Every month we interview some of the greatest makers from Raspberry Pi’s community. Hannah is a specialist journalist turned special effects technician who makes amazing projects and shares them on YouTube. 

    Build a working drinks dispenser

    reBartender V0.1

    Build your own Raspberry Pi-powered drinks dispenser with this cool setup by Seeed Studio and their reTerminal device. This step-by-step build shows you how to assemble an incredible drinks robot. Parties will never be the same!

    Monitor wild critters without tramping through their environment

    Badgercam

    Keep an eye on critters from a safe distance with minimal interference. This Badgercam shows how one maker built a solar and wind-powered camera that monitors badgers. We interview wildlife enthusiast Philip Mill about his incredible remote nature project.

    A 3D printed robot buddy to keep you company

    Chip Bipedal Robot

    Kevin McAleer is an accomplished maker and his latest build is a cute companion built from 3D-printed parts and Pimoroni’s Servo 2040 board. The result is a walking Raspberry Pi Pico-style robot with an ultrasonic range finder for eyes. We think Chip is super cute

    Keeping fields clear of weeds with this solar-powered smart robot

    Roktrack

    Living in rural Japan poses challenges. One of which is elderly farmers maintaining rice terraces and the fear that they may disappear with cultivation. Yuta Suito set about building a robot that can mow and weed. Meet Roktrack – a small solar-powered robot that can handle rough terrain and uses traffic cones for navigation.

  • Win one of five Raspberry Pi 4 8GB

    Win one of five Raspberry Pi 4 8GB

    Reading Time: < 1 minute

    Subscribe

  • Get ready for Moonhack 2023: Bringing space down to Earth

    Get ready for Moonhack 2023: Bringing space down to Earth

    Reading Time: 3 minutes

    Moonhack is a free global, online coding challenge by our partner Code Club Australia, powered by Telstra Foundation. It runs once a year for young learners worldwide. In 2022, almost 44,000 young people from 63 countries registered to take part.

    A young person coding during a Moonhack event.

    This year, Moonhack will happen from 10 to 26 October, to coincide with World Space Week 2023. The challenge is open to all young learners, wherever they are in the world, and features six brand-new projects that focus on space and innovation. We caught up with Kaye North, Community and Engagement Manager at Code Club Australia, to find out more.

    What’s new for 2023?

    Moonhack 2023 offers access to engaging new projects for Scratch, micro:bit, and Python. For the first time ever, young people will also have the option to follow a project brief to code their own solution to a space-based issue, using a programming language of their choice.

    Two children code on laptops while an adult supports them.

    In keeping with this year’s theme — which was inspired by the World Space Week 2023 theme of ‘Space and Entrepreneurship’ — the new Moonhack projects showcase inventions that were created for space exploration but are now used in everyday life, such as mobile phone cameras and LEDs.

    Kaye shared that in Australia, inventions created for space travel and exploration are part of the science curriculum at primary school level. She hopes that this year’s Moonhack will help more young people understand how space exploration and coding are connected to their daily lives.

    What will young people gain from taking part in Moonhack?

    Moonhack features six unique coding projects, giving young people of all ages and experience levels the opportunity to engage and learn. The project brief introduced this year encourages participants to be creative, coding a solution on any platform they choose.

    Young learners coding in a computing classroom.

    Coders who respond to the project brief will also be in with a chance of having their project selected to be developed into an official Code Club Australia project, for other young people and educators around the world to enjoy.

    Kaye emphasised that Moonhack is about more than just taking part in a global event; it also helps young people to better understand the real-world opportunities that coding can offer.

    “The more kids we expose this to, the better, expanding coding past just coding and having purpose behind it. And I do try to link things in so that we’re connecting with real-world context, careers…”

    Kaye North

    How your young coders can get involved

    Registration for Moonhack 2023 is open now. The challenge runs from 10 to 26 October, and projects can be submitted until 30 November. Participation is free and open to any young coder, whether they are part of a Code Club or not. The 2023 projects are already available in English, Arabic, Croatian, Dutch, Filipino, French, Greek, Hindi, Indonesian, Mandarin, Portuguese, and Spanish, and will be available in more languages soon. 

    To find out more and register to take part, visit the Moonhack website.

    Code Club Australia is powered by Telstra Foundation as part of a strategic partnership with us at the Raspberry Pi Foundation.

    Website: LINK

  • Toddler receives a custom cyberdeck

    Toddler receives a custom cyberdeck

    Reading Time: 2 minutes

    The cyberdeck community has exploded in recent years, because makers like to use their creativity to create custom machines tailored to their tastes and requirements. But the community has overlooked one very significant target market: toddlers. Young kids love fiddling with buttons and switches, and there is a plethora of evidence that suggests that interactive toys are good for development. With that in mind, a hacker dad named Josh built his son this cyberdeck for little ones.

    Unlike most cyberdecks, this doesn’t actually have to do any real computing. Josh’s son won’t be performing any pentesting with Kali Linux. Instead, it just needs to be fun and engaging for a two-year-old. That means lots of switches, buttons, dials, and LEDs. The top does have a single-board computer and screen from a promotional video player, but it is self-contained and just loops videos. All of the real magic happens in the bottom half.

    Josh created this cyberdeck using a waterproof hard case. The bottom half has a panel covered in buttons and switches. Each of those also has a corresponding LED. An Arduino Mega 2560 board monitors the states of the inputs, then sets the LEDs accordingly. Right now, that is just a one-to-one direct relationship, so flipping a particular switch turns a specific LED on or off. But Josh envisions more complicated relationships, like logic puzzles, that he can incorporate as his son gets older. Implementing those would be as simple as uploading new sketches to the Arduino.

    The post Toddler receives a custom cyberdeck appeared first on Arduino Blog.

    Website: LINK

  • Play full-color games on this simple Arduino Nano ESP32-based handheld console

    Play full-color games on this simple Arduino Nano ESP32-based handheld console

    Reading Time: 2 minutes

    There is a thriving Arduino gaming community, with many homebrew video games developed to run on Arduino development boards. Arduboy, for example, produces custom handheld consoles with games that can also run on Arduino hardware. However, many boards have microcontrollers with limited processing power and memory, which means the graphics have to be simple. But Volos Projects took advantage of the new Nano ESP32 to build a portable gaming device with full-color graphics.

    As the name suggests, the Nano ESP32 makes use of the popular Espressif ESP32. That has more processing power and memory than most other MCUs, as well as built-in Wi-Fi® and Bluetooth® adapters. In this case, the ESP32’s impressive power was enough to generate colorful video game graphics at a respectable resolution.

    As a demonstration, Volos Projects put together a simple handheld system on a breadboard. Other than the Arduino, this only required a 1.28″ round GC9A01-driven TFT LCD, some jumper wires, and a few buttons. Those are two-pin momentary push buttons, which are nice because they eliminate wiring confusion. Volos Projects then programmed a basic side-scrolling space shooter game to run on this hardware.

    [youtube https://www.youtube.com/watch?v=GjI8mUnlrPM?feature=oembed&w=500&h=281]

    That game looks fun and this is a great way to illustrate what you can achieve with the Nano ESP32!

    The post Play full-color games on this simple Arduino Nano ESP32-based handheld console appeared first on Arduino Blog.

    Website: LINK

  • Seismology with Raspberry Shake

    Seismology with Raspberry Shake

    Reading Time: 2 minutes

    What interesting ways have people used Raspberry Shake?

    Mike: The world went quiet during Covid, with everyone indoors, shut away. Our network is the largest seismic network in real time around the world and we noticed that the human noise of people walking around, traffic, etc., went quiet. It generated some buzz in our community.

    It allowed for seismographs to actually detect more of the Earth’s rumble, but on the other side it was fascinating how much noise was reduced, and there was a study done on it in Science.

    Branden: There were 72 authors for the paper. 71 of them are professional seismologists… and then there’s one person who is listed as a co-author who is a citizen scientist from our community.

    Find live data from your area

    Mike: Raspberry Shakes and Booms have been used in wildlife conservation. So for detecting elephants, how they communicate with each other, and it’s been used in a savannah in Africa.

    And also for conservations efforts for the black-footed ferret. A zoo worked alongside seismologists, and what they did was try and find new habitats for the ferret. So they set up Raspberry Shakes in various habitat zones, because they’re very sensitive to vibrations so, as an endangered species, they want to make sure they’re happy.

    Detect earthquakes and more with this excellent kit

    Raspberry Shake | From £136 / $175 | raspberryshake.org

    01. Hardware setup

    With the DIY kit you have to supply your own Raspberry Pi, and get the geophone wired up to the Raspberry Shake board itself, which needs to be placed on the first 26 pins of Raspberry Pi’s GPIO. Seal it inside the enclosure and then make sure it will stand level with a spirit level and the adjustable feet in its desired location.

    02. Install software

    If you didn’t get the Raspberry Shake SD card, download the OS and install it with Raspberry Pi Imager. Plug in the SD card and power up Raspberry Pi, and then head to a browser on another computer and type in http://rs.local. The username is myshake, while the password is shakeme by default, so make sure to change them.

    03. Listen for earthquakes

    Once all set up, you can start sharing your data to the Raspberry Shake community – exact location is obfuscated so people won’t be able to find out where you live. After hitting Forward Data, your Raspberry Shake will restart and you’ll be able to see data from your station from the global station view page.

  • Arduino speaks without any special hardware

    Arduino speaks without any special hardware

    Reading Time: 2 minutes

    We see many Arduino projects that feature audio output, but they tend to require a substantial amount of additional hardware. Audio files take up a lot of storage space, so they require something like an SD card adapter. Audio signals are analog, so they require a DAC (digital-to-analog converter) to get good quality. And then, to make the audio signal powerful enough for a speaker, these usually need amplifiers. But Scott W Harden found a way to make an Arduino UNO Rev3 talk without any additional hardware beyond the speaker.

    In this case, the Arduino can speak any number, from zero to nine, out loud through the speaker. This is possible because those are very short words (most only a single syllable) that are recognizable when the quality is very low. This audio quality wouldn’t be suitable for music or even general language, but it is enough for a sequence of numbers. By reducing the audio quality as much as possible and making the clips short, Harden was able to create audio files small enough to fit in the 32KB flash memory of the UNO‘s ATmega328 microcontroller with room to spare for the sketch.

    Harden started with normal MP3 recordings of the spoken numbers. He then performed a 100Hz to 2.5kHz band-pass on the clips, resampled them to 5kHz, and then converted the waveforms to eight-bit unsigned values to store in program memory. The Arduino can then play those waveforms through PWM (pulse-width modulation). A low-pass filter, comprised of a capacitor and resistor, helps smooth the PWM output into something closer to a true analog waveform. An optional LM386 chip can amplify the output, but Harden found that he was able to drive a speaker directly without that.

    The post Arduino speaks without any special hardware appeared first on Arduino Blog.

    Website: LINK

  • Save money with a Tuya/SmartLife energy meter monitored on Arduino Cloud via Node-RED

    Save money with a Tuya/SmartLife energy meter monitored on Arduino Cloud via Node-RED

    Reading Time: 4 minutes

    In a world where energy bills are climbing and the environment is on our minds, keeping tabs on how we use energy at home has become a smart move. Every gadget we plug in impacts our wallets and the planet. That’s where home energy monitoring comes in – giving us real-time info on how we’re using energy, so we can save money and do our bit for the Earth.

    This post delves into home energy monitoring, spotlighting how to track your energy consumption using the Arduino Cloud and a Tuya-compatible energy meter with Node-RED acting as a middleware.

    What’s the deal with home energy monitoring?

    Home energy monitoring is all about watching how much energy we’re using at home. It’s not just about paying the bills; it’s about knowing what’s eating up energy, so we can be smarter about it.

    Why does it matter? Well, first off, it helps us be more aware. When we can see which devices are energy hogs (looking at you, always-on TV), we can take action. And with energy costs going up, finding ways to save money is a no-brainer. Plus, with everyone talking about being green these days, knowing where your energy goes is like a badge of honor for doing your part.

    The ingredients

    The key component in this setup is an energy meter designed to monitor both real-time and cumulative power consumption, along with metrics such as voltage and current. This meter is installed within your home’s electrical distribution board. Tuya-compatible devices have gained widespread popularity due to their affordability, user-friendliness, and seamless management through the SmartLife application. Moreover, these devices can also be seamlessly integrated into alternative platforms through the utilization of the Tuya API.

    The Arduino Cloud stands out as a versatile and user-friendly IoT platform, supporting a wide range of hardware. It’s not only customizable and adaptable to suit different purposes and use cases, but it also streamlines the incorporation of multiple devices, facilitating smooth information exchange among them. It is a perfect tool to monitor your energy consumption, being informed when outstanding events happen and perform actions on other devices based on the energy information acquired.

    While direct connection of Tuya-compatible devices to the Arduino Cloud isn’t possible, the process becomes really straightforward with the intervention of Node-RED. This intermediary acts as a bridge between the energy meter and the Arduino Cloud, ensuring seamless communication between the two. With Node-RED you can integrate almost anything with the Arduino Cloud.

    The project

    The following project shows how to integrate all those elements to easily build your own energy monitoring system. 

    Before getting started, you’ll require:

    • A Tuya/Smartlife-compatible energy meter
    • The SmartLife or Tuya app installed on your iOS/Android device
    • The Energy Meter added to the Tuya Smart app
    • An Arduino Cloud account (https://cloud.arduino.cc)
    • An instance of Node-RED running locally or on a cloud machine (installation guide found here)

    The process is really straightforward:

    • Install the energy meter within your electric board.
    • Obtain your Tuya device API key.
    • Create the Device and Thing within the Arduino Cloud.
    • Develop the Node-RED flow to manage data traffic.
    • Fashion the Arduino Cloud Dashboard.

    Build your own energy meter from the ground up

    Monitoring energy consumption with Arduino Cloud doesn’t solely rely on Tuya-compatible energy meters. If you’re inclined to build your own solution from the ground up, consider exploring the Arduino IoT-based energy meter hosted on the Project Hub. There is additional detailed documentation available and a ready-to-use template to deploy your solution with one click.  

    By engaging with this project, you’ll not only gain insight into your energy consumption monitoring but also experience the simplicity of crafting practical projects that interface Arduino boards with external components such as the Modbus energy meter. All this will be seamlessly managed and monitored by the Arduino Cloud.

    Ready to Get Started? Take Control of Your Energy!

    The path to smarter energy consumption begins with your curiosity and action. Now armed with the knowledge of the Arduino Cloud’s potential, it’s time to embark on your own energy monitoring journey. Don’t wait – seize the opportunity to optimize your energy usage, save on bills, and contribute to a more sustainable planet. With the Arduino Cloud as your ally, you can monitor, manage, and make a positive impact starting from your own home. Create your account, dive in, tinker for free, and start your energy-saving adventure today. Your future of empowered energy management is just a click away!

    The post Save money with a Tuya/SmartLife energy meter monitored on Arduino Cloud via Node-RED appeared first on Arduino Blog.

    Website: LINK

  • Live TV on Google TV just got even betterLive TV on Google TV just got even betterProduct ManagerProduct Manager

    Live TV on Google TV just got even betterLive TV on Google TV just got even betterProduct ManagerProduct Manager

    Reading Time: < 1 minute

    Discover NFL Sunday Ticket on YouTube and YouTube TV

    Starting this football season, NFL Sunday Ticket on YouTube and YouTube TV will be fully integrated into Google TV in the U.S.. This means you can now access live out-of-market Sunday afternoon games, see top highlights and get recommendations for top games of the week, all right on your Google TV home screen. And if you’re a YouTube TV subscriber with NFL Sunday Ticket as part of your membership, the content will be available in the channel guide on your Live tab, so you can quickly find any game you’re looking for. Check out YouTube TV’s website to learn more about how to get NFL Sunday Ticket.

    And for a limited time, you can get up to $200 off NFL Sunday Ticket from YouTube and YouTube TV when you purchase an eligible TCL TV with Google TV

    Website: LINK

  • Technaxx TX-207 solar charging case review

    Technaxx TX-207 solar charging case review

    Reading Time: 2 minutes

    Unfolding the case reveals three solar panels that output 6 V with 3 A (max 21 W) of power. Enough to power a Raspberry Pi Zero or Pico device. We set it up with a Raspberry Pi Zero 2 W in the pocket to test performance. We used a modified version of jbudd’s uptime.sh code to log the uptime (see this Raspberry Pi forum post). Our Zero 2 W was connected to the local Wi-Fi network so we could log in and check the uptime.log file throughout the test. Our first test involved popping a Zero 2 W directly to the USB-A slot in the TX-207 and we hung the charger vertical in a south-facing window. In theory, this sounded good but the TX-207 powered Raspberry Pi Zero 2 W for less than a minute in a whole day. After that, we took it outside and laid it out flat in a garden where it would sporadically power, sometimes for up to six minutes, but our Zero 2 W  would frequently drop out along with the sun. Pairing the TX-207 with a USB battery charger was a game-changer. We coupled it up with a Golf GF-017 2600 mAh battery charger, which held the charge provided by the TX-207 and charged up the battery alongside running Zero 2 W. We started with a completely empty battery charger and our Raspberry Pi Zero 2 W ran up the charge and went for a total of 13 hours and 14 minutes with no downtime.

    The TX-207 provides a constant drip of power in a well-designed portable case

    So, paired with a suitable battery, you can expect a day’s worth of power from this. More than enough to run scripts and handle low-voltage sensor HATs and other hardware.

    It’s not listed as waterproof, although it did tip it down one day to no discernible effect. It certainly feels sturdy enough to withstand the elements, as long as you keep an eye on things.

    You need to pair it with a USB charger for it to be of any real use

    Verdict

    8/10

    An exciting device to pair with Raspberry Pi Zero 2 W. You’ll need a battery pack for it to work reliably.

    Specs

    Power: Max power 21 W, Max voltage 6 V, Current 3 A Max, Efficiency >19%

    Dimensions: Weight: 0.75 kg Dimensions: 20 (81 unfolded) × 29 × 3 cm

    Design: Solar panel – monocrystalline solar cell, Operating temperature +10°C~+40°C, Material PET, Plug type 2 × USB-A (3 A max)

  • Helping robot dogs feel through their paws

    Helping robot dogs feel through their paws

    Reading Time: 2 minutes

    Your dog has nerve endings covering its entire body, giving it a sense of touch. It can feel the ground through its paws and use that information to gain better traction or detect harmful terrain. For robots to perform as well as their biological counterparts, they need a similar level of sensory input. In pursuit of that goal, the Autonomous Robots Lab designed TRACEPaw for legged robots.

    TRACEPaw (Terrain Recognition And Contact force Estimation Paw) is a sensorized foot for robot dogs that includes all of the hardware necessary to calculate force and classify terrain. Most systems like this use direct sensor readings, such as those from force sensors. But TRACEPaw is unique in that it uses indirect data to infer this information. The actual foot is a deformable silicone hemisphere. A camera looks at that and calculates the force based on the deformation it sees. In a similar way, a microphone listens to the sound of contact and uses that to judge the type of terrain, like gravel or dirt.

    To keep TRACEPaw self-contained, Autonomous Robots Lab chose to utilize an Arduino Nicla Vision board. That has an integrated camera, microphone, six-axis motion sensor, and enough processing power for onboard machine learning. Using OpenMV and TensorFlow Lite, TRACEPaw can estimate the force on the silicone pad based on how much it deforms during a step. It can also analyze the audio signal from the microphone to guess the terrain, as the silicone pad sounds different when touching asphalt than it does when touching loose soil.

    More details on the project are available on GitHub.

    The post Helping robot dogs feel through their paws appeared first on Arduino Blog.

    Website: LINK

  • DIY parachute system saves drones and rockets

    DIY parachute system saves drones and rockets

    Reading Time: 2 minutes

    Today’s consumer and professional drones are very stable. They’re easy to pilot and we’re past the era of rampant out-of-control drone crashes. But drones can still fail and benefit from a system that lets them return safely to the ground without damage. That is also true for hobby rockets, which still have very experimental controlled descent systems. To suit both types of craft, Niklas Bommersbach designed his own setup to detect critical flight behavior and then activate a two-stage parachute.

    The idea is something familiar to everyone: if the aerial vehicle experiences uncontrolled descent, the parachute deploys and returns it gently to the ground for recovery. But achieving that is more difficult than you might think. Bommersbach had to engineer a robust deployment mechanism, as well as a system to trigger the deployment. He chose to load the primary parachute with a spring mechanism, plus a drogue chute as a backup. That drogue chute would also slow descent if the primary parachute fails to deploy altogether.

    An Arduino Nano Every board monitors altitude using a barometric pressure sensor. It can either deploy the parachute at a set altitude when it senses rapid descent indicative of an uncontrolled fall, or it can respond to a manual command sent via radio. The chutes reside within 3D-printed containers opened servo motors. Power comes from a small lithium battery independent of the craft’s battery, so the system is self-contained. The Arduino first deploys the drogue chute, which slows descent and tries to pull out the main chute. If that fails, the Arduino can actively deploy the main chute.

    [youtube https://www.youtube.com/watch?v=5JmrC4AGryo?feature=oembed&w=500&h=281]

    This redundant and self-contained parachute system should be reliable and affordable, making it suitable for drones and experimental rockets.

    The post DIY parachute system saves drones and rockets appeared first on Arduino Blog.

    Website: LINK

  • Protect your business with Zero Trust security on AndroidProtect your business with Zero Trust security on AndroidSenior Product Manager, Android EnterpriseDirector

    Protect your business with Zero Trust security on AndroidProtect your business with Zero Trust security on AndroidSenior Product Manager, Android EnterpriseDirector

    Reading Time: < 1 minute

    Zero Trust security is an increasingly important way for organizations to protect their data. As a quick refresher, this method requires device, user and network verification for access to corporate resources — and only the minimum access necessary. In a nutshell, trust is never implicit.

    Large enterprises, small businesses and government organizations are all evaluating and implementing Zero Trust. And this investment couldn’t come at a better time. In fact, United States Executive Order 14028 now requires government agencies and their suppliers to set up a Zero Trust architecture. With Android Enterprise, the 94% of organizations currently implementing a Zero Trust architecture can quickly expand it to their mobile devices.

    Android’s Zero Trust capabilities

    A Zero Trust approach requires analyzing device signals to understand a device’s security posture and the context of the access request. Android provides a wide range of signals that businesses can use to help establish trust. There are currently more than 100 unique device trust signals available across 30 APIs on Android devices.

    Website: LINK

  • Arduino-powered pickpocket trap catches thieves red-handed

    Arduino-powered pickpocket trap catches thieves red-handed

    Reading Time: 2 minutes

    People living in small towns and rural areas may not realize it, but pickpocketing is a genuine issue in big cities. Real-life pickpockets aren’t magic like those in movies, but they can pull an item like a wallet from your pocket without you noticing — it is surprisingly easy to do. The only reliable way to prevent that is to make sure nothing valuable is easily accessible. But Engineering Dads didn’t want to protect their belongings, they wanted to catch pickpockets red-handed.

    If a pickpocket does their job well, you won’t notice your missing wallet until later when you go to pay for something. So this device needed to trigger the moment it leaves a pocket and to let everyone in the vicinity know about it. To achieve that, it needed a sensor to detect the theft (but not normal movement) and it needed a way to alert the owner — and, ideally, everyone else in the area.

    In this case, the sensor is a photoresistor. An Arduino Nano monitors that photoresistor and expects to see darkness most of the time, because the gadget should be in a pocket. If it registers significant light, that indicates that the unit is no longer in a pocket and has therefore been stolen. When that occurs, it starts blaring the famous “Attenzione Pickpocket!” viral video audio through a speaker module. Engineering Dads doesn’t say what kind of module that is, but there are a number of suitable options. The hardware fits inside a 3D-printed enclosure that is close enough to the size of a wallet to fool some thieves.

    [youtube https://www.youtube.com/watch?v=xcigUF8nSfM?feature=oembed&w=500&h=281]

    The post Arduino-powered pickpocket trap catches thieves red-handed appeared first on Arduino Blog.

    Website: LINK

  • Testing fast charging damage to smartphone batteries

    Testing fast charging damage to smartphone batteries

    Reading Time: 2 minutes

    Most people leave their phones on their chargers overnight, but sometimes you end up at 5% halfway through the day and need to top off your battery. Fast charging is very convenient in such circumstances, but it may be damaging your smartphone’s battery and reducing its capacity over time. To find out if that does happen, GreatScott! used Arduino to test fast charging on several smartphone batteries.

    Lithium batteries aren’t susceptible to the same degradation issues that were common for NiCad batteries, but that doesn’t mean they are impervious to damage. GreatScott! suspected that fast charging stresses Li-Ion batteries and diminishes their capacity. To test that idea, he needed to put batteries through many charge and discharge cycles. For this experiment, he had a control group charging with the typical 1A of current and another group fast charging at 5A. Both groups discharged at a constant 1A and went through 100 cycles.

    Charging and discharging six batteries 100 times each is a time-consuming task, so GreatScott! designed custom devices for the job. Each is a custom PCB populated with an Arduino Nano board, an OLED screen, lithium charging circuitry, and the discharge circuit. That discharge circuit utilizes an op-amp to convert a constant 1A into waste heat. The OLED shows the battery voltage at any given time and the number of charge cycles.

    These test devices let GreatScott! gather valuable data. The batteries charged at 1A didn’t suffer any substantial capacity loss, but the batteries charged at 5A lost an average of 1.6% of their capacity. That was after only 100 cycles, so the loss would get much worse over the course of years. GreatScott! concluded that it is best to avoid fast charging and to only use it when necessary.

    [youtube https://www.youtube.com/watch?v=iMn2yVoEqPs?feature=oembed&w=500&h=281]

    The post Testing fast charging damage to smartphone batteries appeared first on Arduino Blog.

    Website: LINK

  • Make a Pico LCD true or false quiz game

    Make a Pico LCD true or false quiz game

    Reading Time: 6 minutes

    01. LCD character display

    This project is based around an LCD display. Our display has 16 characters across two lines and is often referenced as a ‘1602’. These usually contain an HD44780, or equivalent, driver chip that displays the appropriate pixels that make up the characters.

    One downside of the display is that the driver chip needs at least six data connections. This uses up GPIO ports, as well as needing lots of wires to the LCD display. A common solution is to have a ‘backpack’ fitted to the rear of the LCD display using a port expander. The example used here is a PCF8574T 8-bit port expander.

    Figure 1: Wiring diagram for Raspberry Pi Pico, voltage level shifter, and LCD display

    02. Designed for 5 V

    The port expanders are available on a PCB backpack pre-soldered onto the back of the LCD PCB. This saves you from having to create your own circuit, but it does come with an issue. These circuits are normally designed for 5 V, whereas a Pico uses 3.3 V for the GPIO ports.

    Connecting a 5 V signal to a Pico GPIO port could cause permanent damage to the latter, so this tutorial looks at some of the possible solutions to interfacing between devices designed for different voltages.

    03. Move pull-up to 3.3 V

    If the 5 V device did not have a pull-up resistor, the I2C bus could work with pull-ups to the 3.3 V supply instead. This is shown in Figure 2. The crossed-out resistors are the pull-ups inside the LCD I2C backpack and the two pull-up resistors on the left are connected to the 3.3 V output on a Pico. Unfortunately, this involves de-soldering surface-mount devices, which can be difficult.

    Figure 2: The I2C bus needs pull-up resistors. Having 5 V pull-ups could damage a Pico designed for 3.3 V

    04. Unidirectional level shifter

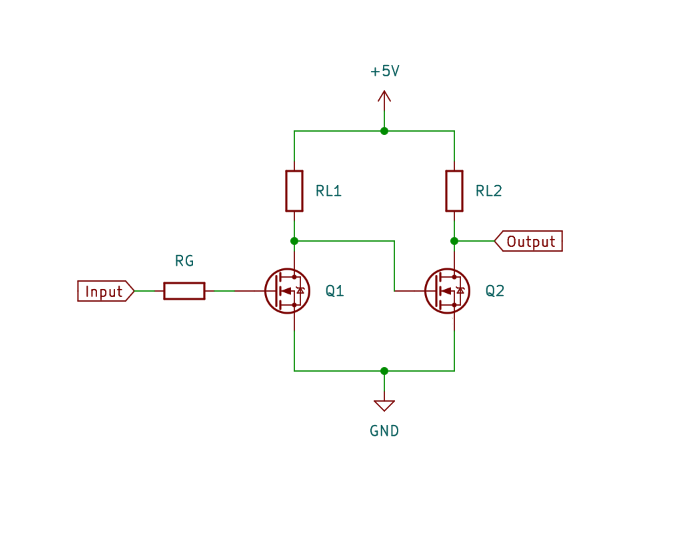
    A simple form of level shifter can be used when controlling 5 V devices from a 3.3 V microcontroller or computer. This is often used for controlling NeoPixels from a Pico or a Raspberry Pi. In its simplest form, this is a MOSFET with two resistors (as shown in Figure 3). The gate resistor RG (typically 470 Ω) reduces the in-rush current, and RL is a pull-up resistor (typically 2.2 kΩ to 10k Ω). With no input, the pull-up resistor sets the output high. When a 3.3 V input is provided, the MOSFET turns on pulling the output low. This results in an inverted signal.

    Figure 3: A simple MOSFET level shifter. The output is the opposite of the input but higher voltage

    The code can be configured to invert the output, or you could add an additional MOSFET to invert it a second time. A two-stage, non-inverting buffer is shown in Figure 4.

    Figure 4: A second MOSFET can be used to create a non-inverting buffer

    05. Bidirectional level shifter

    The LCD is controlled from your Pico, so you may expect the signal would only need to go in one direction. However, due to the use of I2C protocol, signals need to pass in both directions. We need a bidirectional level shifter. These can be made using individual MOSFETS, but using a premade level shifter from Adafruit or SparkFun is more convenient. An example is the Adafruit bidirectional level shifter, which has four level shifters on a convenient PCB. This is shown in Figure 5.

    Figure 5: A bidirectional level shifter is available on small PCBs. These can have headers fitted to be used on a breadboard

    The level shifter has just one MOSFET for each channel. This is in an unusual configuration. The circuit can be thought of as two sides, with the left side being for the low voltage and the right for the higher voltage. The MOSFET joins the two together. The schematic diagram is shown in Figure 6.

    Figure 6: The bidirectional level shifter uses two MOSFETs. This works well for signals with pull-up resistors like I2C

    06. How the level shifter works

    If both the low-voltage and high-voltage signals are high, then the MOSFET is off and the signal is high at both sides. If the low-voltage signal (left) drops low, then the MOSFET is in the forward direction and the voltage at the gate will turn the MOSFET on. This will provide a path to ground and so the high-voltage signal (right) will be pulled low. If the high-voltage signal (right) goes low, due to an internal characteristic of the MOSFET a small current is able to flow in the reverse direction. As this happens, the voltage of the source pin dips, causing the MOSFET to turn on. This pulls the voltage down on the low-voltage signal as well.
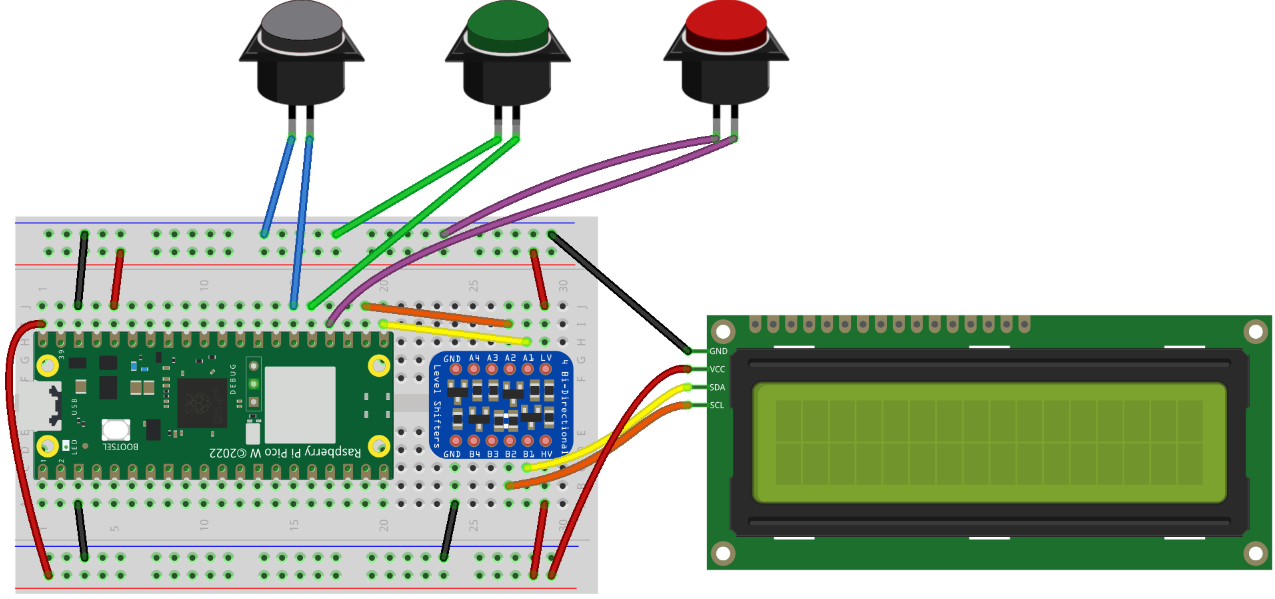
    07. LCD circuit

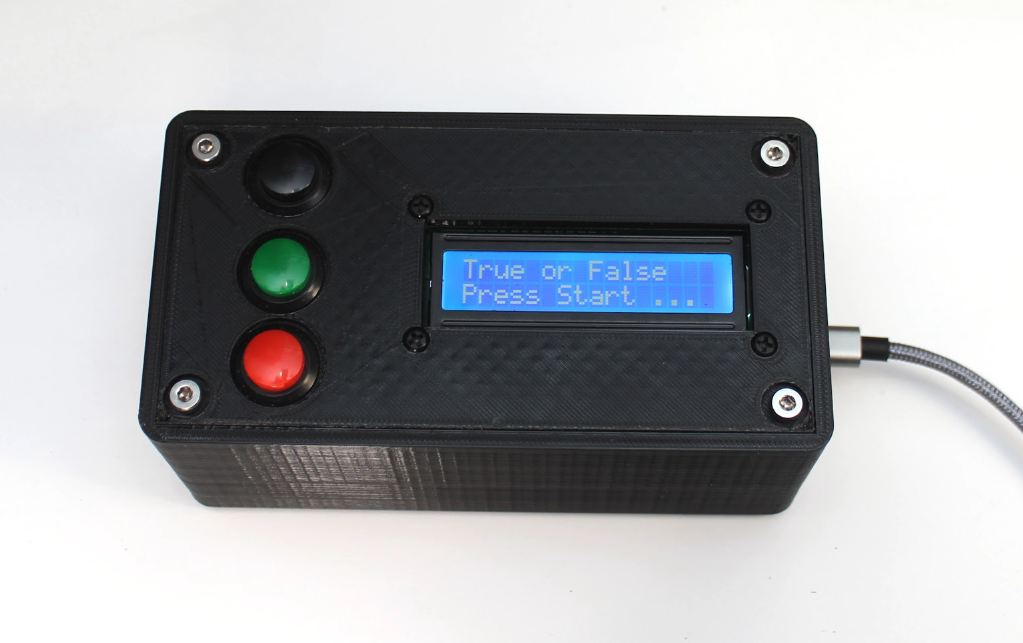
    The level shifter can be inserted onto the breadboard and connected between your Pico and LCD display. Then it’s just a case of adding three buttons for Start, True, and False. These are shown in Figure 1.

    The top power rail is used for 3.3 V taken from your Pico’s 3.3 V output, and the bottom power rail is 5 V taken from the VBUS supply from the USB port.

    The buttons used are 16 mm push-to-make switches, similar to arcade buttons, but smaller. You can use other push-to-make switches if you prefer.

    08. Download the LCD library

    The libraries that support the LCD display with backpack are available from GitHub. Upload the files lcd_api.py and pico_i2c_lcd.py to your Pico. You can see a demo using pico_i2c_lcd_test.py. This can be useful for checking your wiring is correct, but you will need to change the pins used for SDA (GPIO 16) and SCL (GPIO 17).

    09. Coding the game

    The game code (quizgame.py). starts by setting up the three

    button

    objects, along with

    i2c

    and

    lcd

    . It then reads the file quizfile.txt, which contains the questions.

    Then it enters a loop which ensures that the game can be played over again.

    Within the first few lines of the loop, you can see that it first clears the display, puts a string which starts on the top line, moves to the start of the second line, and then puts another string to that line.

    10. Handling button presses

    The button presses are handled by having a

    while

    loop which runs until an appropriate button is pressed. In the case of the Start button, it just looks for that one button, but when waiting for a true and false, it needs to check both the

    true_button

    and

    false_button

    to see if either is pressed. It keeps track of the score and then displays the score at the end, pausing for five seconds before restarting the game.

    11. The quiz file

    The questions are stored in the file quizfile.txt. This has one line per question. Each line should have three entries separated by a semicolon. The first entry is the top line to display, the second is the second line, and the final entry is a letter T or F to indicate whether the correct answer is

    True

    or

    False

    .

    The file is opened using the

    with

    statement. Using with means that the file will be automatically closed after the program has finished reading in the entries. The

    readlines

    method is used to read all the entries into a list.

    To separate the text to display from the answers, the

    split

    method is used. You may notice that it also uses the

    strip

    method to ignore any whitespaces, such as spaces before the newline character.

    The quiz file is created separately and must be uploaded to Pico.

    Figure 7: The game can be placed inside an enclosure. If you don’t have a 3D printer, you can use a generic case and cut appropriate holes

    12. Improving the game

    The game can be placed in an enclosure to make a complete game. You could start with a standard enclosure and cut holes for the display and buttons, or if you have a 3D printer you can download an example from the Penguin Tutor website. One improvement would be to add some error checking. Without error checking, if there is an invalid entry in the quiz file, the program may crash.

    Another possible improvement would be to provide a way to add multiple quizzes rather than just limiting them to a single quiz.

    Download the full code.