Save 35% off the cover price with a subscription to The MagPi magazine. UK subscribers get three issues for just £10 and a FREE Raspberry Pi Pico W, then pay £30 every six issues. You’ll save money and get a regular supply of in-depth reviews, features, guides and other Raspberry Pi enthusiast goodness delivered directly to your door every month.
We’re continuing to work towards making AI useful for everyone, including by collaborating with others— and approaching it in a bold and responsible way.
A great example of this is Lengua Española e Inteligencia Artificial — Spanish Language and Artificial Intelligence (LEIA), a project the Real Academia Española (RAE) set up four years ago to improve the use of the Spanish language in technological environments. The Academia invited tech companies to join, committing to improving the use of the Spanish language in technological environments, helping the 590 million Spanish speakers worldwide and increasing the presence of the Spanish language.
Today, we’re announcing two major advances we’ve made as part of this project: First off, we’ve incorporated the lexical repertoire of the RAE’s Dictionary of the Spanish Language into Gboard, the keyboard app from Google. Second, we’ve integrated the Spanish Language Dictionary of the Royal Academy into Search.
Improved Spanish in Gboard
Thanks to the integration of the RAE lexicon as a source for Gboard’s AI language models, we’ve seen key improvements in Gboard, such as faster autocorrections, in words such as García, Rodríguez, Coruña, Nicaragua or Jaén, and those with an accent — like música, río, frío o vehículo. It has also allowed for better word recommendations, smoother changes between English and Spanish when typing, and reduced biases.
Moreover, hundreds of thousands of new words („ibuprofeno“, „criptomonedas“, „SMS“, „tempura“) have been integrated into the Gboard dictionary for Android.
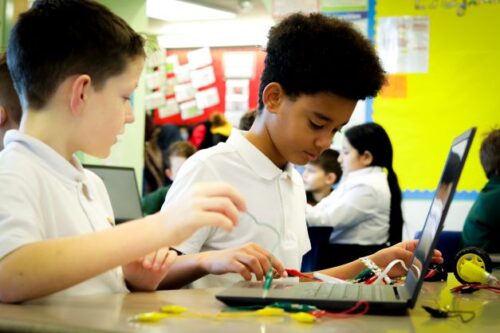
The holidays can be a great time to pick up a new passion, or start a new project! And if you are at home with friends and family, a DIY challenge can be just what you need to spend a few hours together – learning and laughing all the way. We’ve definitely kept all of this in mind while fine tuning our 2023 gift guides, full of ideas and inspiration for the special people on your list! We’re sure you’ll find something for everyone… and a treat for yourself too.
Giving the gift of creativity
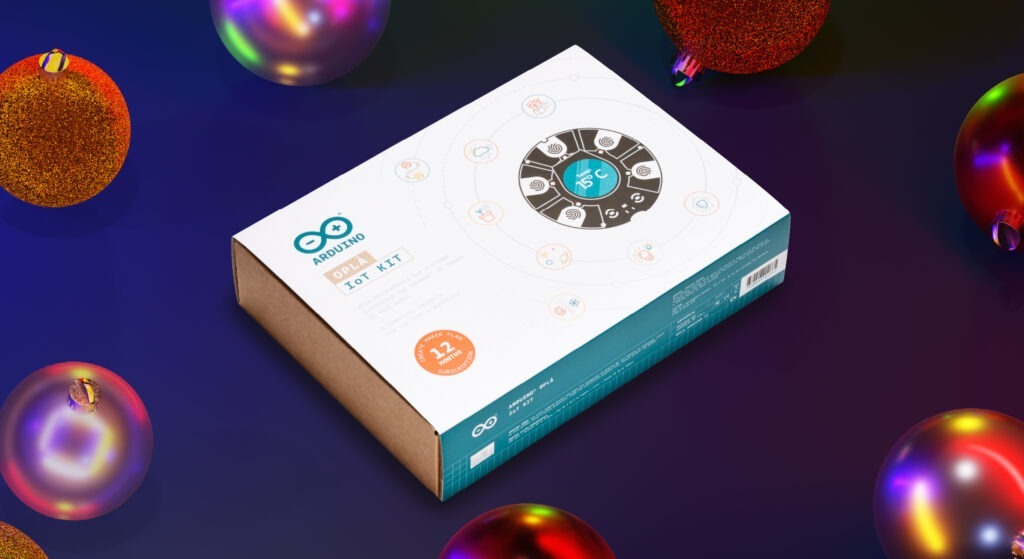
A kit with step-by-step instructions and all the components you need can provide the perfect pastime, even with kids: you can go through the Starter Kit one project at the time to learn the basics of electronics and coding, or try your hand at IoT – it’s easy with the Arduino Oplà IoT Kit! This 8-projects-in-1-box gift allows even beginners to explore smart connectivity: anyone can have their smart lights system, personal weather station, or home security alarm ready by New Year’s Eve, and do the whole thing without coding, using the templates available on Arduino Cloud. And once the basics are mastered, the experience can be customized to infinite creative ideas: for example to monitor a room’s temperature and humidity levels, connect the heating to Alexa, or control Spotify – three ideas to make your time at home even more pleasant, during the holidays and beyond.
Learning something new in the new year
Speaking of the new year, we have some great options for anyone making 2024 their year to learn something new. For example, the Make Your Uno Kit can take anyone from the basics of soldering to their first synth (also available as part of the Make Your UNO Soldering Bundle). Sound daunting? Not to worry: the learning experience is supported by a dedicated content platform with video tutorials, a 3D interactive viewer to help with the finest details of soldering, and instructions on how to program the board once it is finished. If you have someone on your list who would enjoy a huge confidence boost to go with their newly acquired electronics and programming skills, the official recognition of the Arduino Junior Certification Bundle will make for the perfect present.
Finally, for anyone interested in learning MicroPython, the Nano ESP32 is the perfect choice to start their journey! But it can also be the key to amazing home automation projects like the one created by one of our Project Hub users, help you recreate Penny’s computer (remember Inspector Gadget?), or make one of the most interesting, hypnotizing timepieces ever. And yes, it can even run Doom.
Automating your living and work spaces
If being home gets you thinking about how you could make your humble abode more comfortable, fun, or futuristic, experiment with automation using the MKR WiFi 1010 (the easiest point of entry to basic IoT). Bigger plans? Check out the new Arduino Pro Opta micro PLC, offering industrial-grade performance within the friendly Arduino programming experience.
Looking for something more open-ended?
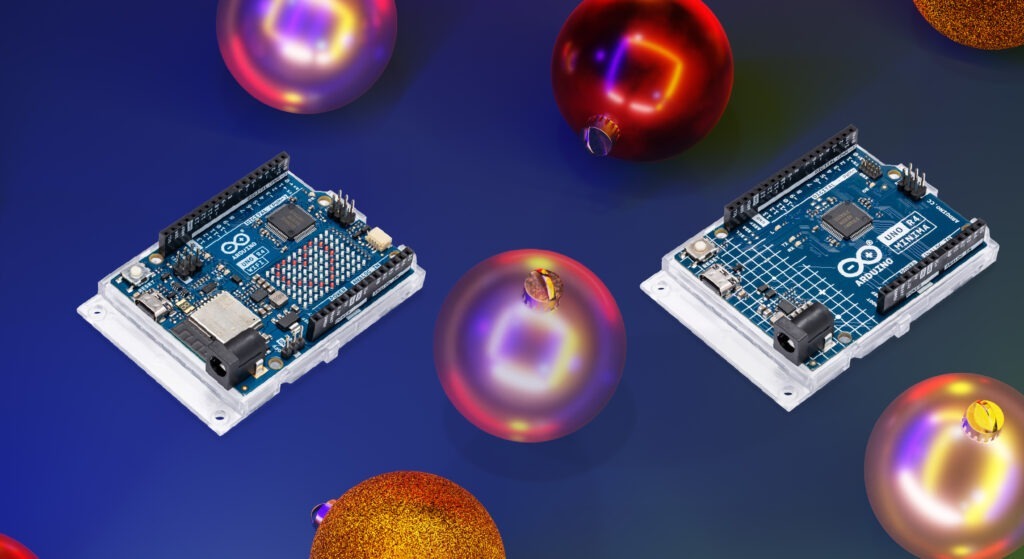
Our gift guides highlight a wide range of versatile and feature-packed modules that can be at the heart of any project you – or your loved ones – may have in mind. Caution: you may end up spending your holidays creating a humanoid robot! Choose the iconic UNO R3, a cornerstone in the maker revolution, or the UNO R4: WiFi or Minima are both great options for any creative project and for any skill level. Artists like Tigris Li and Monica Rikic have used the UNO R4 for their recent works, and fashiotech designer Anouk Wipprecht even made a beautiful dress light up with it. But an UNO R4 can also be used for a DIY filament extruder, or to make a small robot with PID control.
Last but not least, check out the Nano 33 BLE, introducing a better processor, a micro-USB connector, and a 9 axis IMU to the Nano family: that’s enough, for example, to create a micro robot arm to control a macro robot arm (it actually makes a lot of sense: read more about it here!).
Have a friend passionate about technology? Look no further!
Our gift guides include cutting-edge gadgets that will surely light up their faces, and make this holiday season unforgettable. Consider the Portenta Hat Carrier for the robotics enthusiast, or the powerhouse combo that is the GIGA Display Bundle for anyone into gaming, sound design, or really any tech-driven pursuit. Examples of what you can do with these are a whole system to control the lights and fans in your home via a single, custom dashboard, or even a Chat GPT client to boost productivity!
No matter who is on your list and what their skill level or interests may be, head to our 2023 gift guides and find the perfect present for them! We hope you’ll enjoy learning, creating, and making together.
Young children have a unique perspective on the world they live in. They often seem oblivious to what’s going on around them, but then they will ask a question that makes you realise they did get some insight from a news story or a conversation they overheard. This happened to me with a class of ten-year-olds when one boy asked, with complete sincerity and curiosity, “And is that when the zombie apocalypse happened?” He had unknowingly conflated the Great Plague with television depictions of zombies taking over the world.
How to talk to young people about AI
Absorbing media and assimilating it into your existing knowledge is a challenge, and this is a concern when the media is full of big, scary headlines about artificial intelligence (AI) taking over the world, stealing jobs, and being sentient. As teachers and parents, you don’t need to know all the details about AI to answer young people’s questions, but you can avoid accidentally introducing alternate conceptions. This article offers some top tips to help you point those inquisitive minds in the right direction.
AI is not a person
Technology companies like to anthropomorphise their products and give them friendly names. Why? Because it makes their products seem more endearing and less scary, and makes you more likely to include them in your lives. However, when you think of AI as a human with a name who needs you to say ‘please’ or is ‘there to help you’, you start to make presumptions about how it works, what it ‘knows’, and its morality. This changes what we ask, how much we trust an AI device’s responses, and how we behave when using the device. The device, though, does not ‘see’ or ‘know’ anything; instead, it uses lots of data to make predictions. Think of word association: if I say “bread”, I predict that a lot of people in the UK will think “butter”. Here, I’ve used the data I’ve collected from years of living in this country to predict a reasonable answer. This is all AI devices are doing.
[AI] does not ‘see’ or ‘know’ anything; instead, it uses lots of data to make predictions.
When talking to young children about AI, try to avoid using pronouns such as ‘she’ or ‘he’. Where possible, avoid giving devices human names, and instead call them “computer”, to reinforce the idea that humans and computers are very different. Let’s imagine that a child in your class says, “Alexa told me a joke at the weekend — she’s funny!” You could respond, “I love using computers to find new jokes! What was it?” This is just a micro-conversation, but with it, you are helping to surreptitiously challenge the child’s perception of Alexa and the role of AI in it.
Where possible, avoid giving devices human names, and instead call them ‘computer’, to reinforce the idea that humans and computers are very different.
Another good approach is to remember to keep your emotions separate from computers, so as not to give them human-like characteristics: don’t say that the computer ‘hates’ you, or is ‘deliberately ignoring’ you, and remember that it’s only ‘helpful’ because it was told to be. Language is important, and we need to continually practise avoiding anthropomorphism.
AI isn’t just robots (actually, it rarely is)
The media plays a huge role in what we imagine when we talk about AI. For the media, the challenge is how to make lines of code and data inside a computer look exciting and recognisable to their audiences. The answer? Robots! When learners hear about AI taking over the world, it’s easy for them to imagine robots like those you’d find in a Marvel movie. Yet the majority of AI exists within systems they’re already aware of and are using — you might just need to help draw their attention to it.
Even better than just calling out uses of AI: try to have conversations about when things go wrong and AI systems suggest silly options.
For example, when using a word processor, you can highlight to learners that the software sometimes predicts what word you want to type next, and that this is an example of the computer using AI. When learners are using streaming services for music or TV and the service predicts something that they might want to watch or listen to next, point out that this is using AI technology. When they see their parents planning a route using a satnav, explain that the satnav system uses data and AI to plan the best route.
Even better than just calling out uses of AI: try to have conversations about when things go wrong and AI systems suggest silly options. This is a great way to build young people’s critical thinking around the use of computers. AI systems don’t always know best, because they’re just making predictions, and predictions can always be wrong.
AI complements humans
There’s a delicate balance between acknowledging the limitations of AI and portraying it as a problematic tool that we shouldn’t use. AI offers us great opportunities to improve the way we work, to get us started on a creative project, or to complete mundane tasks. However, it is just a tool, and tools complement the range of skills that humans already have. For example, if you gave an AI chatbot app the prompt, ‘Write a setting description using these four phrases: dark, scary, forest, fairy tale’, the first output from the app probably wouldn’t make much sense. As a human, though, you’d probably have to do far less work to edit the output than if you had had to write the setting description from scratch. Now, say you had the perfect example of a setting description, but you wanted 29 more examples, a different version for each learner in your class. This is where AI can help: completing a repetitive task and saving time for humans.
To help children understand how AI and humans complement each other, ask them the question, ‘What can’t a computer do?’ Answers that I have received before include, ‘Give me a hug’, ‘Make me laugh’, and ‘Paint a picture’, and these are all true. Can Alexa tell you a joke that makes you laugh? Yes — but a human created that joke. The computer is just the way in which it is being shared. Even with AI ‘creating’ new artwork, it is really only using data from something that someone else created. Humans are required.
Overall, we must remember that young children are part of a world that uses AI, and that it is likely to be ever more present in the future. We need to ensure that they know how to use AI responsibly, by minimising their alternate conceptions. With our youngest learners, this means taking care with the language you choose and the examples you use, and explaining AI’s role as a tool.
To help children understand how AI and humans complement each other, ask them the question, ‘What can’t a computer do?’
These simple approaches are the first steps to empowering children to go on to harness this technology. They also pave the way for you to simply introduce the core concepts of AI in later computing lessons without first having to untangle a web of alternate conceptions.
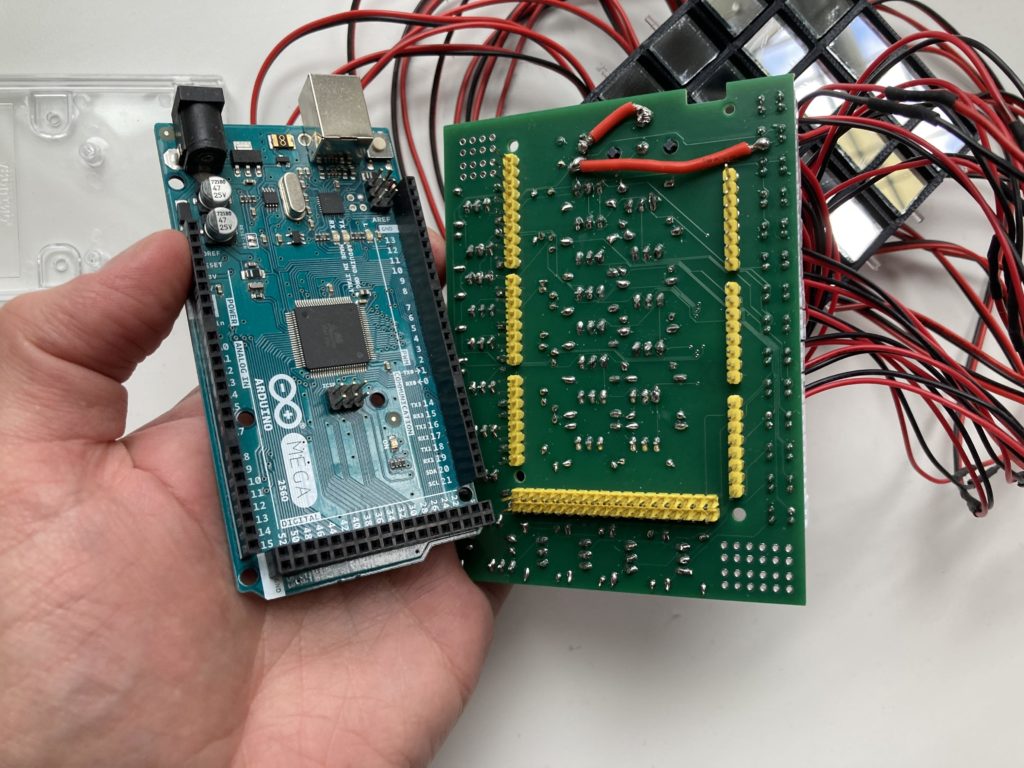
Digital light processing (DLP) devices, which we often see in digital projectors, work by reflecting light off of a two-dimensional array of many thousands — or even millions — of moving mirrors. For that to be practical, each mirror must be microscopic and that makes it very difficult to see and understand the way a DLP device functions. To make that more intuitive, Jon Bumstead scaled up a mirror array to build a “macro” DLP mirror device.
Bumstead’s DLP mirror device only has 25 mirrors arranged in a 5×5 grid, so the resolution is too low to be of any use for displays. But the large size makes this the perfect educational demonstration, because users can easily see how the device operates. Each mirror can pivot to one of two states. The first state angles the mirror so light reflects out to where a lens would be. The second state angles the mirror inwards, so light reflects to where an absorbent pad would be. The first state is an “on” pixel and the second state is an “off” pixel. A real DLP device can switch between states fast enough to create shades of gray and the light would go through filters to introduce color.
Each mirror in the macro DLP device is a square half an inch to a side. Mini push-pull solenoids actuate the mirrors between states and an Arduino Mega 2560 board controls those solenoids through transistors on a custom PCB shield. The frame and mechanical components were 3D-printed to keep costs down.
This device isn’t practical for a display, but it is functional and works great as a tangible illustration of DLP technology. In a hazy room, users can see the reflected rays of light in order to grasp the underlying concept.
With the holidays right around the corner, many of us are in full shopping mode. And while it can be exciting to pick out festive holiday decor or gifts for loved ones, it can also get stressful when the costs start piling up: In fact, one in four holiday shoppers report feeling anxious about gifts and other holiday-related costs.
With its wide selection of apps, Google Play has you covered. Today, we’re highlighting 10 apps on Play that can relieve your holiday budget — and your stress.
1. YNAB (You Need A Budget)
YNAB: Budgeting & Finance is a one-stop shop for taking control of your finances. With tools to organize bills, pay off debt and track your net worth, YNAB helps you reach your financial goals so you can get back to treating your loved ones (and yourself) this holiday season.
2. Cleo
Cleo can help you (literally) start a dialogue about your finances. Ask Cleo anything about your spending and budget through an AI-powered chat interface, and get clear answers to help you track your bills and stay informed about your financial situation.
3. NerdWallet
NerdWallet is a holistic finance app that keeps you smart when it comes to your long-term spending, net worth and credit score. In addition to analyzing month-to-month spending across all your accounts, NerdWallet provides insights into factors affecting your credit score so you have key financial information all in one place.
4. Goodbudget
Goodbudget, formerly EEBA (the Easy Envelope Budget Aid), is an ideal choice for budgeting across devices. It syncs your expenses — whether purchases like holiday gifts or utilities like your internet bill — across platforms so you can easily track your spending from the web or the app, and share with anyone else you’re budgeting with.
5. Honeydue
Honeydue is a finance app specifically designed for couples, helping partners track bills and bank balances while giving them insight into each other’s spending goals and habits.
6. PocketGuard
PocketGuard makes it easy to stay on top of your money and always know what works (or doesn’t) for your budget. The app can analyze your accounts, automatically identify subscriptions and other transactions and send detailed reports to help you stay on track.
7. RocketMoney
RocketMoney, formerly Truebill, helps you manage your subscriptions in one place and provides a clear picture of recurring payments, including those you may have forgotten about. With lower bills and higher savings, you can designate money toward things that matter, like holiday gifts for your loved ones.
8. Wallet: Budget Expense Tracker
Wallet: Budget Expense Tracker is built with financial planning in mind, allowing you to track bills, automatically sync transactions with your primary bank and get valuable insights about spending via weekly reports. You can also share your budget with others to stay on top of household expenses. Wallet accounts for flexible budgets as well, which is especially handy during the holiday season when spending can be unpredictable.
9. Productive – Habit tracker
We know that staying organized goes beyond budgeting during the holidays. Productive – Habit tracker is an easy-to-use app that helps you plan a routine, set reminders and customize your tasks for each day to create productive, long-term habits you can stick to. In addition to alleviating stress when it comes to spending money, it can also give you peace of mind on how you spend your time.
10. Calm
Speaking of stress, Calm can help you manage the pressure that comes with holiday budgeting and make your wellbeing a priority. A popular sleep and relaxation app, Calm includes Sleep Stories narrated by celebrities, guided meditations, soothing soundscapes and more to help you reduce your anxiety and practice self-care.
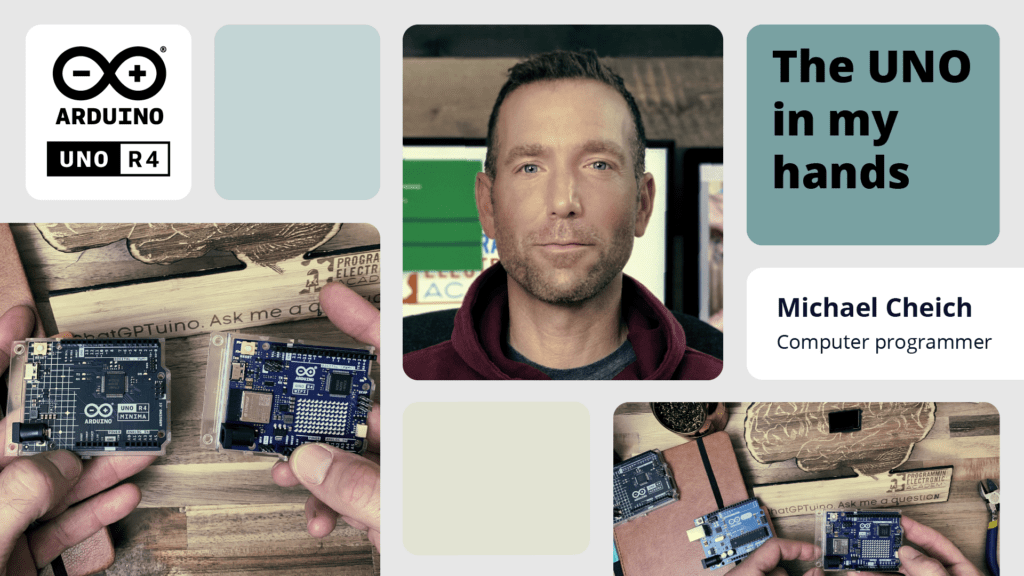
The launch of the Arduino UNO R4 marks a huge leap forward for our community. For us, it’s also the chance to celebrate the people who bring our ecosystem to life with their bright ideas, radiant enthusiasm, and shining insight.
That is how the UNO R4 Stars blog post series began: to highlight makers who have not only created amazing projects with Arduino, but who are giving back to the community by sharing as they go and helping others make anything they wish.
We invite you to discover each profile, hoping you might find a North Star to navigate around an expanding galaxy or venture into completely new universes.
Learning can be overwhelming for anyone – and we mean anyone. Michael Cheich studied neuroscience and spent 20 years in the US military flying helicopters, yet candidly admits he was intimidated when he first began exploring his passion for programming and electronics.
Discovering the Arduino ecosystem turned around his perspective, allowing him to solve every challenge he encountered. Building projects that leverage technology now gives him a sense of accomplishment — a feeling he hopes to share with the almost 200K subscribers to Programming Electronics Academy.
On Cheich’s YouTube channel, you will find weekly videos that promise to give viewers not only the information but also, and more importantly, the confidence they need to keep learning. Just pick among hundreds of tutorials from basic to advanced – including a 90-minute masterclass on programming – as well as product reviews and project ideas.
For example, Cheich recently has had a ton of fun building a ChatGPT terminal and decided to start writing an Arduino library for interfacing the large language model (LLM) with Wi-Fi-enabled microcontrollers. “I’ve always been fascinated by AI, and I just can’t express how amazing it is that an average guy like me has access to such powerful tools. It’s a great time to be alive and be a maker.”
And his creativity does not stop at your typical coding or IoT endeavors. Cheich is also the mind behind The Arduino Paradox (use this affiliate link to support him!), a graphic novel written by Mark Lambert and illustrated by Brandon Scribner. We may not be the most objective, but we thought it was a great read!
We asked Cheich, “What’s your favorite part of the UNO R4?”
The wireless capabilities of the UNO R4 WiFi, which make interfacing with LLMs really accessible.
The bigger, more powerful processor: “I am excited to explore some edge AI applications.”
The debug port in the UNO R4 Minima, making it easier than ever to catch and correct any mistakes.
In his full review of the Arduino UNO R4 Minima, Cheich also pointed out how he appreciates both what has been improved in the new revision and what has been kept the same: while packed with new exciting features, in his eyes the R4 is still perfect for beginners. And clearly “Arduino has thought hard about the hardware compatibility between the R4 and its predecessor, the R3.” So, no matter where you are on your learning journey, head to his Programming Electronics Academy for a booster of knowledge and confidence!
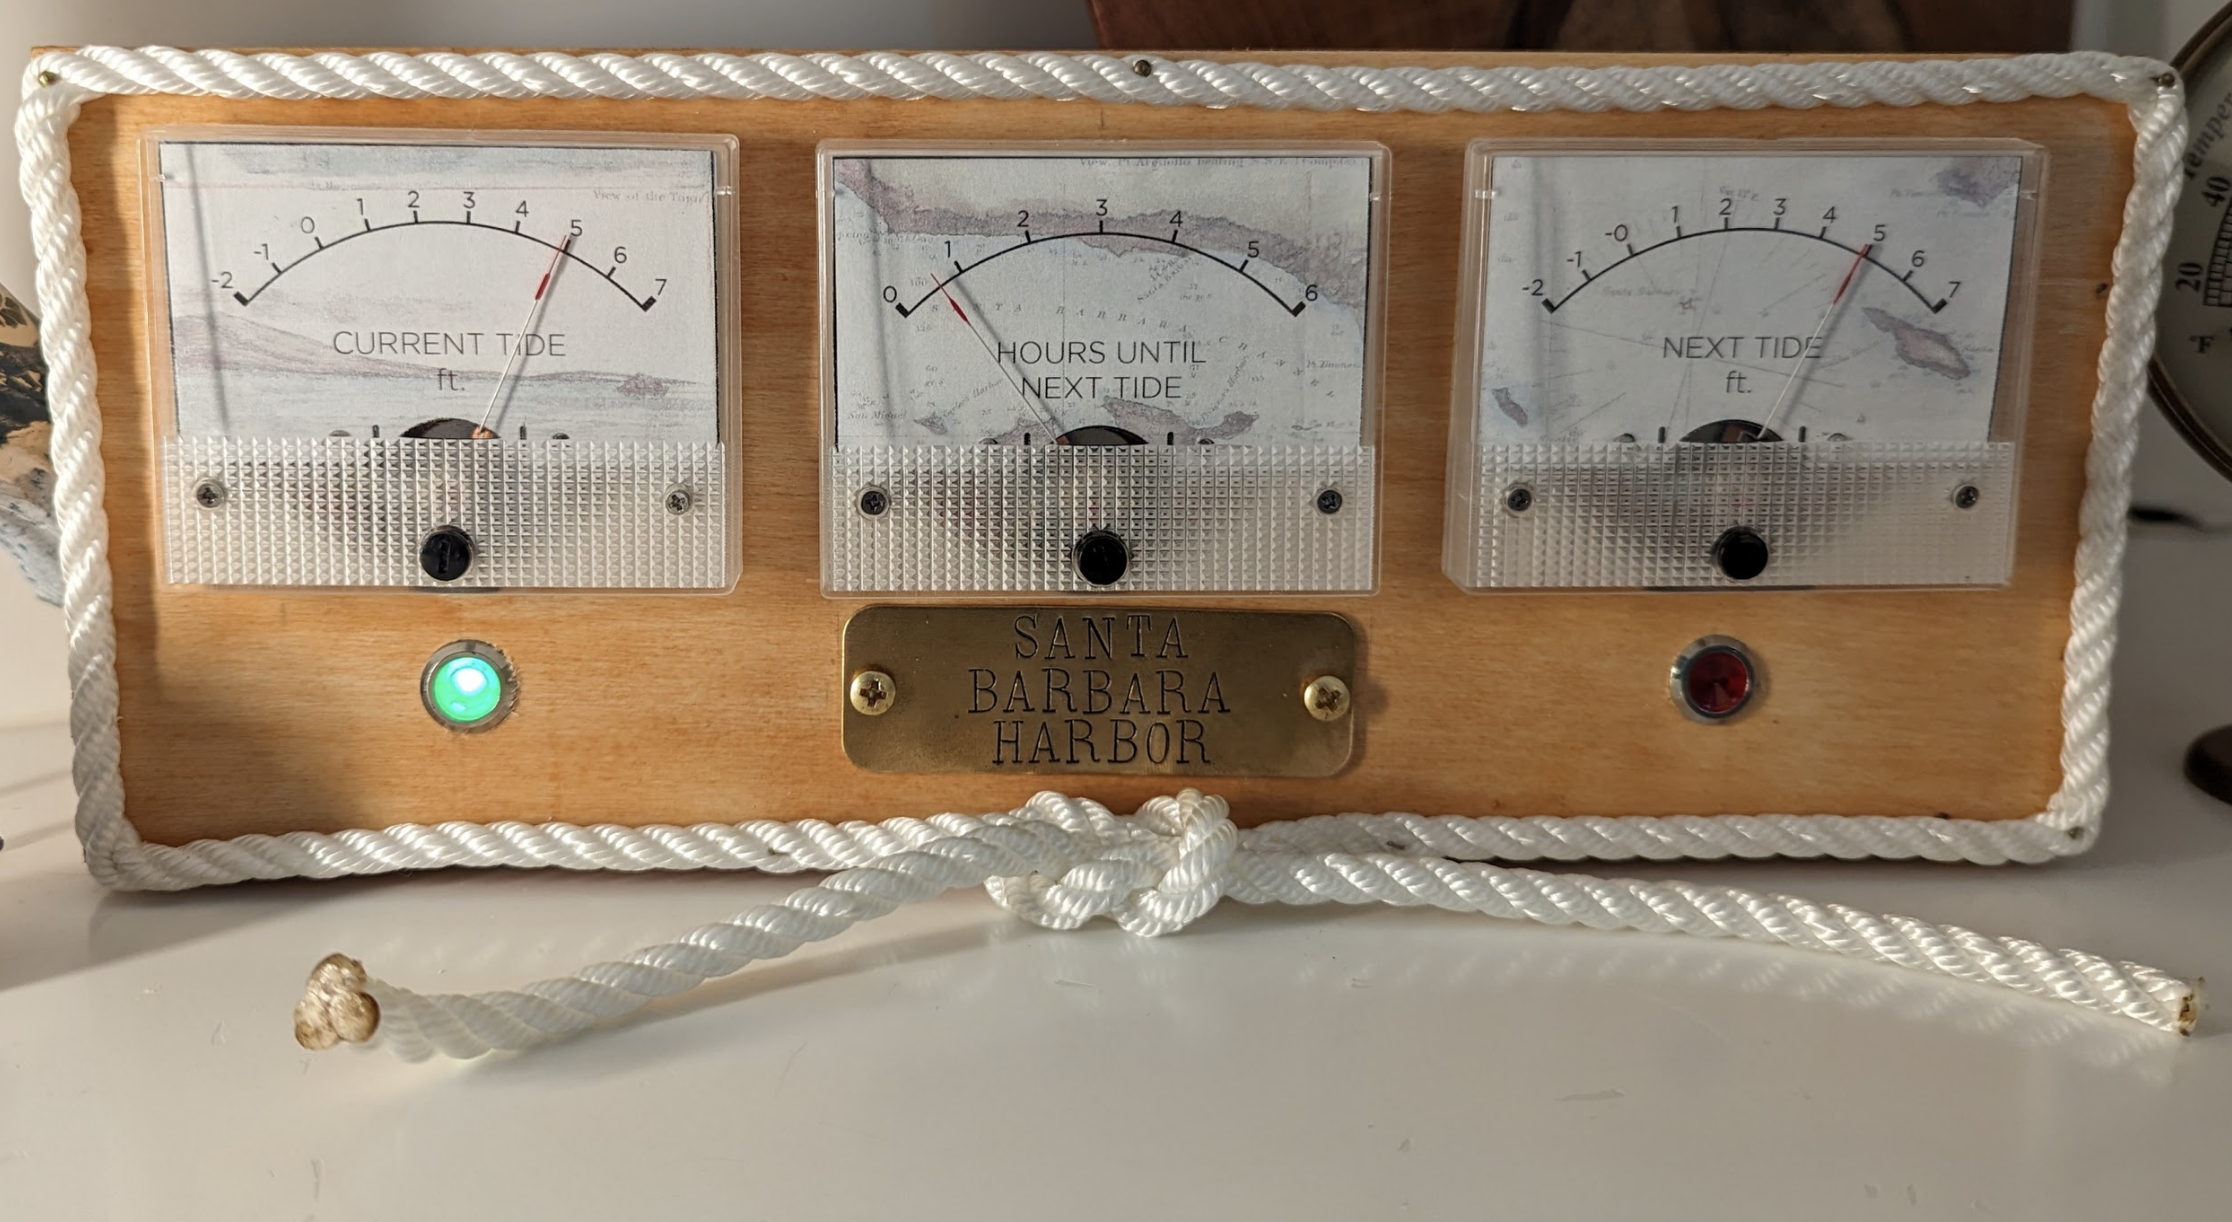
For us landlubbers, tides aren’t always something we have to think about, although Levi was familiar with the tide clocks where he grew up. Not being able to find one for his new Californian home, Levi decided to make his own: “It displays current tide height in feet, predicted hours until next tide and predicted height of the next tide using analogue meters and LED lights.”
Tidal changes
Making a clock wasn’t quite as easy as he first thought, though.
“Growing up in Rhode Island, round, four-segmented tide clocks were a common sight in homes near the Atlantic,” Levi tells us. “But after moving to California, I noticed that these simple analogue clocks were nowhere to be found here. As it turns out, there’s a good reason for that. Similar to many coastal areas around the Pacific and some of the northern Mediterranean coast, the US west coast has a more complex tidal pattern, which means that without constant adjustment, a basic tide clock would get out of sync with the ‘mixed semi-diurnal’ tides here in just a few days.”
This meant Levi needed a way to keep the clock up to date with the NOAA (National Oceanic and Atmospheric Administration) tide data, which led him to turn to Raspberry Pi. “The device stays accurate as long as it has a Wi-Fi connection,” Levi says. “The red light on the right side of the front panel indicates a rising tide and the green light on the left illuminates when the tide is falling. All of the meters and lights are driven by the GPIO pins on a Raspberry Pi 3B+ running a Python script that gathers tide predictions from the US National Oceanic and Atmospheric Administration’s API. The script converts the raw tidal data into PWM values to drive the meters and the binary state voltage for the LEDs.”
Sea worthy
As well as the electronic aspect of the project, Levi was keen to make it look more rustic to camouflage the internal tech, using analogue gauges and a wooden fascia. “Obviously there are more efficient ways to communicate tide predictions than with analogue meters,” Levi admits. “A digital display driven by a Raspberry Pi could easily show graphs and numbers based on the tide API. But I wanted something more rustic but just as accurate. They say measure twice and cut once. I must have tinkered mentally with the physical build design a thousand times over the past two years.
“So when it finally came time to assemble it, I had a very clear vision of how it should look, down to the brass plaque declaring that the information displayed was for ‘Santa Barbara Harbor’.”
According to Levi the finished project works ‘really well’, which hopefully means he’s been able to go for his weekly walks without worrying about the tide since completing it.
The Project Hub is where Arduino users share their achievements to inspire, help others, and maybe show off a little. With thousands of projects already uploaded, in categories that run the gamut from “flying things” to “smart lighting,” we are proud to celebrate this community-boosting initiative by selecting three highlights every month for a special mention and gift card to spend on our Store.
If you are new to the portal and think you’d never be picked, think again! All three top users from September stood out with the very first project they uploaded.
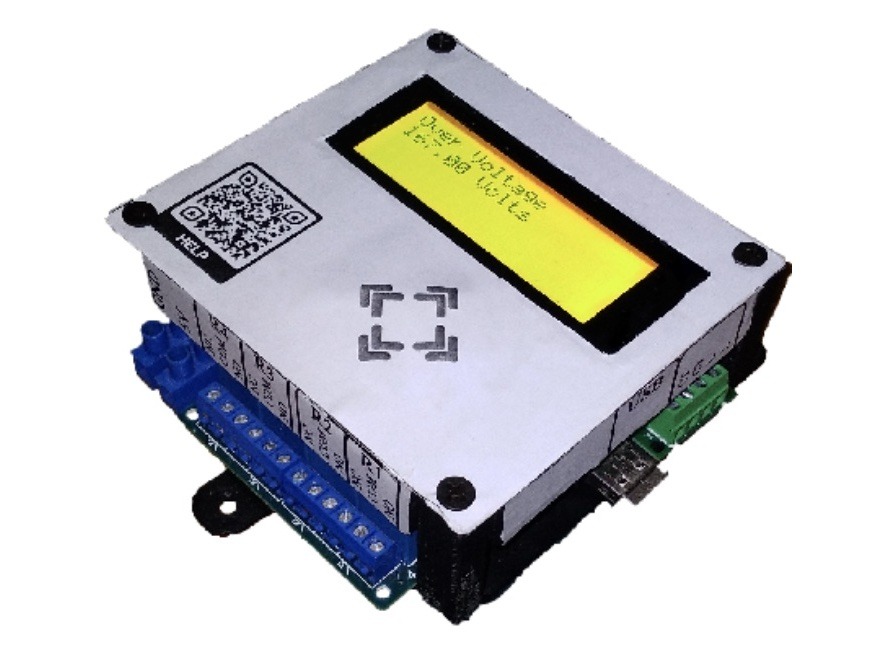
This advanced project allows you to successfully build an Arduino-based power meter system with internal PLC, able to accurately collect and calculate data to monitor energy consumption, improve efficiency, and add value to home automation solutions. Follow the instructions to display voltage, power factor, current, power and frequency instantly, with a handful of commonly available components and a compact Arduino Nano.
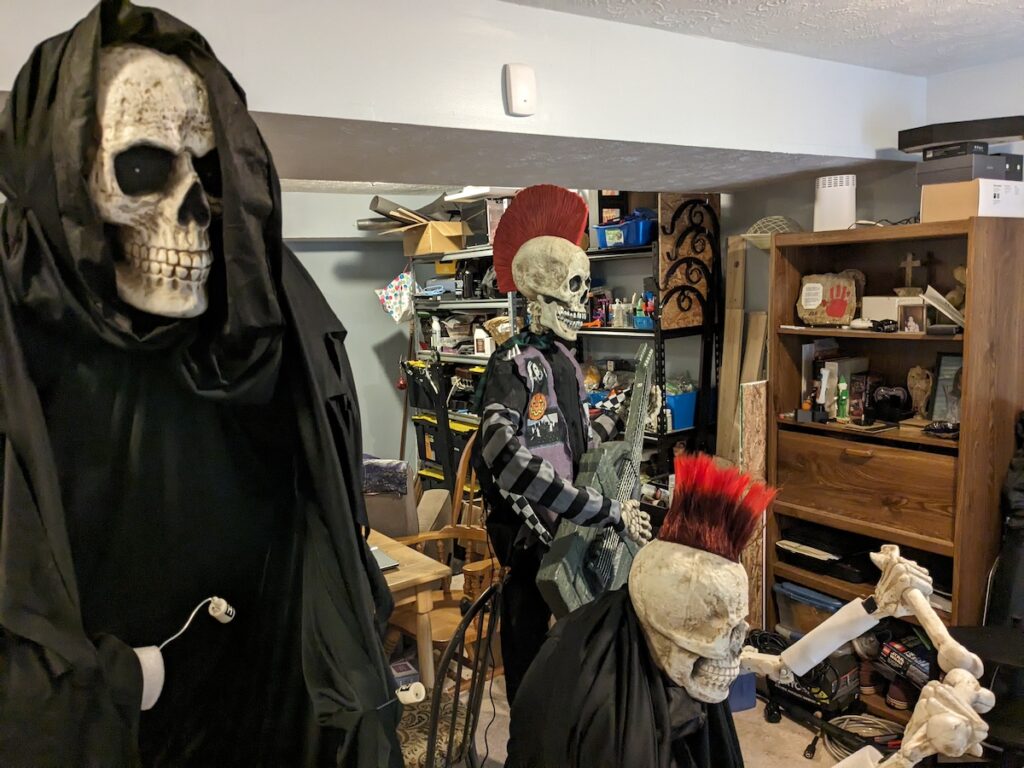
Syncing up different props – from different manufacturers and retailers – to create a cohesive overall installation is no easy feat! This project was specifically intended for Halloween, to get skeletal animatronics to play the same music together thanks to the UNO R3 and some ingenious wiring… but we think it would work great also with more festive characters, for a truly unforgettable holiday display.
A fan of Arduino since graduating with a dissertation on smart homes in 2022, kela910512 has successfully used an Arduino Micro to devise a secure tool to log in and out of Windows 10 using an RFID card. Instead of manually typing passwords, the solution leverages an Android application to send the user’s password to the Arduino via Bluetooth, with a range of additional security mechanisms. To find out more and perhaps try this yourself, head to Project Hub!
For your chance to be selected for a $100, $300 or even $500 gift card to spend on the Arduino Store, submit your best project on Project Hub! We will be awarding three new entries every month, as detailed in the complete terms and conditions. Good luck!
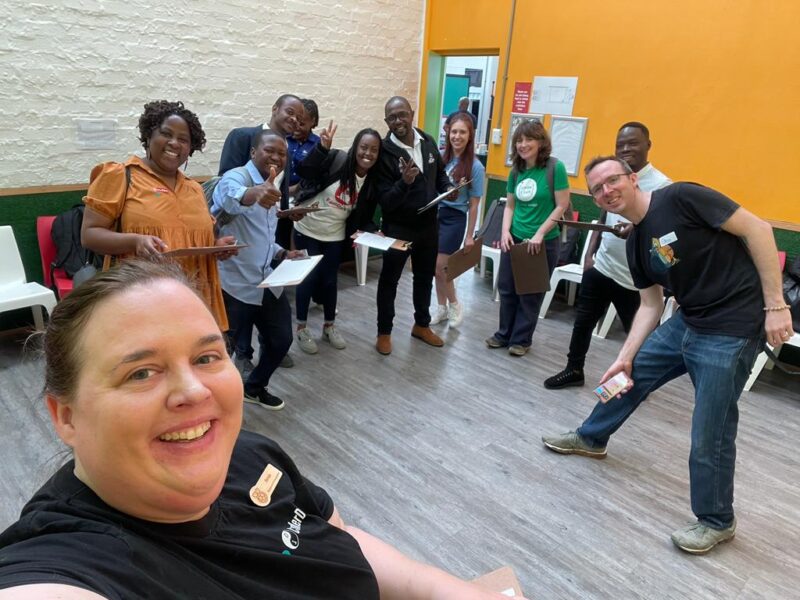
The day after the successful meetup with our Global Clubs Partner organisations based in Africa, our team and some of our partners enjoyed participating in the Coolest Projects South Africa 2023 event to meet young tech creators and help out as project judges. Here are some of our impressions.
A day of Coolest Projects
This is the fourth year of a partner-run, regional version of Coolest Projects — our world-leading showcase for young tech creators — taking place in South Africa, led by David Campey. David is Director of Coder LevelUp, one of our Global Clubs Partners growing and supporting a network of CoderDojos and Code Clubs in the country, and involved in the CoderDojo movement for a whole decade.
There was a buzz of anticipation and excitement at the Cape Town Science Centre as young coders from age 5 to 18 and various backgrounds gathered on this sunny Saturday morning to showcase their coding creations and inventions at Coolest Projects South Africa. From fun games and animations on Scratch, to cool websites created with HTML and CSS, to fantastic Python-based hardware solutions to real-world challenges — every young creator brought along a project they’d created to proudly showcase and celebrate.
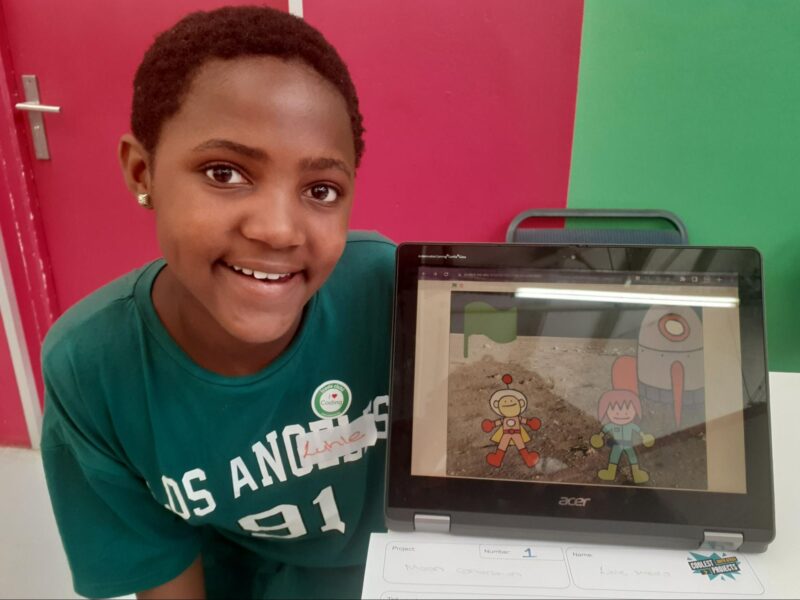
Luhle’s language-inspired coding project
While chatting with the creators and discovering what had motivated their projects, we met up with 11-year-old Luhle, who was delighted to take us through the ‘Moon conversation’ animation she had coded in Scratch.
11-year-old Luhle proudly showcases her ‘Moon conversation’ Scratch animation at the Coolest Projects South Africa 2023 event.
The animation involved a Spanish conversation between two people who journeyed to the moon and back. Luhle had created her animation because of her love for languages and in response to a challenge posed to her class by her teacher: to learn 5 languages. While her mother tongue is isiXhosa, she is confident in English, is learning Afrikaans, has started teaching herself Spanish, and would love to learn Korean.
Kayden’s innovative hardware creation
We also met with 16-year-old Kayden, who showcased a project he’d made to address a real-world challenge. He told us he had always struggled to concentrate in class — a challenge that many young people face — and he wanted to build an alternative solution to the established medications. Using vibration sensors and two microcontrollers, he created a digital device to prompt users when they are no longer paying attention in class. With his friend Carl, he successfully tested the device on a meaningful sample of Grade 1–3 learners (ages 7–9).
16-year-old Kayden listens intently as one of the Coolest Projects judges, Akwabi Paul from Kenya, commends his invention and advises him on next steps. Listening in are two other judges, Solomon from The Gambia and Sylvester from Malawi.
Kayden is now developing this low-cost innovative solution to include a heart rate monitor to help to detect when a user loses focus, and he wants this to be a solution that’s widely accessible and affordable for all South African children. One of the judges, our partner Akwabi Paul from Tech Kidz Africa in Kenya, was greatly impressed and motivated by Kayden’s work, and took time to advise Kayden on the next steps to turn his invention into a commercial product.
The coding club at CBC St Johns Parklands
During the event we also met members of Mrs Hill’s coding club and learnt about Mrs Hill’s experience of nurturing a love and interest for coding and robotics at CBC St Johns Parklands in Cape Town.
Since 2020, Mrs Hills has been providing coding lessons to all school classes — learners aged 6 to 12 years — as well as an after-school coding and robotics club. She approaches her lessons by introducing and demonstrating coding skills and then presenting her learners with a problem to solve collaboratively. In her words, ‘Learners find more interest in learning practically.’
That’s why Coolest Projects is the perfect fit for her and her young people. 4 of her club members took part in Coolest Projects South Africa 2022. This year, she was proud to enter 11 participants, 3 of whom were chosen as judges’ favourites.
Here’s to the young creators and more Coolest Projects events
After the showcasing and judging, the Coolest Projects South Africa event culminated in a hearty celebration of all that the young tech creators had presented. David Campey’s passion for nurturing coding literacy, digital making skills, and innovative thinking among learners from different walks of life made the whole day a truly enjoyable, inclusive event for the young creators.
It was inspiring, no doubt, for our other African partners who participated as judges and are now keen to host Coolest Projects events back in their home countries.
Get involved in Coolest Projects
If you and your young people based anywhere on the globe feel inspired to showcase digital tech creations, you can get involved in our Coolest Projects 2024 online showcase! It’s free and open to any young tech creator up to age 18.
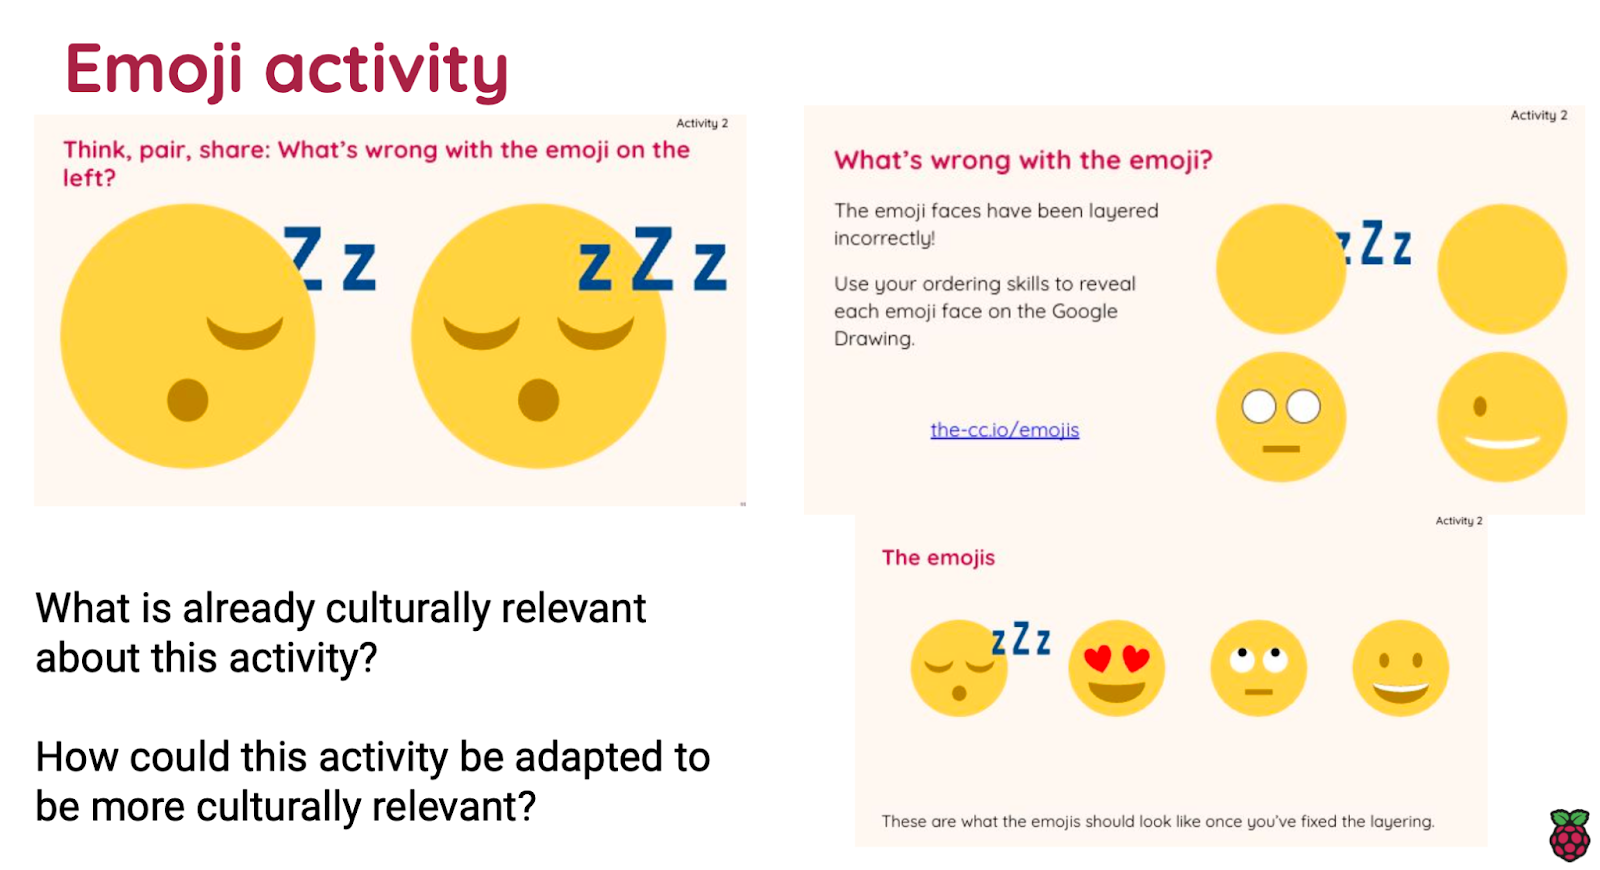
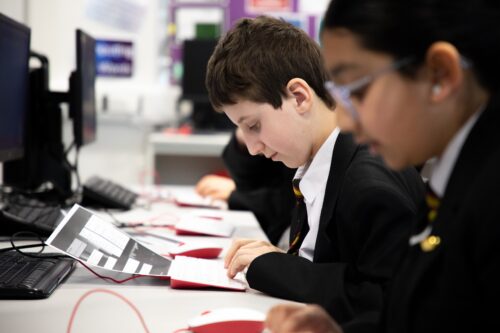
Today’s blog is written by Dr Alex Hadwen-Bennett, who we worked with to find out primary school learners’ experiences of engaging with culturally relevant Computing lessons. Alex is a Lecturer in Computing Education at King’s College London, where he undertakes research focusing on inclusive computing education and the pedagogy of making.
For this reason, a particular focus of the Raspberry Pi Foundation’s academic research programme is to support Computing teachers in the use of culturally relevant pedagogy. This pedagogy involves developing learning experiences that deliberately aim to enable all learners to engage with and succeed in Computing, including by bringing their culture and interests into the classroom.
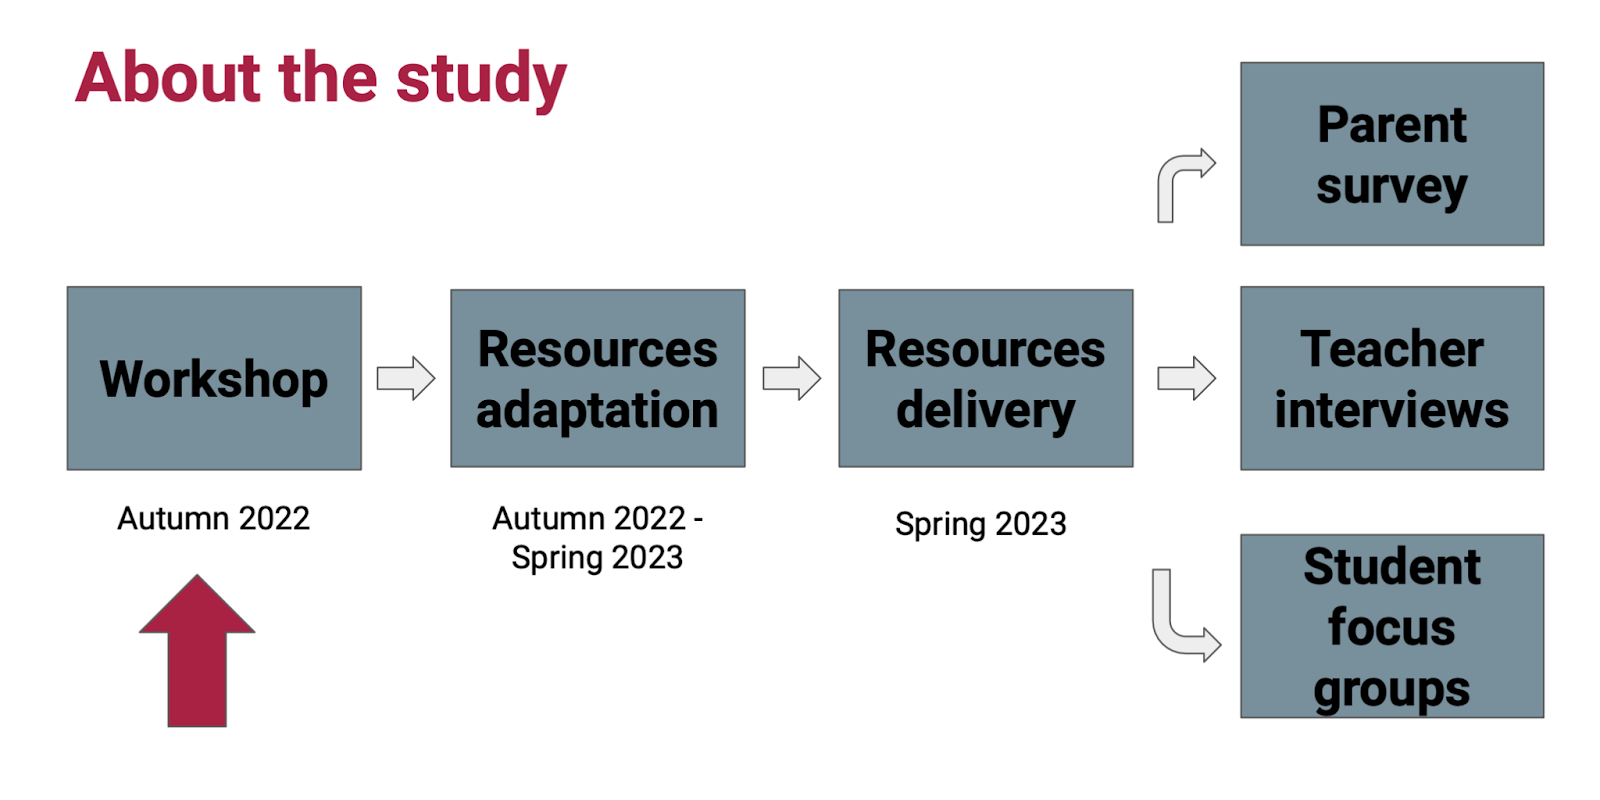
At the beginning of this study, teachers adapted two units of work that cover digital literacy skills
Conducting the focus groups
For the focus groups, the Foundation team asked teachers from three schools to each choose four learners to take part. All children in the three focus groups had taken part in all the lessons involving the culturally adapted resources. The children were both boys and girls, and came from diverse cultural backgrounds where possible.
The questions for the focus groups were prepared in advance and covered:
Perceptions of Computing as a subject
Reflections of their experiences of the engaging with culturally adapted resources
Perceptions of who does Computing
Outcomes from the focus groups
“I feel happy that I see myself represented in some way.”
“It was nice to do something that actually represented you in many different ways, like your culture and your background.”
– Statements of learners who participated in the focus groups
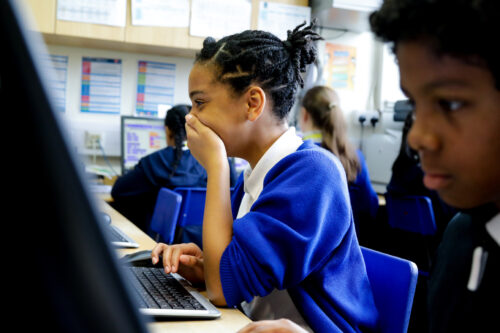
When the learners were asked about what they did in their Computing lessons, most of them made references to working with and manipulating graphics; fewer made references to programming and algorithms. This emphasis on graphics is likely related to this being the most recent topic the learners engaged with. The learners were also asked about their reflections on the culturally adapted graphics unit that they had recently completed. Many of them felt that the unit gave them the freedom to incorporate things that related to their interests or culture. The learners’ responses also suggested that they felt represented in the work they completed during the unit. Most of them indicated that their interests were acknowledged, whereas fewer mentioned that they felt their cultural backgrounds were highlighted.
“Anyone can be good at computing if they have the passion to do it.”
– Statement by a learner who participated in a focus group
When considering who does computing, the learners made multiple references to people who keep trying or do not give up. Whereas only a couple of learners said that computer scientists need to be clever or intelligent to do computing. A couple of learners suggested that they believed that anyone can do computing. It is encouraging that the learners seemed to associate being good at computing with effort rather than with ability. However, it is unclear whether this is associated with the learners engaging with the culturally adapted resources.
Reflections and next steps
While this was a small-scale study, the focus groups findings do suggest that engaging with culturally adapted resources can make primary learners feel more represented in their Computing lessons. In particular, engaging with an adapted unit led learners to feel that their interests were recognised as well as, to a lesser extent, their cultural backgrounds. This suggests that primary-aged learners may identify their practical interests as the most important part of their background, and want to share this in class.
Finally, the responses of the learners suggest that they feel that perseverance is a more important quality than intelligence for success in computing and that anyone can do it. While it is not possible to say whether this is directly related to their engagement with a culturally adapted unit, it would be an interesting area for further research.
The Foundation would like to extend thanks to Cognizant for funding this research, and to the primary computing teachers and learners who participated in the project.
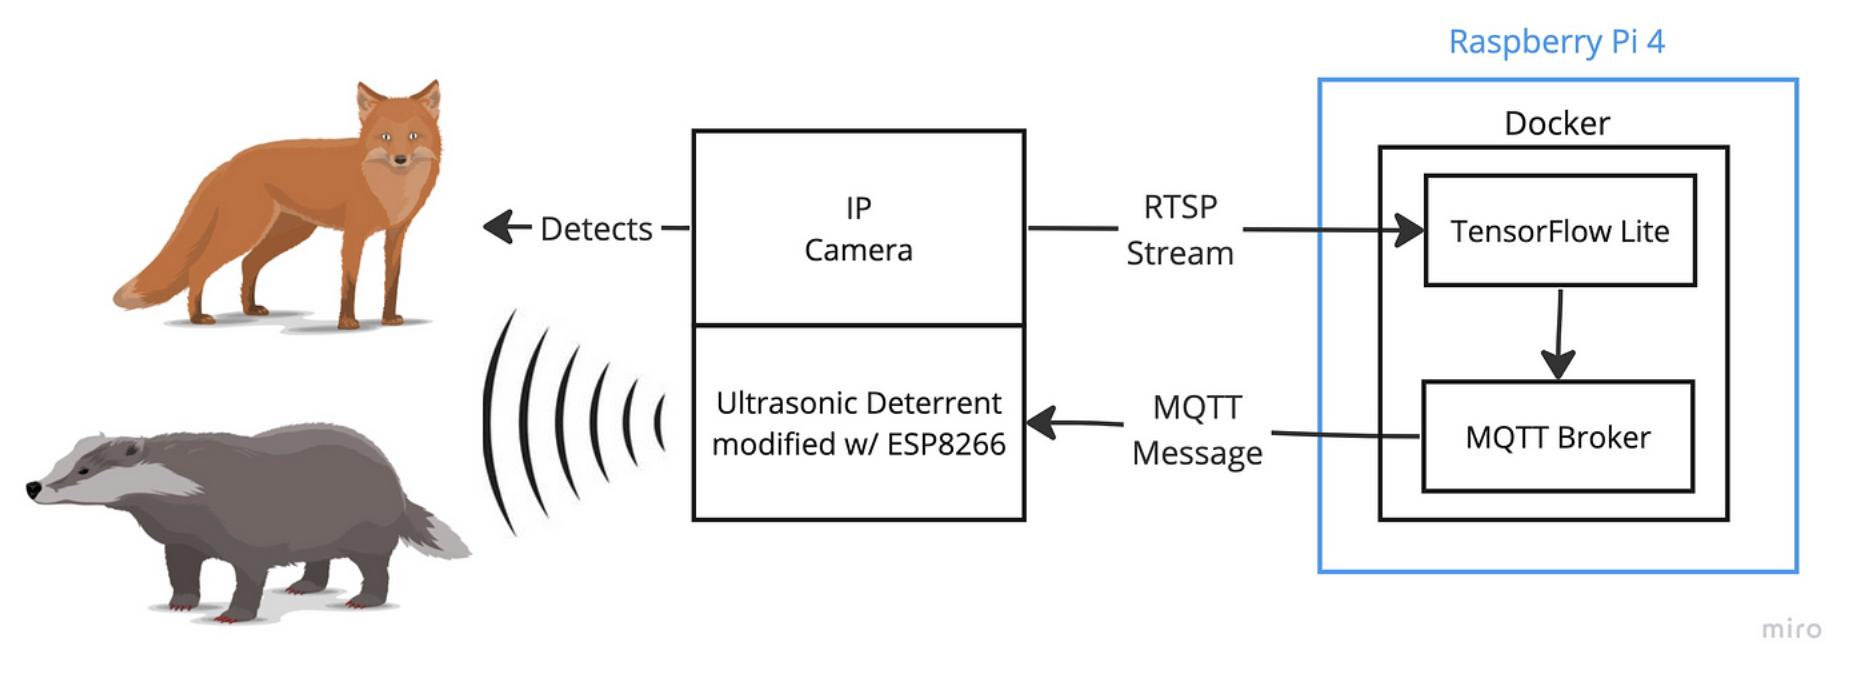
He had a number of Raspberry Pis at home and built a solar-powered watering system using Raspberry Pi A+ back in 2015. He says the low-powered footprint paired with the significant compute capabilities of Raspberry Pi 4 prompted him to explore its machine learning potential at home.
Inaudible alarm bells
Having moved house in 2022, James and his family quickly discovered an issue with their new home: local foxes and badgers “loved ripping the garden up, digging deep holes and leaving ‘gifts’ everywhere for us”. Most disturbingly, they brought in insects carrying who knew what in terms of germs and potentially harmful diseases. Once local wildlife experts confirmed these fleas and ticks were definitely from their garden visitors, James was “set on a path to create a deterrent that could help with our problem”.
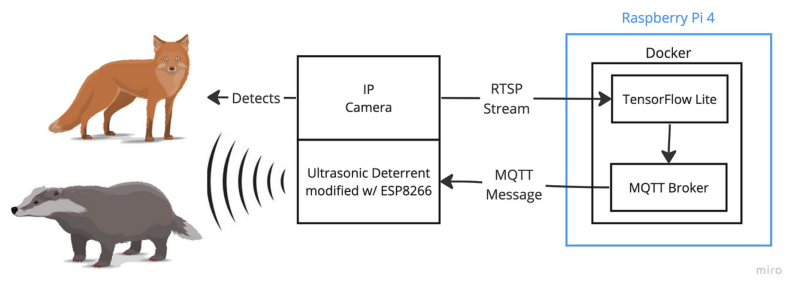
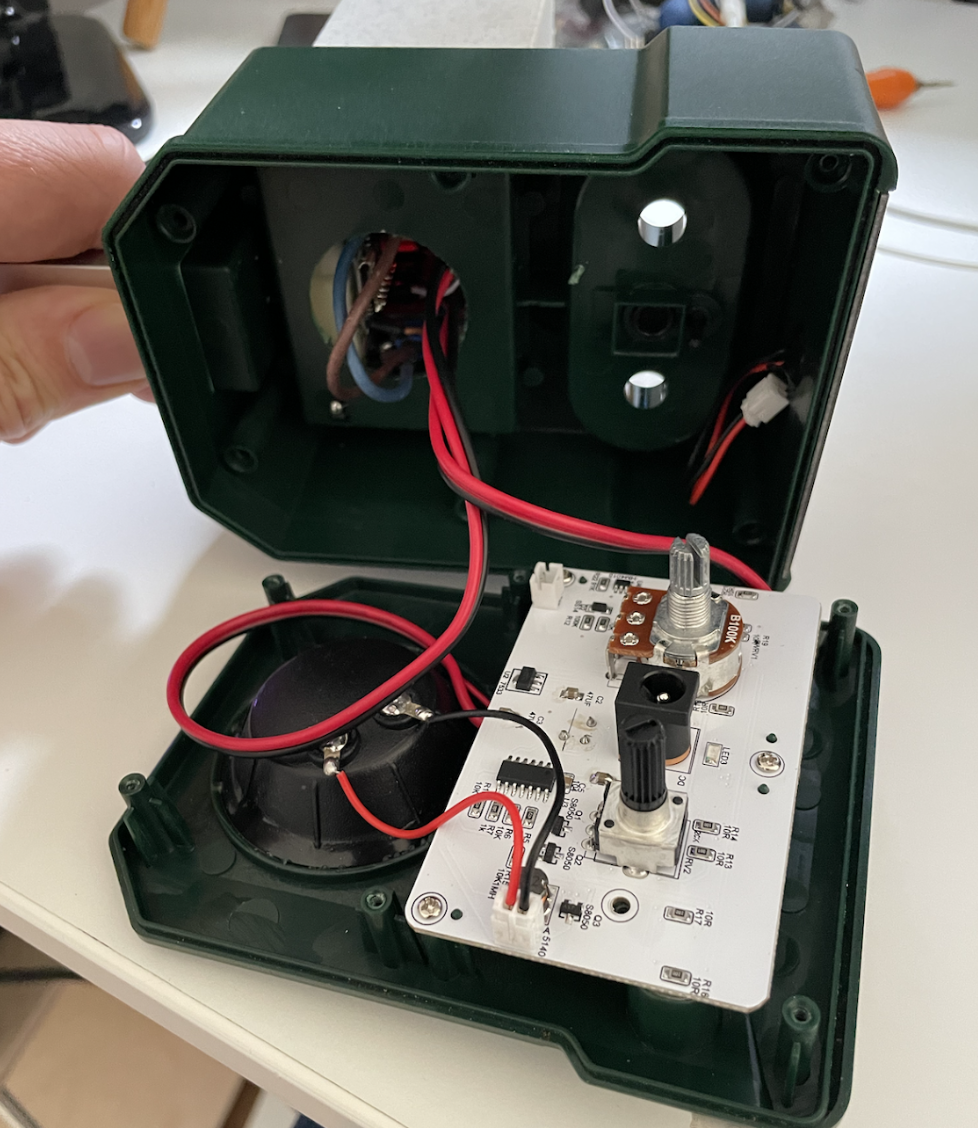
He initially tried scent-marking repellent and natural mixes of citronella and chilli, blocking entry points along the fences in the garden, but “This just resulted in our fluffy friends ignoring my initial attempts and digging more holes”. He tried one solution that offered a glimmer of hope: solar-powered ultrasonic repellents. The Milwards duly placed a few around their garden. However, the repellents required manual setting depending on whether it was badgers or foxes they wanted to warn off, as well as deactivating so as not to trigger when the family was in the garden. This led to occasions when no ultrasonic repellent was in use, and a further incursion of wildlife. Combined with inconsistent charging of the solar-powered units, James realised he needed something smarter: Raspberry Pi would be the perfect choice to help add some intelligence to these very basic devices.
Tense, nervous, headache
James had already experimented with TensorFlow and figured the combination of this open-source machine learning platform’s object recognition capabilities and Raspberry Pi could work well for his Fox and Badger Deterrent, modifying the ultrasonic repellent for remote use. By adding wireless connectivity and an ESP8266 microprocessor, he would even be able to have the repellent operate at a targeted frequency range to “accurately deter targets”.
The project’s real headache came when trying to get video frame rates good enough for object detection at a resolution of 640×640 pixels. James used existing YouTube tutorials designed for 320×320 models, but soon found that more detailed images would be needed, and set about reducing the complexity of the model without losing too much accuracy. Unfortunately, this method brought the frame rate up to just under 1 FPS, which was fine for a single video stream, but James had built the code to work on multiple cameras at once. He then discovered that the Coral USB Accelerator Edge TPU works superbly with Raspberry Pi 4, which has the necessary USB 3.0 ports. “I was able to use this device to get the frame rate for object detection up to 5 FPS for one video feed and about 2 FPS for two feeds running concurrently.”
Warning: Working with animals
Please be mindful when creating devices that interact with animals. Read the RSPCA’s guide on deterrents and animal population control.
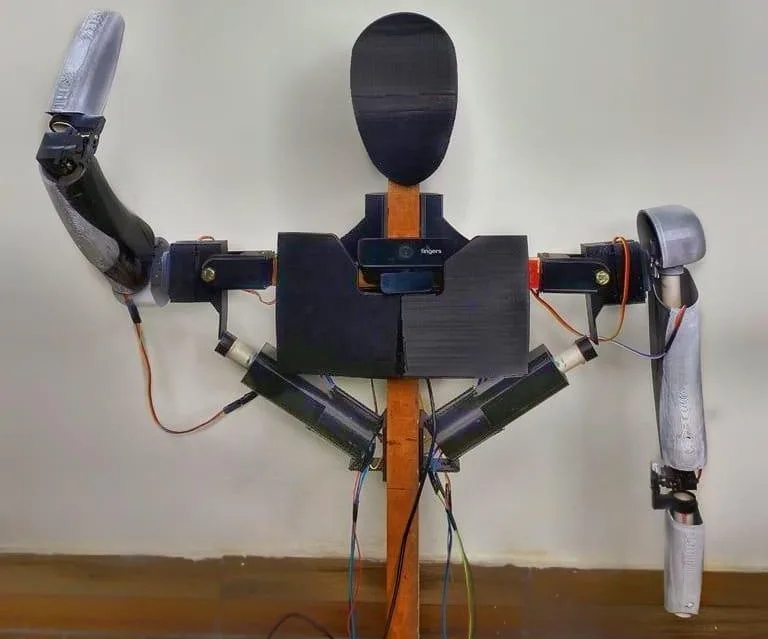
Most people with an interest in robotics probably dream of building android-style humanoid robots. But when they dip their toes into the field, they quickly learn the reality that such robots are incredibly complex and expensive. However, everyone needs to start somewhere. If you want to begin that journey, you can follow these instructions to assemble your own talking humanoid robot.
This robot, dubbed “CHAD,” is a humanoid torso with moving arms, face tracking, and some voice assistant capabilities. It can understand certain voice commands, provide spoken responses, and even hold chat bot-style conversations. The arms weren’t designed to lift anything, but they are capable of movement similar to human arms up to the wrists and that gives CHAD the ability to gesture. It can also move its head to follow a face that it sees.
CHAD achieves that on a remarkably small budget of just ?5000 (about $60 USD) with a handful of components: two Arduino UNO R3 boards, several hobby servo motors, simple L298N motor drivers, and a PC power supply. One Arduino board controls most of the servo movement, while the second focuses on the face tracking movement.
The Arduino boards don’t handle the processing, which is instead outsourced to a PC running Python scripts. Those do the heavy lifting of face recognition, voice recognition, and voice synthesis. The PC then passes movement commands to the Arduino boards through serial.
CHAD’s body and most of its mechanical components are 3D-printable, with two lengths of wood acting as the primary structure. That helps to keep the cost down, giving everyone the chance to create a humanoid robot.
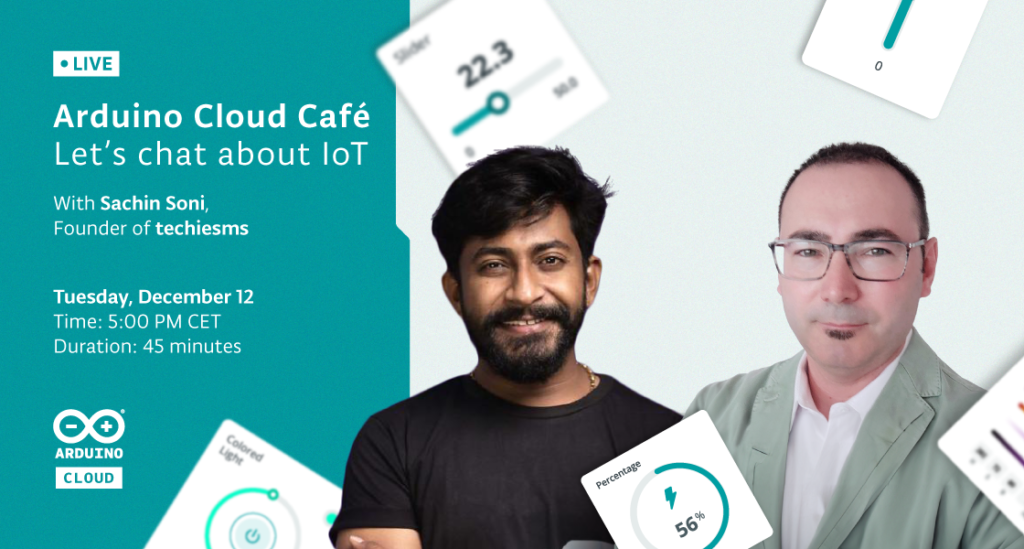
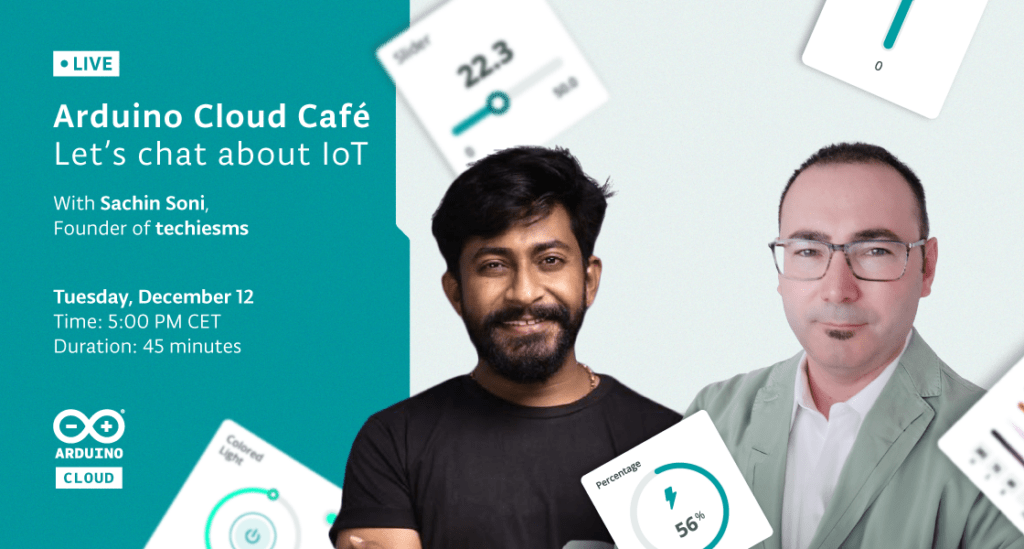
We’re thrilled to welcome Sachin from Techiesms, who’ll not only share his experiences with Arduino Cloud but also showcase his fantastic home automation project
Secure your seat now for a cozy and engaging IoT session with us. Simply visit our YouTube event page and click “Notify me” to ensure you don’t miss out.
Underrepresentation in computing is a widely known issue, in industry and in education. To cite some statistics from the UK: a Black British Voices report from August 2023 noted that 95% of respondents believe the UK curriculum neglects black lives and experiences; fewer students from working class backgrounds study GCSE Computer Science; when they leave formal education, fewer female, BAME, and white working class people are employed in the field of computer science (Kemp 2021); only 21% of GCSE Computer Science students, 15% at A level, and 22% at undergraduate level are female (JCQ 2020, Ofqual 2020, UCAS 2020); students with additional needs are also underrepresented.
Such statistics have been the status quo for too long. Many Computing teachers already endeavour to bring about positive change where they can and engage learners by including their interests in the lessons they deliver, so how can we support them to do this more effectively? Extending the reach of computing so that it is accessible to all also means that we need to consider what formal and informal values predominate in the field of computing. What is the ‘hidden’ curriculum in computing that might be excluding some learners? Who is and who isn’t represented?
Katharine Childs (Raspberry Pi Foundation)
In a recent research seminar, Katharine Childs from our team outlined a research project we conducted, which included a professional development workshop to increase primary teachers’ awareness of and confidence in culturally relevant pedagogy. In the workshop, teachers considered how to effectively adapt curriculum materials to make them culturally relevant and engaging for the learners in their classrooms. Katharine described the practical steps teachers took to adapt two graphics-related units, and invited seminar participants to apply their learning to a graphics activity themselves.
What is culturally relevant pedagogy?
Culturally relevant pedagogy is a teaching framework which values students’ identities, backgrounds, knowledge, and ways of learning. By drawing on students’ own interests, experiences and cultural knowledge educators can increase the likelihood that the curriculum they deliver is more relevant, engaging and accessible to all.
The idea of culturally relevant pedagogy was first introduced in the US in the 1990s by African-American academic Gloria Ladson-Billings (Ladson-Billings 1995). Its aim was threefold: to raise students’ academic achievement, to develop students’ cultural competence and to promote students’ critical consciousness. The idea of culturally responsive teaching was later advanced by Geneva Gay (2000) and more recently brought into focus in US computer science education by Kimberly Scott and colleagues (2015). The approach has been localised for England by Hayley Leonard and Sue Sentance (2021) in work they undertook here at the Foundation.
Provide opportunities for open-ended and problem solving activities
Promote collaboration and structured group discussion
Promote student agency through choice
Review the learning environment
Review related policies, processes, and training in your school and department
At first glance it is easy to think that you do most of those things already, or to disregard some items as irrelevant to the computing curriculum. What would your own cultural identity (see AO2) have to do with computing, you might wonder. But taking a less complacent perspective might lead you to consider all the different facets that make up your identity and then to think about the same for the students you teach. You may discover that there are many areas which you have left untapped in your lesson planning.
Katharine explained how this is where the professional development workshop showed itself as beneficial for the participants. It gave teachers the opportunity to reflect on how their cultural identity impacted on their teaching practices — as a starting point to learning more about other aspects of the culturally relevant pedagogy approach.
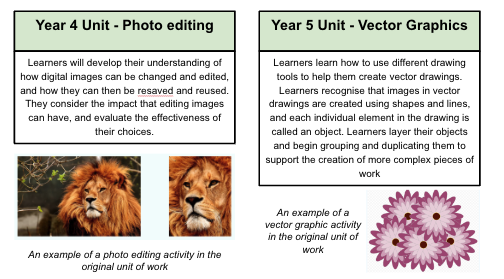
Our researchers were interested in how they could work alongside teachers to adapt two computing units to make them more culturally relevant for teachers’ specific contexts. They used the Computing Curriculum units on Photo Editing (Year 4) and Vector Graphics (Year 5).
Katharine illustrated some of the adaptations teachers and researchers working together had made to the emoji activity above, and which areas of opportunity (AO) had been addressed; this aspect of the research will be reported in later publications.
Results after the workshop
Although the numbers of participants in this pilot study was small, the findings show that the professional development workshop significantly increased teachers’ awareness of culturally relevant pedagogy and their confidence in adapting resources to take account of local contexts:
After the workshop, 10/13 teachers felt more confident to adapt resources to be culturally relevant for their own contexts, and 8/13 felt more confident in adapting resources for others.
Before the workshop, 5/13 teachers strongly agreed that it was an important part of being a computing teacher to examine one’s own attitudes and beliefs about race, gender, disabilities, sexual orientation. After the workshop, the number in agreement rose to 12/13.
After the workshop, 13/13 strongly agreed that part of a computing teacher’s responsibility is to challenge teaching practices which maintain social inequities (compared to 7/13 previously).
Before the workshop, 4/13 teachers strongly agreed that it is important to allow student choice when designing computing activities; this increased to 9/13 after the workshop.
These quantitative shifts in perspective indicate a positive effect of the professional development pilot.
Katharine described that in our qualitative interviews with the participating teachers, they expressed feeling that their understanding of culturally relevant pedagogy had increased and they recognized the many benefits to learners of the approach. They valued the opportunity to discuss their contexts and to adapt materials they currently used with other teachers, because it made it a more ‘authentic’ and practical professional development experience.
The seminar ended with breakout sessions inviting viewers to consider possible adaptations that could be made to the graphics activities which had been the focus of the workshop.
In the breakout sessions, attendees also discussed specific examples of culturally relevant teaching practices that had been successful in their own classrooms, and they considered how schools and computing educational initiatives could support teachers in their efforts to integrate culturally relevant pedagogy into their practice. Some attendees observed that it was not always possible to change schemes of work without a ‘whole-school’ approach, senior leadership team support, and commitment to a research-based professional development programme.
Where do you see opportunities for your teaching?
The seminar reminds us that the education system is not culture neutral and that teachers generally transmit the dominant culture (which may be very different from their students’) in their settings (Vrieler et al, 2022). Culturally relevant pedagogy is an attempt to address the inequities and biases that exist, which result in many students feeling marginalised, disenfranchised, or underachieving. It urges us to incorporate learners’ cultures and experiences in our endeavours to create a more inclusive computing curriculum; to adopt an intersectional lens so that all can thrive.
As a pilot study, the workshop was offered to a small cohort of 13, yet the findings show that the intervention significantly increased participants’ awareness of culturally relevant pedagogy and their confidence in adapting resources to take account of local contexts.
Of course there are many ways in which teachers already adapt resources to make them interesting and accessible to their pupils. Further examples of the sort of adaptations you might make using these areas of opportunity include:
AO1: You could find out to what extent learners feel like they ‘belong’ or are included in a particular computing-related career. This is sure to yield valuable insights into learners’ knowledge and/or preconceptions of computing-related careers.
AO3: You could introduce topics such as the ethics of AI, data bias, investigations of accessibility and user interface design.
AO4: You might change the context of a unit of work on the use of conditional statements in programming, from creating a quiz about ‘Vikings’ to focus on, for example, aspects of youth culture which are more engaging to some learners such as football or computer games, or to focus on religious celebrations, which may be more meaningful to others.
AO5: You could experiment with a particular pedagogical approach to maximise the accessibility of a unit of work. For example, you could structure a programming unit by using the PRIMM model, or follow the Universal Design for Learning framework to differentiate for diversity.
AO6/7: You could offer more open-ended and collaborative activities once in a while, to promote engagement and to allow learners to express themselves autonomously.
AO8: By allowing learners to choose topics which are relevant or familiar to their individual contexts and identities, you can increase their feeling of agency.
AO9: You could review both your learning materials and your classroom to ensure that all your students are fully represented.
AO10: You can bring colleagues on board too; the whole enterprise of embedding culturally relevant pedagogy will be more successful when school- as well as department-level policies are reviewed and prioritised.
Can you see an opportunity for integrating culturally relevant pedagogy in your classroom? We would love to hear about examples of culturally relevant teaching practices that you have found successful. Let us know your thoughts or questions in the comments below.
To get a practical overview of culturally relevant pedagogy, read our 2-page Quick Read on the topic and download the guidelines we created with a group of teachers and academic specialists.
Tomorrow we’ll be sharing a blog about how the learners who engaged with the culturally adapted units found the experience, and how it affected their views of computing. Follow us on social media to not miss it!
Join our upcoming seminars live
On 12 December we’ll host the last seminar session in our series on primary (K-5) computing. Anaclara Gerosa will share her work on how to design and structure early computing activities that promote and scaffold students’ conceptual understanding. As always, the seminar is free and takes place online at 17:00–18:30 GMT / 12:00–13:30 ET / 9:00–10:30 PT / 18:00–19:30 CET. Sign up and we’ll send you the link to join on the day.
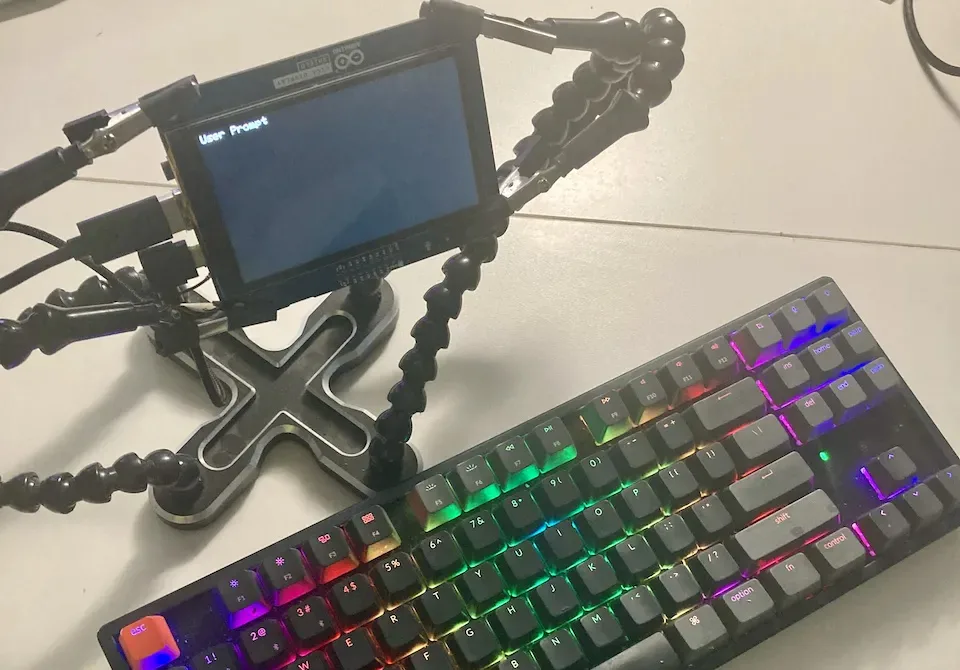
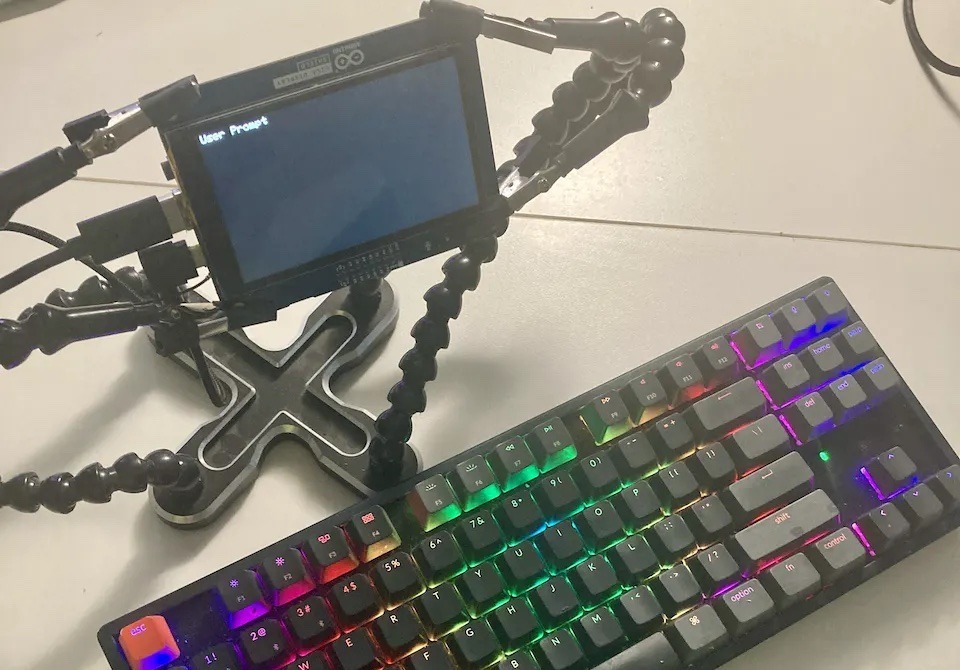
ChatGPT is certainly the best-known large language model (LLM) available today and it has a lot to offer. But you can’t run it locally and instead you must use OpenAI’s online service to access its functionality. That doesn’t, however, mean that you’re out of luck if you want to use ChatGPT on your own DIY devices. As Shakhizat Nurgaliyev shows, you can build your own ChatGPT client powered by Arduino.
Because ChatGPT isn’t available offline, the ArduinoGPT project takes advantage of OpenAI’s API. That lets you access ChatGPT through your sketches if your development board has a network adapter. In this case, Nurgaliyev used an Arduino GIGA R1 WiFi. That can reach the OpenAI API through a wireless network in order to send prompts to ChatGPT and receive responses.
The Arduino GIGA R1 WiFi is also ideal because it possesses a very unique feature: a USB-A port and the ability to act as a USB host. That lets the user connect a standard USB keyboard and type prompts without any other hardware.
Nurgaliyev paired that board with a new Arduino GIGA Display Shield, which provides 3.97″ of LCD touchscreen at a resolution of 480×800. That includes additional hardware, like a microphone and inertial measurement unit (IMU), but they aren’t necessary for this project.
The ArduinoGPT sketch connects to the user’s Wi-Fi network, then lets the user type in a prompt. It sends that prompt to ChatGPT through the OpenAI API and waits for a response. The user can choose to receive the entire response as a single block of text, or as a stream of several blocks sent as ChatGPT generates them.
There is an old joke response in the programming industry for whenever you’re caught slacking off: “I’m waiting for the code to compile.” That still holds up, because even today’s blazing fast computers can take ages to compile. That’s true even when the compiler can run tasks across multiple CPU cores. To find out if that is as efficient as it could be, Lex built this analog gauge array that displays the utilization of each core.
Lex created this for their own computer, which has a 12-core CPU. There is one gauge for each of those cores, plus an additional gauge for swap memory and another for RAM. The same basic idea could apply to computers that have CPUs with fewer cores — the device would just need a number of gauges equal to the number of CPU cores, plus two.
The device contains an Arduino Mega 2560 board and it receives utilization data through serial from a PC running a custom Rust program. That program uses some resources, but it is trivial compared to everything else. The Arduino employs pulse-width modulation (PWM) to control the positions of the gauge needles. There is also a strip of WS2812B individually addressable RGB LEDs illuminating the gauges, with the colors corresponding to utilization. So high utilization will move a gauge’s needle to the right and cause it to light up red.
This gives Lex a quick and easy way to visualize how their computer distributes tasks across the CPU cores. That is interesting when compiling code, but it is also useful for other jobs that attempt to parallelize tasks.
We partner with organisations around the world to bring coding activities to young people in their regions through Code Club and CoderDojo. Currently involving 54 organisations in 43 countries, this Global Clubs Partner network shares our passion for educating kids to create with technology.
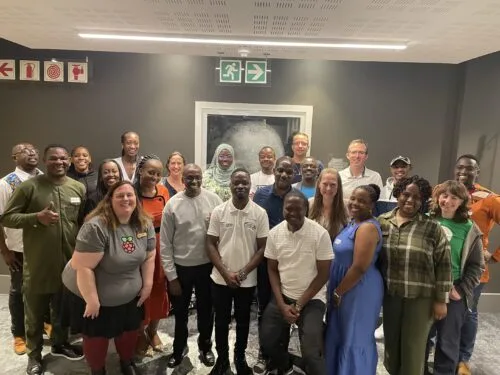
We work to connect our Global Clubs Partners to foster a sense of community and encourage collaboration. As part of this, we run in-person meetups to allow our partners to get to know each other better, and to help us understand how we can best support them, and what we can learn from them. Previously held in Penang, Malaysia, and Almere, the Netherlands, our latest meetup took place in Cape Town, South Africa.
Connecting through stories and experiences
Although we’ve seen some surprising points of commonality among all Global Clubs Partners, we also know that our partners find it helpful to connect with organisations based in their region. For the Cape Town meetup, we invited partner organisations from across Africa, hoping to bring together as many people as possible.
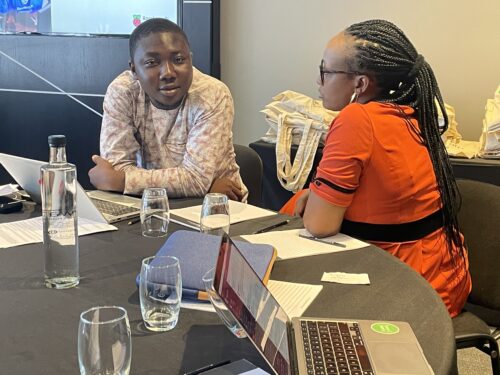
Our aim was to give our partners the opportunity to share their work and identify and discuss common questions and issues. We also wanted to mitigate some of the challenges of working internationally, such as time constraints, time zones, and internet connectivity, so that everyone could focus on connecting with each other.
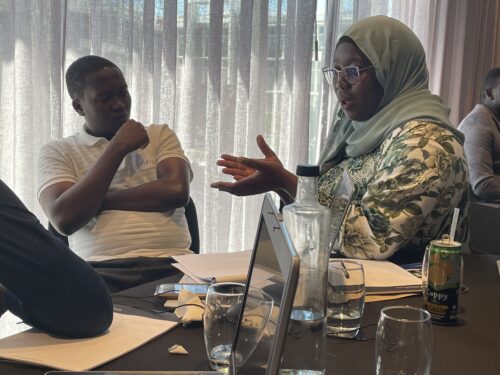
The meetup agenda included time for each Global Clubs Partner organisation to present their work and future plans, as well as time for discussions on growing and sustaining club volunteer and mentor communities, strategy for 2024, and sharing resources.
“If the only thing rural communities have is problems, why are people still living there? … Rural communities have gifts, have skills, they have history that is wasting away right now; nobody is capturing it. They have wisdom and assets.”
Damilola Fasoranti from Prikkle Academy, Nigeria, talking about not making assumptions about rural communities and how this shapes the work his organisation does
A group dinner after the meetup enabled more informal networking. The next day, everyone had the chance to get inspired at Coolest Projects South Africa, a regional Coolest Projects event for young tech creators organised by partner organisation Coder LevelUp.
The meetup gave the Global Clubs Partners time to talk to each other about their work and experiences and understand one another better. It was also very beneficial for our team: we learned more about how we can best support partners to work in their communities, whether through new resources, information about funding applications, or best practice in overcoming challenges.
Building bridges
After attending a previous meetup, two of our partner organisations had decided to create an agreement for future partnership. We were delighted to learn about this collaboration, and to witness the signing of the agreement at this meetup.
By continuing to bring our partner network together, we hope to foster more cross-organisation partnerships like this around the world that will strengthen the global movement for democratising computing education.
Could your organisation become a Global Clubs Partner?
You can find out how your organisation could join our Global Clubs Partner network on the CoderDojo and Code Club websites, or contact us directly with your questions or ideas about a partnership.
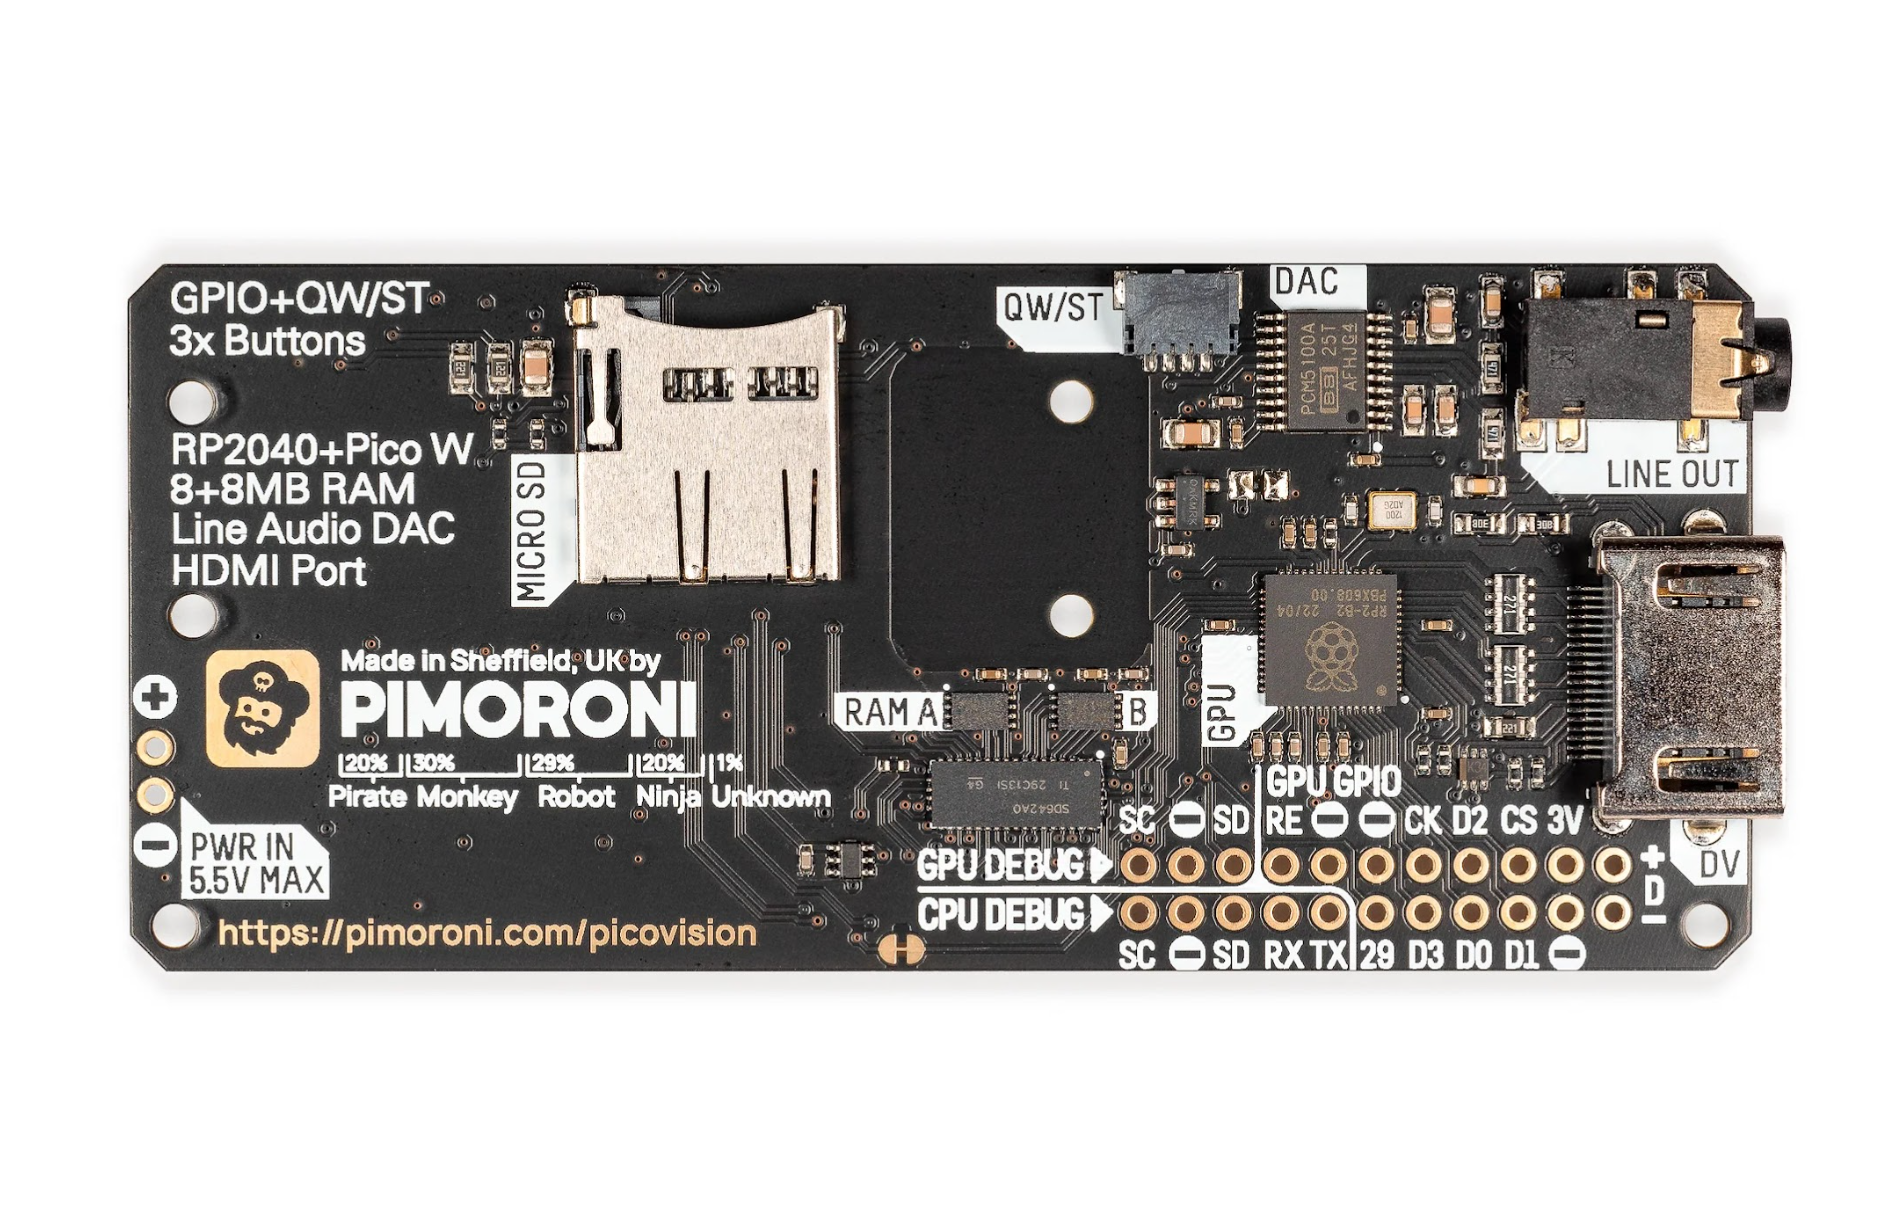
Power is connected using Pico W’s micro USB port – as usual, you can hook this up to a computer for programming in MicroPython or C/C++, or flashing Pico W with new firmware.
Alternatively, PicoVision can be powered via two unpopulated pins. There’s also a breakout header for CPU and GPU debugging, plus a few other GPIO pins. A single Qwiic/STEMMA QT port can be used to connect I2C breakouts or sensors.
On the front of the board are three user buttons, an activity LED, and a handy reset button. At the rear is the bonus of a microSD card slot to provide extra storage for assets such as graphics.
Instant menu
Getting started is as easy as connecting PicoVision to an HDMI monitor or TV and powering it up. It comes pre-flashed with MicroPython firmware that auto-runs a menu of example programs. The A and X user buttons are used to move up and down through the menu options; and a press of the Y button will select one.
Among the example programs are a fun Flappy Bird-style game, magic mirror dashboard, and Teletext-style headlines – the last two require connection to a Wi-Fi network. Several graphical demos showcase PicoVision’s capabilities. These include a classic 3D starfield effect (remember Windows 3.1’s screensaver?), a screen modes menu with numerous resolutions (some require GPU overclocking), and a parallax scrolling animation that makes use of PicoVision’s scroll modes – up to seven groups of scanlines can be scrolled separately.
Up to 80 sprites can be shown on screen simultaneously (or 32 with the special widescreen version of the firmware), with up to ten per any single scanline.
Start coding
When it comes to programming PicoVision yourself, a comprehensive GitHub repo provides lots of useful info, along with MicroPython and C/C++ libraries and code examples from which to learn. The most basic are Hello World programs to print text to the screen. Graphics are handled using Pimoroni’s standard PicoGraphics module, while a PicoSynth sound module is used to play simple tunes and noises using I2S audio from the board’s DAC chip.
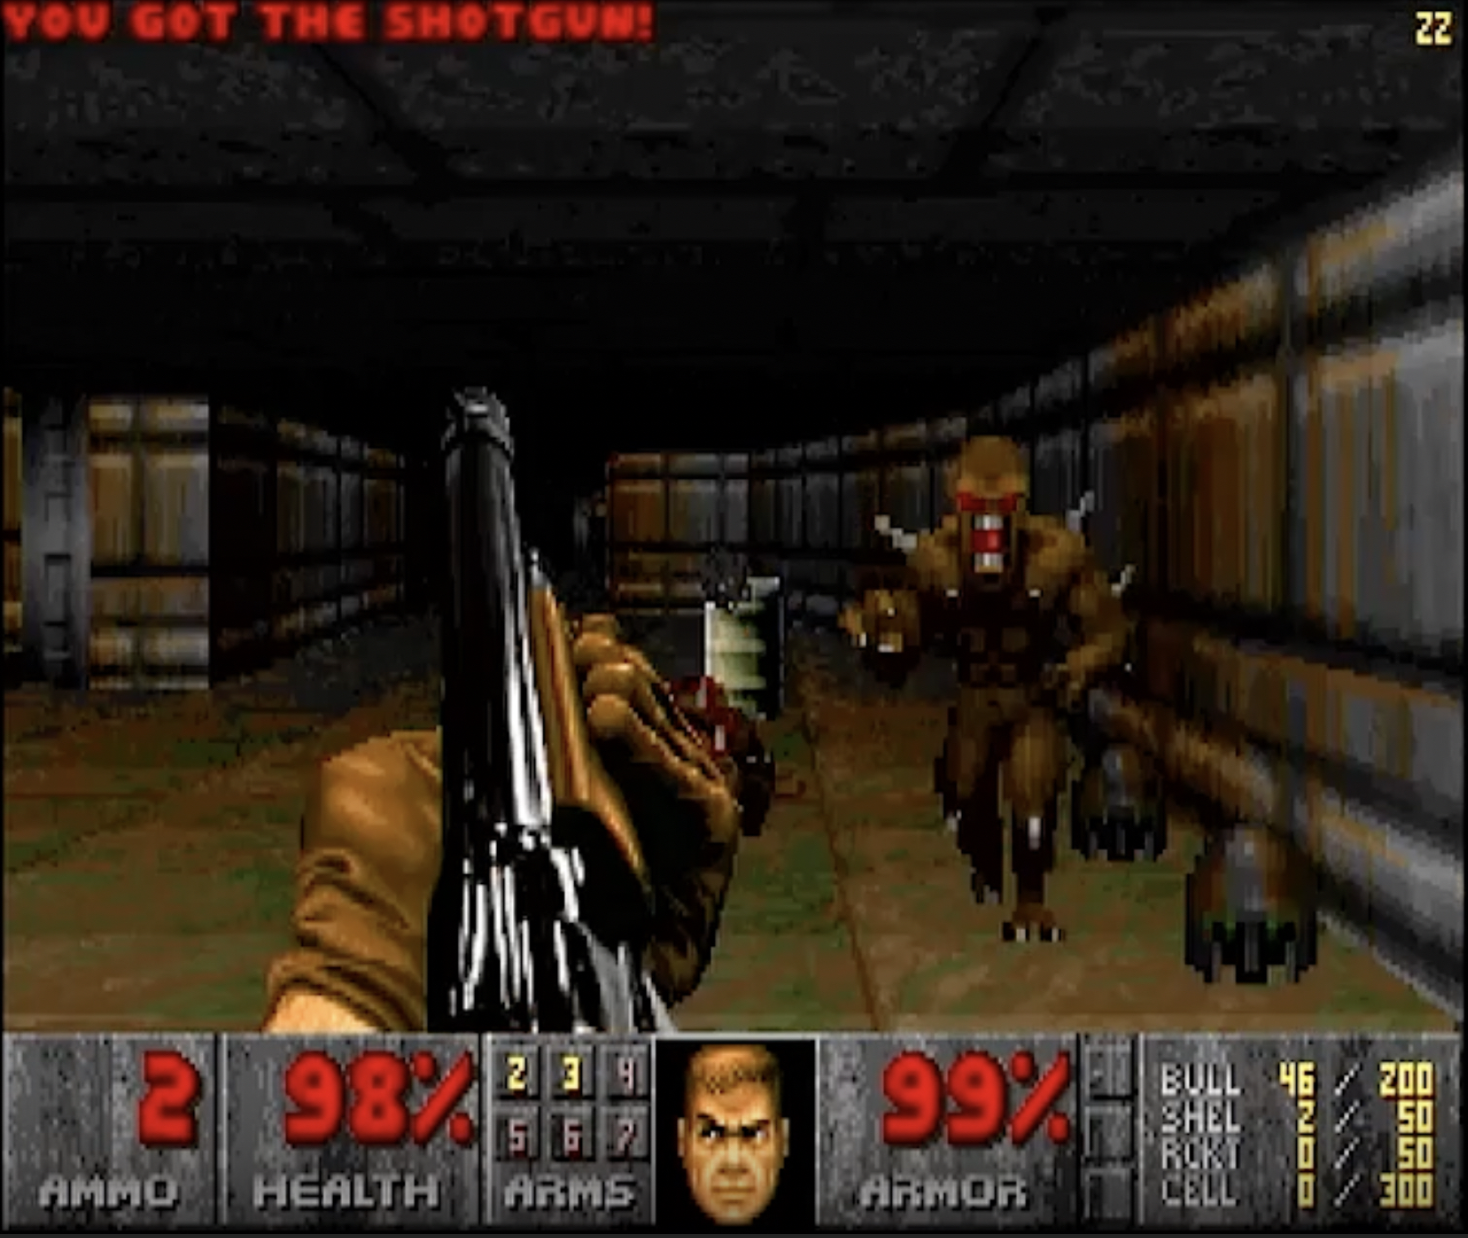
You’ll also want to try playing classic Doom on PicoVision – which works really well. Just flash the Doom firmware UF2 to PicoVision and add the game’s WHX file to a microSD card. For control, you’ll need to connect a USB keyboard via a splitter cable (as supplied in the optional accessory kit).
Verdict
9/10
With a second RP2040 and extra RAM to boost Pico W’s capabilities, PicoVision offers plenty of possibilities for retro gaming and coding projects.
Specs
Features: Pico W, separate RP2040 (GPU), 2 × 8MB PSRAM, PCM5100A DAC for audio, 3 × user buttons, status LED, reset button, microSD card slot
Connections: HDMI video out, 3.5mm audio line out, breakout header, Qw/ST port, micro USB (on Pico W)
There are almost endless variations of clocks for sale on the internet today, but it is still easy to end up in a situation where you can’t quite find a model with the style and features you want. Marco Zonca ended up with that problem while searching for a new clock to put in his music studio. Nothing on the market fit the bill, so he built this minimalist network-updated digital clock.
Zonca wanted a simple design, the ability to adjust brightness, and NTP (Network Time Protocol) updates. There are clocks available with those features, but nothing in the style Zonca wanted. So he created the perfect clock for himself. It displays 24-hour time across a red LED matrix, lets the user control settings like brightness via Bluetooth® Low Energy communication, and always stays in sync with network time.
An Arduino Nano ESP32 board, programmed through Arduino Web Editor, controls all of those functions. It mounts onto a custom PCB that Zonca designed for this clock. The PCB also hosts an 8×32 LED matrix display with MAX7219 driver. Three buttons on the PCB let the user select modes. The PCB fits into a black 3D-printed enclosure that reflects the overall minimalist style.
Now Zonca has the perfect clock for his music studio. If you like the look of it, the sketch, PCB files, and 3D enclosure are all available on Hackster.io.
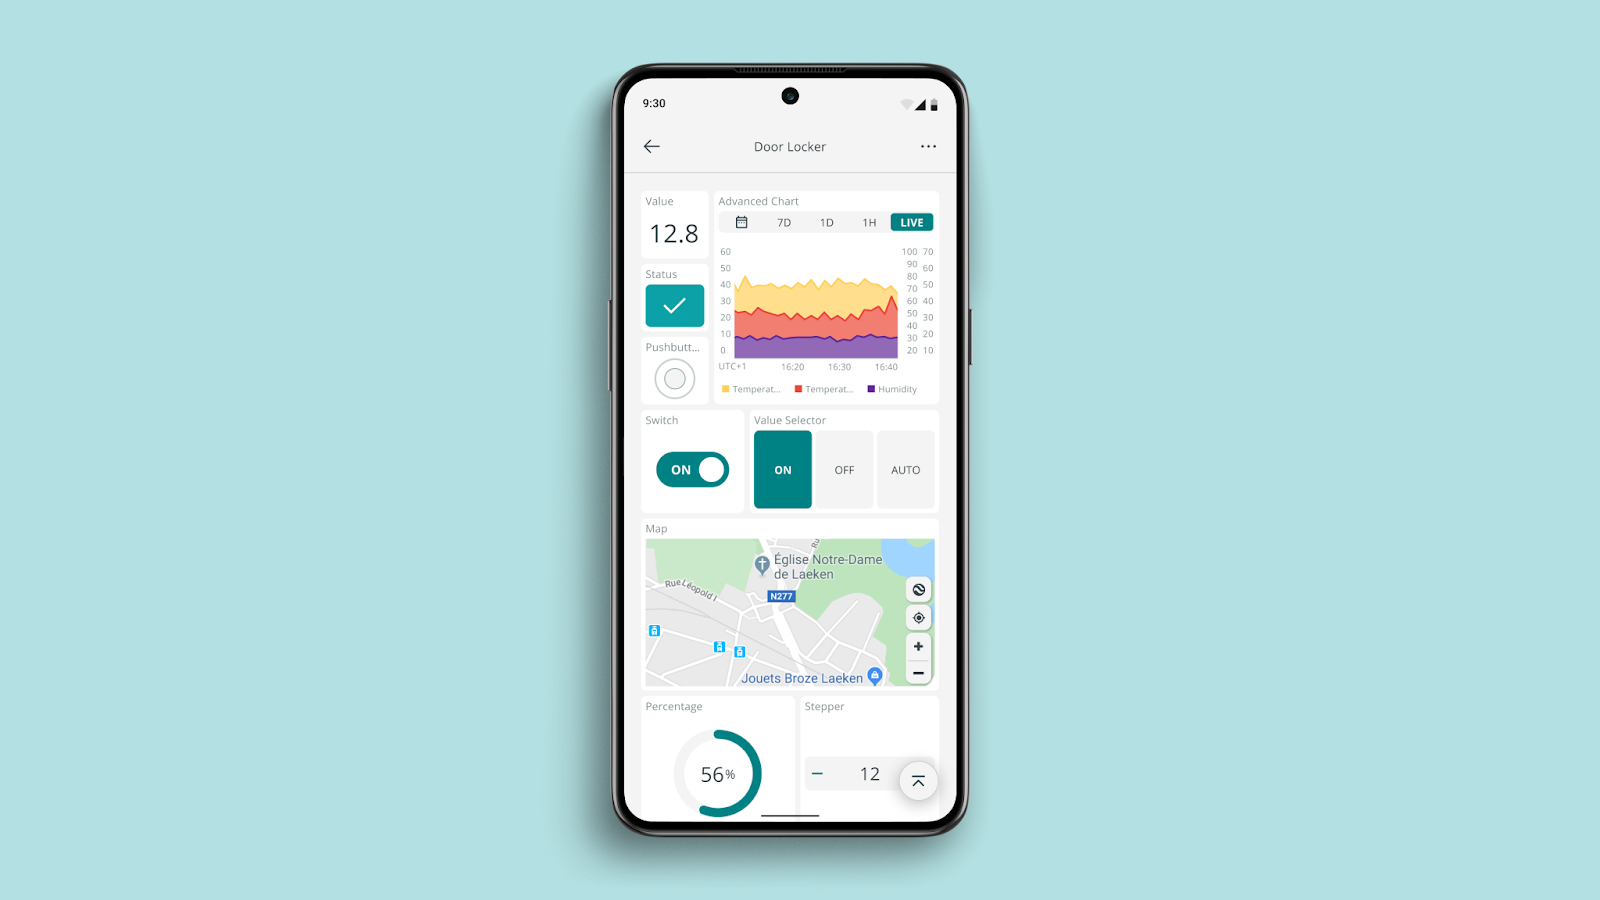
Welcome to the next chapter of our ‘Better, with You’ journey! Now it is time to present the latest updates to the IoT Remote app. These new features are all about making your time with your IoT projects smoother, more fun, and right at your fingertips. Let’s dive in!
If you haven’t caught up on our journey so far, make sure to check out our first blog post of the series, where we reveal a brand new UI on the Arduino Cloud.
Push notifications for real-time alerts
As your list of projects grows and time becomes a rare commodity, checking the status of all your projects on a regular basis is nearly impossible. That’s why having a heads-up for anything significant happening in your deployments is an absolute game-changer. A few months ago, we introduced Triggers and Notifications, a feature that allows you to configure conditions in the Arduino Cloud that trigger email notifications.
Now, with the new IoT Remote app version, you can customize and receive alerts directly on your mobile device. Because we know how life can sometimes get crazy and convenient it is to get notified directly on your phone.
Remember, to unlock this feature, you’ll need the Maker plan ($5.99/month). Make sure you upgrade your plan to use it.
How to use the notifications in your phone
The process is quite straightforward:
Configure your Triggers and Notifications in the Arduino Cloud
Enable notifications in the IoT Remote app
Configure your Triggers and Notifications in the Arduino Cloud
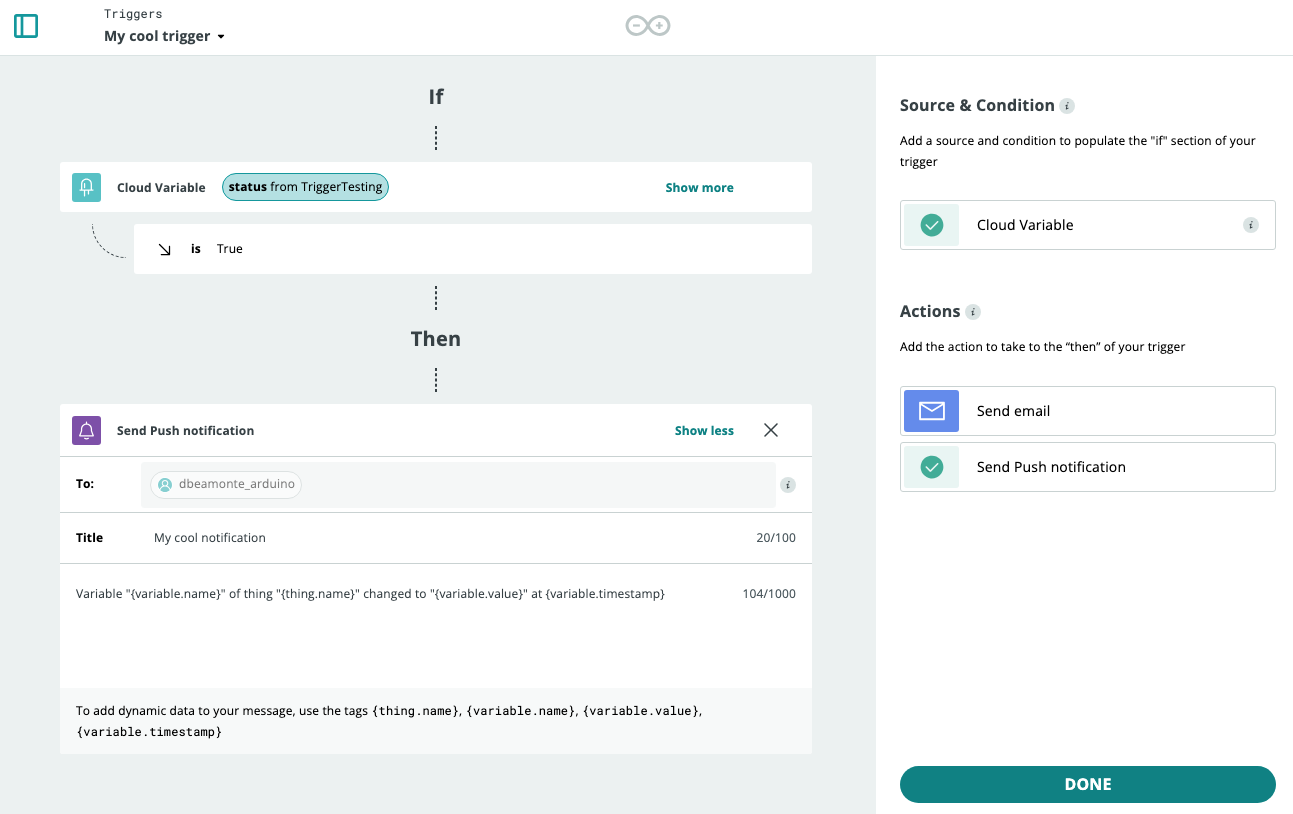
Click on CREATE TRIGGER to start the creation of the Trigger.
Configure your condition selecting your variable.
Configure your desired action: In this case select “Send Push Notification.” Note that you can additionally configure email notifications as well for the same trigger.
Define the fields of your notification: Title and Body.
Triggers set up process in Arduino Cloud
And that’s it. You are ready to configure notifications on your mobile phone.
Enable notifications on the mobile phone
When you open the app with the new version for the first time, you are prompted to allow the app to send you notifications. If you accept, you are ready to go and you will receive instant alerts.
You can change your settings at any time in the “Manage push notifications” menu to enable or disable the notifications behavior.
Learn more about the full configuration process in the documentation article.
Improved app UI
Activity monitor
Explore the history of your project’s alerts with the Activity tab. It is the ideal companion to push notifications, providing you with a comprehensive overview of your notifications activity.
Activity tab in the Arduino IoT remote app
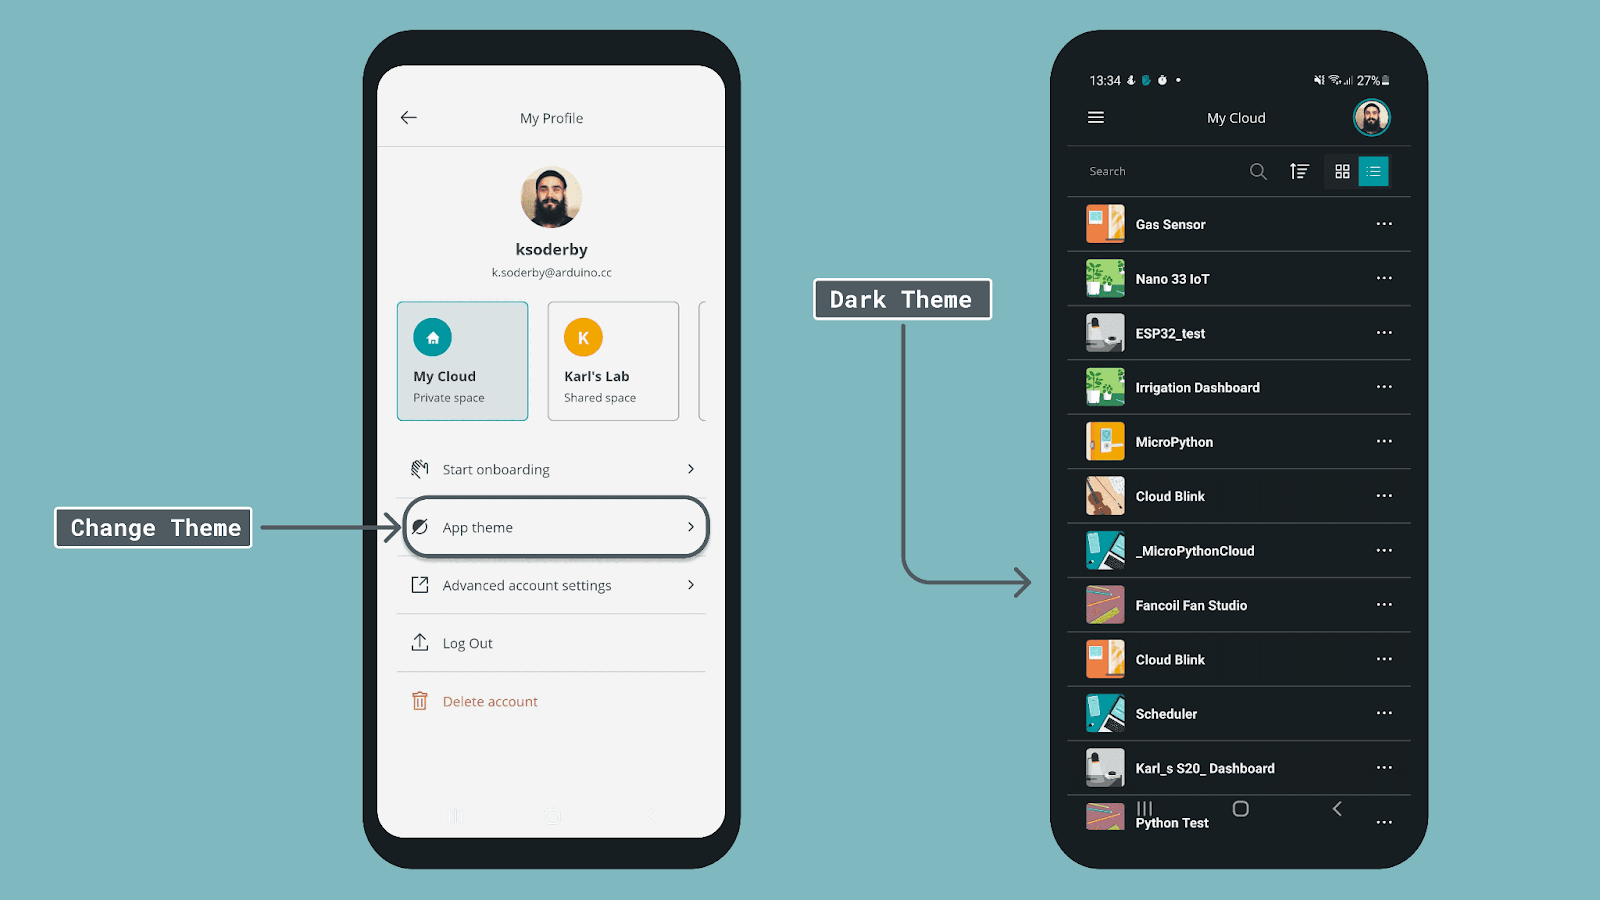
Dark mode
Finally, the long-awaited Dark Mode is here! You can now experience a more comfortable and elegant interface by simply enabling Dark Mode in the IoT Remote app. For a quick guide, refer to the documentation article.
Change theme (light/dark)
New bottom navigation bar
The new bottom tab bar enhances your user experience simplifying the app navigation. This update is part of the major UX improvements implemented on the Cloud. You can seamlessly switch between sections and enjoy a more intuitive journey within the app.
New UI with enhanced navigation bar in the Arduino IoT Remote app
Redesigned widgets
Widgets have been redesigned to provide a clearer and refined data visualization. These improvements are also part of the major UX enhancements implemented on the Cloud.
Enhanced widgets in the Arduino IoT Remote app
Devices list
We understand the importance of simplifying device monitoring. Check the status of your devices and their associated things directly from the IoT Remote app. It’s about bringing convenience to your fingertips, contributing to better IoT project management.
What is Arduino Cloud?
In case you’re new to this whole concept of the Arduino Cloud, we didn’t want to miss the opportunity to remind you of it here. The Arduino Cloud is the next exciting journey for IoT enthusiasts to bring their projects to life quickly. It is an all-in-one intuitive IoT platform, supporting a wide range of hardware and backed by the vibrant Arduino community. The Arduino Cloud removes complexity to empower users from all levels of expertise to create from anywhere, and control and share their projects with amazing dashboards that can be accessible with the IoT Remote app.
The following video provides a comprehensive quick tour of the new UI.
Ready to try alerts in your phone and explore the new look and feel? Learn more about the new IoT Remote app features, download the IoT Remote app (available for Android and iOS), and create a new account to get started with the Arduino Cloud.
And stay tuned for more news. We are creating a better cloud, with you!
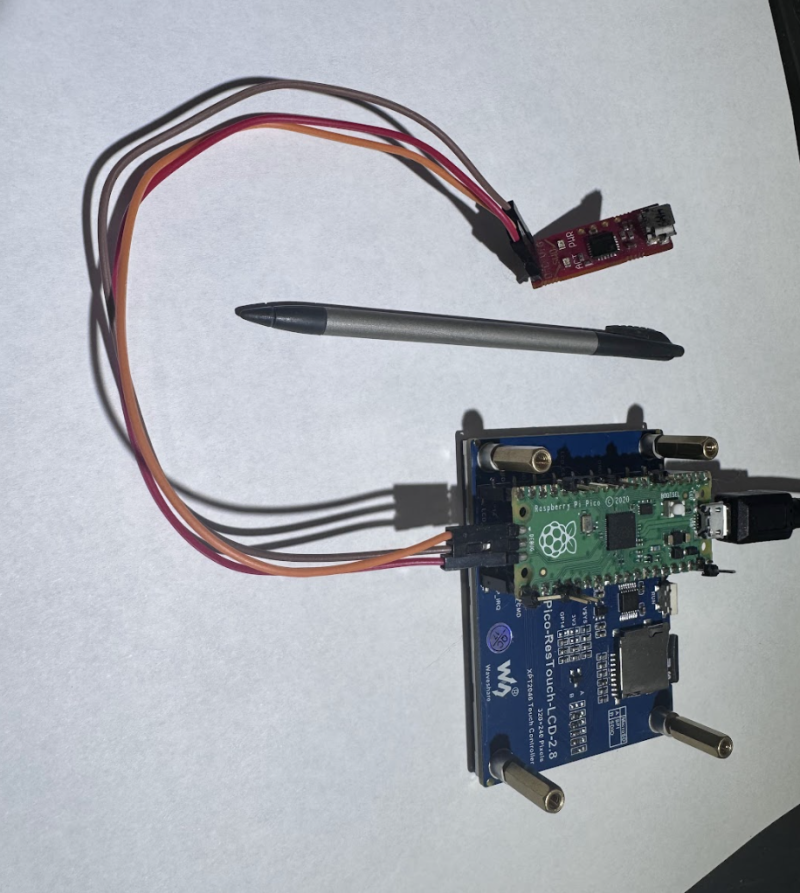
With an ongoing fascination with PalmOS – “it was the first mobile OS with any sort of success and it gave the world the term ‘smartphone” – Dmitry says he wanted to see if he could put the operating system on another device with minimal changes. He looked into emulating the hardware with success (check it out here). “But that was cheating,” he continues. “The goal was to port it to new hardware, which is usually hard without source code, but I figured I’d try.
“I knew that, in theory, most of the drivers were contained in the Device Abstraction Layer (DAL) module, with a few others being separate (SD card, serial port, DMA). I figured that if I managed to replace those modules with some I wrote myself, that the OS should, again in theory, run on any ARM device with a compatible processor – any processor supporting ARMv4T or ARMv5T architecture.” This tech adventure spanned multiple years, but the effort has certainly been worthwhile.
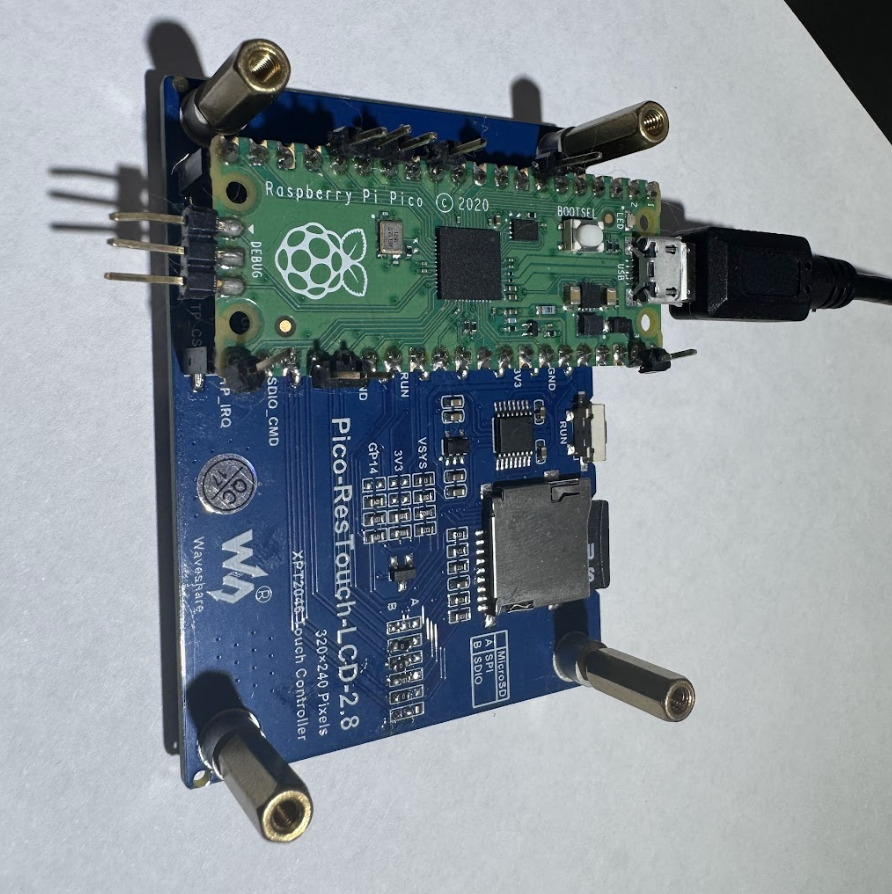
“It culminated in the release of the source earlier this year, and now one can bring up PalmOS even on processors that it never actually supported, like tiny Cortex-M0 cores,” Dmitry continues. Having tried numerous other boards from STMicroelectronics’ STM32F429 to the STM32H7, RP2040 showed the most promise. “I had never encountered a Cortex-M0 microcontroller that had enough RAM for PalmOS,” he says. “RP2040 does – barely – so I wanted to try.”
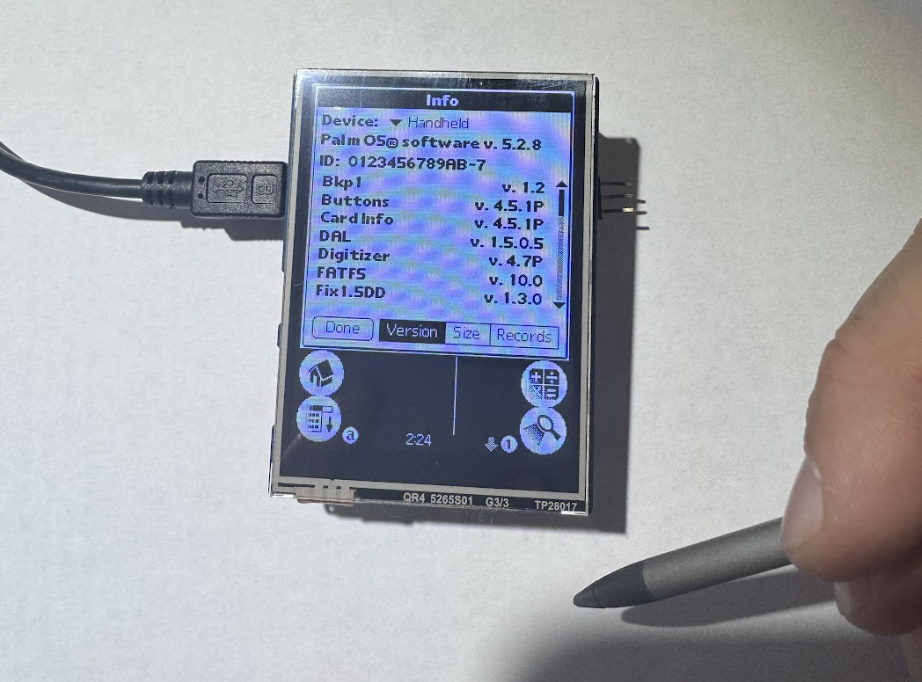
Screen time
The idea was to get PalmOS 5 running on a Raspberry Pi Pico or other RP2040-based development board and connect the device to a suitable touchscreen. Dmitry says the only one that fit his requirements was a low-cost $15.99, 2.8-inch touchscreen display from Waveshare offering a resolution of 320 × 240px.
“It is a resolution that PalmOS supports well and really this is about the applications – the OS itself does not care about screen resolution,” he says. “Applications work best at resolutions that are integer multiples of 160 × 160, and extra space can be used for the dynamic input area. A 320 × 240 resolution is not super common but is supported relatively well.”
Dmitry says it helped that the screen was easy to purchase. “It is a pet peeve of mine when people publish a project and their parts list includes ‘that one thing I bought at a garage sale once’ or ‘an old tube my grandpa left me in his will’,” he explains. But it was also important to have a resistive touchscreen.
“Devices today are designed for capacitive touch, hence the large touch targets,” he says. “PalmOS predates cheap capacitive touch so it is designed for resistive touch screens which needed quite a bit of pressure to work, hence the fact that styluses had a fine tip. The fine tip also allowed the thing being tapped to be seen, while fingers are relatively large and obscure what you tap.”
Ramming in RAM
The more Dmitry used RP2040, the more he realised it was a good fit for the project. “First, the PIO system is very versatile, allowing me to pretend to be a RAM and a ROM to the host 68k processor (in the case of PalmCard) while also driving my display with no CPU cycles needed. No other micro out there has anything quite like it,” he says.
“Second, the performance is good. Cortex-M0 may not be a very performant core per-cycles, but the fact that I can easily run it at 200MHz+ surely papers over a lot of that! Third, the documentation does not suck, and this cannot be overstated. Whoever wrote the RP2040 docs needs a medal, a bonus or a hug because it is clear and accurate.” [That would be Alasdair Allan – Ed].
But that’s not to say Pico is perfect. “There is barely enough RAM to turn around in, so it’s not a practical PalmOS device,” he laments. “PalmOS 5 needs at least 64KB of RAM for the storage heap where the databases are stored and at least 128KB of dynamic heap, where temporary allocations come from, to boot.
“My kernel and DAL need about 30KB for itself and we also need to fit at least one full frame buffer [screen image] into the RAM. At 320 × 240 × 2 bits per pixel, the framebuffer is almost 19KB. Adding that up gives us 241KB. Now, RP2040 has 256KB of RAM – the other pieces are not easily usable for various reasons. This is tight, but it fits. That 30KB was after a lot of extra work I put in to shrink that footprint. Initially, it was closer to 100KB.”
Looking ahead
This all means PalmOS 5 just about barely fits on Raspberry Pi Pico and, once it boots, only basic programs run with a few KB of RAM left over for a memo pad note or two. There’s not enough RAM to load a game, and Dmitry would love an RP2040 with more RAM. “It would work better,” he says.
Still, rePalm is a huge feat that deserves a lot of applause. Hours and hours of disassembly went into its creation and using it shows how well created PalmOS was. “The rules were simple: any common activity should be no more than two device interactions away,” Dmitry says. “People who want a modern PalmOS device don’t seek to replace their phone. They seek to escape the constant advertisements and distractions.”
With rePalm, he is showing once more what is possible. “Current plans include making a PalmOS-based smartwatch as well as a new PalmOS-based device,” he adds.
Why? “Just because.”
Einwilligung verwalten
Um dir ein optimales Erlebnis zu bieten, verwenden wir Technologien wie Cookies, um Geräteinformationen zu speichern und/oder darauf zuzugreifen. Wenn du diesen Technologien zustimmst, können wir Daten wie das Surfverhalten oder eindeutige IDs auf dieser Website verarbeiten. Wenn du deine Einwillligung nicht erteilst oder zurückziehst, können bestimmte Merkmale und Funktionen beeinträchtigt werden.
Funktional
Immer aktiv
Die technische Speicherung oder der Zugang ist unbedingt erforderlich für den rechtmäßigen Zweck, die Nutzung eines bestimmten Dienstes zu ermöglichen, der vom Teilnehmer oder Nutzer ausdrücklich gewünscht wird, oder für den alleinigen Zweck, die Übertragung einer Nachricht über ein elektronisches Kommunikationsnetz durchzuführen.
Vorlieben
Die technische Speicherung oder der Zugriff ist für den rechtmäßigen Zweck der Speicherung von Präferenzen erforderlich, die nicht vom Abonnenten oder Benutzer angefordert wurden.
Statistiken
Die technische Speicherung oder der Zugriff, der ausschließlich zu statistischen Zwecken erfolgt.Die technische Speicherung oder der Zugriff, der ausschließlich zu anonymen statistischen Zwecken verwendet wird. Ohne eine Vorladung, die freiwillige Zustimmung deines Internetdienstanbieters oder zusätzliche Aufzeichnungen von Dritten können die zu diesem Zweck gespeicherten oder abgerufenen Informationen allein in der Regel nicht dazu verwendet werden, dich zu identifizieren.
Marketing
Die technische Speicherung oder der Zugriff ist erforderlich, um Nutzerprofile zu erstellen, um Werbung zu versenden oder um den Nutzer auf einer Website oder über mehrere Websites hinweg zu ähnlichen Marketingzwecken zu verfolgen.