Kategorie: Linux
-

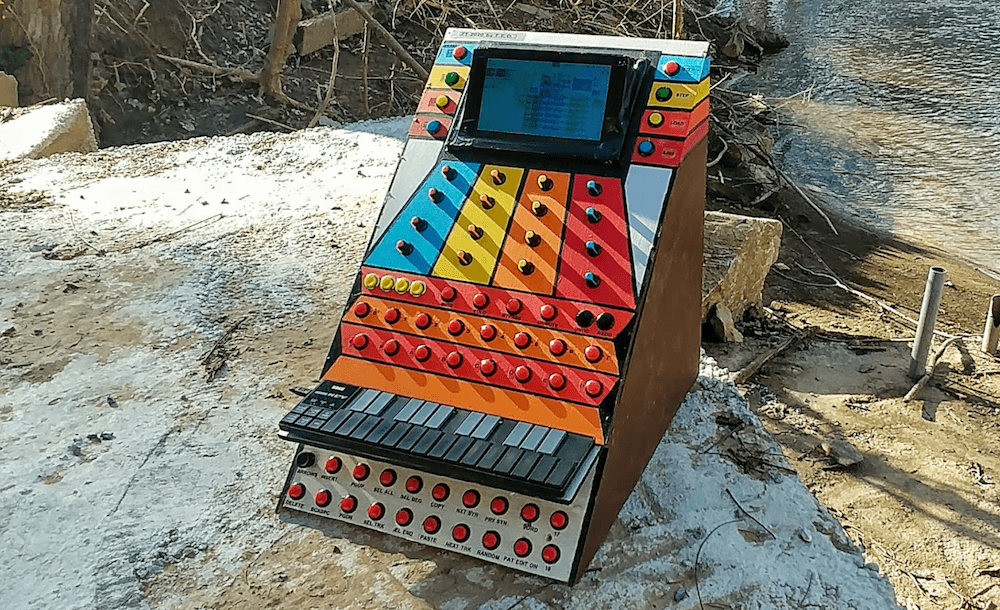
The ZT-2020 is a portable SunVox synth
Reading Time: < 1 minuteThe ZT-2020 is a portable SunVox synth Arduino Team — February 11th, 2020 SunVox synth software allows you to create electronic music on a wide variety of platforms. Now, with his ZT-2020 project — which resembles a miniature arcade game — YouTuber “fascinating earthbound objects” has a dedicated input scheme. This…
-

USA magazine subscriptions offer: 48% off standard prices
Reading Time: 2 minutesToday we’re launching a time-limited special offer on subscriptions to HackSpace magazine and The MagPi magazine for readers in the USA, saving you a whopping 48% compared to standard overseas subscriptions. We want to help as many people as possible get their hands on our fantastic publications. Starting today, you can subscribe…
-

Raspberry Pi Recovery Kit project showcase
Reading Time: 3 minutesShould the world ever be plunged into an apocalypse, then Jay Doscher should do just fine. He’s created a rugged-looking laptop using a Raspberry Pi 4 computer and placed it within a small, air- and watertight Pelican case. Aimed at getting technology up and running in the event of a disaster, it…
-

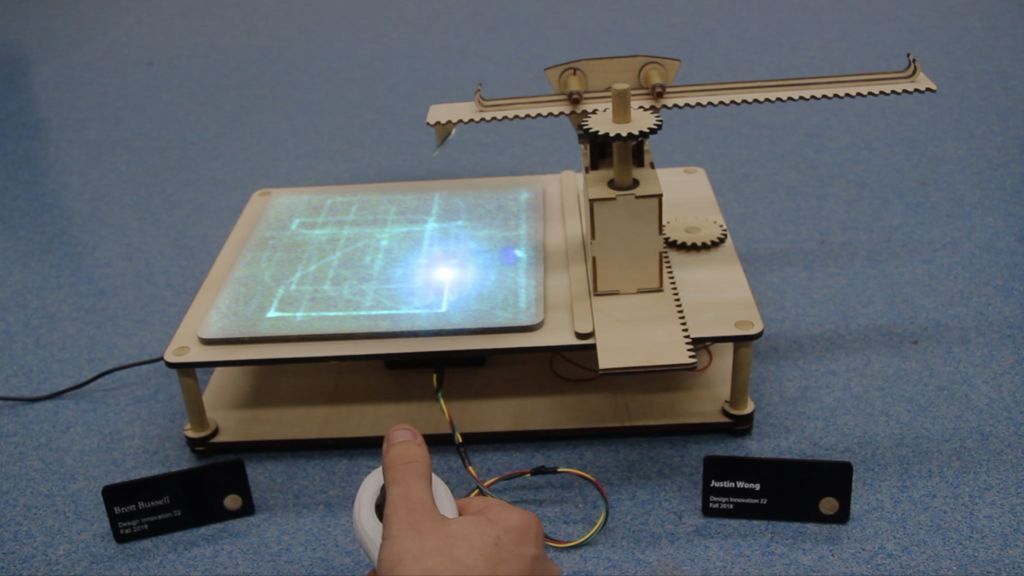
This joystick-controlled machine draws light trails using a laser
Reading Time: 2 minutesThis joystick-controlled machine draws light trails using a laser Arduino Team — February 10th, 2020 Lasers are awesome. Glow-in-the-dark surfaces are, too. As seen here, Justin and Brett were able to combine the two into an excellent drawing machine made from scrap materials and discarded wood. Their device uses a pair of…
-

3D printing infill patterns — what, why, and why not!
Reading Time: < 1 minuteHow many types of infill pattern have you tried? The latest video from Raspberry Pi Press takes a closer look at 3D printing infill patterns, and why you may want to use a certain pattern over another. 3D PRINTING INFILL PATTERNS – What, why, and why not! || HackSpace magazine There’s…
-

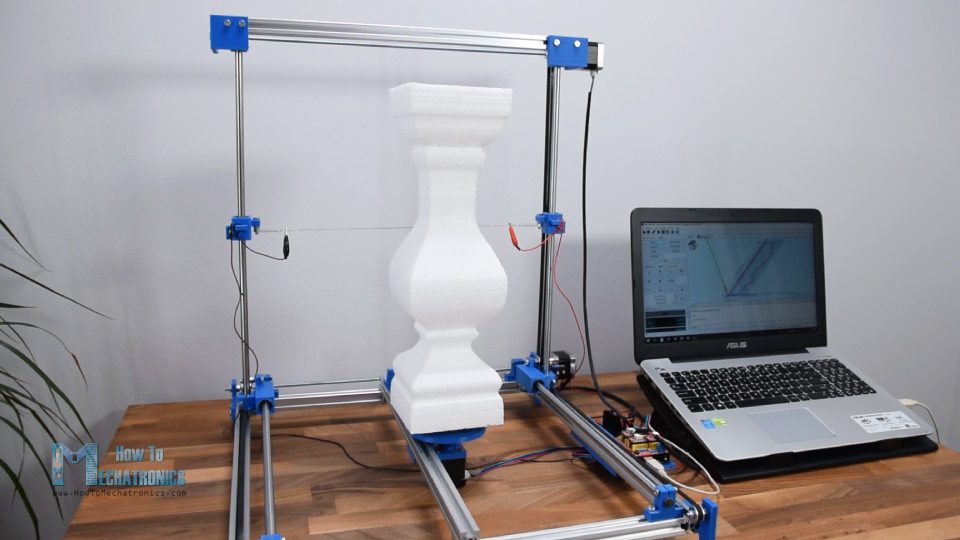
Carve 2.5D shapes out of foam with this Arduino-controlled hot wire cutter
Reading Time: 2 minutesCarve 2.5D shapes out of foam with this Arduino-controlled hot wire cutter Arduino Team — February 8th, 2020 You may have a 3D printer or other “digital” tools like a laser engraver or CNC router, but what if you want to work with Styrofoam? As How To Mechatronics demonstrates in his latest…
-

Save the date: Arduino Day 2020 is Saturday, March 21st!
Reading Time: 2 minutesSave the date: Arduino Day 2020 is Saturday, March 21st! Arduino Team — February 7th, 2020 It’s Arduino’s 15th birthday! We are inviting the whole community to join Arduino Day 2020 on Saturday, March 21st. Arduino Day is a 24-hour-long celebration around the globe, organized by the community for the community —…
-

Group test: Best Raspberry Pi 4 thermal cases tested and ranked
Reading Time: 9 minutesRaspberry Pi 4 – like all the other members of the ever-growing Raspberry Pi family – is entirely usable as is, and plenty of people appreciate the aesthetic of a bare board on a desk. For those who don’t, there are a wealth of cases – both first- and third-party – available.…
-

A new Raspbian update
Reading Time: 7 minutesThe last major release of Raspbian was the Buster version we launched alongside Raspberry Pi 4 last year. There was a minor release a couple of months later, which was mostly just bug-fixes for the first release (hence no blog post), but today’s release has a few changes that we thought it…
-

Cats and lasers and (Raspberry) Pi, OH MY!
Reading Time: 4 minutesKeeping a modern cat entertained requires something more high-tech than a ball of yarn. The MagPi’s Phil King wonders if this is a purr-fect project… WARNING! LASER EYE! Don’t look into a laser beam, and don’t point a laser beam at a somebody’s head. For more on things you SHOULDN’T do with…
-

Interview with Pi Jam Foundation community support lead Pranjali Pathak
Reading Time: 4 minutesLike a few educators in the Raspberry Pi and digital making community, Pranjali Pathak of The Pi Jam Foundation started out life as an engineer before becoming a teacher. She’s been a fellow for Teach for India, where she taught students from grade 3, and brought that experience to the Pi Jam…
-
How to use a servo motor with Raspberry Pi
Reading Time: 2 minutesLearn how to use a servo motor with Raspberry Pi in our latest How to use video on YouTube. HOW TO USE a servo motor with Raspberry Pi Subscribe to our YouTube channel: http://rpf.io/ytsub Help us reach a wider audience by translating our video content: http://rpf.io/yttranslate Buy a Raspberry Pi from one…
-

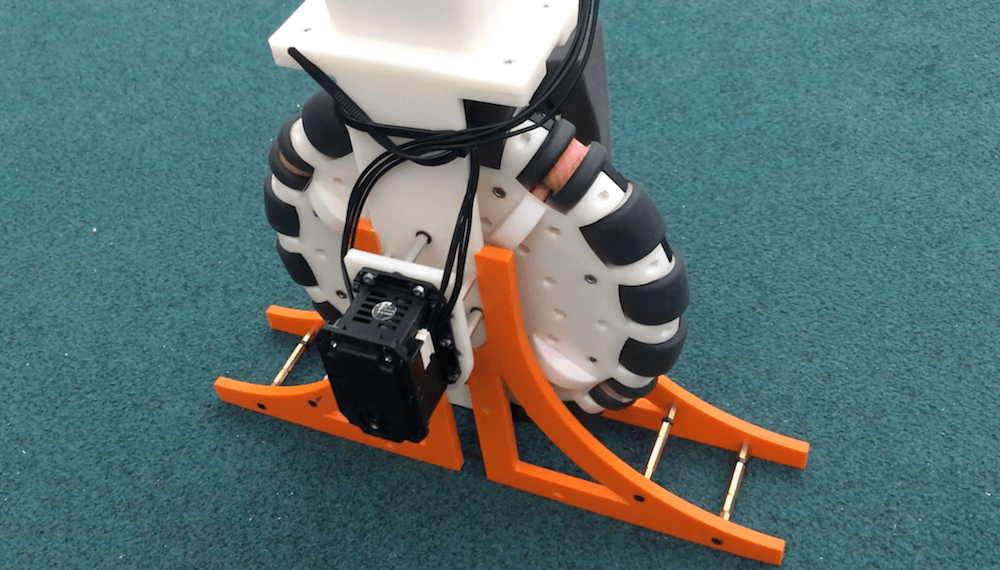
OmBURo is an Arduino-controlled unicycle robot with an active omnidirectional wheel
Reading Time: 2 minutesOmBURo is an Arduino-controlled unicycle robot with an active omnidirectional wheel Arduino Team — February 4th, 2020 Omni wheels normally contain a number of rollers arranged on their circumference, allowing them to slide left and right and perform various tricks when combined with others. The rollers on UCLA researchers Junjie Shen and Dennis…
-

Is upgrade culture out of date?
Reading Time: 8 minutesAt Raspberry Pi, we’re interested in all things to do with technology, from building new tools and helping people teach computing, to researching how young people learn to create with technology and thinking about the role tech plays in our lives and society. Today, I’m writing about our habit of replacing devices…
-

How to overclock Raspberry Pi 4
Reading Time: 6 minutesYou’ll need Warning! Crash likely! Experimenting to find the highest stable overclock involves crashing Raspberry Pi 4. There is a chance of corrupting the microSD card. Experiment with a clean Raspbian installation and ensure no important data is at risk. Getting started Although 1.5GHz is its maximum speed, Raspberry Pi typically idles…
-

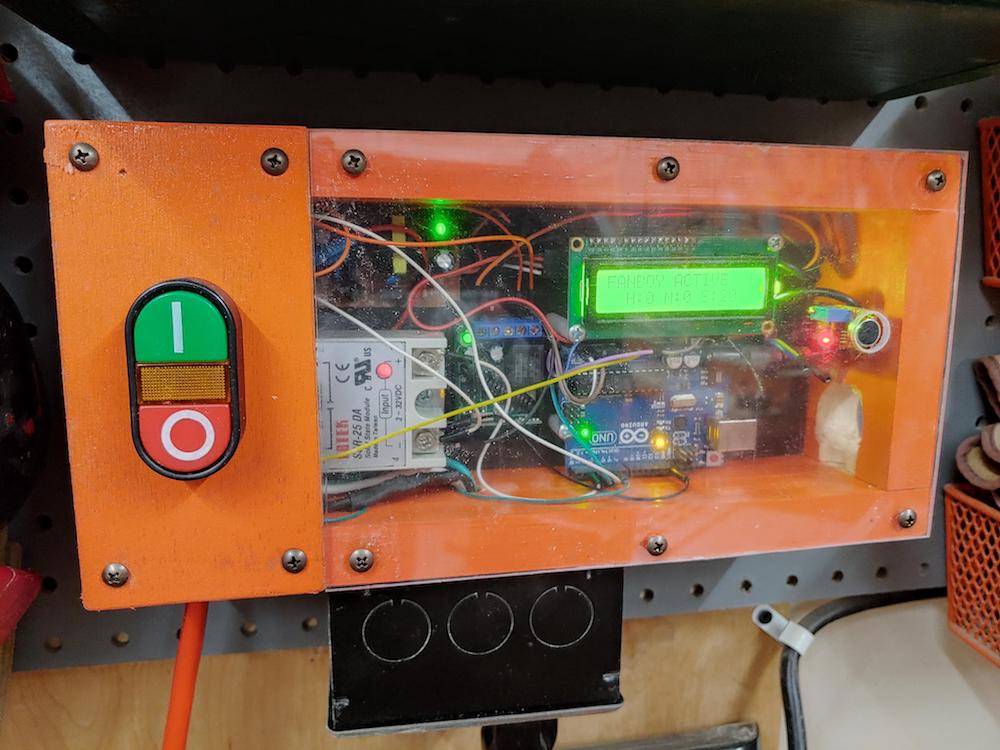
This Arduino device turns on a workshop’s air filtration system whenever it hears a saw
Reading Time: 2 minutesThis Arduino device turns on a workshop’s air filtration system whenever it hears a saw Arduino Team — February 3rd, 2020 Modern woodworking tools are amazing, allowing you to make any number of useful or decorative objects from the comfort of your garage. Unfortunately, they also produce a lot of dust, so…
-

Make a Spy Hunter-style scrolling road | Wireframe #31
Reading Time: 4 minutesRaspberry Pi’s own Mac Bowley shows you how to make the beginnings of a top-down driving game inspired by 1983’s Spy Hunter. Spy Hunter was one of the very first games with both driving and shooting. Spy Hunter The 1983 arcade classic Spy Hunter put players at the wheel of a fictitious…
-

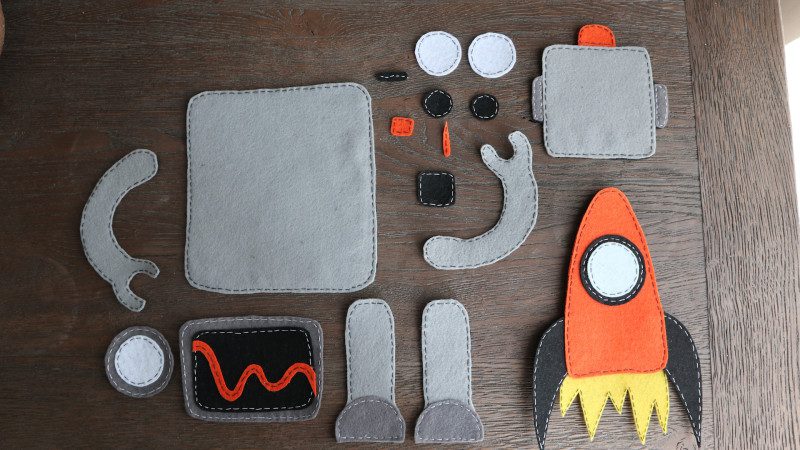
DARVA: The Event Assistant
Reading Time: 3 minutesFelt fusion Enter DARVA, a cute little animated robot who just loves to chat, and who runs off a Raspberry Pi 4. Dane says, “DARVA was made by first cutting and sewing all the separate parts of the robot out of felt. Then we took a picture of all these robot parts…
-

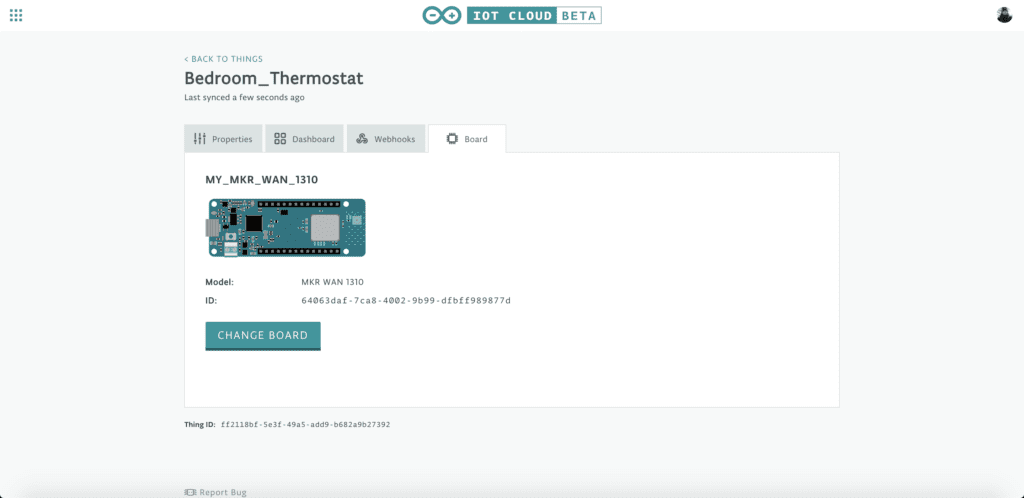
LoRa made easy: Connect your devices to the Arduino IoT Cloud
Reading Time: 3 minutesLoRa made easy: Connect your devices to the Arduino IoT Cloud Arduino Team — January 31st, 2020 An important new feature is now available in the Arduino IoT Cloud — full support for LoRa® devices! LoRa® is one of our favorite emerging technologies for IoT because it enables long-range and low power…
-
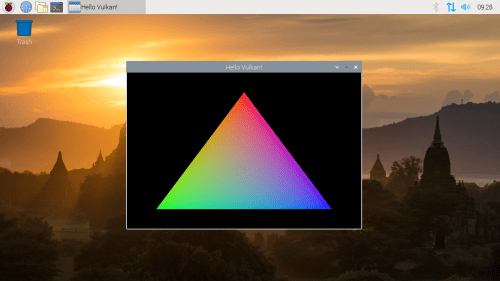
Vulkan is coming to Raspberry Pi: first triangle
Reading Time: 2 minutesFollowing on from our recent announcement that Raspberry Pi 4 is OpenGL ES 3.1 conformant, we have some more news to share on the graphics front. We have started work on a much requested feature: an open-source Vulkan driver! Vulkan Standards body Khronos describes Vulkan as “a new generation graphics and compute…
-
Pirate Audio Headphone Amp
Reading Time: 4 minutesRaspberry Pi has its fair share of DAC audio boards offering high-quality sound output, but Pimoroni’s new Pirate Audio range adds a mini LCD to show music track details and album art. In this review we’re focusing on the Pirate Audio Headphone Amp, but we also tried out the other three models:…
-

The Synthfonio is a guitar-shaped MIDI instrument
Reading Time: 2 minutesThe Synthfonio is a guitar-shaped MIDI instrument Arduino Team — January 30th, 2020 Learning to play an an instrument well takes a lot of time, which many people don’t have. To address this, Franco Molina — who enjoys MIDI controllers and writing music, but describes himself as being terrible at playing the…