Kategorie: Reviews

  • Giant Raspberry Pi 3

    Giant Raspberry Pi 3

    Reading Time: 3 minutes

    A monumental make

    “I have always loved working with microcontrollers and single-board computers,” Zach tells us. “At the end of 2020 I built a large-scale Arduino board and posted a video about it on my YouTube channel. I had lots of suggestions and requests that I build large-scale versions of other DIY electronics components. It wasn’t a far stretch for me to want to do another similar project, and that’s where the giant Raspberry Pi board was born.” 

    Zach says he learnt a great deal from his first giant project build and used his knowledge from that in the latest construction. “The most time-consuming part was printing the large-scale components, which took over 150 hours to complete. I used over 5 kg of PLA filament on this project alone,” he reveals.

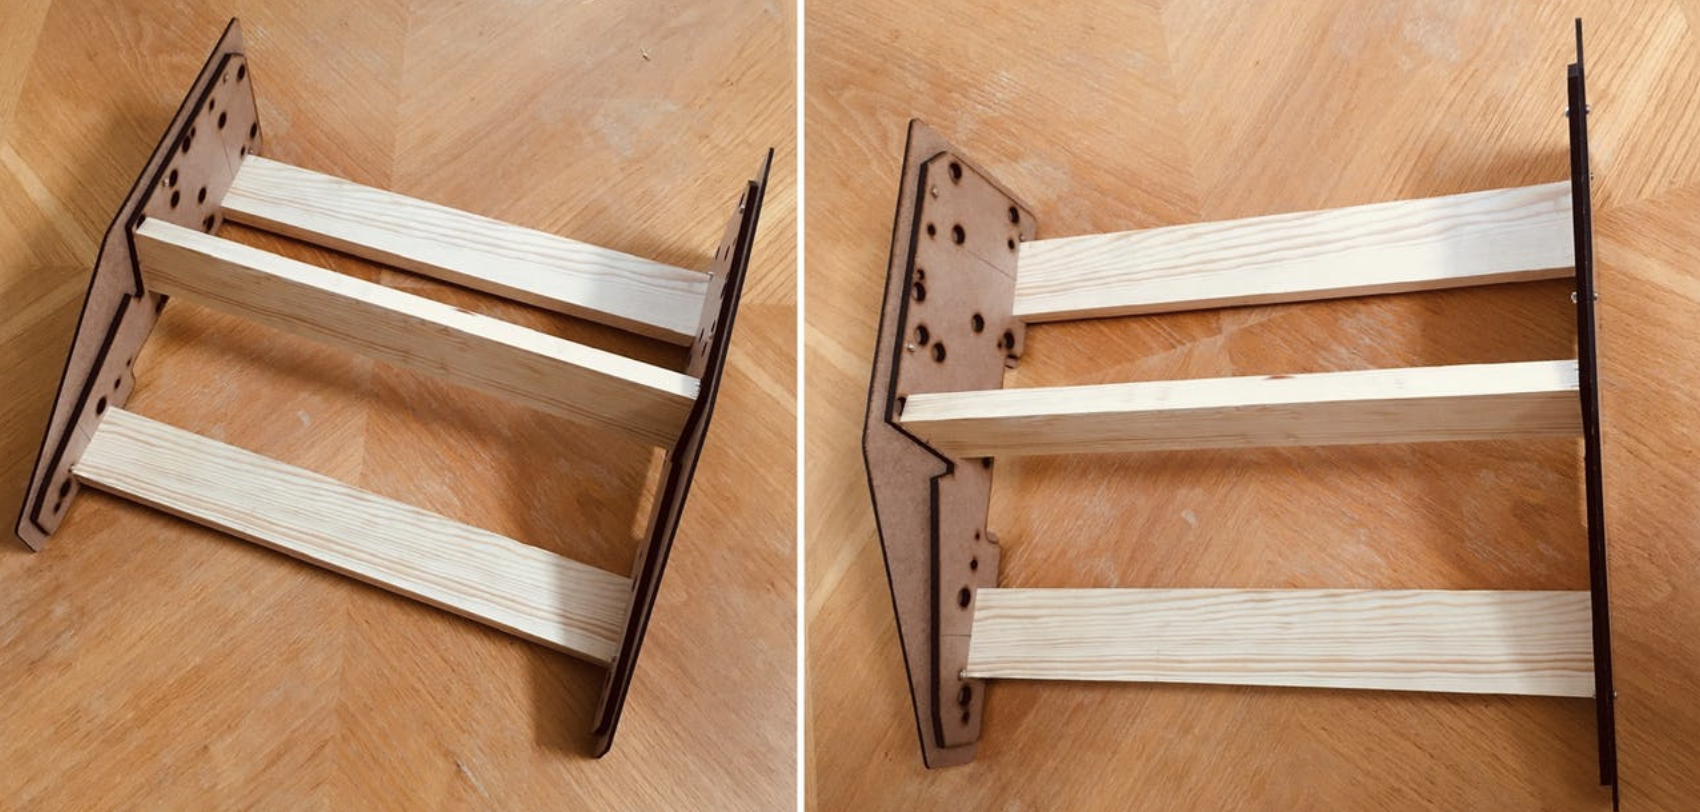
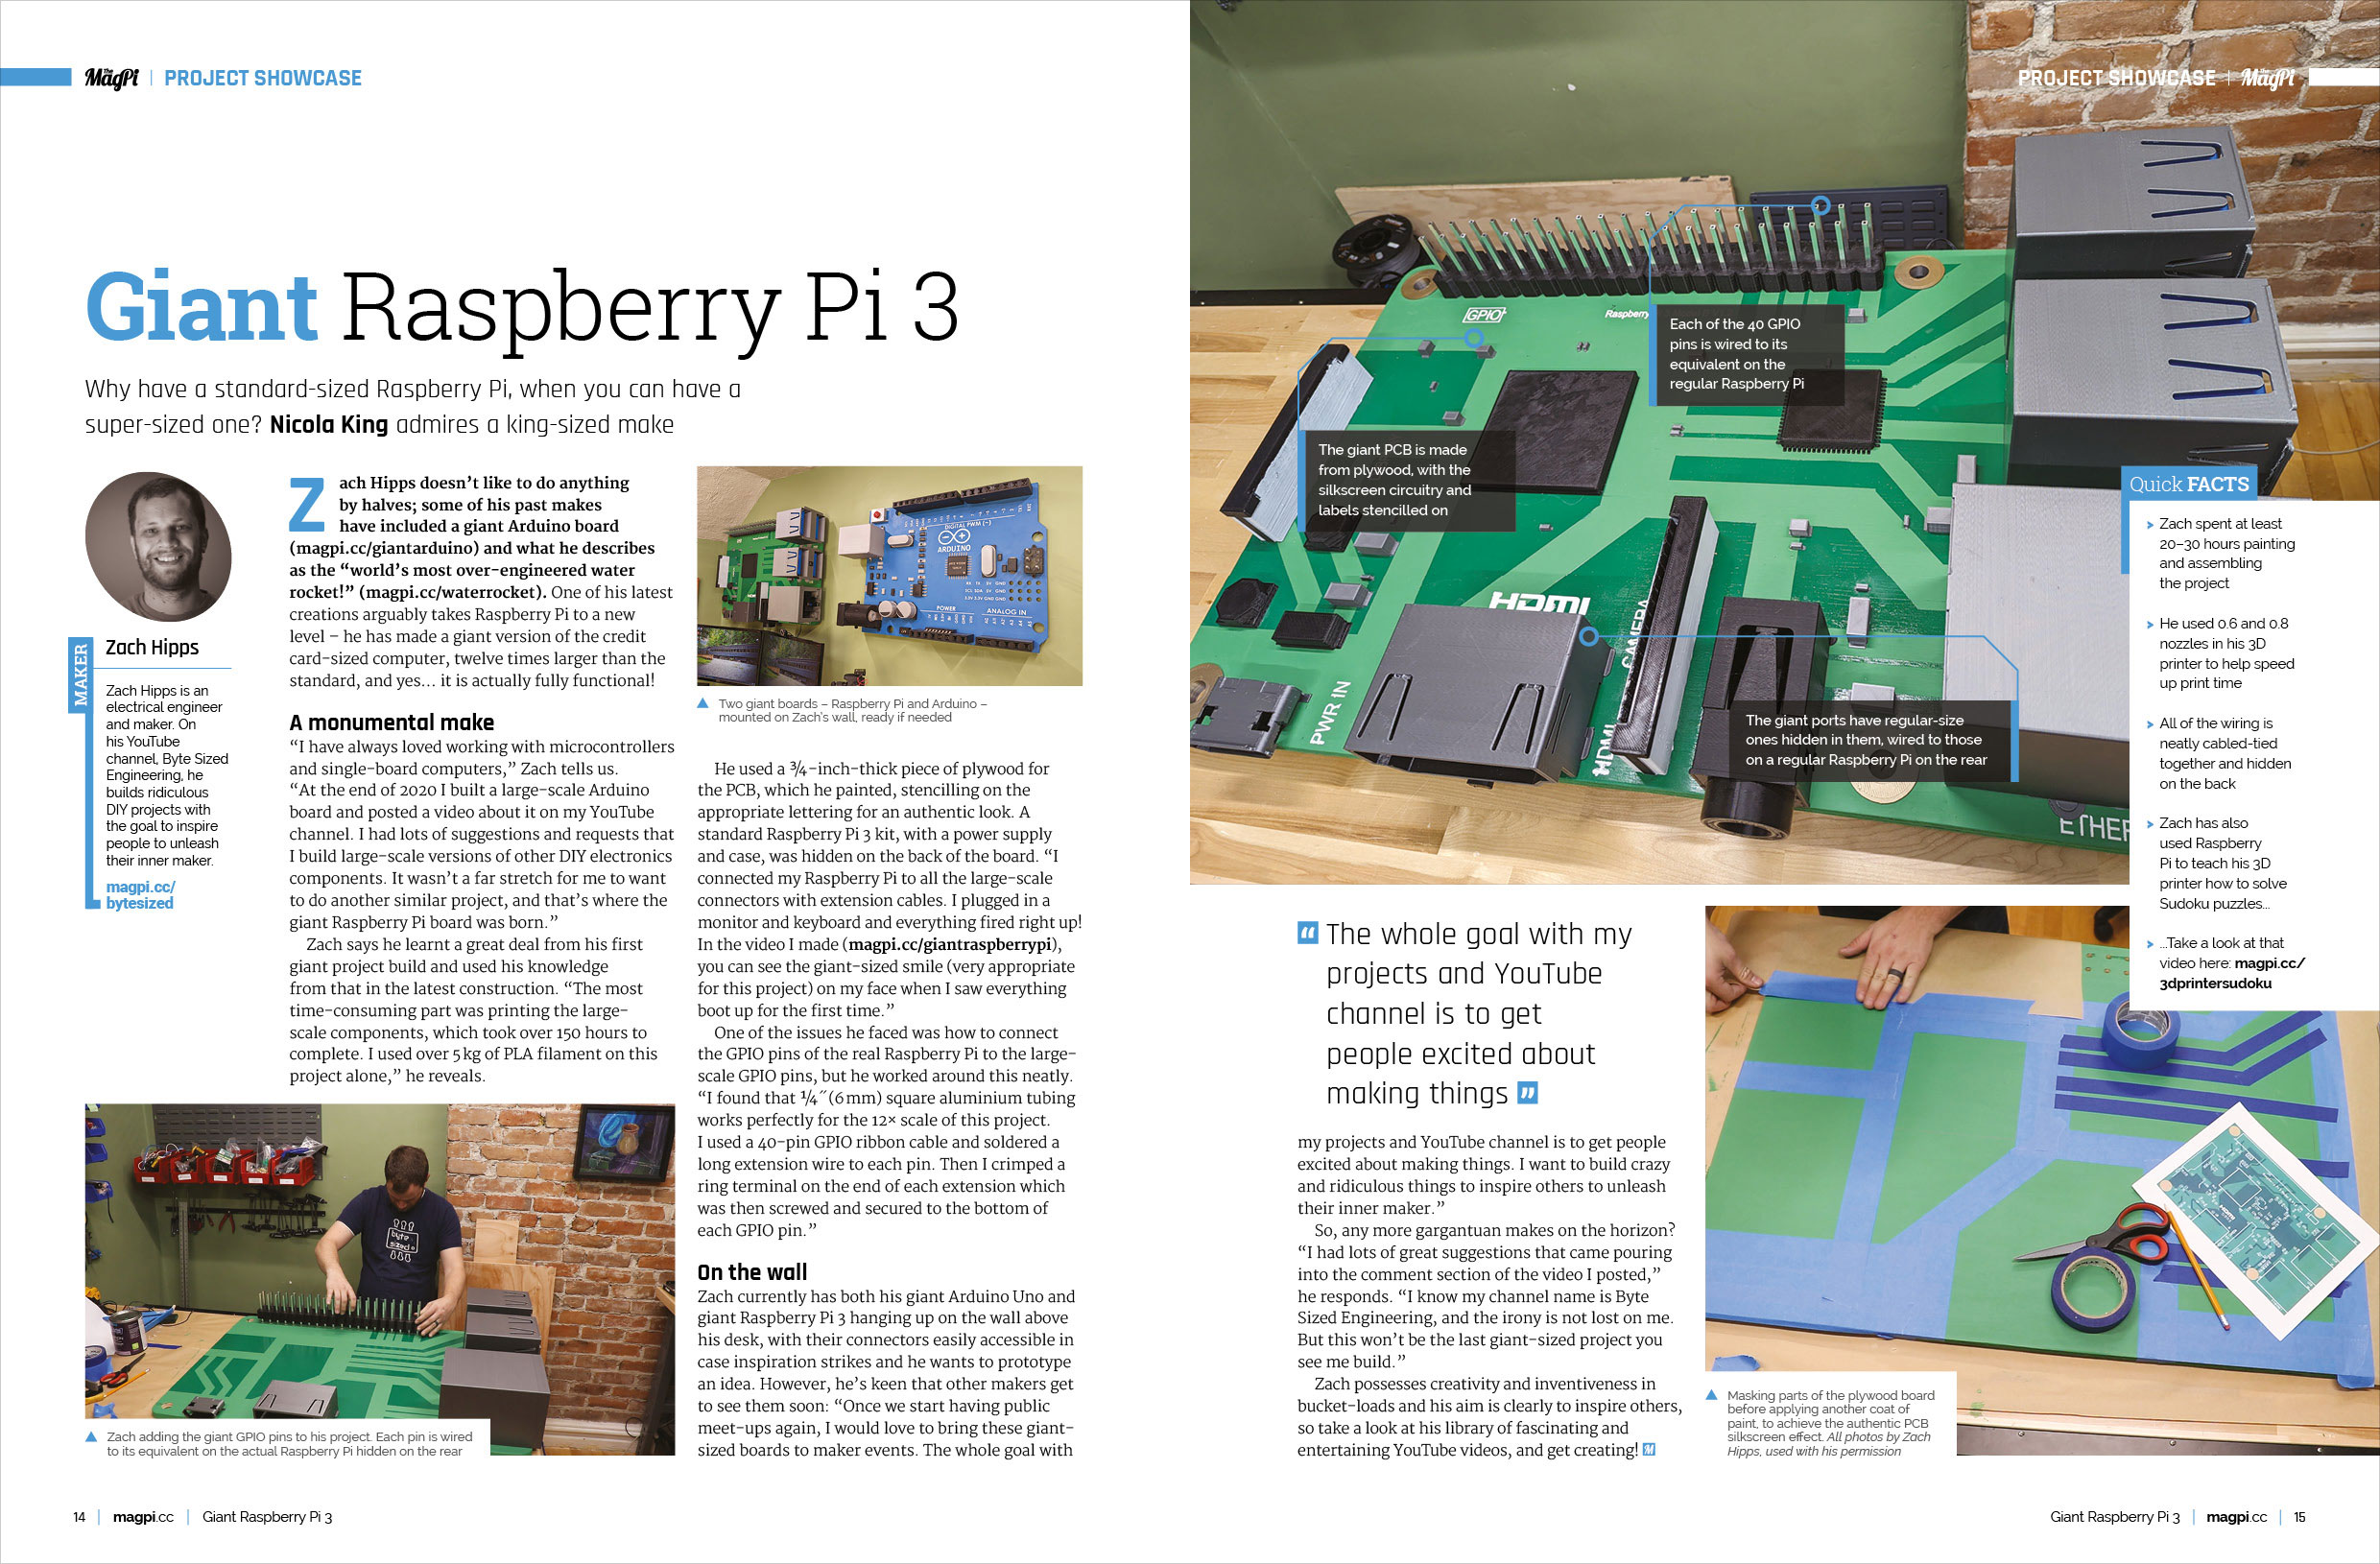
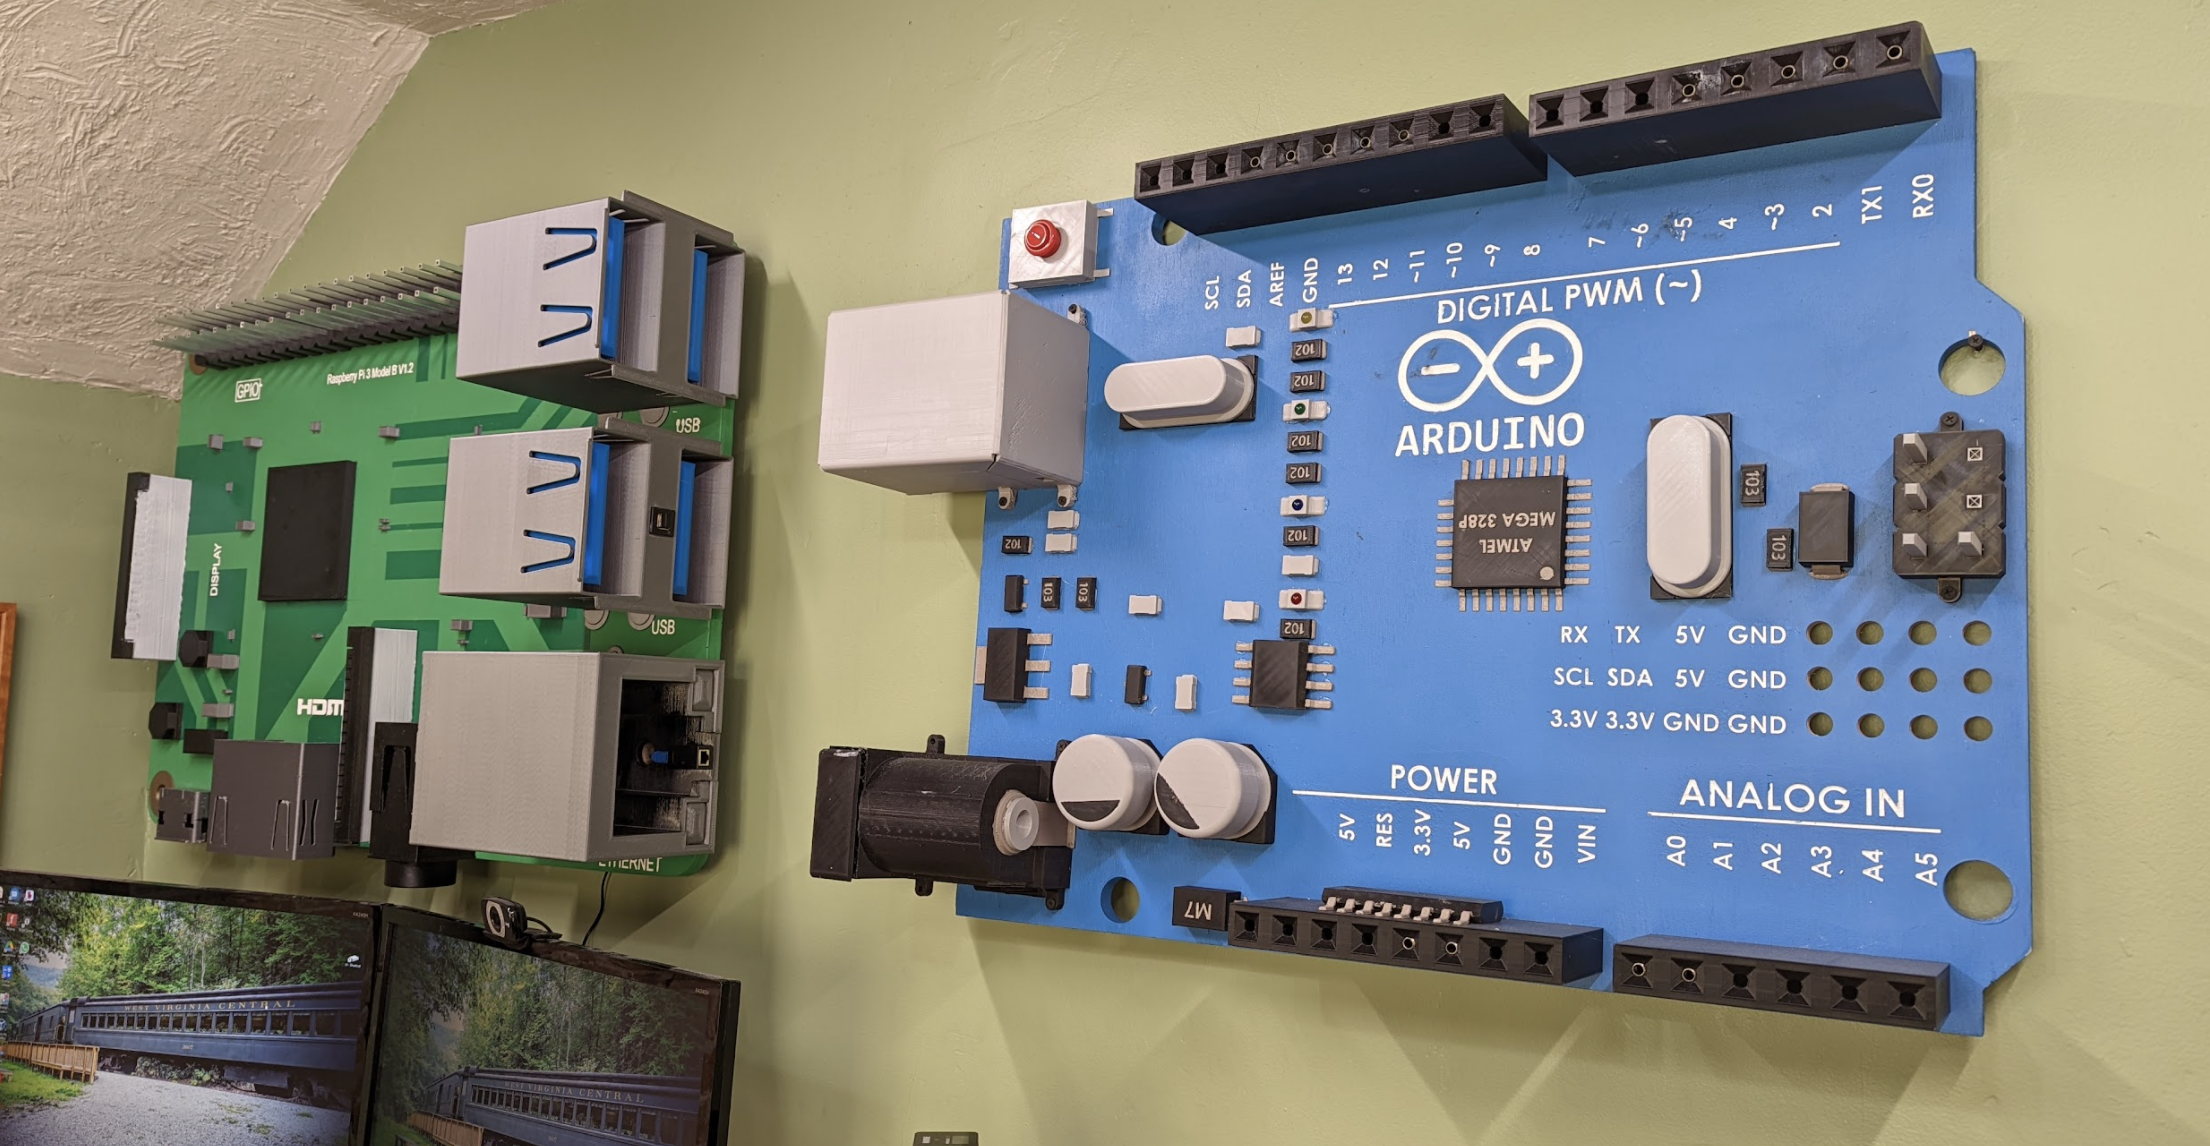
    He used a ¾-inch-thick piece of plywood for the PCB, which he painted, stencilling on the appropriate lettering for an authentic look. A standard Raspberry Pi 3 kit, with a power supply and case, was hidden on the back of the board. “I connected my Raspberry Pi to all the large-scale connectors with extension cables. I plugged in a monitor and keyboard and everything fired right up! In the video I made, you can see the giant-sized smile (very appropriate for this project) on my face when I saw everything boot up for the first time.”

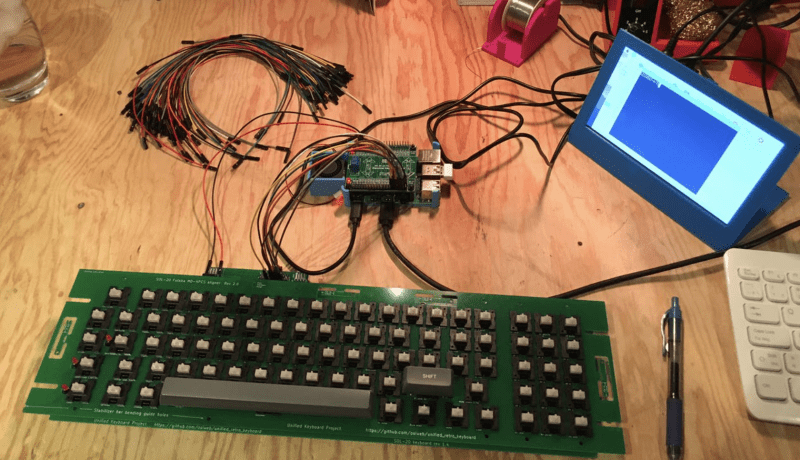
    One of the issues he faced was how to connect the GPIO pins of the real Raspberry Pi to the large-scale GPIO pins, but he worked around this neatly. “I found that ¼˝ (6 mm) square aluminium tubing works perfectly for the 12× scale of this project. I used a 40-pin GPIO ribbon cable and soldered a long extension wire to each pin. Then I crimped a ring terminal on the end of each extension which was then screwed and secured to the bottom of each GPIO pin.”

    On the wall

    Zach currently has both his giant Arduino Uno and giant Raspberry Pi 3 hanging up on the wall above his desk, with their connectors easily accessible in case inspiration strikes and he wants to prototype an idea. However, he’s keen that other makers get to see them soon: “Once we start having public meet-ups again, I would love to bring these giant-sized boards to maker events. The whole goal with my projects and YouTube channel is to get people excited about making things. I want to build crazy and ridiculous things to inspire others to unleash their inner maker.”

    So, any more gargantuan makes on the horizon? “I had lots of great suggestions that came pouring into the comment section of the video I posted,” he responds. “I know my channel name is Byte Sized Engineering, and the irony is not lost on me. But this won’t be the last giant-sized project you see me build.”

    Zach possesses creativity and inventiveness in bucket-loads and his aim is clearly to inspire others, so take a look at his library of fascinating and entertaining YouTube videos, and get creating.

  • REVIEW: reTerminal

    REVIEW: reTerminal

    Reading Time: 2 minutes

    When we say small, we mean small – it’s 140 mm wide and 95 mm high, putting it in the lower end of the size range for a Raspberry Pi attached to a touchscreen. It’s a little bit thick though at 21 mm. However, this is not all because of the internal components – it’s not a full Raspberry Pi inside, but a special PCB with a Compute Module 4 installed, giving it the kind of power you would normally see in a Raspberry Pi 4. This makes it much slimmer than what you’d get if it was sitting on a Raspberry Pi 4.

    The construction feels solid though, with a tough plastic case that includes plenty of ways to mount itself on walls, and brackets on both the rear and sides of the case, and even includes a standard camera tripod thread on the bottom of the case.

    Practically minded

    The buttons on the front of the case are fully programmable, as well as the STA- and USR-labelled LEDs. Seeed gives some simple instructions on how to program them on their website, as well as simple guides on building graphical interfaces with the touchscreen.

    Each side of the machine is used for some of the standard Raspberry Pi connections such as an Ethernet port, a HDMI port, and two USB 2.0. It also includes a full 40-pin GPIO in the same arrangement as any Raspberry Pi since the Raspberry Pi B+ redesign. As well as any extra components you can connect, it will also support standard HATs and an expansion system to add further functionality.

    As this is a kind of display that is not built to be portable, it does lack a battery. It’s powered by a USB C cable, which could easily be built into wherever it’s installed, but also means it can make use of a standard mobile phone charger with a decent amp output. It’s not a negative, but it is something that we initially assumed it came with.

    Full power

    As you’d expect from hardware running on Raspberry Pi 4 chips, it runs extremely well. The touchscreen is responsive even when running the full OS, and the 1080 × 720 screen is high enough resolution that it doesn’t feel too awkward navigating the desktop and such. We’ve already got a few projects in mind that we want to use it for in a more permanent place, which is always a good thing after a review.

    Verdict

    10/10

    Smaller than expected but a very cool, solid device for monitoring or controlling larger systems.

  • Sol-20 Terminal Computer

    Sol-20 Terminal Computer

    Reading Time: 3 minutes

    Michael’s home is full of Raspberry Pi computers performing tasks from NAS to OctoPrint server and RetroPie games arcade, so it seemed obvious to use our favourite single board computer for his Sol-20 project. He chose a Raspberry Pi 4 because he needed “the horsepower it provides to run the emulator at speeds comparable to the original Sol-20”. He also realised the GPIO ports and option to use a variety of HATs – particularly the voltage shifter module – made Raspberry Pi a great choice for this build. 

    In the end, the project took around four months to complete, and cost roughly US $550.

    Computer love

    Michael wanted his Sol-20 reproduction to be “as authentic-looking as possible, with the beautiful walnut sides for sure”. He’d always admired the original computer’s striking steel blue sides too, but chose to 3D-print the case for his version, pointing out that also makes it easier and cheaper for anyone else following in his retro build footsteps. 

    Raspberry Pi came into its own when it came to the software written for Sol-20. Recreating the motherboard to do this and populating it with vintage parts would have been prohibitively expensive, Michael explains. Raspberry Pi runs code that emulates the 8080 CPU at the heart of the Sol-20. “On top of this, it emulates the original hardware providing a display via the HDMI port and a virtual cassette interface for loading and saving programs.” Michael used Python to write the Sol-20 hardware emulation software on top of an existing 8080 emulator that he found on GitHub

    His Sol-20 emulator can be run on Raspberry Pi 4 with a standard keyboard and display, but another Sol-20 fan had recreated a keytronic version of the original keyboard (osiweb.org), and Michael couldn’t resist!

    Screenwise, he bought a Pimoroni PIM372 8in XGA display. The full build details and hardware list can be found here.

    New tricks

    With detailed documentation about the computer he was trying to recreate available online, Michael says the Sol-20 project went smoothly. As a retro computer build veteran, he was able to apply lessons learned from previous projects such as the KENBAK-2/5 and DEC VT100 Terminal, both of which we’ve featured in The MagPi. However, he also challenged himself, learning how to use a CNC machine at his local maker space in order to recreate the Sol-20’s “gorgeous” walnut side panels. 

    If you’re thinking of your own reproduction of a classic, Michael warns you need to be prepared to be in it for the long haul. “Don’t start unless you are passionate about the idea,” he cautions, before enthusing: “Break the project up into smaller pieces that can be finished in a relatively short time. Keep plugging away at it. Have fun!” 

    For further information on Sol-20 Terminal Computer, Michael recommends visiting sol20.org, where you’ll also find Solace (SolAnachronistic Computer Emulation), a Windows version of Sol’s interface.

  • Serious Fun with Electronics in The MagPi magazine issue #115

    Serious Fun with Electronics in The MagPi magazine issue #115

    Reading Time: 3 minutes

    Serious Fun with Electronics

    Serious fun with Electronics

    This month we get serious about electronics. Seriously fun that is. Discover how to wire up kit and components to Raspberry Pi using breadboards, wires and HATs (Hardware Attached on Top). Discover the incredible things you can make with Raspberry  Pi. Plus! Electronics expert Simon Monk has written an entire new starter guide for us. This month is the time to get serious about making your own electronic devices.

    #MonthOfMaking 2022

    #MonthOfMaking 2022

    This March, we invite you to take part in our annual community collaboration event. #MonthOfMaking is a time to start that project you’ve been putting off, and get the job done with the help of the community.

    Sol-20 Terminal Computer

    Recreating a classic Sol-20 Terminal Computer

    This gorgeous computer arrived on the scene 45 years ago, where it laid claim to being the first fully-assembled microcomputer with a built-in keyboard and television output. We love a good retro project here at The MagPi, and Michael Gardi’s recreation of the Sol-20 with Raspberry Pi at the heart certainly counts.

    Giant Raspberry Pi 3

    Giant Raspberry Pi 3

    Raspberry Pi is our favourite small computer, but have you ever wondered how big it could be? Zach Hipps certainly makes an impression with this gigantic, and fully-working, Raspberry Pi 3 computer. The giant ports have working ports inside them, and all of the huge GPIO pins are wired up. It’s for the fun of science!

    Fancy Octopus Arcades

    Fancy Octopus Arcades

    We’re in a golden age of emulation according to Shonee Strother, maker of these incredible arcade builds. Shonee makes small, mini cabinets that are packed to the rafters with arcade games. There are daring designs on display here, and great advice on building your own striking arcade cabinets.

    Build a Raspberry Pi Quiz System

    Build a Raspberry Pi Quiz System

    Bashing a button is a vital part of any live event quiz, and Rob has built a button basher for use during their quiz events. It uses four massive arcade buttons and lights up with a NeoPixel LED strip. The buttons are held in large 3D printed boxes. The result is a great project that brings a lot of fun to the quiz party.

    Trilobot robot review

    Trilobot tiny robot

    It’s been a while since we saw a new two-wheeled robot project in The MagPi, and Trilobot is a Raspberry Pi 4-based build with sensors, cameras and cool RGB underlighting. Phil has been taking it for a trundle and considers it to be an excellent robotics platform. 

    Pick up your copy of The MagPi issue #115

    The MagPi magazine issue 115 is available as a free digital download, or you can purchase a print edition from the Raspberry Pi Press store. Subscribe to The MagPi in print for 12-months and get a free Raspberry Pi Zero 2 computer.

  • Win a Mini Pupper robot!

    Win a Mini Pupper robot!

    Reading Time: < 1 minute

    Subscribe

  • Technical Function

    Technical Function

    Reading Time: 3 minutes

    Electric eye

    The design is based around a two-eye concept by Will Cogley which Sean cut down to be a single eye, and have space for the camera module as well.

    “I then modelled (using Autodesk Inventor) an enclosure for the eye, Raspberry Pi, and the other electronics: including two speakers, amplifier, real time clock, servo controller, custom power circuit, OLED display, microphone, button, and two 5 V power connectors (one micro USB and the other a DC power jack).” Sean tells us. “My first design was entirely 3D-printed, with a white shell covering up most of the exposed bolt heads. It was strongly based on the design for my microphone robot I built previously, with space made inside to mount the eye mechanism, replacing the large speaker with two smaller ones.”

    It’s a very compact design, with a lot of components squeezed in.

    “There were a number of drawbacks with this design,” Sean says. “The biggest one being that the eye was mounted too far forward. If the robot was dropped on its face, the eye would be damaged, and there was no way to move the eye back as the case dimensions were too small. I wanted to try building with sheet metal as a challenge. I designed a case with 3D-printed braces to hold together four pieces of 2 mm aluminium sheet metal, cut with the help of my Dad. The braces hold the sides together with an assortment of nuts and bolts. Since the case was slightly bigger than the previous one, the eye mechanism could be mounted further back.”

    Sean also replaced the power circuit, added an accelerometer, and changed a couple of other small bits to get the eye to where it is now.

    Follow along

    As well as servos that control the direction of the eye (pan and tilt), there’s also two that control the upper and lower eyelid. These are controlled via Raspberry Pi, which tacks faces using OpenCV.

    “Also connected is an audio amplifier that powers the two side-mounted speakers, with the audio signal coming from the 3.5 mm audio jack on Raspberry Pi.” Sean continues. “The microphone array is connected through USB, while two USB ports and the Ethernet port are left exposed for programming. The power circuit connects to the 5 V input, the on/off button, and the micro USB input. All that’s left is the real time clock module and the accelerometer, which are both connected through I2C, as is the servo driver… using all of this, I was able to make the eye track people in real time, and say their name if it saw their face (it would have to have their face recorded first). It also blinks at random intervals.”

    With all that, it works well, although apparently a little too well for some, as Sean explains peoples’ reactions: “Very positive! However, I have had people comment on the ‘uncanny valley’ of the single mechanical eye following them around, and blinking at them.”

  • REVIEW: Maker HAT Base for Raspberry Pi 400

    REVIEW: Maker HAT Base for Raspberry Pi 400

    Reading Time: 2 minutes

    The Maker HAT Base is equipped with quite a bit more functionality, including on-board push-buttons, buzzer, and mini breadboard, plus a female breakout header.

    Base for electronics

    The sticky-back mini breadboard fits into a space in the middle of the board. Note that if you’re using a HAT, it will cover the breadboard – and there’s not a lot of clearance. Still, it’s a nice addition.

    We really appreciate the labelling of the GPIO pins, too, which makes it much easier to find the pin you need rather than having to count along the rows. Even better, there’s a full female GPIO breakout header that you can use even with a HAT attached to the pins, so you can connect jumper wires to electronic circuits on a separate breadboard. A bonus is the inclusion of four on-board push-buttons and a buzzer (with a switch), pre-wired to certain GPIO pins.

    As well as being fully labelled, the female header has a status LED for each pin, which tells you whether it’s currently pulled high or low. This should prove useful, especially for beginners, when debugging your own circuits and programs.

    Verdict

    9/10

    Far more than a GPIO header extender, this feature-packed electronics breakout board represents excellent value for money.

    Specs

    Connector:
    40-pin female-to-female 10 cm ribbon cable with plastic clip

    Features:
    GPIO header, 4 × push-buttons, piezo buzzer, female breakout header with status LEDs, 3 × Grove connectors (GPIO, UART, I2C)

    Compatibility:
    Works with any Raspberry Pi model

  • RMS meteor tracker

    RMS meteor tracker

    Reading Time: 3 minutes

    Mary and Mark’s previous Raspberry Pi projects included a weather station and an all-sky camera which they used with an analogue meteor camera, and for which they adapted code to display findings on their website (see github.com/markmac99). Expense and maintenance issues with this setup meant they were only too happy to get involved with RMS Raspberry Pi meteor tracking instead. “The RMS project was conceived, and software is written collaboratively by astronomy academics who wanted a lost-cost DIY system using off-the-shelf parts, to generate science-grade data about meteors as they burn up in our atmosphere,” says Mary. 

    This chimed with the interests of the McIntyres, who now run five meteor cameras and help co-ordinate the UKMON (UK Meteor Network). Its team of more than 100 UK citizen scientists has adapted RMS with a UK-specific toolset and data archive, making it far simpler for stargazers to identify events and objects they spot. “If more than one station captures the same event, then you can calculate velocity, mass, a more accurate orbit trajectory, and whether or not anything survived and fell as a meteorite,” Mary explains. This is what happened with last year’s Winchcombe fireball meteorite.

    Scanning the skies

    The McIntyres’ meteor tracker uses a relatively inexpensive CCTV camera – chosen because it can detect objects in low light levels – which is pointing up at the sky and is clad in weatherproof housing. Handily, the camera can be positioned several metres from the couple’s home, while its Raspberry Pi is tucked away indoors. Mary’s version uses a Raspberry Pi 3, but she recommends the additional power of Raspberry Pi 4 if you’re keen to build your own. “We sometimes detect several hundred meteors per night on every camera, which can lead to heavy load on Raspberry Pi.”

    Connectivity is in the form of PoE (Power over Ethernet), but there are other options: “The biggest advantage of Raspberry Pi is that the system can be installed virtually anywhere. Ideally, it should have an internet connection, but it can be run off-grid using batteries and solar power if necessary, provided the operator can visit periodically to collect data,” says Mary. Parts to build the meteor tracker were easy to source from The Pi Hut and other component suppliers, with a total cost of around £200, including the camera. “If you have a little experience using Raspberry Pi and Linux, it’s pretty simple to set up,” she says. There’s a pre-built image suitable for UK users on their website.

    Wonders of the universe

    The free open-source Raspberry Pi Meteor Software (RMS) records the sky continuously from dusk until dawn, looking for anything that is moving. RMS recognises and discounts aircraft and satellite trails, fireworks, and most moths, bats, and owls. The camera is calibrated in advance with a ‘platepar’ file that identifies the star field in its field of view. Based on this information, it is able to work out the orbit of the material that caused a meteor event. 

    As well as meteorites, the RMS cameras can detect sprites – the extremely fast and faint upper atmosphere electric discharges that occur very high above thunderstorms. This is helping researchers who study upper atmospheric phenomena.

    The open-source software is primarily written in Python 3 (and supports Python 2) with some performance aspects coded in C/C++. Downloadable from magpi.cc/rmsgit, its video capture and stability have recently been improved, while machine learning and detection accuracy are ongoing. 

    Mary has been impressed at how well Raspberry Pi has worked for their meteor detection setup. It cost around a third as much as a previous meteor system based on Windows. “Raspberry Pi has made it much more affordable, much easier to set up, and much simpler to maintain.”

  • INTERVIEW: Alex Glow

    INTERVIEW: Alex Glow

    Reading Time: 3 minutes

    “When I was a kid, I’d take apart anything”, Alex says about her maker history. “Keyboards, dolls, and so on. I was raised by many people with their own creative endeavours: my bio-dad showed me how to solder, my foster parents taught me to crochet, and my adoptive parents made amazing Halloween costumes, foods, and home improvements. As a pre-teen, I got really into fountain pens and creating illuminated manuscripts; then, costumes, cut paper, and 2D wire drawings. I joined the FIRST Robotics team in high school, where I learned how to solder and program a little (beyond what I could do on the TI-83+). I dug deeply into human languages – Spanish, Russian, and Mandarin – and holography. Something about that art, steeped in the dark, catching ghosts in glass plates, is so magical to me. 

    I helped start the Ann Arbor maker space (All Hands Active / AHA) and worked at a screen printing shop. I started a weekly blog about my projects in 2009, making juggling balls, notebooks, a crappy amplifier for my mandolin, and more. I worked tech support for years while doing hardware in my free time. Lately, I’ve been embracing machine-centric arts… AxiDraw pen plotting, 3D printing, laser cutting, PCB design, and so on. But I still love to create with just my hands.”

    How did you learn about Raspberry Pi?

    It must have been through friends at AHA… gotta be eleven years ago at this point! I do also have a sheaf of Raspberry Pi ad cards I got at a long-ago Maker Faire, advertising things like Sonic Pi tutorials. No lie, I’ve probably been carting those around for over a decade now. I’m sure I’ll get to them soon.

    What led you to join Hackster?

    I was there at the beginning! Our founders, Ben and Adam, had just gotten together and decided to merge their visions into one venture. Ben and I had a mutual friend, Cedric Honnet, who thought I could help them build out a community, reaching out to hardware companies and potential members, plus writing some tutorials to populate the platform. At the time, I thought it would just be “another Instructables”, but I soon saw the difference, with the focus on electronics and connecting creators directly with hardware manufacturers.

    What is your favourite thing you’ve made?

    Off the top of my head, it’s gotta be one of the companion bots! Either Archimedes or F3NR1R – Archie because he was my first, and because I’ve gotten so much joy out of connecting with people at Maker Faires and beyond through him… and F3N was only finished [over the last two years], but he has a cute speaking voice and a really fun design. But on another note, I’ve also been able to build a long-time dream: a stereoscopic light-painting camera! Using the StereoPi – a dual camera setup for the Compute Module – and a long-exposure raspistill command, I’m able to draw things in the air with an LED, then view the whole thing as a 3D image! Magical. I still need to polish that one and write it up more fully.

  • GBA Remote Play

    GBA Remote Play

    Reading Time: 3 minutes

    Rodrigo has achieved this by creating a custom cartridge with a Raspberry Pi 3 computer tucked neatly inside. By installing and running the RetroPie emulator on the cart and engaging in a bit of jiggery pokery with the GBA’s Link Port, Rodrigo has been able to stream PSOne games on the Nintendo handheld.

    “What inspired me the most was the fact that the whole project seemed impossible to achieve,” he says. “But I talked with a friend called Lucas Fryzek who knows a lot about embedded systems and he helped me figure out how to start.”

    With great power

    At that point, Rodrigo says he didn’t even know what a Serial Peripheral Interface (SPI) was, but he soon learned and realised its potential. The idea was to stream video from the cart at 240×160 resolution and send button-press inputs to it through the GBA’s Link Port. Nintendo included this interface so that two handheld consoles could be connected together for multiplayer gaming, but it has definitely come in handy here!

    “My first step was to solder Raspberry Pi’s SPI0 ports to a GBA Link Cable, then test a multiboot tool to send a ROM [a file containing the game] to the Game Boy Advance,” Rodrigo explains. “I then ran a quick benchmark to see how packets could be transferred per second, though after optimising the code, the final transfer rate ended up being considerably higher.”

    Rodrigo’s motivation was to create an impressive “superpowered” cartridge – “something you could take to a party and blow your friends’ minds with,” he says. He’d played lots of GBA games as a child and he still loves to check out new non-commercial releases for it. “But PlayStation was my first home console and I didn’t have too many games for it at the time.”

    3D or not 3D

    The project involved lots of trial and error. “I started to learn about bitmap modes on the GBA and frame buffers on the Raspberry Pi side and I tried to send a small image,” Rodrigo says. “After some trial and error time, the result was the GBA displaying one frame of Raspberry Pi OS’s desktop. Once I had that working, the remaining tasks were creating a virtual gamepad mapped to the GBA keys and improving the transfer rate.”

    Rodrigo says there are limits. It’s not possible to transfer more than 1.6Mbps bi-directionally, for example, otherwise Raspberry Pi starts to receive “garbage” from the GBA. There’s also a one-way limit of 2.6Mbps, or 4.8Mbps if overclocked. Yet a better frame can be achieved if you forgo image quality by lowering the GBA’s native resolution from 240×160 to 120×80. Most games run smoothly.

    Gamers are not limited to PlayStation games either. You could try SNES and Mega Drive, for instance, but Rodrigo says the whole point was to play 3D games. Ideally, he would have run Nintendo 64 games. “That was the original idea, but it requires more processing power and fine-tuning to get it working well.” He’s achieved his main aim, though. “There are several mods out there based on Raspberry Pi [boards] inside Game Boy Advance shells, but this is proper expandability,” he says.

  • Sunrise Lamp

    Sunrise Lamp

    Reading Time: 3 minutes

    “Gro clocks serve to persuade children to stay in bed until a reasonable hour; in our house, the clocks we had been passed on were simply ignored,” Russell relates. Nonetheless, it was while on paternity leave that Russell began his first forays into Raspberry Pi project creation, using the Raspberry Pi Camera for a time-lapse of his young son sleeping in his Moses basket. “I’m lucky his first word wasn’t LED!” he jokes. More recently, Russell had been looking for an excuse to learn more about addressable LEDs and how they may be controlled via the GPIO pins on Raspberry Pi. 

    Snap to it

    The Sunrise Lamp resulted from another of Russell’s nascent interests: Snapology, a technique in which origami shapes are created from rigid triangles. Having seen Ed Chew’s award-winning Tetra Lamp made from recycled cartons, Russell became convinced that a programmable light source in the centre of a similar [origami lampshade] “could create some interesting patterns and lead to lie-ins beyond 5 am!” Creating his version became a good way to unwind of an evening, with mindfulness due to the repetition involved in folding 320 triangles and more than 600 connecting pieces for the lamp’s origami shade.

    During the night, the light dims and the lamp functions as a night light, then at a predetermined time, the Sunrise Lamp slowly begins to brighten to indicate that it’s morning and time to get up, he explains.

    Armed with Raspberry Pi Zero W, a plastic case, and £7 worth of NeoPixels from The Pi Hut, Russell followed the reseller’s detailed instructions for installing LED libraries and NeoPixel maker Adafruit’s guide to installing CircuitPython on Raspberry Pi. 

    Having established that a modest number of LEDs could be controlled from Raspberry Pi with no need for an additional power source – its 5 V pin would suffice – Russell soldered the ring to the GPIO header on his Raspberry Pi and used SSH to log in and control the lamp.

    Changing things up

    Russell was pleased with his Sunrise Lamp and impressed by the intriguing patterns it creates on his ceiling, depending on whether one or more NeoPixels is active. He later revised the setup (seen in his follow-up Moon Phase Lamp) using Apache and PHP directly on the Raspberry Pi Zero. This meant the web page menu could instantly change the light sequence. Raspberry Pi Pico, or a different microcontroller, could also be used to replicate this project, but in this instance Russell was keen to learn about using Raspberry Pi with a web server. 

    He was also advised to use red, not blue, lights so as not to interfere with anyone’s sleep patterns. “Apparently there may be some kind of evolutionary link to our ancestors sleeping around camp-fires,” he muses.

  • Pneumonia detection

    Pneumonia detection

    Reading Time: 3 minutes

    “My project Pneumonia Detection is a complete open-source system that uses a Raspberry Pi accompanied with a Raspberry Pi Camera to run a state-of-the-art embedded machine learning model,” Arijit explains. “[This] allows the device to scan chest X-rays and let the user know the amount of viral or bacterial pneumonia present in the chest of the patient. The entire system kit would cost you less than $100, including all of the hardware and the software needed, and it can practically run anywhere.”

    Over the last two years, there have been more cases of pneumonia, and a great need for a low-cost system that could quickly and accurately detect it.

    “There was also a massive number of people above the age of 60 who were affected by pneumonia [which] even caused death due to delay in detection,” Arijit mentions.

    Machine learning and X-rays

    For this project, Arijit decided Raspberry Pi was the way forward due to it being easily powered by a mobile battery, as well as the software support.

    “The system consists of a Raspberry Pi 4, along with a Raspberry Pi Camera,” he says. “From the software side of things, we have two Docker containers running the balenaCAM and the Edge Impulse machine learning model on top of balenaOS running on Raspberry Pi. The user just has to place a chest X-ray or an image of it in front of the camera and open up http://localhost:4912 in a [browser]. After two-three seconds, the live camera feed will appear in the dashboard and show what type of pneumonia has the person [contracted] with percentages!”

    The model was trained with over 3700 images of bacterial and viral pneumonia, which leads to an 80% accuracy in detections. According to a pulmonologist Arijit spoke to, human doctors only have about a 30% accuracy rate when looking at X-rays themselves.

    Positive science

    “My Twitter and LinkedIn feed was blasted out on the day I released this project publicly,” Arijit tells us. “People have shown very much interest in this. I’ve even been asked for a doing a health camp in my local hospital, which we did and it was great as well. We compared the results laid out by the project [with] the reports given by the doctor, and to my surprise not a single result given by the model was wrong. So, it turns out the ML model has been trained well!”

    With more testing and learning, the accuracy of the system will only increase, hopefully resulting in cheaper and more accessible pneumonia detectors.

    “The project is completely open-sourced,” Arijit adds. “There are a lot of places wherein you can change and add a new feature to the project. It’s now up to the community to contribute and upgrade its features!”

  • Teasmade 2.0

    Teasmade 2.0

    Reading Time: 3 minutes

    This author fondly remembers her late grandmother’s Teasmade that sat proudly in a guest bedroom, waiting for the odd bed-and-breakfast guest that she occasionally took into her home. Although, we did always wonder the point of it when you still had to get up and go to the kitchen to get some milk from the fridge. But, despite our puzzlement, the Teasmade has basked in a form of legendary glory ever since.

    The coffee stimulus

    Hardly surprising then that, decades later, some makers are keen to revive that concept of an automatic hot drink maker, and what better base to use for it than a retro Goblin Teasmade? Martin Spendiff and Vanessa Bradley are two such makers, and this fun update uses a Teasmade along with Raspberry Pi Zero WH to produce their hot drink of choice… coffee.

    Their motivation for the project was twofold, as Martin explains: “The Teasmade (inherited) is pretty impressive – it has no microprocessors and therefore has a workflow built with just a few switches and logic. I’ve long admired the design, so bringing the innards up to date by adding a little Linux machine to the mix was appealing. I don’t like to say cyberpunk, but cyberpunk.” 

    He also wanted to incorporate Google Calendar into the venture. “It’s nice to have a serious idea dressed up in a novelty application,” he tells us. “Getting Google Calendar entries to trigger events has crossed my mind as a useful idea a few times. The idea of automating a cup of coffee was enough motivation to get it over the finish line.”

    Right royal cuppa

    So, how exactly does the machine produce a regular caffeine hit? On the side of the Teasmade is a Raspberry Pi Zero with a Grove ReSpeaker HAT. “There is also a connection to a little cheap speaker and a relay switch, replacing the alarm switch on the inside,” says Martin. “The script is automatically started using systemd when it turns on. It starts a process that monitors a Google Calendar. Every minute, it runs a query on the calendar, looking for the trigger phrase. If it sees it, it starts the boil cycle.” 

    The most difficult challenge for the pair was working out how to get the tool that pulls alerts from a Google Calendar (gcalcli) to act as a trigger in the main code. In the end, they used the subprocess module in Python, and now the Teasmade 2.0 cleverly starts brewing their coffee ten minutes before the time it’s required. 

    What’s more, the speaker that Martin and Vanessa inserted belts out the God Save the Queen while refreshments are being prepared. “There is a recurring appointment in our Google Calendar for an 11 am coffee. The sound of the tinny national anthem wafting from the kitchen is our signal that it is time to down tools for a break,” says Martin. This has generated some “bewildered amusement” from their non-British pals: “Friends and family are baffled by it on a number of levels.”

    If you’d like to create your own version, Martin has generously made the code for the project available on GitHub, and one motivation for this is the old adage, ‘the more the merrier’. “Generally, the more people that replicate it and chip in, the easier it gets,” notes Martin. “Better coders than me have refined my code on other projects – I’ve no doubt that the same would apply here.

  • Travel in time

    Travel in time

    Reading Time: 2 minutes

    Even the difficulty spikes of old-school arcade classics, designed to separate players from their money as efficiently as possible, become artful punctuation in the language of play, thanks to the save states and infinite credits of an emulator-based arcade cabinet.

    With greater access to development tools, approachable languages, and supportive communities, game creation is also being radically democratised. And just as there are many people who love to play retro games, there are plenty of individuals and development teams who have set out to create their own.

    This can go as far as full-scale releases on physical cartridges and major digital platforms, particularly when it comes to the rich world of Sega Mega Drive and other classic consoles, but both the aesthetic and the inherent technical limitations of developing for older hardware have appeal.

    Technical limitations in resolution, memory size, and audio voices can make your game simpler to program. This has directly led to the rise of Fantasy Consoles, virtual 8-bit machines that run on your computer. Priced at $15 (£11), Pico‑8 is the best‑known of these, with official support for Raspberry Pi and a great community.

    Pixel art is still going through a years-long renaissance, with many artists deliberately adopting 256-, 16-, and even four-colour palettes. You’ll see these choices reflected in games as disparate as Unpacking (through its EGA camera filter) and The Eternal Castle, a ‘remake’ of a game that never existed. If you want to start making pixel art on Raspberry Pi, Aseprite can be compiled, and an unofficial ARM build of Pixelorama is now available.

    More modern retro aesthetics can be found in the low-rez horror games exemplified by the Haunted PS1 Demo Disc series.

    Although Unity and Unreal Engine don’t run on Raspberry Pi, the impressive Godot engine does, albeit with a few limitations.

    We’ve got you covered if you want to begin your journey into retro game programming right here with PyGame Zero

    Meanwhile, for those who want to get a feel for techniques from the past and present, BBC BASIC is available for Raspberry Pi, while developing with using C++ and SDL is far more fun that it has any right to be.

  • Discover Practical Programming in The MagPi magazine issue #114

    Discover Practical Programming in The MagPi magazine issue #114

    Reading Time: 3 minutes

    Practical Programming

    As we get into 2022 it’s time to rediscover a love of code. Learning to program is fun for its own sake, and we think it’s the best way to improve your mind. Take code to the next level by putting it to use in a practical way. Practical Programming is designed to explain the basics of code with Raspberry Pi and help you learn to develop skills and put them to use in your projects.

    Maker Tools For All Ages

    A maker space is a place where you focus on building all kinds of things. Not everybody has a shed, but this feature will help you turn a spot in your home into a maker location. You then furnish it with the tools you need to make all manner of projects. Rob walks us through tools that are safe for younger and older makers alike.

    Create your own teletext service

    We’ve got a soft spot for Teletext. This classic text-based television service was hugely popular in the 1980s in the UK. Thanks to a group of dedicated enthusiasts, Teletext has been saved. In this feature, PJ Evans looks at using the video out pins on Raspberry Pi Zero 2 W to attach Raspberry Pi to a CRT television and generate the signals required to deliver Teletext pages to your television. It’s like the internet never happened!

    DeMoor Orrery

    Chris DeMoor has built a gigantic working model of the solar system using Raspberry Pi and a CNC cutting machine. The resulting orrery is suspended from the ceiling and a motorised car and spinning dish move the planets around. It’s a very clever, and stunningly realised project.

    GBA Remote Play

    We’re no strangers to hacked consoles. Usually, the original innards are replaced with Raspberry Pi. Rodrigo Alfono’s Game Boy Advance is something quite different. In this incredible build, the Game Boy is kept completely intact, and a special cartridge with Raspberry Pi 3 inside is used to stream homebrew PlayStation One games. The GBA tells Raspberry Pi which buttons are being pressed, and a stream of images is sent to the Game Boy Advance via the console’s Link Port. Intrigued? We certainly are.

    Bangle.js 2 review

    Gordon Williams has made hackable smartwatches a labour of love, and this is the second iteration of the well-known Bangle project. Rather than build a new watch from scratch, this is an off-the-shelf watch with the stock firmware replaced with an open-source alternative. You hook it up to Raspberry Pi, program it with JavaScript and integrate your projects with your wrists. We’re rather smitten with the result.

    Alex Glow interview

    Most folks involved with the maker community have heard of Alex Glow. When not doing video tutorials, unboxings, or interviewing other makers, Alex is making cool projects and sharing them with the community.

    Pick up your copy of The MagPi issue #114

    The MagPi magazine issue 114 is available as a free digital download, or you can purchase a print edition from the Raspberry Pi Press store. Subscribe to The MagPi in print for 12-months and get a free Raspberry Pi Zero 2 computer.

  • Win! A TonyPi humanoid robot

    Win! A TonyPi humanoid robot

    Reading Time: < 1 minute

    Learn Practical Programming in the latest edition of The MagPi magazine and start making apps, games and devices. The lead feature in this month’s magazine explains Raspberry Pi OS’s coding tools and environment, details the pros and cons of each of the major languages, what the basic aspects of code are and how to use them. A smattering of code is the most vital tool a modern maker can have. So don’t delay! Boost your programming skills and start making practical projects.

  • Using Raspberry Pi OS (Bullseye)

    Using Raspberry Pi OS (Bullseye)

    Reading Time: 3 minutes

    It’s easy to install Raspberry Pi OS onto a microSD card using the Raspberry Pi Imager tool – download it on another computer (Windows, Mac, or Linux) from magpi.cc/imager.

    Upon inserting the microSD card with the OS on it into your Raspberry Pi’s slot and powering up, it will first expand the file system before booting to the Raspberry Pi OS desktop. The Welcome to Raspberry Pi wizard will take you through configuration options including language and time zone, prompt you to change the default password, ask whether all of the taskbar fits on the screen, and prompt you to connect to your wireless router by entering its password.

    You’ll also be asked if you want to check for and install any software updates, which you can do or skip for now. With setup complete, you’ll be prompted to hit Restart to reboot your Raspberry Pi. This time it’ll boot straight to the desktop, without the wizard, and be ready to use.

    Explore the desktop

    Like most operating systems, the standard version of Raspberry Pi OS comes with a desktop interface that you can navigate with a connected mouse.

    The default web browser in Raspberry Pi OS is Chromium, although you can install others such as Firefox ESR, Midori, Vivaldi, and Puffin.

    Chromium is the basis for Google Chrome, so you may well find its user interface very familiar. There’s an Omnibox where you can enter web addresses or search terms. The default search engine is DuckDuckGo, which is focused on preserving the privacy of searchers, but can be changed in the Settings (after clicking on the three dots icon in the top right).

    One drawback is that you can’t sync your Google account in Chromium to use the same bookmarks and settings that you have in Chrome; Firefox is an alternative browser that enables cross-platform syncing. Other than that, most features are present, including the ability to add extensions from the Chrome Web Store and also to group tabs together. You can also install web apps for some sites such as YouTube, by clicking the option that appears on the right side of the Omnibox.

    Install extra software

    The standard Raspberry Pi OS only comes with a handful of core applications pre-installed – although there is a ‘Full’ version of the OS supplied with a lot more software (find it in Raspberry Pi Imager, under ‘Raspberry Pi OS (other)’).

    It’s simple to install any extra software you want, however. By far the easiest way is to use the Recommended Software tool (Menu > Preferences > Recommended Software). You can then browse a range of applications; to install one, simply tick its box and click Apply.

    Applications in Recommended Software include the Claws email client and the LibreOffice productivity suite. The latter features six applications: the Writer word processor, Calc spreadsheet, Impress presentation, Draw diagrams, Base database, and Math formula editor. It can load/save Microsoft Office documents too.

    If you can’t find what you need in Recommended Software, you will be able to install additional software packages using the Add/Remove Software tool, or by entering commands (such as sudo apt install and sudo pip install) in a Terminal window.

  • Run Linux games natively on Raspberry Pi

    Run Linux games natively on Raspberry Pi

    Reading Time: 2 minutes

    Micropolis

    magpi.cc/micropolis

    Created by the SimHacker team, this free and open-source game is based on the original SimCity. For those unaware of it, it’s a simulation game which allows you to plan out and build a city while also facing any consequences your actions might result in. And, sometimes, giant monsters.

    How to install:

    sudo apt install micropolis

    Freeciv

    freeciv.org

    As you may have gathered from the name, Freeciv is a clone of the Civilization games, albeit the earlier ones. This version supports up to 126 people in multiplayer, and has a load of mods and scenarios for you to play around with.

    How to install:

    sudo apt install freeciv-client-sdl

    SuperTuxKart

    supertuxkart.net

    This mascot kart racer includes mascots from all your favourite libre operating systems and software, including Tux, the mascot of Linux himself. This is a fun racer full of power-ups, much like your Mario Karts, Sonic Karts, or Diddy Karts, and it even has a story!

    How to install:

    Follow the instructions here.

    Hurrican

    magpi.cc/hurrican

    This game describes itself as ‘THE ultimate Turrican Mega-Mix’, taking ideas from several instalments of the original franchise while at the same time expanding on its universe. It’s a side-scrolling run-and-gun game with a killer soundtrack.

    How to install:

    Follow the instructions here.

    Pingus

    magpi.cc/pingus

    A Lemmings-style puzzle game with little penguins instead. Basically, you have to guide the penguins through a level using a variety of commands you can give them, like dig, redirect, build a bridge, etc. Unfortunately, the penguins do not have any regard for their own well-being.

    How to install:

    sudo apt install pingus
  • 10 Amazing Starter kits

    10 Amazing Starter kits

    Reading Time: 3 minutes

    Picade

    Arcade kit

    This mini arcade cabinet is a wonderful kit that allows you to create a high-quality retro games console, with a nice stick and buttons which can be upgraded in the future if you wish.

    £225 / $249

     
    Raspberry Pi 400 Personal Computer Kit

    All-in-one Raspberry Pi

    A box full of just about everything you need to create a PC – a Raspberry Pi 400, mouse, power supply, microSD card, and a nice Beginners Guide book. Just add a monitor or TV.

    £94 / $125


    CamJam EduKit 3 – Robotics

    Beginner’s robot

    A classic kit for beginners that lets you easily build and program a robot of your very own, and quite cheaply as well! You can even use the box as the chassis.

    £18 / $24

     
    Grow Kit

    Automated herbs

    Growing your own herbs is a great way to not have to constantly buy fresh herbs for cooking, and the Grow Kit makes it very easy to keep them watered so they’ll grow properly.

    £30 / $40

    Autonomous Robotics Platform for Pico

    Pico robot

    We’re entering a new world of Pico robotics, and this Kitronik kit will get you going with it. Pico offers different advantages over Raspberry Pi for robots, so give it a look.

    £41 / $55

    Pico Explorer Base

    Pico playground

    This board allows you to really explore what can be done with a Pico, with plenty of stuff for beginners and loads of things you can then build up from, thanks to its breakouts and screen.

    £22 / $29

    Discovery Kit for Raspberry Pi Pico

    Electronics and microcontrollers

    Loads of little electronics bits that you can use with a Raspberry Pi as well as Pico. It comes with a little guide with several projects too.

    £12 / $16

    Monk Makes Project Box 1

    Intro to electronics

    With enough components to create ten projects, these Monk Makes boxes are a great way to get stuck in with a new Raspberry Pi.

    £12 / $15

    Raspberry Pi Pico MicroPython Learning Kit

    More electronics

    This is basically a bigger version of the Discovery kit with many more components to play around with. It even comes with a Pico.

    £32 / $43

    Grove Starter Kit for Raspberry Pi Pico

    Sensors and more

    This kit is a great way to play around with sensors and motors and more without needing to worry to much about wires – just the programming.

    £44 / $59

  • Old School Minitel Laptop

    Old School Minitel Laptop

    Reading Time: 3 minutes

    Launched in 1982 and remaining in use for exactly 30 years, it was far ahead of its time. Anyone who wanted a terminal to connect to Minitel could get one for free from what became France Télécom, and this led to 9 million sets being installed in homes by 1999. But since Minitel closed, many have ended up being sold. “It’s easy to find a terminal on sale for below €10,” says French maker Gautier Serodon.

    Having snapped one up himself at a garage sale, the 25-year-old decided to bring it back to life. “I love retro tech and I wanted to revive my Minitel with today’s technology,” he says. He decided a Raspberry Pi 3B computer would enable him to do just that. “It’s affordable, compact, and internet-compatible,” he explains. And the plan? To convert it into a battery-powered laptop so he could take notes during his engineering school classes.

    Key to authenticity

    Gautier bagged himself a Minitel 1B terminal, made in 1982 by Telic Alcatel. He stripped it of most of its parts, including the CRT display, but decided he wanted to at least retain use of the terminal’s original – and satisfyingly clicky – AZERTY keyboard. 

    He also kept the power button and power indicator. “I wanted to keep as much of this charming old technology as possible,” he tells us. “The power button and the LED played an important role in maintaining the aesthetics of the Minitel.”

    The screen was replaced by a 10.4-inch LCD panel which came complete with a driver board and this was fixed within the Minitel casing using four 3D-printed parts, one for each corner. The biggest challenge, however, involved retrofitting the old Minitel keyboard so that it would simulate a USB HID keyboard that Raspberry Pi could work with.

    “The Minitel keyboard is a matrix with a 17-wire output cable,” Gautier explains. “When you retrofit a matrix keyboard, the goal is to find the wires of the columns and the wires of the rows – in this case, there are eight rows and eight columns, making a keyboard with a maximum of 64 keys.”

    Looking rosy

    Gautier used an Arduino Pro Micro which has an ATmega32U4 microcontroller on board. “This is the easiest way to emulate a keyboard,” he says. “Other boards such as the Arduino Nano don’t have the same microcontroller, so it’s way more difficult to simulate a keyboard without modifying the bootloader and other things.”

    From this point, the main work involved fixing a Raspberry Pi in place and connecting it to the keyboard, a DC step-down converter, and the power switch. “I placed Raspberry Pi right behind the Minitel’s hatch [located behind the screen] so that it is easy to plug in a dongle for a wireless mouse,” Gautier says. “It’s possible to plug an Ethernet cable directly into Raspberry Pi too.”

    All in all, it makes for a very neat setup, one that is powered by a 12 V Li-ion rechargeable battery for portability. Gautier doesn’t attempt to emulate the UI of an old Minitel system – “I’m simply running Raspberry Pi OS,” he says – but it still gives a flavour of what it was like to use the system. “It’s just a shame I never had the chance to use a Minitel for its original applications,” he laments.

  • Classic games

    Classic games

    Reading Time: 2 minutes

    Doom (1993)

    A game so good, it defined a genre for years. Seriously – FPS games used to be called Doom-clones. As the space marine Doom Guy, you have to fight off the forces of hell with a large variety of guns and a rocking soundtrack. The source code was released by id Software in 1997, and became open-source in 1999, which is why there’s been a long-running joke about trying to get every piece of tech to run it.

    How to install:

    sudo apt install chocolate-doom

    Beneath a Steel Sky (1994)

    A classic point-and-click adventure game, Beneath a Steel Sky has been available as freeware since 2003. It’s a cyberpunk story set in a dystopian Australian future and… well it’s a story game, so we won’t spoil too much. A sequel for it came out just last year, so it’s a great time to familiarise yourself with it.

    How to install:

    sudo apt-get install beneath-a-steel-sky

    Quake III Arena (1999)

    Another id Software classic, and the granddaddy of multiplayer twitch shooters, Q3A was the bane of school IT administrators in the early 2000s because of how easily available it was. Only the demo data is free, but if you have a copy of the game, you can add the files yourself to get the full game.

    How to install:

    sudo apt install quake3
    game-data-packager quake3 -i --gain-root-command sudo

    Minecraft (2011)

    Minecraft Raspberry Pi Edition is a free game on Raspberry Pi. However, it has not been officially updated in many years. You can still hack it with Python to do fun things, and we’ve covered that in the mag before. Minecraft Raspberry Pi Edition Reborn is an effort to mod it to be much closer to the Minecraft you can play elsewhere – it’s still in development, though.

    How to install:

    Follow instructions here.

  • INTERVIEW: Stewart Watkiss

    INTERVIEW: Stewart Watkiss

    Reading Time: 3 minutes

    “I became a member of the Raspberry Pi community from the launch of the first Raspberry Pi,” Stewart tells us. “I couldn’t wait to get my hands on one. Being a member of the community has opened new doors for me; it’s given me an opportunity to make projects which were previously out of reach, to teach skills to others, and fulfil my ambition of writing a book.”

    What is your history with Raspberry Pi?

    As a supporter of Linux, I first heard about Raspberry Pi a few days before the launch. I heard it was a new low-cost Linux computer, and wanted to get hold of one. I was up early on the day of the launch, but didn’t manage to place an order until later that day when the retailers’ websites had recovered. It was then a few months’ wait before it was delivered. Once I had one, it became clear that it was much more than just a Linux computer, and the GPIO connectors meant that I could use it for so much more.

    I created some initial projects and then got involved with more community events, giving talks and workshops at Raspberry Pi events, including some in Cambridge and those nearer home at Birmingham. I also signed up as a STEM ambassador, and I’ve run some Code Clubs in schools.

    How long have you been making for?

    I started getting interested in making during the early 1990s whilst studying electronics. After finishing university, I no longer had access to the equipment needed to go beyond basic projects, so I dropped the hardware side and concentrated more on software projects.

    I bought my first Arduino in 2008, which made electronics much easier and expanded the scope of what the home electronics enthusiast could achieve. I started to get back into electronics, working on some simple projects. It was really in 2012 when I first got my first Raspberry Pi when my making took off. I started with some simple projects and then it grew from there, learning new skills and progressing to more adventurous projects. Since then, I’ve now got a 3D printer as well, which has expanded the scope of what I’m able to do.

    Could you tell us about writing for The MagPi in the early days?

    I wrote a few articles for The MagPi when it was a purely volunteer magazine. I took some projects that I’d created already and created a write-up for the magazine. At the time, I was wanting to write a book and writing for The MagPi was a great way to get more experience. Despite being written by volunteers, it followed all the same process as a professional publication, including a technical review and proofreading. I was impressed by how professional it was, and it was valuable experience for when I got my first book deal.

    What is your favourite thing that you’ve made with a Raspberry Pi?

    My favourite project is one of my first, known as the Bee Box. This was the first project that I did with my children, and I really enjoyed that we were able to work together on it. It was a minibeast project for school using some reed switches to determine the position of a model bee. It then showed a picture on the screen and included sound effects.