In this tutorial from The MagPi issue 68, Steve Martin takes us through the process of house-building in Minecraft Pi. Get your copy of The MagPi in stores now, or download it as a free PDF here.
Minecraft Pi is provided for free as part of the Raspbian operating system. To start your Minecraft: Pi Edition adventures, try our free tutorial Getting started with Minecraft.

Writing programs that create things in Minecraft is not only a great way to learn how to code, but it also means that you have a program that you can run again and again to make as many copies of your Minecraft design as you want. You never need to worry about your creation being destroyed by your brother or sister ever again — simply rerun your program and get it back! Whilst it might take a little longer to write the program than to build one house, once it’s finished you can build as many houses as you want.
Co-ordinates in Minecraft
Let’s start with a review of the coordinate system that Minecraft uses to know where to place blocks. If you are already familiar with this, you can skip to the next section. Otherwise, read on.
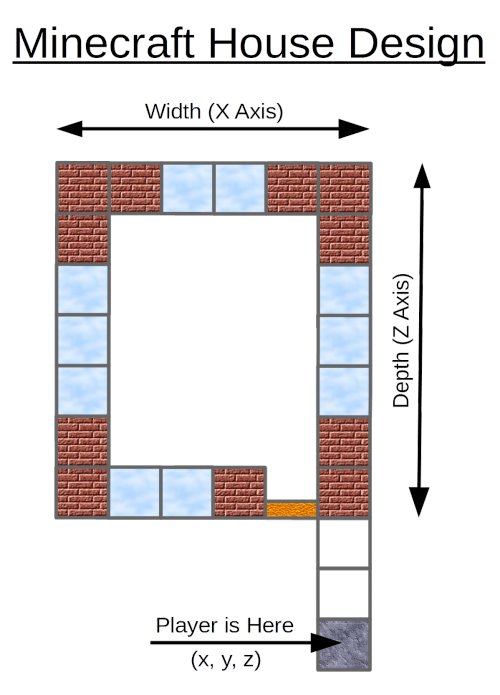
Plan view of our house design
Minecraft shows us a three-dimensional (3D) view of the world. Imagine that the room you are in is the Minecraft world and you want to describe your location within that room. You can do so with three numbers, as follows:
- How far across the room are you? As you move from side to side, you change this number. We can consider this value to be our X coordinate.
- How high off the ground are you? If you are upstairs, or if you jump, this value increases. We can consider this value to be our Y coordinate.
- How far into the room are you? As you walk forwards or backwards, you change this number. We can consider this value to be our Z coordinate.
You might have done graphs in school with X going across the page and Y going up the page. Coordinates in Minecraft are very similar, except that we have an extra value, Z, for our third dimension. Don’t worry if this still seems a little confusing: once we start to build our house, you will see how these three dimensions work in Minecraft.
Designing our house
It is a good idea to start with a rough design for our house. This will help us to work out the values for the coordinates when we are adding doors and windows to our house. You don’t have to plan every detail of your house right away. It is always fun to enhance it once you have got the basic design written. The image above shows the plan view of the house design that we will be creating in this tutorial. Note that because this is a plan view, it only shows the X and Z co-ordinates; we can’t see how high anything is. Hopefully, you can imagine the house extending up from the screen.
We will build our house close to where the Minecraft player is standing. This a good idea when creating something in Minecraft with Python, as it saves us from having to walk around the Minecraft world to try to find our creation.
Starting our program
Type in the code as you work through this tutorial. You can use any editor you like; we would suggest either Python 3 (IDLE) or Thonny Python IDE, both of which you can find on the Raspberry Pi menu under Programming. Start by selecting the File menu and creating a new file. Save the file with a name of your choice; it must end with .py so that the Raspberry Pi knows that it is a Python program.
It is important to enter the code exactly as it is shown in the listing. Pay particular attention to both the spelling and capitalisation (upper- or lower-case letters) used. You may find that when you run your program the first time, it doesn’t work. This is very common and just means there’s a small error somewhere. The error message will give you a clue about where the error is.
It is good practice to start all of your Python programs with the first line shown in our listing. All other lines that start with a # are comments. These are ignored by Python, but they are a good way to remind us what the program is doing.
The two lines starting with from tell Python about the Minecraft API; this is a code library that our program will be using to talk to Minecraft. The line starting mc = creates a connection between our Python program and the game. Then we get the player’s location broken down into three variables: x, y, and z.
Building the shell of our house
To help us build our house, we define three variables that specify its width, height, and depth. Defining these variables makes it easy for us to change the size of our house later; it also makes the code easier to understand when we are setting the co-ordinates of the Minecraft bricks. For now, we suggest that you use the same values that we have; you can go back and change them once the house is complete and you want to alter its design.
It’s now time to start placing some bricks. We create the shell of our house with just two lines of code! These lines of code each use the setBlocks command to create a complete block of bricks. This function takes the following arguments:
setBlocks(x1, y1, z1, x2, y2, z2, block-id, data)
x1, y1, and z1 are the coordinates of one corner of the block of bricks that we want to create; x1, y1, and z1 are the coordinates of the other corner. The block-id is the type of block that we want to use. Some blocks require another value called data; we will see this being used later, but you can ignore it for now.
We have to work out the values that we need to use in place of x1, y1, z1, x1, y1, z1 for our walls. Note that what we want is a larger outer block made of bricks and that is filled with a slightly smaller block of air blocks. Yes, in Minecraft even air is actually just another type of block.
Once you have typed in the two lines that create the shell of your house, you almost ready to run your program. Before doing so, you must have Minecraft running and displaying the contents of your world. Do not have a world loaded with things that you have created, as they may get destroyed by the house that we are building. Go to a clear area in the Minecraft world before running the program. When you run your program, check for any errors in the ‘console’ window and fix them, repeatedly running the code again until you’ve corrected all the errors.
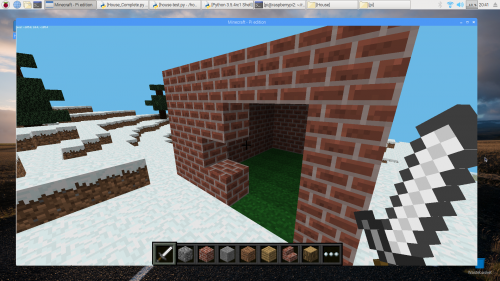
You should see a block of bricks now, as shown above. You may have to turn the player around in the Minecraft world before you can see your house.
Adding the floor and door
Now, let’s make our house a bit more interesting! Add the lines for the floor and door. Note that the floor extends beyond the boundary of the wall of the house; can you see how we achieve this?
Hint: look closely at how we calculate the
xandzattributes as compared to when we created the house shell above. Also note that we use a value ofy-1to create the floor below our feet.
Minecraft doors are two blocks high, so we have to create them in two parts. This is where we have to use the data argument. A value of 0 is used for the lower half of the door, and a value of 8 is used for the upper half (the part with the windows in it). These values will create an open door. If we add 4 to each of these values, a closed door will be created.
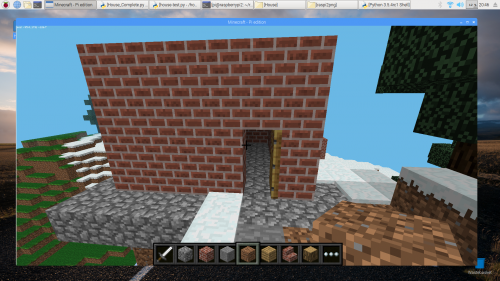
Before you run your program again, move to a new location in Minecraft to build the house away from the previous one. Then run it to check that the floor and door are created; you will need to fix any errors again. Even if your program runs without errors, check that the floor and door are positioned correctly. If they aren’t, then you will need to check the arguments so setBlock and setBlocks are exactly as shown in the listing.
Adding windows
Hopefully you will agree that your house is beginning to take shape! Now let’s add some windows. Looking at the plan for our house, we can see that there is a window on each side; see if you can follow along. Add the four lines of code, one for each window.
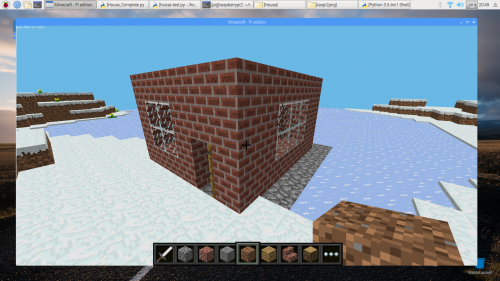
Now you can move to yet another location and run the program again; you should have a window on each side of the house. Our house is starting to look pretty good!
Adding a roof
The final stage is to add a roof to the house. To do this we are going to use wooden stairs. We will do this inside a loop so that if you change the width of your house, more layers are added to the roof. Enter the rest of the code. Be careful with the indentation: I recommend using spaces and avoiding the use of tabs. After the if statement, you need to indent the code even further. Each indentation level needs four spaces, so below the line with if on it, you will need eight spaces.
Since some of these code lines are lengthy and indented a lot, you may well find that the text wraps around as you reach the right-hand side of your editor window — don’t worry about this. You will have to be careful to get those indents right, however.
Now move somewhere new in your world and run the complete program. Iron out any last bugs, then admire your house! Does it look how you expect? Can you make it better?
Customising your house
Now you can start to customise your house. It is a good idea to use Save As in the menu to save a new version of your program. Then you can keep different designs, or refer back to your previous program if you get to a point where you don’t understand why your new one doesn’t work.
Consider these changes:
- Change the size of your house. Are you able also to move the door and windows so they stay in proportion?
- Change the materials used for the house. An ice house placed in an area of snow would look really cool!
- Add a back door to your house. Or make the front door a double-width door!
We hope that you have enjoyed writing this program to build a house. Now you can easily add a house to your Minecraft world whenever you want to by simply running this program.
Get the complete code for this project here.
Continue your Minecraft journey
Minecraft Pi’s programmable interface is an ideal platform for learning Python. If you’d like to try more of our free tutorials, check out:
You may also enjoy Martin O’Hanlon’s and David Whale’s Adventures in Minecraft, and the Hacking and Making in Minecraft MagPi Essentials guide, which you can download for free or buy in print here.
Website: LINK
Schreibe einen Kommentar
Du musst angemeldet sein, um einen Kommentar abzugeben.