Looking for something interesting to attend on August 30 — between PAX Dev and PAX West? Join TwitchDev, GameSparks, and Amazon Web Services to learn how to grow your game community and use analytics to expand even faster.
Here are a few reasons to join us:
1. Grow your community
You want people to learn about your game and Twitch is one of the best ways to make it happen. But this isn’t going to happen on its own.
At this event, learn how to bring your game to the top of the pile for your community. Take advantage of Twitch Extensions and the Twitch API to make the experience as immersive as possible and produce data about your game and engaged viewers.
2. Build better games
As your community grows, wouldn’t you like to understand how to increase the fun? Or the areas people like to play, a pinch point in the game play that frustrates newer players, or even understanding the demographics of your audience?
At this event, you’ll hear how harnessing the power of AWS can help you ingest player data on the fly via GameSparks or your own Business Intelligence (BI) tools for reporting stats on what is really happening in your game. Use these insights to develop games that resonate better with your core audience.
3. Connect with your peers
Not only will you hear from experts in the gaming industry, but you’ll also be able to have your questions answered, meet other developers, and get help with your specific use cases.
Copymaster 3D is selling its first 50 3D printers for a 20% discount–meaning you could get one for as low as £399.20. First come first served. Learn more here.
Copymaster 3D is a brand new player in the 3D printing world and has certainly raised a few eyebrows since it burst onto the scene with its website launch in June. Copymaster has now announced that it is set to debut its first generation of 3D printers on the 27th August. With its high performance and low price tag, it looks set to shake up the budget-mid range sector of the market.
3D printing is in a great spot at the moment. It is more affordable than it ever has been and even the most basic budget 3D printers are capable of creating some nice prints. Popular brands like Creality and Wanhao offer a range of good value 3D printers that have so far satisfied the needs of beginner and intermediate users alike. So, what do Copymaster 3D printers offer that make them a better proposition?
Print Bigger For Less
The Copymaster 3D is available in 3 different models. The model numbers are relative to the build size of the printer, with the 500 having the largest build volume of the three:
You would typically expect large build volumes like these to be from a much more expensive printer. Having a bigger space to play with means bigger possibilities for what you can print.
Be More Flexible
Arguably the most compelling feature of the Copymaster is its wide compatibility with a range of different filaments as standard. The direct drive integrated extruder head can print with flexible filament straight out of the box with no modifications or upgrades required. The extruder head has also been designed to be highly precise. Its print accuracy is within 50 microns so finished prints truly represent the design files that are used.
Thoughtfully Designed In The UK
From concept to final product, the Copymaster 3D was designed by a team of people who are passionate about 3D printers and actually use them on a daily basis. This really shows when you see, first hand, the useful features, solid build quality and nice touches that have been incorporated into the design.
The Copymaster 3D is an open design, all in one unit. It is simple to assemble and only takes about 20 minutes. The industrial grade aluminium frame is very strong and stable, which benefits the printing process.
The no-filament sensor is a great feature that will rescue countless 3D print jobs. Running your printer for hours at a time only for the print to fail because you ran out of filament is probably one of the biggest frustrations you can ever experience in 3D printing. The sensor will automatically pause the printing if it detects that the filament has run out. When you swap out the filament, it will resume as normal.
The Copymaster 3D also comes with a heated print bed as standard, with a diamond black glass print surface upgrade available, to help give you more consistent results for a variety of different filaments. It is magnetic, flexible and is designed to take the hassle out of print removal.
Inspiration Behind the Brand
Tim Gray, the founder of Copymaster 3D and also the CEO of Technology Outlet, the UK’s leading online retailer for 3D printers, explains why he created the Copymaster 3D brand:
“I wanted to make 3D printing easier and more accessible for more people. I wanted to let people experiment with a range of different filaments without running out of space to print or running into the issue of needing to modify the extruder head. There has been a lot of demand for an affordable printer that offers this functionality and the Copymaster provides this. I’m really happy with it.”
—
Copymaster 3D will be attending the TCT Show at the NEC on the 25-27 September to showcase its lineup for the first time. Copymaster 3D is open to reseller applications worldwide. For more information, email [email protected]
All Copymaster 3D printers will begin shipping worldwide from the 27th August and all pre orders will receive any two PLA filaments of any colour for free.
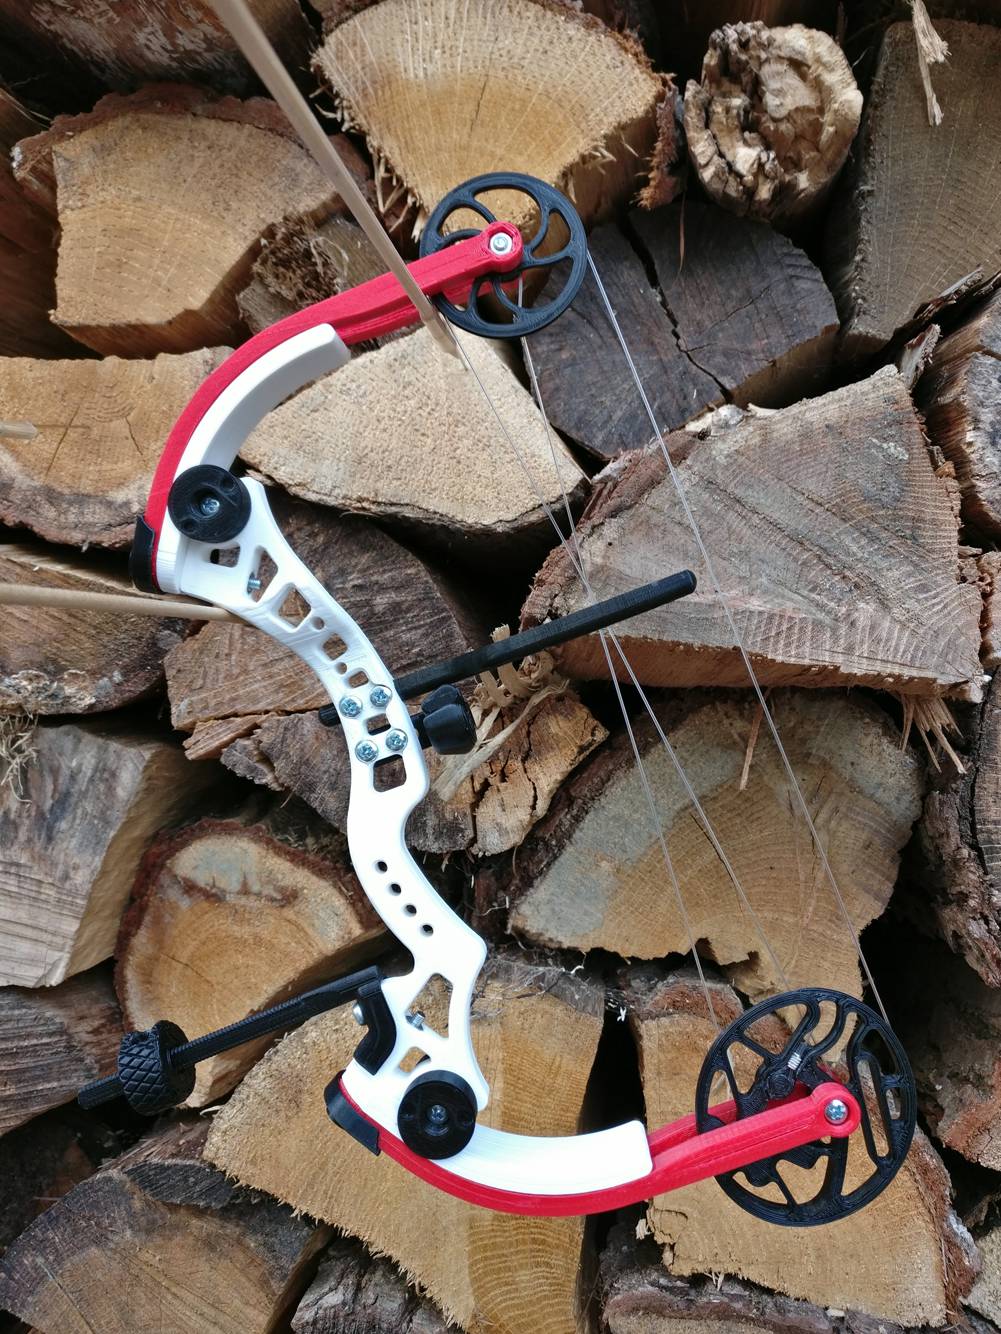
Looking for an affordable and fun project to round out the summer with? Why not practice your archery skills with a fully 3D printed miniature compound bow.
While the world has been expressing an immense amount of concern over the potential rise of 3D printed guns, it’s easy to lose sight of all the fun projects that this technology enables us to create. To us, the most impressive projects consist of functional objects that are primarily made up of 3D printed parts.
One type of design we’ve commonly seen shared by makers is the crossbow, available on the internet in both miniature and regular size. For instance, German engineer and maker Sebastian Stickel–who goes by DonStick3l on Thingiverse–created a 3D printed miniature compound bow to fire off wood skewers.
It’s fully functional and has an incredible design, made up of 18 3D printed parts, some string and a few screws.
For just a few bucks, you can create your own compound bow too. Of course, if you plan on 3D printing your own, be sure to use it responsibly! With it, you can become maker version of Robin Hood, becoming a master archer and having an enjoyable outdoor activity to impress your friends and family with.
Let’s take a look at what you need and the basics on how to build your own.
3D Printed Miniature Compound Bow: What You Need & How to Build it
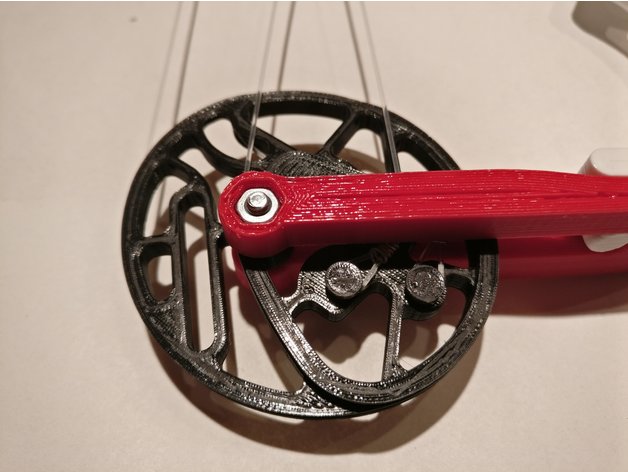
There are 18 different 3D printed parts that make up the miniature compound bow, all of which are freely available to download via Thingiverse. Aside from your 3D printer, you need a collection of M3 screws and some bow string (some Thingiverse comments suggest using nylon fishing line with a 0.7mm diameter). Finally, for the arrows, the designer recommends wood skewers that are 300mm in length and have a diameter of 2.5 to 3.5mm.
Compared to some of the other Weekend Projects we’ve shared, this miniature compound bow seems quite challenging to build. Thankfully, Stickel shares a comprehensive assembly guide alongside the STL files, equipped with every step, part ID, and pictures to assist in the build process.
After a quick disclaimer urging makers to use the compound bow responsibly, the creator shares all of his slicer settings. Next, there’s a lengthy section that explains what each 3D printed part does and how it was designed, along with how to optimize the printing process and perform post-processing for every component.
After going over some information on how to select the non-3D printed hardware, the engineer starts on the intensive build process, which consists of 36 different steps.
If you want to learn more about the assembly of the miniature compound bow, head over to the project’s Thingiverse page and look at the Compound_Bow_Instructions.pdf, which is included with the collection of STL files. Stickel also appears to be quite active in the comment section, so feel free to drop him a line if you’d like.
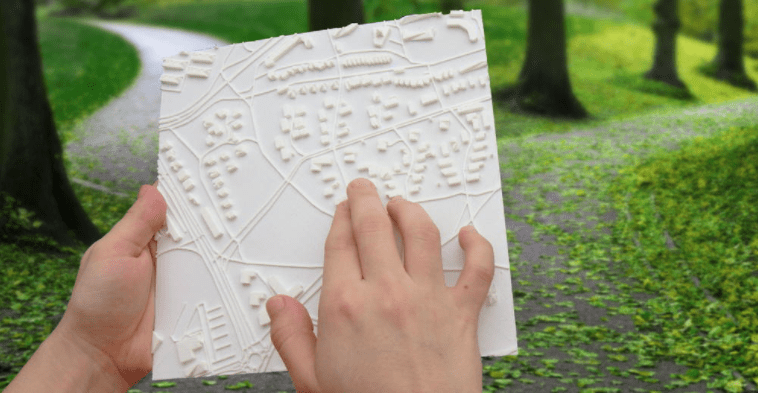
Recently shared on the r/3DPrinting subreddit, one maker created an endearing anniversary gift for his girlfriend. This 3D printed clock has a custom 3D map as the face, showcasing the exact area where they first met. You make your own too!
Every relationship is special in its own way, and 3D printing offers a great way to express your affection with a completely customized and unique present.
One Reddit user named “rhonest” recently shared an amazing anniversary gift on the r/3Dprinting subreddit: a 3D printed clock that showcases a map of the location where the couple met. To make the gift even more personal, he also accentuated the numbers of the date when they first became acquainted with one another.
It’s a lovely and charming idea, and also pretty easy to make on your own. Using your 3D printer, a custom map making website and a simple clock mechanism, you can also preserve your own cherished memories in time (pun intended).
Whether you’re celebrating a relationship or just want to pay homage to your childhood neighborhood, this Weekend Project is an easy way to make something extremely special to you or your loved ones.
Let’s take a quick look at how to make a 3D printed clock with a customized map embedded into the face!
3D Printed Customized Map Clock: What You Need & How to Build it
According to “rhonest”, he used Touch Mapper to create his 3D tactile map. The platform is simple to use; all you have to do is enter an address to create your map. You can either order a professional 3D print directly from the website or download the STL yourself.
Aside from your 3D printer and 3D map file, all you need is a Quartz Movement mechanism to operate the wall clock.
Since the map comes in a square shape, you’ll need to use some CAD software to transform it into a circle. And, in order to tell the time, you’ll also need to integrate the proper marks where each number should be situated. For the clock mechanism, a small circle must be placed in the very center of the design. The exact measurement will depend on the Quartz Movement mechanism you decide to buy.
If you don’t have too much experience with 3D modeling, there are easy options like TinkerCAD. Check out our TinkerCAD Tutorial to learn more about this web-based program.
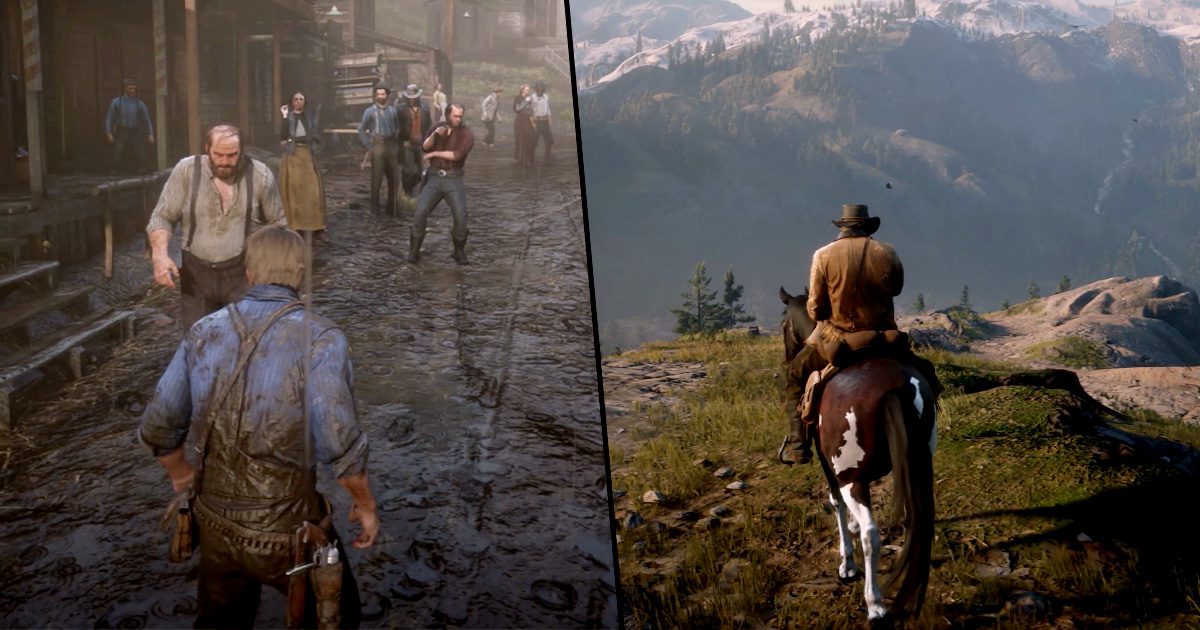
Rockstar Games have finally released the first gameplay trailer for the hotly anticipated Red Dead Redemption 2.
Though the initial, tantalising trailer for the game dropped earlier this year, fans have been craving shots of actual gameplay ever since the announcement of the game.
Up until now, Rockstar have only teased fans with a few cinematic trailers, which have focussed on setting up the story of the game, namely the tales of Arthur Morgan and the Van der Linde gang.
However, the games company confirmed fans will get to see actual gameplay in a tweet yesterday, August 8, simply giving the time and date for the release of the official gameplay trailer.
And here it is:
In the past, the game’s company has teased that Red Dead Redemption 2 will offer ‘incredible emotional depth’, ‘great story elements’ and ‘great gameplay elements’.
They have also suggested the sequel will have a bigger focus on multiplayer, though it’s not yet clear how that will be incorporated in the game.
Rockstar announced Red Dead Redemption‘s sequel back in February this year, again via Twitter, with a post simply saying ‘Red Dead Redemption 2 is Coming October 26th 2018’.
The sequel has been long overdue since the debut of 2010’s seminal masterpiece Red Dead Redemption on the PlayStation 3 and Xbox 360.
A press release at the time said:
We are excited to announce that Red Dead Redemption 2 will be released on October 26th 2018. We apologise to everyone disappointed by this delay. While we had hoped to have the game out sooner, we require a little extra time for polish.
We sincerely thank you for your patience and hope that when you get to play the game, you will agree the wait will have been worth it. In the meantime, please check out these screenshots from the game. We look forward to sharing a lot more information with you in the coming weeks.
The release and subsequent success of Red Dead Redemption in 2010 was a pivotal moment for Rockstar, as it proved once and for all they didn’t need to rely on the huge achievement of Grand Theft Auto to thrive as a company.
Talking about the new game, Strauss Zelnick, CEO of Take Two Interactive, told Game Rant last year:
We support all of our releases very significantly. We’re incredibly proud of our marketing teams throughout the company and our support is quite significant for all of our releases…I think you should expect to see, with regard to all of our releases, very significant marketing support.
I don’t think there is any competitive dynamic with any of our upcoming releases, apart from the fact that our success is driven by quality. So I think the success of [Red Dead Redemption 2], which is highly anticipated, will be driven by its quality, and I think that the ongoing success of Grand Theft Auto Online is driven by its extraordinary quality.
Only a couple months to wait for the real thing now!
Red Dead Redemption 2 will be released on October 26.
If you have a story you want to tell send it to UNILAD via [email protected]
Around two hours into Motion Twin’s wonderful metroidvania/rogue-lite Dead Cells, I was on a roll – confident I’d really gotten the hang of things, and certain I was on the path to victory.
I’d just fought my way through a dungeon full of zombies, barely made it in one piece across a field of demonic killing machines, and done battle with wizards and archers along the ramparts of an ancient castle. I felt good. Powerful. Ready for whatever came next.
Then I came face to face with the first boss, and my newfound arrogance led to my foolhardy tush being handed to me on a plate. I fell in battle, and was returned once more to the now all-too familiar starting area.
And so, faced with the prospect of doing it all over again (yet again), I decided I’d walk away for a bit. I turned off my Switch and went to make a cup of tea.
Without even really realising it however, I found myself back at it – knee deep in zombie guts and nearly at the second area – before the kettle had even boiled. Long story short; Dead Cells is seriously damn addictive, my friends.
Here’s the deal for the uninitiated: Dead Cells is essentially a cross between Dark Souls, Binding of Isaac, and classic Metroid – but it amounts to so much more than the games that influenced it.
It’s that rare breed of game that offers a slick, punishing, but constantly rewarding experience that will always leave you desperate to come back for more, no matter how hard it slaps you down. And it will slap you down hard.
The hero of Dead Cells is unable to die, you see. A silent protagonist, it’s your job to guide him through this mysterious castle and find the way out. Like Metroid, there are special items to collect that open up new areas and help you get through earlier areas faster – the twist, however, is that when you die in Dead Cells, you lose all the gear you’ve collected and have to go right back to the beginning to start over.
Only certain perks – like traversal abilities and health potion upgrades – will remain with you when you return to life, whereas most of your gold, weapons, and precious cells (the “souls” of this game that can be used to be upgrade and unlock new gear) are gone.
Unlike Dark Souls, you can’t reclaim that shit, my friend. When it’s gone, it’s gone, which makes trying to find the exit in an area so you can go upgrade your gear an arse-clenchingly tense exercise- especially when you’re lugging around 30+ cells.
If starting over again and again sounds like a bit of a slog, that’s because it can be – but very, very rarely. For the most part, you’ll find that each playthrough gets incrementally easier, thanks to those handy cells we were just talking about. You remember. It wasn’t that long ago. Pop back up the last paragraph if you’ve already forgotten, I’ll wait.
In between each “level”, you’ll come across a helpful chap who can help you unlock all manner of handy goodies. These range from permanent perks like health potions or the ability to retain a certain amount of gold upon death, to weapons and traps that can be unlocked and will randomly appear across the map on your next playthrough.
In short then, every time you die, you’ll get to start again with new gear to find, a better understanding of the enemies, and – even though the map layout does ever so slightly change each time – a better understanding of where you’re going. If it sounds slightly daunting on paper, it’s really not as complicated as I made it sound. As soon as the game starts, instinct kind of kicks in, and you really do just go with the flow, even if that flow does seem to kill you a lot.
Still, once you accept that you’re just gonna have to roll with the punches and adjust to the game’s ethos of doing a little bit better each time, the game really clicks. Death is never something you want, but it never feels frustrating or unfair. You simply head back to the start, safe in the knowledge that you’ve learned something important, or earned a sweet new bit of gear.
I know the idea of having to play through the same areas and fight the same enemies over and over again doesn’t sound super appealing, but Motion Twin have done a magnificent job of turning what should be a massive pain into one of the game’s most addictive – and innovative – features.
For a start, a “run” doesn’t even take that long. You can get through an area in anywhere between two to ten minutes, depending on how thorough you want to be. During the first few hours you’ll want to scour levels to find the best weapons, unlock blueprints, and collect as many cells as you can – but as you slowly upgrade your characters abilities you’ll come across stronger weapons more frequently, negating the need to comb every nook and cranny of every area.
You’ll also be pleased to know that there are various permanent runes you can claim. Not only do these make travelling from A to B a little more expedient, they also open up new paths that lead to entirely new areas, in that grand Metroidvania tradition. For example, early on you’ll discover a rune that lets you sprout vines to climb to previously unreachable ledges.
With this new ability, you’ll find that from the starting area, instead of going back to the usual second location, you’re able to reach an entirely new section which in turn has its own secrets, enemies, and upgrades to discover.
It’s this constant loop of minor progression that makes death in Dead Cells genuinely rewarding, and deliciously addictive – no matter how many mistakes you make, the game will continue to slowly unfold in front of you, revealing something new, and offering you more choices with every new start.
These choices naturally extend to combat, which offers a frankly astounding level of detail and variety. You’ll start off with your standard sword and bow (or shield if you prefer), but you’ll slowly unlock blueprints for powerful flaming swords, ice bows, elemental attacks, bear traps, turrets, grenades, and more.
Your loadout will often come down to the items you discover during a run, which gently nudges you to try out new tactics with every fresh attempt. With that said, if you are set in your ways and know that ice attacks, a quick sword, and a turret is all you need for a good time, then if you scout an area hard enough you’ll usually find something along the lines of what you’re looking for. Even when you can’t though, adapting to new approaches is all part of the fun.
Combat itself is absolutely incredible, by the way. Slicker than an oiled up Danny Devito, scrapping in Dead Cells is a deadly ballet of dodges, melee attacks, and ranged moves. Your two standard weapons are joined by two special items – the aforementioned turrets and grenades.
Not only are these fantastic tools for clearing a crowd of enemies without ever getting your hands dirty, you’ll find that they also have a super generous cooldown time, which means you can, for example, throw freeze grenades, roll behind opponents, and slice them to pieces till your heart’s content. This is currently my favourite tactic, by the way.
There are various enemies lurking throughout the game, all with their own unique attack patterns for you to learn and master. Once again, the more you play, the easier you’ll find even the more formidable of foes as you discover the best techniques for dealing with them swiftly, and without mercy. That’s not to say the game doesn’t remain a constant challenge however – the second you start to get complacent, Dead Cells will beat your face into the pavement and remind you who’s boss.
To sum up then, Dead Cells is a towering success on every level. Motion Twin have managed to smoosh together two genres that should never, ever have worked together, and created an utterly captivating, constantly changing arcade-style adventure.
The idea of playing through areas over and over again had me groaning when I first heard about it, but in practice there’s more than enough variety in the weapons, secrets and enemies you discover on your journey – helped by some first rate combat and level design – that ensures I genuinely cannot put this game down.
Now if you’ll excuse me, I was cut down far too soon on my last attempt. And you know what they say – if at first you don’t succeed, stab things with your flaming ninja blade till you get the result you want.
Child of Light und Valiant Hearts, zwei von Hand gezeichnete Abenteuer aus der Feder von Ubisoft Montreal und Ubisoft Montpellier erscheinen am 11. Oktober sowie 8. November für die Nintendo Switch. Child of Light erzählt die Entwicklungsgeschichte der heranwachsenden Aurora, einem jungen Mädchen, dass das verlorene Königreich Lemuria und ihren kränkelnden Vater zu retten versucht. In der modernen Neuinterpretation eines Märchens aus Kindheitstagen, mit einzigartiger Wasserfarben-Optik, begleiten Spieler Aurora und ihr Irrlicht Igniculus sowie eine ganze Reihe weiterer Mitstreiter, durch ihren Kampf gegen die dunkle Königin von Lemuria und deren Gefolgsleuten.
Mit jedem errungenen Sieg über die Schergen der Dunklen Königin, steigt der Charakter weiter auf und schaltet neue Fähigkeitenpunkte frei, die dann verwendet können, um die einzigartigen Fähigkeiten der eigenen Begleiter aufzuwerten. Durch die Anfertigung und Optimierung der eigenen Ausrüstung, lässt sich zusätzlich die eigene Schlagkraft verbessern. Mit Hilfe der Macht des Lichtes und Igniculus gilt es zudem Rätsel zu lösen. Auf der Switch, können Spieler gemeinsam mit einem Freund spielen wobei dieser dann die Rolle des Igniculus übernimmt und mittels Joy-Con gesteuert werden kann.
Valiant Hearts erzählt die liebevoll gestaltete Geschichte von fünf Fremden, die durch den Horror des Krieges und einen treuen vierbeinigen Begleiter zusammenfinden. Angesiedelt während des ersten Weltkrieges, handelt es sich bei Valiant Hearts um eine Geschichte voller Freundschaft, Liebe, Aufopferung und Tragödien – ein wahrlich herzzerreißendes Abenteuer während einem der dunkelsten Kapitel der Geschichte.
Auf eurer Reise werdet ihr berühmte Schauplätze des ersten Weltkrieges zu sehen bekommen, darunter Reims sowie Montfaucon und wichtige, kriegsentscheidende Momente miterleben, wie bspw. die Schlacht um Marne und Somme, während ihr mit eurem treuen Hund knackige Rätsel löst, und euch hinter den feindlichen Linien bewegt.
What is an STL file? What is it good for? How does it work? We simply explain the STL file format for 3D printing in depth.
Here’s a primer on what they are and how they work, the advantages and disadvantages of their use, plus alternative file formats to consider. In this article, we’re talking about the 3D printing file format, not about the Standard Template Library in C++.
In a nutshell, an STL file stores information about 3D models. This format describes only the surface geometry of a three-dimensional object without any representation of color, texture or other common model attributes.
These files are usually generated by a computer-aided design (CAD) program, as an end product of the 3D modeling process. “.STL” is the file extension of the STL file format.
The STL file format is the most commonly used file format for 3D printing. When used in conjunction with a 3D slicer, it allows a computer to communicate with 3D printer hardware.
Since its humble beginnings, the STL file format has been adopted and supported by many other CAD software packages, and today is widely used for rapid prototyping, 3D printing, and computer-aided manufacturing. Hobbyists and professionals use it alike.
2. What does the file extension .STL stand for?
The true meaning of the file extension .STL has been lost to the mists of time.
It’s widely believed to be an abbreviation of the word STereoLithography, though sometimes it is also referred to as “Standard Triangle Language” or “Standard Tessellation Language”.
3. How does the STL file format store a 3D model?
The main purpose of the STL file format is to encode the surface geometry of a 3D object. It encodes this information using a simple concept called “tessellation”.
3.1 Tessellation
Tessellation is the process of tiling a surface with one or more geometric shapes such that there are no overlaps or gaps. If you have ever seen a tiled floor or wall, that is a good real life example of tessellation.
The tiled wall and floor are simple real life examples of tessellation
Tessellation can involve simple geometric shapes or very complicated (and imaginative) shapes. Here are some examples of artistic tessellations due to the famous painter M. C. Escher. In fact, if you want to see more examples of amazing tessellations, we recommend that you check out his paintings.
Two tessellation paintings by M. C. Escher
3.2 The invention of the STL file format: exploiting tessellation to encode surface geometry
Back in 1987, Chuck Hull had just invented the first stereolithographic 3D printer, and The Albert Consulting Group for 3D Systems were trying to figure out a way to transfer information about 3D CAD models to the 3D printer. They realized that they could use tessellations of the 3D model’s surface to encode this information!
The basic idea was to tessellate the 2 dimensional outer surface of 3D models using tiny triangles (also called “facets”) and store information about the facets in a file.
Let’s look at a few examples to understand how this works. For example, if you have a simple 3D cube, this can be covered by 12 triangles, as shown in the image below. As you can see, there are two triangles per face. Since the cube has six faces, it adds up to 12 triangles.
If you have a 3D model of a sphere, then it can be covered by many small triangles, also shown in the same image.
Tessellations of a cube and a sphere
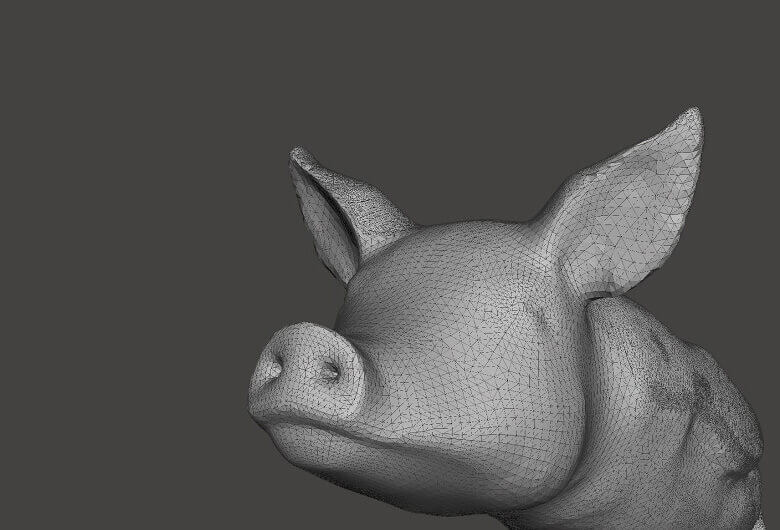
Here is another example of a very complicated 3D shape which has been tessellated with triangles.
Tessellation of a 3D pig (source : i.materialize)
The Albert Consulting Group for 3D Systems realized that if they could store the information about these tiny triangles in a file, then this file could completely describe the surface of an arbitrary 3D model. This formed the basic idea behind the STL file format!
4. How does an STL file store information about facets?
The STL file format provides two different ways of storing information about the triangular facets that tile the object surface. These are called the ASCII encoding and the binary encoding. In both formats, the following information of each triangle is stored:
The coordinates of the vertices.
The components of the unit normal vector to the triangle. The normal vector should point outwards with respect to the 3D model.
An STL file stores the co-ordinates of the vertices and the components of the unit normal vector to the facets
4.1 The ASCII STL file format
The ASCII STL file starts with the mandatory line:
solid name>
where is the name of the 3D model. Name can be left blank, but there must be a space after the word solid in that case.
The file continues with information about the covering triangles. Information about the vertices and the normal vector is represented as follows:
Here, n is the normal to the triangle and v1, v2 and v3 are the vertices of the triangle. Co-ordinate values are represented as a floating point number with sign-mantissa-e-sign-exponent format, e.g., “3.245000e-002”.
The file ends with the mandatory line:
endsolid name>
4.2 The binary STL file format
If the tessellation involves many small triangles, the ASCII STL file can become huge. This is why a more compact binary version exists.
The binary STL file starts with a 80 character header. This is generally ignored by most STL file readers, with some notable exceptions that we will talk about later. After the header, the total number of triangles is indicated using a 4 byte unsigned integer.
UINT8[80] – Header
UINT32 – Number of triangles
The information about the triangles follow subsequently. The file simply ends after the last triangle.
Each triangle is represented by twelve 32-bit floating point number. Just like the ASCII STL file, 3 numbers are for the 3D Cartesian co-ordinates of the normal to the triangle. The remaining 9 numbers are for the coordinates of the vertices (three each). Here’s how this looks like:
Note that after each triangle, there is a 2 byte sequence called the “attribute byte count”. In most cases, this is set to zero and acts a spacer between two triangles. But some software also use these 2 bytes to encode additional information about the triangle. We will see such an example later, where these bytes will be used to store color information.
5. Special rules for the STL format
The STL specification has some special rules for tessellation and for storing information.
5.1 The vertex rule
The vertex rule states that each triangle must share two vertices with its neighboring triangles.
This rule is to be respected when tessellating the surface of the 3D object.
Here’s an example of a valid and invalid tessellation, according to this rule. The figure on the left violates this rule and is an invalid tessellation, while the figure on the right is conformant and a valid tessellation.
Vertex rule for STL files: The figure on the left is an invalid tessellation, while the figure on the right is acceptable.
5.2 The orientation rule
The orientation rule says that the orientation of the facet (i.e. which way is “in” the 3D object and which way is “out”) must be specified in two ways.
First, the direction of the normal should point outwards. Second, the vertices are listed in counterclockwise order when looking at the object from the outside (right-hand rule).
The orientation of each facet is specified in two ways: by the direction of the normal vector and by the ordering of the vertices
This redundancy exists for a reason. It helps ensure consistency of the data and spot corrupt data. A software can, for example, calculate the orientation from the normal and subsequently from the vertices and verify whether they match. If it doesn’t, then it can declare the STL file to be corrupt!
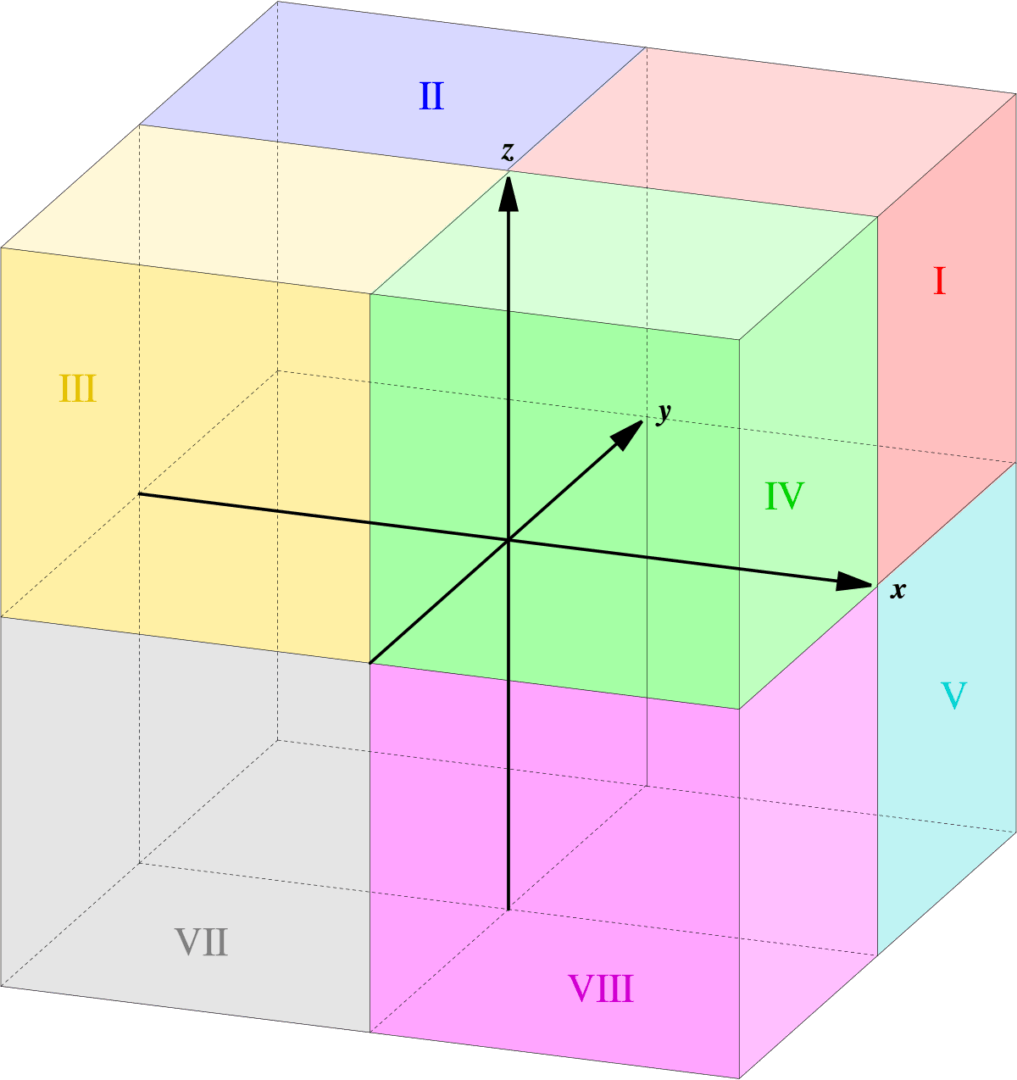
5.3 The all positive octant rule
The all positive octant rule says that the coordinates of the triangle vertices must all be positive.
This implies that the 3D object lives in the all-positive octant of the 3D Cartesian coordinate system (and hence the name).
The rationale behind this rule is to save space. If the 3D object was allowed to live anywhere in the coordinate space, we would have to deal with negative co-ordinates. To store negative co-ordinates, one needs to use signed floating point numbers. Signed floating point numbers require one additional bit to store the sign (+/-). By ensuring that all coordinates are positive, this rule makes sure that we are able to use unsigned numbers for the coordinates and save a bit for every coordinate value we store.
Octant I (red) is the all positive octant
5.4 The triangle sorting rule
The triangle sorting rule recommends that the triangles appear in ascending z-value order.
This helps Slicers slice the 3D models faster. However, this rule is not strictly enforced.
6. How is an STL file 3D printed?
For 3D printing, the STL file has to be opened in a dedicated slicer. What’s a slicer? It’s a piece of 3D printing software that converts digital 3D models into printing instructions for your 3D printer to create an object.
The slicer chops up your STL file into hundreds (sometimes thousands) of flat horizontal layers based on the settings you choose and calculates how much material your printer will need to extrude and how long it will take to do it.
All of this information is then bundled up into a GCode file, the native language of your 3D printer. Slicer settings do have an impact the quality of your print so it’s important to have the right software and settings to get you the best quality print possible.
Once the GCode has been uploaded to your 3D printer, the next stage is for those separate two-dimensional layers to be reassembled as a three-dimensional object on your print-bed. This is done by depositing a succession of thin layers of plastics, metals, or composite materials, and building up the model one layer at a time.
Unfortunately not. Only a 3D design that’s specifically made for 3D printing is 3D printable. The STL file is just the container for the data, not a guarantee that something is printable.
3D models suitable for 3D printing need to have a minimum wall thickness and a “watertight” surface geometry to be 3D printable. Even if it’s visible on a computer screen, it’s impossible to print something with a wall thickness of zero.
There’s also the consideration of overhanging elements on the model. Look at the ALL3DP logo in the picture above; if the model is printed upright, then overhanging elements with more than a 45-degree angle will require supports (which you can see in green).
When downloading an STL file that you haven’t created yourself, it’s worth taking the time to verify that it is indeed 3D printable. This will save you a lot of time and frustration (and wasted filament).
8. Optimizing an STL file for best 3D printing performance
The STL file format approximates the surface of a CAD model with triangles. The approximation is never perfect, and the facets introduce coarseness to the model.
The perfect spherical surface on the left is approximated by tessellations. The figure on the right uses big triangles, resulting in a coarse model. The figure on the center uses smaller triangles and achieves a smoother approximation (source: i.materialize)
The 3D printer will print the object with the same coarseness as specified by the STL file. Of course, by making the triangles smaller and smaller, the approximation can be made better and better, resulting in good quality prints. However, as you decrease the size of the triangle, the number of triangles needed to cover the surface also increases. This leads to gigantic STL file which 3D printers cannot handle. It’s also a pain to share or upload huge files like that.
It is therefore very important to find the right balance between file size and print quality. It does not make sense to reduce the size of the triangles ad infinitum because at some point your eye is not going to be able to distinguish between the print qualities.
Most CAD software offer a couple of settings when exporting STL files. These settings control the size of the facets, and hence print quality and file size. Let’s dig into the most important settings and find out their optimum values.
8.1 Chord height or tolerance
Most CAD software will let you choose a parameter called chord height or tolerance. The chord height is the maximum distance from the surface of the original design and the STL mesh. If you choose the right tolerance, your prints will look smooth and not pixelated. It’s quite obvious that the smaller the chord height, the more accurately the facets represent the actual surface of the model.
The chord height is the height between the STL mesh and the actual surface (source : www.3dhubs.com)
It is recommended to set the tolerance between 0.01 milimeters to 0.001 milimeters. This usually results in good quality prints. There is no point in reducing this any further, as 3D printers cannot print with that level of detail.
8.2 Angular deviation or angular tolerance
Angular tolerance limits the angle between the normals of adjacent triangles. The default angle is usually set at 15 degrees. Decreasing the tolerance (which can range to 0 to 1) improves print resolution.
Angular tolerance is the angle between the normals of adjacent triangles (source : www.3dhubs.com)
The recommended setting for this parameter is 0.
8.3 Binary or ASCII?
Finally, you have a choice of exporting the STL file in binary or ASCII format. The binary format is always recommended for 3D printing since it results in smaller file sizes. However, if you want to manually inspect the STL file for debugging, then ASCII is preferable because it is easier to read.
9. Are there any alternatives to the STL File Format?
The STL file format is not the only format used in 3D printing. There are over 30 file formats for 3D printing. Most important is the OBJ file format, which can store color and texture profiles. Another option the is Polygon file format (PLY), which was originally used for storing 3D scanned objects.
More recently, there have been efforts to launch a new file type by The 3MF Consortium, which is proposing a new 3D printing file format called 3MF. They claim it will streamline and improve the 3D printing process.
To implement it, Microsoft has partnered up companies like Autodesk, HP, and Shapeways to make their vision a reality. More details on the 3MF Consortium can be read on their website, together with preliminary documentation about the 3MF file type on their GitHub page. It’s far too early to say whether this will become widely adopted, however.
10. Advantages and disadvantages of using STL file format over other file formats
Since there are many 3D printing file formats, the obvious question is : which one should you use for your prints? The answer, as it turns out, depends a lot on your use case.
10.1 When not to use an STL file
As we saw earlier, the STL file format cannot store additional information such as color, material etc. of the facets or triangles. It only stores information about the vertices and the normal vector. This means that if you want to use multiple colors or multiple materials for your prints, then the STL file format is not the right choice. The OBJ format is a popular format enjoying good support which has a way to specify color, material etc. Therefore, this is the right choice for this task.
10.2 When to use an STL file
On the other hand, if you want to print with a single color or material, which is most often the case, then STL is better than OBJ since it is simpler, leading to smaller file sizes and faster processing.
10.3 Other advantages of the STL file format
Universal: Another big advantage of the STL file format is that it is universal and supported by nearly all 3D printers. This cannot be said for the OBJ format, even though it enjoys reasonable adoption and support as well. The VRML, AMF and 3MF formats are not widely supported at this point of time.
Mature ecosystem: Most 3D printable models you can find on the internet are in the STL file format. The existence of this ecosystem, combined with STL-based software investments made by 3D printer manufacturers, has given rise to a large user-base that’s heavily invested in the format. This means there’s plenty of third party software dealing with STL files, which is not the case with the other file formats.
10.4 Some disadvantages of the STL file format
There are some glaring disadvantages to using STL as well. As the fidelity of printing processes embraces micron-scale resolution, the number of triangles required to describe smooth curved surfaces can result in massive file sizes. It’s also impossible to include metadata (such as authorship and copyright information) in an STL file.
10.5 Verdict
If your 3D printing needs are simple, then perhaps there is no reason to move away from the STL file format. However, for more advanced prints using multiple material and color, it is perhaps advisable to try the OBJ or other available formats.
11. Color in STL File Format
In the last section, we said that the STL file format cannot handle multi-color models. The reason the STL file format lacks color information is simple. When rapid prototyping evolved in the 1980s, no one thought of color printing. Nowadays, 3D printing materials and processes have evolved rapidly. Some allow you to print in full-color – just think of sandstone 3D selfies, as pictured above.
However it’s not completely fair to say that STL cannot handle colors. It turns out that there are non-standard versions of the STL format that are indeed capable of carrying color information.
For example, the VisCAM and Solidview software packages use the “attribute byte count” at the end of every triangle to store a 15-bit RGB color using the following system:
bits 0 to 4 for blue (0 to 31),
bits 5 to 9 for green (0 to 31),
bits 10 to 14 for red (0 to 31),
bit 15 is 1 if the color is valid, or 0 if the color is not valid (as with normal STL files).
The Materialize Magics software, on the other hand, uses the 80-byte header in the binary format to represent the overall color of the 3D object. The color is specified by including the ASCII string “COLOR=” followed by four bytes representing red, green, blue and alpha channel (transparency) in the range 0–255. This base color can also be overridden at each facet using the “attribute byte count” bytes.
12. STL file resources
If you have read so far, congratulations! You now know quite a bit about STL and can be undoubtedly called an STL file format expert.
In this final section, we will share some awesome software and resources that you can use for downloading, viewing, editing and repairing STL files.
Fortunately, opening an STL file is not too complicated. There are several free STL file viewers for this purpose, which you can either use online or as a desktop application. Refer to our dedicated guide here: 20 Best Free STL File Viewer Tools of 2018
12.3 Editing and converting an STL file
Yes, it is entirely possible to edit an STL file and convert the STL file to another file format. Because the format is open, there is nothing to prevent you from changing the contents of a file. Actually, the process of editing is quite easy. We have a dedicated article on this topic: 7 Free STL Editors + How to Edit and Repair STL Files
12.4 Repairing an STL file
Remember the section where we discussed the rules that STL files must satisfy? For example, adjacent triangles must share two vertices and the right hand rule applied on the vertices should result in the same orientation as the normal vector. If these conditions are violated in an STL file, then it is broken or corrupt.
There are several programs which can help with repairing a broken STL file. For example, Netfabb Basic is a great tool for repairing the most common STL file problems. You find more information on these programs in our article: 24 Best Free 3D Printing Software Tools of 2018
13. Conclusion
In conclusion, we have learned about how the STL file format encodes the layout of 3D models. We discussed how to optimize STL files for the best 3D printing quality. We talked about how the STL file format compares with the other popular 3D printing file format .OBJ and when to use each of these formats. Finally, we shared some resources using which you can download, view, edit and repair STL files.
We hope that an in-depth understanding of the STL file format helps you become a more knowledgeable user of your 3D printer. If you found this article useful, share it with other 3D printing enthusiasts and spread the word. Do you have some questions or remarks? Let us know in the comments below!
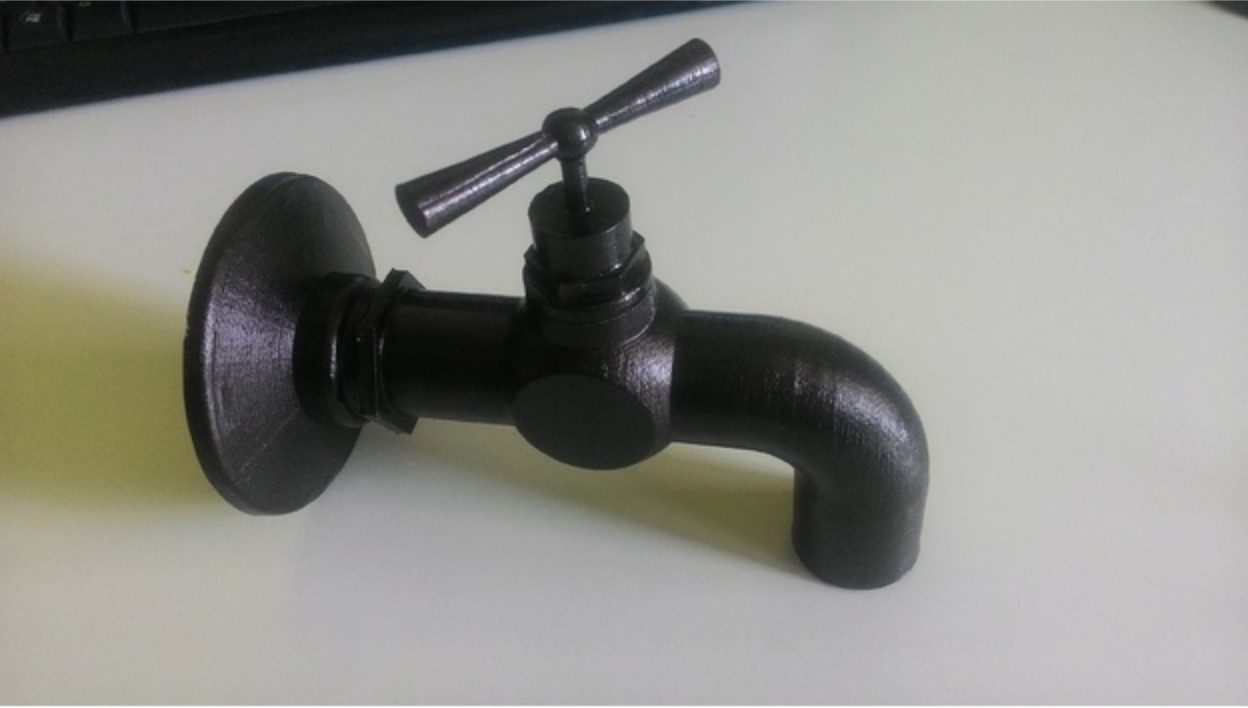
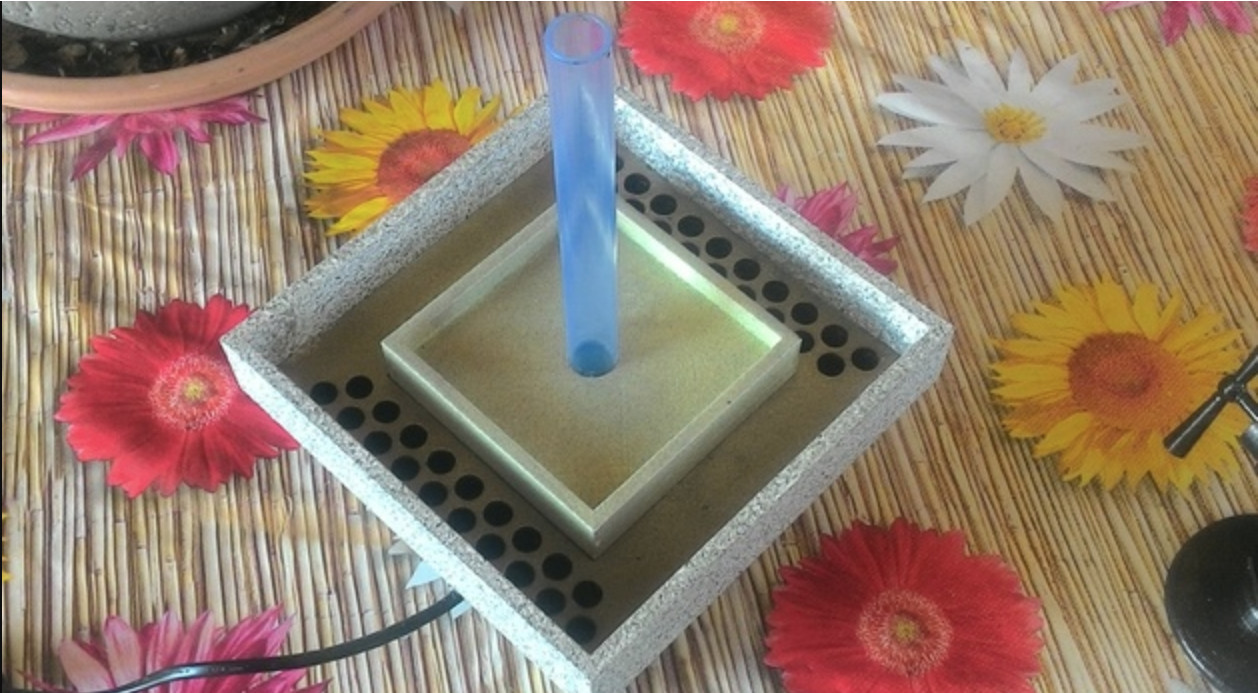
A floating faucet? Sounds interesting, doesn’t it? This 3D printed Magic Faucet is a wonderful project for those who love optical illusions. It’s relatively easy to make and simply amazing to look at.
In our never-ending endeavor to provide users with fun and useful projects to take on during the weekend, we’ve stumbled across a handful of 3D printed fountains to help wash away the boredom. However, we’ve yet to find anything quite like the Magic Faucet created by designer Manuel Arrigoni (who goes by “hazon” on Thingiverse).
This remarkable fountain uses 3D printed parts and components that are commonly found online or at your local aquarium shop to create the illusion of a floating faucet. You can decorate it with different colors and knickknacks, so you can also customize your fountain the way you see fit.
Having some mental blockage and need a 3D printing project to help the creativity flow? Look no further than this Magic Faucet. Let’s take a quick look at what you need and how to build this one-of-a-kind Weekend Project.
3D Printed Magic Faucet: What You Need & How to Build it
You can build your own Magic Faucet with a 3D printer and a few components. There are 12 different parts of the fountain that need to be 3D printed, all of which are freely available on Thingiverse.
Here’s what else you need to create your own Magic Faucet:
Now for the assembly process… The designer has separated the .STL files into two categories: the “faucet” and the “vase” (or base). Once the parts are 3D printed, you can perform some post-processing and spray paint them in the color of your choice.
For the pump cable, you can either run it through the pot or pull it out of the top of the base. Arrigoni has provided different models depending on how you want to situate the pump cable. If you decide to run the pump cable through the pot you should cut it to avoid potential harm from the electric current.
He also notes that the “faucet water diffuse.stl” model must be printed in its pre-determined position with the supports, as this is critical to the functionality of the internal part.
Once everything is 3D printed, use the silicone sealing to connect all of the parts together. The designer also suggests using the silicone to isolate the cable that passes through the faucet’s base.
If you want more information or have questions on this unique Magic Faucet, head over to Thingiverse and drop a comment to the designer. He also provides a hefty amount of photos to help make the assembly process easier.
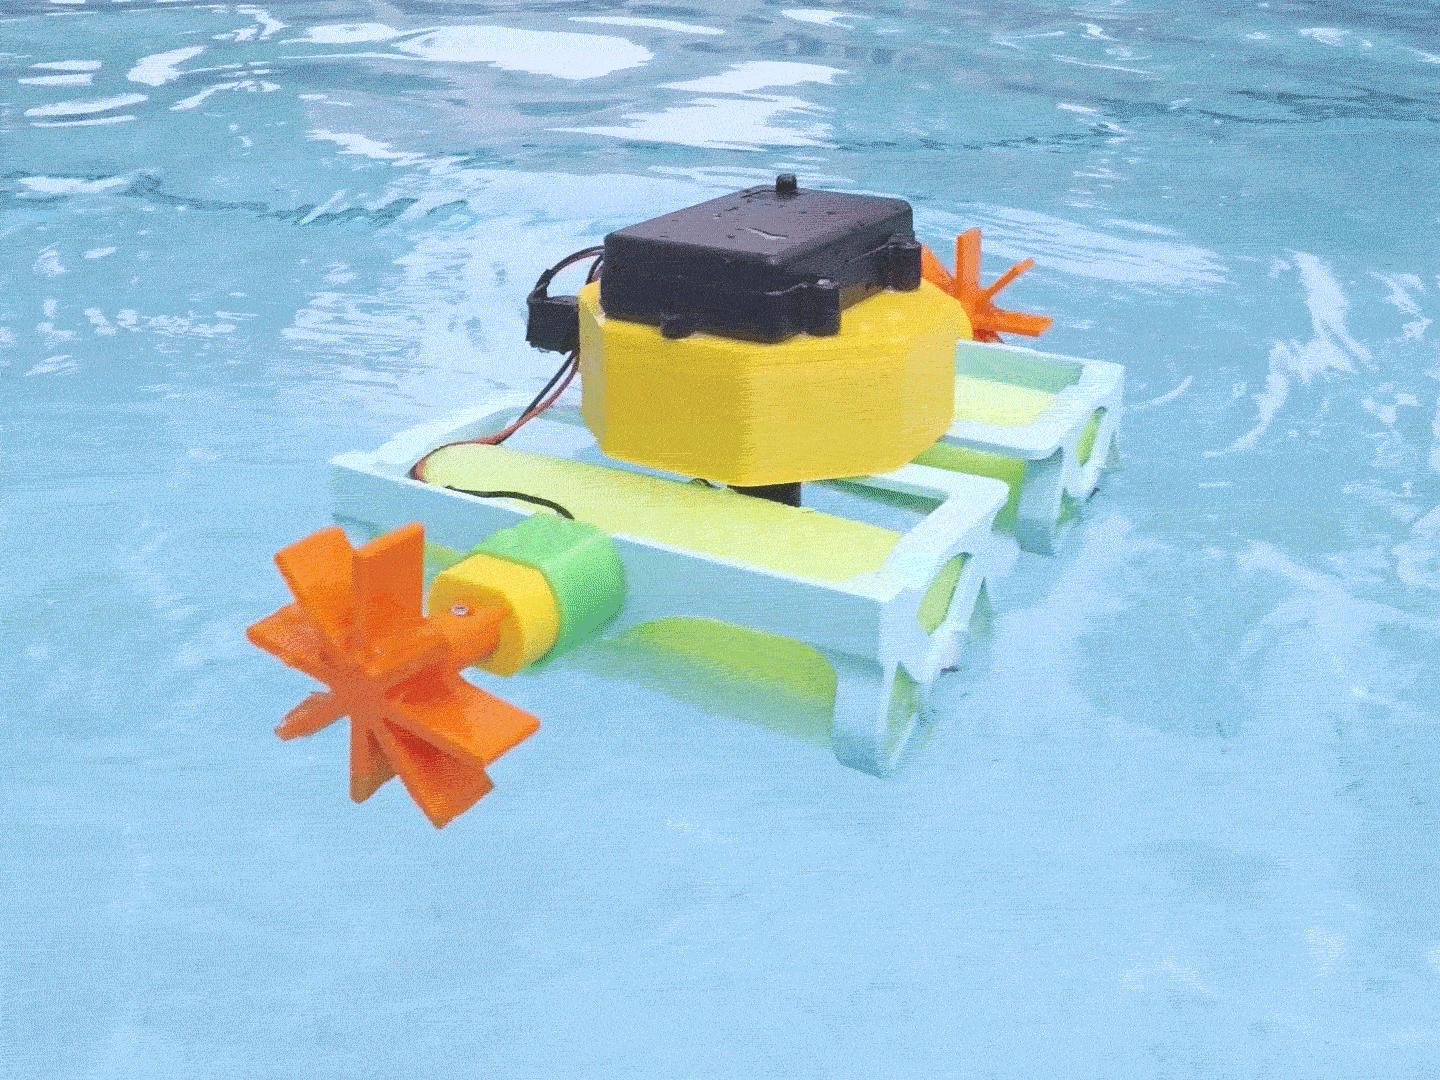
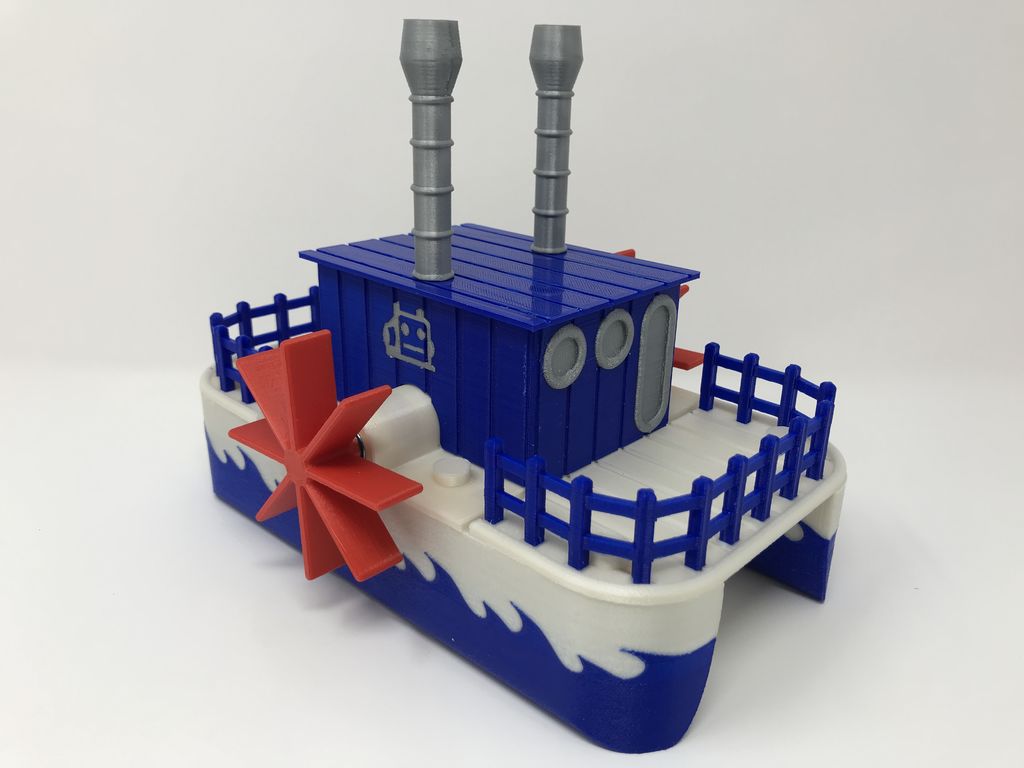
The Ruiz Brothers of Adafruit are at it again with another fascinating 3D printing project: the 3D printed Crickit Paddle Wheel Boat. This water rover even has an underwater camera mount, so you can capture footage at your end of the summer pool party!
As we enter into the final stretch of the summer, it’s time to soak up the sun and enjoy a refreshing swim to cool down from the heat. Pool parties are a great way to make memories with the friends and family, and now you can also capture your underwater moments with a 3D printed Crickit Paddle Wheel Boat.
Designed by the Ruiz Brothers from Adafruit, this unique water bot makes use of 3D printing, some electronic components and a pool noodle (which keeps the paddle wheel boat afloat). It also has a tripod mount so you can utilize underwater photography with a GoPro camera.
Powered by an Adafruit CRICKIT and Circuit Playground Express, this 3D printed boat also resembles an actual cricket with its googly eyes, especially if you decide to utilize a green pool noodle. Needless to say, this buoyant little critter will keep everyone entertained while you lounge poolside.
Want to take a dive into this project? Let’s take a look at what you need in order to put the Crickit Paddle Wheel Boat together.
3D Printed Crickit Paddle Wheel Boat: What You Need
The STL files for the Crickit Paddle Wheel Boat are available to download via Thingiverse. 3D printed parts include the pool noodle enclosure, wheel props, and enclosures for both the electronics and motors. When printing the watertight mounts for the motors and components, the Ruiz Brothers suggest using NinjaFlex filament.
There are also a handful of electronic components that go into the assembly of the Paddle Wheel Boat. Here’s a checklist of what you need:
If you’re unfamiliar with the Adafruit CRICKIT and Circuit Playground Express, there are a number of resources and tutorials available on the project’s page. Once the parts are 3D printed or acquired and your up to speed with using MakeCode, it’s time to start building the Crickit Paddle Wheel Boat.
There’s a modest amount of soldering to connect the circuitry, but the Ruiz Brothers spell everything out in a simple diagram and instructions. After the connections are made, the next step is to setup the Circuit Playground Express with MakeCode, a programming editor that is both block based and text editor and runs in the Google Chrome web browser.
The assembly process seems to require an ample amount of time, but again, the Ruiz Brothers do a terrific job with their instructions, including photos and GIFs for every step of the way. All in all, this project is ideal for ambitious beginners and seasoned makers that want a fun way to make a splash at the next poolside gathering!
If you want to build the Crickit Paddle Wheel Boat, you can find the full step by step process for the circuitry, coding and assembly on the Adafruit website.
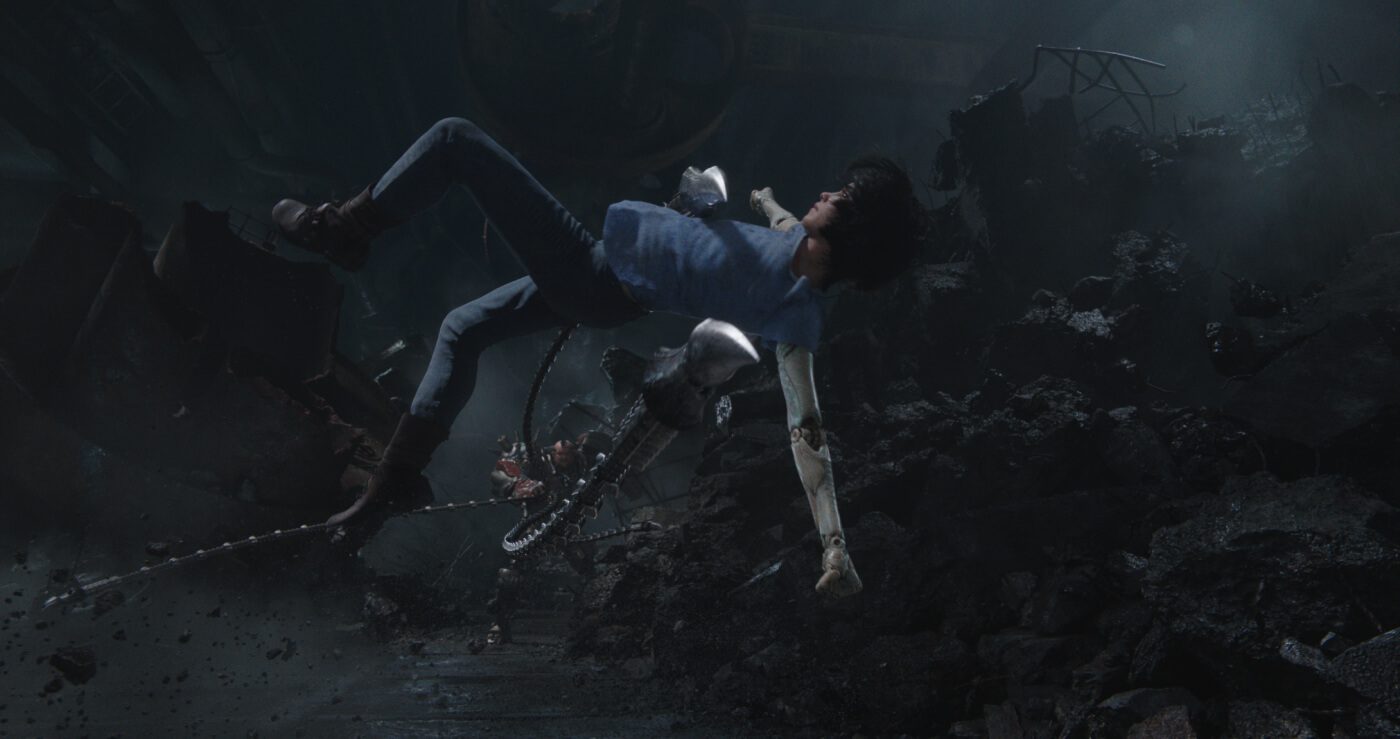
Die Geschicht eist in einer fernen Zukunft angesiedelt und erzählt vomCyborg Alita (Rosa Salazar), die bewusstlos auf einem Schrottplatz in Iron City vom einfühlsamen Cyber-Arzt Ido (Christoph Waltz) gefunden wird. Er nimmt die Cyborgmit in seine Klinik undals Alita zu sich kommt, hat sie keinerlei Erinnerung daran, wer sie ist,noch kann sie irgendetwas wiedererkennenin der Welt, in der sie erwacht ist.
Für Alita ist alles neu, sie erlebt alles zum erstenMalund sie lernt, sich in ihrem neuen Leben und den gefährlichenStraßen von Iron City zurecht zu finden. Während Idoauf der einen Seite versucht, Alita vorihrer mysteriösen Vergangenheit zu schützen, unterstützt sie auf der anderen Seite ihr neuer, smarter Freund Hugo(Keean Johnson)dabei,ihre Erinnerungen wachzurufen. Zwischen Hugo und Alita entwickelt sich eine wachsende Zuneigung, bis dunkleMächteAlita verfolgen und ihre neugefundenen Freundschaftenbedrohen. Dabeientdeckt Alita, dass sie über außergewöhnliche Kampffähigkeiten verfügt, die es ihr ermöglichen könnten, die Menschen, denen sie sich nahe fühlt und die sie liebt,zu beschützen. Alita istentschlossen, das Geheimnis ihrer Herkunft zu lüften. Sie brichtzu einer Reise auf, die sie mit den Ungerechtigkeiten einer dunklen, korrupten Welt konfrontiert,und sie entdeckt, dass sie die Welt, in der sie lebt, verändern kann
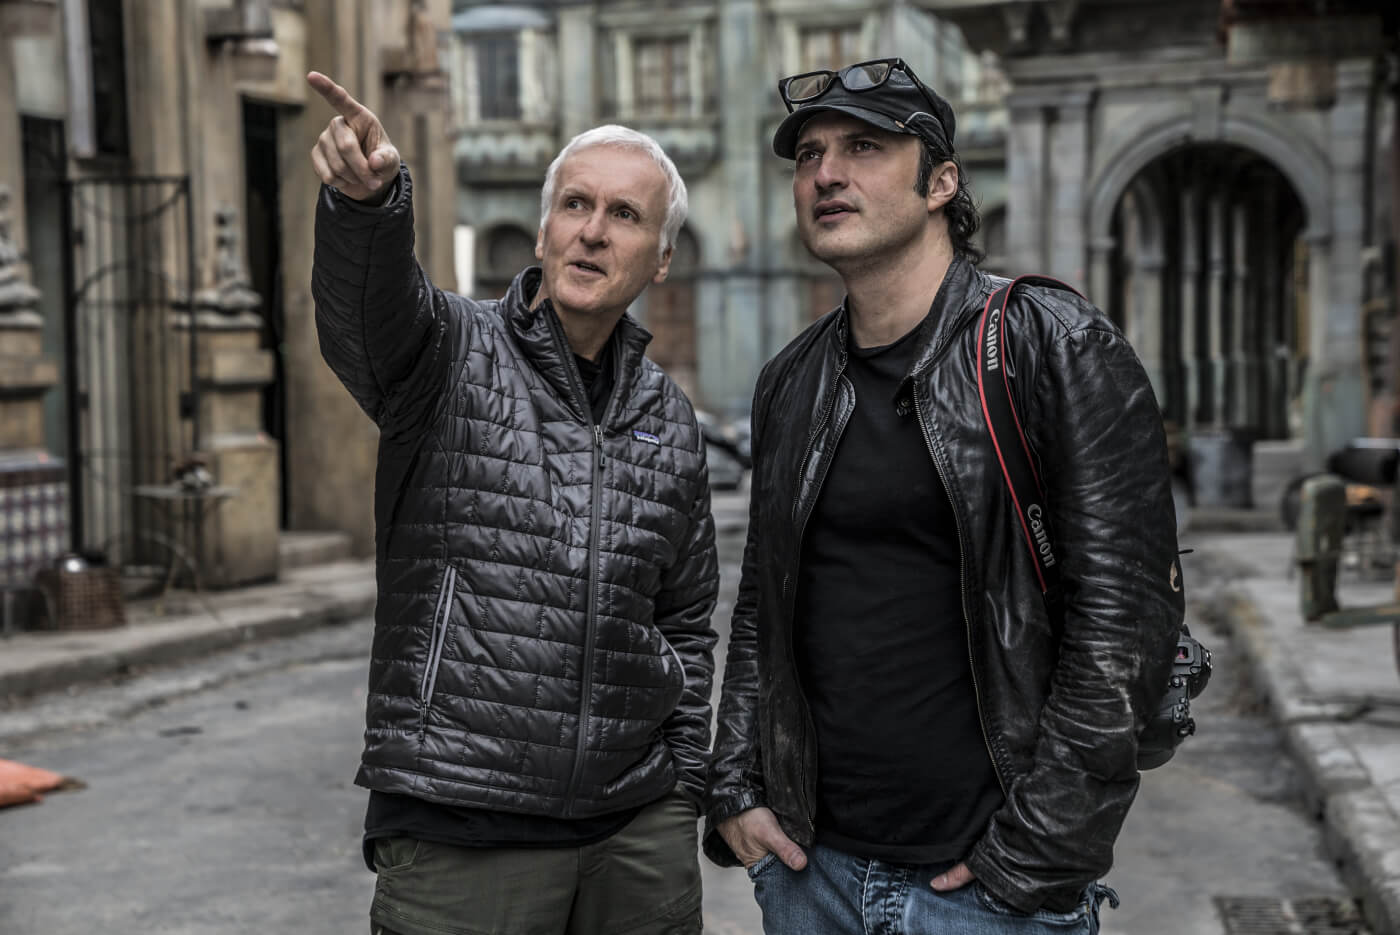
Regie: Robert Rodriguez
Drehbuch: James Cameron, Laeta Kalogridis und Robert Rodriguez
Basierend auf den Mangas „Gunnm” von Yukito Kishiro
Produziert von: James Cameron und Jon Landau
Cast: Rosa Salazar, Christoph Waltz, Jennifer Connelly,
Mahershala Ali, Ed Skrein, Jackie Earle Haley, Keean Johnson
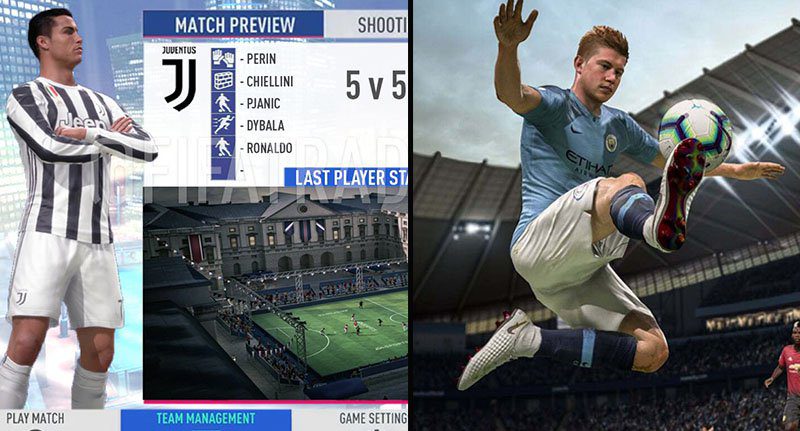
If the World Cup wasn’t enough for you, and the Premier League starting again this month still doesn’t fill your football fantasies, how does the new FIFA 19 sound?
A new FIFA for the new season is always a treat, right? Incidentally, does anyone remember FIFA ’94?
Anyway. The good news is that FIFA 19 is arriving shortly, and if rumours are to be believed, it’s going to have some great new features, as well as bringing back some absolute classics.
Check out the trailer here:
One of the biggest new features in the game will be the arrival of a Champions League mode. However, there’s one new addition which, if true, will definitely excite FIFA fans new and old.
Images are surfacing online of the highly anticipated 5 v 5 mode. If you’re anything like me and you’ve often thought there’s simply too many people on the pitch, this new feature is really going to butter your bread roll.
The 5-a-side feature looks like it’s taking its cue from the 2005’s FIFA Street, in which famous players were matched against one another in a fast-paced, old-school environment, with an emphasis on skill and tricks.
It has also been rumoured that the new mode will have a ‘last man standing’ feature, in which every goal scored results in a player on the opposing team leaving the pitch until, you guessed it, you’re left with the last man standing.
There is a new mode in Kick Off where you lose a player for every goal scored, similar to “Last Man Standing” in FIFA Street. pic.twitter.com/VVZu2xh63z
— BrokerFUT – Not a FUT Trader (@brokerfut) August 1, 2018
As well as the usual option of customising players, the updated career mode in the new game will feature an option to customise managers too, and even have them host press conferences.
In an interview with USGamer, FIFA’s creative director Matthew Prior spoke about what to expect from the game’s new features.
He said:
I think this time, career mode is the most authentic it’s ever been. So that in itself is a big update, and not just the fact that it’s in there, but the way we’ve implemented it.
The whole UI takeover, the cinematic scenes within the UI showing the Europa League draw. It’s not just Champions League, it’s Europa. So I think the integration of that, just in and of itself, is all we can really talk about right now.
It is a sufficiently big change to career mode that people will kind of love it because it is now 100 percent authentic.
One of the big changes to the playing of the game itself is the ‘active touch system’, which, according to EA Sports:
Fundamentally changes the way you receive and strike the ball, providing closer control, improved fluidity, more creativity and increased player personality.
The new game will be available in ultimate, champions or standard edition, as well as a Nintendo Switch edition.
FIFA 19 will be out on September 28 for PC, PS4, Xbox One, and Switch.
Happy gaming!
If you have a story you want to tell send it to UNILAD via [email protected]
Some parents are paying over £25 an hour for their children to be coached to play the video game Fornite.
While the hype to have ‘#1 Victory Royale’ pop up on your screen seems to have worn off a bit, there’s still many people who spend hours playing Fortnite.
A lot of parents no doubt get frustrated when their child is stuck in front of a computer screen for hours on end, and probably roll their eyes when they see the animated characters burst out into their victory dance.
The Wall Street Journal found that there are some people out there who are spending real money to help improve their children’s Fortnite playing skills, by hiring professional Fortnite coaches.
Now, I’m not exactly sure how someone comes to be classified as a ‘Fortnite coach’ – surely they’ve just played the game a lot? I think I know a lot of people who could, and would be more than happy to, take on that role.
One mother from Winchester hired a coach to train her son on the game in the hopes that it would help him improve, and alleviate some of the pressure felt to be good at the game.
Speaking to The Wall Street Journal, she said:
There’s pressure not to just play it but to be really good at it. You can imagine what that was like for him at school.
I suppose it’s only like fuelling a hobby such as football or dancing lessons – just, it’s the computer characters that are getting the healthy exercise, rather than the children.
The coaches usually charge between £11 and £26 an hour for the passing of their Fortnite wisdom, and were scouted by parents from social media, contracting sites, or even whole sites dedicated to coaching, such as Gamer Sensei.
I can imagine it’s all very Karate Kid. Move the mouse like you’re waxing the car. That’ll be £10 please.
Some of the parents who paid for their children’s Fortnite classes have bigger dreams than simply giving their kid bragging rights.
They have hopes that their children’s newfound skills will lead to them having e-sports careers, or a scholarship for university.
Despite this almost acceptable reasoning behind the lessons, even the Fortnite coaches are surprised at the fact the parents are willing to shell out.
18-year-old Fortnite coach and professional gamer Logan Werner said:
My dad would have never paid for me to take video game lessons.
Mine either, Logan. The closest my dad came to helping me win a video game was when he’d complete the quidditch challenge for me on Harry Potter for PS2.
A lot of people have mixed opinions about this use of coaches for children, and took to social media to share:
Where do I sign up to be a Fortnite coach? I will gladly teach kids video games for $25 an hour #dumbparents
However, the parents are defending their choices, insisting that paying for a Fortnite coach is the same as paying for private lessons in any other skill.
I bet they’re praying that their kids don’t get bored of the game as soon as a new one comes out. I’m sure they’d be regretting paying for those Fortnite lessons if their child’s school scholarship plan falls through…
Pixel Ripped 1989 erscheint heute für Oculus Rift und HTC Vive. Auf die europäische Konsolenversion für PlayStation VR (PSVR) müssen wir uns zwar noch etwas länger gedulden, aber wir haben bereits einen Blick in die PC-Version des Spiels gewagt. Der VR-Titel entführt uns in das Jahr 1989, in welchem Videospiele noch keine hochauflösende Grafik hatten und stattdessen die Fantasie der Spieler/innen ansprach. Als Teenager Nicola dürft ihr per virtueller Konsole und Handheld dem 2D-Helden Dot im Kampf gegen den fiesen Cyblin Lord beistehen. Wir haben das erste Level erst kürzlich angespielt und waren davon äußerst angetan. Ob sich das Konzept über die gesamte Spielzeit trägt, erfahrt ihr jetzt.
Pixel Ripped 1989 im Test
Nachdem Start des Spiels, landet ihr zunächst in einem Klassenzimmer. Ihr seid bewaffnet mit Blasrohr und Papierkugeln, welche euch als praktisches Ablenkungsmanöver dienen. Eure Aufgabe ist zunächst mit euren Utensilien ordentlich Unruhe zu stiften, damit ihr nicht beim Zocken mit eurem Gear Kid erwischt werdet. Solange die Lehrerin abgelenkt ist, macht ihr euch mit Dot auf die Jagd nach dem Cyblin Lord, der die Grenzen der Videospielwelt überwinden und in die echte Welt gelangen kann. Dementsprechend gilt es, den Endgegner des Levels auch in der “realen” Welt zu besiegen. Das sieht nicht nur beeindruckend aus, sondern erzeugt eine tolle Immersion.
Das Zocken auf dem virtuellen Gear Kid macht dabei so viel Spaß, dass man schnell glaubt, man schaue tatsächlich auf einen echten Handheld. Dadurch wirkt die Umgebung trotz simpler Grafik äußerst real und lädt zum Versinken in der Spielwelt ein. Im zweiten Level nutzt ihr die portable Konsole für eine Runde AR-Moorhuhn-Jagd auf dem Schulhof, während euch die dritte Runde bereits zurück ins Klassenzimmer führt. Der Alltag einer Schülerin ist manchmal eben nicht besonders spannend. Das letzte Level führt euch daraufhin direkt zum Endboss und nach dessen Bezwingung ist der Spaß auch schon vorbei. Mehr als zwei bis drei Stunden Spielzeit sind nicht drin, außer ihr stellt euch beim Spielen mit dem Handheld etwas ungeschickt an.
Doch auch wenn die Spielzeit recht kurz ist, kann das Setting in seinen Grundzügen durchaus überzeugen. Überall findet man kleine Hinweise und Hommagen an die Videospiele der 90er Jahre, was besonders bei Kindern dieser Zeit die Herzen höher schlagen lässt. Wer in seinen eigenen Jugendtagen ähnliche Szenarien im Klassenzimmer erlebt hat und mit seiner Fantasie aus einem 2D-Spiel eine einzigartige Erfahrung zauberte, fühlt sich direkt wohl.
Persönlich gefällt mir die Idee, dass der Spielende ständig auf seine Umwelt achten muss. Leider ist diese für meinen Geschmack nicht besonders schön gestaltet. Auch die Tatsache, dass es ohne Bonus-Level quasi nur drei unterschiedliche Szenen gibt, ist äußerst bedauerlich. Das Konzept ist großartig und die Entwickler/innen hätten mit mehr Budget sicherlich noch deutlich mehr herausholen können. Generell ist die Gestaltung des Gear Kids sowie der Neon-Szenen nämlich extrem gelungen.
Bei der Steuerung habt ihr die Wahl zwischen Motion Controller und Gamepad. Da es keine trackbaren Controller für den PC gibt, sind eure Hände in diesem Fall an einem Punkt fixiert. Entsprechend fühlt sich das Zocken mit Motion Controllern auch deutlich besser an. Ob der DualShock-4-Controller getrackt wird, konnten wir noch nicht testen, wir gehen jedoch davon aus.
Fazit
Das erste Level des Games macht extrem viel Spaß, weshalb meine Erwartungen an die Vollversion vielleicht etwas zu hoch waren. Die Spielzeit ist für knapp 20 Euro doch recht kurz, besonders da sich das erste und dritte Level im Gameplay nicht sonderlich unterscheiden. Pixel Ripped 1989 ist eine solide Hommage an die frühen 90er Jahre und trifft generell genau meinen Geschmack. Zum Hit reicht es mich aber nicht.
In March, Desktop Metal filed a lawsuit against Markforged for allegedly copying portions of its patented metal 3D printing processes. Last week, a federal jury decided to clear Markforged of both IP infringement allegations, marking a major victory for the defendant.
UPDATE (7/30/18) – Court Clears Markforged of IP Infringement Accusations
Earlier this year, two of the pioneers in metal additive manufacturing squared off in court over accusations of patent infringement. The Massachusetts-based startup Desktop Metal alleged that its competitor Markforged– also based in Massachusetts –had copied two patents relating to their metal 3D printing process.
After a three-week trial concluded on July 27th, a 12-person federal jury reached a verdict clearing Markforged of the charges that it infringed upon Desktop Metal’s Intellectual Property. Court proceedings relating to the five counts of trade and contract violations are still pending and have yet to be settled, but the verdict on IP infringement can certainly be considered as a victory for Markforged.
The lawsuit was initially launched in March 2018 when Desktop Metal accused Markforged of infringing upon U.S. Patent No. 9,815,118, entitled ‘Fabricating Multi-Part Assemblies’, and U.S. Patent No. 9,833,839, entitled ‘Fabricating an Interface Layer for Removable Support’. Shortly after the infringement lawsuit was filed, Markforged CEO Greg Mark came out strongly against the allegations, calling them “far-fetched.”
Both companies have been developing metal 3D printing systems for around the same time, with Markforged unveiling its own three months about before Desktop Metal did. However, aside from having similar aspirations in the metal 3D printing field, there was also an odd familial link between the two companies. Desktop Metal had previously employed a man named Matiu Parangi as a print lab technician. Unbeknownst to them at the time of hiring, Matiu’s brother Abraham Parangi was working as the Director, Technology & Creative at Markforged.
In the lawsuit, Desktop Metal alleged that the former employee downloaded a host of proprietary information relating to IP and processes, sharing them with his brother and thus Markforged, directly violating a Non-Disclosure Agreement that he signed in 2016. While some aspects of the case is still pending, the decision to dismiss the IP infringement charges against Markforged is certainly newsworthy.
All3DP reached out to Desktop Metal and Markforged for comment, and received the following responses.
Markforged’s Statement
“Markforged printers have changed the way businesses produce strong parts while dramatically impacting the delivery times, cost, and supply chain logistics. We feel gratified that the jury found we do not infringe, and confirmed that the Metal X, our latest extension of the Markforged printing platform, is based on our own proprietary Markforged technology,” said Greg Mark, founder and CEO of Markforged.
Desktop Metal’s Statement
“Desktop Metal is pleased that the jury agreed with the validity of all claims in both of Desktop Metal’s patents asserted against Markforged. Desktop Metal has additional claims pending alleging trade secret misappropriation by Markforged. The Federal District Court has bifurcated those counts and will try them at a later date. At Desktop Metal, we remain committed to building on our leadership in the metal 3D printing sector and continuing to provide innovative products and solutions to our hundreds of customers across industries. We are currently reviewing legal options concerning the infringement issue,” Desktop Metal stated.
We will continue to update this story as more information comes to light.
If you’re unfamiliar with the origins of this case, continuing scrolling to read our previous coverage on the case, as well as the public statements issued by both Desktop Metal and Markforged.
This metal manufacturing movement also saw contributions from the likes of Digital Metal and Markforged, the latter of which was already a household industry name for its development in continuous carbon fiber 3D printing.
Interestingly enough, right around the same time that Desktop Metal unveiled its metal 3D printing systems, Markforged also made a public shift into the very same market.
In January 2017, the continuous carbon fiber 3D printing pioneers announced the Markforged Metal X, a metal 3D printer that operates similarly to Desktop Metal’s Studio System. Meanwhile, Desktop Metal had been working on its process since it was founded in 2015, and officially debuted the Studio System and Production System in April 2017.
Desktop Metal’s Studio System
At the time, both Desktop Metal and Markforged were recognized as two prominent trailblazers on the new frontier of affordable metal 3D printing.
But this week, we learned some shocking revelations that seem to have pitted the two companies against one other in the courtroom.
Desktop Metal has launched a lawsuit against Markforged, alleging that the competitor and fellow Massachusetts-based business had copied portions of their patented metal 3D printing process. The official lawsuit, which was filed in the United States District Court for the District of Massachusetts, is leveled against Markforged and an ex-employee of Desktop Metal named Matiu Parangi.
We were intrigued by the case for obvious reasons, and after taking a deeper look at the court documents, discovered a riveting and longwinded history between this pair of 3D printing companies.
Markforged’s Metal X 3D printer
The Unique History Between Desktop Metal’s CEO and Markforged
In the lengthy complaint, Desktop Metal accuses Markforged of infringing on two particular patents. The first is entitled “Fabricating Multi-Part Assemblies” (U.S. Patent No. 9,815,118). This patent refers to Desktop Metal’s method for fabricating a first object from a first material, which includes a powdered material and a binder system.
The second patent is entitled “Fabricating an Interface Layer for Removable Support” (U.S. Patent No. 9,833,839). This patent refers to the support structure system developed by Desktop Metal.
In the recently filed complaint, these two patents are commonly referred to as the “Patents-in-Suit”.
Although the two competitors both unveiled its metal 3D printing technology in 2017, the origins of this story actually start in 2015, the very same year that Desktop Metal was founded by CEO Ric Fulop.
Prior to starting the company, Fulop worked as a General Partner at the venture capital fund North Bridge. According to complaint, Fulop was directly involved with the venture capital fund’s investment in Markforged.
Section 14 of the complaint states:
At North Bridge, Mr. Fulop led the software and 3D investing practices, and was an early stage investor and board member in Dyn (acquired by Oracle for $600 million), Gridco, Lytro, Markforged, Onshape, and Salsify. In the spring of 2015, Mr. Fulop began to the process of winding up his activities at North Bridge and thinking of new projects to pursue.
CEO of Desktop Metal, Ric Fulop
The court filing goes on to state that Fulop informed North Bridge and Markforged on his intention to pursue metal 3D printing, eventually leading to the founding of Desktop Metal. At that time, Markforged’s co-investor Matrix Partner expressed interest in investing in the new metal 3D printing startup, but Fulop opted to accept funding from other investors, and also stepped down from the Board of Markforged. In fact, the two companies even agreed to a review to ensure that Fulop’s plan for Desktop Metal didn’t infringe on Markedforged’s IP, and both sides agreed that it did not.
In April 2016, Desktop Metal filed the first provisional patent application that lead to the two “Patents-in-Suit”. The complaint alleges that, during this time, Markforged remained focused on its continuous carbon fiber 3D printing technology, releasing the Mark 2 3D printer in the same month.
The Hiring of Mr. Parangi: Another Unusual Connection Between Desktop Metal and Markforged
Let’s fast-forward to August 2016, the moment where this story and connection between Desktop Metal and Markforged gets really interesting. Desktop Metal had hired a man named Matiu Parangi to work as a technician on the startup’s “print farm”, which is where parts were 3D printed with prototypical machines.
Section 63 of the complaint explains the depth of sensitive information that Parangi was granted access to:
According to the complaint, in October 2016, Parangi “downloaded documents unrelated to his work on the print farm, including documents relating to Desktop Metal’s R&D strategy and proprietary technology” without the company’s knowledge.
Simultaneously, Fulop had revealed to employees that the company was about to close a financing round. Just one month later, Markforged’s counsel sent a letter to the Desktop Metal CEO to remind him “of obligations asserted to be owed to Markforged”.
Section 17 in the filed complaint reads:
On information and belief, this letter was intended to interfere with the financing of Desktop Metal. Nevertheless, the financing was successful and Mr. Fulop received no further communication from Markforged’s counsel.
In December 2016, Desktop Metal discovered that Matiu Parangi was actually the brother of Abraham Parangi, the “Digital Prophet” / Director, Technology & Creative” at Markforged. One month later, Markforged announced its Metal X 3D printer at CES 2017.
The Studio System was officially debuted by Desktop Metal in April 2017, showcasing the office-friendly 3D printer and its proprietary Separable Supports method, which enables users to remove support structures by hand. The company began shipping Studio System to customers in December 2017.
One year after announcing the Metal X at CES 2017, Markforged exhibited its new metal 3D printer at the very same trade show.
In an article written by 3DPrint.com in January 2018, Jon Reilly, Markforged’s Vice President of Product, was interview about the capabilities of the new Metal X 3D printer. He was directly quoted as stating that “the ceramic release layer sinters right off in the furnace for easy support removal,” in describing the capabilities of Markforged’s metal 3D printing technology.
Desktop Metal clearly believes that Markforged was infringing upon these “Patents-in-Suit” in order to compete with the Studio System. Section 25 of the complaint states:
As Desktop Metal begins shipping its Studio System, Markforged is seeking to compete directly with Desktop Metal by offering its Metal X 3D print system. Based on at least Markforged’s recent disclosures that its Metal X 3D print system uses a ceramic release layer that turns to powder during sintering, Markforged seeks to compete using Desktop Metal’s patented technology protected by the Patents-in-Suit.
Desktop Metal’s Studio System and Production System
Desktop Metal Files Lawsuit Against Markforged: What are the Allegations?
Desktop Metal has filed eight separate counts against Markforged and Mr. Parangi in the recently filed complaint. To gain a better understanding of what the company is alleging, let’s take a brief look at each count:
Count I – Infringement of ‘839 Patent
The first count accuses Markforged of infringing and continuing to infringe on Desktop Metal’s “Fabricating an Interface Layer for Removable Support” patent. This patent pertains to the unique support removal process featured in the Studio System, which uses an interface layer for easy removal.
The complaint states that Markforged has been selling the Metal X 3D printer for performing the same support removal methods Desktop Metal patented without permission.
Desktop Metal believes that this patent infringement was done knowingly, and that Markforged has caused damage and “irreparable injury” to the company.
Section 39 in the complaint states:
On information and belief, Markforged has had actual notice of the ’839 patent at least since Desktop Metal publicly announced its issuance on January 3, 2018, before Markforged exhibited its Metal X printer at CES and before Markforged granted an interview explaining its use of the methods claimed in the ’839 patent. On information and belief, Markforged’s infringement has been willful, as further evidenced by the allegations of 16 misappropriation and unfair competition set forth below. Markforged’s infringement will continue to be willful if Markforged does not discontinue its infringement.
Count II – Infringement of ‘118 Patent
This allegation pertains to the other half of the Patents-in-Suit, entitled “Fabricating Multi-Part Assemblies”. This patent refers to the process of fabricating a first object from a material that includes both powdered material and a binder system. Desktop Metal alleges that Markforged also knowingly infringed upon this patent, making the same argument displayed in Count I.
Count III – Violation of the Defend Trade Secrets of 2016
Count III is leveled against Markforged and Mr. Parangi, who Desktop Metal claims signed a Non-Disclosure Agreement (NDA) while working with the company. The plaintiff accuses Parangi of acquiring trade secrets from Desktop Metal through improper means and disclosed them, therefore violating his NDA and obligations to his employer.
This allegation is summed up nicely in Section 77 of the complaint:
As a direct and proximate result of Mr. Parangi’s and Markforged’s misappropriation of trade secrets, Desktop Metal has suffered and will continue to suffer irreparable harm and other damages, including, but not limited to, loss of value of its trade 26 secrets. Desktop Metal is therefore entitled to civil seizure of property, injunctive relief, monetary damages for its actual losses, and monetary damages for unjust enrichment where damages for its actual losses are not adequately addressed.
Count IV – Trade Secret Misappropriation
Similar to the Count III, the following allegation refers to the misappropriation of Desktop Metal’s trade secrets, and is again leveled against both Markforged and Parangi. Here, the plaintiff expounds about the economic value that Desktop Metal’s trade secrets have, and that the ex-employee stole or unlawfully took these secrets and passed them onto his brother’s company.
Count V – Unfair or Deceptive Trade Practices
Count V alleges that both Markforged and Parangi engaged in unfair or deceptive trade practices through Desktop Metal’s Proprietary Information. The complaint states that Mr. Parangi assisted Markforged “to develop a directly competing product in the 3D metal printing field”, and that the defendant (Markforged) “knowingly received the benefits from the disclosure” of this information.
Count VI and VII – Breach of Contract (NDA)
These two counts focus strictly on Parangi, discussing the belief that the ex-employee knowingly violated the NDA, non-competition, and non-solicitation agreements that he had signed while working with Desktop Metal. Due to this alleged breach of contract, the plaintiff believes that Desktop Metal “has been and will continue to be irreparably harmed”. Therefore, the company believes it is entitled to injunctive relief and damages for these counts.
Count VIII – Breach of the Covenant of Good Faith and Fair Dealing
This final count is also focused on Parangi, once again covering the “breaches of his contractual obligations and his improper use and/or disclosure of Desktop Metal’s Proprietary Information”. In Section 117, the plaintiff explains:
In Conclusion: Which Way Will the Gavel Fall?
We’ve reached out to Desktop Metal and Markforged for comment, and are still awaiting a response from both parties. Of course, we will continue to update this story as more information comes to light.
In the complaint, Desktop Metal requests that the Massachusetts Court takes a number of actions in favor of them and against Markforged and Parangi. These actions include:
A declaration in favor of Desktop Metal for each count.
Preliminary and permanent injunction preventing Markforged from continued infringement of the two patents.
Compensation for any current or future profits that Markforged has achieved as a result of the alleged breaches.
An award of three times the actual damages for Markforged’s unfair trade practices.
Civil seizure of property incorporating Desktop Metal’s trade secrets.
Until then, we can only speculate on how this strange case will play out. However, what we do for sure is that the connection between Desktop Metal and Markforged goes far beyond the two companies being located in Massachusetts and involved with metal 3D printing technology.
Stay tuned as this story develops…
UPDATE (3/21 at 11:15 EST)
A few hours after reaching out to Desktop Metal for a comment, we received a background statement from the company. Because the case is now in litigation, the company was unable to provide any further comments. Here’s the full statement released to All3DP:
Desktop Metal has filed a patent infringement lawsuit in the United States District Court for the District of Massachusetts to protect the Company’s intellectual property from unauthorized use by Markforged. The lawsuit alleges Markforged’s Metal X 3D printer violates two Desktop Metal patents related to interface layer and separable support strategies for printing 3D metal parts, as well as trade secret misappropriation.
The lawsuit is based on U.S. Patent Nos. 9,815,118 and 9,833,839 that were granted to Desktop Metal in 2017 covering the Company’s interface layer technology for both its Studio System™, the first office-friendly metal 3D printing system for rapid prototyping, and Production System™, the only 3D printing system for mass production of high resolution parts. This technology makes it possible to print support structures that do not bond to parts and consolidate during sintering, as well as assemblies that do not consolidate during sintering.
In addition to the two patents covering the interface layer and Separable Supports™ technology, Desktop Metal has a portfolio of 100+ pending patent applications covering more than 200 inventions.
Desktop Metal was founded in October 2015 by CEO Ric Fulop and a group of the world’s leading experts in advanced manufacturing, metallurgy, and robotics, including 4 MIT professors, seeking to create a new category of metal 3D printers. Mr. Fulop has a long history as a successful entrepreneur and was an early stage investor and board member for a number of 3D printing startups, including Markforged. In the summer 2015, Mr. Fulop discussed with Markforged his intent to pursue untapped opportunities in metal 3D printing, and thereafter left the board to launch Desktop Metal. At that time, Markforged was not in the metal 3D printing business.
“Metal 3D printing is an exciting, quickly growing and rapidly evolving industry and, as a pioneer in the space, Desktop Metal welcomes healthy and vibrant competition,” said Mr. Fulop. “When that competition infringes on our technology, however, we have a duty to respond. We believe Markforged products clearly utilize technology patented by Desktop Metal and we will do what is necessary to protect our IP and our Company.”
“Desktop Metal has invested significant resources in developing innovative additive manufacturing technologies for metal 3D printing and our intellectual property portfolio reflects the hard work of our engineers and scientists,” said James Coe, General Counsel of Desktop Metal. “We owe it to our customers, employees and shareholders to protect the ground-breaking nature of our technology and preserve that investment so we can continue to promote innovation.
Shortly after we received the response from Desktop Metal, a company spokesperson for Markforged also responded to our inquiry with a brief statement that “Markforged does not discuss ongoing legal matters publicly”.
I founded Markforged in my kitchen six years ago. I dreamt of giving every engineer the ability to 3D print real, functional, mechanical parts. We invented something that had never existed before – a continuous carbon fiber 3D printer. Our Metal X product is an extension of that platform.
We’ve come a long way. We now have the most advanced technology platform in 3D printing, and I’m incredibly proud of what our team of engineers have accomplished.
On Monday, a competitor filed a lawsuit against us, including various far-fetched allegations. Markforged categorically denies these allegations and we will be formally responding shortly in our own court filing.
Markforged is a thriving business with a dedicated team of passionate people, and we’re going to continue to execute and deliver amazing products to our customers.
Der Einsatz von Virtual Reality zu therapeutischen Zwecken ermöglicht eine Erweiterung der bisherigen Praxis und fügt dadurch eine digitale Komponente zur Behandlung von psychisch erkrankten Patienten hinzu. Die Möglichkeit sich seinen Ängsten in einem gefahrlosen Raum zu stellen, offenbart völlig neue Herangehensweisen in der gängigen Angsttherapie. Die Oxford University untersuchte in einer empirischen Studie, wie sinnvoll der Einsatz der VR-Therapie bei der Behandlung von Höhenangst wirklich ist.
VR-Therapie zur Bewältigung von Höhenangst – Now I Can Do Heights mit der HTC Vive
In einer kürzlich durchgeführten Studie der Universität Oxford unter der Leitung von Dr. Daniel Freeman, ausgebildeter Psychotherapeut, wurde die Wirksamkeit der VR-Technologie zur therapeutischen Behandlung von Patienten mit Höhenangst überprüft. Dabei wurde eine Stichprobe von insgesamt 100 freiwilligen Teilnehmern mit diagnostizierter Akrophobie gezogen. Die Betroffenen erzielten einen Score von über 29 Punkten in einem diagnostischen Fragebogen und wiesen mehr als 30 Jahre lang das Krankheitsbild auf.
Von den insgesamt 100 Versuchspersonen wurden 49 Teilnehmer randomisiert ausgewählt, um in einem Zeitraum von vier Wochen über sechs Sitzungen verteilt, je 30 Minuten, Aufgaben zur Bewältigung der Höhenangst in einer virtuellen Umgebung auszuführen. Die Aufgaben bestanden beispielsweise aus der Rettung einer Katze von einem Baum oder dem Gang über eine Leiste über eine hohe Schlucht. Die VR-Erfahrung Now I Can Do Heights kam dabei mit einer HTC Vive zum Einsatz.
Interessanterweise waren die Teilnehmer innerhalb der Sitzungen alleine und wurden lediglich von einem virtuellen Coach begleitet. Dieser übernahm die Aufgabe des Therapeuten und begleitete die Patienten bei ihren Erfahrungen. Währenddessen stellte er für die Expositionstherapie typische Fragen, wie beispielsweise eine Abfrage des derzeitigen Angst-Levels der Versuchsperson auf einer Skala von 1 – 10, um daraufhin Vorschläge zum weiteren Vorgehen bereitzustellen.
VR-Therapie zur Bewältigung von Höhenangst – Oxford-Studie zeigt Erfolg
Die Patienten wurden daraufhin in Form von Selbstfragebögen befragt. Diese sollten unter anderem Auskunft über das gefühlte Erleben von Angst, Disstress und Vermeidungsverhalten geben und damit Aufschluss über die Wirksamkeit aufzeigen. Die Ergebnisse zeigen, dass vor allem ein großes Interesse an der Therapieform besteht, weshalb eine erhöhte Motivation bei den Teilnehmern aufzufinden war. Insgesamt konnten zahlreiche positive Effekte festgestellt werden. Bei Patienten mit schwer ausgeprägten Symptomen konnte nach Beendigung der VR-Therapie ein Abfall von bis zu 25 Punkten innerhalb des diagnostischen Scores festgestellt werden. Somit wurden diese Teilnehmer, daraufhin in eine moderat ausgeprägte Kategorie eingestuft.
Der Versuchsleiter hebt in einem Interview die Effektivität der Therapieform hervor:
“Das Schöne an den Simulationen ist, dass sie den Patienten erlauben Dinge auszuprobieren, bei denen sie im echten Leben argwöhnisch wären. […] Nach der Therapie konnten sie an Orte gehen, die für sie nie denkbar gewesen wären. So stiegen sie auf einen steilen Berg, liefen mit ihren Kindern über eine Seilbrücke oder nutzten den Aufzug in einem Einkaufszentrum ohne konstante Angst zu erleben.”
Zwar wird die virtuelle Therapie keine echten Therapeuten ablösen, dennoch beweist sie sich als effektive Methode, um in Zukunft gängige Therapieformen zu unterstützen und gegebenenfalls sogar zu verbessern.
Need some affordable scientific equipment to experiment and make a breakthrough discovery? This 3D printed open source laboratory rocker is a terrific tool for biological and molecular mixing applications.
In the scientific setting, a laboratory rocker is used as a mixing device for various biological and molecular applications. It consists of a tray mounted on top of a base, which contains the electronics and motor that control the speed and tilt angles of the platform.
This 3D printed lab rocker was designed by biomedical engineer and designer Akshay Dhamankar. It’s a variable speed, two-dimensional device that moves back and forth to create waves in liquid samples at mild to moderately aggressively rate. The design uses a changeable apparatus rack that can either hold a test tube or beaker.
While this 3D printed lab device sounds a bit difficult to put together, Dhamankar lays everything out in a few simple steps. If you’re a researcher on a budget who wants to spruce up your wet lab, bring some science home, or just take on a fun and educational project, this open source laboratory rocker is worth a look.
The creator of this project lists a number of applications that this lab rocker can be utilized for, including biological and molecular mixing, aggressive agitation of a biological mixture, PCB etching via Ferric Chloride bath, and even for mixing paint and thinner.
“It is my sincere hope that my design and contribution will help out many of the research personnel, small labs, wet labs etc. who plan to incorporate laboratory equipment like this with a tight budget,” the designer writes on Thingiverse.
3D Printed Open Source Laboratory Rocker: What you Need & How to Built it
The purpose of this open source project is to provide access to researchers and scientists on a tight budget, so the components needed to build your own lab rocker aren’t too costly. Aside from your 3D printer and material, here’s what else you need:
There are 10 different STL files you’ll have to 3D print for this project, which the designer recommends using 25 percent infill for. Once you’ve printed the parts out, the rest of the assembly process is relatively straightforward.
Following along schematics and provided photos, you need to connect all of the electronic components and situate them inside of the 3D printed base.
Dhamankar uses super glue to mount the skateboard bearings in the various slots that are embedded in the 3D printed parts. He also suggests using a thick silicone rubber sheet (3mm) on the surface of the ‘Single Piece Beaker Tray’ to act as an anti-slip mat.
Die Walt Disney Animation Studios präsentieren auf der SIGGRAPH 2018 den ersten eigenen VR-Kurzfilm Cycles, bei dem Jeff Gibson sein Debüt als VR-Regisseur feiert. Dabei kamen experimentelle Storyboard-Ansätze wie Motion-Capture-Verfahren und VR-Artwork-Werkzeuge wie Quill zum Einsatz, bevor das Werk schließlich in die Produktion ging.
Disney stellt ersten VR-Kurzfilm Cycles auf der SIGGRAPH 2018 vor
Disneys Interesse an der Virtual-Reality-Technologie bleibt beständig. Bereits mit der VR-Erfahrung Coco und diversen weiteren Projekten setzte das internationale Unternehmen erste Schritte in die immersive Welt. Mit Cycles präsentieren die Walt Disney Animation Studios nun ihren ersten selbstständig produzierten VR-Kurzfilm, der erstmals im August auf der SIGGRAPH 2018 vorgeführt wird, um in die Fußstapfen von erfolgreichen Animationsfilmen wie Frozen (2013), Zootopia (2016) oder Vaiana (2016) zu treten.
Image courtesy: Disney
Die Story dreht sich um einen Haushalt und das wilde Treiben darum, eine eigene Zukunft mitsamt Familie aufzubauen. Dabei werden die Zuschauer auf eine gefühlvolle Reise mit Höhen und Tiefen eingeladen, welche die glücklichen und traurigen Momente des Lebens in den Fokus setzen. Jeff Gibson, seit 2013 Lichtkünstler bei den Disney Animation Studios, führt erstmals Regie und lies seine eigene Kindheitserfahrung in das Werk einfließen. Die Erlebnisse bestehen aus glücklichen Kindheitstagen und düsteren Momenten.
Das gesamte Team, aktuell ca. 50 Mitarbeiter/innen, produzierten den Kurzfilm in knapp vier Monaten. Dabei entfernte man sich von traditionellen Storyboard-Ansätzen und setzte stattdessen auf experimentelle Methoden. So kamen Tools wie Quill zum Einsatz, aber auch Motion-Capture-Verfahren spielten eine wichtige Rolle in der Vorproduktion.
Gibson sieht im Einsatz der Virtual Reality massive Vorteile, wie er in einem Interview mit Variety beschrieb:
“VR ist eine unglaubliche Technologie, die oftmals hält, was sie verspricht. Wir hoffen, dass immer mehr Leute die emotionale Tragweite von VR-Filmen verstehen und ganz besonders bei “Cycles” die Emotionen fühlen, die wir uns wünschen, dass sie die Zuschauer/innen erreichen.”
Cycles wird erstmals auf dem SIGGRAPH 2018 von 12. bis 16. August in Vancouver vorgeführt.
Übernahmen Spieler bisher in Star Trek: Bridge Crew nur das Kommando der USS Aegis oder der klassischen Enterprise NCC-1701 (aus der klassischen Star Trek Serie) wird nun die nächste Grenze überschritten. Mit dem Star Trek: The next Generation DLC betritt das Spiel nämlich nun das Universum der USS Enterprise NCC-1701-D. Die The Next Generation Erweiterung ist jetzt für PC und PS4 erhältlich und führt damit neue Szenarien, neue Modi und die neue Operations Rolle in Star Trek: Bridge Crew ein.
The Next Generation fügt gleich zwei neue Spielmodi in den „Fortlaufende Reisen“ Modus ein: Patrouille, in welchem Spieler das Weltall frei erkunden können und dabei auf Gegner treffen oder anderweitige Missionsziele auf ihren Reisen absolvieren; und Widerstand, in welchem Spieler von einem unnachgiebigen Borgwürfel verfolgt werden und eine ganze Reihe an Missionszielen erfolgreich abschließen müssen um für den finalen Showdown vorbereitet zu sein. Zusätzlich dazu wird der Ingenieur-Posten durch den neuen Ops-Offizier ersetzt und muss sich um die Zuordnung der Crewmitglieder auf diverse Stationen kümmern, um die damit verbundenen Features wie z.B. Präzisionsfeuer oder die Schildmodulation nutzen und Reperaturen einleiten zu können.
Wie schon das Hauptspiel Star Trek: Bridge Crew, ist auch The Next Generation ein Cross-Platform Spiel und kann mit oder ohne VR Headset gespielt werden. Auf dem PC unterstützt das Spiel die HTC Vive, Oculus Rift und Windows Mixed Reality, während PS4-Spieler mit der oder ohne PlayStation VR spielen können. Star Trek: Bridge Crew ist bereits erhältlich für PS4 und PC.
Ghost Recon und Rainbow arbeiten ab dem 24. Juli während einer Mission namens “Operation Erzengel” zusammen, welche Teil der kostenlosen Special Operation 2 von Ghost Recon Wildlands sein wird. Die zweiteilige Mission spielt in der Provinz der Caimanes und wird die Rainbow Six Siege Operator Twitch und Valkyrie während einer Such-und Rettungsmission zum Team der Ghosts stoßen lassen, um Caveira zu finden.
Genau wie Special Operation 2 so ist auch Operation Erzengel für alle Spieler von Ghost Recon Wildlands kostenlos und diejenigen, die diese Mission noch vor dem 14. August abschließen, erhalten Caveiras Handschuhe (mittels denen sie ihren Nahkampfangriff durchführen und die Position möglicher Gegner enthüllen kann). Zudem wird auch ein Rainbow Six Gear Pack verfügbar sein, welches neben Caveiras Luison Pistole, Valkyries Shemagh Schal, Twitchs Totenkopf-Balaclava und ein individualisierbares HK 416 Sturmgewehr enthalten wird.
Neben Operation Erzengel, wird mit Special Operation 2 auch der Ghost Modus ins Spiel integriert werden, welcher neue Möglichkeiten die PVE Kampagne durchzuspielen bereithalten wird. Mittels Dauertod und diversen anderen Optionen wird das Spiel zum absoluten Hardcore Erlebnis. Zu den Features gehört auch eine neue Nachlade-Mechanik mittels der alle ungenutzten Kugeln verloren gehen, sobald ein angebrochenes Magazin gegen ein Volles ausgetauscht wird – ideal für alle Spieler die etwas mehr Risiko bevorzugen. Zusätzlich kommen mit Special Operation 2 auch zwei neue PVP-Karten und ein Beobachtermodus zu Ghost War, sowie zwei durch Rainbow Six Siege-inspirierte PVP-Klassen. Toxikologe, basiert auf Rainbows Smoke und kann eine Drohne dazu verwenden, große Mengen einer toxischen Gaswolke freizusetzen. Chirurg basiert hingegen auf Doc und kann daher mittels Reanimationspistole Teammitglieder auch über Distanz wiederbeleben.
Aufgrund der Masse an Neuerungen, sprachen wir direkt mit Senior Producer Nouredine Abboud um herauszufinden, wie es zu dieser Überschneidung mit Team Rainbow kam, wie sie das Spiel an sich verändern wird und was Special Operation 2 sonst noch zu bieten haben wird.
Wie kam es zu der Zusammenarbeit mit Rainbow Six Siege? Nach welchen Gesichtspunkten habt ihr die R6 Operator ausgewählt, die ihr verwenden wolltet?
Nouredine Abboud: Das zweite Jahr von Ghost Recon Wildlands bietet die perfekte Gelegenheit das Universum unseres Spiels zu erweitern. Uns ist bewusst, dass unsere Community sehr an Rainbow Six Siege interessiert ist und beide Universen hinsichtlich des Spieltaktiken verwandt sind. Also haben wir uns mit dem Rainbow Six Siege Team in Verbindung gesetzt und gefragt, ob auch auf deren Seite Interesse an einer Partnerschaft besteht. Und heute können wir euch stolz Special Operation 2 ankündigen.
Wie intensiv habt ihr euch während der Entwicklung mit dem Rainbow Six Siege Team ausgetauscht was die Hintergrundgeschichte und dass Verhalten der R6 Operator in Ghost Recon Wildlands angeht?
NA: Während der Konzeptions- und früheren Entwicklungsphase, haben wir uns täglich mit dem Rainbow Six Siege Team unterhalten um festlegen zu können, welche Operator sie integrieren wollen. Uns war es zwar wichtig, dass die Operator relevant für die Geschichte und das Szenario sind, aber wir wollten auch sicherstellen, dass die Spieler bedeutende Interaktionen mit diesen haben.
Welchen Herausforderungen musstet ihr euch während der Integration der Team Rainbow Charaktere, in ein Spiel wie Wildlands stellen?
NA: Die Kern-Herausforderung bestand darin, eine Hintergrundgeschichte zu entwickeln die sowohl spannend als auch stimmig ist. Wir wollten sowohl Referenzen als auch Gameplay Momente entwickeln, welche die besten Elemente beider Welten miteinander verbinden und wir hoffen, dass unser Crossover unseren Spielerneine neue sowie spannende Erfahrung bieten kann.
Welche Leitlinie des Rainbow Six Siege Team war für euch am wertvollsten?
NA: Eine der wichtigsten Leitlinien während der Entwicklung dieser Inhalte, war es die Verhaltensweisen und Überzeugungen der Rainbow Six Siege Operator hinzubekommen. Wir wollen, dass die Fans sie sofort widererkennen und ihnen gleichzeitig mehr über deren Vergangenheit sowie Hintergrundggeschichte erzählen. Dieser Punkt war im Mittelpunkt diverser Diskussionen mit dem Rainbow Six Team.
Wie passt diese Mission in die Hintergrundgeschichte von R6? Was werden Spieler während dieser Mission über die jeweiligen Operator erfahren können?
NA: In Operation Erzengel, werden die Spieler den Auftrag erhalten Caveira in Bolivien aufzustöbern, aber sie wird nicht der einzige Operator sein der in Erscheinung treten wird. The Ghosts werden Funk-Unterstützung durch Valkyrie erhalten und auch am Boden durch Twitch unterstützt werden. Wir möchten an dieser Stelle zwar noch nicht allzu viel über die Mission verraten, aber wir hoffen das sowohl Ghost Recon als auch Rainbow Six Siege Fans die neuen Inhalte spannend finden werden!
Wie werden Caveiras und Twitchs individuelle Fähigkeiten bzw. Ausrüstung innerhalb dieser Mission zum Einsatz kommen?
NA: Spieler werden bestimmte Signatur-Verhaltensweisen und Ausrüstungsgegenstände von sowohl Caveira als auch Twitch erkennen und zudem Caveira berühmten Nahkampf einsetzen können, falls es ihnen gelingen sollte die Mission abzuschließen.
Ghost War verfügt nun auch über einen Beobachtermodus. Wie funktioniert der genau? Wird man nur ausgeschaltete Verbündete im Spiel betrachten können? Oder nur Freunde? Oder wird jeder in der Lage sein, das Match zu beobachten?
NA: Spieler können nun einer benutzerdefinierten Lobby beitreten und innerhalb eines dedizierten Slots als Beobachter des Matches fungieren. Ihnen werden ganz bestimmte Werkzeuge zur Verfügung stehen, über die sie das Match leichter beobachten können. So werden sie die Position des Spielers sehen, die Ausstattung, eingesetzte Ausrüstung und dem jeweiligen Spieler aus dessen Perspektive folgen können. Zusätzlich dazu werden die Beobachter auch Zugang zu einer freischwebenden Kamera haben, mittels derer sie das chlachtfeld frei erkunden können. Speziell für Spieler die Turniere organisieren oder einfach nur zusehen wollen, ist diese Funktion großartig.
Was führte zur Einführung der Ganzkörper-Emotes und dem neuen Siegesbildschirm?
NA: Während der Hauptkampagne und dem Ghost War PVP-Modus konnten wir sehen, dass die Kommunikation und Interaktion mit Freunden in unserem Spiel besonders wichtig sind. Emotionen und Sprachausgabe warden den Spielern die Möglichkeit geben, sich noch besser ausdrücken zu können, während der Ghost War Siegesbildschirm die perfekte Gelegenheit ist, deren Individualiserung darzustellen.
Wie können sich Spieler eigentlich die Caveira Handschuhe verdienen?
NA: Spieler können die Caveira Handschuhe nach Abschluss der Operation Erzengel erhalten. Während sie diese Handschuhe tragen, können sie Caveiras symbolträchtigen Nahkampf-Move ausführen und damit automatisch die gegnerischen Positionen innerhalb der näheren Umgebung aufdecken.
Inwiefern wird der Ghost Modus von den neuen Toxikologe- und Chirurgen-Klassenprofitieren? Wie werden deren deren Fähigkeiten funktionieren?
NA: Toxikologe und Chirurg wurden direkt durch Rainbow Six Sieges Smoke und Doc inspiriert. Toxikologe verwendet eine Drohne mittels der sich eine große Wolke toxischen Gases freisetzen lässt, wodurch Spieler beispielsweise ein gegnerisches Team in die Falle locken oder Zugänge versperren können. Chirurg verwendet eine Reanimationspistole um sein Team aus sicherer Entfernung zu heilen, was vollkommen neue Unterstützungsstrategien auf mittlerer Distanz ermöglicht.
Wie werden Spieler Annäherungsminen im PVE freispielen können? Würdet ihr sie als potenziellen Game Changer bezeichnen, wenn es darum geht wie die Ghosts ein gegnerisches Gelände betreten? Wo liegen deren Grenzen?
NA: Annäherungsminen warden alle Spieler erhalten, die sich das Special Operation 2 Update heruntergeladen haben. Man kann sie als Werkzeug ähnlich wie z.B. Handgranten oder Minen verwenden. Sie werden aufgrund ihrer Vielseitigkeit den Spielern definitiv neue Wege eröffnen, dass Santa Blanca Cartel zur Strecke zu bringen, da sie in einer Vielzahl möglicher Situationen eingesetzt werden können, in welchen normale Minen keine Verwendung finden. Gleichwohl ist deren Sprengkraft deutlich geringer und das sollte man unbedingt als Spieler im Hinterkopf behalten.
Woher kam die Idee für den Ghost Modus? Hat sich die Community nach einer größeren Herausforderung gesehnt?
NA: Wir haben viele Anfragen von der Community erhalten, in denen der Wunsch war, die Hauptkampagne nochmal unter einem völlig neuen Licht neu entdecken zu können und das führte dann zur Entwicklung des Ghost Modus. Dank spannender neuer Features wie dem Dauertod, Eigenbeschuss und einer einzigartigen Pirmärwaffe wird dieser Modus unsere Spieler dazu bringen, ihre bisherigen Herangehensweisen zu überdenken und sich an jede Situation mehr anpassen zu müssen, als es bisher der Fall war. El Sueño zu erreichen wird dadurch definitive noch herausfordernder und wir hoffen, dass unsere Spieler dabei jede Menge Spaß haben werden.
Was hofft ihr euch über die Spieler zu erfahren, die den Ghost Modus spielen werden?
NA: Der Ghost Modus ist ein neues Experiment des Ghost Recon Teams und wir sind schon sehr darauf gespannt die Reaktionen der Community zu sehen, sobald er live ist. Wir wissen das unser Spieler sehr unverwüstlich sind, den das zeigt allein die Tatsache, dass manche bereits den Weltrang 1 erreicht haben und somit auch den höchsten Schwierigkeitsgrad freigeschaltet haben. Wir können es kaum noch erwarten zu sehen, wie diese Spieler den Ghost Modus angehen werden und ob sie ihn im Weltrang 1 Modus oder einer anderen Schwierigkeitsstufe spielen werden.
Ghost Recon Wildlands ist mittlerweile dafür bekannt solche Crossover auszuprobieren. Zuerst mit Predator, dann Sam Fisher und jetzt Rainbow Six Siege. Werden wir noch weitere sehen?
NA: Es war sehr spannend das Ghost Recon Universum in den letzten Monaten zu erweitern. Wir haben definitive noch weitere Ideen und warden anhand der Reaktionen aus der Community entscheiden, ob wir diese innerhalb des Ghost Recon Universum weiterentwickeln werden.
Inwiefern spiegelt all dies wieder, wie Ubisoft auf die eigene Community hört?
NA: Unsere Community liegt uns – bei allem was wir während des 2. Jahres von Ghost Recon Wildlands tun – sehr am Herzen. Wir können uns glücklich darüber schätzen, derart viel Feedback zu erhalten, dass uns wiederrum in die Lage versetzt einzelne Elemente feinzutunen und so anzupassen, dass sie die Zustimmung unserer Community finden. Die Special Operation Updates erlaubt uns die Wünsche der Community zu berücksichtigen, die sich mehr Individualisierungsmöglichkeiten in Special Operation 1, oder dem Ghost Modus in Special Operation 2 gewünscht haben. Wir freuen uns sehr darauf unsere passionierte Community auch weiterhin, mit spannenden Inhalten versorgen zu können.
A professional video gamer has dumped his girlfriend so he can spend more time playing Call of Duty.
Let me just reiterate the intro for you in case you thought I was pulling your leg.
A man has left his girlfriend – who the internet has dubbed the ‘world’s sexiest weather girl’ – so he can dedicate more time to playing video games. Good to see he’s got his priorities in order.
The gamer in question is YouTube star, Douglas ‘FaZe Censor’ Martin, who revealed in his latest video, he dumped his girlfriend – weather forecaster, Yanet Garcia – so he could focus on professional gaming on a full-time basis.
Look, I love video games… a lot. I would never disparage the culture as gaming helped me through some difficult moments in my life. These days, when I switch on my PlayStation 4, it’s a form of therapy/release after a long day or week (unless I’m playing something on the hardest setting – then it’s stress galore).
But as much as I love it, I would never put it above a relationship.
Yet this is the choice Martin has made and the decision has left Garcia ‘heartbroken’.
Martin addressed the breakup in his latest video, where he confirmed ‘Yanet and I are no longer in a relationship’.
He said:
Yanet is an awesome girl, she deserves the best. She’s beautiful, she’s smart, she was an awesome girlfriend.
I know it sounds weird I’m saying all this…it’s just, I gotta do what feels right for me.
In the video, he reveals how he flew ‘all the way out to Mexico’ from New York three years ago, in order to meet her. They soon started to date and Yanet moved to New York for a year.
However, things changed when Yanet decided to go back to Mexico to continue her job as a weather girl and to pursue a career in acting and modelling.
He went on to say:
I supported her decision. She wanted to be a supermodel actress – chase your dreams, life’s too short. I’m playing Call of Duty full-time now and she wanted to take her job opportunity. I didn’t think it was going to be that difficult. Back then it was a lot easier for me to go out and see her. But now I have obligations.
I’m on a contract. It’s not like I don’t want to do this, this is the career that I want. I want to win a ring, I want to win a world championship, what I want in my life at this very moment is to compete in Call of Duty because I love it so much. I’m going to do whatever it takes to be a champion.
There’s only 24 hours in a day and I just didn’t have enough time to do what I needed to do.
Since the breakup, Garcia, who has an estimated 6.5 million followers on Instagram, posted a few tweets about her heartbreak and thanked her fans for supporting her at this difficult moment in her life.
She also appeared to have a final dig at her ex-boyfriend by posting a subliminal tweet in Spanish, which translates to:
Never listen to the advice of a person who has not done anything good with his life.
Nunca escuches el consejo de una persona que no ha hecho nada bueno con su vida.
Summertime is here, and what better way to spend it then by lounging outside by a refreshing body of water. Take your enjoyment of the outdoors a step further by becoming the captain of your own 3D printed WiFi Paddle Boat, designed by Greg Zumwalt.
When the heat of the summer hits, we all want to flock to the nearest pool or lake to cool off. Just because you’ve decided to get off of the computer and outdoors doesn’t mean you can’t utilize WiFi for some recreational fun. At least that’s what we’ve learned from maker and designer Greg Zumwalt, who recently shared his 3D printed WiFi Paddle Boat on Instructables.
The WiFi Paddle Boat is controlled use WiFi via a smart phone, tablet, or any other touch enabled device. The designer explains that his boat creates a WiFi access point that you can connect directly to. From there, you can navigate the ship from his WiFi Paddle Boat webpage.
This project offers a great way to entertain the kids or even yourself this summer, and is a bit complex but also undeniably awesome. Think you’re up for the challenge? Let’s take a closer look at this project to see whether you’re seaworthy or not!
3D Printed WiFi Paddle Boat: What You Need & How to Build
This is a pretty complex project that requires a wide range of 3D printed parts, components and also some soldering. However, don’t get discouraged, as Zumwalt lays out the entire project in detail on his Instructables page. We’ll give a quick overview of what you need and how to build the WiFi Paddle Boat.
For printing, the designer shares the STL files for three versions: the base model, detailed model and another for those that have a dual extrusion 3D printer. Depending on which model you choose, you’ll need to print anywhere from seven to ten parts. You should also test fit and trim, file, and sand the 3D printed parts prior to assembly. The STL files can be downloaded directly from Instructables.
Here’s the rest of the checklist for this project:
Main Components
Additional Tools
Once you’ve gathered your supplies and printed the parts, it’s time to start the assembly process. The instructions are bit lengthy, so we’ll just spell out the basics for you. After preparing the 3D printed parts for assembly, you’ll have to program the Heltec WiFi Kit 32 board. The WiFi Paddle Boat was written in the Arduino environment for the ESP32 chip, and Zumwalt shares the libraries and everything else you need on the project page.
Next, there’s some wiring required, so you’ll need to have a soldering iron and solder on-hand. The maker shares each step on Instructables, but to give you an idea of the complexity level, here’s a photo of the wiring:
Finally, once the wiring is complete, it’s time to assemble the WiFi Paddle Boat. There are a number of steps to take in order to put everything together, making this project more ideal for seasoned makers. However, if you’re feeling ambitious enough, a determined beginner can also follow along with Zumwalt’s step-by-step instructions. You can find the lengthy assembly process on Instructables, along with detailed photos and videos showcasing how to build and test your 3D printed ship.
Um dir ein optimales Erlebnis zu bieten, verwenden wir Technologien wie Cookies, um Geräteinformationen zu speichern und/oder darauf zuzugreifen. Wenn du diesen Technologien zustimmst, können wir Daten wie das Surfverhalten oder eindeutige IDs auf dieser Website verarbeiten. Wenn du deine Einwillligung nicht erteilst oder zurückziehst, können bestimmte Merkmale und Funktionen beeinträchtigt werden.
Funktional
Immer aktiv
Die technische Speicherung oder der Zugang ist unbedingt erforderlich für den rechtmäßigen Zweck, die Nutzung eines bestimmten Dienstes zu ermöglichen, der vom Teilnehmer oder Nutzer ausdrücklich gewünscht wird, oder für den alleinigen Zweck, die Übertragung einer Nachricht über ein elektronisches Kommunikationsnetz durchzuführen.
Vorlieben
Die technische Speicherung oder der Zugriff ist für den rechtmäßigen Zweck der Speicherung von Präferenzen erforderlich, die nicht vom Abonnenten oder Benutzer angefordert wurden.
Statistiken
Die technische Speicherung oder der Zugriff, der ausschließlich zu statistischen Zwecken erfolgt.Die technische Speicherung oder der Zugriff, der ausschließlich zu anonymen statistischen Zwecken verwendet wird. Ohne eine Vorladung, die freiwillige Zustimmung deines Internetdienstanbieters oder zusätzliche Aufzeichnungen von Dritten können die zu diesem Zweck gespeicherten oder abgerufenen Informationen allein in der Regel nicht dazu verwendet werden, dich zu identifizieren.
Marketing
Die technische Speicherung oder der Zugriff ist erforderlich, um Nutzerprofile zu erstellen, um Werbung zu versenden oder um den Nutzer auf einer Website oder über mehrere Websites hinweg zu ähnlichen Marketingzwecken zu verfolgen.