Recently we looked at a superb case from Argon (magpi.cc/argononem2) which transformed our Raspberry Pi 4 by upgrading the boot drive to an M.2 SSD.
The result was a tenfold increase in storage speed, making for faster performance across the board. Apps load more quickly, and browsing the internet is vastly improved. M.2 SATA is also great for working with large, demanding files such as video, large photo images, and big data files.

The latest offering from Raspberry Pi and our favourite all-in-one computer is Raspberry Pi 400.
So we set about sourcing a compatible solution for Raspberry Pi 400. Thanks to the USB 3.0 ports on the rear of Raspberry Pi 400, and recent default support for USB boot, it turns out to be easy to upgrade a Raspberry Pi 400 in the same manner.
All you need to do is source a compatible M.2 SATA drive and M.2 SATA to USB 3.0 enclosure. Put the two together and hook the unit up to Raspberry Pi 400, then copy across the operating system and you’re good to boot.

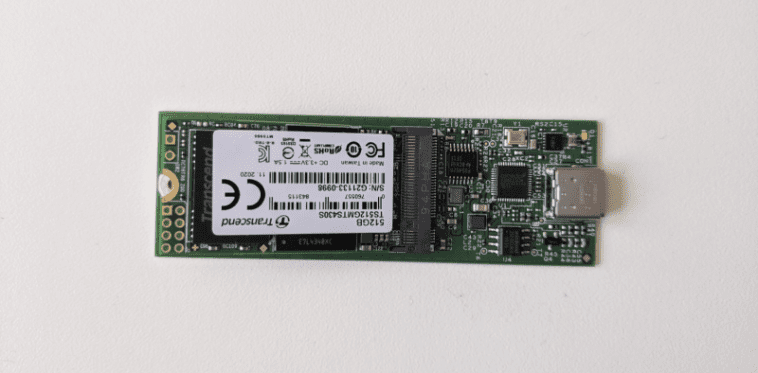
We used a Transcend M.2 SSD 430S and Transcend TSCM42S USB enclosure. The Transcend 430S was 512GB, a mighty upgrade from the 16GB card included with Raspberry Pi 400. However, you don’t need to purchase such a huge drive and the 128GB model will be more than enough for most use cases.
01 Assemble the drive
We start by assembling the M.2 drive enclosure. Our M.2 SATA to USB 3.1 SSD Enclosure Kit (TSCM42S) contains a SATA III to USB board that the M.2 SSD is mounted on. Place the SATA III interface into the socket and gently push the M.2 SSD. Then, a single screw is used to hold the M.2 SSD in place. Once the M.2 SSD drive is affixed to the board, we use the enclosure to contain it. The assembly process will vary depending on which M.2 drive and enclosure you use, but most will follow a similar pattern.
02 Set up the drive
If you want to install a fresh installation of Raspberry Pi OS to the M.2 SSD drive, then use Raspberry Pi Imager (magpi.cc/imager) to install the OS directly to the drive. You can do this on any computer, including your Raspberry Pi running from a microSD card. See the ‘Using Imager’ box (overleaf) and head to Step 4 after installing your fresh installation.
Another option is to boot your Raspberry Pi from the microSD card and clone the current operating system to the M.2 SSD drive. Boot Raspberry Pi 400 from the microSD card and – once Raspberry Pi OS is running – make sure your microSD card is running the latest version of Raspberry Pi OS:
sudo apt update sudo apt full-upgrade03 Copy the drive
Connect the M.2 drive to one of the two blue USB 3.0 connections. Open the Raspberry Pi menu and choose Accessories and SD Card Copier. Choose the microSD card in Copy From Device; ours is marked ‘SC16G (/dev/mmcblk0)’. In Copy To Device, select the M.2 drive. It should be mounted on /dev/sda and the only other option available.

Make sure to tick New Partition UUIDs (this will enable you to mount and access both devices at the same time). Click Start and Yes at the ‘erase all content’ warning menu to begin the copying process.
04 Boot into M.2
When SD Card Copier has finished duplicating the contents of the microSD card to the M.2 drive, you will be able to use the latter to boot and run your Raspberry Pi 400.

Power off your Raspberry Pi (choose Shutdown > Shutdown from the Raspberry Pi applications menu). Now remove the microSD card from Raspberry Pi as it has boot priority over the external M.2 drive. Press the FN and Power (F10) keys to power Raspberry Pi 400 back up. It will boot and run from the M.2 drive.
05 Install GNOME Disks
You should notice a speed improvement when using the M.2 drive over the microSD card.
Opening programs and browsing the web will be much faster. To get detailed information about the speed of M.2, you can benchmark the drive with GNOME Disks. Open a Terminal window and install it with:
sudo apt update sudo apt install gnome-disk-utilityOpen the Raspberry Pi applications menu and choose Accessories > Disks to open GNOME Disks.
06 Speed-test drive
Select the rootfs partition and click the ‘Additional partition options’ icon (shaped as two
cogs); choose Benchmark Partition. Click Start Benchmark and Start Benchmarking to test the drive. We get an average read rate of 382.4MB/s (much faster than our microSD card).
Insert the microSD card and select it in GNOME Disks to perform a comparative test. We get just 44.9MB/s in comparison.
07 Swap boot order
You can now use Raspberry Pi 400 with the M.2 drive attached and the microSD card ejected (as it will boot from the M.2 drive). If you insert the microSD card, the EEPROM (electrically erasable programmable read-only memory) in Raspberry Pi 400 will prioritise the microSD card over USB.
Following a recent update to raspi-config, the option to prioritise USB boot over microSD is just a few clicks away. Open Terminal and enter:
sudo raspi-configUse the arrow keys to choose Advanced Options and Boot Order, then pick ‘B2 USB Boot’. The screen will say ‘USB is default boot device’. Press ENTER and choose Finish and then Yes to ‘Would you like to reboot now?’
When Raspberry Pi reboots, it will start up from the M.2 SDD connected to USB (even if the microSD card is inserted). You can now use your Raspberry Pi 400 with the M.2 SSD drive as the default.