Kategorie: Technology

  • Opta: Enhanced cybersecurity after HWG Sababa’s testing

    Opta: Enhanced cybersecurity after HWG Sababa’s testing

    Reading Time: 2 minutes

    Connecting machines and equipment to the internet became easier than ever when we launched the Arduino Opta micro PLC, enabling real-time control, monitoring, predictive maintenance and more – in industries ranging from smart agriculture to large-scale manufacturing to building automation. 

    Supporting our well-known Arduino sketch programming experience and any of the five IEC 61131-3 PLC standard languages, the Opta was designed to be powerful yet easy to use from the start – as well as highly secure. Indeed, the Opta supports OTA firmware updates and ensures data security from the hardware to the Cloud thanks to the physical onboard secure element and X.509 Standard compliance. 

    In addition, as part of the go-to-market for this innovative hardware solution, we actively committed to verifying its security against the threats posed by cyberattacks. 

    To this end, in late 2023 we started a collaboration with global cybersecurity provider HWG Sababa: their Offensive Team engaged in a penetration test that lasted weeks, assessing Opta’s security posture and pinpointing any weaknesses. Their meticulous report allowed us to remedy any vulnerabilities before they became actual issues, and now we are proud to say the Opta is more secure than ever.

    The software patches and configuration updates we carried out are part of our ongoing commitment to providing you the most robust solutions on the market in every respect – including against ever-evolving cyber threats. The rigorous testing process and following activities our team completed only confirms Opta as an ideal candidate for any industrial automation project you have in mind. 

    To find out more about the testing process itself, check out the case study published by HWG Sababa

    The post Opta: Enhanced cybersecurity after HWG Sababa’s testing appeared first on Arduino Blog.

    Website: LINK

  • Troubleshooting Raspberry Pi in The MagPi magazine #139

    Troubleshooting Raspberry Pi in The MagPi magazine #139

    Reading Time: 3 minutes

    Solve new problems with our Raspberry Pi Troubleshooting Guide 2024

    Raspberry Pi Troubleshooting Guide 2024

    Raspberry Pi star PJ Evans wants to sit you down, hand you a tissue and ask how he can help. This month’s cover feature is jam-packed with advice. From power supply issues to video errors, audio problems, networking, and more. 

    Take part in 2024's #MonthOfMaking event and build something remarkable

    #MonthOfMaking 2024

    Every March we enter #MonthOfMaking, where we all come together to build incredible things and share them with one another. This month, we’ve scoured for the most extravagant and elaborate projects out there – genuine Rube Goldberg devices that utilize Raspberry Pi to produce unique DIY projects!

    Add an M.2 drive to Raspberry Pi 5 with NVMe Base

    NVME SSD Drive options

    The PCIe port on Raspberry Pi 5 is perfect for adding super-fast, and super-large, SSD drives. It’s a huge upgrade from the microSD card and we’ve got the first of two pieces of kit in for testing: Argon ONE V3 M.2 case and NVME Base. With two very different approaches to providing SSD storage, we put each device to a full test.

    This interactive climbing wall uses Raspberry Pi to light up the way

    The best projects! Like PeggyBoard

    Every month we strive to cover the very best of Raspberry Pi’s amazing community. One of our standout projects this month is Pegor Karolglanian’s PeggyBoard. This incredible climbing wall features LEDs to provide interactive routes and help train climbers. 

    Yet Another Flux Capacitor uses a digital screen to replicate the prop from Back to the Future

    YAFC Flux Capacitor

    Great Scott! It’s “Yet Another Flux Capacitor” built with the power of Raspberry Pi. Ambrogio Galbusera’s Flux Capacitor recreates the energy flow using a video screen, rather than the LED strips found in other projects. 

    One maker built a fully-working giant SNES controller with Raspberry Pi and custom PCB boards

    SNES XL

    Sometimes the very best projects are a little daft! Like this gigantic (but fully working) SNES controller. Inside is a Raspberry Pi so you can play games, and each button has its own custom-built PCB board.

    Turn an old Sonos speaker into a super-smart SOMA FM radio player

    Upcycle a Sonos

    Raspberry Pi is ideal for upcycling kit (rescuing old equipment that is no longer supported). PJ has taken an old Sonos speaker and used Raspberry Pi to turn it into a SOMA FM radio player. He walks you step-by-step through the process.

    Grab your copy of The MagPi magazine today! Straight from our Raspberry Pi Press Store.

  • New Portenta Machine Control library boosts industrial project performance

    New Portenta Machine Control library boosts industrial project performance

    Reading Time: 2 minutes

    At Arduino, we’re committed to providing developers with tools that make the coding process smooth and efficient. That’s why we’re thrilled to announce the new Arduino_PortentaMachineControl library, an upgraded version designed to replace the deprecated Arduino_MachineControl library. It comes with a number of improvements, from a revamped structure to enhanced documentation, making it easier than ever to manage the features of the Arduino Portenta Machine Control.

    Don’t know the Arduino Portenta Machine Control? It’s a versatile industrial control unit offering soft-PLC control, diverse I/O options, and flexible network connectivity. For more information about this product, visit the dedicated page.

    What you’ll find in the new library

    • Enhanced library structure: We restructured the library to improve its organization, making it more intuitive. This ensures that you can quickly locate and utilize the functions you need for your projects. 
    • Easier-to-understand names: We standardized function and class names for better consistency and readability. This change ensures a clearer and more understandable codebase. 
    • Optimized efficiency: We eliminated unnecessary functions, decluttering the library and focusing on the essential features needed for effective machine control. 
    • Refreshed and clearer examples: You’ll find reworked examples to showcase the library’s capabilities, providing a better demonstration of the board’s features and of their usage.

    User manual and migration tutorial

    But that’s not all! Alongside the library, we’re excited to release the official user manual for the Arduino Portenta Machine Control: an essential and in-depth guide to all the board’s features, readily available to all users.

    In addition – knowing that transitioning from the old Arduino_MachineControl library might pose some challenges – we’ve prepared a detailed migration tutorial to guide you seamlessly through the process. Make the switch confidently and take advantage of the improved functionality offered by the new library!

    And if that’s not enough, we’ve also included additional technical documentation with the library, ensuring that you have all the information you need to benefit from its new and improved capabilities.

    Ready to elevate your industrial product?

    Download the Arduino_PortentaMachineControl library through the Arduino IDE library manager or directly from the GitHub repository.

    Don’t forget to explore the user manual and the migration tutorial to make the most of the new features.

    We’re excited to see how this library empowers your projects and takes your Arduino development to new heights. Happy coding!

    The post New Portenta Machine Control library boosts industrial project performance appeared first on Arduino Blog.

    Website: LINK

  • Win! One of five Argon ONE V3 cases!

    Win! One of five Argon ONE V3 cases!

    Reading Time: < 1 minute

    Subscribe

  • The Hardware-Oriented Microprocessor Simulator illustrates the inner workings of microcontrollers

    The Hardware-Oriented Microprocessor Simulator illustrates the inner workings of microcontrollers

    Reading Time: 2 minutes

    Do you really understand what is happening within the mysterious black packaging of a microcontroller or microprocessor? Most people don’t — we just learn how to use them. That’s because they’re wildly complex circuits combining many different subsystems that are all abstracted away from the view of the user. To help students better understand these integrated circuits (ICs), Dr. Panayotis Papazoglou designed the Hardware-Oriented Microprocessor Simulator (HOMS)

    Dr. Papazoglou is an associate professor at the National and Kapodistrian University of Athens (NKUA), so he has a stake in creating an educational tool like this one. The goal of HOMS is to provide a visual and tactile demonstration of what happens inside an eight-bit microprocessor. For example, it will show a value moving from a counter to a memory register. That’s something that is difficult to visualize when using a microprocessor, even if you’re working close to “the metal” in assembly. 

    HOMS is a modular system, so students can experiment with blocks that represent different subsystem circuits within a microprocessor. Each module has an Arduino UNO Rev3 board to control its own functions, with all of the modules working under the coordination of a central Arduino Mega 2560 controller. One module may, for instance, represent memory and will show the data “written” to it on a display. Another module may have buttons and switches to allow user input.

    There are software simulation tools that seek to illustrate computing fundamentals in a similar way, but many people learn better through physical interaction. For those people, HOMS could be very helpful.

    [youtube https://www.youtube.com/watch?v=PM6FMw1mrSM?feature=oembed&w=500&h=281]

    The post The Hardware-Oriented Microprocessor Simulator illustrates the inner workings of microcontrollers appeared first on Arduino Blog.

    Website: LINK

  • Not bigger, just better: Introducing the Nano 33 BLE Rev2

    Not bigger, just better: Introducing the Nano 33 BLE Rev2

    Reading Time: 2 minutes

    The Nano 33 BLE is one of our most popular boards, and for good reason. It’s small and 3.3-V-compatible; it comes with an embedded nine-axis IMU featuring accelerometer, gyroscope and magnetometer; it has a powerful processor; it offers a powerful Bluetooth® Low Energy module with an internal antenna that can be used to transmit data between different devices using the ArduinoBLE library; and it can be programmed with MicroPython. 

    It’s basically everything you need for projects that span from wearable to advanced robotics. 

    So, why work on making it better?

    Because we listen to our community, that’s why. And based on your requests, we’ve come up with improvements to enhance your experience with a revised iteration of the Arduino Nano 33 BLE with a newly integrated IMU to expand experimentation possibilities, and a streamlined PCB design to grant easy access to essential features.

    And here is exactly what you can find in the new Rev2, compared to its predecessor:

    • It has a combination of two IMUs (BMI270 six-axis IMU plus BMM150 three-axis IMU) instead of a single, nine-axis one.
    • While retaining the compact form factor, the new Nano 33 BLE Rev2 incorporates new pads and test points for USB, SWDIO, and SWCLK, making it easier to access these crucial points on the board.
    • We introduced a new VUSB soldering jumper on the top side, allowing you to conveniently enable the VUSB pin while using the castellated pins.
    • In addition, the Nano 33 BLE Rev2 transitions the power supply component to the MP2322 to guarantee increased performance. 

    These updates collectively contribute to a more streamlined and robust device, ready for you to test and build just about any IoT project – and more. For example, the Nano 33 BLE Rev2 is still ideal to control RGB LEDs over Bluetooth®, using an app on your phone, and supports OpenMV’s fork of MicroPython

    If you already know the Nano 33 BLE from its first revision, you can easily migrate your sketches to use them with the new and improved version: if you need help, just follow our dedicated tutorial.

    After the launch of the Nano ESP32 earlier this year, it’s the perfect addition to the “tiny footprint, mighty features” family that has proven time and time again that we can ramp up features and performance while scaling down size. Don’t believe us? Check out the classic Arduino Nano or upgrade to the Nano 33 BLE Sense Rev2 if you want to include a complete set of sensors, too. 

    For full tech specs, tutorials and inspiration on the Nano 33 BLE Rev2, head to the dedicated Arduino Docs page. Ready to get your own? The Nano 33 BLE with headers and without headers are now available on our Store.

    The post Not bigger, just better: Introducing the Nano 33 BLE Rev2 appeared first on Arduino Blog.

    Website: LINK

  • Black role models in tech are making history every day

    Black role models in tech are making history every day

    Reading Time: 5 minutes

    It’s the last week of Black History Month 2024 in the USA, but by no means is the celebration over. The beautiful thing about history is that it’s not an isolated narrative about the past, but an ongoing dialogue in which we talk about how our collective past informs our present, and what more can be achieved in the future. The fact is this: we make history every single day. That’s why it’s so important for everyone to actively engage with history, and for us to celebrate the achievements of all.

    A young person with their project at a Coolest Projects event.

    When we talk about the history of STEM and computing, it’s necessary to highlight the achievements of people from groups that are still underrepresented in these fields: communities of colour, female and gender non-conforming people, people with disabilities, and underresourced communities. When we highlight their achievements, everyone can gain a fuller understanding of this history, and more young people from these groups can see they have a place in these fields and in moving them forward. 

    [When young kids of colour help inform the technology they use,] we end up with technology that is more inclusive to diverse communities […], and we help the kids become creators instead of just consumers.

    Qumisha Goss

    So to keep the conversation going about Black history in STEM and computing and how people make it every day, today we’re highlighting stories of Black community members. You’ll find out how they got involved in coding and creating with technology, and who their Black role models in tech are — past and present.

    Community spotlight: Qumisha Goss

    Meet Qumisha Goss, a brilliant source of inspiration and a shining light for youth in the ‘Motor City’ of Detroit, Michigan, USA.

    A smiling woman.

    Growing up, Qumisha always had an interest in tech, often tinkering and putting projects together, and her interest quickly transformed into a dream of becoming an engineer one day. Fast forward to now, and Qumisha has done exactly that and so much more.

    She’s the Interim Executive Director of Peer 2 Peer University, the Digital Literacy Subject Matter Expert for Connect 313, the Creator and Lead Instructor of Code Grow, and a Raspberry Pi Certified Educator. Talk about impact! We asked Qumisha a few questions to explore her incredible story and to learn how she’s giving back to her community today: 

    Which Black individuals have helped pave the way for you?

    Qumisha: “When I was a kid, my grandmas, Gloria and Cassandra, helped my brother and I make a shrinking machine out of a cardboard box, some batteries, and some lights. There was a minimum of science used, but my grandma swapped out our test ear of corn for a baby corn and my curiosity was rewarded with success. In elementary school, my ‘hero’ was Mae Carol Jemison, engineer, doctor, and astronaut. She was the first African American woman to go to space, in 1992 on the Endeavor. I found someone who looked like me who was doing something that I wanted to do, and that was encouraging.”

    Two young people using laptops at a Code Club session.

    Why is it important to encourage diversity in tech?

    Qumisha: “It’s important that young kids of colour help inform the technology that they use. The benefits are twofold: we end up with technology that is more inclusive to diverse communities because it is informed by them, and we help the kids become creators instead of just consumers.”

    How did you find your way into tech?

    Qumisha: “I eventually went to college to study engineering. I ended up switching majors and studying history and classical languages, but later returned to the tech world when I joined the Python and Raspberry Pi communities. I learned how to code outside of a traditional classroom and have been running physical computing classes and workshops for kids in my hometown of Detroit.”

    A Coolest Projects participant

    How do you believe your work is paving the way for more Black excellence in tech?

    Qumisha: “Even if kids don’t stick with it, they learn that coding — and lots of things — are not beyond them. The next Bill Gates might be sitting on the library stoop. The difference between them being able to make it or not is: ‘Did they ever get the opportunity to touch the thing that really sparks their genius?’ And for me, I want to help as many kids as possible interact with tech in a fun and engaging way so that they know that they can be technologists too.”

    The difference between [kids] being able to make it or not is: ‘Did they ever get the opportunity to touch the thing that really sparks their genius?’

    Qumisha Goss

    To connect with Qumisha and learn how you can support the incredible, history-making work that she’s doing, follow her on X at @QatalystGoss.

    Keep reading to meet more Black history makers across the USA, and to find resources to learn how you can help increase diversity in the technology sector in your community.  

    Ways to continue celebrating Black history

    Explore our research seminars for educators who want to learn how to make computer science more accessible to all.

    Listen to the stories of other Black community members who are making history all over the US. Siblings Sophia and Sebastian, researcher Randi Williams, and aspiring filmmaker Jordan chatted to us about their interest in coding, tech, and getting creative with digital tools.

    At Coolest Projects, a group of people explore a coding project.

    Try out one of our guided projects for young people to get creative with tech. Check out Coolest Projects, our free online showcase for young tech creators, and how you can get young people involved

    And if you want to share the story of how you got into tech and how you’re inspiring kids to do the same, reach out to us on social media so we can amplify your voice. 

    Happy Black History Month!

    Website: LINK

  • 9 new Android features to help you stay productive9 new Android features to help you stay productiveSr. Director

    9 new Android features to help you stay productive9 new Android features to help you stay productiveSr. Director

    Reading Time: < 1 minute

    6. View your health, wellness and fitness data in one place

    See a more complete picture of your health right in the redesigned Fitbit app through Health Connect — with data from your favorite wearables and apps like AllTrails, Oura Ring and MyFitnessPal. In the Fitbit app on your Android phone, head to the You tab to see data from connected apps next to your Fitbit data. And in the Today tab, you can see data like exercise, steps, calories burned, floors climbed and distance traveled from Health Connect-compatible apps.

    Website: LINK

  • 6 Android experiences to see at MWC Barcelona6 Android experiences to see at MWC BarcelonaSenior Director, Global Android Product Marketing

    6 Android experiences to see at MWC Barcelona6 Android experiences to see at MWC BarcelonaSenior Director, Global Android Product Marketing

    Reading Time: < 1 minute

    At MWC Barcelona, we’re sharing how our latest AI technologies and multi-device experiences can help you get more done across the Android ecosystem.

    Here are six experiences to see at MWC this week. And if you’re not on the ground, follow along from home using the hashtags #MWC24 and #Android.

    1. Try Circle to Search

    Only on Android, Circle to Search lets you instantly search anywhere on your phone without switching apps. In the Circle to Search exhibit at MWC, explore what you can circle, highlight, scribble or tap — like interesting landmarks, dishes you want to try and more. Circle to Search is available now on select Android premium phones, including the Pixel 8, Pixel 8 Pro and the Samsung Galaxy S24 series.

    Website: LINK

  • UNO R4 Stars: Meet Clatters Machines

    UNO R4 Stars: Meet Clatters Machines

    Reading Time: 2 minutes

    The launch of the Arduino UNO R4 marks a huge leap forward for our community. For us, it’s also the chance to celebrate the people who bring our ecosystem to life with their bright ideas, radiant enthusiasm, and shining insight.

    That is how the UNO R4 Stars blog post series began: to highlight makers who have not only created amazing projects with Arduino, but who are giving back to the community by sharing as they go and helping others make anything they wish.

    We invite you to discover each profile, hoping you might find a North Star to navigate around an expanding galaxy or venture into completely new universes.

    Clatters Machines creates “noisy machines for music lovers” – handmade electronic musical instruments that turn technology into sound waves. The company was co-founded by Carolina Guidi and Michelangelo Nasso, brought together by a unique passion for sound and for making what could be a mess of cables, wires, and knobs look really cool. 

    Guidi, in particular, is in charge of visual branding and product design – which makes for great eye candy on their Instagram wall! – while Nasso’s favorite part of the job is prototyping and testing the modules, fueled by his passion for hardware and software engineering.

    Arduino has always played a crucial role in the duo’s explorations, and later, in their work. Guidi discovered the brand during a university workshop: she says she was surprised to find out that putting together a few components on a breadboard could be so easy and accessible – “all you need to worry about is your own creativity.” 

    Nasso got his first taste of Arduino a bit earlier, quickly realizing how it made a lot of his ideas closer to reality than he thought, even before he acquired the engineering skills he would develop during university. 

    It is not by chance that their very first product, the Pocket Garden Listener, was “all designed, prototyped and tested with an Arduino UNO,” and that they have fond memories of the experience.

    The embodiment of how creative flair and engineering mastery can come together beautifully, Clatters Machines takes pride in inspiring “people who play and love music, with products that start right here, from an original idea:” isn’t that the essence of making?

    [youtube https://www.youtube.com/watch?v=Cnk_oSLKq8Y?feature=oembed&w=500&h=281]

    We asked Guidi and Nasso, “What’s your favorite part of the UNO R4?”

    • Its thrilling potential, which opens up to infinite new possibilities – just like the very first Arduino UNO did for the many makers who started with it! 
    • The huge leap forward it represents for anyone working in prototyping, thanks to the upgraded tech specs.
    • How it “ramps up everything that made Arduino the brand it is today.’

    Ready to play with Clatters Machines? Head to their website to get yourself a cool sound machine. 

    The post UNO R4 Stars: Meet Clatters Machines appeared first on Arduino Blog.

    Website: LINK

  • 8BitDo Retro Mechanical Keyboard

    8BitDo Retro Mechanical Keyboard

    Reading Time: 3 minutes

    8BitDos latest offering (£79/$100) bucks this trend. A pair of beautiful wireless mechanical keyboards with colour schemes based on the original NES and Famicom, the most noticeable thing about them is an included pair of gigantic ‘super buttons’, arcade-esque add-ons that plug into the keyboard and can be programmed to run certain keys or macros.

    Playing with power

    If you’ve used any 8BitDo input device before, you’ll know that you can press a specific macro button to assign a keypress manually to these buttons, along with very conspicuous A and B buttons next to the space bar. In our mind, the intended use of this is either shortcuts on the desktop, or to assign custom keys for a more accurate experience on some retro games via RetroPie. Unlike other controllers and keyboards, you can’t set up these extra super buttons inside RetroPie but it will recognise the inputs you’ve set to it from using the macro button, or via a custom ‘profile’ that’s set up on another machine.

    The software is fairly easy to use although it does allow for a lot of customisation

    The customisation software, called 8BitDo Ultimate Software V2 is very powerful, allowing you to not only assign keys and/or macros to the super buttons, but also completely remap the keyboard as well – including adding special navigation or media control functions, which is very fancy. Creating macros is very deep as well, allowing you to pull off long combos with custom delay between button presses too. It’s an astounding amount of customisation, although unfortunately the software is only available on Windows PCs right now. Still, you can turn the customisation on and off with a simple press of the keyboards profile button, so once you have set it up on a PC you don’t need to remain connected to it.

    Hook it up

    The connection options are great – as well as a classic wired connection via the USB-C charging port, you can connect via Bluetooth or a 2.4GHz RF stick stored away on the underside. We found initially connecting the keyboard via Bluetooth had some issues, but once connected it worked just fine. The 2.4GHz stick worked right away and is currently out preferred way to use it. There’s a satisfying clunky switch that goes between the different radio types which perfectly complements the comfy and clicky keys on the keyboard. We had no lag on any games we played on RetroPie, and the super buttons were very fun to smash for that.

    The super buttons connect via a 3.5mm jack just like peripherals on accessible game controllers, and are very satisfying to use

    The switches and keys are standard PCB/PBT types so you can swap them out if you have preferred keys or want a quieter type (we have been banned from using them at Pi Towers due to the noise, oops).

    There is currently only a US layout, and despite the Japanese symbols on the Famicom version, it’s missing one or two keys to be a full Japanese keyboard. It is just an aesthetic choice though, and the design of the keys and labelling elsewhere is authentic and very pretty.

    Verdict

    9/10

    A very good retro keyboard for retro gaming, although you can’t unlock its full features with just a Raspberry Pi.

  • Building your own affordable SCARA plotter with Arduino

    Building your own affordable SCARA plotter with Arduino

    Reading Time: 2 minutes

    Robots come in all shapes and sizes, but one of the most popular styles for industrial applications is the SCARA (Selective Compliance Assembly Robot Arm). These have multiple degrees of freedom, each of which rotates around the vertical Z axis. But they’re otherwise constrained, which can have advantages for certain applications. For example, they tend to have relatively high payload capacities. If you’re on a budget but want to dip your toes in, tuenhidiy’s SCARA plotter is a great way to start.

    This is a follow-up to tuenhidiy’s previous SCARA design from a couple of years ago. The new version is more robust and includes a homing feature, which is important for repeatability. This is set up as a plotter and the firmware reflects that, but it would be possible to adapt the mechanical design for other purposes. 

    To keep costs down, most of the structure is PVC pipe. Stepper motors provide actuation via GT2 timing belts and pulleys. An Arduino Mega 2560 board controls those steppers through a RAMPS 1.4 board with A4988 stepper drivers. An interface module with a 2004 LCD, rotary encoder, buzzer, and button lets the user start jobs.

    In this case, those jobs are G-code files containing the movement commands to reproduce the drawings. That works because the Arduino runs Marlin firmware (popular in the 3D printing community). The use of Marlin made homing easy and it accepts g-code that users can create with most of the standard software tools. 

    [youtube https://www.youtube.com/watch?v=5AB-XvNw8qY?start=2&feature=oembed&w=500&h=281]

    The post Building your own affordable SCARA plotter with Arduino appeared first on Arduino Blog.

    Website: LINK

  • These custom Chucks are smokin’ hot kicks

    These custom Chucks are smokin’ hot kicks

    Reading Time: 2 minutes

    Once you get bored with the shoes on the shelves at Payless, you can dive into the fascinating world of custom sneakers. Converse Chuck Taylors are probably the most popular canvas for shoe customizers, as they offer plenty of room for paint and jewel bedazzling. But creative technologist Tigris Li took it to a whole other level with her Chuck 70s Smoke Shoes that blow clouds as the wearer walks.

    Each shoe has an apparatus that looks like it was cobbled together by a mad scientist trying invent their way into dunking. When the wearer puts pressure down on the sole, that apparatus will puff out a cloud of smoke. Those soles are actually custom, too. Li 3D-printed them in TPU to give the shoes a cool, angular look. They also contain the force sensors that trigger the smoke production.

    An Arduino Nano ESP32 board in each shoe monitors the force sensor in the sole. When the signal surpasses a set threshold, the Arduino activates a relay that allows power to flow through a heating coil. That coil sits in smoke machine fluid that comes from a tiny flask attached to the shoe. With power flowing, the coil burns the fluid and that expands to create the smoke.

    https://platform.twitter.com/widgets.js

    We can only assume that we’ll see Jay-Z wearing these at his next appearance at the Grammy Awards.

    The post These custom Chucks are smokin’ hot kicks appeared first on Arduino Blog.

    Website: LINK

  • Hello World #23 out now: Global exchange of computing education ideas

    Hello World #23 out now: Global exchange of computing education ideas

    Reading Time: 3 minutes

    How is computing taught around the globe? Our brand-new, free issue of Hello World, out today, paints a picture for you. It features stories from over 20 countries, where educators, researchers, and volunteers share their work and their personal challenges and joys in bringing computing education to their part of the world.

    The Hello World Global Exchange magazine cover on a plain background.

    Global exchange in a worldwide community

    In Hello World issue 23, you’ll hear about countries where computing is an official school subject and how it was set up that way, and you’ll hear about countries that are newer to computing education and working to fast-track their students’ learning.

    • Ethel Tshukudu’s article on her research using the CAPE framework is a fascinating comparison of computer science education in four African countries
    • Iliana Ramirez describes how volunteers are at the heart of Ciberistas, a technology training programme for young people in Mexico
    • Matthew Griffin’s article highlights how computing education works in Canada, a large country with two official languages
    • Dana Rensi’s article about a solar-powered Raspberry Pi computing lab in the middle of the Peruvian rainforest will surprise and delight you
    • Randal Rousseau, a librarian in Cape Town, South Africa, shares how he teaches children to code through unplugged activities

    And there is lots more for you to discover in issue 23.

    Sue Sentance, director of the Raspberry Pi Computing Education Research Centre at the University of Cambridge, says in her article:

    “Our own experience of implementing computing education in England since 2014 has shown the importance of teachers supporting each other, and how various networks … are instrumental in bringing computing teachers together to share knowledge and experiences. With so many countries introducing computing education, and teachers around the globe facing similar challenges, maybe we need to extend this to a global teacher network, where teachers and policymakers can share good practice and learn from each other. “

    We aim for Hello World magazine to be one of the places where this sharing, exchange, and learning can take place. Subscribe for free to never miss an issue, and find out how you can write for the magazine.

    Download Hello World issue 23 for free

    Research highlights the importance of computing education to young people’s futures, whether or not they pursue a degree or career in the area. From teaching computing in schools where the electricity cuts out, to incorporating artificial intelligence into curricula in different countries, and to teaming up with local governments when there isn’t a national computing curriculum, educators are doing wonderful things around the globe to make sure the young people they support have the opportunity to learn. Read their stories today.

    Also in issue 23:

    • Research on culturally adapted resources 
    • How community building enhances computing education
    • Tips for hosting a STEM event in school

    And much, much more.

    Send us a message or tag us on social media to let us know which articles have made you think, and most importantly, which will help you with your teaching. And to hear monthly news about Hello World and the whole Raspberry Pi Foundation, sign up to the Hello World newsletter.

    Website: LINK

  • The ultimate lighting system for model railroaders

    The ultimate lighting system for model railroaders

    Reading Time: 2 minutes

    Go to any model railroading convention and you’ll see that most layouts have far more work put into the terrain and buildings than into the trains themselves. The emphasis is usually on realism, so enthusiasts spend uncountable hours constructing and weathering their buildings. But lighting those buildings can be difficult, leading many people choose simple static lighting. This project by Olivier Wagener makes it relatively easy to upgrade that lighting to something much more sophisticated.

    Wagener started this project to help his father improve the lighting of a train station building for his model railroad. The result is really impressive, because every room in the building has two of its own LEDs: one a warm temperature and one a cool temperature. This also supports RGB LEDs. Using a smartphone, the user can set the brightness, color, and temperature of each room individually. They can also group those into zones for quick control. Once setup, the user has complete control over the realistic lighting and that adds a whole new dimension to model railroading.

    This is possible thanks to an Arduino MKR 1010 WiFi board that communicates with Wagener’s custom app over the local network. This can handle up to 976 single-color LEDs (warm or cool), 305 RGB LEDs, or some combination of the two. To give the Arduino full PWM (pulse-width modulation) control over that many LEDs, Wagener chose PCA9685 PWM module boards. Each one has 16 channels, so a full set of 976 single-color LEDs will require 61 boards. 305 RGB LEDs will also require 61 boards, because each of those LEDs takes up three channels.

    [youtube https://www.youtube.com/watch?v=cVVxhGMEgmw?feature=oembed&w=500&h=281]

    If you want to use Wagener’s project in your own buildings, all of the code and information is available on his Gitlab page

    The post The ultimate lighting system for model railroaders appeared first on Arduino Blog.

    Website: LINK

  • Adam Cohen-Rose interview

    Adam Cohen-Rose interview

    Reading Time: 3 minutes

    What is your history with making?

    I’ve always enjoyed building things – I had a big chest of LEGO as a kid, and so did my wife, and now we’ve only expanded it as our children got into model building too!

    I’ve been going to BarCamps and hackathons since 2007 and have loved the opportunity to work with other people to put something together in a short space of time. I was even featured on BBC Click as an ‘Inventor’ back in 2009 for building a LEGO Dalek controlled from my phone.

    The maze game on the Astro Pi – it’s a bit small, but so is the screen it’s displayed on.

    When did you learn about Raspberry Pi?

    Pretty early on. My then 12-year-old (now 20!) was one of the judges at the Code Club Pi-hack back in December 2012.

    I’ve three active Raspberry Pi [boards] in the house, plus about seven or eight others, connected or embedded in various projects.

    This displays temperature and humidity, so during the demo people can figure out how the Sense HAT works.

    How did you start with Code Club?

    I started running a programming club in my child’s primary school back in February 2012 – just before Code Club was founded. I approached the head teacher to offer a free lunchtime club for year 4s and he jumped at the idea!

    Once the Code Club Scratch projects came out, I switched to using them pretty quickly as they were great fun and the children really enjoyed making their own games.

    We’ve now had Code Clubs at Fleetville Junior School for nearly 12 years. I’m still running the year 6 club, even though neither of my kids go there any more! And we also run lunchtime clubs for years 4 and 5 – using Code Club material as well as Minecraft Education, micro:bits and Machine Learning for Kids.

    I’ve also started up Code Clubs at work: Tesco Technology supports two clubs – one lunchtime club by our Welwyn office, and one after-school club by our London office.

    What are some of your favourite Astro Pi moments?

    Getting the kids to guess what the sensors are on my 3D-printed Astro Pi mockup – I run a small program that displays a maze for the gyroscope and accelerometer, and a bar graph for the humidity and temperature sensors. The kids then have to try different inputs to figure out what they are responding to. See the code and some pictures here.

    Seeing the actual Astro Pi hardware at Raspberry Pi Big Birthday Bash events and at Richard Hayler’s talk at EMF Camp – and then seeing videos of their twins in the space station.

  • Supporting learners with programming tasks through AI-generated Parson’s Problems

    Supporting learners with programming tasks through AI-generated Parson’s Problems

    Reading Time: 6 minutes

    The use of generative AI tools (e.g. ChatGPT) in education is now common among young people (see data from the UK’s Ofcom regulator). As a computing educator or researcher, you might wonder what impact generative AI tools will have on how young people learn programming. In our latest research seminar, Barbara Ericson and Xinying Hou (University of Michigan) shared insights into this topic. They presented recent studies with university student participants on using generative AI tools based on large language models (LLMs) during programming tasks. 

    A girl in a university computing classroom.

    Using Parson’s Problems to scaffold student code-writing tasks

    Barbara and Xinying started their seminar with an overview of their earlier research into using Parson’s Problems to scaffold university students as they learn to program. Parson’s Problems (PPs) are a type of code completion problem where learners are given all the correct code to solve the coding task, but the individual lines are broken up into blocks and shown in the wrong order (Parsons and Haden, 2006). Distractor blocks, which are incorrect versions of some or all of the lines of code (i.e. versions with syntax or semantic errors), can also be included. This means to solve a PP, learners need to select the correct blocks as well as place them in the correct order.

    A presentation slide defining Parson's Problems.

    In one study, the research team asked whether PPs could support university students who are struggling to complete write-code tasks. In the tasks, the 11 study participants had the option to generate a PP when they encountered a challenge trying to write code from scratch, in order to help them arrive at the complete code solution. The PPs acted as scaffolding for participants who got stuck trying to write code. Solutions used in the generated PPs were derived from past student solutions collected during previous university courses. The study had promising results: participants said the PPs were helpful in completing the write-code problems, and 6 participants stated that the PPs lowered the difficulty of the problem and speeded up the problem-solving process, reducing their debugging time. Additionally, participants said that the PPs prompted them to think more deeply.

    A young person codes at a Raspberry Pi computer.

    This study provided further evidence that PPs can be useful in supporting students and keeping them engaged when writing code. However, some participants still had difficulty arriving at the correct code solution, even when prompted with a PP as support. The research team thinks that a possible reason for this could be that only one solution was given to the PP, the same one for all participants. Therefore, participants with a different approach in mind would likely have experienced a higher cognitive demand and would not have found that particular PP useful.

    An example of a coding interface presenting adaptive Parson's Problems.

    Supporting students with varying self-efficacy using PPs

    To understand the impact of using PPs with different learners, the team then undertook a follow-up study asking whether PPs could specifically support students with lower computer science self-efficacy. The results show that study participants with low self-efficacy who were scaffolded with PPs support showed significantly higher practice performance and higher problem-solving efficiency compared to participants who had no scaffolding. These findings provide evidence that PPs can create a more supportive environment, particularly for students who have lower self-efficacy or difficulty solving code writing problems. Another finding was that participants with low self-efficacy were more likely to completely solve the PPs, whereas participants with higher self-efficacy only scanned or partly solved the PPs, indicating that scaffolding in the form of PPs may be redundant for some students.

    Secondary school age learners in a computing classroom.

    These two studies highlighted instances where PPs are more or less relevant depending on a student’s level of expertise or self-efficacy. In addition, the best PP to solve may differ from one student to another, and so having the same PP for all students to solve may be a limitation. This prompted the team to conduct their most recent study to ask how large language models (LLMs) can be leveraged to support students in code-writing practice without hindering their learning.

    Generating personalised PPs using AI tools

    This recent third study focused on the development of CodeTailor, a tool that uses LLMs to generate and evaluate code solutions before generating personalised PPs to scaffold students writing code. Students are encouraged to engage actively with solving problems as, unlike other AI-assisted coding tools that merely output a correct code correct solution, students must actively construct solutions using personalised PPs. The researchers were interested in whether CodeTailor could better support students to actively engage in code-writing.

    An example of the CodeTailor interface presenting adaptive Parson's Problems.

    In a study with 18 undergraduate students, they found that CodeTailor could generate correct solutions based on students’ incorrect code. The CodeTailor-generated solutions were more closely aligned with students’ incorrect code than common previous student solutions were. The researchers also found that most participants (88%) preferred CodeTailor to other AI-assisted coding tools when engaging with code-writing tasks. As the correct solution in CodeTailor is generated based on individual students’ existing strategy, this boosted students’ confidence in their current ideas and progress during their practice. However, some students still reported challenges around solution comprehension, potentially due to CodeTailor not providing sufficient explanation for the details in the individual code blocks of the solution to the PP. The researchers argue that text explanations could help students fully understand a program’s components, objectives, and structure. 

    In future studies, the team is keen to evaluate a design of CodeTailor that generates multiple levels of natural language explanations, i.e. provides personalised explanations accompanying the PPs. They also aim to investigate the use of LLM-based AI tools to generate a self-reflection question structure that students can fill in to extend their reasoning about the solution to the PP.

    Barbara and Xinying’s seminar is available to watch here: 

    [youtube https://www.youtube.com/watch?v=ieFB_C2bq2Y?feature=oembed&w=500&h=281]

    Find examples of PPs embedded in free interactive ebooks that Barbara and her team have developed over the years, including CSAwesome and Python for Everybody. You can also read more about the CodeTailor platform in Barbara and Xinying’s paper.

    Join our next seminar

    The focus of our ongoing seminar series is on teaching programming with or without AI. 

    For our next seminar on Tuesday 12 March at 17:00–18:30 GMT, we’re joined by Yash Tadimalla and Prof. Mary Lou Maher (University of North Carolina at Charlotte). The two of them will share further insights into the impact of AI tools on the student experience in programming courses. To take part in the seminar, click the button below to sign up, and we will send you information about joining. We hope to see you there.

    The schedule of our upcoming seminars is online. You can catch up on past seminars on our previous seminars and recordings page.

    Website: LINK

  • Registration is open for Coolest Projects 2024

    Registration is open for Coolest Projects 2024

    Reading Time: 4 minutes

    Big news for young coders and everyone who supports them: project registration is now open for Coolest Projects 2024! Coolest Projects is our global technology showcase for young people aged up to 18. It gives young creators the incredible opportunity to share the cool stuff they’ve made with digital technology with a global audience, and receive certificates and rewards to celebrate their achievements.

    A young coder shows off her tech project Five young coders show off their robotic garden tech project for Coolest Projects to two other young tech creators.

    What you need to know about Coolest Projects

    The Coolest Projects online showcase is open to young people worldwide. Young creators can register their projects to share them with the world in our online project gallery, and join our exciting livestream event to celebrate what they have made with the global Coolest Projects community.

    Four young coders show off their tech project for Coolest Projects.

    By taking part in Coolest Projects, young people can join an international community of young makers, represent their country, receive personalised feedback on their projects, and get certificates and more to recognise their achievements.

    Here’s how it works:

    • Coolest Projects is completely free to take part in!
    • All digital technology projects are welcome, from very first projects to advanced builds, and the projects don’t have to be complete
    • Projects can be registered in one of six categories: Scratch, games, web, mobile apps, hardware, and advanced programming
    • Young creators up to age 18 can take part individually or in teams of up to five friends
    • Any young person anywhere in the world can take part in the online showcase, and there are in-person events in some countries for local creators too (find out more below)
    • Registration for the online showcase is now open and closes on 22 May 2024
    • All creators, mentors, volunteers, teachers, parents, and supporters are invited to the special celebration livestream on 26 June 2024

    Taking part in Coolest Projects is simple:

    • Young people think of an idea for their project, or choose something they’ve already made and are proud of
    • Young people work with friends to create their project, or make it on their own 
    • Creators (with the help of mentors if needed) register projects via the Coolest Projects website by 22 May
    • Creators’ projects are shared with the world in the online showcase gallery
    • Creators, mentors, and supporters explore the amazing projects in the online gallery, and join the livestream on 26 June to celebrate young creators’ achievements with the Coolest Projects community worldwide
    Two young coders work on their tech project on a laptop to control a sewing machine for Coolest Projects.

    Coolest Projects in-person events in 2024

    As well as the global online showcase, Coolest Projects in-person events are held for young people locally in certain countries too, and we encourage creators to take part in both the online showcase and their local in-person event.

    The exhibition hall at Coolest Projects Ireland 2023.

    In 2024, creators can look forward to the following in-person events, run by us and partner organisations around the world:

    More events are coming soon, so sign up to the Coolest Projects newsletter to be sure to hear about any in-person events in your country. And if there isn’t an event near you, don’t worry. The online showcase is open to any young person anywhere in the world.

    A Coolest Projects sign with two people doing handstands in front of it.

    Help for you is at hand

    Coolest Projects welcomes all digital tech projects, from beginner to advanced, and there are loads of great resources available to help you support the young people in your community to take part.

    Young people and an adult mentor at a computer at Coolest Projects Ireland 2023.

    We are running a series of online calls and webinars for mentors and young people to share practical tips and help participants develop their ideas and build their creations. Sign up for the sessions here. All sessions will be recorded, so you can watch them back if you can’t join live.

    You can also check out the Coolest Projects guidance page for resources to help you support young people throughout their Coolest Projects journey, including a mentor guide and session plans.

    Five young coders show off their robotic garden tech project for Coolest Projects.

    To inspire your coders, encourage them to take a look at the 2023 showcase gallery, where they can explore the incredible projects submitted by participants last year.

    Our projects site is also a great place for participants to begin — there are hundreds of free step-by-step project guides to help young people create their own projects, whether they’re experienced tech creators or they’re just getting started.

    Sign up for Coolest Projects updates

    There’s lots more exciting news to come, from the announcement of our VIP judges to details about this year’s swag, so sign up for email updates to be the first to know. And whether your coders have already made something fun, innovative, or amazing that they want to share, or they’re inspired to make something new, Coolest Projects is the place for them. We can’t wait to see what they create!

    Website: LINK

  • SPIN is a beautiful and imaginative AI synthesizer

    SPIN is a beautiful and imaginative AI synthesizer

    Reading Time: 2 minutes

    If you’re heard the pop music emanating from any recent reality TV show, you won’t be surprised to learn that AI is perfectly capable of generating tunes on demand. It won’t replace true artistry any time soon, but AI music fits all of the technical criteria. But typing a prompt is boring, which is why Arvind Sanjeev constructed this gorgeous and imaginative AI synthesizer called SPIN.

    SPIN is beautiful and looks like a cross between a turntable and a drum machine. Those visual cues hint at its function. The user can press buttons on the right-side pad to define musical characteristics, which then form a prompt for a language model called MusicGen. That synthesizes music according to the selected characteristics, like “happy” and “lo-fi.” The music then starts playing and the user can control its speed and direction using the record on the turntable — even scratching like a DJ if they want.

    A Raspberry Pi 4 Model B runs MusicGen, but it receives inputs through an Arduino Mega 2560 connected to the buttons. There are also dials to set song duration and BPM (beats per minute), as well as control knobs.

    The turntable is a Numark PT-01, but the vinyl is a special dummy record that only contains a time code track. The sound from that then feeds through the audio driver back to the Raspberry Pi, where it is decoded to control the playback of the synthesized music. 

    SPIN is truly stunning to look at and its functionality is quite interesting, but Sanjeev’s real motivation was to raise awareness about the ethics of AI-generated art and the original human-made art it is trained on. 

    The post SPIN is a beautiful and imaginative AI synthesizer appeared first on Arduino Blog.

    Website: LINK

  • Upgrade your shop with voice-controlled smart LED lighting

    Upgrade your shop with voice-controlled smart LED lighting

    Reading Time: 2 minutes

    Congratulations! You finally have a garage to call your own and you’re ready to turn it into the workshop of your dreams. But before you go on a shopping spree in Home Depot’s tools section, you may want to consider upgrading from that single dim lightbulb to more substantial lighting — otherwise, you’ll never find the screws you drop on the ground. LeMaster Tech can help with his great video on installing DIY voice-controlled smart LED lighting.

    LeMaster Tech’s primary goal was simply to increase the brightness in the garage. He took the route that gives the best bang for the buck: LED tubes. Those are similar in form factor to fluorescent light tubes, but they can put out more lumens with fewer watts and they tend to last a lot longer. They also don’t need expensive and bulky ballasts. LeMaster Tech installed several of those on the ceiling of his garage, then took things to the next level.

    These LED light tubes work with standard household mains AC power, so they can be wired like regular light bulbs. But instead, LeMaster Tech made them smart by wiring them through a relay board controlled by an Arduino UNO Rev3 board. That lets the Arduino safely switch each light tube on and off. LeMaster Tech gave it the ability to do that in response to voice commands by adding a DFRobot Gravity voice recognition module. That handy module works entirely offline and uses a simple AI to recognize spoken words. It has 121 built-in words and supports 17 custom words, so LeMaster Tech was able to tailor it to his needs.

    Now he can switch the lights with a simple voice command and even activate pre-programmed effects, like flashing the lights. 

    [youtube https://www.youtube.com/watch?v=L6Vg9dT7hsU?feature=oembed&w=500&h=281]

    The post Upgrade your shop with voice-controlled smart LED lighting appeared first on Arduino Blog.

    Website: LINK

  • Build a better spindle controller for your CNC mill

    Build a better spindle controller for your CNC mill

    Reading Time: 2 minutes

    Proper spindle speed control is necessary to get good CNC milling results. If your spindle speed is inconsistent, your speed and feed calculations will be wrong. That will lead to poor finishes and even broken end mills (and ruined parts) in extreme cases. But cheap CNC mills and routers often have insufficient spindle speed controllers. That’s why Joekutz’s Workbench built an improved spindle speed controller for his generic CNC 3040.

    This DIY spindle speed controller has two major improvements: more precise adjustment and closed-loop feedback.

    The original controller just had an imprecise potentiometer knob and dot markings, making it impossible to set to a specific speed. The new version lets the user set the spindle to a desired speed with a digital readout.

    It also has closed-loop feedback, so it can adjust power to the motor as necessary to maintain the set speed under load. Without that, even a light load could slow down the spindle and throw off the speed/feed balance. 

    Joekutz’s Workbench achieved this using an Arduino UNO Rev3 board. It reads input from a rotary encoder to set the motor speed, then shows that speed on a seven-segment display. It controls the motor speed via PWM through a DIY optical isolator, a transistor, and a MOSFET. At the same time, it receives feedback on the real-world motor speed using an LED and photoresistor. That measures the reflectivity of the spinning spindle, which has a piece of aluminum foil tape in one area to increase reflectivity. That lets the Arduino detect a revolution of the motor and calculate the RPM. 

    [youtube https://www.youtube.com/watch?v=_ExjwMC0-Nw?feature=oembed&w=500&h=281]

    The CNC mill uses an Arduino Mega 2560 with GRBL for controlling the axes’ stepper motors. The Arduino Uno spindle controller can receive g-code speed commands from that, or the user can set the speed using the rotary encoder dial. 

    The post Build a better spindle controller for your CNC mill appeared first on Arduino Blog.

    Website: LINK

  • Rise as a Champion in Overwatch 2 – Season 9

    Rise as a Champion in Overwatch 2 – Season 9

    Reading Time: 6 minutes

    Overwatch 2 Season 9 arrives tomorrow with exciting core gameplay updates, a reworked Competitive game mode, and a season theme that will test the courage of even the bravest heroes as they face a dangerous threat of cosmic proportions. Get your friends together, queue up, and face the unknown that awaits you.

    Competitive Play Updates

    Thanks in part to your feedback, we’ve updated Competitive Play. Now more transparent than ever, the new Competitive Overview after every match provides clear insights into how your rank changes, including skill modifiers to help you understand your progress through the ranks. At the start of Season 9, we’re doing a soft reset of everyone’s rank, giving everyone a fresh opportunity to climb higher while maintaining a standard in match quality. We’re also bringing placements back, which means your performance in these games substantially influences your initial rank placement.

    For the truly daring, we’re introducing a prestigious new rank above Grand Master – Champion rank. This new rank offers a fresh challenge and a chance to claim your place among elite Overwatch 2 players. We’re also providing new Competitive rewards by introducing new Jade Weapon Variants, available only during the 2024 Competitive Year beginning with Season 9. Earn new Competitive Points as you win matches and unlock Jade Variants for your favorite heroes. Click here to learn more about what changes are in store when you log in to play. It’s Time for Your Competitive Comeback!

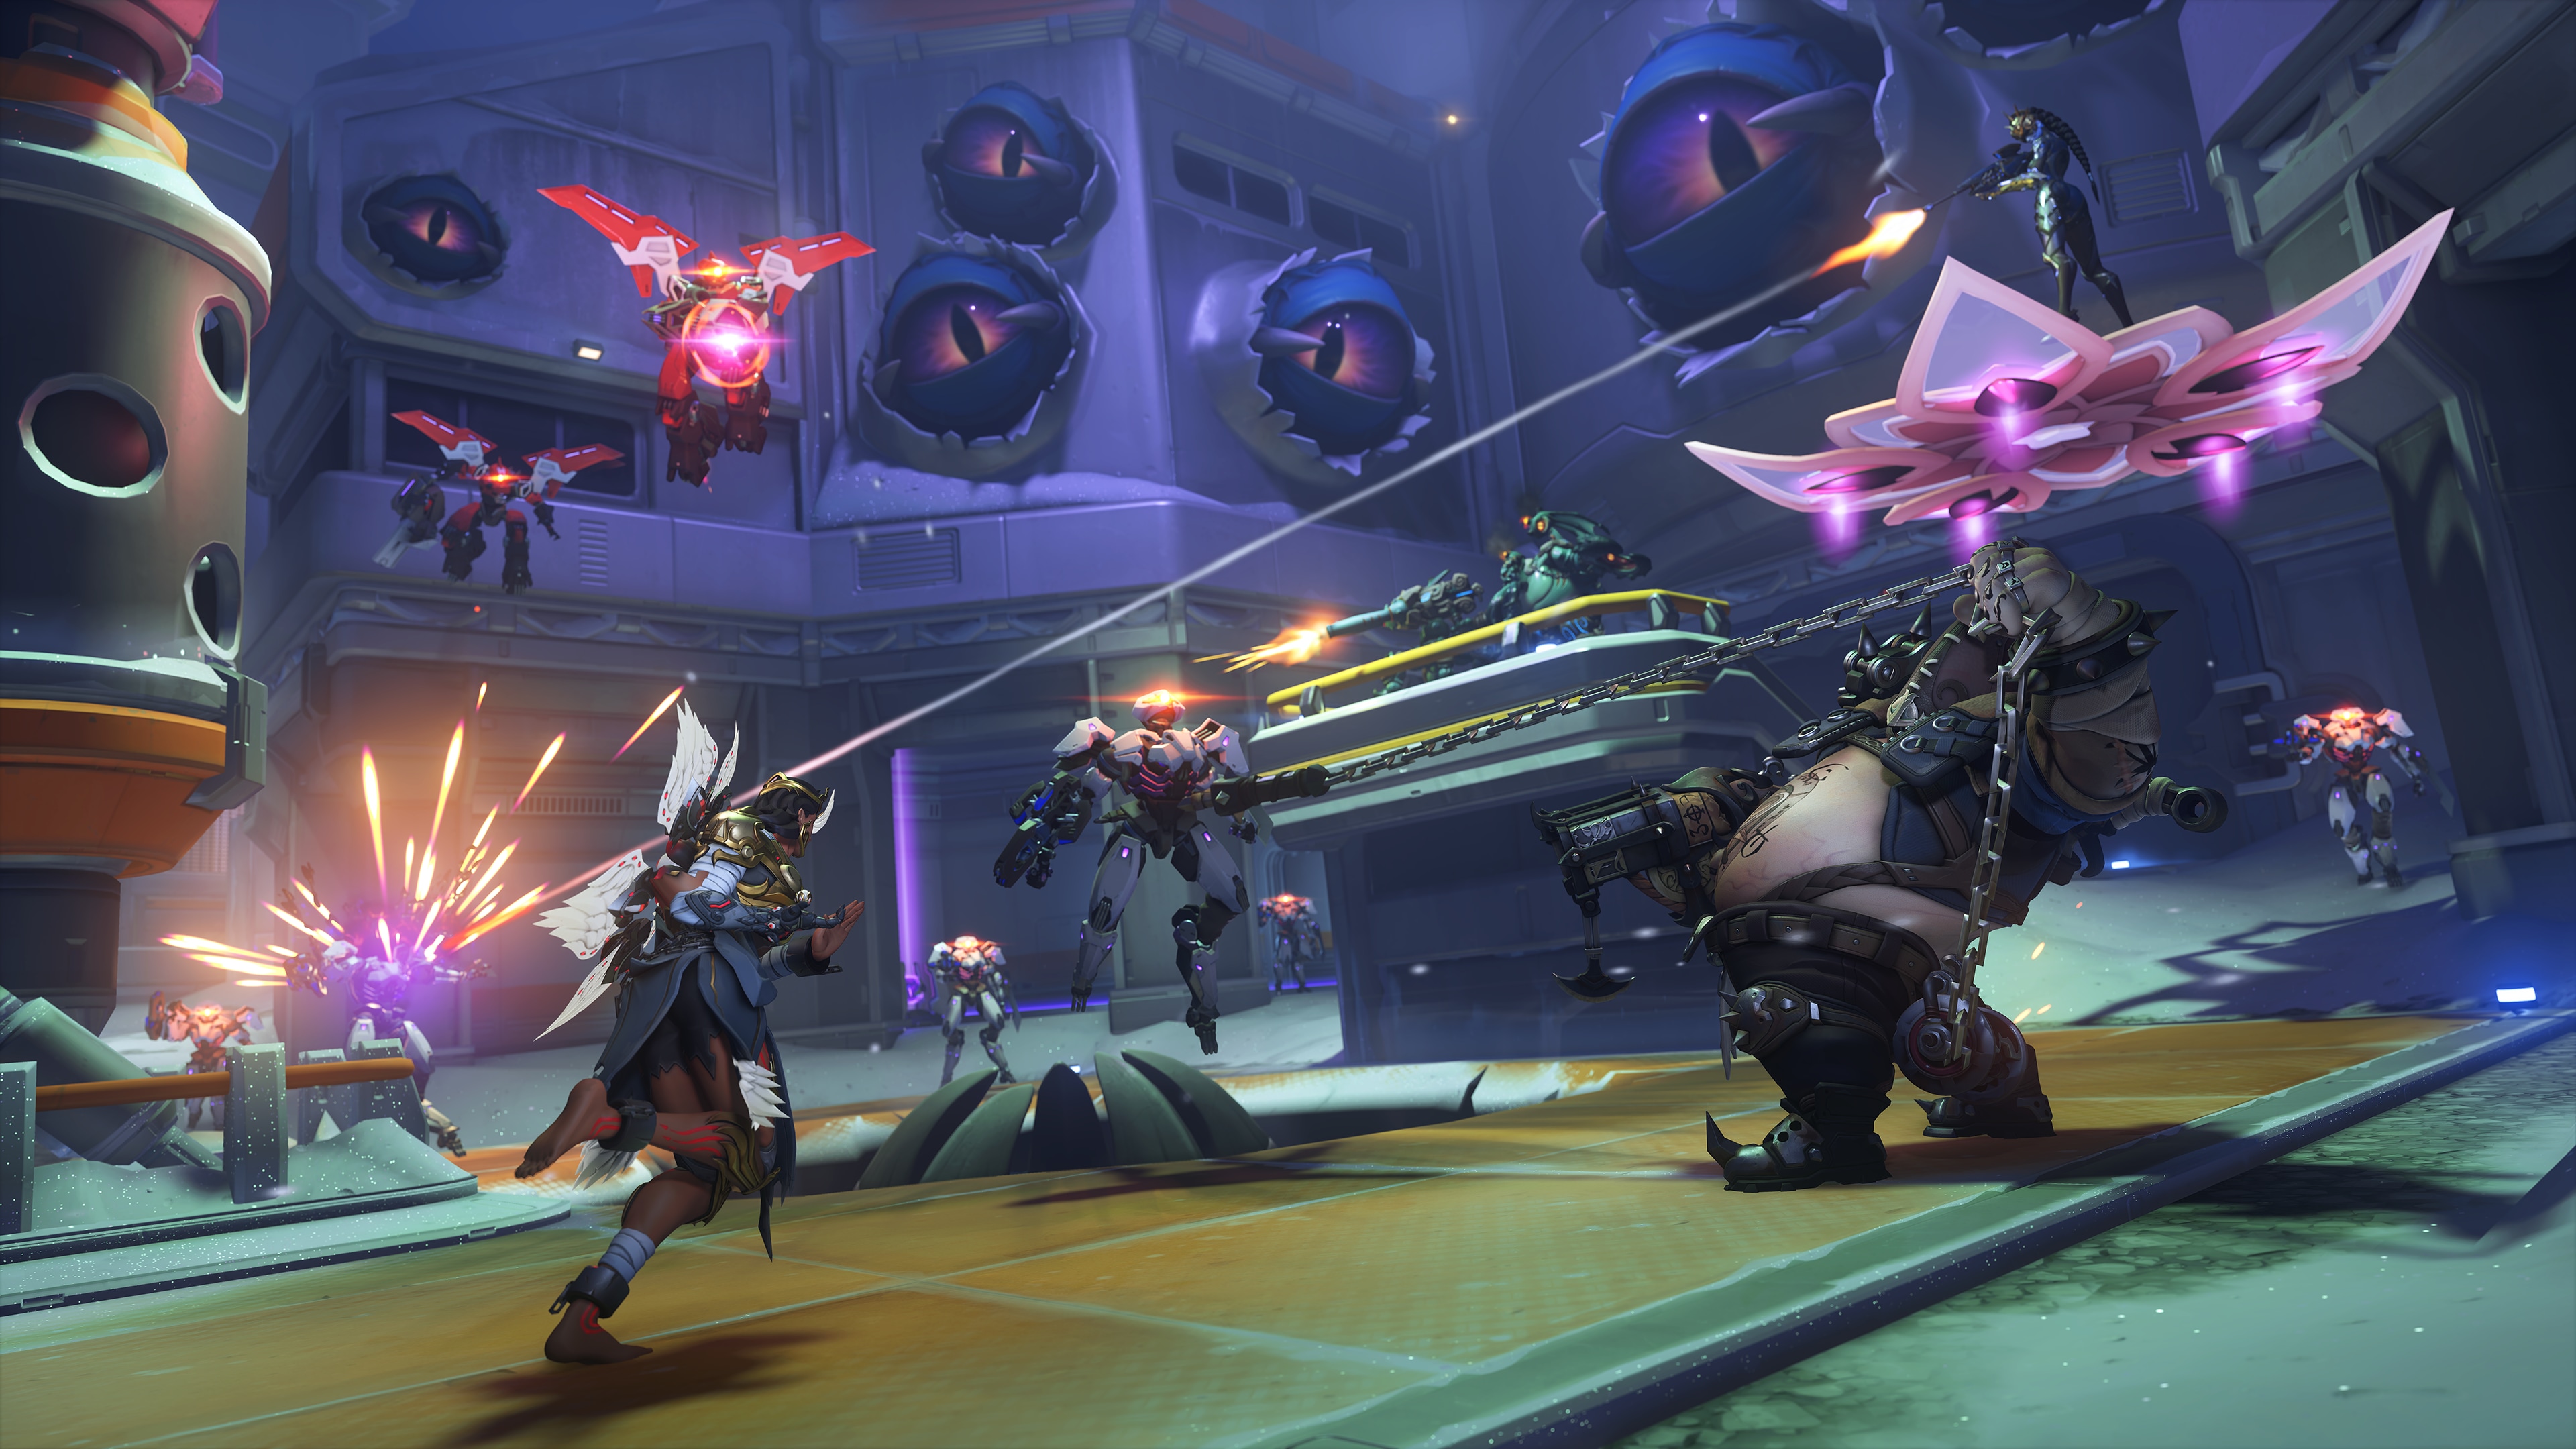
    Face a Cosmic Crisis

    OVR_Season9_CosmicCrisisEvent_GroupShot_001.png

    Join forces with your teammates in a new non-canon Co-op event to complete challenges and branching objectives as you explore the unknown, making each mission you play uniquely different. Survive the Crisis as Sigma, Roadhog, Soldier: 76, Mei, Torbjorn, Widowmaker, Lifeweaver, Moira, Ana, and Illari. Work together to uncover the truth behind your crash landing and escape the mysterious threat that lies beneath the station at Antarctica Peninsula. But beware, because a traitor in pursuit of incredible powers may be in your midst!

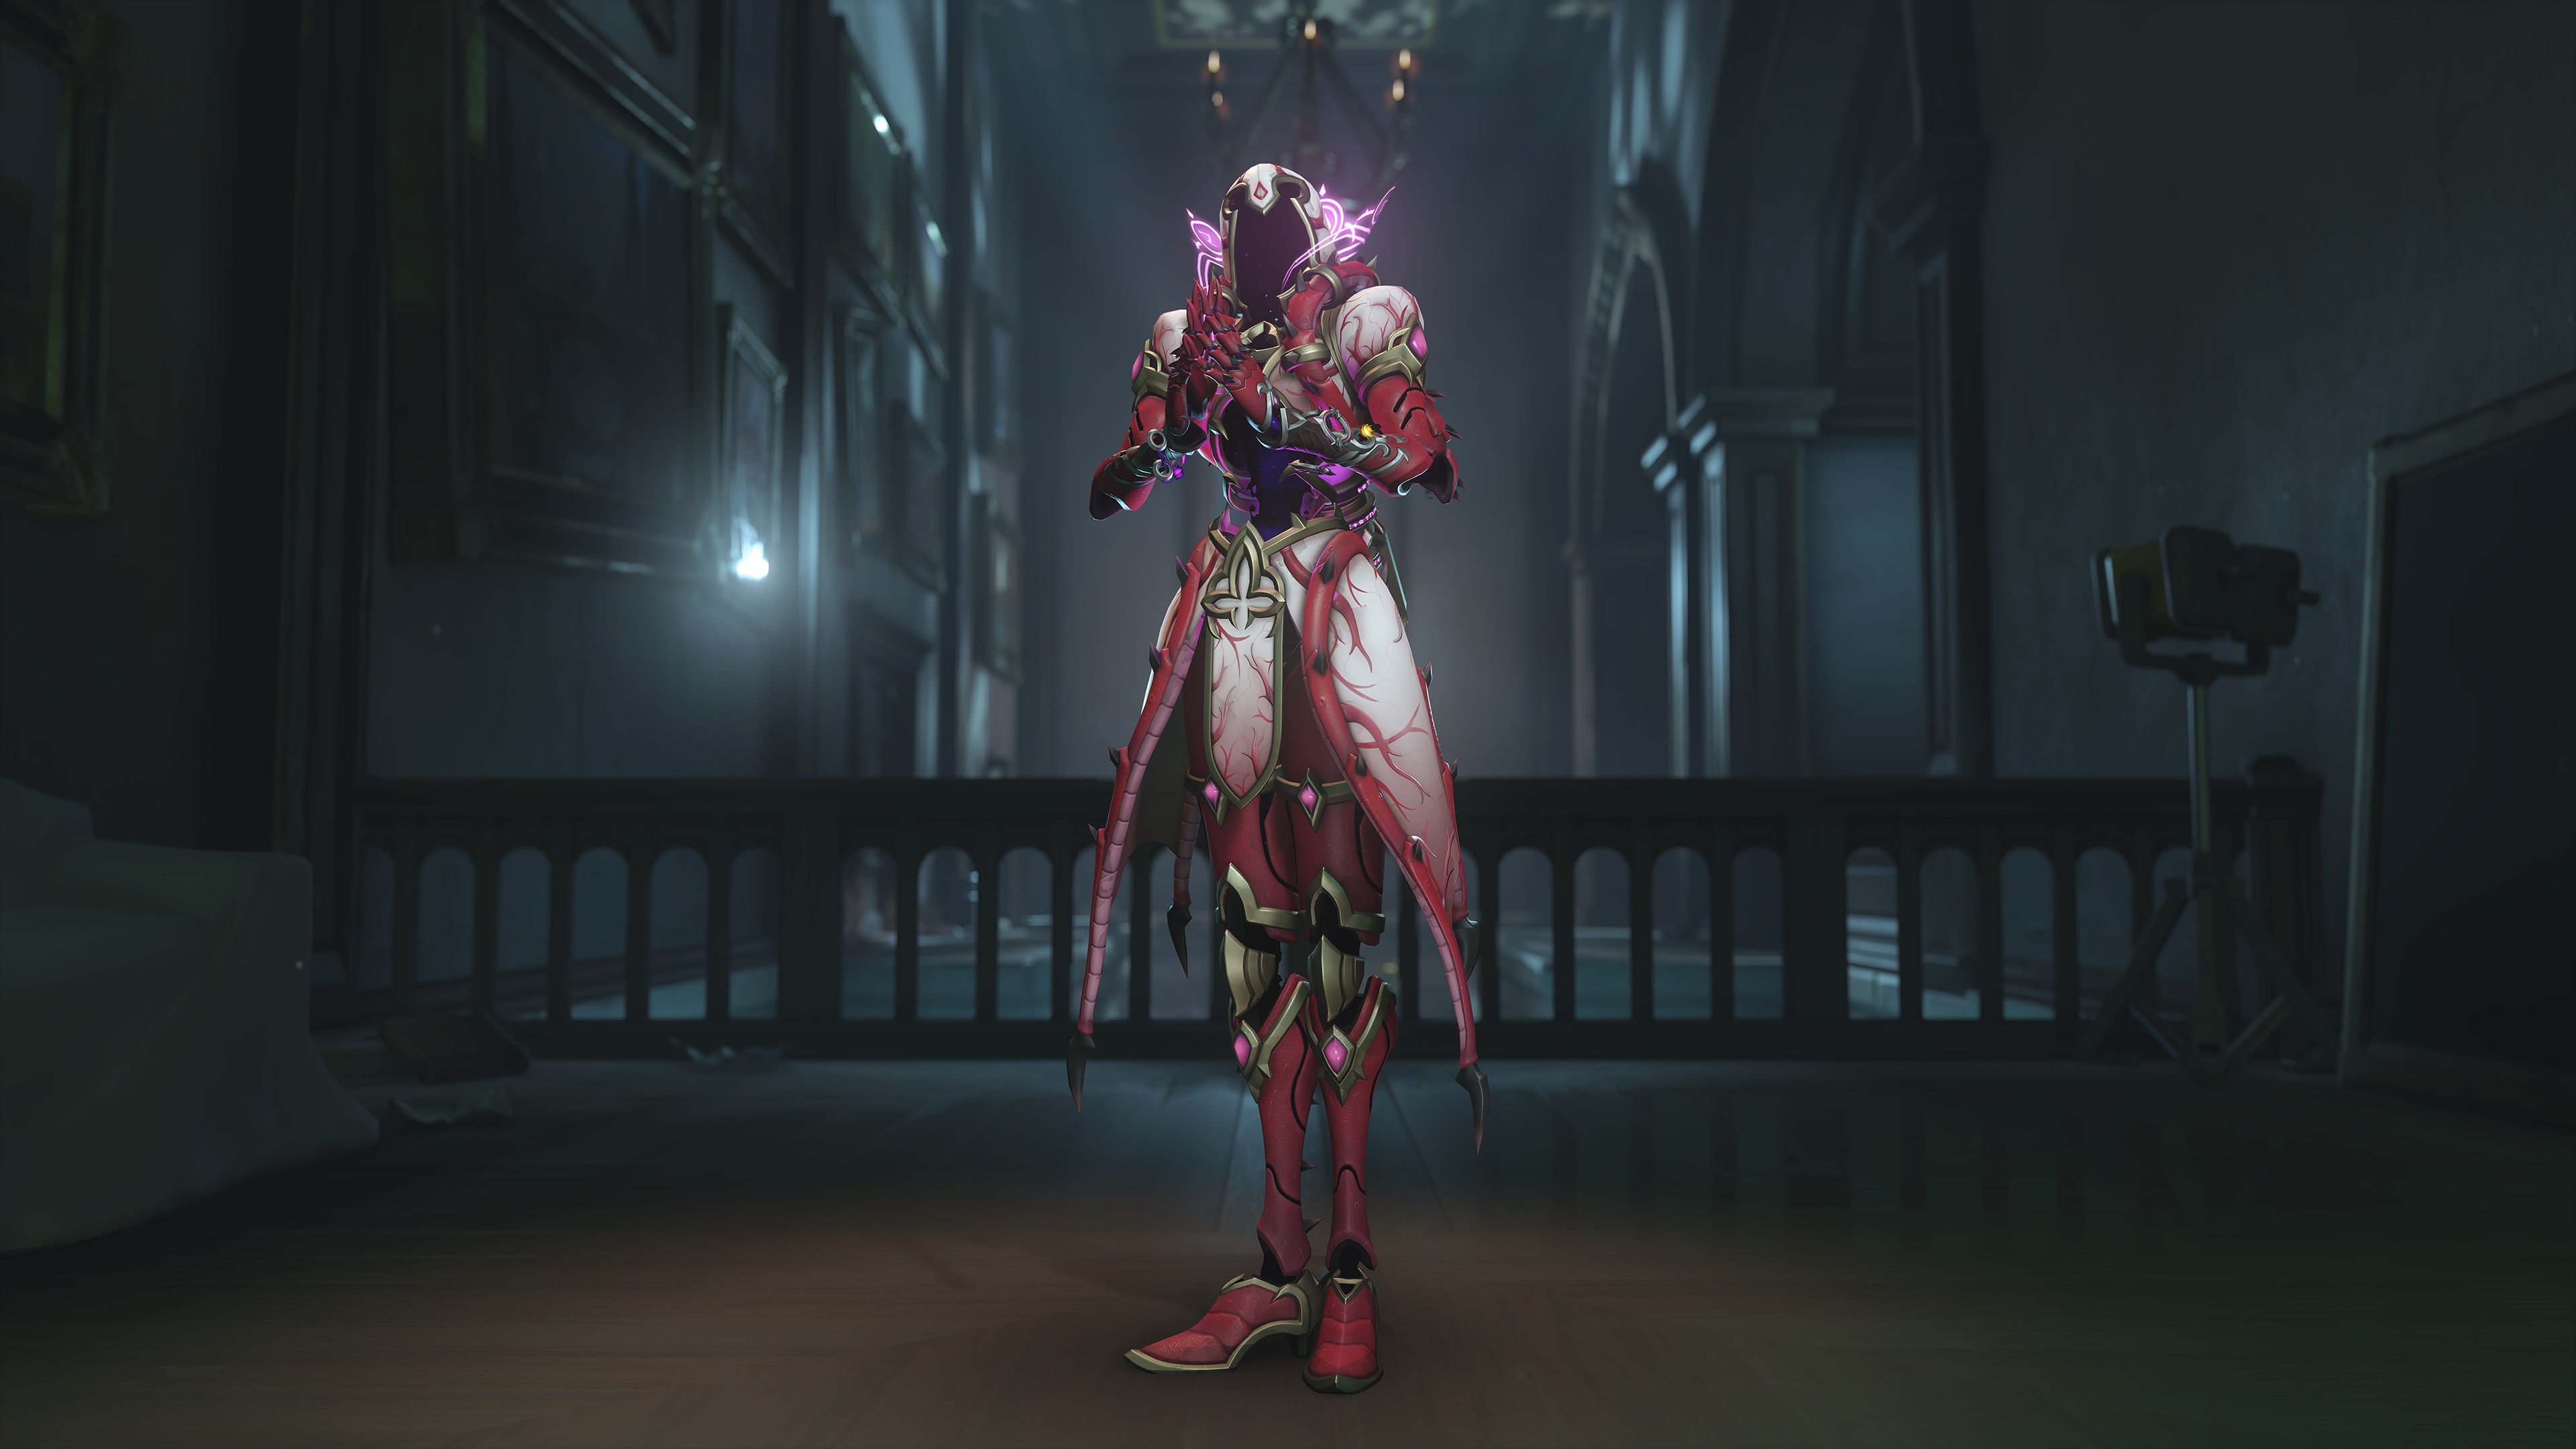
    Brave Eldritch Horrors in the Battle Pass

    Give in to whispers of madness in the Overwatch 2 – Season 9 Battle Pass. Over 80 tiers of rewards, including Survivor Soldier: 76, Tentacle Horror Torbjörn, Horror Hog Roadhog, and more, can be earned when you upgrade to the Premium Battle Pass. If you can brave the horrors of all 80 tiers of the Battle Pass, you’ll unlock Ancient Caller Mythic Moira skin. You can also get the Beholder Sigma and Harbinger Lifeweaver Legendary skins along with 2,000 Overwatch Coins and 20 tier skips when you pick up the Ultimate Battle Pass bundle.

    OVR_Season9_Skins_Moira_AncientCaller_002.png

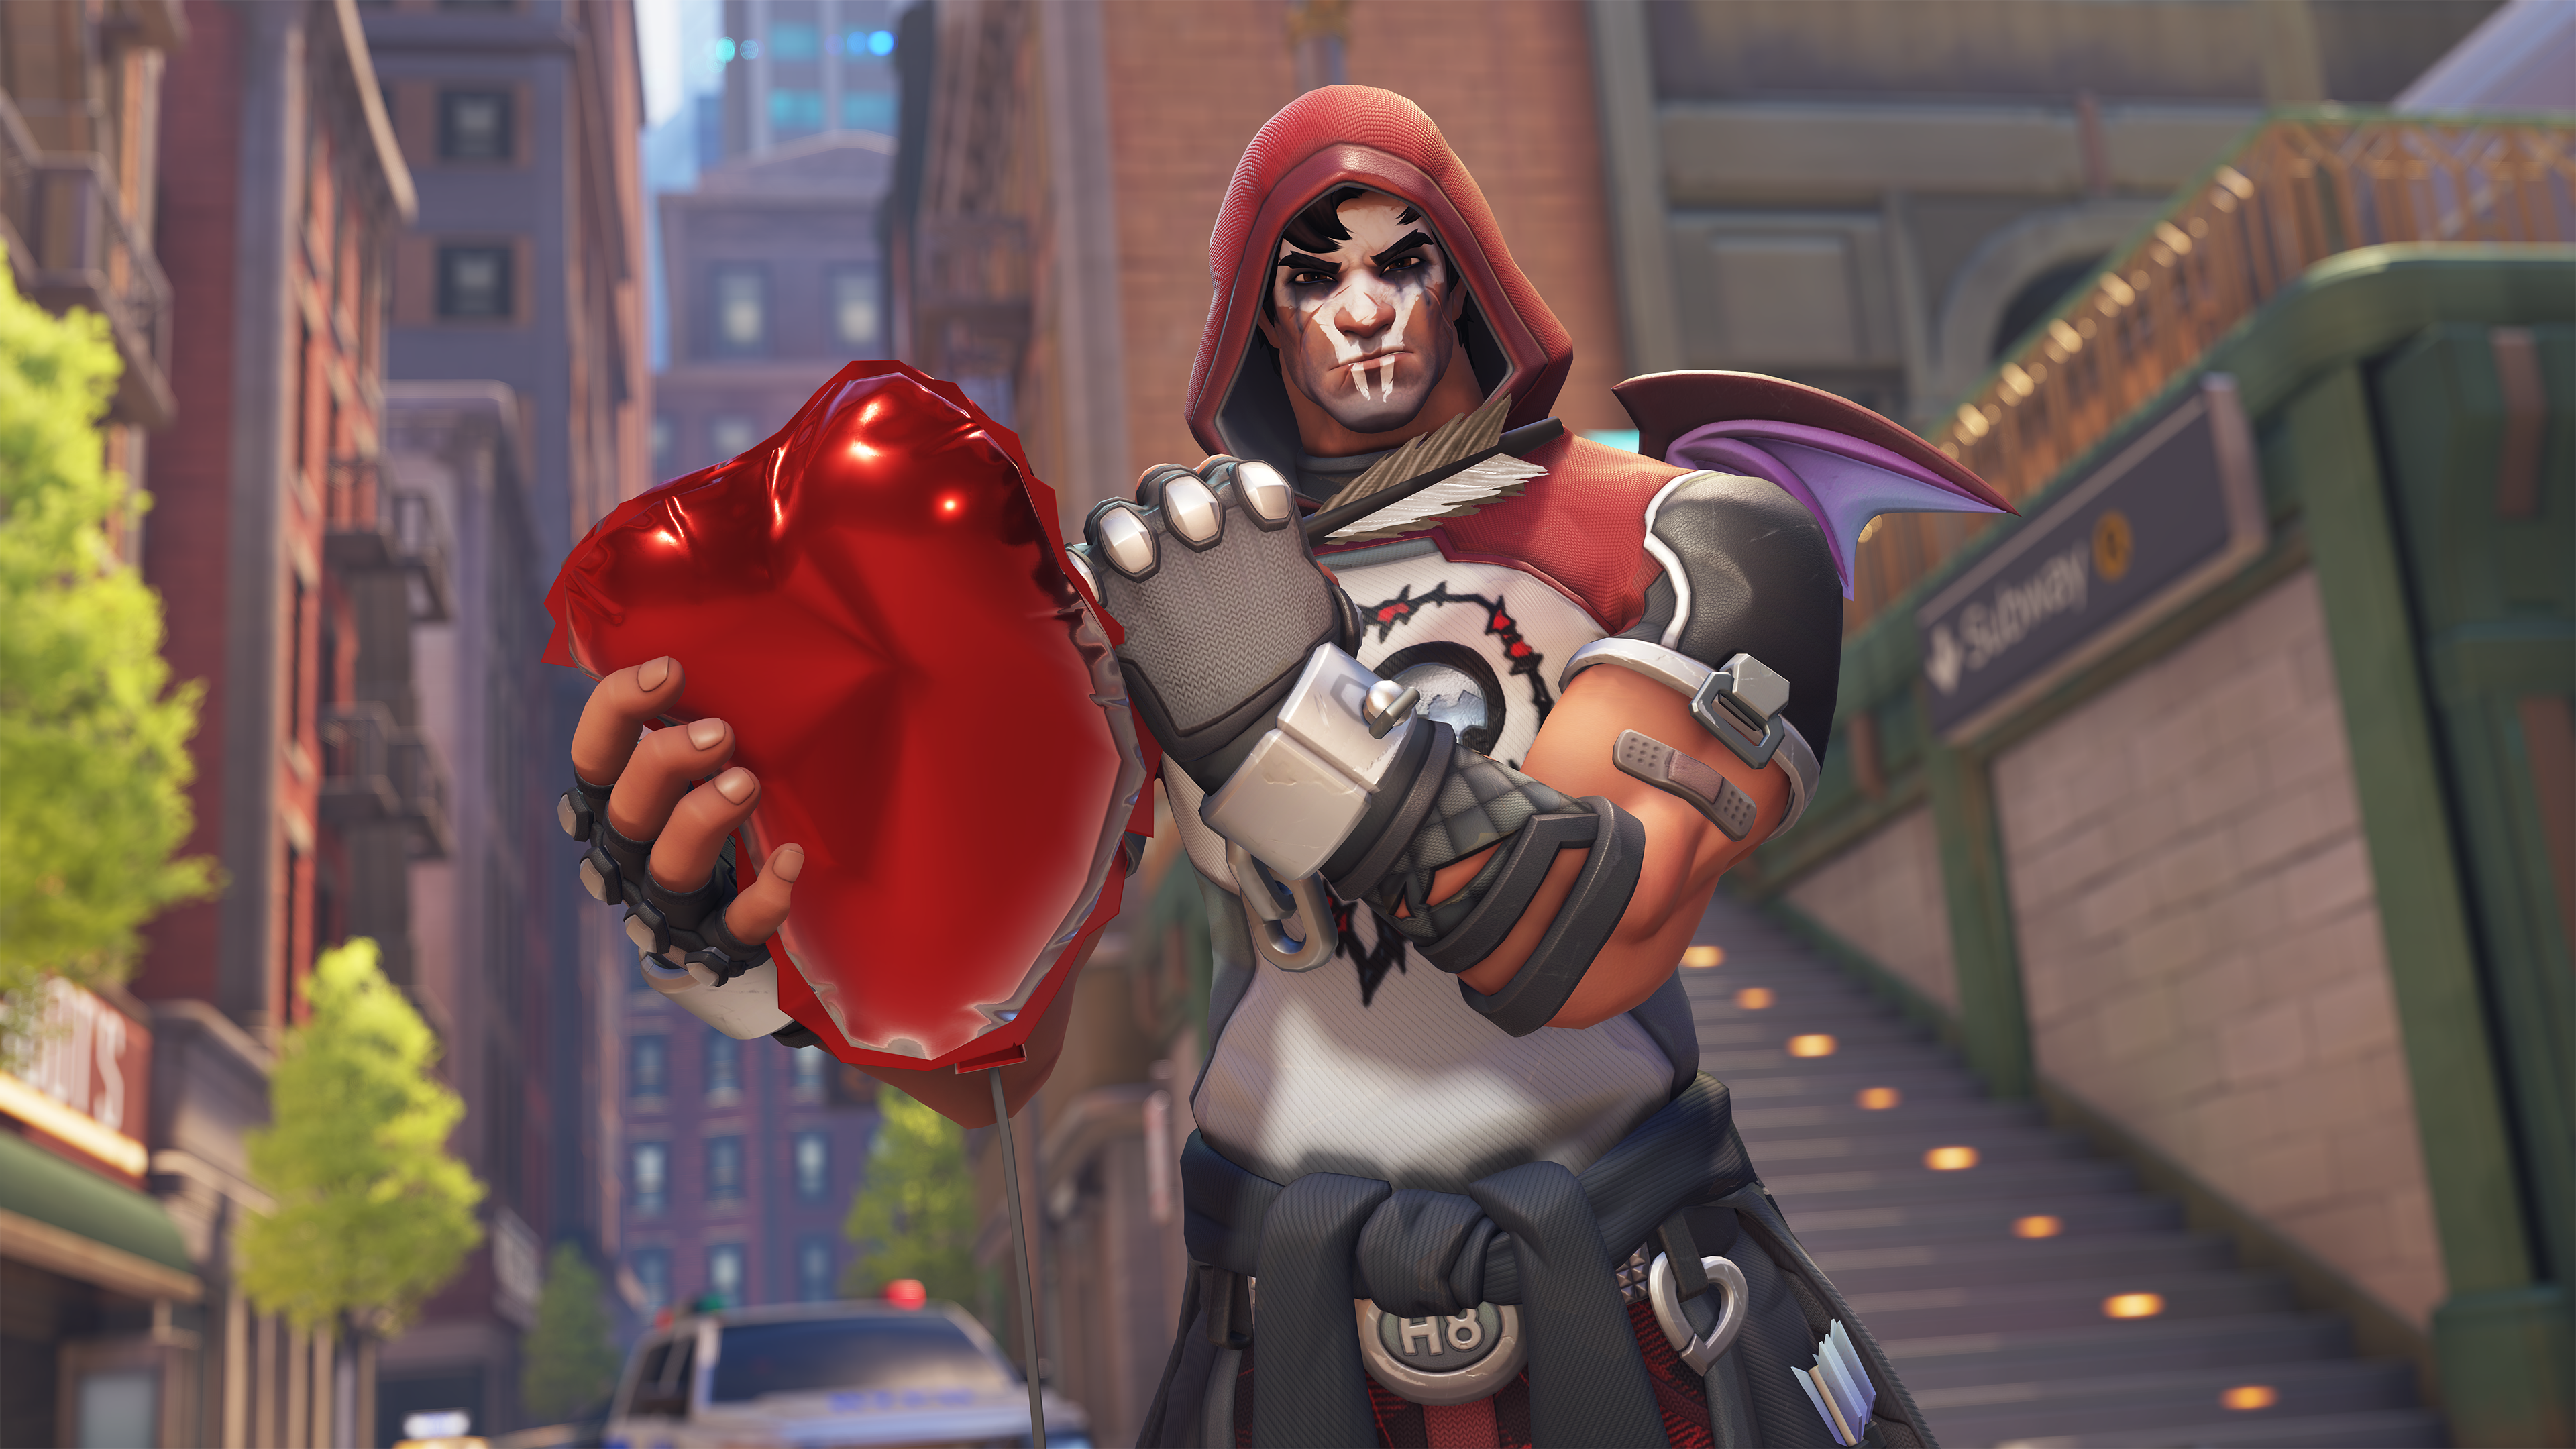
    New Skins to Fall in Love With

    Visit the shop throughout the season for out-of-this-world cosmic cosmetics, plus Valentine‘s-themed skins you’re sure to fall in love with. Collect the themed remixes of Rosahardt Reinhardt, Rose Lily Widowmaker, and Cherry Blossom Kiriko. Or capture your true love with the return of fan-favorite Cupid Hanzo and the all-new Valentine’s Reaper skin.

    Other cosmic surprises coming soon to the shop are Legendary Skins with scary cool remixes, including Fiend Orisa and Dark Fawn Lucio, along with Weapon Skins inspired by the graffiti of the Los Muertos gang seen on Dorado. And be sure to stay tuned for a new collaboration that will be rolling in later this season.

    OVR_Season9_Skins_Reaper_Heartbreaker_007.png

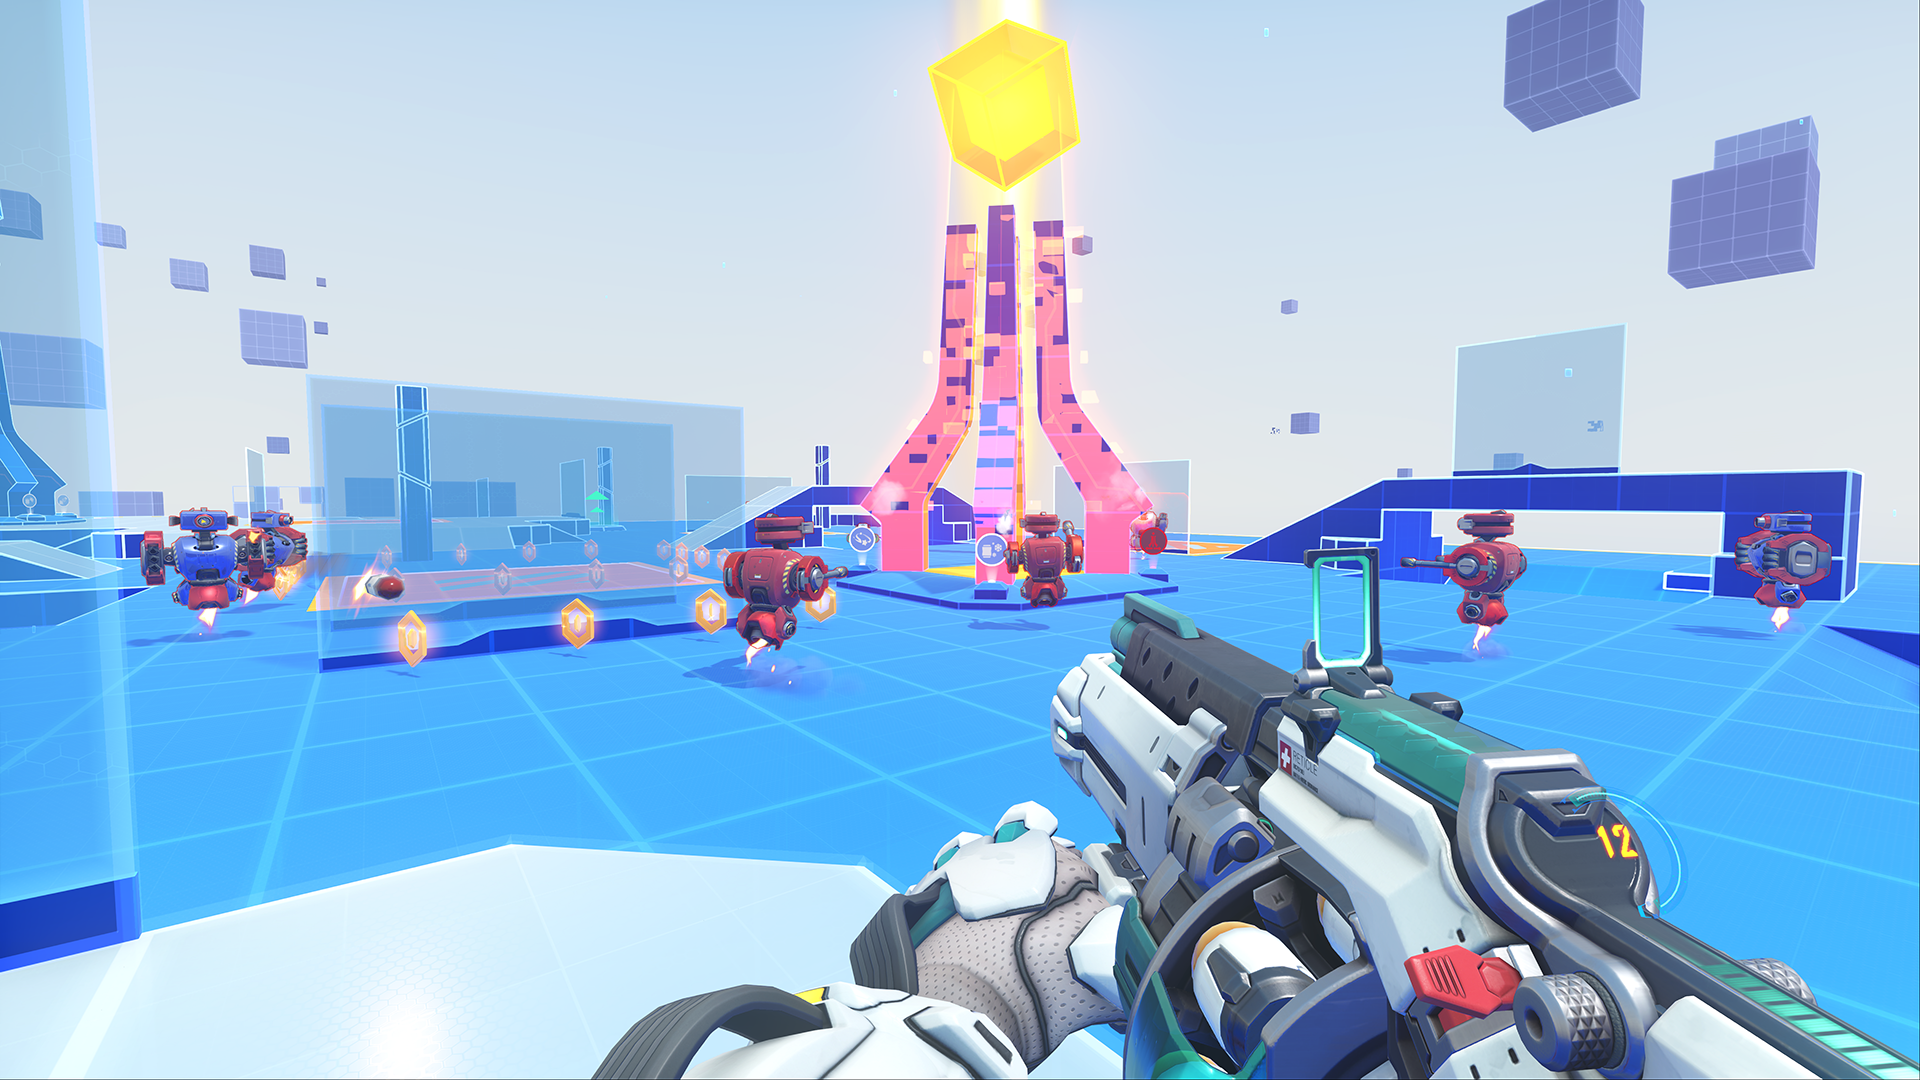
    Team Up for Hero Mastery: Gauntlet

    Experience a new multiplayer experience in Hero Mastery. Work with your team to fight against changing waves of enemies, defend your towers, and upgrade your defenses. Can you survive the Hero Mastery: Gauntlet?

    Team up with friends and face tactical moments requiring both individual and collective skill. Every time you play will be a fresh experience with variations in enemy waves, objectives, and upgrade options, ensuring no two games are the same and that you can test your skill with any hero.

    HeroMasteryGauntlet.png

    Bringing a Whole New Balance to Gameplay

    Season 9: Champions also introduces global balance changes that affect every hero in the game. We’re adjusting how the damage dealt is more consistent by increasing the projectile size while also increasing the health pools of all heroes, thereby keeping the time it takes to eliminate targets relatively the same. We also added a new passive for all heroes to regenerate their health when they step out of combat.

    If you haven’t already, read up on the full details of these changes in our previous blog or check out our patch notes.

    Justice Rains From Above

    Season 9 also presents significant updates to Pharah, made with some strong goals in mind:

    • Empower Pharah to make more individual plays and lessen her reliance on heroes like Mercy.  
    • Shift Pharah’s movement capabilities from feathering up in the sky toward more horizontal movement that can cover distance quickly. 
    • Introduce brief moments of downtime for Pharah’s flight.

    These goals are aimed at enabling Pharah to be more effective at higher ranked thresholds and as a solo hero, while also addressing rougher experiences players have going against Pharah – such as her presence limiting the effective hero pool of the opposing team.

    PharahUpdate.png

    Pharah’s Hover Jets passive has been reworked to limit her time in the air, with fuel being recharged only while she is touching the ground. To compensate for this large change,  Pharah has more speed and acceleration while in the air, allowing her to traverse between areas quicker. Jump Jets also now provide bonus fuel (50% of the total tank) and that overflows if you hit 100% fuel. So, while there are moments of downtime introduced, Pharah players will have much more control of where they want to be on the battlefield during that time in air.

    Pharah also has a new ability called Jet Dash. When Pharah uses Secondary Fire she will dash in the direction she’s moving. When combined with Concussive Blast and the enhanced mobility from Hover Jets, Pharah can quickly navigate herself into positions where she’s highly lethal.

     This more active Pharah means a healthier game and offers new levels of skill expression. We’re looking forward to your feedback on these Pharah changes.

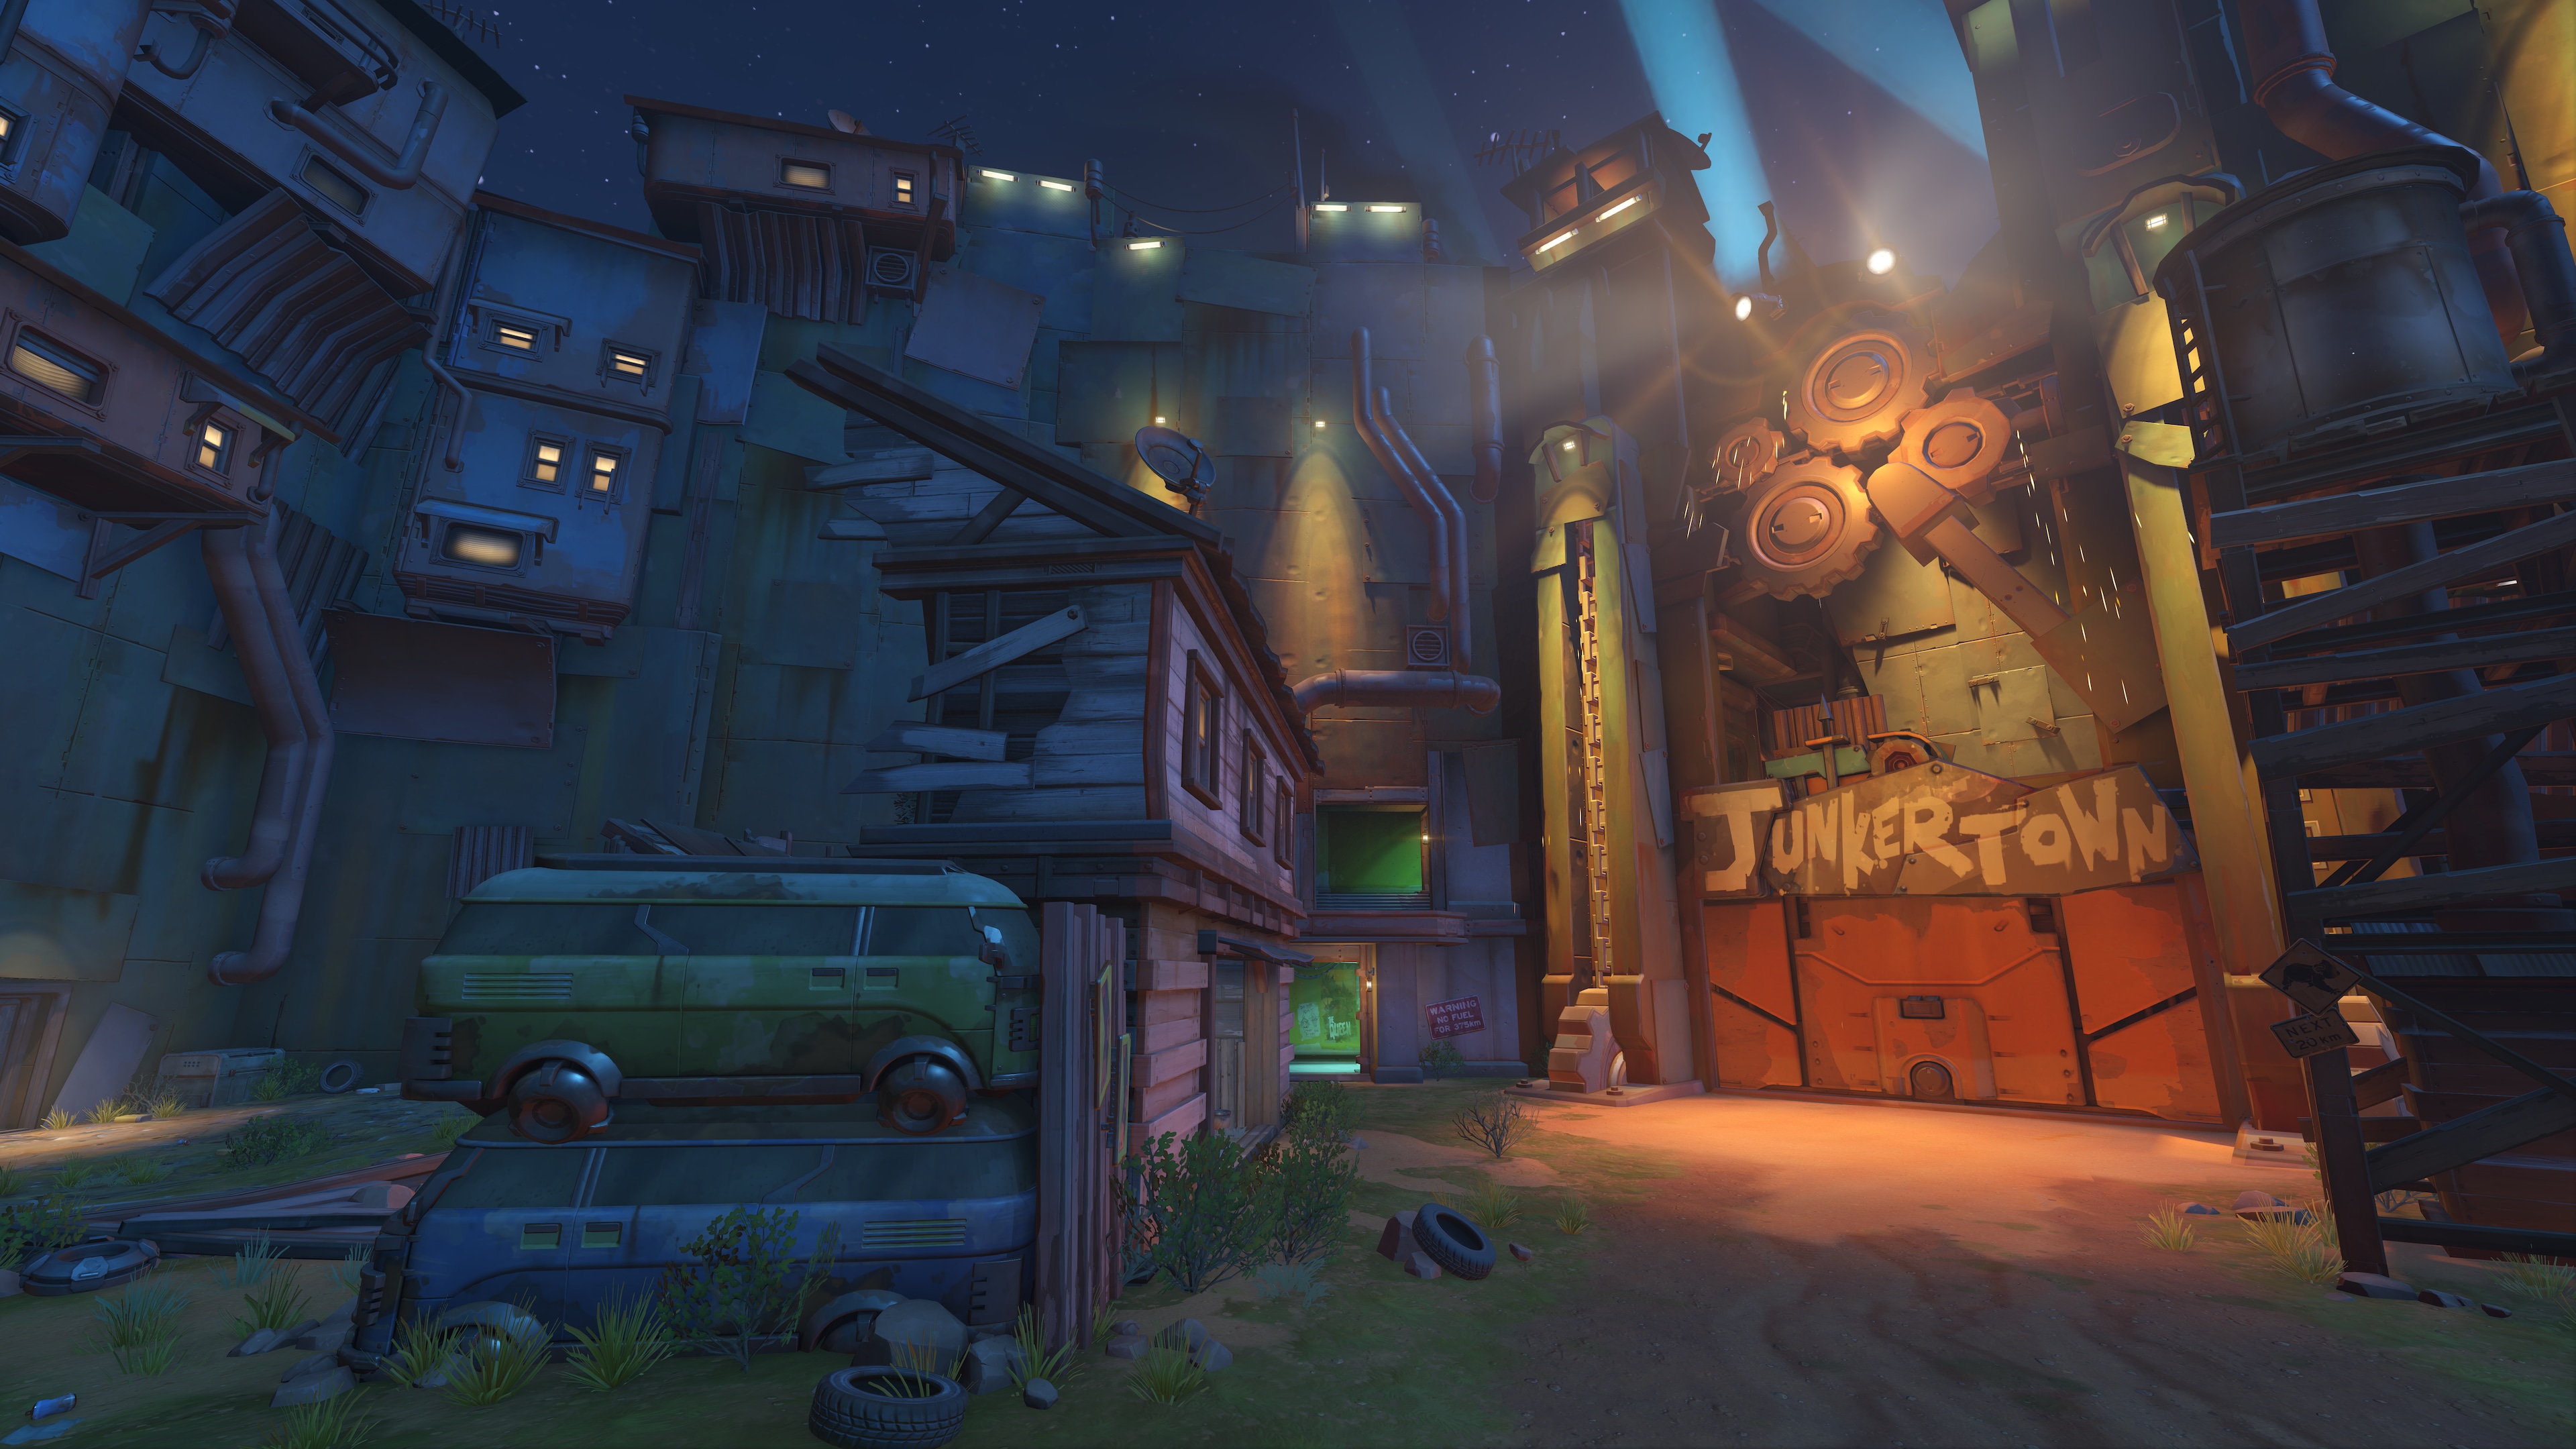
    Rolling into Junkertown

    And finally, a big update for the wild and rowdy Junkertown map is coming this season. The first section of the map (the area by the first checkpoint) is quite open. It can be tough for the offensive team to push the cart through here if the defending team has a Widow or Pharah. So, we’ve replaced the small cover with a trusty, burned-out building. We’ve also replaced the outhouse that was close to the gate with a tall water tower to block the line of sight from the openings above the choke point. Additionally, a few more cars have been added to this area, and the cliffside path has been reduced.

    Junkertown.png

    The small health pack on the balcony overlooking the hairpin turn on the second area has been removed to lessen the defender advantage from that choke. In the third area, we added a vertical support beam on the left side of the hallway to block the sightline from the upper ledge to give more cover for attackers to enter the area. We also widened and added cover to a hallway on the outer mid-section of area 3 to open up team fights that happen there. Finally, the updated map features a new night-time lighting theme to try out.


    Overwatch 2 – Season 9: Champions begins tomorrow, so answer the call and challenge yourself on the Competitive ranks today.

    Website: LINK