Schlagwort: Wireframe magazine
-

Code your own pinball game | Wireframe #53
Reading Time: 4 minutesGet flappers flapping and balls bouncing off bumpers. Mark Vanstone has the code in the new issue of Wireframe magazine, available now. There are so many pinball video games that it’s become a genre in its own right. For the few of you who haven’t encountered pinball for some reason, it originated…
-

How pillars and triangles can focus your game design
Reading Time: 12 minutesIn game design, freedom can lead to paralysis. But in the latest issue of Wireframe magazine, Stuart Maine explains how game pillars and the iron triangle will help you focus on what’s important. The flexibility of the medium of video games lets us experience concepts like the non-Euclidean geometry behind Superliminal’s ‘whatever…
-

Recreate Gradius’ rock-spewing volcanoes | Wireframe #52
Reading Time: 4 minutesCode an homage to Konami’s classic shoot-’em-up, Gradius. Mark Vanstone has the code in the new edition of Wireframe magazine, available now. Released by Konami in 1985, Gradius – also known as Nemesis outside Japan – brought a new breed of power-up system to arcades. One of the keys to its success…
-

Meet Katt Strike: Musician, producer, and Twitch streamer
Reading Time: 3 minutesMusician, producer, and Twitch star Katt Strike chats to Wireframe magazine about video games, toxicity online and the appeal of streaming. What’s your favourite game? Oh, that’s a very hard question! I’d have to narrow it down between Fallout: New Vegas and The Legend of Zelda: Majora’s Mask. Katt in action with…
-

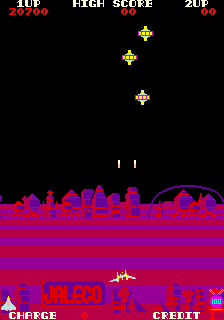
Recreate Exerion’s pseudo-3D landscape | Wireframe #51
Reading Time: 4 minutesSwoop over mountains in our homage to Jaleco’s shooter. Mark Vanstone has the code in the latest issue of Wireframe magazine, out now. Taking the shooting action of Galaxian from a few years earlier, Japanese developer Jaleco released Exerion in 1983. What helped Exerion stand out from other shoot-’em-ups of the period,…
-

Keza’s love for the Japanese games industry
Reading Time: 4 minutesKeza MacDonald has been a video games journalist and critic for more than 15 years, and is currently video games editor at The Guardian. In the latest issue of Wireframe magazine, she tells us how her love affair with the Japanese gaming industry started. Follow Keza’s adventures on Twitter When I was…
-

Play your retro console on a modern TV
Reading Time: 3 minutesWant to connect your retro console to your modern TV? The latest issue of Wireframe magazine has the only guide you need, courtesy of My Life in Gaming’s Mark Duddleson. “Get a Raspberry Pi. Done.” It’s probably the most frequently recurring comment we get across all videos on the My Life in…
-

Gifts that last all year round
Reading Time: 3 minutesWhat if you could give the joy of opening a Raspberry Pi–themed gift every single month for a whole year? But what if the thought of wrapping 12 individual things fills you with Scrooge-level dread? Snap up a magazine subscription for one of your nearest and/or dearest and we’ll take care of…
-
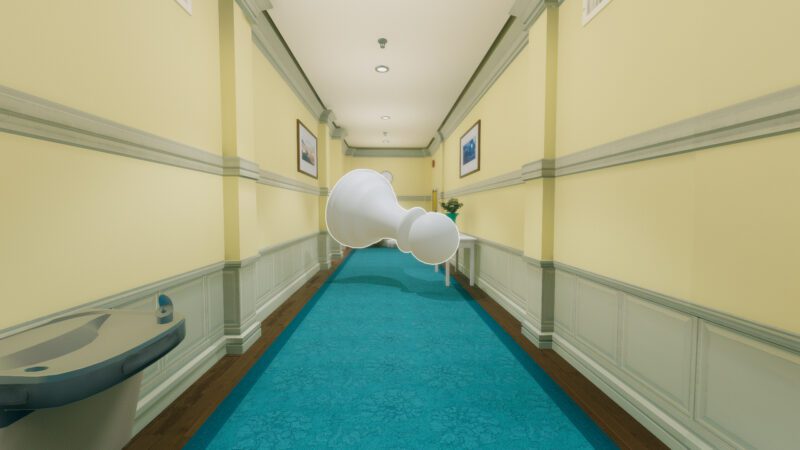
Make your own virtual reality 3D Shooter
Reading Time: 5 minutesIn the latest issue of Wireframe magazine, Mark Vanstone shows you how to turn a 3D shooter into a VR game for a variety of viewers, from Google Cardboard to gaming headsets. Our shooter, now in VR format. Blast aliens from the sky as they fly over the mountains. Browser development has…
-

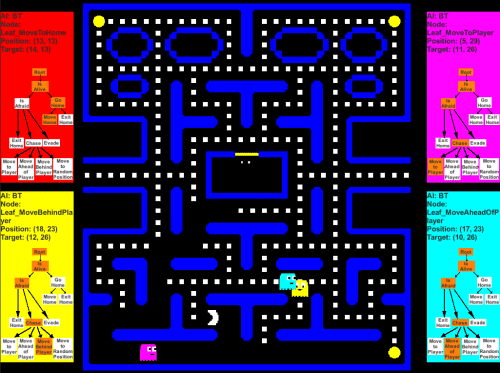
AI-Man: a handy guide to video game artificial intelligence
Reading Time: 9 minutesDiscover how non-player characters make decisions by tinkering with this Unity-based Pac-Man homage. Paul Roberts wrote this for the latest issue of Wireframe magazine. From the first video game to the present, artificial intelligence has been a vital part of the medium. While most early games had enemies that simply walked left…